

Page 1
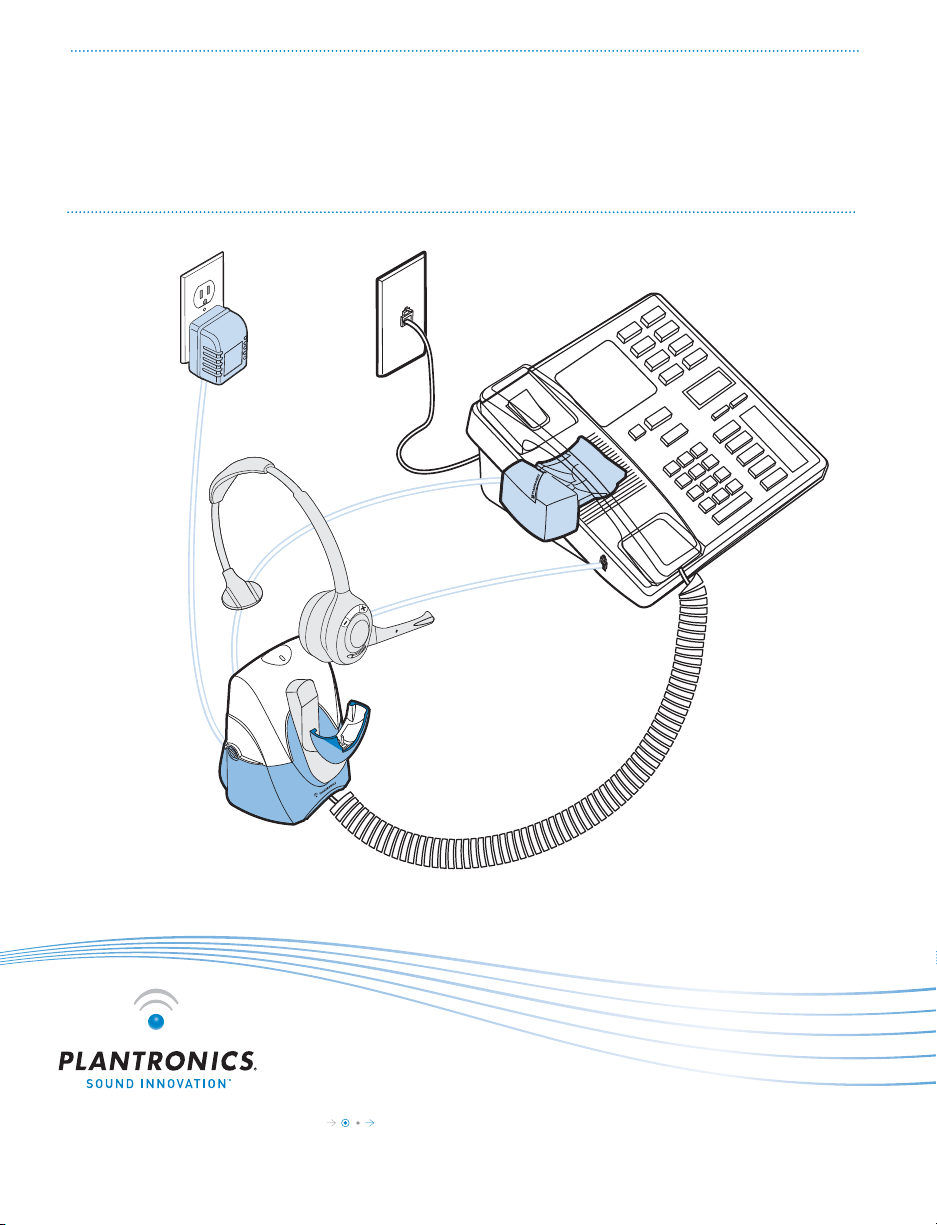
4 Easy Steps
The fastest way to set up your Plantronics
SupraPlus® Wireless Headset System
Base Power
Adapter
HL10
Automatic
Handset Lifter*
SupraPlus
Wireless
Headset
SupraPlus
Wireless
Headset
Base
*Not included in all con gurations
Plantronics SupraPlus Wireless SETUP GUIDE
Page 2
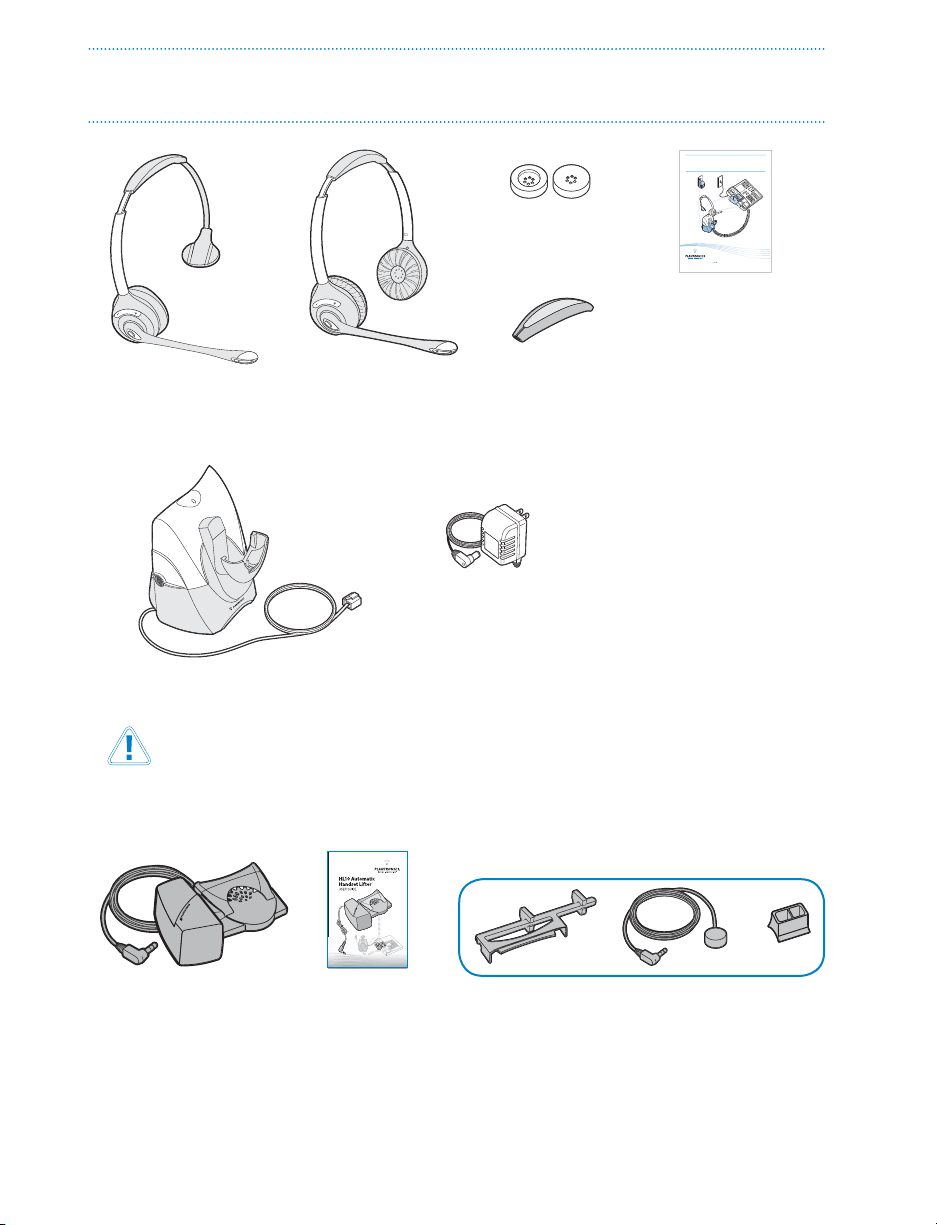
PLANTRONICS SUPRAPLUS WIRELESS PACKAGE CONTENTS
4 Easy Steps
The fastest way to set up your Plantronics
®
SupraPlus
Wireless Headset System
A l t e r n a t i v e
Ear Cushions
Plantronics SupraPlusWirelessSG
Setup Guide
Monaural
Noise-Cancelling
Headset*
Binaural
Noise-Cancelling
Headset*
R e m o v a b l e
Comfort Pad
*One model included in each package–all available models shown.
A C C h a r g e r
Tel ephon e
Base
Cord
Please refer to the separate Safety Instructions for important product safety information prior
to installation or use of the product.
SupraPlus Wireless With Automatic Handset Lifter** Adds:
HL10 Additional Parts Kit (if needed)
HL10 Automatic
Handset Lifter
HL10
User Guide
**Automatic Handset Lifter is bundled with certain SupraPlus Wireless con gurations and also available
separately.
Accessories are available separately.
Plantronics SupraPlus Wireless Setup Guide
2
Extender
Arm
Ringer
Microphone
Adapter for
Nortel i2004
Phones
Page 3
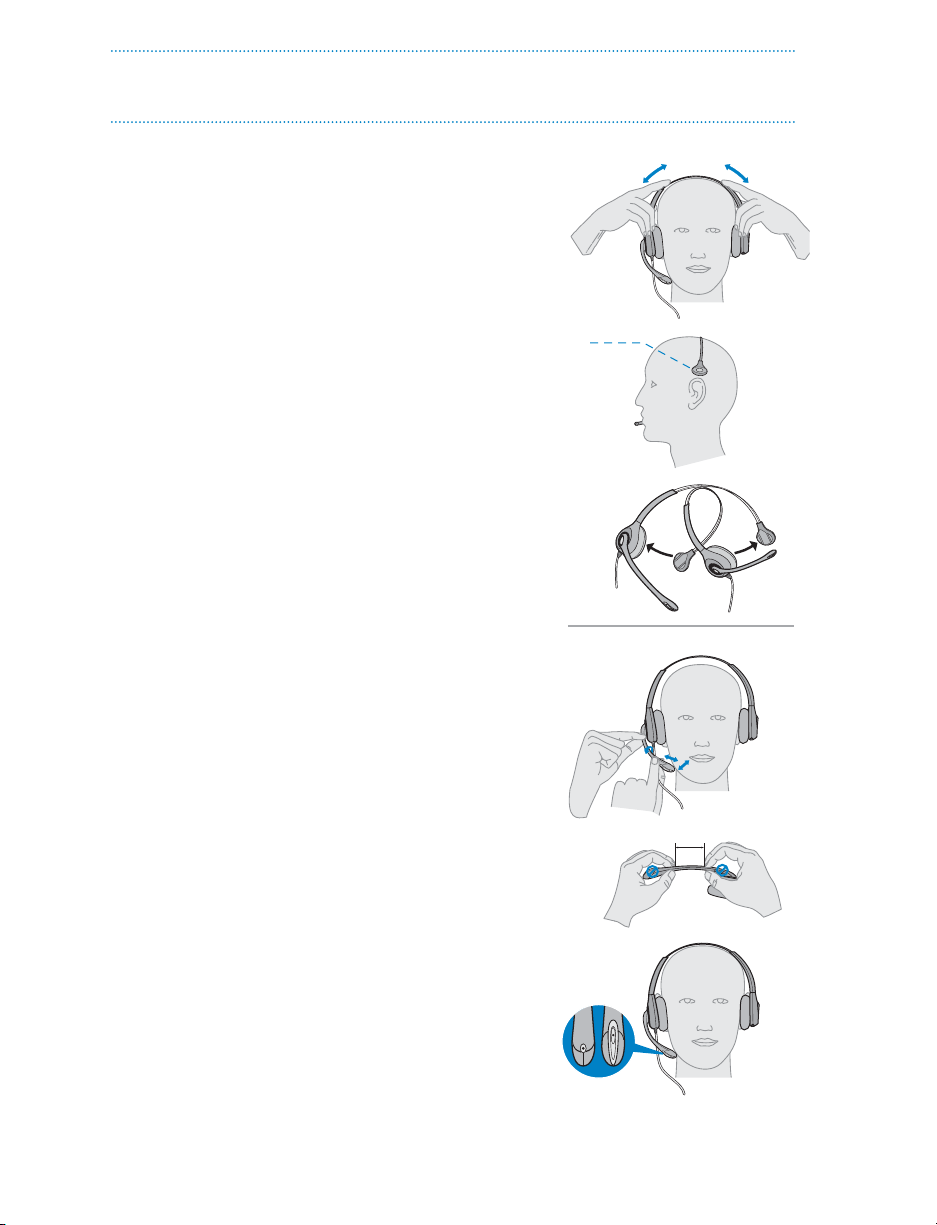
1
STEP
ADJUST FIT
A. Adjust the Headband
1. To adjust the headband, lengthen or shorten
the band until it ts comfortably. The clickstop
feature keeps the headband securely adjusted.
Position the headset receivers so that the foam
cushions sit comfortably over the center of your
ears.
2. On models with only one receiver, position the
stabilizer T-bar above your ear.
3. For a tighter t, gently pull the opposite ends of
the headset inward as shown.
B. Adjust the Mouthpiece
1. Carefully bend and shape the boom with both
hands as shown. Avoid bending or twisting the
boom near the microphone or earpiece.
A
1
2
3
B
1
2"
2. Position the clickstop turret and boom so that the
microphone is two nger-widths from the corner
of your mouth.
3. Make sure the front of the microphone faces your
mouth. If necessary, twist the micophone slightly
so it’s in the proper position. Do not use forceful
twisting motions or try to turn the microphone
completely around.
2
3
front back
50.8mm
Questions? For fast, efficient Technical Support call: 800-544-4660 Ext. 5538
3
Page 4

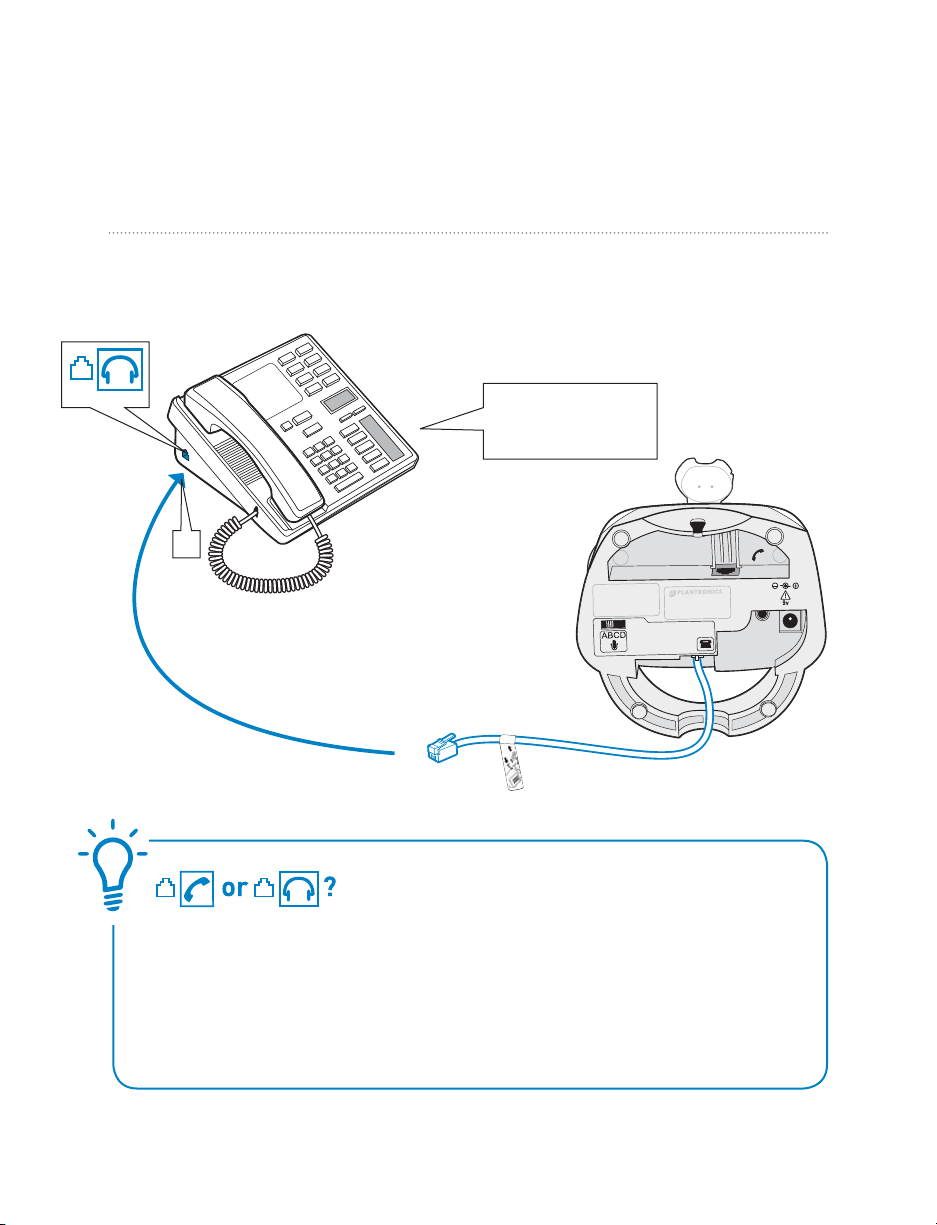
CONNECT BASE TO DESK PHONE
2
STEP
It is important for correct and safe operation that the base cord is installed into the proper jack of
your telephone. Follow these instructions carefully, especially if your telephone has two jacks where
the handset was attached. Be sure to note or mark which jack was used for the handset.
Use Con guration A if:
You will use the Automatic Handset Lifter
or…
Your phone does NOT have built-in headset functionality (no Headset button).
Con guration A
1. Unplug the handset coil
cord from the desk phone
handset port [A], then plug it
into the handset port [B] on the
Headset Base.
A
Handset
Coil Cord
A
Plantronics SupraPlus Wireless Setup Guide
4
Handset
Headset Base
(bottom view)
B
2. Plug the short black Phone Cable that
is pre-installed on the Headset Base into
the now-open handset port [A] on the
desk phone.
Page 5
Use Con guration B if:
You will NOT use the Automatic Handset Lifter
and…
Your phone has built-in headset functionality (a Headset button).
Con guration B
Con rm there is
a “HEADSET” button
on your phone
C
1. Plug the short BLACK Phone
Cable that is pre-installed on
the Headset Base into the
Headset port [C] on the
desk phone.
Headset Base
(bottom view)
HANDSET port or HEADSET port?
You should only use the headset port if you will NOT be using the Automatic Handset
Lifter
AND you have a pre-programmed Headset button on your phone.
In this con guration you
AND the Call Control Button on the headset to answer/end calls.
MUST press both the Headset button on your phone
Questions? For fast, efficient Technical Support call: 800-544-4660 Ext. 5538
5
Page 6

CONNECT POWER AND CHARGE HEADSET
2
3
STEP
A. Connect Headset Base to power outlet
1. Plug the Base Power Adapter into a wall outlet, then plug the power cord into the YELLOW
labeled connector on the bottom of the Headset Base. The RED Power light on the left
front of the Headset Base will turn on. (See illustration on page 13.)
Insert into YELLOW labeled power
connection on Headset Base as
shown to charge.
Headset Base
(bottom view)
B. Charge the Headset for at least 20 Minutes before using
1
. Slide the earpiece with microphone into the charging cradle as shown below.
2. Gently press down on the earpiece until fully seated into the cradle. The
Status light on the base will ash to indicate the headset battery is charging. (See
illustration on page 13.) A solid light indicates full charge. A full charge will take
approximately 3 hours.
Base
Power
Adapter
AMBER Charge
Plantronics SupraPlus Wireless Setup Guide
6
1
Page 7

4
STEP
INSTALL AUTOMATIC HANDSET LIFTER
Why use a handset lifter? The lifter greatly simpli es using
a headset with your desk phone. It lets you answer and
end calls without being near your phone.
The HL10™ Automatic Handset Lifter is included with certain SupraPlus Wireless con gura-
tions and is also available separately. See www.plantronics.com/SupraPlusWireless for a
complete list of accessories.
A. Connect Handset Lifter power cord to Headset Base
1. Verify that the base-to-desk phone cable is connected to the handset port of the desk
phone, and not the headset port (Refer to Step 2, Con guration A).
2. FIRM LY PRESS the Handset Lifter power cord into the RED labeled port to ensure a
complete connection.
Automatic
Handset Lifter
Headset Base
(bottom view)
FIRMLY press Lifter power
cord into
on Headset Base.
Questions? For fast, efficient Technical Support call: 800-544-4660 Ext. 5538
RED labeled port
7
Page 8

B. Determine Lifter position and height setting
1
. Set the Lifter Height Switch to the lowest setting.
Handset Lifter Arm
Lifter viewed
from back
Start with Lifter
Height Switch in
lowest position
2. While wearing your headset slide the Handset Lifter Arm under the handset until the
lifter base touches the side of the phone.
3. Slide the Lifter up to where it nearly touches the handset earpiece.
Slide Lifter under
handset, then up
toward the ear piece
4. Press the Call Control Button on the headset. This will activate the Handset Lifter and
lift the handset from the phone.
If you hear a dial tone, the lifter height is set correctly and needs no adjustment.
Press the Call Control Button to return the handset to the cradle. Please continue
with section D “Mount the Lifter in permanent position” below. If you do not hear
a dial tone continue with section C.
Call Control
Button
Plantronics SupraPlus Wireless Setup Guide
8
Page 9

C. If you do not hear a dial tone
If you do not hear a dial tone, the Lifter may not be raising the handset high enough
or the Con guration Dial may need adjusting.
1. Check the Lifter height adjustment by moving the Lifter Height Switch to a higher
position. See Section B and repeat steps 2 through 4 .
If you hear a dial tone, the lifter height is now set correctly. Please continue with
the next section “Mount the Lifter in Permanent Position”.
2. If you still cannot hear a dial tone, you
will need to change the setting on
the Con guration Dial. Using a coin or
paperclip, turn the Con guration Dial
to a di erent setting until you hear a
dial tone. If you still cannot hear a dial
tone, please call Technical Support at
800-544-4660 Extension 5538.
Multiple settings might work with your phone; however, only one is the
optimal position.
Con guration
Dial
Position Indicator
Use the Extender Arm to Stabilize Handset
(if needed)
If your handset falls o the phone base or does not return to its cradle when lowered, you will need to attach
the Extender Arm to the Lifter as described in the HL10
Additional Parts Kit.
D. Mount the Lifter in permanent position
Note: If the side of the phone is curved, the protective cover on the side can be left on to improve fit.
1. Remove the protective strips from the three mounting tapes on the underside of the Lifter.
2. GENTLY place the Lifter on the desk phone in the optimum position as determined above.
Test the Lifter to verify positioning by pressing the Call Control Button on your headset to
activate the Lifter and listen for a dial tone.
3. Press FIRMLY to adhere the Lifter to the desk phone.
Questions? For fast, efficient Technical Support call: 800-544-4660 Ext. 5538
9
Page 10

USING YOUR SUPRAPLUS WIRELESS HEADSET
WITH
YOUR DESK PHONE
For your safety, do not use headset at high volumes for extended periods of time. Doing so
can cause hearing loss. Always listen at moderate levels. For more information on headsets
and hearing visit: www.plantronics.com/healthandsafety
If your desk phone has a volume control, set it to mid-range.
Powering the Headset on and o
If the headset is charged and the base is connected to power, the headset is automatically on.
The SupraPlus Wireless does not have an ON/OFF button.
Placing, Answering, or Ending Calls on your Desk Phone
Desk phone
Con guration
To place a call 1. Press Call Control Button
To answer a call 1. Press Call Control Button 1. Press Call Contro l Button
To end a call 1. Press Call Control Button 1. Press Call Control Button
ALL phones with
Handset Lifter
2. Dial number
Phones WITHOUT Headset
button and NO Handset
Lifter
1. Press Call Control Button
2. Remove handset from cradl e
3. Dial number
2. Remove handset from cradl e
2. Place handset back on cradle
Phones WITH Headset button
and NO Handset Lif ter
1. Press Call Control Button
2. Press Headset button on phone
3. Dial number
1. Press Call Control Button
2. Press Headset button on phone
1. Press Call Control Button
2. Press Headset button on phone
Muting a Call
To mute headset, press the mute button
straight in. Press again to unmute.
Talk indicator light on base will ash while
muted.
You will hear 3 rapid beeps every 15 seconds
to indicate that mute is on.
Volume settings are pre-set at the factory and for most phones will not require
adjustment. To ensure settings are correct for your phone, make a test call. If
you can not hear or be heard clearly, refer to the volume adjustments on the
following pages.
Plantronics SupraPlus Wireless Setup Guide
10
Page 11

Adjust Listening Volume
While on a call, adjust the listening volume by using the Listening Volume Switch on the
back of the base.
Listening Volume Switch
Position 1 = Loudest
Position 4 = Softest
To Fine Tune Listening Volume
On the headset, press the (+) on the Listening Volume Button
to increase the volume. Press the (–) to decrease the volume
If the sound quality is poor or background noise is evident after these adjustments
re-adjust the con guration dial for better quality. See page 9.
Adjust Speaking Volume
While on a call, set the Speaking Volume Switch to the best setting for the listener (a paper
clip or pen tip can help). Too high a setting can produce an uncomfortable echo for you
and distorted sound for your listeners. You will be able to make minor adjustments to
speaking volume while on a call using the Speaking Volume Control on the back of the base.
Speaking Volume Switch
Position A = Softest
Position D = Loudest
To Fine Tune Speaking Volume
While on a call, you can adjust your speaking volume by pressing the Speaking Volume
Minor Adjustment Control buttons on the back of the base.
Speaking Volume
Minor Adjustment
Control
Questions? For fast, efficient Technical Support call: 800-544-4660 Ext. 5538
11
Page 12

If the sound quality is poor or background noise is evident after these adjustments
re-adjust the con guration dial for better quality. See page 9.
Set the IntelliStandTM Feature
The SupraPlus Wireless IntelliStand feature allows you to choose how to activate your headset when answering or making a call. Consider how you’ll use your headset to determine
the best setting for you.
IntelliStand Switch
In the UP position, answer, make or end a call by pressing the Call Control Button on your
headset. Choose the
In the
DOWN position, calls are initiated, or answered by taking the headset out of the stand.
UP position if you plan to wear your headset most of the time.
A short delay gives you time to put the headset on. Choose the down position if you think
you’ll wear your headset
ONLY while on calls. In the DOWN position you can still answer, end or
make a call by pressing the Call Control Button.
Multi-shift Pairing
1
1. To pair another headset to the same base, you must rst enable the multi-shift pairing feature. Press the speaking volume minor adjust
the power indicator light ashes.
2. Place a charged headset in charging cradle and red indicator light on base will ash for 2 seconds if the multi-shift pairing feature is enabled. Within 10 seconds of doing so, press either
the “+” or “-” listening volume button for 3 seconds until the headset talk indicator lights to
indicate pairing mode, and goes out after successful pairing. Repeat steps 1 and 2 if headset
and base do not link when call control button is pressed.
NOTE: Only the last paired headset will work with the base. You must NOT be in talk mode (i.e. on a
call) to enable or disable this feature.
To disable the multi-shift pairing feature, press the speaking volume minor adjust
for 5 seconds until the power indicator light ashes.
Plantronics SupraPlus Wireless Setup Guide
12
Enable
Disable
2
OROR
UP button for 5 seconds on back of base until
DOWN button
Page 13

SUPRAPLUS WIRELESS LIGHTS AND TONES
Base Indicator Lights
Indicator Lights
Talking/Muted (green)
Power (red)
Charging (amber)
Action Light
Charging Flashes amber
Fully cha rged Solid am ber
Power Solid re d
Tal kin g So lid g ree n
Muted Flashes green
Tone s
Out of Range Warning:
If you walk out of range of your base, your headset will issue audible tones at its
operating limit.
If you are on a call, you will hear two tones when reaching edge of range, and again
when back in range. If you stray out of range, active calls will be suspended. Calls will
be re-established on walking back into range. If you remain out of range for more than
10 minutes the system will drop the call.
Low Battery Warning:
When battery is low, a single tone repeats every ten seconds. You should recharge the
headset immediately.
Mute Warning:
When Mute is rst activated, three rapid high tones will sound. These tones will repeat
every 15 seconds while Mute is active.
When Mute is deactivated you will hear three rapid low tones.
Questions? For fast, efficient Technical Support call: 800-544-4660 Ext. 5538
13
Page 14

TROUBLESHOOTING AND COMMON QUESTIONS
I can’t hear a dial tone at the headset.
• Make sure your headset is charged.
• Press the Call Control Button on your headset.
• Make sure the Talking (solid green light) on top of the
base is illuminated. If not, the headset lost subscription
and needs to be re-subscribed. See the User Guide available on line at www.Plantronics/com/SupraPlusWireless.
• Make sure the lifter is lifting the handset high enough
to operate the hookswitch; set to a higher setting if
necessary.
• Adjust the Con guration Dial on the left side of the base.
Align the “1” on the dial with the ridges to the right side
of the dial. If there is no dial tone for setting “1” try the
other dial settings. Adjust the Listen Volume Button
on the headset. If the volume is still too low, select
another setting on the Listening Volume Switch on the
Headset Base.
I hear static.
• Make sure there is at least 12” between your SupraPlus
Wireless base and your computer, and 6” between your
base and your telephone. If adjusting the distance doesn’t
help, your headset is going out of range, move closer to
base or cell phone.
• Your system may need to be reset. See the User Guide
available online at:
www.plantronics.com/SupraPlusWireless.
The sound is distorted or I hear an echo in the headset.
• Reduce speaking volume by pressing the (–) minor
adjustment control button on the base. If the problem
still persists, change the Speaking Volume setting. See
page 11.
• Point microphone towards your chin.
• Listening volume may be too high on phone. If your
phone has a handset volume control, lower this until the
distortion disappears.
• If the distor tion is still present, lower the volume using
the Listen Volume Button on the headset. If the distortion
persists, select another Listening Volume Switch setting
on the Headset Base.
• Make sure there is 12” between your SupraPlus Wireless
base and your computer, and 6” between your base and
your telephone.
People I talk to can hear a buzz in the background.
• Move the base further away from your phone.
• Power Adapter is plugged into a power strip.
Plug the Power Adapter into the wall directly.
Talk time performance is signi cantly degraded even
after a full recharge.
• Battery is wearing out. Call Plantronics at
(800) 544-4660 Ext. 5538 to order a new one.
The Handset Lifter is installed but does not lift
the handset.
• Be sure the Handset Lifter power cord is rmly pushed
into the Handset Lifter jack on the base.
My Handset Lifter operates every time I remove or
replace my headset in the base.
• IntelliStand is enabled. To disable this feature, move the
IntelliStand switch to the
UP position. See page 12.
The call is dropped. (Talk indicator in the headset and
base will not be illuminated.)
• Headset lost subscription and needs to be re-subscribed.
See the User Guide available on line at:
www.Plantronics/com/SupraPlusWireless
Plantronics SupraPlus Wireless Setup Guide
14
Page 15

Additional Information and Support
Additional Information
Additional Information including an
Interactive Quick Start Guide, Product
Information and Accessories including the
HL10 Automatic Handset Lifter and Online Indicator
Light can be found at www.plantronics.com/
SupraPlusWireless.
Telephone Support
Telephone Tech Support at
800-544-4660 Ext. 5538
(Sunday 3:00
PM to Friday 5:00 PM, PST).
Plantronics Limited Warranty
• This warranty covers defects in materials and workmanship of products manufactured, sold or
certi ed by Plantronics which were purchased and used in the United States.
• This warranty lasts for one year from the date of purchase of the products.
• This warranty extends to you only if you are the end user with the original purchase receipt.
• We will, at our option, repair or replace the products that do not conform to the warranty.
We may use functionally equivalent reconditioned/refurbished/remanufactured/pre-owned or
new products or parts.
• To obtain service in the U.S., contact Plantronics at 800-544-4660 Ext. 5538.
• THIS IS PLANTRONICS COMPLETE WARRANTY FOR THE PRODUCT.
• This warranty gives you speci c legal rights, and you may also have other rights that vary from
state to state. Please contact your dealer or our service center for the full details of our limited warranty, including items not covered by this limited warranty.
Online Technical Support
www.plantronics.com/support
Knowledge Base FAQs
Live Chat with a Support Technician
Email Support
Product Compatibility Guide
Product Manuals
(including all available language versions)
Service
Product Registration
Maintenance
• Always unplug the Headset Base from the telephone and the Base Power Adapter from the power
source before cleaning.
• Clean the equipment with a damp (not wet) cloth.
• Do not use solvents or other cleaning agents.
Battery replacement
The custom battery supplied in your headset should last 2–3 years. When talk time decreases
signi cantly, the battery may need replacing. Please call Plantronics at 800-544-4660 Ext. 5538 to
order a new one.
Still having problems?
Given the hundreds of di erent types of phones, it’s possible a trick or two may
be needed to make the SupraPlus Wireless System work with your desk phone.
For further help:
• For the product knowledge base and instant live chat with Technical Suppor t:
www.plantronics.com/support
• For the Plantronics Technical Support Center (open from Sunday 3:00 PM to
Friday 5:00 PM PST, except major U.S. holidays): 800-544-4660 Ext. 5538
Questions? For fast, efficient Technical Support call: 800-544-4660 Ext. 5538
15
Page 16

FCC REQUIREME NTS
This dev ice complies with P art 15 of the FCC Rules. Op eration is subj ect to the follow ing two conditi ons:
1. This devic e may not cause harmf ul interfere nce, and
2. This de vice must accept any i nterference r eceived, incl uding interfe rence that may caus e
undesired operation.
This equ ipment has been t ested and found to c omply with the lim its for a Class B dig ital device, pur suant to Part 15 of the FCC Rules.
These li mits are desig ned to provide re asonable prot ection again st harmful inte rference in a re sidential ins tallation. Th is equipment generates, u ses, and can rad iate radio freq uency energ y and, if not insta lled and used in a ccordance with the i nstructio ns, may cause harmful
interf erence to radio co mmunications . However, there is no gu arantee that inte rference wil l not occur in a part icular instal lation. If this
equipm ent does cause ha rmful interf erence to radio or t elevision rece ption which can b e determined by t urning the radi o or television
o and on, the user is e ncouraged to tr y to correct inte rference by on e or more of the foll owing measures :
1. Reorient or relocate the receiving antenna.
2. Increa se the separati on between th e equipment and r eceiver.
3. Connec t the equipmen t into an outlet on an other circuit.
4. Consult t he dealer or an ex perienced rad io/TV tech nician for help.
FCC REGISTRATION INFO RMATION — Part 68
This equ ipment complie s with Part 68 of th e FCC rules and the req uirements ado pted by ACTA. On the ex terior of this e quipment is
a label th at contains a prod uct identi er in the format US:A AAEQ##TX XXX. If requ ested, this info rmation must be p rovided to your
telephone comp any.
A plug and j ack used to conne ct this equipm ent to the premise s wiring and tele phone netwo rk must comply wi th the applica ble FCC Part
68 rules a nd requiremen ts adopted by ACTA. A co mpliant telep hone cord and mod ular plug is provi ded with this pro duct. It is designed
to be conne cted to a compati ble jack that is als o compliant. See i nstallation i nstructions f or details.
The REN is us eful to determi ne the quantity o f devices you may con nect to your tele phone line. E xcessive RENs on a tel ephone line may
result in t he devices not rin ging in respons e to an incoming call . In most, but not a ll areas, the sum of th e RENs should not e xceed ve
(5.0). To be cert ain of the number o f devices you may con nect to your line , as determined by t he REN, contac t your local
teleph one company. For pro duct approved a fter July 23, 20 01, the REN for thi s product is par t of the produc t identi er t hat has the
format US:AAAEQ##TXXXX. The digits represented by ### are the REN without the decimal point. (For example, 03 represents a REN of
0.3.) For e arlier produc ers, the REN is sep arately shown on t he label.
If this tel ephone equip ment causes har m to the telephone n etwork, the t elephone comp any will notif y you in advance that te mporary
disconti nuance of serv ice may be require d. But if advance n otice isn’t prac tical, the tel ephone company w ill notify the c ustomer as soon
as possib le. Also, you will b e advised of you r right to le a complaint wi th the FCC if you belie ve it is necessar y.
The tele phone company may m ake changes in its f acilities, e quipment, ope rations, or pro cedures that coul d a ec t the proper functioning of your e quipment. If t hey do, you will be no ti e d in advance in ord er for you to make nec essary modi cations to maintain uninterrupted service.
If troub le is experien ced with this unit , for repair or war ranty inform ation, please co ntact custom er service at (80 0) 544-4 660. If the
equipm ent is causing har m to the network , the telephon e company may reque st that you disconn ect the equip ment until the pro blem
is resolved.
DO NOT DISA SSEMBLE THIS EQUI PMENT: it does not conta in any user serv iceable compo nents.
We recomm end the install ation of an AC surge ar rester in the AC outl et to which this equ ipment is conne cted. Telephon e companies
repor t that electr ical surges, t ypically ligh ting transient s, are very dest ructive to cust omer terminal e quipment conne cted to AC
power sources.
EXPOS URE TO RF RADIATIO N
The inter nal wireless ra dio operates wi thin the guideli nes found in radi o frequency s afety stan dards and recomm endations, whi ch
re ect the conse nsus of the scienti c com munity. In dependent st udies have shown th at the internal wir eless radio is sa fe for use
by consumers.
© 2007 Plantronics, Inc. All rights reserved. Plantronics, the logo design, HL10, IntelliStand, Sound Innovation, and SupraPlus are trademarks or
registered trademarks of Plantronics, Inc. The Bluetooth® word mark and logos are owned by the Bluetooth SIG, Inc. and any use of such marks by
Plantronics, Inc. is under license. All other trademarks are the property of their respective owners.
Patents U.S. 5,210,791; 6,735,453; D469,756; D505,413; D538,785; Australia 147229; China ZL200630123313.2; ZL200630123314.7; EM 0005437980004; 000543798-0005; France 651,857-651,865; Germany 40108524.4; GB Regd.Des.No. 2104923 and Patents Pending.
Printed in USA. 76529-04 (07.07)
Plantronics, Inc.
345 Encinal Street
Santa Cruz, CA 95060 USA
www.plantronics.com
 Loading...