

Page 1
DSR470
Digital Receiver User Guide
Page 2

This user guide is for use with DSR470 Digital Receivers
Publication #479169-001
Rev A
All RightsReserved
General Instrument Corporation doing businessas
Broadband Communications Sector of Motorola, Inc. (MotorolaBCS)
6450 SequenceDr.
San Diego, California 92121
Internet: http//www.mot.com
This device incorporates ananticopyprocess technology that is protected byU.S. patents and other
intellectualpropertyrights. The anticopyprocess is licensedfor non-commercial home useonly.
Reverse engineering or disassembly is prohibited.
DOCUMENTATION NOTICE
The information contained in this document is subject to change without notice and should not be
construed as a commitment by Motorola BCS.
Motorola BCS assumes no responsibility for any errors that may appear inthis document nor does it
make an expressor implied warranty of any kindwith regard to this material, including, butnot limited
to, the implied warranties of merchantability and fitness for a particular purpose.
Motorola BCS shall notbe liable for incidental or consequential damagesin connection with, or arising
out o f the furnishing,performance, oruse of thisdocument andthe program material which itdescribes.
Page 3

DSR470
Digital Receiver
User Guide
Motorola Broadband Communications Sector
Page 4

Page 5

TOC
Welcome! ....................................................................................9
Regulatory Information ............................................................11
Programming Copyright Notice .................................................................11
FCC-Required Notification of Service .............................................. 11
Telephone Company Procedures .......................................................11
If Problems Arise ............................................................................... 12
FCC Certified .............................................................................................12
FCC Part 68 ................................................................................................13
User Instructions .........................................................................................14
Equipment Attachment Limitations ...........................................................15
Operation Precautions ................................................................................16
Important Safeguards ..................................................................................17
Safeguard Instructions ................................................................................19
Using Your Remote ..................................................................21
Key Functions .............................................................................................22
Programming the Remote Control ..............................................................24
If Your RemoteControlCannot Find a Working Three-Digit Codein theTa-
bles (Scanning) ...........................................................................................25
Programming the Master Power Feature ....................................................26
Volume Control Crossover .........................................................................26
Verifying Your TV Mode Codes ................................................................26
If You Have More Than One Receiver ......................................................27
Replacing the Remote Control Batteries ....................................................27
"Remote Energy Saver" ..............................................................................27
TV Codes ....................................................................................................27
Installation ................................................................................31
Connecting the Cable, Receiver, and TV ...................................................31
Front Panel Descriptions ............................................................................31
Back Panel Connections .............................................................................33
Using the Menus .........................................................................................34
Choosing the Menu Language ....................................................................35
Authorizing Your Receiver ........................................................................36
Completing the ReceiverConnectionsto
Your Entertainment System .......................................................................36
Connections to Audio/Video Monitor ........................................................37
Connections to Audio/Video Monitor and VCR ........................................37
DSR470 User Guide 5
Page 6

TOC
Additional Features ....................................................................................38
Viewing and Language Settings .................................................................39
Audio Settings ............................................................................................40
Installation Settings ...................................................................................41
System Status ..............................................................................................43
Authorization Screens ................................................................................43
Watching TV ..............................................................................45
How to Select Menu Options .....................................................................45
Headers .............................................................................................. 45
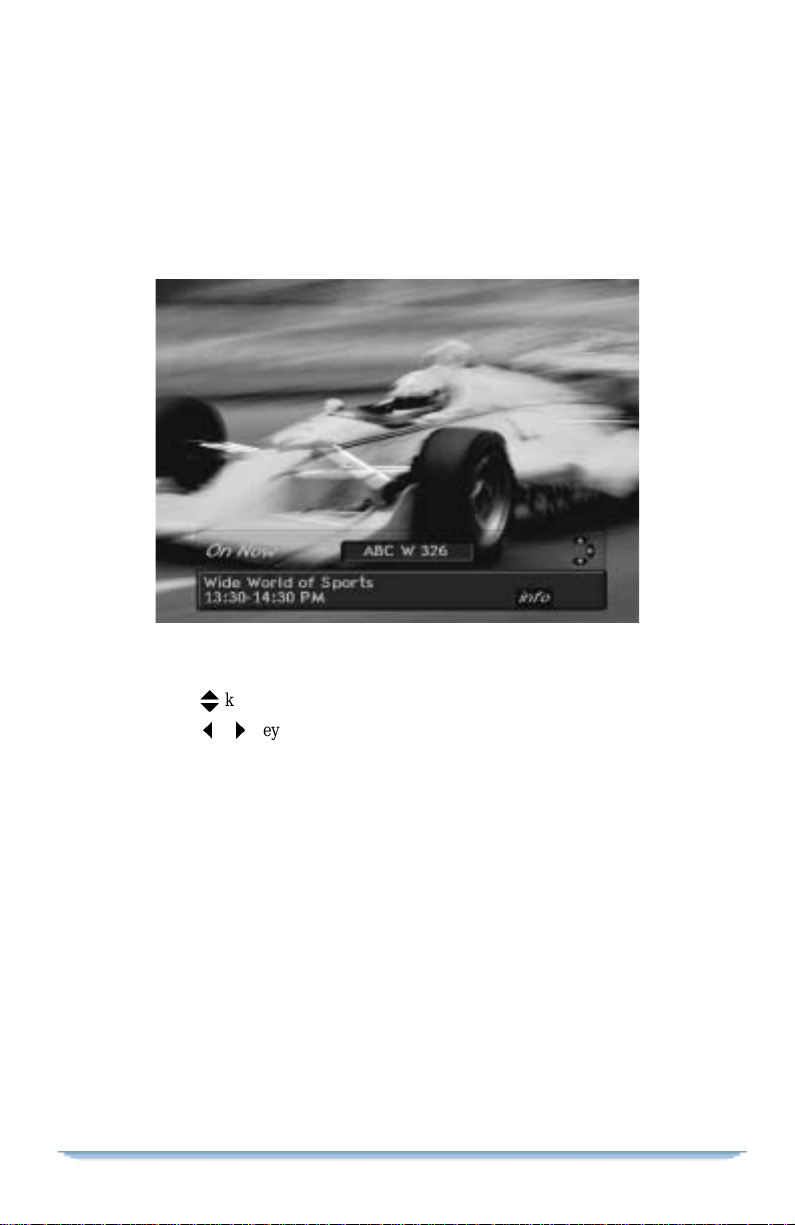
Banners .............................................................................................. 46
Info Banner ........................................................................................ 46
Browse Banner .................................................................................. 47
Authorization Screens ....................................................................... 47
Interactive Program
Guide (IPG) ................................................................................49
How to Display the Guide ..........................................................................49
How to Use the Guide ....................................................................... 50
Guide Screen ..................................................................................... 50
How to Display a Future Day and Time on the Guide ...................... 50
How to View the Guide by Interests ................................................. 51
Detailed Program Information ........................................................... 51
Setting a Timer for a Future Program ................................................ 51
Interests and Favorites ............................................................53
How to Display and Use the Interests Menu ..................................... 53
Pay-Per-View Events ................................................................55
Purchasing Instant Pay-Per-View (IPPV) Events .......................................55
How to Purchase an IPPV Event ................................................................56
Purchase Screen ................................................................................. 56
How to Cancel a Purchase ................................................................. 57
Purchase the Next Program ............................................................... 57
Purchase a Future Program ................................................................ 57
Changes in Purchase Options ............................................................ 57
How to Purchase a Program While Viewing an IPPV Program .......58
How to Display Your Purchase History ............................................ 58
Purchase List ..................................................................................... 58
Account Status ...................................................................................58
Credit Message .................................................................................. 59
Options ......................................................................................61
How to Display and Use the Options Menu ...............................................61
Opening Your Mail .....................................................................................63
How to Display the Mailbox Menu ................................................... 63
6
Page 7

Mailbox Menu ................................................................................... 63
Mailbox Message Screen ................................................................... 63
Erase or Keep Message Screen .......................................................... 64
Setting a Future Day and Time for the Guide ................................... 64
Setting Favorite Channels ...........................................................................65
How to Display the Favorite Channels Menu ................................... 65
Favorite Channels Menu .................................................................... 65
To assign a channel to the Favorites A, B, C or D list: ..................... 65
Setting Parental Controls & Passwords ......................................................66
How to Display the Parental Control Menu ...................................... 66
Parental Control Menu Options ......................................................... 67
Setting Timers ............................................................................................70
How to Display the Timers Menu ..................................................... 71
How to Use the Timers Menu ........................................................... 71
Change Timer/Erase Timer Prompt Screen ....................................... 72
Maximum Number of Timers ............................................................ 72
Before a Timer Executes ................................................................... 72
How to Use the Set Timer Menu ....................................................... 72
How to Set Each Timer Option ......................................................... 73
Setting a Timer for Next Year ........................................................... 73
If You Press the GO BACK Key ....................................................... 73
How to Use the Confirm Timer Menu .............................................. 74
Setting a Timer Using the Guide ....................................................... 75
How to Cancel a Timer ...................................................................... 75
If New Settings Conflict with Previous Settings ............................... 75
List Purchases .............................................................................................76
Change System Settings .............................................................................76
Viewing and Language Settings ........................................................76
Audio Settings ................................................................................... 77
Installation Settings ....................................................................................78
Help ............................................................................................79
Using Help ..................................................................................................79
Explanations ...................................................................................... 79
Icons .................................................................................................. 80
Specifications ...........................................................................81
Input ............................................................................................................81
Cable Input ........................................................................................ 81
Antenna Input .................................................................................... 81
Video ..........................................................................................................81
Composite Video ............................................................................... 81
DigiCipher II (Digital) System .......................................................... 81
Analog Cable Video .......................................................................... 82
Remodulator Output ...................................................................................82
DSR470 User Guide 7
Page 8

TOC
DigiCipher II (Digital) System .......................................................... 82
Analog Cable ..................................................................................... 82
Remote Control ................................................................................. 82
Physical/Environmental ..................................................................... 82
Warranty & Service ..................................................................83
Limited Warranty and Obtaining Services .................................................83
Limitations ..................................................................................................84
Calling for Service ......................................................................................84
How to Obtain Warranty Service ...............................................................85
8
Page 9

1
Welcome!
All around the world, peoplejust like you are enjoying the ultimate in
entertainment, educational, and informational programming with the DSR470
Digital Receiver. In addition to offering among the best available pictureand
sound quality,thereceiver comes in severalmodels. Depending uponwhich
model you own, it may have slightly different features than the model shown in
this guide. Differences include variationsinthefrontand rearpanels, available
connections (modem, and type of audio connectors), pay-per-viewprogramming,
and remote control keys. So, don’tbe concerned if some instructions do not apply
to your model.
DSR470 User Guide 9
Page 10

1
10
Page 11

2
Regulatory Information
Programming Copyright Notice
Use oft his devicemayviolate Section 605ofthe CommunicationsActof
1934, as amended,if that use consists of the unauthorized interception
and divulgence of radio communicationsfor one’s ownbenefit where
there is no entitlementtoitsreceipt.
Changes or modifications to this devicenot expressly approvedby the
party responsible for compliance with FCC regulations(the
manufacturer) could void the user’s authoritytooperate the equipment.
Resale of signals received from broadcast satellites is explicitly
regulated. In any use or application involving resaleor distribution,the
user should verifycompliance with currentlaws, regulations, and
approvedprocedures for use. Whererequired, localandfederal licensing
or franchiseauthorization is the sole responsibility of the user.
Export of this device requires a valid export license issued by the U.S.
Departmentof State, Office of Munitions Control.
FCC-Required Notification of Service
The Impulse Pay-Per-View system is designed to be used on standard
device telephone lines. The Impulse Pay-Per-View connectsto the
telephonelinebymeansof a standard jack called the USOC RJ11C.
Connectionto telephone company-provided coin service (centraloffice
implemented systems) is prohibited. Connection to party line serviceis
subject to state tariffs.
Telephone Company Procedures
In order for your telephone company to provide service to you, it may
occasionally be necessary for them to make changes in theirequipment,
DSR470 User Guide 11
Page 12

2
operations, or procedures. If these changes affect your service or
the operationof your equipment, the telephonecompany should
give you notice, in writing, to allow you to make any changes
necessary to maintain uninterrupted service.
If you have any questionsaboutyour telephone line, suchashow
many pieces of equipmentyou can connect to it, your telephone
company shouldprovide this information upon request.
In certain circumstances, it may be necessary for your telephone
company to requestinformation from you concerning the
equipmentwhich you haveconnectedtoyour telephone line. Upon
request of your telephone company, provide the FCC registration
number and the Ringer Equivalence Number (REN) of the
equipment which is connected to your line;bothof these items are
listed on the equipment label. The sum of all the REN’s on your
telephoneline should be less than five in order to assure proper
servicefrom yourtelephonecompany. In somecases, a sumoffive
may not be usable onagivenline. NOTE: The REN for the Digital
Entertainment Receiver with Impulse Pay-Per-View is 0.3B.
If Problems Arise
If any of your telephone equipment is not operating properly,you
should immediately remove it from your telephone line, as it may
cause harm to the telephonenetwork. If your telephone company
notes a problem,theymay temporarilydiscontinue service. When
practical, they will notify you in advanceof this disconnection. If
advance noticeisnot feasible, you should be notified as soon as
possible.When you are notified, you should be given the
opportunity to correct the problemandinformed of your right to
file a complaint with the FCC.
FCC Certified
Thisequipmenthasbeen testedandfoundto complywith thelimits
for a Class B digital device, pursuanttoPart 15 of the FCC Rules.
These limits are designed to providereasonable protection against
harmful interferencein a residential installation. This equipment
generates,uses, and can radiate radio frequencyenergy and, if not
installed and used in accordance with the instructions, may cause
harmful interferenceto radio communications. However, there is
no guarantee thati nterference willnotoccurina particular
installation.
12
Page 13

RegulatoryInformation
FCC Part 68
This equipment complies withPart 68 oftheFCC rules. Locatedon
the equipment isalabel thatcontains,among other information,the
FCC registrationnumber and Ringer Equivalence Number (REN).
If requested, this information must be provided to the telephone
company.
The REN is used to determine the quantityof devicesw hich may
be connected to the telephone line. Excessive REN’s on the
telephoneline may result in the devices not ringing in response to
an incoming call. In most, but not all areas, the sum of the REN’s
shouldnotexceed five(5.0).Tobe certain of thenumber of devices
that may be connectedtothe line, asdeterminedbythe total REN’s
contact the telephone company to determine the maximumREN
for the calling area.
This equipment cannot be used on the telephone companyprovidedcoin service.Connection to party line service issubject to
state tariffs.
If this equipmentcauses harm to the telephone network, the
telephonecompany will notify you in advancethat temporary
discontinuance of servicemay be required. If advance noticeisn’t
practical, the telephone company will notify you as soon as
possible.Alsoyou will be advised of your right to file a complaint
with the FCC if you believe it is necessary.
The telephone company may make changes in its facilities,
equipment, operations, or procedures thatcould affect the
operationof the equipment. Ifthis happens, thetelephonecompany
will provideadvance notice in order for you to make the necessary
modifications in order to maintain uninterrupted service.
If trouble is experienced with this equipment, please contact:
Motorola Broadband Communications Sector
6450 Sequence Dr., San Diego, CA 92121
1-888-436-4678
If the trouble is causingharmto the telephone network, the
telephonecompany mayrequest youtoremove theequipmentfrom
the network until the problem is resolved.
This equipment usest he following USOC jacks: RJ11C
It is recommended that thecustomer install an AC surgearresterin
the AC outlet to which this deviceis connected. This is to avoid
damaging the equipment caused by local lightening strikesand
other electrical surges.
DSR470 User Guide 13
Page 14

2
This equipment is Hearing-Aid Compatible (HAC).
The Telephone ConsumerProtection Act of 1991 makes it
unlawful for any person to use a computer or other electronic
device, including fax machines, to send any message unless such
message clearly contains in a margin atthe top or bottom of each
transmitted page or on the first page of the transmission, the date
and timethat it is sentand an identification of the business or other
entity, or other individual sending the message and the telephone
number of the sending machine or suchbusiness, other entity, or
individual. (The telephone number provided may not be a 900
number or any other number for which charges exceed localor
long-distance transmissioncharges.)
User Instructions
If this equipmentdoes cause interference to radio or television
reception, which can be determinedby turning the equipment off
and thenon, the user isencouragedto try tocorrect the interference
by one or more of the following measures:
- Reorient or relocate the receiving antenna.
- Increase the distance between the equipment and
receiver.
- Connect the equipment into a different outlet so that the
equipment and receiverareon different branch circuits.
- Consulta dealeror an experienced radio/TV technician
for help.
Changes or modifications not expressly approved by Motorola
BCS couldvoid the user’sright to operate theequipmentand/or the
equipmentwarranty.
14
Page 15

RegulatoryInformation
Equipment Attachment Limitations
Note: This product was FCC certified under test conditions that
included the use of shieldedI/O cables and connectors between
systemcomponents.Tocomply withFCCregulations, theuser must
use shielded cablesand connectors and install them properly.
CP-01, Part 1, Section 10.1 . "NOTICE:The Canadian
Departmentof Communicationslabeli dentifies certified
equipment. This certification means that the equipment meets
certaintelecommunications network protective, operational and
safety requirements.The Department does not guarantee the
equipment will operate to the user’ssatisfaction.
Before installing this equipment, users should ensure that it is
permissible to be connected to the facilities of the local
telecommunicationscompany. The equipment must also be
installed using anacceptablemethod of connection. In some cases,
the company’s insidewiring associated witha single lineindividual
service maybe extended by means of a certified connector
assembly (telephone extension cord). The customer should be
aware that compliance with the above conditionsmay not prevent
degradation of service in some situations.
Repairs tocertified equipment should be made by an authorized
Canadian maintenance facility designated by the supplier.Any
repairsor alterations made by the user to this equipment, or
equipment malfunctions,may give the telecommunication
company causeto requestthe user to disconnect the equipment.
Users should ensure for their own protection that the electrical
ground connections of the power utility, telephone lines, and
internal metallic waterpipe system,ifpresent,are connected
together.This precaution may be particularly important in rural
areas.
CAUTION: Users should not attempt to make such connections
themselves, but should contact the appropriate electric inspection
authority,orelectrician, as appropriate.
NOTICE: The Ringer Equivalence Number (REN) assignedto
each terminaldevice provides an indication of the maximum
number of terminals allowed to be connected to a telephone
interface. The termination on an interfacemayconsist of any
combination of devices subjectonly to the requirement that the
sum oftheRinger EquivalenceNumbers ofall the devicesdoes not
exceed 5.
DSR470 User Guide 15
Page 16
2
The standard connecting arrangement (telephonejacktype) for this equipmentisCA11A.
The Ringer Equivalence Number (REN) of this device is 0.3.
Operation Precautions
WARNING: To reduce the riskof fireorelectric shock,do
not exposethis unit torain or moisture. Do not opentheunit. Refer
servicingto qualified personnel only.
CAUTION: Toprevent electric shock, do not use this
(polarized) plug with an extension cord receptacle or other outlet
unless the blades can be fully inserted to prevent blade exposure.
A TTENTION: Pour éviterleschocsélectriques, ne pas
utiliser cette fiche (polarisée) avec la prise d’unerallonge ou de
tout autre prise de courantsi les lamesdela fichene peuventêtre
insérées á fond.
Lightning Flash Icon. The lightning flash with arrowhead
symbolwithin an equilateral triangle is intended to alertthe userto
the presence of un-insulated “dangerous voltage” within the
product’s housingt hat may be strong enough to constitute a risk of
electric shock to persons.
Exclamation Point Icon. The exclamation point within
an equilateralt riangle is intended toalerttheuser to thepresenceof
important operating andmaintenance (servicing)instructions inthe
literature accompanying the appliance.
This digital apparatus does not exceed the Class A/Class B
(whichever is applicable) limits for radio noise emissions from
digitala pparatus assetout in the Radio InterferenceRegulationsof
the CanadianDepartment of Communications.
16
Page 17
RegulatoryInformation
Important Safeguards
Read, Follow and Keep Instructions. Before you
operate the unit, read and follow all safety and operating
instructions. Keep the safety and operating instructions for future
reference.
Heed Warning. Payattention to all warningson the
equipment and in the operating instructions.
Cleaning. Do not use liquid or aerosol cleaners. Use a damp
cloth to clean the outsideof the unit. Do not open the unit for
cleaning or any other reason.
Power Cord Protection. Place powersupplycords sothat
they are not walked on or pinched by items placed on or against
them. Payparticular attentiontothecords where theyjoin the plug,
near convenience receptacles, and where they exit from the
equipment.
Power Sources/Grounding. Operate the equipment
from the type of power source indicated on the marking label.
This product has a polarizedalternating-currentline plug as a
safety feature. This plug fits intothe poweroutlet only one way. If
the plug does not fit, contact your electrician to replace your
obsoleteoutlet. Do not try to change the plug or defeat its safety
purpose.
Ventilation. Do not block or cover the slots and openings of
the unit. They provide ventilationandprotect it from overheating.
Never place the unit on carpeting, which it may block ventilation
through the bottom slots. Never place the unit near a source of heat
or in a built-in installation rack unlessthereisproper ventilation.
Do Not Operate near Water. Do not use this product
near water. For example; a bath tub, wash bowl, kitchen sink,
swimming pool,laundry tub, in a wet basement,or in similar
situations.
DSR470 User Guide 17
Page 18
2
Objects or Liquid in the Unit. Never push any object
into this unit throughanyof its openings because they may touch
dangerous voltage points or short out the parts. This couldcause a
fire or an electrical shock. Do not spill liquid of any kind on the
unit.
Overloading. Do not overload power outlets or extension
cords. This canresult in a risk of fire or electrical shock.
Damage Requiring Service. Unplug this equipment
from the power source and contact a qualifiedservice provider if
any of the following situations occurs:
- If the power supply cord or plug is damaged.
- If liquid or objects have fallen into the unit.
- If the unit became wet from rain or water.
- If the unit was dropped or damaged.
- If the unit’s performance changes.
Service. Do not try to service this product yourself. If youopen
or remove the cover, you may be exposed to dangerous voltage or
other hazards and mayvoid the unit’s warranty. Contact a qualified
service provider for all service.
Mounting and Placement. Do not place this product on
an unstable surfacesuch as a cart, stand, tripod,bracket, ortable. It
may fall, causing serious injury to achild, adult, or to the unit itself.
To mount the unit, follow the manufacturer’s instructions, and use
a mounting accessory recommended by the manufacturer. Do not
place this product directly on wood or simulated wood surfaces
because these surfaces may be damaged.
Power Lines. Donotlocate the antenna systemnear overhead
power lines, electrical light or power circuits, or where it can fall
into power lines or circuits. When installing an antenna system,
avoid dangerous contact withpowerlinesor circuits.
Outdoor Antenna Grounding. To provide some
protection against voltage surges, lightning, and built-up static
charges, make sure that the antennais properly grounded.
18
Page 19

RegulatoryInformation
Replacement Parts. If your receiver requires repairs,
contact your equipment provider, who will be able to assist you.
Safety Check. After the unit is serviced or repaired, ask the
service technician to perform safety checks to find out if the unit is
in proper operating condition.
Lightning. To protect the product from damage caused by
lightningandpower line surges,unplugit fromthewall outlet and
disconnectitfromtheantenna or cable system beforea lightning
storm or if the unit will be left unattendedor unused for a long
periodoftime. Once astorm passes, reconnectall antenna cables to
the correct connectors. If you live in an area that has many
lightningstorms, buy polarized surge protectors andsurge
protectors for the power line, telephone line, and RF cable to
protect your system from damage. Never attempttoconnect or
disconnectany wires during a thunderstorm or lightning storm.
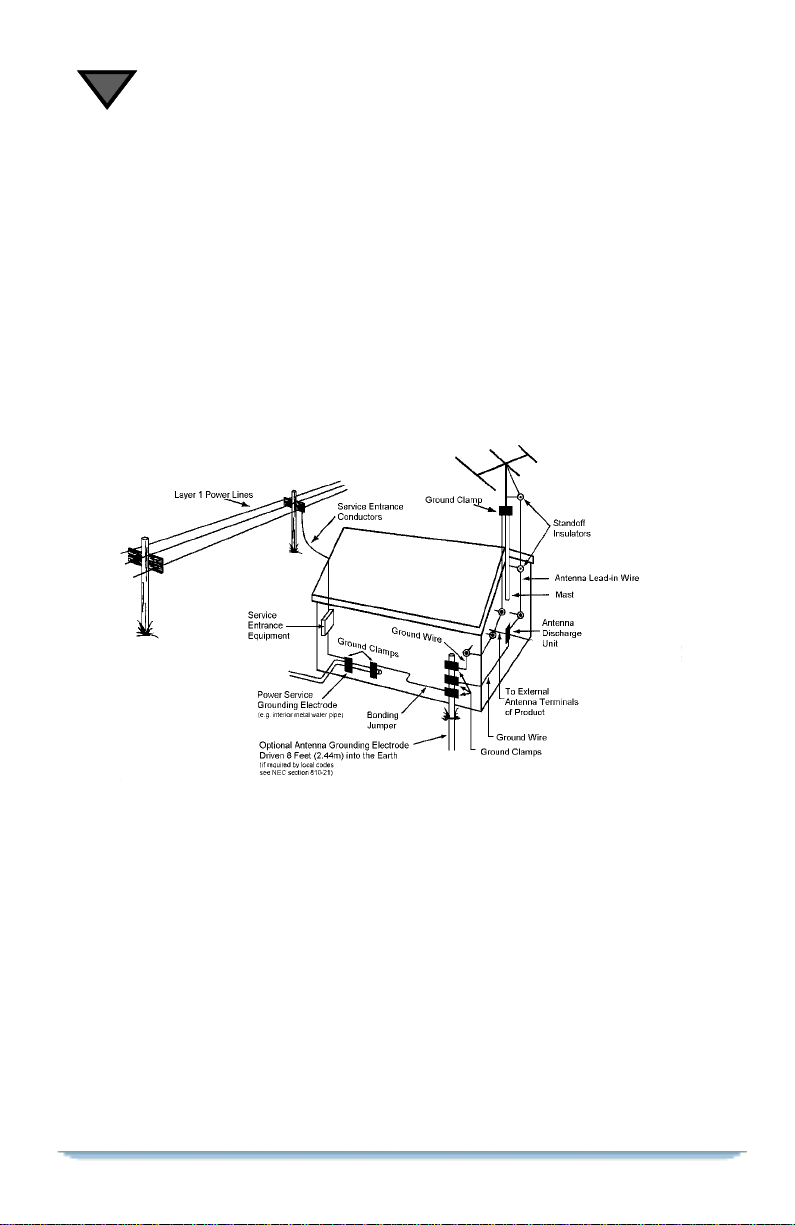
Safeguard Instructions
1. Forthegroundwire, use No. 10 AWG (5.3mm2) copper,
No. 8 AWG (8.4mm2) aluminum, No. 17 AWG
(1.0mm2) copper-clad steel or bronze wire, or larger.
2. Secure the antenna lead-in wire and ground wires to the
house with stand-off insulatorsspaced 4 ft. (1.22mm) to
6 ft. (1.83mm) apart.
3. Mount the antenna discharge unit as close as possibleto
the place where the lead-in enters the house.
4. Use a jumper wire that is no smaller than No. 6 AWG
(13.3mm2) copper, or the equivalent, when using a
separate antenna grounding electrode.See NEC Section
810-21(1).
5. In areasthat are heavily prone to lightningstormsinstall
a lightning rod mounted to the top of the a ntenna on the
back side. Install a ground strap (2 AWG, or larger, of
copper wire) from the lightning rod to the rest of the
antenna ground system.
DSR470 User Guide 19
Page 20
2
6. Section 810 of the National E lectrical Code, ANSI/
NFPA No. 70-1984, provides information about the
following items:
- Proper grounding of the mast and supportingstructure.
- Grounding of the lead-in wire to the antenna discharge
unit.
- Size of groundingconductors.
- Location of antenna-discharge unit.
- Connection to grounding electrodes.
- Requirement for the grounding electrode.
Note to the system installer: The purpose of this reminder is to call
your attention to Article 820-40 of the NEC that provides
guidelinesfor propergroundingand, in particular,specifiesthatthe
cable ground shall be connected to the grounding system of the
building,asclosetothepointofcableentry as practical. The
illustration is an example of antennagrounding according to the
NationalElectrical Code Section810,"Radio and Television
Equipment." Check your local building and electrical codes for
other restrictions on antenna grounding.
20
Page 21
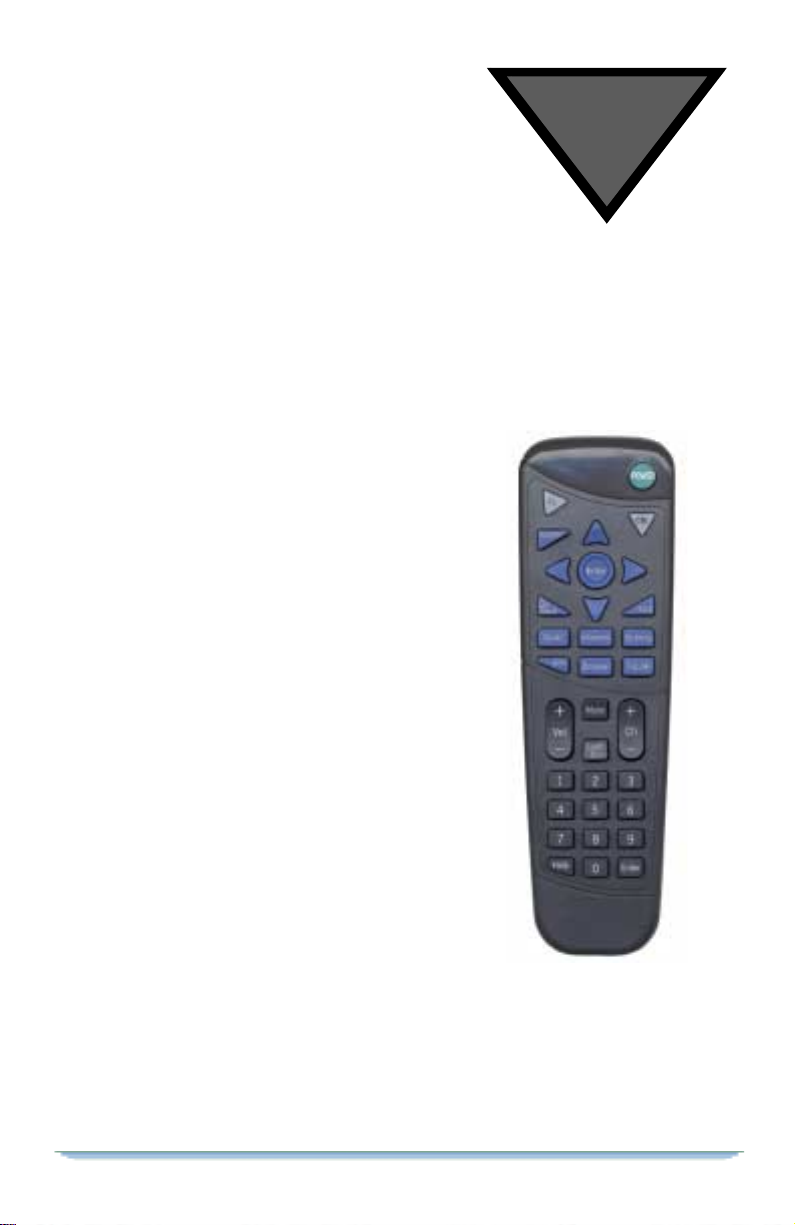
Using Your Remote
The receiver comeswitha basic remote controlunit
thatcanbeprogrammedtocontrolboththereceiver
and/or the television.
A Word About Modes. Toenabletheremote
control to operateyourreceiver, and your TV, it has
two main modes of operation: CBL mode, and TV
mode. Thismeans thatwhenyou press the CBLorTV
keys on the remote control,you enable it to control
eachofthese devices,oneat a time.Naturally,some of
the remote control keys have more than one function,
depending upon which modeyou are usingatthe time.
Keep this in mind asyou read the descriptions for each
remotecontrolkey.Alsokeepinmind,someCBL
functions are available only within CBL mode.
Amongthese specialfunctionsare accesstothe menus
through the OPTIONSkey and use of the Interactive
Program Guide(IPG)through the GUIDE key.
3
DSR470 User Guide 21
Page 22

3
Key Functions Power. To turn the component on or off.
CBL(mode). To change the remotetoCable mode so it can control the
receiver for viewing cable television signals as wellas the OPTIONSmenu.
TV(mode). TochangetheremotetoTVmodesoitcancontroltheTV. Source. To control the input source to your receiver, your TV, yourVCRor
your auxiliarycomponents.
- In CBL mode, it shifts between the cable andantenna input.
- In TV mode, it shifts betweenauxiliaryantenna and videosources.
Options. To exit any menu and display the Options menu. Interests. To exit any menu and display the Interests menu. Press it again to
remove the Interests menu and return to watching a program.
Browse. Toviewprogram information for channels and timesother than the
currentchannel and time while continuingtoview a program. Press GO BACK to
return to watching a program. Press ENTER to go to the program located in the
Browse banner.
Guide. T o display the Interactive Program Guide (IPG). Press it again to return
to program viewing.
Go Back. To return to the previous menu. Enter. For convenience, there are two ENTER keys. Ifyou are using a menu,
pressENTERto select a highlightedoption. In CBLmodepress ENTER to tunein
the channel whose numbers you have already pressed.
Arrow Keys. To highlight selections from menu screens. Also used in the
Browse banner to navigate between listings.
Exit. To exit any menu and watch a programor to displayprogram information
if you are already watchinga program.
Future. Todisplay a program banner for what’s on in the futurewhileyouare
watching a program.
Last Ch. Toreturn to the last channel viewed. Info. To display detailedinformation aboutthecurrent programorahighlighted
program in the Guide.Pressitagain to turn the informationoff.
22
Page 23

UsingYourRemote
Vol. To raise or lower the TV volume level. Mute. Tomute the TV sound. Chan. To change the channel. Ifyou are using amenu,press to changechannels
without removing the menu. If you are using the Guide, press to move one screen
up or down.
Number Keys. Thesekeys operatein different ways,depending uponwhich
mode you are in:
- If you are using the menus,press these keys to select a numbered
option.
- If you are watching a program, pressthese keys and ENTER to change
channels. If the channel has three numbers, it will tune in immediately
after you enterthethird number.
Help. To display the help screens. Pressit again to turn off the help screens and
return to watching a program.
DSR470 User Guide 23
Page 24

3
Programming the Remote Control
The remote control is set at the factory to control all of the receiver functions,but
to use it to operateyour TV, youmust "program" it for the brand you own.Follow
these instructions to program the remote to controlyourTV.
1. Turn on the TV for programming.
2. Use the table that appears later in this section to find the brand of TV.
3. After the manufacturer’s brand name is a three-digit code number (or several three-digit codes).
4. Press and hold the TV key on the remote control for at least three
seconds or until the light on your remote flashes.
5. If the remote control "accepts" the code, you will s ee several rapid
flashes of the light. If it does not flash, repeat steps 3 and 4. A fter the
remote control accepts the code, press the POWER key on the remote
control to make sure the remote control is able to turn your
component off. This means it is functioning properly.
6. If your component does not respond to the remote control POWER
key, even though it has "accepted" the manufacturer’s code, repeat
steps 3 and 4 using the second three-digit code from the table. If this
does not work, try the third code, etc., until the remote control accepts
the code and your component responds to the remote control POWER
key.
24
Page 25

UsingYourRemote
If Your Remote Control Cannot Find a Working ThreeDigit Code in the Tables (Scanning)
If you try to program your remotecontrol using the three-digit codes, andthe
remotecontrol does not workcorrectly,you may be able to find a code that works
by using the "scanning"process.
1. Turn on the TV.
2. Press the TV ke y for at least three seconds or until the LED blinks.
3. The following steps explain how to "scan" through the TV codes
stored in your remote control using the
lit while the
- Whilepointingtheremote controlat your TV pressthe#arrowkey to
scan upward to the next code. Use the
previouscode.
- If the transmitted code is the correct one, your TV will turn off,
responding as if its POWER key were pressed.
- If your TV does not respond, pressthe
code. When your TV turns on or off as a result of the transmitted code,
you will know that you have found thecorrect code.
- When you havefound the correct code (powerto your TV is toggled on
or off), press the ENTER key. This will store the manufacturer’s code.
The LED will then flash rapidly several times and turn off.
NOTE:Ifyour TV is not listed inthetables and/orthe codes foryour brand arenot
accepted by the remote, you willneed to use the remote originally manufactured
for your unit.
keys are pressed.
L
keys. The LED will not be
L
arrow key to returnto the
$
arrow key to try the next
#
DSR470 User Guide 25
Page 26

3
Programming the Master Power Feature
If you wish to control the power on/off function of your receiver and TV, and all
connectedequipment with a single press of the POWER key on your remote
control, you can enable the remote control’s Master Power feature by following
these steps:
• Press the CBL key on the remote control for at least three seconds or until the
light on the key blinks.
• Press the POWER key on the remote. The light will remain on steady. Press the
power key a second time, and the light on the remote will blink on and off
briefly,which indicates that the remote hasaccepted the MasterPower
command.
If you wish to cancel the MasterPower feature, just repeat the steps outlined above.
V olume Control Crossover
Your remotecontrol unit is programmedfrom the factory to controlthevolume of
your television set when you are using the remote control in the CBL mode.
Verifying Your TV Mode Codes
Youcanverify the accepted programming codes for eachmode by followingthese steps.
1. Press the TV key for at least three seconds or until the remote control
unit LED blinks.
2. Press the "INFO" key.
3. The LED will blink, indicatingthe code of your TV, in the following
sequence. For example, if your TV code is for a Tandy brand TV
(code 105), the blink pattern will be:
- Pause>long blink "1;"
- Pause>short blink "0;"
- Pause>long blink, long blink, longblink, long blink, long blink "5."
A zero in the code will always be represented by a short blink.
26
Page 27

UsingYourRemote
If You Have More Than One Receiver
If you have more than one receiver, you may want to preventtheremote controls
from affecting the other receivers. To prevent this kindofinterference, you must
"pair" each remote control with one receiver. In order to do this, you will have to
assign a new "address" to each pair of remote controls and receivers so that each
pair functions independentlyof the others. If you have two or more receivers see
Chapter 4, for information about the procedure for changingaddresses.
Replacing the Remote Control Batteries
When the remote controlbatteries are worn out (discharged), the remote will stop
working. Replace the batteriesas soon as possible to retain your programmed
codes. Once you remove the batteries fromthecompartment, you mustreplace
them within two hours to retain your programmablefeatures. The remote control
for this unit is powered by two AAA batteries. Use only high quality, noncorrosivebatteries designed for use in electronic equipment. Replace both
batteries at the same time. T o replace the batteries:
- Remove the cover by pressing down the back panel indentation and
removing the panel off the remote control.
- Position each battery in the battery compartment so that the flat base (-)
is against thespring so thattheraised contact(+) isagainst theterminal.
Make sure the batteries are securely seated.
- Replace the cover.
"Remote Energy Saver"
If you misplaceyourremote (i.e., it is stuck in your couch),anda key is
inadvertentlypressed, theremote will automatically turn itselfoff after three
minutes.
TV Codes
Admiral..................................................018,090,125
A-Mark...................................................120,224,225
Aiwa.........................................................090,251
Akai.............................................. 000,032,070,149,172
Amstrad......................................................... 033
Anam..........................................005,009,021,041,120,121
AnamNational.................................................... 211
AOC....................................005,006,019,020,120,140,163,173
Archer........................................................... 120
ASA............................................................ 047
DSR470 User Guide 27
Page 28

3
AudioDynamics...................................................234
Audiovox........................................................120
Bell&Howell ....................................................018
Broksonic...................................005,144,172,173,174,219,226
Candle.........................................006,022,023,025,163,213
Capehar .........................................................t019
Centurion.....................................................192,194
Citizen . . . . . . .. . . . . . . . 006,016, 018,022,023,024,025,026,144, 163,202,213,224
Concerto..................................................005,023,213
Contec................................................041,091,185,227
Coronado .....................................................224,225
Craig.........................................................021,041
Crown...........................................................026
Curtis Mathes . . . . . . . . . . . 006,016,018,026,059,125,163,172,192,194,202,224,231
CXC............................................................041
Daewoo . . . . . . . . .. . 005,024,026,029, 030,031,032,130,172,214,215,224,233,252
Daytron................................................026,192,194,224
DBX............................................................234
Dimensia ........................................................ 125
Dumont.......................................................... 047
Electrohome...............................................026,149,224
Emerson. . . . . . . . . . . 017,023,026,028,033,034,035,037,038,039,041,122,141,143,
. . . . . . . . . . . 144,172,176,187,203,204,205, 219,222,223,224,225,226,227,251,253
Envision......................................................... 163
Fisher.............................................042,090,099,216,217
Fujitsu. . . . . .. . . . . . . . . . . . . . . . . .. . . . . . . . . . . . . . . . . .. . . . . . . . . . . . . . 034,187
Funai..................................................034,041,187,251
Futuretech........................................................041
GE . . . . . 003,008,009,023,043,044,125,130, 134,147,172,195,206,207,211,228,231
Goldstar . . . . 005,023,026,045,046,088,172,173,194, 213,223,224,225,230,234,254
Grundig .........................................................047
Hallmark......................................................... 023
HarmonKardon................................................... 234
Hinari........................................................034,187
Hitachi..............................018,023,026,048,049,050,051,052,053
..........................054,055,116,126,142,172,185,213,224,225,231,251
Infinity...................................................010,066,151
JBL......................................................010,066,151
JCPenny.............................003,005,006,014,016,026,043,044,096
..........................125,134,163,172,194,206,207,223,224,231,232,234
Jensen........................................................... 056
JVC............................................057,058,059,060,186,234
Kawasho......................................................... 061
Kenwood.....................................................006,251
Kloss.........................................................022,110
KMC.........................................................224,225
KTV...........................................026,039,041,172,224,225
Lloytron.........................................................224
Lodgenet......................................................... 018
Logik ........................................................... 018
Luxman......................................................023,213
LXI .. . . . . . . . . . . 003,010,066,090,117,125,129,131,134,172,173,194,223,251,254
Magnavox. . .. . . . 000,006,008,010,017,020,025,027,028,066,067,068,110,144,151
...................154,163,164,167,172,173,175,192,194,218,224,225,231,251
Majestic......................................................... 018
Marantz.............................006,010,066,068,088,149,163,172,234
Marta ........................................................... 223
Matsui........................................................032,109
Memorex .......................................018,032,090,223,232,251
MGA . . . . . . . . . . . . . . . . . 004,005,006,023,034,071,072,149,163,172,187,192,194
28
Page 29

Mitsubishi. .. . . . . 004,005,023,034,070,071,072,122,123,149,172,173,187,192,194
MTC....................................005,006,016,023,031,163,202,213
NAD.........................................................002,117
NEC . . . . . . . . . . . . . . 005,006,007,023,028,090,144,163,172,173,191,192, 194,213
National........................................011,151,190,195,196,211
Nikkai........................................................113,118
Onwa ........................................................... 041
Optimus......................................................... 232
Optonica......................................................... 129
Orion ........................................................219,226
Osume ..........................................................091
Panasonic . . . . . . . . . . . .. . . . . . 008,009,010,011,012,066,151,195,196,211,231,232
Philco . . . . . . . . . . . . . . . . . 005,006,025,067,068,110,151,163,172,218,224,225,251
Philips. . . . . .. . . . . . . . . . . . . . . . . .. . . . . . . 005,010,025,027,066,068,088,146,151
........................................... 163,164,218,220,223,225,251
Pioneer............................................ 002,008,048,051,076
Portland ...........................................005,026,172,224,225
Proscan...................................................125,147,172
Proton......................................006,013,019,023,026,172,224
Pulsar...........................................................001
Quasar.........................................008,009,195,211,231,232
RadioShack.......................026,041,112,141,173,194,224,229,230,232
RCA......................... 003,005,008,014,048,078,079,080,082,084,085
.................................086,087,125,130,134,147,172,210,231,251
Realistic..........................035,041,090,141,194,222,223,224,229,251
SAA............................................................ 145
Saba..................................................... 051,116,142
Saisho....................................................032,033,109
Sampo.............................................006,019,163,192,194
Samsung..........................005,006,016,023,026,032,088,112,163,172
.................................173,192,194,202,213,221,224,225,229,233
Sansui........................................................... 219
Sanyo............................... 042,089,090,091,092,109,194,216,217
Scott.........................026,034,037,041,093,173,187,192,194,224,233
Sears......................003,023,034,042,090,096,098,099,101,102,104,117
..........................125,131,134,151,187,194,202,216,217,223,224,225
Sharp ...................................... 026,091,129,141,200,224,225
Signature .....................................................018,251
Sony..................................................000,109,119,122
Soundesign......................................... 023,025,041,172,251
Spectricon........................................................120
SSS..........................................................005,041
Supra ........................................................022,023
Sylvania..........................006,010,025,066,068,110,112,151,163,172
.................................................. 173,192,194,229,251
Symphonic................................................132,179,251
Tandy.................................................112,113,129,251
Tatung........................................................009,211
Teac............................................................ 251
Technics......................................................008,032
Techwood.....................................................023,213
Teknika...........................004,005,016,018,022,023,024,025,026,034
..........................041,072,114,149,151,187,202,213,223,224,225,251
Telerent.......................................................018,224
Teletech.........................................................032
Thomson.................................................. 051,116,142
TMK.....................................................023,172,213
Toshiba...............................016,017,047,090,096,117,118,131,180
......................................................201,202,216,233
Totevision.................................................026,223,224
UsingYourRemote
DSR470 User Guide 29
Page 30

3
Universal ..............................................043,044,206,207
VectorResearch................................................006,234
Victor...........................................................057
VideoConcepts ............................................070,234,251
Vidtech................................................005,023,172,173
Viking...........................................................022
Wards............................... 005,006,018,023,034,043,044,067,068
...................119,125,141,151,163,172,173,187,192,194,206,207,224,251
Westinghouse.....................................................090
Yamaha................................................005,006,234,251
Yorx.........................................................192,194
Zenith..........................................001,018,178,219,223,251
Zonda........................................................... 120
30
Page 31

4
Installation
Connecting the Cable, Receiver, and TV
Completethefollowingstepsand make sure that the receiver is not pluggedinto a
power source before you connect any cables to the receiver:
• Connectthe cablefrom the cable TV outlet onthewall to thecable terminalon
the digitalreceiver’s backpanel. Connect the supplied coaxial cable to VHF
IN terminalon your TV and to the Out to TV connector on the receiver.
• On the back panel of the receiver, set the CH3 CH4 switch, which is located
just above the TV terminal,to the samechannel that you set on your TV for
use with your VCR.
• Turn on theTVand tune it to channel3or 4 to match the position of the switch
on the back panel of the receiver.
• Plug the receiver power cordintoa standard power outlet. Wait one minute,
then pressthe POWER key (green) on the leftside of the receiver'sfront panel.
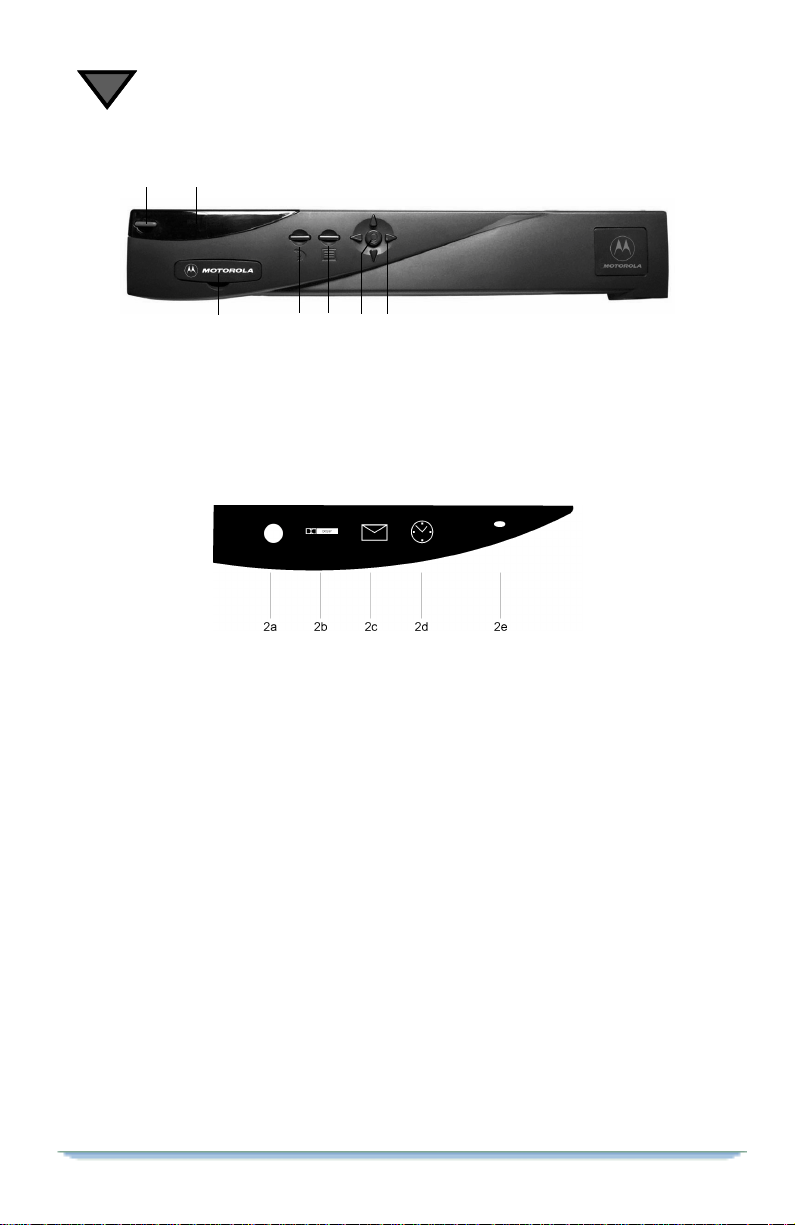
Front Panel Descriptions
Most viewers find it more convenient to use the keys on the remote control rather
than the keys on the front panel of the receiver.Buteventhough there are far
fewer keys on the receiver, they still allow you to control most receiver functions.
DSR470 User Guide 31
Page 32
4
1
2
45637
1. Power. Press this key to turn the receiver power on/off and to watch pro-
grams in CBL mode.
2. Front Panel Display. This area displays the current channel number
while you are viewingprograms. An indicator flashes each time you press a
remotecontrol key.
2a. Signal. An indicator lightsup when a digitalsignal ispresent. Green
indicates a good signal. Red indicates the unit is not receiving any signal.
2b. Dolby®Digital. This indicator lights up when the unit is
receiving a signal using Dolby
®
AC-3®Digitalencoding.
2c. Mail. This indicator lights up if you have an unread message in the
mailbox.
2d. Timer. A steadylight indicatesthe timersystem isset. Theindicator
flasheswhenthetimer system is withintwominutes of being activated or if
it is active.
2e. Remote. An indicator dot blinks each time you press a key on the
remote control.
3. TVPass®Card. In the event of certain types of data security problems,
your service provider may decideto utilize an authorizationfeature calledTVPass
card. This plastic card (smaller than a credit card) fits into a slot on the lowerleft
corner of the front panel.
32
Page 33

Installation
4. Go Back. Pressthis key to return to a previous menu or the lastchannel
viewed.
5. Menu. Press this key to display the Menu screen.Pressitagain to turn off
the Menu and return to CBL mode. Press this key to controlthereceiver if you
cannot find your remote control.
6. Enter. Press this key to select a highlighted menu option.
7. Arrow Keys. Pressthese keys tohighlight selections frommenu screens.
The
keysarealsousedtochangethechannelortomoveupanddownonthe
L
menu screen.Use the
keys to move right or left on the menu sceen.
!"
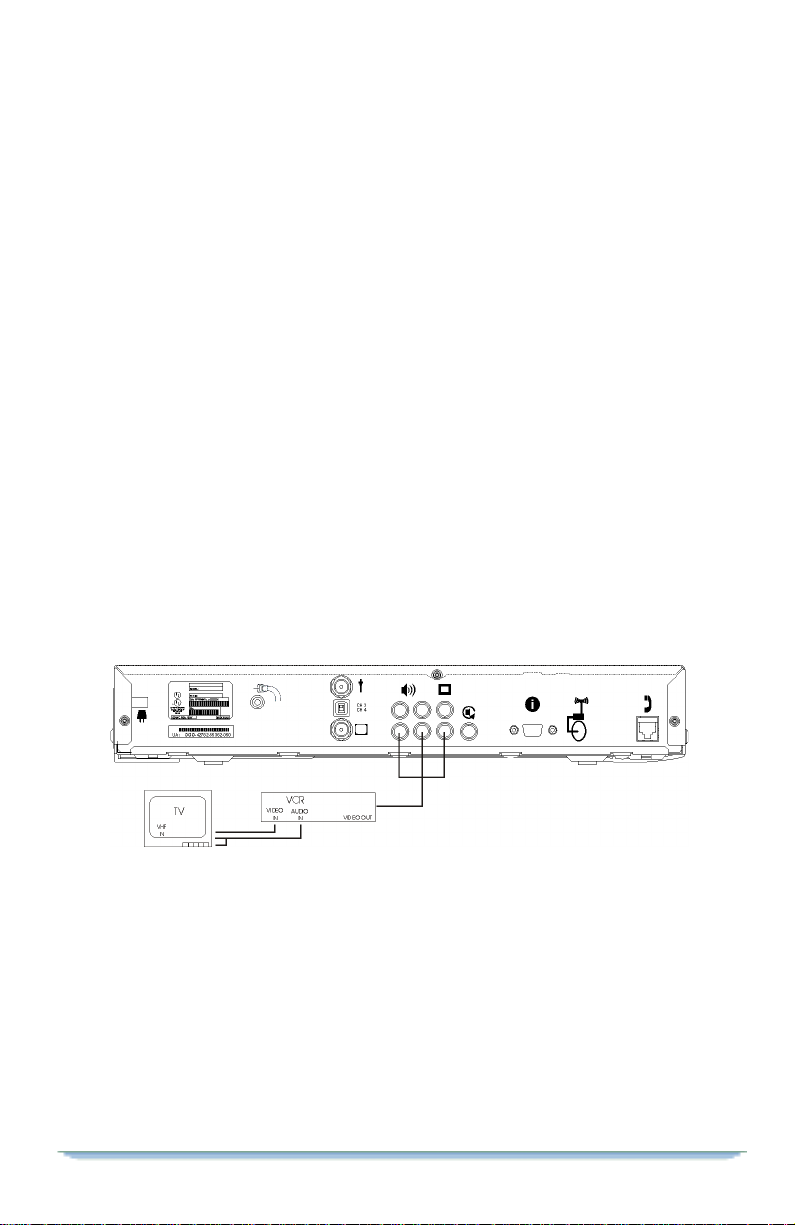
Back Panel Connections
The following back paneldescriptions are for reference only. Check with your
dealer and/orsystem installerfor specific details.
1. Power. Thepower cord is attached here.
2. Cable In. This connects your cable TV service to your system.
3. CH3 CH4. Thisswitch determines the channel (3 or 4) to which you set
your TV to receive broadcasts. Thesettings shouldbe the same as the TV setting
for use withyourVCR (usually channel 3). Yourinstaller should discuss this with
you.
4. Antenna In. This is an off-air antenna terminal.
5. Out To TV. This supplies the VHF signal to your TV.
6. Audio Out (L & R). Theseareaudiooutputsthatmaybeusedto
connect your TV and VCR.
7. To TV. This is a standard video output terminal.
DSR470 User Guide 33
Page 34
4
8. To VCR. This videooutput jack may be connected to your VCR input
connections for VCR taping.
9. Dolby Digital. If your entertainment centerisenabled for Dolby Digital
AC-3 Version 5.1 (six channel)surround sound, connect one end of the cable to
this port and the other end of the cable to your surroundsound processor.
10. Multimedia Port (MMAP). TheMultiMediaAccessPortis
designed to connect to th e HDD200 High Definition Decoder.To receive HDTV
signals you will need a special HDTV monitor capable of displaying a 1080i
television image and the HDD200 decoder. YouMUST use the HDD200 decoder,
you cannot connect the MMAP directly to any monitor or computer. Please
contact your local dealer for more information about the HDD200 decoder.
11. UHF Remote. This is the connection for the remote control antenna.
This is an optional upgradeand is available through your distributor.
16. To Phone Jack. This is a telephone jack connectionfor IPPV(Instant
Pay-Per-View) which allows you to automatically order PPV movies on screen
rather than calling your cable operator manually.
Using the Menus
You will be making various adjustments to your receiver using the keyson the
remotecontrol or receiver.
If you use thekeys on the remote control to control the menus,there are two ways
to select a menu option:
•Pressthe
34
!"
keys or the
keys to highlighttheoption you wish to
#$
Page 35
Installation
select.Press the ENTER key to selectit.
• If the options are numbered, simplypress the number key for an option.
You may use the remote control, but if you use the keys on the front panel of the
receiver, thereis onlyone way to select a menu option.
• Press the MENU key to first displaytheMenuscreen. Then press the
keys or the
!"
key to select the highlighted option.
keys to highlightanoption. Thenpress the ENTER
#$
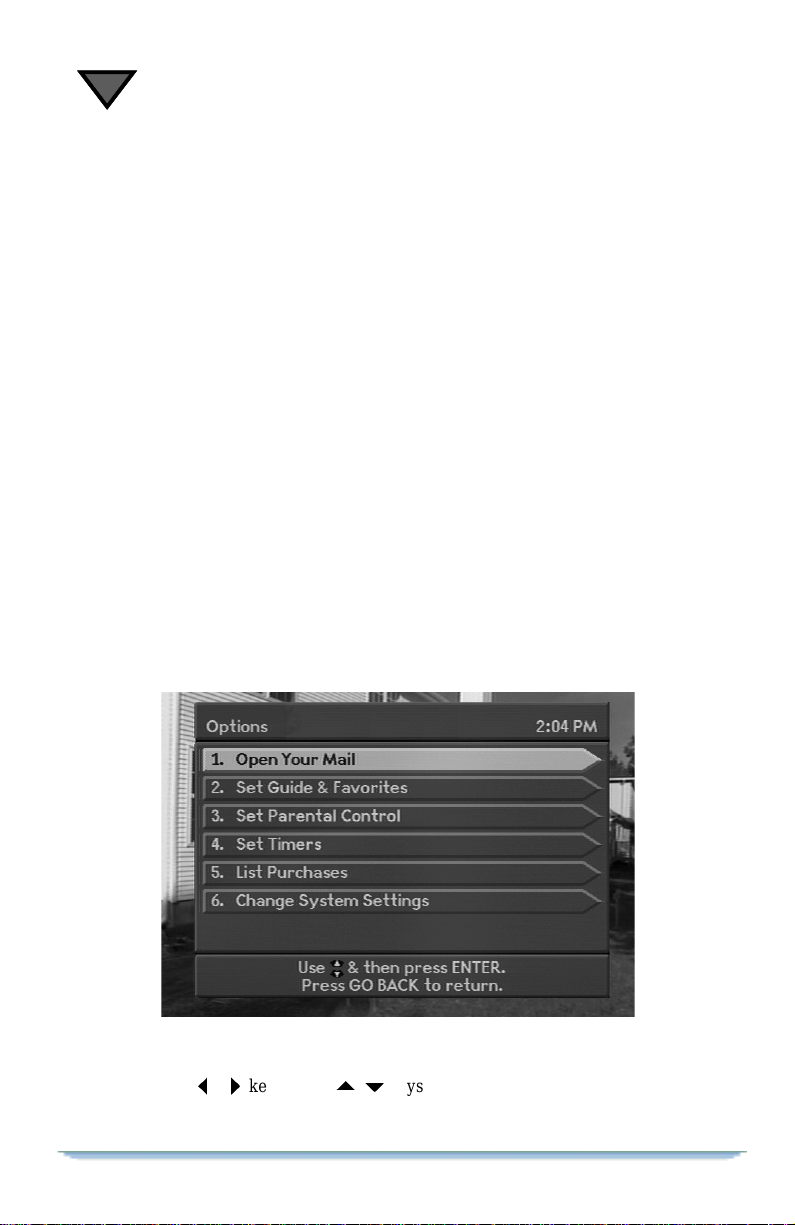
Choosing the Menu Language
To make sure that the menus are displayed in the appropriatelanguage for you,
completethe following steps:
• While your receiver is turned on, aim the remote control at the receiver and
press the OPTIONS key. The Options menu will appear.
• From the Options menu, select option6 (Change SystemSettings), and the
System Settings menu will appear.
• Select option 1 (Change Viewing and Language Settings), and the Viewing &
Language Settings menu will appear.
• Option 3 shows you the language optionsavailable for the menus. Pressthe
keys on the remote to select your language.
#$
• Once you have chosen alanguage, press the GO BACK key until youreturn to
the Options menu or press the EXIT key to exit and return to watching
programs.
DSR470 User Guide 35
Page 36

4
Authorizing Your Receiver
• Press the EXIT key on the remote control. Then pressthenumber keys for the
authorization channel.
• Press the OPTIONSkey on the remote control. The Optionsmenu will appear.
• From the Options menu, select option6 (Change System Settings),and the
System Settings menu will appear.
• Select option 4 (Check System Status), and the System Status menu will
appear. Line A shows your Unit ID number.
• Telephone the company that provides yourprogramming subscription,and ask
to authorize your unit.
• When your receiver has receivedthe authorization message, the TripCounter
on the Installation Settings menu will advance.
Completing the Receiver Connections to Your Entertainment System
YouwillneedtomakechangestoconnectyourVCR.
• Connect the top/leftTV terminal on the back panel of the receiverto the IN
terminalon the VCR. If you had already connected this cable to your TV you
must disconnect and connect it to your VCR.
• Connect the OUT terminal(s) on the VCR tothe VHF IN terminal(s) on the
TV.
36
Page 37
Installation
Connections to Audio/Video Monitor
Complete the following steps if you only plan to connect the receiver to an audio/ video monitor:
• Using standard RCA-typeaudio/video cables, connect the top/left TV
(VIDEO output)terminal on the rear panel of the receiver to the video input
terminalon themonitor (or TV using the baseband inputs).
• Using standard RCA-typeaudio/video cables, connect the two bottom/left
speaker(R and L)terminalson the back panelofthe receiverto the audio input
terminals on the monitor (or TV using the baseband inputs).
Connections to Audio/Video Monitor and VCR
Complete thefollowingstepsif you plan to connect the receiver to an audio/video monitor and VCR:
• Using standard RCA-type audio/video cables, connect the top/right TV
(VIDEO output)terminal on the rear panel of the receiver to the video input
terminalon the VCR.
• Using standard RCA-typeaudio/video cables, connect the two bottom/right
speaker icon (R and L) terminals on the Rear Panel of the receiver to the audio
input terminalson theVCR.
• Using standard RCA-typeaudio/video cables, connect the audio and video
inputs on the audio/video monitor (or TV using baseband audio/video inputs)
to the outputs on the VCR.
• If your entertainmentcenter isenabled forDolby DigitalAC-3 Version5.1 (six
channel)surround sound, connect thisport tooneend of theorange RCA cable
and the other end of the orange RCA cable to your surround sound processor.
After youcomplete the installation procedures,you may wishtouse the on-screen
menus to make adjustments to the receiver'soperation.
DSR470 User Guide 37
Page 38

4
Additional Features
Options. The Options menu provides access to all of the on-screen menus.It
appears when you press the OPTIONS key on the remote controlorwhen you
press the MENU key on the receiver followed by selectingOPTIONS from the
main Menu.
System Settings. The System Settingsmenu provides access to menus
which allow you to adjustthe operation of your system.
38
Page 39

Installation
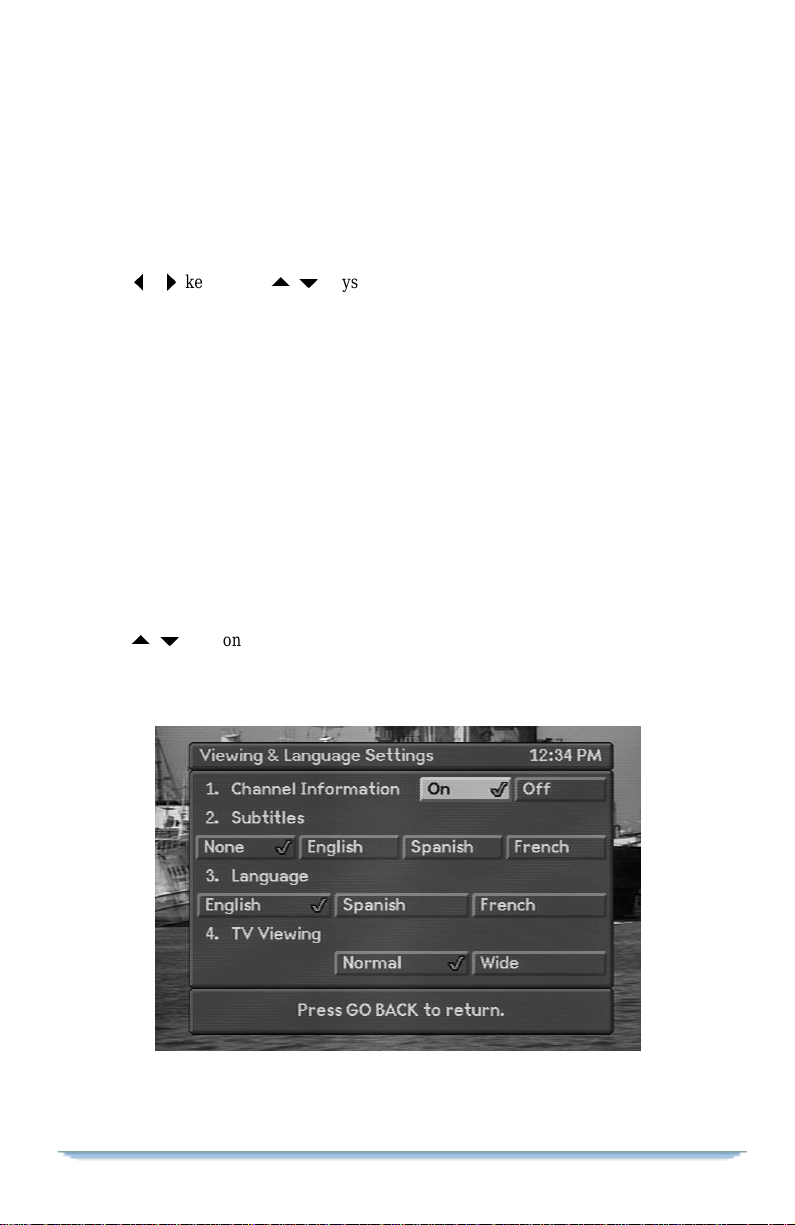
Viewing and Language Settings
The Channel Information option allows you to turn the header (top of screen) and
banner (bottom of screen) On or Off. The default setting is On.
Subtitles. The Subtitles optionallowsyou to select the language for subtitles
(if available for the particularprogram) or keep them turned off. Thedefault
setting is None.
Language. The Language option allows you to select the languageof the on-
screen menusand audioforyourprograms. The defaultsetting is English.
TV Viewing. The TV Viewing option allows you to select the size of the
viewing area. Selectthe Standard option if yourTVscreen is atypical screenwith
a 4:3 ratio of width to height. Select Widei f your TV screen is a wide screen with
a 16:9 ratio (asin HDTV’sor digital TV’s). The default setting is Standard.
DSR470 User Guide 39
Page 40

4
Audio Settings
If you are in CBL mode (digital) broadcast, three optionsappear on the Audio Settings menu.
1. Audio Connections. Selectoption 1(Audio Connections),and youwill
be able to select eitherTV or HiFi (the default is TV). Select TV if the receiver’s
AUDIO OUT port is connected to your TV. Select HiFi if it is connected to your
stereo system.
2. Digital Audio. Select option 2 and then select Mono, Stereo, Surround or
Dolby Digital (the default is Surround). The Dolby Digital selection will disable
other audio ports.
3. Cable Audio. Select Mono, Stereo or SAP (Secondary Audio Program)
for your analog cable TV programming (channelnumbers normally under 100).
The default is Stereo.
40
Page 41

Installation
Installation Settings
Channel Signal Strength.This option allows you to see the strength of
the signal your system is receiving.
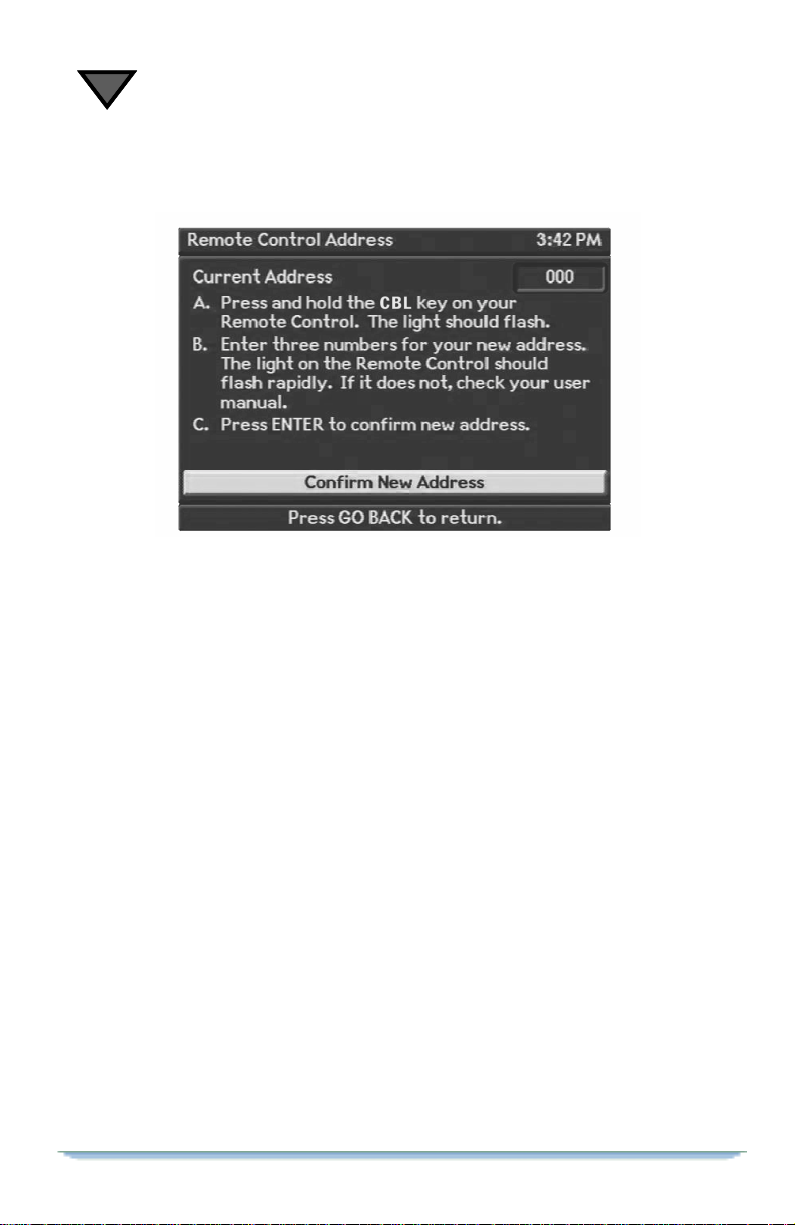
Set Remote Control Address. This option allows you to control up to
four receivers in a centralized area, with one or more remote controls. Each
receiver requires a separate address. The default address is 000.
On the front panel of your receiver, press the Menu button to bring up the Menu
screen.
• Choose Options.
• Choose option 6 (Change System Settings).
DSR470 User Guide 41
Page 42
4
• Choose option 3 (Installation Settings).
• On the InstallationSettings menu, choose option 2 (Set Remote Control
Address). Now follow the instructions on the Remote ControlAddress screen.
• If you have four receivers, you will have to change the addresses on three of
them: they will haveaddresses of 000, 001, 002, and 003.
To program your remote control for each receiver, hold down the CBL key on the
remote control until the light flashes. Once the light begins toflash, enter the
desired address.
Cable Frequency Plan. This option allows you to select the appropriate
frequencyplan for a network—Standard or HRC.
Cable Channel Plan. This option allows you to select the appropriate
frequency plan for the given network.Selection A is the EAI channel plan, and
selection B is the General Instrument/Motorola BCS channelplan.
42
Page 43

Installation
System Status
This is a view-only screen that displays information about thestatus of the receiver.
Trip Counter. Trip Counter displays the number of messageupdates from
your service provider.
Modem Status. Displays messagesthat describethecurrent modem status.
Authorization Screens
Sometimes whenyou tune to a program, an Authorization screen will appear. It
will fade to black after a short time, but if you press the VIEW key it will reappear. The Authorization screenmay appear if:
• The channel or program is locked out.
• The receiver is not authorized.
• A subscription is required.
• There is a program blackout.
• You need to insert a TVPass card.
DSR470 User Guide 43
Page 44

4
44
Page 45

5
Watching TV
Once you become accustomed to the various controls and features,youwill spend
most of your television viewing time enjoying the programs made available
throughthe receiver.The features described in this section will be available to you
when the remote control is set to CBL mode— in other words, when you have
pressed the CBL key and are viewing various programs.
How to Select Menu Options
As you use the many menus, you will be asked to select variousoptions. When
you see the word select, it is important that you understand what to do—whether
you use the remote controlorthe keys on the FrontPanelof the receiver:
If you use the remotecontrol,there are two ways to select a menu option:
1. Press the
ENTER key to select it.
2. If the options are numbered,simply press the number key foran option. Youdo
not have to press the ENTER key.
If you use the Front Panel of the receiver, there is only one way to selecta menu
option. Press the
press the ENTER key to select the highlighted option.
!"
keys or theLkeys to highlightan option. Then press the
!"
keys or theLkeys to first highlight an option. Then
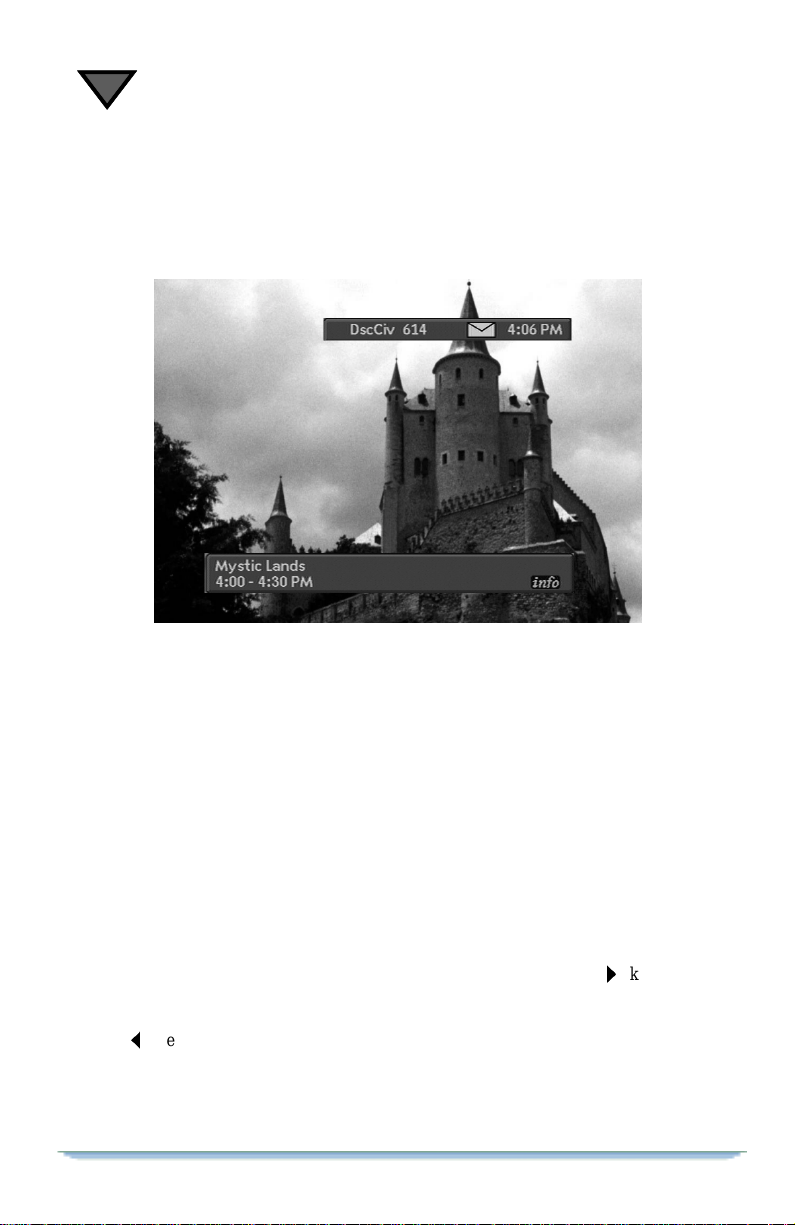
Headers
Your viewing screen displays a variety of information about the programs you are
viewing or plan to view. When you tune in a channel, a header appears at the top
of the screen. It displaysthefollowing information from left to right:
• Interests—Until you identify your viewinginterests(covered later in this User
Guide), nothing appears on the left side of the header. After you select an
interest such as Movies,Sports, Pay-Per-View, or Music/Radio, thename of
DSR470 User Guide 45
Page 46
5
the interest you have selected will appear on the left side of the header.
• Channel name—NBC-W, BRAVO, HISTORY, etc.
• Channel number—A number from1 to 999.
• Message—An envelope icon appears if a message is waiting for you.
• Time—The current time automaticallyappears on the right side of the header.
Banners
Program banners appear at the bottom of the screen:
On Now banner—When you tune in a channel, this bannerdisplays the current
program title,start and end times, and rating icon. Press EXITto remove the
banner.
While you are viewing a channel, if you press the FUTURE key,t he Browse
Banner displaysthenext program’s title, start and end times, and ratings icon.
Press EXIT to remove the banner.
Info Banner
To obtain detailed information about the current program, press the INFO key.
To obtain detailed program information about the nextprogram on a selected
channel,presstheINFO key and then press the FUTURE key or the
the On Next banner is already displayed at the bottom of your screen, just press
the INFO key to display more detailed information about the next program. Press
the
keytoreturntotheinformationdisplayforthecurrentprogram.
!
46
"
key. If
Page 47
Watching TV
Browse Banner
Browse is used to view current program information while viewing a program.
Browse is also used to view information for channelsand times other than the
currentchannel and time.Press GO BACK to return to watching a program. Press
ENTER to change channelsto theprogram located intheBrowse banner or set
timers for future programs.
• Press GO BACK to return to watching a program.
• Press FUTURE to go to a different dayand/ort ime.
•Pressthe
•Pressthe
• Press ENTER to changechannels to theprogram located in theBrowse banner.
• While in Browse, press the INFO key to obtain more detailed information
about the program displayed.
keys to scroll through the channels.
L
keys to scroll through the next or previous program.
!"
Authorization Screens
Sometimes whenyou tune to a program, an Authorization screen will appear. It
will fade to black after a short time, it will reappear when:
• The channel or program is locked out because of your parental control setting,
which requires you to enter a password. (If you have not set a password, just
press the ENTER key.)
• The receiver is not authorized.
• A subscription is required to receivethe program.
• There is a program blackout in your area.
DSR470 User Guide 47
Page 48

5
• There is a technical problem.
• You need to insert a TVPass
TVPass card.
®
card, or there are problems with your current
48
Page 49

6
Interactive Program
Guide (IPG)
The Interactive Program Guide(IPG)provides accessto currentand future
program information while you watchTV. It displays a 90-minute block of
scheduled programs, and can be used as a starting point for purchasing IPPV
programs andsettings timers.
How to Display the Guide
• Press the GUIDE key once. (displays 6 channels at once).
• Press the GUIDE key a second time or press the EXIT key to return to
watching TV programs.
• Press the GO BACK key to return to the menu last viewed (or returnto
watching TV).
DSR470 User Guide 49
Page 50

6
How to Use the Guide
•PresstheLkeys to display different channels.
•Pressthe
• Enter a particular channel number to display that channelat the top of the
screen.
• Press the ENTER key to tune to a current program that is highlighted. If you
press the ENTER key on a future program,a detailed program information
banner appears (discussed later in this section).
• Press the INFO key to display more detailedinformation.
• Press the CHANNEL + and – k eys to page up and down t hrough the Guide.
keys to scroll backward and forward by half-hourincrements.
!"
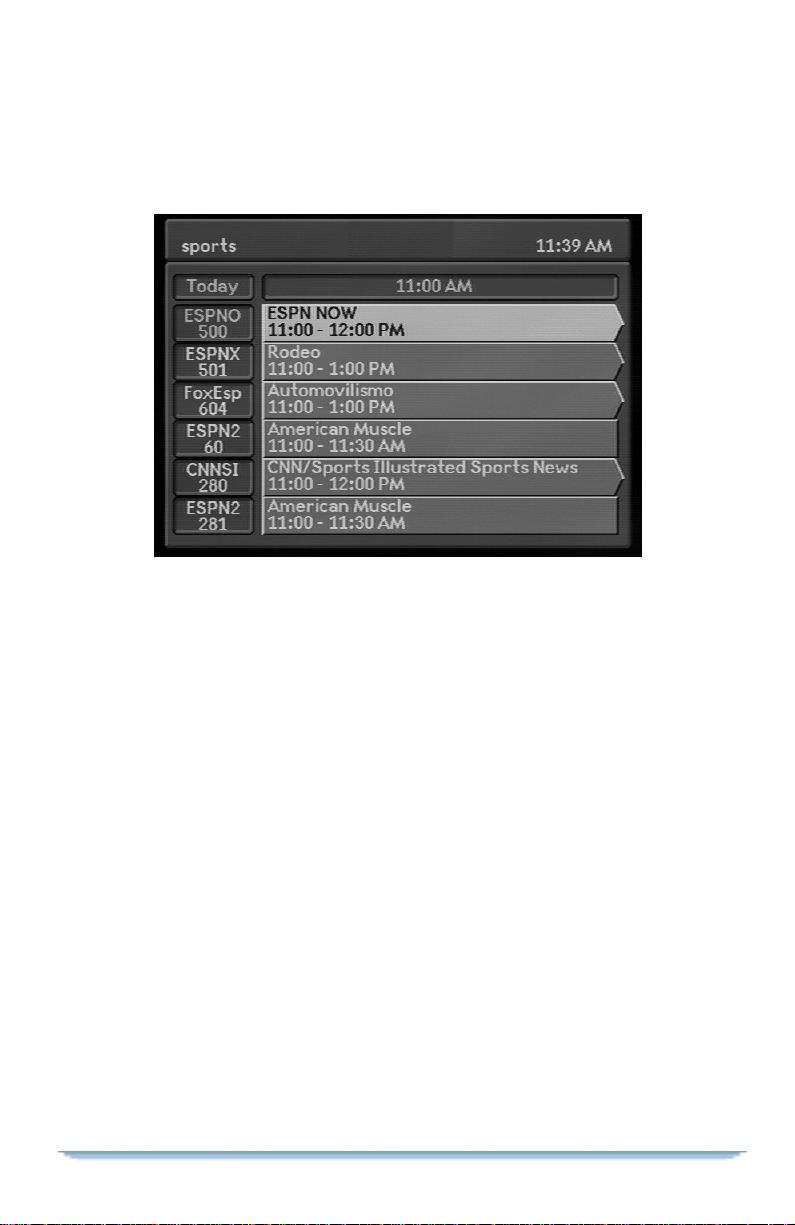
Guide Screen
The header (top of screen) displays thecurrent Interests menu setting (sports,
movies, etc.)on the leftsideandthetime on the right. The line below the header
displays the day of the program information being viewed. The rest of the screen
displaysthe channel names and numbers on the leftand the program names on the
right. The Guidescreen displays6 programs at a time.
How to Display a Future D a y and Time on the Guide
You can always scroll ahead with the Guide, but if you want to immediately look
at program offerings for anotherdayora specific time, you can jump ahead
without scrolling. To jump to a specific day and time:
• Display the Options menu (press the OPTIONS key on the remote control).
• Select option 2 (Guide & Favorites).The Guide & Favorites menu appears.
• Select option 1 (Set a Future Day & Time for the Guide). A Choose Day menu
appears.
• Select whichday of the Guide youwould like todisplay.A Choose Time menu
will appear.
• Select the time of day for the Guide programming you would like to view.
Short Cut: Press the FUTURE key after pressing GUIDE. You can go directly
to the Choose Day menu.
Press the GUIDE key. The Guide will return to displaying the current day and
time. If you press the GO BACK key, you will return to the previous screen or the
program you were watching.
50
Page 51
Interactive ProgramGuide (IPG)
How to View the Guide by Interests
You can also focus the Guide display to a list of your favorite channels or to
special programming interests (such as Sports or Movies). To selectan interest:
• Press the INTERESTS key. The Interests menu will appear.
• Highlight one of the listed choicesand presstheENTER key.
• The Guide will appear and display only programs that pertain to the interest
(such asSports) that youhave selected.For example, ifyouhave selecteda list
of favorite channels (Favorites A, B, C or D), the Guide will display only the
list of favorite channels you have selected. (Refer to the section entitled
"Setting Favorite Channels"toselect the channels you wantto include in your
Favorites list.)
• Future interest programming by day and time can be viewed by pressing the
FUTURE key on the remote while in GUIDE.
Detailed Program Information
Press the INFO key to displaya programinformation banner that hasa detailed
description of the program, ratings, purchasing information, and information
icons.
Setting a Timer for a Future Program
Using the Guide, you can set a timer to automatically display aprogram at a future
time and date. If you are viewinga programming listfora futuredate or time on
the Guide, press the ENTER key or the INFO key while a program is highlighted
to display the detailed program information banner. This banner includes a Timer
button. Selectt he Timer buttonby pressing the ENTER key to display a Confirm
DSR470 User Guide 51
Page 52

6
Timer screen. Confirm the Timer by pressing the ENTER key again. You will
return tothe Guide and a Timer icon will appear in the lower right cornerof the
programcell. PressINFOagainorpress the GOBACK key toturn offthe detailed
information and return to the Guide.Moreinformationon timers is in the section
entitled, "Options: Setting Timers."
52
Page 53

7
Interests and Favorites
You have the choice to scan every channel when you "channelsurf." But to help
you locate channels and shows of specific interest to you, the receiver has an
Interests menu that helps focusyourchannel surfing.
• By using the Interests menu, you can quickly locate programs according to a
particular theme such as Movies, Pay-Per-View, Sports, Music/Radio, News/
Educaton or Network Series.
• You can also surfthrough four listsoffavorite channels(FavoritesA, B, C and
D) and surf only the channels on these lists.
How to Display and Use the Interests Menu
• Press the INTERESTS key on the remote control. The Interests menu appears.
• To select an interest (for example, All Programs, FavoritesA,B,C, D or
Network Series, News/Education, Movies, Sports, Pay-Per-View, or Music/
Radio), highlight one of these options and press the ENTER key. The Guide
will appear and display channels or programsthatpertain to the interest you
have selected. Remember that once you have selected one of the options (or
interests) from the Interests menu:
A. The information you see in the Guide will be limited to programmingthat
matches the interest you have selected. If there is no programmingwhich
matches the interest, a message will appear notifying you of this.
B. You will notice that whileyou are watching a program or channel, the left
side of the header will display the interestyou selected. If there is no
programming matchingtheselected interest, a messagewill appear notifying
you of this.
• Press the INTERESTS key again to display the Interests menu and change
your selection.
DSR470 User Guide 53
Page 54

7
1. All Programs. Each time you turn on the receiver, it automatically
returnsto the All Programs setting.Whenthis option is selected, you will be able
to scan for all programs whilechannel surfingor when you are usingtheGuide.
2. Favorites A, B, C, D. IfyouselectFavoritesA,B, C or D, you willbe
able to limit your channels urfing and the Guide information listings to channels
that are listedin theFavorites A, B, C or D lists. If you have notyetm ade a list of
favoritechannels, a messagewillinstruct you to do so.
3. Movies. If you select this interest, you will be able to channel surf
exclusively for movies.
4. News/Education. If you selectthis interest, you will be able tochannel
surf exclusively for news/education programs.
5. Sports. If you select this interest, you will be able to channel surf
exclusively for sports programs.
6. Music. If you select this interest, you will be able to channel surf
exclusively for music/radio programs.
7. Network Series. If you select this interest, you will be able to channel
surf exclusively for network series programs.
8. Pay-Per-View. Ifyouselect thisinterest,you will be ableto channel surf
exclusively for Pay-Per-Viw (PPV) programs.
54
Page 55

8
Pay-Per-View Events
Purchasing Instant Pay-Per-View (IPPV) Events
With the DSR470digital receiver, you have opportunities to purchasePay-PerView hit movies, concerts, live sportingevents, or adult entertainment in CBL
mode. You can make a purchasein two ways: (1) telephone ahead to the service
providerto purchase a Pay-Per-View (PPV) program, or (2) use the Instant PayPer-View (IPPV)screens to purchase a programthrough your receiver. This
section explains how to purchase IPPV events.The prices shown in these
examples are purely for demonstration. Your receiver must be connectedtoa
telephone jack for IPPVto operate.
DSR470 User Guide 55
Page 56
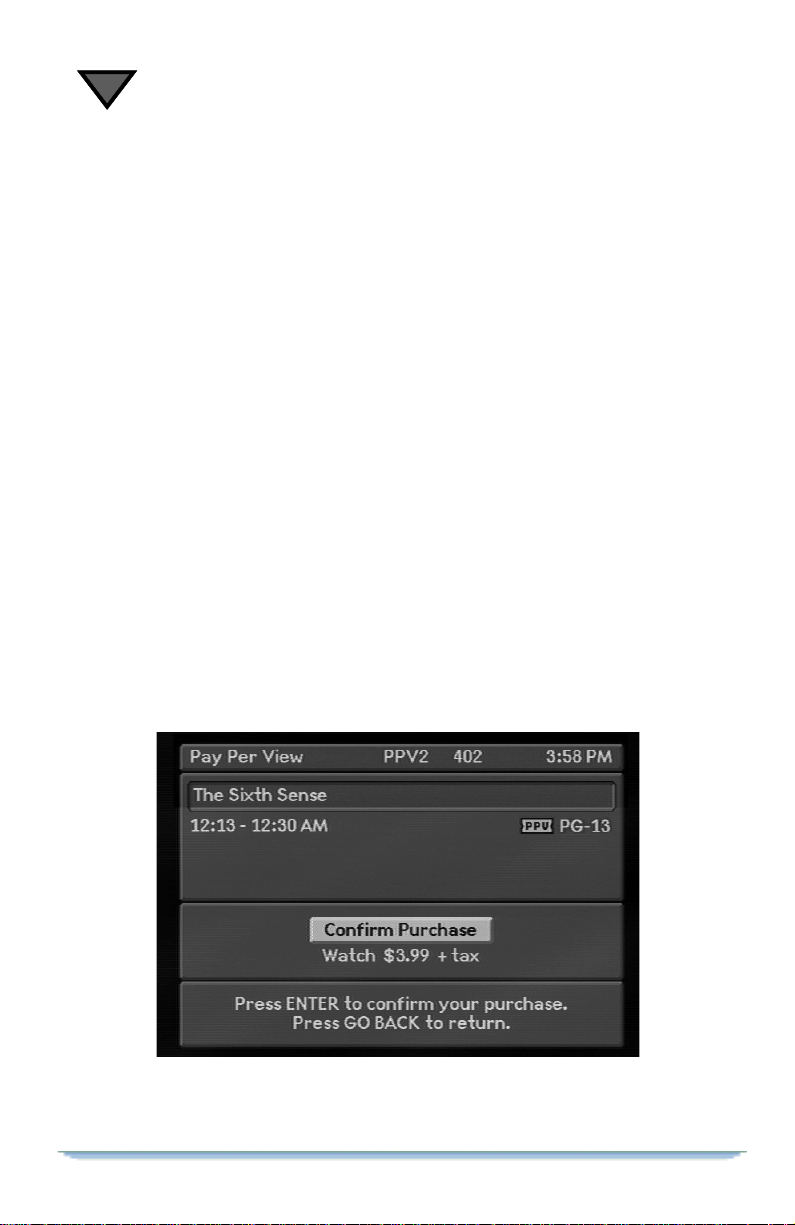
8
HowtoPurchaseanIPPVEvent
• Tune to a channel that displays IPPV programs.
• Follow the instructions on the Purchase menu.
Free Preview Period. There is a free preview period at the beginning of
an IPPV event when you can watch the program without purchasingit.You can
purchase a program or cancel your purchase anytime during the free preview
period.
Passwords. You may be asked to enter your passwordbefore you can view
the program. If you forget your password or the system does notaccept it, you
may have to call your service provider for assistance.
Videotaping Options. You maybe unabletovideotapesomeprograms, or
you may have the option of paying a higher price for the opportunity to tape the
program on your VCR.
Purchase Screen
There are a variety of purchase screens,butmost of themhave the following elements:
• The header (top of screen)willhave the screen name, viewing interest (if one
is selected),channel name, channel number, an envelope (if you have an
unread message), and the time.
• If the program is within the free preview period,videowill appear in the
middle of thescreen.
• The screen will display the programname, the start and end times, icons,
ratings, and the price ofthe program.
56
Page 57

Pay-Per-ViewEvents
• There will be a purchase button, instructions to press the ENTER key, or
instructionsto callthe program provider.
• Follow any additionalinstructions.Forexample, you may need to enter a
password,or you may be unable to purchase a program for another reason.
• Aconfirmationscreenwillappearsothatyoucanverifyyourpurchase.You
may be asked to entera password and press theENTER key.
How to Cancel a Purchase
You may only cancel a purchased program (thathas beenconfirmed) duringthe free preview period.
• Press the FUTURE key. A cancel screenwillappear.Press the ENTER key to
cancel the purchase.
• You may also cancel a program by changingthe channelduring the free
preview period.
Purchase the Next Program
You will be unable to purchasea program if you miss a significant portionofit,
but you may be able to purchase the next program.After you purchase the next
program,a countdown timer displays how much timeremains before theprogram
begins.
Purchase a Future Program
You can pre-purchaseaprogram thatstarts hoursordays ahead by usingtimers as
explained in the section entitled "Options: Setting Timers".
Changes in P urchase O ptions
If aprogramproviderchangesthe purchase optionsafter youhavepre-purchaseda
program using a timer, and ifthechange affects yourpurchase, yourpurchase will
be canceled, and you must buy the program again.
DSR470 User Guide 57
Page 58

8
How to Purchase a ProgramWhile Viewing an IPPV Program
To purchase an IPPV program while you are viewing another IPPV program:
• Press the GUIDE key to display the GUI DE screen.
• Select the program you wish to purchase. If the selected show is currently on,
the channel will switch to the selected program.
• Press the ENTER key, anda miniature Confirm Purchasescreen will appear.
Press the ENTER key to confirm your purchase.
How to Display Your Purchase History
The List Purchasesoption allows you to review a list of previously purchased IPPV programs.
• Display the Options menu (press the OPTIONS key on the remote control).
• Select option 5 (List Purchases). The Purchases menu will display a list of
purchases.Ifit displays more than two programs, press the
through them. Press the GO BACK key to exit this menu.
keys to scroll
L
PurchaseList
This list shows the date,time, cost, and name of each purchased program. The
most recentpurchase is at the top of the list. If you wish to display previous
purchases, press the
that the purchase was reported to the service provider.
keys to scroll through the list. A telephone icon indicates
L
Account Status
If you are qualified to make IPPV purchases, the Account Status option will
display the word "Active". If the word "Inactive" appears, youcannotpurchase
58
Page 59

Pay-Per-ViewEvents
IPPV programs.You will need to call your service provider to discuss your
account if it is "Inactive".
Credit Message
Below the Account Status is a message that explainsyourcredit status.
DSR470 User Guide 59
Page 60

8
60
Page 61
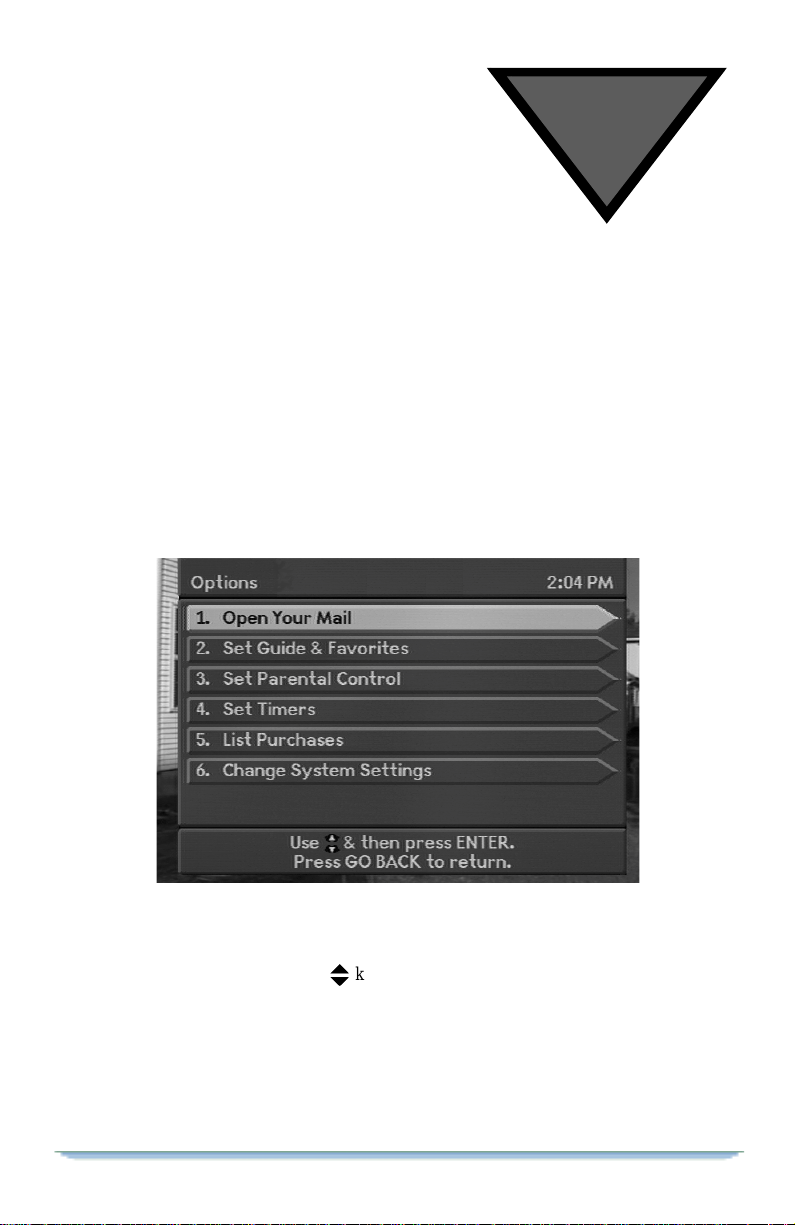
9
Options
How to Display and Use the Options Menu
The Options menu is your doorway to a series of menu screensthatallow you to
set up various features forprogramviewing.Thereis one procedurefor displaying
the Options menu if you are using theremote control,and thereisanother if you
are using the keys on the Front Panel of the receiver.
If you are using the remote control, press the OPTIONS key. The Options menu will appear.
If you are using the front panelof the receiver,press the MENU key.When the
Menu screen appears, press the
ENTER key.TheOptions menu will appear.
The following list will give you a broad overview of the menu options and the featuresthey control.
DSR470 User Guide 61
keys to highlightOptions, and then press the
L
Page 62

9
1. Open Your Mail. This option lets you read personal, programming, or
promotional messages. Look for the envelope icon on your viewing screen.
2. Set Guide & Favorites. This option allows you to select a future day
and time for viewing IPG listings. It also allows you to create a list of favorite
channels that can be used for selective channelsurfing and to limit the programs
displayedon the IPG to a particulargroup.
3. Set Parental Control (and Passwords). Parental Control
featuresand passwords allowyou to controltheprograms, channels, and subject
matterthatcan be viewed with your receiver.
4. Set Timers. This option allows you to set a timer to view (or record) a
program at a future time and day up to one year in advance.
5. List Purchases. This list shows the date, time, cost, and name of each
purchased program.
6. Change System Settings. There are a variety of topics available
throughthis menu option includinglanguage,audio, installationandsystem status
settings. The Sleep Timeris also located under this option.
62
Page 63

Options
Opening Your Mail
Your receiver is able to display a varietyof messages that are sent to it. Some
messages will bedisplayed on your screen as soon as they arrive, but others are
storedin your mailbox foryouto retrieve.I f a message iswaitingin your mailbox,
the envelope icon willappear on your screen headerwhileyou are watching a
program. This feature appliesto viewingin CBL mode only.
How to Display the MailboxMenu
• Press the OPTIONSkey to display the Options Menu.
• Select option 1 (Open Your Mail). The Mailbox menu appears.
Mailbox Menu
The Mailbox menu displaysa listof numbered message titles, each with a date. If
you wish to read the entire contents of a message, select the message(while the
message is highlighted, press the ENTER key), and a messagescreen will appear
within the Mailbox menu.
Mailbox Message Screen
The Message screencontains the complete message. Once you read the message
andwishtoeraseit,presseithertheENTERkeyortheGOBACKkey.AnErase
Message prompt screen will appear.Somemessages will be automaticallyerased
DSR470 User Guide 63
Page 64

9
after you read them. Such messages will have the following statement in the
instructionsatthe bottom of thescreen: "This message willerase after beingread."
Erase or Keep Message Screen
When the Erase Message prompt screen appears within the Mailbox menu, it
allows you to select from two options.
• Select Erase Messagetoerasethe message and return to the Message List
menu.
• Select Keep Message to save the message and return to the Message List
menu.
Setting a Future Day and Time for the Guide
If youwantto immediatelylook at programofferingsin the IPG foranotherdayor a specifictime:
• Display the Options menu (press the OPTIONS key on the remote control).
• Select option 2 (Guide & Favorites).The Guide & Favorites menu appears.
• Selectoption1(SetaFutureDay&TimefortheGuide).AchooseDaymenu
appears.
• Select whichday of the Guide youwould like todisplay.A Choose Time menu
will appear.
• Select the time of day for the Guide programming you would like to view.
Refer to the section entitled "Guide (IPG)" for moreinformationaboutusing the
IPG.
64
Page 65

Options
Setting Favorite Channels
With this option, you can create a list of favorite channels using the Favorite
Channels menu. Onceyou createthis list you will be able to focus your channel
surfing andfindprograms more quickly.
How to Display the Favorite Channels Menu
• Display the Options menu.
• Select option 2 (Set Guide & Favorites). The Guide and Favorites menu
appears.
• Select option 2 (Set FavoriteChannels). The Favorite Channels menu appears.
Favorite Channels Menu
The Favorite Channels menu allows you to assign channelstoeachof four lists
(refer to thesection entitled, "Viewing Interestsand Favorites").The Favorite
Channels menu displaysoptions to set Favorite Channels A, B, C, or D. Press the
keys and press ENTER or use the number keys to select which Favorite
L
Channels list you would liketo modify. When you select one of these options the
correspondingFavoritesscreenwill appear, i.e. FavoritesA. Each oft he Favorites
menus displays a list showing the name of the channel and the channel number
with corresponding buttons running down the right side of the screen.
To assign a channel to the Favorites A, B, C or D list:
•PresstheLkeys to scroll through the list of channels.
•Pressthe
DSR470 User Guide 65
keys to highlightthebox to which you will assign the
!"
Page 66

9
channel.
• Press the ENTER key. A check mark will appear in the box you select. Press
theENTERkeyagainifyouwishtoremovethecheckmark.
• Press GO BACK to return to the Favorite Channels menu.
• Repeat this process to create each Favoriteslist.
• Press EXIT to return to view programming.
Setting Parental Controls & Passwords
The Parental Control menu enables you to set passwords, lock out certain
channels, and lock out certain programs based on their rating or specific content.
This applies to programswhich have a U.S. content rating.
How to Display the Parental Control Menu
• Display the Options menu.
• Select option 3 (Set Parental Control). If a password has already been
programmed,youwillbe asked to enter your password beforeyou can have
access to the Parental Control menu.
66
Page 67
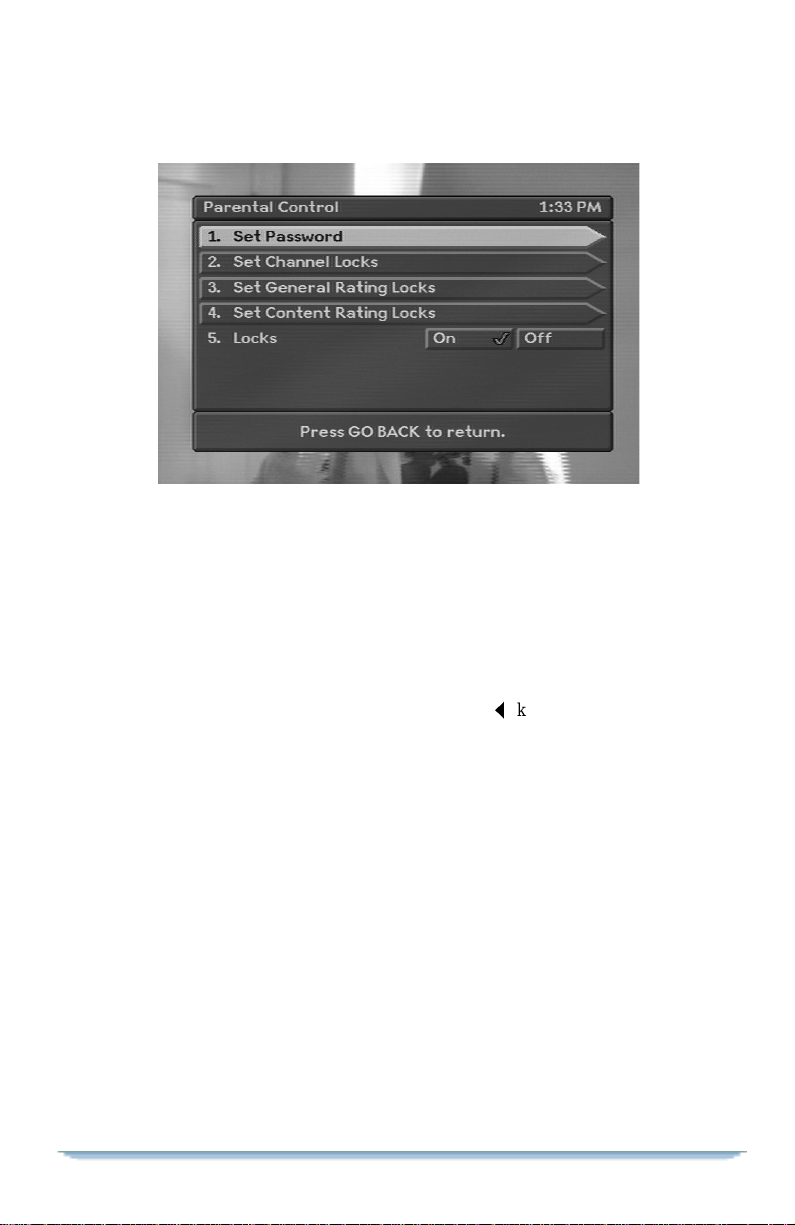
Options
Parental Control Menu Options
1. Set Password. TheSetPassword option allows you to set a parental
control password that preventsothers from viewing certain channels and
programs.It also prevents them from purchasing IPPV programs.
• From the Parental Control menu, select option 1 (Set Password). TheNew
Passwordscreen appears.
• Usethenumberkeystoenterapasswordofupto8numbers.Anasterisk(*)
will appear each time you add a number. Press the
and change a number. When you are finished, press the ENTER key. The
Confirm Password screen appears.
• Re-enter your passwordnumbers and press the ENTER key. The Password
Changedscreen appears, lettingyouknow that yourpassword isnoweffective.
key to move to the left
!
DSR470 User Guide 67
Page 68
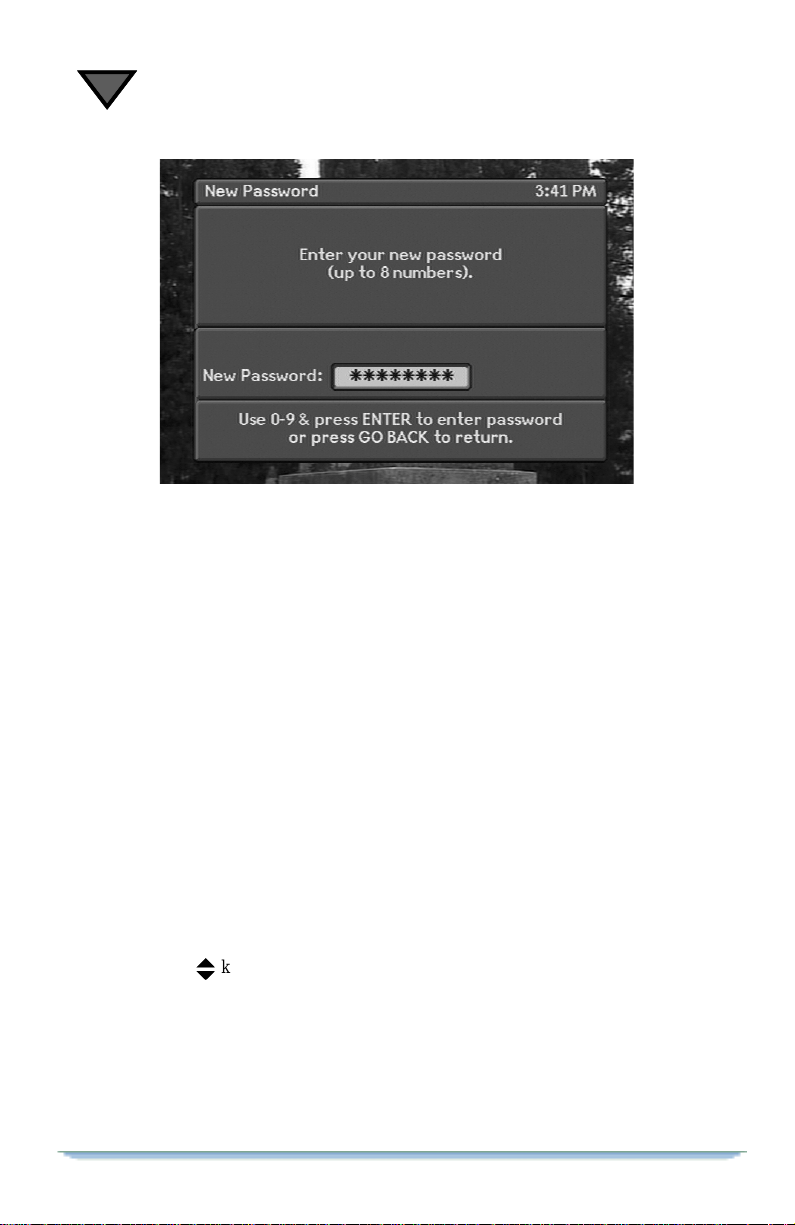
9
Press the GO BACK key to return to the Parental Controlmenu.
To Set a New Password. Ifyouwish to change your password in the
future,you must first enter your currentpassword to gain access to the Parental
Control menu. From the Parental Control menu, select option 1 (Set Password).
The New Password screen appears. Keyinanew password,and press the ENTER
key. When the Confirm Passwordscreen appears, re-enterthe new password. A
Password Changed screen will confirm that your passwordhas been changed.
To Clear Your Password. If you wish toclear your password so that no
passwords are required to purchase Pay-Per-View programs or view locked-out
channelsor programs, you mustfirst enteryour current passwordto gain access to
the ParentalControl menu. From the Parental Control menu, select option1 (Set
Password). The New Password screen appears.Press the ENTER key without
keying in any numbers.When the Confirm Password screen appears, press the
ENTER key again without keyingin any numbers. A Password Changed screen
will confirm that your password has been cleared.
2. Set Channel Locks. The Set Channel Locks option allows you to lock
out specificchannels from viewing.Once a channelis locked out, you must use
the parentalcontrol password to view programs on the locked out channel.
• Select option 2 (Set Channel Locks). The Channel Locks menu appears. The
Channel Locks menu displays a list of channel names, numbers, and buttons.
Press the
• Select a highlighted channel (press the ENTER key) to lock it out. A lock
appearsonthe button. To removealock, select a channel that isalreadylocked
(press theENTER key when it is highlighted).
• Press the GO BACK key to exit this menu. Changes are saved automatically
each time you set a lock.
68
keys to scroll up and down the list of names.
L
Page 69

Options
• When you are channel surfing,thereceiver will skip lockedout channels. If
you try to directly enter the channel number of the locked-out channel while
channel surfing, the followingmessage will appear:"This channel has been
locked".
3. Set General Rating Locks. The Set General Rating Locks option
allows you to lockout programs based on theirgeneral rating—PG, R, NC-17, X,
etc. Once you set a general rating limit, you must use the parental control
password toview programs with that rating or a higher rating.
• Select option 3 (Set GeneralRating Locks). TheGeneral RatingLocks menu
appears.
• If you highlight one of the rating boxes on the left side of the menu, a
description of that rating will appear.
• Select a rating to lock out programs matching that rating.All higherratings
will alsobeautomatically lockedout. A closedlock symbol will appear. If you
select a locked rating, it will be unlocked.
• You may also select No Locks to permit access.
4. Set ContentRating Locks. The Set Content Rating Locks option
allows you tolockout digital programs basedon their specific content—violence,
sexual material, or offensive language—regardlessof theirgeneral rating.Once
you set a content rating lock, you must use the parental control password to view
programs that possess the locked-outcontent. This applies to programs which
have a content rating.
• Select option 4 (Set Content Rating Locks).The Content Rating Locks menu
appears.
• Listed under each category (Violence, Sexual Material, or Language) are four
boxes. For example,under the Violencecategory are: No Locks, GV (graphic
DSR470 User Guide 69
Page 70

9
violence),V (violence), and (MV) mild violence. If you highlightone of the
boxes, a full description of the category will appear.
• Select a rating to lock out programs with thatrating. All higher ratings will be
automatically lockedout, and a Closed Lock icon will appear.If you select a
locked rating,itwillbe unlocked.
• You may also select No Locks for each category.
5. Locks. The Locks optionallowsyouto turnoffallof the channel and
programlocks sothatyou can view allofthe locked out channels andprograms. If
you set any new locks after Locks is set to Off, the Locks optionautomatically resets itself to On. Each time you press the POWER key to turn on the receiver, the
Locks option resets itself to On.
Setting Timers
With timers, you can schedule your viewing up to one year in advance—whether
you want to schedule one-time-only events or daily programs. Once you haveset
the timer, the receiver will automatically tune to the channel when the program
begins. You can change, erase, and review thetimers whenever you wish. Make
sure to set your VCR if you wish to make a tape since the receiverwill not
automaticallyprogram your VCR to tape an event.
Sleep Timer. Sometimes when you are watching a program in CBL mode,
you will wanttoautomatically turn off the picture and sound because you plan to
fall asleepafter a certain amount of time.
To set the sleep timer:
• Display the Options menu (press the OPTIONS key on the remote control).
70
Page 71
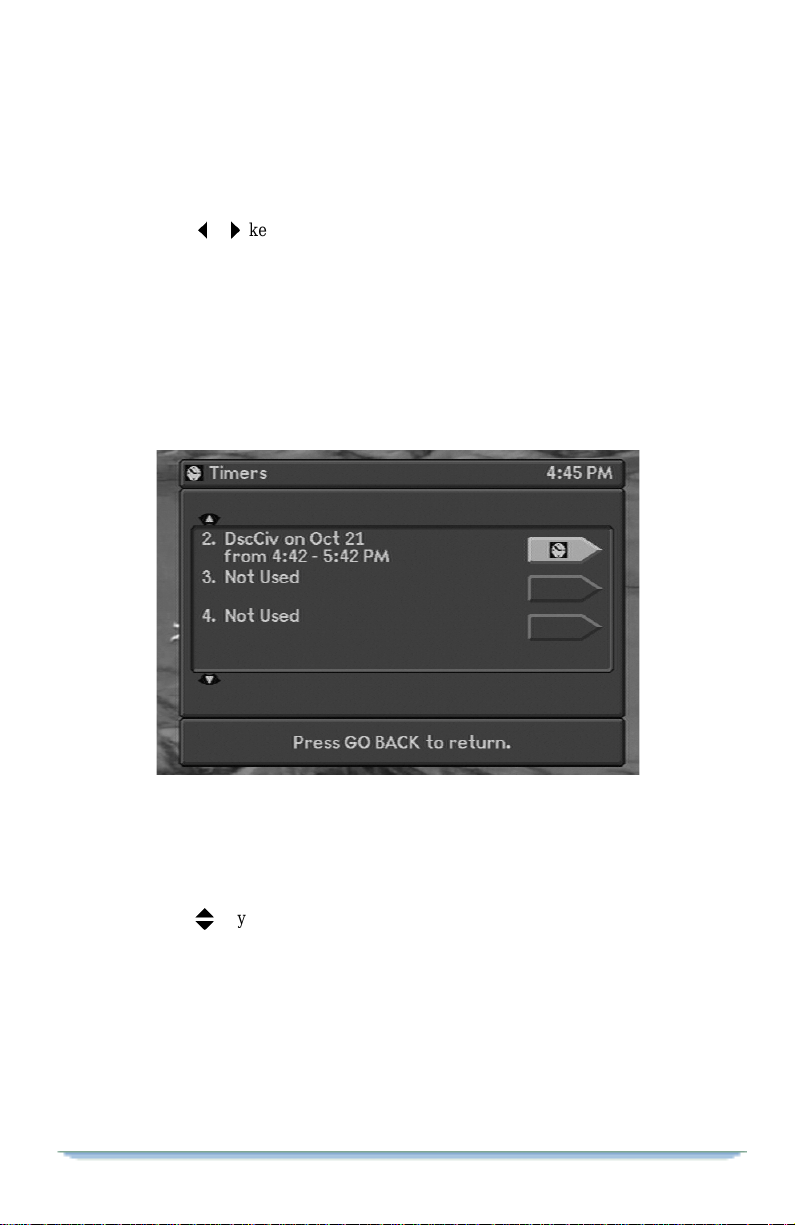
Options
• Select option 6 (ChangeSystem Settings),and the System Settingsmenu
appears.
• Selectoption5(SleepTimer)tohighlightit.
•Pressthe
program until the sleep timer shuts off the picture and sound (shown in hours
and minutes).The maximum time limit is 3 hours.
NOTE: Any time that a sleep timer is set, the LOCKS option re-sets itself to On.
See "SettingParental Controls & Passwords."
keys to set the amount of time you wish to watch and hear a
!"
How to Display the Timers Menu
• Display the Options menu.
• Select option4 (Set Timers),and the Timersm enu appears.
How to Use the Timers Menu
The Timers menu has up to 25 timer listings. Each listing that has already been set
includes the program name, the day and timeit begins, and icons for parental
controlsand IPPV programs.
•Pressthe
• If you select a Not Used listing, a Set Timer menu will appear.
• If you selecta listing that hasalready beenset,the Change Timer/EraseTimers
prompt screen willappear.
DSR470 User Guide 71
keys to scroll up and down the listings.
L
Page 72

9
Change Timer/Erase Timer Prompt Screen
The Change Timer/Erase Timer prompt screen has two options:
• If you select the Change Timer option, the Set timermenu willappear so that
you can change the timer settings.
• If you select Erase Timer, The Timers menu will reappear, and the listingwill
be changed to Not Used.
A clock icon appears on the right sideof the arrow-shaped box if the timer is set
but the program has not yet begun.
Maximum Number of Timers
The maximum number of timers is twenty-five (25). If all of the timers have been
used you will have to erase an existingtimer before a new timer can be set.
Beforea Timer Executes
Two minutesbefore a timer executes, the Front PanelTimer light will blink, and a
countdown screen will appear. You may either: (1) press the GO BACK key to
remove the countdownscreen, (2) press the ENTER key to return to the Timers
menu so that you can erase the timer, or (3) wait untilthetimer executes.
HowtoUsetheSetTimerMenu
If you selected a Not Used listing in the Timers menu,theSet Timermenu
appears. The Set Timer menu allows you to select the frequency for the timer, the
date, the beginning and ending times for the program, and the channel.
72
Page 73
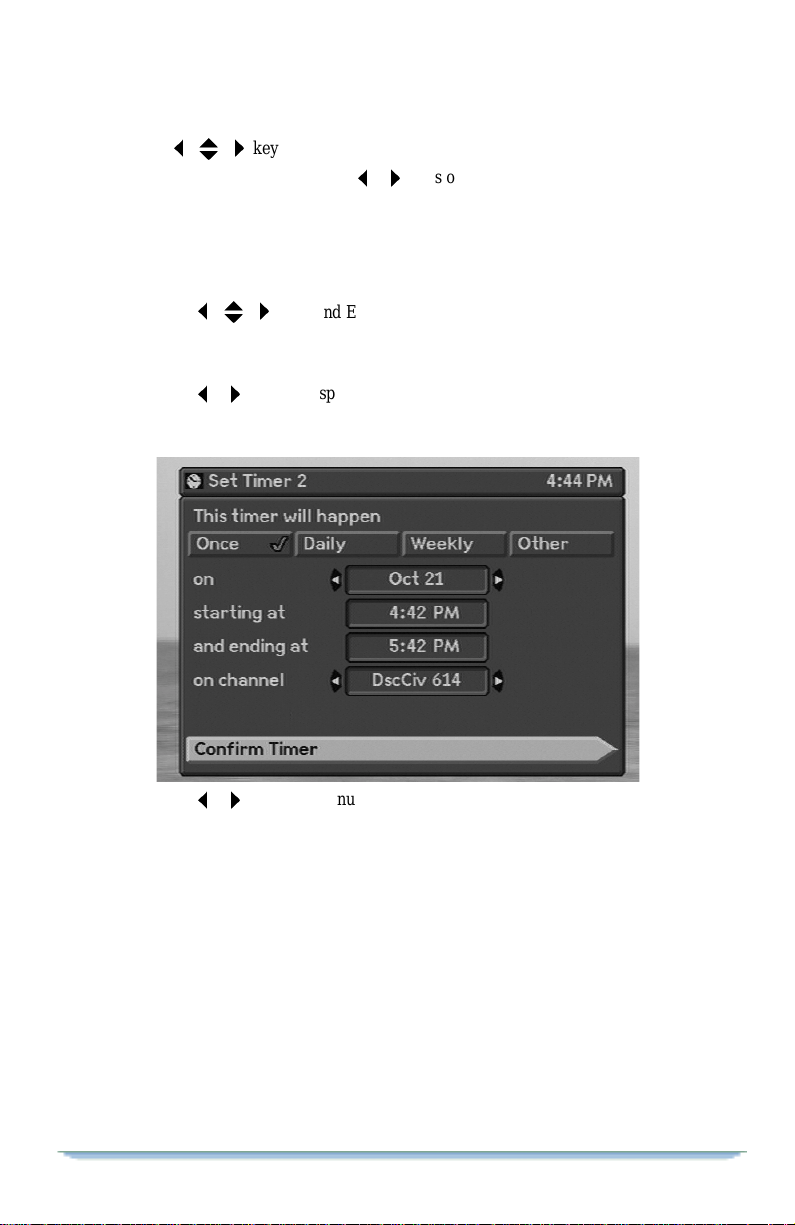
Options
Press the
To set each option, press eitherthe
When you are finished setting all of the timer options, selectthe Confirm Timer
arrow to displaythe Confirm Timer menu.
!L"
keys to highlightthevarious options.
keys or the number keys as indicated.
!"
How to Set EachTimer Option
•Pressthe
frequency (for example,a weeklyor dailyprogram).
• If Daily, Weekly or Other is selected, differentscreens will appear.
•Pressthe
• Press the number keys to set the time.A timermustbe atleast5 minutes long
to activate.
!L"
!"
keys and ENTER to display the day of the the program’s
keys to display the date.
•Pressthe
keys, or the number keys to indicate the channel number.
!"
Setting a Timer for Next Year
If you set the timer for a month and day that have already passed in the current
year, the receiver willconsider the setting to be for the next year on that date. For
example, if it is December and you set a timer for February, your timer will
execute in February of the coming new year.
If You Press the GO BACK Key
If you press the Go BACK key from the Set Timer menu, a message screen will
appear. It will instruct you to do either one of the following:
• Cancel your changes by pressingthe ENTER key.
DSR470 User Guide 73
Page 74

9
• PresstheGOBACKkeyagaintoreturntotheSetTimermenu.
How to Use the Confirm Timer Menu
The top portion of the Confirm Timer menu displays timer information followed
by up to four options (the IPPV option does not appear if the program is not a
subscription program). Some programs may be scheduledtoo far in advance to
immediately determine this information.
1. Selectoption 1 (ConfirmTimerandLeave) to completeyour settingsfrom the
Set Timer menu and to returnto the Timers menu to complete additional settings.
Select thisoption only after you make sure the other options on this screen are
correct.
2. Selectoption 2 (Change Timer) to return to the Set Timer menu and change
the Timer option settings.
3. Option 3 (ApprovePurchase) allows you to pre-purchase a programbefore
viewing time.This option only appears if your receiveri s IPPVenabled. The
program’s price is not alwaysdisplayed.
• Select the Yes option to pre-purchase the program.
• If you select the No option, the program will not be pre-purchased. The timer
will be set for the program, but you will have to purchasetheprogram at
viewing time.
• If the program cannot be taped,a no tape icon will appear.
If you have purchased a program or have used parental control featuresto lock
out channelsor program content, a Password screen will appear. Youwillhave to
enter your password to finish setting the timer. Refer to the section entitled
"Setting Parental Controls and Passwords".
74
Page 75

Options
Setting a Timer Using the Guide
To set a timer while you are using the Guide:
• Highlight a future program.
• Press the INFO key or the ENTERkey.
• The Confirm Timer menu will appear (follow the instructions for the Confirm
Timer menu).
How to Cancel a Timer
To cancel a timer whileit is executing:
• Press the POWER key.For repeating timers(such as those used for daily or
weekly programs), pressingthePOWERkey only cancels the currently
executingevent. The timer for the next repeating event (the timer for the next
day or week) will be re-enabled at the start of the next day.
• Erase the timer on the Timers menu. This will cancel single-event and
repeating event timers. Refer to the section entitled "Change Timer/Erase
Timer Menu".
If New Settings Conflict wi th Previous Settings
If yournewtimer settingsconflictw ith a previouslyset timer (forexample,if both
are set for the same time),a message screen willappear. It will describe the
conflictandaskyoutodoeitheroneofthefollowing:
• Press ENTER to replace the conflicting (previously set) timer withthe new
one.
DSR470 User Guide 75
Page 76
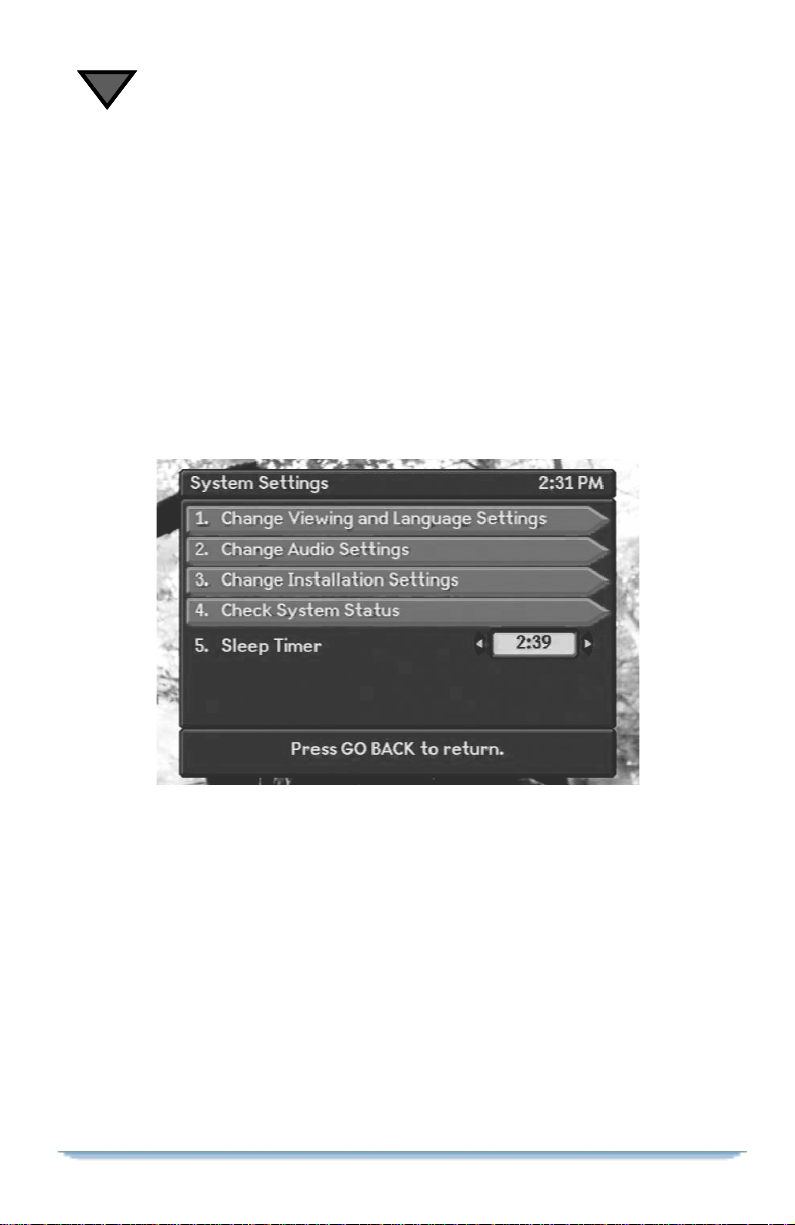
9
• Press GO BACK so that youcanretain thepreviously settimer and changethe
settingsof the current timer so that they no longerare in conflict.
List Purchases
This is a view only screen that allows you to review a list of previously purchased
IPPV programsand to verify your account status. Refer to the section entitled
"Pay-Per-View Events" for moreinformationregarding thisoption.
Change System Settings
The System Settingsmenuprovides accessto menus that allowyou to adjust the
operationofyour system.
Viewing and Language Settings
The Change Viewing and Language Settings option allows you to turn off the
headers and banners, choose the languageforsubtitles and audio, and choose the
size of the viewingarea.To use these options, you will be using the onscreen
menus. Typically, these settings are selected at the time of initial installation by
your installer.
• Press the OPTIONS key on the remote. The Optionsmenu appears.
• Select option 6 (Change System Settings), and the System Settings menu
appears.
76
Page 77

Options
• Select option 1 (Change Viewing & Language Settings). The Viewing &
Language Settings menu will be displayed.
Channel Information. The Channel Information option allows you to
turn the header (topofscreen) and banner (bottom of screen) on or off. Select the
option of your choice, On or Off. The default setting is On.
Subtitles. The Subtitles optionallowsyou to select the language for subtitles
(if available for the particular program) or keep them turned off. Select the option
of your choice—None,English, Spanish,or French.The default setting is None.
Language. The Language option allows you to select the languageof the
audio for your programs. Select the option of your choice—English, Spanish, or
French. The defaultsetting is English.
TV Viewing. The TV Viewing option allows you to select the size of the
viewing area.Select the Normal optionifyourTV screen is a typicalscreen with
4:3 ratio of width to height. Select Wide if your TV screen is a wide screen with a
16:9 ratio.The default setting is Normal.
Audio S ettings
To adjust the audio settings so that they are correct for thetypeof equipment
connected to yourreceiver,you will be usingthe onscreen menus.Typically,these
settingsareselected at the time of initial installation by your installer.
• Press the OPTIONS key on the remote. The Optionsmenu appears.
• From the Options menu, select option6 (Change Systems Settings),andthe
System Settingsmenu appears.
DSR470 User Guide 77
Page 78

9
• From the System Settings menu,select option 2 (Change Audio Settings), and
an Audio Settingsmenu will appear.
Audio Settings Menu for Digital Broadcasts. On the Audio
Settingsmenu, three options appear:
• Select option 1 (Audio Connections), and you will be able to select eitherTV
or Hi Fi (the default is TV), SelectTV if the receiver’s AUDIO OUT port is
connected to your TV. Select Hi Fi if it is connected to your stereosystem.
• Select option 2 and then select Mono,Stereo, Surroundor Dolby Digital (the
default is Surround). The Dolby Digitalselection will disable other audio
ports.
• Select option 3 and select Mono, StereoorSAP (Secondary Audio Program)
for your analog cable TV programming (channel numbers normally under
100). The default is Stereo.
Installation Settings
See Chapter 4, "Installation", for informationin greater detail.
78
Page 79

10
Help
Using Help
If you occasionally forget what an icon(symbol) means or how to use one of the
receiverfeatures, just press the HELP key to displaythe Help messages.Press the
ENTER key to display each successive Help screen.
Explanations
Some screensprovide explanations that help you to use receiverfeatures.
DSR470 User Guide 79
Page 80

10
Icons
If you forgetwhat certain keys or icons mean, just look them up by displaying the screen below.
80
Page 81

Input
Cable Input
Connector "F" type receptacle
Input Frequency 54-860MHz
Input Impedance 75 ohm
Input Level = 0 to +15dBmv
Demodulator QAM
Antenna Input
Connector "F" type, r eceptacle
Input Impedance 75 ohm
11
Specifications
Video
Composite Video
Output level 1.0 Vp-p ±10% into75 ohm
Connector Yellowphono, markedVideo out
De-emphasis 525 line CCIR Rec. 405-1
DigiCipher II (Digital) System
Frequency response ±1.0 dB, 1kHz to 4.2 MHz
Differential gain 5.0% p-p maximum
Differentialphase 5.0 deg. p-pmaximum
S/N 57 dB minimum
DSR470 User Guide 81
(unified weighting 100 kHz HPF, 5MHz LPF)
Page 82

11
Analog Cable Video
Frequency response +1.58 to -1.94 dB, 0.5 to 3.0MHz
Differential gain 8.0% p-p maximum
Differentialphase 8.0 deg. p-pmaximum
S/N 49 dB minimum @ 6dBmv
+1.58to -2.98dB, @ 3.58 MHz
(unified weighting 100 kHz to 4.2 MHz)
Remodulator Output
Connector "F" type receptacle, "Out to T V" NTSC & IEC
Impedance 75 ohm
Channel Ch. 3 or4 (NTSC, North America)
Audio Mono
DigiCipher II (Digital) System
Frequency response ±1.0 dB, maximum
Analog Cable
Frequency response ±3.0 dB, 50 Hzto 10 kHz
20 Hzto 20 kHz
Remote Control
Transmitter Infrared (IR), UHF optional
Batteries 2xAAtypeor3xAAAtype
Range Up toa maximumof 35 ft. (IR)
Angle ±22 deg. (IR)
Up to a m aximum of 200 ft (UHF)
Physical/Environmental
Temperature 0 deg. to 40 deg. C ambient
Humidity 95% relative
Dimensions 17"W x 4" H x 13 1/2" D
Weight 18 lbs
Power input 115V±10% AC;60 Hz nominal;
UL Listed
CSA Certified
82
25W maximum
Page 83

12
Warranty & Service
Limited Warranty and Obtaining Services
To Original Consumer Purchaser at Retail
General Instrument Corporation doing business as the Broadband
Communications Sector of Motorola, Inc. (Motorola BCS) warrants only to the
original consumer purchaseratretail each Motorola BCS digital receiver and
component,which it sells under this Limited Warranty, to be free from defectsin
materials andworkmanship under conditions of normal home use. This limited
warranty isforone (1) year on all electricaland mechanical components. This
limited warranty runs from the date of originalpurchase for consumeruse.
Responsibilities forYouand Motorola BCS
You must retainyour sales receipt or provideother proof-of-purchase date.
Promptly completing and mailing in the warrantyregistrationcardis one way of
providingproof-of-purchase date. If you have no such proof, thenthewarranty
will run from the date of shipment by Motorola BCS. You shouldalso keep this
warranty for your records.
If you desire warranty service, you must notify Motorola BCS within the
applicable warranty period. See “How to Obtain WarrantyService” below.
Within a reasonable period after proper notification, Motorola BCS or an
authorized Motorola BCS Service Centershall, at its option, repair or replace the
defective part(s) or the affected component. Replacement may be with factory
refurbished parts or components. You are responsible for any packing, shipping,
and insurance charges associated with sending the component to any authorized
service center for repair or replacement.
This warranty does not cover charges for any assembly, installation, setup or
removal, or adjustment of controls.
DSR470 User Guide 83
Page 84

12
This warranty shall be void if any product marking or label has been altered,
defaced,or removed, or if any product componenthas been altered, modified,
used improperly, or had its housing opened.
MOTOROLA BCS IS NOT RESPONSIBLE FOR DAMAGES CAUSED BY
LIGHTNING,IMPROPER ASSEMBLY, INSTALLATION, SETUP, OR
REMOVAL, DAMAGES OR INOPERABILITY CAUSED BY ASSEMBLY OR
USE WITH INCOMPATIBLE PRODUCTS, RECEPTION PROBLEMS
CAUSED BY INADEQUATE ANTENNA SYSTEMS OR DAMAGES
CAUSED BY MISUSE, ALTERATION, IMPROPER MAINTENANCE,
SHIPMENT,ACCIDENT, OR ABUSE. AS TO ANY OUTDOOR
COMPONENT, THIS WARRANTY DOES NOT COVER THE PAINTING OR
PLATING.
Limitations
MOTOROLA BCSMAKES NO OTHER EXPRESS WARRANTIESON HOME DIGITALRECEIVER
SYSTEMS AND COMPONENTS. TO THE EXTENT ALLOWED BY LAW, ANY WARRANTY BY
MOTOROLA BCS ON A SYSTEM OR COMPONENT (INCLUDING ANYIMPLIED WARRANTY
OF MERCHANTABILITY OR FITNESS) IS LIMITED TO THE WARRANTY PERIOD
APPLICABLE TO THE AFFECTED COMPONENT UNDER THIS EXPRESS LIMITED
WARRANTY. Some states do not allow limitations on how long an implied warranty lasts, so the above
limitation may not apply to you.
IN NO EVENT SHALL MOTOROLA BCS BE LIABLE FOR INDIRECT, EXEMPLARY,
INCIDENTAL, SPECIAL OR CONSEQUENTIAL DAMAGES (INCLUDING LOST PROFITS AND
LOSS OF USEOR PAID TV TIME) BASED UPON BREACH OF WARRANTY OR CONTRACT,
NEGLIGENCE, STRICT LIABILITY,OR ANY OTHER LEGAL THEORY. Some states do not allow
the exclusion or limitation of incidental or consequential damages, so the above limitation may notapply
to you.
NO AGENT, DEALER, DISTRIBUTOR,SERVICE CENTER, COMPANY,OR OTHER PERSON IS
AUTHORIZED TO CHANGE,MODIFY, OR EXTEND THE TERMS OF THISLIMITED
WARRANTY IN ANY MANNER WHATSOEVER. This warranty gives you specific legal rights, and
you mayhave other rights,which vary,from state tostate.
Calling for Service
Before you callforservice:
• Unplug your receiver from the AC outlet,wait one minute, plug the receiver
back in, and try to use it again.
• Do not open the cover (enclosure) or attempt to repair the receiver. This will
void the warranty.
• Call our Technical Response Center: 1-888-944-HELP between8am-5pm,
Mon - Fri, Pacific Standard Time (PST) and choose the Satellite Products
option.
84
Page 85

Warranty& Service
How to Obtain Warranty Service
To obtain warranty service, you must call or write Motorola BCS Technical
Response Center within the applicablewarranty period at Motorola BCS
Technical Response Center,6450Sequence Drive, San Diego,CA 92121, (858)
535-1717.
When you call or write, explaintheproblem. Ask whetherthecomponent should
be returned for service or retained by you for servicing in place. Ask for a Return
ServiceAuthorization (RSA) numberand for theaddress to sendthe componentif
the component is to be returned. (If you write, be sure to include a copy of your
sales receiptorotherproof of purchase date, a copy of your warranty, your phone
number, and return address.
If the Motorola BCS Technical Response Center requests you to return the
component,pack it safely and securely,preferably in the originalshipping carton.
Put the RSA number on the outside of the shipping carton.Enclose a letter
explaining the problem. Be sure to include a copy of your sales receipt or other
proof of purchase date, a copy of your warranty, and your phone number and
return address. Ship it insured to the authorized servicecenter specified by
Motorola BCS. All packing, shipping and insurance charges to return the
component to Motorola BCS must be prepaid by you. A qualified technician may
be required to remove or install a component, and any chargesfor suchwork are
your responsibility.
NOTE: If the warranty on your component is expired, voided or inapplicable,
Motorola BCS will not repair the component until you agree to pay for quoted
charges. If you do not agree within 30 days, the component will be returned unrepaired.Youare responsible for transportation chargesboth ways on components
which are not under warranty.Out ofwarranty product shall be subject to
additionalservice and repair charges if it is determined that any product label,
markingor serial numberhas been altered,defacedorremoved, and/orif a product
or component has been altered, modified,used improperly or had its housing
opened.
DSR470 User Guide 85
Page 86

12
MOTOROLA, the Stylized "M" Logo and all other trademarks indicated as such
herein are trademarks of Motorola, Inc.
Office. Dolby
®
, Pro-Logic®and AC-3®are registered trademarks of Dolby
®
Registered U.S. Patent & Trademark
Laboratories LicensingCorporation.All other product or service names are the
propertyof their respectiveowners.
©2001 Motorola, Inc. All rights reserved.
Covered under one or more U.S.patents: D399840,D407071, 3846719,4613901,
4634808, 4700361, 4700362, 4712238,4792973, 4864615, 4908859, 4933898,
4975951, 5068724, 5081680, 5083293,5091782, 5093720, 5111504, 5144664,
5216295, 5216503, 5345408, 5376968, 5485577,5497112, 5517250, 5530400,
5537420, 5565922, 5566089, 5579348,5594794, 5598415, 5638128, 5671276,
5675387, 5699124, 5703877, 5717461,5742623, 5754659, 5771239, 5801753,
5844620.
Macrovision patent numbers 4,631,603; 4,577,216; 4,819,098and related patent
numbersare licensed for non-commercial home use only.
This device incorporates a copyrightprotection technology that is protected by
U.S. patentsandother intellectual propertyrights. Use of the copyright protection
technologyisgranted by Macrovision for home and other limited Pay-Per-View
uses only, unless otherwise authorized by Macrovision, reverse engineering or
disassembly is prohibited.
AC-3 digital audio system manufactured under license from Dolby Laboratories LicensingCorporation.
86
Page 87

13
Page 88

13
Motorola Broadband Communications Sector
6450 Sequence Dr.
San Diego, CA 92121
Publication #479169-001 Rev. A
 Loading...