

Page 1
univex
INSTRUCTION MANUAL
PIZZA XPRESS
DOUGH SHEETER
PATENTED
MODEL DSI2
MODEL DS'14
A SINGLE.PASS MACHINE TO FLATTEN
PiZZA AND BREAD DOUGH WITHOUT HEATING IT
3 OId Rockingham Rd.
Salem, NH 03079
MODEL DS18
Tel. 603-8936191
Fax 603893-1249
PDF compression, OCR, web optimization using a watermarked evaluation copy of CVISION PDFCompressor
Page 2
TABLE OF CONTENTS
A)
i .
EMPLOYMENT OF THE MACHiNE
2. WORKING PLACES
i STARTINGUP
5 TRANSPORTATION .
6. INSTALLATION
7
7J ASSEMBLING
7.2 DISASSEMBLING
PAGE 3
PAGE 3
PAGE 3
PAGE 3
PAGE 3
.
PAGE 4
PAGE 4
B)
9
9A MAINTENANCE
ELECTRICAL SCHEME
PAGE 5
PAGE 10
PDF compression, OCR, web optimization using a watermarked evaluation copy of CVISION PDFCompressor
Page 3
PIZZA XPRESS
DOUGH SÑEETER
PDF compression, OCR, web optimization using a watermarked evaluation copy of CVISION PDFCompressor
Page 4
A)
L EMPLOYMIENT OF TUF
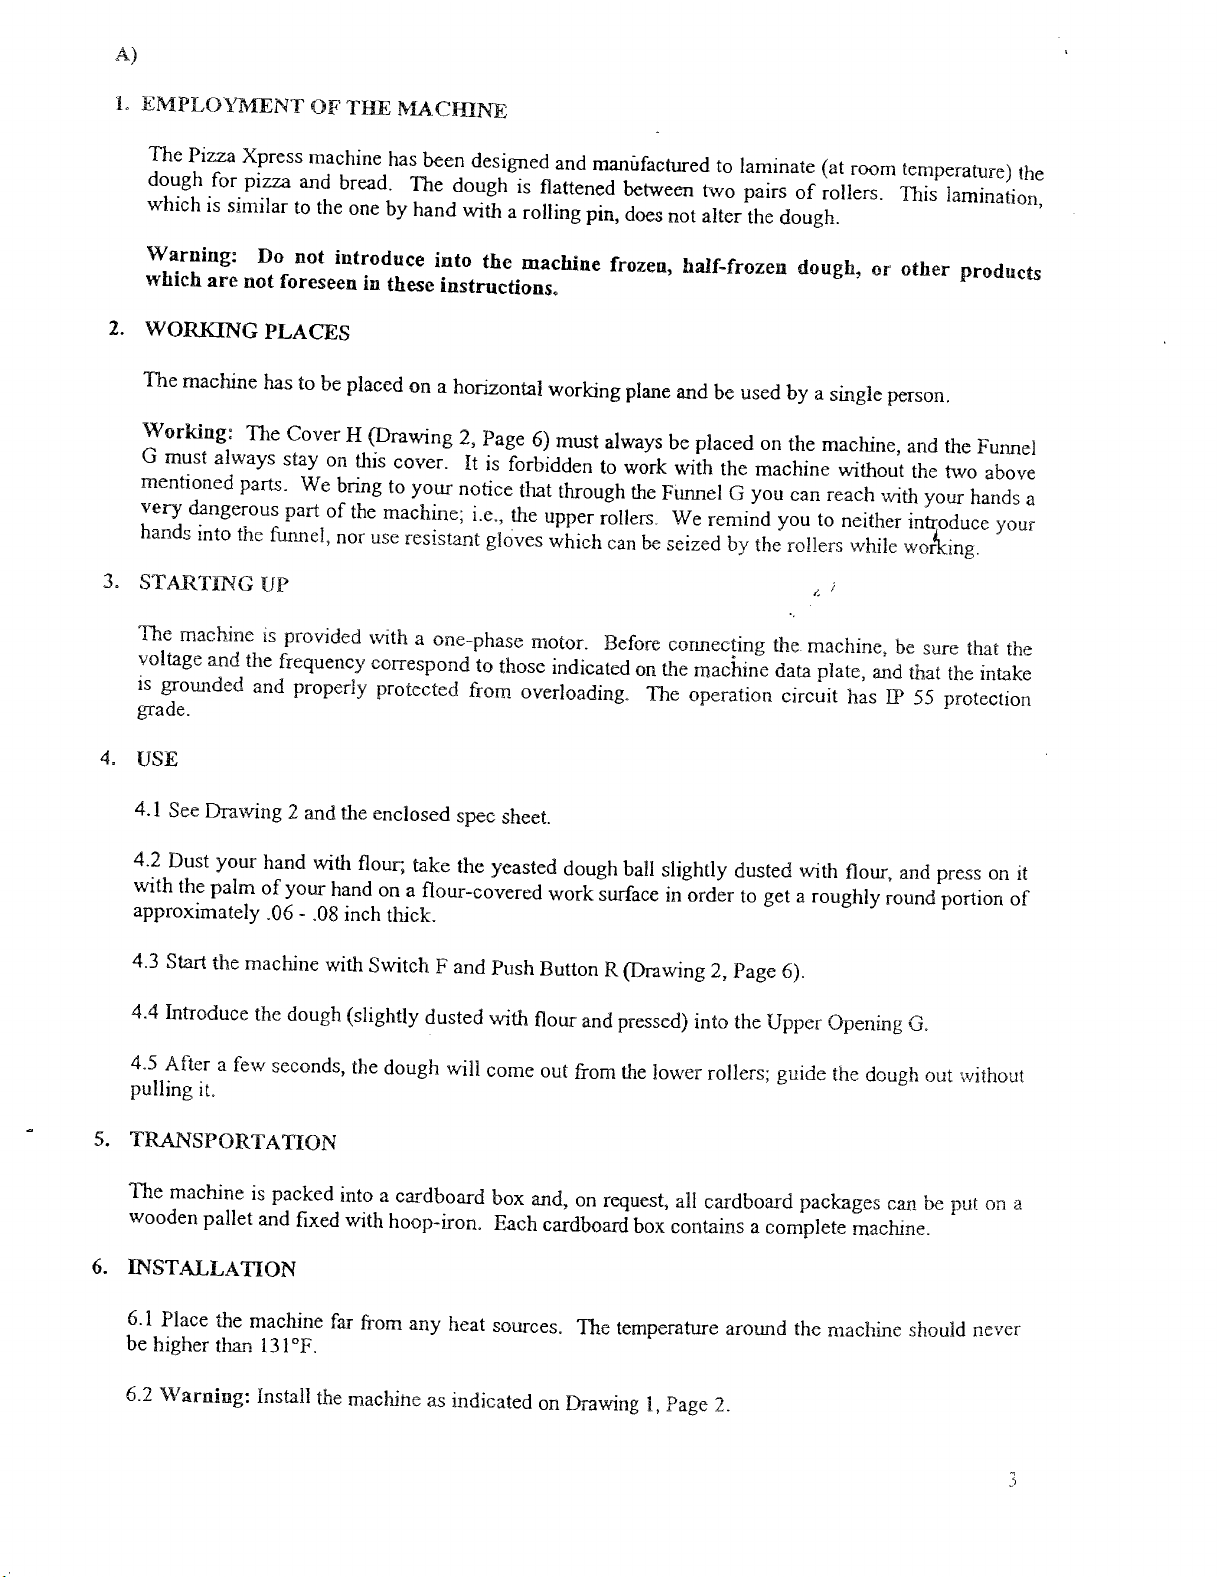
The Pizza Xpress machine has been
MACBJNE
dough for pizza and bread. The
which is similar to the one by hand
Warning: Do not introduce into
which are not foreseen in these
2. WORKING PLACES
The machine has to be placed
Working: The Cover H (Drawing
G must always stay
on this cover.
mentioned parts. We bring to
very dangerous part of the machine; i.e.,
hands into the funnel,
nor use resistant ghves which
STARTiNG UP
The machine is provided with
voltage and the frequency
is grounded and properly
grade.
on a horizontal working plane and be used by
your notice that through the Funnel G
a onephase motor. Before connecting the. machine,
correspond to those indicated
protected from overloading. The operation circuit
designed and manùfaetured to laminate (at
dough is flattened between two pairs
with a rolling pin, does not alter the
the machine frozen, haif4rozen
instructions.
2, Page 6) must always be placed
on the machine, and the Funnel
It is forbidden to work with the machine
you can reach with your hands a
the upper rollers. We remind
can be seized by the rollers while woring.
on the machine data plate, and that the intake
room temperature) the
of rollers.
dough.
This lamination,
dough, or other products
a single person.
without the two above
you to neither introduce your
be sure that the
has lIP 55 protection
USE
4. 1 See Drawing 2 and the enclosed
spec sheet.
4.2 Dust your hand with flour take the
with the palm of your hand
approximately .06 - .08 inch thick.
4.3 Start the machine with Switch F and
4.4 Introduce the dough (slightly dusted
4.5 After a few seconds, the dough
pulling it.
on a flourcovered work surface in order to get
will come out from the lower rollers; guide the dough
TRANSPORTATION
The machine is packed into
wooden pallet and fixed with hoop-iron.
a cardboard box and, on request, all cardboard packages
iNSTALLATION
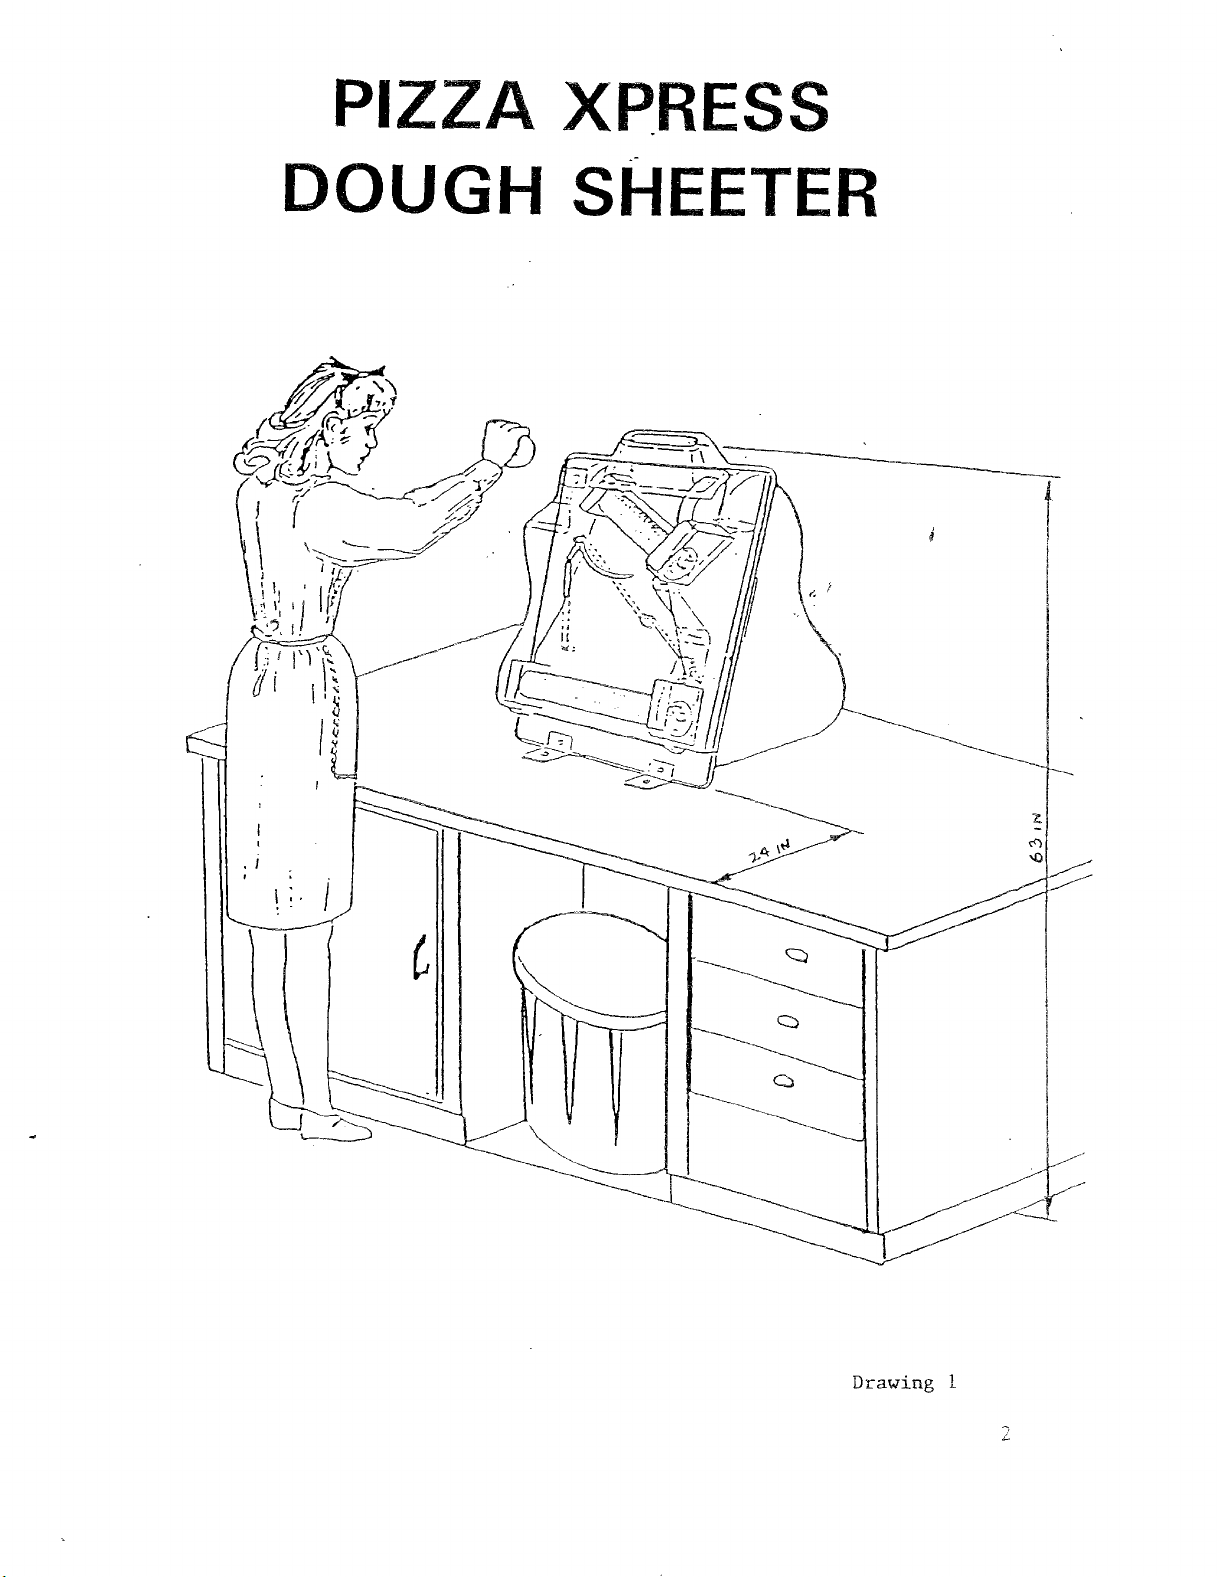
6. 1 Place the machine far from
be higher than 13 1°F.
any heat sources. The temperature around the machine should never
yeasted dough ball slightly dusted with flour, and
a roughly round portion of
Push Button R (Drawing 2, Page 6).
with flour and pressed) into the Upper Opening G.
can be put on a
Each cardboard box contains a complete machine.
press on it
out without
6.2 Warning: Install the machine
as indicated on Drawing 1, Page 2.
3
PDF compression, OCR, web optimization using a watermarked evaluation copy of CVISION PDFCompressor
Page 5
7
7i ASSEMBLING
The Funnel G must be screwed
72 DISASSEMBLING
7.2. 1
. Take offthe transparent cover after having
fitted. To free itjust pull it
slightly towards
7.2.2 Take out the two Springs
Drawing 4) in order to take them
7.2.3 Take out the Dough Guides
4). The dough guide and
them slightly towards
the plate are simply
you.
7.2.4 Take out the Cenl Plate
21, Drawing 4) in order
counterweight and the two Roll Suppor-ts
8. REGULATION (See
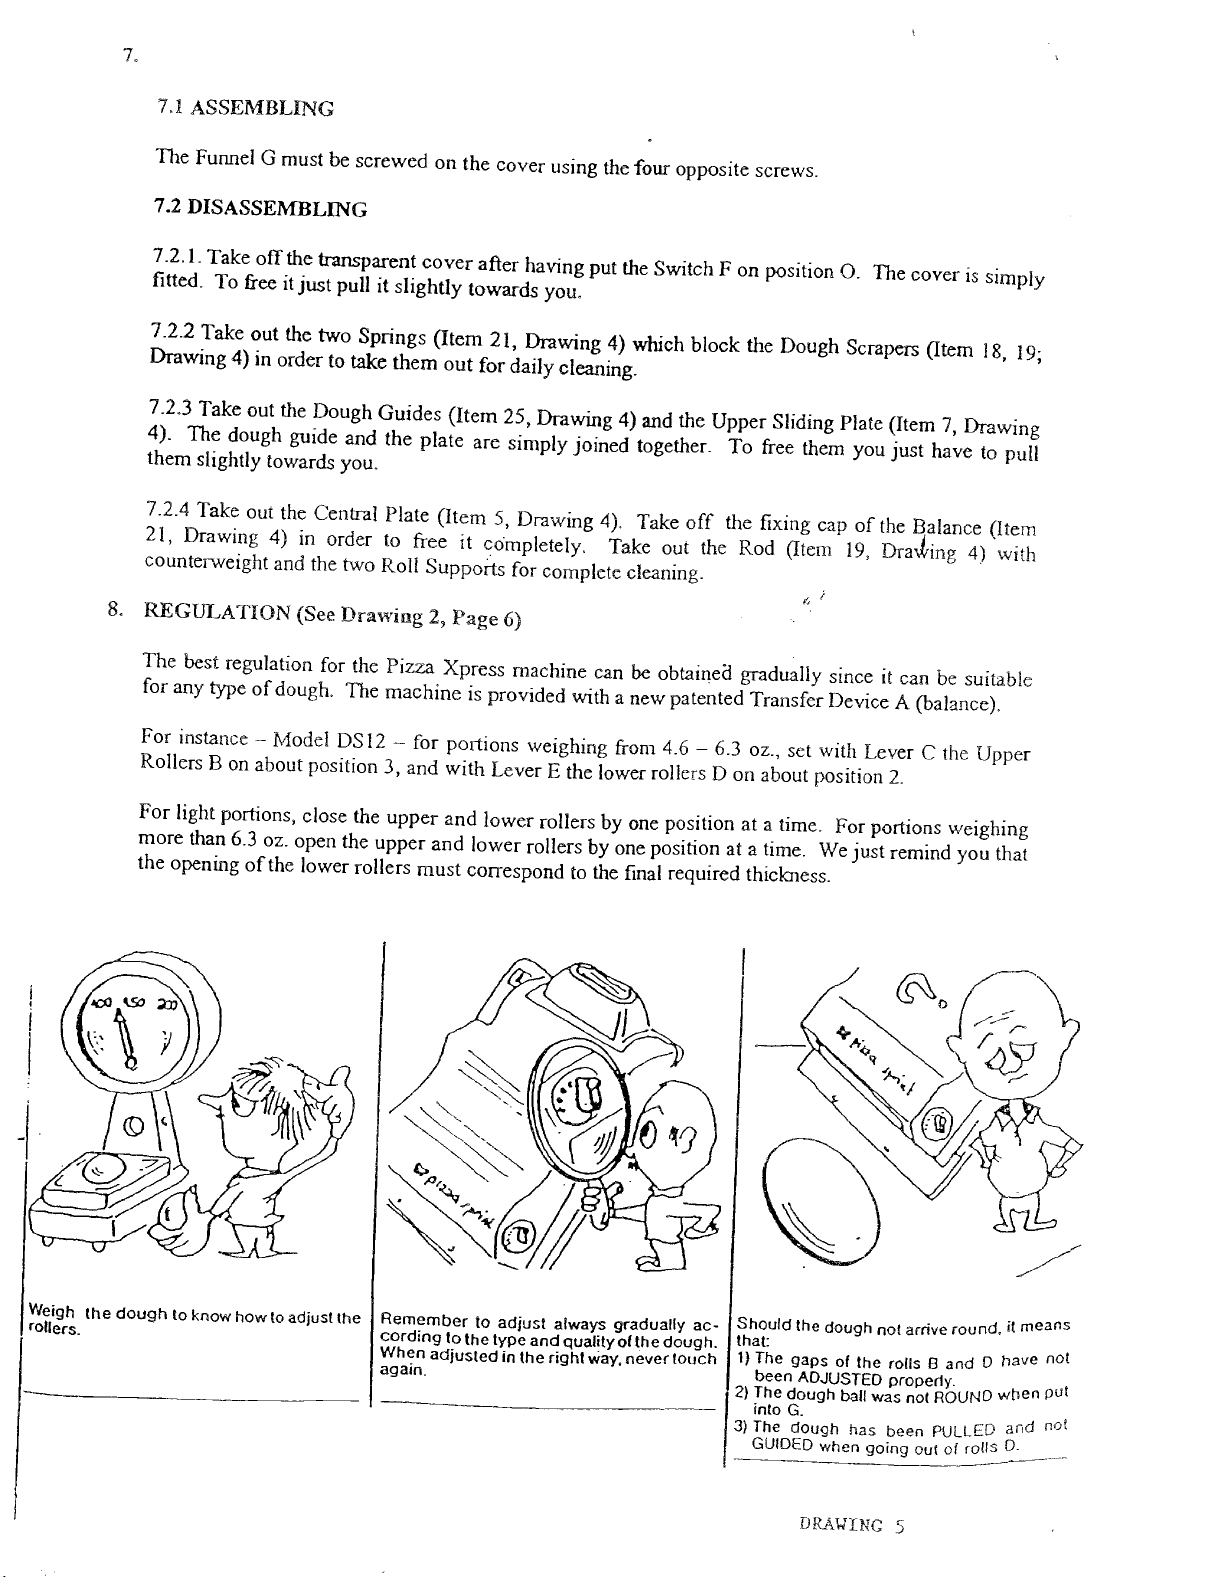
The best regulation for the Pizza
for any type ofdough. The
For instance
Rollers B on about position 3, and
- Model DSI2 - for poions weighing from 4.6
to free it completely.
Drawing 2, Page 6)
machine is provided with
on the cover using the four opposite
screws.
put the Switch F on position O. The
you.
(Item 21, Drawing 4) which block
the Dough Scrapers (Item 1
out for daily cleaning.
(Item 25, Drawing 4) and the Upper
Sliding Plate (Item 7, Drawing
joined together. To free them
(Item 5, Drawing 4), Take off the
fixing cap of the Balance (Item
Take out the Rod (Item 19. Drating
for complete cleaning.
Xpress machine can be obtainea gradually
a new patented Transfer Device A (balance).
- 6.3 oz., set with Lever C the Upper
with Lever E the lower rollers D
on about position 2.
cover is simply
8, 19;
you just have to pull
4) with
since it can be suitable
For light portions, close the
more than 6.3 oz. open the upper and lower
the opening ofthe lower rollers
Weigh the dough to know
rollers
how to adjust the
upper and lower rollers by one position at
rollers by one position at a time. We just
must correspond to the final required thickness.
Remember o adjust atways gradually
cording to the type and qualityotthe dough.
When adjusted
again.
n the
right way. never touch
ac-
Should
that:
a time. For portions weighing
remind you that
the dough not arrive round, it means
The gaps of the rolls 13 and O have not
been ADJUSTED properly.
The dough ball
into G.
The dough has been PULLED and flOt
GUtOED when going out of lotis D
was not ROUND when
put
PDF compression, OCR, web optimization using a watermarked evaluation copy of CVISION PDFCompressor
DRAWING 5
Page 6

9
9.1 MAINTENANCE
To keep the machine
the rollers using
dough guides) must be
in cold water. We
dishwasher, but by hand th
a brush if possible. The
especially recommend
we remind you to clean it with
detergents since they could
any special lubrication.
Warning: Do not wash
while the rollers
them.
are moving and, most of all,
9.2 REpijj
For repairs, conols,
directly to the manufacer
far as safety is
Before any mechanical
unplug.
concerned:
electrical cable with plug (2
switch (push buttons)
well functioning, you just
parts which can be disassembled
washed instead with liquid
not to wash the plastic parts (cover
lukewarm water. As far
neither sodium hypoch1orite-baed
damage the external
the machine with
parts ofthe machine. The machine
water jets for safe working. Do
do not put your hands into
or replacement of damaged
to replace the damaged
phase and ground)
or eleccal maintenance, it is
n5ed to dry-clean daily all dough
detergent for dishes, taking
as the housing of the machine is
solutions, nor with abrasive
(dough scraper,
care to rinse them
and funnel) in
not clean the machine
the rollers to clean
pans we suggest you apply to t
pans with equivalent matethls
compulso
to stch the machine off and
remainings on
plate,
the
concerned
does not need
retailer or
especially as
B)
Warning: The repairs
are to be caed out by qualified
conditions ofthe machine, ofits
ELECTRJC&r SCffEJi1 (See
cable and ofits plug.
Drawing 6, Page 10)
people.
Periodically check the good
J
PDF compression, OCR, web optimization using a watermarked evaluation copy of CVISION PDFCompressor
Page 7

DRAWING 2
PDF compression, OCR, web optimization using a watermarked evaluation copy of CVISION PDFCompressor
Page 8

DOUGH SHEETER
DRAWlING 4
thus.
I
Part No
3110010
3110012
3 1 1 00 1 4
2
3
4
3 1 1 00 1 6
3110018
3 1 10020
3110022
3110024
5 3110026
31 10028
3 1 10030
6
7
31 10032
31 10034
3 1 1 003 6
3110038
3l 10040 Upper Plate DS14
31 10042 Upper Plate DSI8
8
9
lo
il
12
3 1 10044
3 1 1 0046
3 1 10048
3110050 Support Plate DS12
31 10052
31 10054
3110056
3110058 UpperBeltDSl4
3110060 UpperBeltDSl8
I 3
14
3 i I 0062 Upper Roller Pulley
3110064 MotorDSl2,DS14
3110066
15
16
17
18
19
20
21
3110068 Cover, Bttom DS12
31 10070 Cover, Bottom DSI4
3 1 1 0072 Cover, Bottom DS i 8
31 10062
3 1 1 0074 Lower Roller Pulley DS I 8
3110076
31 10078
3 1 1 0080
3110082
3 1 10084
3 1 1 0086
3 i 1 0088
3110090
3110092
3110094
22
3 1 10096
31 10098
3 1 1 0 1 00
Description
CoverDSl2
CoverDSl4
Cover DS i 8
Emergency Push Button
Switch
Funnel DS 12
Funnel DS14
FunnelDSl8
Center Plate DS12
Center Plate DS14
Center Plate DSI8
Upper Roller Assembly DSI2
Upper Roller Assembly DSI4
Upper Roller Assembly DS I 8
UpperPlateDSl2
Protection Box
Lack of Voltage Card
Junction Box
Support Plate DS14
Support Plate DS18
Upper BeltDSl2
MotorDSl8
LowerRoller Pulley DS12, DS14
Lower Belt
Motor Pulley DS12, DSI4
Motor Pulley DS I 8
Rod with Counterweight DSI2
Rod with Counterweight DS14
Rod with Counterweight DS 18
Thickness Regulation Device
BalanceDSl2
Balance DS14
Balimee DS18
Lower Dough Scraper DS i 2
Lower Dough Scraper DSI4
Lower Dough Scraper DS I 8
7
PDF compression, OCR, web optimization using a watermarked evaluation copy of CVISION PDFCompressor
Page 9

DOUGH ShEETER
DRAWij'G 4 (Continued)
Illus.
23
24
25
Part No.
3110102
3110104
31 10106
3 1 10108
31 101 10
3 1 1 0 1 1 2
3110218
3 1 10220
31 10222
Description
UpperDoughScraperDsl2
UpperDoughScmpDs14
Upper Dough Scraper DS18
Lower Ro11ei Assembly DS12
Lower Roller Assembly DS14
Lower Roller Assembly DS i 8
DoughGuideDsl2
Dough Guide DS14
Dough Guide DSI8
8
PDF compression, OCR, web optimization using a watermarked evaluation copy of CVISION PDFCompressor
Page 10

DRA?ThG 4
9
PDF compression, OCR, web optimization using a watermarked evaluation copy of CVISION PDFCompressor
Page 11

CIRCUIT DIAGRAM
M = MOTOR
DRAWlING 6
PDF compression, OCR, web optimization using a watermarked evaluation copy of CVISION PDFCompressor
Page 12

COMPLETE ROLLER
DRAWING 7
10
11
12
13
14
15
16
17
ll1us
i
2
3
4
5
6
7
8
9
Part No
3110114
8512863
3110118
3110120
3 1 10122
3110124
3110126
3110128
3110130
3110132
3110134
3110136
3110138
3110140
4509027
3110144
3110146
3110148
3110150
3110152
3110154
3110156
3110158
3 i I O 160
3110162
3110164
3110166
3110168
3110170
3110172
3 1 i O I 74
3110176
3110178
3110180
3110182
3110184
3110186
3110188
3110190
3110192
3110194
3110196
3110198
3110200
3110202
3110204
3110206
Description
Cap
Bearing 6200LL
Upper Endless Screw Support DS i 2, DS
Upper Endless Screw Support DS18
Lower Endless Screw Support DS12, DS14
Lower Endless Screw Support DSI8
Thickness Regulation Device
Upper Endless Screw DS12
Upper Endless Screw DS14
Upper Endless Screw DS I 8
Lower Endless Screw DS 12
Lower Endless Screw DS 14
Lower Endless Screw DS 18
Retaining Ring
Bearing 6202ZZ
Upper Fixed Roller DS12
Upper Fixed Roller DSI4
Upper Fixed Roller DS 1 8
Lower Fixed Roller DSI2
Lower Fixed Roller DS14
Lower Fixed Roller DS 18
Upper Adjustable Roller DSI2
Upper Adjustable Roller DS14
Upper Adjustable Roller DS I 8
Lower Adjustable Roller DS12
Lower Adjustable Roller DS14
Lower Adjustable Roller DS1 8
Upper Adjustable Shafi DS12
Upper Adjustable Shaft DS14
Upper Adjustable Shaft DS 18
Lower Adjustable Shaft DS12
Lower Adjustable Shaft DS14
Lower Adjustable Shaft DS18
Drive Coupling
Transmission Joint
Upper Gear DS12
Upper Gear DS14
Upper Gear DS 18
Retaining Ring
Lower Gear
Retaining Ring
Upper Fixed Shaft DS12
Upper Fixed Shaft DS14
Upper Fixed Shaft DS18
Lower Fixed Shaft DS i 2
Lower Fixed Shaft DS 14
Lower Fixed Shaft DS i 8
14
PDF compression, OCR, web optimization using a watermarked evaluation copy of CVISION PDFCompressor
Page 13

COMPLE'1E ROLLER
DRAWijG 7 (Continued)
ums.
18
19
20
21
Part No.
3110102
3110104
3110106
3110096
3 1 10098
3110100
3 1 10208
3110210
3110212
31 10214
3110216
Description
UpperDoughscraperDsl2
UpperDoughscrape-Ds14
UpperDough Scraper DSI8
LowerDoughscraperDsl2
Lower Dough Scraper DSI4
LowerDoughScraperDsl8
Upper Roller Support DS12, DS14
UpperRollerSupportDSl8
LowerRollerSupportDSl2, DS14
Lower Roller Support DS18
Spring
12
PDF compression, OCR, web optimization using a watermarked evaluation copy of CVISION PDFCompressor
Page 14

=1
COMPLETE ROLLS
DRAWING 7
PDF compression, OCR, web optimization using a watermarked evaluation copy of CVISION PDFCompressor
 Loading...