

Page 1

®
2011 NAVIGATION
SYSTEM
OWNER’S MANUAL
For your safety, read carefully and keep in this vehicle.
Page 2

FOREWORD
NISSAN NAVIGATION SYSTEM HELPDESK CONTACT INFORMATION
For assistance or inquiries about the NISSAN
Navigation System, or to order updated map
data
contact the NISSAN NAVIGATION
SYSTEM
. ADDRESS: P .O. Box 1588,
. E-MAIL: Nissan-Navi-Info@navteq.com
. WEB SITE: www.NissanNavigation.com or
. PHONE: 1-888-661-9995
. HOURS: 6:00 AM to 5:00 PM
HELPDESK at:
Orem, UT 84059-992
www. issan.c
n
(Pacific Time)
a
NISSAN CONSUMER AFFAIRS DEPARTMENT
For assistance or inquiries about the NISSAN
warranty, service or general questions, contact
the NISSAN Consumer Affairs Department at:
For U.S. customers
Nissan North America, Inc.
Consumer Affairs Department
P.O. Box 685003
Franklin, TN 37068-5003
1-800-NISSAN-1
(1-800-647-7261)
For Canadian customers
Nissan Canada Inc.
5290 Orbitor Drive
Mississauga, Ontario L4W 4Z5
1-800-387-0122
Thank you for purchasing a NISSAN vehicle.
This user’s manual is for the navigation system
only. This manual contains operating instructions
for the NISSAN Navigation System offered in
your NISSAN vehicle.
Please read this manual carefully to ensure safe
operation of the navigation system.
. Because of possible specification changes
and optional equipment, sections of this
manual may not apply to your vehicle.
. All information, specifications and illustra-
tions in this manual are those in effect at the
time of printing. NISSAN reserves the right
to change specifications or design at any
time without notice.
. Do not remove this manual from the vehicle
when selling this vehicle. The next user of
this navigation system may need the manual.
Page 3

Table of
Introduction
1
Contents
Getting started
Map settings
Setting a destination
Route guidance
Storing a location/route
Viewing technical information
Other settings
General system information
Troubleshooting guide
Index
2
3
4
5
6
7
8
9
10
11
Page 4

Page 5

1 Introduction
How to use this manual ....................................... 1-2
For safe operation .............................................. 1-2
Reference symbols ......................................... 1-2
Safety information .............................................. 1-3
Laser product.................................................... 1-4
Page 6
HOW TO USE THIS MANUAL FOR SAFE OPERATION
This manual uses special words, symbols and
icons, organized by function.
Please refer to the following items and familiarize
yourself with them.
Basic operations of the navigation system can
be performed in a similar manner for all vehicle
models. However, the map screen and setting
screen may be different for each model. Set the
navigation system as appropriate for your
vehicle.
WARNING
This is used to indicate the presence of a
hazard that could cause death or serious
personal injury. To avoid or reduce the
risk, the procedures must be followed
precisely.
CAUTION
This is used to indicate the presence of a
hazard that could cause minor or moderate personal injury or damage to your
vehicle. To avoid or reduce the risk, the
procedures must be followed carefully.
NOTE:
This indicates an item to help you understand and maximize the performance of
your vehicle. If ignored, it may lead to a
malfunction or poor performance.
REFERENCE SYMBOLS
INFO:
This indicates information that is necessary for
efficient use of your vehicle or accessories.
Reference page:
This indicates the title and page that you should
refer to.
<>:
This indicates a button on the control panel.
[]:
This indicates a key/item displayed on the
screen.
1-2 Introduction
Page 7

SAFETY INFORMATION
This system is primarily designed to help you
reach your destination, and it also performs
other functions as outlined in this manual.
However, you, the driver, must use the system
safely and properly. Information concerning road
conditions, traffic signs and the availability of
services may not always be up-to-date. The
system is not a substitute for safe, proper and
legal driving.
Before using the navigation system, please read
the following safety information. Always use the
system as outlined in this manual.
WARNING
. When the driver wants to operate the
navigation system, first park the vehicle in a safe location and set the
parking brake. Operating the system
while driving can distract the driver
and may result in a serious accident.
. Do not rely on route guidance alone.
Always be sure that all driving maneuvers are legal and safe in order to
avoid accidents.
. Do not disassemble or modify this
system. If you do, it may result in
accidents, fire or electrical shock.
. Do not use this system if you notice
any malfunctions such as a frozen
screen or the lack of sound. Continued
use of the system may result in
accidents, fire or electrical shock.
. If you notice any foreign objects in the
system hardware, spill liquid on the
system or notice smoke or a smell
coming from it, stop using the system
immediately and contact a NISSAN
dealer. Ignoring such conditions may
lead to accidents, fire or electrical
shock.
CAUTION
. Do not keep the navigation system
running with the engine stopped.
Doing so may discharge the vehicle
battery. When you use the navigation
system, always keep the engine running.
. Some states/provinces may have laws
limiting the use of video screens while
driving. Use this system only where it
is legal to do so.
Introduction 1-3
Page 8

LASER PRODUCT
This navigation system is certified as a Class 1
laser product.
The navigation system complies with DHHS
Rules 21 CFR Chapter 1, Subchapter J.
WARNING
. Do not disassemble or modify this
system. There are no user serviceable
parts in this navigation system.
. If maintenance, adjustments and op-
erations other than those specified in
this manual are attempted, injury due
to laser radiation and exposure could
occur.
1-4 Introduction
Page 9

2 Getting started
Control buttons and functions ............................... 2-2
Control panel ................................................ 2-2
Start-up screen ................................................. 2-3
Menu screen types and how to operate................... 2-4
Menu screens and their purposes ...................... 2-4
Using controls to adjust values, levels, etc............ 2-6
Map menu screen .......................................... 2-7
Functions disabled while driving .......................... 2-10
Operating maps ............................................... 2-11
How to view map screen ............................... 2-11
Map screen types ........................................ 2-12
Switching the map view ................................. 2-13
Moving around within a map ........................... 2-15
Changing the scale of a map .......................... 2-16
Storing your home location/address...................... 2-17
How to store your home ................................ 2-17
Character (letter and number) input screen ........ 2-20
Phone number input screen ............................ 2-22
List screen ................................................. 2-24
Setting a destination ......................................... 2-25
Searching for a destination ............................. 2-25
Starting route guidance ................................. 2-28
Deleting a route........................................... 2-30
Setting the voice guidance ................................. 2-31
Turning voice guidance ON/OFF...................... 2-31
Adjusting voice guidance volume ..................... 2-32
Page 10
CONTROL BUTTONS AND
FUNCTIONS
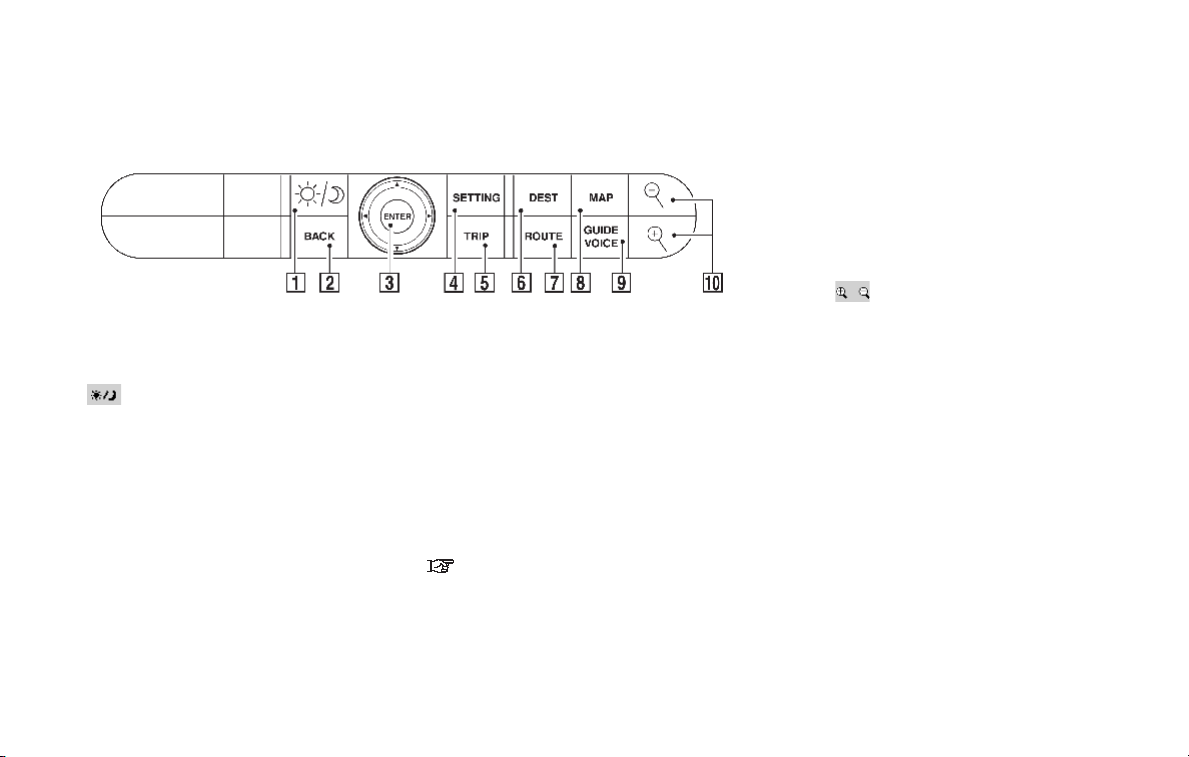
CONTROL PANEL
1
&
< > (DAY/NIGHT):
Push to switch between the day screen and
the night screen.
2
&
<BACK>:
Push to return to the previous screen. In a
settings screen, this button can also be
used to apply the setting.
3
&
JOYSTICK and <ENTER>:
Move to highlight an item on the screen,
then push to select the highlighted item,
move on the screen, etc.
4
&
<SETTING>:
Push to access the system settings.
5
&
<TRIP>:
Push to display the trip computer. Refer to
the Owner’s Manual of your vehicle.
6
&
<DEST>:
Push to enter a destination. Various methods
for entering a destination are available.
“4. Setting a destination”.
7
&
<ROUTE>:
Push to access guidance control functions
(guidance cancellation, route priority, waypoint setting on the route, etc.).
NAI1097
8
&
<MAP>:
Push to display the current location map
screen.
9
&
<GUIDE VOICE>/<VOICE>:
Push to repeat voice guidance for a guide
point.
10
&
< > (ZOOM IN/ZOOM OUT):
Push to switch to the zoom mode to change
the map scale.
2-2 Getting started
Page 11

START-UP SCREEN
NAV2701
1. Th e navigation system starts when the
ignition switch is turned to the ACC or ON
position.
NAV2702
2. As the start-up screen is displayed, read the
precautions carefully, highlight [OK] and
push <ENTER>.
INFO:
If you do not push <ENTER> for more than 30
seconds, the status screen will be displayed.
Push <DEST>, <MAP>, <ROUTE>,
<INFO>, <SETTING> or <TRIP> to return
to the start-up screen.
Getting started 2-3
Page 12

MENU SCREEN TYPES AND HOW
TO OPERATE
MENU SCREENS AND THEIR PURPOSES
Push <DEST>, <ROUTE>, <TRIP>, <INFO>
or <SETTING> to display the corresponding
menu screen.
How to select a menu item
Example: <DEST> screen
1. Tilt the joystick up and down. An item is
highlighted accordingly.
2. To select the preferred menu item, highlight
the item and push <ENTER>.
INFO:
Some items in the menu contain further
details, which are displayed on the right side
of the screen when the menu item is
highlighted. This allows you to preview
details of the item. These details appear
only on the menu screen displayed by
pushing <DEST>.
NAI0406
2-4 Getting started
Page 13

NAV3061
3. Depending on the item you selected, a
detailed menu screen, a character input
screen or a setting screen, etc. is displayed.
On the screen displayed, make adjustments,
input information, etc. accordingly.
NAV2704
4. Push <BACK> to return to the previous
screen without applying any changes.
Push <MAP> to return to the curr ent
location map screen without applying any
changes.
INFO:
Depending on the menu selected, pushing
<MAP> may not return you to the current
location map screen.
Getting started 2-5
Page 14

NAI0407
USING CONTROLS TO ADJUST VALUES, LEVELS, ETC.
Use the joystick to adjust the volume of the voice
guidance and the display brightness.
How to adjust
1. Highlight the preferred setting item and
push <ENTER>. The color of the corresponding adjustment item changes.
2. Use the joystick, and the value or bar
indicating levels increases or decreases
accordingly.
3. Push <ENTER> or <BACK> to apply the
setting.
2-6 Getting started
Page 15

MAP MENU SCREEN
Push <ENTER> while the current location map
screen or a scrolled map screen is displayed to
display the menu corresponding to that screen.
This menu allows you to quickly use helpful
functions, such as setting a destination easily
and searching for Points of Interest nearby.
To select a menu item, u se the method
described in “Menu screen types and how to
operate”.
NAV2705
Current location map screen
If <ENTER> is pushed while the current
location map screen is displayed, the following
options are available.
. Store Location:
Allows you to store the current vehicle
location in the Address Book. The stored
location can be retrieved as necessary to set
it as a destination (waypoint).
“STORING A LOCATION” (page 6-2)
. Nearby:
Allows you to search for points of interest
near the current vehicle location, such as
restaurants and gas stations, etc.
“SETTING A NEARBY PLACE” (page
4-42)
. Map View:
Switches the map type. It is used to switch
between Plan View and Birdview
TM
the left screen display.
“SWITCHING THE MAP VIEW” (page
3-4)
. Heading:
Switches the orientation of the map. “North
Up” or “Heading Up” are the available
options.
“SETTINGS OF HEADING/LONG
RANGE MAP VIEW” (page 3-15)
. Landmark Icons:
Allows you to display certain points of
interest near the current vehicle location on
the map, such as restaurants and gas
stations, etc.
“DISPLAYING LANDMARK ICONS”
(page 3-22)
and set
Getting started 2-7
Page 16

. Store Tracking:
Allows you to store in the Address Book the
route that you have travelled from the
starting point to the current location.
“STORING A TRACKED ROUTE”
(page 6-14)
2-8 Getting started
Page 17

Scrolled location map screen
If <ENTER> is pushed while a scrolled map
screen is displayed, the following options are
available.
. New Dest:
Allows you to set the destination to the
location where you pushed <ENTER>.Ifa
destination is already set, the location will be
set as the new destination.
“SETTING FROM MAP” (page 4-18)
NAV2706
. Add to Route:
Allows you to set the location where you
pushed <ENTER> as the destination or a
waypoint.
This is available only when the suggested
route is already set.
“Setting a destination or waypoint”
(page 5-20)
. Nearby:
Allows you to search for points of interest
near the location where you pushed
<ENTER> and set it as a destination or
waypoint.
Use the same search method as the one for
POI.
“SETTING A NEARBY PLACE” (page
4-42)
. Store Location:
Allows you to store the location where you
pushed <ENTER> in the Address Book.
The stored location can be retrieved to set it
as a destination or waypoint.
“STORING A LOCATION” (page 6-2)
. Delete:
Allows you to delete a stored locati on,
destination or waypoint. To delete it, place
the cross pointer over the corresponding
icon, push <ENTER>, highlight [Delete]
and push <ENTER> again.
Getting started 2-9
Page 18

FUNCTIONS DISABLED WHILE
DRIVING
To ensure safe driving, some functions cannot
be operated while driving.
The on-screen functions that are not available
while driving will be “grayed-out” or muted.
Park the vehicle in a safe location and then
operate the navigation system.
NAV2707
2-10 Getting started
Page 19
OPERATING MAPS
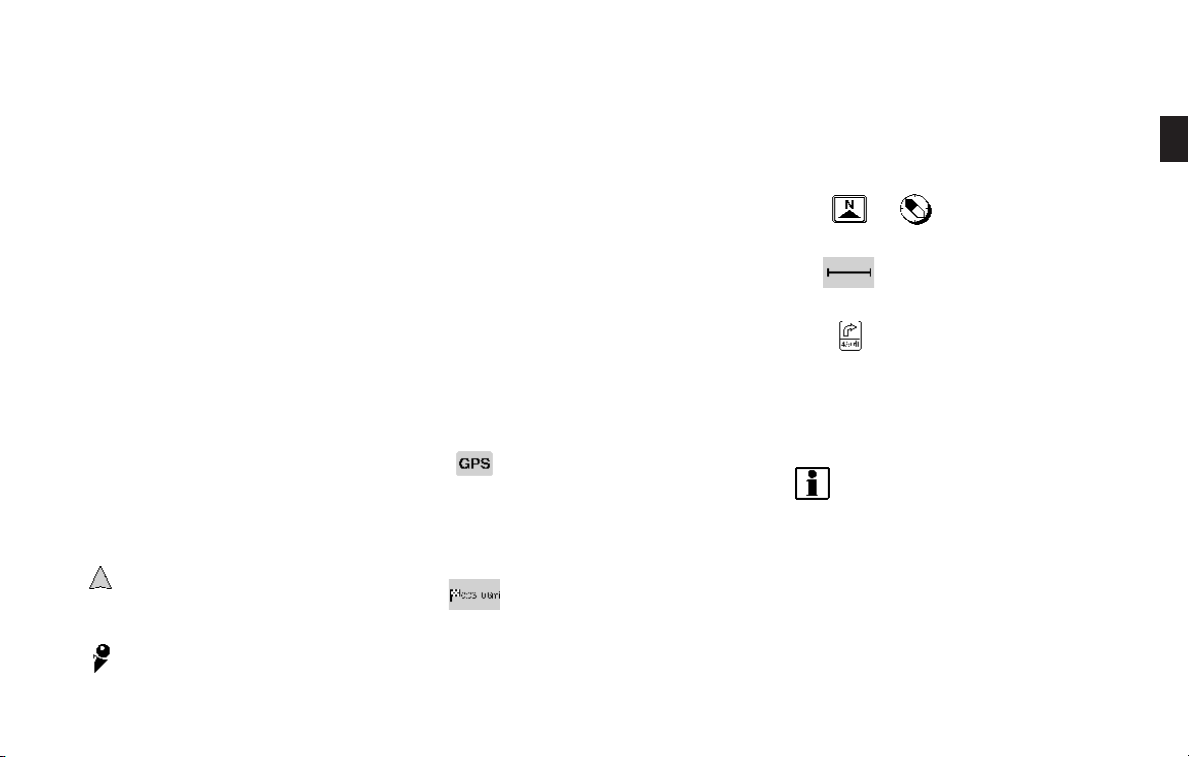
HOW TO VIEW MAP SCREEN
The navigation system displays various information on the map screen.
Screen information
1
&
2
&
Vehicle icon:
Indicates the current vehicle location and
the direction that you are traveling.
Guide point:
Indicates a guide point on the route.
3
&
4
&
GPS indicator:
Indicates the GPS reception condition of
signals from the satellites.
*
Green: accurate positioning is possible
*
Gray: accurate positioning is not possible
Remaining time and distance to the
destination:
Indicates the remaining time and distance to
the destination.
NAV2708
5
&
Suggested route:
Appears in bold yellow during route gui-
dance.
6
&
7
&
8
&
. Roads with a width of 10 ft (3 m) or less may
. The system may require a long time for
/ Direction indicator:
Indicates the direction of the map.
Scale indicator:
Indicates the scale of the map.
Arrow and distance:
Appears on the upper left corner of the
screen when the suggested route is set.
Indicates the distance to the next guide
point and the turning direction at that guide
point. This function can be turned on or off.
INFO:
not be displayed on the map.
positioning. The GPS indicator may remain
gray for 3 to 4 minutes after the system is
started. This is not a malfunction.
Getting started 2-11
Page 20

MAP SCREEN TYPES
Two types of map views are available: Plan View
and Birdview
TM
.
2-12 Getting started
NAV2709
Plan View
Plan View displays the map in a 2-dimensional
environment similar to a road map.
NAV2710
Birdview
BirdviewTMdisplays the view from an elevated
perspective. In Birdview
TM
TM
, it is easy to recognize an image of the route because it provides a
panoramic view over a long distance.
Page 21

NAV2711
SWITCHING THE MAP VIEW
1. Push <ENTER> while the current location
map screen is displayed.
NAV2712
2. Highlight [Map View] and push <ENTER>.
NAV2713
3. Highlight the preferred map view and push
<ENTER>. The indicator of the selected
map view illuminates.
“SWITCHING THE MAP VIEW” (page
3-4)
4. Push <MAP> to return to the current
location map screen.
Getting started 2-13
Page 22

INFO:
. When you select a map view, a preview of
that view is displayed on the right side of the
screen.
. You can also switch the map view using the
following procedure.
1) Push <SETTING>.
2) Highlight [Navigation] and push
<ENTER>.
3) Highlight [Map View] and push
<ENTER>.
2-14 Getting started
Page 23

NAI0408
MOVING AROUND WITHIN A MAP
You can manually move across the map to view
the surrounding areas or a preferred location.
1. Tilt the joystick corresponding to the direction that you want to move across the map.
Keep tilting the joystick to continuously
move across the map in that direction. Once
you start moving on the map, the cross
pointer appears.
2. Returning to the current location map screen
Push <MAP> or <BACK> to return to the
current location map screen, and the cross
pointer disappears.
Getting started 2-15
Page 24

NAI0409
CHANGING THE SCALE OF A MAP
Push <ZOOM IN> ( )or<ZOOM OUT>
). A scale appears on the left side of the
(
screen.
To view the map in detail, push <ZOOM IN>
(
).
To view a wider area, push <ZOOM OUT>
).
(
The scale will automatically disappear when
neither <ZOOM IN> (
OUT> (
seconds.
Free zoom
Push and hold <ZOOM IN> (
OUT> (
smaller steps (free zoom). Once the free zoom
has been utilized, push <ZOOM IN> (
<ZOOM OUT> (
in smaller steps.
) has been pushed for several
INFO:
) to change the map scale in
) to change the map scale
)nor<ZOOM
)or<ZOOM
)or
2-16 Getting started
Page 25
STORING YOUR HOME LOCATION/
ADDRESS
HOW TO STORE YOUR HOME
If your home location is already stored in the
Address Book, it can be easily retrieved to set
the route to your home.
The procedure to store your home location is the
same as for storing any other location.
“4. Setting a destination”
As an example, the procedure for storing your
home location by searching for a destination by
address is described here.
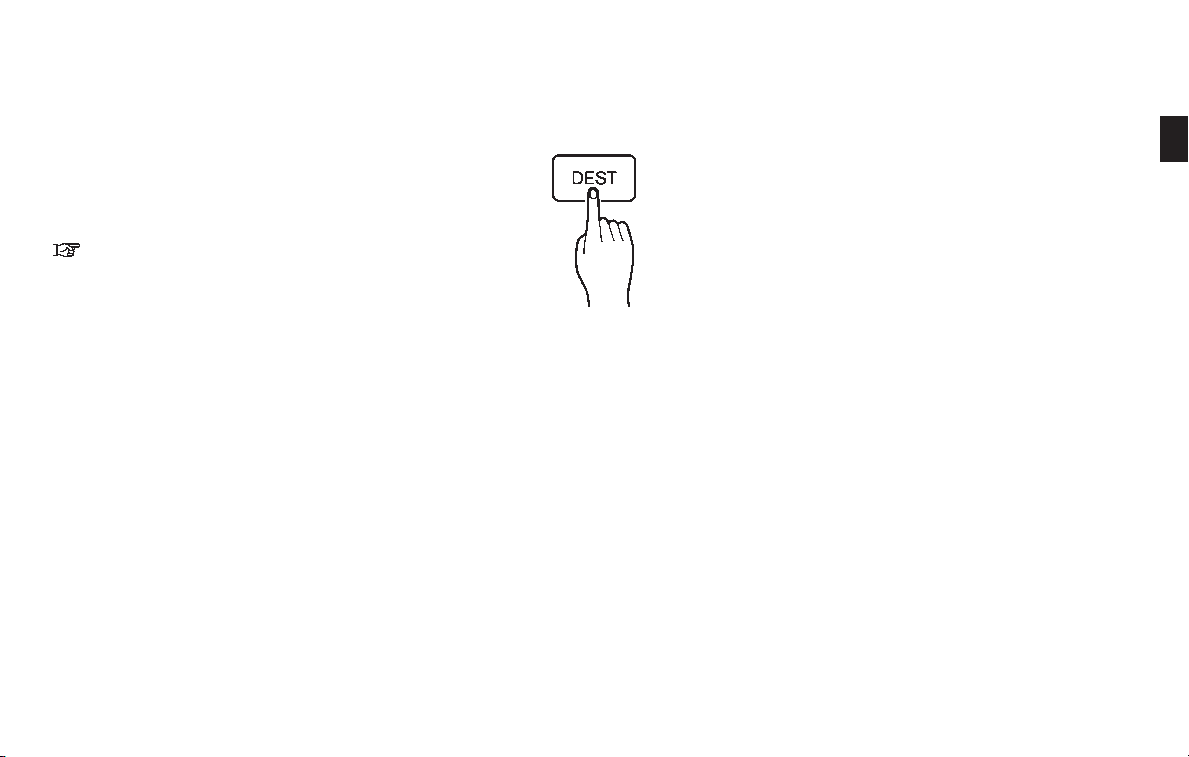
1. Push <DEST>.
NAI0410
NAV2714
2. Highlight [Address Book] and push
<ENTER>.
Getting started 2-17
Page 26

NAV2715
3. Highlight [Home Location (Add New)] and
push <ENTER>.
2-18 Getting started
NAV3023
4. A confirmation message is displayed. Confirm the contents of the message, highlight
[Yes] and push <ENTER>.
NAV3048
5. Highlight [Street Address] and push
<ENTER>. A character input screen is
displayed.
Page 27

NAV3062
6. Enter the address of your home, highlight
[OK] and push <ENTER>.
The map screen is displayed.
“SETTING A STREET ADDRESS”
(page 4-3)
NAV3050
7. Using the joystick, adjust your home location
if necessary.
8. After adjusting the location, push
<ENTER>.
NAV3051
9. A message is displayed and your home
location is stored.
10. Push <MAP> to return to the current
location map screen.
The home icon is displayed on the map.
INFO:
You can also perform the same setting by
pushing <SETTING> and selecting [Navigation].
“STORING A LOCATION BY SEARCHING” (page 6-2)
Getting started 2-19
Page 28

CHARACTER (letter and number) INPUT
SCREEN
You will have to enter alphanumeric characters
when setting a destination, searching for a
facility or editing the stored locations, etc.
2-20 Getting started
NAV3063
1. Use the joystick to highlight a character on
the displayed keyboard.
NAV3064
2. Push <ENTER>. The highlighted character
is entered.
Page 29

NAV3065
3. Push <BACK> or highlight [ ], and push
<ENTER> to delete the last character
entered.
Push and hold <BACK> to delete all the
characters entered.
Highlight [
] and push <ENTER> to
enter a space.
NAV3066
4. After finishing the entry, highlight [OK] and
push <ENTER>.
INFO:
You can push <BACK> to return to the
previous screen, but only after deleting all
the characters entered.
Getting started 2-21
Page 30

PHONE NUMBER INPUT SCREEN
You can enter a phone number as a search
method to look for a point of interest.
INFO:
Only the locations included in the database in
the map DVD-ROM can be searched by the
phone number.
2-22 Getting started
NAV2723
1. Use the joystick to highlight a number on the
displayed keyboard.
NAV2724
2. Push <ENTER>. The highlighted number is
entered.
Page 31

NAV2725
3. Push <BACK> or highlight [ ], and push
<ENTER> to delete the last number entered.
Push and hold <BACK> to delete all the
numbers entered.
NAV2726
4. After finishing the entry, highlight [Map] and
push <ENTER>.
INFO:
You can p u s h <BACK> to return to the
previous screen, but only after deleting all the
numbers entered.
Getting started 2-23
Page 32

NAV2727
4
&
If the entire list cannot be displayed on the
screen, the system displays the total number
of items in the list and the entry number of
the selected item. Tilt the joystick upward or
downward to scroll the list.
5
&
Highlight and push <ENTER> to sort the
list by shortest distance.
6
&
Highlight and push <ENTER> to sort the
list in the original order.
7
&
When the list is sorted by the shortest
distance, you can confirm the selected
location in the preview on the right side of
the screen.
LIST SCREEN
After searching for a point of interest, a list
screen is displayed.
Depending on the list displayed, it can be
sorted.
2-24 Getting started
Items displayed in a list
1
&
Highlight the preferred item from the list and
push <ENTER> to select it.
If a location or facility name is not completely
displayed (due to length), highli ght the item
to show the hidden part of the name.
2
&
Distance from the current location
3
&
Direction to the point of interest
Page 33

SETTING A DESTINATION
SEARCHING FOR A DESTINATION
As an example, the method for setting an airport
as the destination using [Points of Interest] is
described here.
1. Push <DEST>.
NAI0410
NAV2728
2. Highlight [Points of Interest] and push
<ENTER>.
Getting started 2-25
Page 34

NAV2729
3. Highlight [Travel] and push <ENTER>.
2-26 Getting started
NAV2730
4. From the category list, highlight [AIRPORT]
and push <ENTER>.
The character input screen is displayed.
NAV3067
5. Highlight [OK] and push <ENTER>.
A list screen is displayed.
INFO:
You can enter the city name and facility
name to narrow down your search.
Page 35

NAV2732
6. Highlight the preferred airport from the list
and push <ENTER>.
NAV2733
INFO:
By selecting [By Distance], you can sort the
list by the shortest distance.
The position of the selected location is
displayed in the preview on the right side
of the screen.
NAV2734
7. The selected destination is displayed at the
center of the map. Highlight [OK] after
confirming the location of the displayed
destination, and push <ENTER>.
INFO:
The system sets the destination to the
selected location and starts calculating a
route.
Getting started 2-27
Page 36

NAV2735
INFO:
Even after setting a destination, you can adjust
the location of the destination, store the route,
etc. if necessary.
“OPERATIONS AFTER SETTING A
DESTINATION” (page 4-45)
2-28 Getting started
NAV2736
STARTING ROUTE GUIDANCE
After setting the destination and performing
route calculation, the suggested route is displayed.
1. Highlight [Start] and push <ENTER>.
NAV2737
2. Once route guidance is started, the system
navigates you through the guide points
using visual and voice guidance.
Page 37

NAV2738
3. When approaching a guide point, the
system automatically changes to the split
screen and shows an enlarged view of the
intersection in the left screen.
NAV2739
4. When arriving at the destination, route
guidance automatically ends.
Getting started 2-29
Page 38

DELETING A ROUTE
To delete a route already set, use the following
procedure. If you delete a route, the destination
is also deleted.
2-30 Getting started
1. Push <ROUTE>.
NAI0411
NAV2740
2. Highlight [Cancel Route Guidance] and
push <ENTER>.
Page 39

SETTING THE VOICE GUIDANCE
TURNING VOICE GUIDANCE ON/OFF
You can activate or deactivate voice guidance
and adjust the volume.
NAV2741
3. A confirmation message is displayed. Highlight [Yes] and push <ENTER>.
INFO:
If a route is cancelled, [Cancel Route Guidance]
changes to [Resume Route Guidance].
Highlight [Resume Route Guidance] and push
<ENTER> to reactivate the cancelled route.
This is available only until a new route is set.
NAI0413
1. Push <SETTING>.
Getting started 2-31
Page 40

ADJUSTING VOICE GUIDANCE VOLUME
You can adjust the volume of voice guidance.
NAV3052
2. Highlight [Guidance Voice] and push
<ENTER>. The indicator illuminates if voice
guidance is activated.
2-32 Getting started
NAI0413
1. Push <SETTING>.
Page 41

NAV3053
2. Highlight [Guidance Volume] and push
<ENTER>.
NAV3054
3. Adjust the voice guidance volume using the
joystick.
Getting started 2-33
Page 42

MEMO
2-34 Getting started
Page 43

3 Map settings
Map types ........................................................ 3-2
Plan View ..................................................... 3-2
Birdview
Switching the map view ....................................... 3-4
Available views .............................................. 3-5
Moving a map ................................................... 3-7
Plan View ..................................................... 3-7
Birdview
Returning to the current vehicle location .............. 3-9
Map scrolling information ............................... 3-10
TM
.................................................... 3-3
TM
.................................................... 3-8
Changing the scale of a map .............................. 3-12
Map scale .................................................. 3-13
Other settings for the map screen........................ 3-15
Settings of heading/long range map view........... 3-15
Changing the Birdview
Changing the scale of the left screen................ 3-20
Map icons ...................................................... 3-22
Displaying landmark icons .............................. 3-22
Map symbols. .............................................. 3-24
TM
angle ....................... 3-17
Page 44

MAP TYPES
Two types of map views are available: Plan View
and Birdview
TM
.
PLAN VIEW
Plan View displays the map in a 2-dimensional
environment similar to a road map.
3-2 Map settings
Screen information
1
&
2
&
Vehicle icon:
Indicates the current vehicle location and
the direction that you are traveling.
Guide point:
Indicates a guide point on the route.
3
&
4
&
GPS indicator:
Indicates the GPS reception condition of
signals from the satellites.
*
Green: accurate positioning is possible
*
Gray: accurate positioning is not possible
Remaining time and distance to the
destination:
Indicates the approximate remaining time
and distance to the destination. This indicator will appear when you set the destina-
NAV2708
Page 45

tion and start route guidance.
5
&
Suggested route:
Appears in bold yellow during route gui-
dance.
6
&
/ Direction indicator:
Indicates the direction of the map.
7
&
Scale indicator:
Indicates the scale of the map.
8
&
Arrow:
Indicates the distance to the next guide
point and the turning direction at that guide
point.
BIRDVIEW
BirdviewTMdisplays the map from an elevated
perspective. In Birdview
TM
TM
, it is easy to recognize an image of the route because it provides a
panoramic view over a long distance.
INFO:
About the Birdview
. “Birdview
TM
TM
display
” is a registered trademark of
Clarion Co., Ltd.
. The map in Birdview
TM
always appears with
the current forward direction facing up.
NAV2746
Map settings 3-3
Page 46

SWITCHING THE MAP VIEW
The map view can be changed between Plan
View and Birdview
TM
. The map can also be
displayed in the split screen mode.
NAV2711
1. Push <ENTER> while the current location
map screen is displayed.
NAV2712
2. Highlight [Map View] and push <ENTER>.
3-4 Map settings
Page 47

3. Highlight the preferred map view and push
<ENTER>. The indicator of the selected
map view illuminates.
4. Push <MAP> to return to the current
location map screen.
NAV2747
AVAILABLE VIEWS
. Plan View:
Switches to Plan View.
. Birdview
Switches to Birdview
. Split (Plan View):
Changes to the split screen mode and both
halves display maps in Plan View.
. Split (Birdview
Changes to the split screen mode and the
left half displays the map in Plan View and
the right half displays the map in Birdview
. When you select a map view, a preview of
that view is displayed on the right side of the
screen.
. When you select [Split (Plan View)] or [Split
(Birdview
becomes available. This is used to change
the scale of the map in the left screen.
TM
:
TM
.
TM
):
INFO:
TM
)], [Change Map Scale for Left]
“CHANGING THE SCALE OF THE
LEFT SCREEN” (page 3-20)
TM
.
Map settings 3-5
Page 48

Split (Plan View)
NAV2748
NAV2750
INFO:
You can also set the map view using the
following procedure.
1) Push <SETTING>.
2) Highlight [Navigation] and push <ENTER>.
3) Highlight [Map View] and push <ENTER>.
Split (BirdviewTM)
3-6 Map settings
NAV2749
Page 49

MOVING A MAP
NAI0408
The operations for moving across the map are
different between Plan View and Birdview
TM
.
PLAN VIEW
Tilt the joystick corresponding to the direction
that you want to move across the map. Keep
tilting the joystick to continuously move across
the map in that direction.
Once you start moving across the map, the
cross pointer appears.
Map settings 3-7
Page 50

NAI0414
BIRDVIEW
The joystick allows movement in the following
ways.
Keep tilting the joystick to continuously move
across the map in that direction.
1
&
Rotates the map clockwise.
2
&
Rotates the map counterclockwise.
3
&
Moves the cross pointer on the map upward.
4
&
Moves the cross pointer on the map downward.
Once you start moving on the map, the cross
pointer appears.
TM
3-8 Map settings
Page 51

NAI0415
RETURNING TO THE CURRENT VEHICLE LOCATION
Push <MAP>.
The current location map screen is displayed.
INFO:
. The previous screen can be displayed by
pushing <BACK>. You can also return to
the current location map screen by repeatedly pushing <BACK>.
. Depending on the menu selected, pushing
<MAP> may not return you to the current
location map screen.
Map settings 3-9
Page 52

MAP SCROLLING INFORMATION
Information about the location, on which the
center of the cross pointer is placed by scrolling
on the map, can be set to be displayed.
1. Push <SETTING>.
3-10 Map settings
NAV3055
2. Highlight [Navigation] and push <ENTER>.
NAV2752
3. Highlight [Map Scrolling Information] and
push <ENTER>.
Page 53

NAV2753
4. Highlight the preferred information item and
push <ENTER>. The indicator of the
selected information item illuminates.
Available information items:
. Address Book Icons
. Destination/Waypoint Icons
. Latitude/Longitude Info
NAV2754
5. Push <MAP> to return to the current
location map screen.
Move the cross pointer to the set location to
display the information.
Map settings 3-11
Page 54

CHANGING THE SCALE OF A MAP
NAI0409
Push <ZOOM IN> ( )or<ZOOM OUT>
). A scale appears on the left side of the
(
screen.
To view the map in detail, push <ZOOM IN>
).
(
To view a wider area, push <ZOOM OUT>
).
(
The scale will automatically disappear when
neither <ZOOM IN> (
<ZOOM OUT> (
several seconds.
INFO:
Free zoom
Push and hold <ZOOM IN> (
OUT> (
smaller steps (free zoom). Once the free zoom
has been utilized, push <ZOOM IN> (
<ZOOM OUT> (
in smaller steps.
) to change the map scale in
) nor
) has been pushed for
)or<ZOOM
)or
) to change the map scale
3-12 Map settings
Page 55

MAP SCALE
The following scales are available depending on
the map view.
. In Plan View:
Widest (1/51,200,000) to the most detailed
(1/5,000)
. In Birdview
Widest (1/20,480,000) to the most detailed
(viewpoint height at 1/25,000)
TM
:
Scale level of the Plan View display
Map scale Actual distance
1:51.2 million 400 miles (640 km)
1:5.12 million 32 miles (64 km)
1:1.28 million 8 miles (16 km)
1:320,000 2 miles (4 km)
1:160,000 1 mile (2 km)
1:80,000 1/2 mile (1 km)
1:40,000 1/4 mile (500 m)
1:20,000 1/8 mile (200 m)
1:10,000 1/16 mile (100 m)
1:5,000
1/32 mile (50 m)
Example: The most detailed level
NAV2755
Example: The widest level
NAV2756
Map settings 3-13
Page 56

Scale level of the BirdviewTMdisplay
Map scale Distance between grids
1:20.48 million 160 miles (256 km)
1:5.12 million 32 miles (64 km)
1:2.56 million 16 miles (32 km)
1:1.28 million 8 miles (16 km)
1:640,000 4 miles (8 km)
1:320,000 2 miles (4 km)
1:160,000 1 mile (2 km)
1:80,000 1/2 mile (1 km)
1:40,000 1/4 mile (500 m)
1:25,000
1/6 mile (250 m)
Example: The most detailed level
NAV2757
3-14 Map settings
Example: The widest level
NAV2758
Page 57

OTHER SETTINGS FOR THE MAP
SCREEN
Other settings are also available for the map
screen, such as changing the map direction,
splitting the screen, etc.
SETTINGS OF HEADING/LONG
RANGE MAP VIEW
You can change the map direction (orientation)
in Plan View or change the position of the
vehicle icon to view a wider area in the traveling
direction.
These settings are available only in the Plan
View or Split (Plan View) mode.
NAV4173
1. Push <ENTER> while the current location
map screen is displayed.
NAV4174
2. Highlight [Heading] and push <ENTER>.
Map settings 3-15
Page 58

NAV2760
3. Highlight the preferred map orientation and
push <ENTER>. The indicator of the
selected map orientation illuminates.
INFO:
[Long Range Map View] is displayed only
when you select [Heading Up].
4. Push <MAP> to return to the current
location map screen.
Available map orientations
. North Up:
North is set at the top of the map.
. Heading Up:
The traveling direction is set at the top of the
map.
. Long Range Map View:
The vehicle icon is located slightly lower
than the center of the screen. This offers a
wider view in the traveling direction.
. Birdview
This changes the Birdview
TM
Angle:
TM
angle.
North Up
NAV2761
3-16 Map settings
Heading Up
NAV2762
Page 59

CHANGING THE BIRDVIEWTMANGLE
This changes the BirdviewTMangle.
This setting is available only in the Birdview
Split (Birdview
TM
) mode.
TM
or
Long Range Map View
NAV2763
INFO:
If the map orientation is switched, the icon
displayed in the lower left corner is also
switched.
: North Up
: Heading Up
NAV2764
INFO:
You can also set the orientation of the map using
the following procedure.
1) Push <SETTING>.
2) Highlight [Navigation] and push <ENTER>.
3) Highlight [Heading] and push <ENTER>.
Map settings 3-17
Page 60

NAV4173
1. Push <ENTER> while the current location
map screen is displayed.
3-18 Map settings
NAV4174
2. Highlight [Heading] and push <ENTER>.
NAV2765
3. Highlight [BirdviewTMAngle] and push
<ENTER>.
INFO:
This setting is available only when the map
view is set to the Birdview
(Birdview
TM
) mode.
TM
or Split
Page 61

4. Adjust the BirdviewTMangle by moving the
cursor in the direction of [
]or[ ].
NAV2766
5. Push <MAP> to return to the current
location map screen.
NAV2764
INFO:
You can also set the Birdview
TM
angle using the
following procedure.
1) Push <SETTING>.
2) Highlight [Navigation] and push <ENTER>.
3) Highlight [Heading] and push <ENTER>.
TM
4) Highlight [Birdview
Angle] and push
<ENTER>.
Map settings 3-19
Page 62

CHANGING THE SCALE OF THE LEFT
SCREEN
When the split screen is displayed, you can
change the scale of the left screen.
3-20 Map settings
NAV2711
1. Push <ENTER> while the current location
map screen is displayed.
NAV2712
2. Highlight [Map View] and push <ENTER>.
Page 63

NAV2767
3. Highlight [Change Map Scale for Left] and
push <ENTER>.
INFO:
[Change Map Scale for Left] is displayed
only when the map view is in the Split (Plan
View) or Split (Birdview
TM
) mode.
NAV2768
4. Highlight [Map Scale] and push <ENTER>.
Adjust the map scale by moving the cursor
in the direction of [+] or [−].
Use the joystick to adjust the scale of the
map.
After finishing the setup, push <ENTER> or
<BACK> to apply the scale setting.
5. Push <MAP> to return to the current
location map screen.
NAV2750
INFO:
You can also change the scale of the left screen
using the following procedure.
1) Push <SETTING>.
2) Highlight [Navigation] and push <ENTER>.
3) Highlight [Map View] and push <ENTER>.
4) Highlight [Change Map Scale for Left] and
push <ENTER>.
Map settings 3-21
Page 64

MAP ICONS
Some landmarks in the surrounding area can be
displayed as icons on the screen.
DISPLAYING LANDMARK ICONS
This allows you to display or hide the landmark
icons by type.
Landmark icons that can be displayed
. Restaurant
.
.
.
.
Gas Station
Hotel
ATM
Rest Area
3-22 Map settings
NAV2711
1. Push <ENTER> while the current location
map screen is displayed.
NAV2769
2. Highlight [Landmark Icons] and push
<ENTER>.
Page 65

NAV2770
3. Highlight the preferred icon and push
<ENTER>.
The icon display setting toggles on and off
each time you push <ENTER>.
The indicator of the selected icon illuminates.
NAV2771
4. Push <MAP> to return to the current
location map screen.
The activated landmark icons are displayed
on the map.
NAV2772
INFO:
You can also set the landmark icons using the
following procedure.
1) Push <SETTING>.
2) Highlight [Navigation] and push <ENTER>.
3) Highlight [Landmark Icons] and push
<ENTER>.
Map settings 3-23
Page 66

MAP SYMBOLS
This navigation system uses symbols to display facilities.
NAI0502
3-24 Map settings
Page 67

NAI0417
Map settings 3-25
Page 68

Road color
The road types are differentiated by colors.
Freeway: Pink with red border
Main road: Amber
Narrow street: Gray
Road with incomplete map data: Dark green
3-26 Map settings
Page 69

4 Setting a destination
Destination screen.............................................. 4-2
Basic operation ............................................. 4-2
Setting a street address/residence as the
destination........................................................ 4-3
Setting a Street Address ................................. 4-3
Setting a City Center ...................................... 4-8
Setting an Intersection .................................. 4-12
Setting from map ......................................... 4-18
Setting a stored location as the destination ............ 4-20
Setting your home ........................................ 4-20
Setting from Address Book ............................ 4-22
Setting a previous destination ......................... 4-24
Setting the previous starting point.................... 4-25
Setting from stored routes.............................. 4-27
Setting a facility as the destination ....................... 4-28
Setting a point of interest............................... 4-28
Setting a freeway entrance/exit ........................ 4-38
Setting by phone number ............................... 4-41
Setting a nearby place .................................. 4-42
Operations after setting a destination.................... 4-45
Available setting items................................... 4-45
Adjusting the location of the destination ............ 4-46
Adding additional destinations to a route ........... 4-47
Viewing information about the searched
location...................................................... 4-48
Storing a location......................................... 4-49
Page 70

DESTINATION SCREEN
There are several methods you can use to set
your destination. Understand the advantages of
each method and select the best method for
finding and setting your destination.
BASIC OPERATION
1. Push <DEST>.
2. Highlight the preferred destination setting
method and push <ENTER>.
NOTE:
There may be a case that you cannot
search by pointing at “Street Address”,
“Intersection” and “Point of Interest
(POI)”. This is because the map DVDROM data of Nunavut in Canada is undeveloped.
Available setting items
. Street Address:
Searches for a destination by address.
. Address Book:
Searches for a destination from the stored
home or the list of stored locations.
NAV2773
. Previous Destinations:
Searches for a destination from the previous
destinations.
. Points of Interest:
Searches for a destination from various
categories of businesses or locations.
4-2 Setting a destination
Page 71

SETTING A STREET ADDRE SS/
RESIDENCE AS THE DESTINATION
. Others
— Phone Number:
Searches for a destination by the telephone number.
— Nearby Places:
Searches for a business/location near
your vehicle.
— Previous Starting Point:
Sets the previous starting point as the
destination.
— Stored Route:
Selects a stored route.
— Freeway Entrance/Exit:
Searches for a destination from a freeway entrance/exit.
— Intersection:
Searches for a destination from intersections.
— City Center:
Sets the center of a city as the destination.
If you know the address of a friend or business
or you are going to a central location (tourist
spot,etc.)inacity,thefollowingsetting
methods are available.
. Setting a Street Address
If you know the address of your destination,
use this method to enter the address and
then have the system calculate a route. You
can also search for a location near the
preferred destination by entering the house
number if the map DVD-ROM contains the
relevant data.
. Setting a City Center
This allows you to have the system calculate
a route to the center of a city, without setting
a specific location.
. Setting an Intersection
This allows you to set the destination to an
intersection of any two streets, and then
have the system calculate a route.
NAV2825
SETTING A STREET ADDRESS
1. Push <ENTER>.
2. Highlight [Street Address] and push
<ENTER>.
A character input screen is displayed.
Setting a destination 4-3
Page 72

INFO:
Character input screen for Street Address
1
&
Region:
The region previously entered is auto-
matically displayed. It can be changed.
2
&
City:
By default, all cities in the region are
available. Route calculation conditions
can be narrowed down by entering the
name of the city.
4-4 Setting a destination
3
&
Street:
Enter the name of a street.
4
&
House No. :
A house number can be entered.
5
&
Symbols/A-Z:
Symbol keys are displayed by high-
lighting [Symbols] and pushing
<ENTER>. Alphabet keys are displayed by highlighting [A-Z] and pushing <ENTER>.
NAV3068
NAV3069
3. Enter the house number, highlight [OK] and
push <ENTER>.
If you do not know the house number,
highlight [OK] or [Skip] and push
<ENTER>.
Page 73

NAV3070
4. Enter the name of the street. After finishing
the entry, highlight [OK] and push
<ENTER>. A list of cities is displayed.
NAV2829
5. Highlight the correct city of the destination
from the list and push <ENTER>.
INFO:
If the list of cities is too long, choose a city
by selecting <BACK>, highlight [City] and
push <ENTER>.
NAV2830
6. The selected destination is displayed at the
center of the map. Highlight [OK] after
confirming the location of the displayed
destination, and push <ENTER>.
The system sets the destination to the
selected location and starts calculating a
route.
Setting a destination 4-5
Page 74

INFO:
Even after setting a destination, you can
adjust the location of the destination, store
the route, etc.
“OPERATIONS AFTER SETTING A
DESTINATION” (page 4-45)
4-6 Setting a destination
NAV2831
NAV3071
Changing the region
1. From the Street Address destination entry
screen, highlight [Region] and push
<ENTER> to change the region.
NAV3072
2. Highlight the preferred region and push
<ENTER>.
A character input screen is displayed.
Page 75

NAV3073
Specifying a city
1. From the Street Address destination entry
screen, highlight [City] and push <ENTER>
to narrow down the route calculation conditions by entering the name of the city.
NAV3074
2. Enter the name of the city, highlight [OK] and
push <ENTER>.
A list screen is displayed.
INFO:
. Highlight [All Cities] and push
<ENTER> to include all cities in the
region as the route calculation condition.
. Highlight [Last 5 Cities] and push
<ENTER> to display 5 cities recently
set as destinations.
NAV2836
3. Highlight the city of the destination from the
list and push <ENTER>.
Setting a destination 4-7
Page 76

NAV2787
SETTING A CITY CENTER
1. Push <DEST>.
2. Highlight [Others] and push <ENTER>.
4-8 Setting a destination
NAV2837
3. Highlight [City Center] and push
<ENTER>.
A character input screen is displayed.
NAV3075
INFO:
Character input screen for City Center
1
&
Region:
The region previously entered is auto-
matically displayed. It can be changed.
2
&
City:
By default, all cities in the region are
available. Route calculation conditions
can be narrowed down by entering the
name of the city.
Page 77

3
&
Symbols/A-Z:
Symbol keys are displayed by high-
lighting [Symbols] and pushing
<ENTER>. Alphabet keys are displayed by highlighting [A-Z] and pushing <ENTER>.
NAV3076
4. Highlight [City] and push <ENTER> to
narrow down the route calculation conditions by entering the name of the city.
Enter the name of the city, highlight [OK] and
push <ENTER>.
A list screen is displayed.
INFO:
Highlight [Last 5 Cities] and push
<ENTER> to display 5 cities recently set
as destinations.
NAV2840
5. Highlight the preferred destination from the
list and push <ENTER>.
The position of the selected location is
displayed in the preview on the right side
of the screen.
Setting a destination 4-9
Page 78

INFO:
By selecting [By Distance], you can sort the
list by the nearest distance.
4-10 Setting a destination
NAV2841
NAV2842
6. The selected destination is displayed at the
center of the map. Highlight [OK] after
confirming the location of the displayed
destination, and push <ENTER>.
The system sets the destination to the
selected location and starts calculating a
route.
NAV2843
INFO:
Even after setting a destination, you can
adjust the location of the destination, store
the route, etc.
“OPERATIONS AFTER SETTING A
DESTINATION” (page 4-45)
Page 79

NAV3077
Changing the region
1. From the City Center destination entry
screen, highlight [Region] and push
<ENTER> to change the region.
NAV3078
2. Highlight the preferred region and push
<ENTER>.
A character input screen is displayed.
Setting a destination 4-11
Page 80

NAV2787
SETTING AN INTERSECTION
1. Push <DEST>.
2. Highlight [Others] and push <ENTER>.
4-12 Setting a destination
NAV2846
3. Highlight [Intersection] and push
<ENTER>.
A character input screen is displayed.
Page 81

INFO:
Character input screen for Intersection
1
&
Region:
The region previously entered is auto-
matically displayed. It can be changed.
2
&
City:
By default, all cities in the region are
available. Route calculation conditions
can be narrowed down by entering the
name of the city.
3
&
1st Street:
Enter the name of the 1st street of the
destination intersection.
4
&
2nd Street:
Enter the name of the 2nd street of the
destination intersection.
NAV3079
5
&
Symbols/A-Z:
Symbol keys are displayed by high-
lighting [Symbols] and pushing
<ENTER>. Alphabet keys are displayed by highlighting [A-Z] and pushing <ENTER>.
Setting a destination 4-13
Page 82

4. Enter the name of the 1st street.
After finishing the entry, highlight [OK] and
push <ENTER>.
A list screen is displayed.
4-14 Setting a destination
NAV3080
NAV2849
5. Highlight a street as the 1st street from the
list and push <ENTER>.
NAV3081
6. Enter the name of the 2nd street.
After finishing the entry, highlight [OK] and
push <ENTER>.
A list screen is displayed.
Page 83

NAV2851
7. Highlight a street as the 2nd street from the
list and push <ENTER>.
NAV2852
8. The selected destination is displayed at the
center of the map. Highlight [OK] after
confirming the location of the displayed
destination, and push <ENTER>.
The system sets the destination to the
selected location and starts calculating a
route.
NAV2853
INFO:
Even after setting a destination, you can
adjust the location of the destination, store
the route, etc.
“OPERATIONS AFTER SETTING A
DESTINATION” (page 4-45)
Setting a destination 4-15
Page 84

NAV3082
Changing the region
1. From the Intersection destination entry
screen, highlight [Region] and push
<ENTER> to change the region.
4-16 Setting a destination
NAV3083
2. Highlight the preferred region and push
<ENTER>.
A character input screen is displayed.
NAV3084
Specifying a city
1. From the Intersection destination entry
screen, highlight [City] and push <ENTER>
to narrow down the route calculation conditions by entering the name of the city.
Page 85

NAV3085
2. Enter the name of the city, highlight [OK] and
push <ENTER>.
A list screen is displayed.
INFO:
. Highlight [All Cities] and push
<ENTER> to include all cities in the
region as the route calculation condition.
. Highlight [Last 5 Cities] and push
<ENTER> to display 5 cities recently
set as destinations.
NAV2858
3. Highlight the city of the destination from the
list and push <ENTER>.
A character input screen is displayed.
Setting a destination 4-17
Page 86

SETTING FROM MAP
This allows you to search for a destination by
scrolling the map, and then have the system
calculate a route to the destination.
4-18 Setting a destination
NAV2859
1. Scroll the map, place the cross pointer over
the preferred location, and push <ENTER>.
INFO:
. Adjust the map scale to search for a
location more effectively.
. The point on the blinking road where the
center of the cross pointer is located
can be set as a destination.
NAV2860
2. Highlight [New Dest] and push <ENTER>.
INFO:
For the items except for [New Dest], refer to
“Map menu screen”.
“Scrolled location map screen” (page
2-9)
Page 87

NAV2861
3. The system sets the destination to the
selected location and starts calculating a
route.
NAV2862
INFO:
If you set the destination on a freeway, a
confirmation message is displayed.
Setting a destination 4-19
Page 88

SETTING A STORED LOCATION AS
THE DESTINATION
The following setting methods are available
when setting the destination to your home or
any location stored in the Address Book.
. Setting your home
This allows you to set your home as the
destination and have the system calculate a
route. It is useful especially when you are
searching for a route to return to your home.
“STORING A LOCATION” (page 6-2)
. Setting from Address Book
This allows you to set the destination to a
location stored in the Address Book and
have the system calculate a route. To utilize
this function more effectively, destinations
that you often travel to should be stored in
advance.
“STORING A LOCATION” (page 6-2)
. Setting a Previous Destination
This allows you to set the destination to a
location that you have previously set as the
destination and have the system calculate a
route. Up to 100 previous destinations will
be automatically stored.
If the numbe r of previous destinations
exceeds 100, the oldest one will be
replaced by the new one.
. Setting the Previous Starting Point
This allows you to set the destination to the
starting point of the previous route guidance
and have the system calculate a route.
. Setting from Stored Routes
You can select a preferred route from the
stored routes.
NAV2774
SETTING YOUR HOME
1. Push <DEST>.
2. Highlight [Address Book] and push
<ENTER>.
4-20 Setting a destination
Page 89

NAV2775
3. Highlight [Home Location] and push
<ENTER>.
INFO:
If you have not stored your home yet, the
system will automatically display a screen for
storing it.
“STORING A LOCATION” (page 6-2)
NAV2776
4. A confirmation message is displayed, and
the system sets your home as the destination.
NAV2777
5. Your home is displayed at the center of the
map, and the system starts calculating a
route.
Setting a destination 4-21
Page 90

NAV2774
SETTING FROM ADDRESS BOOK
1. Push <DEST>.
2. Highlight [Address Book] and push
<ENTER>.
A list screen is displayed.
4-22 Setting a destination
NAV2778
3. Highlight the preferred location from the list
and push <ENTER>.
NAV2779
INFO:
Selecting [Sort List] displays a list of various
sort functions.
To use the sort functions, stored locations
must be set in advance.
“EDITING THE STORED HOME AND
LOCATION” (page 6-16)
Page 91

1
&
Sort by number:
The Address Book entries are displayed
in ascending numerical order.
2
&
Sort by name:
The Address Book entries are displayed
in alphabetic order.
3
&
Sort by icon:
By selecting a particular icon, a list that
contains only the Address Book entries
associated with that icon is displayed.
4
&
Sort by group:
By selecting a particular group (family,
friends, leisure, etc.), the selected group
is displayed at the top of the list.
NAV2780
NAV2781
4. The selected destination is displayed at the
center of the map. Highlight [OK] after
confirming the location of the displayed
destination, and push <ENTER>.
The system sets the destination to the
selected location and starts calculating a
route.
Setting a destination 4-23
Page 92

INFO:
Even after setting a destination, you can
adjust the location of the destination, store
the route, etc.
“OPERATIONS AFTER SETTING A
DESTINATION” (page 4-45)
4-24 Setting a destination
NAV2782
NAV2783
SETTING A PREVIOUS DESTINATION
1. Push <DEST>.
2. Highlight [Previous Destinations] and push
<ENTER>.
NAV2784
3. Highlight the preferred destination from the
list and push <ENTER>.
Page 93

NAV2785
4. The selected destination is displayed at the
center of the map. Highlight [OK] after
confirming the location of the displayed
destination, and push <ENTER>.
The system sets the destination to the
selected location and starts calculating a
route.
NAV2786
INFO:
Even after setting a destination, you can
adjust the location of the destination, store
the route, etc.
“OPERATIONS AFTER SETTING A
DESTINATION” (page 4-45)
NAV2787
SETTING THE PREVIOUS STARTING
POINT
1. Push <DEST>.
2. Highlight [Others] and push <ENTER>.
Setting a destination 4-25
Page 94

NAV2788
3. Highlight [Previous Starting Point] and push
<ENTER>.
4-26 Setting a destination
NAV2789
4. The starting point of the route of the
previous route guidance is displayed at the
center of the map. Highlight [OK] after
confirming the location of the displayed
destination, and push <ENTER>.
The system sets the destination to the
selected location and starts calculating a
route.
NAV2790
INFO:
Even after setting a destination, you can
adjust the location of the destination, store
the route, etc.
“OPERATIONS AFTER SETTING A
DESTINATION” (page 4-45)
Page 95

NAV2787
SETTING FROM STORED ROUTES
1. Push <DEST>.
2. Highlight [Others] and push <ENTER>.
NAV2791
3.Highlight[StoredRoutes]andpush
<ENTER>.
A list screen is displayed.
NAV2792
4. Highlight the preferred route from the list
and push <ENTER>.
The route to the destination is set.
INFO:
The stored route includes only locations
(destination and waypoints) and route calculation conditions, not the route itself.
Therefore, when the destination is set using
a stored route, a different route may be
suggested if the current vehicle location is
different from the one when the route was
stored.
Setting a destination 4-27
Page 96

SETTING A FACILITY AS THE
DESTINATION
When you are setting the destination to a facility,
the following methods are available.
. Setting a Point of Interest
This allows you to find a facility by type, and
then have the system calculate a route to
that destination. Specify the region and city
of the destination to find it more quickly.
. Setting a Freeway Entrance/Exit
This allows you to set the destination to an
entrance or exit of a freeway, and then have
the system calculate a route.
. Setting by Phone Number
If you know the telephone number of the
facility, use this to find the facility by entering
the number, and then have the system
calculate a route.
. Setting a Nearby Place
This allows you to set the destination to a
facility located near the current vehicle
location or another location that you move
to by scrolling the map, and then have the
system calculate a route.
If there are any particular Points of Interest
that you intend to use frequently, you can
store them in the list of nearby Points of
Interest.
“CUSTOMIZING NEARBY PLACES”
(page 6-33)
NAV2728
SETTING A POINT OF INTEREST
1. Push <DEST>.
2. Highlight [Points of Interest] and push
<ENTER>.
NAV2793
3.Highlightthemaincategoryandpush
<ENTER>.
INFO:
Highlight [By Name] and push <ENTER> to
include all categories in the route calculation
conditions.
4-28 Setting a destination
Page 97

NAV2794
4. Highlight the subcategory and push
<ENTER>.
A character input screen is displayed.
Setting a destination 4-29
Page 98

INFO:
Character input screen for Points of Interest
1
&
Region:
The region previously entered is auto-
matically displayed. It can be changed.
2
&
City:
By default, all cities in the region are
available. Route calculation conditions
can be narrowed down by entering the
name of the city.
4-30 Setting a destination
3
&
Category:
The preferred facility type can be
selected.
4
&
Name:
The name of the destination facility can
be selected.
5
&
Nearby POI:
The system will search for the facility,
based on the type selected, near the
current vehicle location.
NAV3086
6
&
Symbols/A-Z:
Symbol keys are displayed by high-
lighting [Symbols] and pushing
<ENTER>. Alphabet keys are displayed by highlighting [A-Z] and pushing <ENTER>.
Page 99

NAV3087
5. Highlight [Name] and push <ENTER>.
Enter the name of the destination facility.
NAV3088
6. After finishing the entry, highlight [OK] and
push <ENTER>.
A list screen is displayed.
NAV2798
7. Highlight the preferred destination facility
from the list and push <ENTER>.
INFO:
If the list of a POI names is too long, enter
more character s to further reduce the
number of matches.
Setting a destination 4-31
Page 100

INFO:
By selecting [By Distance], you can sort the
list by the nearest distance.
The position of the selected location is
displayed in the preview on the right side
of the screen.
4-32 Setting a destination
NAV2799
NAV2800
8. The selected destination is displayed at the
center of the map. Highlight [OK] after
confirming the location of the displayed
destination, and push <ENTER>.
The system sets the destination to the
selected location and starts calculating a
route.
NAV2801
INFO:
Even after setting a destination, you can
adjust the location of the destination, store
the location, etc.
“OPERATIONS AFTER SETTING A
DESTINATION” (page 4-45)
 Loading...