

Page 1
Page 2

TABLE OF CONTENTS
Introduction. . . . . . . . . . . . . . . . . . . . . . . . . . . . . . . . . . . . . . . . . . . . . . . . . . . . . . . . . . . . . . . . . . . 3
Features And Functions . . . . . . . . . . . . . . . . . . . . . . . . . . . . . . . . . . . . . . . . . . . . . . . . . . . . . . . 4
Key Charts . . . . . . . . . . . . . . . . . . . . . . . . . . . . . . . . . . . . . . . . . . . . . . . . . . . . . . . . . . . . . . . . . . 5
Device Table . . . . . . . . . . . . . . . . . . . . . . . . . . . . . . . . . . . . . . . . . . . . . . . . . . . . . . . . . . . . . . . . 6
Installing Batteries. . . . . . . . . . . . . . . . . . . . . . . . . . . . . . . . . . . . . . . . . . . . . . . . . . . . . . . . . . . . 7
Programming Device Control . . . . . . . . . . . . . . . . . . . . . . . . . . . . . . . . . . . . . . . . . . . . . . . . . . 8
Searching For Your Code. . . . . . . . . . . . . . . . . . . . . . . . . . . . . . . . . . . . . . . . . . . . . . . . . . . . . . . 9
Checking The Codes . . . . . . . . . . . . . . . . . . . . . . . . . . . . . . . . . . . . . . . . . . . . . . . . . . . . . . . . . . 9
Programming A Master Power Macro . . . . . . . . . . . . . . . . . . . . . . . . . . . . . . . . . . . . . . . . . . 10
Programming The Power Key For The Master Power Macro . . . . . . . . . . . . . . . . . . . . . . . . . . . 10
Operating The Master Power Macro . . . . . . . . . . . . . . . . . . . . . . . . . . . . . . . . . . . . . . . . . . . . . 10
Clearing The Master Power Macro . . . . . . . . . . . . . . . . . . . . . . . . . . . . . . . . . . . . . . . . . . . . . . 11
Re-Assigning Device Keys . . . . . . . . . . . . . . . . . . . . . . . . . . . . . . . . . . . . . . . . . . . . . . . . . . . . 11
Using Channel Scan . . . . . . . . . . . . . . . . . . . . . . . . . . . . . . . . . . . . . . . . . . . . . . . . . . . . . . . . . 11
Programming Favorite Channel Scan . . . . . . . . . . . . . . . . . . . . . . . . . . . . . . . . . . . . . . . . . 12
Changing Volume Lock . . . . . . . . . . . . . . . . . . . . . . . . . . . . . . . . . . . . . . . . . . . . . . . . . . . . . . 12
Locking Volume Control To One Mode
(Global Volume Lock). . . . . . . . . . . . . . . . . . . . . . . . . . . . . . . . . . . . . . . . . . . . . . . . . . . . . . . . . 12
Unlocking Volume Control For A Single Device
(Individual Volume Unlock) . . . . . . . . . . . . . . . . . . . . . . . . . . . . . . . . . . . . . . . . . . . . . . . . . . . . 13
Unlocking All Volume Control
(Restoring Default Setting ) . . . . . . . . . . . . . . . . . . . . . . . . . . . . . . . . . . . . . . . . . . . . . . . . . . . 13
Clearing Custom Programming . . . . . . . . . . . . . . . . . . . . . . . . . . . . . . . . . . . . . . . . . . . . . . . 14
Restoring Factory Default Settings . . . . . . . . . . . . . . . . . . . . . . . . . . . . . . . . . . . . . . . . . . . . 14
Troubleshooting . . . . . . . . . . . . . . . . . . . . . . . . . . . . . . . . . . . . . . . . . . . . . . . . . . . . . . . . . . . . . 15
Instructions To The User . . . . . . . . . . . . . . . . . . . . . . . . . . . . . . . . . . . . . . . . . . . . . . . . . . . . . 15
Lifetime Warranty . . . . . . . . . . . . . . . . . . . . . . . . . . . . . . . . . . . . . . . . . . . . . . . . . . . . . . . . . . . . 16
Additional Information . . . . . . . . . . . . . . . . . . . . . . . . . . . . . . . . . . . . . . . . . . . . . . . . . . . . . . . 17
Manufacturer’s Codes . . . . . . . . . . . . . . . . . . . . . . . . . . . . . . . . . . . . . . . . . . . . . . . . . . . . . . . . 34
Setup Codes For Cable Boxes . . . . . . . . . . . . . . . . . . . . . . . . . . . . . . . . . . . . . . . . . . . . . . . . . . 34
Setup Codes For Cable Box/PVR (or DVR) Combos. . . . . . . . . . . . . . . . . . . . . . . . . . . . . . . . . . 34
Setup Codes For DVD Players . . . . . . . . . . . . . . . . . . . . . . . . . . . . . . . . . . . . . . . . . . . . . . . . . . 34
Setup Codes For DVD Player/VCR Combos . . . . . . . . . . . . . . . . . . . . . . . . . . . . . . . . . . . . . . . . 35
Setup Codes For PVRs (or DVRs). . . . . . . . . . . . . . . . . . . . . . . . . . . . . . . . . . . . . . . . . . . . . . . . 35
Setup Codes For Satellite Receivers . . . . . . . . . . . . . . . . . . . . . . . . . . . . . . . . . . . . . . . . . . . . . 35
Setup Codes For Satellite Receiver/PVR (or DVR) Combos. . . . . . . . . . . . . . . . . . . . . . . . . . . . 36
Setup Codes For TVs . . . . . . . . . . . . . . . . . . . . . . . . . . . . . . . . . . . . . . . . . . . . . . . . . . . . . . . . . 36
Setup Codes For TV/DVD Player Combos . . . . . . . . . . . . . . . . . . . . . . . . . . . . . . . . . . . . . . . . . 37
Setup Codes For TV/VCR Combos . . . . . . . . . . . . . . . . . . . . . . . . . . . . . . . . . . . . . . . . . . . . . . . 38
Setup Codes For TV/VCR/DVD Player Combos . . . . . . . . . . . . . . . . . . . . . . . . . . . . . . . . . . . . . 38
Setup Codes For VCRs . . . . . . . . . . . . . . . . . . . . . . . . . . . . . . . . . . . . . . . . . . . . . . . . . . . . . . . . 38
2
WALRB3P manual booklet 5/2/06 3:13 PM Page 2
Page 3
43
INTRODUCTION
The One For All 3 Device Universal Remote Control (URC-3220) is designed
to remotely operate up to three home entertainment devices. It also
features intuitive and easy-to-use keys for instant control of DVD and PVR
(or DVR) components. Moreover, its sophisticated technology will allow you
to consolidate your original home entertainment remote controls into one
easy-to-use product. Advanced features include:
• Intuitive buttons to allow easy access to functions and menus on your DVD
player, PVR (or DVR), and Cable/Satellite devices
• Direct code setup for easy device programming
•
Step-and-Set
code search and
Code Verification
for an alternate way to pro-
gram devices
•
Power Macro
for master on/off control of all of your equipment with a single
keystro ke
•
Vo lu me L oc k/Un loc k
feature to lock or unlock the volume control to one mode
or individual modes
•
Device Key Re-Assignment
to remotely control a second (duplicate) device
•
Channel Scan
and
Favorite Channel Sca n
for easy channel surfing
• Color-coded keys to quickly locate popular functions
• Extensive code library for popular video devices including DVD players and
PVRs (or DVRs)
The URC-3220 remote control requires two (2) new AAA alkaline batteries (not included) and some easy programming to control your devices.
For best results, please read and perform all instructions listed here.Also,
keep this guide for future reference.
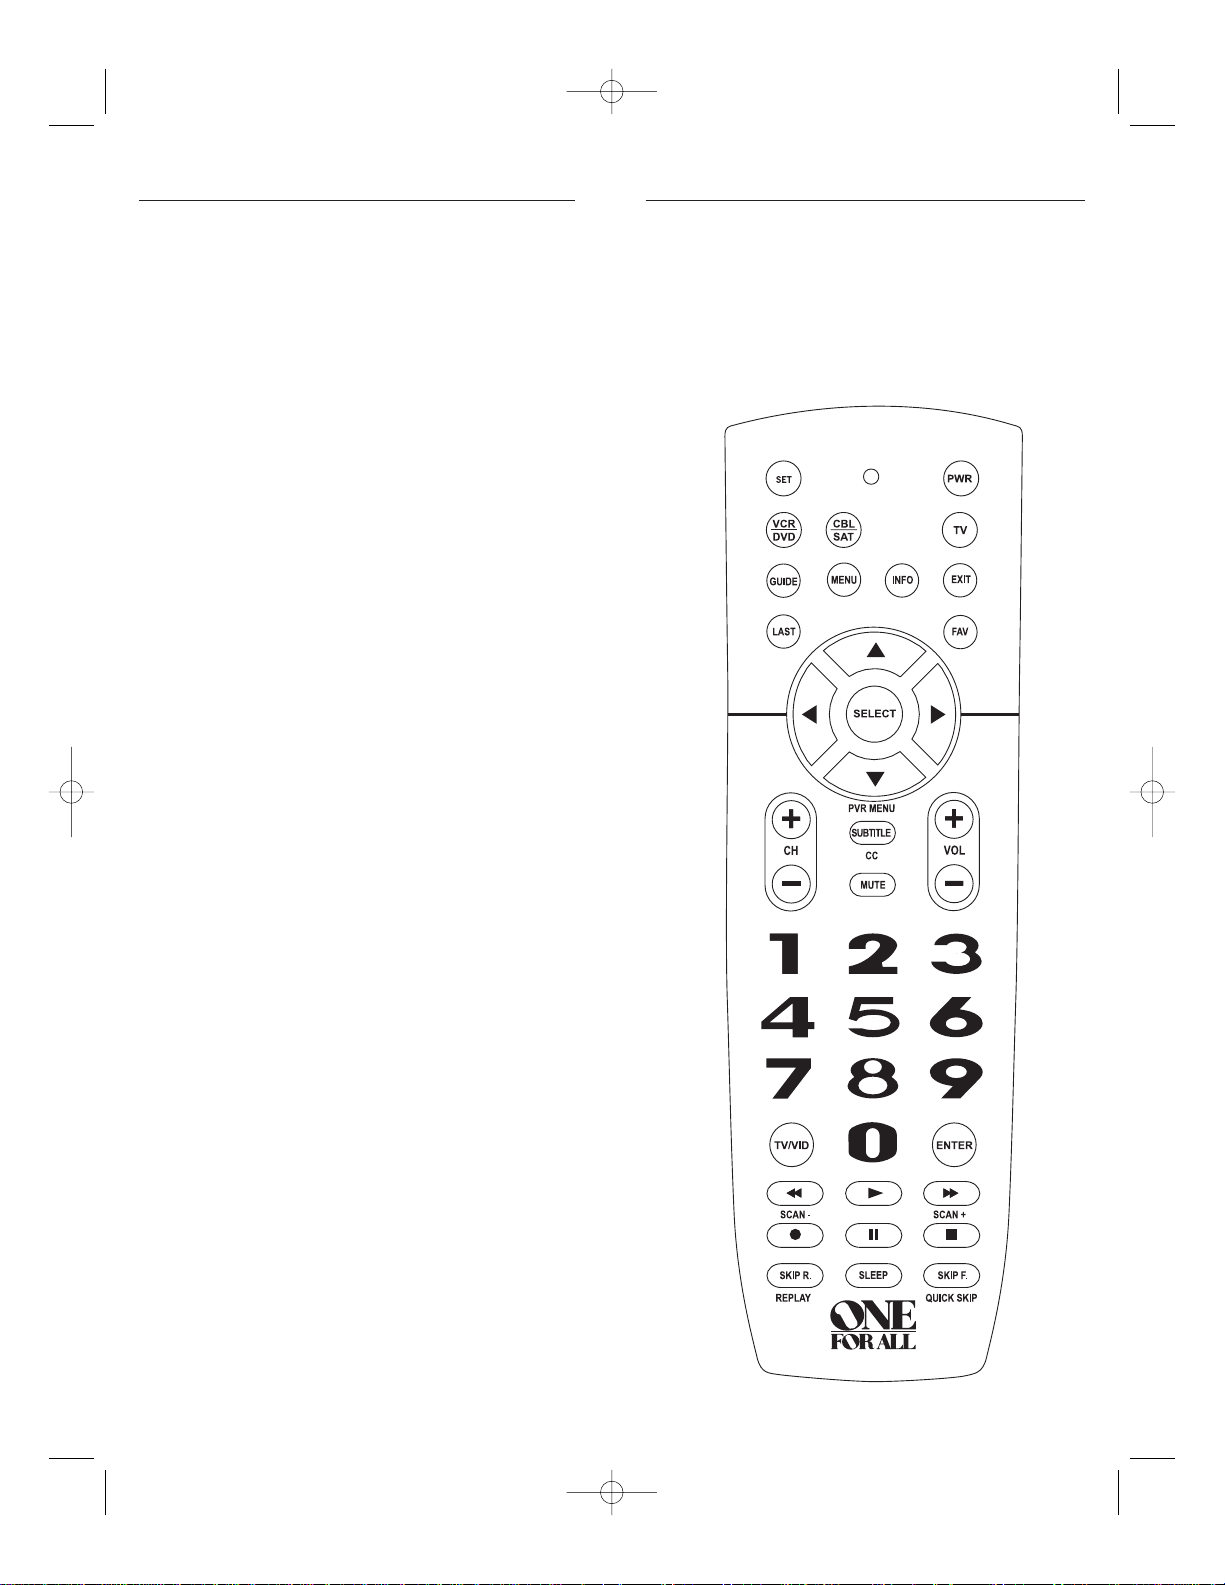
FEATURES AND FUNCTIONS
Use the illustration below to locate features on the One For All 3 Device
Universal Remote Control (URC-3220) and then study the
Key Charts
(on
the next two pages) to learn how they function.
To find out what type of devices can be controlled by each device key after
programming,see the
Device Table
on page 6.
WALRB3P manual booklet 5/2/06 3:13 PM Page 3
Page 4

Use REW,PLAY, FWD,PAUSE,or STOP to control your VCR,
PVR (or DVR),or DVD player.
For a DVD player, use SKIP F. or SKIP R. to view the next
or previous chapter.
For a VCR,PVR (or DVR), or VOD (if available), use SCAN-
or SCAN+ to quickly scan forward or back through a video
program. Use REPLAY for an instant replay.Use QUICK
SKIP to advance the video program a preset amount (as
set on your device).
Press REC twice to record a VCR or PVR (or DVR)
program.
Use SLEEP to set the sleep timer on a selected device if
equipped with this feature.
Use SET for all programming sequences.
Device Table
NOTE: Plea se refer to the table b elow when performing t he instruction s in “Progra mming
Device Control” on page 8.
After programming,the One For All 3 Device Universal Remote Control will
be able to control the following types of devices:
56
Key Charts
When the LED (red light) blinks,the remote control
is working and (after programming) is sending
signals.
Press DVD/VCR,CBL/SAT,or TV once to select a
desired home entertainment device to control.
Also see the
Device Table
on page 6.
Press POWER once to turn on or off the selected
device. For master power control, see
Programming
A Master Power Macro
on page 10.
Use the keypad (1 ~ 9 and 0) to directly select
channels (e.g., 009or 031).
Use TV/VID to switch the TV’s input to view TV or
video programs.
Press ENTER once after entering the channel
numbers on some TVs.
Use GUIDE to display your selected device’s
program guide or setup menu.
Press MENU once to display your selected device’s
main menu.
Use INFO to display the current channel and
program or on-screen directory.
Use EXIT to exit from your selected device’s guide
or menu.
Use the Cursor Keys to move the cursor in the program guide and menu screens.
Use SELECT (OK) to choose options from your
selected device’s menu or guide.
Press LAST once to recall the last channel.
Use FAV to scan all channels, or after programming,
to scan up to10 favorite channels.
Use CH+ (or CH-) to select the next higher (or
lower) channel.
Press SUBTITLE/CC once to display (or turn off) sub-
titles or closed captions, if available on your DVD
player or cable/satellite service.
For a PVR (or DVR), press PVR MENUonce to dis
play a list of your recorded shows.
Press MUTE once to turn the sound off or on.
Use VOL+ (or VOL -) to raise (or lower) the sound
volume.
DEVICE KEY CONTROLS THESE TYPES OF DEVICES
• DVD Player
•VCR
• PVR (or DVR)
• TV/DVD Player Combo
• VCR/DVD Player Combo
• TV/VCR Combo
• TV/VCR/DVD Player Combo
• VCR/DVD Player Combo
• Cable Box (or Converter)
• Cable Box/PVR (or DVR) Combo
• Satellite Receiver
• Satellite Receiver/PVR (or DVR) Combo
• Television
WALRB3P manual booklet 5/2/06 3:13 PM Page 5
Page 5

78
INSTALLING BATTERIES
1. On the remote control’s back, push the tab and lift off the
battery cover.
2. Obtain two (2) new AAA alkaline batteries.Match the +
and – marks on the batteries to the + and – marks in the
battery case, then insert the new batteries.
3. Press the battery cover back into place.The tab should
click when the cover is locked.
4. Test the remote control by pressing any mode key (e.g.,
TV). If the batteries are inserted correctly, the LED (red
light) will blink.
NNOOTTEE:: WWhheenn bbaatttteerriieess nneeeedd rreeppllaacceemmeenntt,, tthhee rreemmoottee ccoonnttrrooll ww iillll ssttoopp ooppeerraa tt--
iinngg.. RReemmoovvee tthhee oolldd bbaatttteerriieess aanndd iinnsseerrtt nneeww oonneess wwiitthhiinn 1100 mmiinnuutteess ttoo
eenn ssuurree aallll ooff yyoouurr pprrooggrraa mmmmiinngg iinnffoorrmmaattiioonn iiss rreessttoorreedd..
PROGRAMMING DEVICE CONTROL
The One For All 3 Device Universal Remote Control is preprogrammed at
the factory to operate an RCA TV, a Toshiba DVD player,and a Motorola
cable box.To control devices other than the default brands, perform the following steps; otherwise skip this section:
1. Turn on a desired device (e.g.,VCR or DVD player) and, if
applicable, insert media (e.g., cassette or disc).
NOTE: Please read steps 2 through 4 completely before proceeding.
Highlight or write dow n the codes and device you wish to program
before starting step 2.
2. On the remote control, press a device key once (i.e., DVD/VCR,
CBL/SAT,or TV).
NOTE: To program control of a VCR, PVR (or DVR),TV/VCR Combo,
or TV/VCR /DVD Playe r Combo pr ess DVD/VCR once. After progra mming a VCR Combo dev ice, you will be able to control channel selection,volume,a nd VCR functions.
NOTE: To program control of a DVD Player,DVD Player/VCR
Combo, or TV/DVD Pl ayer C ombo, press DVD/VCR once. After programming a DVD Combo device, you will be able to control channel
selection,volume, and DVD functions.
NOTE: To program control of a Ca ble Box, Cable Box/PVR (or DVR)
Combo, Satellite Receiver,or a Satellite Receiver/PVR (or DVR)
Combo, press CBL/SAT once.
3. Press and hold SET until the LED (red light) blinks twice,
then release
SET.
4. Use the
Manufa cturer’s Codes
(starting on page 34) to
locate the type of device and brand name and then enter
the first four-digit code for your device.If performed correct ly, th e
LED will blink twice.
NOTE: If the LED did not blink twi ce, repeat steps 2 through 4 and enter
the same code agai n.
5. Aim the remote control at the device and press POWER
once. The device should turn off. If it does not, repeat
steps 2 through 5,trying each code for your brand until
you find one that works. If it still doesn’t work,try
Searching For Your Code on next page
.
NOTE: If the device does not have a POWER key, press PLAY.
6. Repeat steps 1 through 5 for each device you want to control.For future reference,write down each working device
code in the following boxes:
DVD/VCR Code:
Device Type:__________________
CBL/SAT Code:
Device Type:__________________
TV Code:
Device Type:__________________
WALRB3P manual booklet 5/2/06 3:13 PM Page 7
Page 6

910
SEARCHING FOR YOUR CODE
If your device does not respond to the remote control after trying all codes
listed for your brand, or if your brand is not listed at all, try searching for
your code.
NOTE: Before performing a code search for a DVD player or a VCR, turn on the device and
insert the required media.
For example,to search for a code for your TV:
1. On the remote control, press
TV once.
2. Press and hold
SET until the LED (red light) blinks twice,
then release SET.
3. Enter
9 - 9 - 1.The LED will blink twice.
4. Aim the remote control at the TV and slowly alternate
between pressing
POWER and TV. Stop when the TV turns off
(after pressing POWER).If the device does not have a Power
key, you can substitute another function, such as digits 0 ~ 9,
CH+,or PLAY).
NOTE: In the search mode, the remote control will send IR codes from
its li bra ry to the sel ected device, sta rting w ith the most popula r code
first.
5. To lock in the code,press and release SET.The LED will
blink twice.
6. To search for the codes of your other devices,repeat steps
1 through 5,but substitute the appropriate device key for
the device you are searching for.
CHECKING THE CODES
If you have set up the remote control using the
Searching For Your Code
procedure as above, you may need to find out which four-digit code is operating your equipment. For example, to find out which code is operating your
TV:
1. On the remote control, press
TV once.
2. Press and hold
SET until the LED (red light) blinks twice,
then release
SET.
3. Enter
9 - 9 - 0.The LED will blink twice.
4. To view the code for the first digit,press
1 once. Wait 3
seconds, count the LED blinks (e.g., three blinks = 3) and
write down the number in the leftmost box in the TV
code boxes on page 8.
NOTE: If a code digit is “0”,the LED will not blink.
5. Repeat step 4 (on the previous page) three more times for
remaining digits.Use
2 for the second digit,3 for the third
digit, and 4 for the fourth digit. Write down the code digits in the remaining TV code boxes on page 8.
6. To check for codes of other devices, repeat steps 1
through 5 (starting on the previous page), but substitute
the appropriate device key for each device you are checking.Write down the device’s code digits in the appropriate
code boxes on page 8.
PROGRAMMING A MASTER POWER MACRO
In its default state, the POWER key on the One For All 3 Device Universal
Remote Control will individually power your home entertainment devices
on or off.However,you can also program a
Master Power Macro
onto the
POWER key that will sequentially turn on or off all the devices with a single
key press.
Programming The Power Key For The Master Power Macro
1. Press and hold SET until the LED (red light) blinks twice,
then release SET.
2. Enter
9 - 9 - 5.The LED will blink twice. Then press POWER
once.
3. For the first device you want in the power-on sequence,
press its device key (e.g.,
CBL/SAT) once.
4. Repeat step 3 up to two more times to add desired
devices to the power-on sequence (e.g.,
DVD/VCR and TV).
5. To save the settings and exit the program, press and hold
SET until the LED blinks twice, then release SET.
Operating The Master Power Macro
1. After programming,point the remote control at the
devices and press POWER for at least 2 seconds to sequentially turn on (or off) your devices.
NOTE:When POWER is pressed for less than 2 seconds, a power command w ill only be sent to the cur rently-selected de vice. This a llows
you to still indiv idually power devices on or off.
2. Devices will turn on (or off) according to your programmed sequence.
NOTE: The cu rrently-selected d evice wi ll alwa ys turn o n or off fir st,
followed by the remaining programmed sequence.After the master
power sequence ha s been completed, the remote control will be se t to
control the first powered-on device.
NOTE: If one or more devices does not have a POWER key, the pow er
off/on se quence m ay be sl ightly delay ed when the re mote contro l sign als
the device(s). This action is normal.
continued on next page...
WALRB3P manual booklet 5/2/06 3:13 PM Page 9
Page 7

PROGRAMMING FAVORITE CHANNEL SCAN
In the CBL/SAT or TV mode, you can store a list of up to 10 favorite channels,
in any order,that will be immediately scanned when FAV is pressed (see
Using Channel Scan
on the previous page).
NOTE: Favorite channels can only be programmed for one mode.After programming, if FAV
is pressed while in another mode, the remote control will start scanning all channels instead
(if a ppli cable to the se lected device) .
1. On the remote control, press CBL/SAT or TV once.
2. Press and hold
SET until the LED (red light) blinks twice,
then release
SET.
3. Enter
9 - 9 - 6.The LED will blink twice.
4. Use the keypad to enter a favorite channel number (e.g.,
031). Then press SET once.
NOTE: If the original remote control required pressing an Enter key
to change the channel,a lso press the ENTER key after the channel
number (e.g., 0 - 3 - 1 - ENTER). On some satellite receivers and cable
boxes, you may need to press the SELECT (OK) key instead of ENTER.
5. If desired,repeat step 4 for each channel to be stored,up
to a total of 10 channels.
NOTE:If you try entering more than 10 channels,the remote control
will automatically ex it programming. To cha nge your fa vorite cha nnel list at this point, you will first need to delete the existing list by
perfor ming the steps in “Cleari ng Custom Progra mming”on p age 14.
Then, perform the instructions in this section once again.
6. To exit programming with less than 10 favorite channels
stored, press and hold
SET until the LED blinks twice.
Otherwise, the remote control will automatically exit the
program after 10 channels have been stored.
CHANGING VOLUME LOCK
The One For All 3 Device Universal Remote Control is set at the factory for
independent volume control of each selected device. However, you may
change the Volume Lock setting to
Global Volume Lock
so that a device’s volume will be locked to one mode (e.g., to control TV volume in all other
modes).After that,if desired,you can perform
Indiv idual Volume Unlock
on
a selected device to set its volume control for independent operation.
Locking Volume Control To One Mode
(Global Volume Lock)
1. Press and hold SET until the LED (red light) blinks twice,
then release
SET.
continued on next page...
11 12
PROGRAMMING A MASTER POWER MACRO
(cont’d)
Clearing The Master Power Macro
1. Press and hold SET until the LED (red light) blinks twice,
then release
SET.
2. Enter
9 - 9 - 5.The LED will blink twice. Then press POWER
once.
3. Press and hold
SET until the LED blinks twice, then release
SET.The
Master Power Macro
is now cleared.
RE-ASSIGNING DEVICE KEYS
The One For All 3 Device Universal Remote Control can be set to control a
DVD player and a VCR (or a PVR) or a second DVD player by re-assigning
the unused CBL/SAT key as follows:
1. On the remote control, press and hold
SET until the LED
(red light) blinks twice,then release SET.
2. Enter
9 - 9 - 2.The LED will blink twice.
3. Press
DVD/VCR once.
4. Press
CBL/SAT once. The LED will blink twice.The CBL/SAT key
is now ready to be set up to control your VCR (or PVR) or
second DVD player. See
Programming Device Control
on page
8.
NOTE: Only one device can be assigned to an unused device key at a time.
USING CHANNEL SCAN
In the CBL/SAT or TV mode, use the FAV key to start a 3-second scan of all
channels. Or, if programmed,use the
FAV key to scan only your favorite
channels to view a desired channel (see
Programming Favorite Channel Scan
on next page.)
1. Press
CBL/SAT or TV once.
2. Press
FAV on ce.
•If
Favorite Channel Sca n
has been set up,scanning of favorite
channels will start with up to 100 channel changes or until
stopped by pressing any key.
•If
Favorite Channel Sca n
has not been set up,scanning
will start with the current channel, and continue up to
100 channel changes or until stopped by pressing any key.
3. To stop scanning channels at any time, press any key once.
WALRB3P manual booklet 5/2/06 3:13 PM Page 11
Page 8

1413
CLEARING CUSTOM PROGRAMMING
The One For All 3 Device Universal Remote Control contains an
Operational
Feature Reset
program.If desired,you can use it to clear custom programming, except your setup codes and reassigned device keys, and reset them
to original factory settings.Also see
Restoring Factory Default Settings
below.
IIMMPPOORRTTAANNTT:: EExxeeccuuttiinngg tthhiiss pprrooggrraa mm ww iillll eerraassee aallll yyoouurr ccuussttoomm sseettttiinnggss ffoorr
PPoowweerr MMaa ccrroo,, FFaa vvoorriittee CChhaannnneellss,, aanndd VVoolluummee LLoocckk..
1. Press and hold SET until the LED (red light) blinks twice,
then release
SET.
2. Enter
9 - 8 - 0.The LED will blink twice. The remote con-
trol will return to normal operation.
RESTORING FACTORY DEFAULT SETTINGS
The One For All 3 Device Universal Remote Control also contains a
Factor y
Reset
program that you can use to reset all custom settings and setup codes
to original factory settings.Also see
Clearing Custom Programming
above.
IIMMPPOORRTTAANNTT:: EExxeeccuuttiinngg tthhiiss pprrooggrraa mm ww iillll eerraassee aallll yyoouurr ccuussttoomm sseettttiinnggss ffoorr
PPoowweerr MMaa ccrroo,, FFaa vvoorriittee CChhaannnneellss,, VVoolluummee LLoocckk,, RReeaa ssssiiggnneedd DDeevviicceess,, aa nndd aallll
ddeevviiccee sseettttiinnggss..
1. Press and hold SET until the LED (red light) blinks twice,
then release
SET.
2. Enter
9 - 8 - 1.The LED will blink twice. The remote con-
trol will return to normal operation.
CHANGING VOLUME LOCK (cont’d)
Locking Volume Control To One Mode
(Global Volume Lock)
2. Enter 9 - 9 - 3 and then press any mode key once (e.g., TV).
The
LED will blink twice.
3. Now, when you press
VOL +, VOL -,or MUTE,the volume of
the selected device (e.g., TV) will be controlled,regardless
of the mode you have selected.
Unlocking Volume Control For A Single Device (Individual Volume
Unlock)
1. After performing
Global Volume Lock
(above),press a desired
mode key where you want volume to be unlocked (e.g.,
DVD/VCR) and controlled within its own mode.
2. Press and and hold
SET until the LED (red light) blinks twice,
then release SET.
3. Enter
9 - 9 - 3 and then press VOL - once. The LED will blink
four times.
4. If desired,repeat steps 1 through 3 (of this section) for
each device that you want volume to be unlocked.
5. After selecting a device that has volume unlocked (e.g.,
DVD/VCR), pressing VOL +, VOL -,or MUTE will control the
device’s volume only in its own mode.
Unlocking All Volume Control (Restoring Default Setting)
NOTE: Performing these instructions will restore independent volume control for all programmed dev ices (e.g., TV volume control in T V mode, VCR volume in DVD/VCR mode,
etc.).
1. On the remote control, press and hold SET until the LED (red
light) blinks twice, then release
SET.
2. Enter
9 - 9 - 3 and then press VOL + on ce.The LED will
blink four times.
3. Volume will again be independently controlled according
to its default states for all programmed devices.
WALRB3P manual booklet 5/2/06 3:13 PM Page 13
Page 9

15 16
TROUBLESHOOTING
PROBLEM: LED (red light) does not blink when you press a key.
SOLUTION: Replace batteries with two new AAA alkaline batteries.
PROBLEM:
LED blinks when you press a key,but home entertain-
ment device does not respond.
SOLUTION: Make sure the remote control is aimed at your home
entertainment device and is not farther than 15 feet
away.
PROBLEM: The unit does not control home entertainment devices
or commands are not working properly.
SOLUTION: Try all listed codes for the device brands being set up.
Make sure they can be operated with an infrared remote
control.
PROBLEM: Changing channels does not work.
SOLUTION: If original remote required pressing ENTER or SELECT to
change channels, press
ENTER or SELECT on this remote after
entering the channel number.
PROBLEM: Tried
Searching For Your Code
method and still could not
find a working code.
SOLUTION: Clear the device key as follows: Press and hold
SET until
the
LED (red light) blinks twice,then release.Next enter
9 - 9 - 2. Then press the device key to be cleared twice.
Now repeat the
Searching For Your Code
method on page
9.
PROBLEM:
CH + and CH - do not work for your RCA TV.
SOLUTION: Due to RCA design (1983-1987), only the original
remote control will operate these functions.
PROBLEM: No remote control of volume.
SOLUTION: See
Changing Volume Lock
on page 12 to lock/unlock
volume.
For assistance,please contact us in any of the following ways:
• E-mail: ofasupport@ueic.com
• Internet: http://www.oneforall.com
• Consumer Help Line: (330) 405-8612
INSTRUCTIONS TO THE USER
This equipment has been tested and found to comply with the limits for a class B
digital device, pursuant to part 15 of the FCC Rules. These limits are designed to
provide a reasonable protection against harmful interference in a residential
installation. This equipment generates,uses,and can radiate radio frequency
energy and if not installed and used in accordance with the instructions, may
cause harmful interference to radio communications.However,there is no guarantee that interference will not occur in a particular installation. If this equipment does cause harmful interference to radio or television reception,which can
be determined by turning the equipment off and on, the user is encouraged to
try to correct the interference by one or more of the following measures:
• Reorient or relocate the receiving antenna.
• Increase separation between equipment and receiver.
• Connect equipment into an outlet or a circuit different from that to which the
receiver is connected.
• Consult dealer or experienced radio/TV technician for help.
LIFETIME WARRANTY
One For ALL ("OFA") warrants this product to be free from defects in materials
and workmanship,under normal use, throughout the period of the product’s
ownership by the original purchaser.This warranty does not cover damages or
failures caused by products or services not supplied by OFA, or which result from
accident,misuses,abuse, neglect, mishandling,misapplication, faulty installation,
set-up adjustment,improper maintenance,alteration, maladjustment of consumer controls,modifications, commercial use,or that is attributable to acts of
God.
There are no express warranties except as listed above. OFA SHALL NOT BE
LIABLE FOR INCIDENTAL OR CONSEQUENTIAL DAMAGES RESULTING
FROM THE USE OF THIS PRODUCT OR ARISING OUT OF ANY BREACH OF
WARRANTY, ALL EXPRESS AND IMPLIED WARRANTIES,INCLUDING THE
WARRANTIES OF MERCHANTABILITY AND FITNESS FOR A PARTICULAR
PURPOSE,ARE LIMITED TO THE WARRANTY PERIOD SET FORTH ABOVE.
Some states do not allow the exclusion or limitation of incidental or consequential damagers, or limitations on how long an implied warranty lasts, so the above
exclusions or limitations may not apply to you. This warranty gives you specific
legal rights and you may also have other rights which vary from state to state.
To obtain warranty service for a defective product, please return the product,
preferably in the original carton, along with your purchase receipt,to the store of
original purchase for the first 90 days.A note detailing the complaint would be
helpful.The store, at its option, will replace or repair this product if found to be
defective.
If the unit has been purchased more than 90 days ago,please return it to CT
Global Inc. 2305 Hurstbourne Village Dr.Suite 1000 Louisville, KY 40299 USA
together with the original receipt and $3.95 to cover postage and handling.It will
be repaired or replaced at the manufacturer’s option.The manufacturer reserves
the right to substitute a currently manufactured model with equal or superior
features.
One For All:(330) 405-8655
URC-3220 01/06
WALRB3P manual booklet 5/2/06 3:13 PM Page 15
 Loading...