

Page 1
Page 2

Congratulations!
Congratulations on purchasing Universal Remote Control’s Universal
GAMER. You now have the ultimate control solution for your Home
Theater gaming! The GAMER is programmed to operate your game
consoles and Media PC right out of the box. With its extensive
library of pre-programmed codes and learning, the GAMER can also
operate thousands of audio/video components – even iPod docks!
Everything you need to know about programming the GAMER is
contained in this Manual.
GAMER Owner’s Manual © 2006 Universal Remote Control, Inc.
The information in this manual is copyright protected. No part of this manual may be
copied or reproduced in any form without prior written consent from Universal Remote
Control, Inc. Universal Remote Control, Inc. shall not be liable for operational,
technical or editorial errors/omissions made in this manual. The information in this
manual may be subject to change without prior notice. GAMER™ is a registered
trademark of Universal Remote Control, Inc. All other brand or product names are
trademarks or registered trademarks of their respective companies or organizations.
500 Mamaroneck Avenue, Harrison, NY 10528
Phone: (914) 835-4484 Fax: (914) 835-4532
Page 3

Table of Contents
Getting Started
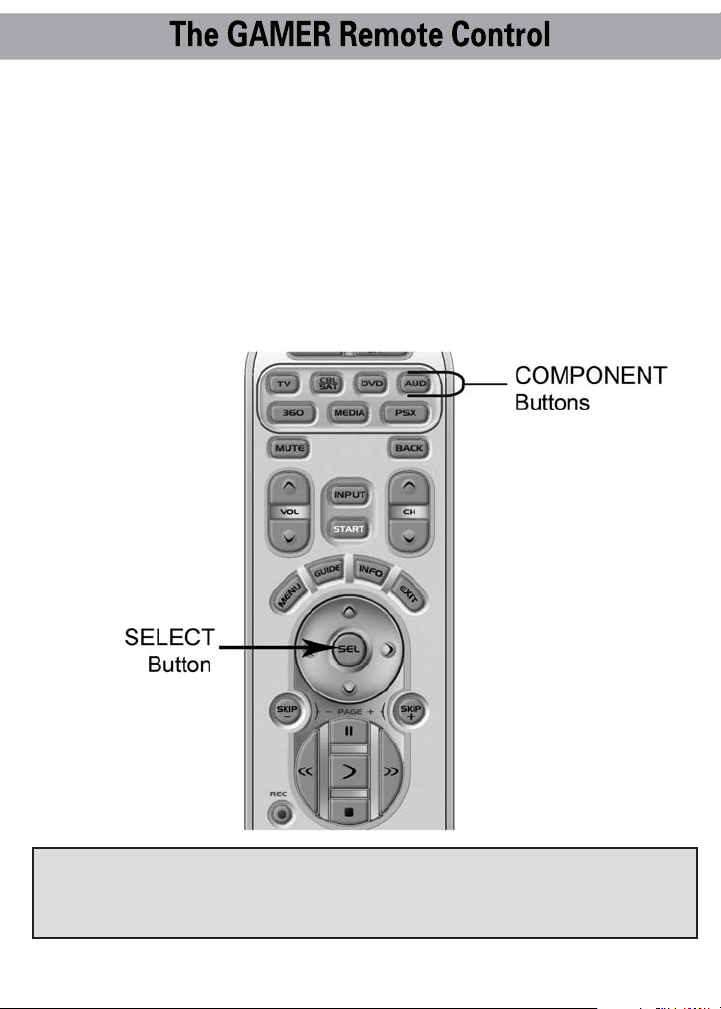
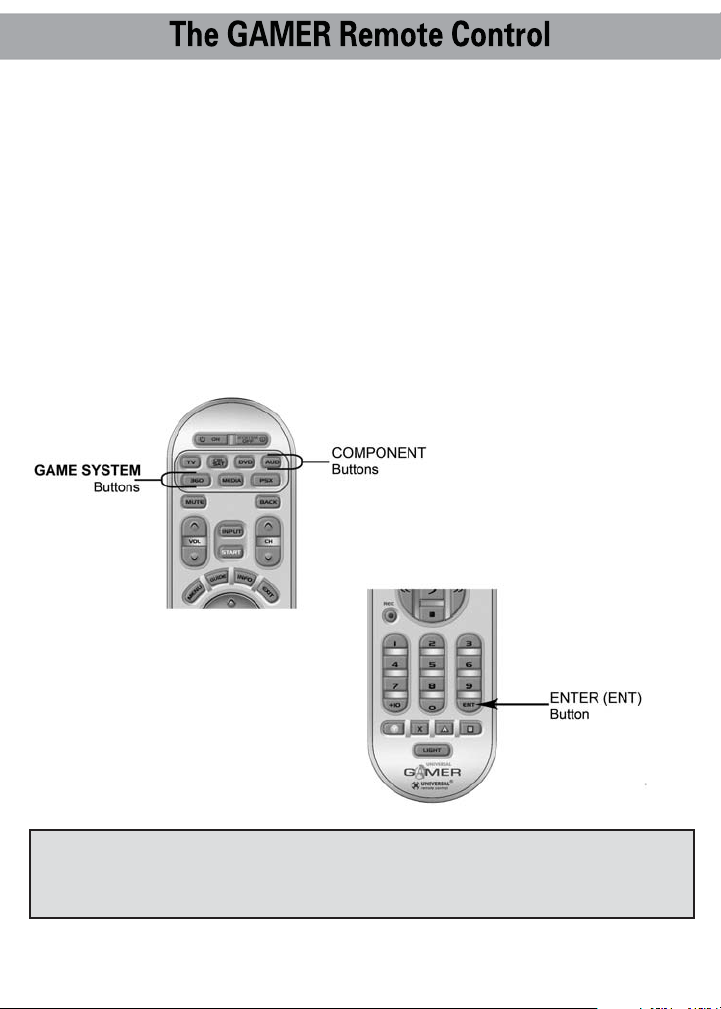
Controls Game Consoles & up to 6 Components ….......................3
Activate Component Buttons …….....................................................3
The Media Function ………….............................................................3
Special Features
SimpleSound
TM
…………………...........................................................4
MacroPowerTM…………………….........................................................4
Learning Capability ............................................................................4
Battery Installation ........................................................................5
GAMER Location of Controls…………........................................6
Light Button ………………...............................................................7
Setting Up ........................................................................................8
SECTION 1: Pre-Programmed Code Method....................................8
SECTION 2: Auto Search Method....................................................12
SECTION 3: Learning Method..........................................................14
Advanced Setup
SECTION 1: SimpleSoundTMand Other ‘Punch Throughs’............18
SECTION 2: MacroPowerTM..............................................................21
SECTION 3: Media Function Button................................................23
Finding a Component’s Set-Up Code Number .................... 25
1
Page 4

Erasing Commands - Overview ................................................27
SECTION 1: Erasing a Single Learned Command..........................27
SECTION 2: Erasing All Learned Commands from one component.. 29
SECTION 3: Erasing SimpleSoundTMCommands ………...............30
SECTION 4: Erasing MacroPowerTMCommands............................31
SECTION 5: Re-setting GAMER to Original Factory Defaults.......32
Pre-Programmed Code Tables ..................................................33
360 ............................................................................................... 34-35
PSX............................................................................................... 36-37
MEDIA ..........................................................................................38-41
TV .................................................................................................42-49
CABLE/SAT...................................................................................50-56
DVD/VCR ......................................................................................57-66
AUDIO ..........................................................................................67-71
FAQs .................................................................................................7 2
Warranty..........................................................................................73
Specifications................................................................................73
2
Page 5
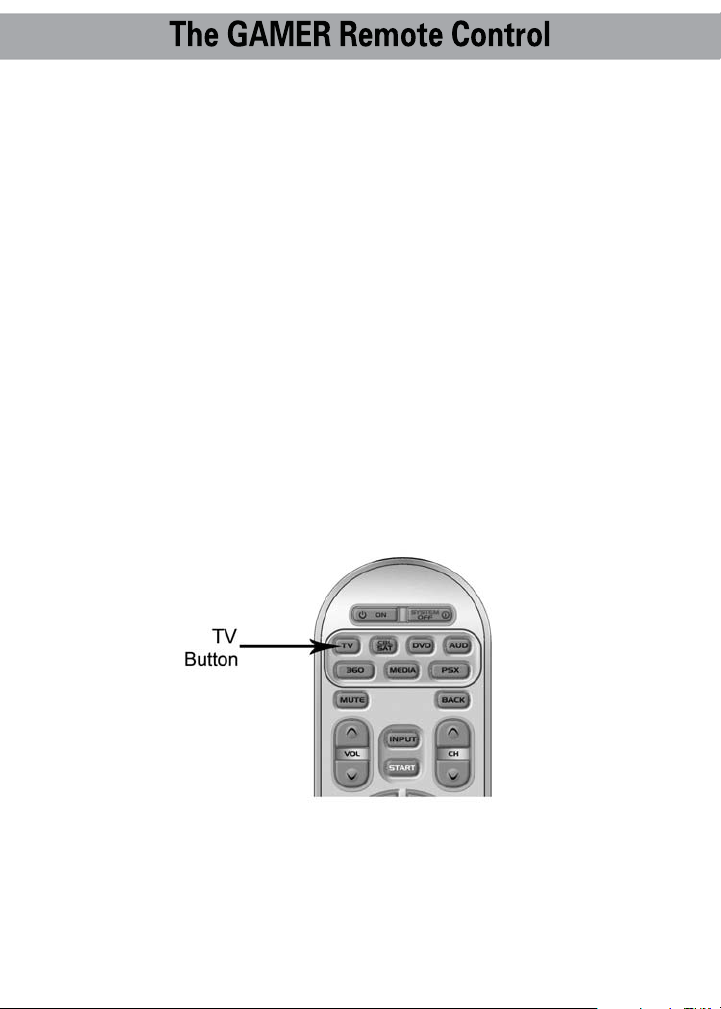
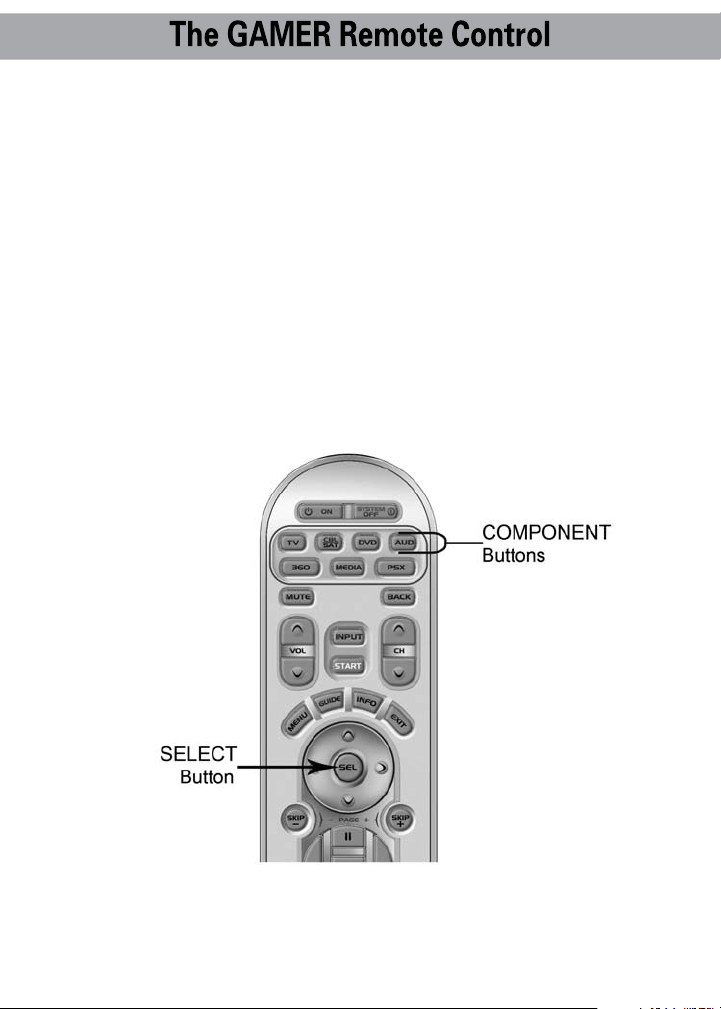
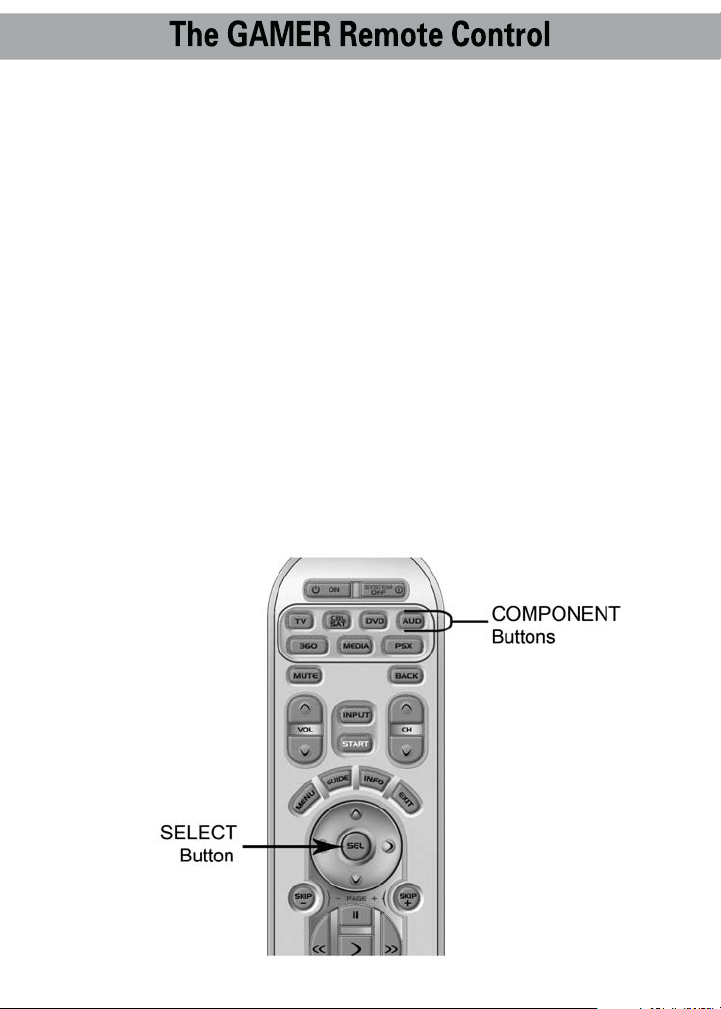
Getting Started
Control Game Consoles and up to 6 Components
The GAMER is designed to control game consoles and up to
6 different audio/video components. It is pre-programmed to
operate your Xbox 360, Playstation and Media Center PC right
out of the box! The GAMER also has an extensive library of
codes to operate virtually all brands of Audio, TV, DVD, Cable
and Satellite components – even iPod docks!
One Press Activates All Component Buttons
Once you have programmed GAMER for all of your A/V components,
all you have to do is simply press a component button and all the
buttons on the GAMER will work with the component you just
pressed. As an example, if you pressed the TV component button,
all the buttons on GAMER will work your TV. If you press the DVD
component button, all the buttons on GAMER will work your DVD.
The MEDIA Function
The MEDIA device button is pre-programmed to operate a Media
Center PC, or it can be designated to operate any additional 5th
audio/video component you may have in your system such as
TiVo or iPod docks.
3
Page 6
Special Features
In addition, the GAMER also offers the following special features
that can offer you time-saving conveniences:
Learning Capability
The GAMER has a Learning Capability that enables it to actually
‘learn’ functions from other remotes.
SimpleSound
TM
SimpleSound Volume Control is a dynamic feature that gives you
total volume control over all the components in your system, even
those that do not have their own built-in volume control, such as
TiVo, DVD and VCR.
MacroPower
TM
This is a unique feature that enables you to turn all your components
ON or OFF, all at the same time, simply with the press of one button.
These special features will be discussed in greater detail later on
in the manual.
4
Page 7

Battery Installation
Insert the two AA batteries that are included in the package into the
battery compartment located in the back of your remote. Just press
the tab and lift off the cover. Please be sure to insert the batteries
correctly as you see in the diagram. Once the batteries are correctly
installed, replace the cover.
Insert
Batteries
Correctly
5
Page 8
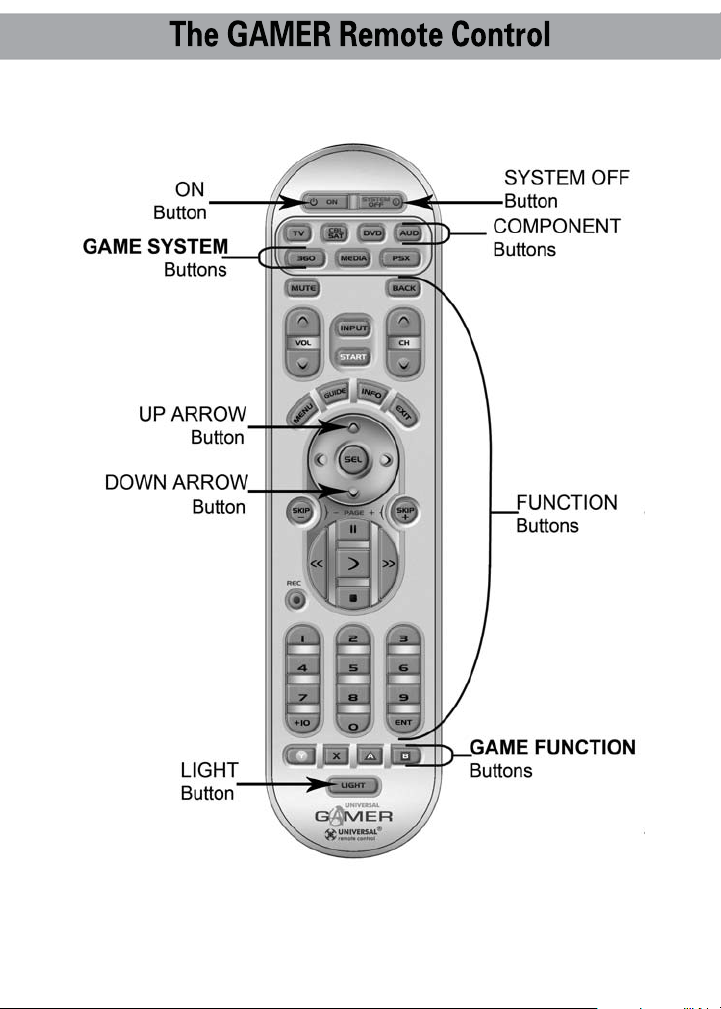
GAMER Location of Controls
6
Page 9
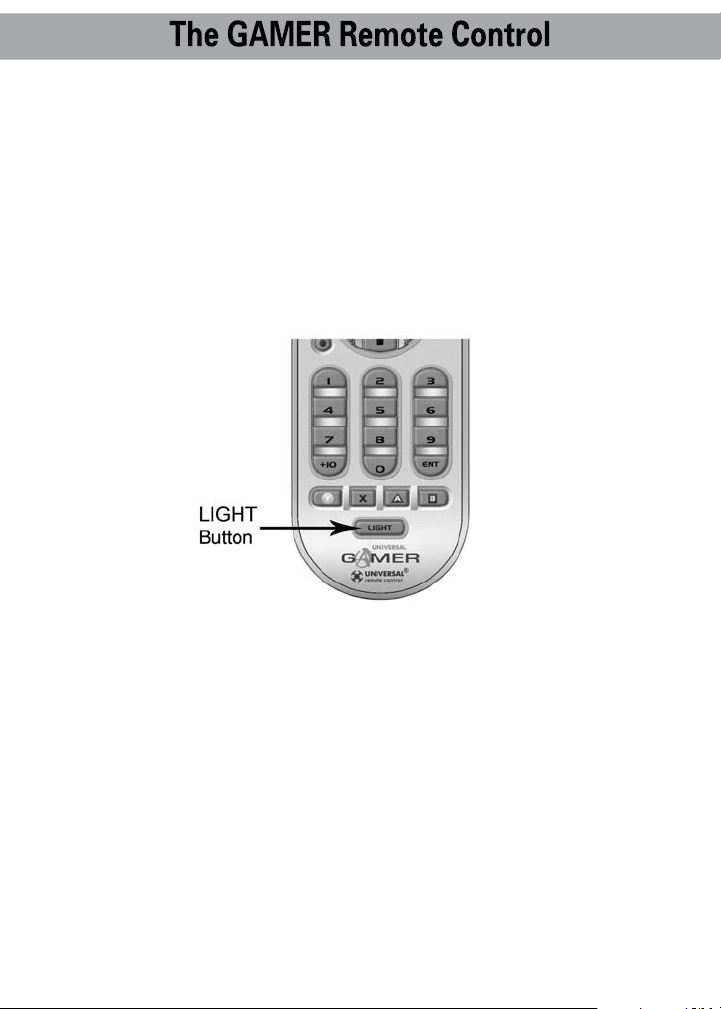
LIGHT BUTTON
Press the LIGHT button to backlight all the buttons. To turn off the
backlight, press the LIGHT button again, or just wait ten seconds
and the backlight will automatically shut itself off.
7
Page 10

Setting Up Your GAMER
There are three ways you can program your remote to work with
your A/V Components:
• The Pre-Programmed Code Method (page 8)
• The Auto-Search Method (page 12)
• The Learning Method (page 14)
The Pre-Programmed Code Method allows you to set up all the
buttons at once, so it’s the fastest and easiest of the three methods.
The Auto-Search Method scans through all the codes in the remote
control, one at a time. The Learning Method allows you to transfer
functions from your old remote to Gamer, one button at a time.
* * * * *
SECTION 1: Pre-Programmed Code Method
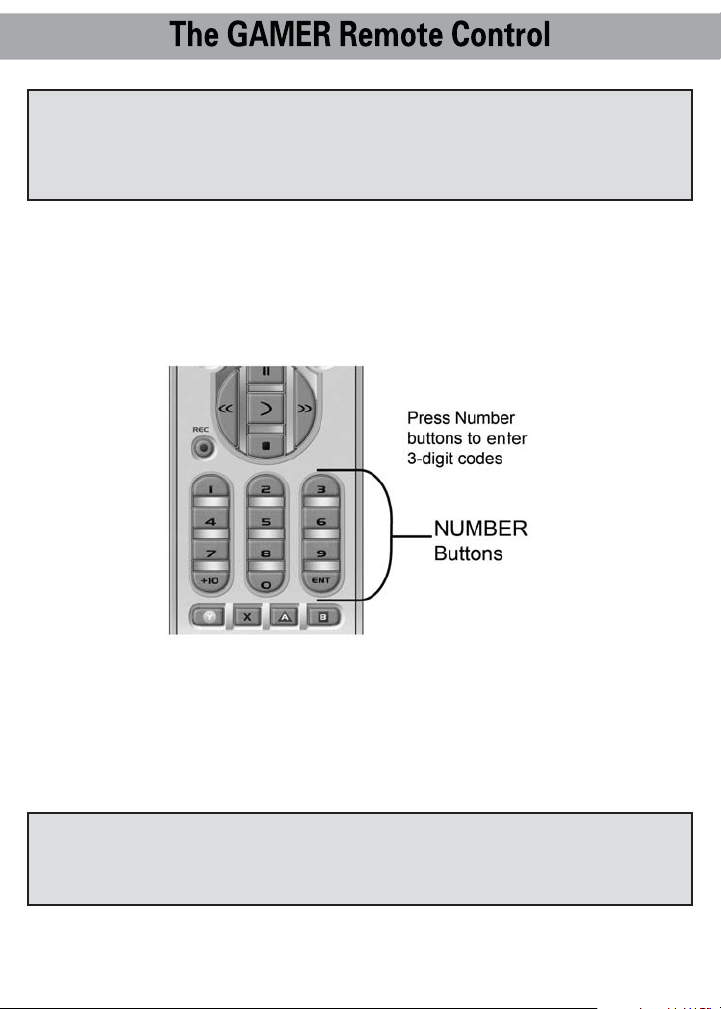
STEP 1: The pre-programmed 3-digit codes are found in the back
of this Instruction Manual (starting on page 34). The codes are listed
by component category (i.e., TV, VCR, DVD, etc.), then by brand
name. For instance, if you would like to locate a code for a Sony
TV, first locate the TV category, and then look for the Sony brand.
8
Page 11
STEP 2: Once you have located the 3-digit codes for each of the
components that you want to operate from your GAMER, write them
ALL down on a piece of paper. It’s important that you write down all
the codes because only one code is going to work for you.
STEP 3: Now, turn on the component you want to program using
your old remote… let’s say your TV to start. Look up your TV’s
manufacturer set-up code from your hand-written list.
STEP 4: Press down on the component button, in this case the
button that says TV, and the SELECT (SEL) button at the same time.
Hold both down for 3 seconds until the TV component button light
turns on.
9
Page 12
IMPORTANT: You now have 20 seconds to perform the next step
while you are in set-up mode. If you don’t press a button within 20
seconds, the LED light will turn off and exit the setup mode and you
will need to start over.
STEP 5: Point the remote toward the component, in this example
the TV, and punch in the 3-digit-code that you wrote down for that
specific component. Use the Number buttons 0-9 on the remote to
punch in the code.
If the 3-digit code number you just punched in is the correct number,
the component you are trying to program will turn off. If it does not
turn off, continue entering code numbers from your list one code at
a time until the TV turns off.
IMPORTANT: If you tried all the set-up codes in the list and the
component still did not turn off, either the Auto-Search Method
(page 12) or the Learning Method (page 14) will help you.
10
Page 13
STEP 6: After you’ve entered the code number and the component
has turned off, press the POWER button on your remote to turn the
component back on.
Now it’s time to test the VOLUME and CHANNEL buttons (or PLAY
and STOP buttons for VCR and DVD) to make sure they all work. For
example, maybe your Sony TV turned off with code number 147, but
the volume controls did not work properly. If this is the case, repeat
STEP 5 using the next code number until you find a perfect match.
STEP 7: Once you have found a correct code, you must save it.
Press the component button you just programmed, in this case TV,
one more time to store the code number. The component button LED
light will blink three times to confirm that the code was successfully
stored. Now when you press the TV component button, all of the
buttons will work with your TV.
NOW, PROGRAM THE REST OF YOUR COMPONENTS BY REPEATING STEPS 3 THROUGH 7.
IMPORTANT: If the Pre-Programmed Code Method did not work
for you, try the Auto-Search Method next as outlined on page 12.
11
Page 14
SECTION 2: Auto-Search Method
The Auto-Search Method is a way you can scan through all the
codes in the table to find the right code for your component.
STEP 1: Using your old remote, turn on the component you want
to program with the GAMER... let’s say your TV.
STEP 2: Now, press down on the component button, in this case the
button that says TV, and the SELECT (SEL) button at the same time.
Hold them both down for 3 seconds until the TV component button
LED light turns on.
IMPORTANT: If you don’t press a button within 20 seconds, the
LED light will turn off and exit the set-up mode and you will need
to start over.
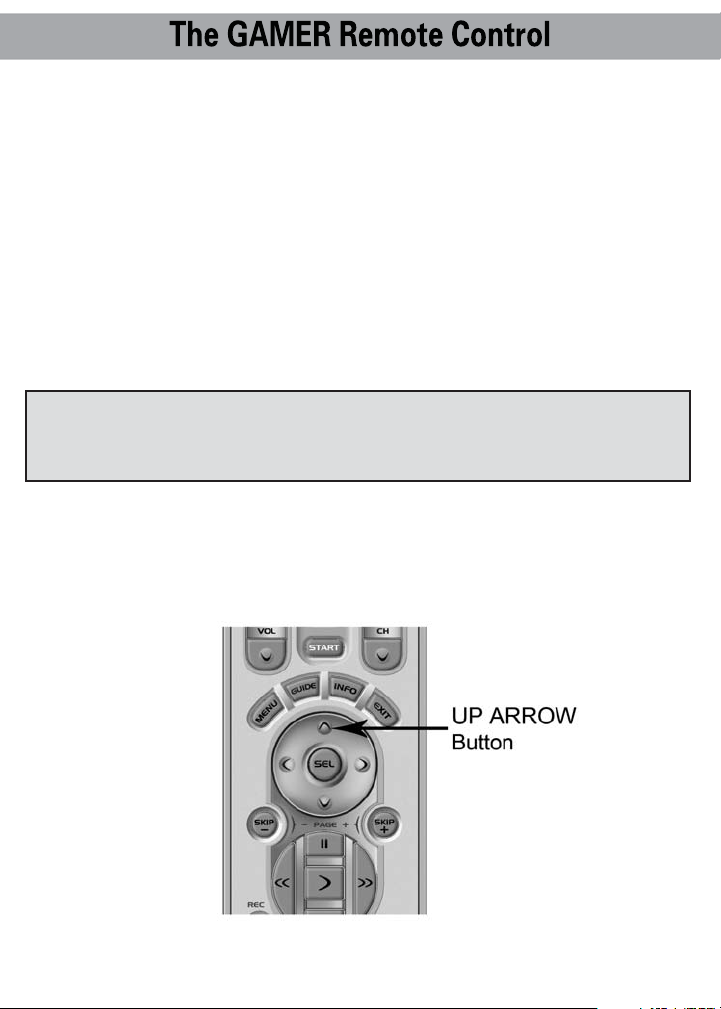
STEP 3: Press and release the UP ARROW button. Please note,
each time the Up Arrow is pressed, the code will count up one code
number and send a Power OFF signal. When the correct code is sent
out, the component will turn off.
12
Page 15

STEP 4: Press the ON button on the GAMER to turn the component
back on. Now you can test the VOLUME and CHANNEL buttons (or
PLAY and STOP buttons for VCR and DVD) to make sure they all
work. If any of the buttons do not work properly, you need to find a
new code. So, continue pressing the Up Arrow button until you find
a code that turn off the component and makes the VOLUME or PLAY
buttons work.
STEP 5: Once you have found the right code, you must save it by
pressing the component button (in this case TV). The component LED
light will blink three times to confirm that the code was stored.
REPEAT THIS METHOD FOR THOSE COMPONENTS YOU COULD
NOT PROGRAM EARLIER WITH THE PRE-PROGRAMMED CODE
METHOD.
If you cannot find the right code after 5 minutes of trying the UP
ARROW button, please try the Learning Method (page 14).
13
Page 16
SECTION 3: The Learning Method
This method allows you to ‘teach’ your GAMER the commands
from your old remote.
STEP 1: Line up the GAMER to your old remote head-to-head as
you see here. Make sure the heads are one to two inches apart.
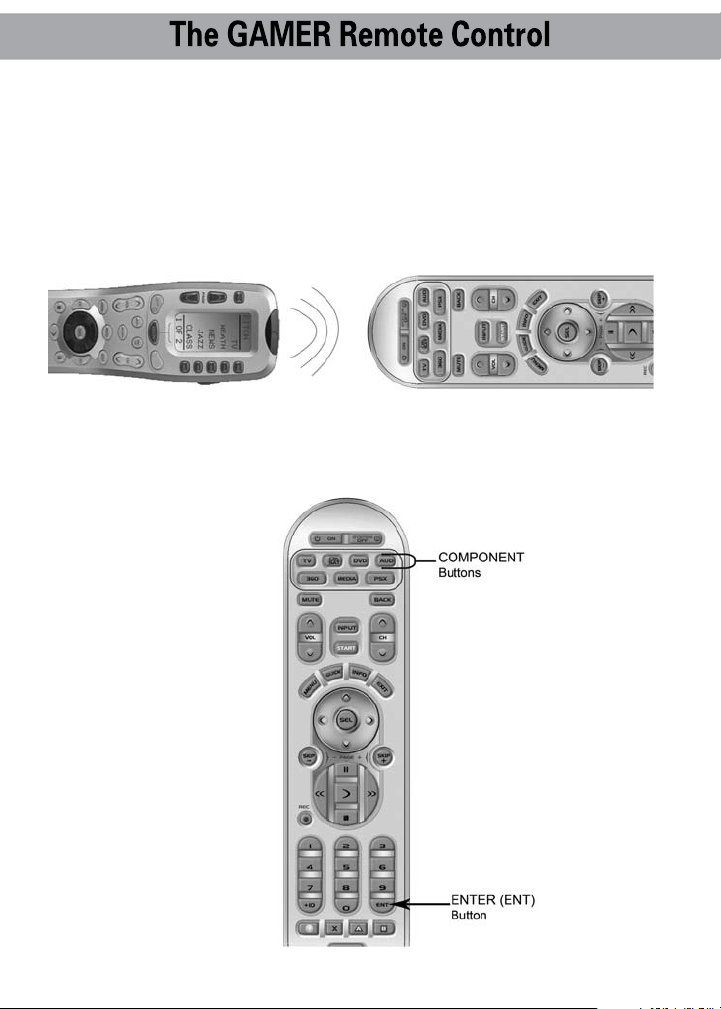
STEP 2: On the GAMER remote, press down on both the component
button you wish to teach (such as TV, VCR,etc.) and the ENTER (ENT)
button at the same time for 3 seconds until the component
LED light turns on.
14
Page 17
IMPORTANT: If you don’t press a button within 20 seconds, the
LED light will turn off and exit the set-up mode and you will need
to start over.
STEP 3: Press any button on the GAMER that you want to teach
a command to. For example, if you want to teach the MUTE button
on the GAMER from your old TV remote, press the MUTE button on
the GAMER. The TV component button LED light will blink once
indicating that the GAMER is ready to learn the command.
STEP 4: Press and hold the MUTE button on your old remote until
the component button LED light on the GAMER blinks twice. Now
you can continue learning all other buttons from your old remote
by pressing the next button on the GAMER and repeating this step.
Note: The component LED will blink five times if there was an error
in the learning process. In this case, please repeat Steps 3 and 4.
15
Page 18
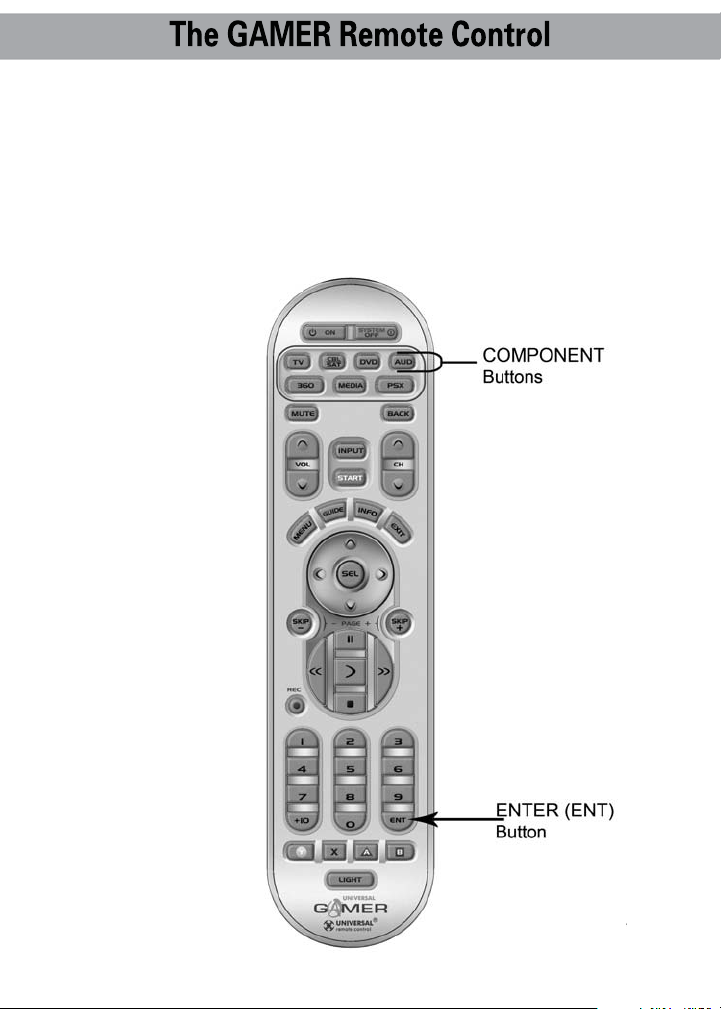
STEP 5: Once you have completed teaching the GAMER all the
buttons, press and hold the component button and ENTER (ENT)
buttons together to save the learned functions. The LED light will
blink three times to confirm the programming. Now test all the
learned buttons to make sure they learned correctly.
If necessary, please repeat Step 2 to program the next component.
16
Page 19

If the Learning Method does not work, here are
a few suggestions:
• If you have a Plasma TV, move to another room
• Avoid programming under fluorescent light or direct sunlight
• Put new batteries in your old remote
• Gradually vary the distance between the two remote controls.
• Tap the button on your old remote instead of pressing and holding
it during the learning process.
See the following notes regarding the
Learning process:
• Learned functions override any existing pre-programmed
functions on the remote control.
• All buttons for the seven component modes can be learned
except for the LIGHT button.
• Learned functions are automatically erased when a new
function is learned on the same button.
• Learned functions are retained even after a different Set-up
Code number is programmed into the remote control.
• To return to an original pre-programmed function, a learned
function must be erased.
17
Page 20
SECTION 4: SimpleSound™ Volume Control
SimpleSound gives you total volume control over ALL the components in your system, even those that do not have built-in volume
control, such as TIVO, DVD and VCR. SimpleSound saves you the
hassle and inconvenience of constantly switching between
component modes just to control volume.
In a basic system, the sound may come from your TV. In a more
advanced system, the sound may come from your audio component
such as a Surround Sound Receiver or Home Theatre system. So
first, identify what device you want to use in your system for sound.
Now, let’s set-up SimpleSound. Here’s how:
STEP 1: Press and hold the component button you want to add
volume control to, such as DVD or VCR and the SELECT (SEL) button
at the same time for about three seconds until the component LED
light turns on.
18
Page 21
IMPORTANT: If you don’t press a button within 20 seconds, the
LED light will turn off and exit the set-up mode and you will need
to start over.
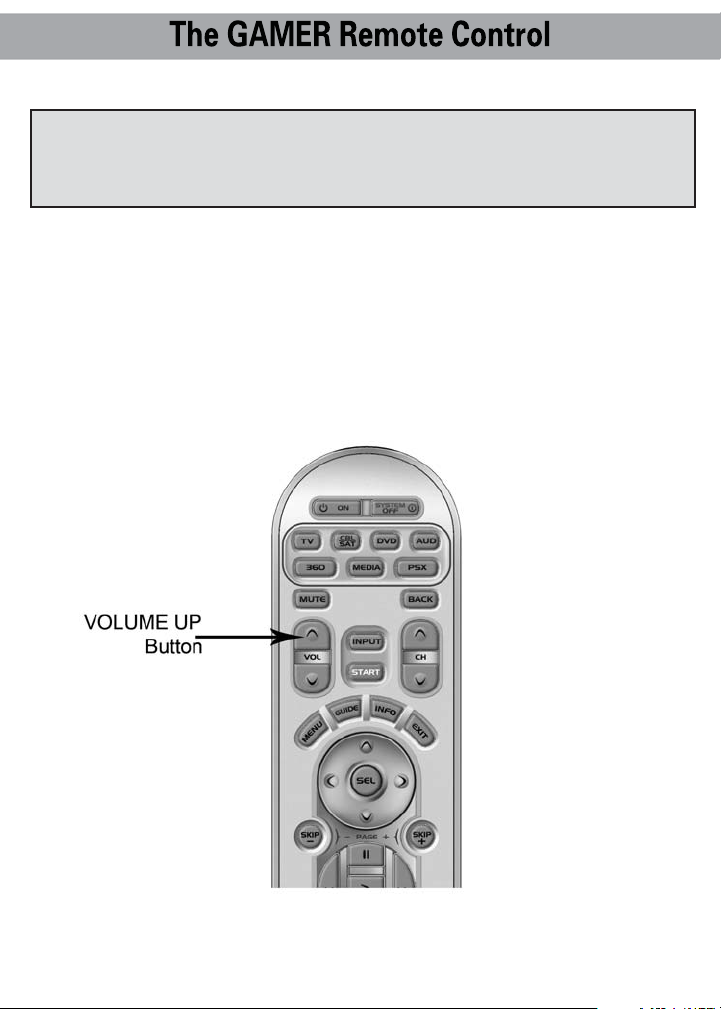
STEP 2: Press the VOLUME UP button and then press either the TV
or AUDIO button that you want to use for volume. The component
LED light will blink three times to confirm it is saved. This sets up
a group of three buttons (VOLUME UP, VOLUME DOWN and MUTE)
in one action!
Repeat Steps 1-2 for all other components.
19
Page 22

Note: SimpleSound is what is called a ‘Punch Through’ feature
and is not limited to volume control. It can also be applied to other
groups of buttons. If you find yourself switching to a particular
device frequently to use a group of controls, consider using Punch
Through for another group, as listed here. Simply perform the steps
above and for step 2, press the first button listed in the group and all
buttons will be programmed:
VOLUME: VOLUME UP, VOLUME DOWN AND MUTE
CHANNEL: CHANNEL UP, CHANNEL DOWN, PREV. CHANNEL AND
NUMBERS (0-9)
VCR/DVD: PLAY, STOP, PAUSE, REWIND, FAST
FORWARD, SKIP+, SKIP–, RECORD
DVD/SAT OSD: MENU, GUIDE, INFO, EXIT, UP, DOWN,
LEFT, RIGHT, SEL
20
Page 23
MacroPower
TM
Imagine turning on all your components such as TV, DVD player
and surround sound receiver by pressing a single button on your
GAMER! What would normally take three remotes and three button
pushes, the GAMER can accomplish with the press of one button.
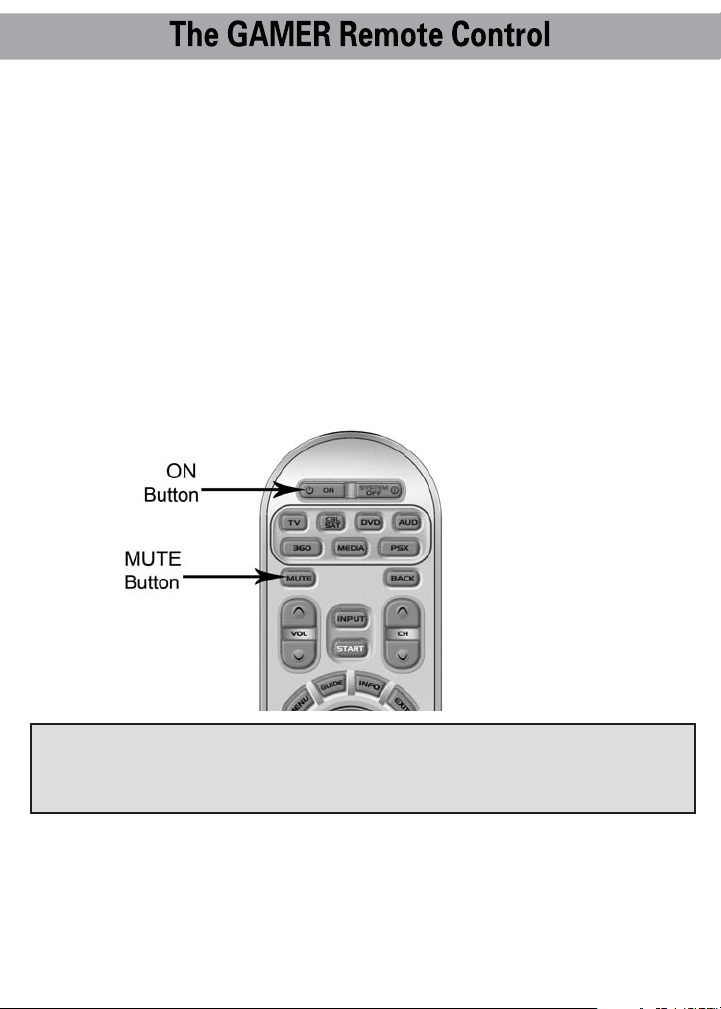
We call that MacroPower. Any of the POWER ON or the SYSTEM
OFF buttons can be programmed for MacroPower control. To set up
MacroPower to these buttons, follow these easy steps:
STEP 1: To program MacroPower commands for the Power ON
button, press the ON button and the MUTE button together and
hold them down for about 3 seconds until one of the component
button LED lights turns on.
IMPORTANT: If you don’t press a button within 20 seconds, the
LED light will turn off and exit the set-up mode and you will need
to start over.
STEP 2: Press the component button you want to turn on and
then the Power ON button and repeat for all other components in
the order you want them to turn on. The LED light will blink once
for each command.
21
Page 24

STEP 3: Once you’ve entered all the Power On commands, press
the CHANNEL UP button to save your MacroPower commands and
the component button LED light will blink three times to confirm
the programming.
SUGGESTION: Most of the components have the same signal to
turn the power On and Off. You may want to program MacroPower
only in the ON button and save the System Off button to turn
components On or Off individually.
Note: If you want to program MacroPower for the POWER OFF
button, repeat the same steps used for Power ON programming.
22
Page 25
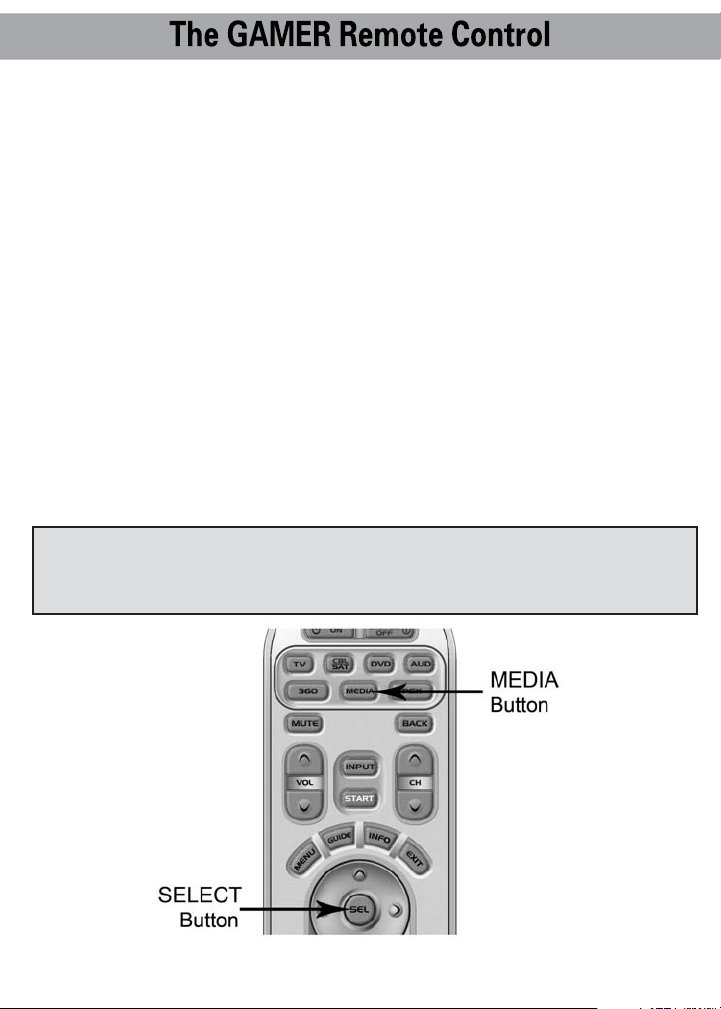
MEDIA Function: Programming a 5th Component
After you’ve finished customizing the GAMER’s basic programming
for game consoles (Xbox 360 and/or PSX Playstation) and four
primary audio/video components, and you did not use MEDIA, you
can take advantage of the MEDIA function to program a 5th
audio/video component, such as TiVo or iPod docks. It’s very
simple. Here’s how:
STEP 1: Turn on the component you want to program.
STEP 2: Refer to the pre-programmed code tables starting on page
34 and write down the code numbers listed for your component.
The code numbers are listed by categories of devices, then by brand.
See page 33 for a category list.
STEP 3: Press down both the MEDIA button and the SELECT (SEL)
button at the same time and hold them down for 3 seconds until the
MEDIA LED light turns on.
IMPORTANT: If you don’t press a button within 20 seconds, the
LED light will turn off and exit the set-up mode and you will need
to start over.
23
Page 26

STEP 4: Press the component button you want to set-up in the
MEDIA component button.
STEP 5: Point the GAMER at the component you want to program
and enter the 3-digit set-up code listed in the Code Tables. Once you
enter the correct code number, the component will turn off. If the
component does not turn off, enter the next code numbers listed
for your component until it turns off.
STEP 6: Now, turn on the component and test the the VOLUME
and CHANNEL buttons (for TV) or the PLAY and STOP buttons (for
VCR and DVD) to make sure that they all work. If any of the
functions do not work properly, repeat Step 5 using the next code
number listed for your component until you find a perfect match.
STEP 7: Once you’ve found a correct code, you must save
it. Press the MEDIA component button you just programmed one
more time to store the code number. The MEDIA component LED
light will blink three times to confirm that the code was
successfully stored.
24
Page 27
Finding a Device Button’s Set-up Code Number
If you used the Auto-Search Method to program a component,
you may not actually know what the correct code number is. Here is
a way for you to identify what that code number is, so you can make
a note in the back of this Manual for future reference.
STEP 1: Press and hold the SEL and the desired component button
you would like to verify for approximately three seconds until the
component LED light turns on.
IMPORTANT: If you don’t press a button within 20 seconds, the
LED light will turn off and exit the set-up mode and you will need
to start over.
25
Page 28
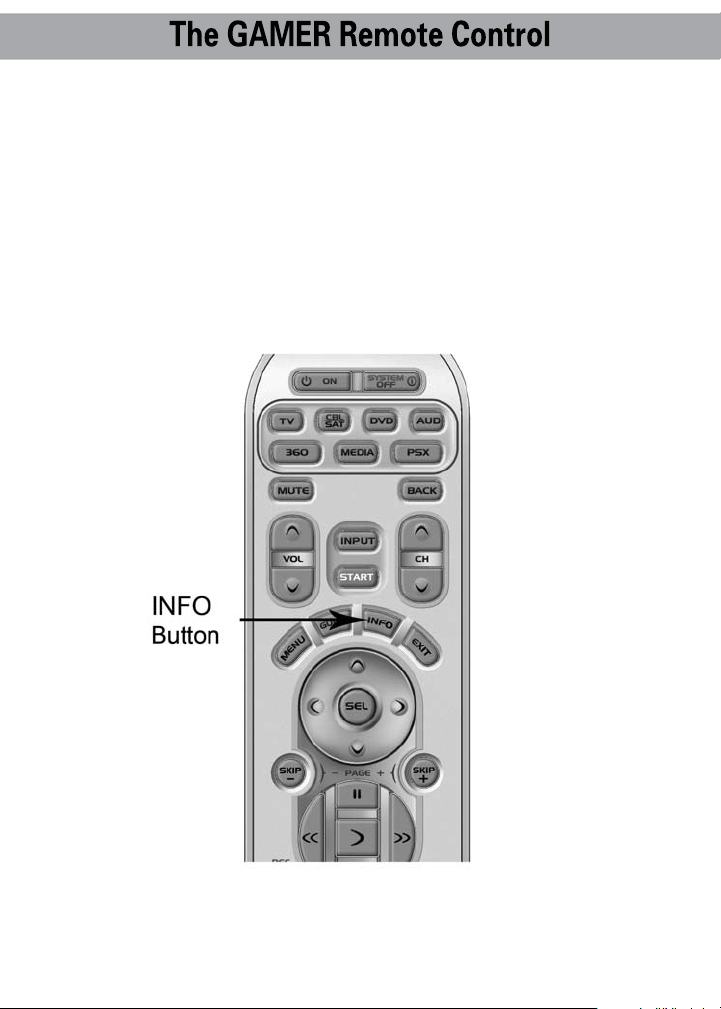
STEP 2: Press the INFO button and count the number of times the
component LED light blinks. This number indicates the first digit
of the code. Now it will pause for one second and blink again to
indicate the number of the second digit. And again, it will pause
and blink to indicate the number of the third digit.
10 blinks represents the number 0.
For example: One blink, pause, eight blinks, pause and three blinks indicate
code number 183.
26
Page 29
Erasing Commands – Overview
You can erase a single learned command, all learned commands in
each component mode, SimpleSound programming, MacroPower
commands, or re-set the remote to original factory default settings,
if desired.
SECTION 1: Erasing a Single Learned Command
STEP 1: To erase a single command, press and hold both the
component button and the ENTER (ENT) button together for
about 3 seconds until the component LED light turns on.
IMPORTANT: If you don’t press a button within 20 seconds, the
LED light will turn off and exit the set-up mode and you will need
to start over.
27
Page 30

STEP 2: Now, press and hold the button you want to erase for
3 seconds. The component LED light will blink twice to confirm
the erasure.
STEP 3: Repeat Step 2 to erase any other buttons in the selected
component’s mode.
STEP 4: To exit, press and hold both the component button and
the ENTER (ENT) button until the component LED light blinks
three times.
28
Page 31

SECTION 2: Erasing All Learned Commands from
One Component Mode
This function allows you to erase all the learned commands from
one component. For example, if you want to erase all learned
commands on the TV component button because you bought a
new TV, the process is very simple.
STEP 1: Press and hold both the desired component button and
the ENTER (ENT) button at the same time for about 3 seconds until
the component LED light turns on.
IMPORTANT: If you don’t press a button within 20 seconds, the
LED light will turn off and exit the set-up mode and you will need
to start over.
STEP 2: Press and hold both the desired component button you
want to erase and the PAUSE button for about three seconds, until
the component LED light blinks twice to confirm the erasure.
STEP 3: To exit, press and hold both the component button and
the ENTER (ENT) button until the component LED light blinks
three times.
29
Page 32

SECTION 3: Erasing SimpleSound Commands
STEP 1: Press and hold the component button you want to erase
volume control from, such as DVD or VCR and the SELECT (SEL)
button at the same time for about three seconds until the component
LED light turns on.
STEP 2: Press the VOLUME UP button and then the same
component button from Step 1. The component LED light will
blink three times to confirm the erasure.
Repeat Steps 1-2 to erase SimpleSound commands from other
components.
30
Page 33

SECTION 4: Erasing MacroPower Commands
STEP 1: For erasing MacroPower commands on the POWER ON
or SYSTEM OFF button, press and hold either the POWER ON or
SYSTEM OFF button and the MUTE button simultaneously for 3
seconds until the component LED light turns on.
IMPORTANT: If you don’t press a button within 20 seconds, the
LED light will turn off and exit the set-up mode and you will need
to start over.
STEP 2: Press the CHANNEL UP button to erase and exit the
Erase mode. The component LED light will blink three times to
confirm the erasure.
31
Page 34

SECTION 5: Re-setting the Remote to Original
Factory Default Settings
If you want to start with a clean slate with the GAMER, you can
re-set your remote to the original factory default settings.
Press and hold both the 360 and RECORD buttons for about five
seconds until the PSX component LED light blinks five times.
All added information in the remote will be erased and the GAMER
will return to the original factory default settings.
32
Page 35

Pre-Programmed Code Tables
The GAMER’s Pre-Programmed code library is classified by
component category (360, Media, PSX, TV, DVD, etc.). Some
component categories actually include other types of components.
For example, the MEDIA category includes Lighting Controls, iPod
Docks and Custom Installation Products.
(Reference the legend below.)
Within each category, the code numbers are listed in rows by
brand (Sony, Panasonic, B & K, etc.). Some brands have more than
one three digit code for you to try. Just circle the correct row and
refer to it while you setup.
360
PSX
MEDIA
TV
SAT/CBL
DVD
AUDIO
NOTE: Following some Code Tables is a Command Locator.
Use the Command Locator to locate additional commands.
Xbox 360 and Xbox
Playstation
Media Center PCs, Lighting Controls, iPod Docks,
and Custom Installation Products
TVs, Plasmas, Projectors and Monitors
Cable TV Tuner/Descrambler, Satellite
Receivers, TiVo, Replay and Other DVR Receivers
DVD Players, DVD Recorders, VCRs and
TV/VCR Combos.
Satellite Radios, Amps, Preamps and A/V
Receivers
33
pages 34 - 35
pages 36 - 37
pages 38 - 41
pages 42 - 49
pages 50 - 56
pages 57 - 66
pages 67 - 71
Page 36

360 (XBOX) CODE TABLE/COMMAND LOCATIONS
BRAND CODE NUMBERS
XBOX 001 002
BUTTON NAME COMMAND
ON XBOX
SYSTEM OFF ON/OFF
VOL+ VOL+
VOL- VOLMUTE MUTE
CH+ CH/PG+
CH- CH/PGINPUT XBOX
START START
BACK OPEN/CLOSE
MENU DVD MENU
GUIDE TITLE
INFO INFO
EXIT BACK
UP UP
DOWN DOWN
SEL OK
LEFT LEFT
RIGHT RIGHT
PAGE+/SKIP+ >I SKIP
PAGE-/SKIP- I< REPLAY
REC REC
PLAY PLAY
STOP STOP
PAUSE PAUSE
REW REW <<
FF FWD >>
1/TUNER 1
2/CD 2 ABC
3/DVD 3 DEF
34
Page 37

360 COMMAND LOCATIONS
BUTTON NAME COMMAND
4/VCR 4 GHI
5/TV 5 JKL
6/CABLE 6 MNO
7/SAT 7 PQRS
8/AUX 8 TUV
9/TAPE 9 WXYZ
0/PHONO 0
+10 100(*)
ENT ENTER
Y/PIP ON-OFF Y/GUIDE
X/PIP SWAP X
A/PIP MOVE A
B/PIP FREEZE B/LIVE TV
Light
35
Page 38

PSX (PlayStation) CODE TABLE/COMMAND LOCATIONS
BRAND CODE NUMBERS
PLAYSTATION 001
BUTTON NAME COMMAND
ON POWER/RESET
SYSTEM OFF POWER/RESET
VOL+
VOLMUTE
CH+ SLOW I>
CH- SLOW <I
INPUT SUBTITLE
START START
BACK OPEN/CLOSE
MENU MENU
GUIDE TOP MENU
INFO DISPLAY
EXIT RETURN
UP UP
DOWN DOWN
SEL ENTER
LEFT LEFT
RIGHT RIGHT
PAGE+/SKIP+ NEXT >>I
PAGE-/SKIP- PREV I<<
REC
PLAY PLAY
STOP STOP
PAUSE PUASE
REW SCAN <<
FF SCAN >>
1/TUNER 1
2/CD 2
3/DVD 3
36
Page 39
PSX (PlayStation) COMMAND LOCATIONS
BUTTON NAME COMMAND
4/VCR 4
5/TV 5
6/CABLE 6
7/SAT 7
8/AUX 8
9/TAPE 9
0/PHONO 0
+10
ENT SELECT
Y/PIP ON-OFF O
X/PIP SWAP X
A/PIP MOVE
B/PIP FREEZE
Light
37
Page 40

MEDIA CODE TABLES
BRAND CODE NUMBERS
MEDIA CENTER PC 001 002
APPLE/iPod 412 401
DELL 001 002
DWIN 080 253
FAROUDJA 184
GATEWAY 001 002
HAUPPAUGE 294 295
HP 001 002
HUNTERDOUGLAS 219
KEYSPAN 297
NILES 160 187
RUSSOUND 081
SIMA 082
SONY 001 002
TOSHIBA 001 002
MEDIA-LIGHTING CONTROLS
BRAND CODE NUMBERS
LITE-TOUCH 208 257
LUTRON 158 159 077
X-10 183 093
XANTECH 172 188 189
38
Page 41

MEDIA COMMAND LOCATIONS
BUTTON NAME COMMAND
ON POWER
SYSTEM OFF POWER
VOL+ VOL +
VOL- VOL MUTE MUTE
CH+ CH/PG +
CH- CH/PG INPUT SUBTITLE
START START
BACK EJECT
MENU TITLE (DVD MENU)
GUIDE GUIDE
INFO MORE INFO
EXIT BACK
UP UP
DOWN DOWN
SEL OK
LEFT LEFT
RIGHT RIGHT
PAGE+/SKIP+ SKIP >I
PAGE-/SKIP- REPLAY I<
REC REC
PLAY PLAY
STOP STOP
PAUSE PAUSE
REW REW <<
FF FF >>
1/TUNER 1
2/CD 2 ABC
3/DVD 3 DEF
4/VCR 4 GHI
5/TV 5 JKL
6/CABLE 6 MNO
7/SAT 7 PQRS
39
Page 42

MEDIA COMMAND LOCATIONS
BUTTON NAME COMMAND
08/AUX 8 TUV
9/TAPE 9 WXYZ
/PHONO 0
+10 CLEAR
ENT ENTER
Y/PIP ON-OFF RECORDED TV
X/PIP SWAP LIVE TV
A/PIP MOVE ASPECT
B/PIP FREEZE PRINT
Light
MEDIA-COMMAND LOCATIONS (LIGHT)
BUTTON NAME COMMAND
ON ON
SYSTEM OFF OFF
VOL+
VOLMUTE
CH+
CHINPUT
START
BACK
MENU
GUIDE
INFO
EXIT
UP UP/BRIGHT
DOWN DOWN/DIM
EL
LEFT
RIGHT
PAGE+/SKIP+
PAGE-/SKIP-
40
Page 43

MEDIA COMMAND LOCATIONS
MEDIA-COMMAND LOCATIONS (LIGHT)
BUTTON NAME COMMAND
REC
PLAY
STOP
PAUSE
REW
FF
1/TUNER 1
2/CD 2
3/DVD 3
4/VCR 4
5/TV 5
6/CABLE 6
7/SAT 7
8/AUX 8
9/TAPE 9
0/PHONO 10
+10 11
ENT 12
Y/PIP ON-OFF 13
X/PIP SWAP 14
A/PIP MOVE 15
B/PIP FREEZE 16
Light
41
Page 44

TV CODE TABLES
BRAND CODE TABLES
ABEX 025
ADMIRAL 072 081 161 160
ADVENT 247
ADVENTURA 002
AKAI 197 146 248
A MARK 112 143
AMPRO 167 073 157 183
AMSTRAD 052
ANAM 043 054 056 080 112 131
AOC 197 004 112 058
APEX DIGITAL 006
AUDIOVOX 076
BARCO 233
BELCOR 116
BELL&HOWELL 161 072
BLAUPUNKT 088
BROKSONIC 238
BROCKWOOD 116
CAIRN 201
CANDLE 197 002 003 004
CAPEHART 058
CELEBRITY 070
CENTURION 197
CETRONIC 043
CITIZEN 197 002 003 004 043 101 103 143
CLASSIC 043
CLP CLASSIC 161
COLORTYME 116 197
CONCIERGE 073 157 183
CONCERTO 004
CONTEC 043 050 051
CORNEA 116
CORONADO 143
CRAIG 043 054
42
Page 45

TV CODE TABLES
BRAND CODE TABLES
CROWN 043 143
CURTIS MATHES 197 101 004 143
CXC 043
DAEWOO 004 016 043 044 076 103 114 125 127 143
DAYTRON 004 143
DELL 319 320 321
DIMENSIA 161
DREAMVISION 235
DUKANE 163 025
DUMONT 116 073 157 183
DURABRAND 096
DWIN 177 257
DYNASTY 043
DYNATECH 062
EIKI 187
ELECTROBAND 070
ELECTROHOME 143 024 076 196
ELEKTRA 072
EMERSON 028 048 043 155 005 197 004 047 050 051 076 096 143
151 153 154
ENVISION 116 197
ESA 323
FISHER 007 057
FUJITSU 198 246 346
FUNAI 028 043 052
FUTURETECH 043
GATEWAY 242 268
GE 160 144 165 073 197 008 009 034 056 074 130 155 161
004 157 183
GIBRALTER 116 073 157 183
GOLDSTAR 113 116 102 004 106 112 119 127 143
HALL MARK 004
HITACHI 011 163 166 004 009 010 012 023 075 143 158 072
HP 316 327 378
43
Page 46

TV CODE TABLES
BRAND CODE TABLES
NFINITY 164
INFOCUS 230 330 333
INTEQ 073 157 183
INSIGNIA 350
JANEIL 002
JBL 164
JCB 070
JCPENNEY 004 024 197 008 009 030 065 101 143 160
JENSEN 013
JVC 038 034 070 083 145 199 210 240 241
KAWASHO 116 070 197
KEC 043
KENWOOD 197 070
KLOSS 002 059
KLOSS NOVABEAM 002
KMC 143
KTV 043 197 143 154
KURAZAI 072
LG 113 116 102 004 106 112 119 127 143 243 284 363
LODGENET 072
LOEWE 164
LOGIK 072
LUXMAN 004
LXI 166 007 015 052 081 160 164
MAGNAVOX 164 059 197 003 060 061 004 063 064 127 022 160 094
239 226
MAJESTIC 161 072
MARANTZ 197 164 184
IMATSUI 164
MAXENT 242
MEGATRON 116 197 163
MEMOREX 007 072 004
METZ 088
MGA 197 004 024 028 042
44
Page 47

TV CODE TABLES
BRAND CODE TABLES
MIDLAND 161 073 157 183
MINERVA 088
MINUTZ 008
MITSUBISHI 109 124 024 004 028 040 042 146 191
MONTGOMERY WARD 161 072
MTC 197 004 062 101
NAD 015 025
NEC 132 130 134 197 040 016 024 056 019 236 237 262 272
NET TV 202
NIKEI 043
NIKKO 116 197
NUVISION 351
ONKING 043
ONWA 043
OPTIMUS 025
OPTONICA 019 081
OPTOMA 265 270
ORION 096
PANASONIC 034 056 080 092 164 208
PHILCO 197 003 059 060 064 164 004 024 056 063
PHILIPS 164 005 093 038 197 003 004 059 127 184 206 239 259
PILOT 116
PIONEER 135 025 197 018 023 116 234
PORTLAND 004 143
PROSCAN 144 160 161 165 167
PROTON 004 131 058 143 171 173 193
PULSAR 116 073 157 183
QUASAR 034 056 092
RADIO SHACK 019 004 143 043 127
RCA 160 165 065 144 161 197 004 024 056 152 023 074 333
REALISTIC 007 019 043 047
ROCTEC 186
RUNCO 168 169 178 179 180 181 182 183 073 157
SAMPO 197 058 004 202
45
Page 48

TV CODE TABLES
BRAND CODE TABLES
SAMSUNG 050 089 101 105 004 127 143 160 228 229 258
SAMSUX 197
SANSUI 096
SANYO 166 007 020 053 057 082 187
SCEPTRE 276
SCOTCH 116 197
SCOTT 028 043 004 048 143
SEARS 015 030 004 007 028 057 143 094 160 082 165 166
SELECO 189 200 205 227
SHARP 081 019 014 170 028 029 004 022 143 175 251
SHOGUN 116
SIEMENS 088
SIGNATURE 072
SIMPSON 003
SOLE 231 232
SONY 070 139 147 126 185 085 213 277 279
SOUNDESIGN 028 004 003 043
SPECTRICON 112
SSS 004 043
SUPRA 116
SUPRE MACY 002
SUPREME 070
SVA 328
SYLVANIA 197 003 052 059 060 063 064 164 044 160 127
SYNTAX OLEVIA 161 144 160 376
TANDY 081
TATUNG 056 062
TECHNICS 034 080
TECHWOOD 004
TEKNIKA 002 003 004 024 028 043 072 101 143
TELEFUNKEN 037 046
TELERENT 072
TERA 172
TMK 004
46
Page 49

TV CODE TABLES
BRAND CODE TABLES
TOSHIBA 015 138 030 007 040 062 101 325
TOTEVISION 143
UNIVERSAL 008 009
VICTOR 145
VIDEO CONCEPTS 146
VIDIKRON 174 184 188 192
VIDTECH 004
VIEWSONIC 242
VIKING 002
WARDS 004 008 009 019 028 060 061 063 064 072 074 143
164 034
WESTINGHOUSE 076 280
YAMAHA 197 004
YORK 004
YUPITERU 043
ZENITH 073 072 095 103 157 183 243 284
ZONDA 112
47
Page 50

TV COMMAND LOCATIONS
BUTTON NAME COMMAND
ON ON
SYSTEM OFF OFF
VOL+ VOL+
VOL- VOLMUTE MUTE
CH+ CH+
CH- CHINPUT TV/VCR
START FAVORITES
BACK LAST
MENU MENU
GUIDE GUIDE
INFO INFO
EXIT EXIT
UP UP
DOWN DOWN
SEL SEL/OK
LEFT LEFT
RIGHT RIGHT
PAGE+/SKIP+ PIP CH+/SLEEP
PAGE-/SKIP- PIP CH-/CC
REC
PLAY
STOP
PAUSE
REW
FF
1/TUNER 1
2/CD 2
3/DVD 3
4/VCR 4
5/TV 5
6/CABLE 6
7/SAT 7
48
Page 51

TV COMMAND LOCATIONS
BUTTON NAME COMMAND
8/AUX 8
9/TAPE 9
0/PHONO 0
+10 +10
ENT ENTER
Y/PIP ON-OFF PIP/POP
X/PIP SWAP PIP SWAP
A/PIP MOVE PIP MOVE
B/PIP FREEZE PIP FREEZE
Light
49
Page 52

SAT/CABLE CODE TABLES
BRAND CODE NUMBERS
CABLE BOXES
ABC 004 103 003 039 042 046 053
ADELPHIA 043 074
ADVANCED NEWHOUSE 043
ALTRIO 043
AMERICAST 099
ARMSTONG 074
AT&T BROADBAND 074
ATLANTIC BROADBAND 043 074
BELL SOUTH 099
BLUE RIDGE 043 074
BRESNAN 074
BRIGHT HOUSE 043 110
BUCKEYE COMM 074
CABLEVISION 043 074 108
CHARTER 043 074
COGECO 074
COMCAST 043 074 110
COMSAT 074
COX DIGITAL 043 074
EAGLE 020 030 040
EASTERN 057
GEMINI 008
GENERAL INSTRUMENT 074 103 104
GNC 099
GOLDEN CHANNEL 030
HAMLIN 049 050 055
HITACHI 103 055
INSIGHT 074
JERROLD 074 004 103 002 003 008 009 010 069
MAGNAVOX 010 012
MASSILLON 074
MEDIACOM 74
MEMOREX 052
MOTOROLA 074 110 148 111
50
Page 53

SAT/CABLE CODE TABLES
BRAND CODE NUMBERS
MOVIE TIME 028
MOXI 111
NCTC 074
NSC 015 028 038 071
OAK 031 037 053
PACE 043 074
PANASONIC 044 047
PARAGON 052
PHILIPS 006 012 013 020 085
PIONEER 043 103 034 051 063 076 105
PULSAR 052
RCA 047
RCN 074
REGAL 049 050
REGENCY 057
RODGERS 043
SAMSUNG 030
SCIENTIFIC ATLANTA 043 003 041 042 045 046
SEREN 043
SERVICE ELECTRIC 074
SHAW 074
SIGECOM 043
SONY 108
SPRUCER 047
STARCOM 002 004 008 009
STARGATE 008 030 104
SUSQUEHANNA 043 074
TIME WARNER 043 074
TOCOM 039 040 056
TOSHIBA 052
UNITED CABLE 004 053
VIDEOTRON 043
VIEWSTAR 012 015
WIDE OPEN WEST 043 099
51
Page 54

SAT/CABLE CODE TABLES
BRAND CODE NUMBERS
ZENITH 052 060 093 100
SAT RECEIVERS
BRAND CODE NUMBERS
CABLEVISION 148
DIRECTV 173
DISH NETWORK 122 167
ECHOSTAR 122 167
EXPRESSVU 122 167
GENERAL ELECTRIC 151 116 150
GENERAL INSTRUMENT 148
GOI 122 167
HITACHI 139 140
HTS 122 167
HUGHES 114 154
JVC 122 167
LG 170
MAGNAVOX 136
MEMOREX 136
MITSUBISHI 114 154
MOTOROLA 148
NEXT LEVEL 148
PANASONIC 142 160
PAYSAT 136
PHILIPS 152 153 156 114 154 136
PROSCAN 151 116 150
RADIOSHACK 148
RCA 151 116 150
SAMSUNG 123 155 163 169 175
SKY 164
SONY 115
STAR CHOICE 148
TOSHIBA 127 114 154 157 158
UNIDEN 136
52
Page 55

SAT/CABLE CODE TABLES
SAT RECEIVERS
BRAND CODE NUMBERS
VOOM 148
ZENITH 159
DVR RECEIVERS
BRAND CODE NUMBERS
DISH NETWORK 122 167
ECHOSTAR 122 167
HUGHES 209
HUMAX 209
JVC 122 167
PHILIPS 201 209
REPLAY NETWORKS 200
SONY 205 206
TIVO 201 209
53
Page 56

SAT/CABLE COMMAND LOCATIONS
BUTTON NAME COMMAND
CABLE BOXES
ON ON
SYSTEM OFF OFF
VOL+ VOL+
VOL- VOL-
MUTE MUTE
CH+ CH+
CH- CH-
INPUT VIDEO/BYPASS
START FAV
BACK LAST
MENU MENU
GUIDE GUIDE
INFO INFO
EXIT EXIT
UP UP
DOWN DOWN
SEL SEL/OK
LEFT LEFT
RIGHT RIGHT
PAGE+/SKIP+ PAGE+ / PIP CH+
PAGE-/SKIP- PAGE- / PIP CH-
REC REC
PLAY PLAY
STOP STOP
PAUSE PAUSE
REW REW
FF FF
1/TUNER 1
2/CD 2
3/DVD 3
4/VCR 4
5/TV 5
6/CABLE 6
7/SAT 7
8/AUX 8
9/TAPE 9
0/PHONO 0
+10 * / PPV
ENT ENTER/ MUSIC
Y/PIP ON-OFF PIP ON.OFF
X/PIP SWAP SWAP, A / DAY-
A/PIP MOVE MOVE, B / DAY+
B/PIP FREEZE LIST, C / HELP
Light Light
54
Page 57

SAT/RECEIVER COMMAND LOCATIONS
BUTTON NAME COMMAND
SATELLITE RECEIVERS
ON ON
SYSTEM OFF OFF
VOL+ VOL+
VOL- VOLMUTE MUTE
CH+ CH+
CH- CHINPUT INPUT
START FAV
BACK LAST
MENU MENU
GUIDE GUIDE
INFO INFO
EXIT EXIT
UP UP
DOWN DOWN
SEL SEL/OK
LEFT LEFT
RIGHT RIGHT
PAGE+/SKIP+ PAGE+/THUMBS UP
PAGE-/SKIP- PAGE-/THUMBS DN
REC REC
PLAY PLAY
STOP STOP
PAUSE PAUSE
REW REW
FF FF
1/TUNER 1
2/CD 2
3/DVD 3
4/VCR 4
5/TV 5
6/CABLE 6
7/SAT 7
55
Page 58

SAT/CABLE COMMAND LOCATIONS
BUTTON NAME COMMAND
DVD PLAYERS
8/AUX 8
9/TAPE 9
0/PHONO 0
+10 *, (-)
ENT ENTER
Y/PIP ON-OFF PIP/REPLAY
X/PIP SWAP SWAP/ADVANCE
A/PIP MOVE POSITION/SLOW
B/PIP FREEZE RECOVER/LIVE TV
Light
56
Page 59

DVD CODE TABLES
BRAND CODE NUMBERS
DVD PLAYERS
AIWA 146
ALPINE 098
APEX DIGITAL 087 111 115
BROKSONIC 130
CINEVISION 091
DENON 007 080 173
DURABRAND 091
DVD 2000 017
EMERSON 091 143
FISHER 147
FUNAI 143
GE 026 027
GOLDSTAR 091
GO VIDEO 137 091 220 221 222
HARMAN KARDON 084 140
HITACHI 101
INTEGRA 142 180
JBL 084
JVC 012
KENWOOD 151
KLH 135
KRELL 104
LEXICON 148
LG 091 057 074
MAGNAVOX 066 096
MARANTZ 083 095
MERIDIAN 153
MICROSOFT 027
MITSUBISHI 017
MYRYAD 102 134
NAD 088
NAKAMICHI 103
ONKYO 076 035 180
OPTIMUS 107
57
Page 60

DVD CODE TABLES
BRAND CODE NUMBERS
ORION 130
PANASONIC 021 042 138 139 144 150
PHILIPS 066 083 095 105 166
PHILIPS-MAGNAVOX 035 066
PIONEER 023 092 099 107 108 131
POLAROID 233
POLK AUDIO 035 066
PROCEED 086
PROSCAN 026 027
RCA 026 027
SAMSUNG 056 070 119 165 170 137 159
SANSUI 154
SANYO 147
SEARS 130
SENSORY SCIENCE 222
SHARP 094
SONY 033 118 145 126 191
SYLVANIA 143
SYMPHONIC 143
TATUNG 102
TEAC 107
TECHNICS 042
TECHWOOD 088
THOMPSON 026 027
TOSHIBA 035 034 130 141 164 188
VENTURER 149
X-BOX 027
YAMAHA 042 089 166 195 197
ZENITH 057 074 091
58
Page 61
DVD CODE TABLES
DVD Recorders
BRAND CODE NUMBERS
GO VIDEO 220 221 222
PANASONIC 139
SENSORY SCIENCE 222
SONY 191
TOSHIBA 188
DVD-TV/DVD Combos
BRAND CODE NUMBERS
AIWA 146
FUNAI 143
SAMSUNG 165
SYLVANIA 143
SYMPHONIC 143
TOSHIBA 130
DVD-TV/DVD/VCR Combos
BRAND CODE NUMBERS
MAGNAVOX 143
PANASONIC 144
SYLVANIA 143
TOSHIBA 164
DVD-DVD/VCR Combos
BRAND CODE NUMBERS
GO VIDEO 137
PANASONIC 150
PHILIPS 105 (VCR Functions for VCR 067)
SAMSUNG 137 159
SANSUI 154
59
Page 62

DVD CODE TABLES
DVD-DVD/VCR Combos
BRAND CODE NUMBERS
SONY 145 191
TOSHIBA 141
ZENITH 091 (VCR Functions for VCR101)
VCRs
BRAND CODE NUMBERS
AIWA 534 661
AKAI 516 646 543 546 624 625
AMPRO 572
ANAM 531
AUDIO DYNAMICS 512 523 539 543
BROKSONIC 535 537 629
CANON 528 531
CAPEHART 608
CRAIG 503 540 635
CURTIS MATHES 531 541
DAEWOO 611 616 617 619 505 507 510 565 608 610 612
DAYTRON 608
DBX 512 523 539 543
DYNATECH 534 553
ELECTROHOME 559
EMERSON 506 529 535 517 525 527 531 534 536 537 546
601 629 631 653 662 616
FISHER 503 510 508 509
FUNAI 534
GE 531 572 647 563 607 609 644
GO VIDEO 632 636 655 540 615
GOLDSTAR 601 606 614 513 520 512 623
HARMAN KARDON 512 545
HITACHI 504 526 650 518 534 543 563 637 660 513
INSTANTREPLAY 531
JCL 531
60
Page 63
DVD CODE TABLES
VCRs
BRAND CODE NUMBERS
JCPENNEY 512 513 515 540 566 601
JENSEN 543
JVC 548 543 630 650 555 560 512 531 550 652 666
KENWOOD 514 548 534 547
LG 601 606 614 513 520 512 623
LLOYD 534
LXI 534 503 509 517 606
MAGIN 540
MAGNAVOX 567 531 534 568 541 656 664
MARANTZ 567 569 512 531 656
MARTA 601
MATSUI 527 530
MEI 531
MEMOREX 601 503 510 514 531 534 553 572 602 634 639
MGA 545 546 559
MINOLTA 513 520
MITSUBISHI 559 561 651 513 520 545 546 551 549 668
MTC 534 540
MULTITECH 524 534
NEC 512 523 539 543 548
NORDMENDE 543
OPTONICA 553 554
ORION 525
PANASONIC 566 570 645 583 633 640 657 663 574 667
PENTAX 513 520 531 563
PHILCO 531 534 567
PHILIPS 531 567 534 601 554 571 656
PILOT 601
PIONEER 521 513 548
PORTLAND 608
PULSAR 572
QUARTZ 502 514
61
Page 64

DVD CODE TABLES
VCR Combos
BRAND CODE NUMBERS
QUASAR 566 645 575
RADIO SHACK 623
RCA 607 609 644 647 658 541 645 513 520 640
534 540
REALISTIC 503 508 510 514 531 534 540 553 554 601
RICO 558
RUNCO 648
SALORA 514
SAMSUNG 602 604 613 615 612 620 532 540 566 607
609 625
SANSUI 522 543 548 635
SANYO 503 510 507 514 634 602
SCOTT 517 537 612 629 631
SEARS 503 508 510 514 513 601 509 517 573 612
SHARP 649 554 531 659 665
SHINTOM 524
SIGNATURE 534
SONY 556 557 558 577 552 503 578 576 531 649 654
SOUNDESIGN 534
STS 513
SYLVANIA 531 534 559 567
SYMPHONIC 534
TANDY 510 534
TATUNG 539 543
TEAC 534 539 543
TECHNICS 531 570
TEKNIKA 531 519 534 601
THOMAS 534
TMK 506
TOSHIBA 612 631 579 508 559 547 582 513
TOTEVISION 540 601
UNITECH 540
62
Page 65

DVD CODE TABLES
VCRs
BRAND CODE NUMBERS
VECTOR RESEARCH 512
VICTOR 548
VIDEO CONCEPTS 512 534 546
VIDEOSONIC 540
WARDS 503 513 517 524 531 534 540 553 554 631
YAMAHA 512 534 539 543
ZENITH 572 580 556 548 601 534 558
VCR TV/VCR Combos
BRAND CODE NUMBERS
DAEWOO 505 617
EMERSON 653
FUNAI 534
GOLDSTAR 601 623
HITACHI 534
JCPENNEY 601
LG 601 623
LLOYD 534
MAGNAVOX 534 567
MEMOREX 601
PANASONIC 570 667
PHILIPS 534 567
RADIO SHACK 623
RCA 534
SEARS 601
SONY 557 654
SYLVANIA 567
SYMPHONIC 534
THOMAS 534
ZENITH 534
63
Page 66

DVD COMMAND LOCATIONS
BUTTON NAME COMMAND
ON ON
SYSTEM OFF OFF
VOL+ VOL+
VOL- VOLMUTE MUTE
CH+
CHINPUT INPUT / DVD
START ZOOM / VCR
BACK OP/CL /HDD
MENU MENU
GUIDE SETUP
INFO INFO
EXIT EXIT
UP UP
DOWN DOWN
SEL SEL/OK
LEFT LEFT
RIGHT RIGHT
PAGE+/SKIP+ SKIP +
PAGE-/SKIP- SKIP REC REC
PLAY PLAY
STOP STOP
PAUSE PAUSE
REW REW
FF FF
1/TUNER 1
2/CD 2
3/DVD 3
4/VCR 4
5/TV 5
6/CABLE 6
7/SAT 7
64
Page 67

DVD/VCR COMMAND LOCATIONS
BUTTON NAME COMMAND
8/AUX 8
9/TAPE 9
0/PHONO 0
+10 +10
ENT ENTER
Y/PIP ON-OFF
X/PIP SWAP
A/PIP MOVE
B/PIP FREEZE
Light
DVD COMMAND LOCATIONS (VCR)
BUTTON NAME COMMAND
ON ON
SYSTEM OFF OFF
VOL+ VOL+
VOL- VOLMUTE MUTE
CH+ CH+/TRK+
CH- CH-/TRKINPUT TV/VCR
START
BACK
MENU MENU
GUIDE
INFO
EXIT
UP
DOWN
SEL
LEFT
RIGHT
PAGE+/SKIP+
65
Page 68

DVD/VCR COMMAND LOCATIONS
BUTTON NAME COMMAND
PAGE-/SKIPREC REC
PLAY PLAY
STOP STOP
PAUSE PAUSE
REW REW
FF FF
1/TUNER 1
2/CD 2
3/DVD 3
4/VCR 4
5/TV 5
6/CABLE 6
7/SAT 7
8/AUX 8
9/TAPE 9
0/PHONO 0
+10
ENT ENTER
Y/PIP ON-OFF
X/PIP SWAP
A/PIP MOVE
B/PIP FREEZE
Light
66
Page 69

AUDIO CODE TABLES
BRAND CODE NUMBERS
ADC 007
ADCOM 082 092 225 161 269 355 356
AIWA 170 018 104 202 203 213 211 188
AKAI 189
AMC 125 126 127 281 282
ANGSTROM 142
ANTHEM 335 337
ARCAM 141 418
ATLANTIC TECHNOLOGY 342
AUDIO FILE 071
AUDIO MATRIX 167
AUDIO TECHNICA 134
B & K 096 097
BOSE 070 170 224 347 409 460
BOSTON ACOUSTICS 447
CARVER 006 028 061 071 201 214 226 185 022 077 284
CINEMA SOUND 134
CITATION 148 272
CLARION 026
DELPHI 515
DENON 109 215 230 234 259 330 340
ELAN 057 290
ENLIGHTENED AUDIO 099 098
ESCIENT 368 451
FISHER 047 214 182 297
FLEXTRONICS 378
FOSGATE AUDIONICS 231 342
GE 056
GOLDSTAR 008
HARMAN KARDON 231 233 153 154 118 318
HITACHI 020
INTEGRA 275
JAMO 398
JCPENNEY 216
67
Page 70

AUDIO CODE TABLES
BRAND CODE NUMBERS
JENSEN 058
JVC 163 191 114 279 291
KENWOOD 026 066 145 192 182 005 280 374
KLH 331
KOSS 216
KRELL 150 072 376 384
KYOCERA 007
LEXICON 120 235 236 237 357 360
LINN 124 377
LUXMAN 137 139 052 165 115 004 009
LXI 056
MAGNAVOX 086 164 152 208
MARANTZ 006 028 031 040 063 185 186 251 265 119 289 296
MCINTOSH 238 286
MERIDIAN 100 012 013
MITSUBISHI 242 243 204
MONDIAL 157 158 042 043 081 112
MYRYAD 276 293
NAD 186 113 283 478 479
NAKAMICHI 111 244 245 172 183 287
NEC 176
NIRO 343
NILES 403
ONKYO 017 046 108 080 209 275
OPTIMUS 026 041
OUTLAW 342
PANASONIC 032 195 219 177 292 383
PARASOUND 129 130 132 261 294 295 333 334
PHILIPS 249 250 251 063 119
PIONEER 014 039 044 069 168 116 035 078 198 480
POLKAUDIO 515
PROCEED 144 268
RCA 010 048 117 156 067 288
REALISTIC 019 056 073 075 095
68
Page 71

AUDIO CODE TABLES
BRAND CODE NUMBERS
ROTEL 074 083 085
RUSSOUND 379 391 392
SAMSUNG 016
SANSUI 040 048 110 119 065 228
SANYO 047 059
SCOTT 019 091
SHARP 026 094 131 175
SHERWOOD 024 102 106 447
SONY 018 247 248 166 101 184 218 271 369 372 380
SOUNDESIGN 036
SSI 068
SUNFIRE 344 345 346
TEAC 005 019 049 111 212 217
TECHNICS 122 176 193 219 178 177 200 257 262
THETA DIGITAL 136
TOSHIBA 060 087 198 278
XM STELLITE RADIO 515
YAMAHA 026 253 169 067 173 205 264 232 089 264 274 285 373
ZENITH 143 210
SATELLILTE RADIOS
BRAND CODE NUMBERS
DELPHI 515
POLKAUDIO 515
SONY 380
XM STELLITE RADIO 515
69
Page 72

AUDIO COMMAND LOCATIONS
BUTTON NAME COMMAND
ON ON
SYSTEM OFF OFF
VOL+ VOL+
VOL- VOLMUTE MUTE
CH+ PRESET+
CH- PRESET+
INPUT BAND(FM/AM)
START MULTI CH
BACK
MENU MENU
GUIDE
INFO DISPLAY
EXIT EXIT/RETURN
UP UP
DOWN DOWN
SEL SEL/OK
LEFT LEFT
RIGHT RIGHT
PAGE+/SKIP+ DSP+/MODE+
PAGE-/SKIP- DSP-/MODEREC REC
PLAY PLAY
STOP STOP
PAUSE PAUSE
REW REW
FF FF
1/TUNER TUNER
2/CD CD
3/DVD DVD
4/VCR VCR/V1
5/TV TV/V2
6/CABLE CABLE/V3
7/SAT SAT/V4
70
Page 73

AUDIO COMMAND LOCATIONS
BUTTON NAME COMMAND
8/AUX AUX
9/TAPE TAPE
0/PHONO PHONO
+10
ENT
Y/PIP ON-OFF
X/PIP SWAP
A/PIP MOVE
B/PIP FREEZE
Light
71
Page 74

Frequently Asked Questions
If the batteries run out, will I lose my settings?
No. The GAMER stores all of your settings in non-volatile
FLASH memory. You could remove the batteries for months,
replace them at your convenience, and the GAMER would still
remember your settings.
What is MacroPower?
MacroPower is a very useful way to make a lot of things happen
with one button push. For example, in most home theaters, to
watch television, the user must turn on the TV, then turn on the
Cable Box or the Satellite Receiver, then turn on the Surround
Sound system for sound. Instead of pressing all of those buttons
one at a time, MacroPower enables you to turn on all of these
components, in the sequence you want, with one button push.
For more information on why and how you should program
MacroPower commands, refer to page 21 in this Manual.
What if my remote control no longer works from a distance?
Replace the batteries with new Alkaline batteries.
Who can I call for more answers?
The Universal Remote Control technical support and customer
service staff are ready to answer any questions you might have.
E-mail us at techsupport@universalremote.com or Call us
at 1-914-835-4484
Monday – Friday, 9AM to 6PM (EST)
www.universalremote.com
72
Page 75

Warranty
USA Limited Warranty Statement
UNIVERSAL REMOTE CONTROL, INC. warrants this product against
defects in material or workmanship for a period of one (1) year and
as set forth below. Universal Remote Control will, at its sole option,
repair the product using new or comparable rebuilt parts, or exchange
the product for a comparable new or rebuilt product.
This warranty does apply to the following:
• Units purchased from unauthorized resellers.
• Units purchased second-hand (used).
• Units installed or deployed for rental or commercial use.
• Damage caused by misuse, neglect, or acts of nature.
• Products that have been modified or incorporated into other products.
• Products purchased more than 12 months ago.
Specifications
Learning Capability
Macro Capability
IR Range (Line of Sight via Infrared)
Weight
Size
Batteries
2 Macro buttons, up to 20 steps each
Two AA Alkaline batteries included
73
160 IR commands at standard
frequencies (15kHz to 100kHz)
0-50 feet, depending on
the environment
6.9 oz. (with batteries)
2 1/8” x 1 1/8” x 8 3/4”
Page 76
Page 77

¡Felicitaciones!
Felicitaciones por la compra del control remoto para el GAMER
Universal de Universal Remote Control. ¡Ahora tiene usted la solución final para el control de sus juegos en el Teatro de su Hogar!
El GAMERTMya viene programado para operar sus consolas de juego
y de Medios PC al sacarlo de la caja. Con su amplia biblioteca de
códigos preprogramados y de aprendizaje, el GAMER puede operar
miles de componentes de audio y video – ¡hasta dispositivos iPod!
Todo lo que necesita conocer acerca de la programación del
GAMER está contenido en este Manual.
Manual del Propietario GAMER © 2006 Universal Remote Control, Inc.
La información en este manual está protegida por derechos de autor. Ninguna parte
de este manual puede ser copiada o reproducida en forma alguna sin el consentimiento previo por escrito de Universal Remote Control, Inc. Universal Remote
Control, Inc. no será responsable por errores/omisiones operativas, técnicas o editoriales hechas en este manual. La información en este manual puede estar sujeta a
cambios sin aviso previo. GAMERMC es marca comercial registrada de Universal
Remote Control, Inc. Todas las otras marcas o nombres de productos son marcas
comerciales o marcas comerciales registradas de sus respectivas compañías u
organizaciones.
500 Mamaroneck Avenue, Harrison, NY 10528
Teléfono: (914) 835-4484 Fax: (914) 835-4532
Page 78

Contenido
Cómo Comenzar
Control de Consolas de Juego y hasta 6 Componentes .............76
Botones para Activar Componentes ……......................................76
La Función de Medios …………......................................................76
Características Especiales
TM
SimpleSound
…………………........................................................77
MacroPowerTM……………………......................................................77
Capacidad de Aprendizaje ..............................................................77
Instalación de Baterías ..............................................................78
Ubicación de Controles GAME……..........................................79
Botón de Luz ………………...........................................................80
Configuración ...............................................................................8 1
SECCIÓN 1: Método de Códigos Preprogramados.......................8 1
SECCIÓN 2: Método de Búsqueda Automática
Preprogramada............................................................85
SECCIÓN 3: Método de Aprendizaje..............................................87
Configuración Avanzada.............................................................91
TM
SECCIÓN 1: SimpleSound
y Otros ‘Punch Throughs’...............91
SECCIÓN 2: MacroPowerTM.............................................................94
SECCIÓN 3: Botón de Función de Medios.....................................96
Cómo encontrar el Número de Código de
Configuración de un Componente. ........................................98
74
Page 79

Cómo Borrar los Comandos – Reseña General ....................100
SECCIÓN 1: Cómo Borrar un Solo Comando Aprendido..............100
SECCIÓN 2: Cómo Borrar Todos los Comandos Aprendidos
de un Componente.......................................................102
TM
SECCIÓN 3: Cómo Borrar los Comandos SimpleSound
……....103
SECCIÓN 4: Cómo Borrar los Comandos MacroPowerTM..............104
SECCIÓN 5: Cómo Reponer GAMER a los Valores por
Defecto Originales de Fábrica ...................................105
Tablas de Códigos Preprogramados .......................................106
360 .................................................................................................34-35
PSX................................................................................................ 36-37
Medios .......................................................................................... 38 -41
TV .................................................................................................. 42-49
CABLE/SAT....................................................................................50-56
DVD/VCR ....................................................................................... 57-66
AUDIO ...........................................................................................67-71
Preguntas Más Frecuentes..........................................................107
Garantía............................................................................................108
Especificaciones ...........................................................................108
75
Page 80

Cómo Comenzar
Control de Consolas de Juego y hasta 6 Componentes
El GAMER está diseñado para controlar consolas de juego y hasta
6 componentes de audio y video diferentes. ¡Ha sido programado
para operar su XBox 360, Play Station y Centro de Medios PC des
de el momento que se le saca de la caja! El GAMER tiene también
una amplia biblioteca de códigos para operar prácticamente todas
las marcas de componentes de Audio, TV, DVD, Cable y
Satélite – ¡hasta dispositivos iPod!
Una Presión Activa los Botones de Todos los Componentes
Una vez que ha programado el GAMER para todos sus componentes
de audio y video, todo lo que tiene que hacer es presionar un botón
de componente y todos los botones en el GAMER trabajarán con el
componente que acaba de presionar. Por ejemplo, si presionó el
botón del componente TV, todos los botones en el GAMER
trabajarán con su TV. Si presiona el botón del componente DVD,
todos los botones en el GAMER trabajarán con su DVD.
Botón
TV
La Función de MEDIOS
El botón del dispositivo de MEDIOS ha sido programado para
operar un Centro de Medios PC, o puede ser designado para operar
cualquier 5to. componente adicional de audio y video que pueda
usted tener en su sistema tal como dispositivos TiVo o iPod.
76
Page 81

Características Especiales
Además, el GAMER también ofrece las siguientes características
especiales que pueden ofrecerle ventajas de ahorro de tiempo:
Capacidad de Aprendizaje
El GAMER tiene una Capacidad de Aprendizaje que le permite
realmente ‘aprender’ funciones de otros controles remotos.
SimpleSound
El Control de Volumen SimpleSound es una característica dinámica
que le da total control del volumen sobre todos los componentes
en su sistema, hasta aquellos que no tienen su propio control de
volumen incorporado, tales como TiVo, DVD y VCR.
MacroPower
Ésta es una característica exclusiva que le permite ENCENDER y
APAGAR todos sus componentes, a la misma vez, bastando
presionar un botón.
Estas características especiales serán tratadas en mayor detalle
más adelante en el Manual.
TM
TM
77
Page 82

Instalación de las Baterías
Inserte las dos baterías AA que están incluidas en el paquete dentro
del compartimento para baterías situado en la parte posterior de
su control remoto. Basta presionar la aleta y levantar la cubierta.
Por favor, asegúrese de insertar las baterías correctamente como
lo ve en el diagrama. Una vez que las baterías estén correctamente
instaladas, vuelva a colocar la cubierta.
Inserte
las baterías
correctamente
78
Page 83

Ubicación de Controles GAMER
Botón
Encender
Botones del
Sistema de Juego
Botón
FLECHA ARRIBA
Botón
DE FLECHA ABAJO
Botón
SYSTEM OFF
[Apagar Sistema]
Botones de
COMPONENTES
Botones de
Funciones
BOTÓN
DE LUZ
Botones del
Funciones del
Juego
79
Page 84

Botón de LUZ
Oprima el botón de LUZ para iluminar por atrás todos los botones.
Par apagar la iluminación posterior, oprima el botón de LUZ
nuevamente, o espere 10 segundos y la iluminación posterior
se apagará automáticamente.
BOTÓN
DE LUZ
80
Page 85

Configuración Especial de su GAMER
Hay tres maneras en las que puede programar su control remoto
para trabajar con sus componentes A/V:
• El Método de Códigos Preprogramados (página 81)
• El Método de Búsqueda Automática (página 85)
• El Método de Aprendizaje (página 87)
El Método de Códigos Preprogramados le permite configurar todos
los botones a la vez, por lo que es el más rápido y fácil de los tres
métodos. El Método de Búsqueda Automática escanea a través de
todos los códigos en el control remoto, uno por uno. El Método de
Aprendizaje le permite transferir funciones de su control remoto
antiguo a GAMER, un botón a la vez.
* * * * *
SECCIÓN 1: Método de Códigos Preprogramados
PASO 1: Los códigos preprogramados de 3 dígitos se encuentran
en la parte final de este Manual de Instrucción (comenzando en la
página 34). Los códigos están listados por categoría de componente
(es decir, TV, VCR, DVD, etc.), luego por marca. Por ejemplo, si desea
ubicar un código para un TV Sony, primero ubique la categoría TV
y luego busque la marca Sony.
81
Page 86
PASO 2: Una vez que haya localizado los códigos de 3 dígitos para
cada uno de los componentes que desea operar desde su GAMER,
escríbalos TODOS en un pedazo de papel. Es importante que escriba
todos los códigos porque sólo un código va a funcionar para usted.
PASO 3: Ahora, encienda el componente que desea programar
usando su control remoto antiguo… digamos su TV para comenzar.
Busque el código configurado de su fabricante de TV de su lista
escrita a mano.
PASO 4: Oprima el botón del componente, (en este caso el botón
que dice TV), y el botón SELECCIONAR (SEL) al mismo tiempo.
Sostenga ambos botones oprimidos durante 3 segundos hasta
que la luz del botón del componente TV se encienda.
Botones de
COMPONENTES
Botón
SELECCIONAR
(SEL)
82
Page 87

IMPORTANTE: Ahora tiene 20 segundos para ejecutar el siguiente paso mientras está en la modalidad de configuración. Si no
presiona un botón dentro de 20 segundos, la luz LED se apagará
y se saldrá de la modalidad de configuración y será necesario
comenzar de nuevo.
PASO 5: Dirija el control remoto hacia el Componente, (en este
ejemplo el TV), y marque el código de 3 dígitos que escribió para
ese Componente específico. Use los botones de Números 0-9 en el
control remoto para marcar el código.
Oprima los
botones de
Número para
añadir códigos
de 3 dígitos
Botones de
Números
Si el número de código de 3 dígitos que acaba de marcar es el
número correcto, el componente que está tratando de programar
se apagará. Si no se ha apagado, continúe ingresando números de
códigos de su lista, uno a uno, hasta que se apague el TV.
IMPORTANTE: Si ha usado todos los códigos de configuración en
la lista y el componente aún no se apaga, lo podrán ayudar ya sea
el Método de Búsqueda Automática (página 85) o el Método de
Aprendizaje (página 87).
83
Page 88

PASO 6: Después que haya ingresado el número de código y el
componente se haya apagado, oprima el botón POWER [Energía]
en su control remoto para encender nuevamente el componente.
Ahora es el momento de probar los botones de VOLUME [Volumen]
y CHANNEL [Canal] (o los botones PLAY [Reproducir] y STOP
[Detener] para VCR y DVD) para asegurarse que todos funcionan.
Por ejemplo, es posible que su TV Sony se apagó con el código
número 147, pero los controles de volumen no funcionaron correctamente. Si ese fuese el caso, repita el PASO 5 usando el siguiente
número de código hasta que encuentre una combinación perfecta.
PASO 7: Una vez que ha encontrado un código correcto, lo guarda.
Oprima el botón del componente que acaba de programar, (en este
caso el del TV), una vez más para almacenar el número de código.
La luz LED del botón del componente destellará tres veces para
confirmar que el código ha sido almacenado. Ahora, cuando presiona el botón del componente TV, todos los botones funcionarán
con su TV.AHORA, PROGRAME EL RESTO DE SUS COMPONENTES
REPITIENDO LOS PASOS 3 HASTA 7.
IMPORTANTE: Si el Método de Códigos Preprogramados no le
funciona, pruebe el Método de Búsqueda Automática reseñado
en la página 85
84
Page 89

SECCIÓN 2: Método de Búsqueda Automática
Preprogramada
El Método de Búsqueda Automática es una manera de escanear a
través de todos los códigos en la tabla para encontrar el código
correcto para su componente.
PASO 1: Usando su control remoto antiguo, encienda el componente
que desea Programar con el GAMER... digamos, su TV.
PASO 2: Ahora, oprima el botón del componente, (en este caso el
botón que dice TV), y el botón SELECCIONAR (SEL) a la vez.
Sostenga ambos presionados durante 3 segundos hasta que la
luz LED del botón del componentes TV se encienda.
IMPORTANTE: Si no presiona un botón dentro de 20 segundos, la
luz LED se apagará se saldrá de la modalidad de configuración y
será necesario comenzar de nuevo.
PASO 3: Oprima y suelte el botón UP ARROW [FLECHA ARRIBA].
Cada vez que se oprime el botón de Flecha Arriba, el código contará
un número de código y enviará una señal de apagar la energía.
Cuando se envía el código correcto, el componente se apagará.
85
Botón
FLECHA
ARRIBA
Page 90

PASO 4: Oprima el botón ON [ENCENDER] en el GAMER para
volver a encender el componente. Ahora puede probar los botones
de VOLUME [Volumen] y CHANNEL [Canal] (o los botones de PLAY
[Reproducir] y STOP [Detener] para VCR y DVD) para asegurarse
que todos funcionan. Si alguno de los botones no funciona
correctamente, necesita encontrar un nuevo código. Si ese fuese
el caso, continúe oprimiendo el botón Up Arrow [Flecha Arriba]
hasta que encuentre un código que apague el componente y haga
funcionar los botones VOLUME o PLAY.
PASO 5: Una vez que haya encontrado el código correcto, sólo
tiene que guardarlo oprimiendo el botón del componente, (en este
caso del TV). La luz LED del componente destellará tres veces para
confirmar que el código ha sido almacenado.
REPITA ESTE MÉTODO PARA AQUELLOS COMPONENTES QUE
NO PUDO PROGRAMAR ANTES CON EL MÉTODO DE CÓDIGOS
PREPROGRAMADOS.
Si no puede encontrar el código correcto después de 5 minutos de
probar con el botón UP ARROW [Flecha Arriba], pruebe el Método
de Aprendizaje (página 87).
86
Page 91

SECCIÓN 3: El Método de Aprendizaje
Este método le permite ‘enseñar’ los comandos de su antiguo
control remoto a su GAMER.
PASO 1: Alinee el GAMER con su antiguo control remoto cabeza a
cabeza como lo ve aquí. Asegúrese que las cabezas estén separadas
entre una y dos pulgadas.
PASO 2: En el control remoto GAMER, oprima el botón del componente
que desea enseñar, (tal como TV, VCR, etc.) y el botón ENTER (ENT) a
la vez durante 3 segundos hasta que la luz LED del componente se
encienda.
Botones del
COMPONENTE
87
Botón
ENTER (ENT)
Page 92

IMPORTANTE: Si no oprime un botón dentro de 20 segundos, la
luz LED se apagará y se saldrá de la modalidad de configuración y
será necesario comenzar de nuevo
PASO 3: Oprima cualquier botón en el GAMER al que desea enseñar
un comando. Por ejemplo, si desea enseñar al botón MUTE [Silencio]
en el GAMER desde su antiguo control remoto de TV, oprima el
botón MUTE en el GAMER y la luz LED del botón del componente
TV destellará una vez indicando que el GAMER está listo para
aprender el comando.
PASO 4: Oprima y sostenga el botón MUTE en su antiguo control
remoto hasta que la luz LED del botón del componente en el GAMER
destelle dos veces. Ahora puede continuar enseñando a todos los
otros botones desde su antiguo control remoto oprimiendo el
siguiente botón en el GAMER y repitiendo este paso.
Nota: La luz LED del dispositivo destellará cinco veces si hubo un
error en el proceso de aprendizaje. En este caso, sírvase repetir los
Pasos 3 y 4.
88
Page 93

PASO 5: Una vez que haya terminado de enseñar al GAMER todos
los botones, oprima y sostenga el botón del Componente y del botón
ENTER (ENT) a la vez para guardar las funciones aprendidas. La luz
LED destellará tres veces para confirmar la programación. Ahora,
pruebe todos los botones enseñados para asegurar que hayan
aprendido correctamente.
Si fuese necesario, sírvase repetir el Paso 2 para programar el
siguiente componente.
Botones de
COMPONENTES
89
Botón
ENTER (ENT)
Page 94
Si el Método de Aprendizaje no funciona, siga las
siguientes sugerencias:
• Si tiene un TV de Plasma, pase a otra habitación
• Evite programar bajo luz fluorescente o luz solar directa
• Ponga baterías nuevas en su control remoto antiguo
• Varíe gradualmente la distancia entre los dos controles remotos.
• Golpee el botón en su control remoto antiguo en vez de presionarlo
y sostenerlo durante el proceso de aprendizaje.
Vea las siguientes notas acerca del proceso
de Aprendizaje:
• Las funciones aprendidas sustituyen a cualquier función existente
preprogramada en el control remoto.
• Todos los botones para las siete modalidades de Componentes
pueden ser enseñados con excepción del botón LIGHT [Luz].
• Las funciones aprendidas se borran automáticamente cuando se
enseña una nueva función en el mismo botón.
• Las funciones aprendidas son retenidas aun después que se
programe un número diferente de Código de Configuración en
el control remoto.
• Para regresar a una función original preprogramada, debe
borrarse la función enseñada.
90
Page 95

Configuración Avanzada
SECCIÓN 1: Control de Volumen SimpleSound™
y Otros ‘Punch Throughs’
SimpleSound le proporciona control total de volumen sobre TODOS
los componentes de su sistema, aun sobre aquellos que no tienen
control de volumen incorporado, tales como TIVO, DVD y VCR.
SimpleSound lo libra de las molestias e inconveniencias de estar
cambiando constantemente entre modalidades de componentes
sólo para controlar el volumen.
En un sistema básico, el sonido puede venir desde su TV. En un
sistema más avanzado, el sonido puede venir de su componente de
audio tal como un Receptor de Sonido Circundante o un sistema de
Teatro del Hogar. Por ello, primero, debe identificar cual dispositivo
desea usar para sonido en su sistema.
Ahora, configuremos SimpleSound. Así es como se hace:
PASO 1: Oprima y sostenga el botón del Componente al que
desea añadir control de volumen, tal como DVD o VCR y el botón
SELECCIONAR (SEL) al mismo tiempo durante unos tres segundos
hasta que la luz LED del componente se encienda.
Botones de
COMPONENTES
Botón
SELECCIONAR
(SEL)
91
Page 96

IMPORTANTE: Si no oprime un botón dentro de 20 segundos, la
luz LED se apagará y se saldrá de la modalidad de configuración y
será necesario comenzar de nuevo.
PASO 2: Oprima el botón VOLUME UP [Subir Volumen] y luego
oprima ya sea el botón TV o AUDIO que desea usar para volumen.
La luz LED del componente destellará tres veces para confirmar que
se ha guardado. ¡Esto configura un grupo de tres botones (Subir
Volumen, Bajar Volumen y Silencio) en una acción!
Repita los Pasos 1-2 para todos los otros componentes.
Botón
VOLUME UP
[Subir Volumen]
92
Page 97

Nota: SimpleSound es lo que se llama una característica ‘Punch
Through’ y no está limitada a control de volumen. También puede
aplicarse a otros grupos de botones. Si se encuentra usted en la
situación de estar cambiando con frecuencia a un dispositivo
particular para usar un grupo de controles, considere el uso de
‘Punch Through’ para otro grupo, como se indica aquí. Basta
ejecutar los pasos de arriba y para el paso 2, oprimir el primer
botón listado en el grupo y todos los botones serán programados:
VOLUMEN: SUBIR VOLUMEN, BAJAR VOLUMEN Y SILENCIO
CANAL: SUBIR CANAL, BAJAR CANAL, CANAL PREVIO Y
NÚMEROS (0-9)
VCR/DVD: REPRODUCIR, DETENER, PAUSA, RETROCEDER,
AVANZAR RÁPIDO, SALTAR+, SALTAR–, GRABAR
DVD/SAT OSD: MENÚ, GUÍA, INFORMACIÓN, SALIR, ARRIBA,
ABAJO, IZQUIERDA, DERECHA, SELECCIONAR
93
Page 98

SECCIÓN 1: MacroPower
TM
¡Imagínese encendiendo todos sus componentes tales como TV,
reproductor DVD y receptor de sonido circundante oprimiendo un
solo botón en su GAMER! Lo que normalmente tomaría tres controles
remotos y tres presiones de botones, el GAMER puede lograr con la
presión de un botón. A eso le llamamos MacroPower. Cualquiera de
los botones POWER ON [Encender Energía] o SYSTEM OFF [Apagar
Sistema] pueden ser programados para control por MacroPower. Para
configurar MacroPower para estos botones, siga estos sencillos pasos:
PASO 1: Para programar comandos MacroPower para el botón
POWER ON, Oprima el botón ON [Encender] y el botón MUTE
[Silencio] juntos y sosténgalos oprimidos durante unos 3 segundos
hasta que se encienda una de las luces LED del botón del componente.
Botón
ON [Encender]
Botón
MUTE [Silencio]
IMPORTANTE: Si no presiona un botón dentro de 20 segundos,
la luz LED se apagará y se saldrá de la modalidad de configuración
y será necesario comenzar de nuevo.
PASO 2: Oprima el botón del componente que desea encender y
luego el botón POWER ON [Encender Energía] y repita para todos los
otros componentes en el orden que desee que se enciendan. La luz
LED destellará una vez para cada comando.
94
Page 99

Botón
ON [Encender]
Botones del
Sistema de
Juego
Botones de
COMPONENTES
PASO 3: Una vez que haya ingresado todos los comandos de Power
On [Encender Energía], oprima el botón CHANNEL UP [Subir Canal]
para guardar sus comandos MacroPower y la luz LED del botón del
componente destellará tres veces para confirmar la programación.
Botón
CHANNEL UP
[Subir Canal]
SUGERENCIA: La mayoría de los componentes tienen la misma
señal para encender y apagar la energía. Usted puede desear
programar MacroPower sólo en el botón ON [Encender] y guardar
el botón System Off [Apagar Sistema] para apagar o encender los
componentes individualmente.
Nota: Si desea programar MacroPower para el botón POWER
OFF [Apagar Energía], repita los mismos pasos usados en la
programación de POWER ON [Encender Energía].
95
Page 100
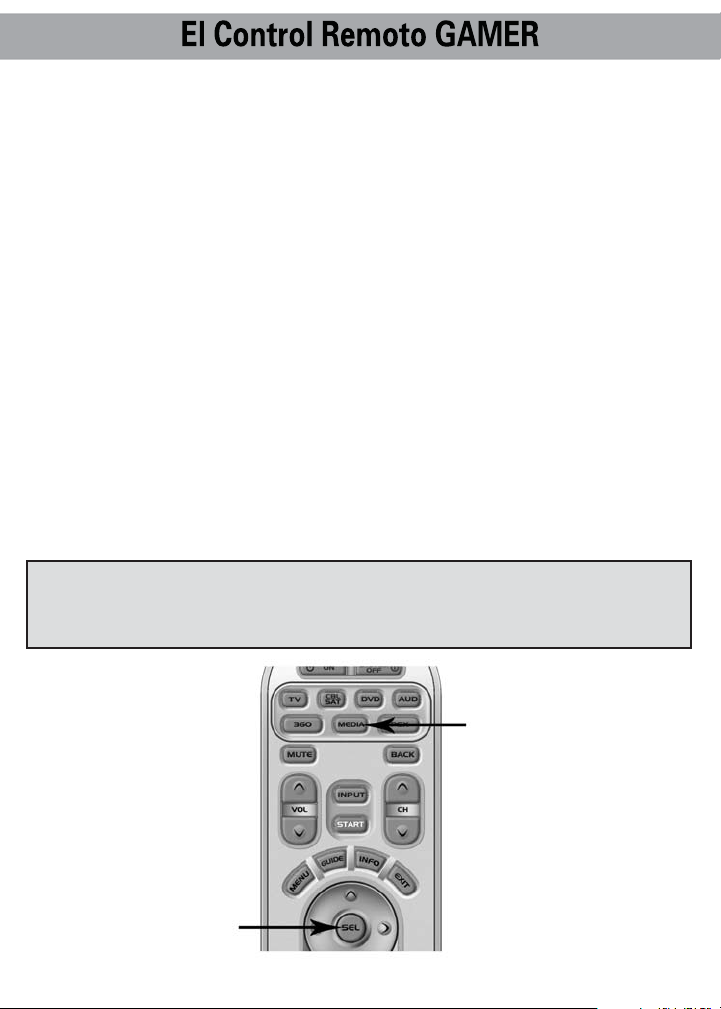
SECCIÓN 1: Función de MEDIOS: Programación
de un 5 to. Componente
Después que haya terminado adecuando a sus necesidades la
programación básica del GAMER para consolas de juego (XBox 360
y/o Play Station PSX) y cuatro componentes primarios de audio y
video, y si no usó MEDIOS, puede aprovechar de la función MEDIOS
para programar un 5to. componente de audio y video, tal como un
dispositivo TiVo o iPod. Es muy sencillo. Así se hace:
PASO 1: Encienda el componente que desea programar.
PASO 2: Consulte la tablas de códigos preprogramados que
comienzan en la página 34 y escriba los números de códigos
listados para su componente. Los números de códigos están
listados por categorías de dispositivos, luego por marca. Vea
una lista por categoría en la página 33.
PASO 3: Oprima tanto el botón MEDIA [Medios] como el
SELECCIONAR (SEL) a la misma vez y sosténgalos durante 3
segundos hasta que la luz LED MEDIA se encienda.
IMPORTANTE: Si no presiona un botón dentro de 20 segundos,
la luz LED se apagará y se saldrá de la modalidad de configuración
y será necesario comenzar de nuevo.
Botón
SELECCIONAR
[SEL]
Botón
MEDIA
[Medios]
96
 Loading...