

Page 1
Page 2

Congratulations!
Congratulations on purchasing Universal Remote Control’s
FX1 pre-programmed remote control. You now have the
power to control your entire home entertainment system
with one easy-to-use remote. The FX1 can be used with
thousands of audio/video components because of the
extensive library of codes that have already been programmed into the remote. So...get ready to sit back,
relax, and simplify your home entertainment experience.
This Owner’s Manual is designed to assist you in
programming your FX1 remote to work with your
components by guiding you through an easy step-by-step
process. Everything you need to know about programming
the FX1 is contained in this Manual.
FX1 Owner’s Manual © 2006 Universal Remote Control, Inc.
This document is protected by the copyright laws of the United States and internationally
by the Berne Convention. No part of this manual may be reproduced in any form without
the express written consent of Universal Remote Control, Inc. Although reasonable care
has been taken to assure the accuracy of the information herein contained, Universal
Remote Control, Inc. is not responsible for operational, technical or editorial errors or
omissions. The specifications and information in this manual may be subject to change
without notice. MacroPower, SimpleSound and FX1 are trademarks of Universal Remote
Control, Inc. Entertainment Made Simple® is a registered trademark of Universal Remote
Control, Inc. All other brand or product names are trademarks or registered trademarks of
their respective owners.
Page 3

The FX1 Remote Control
Table of Contents
Getting Started
Control up to 5 Components................................................................ 2
Activating Component Buttons.......................................................... 2
Battery Installation...…………….................................................... 2
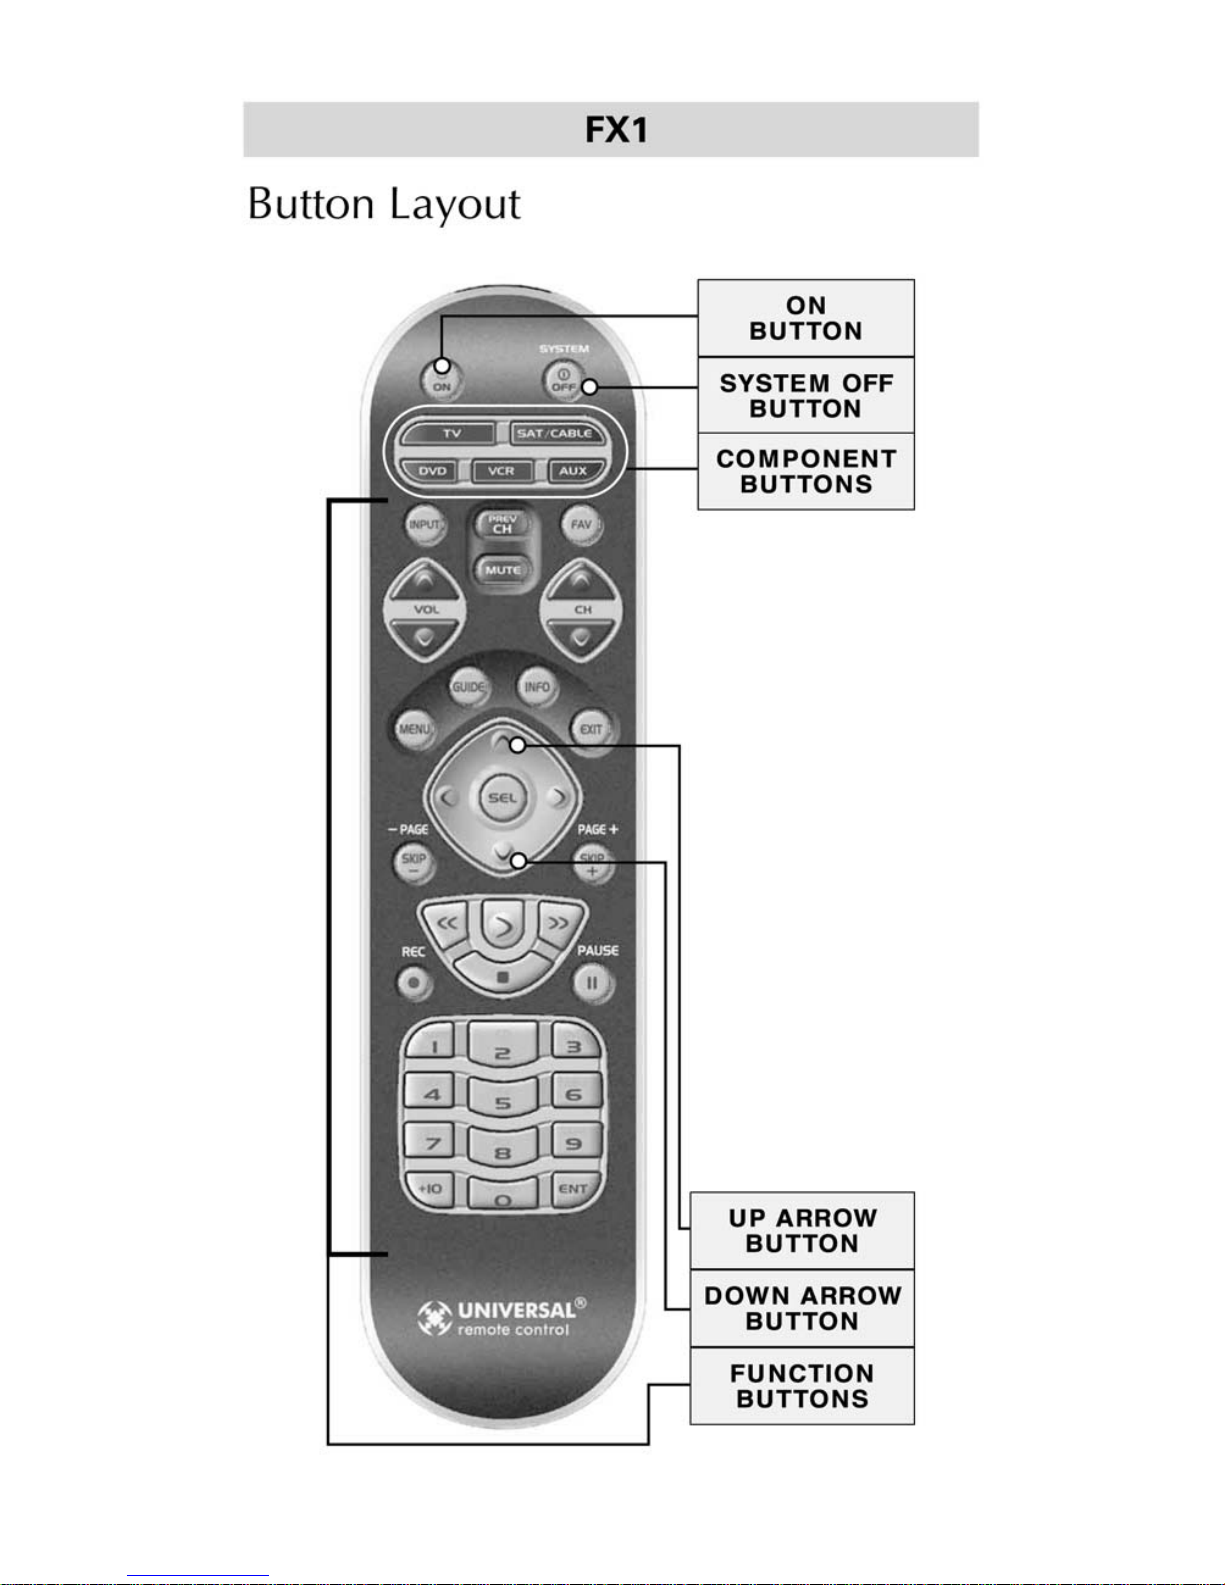
FX1 Button Layout………………….......…………..……............. 3
Setting Up Your FX1………………..................……………..…... 4
Code Entry Method….....………………………………............... 4-6
Auto Search Method ........................................................................... 7-8
Finding a Component’s Set-Up Code Number.................................. 9-10
Advanced Features ............................................................................. 11
SimpleSound™ & Other “Punch Throughs”………..………....... 11-12
MacroPower™………................................................………..….... 13-14
Erasing Advanced Features………...................……………….... 15
Erasing SimpleSound™ Commands …..........………................… 15
Erasing MacroPower™ Commands……............……………….. 16
Re-setting FX1 to Original Factory Defaults .................................... 17
Pre-Programmed Code Tables ……….........…………………... 18
TV……………………………………………………………… 19-23
SAT/CABLE…………………………………………………….. 24-27
DVD…….........…………………………………………………. 28-30
VCR…………………………………………………………...... 31-33
AUX…………………………………………………................... 34-38
Frequently Asked Questions.............................................................. 39
Warranty................................................................................................ 40
Specifications...................................................................................... 40
1
Page 4
Getting Started
Control up to five (5) Components
The FX1 is designed to control up to five different
Audio/Video components and operate virtually all
brands of Audio, TV, DVD, VCR, Cable and Satellite
components.
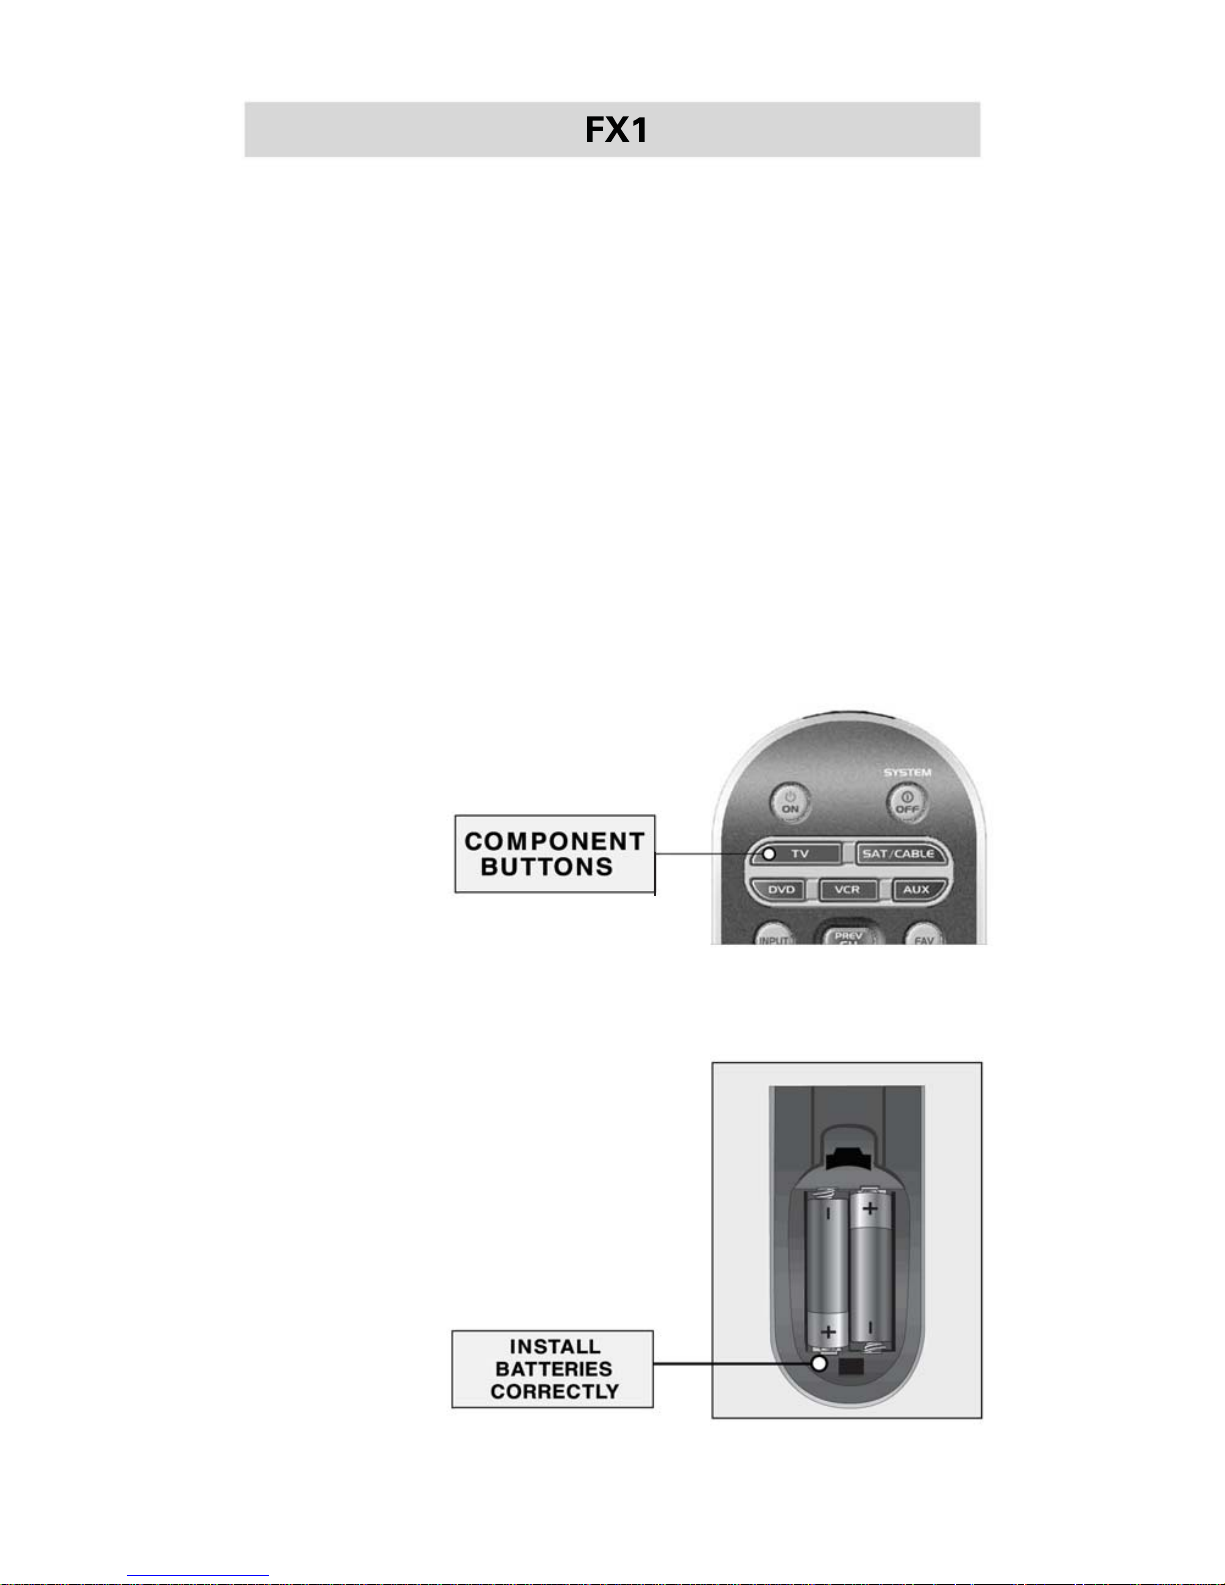
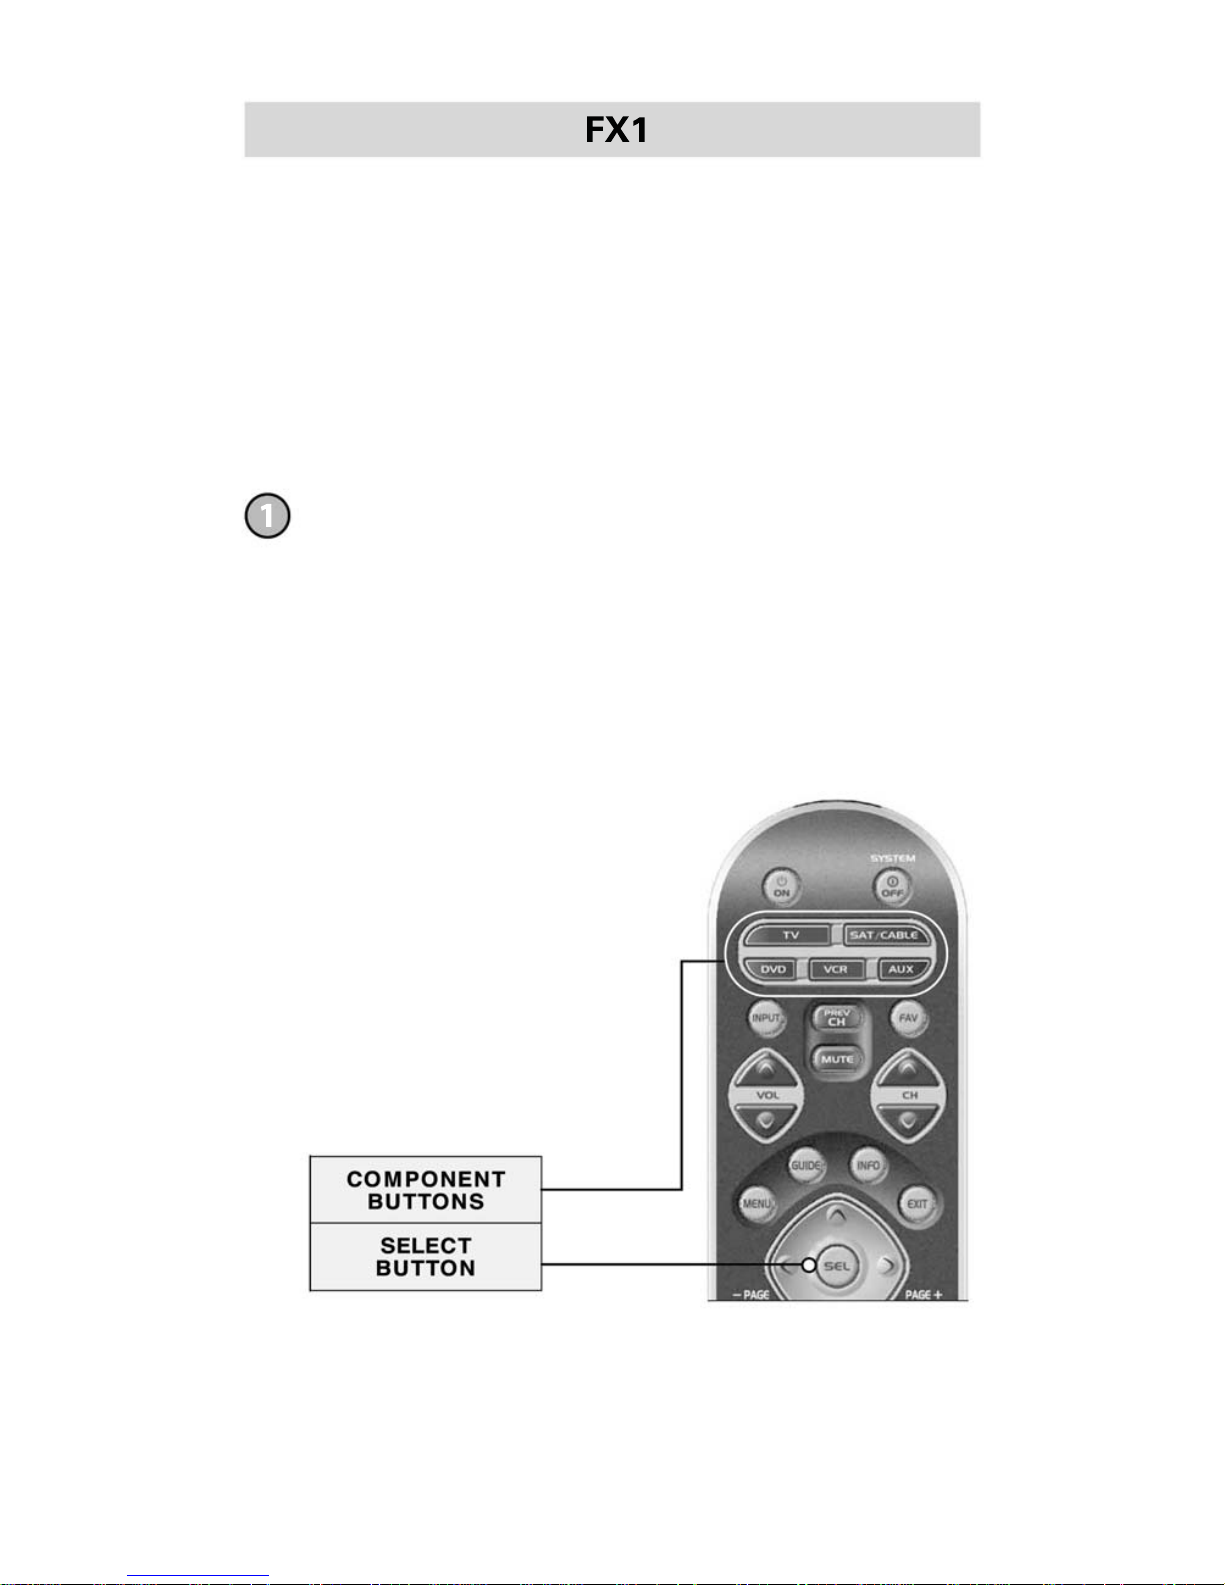
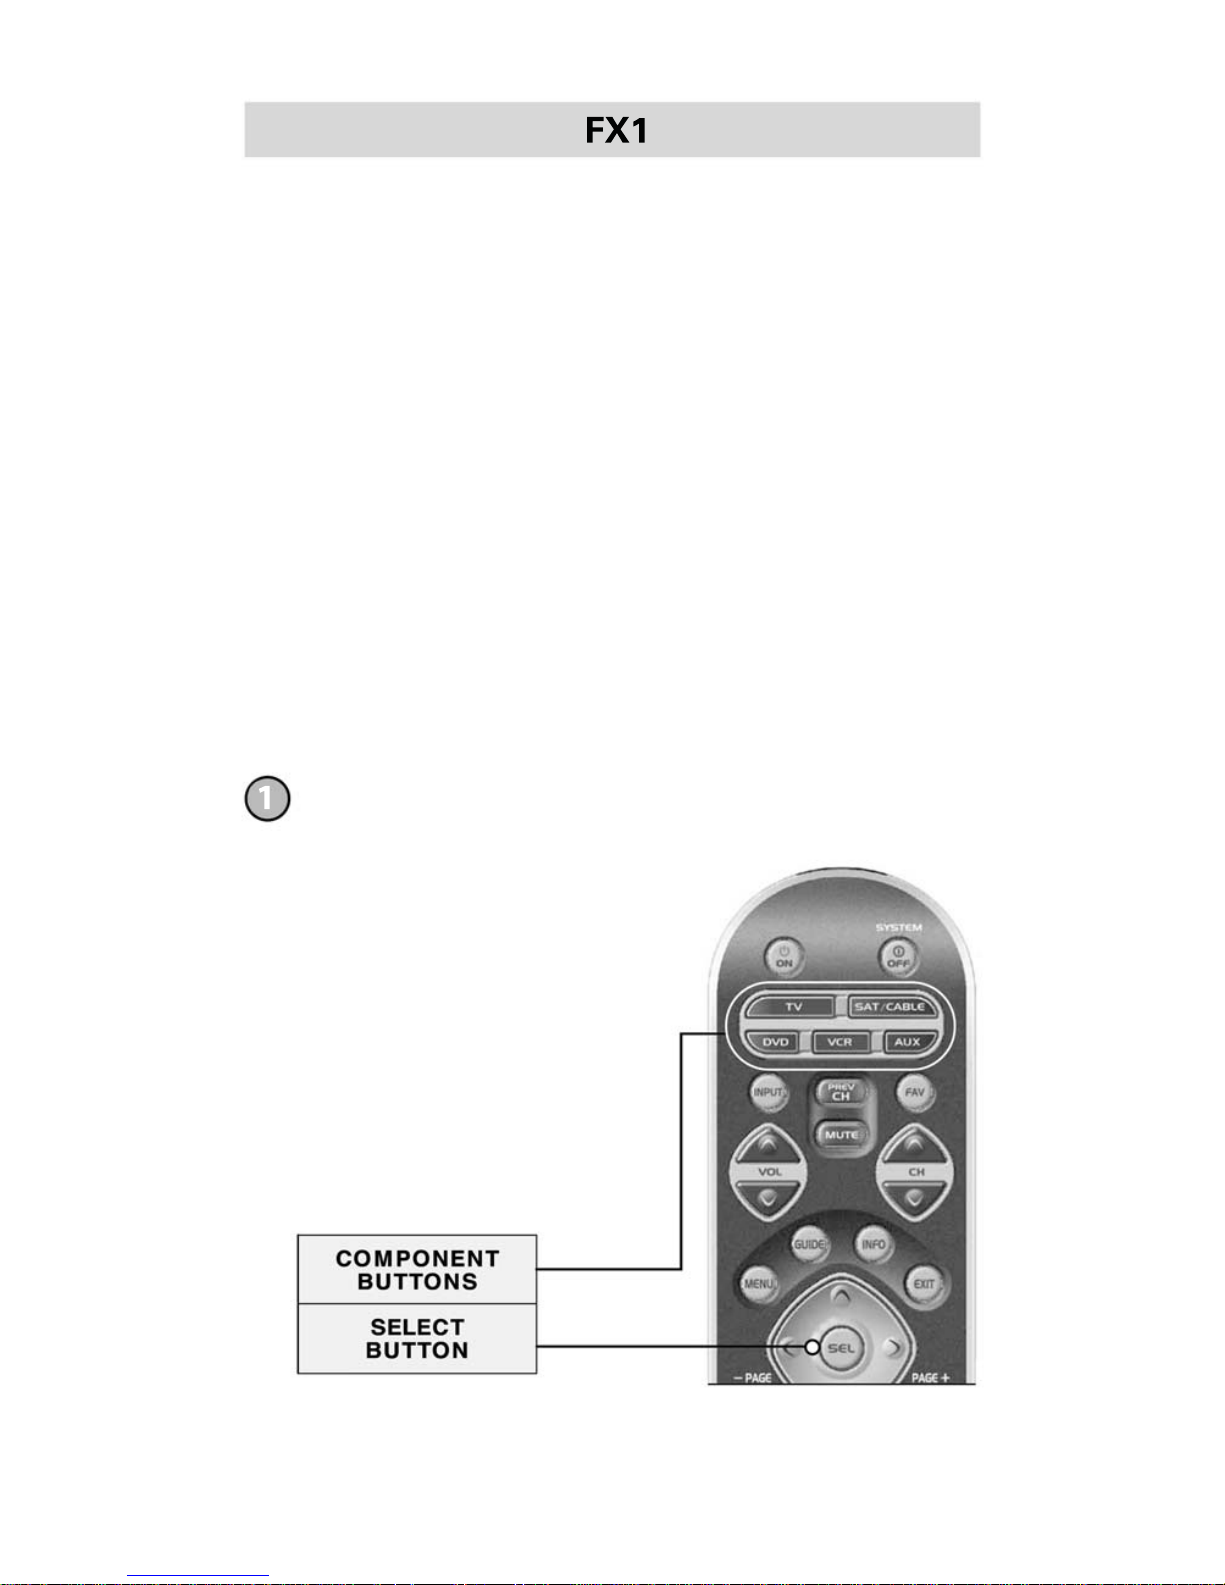
Component Buttons
Once you have programmed the FX1 for all of your components, all you need to do is press a component button and
all the buttons on the FX1 will work with that component.
For example, when you press the TV component button, all
the buttons on your FX1 will operate your TV. If you press
the DVD component button, all the buttons on the FX1 will
operate your DVD.
Each time you press any of the buttons
on the remote, the LED light in the
component button
will light up to
indicate which
component you
are controlling.
Battery Installation
Press the tab and remove the cover
of the battery compartment located
in the back of your remote. Insert the
two AA batteries (included in the
package) making sure to match the
positive (+) and negative (-) symbols
as shown in the diagram. Place the
cover back over
the battery
compartment.
2
Page 5
3
Page 6
4
Setting Up Your FX1
There are two ways you can program your remote:
• The Code Entry Method (page 4)
• The Auto-Search Method (page 7)
The Code Entry Method allows you to set up the FX1 using
brand names. It is fast and easy to program. The Auto-Search
Method scans through all the brands in the remote control,
one at a time. It should be used when the Code entry
method does not work.
Code Entry Method
Find the 3 digit code numbers assigned to your brand from the
lists in the back of this manual. The codes are listed by component category (i.e., TV, VCR, DVD, etc.), then by brand name.
For instance, if you would like to locate a code for a Sony
television, first locate the TV category and then look for the
Sony brand.
Once you have located the 3-digit codes for each of the
components that you wish to operate with your FX1, write
them ALL down on a piece of paper. It’s important that you
write down all the codes listed for your brand because only
one code is going to work with your component.
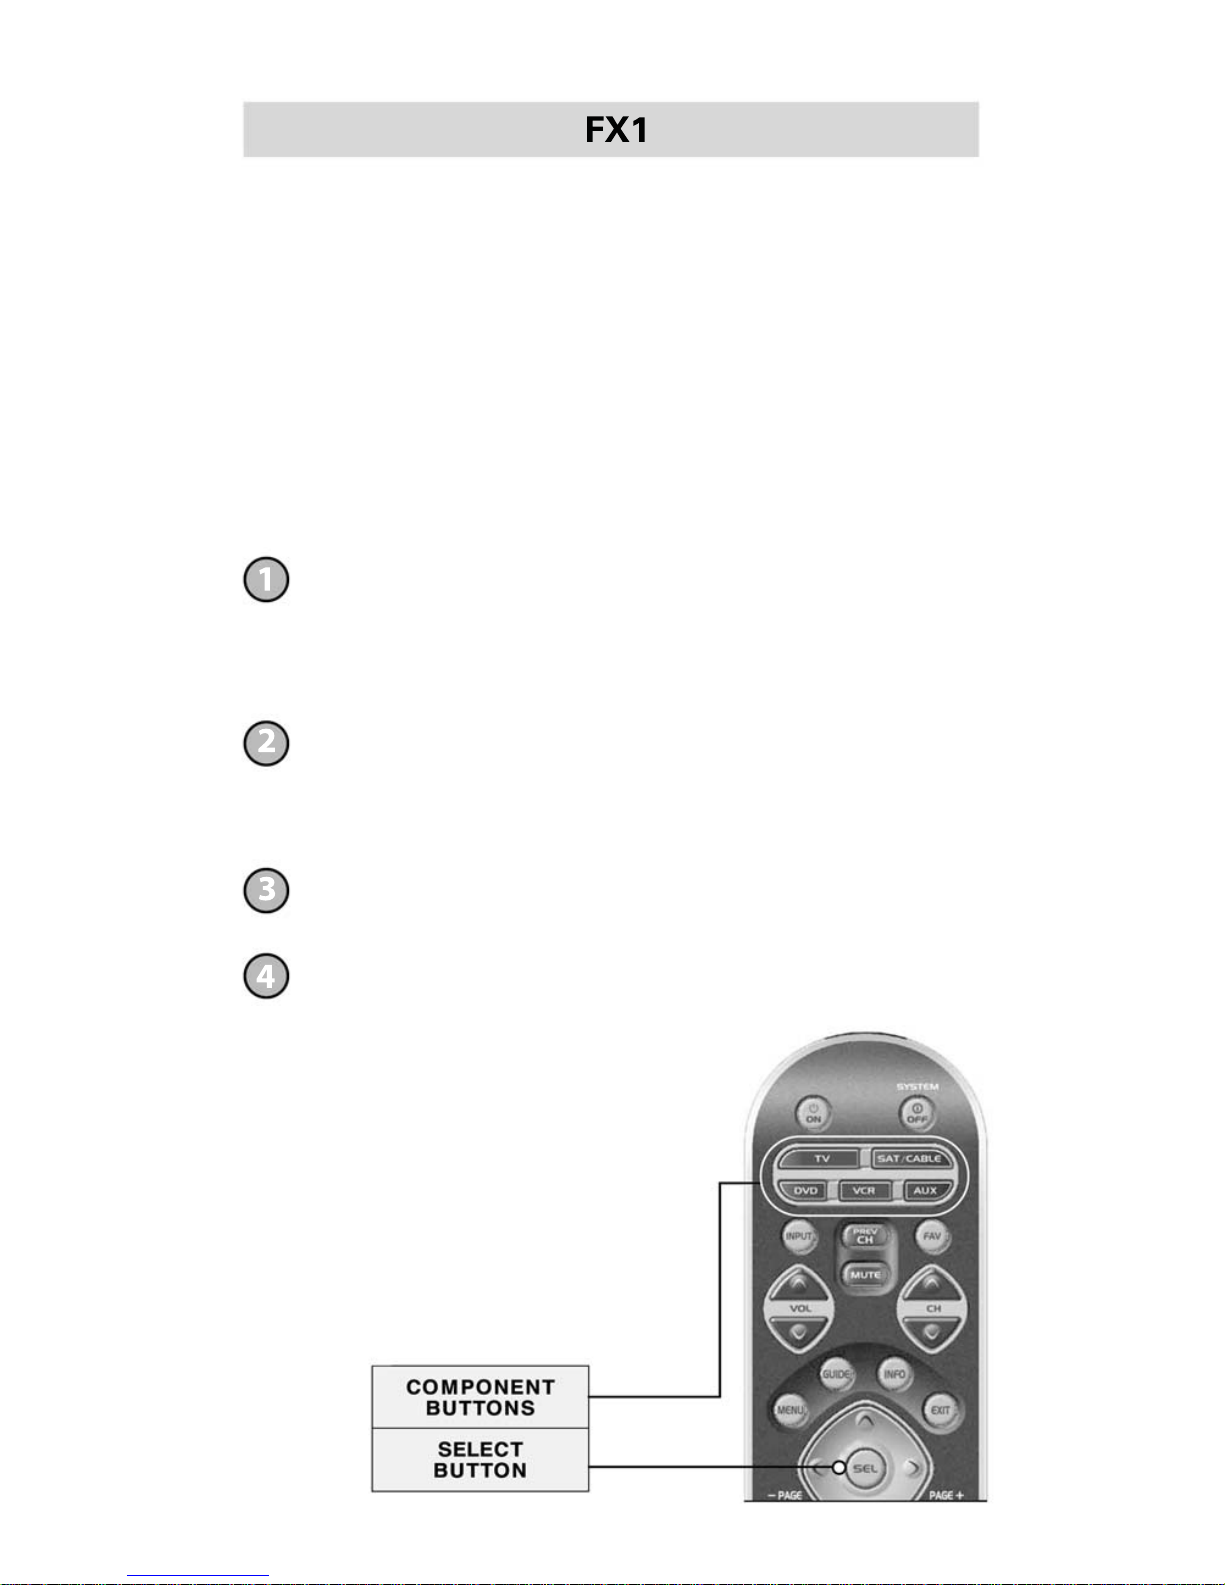
Using your old remote, turn on the component you want to
program—for example, to program your TV turn on your TV set.
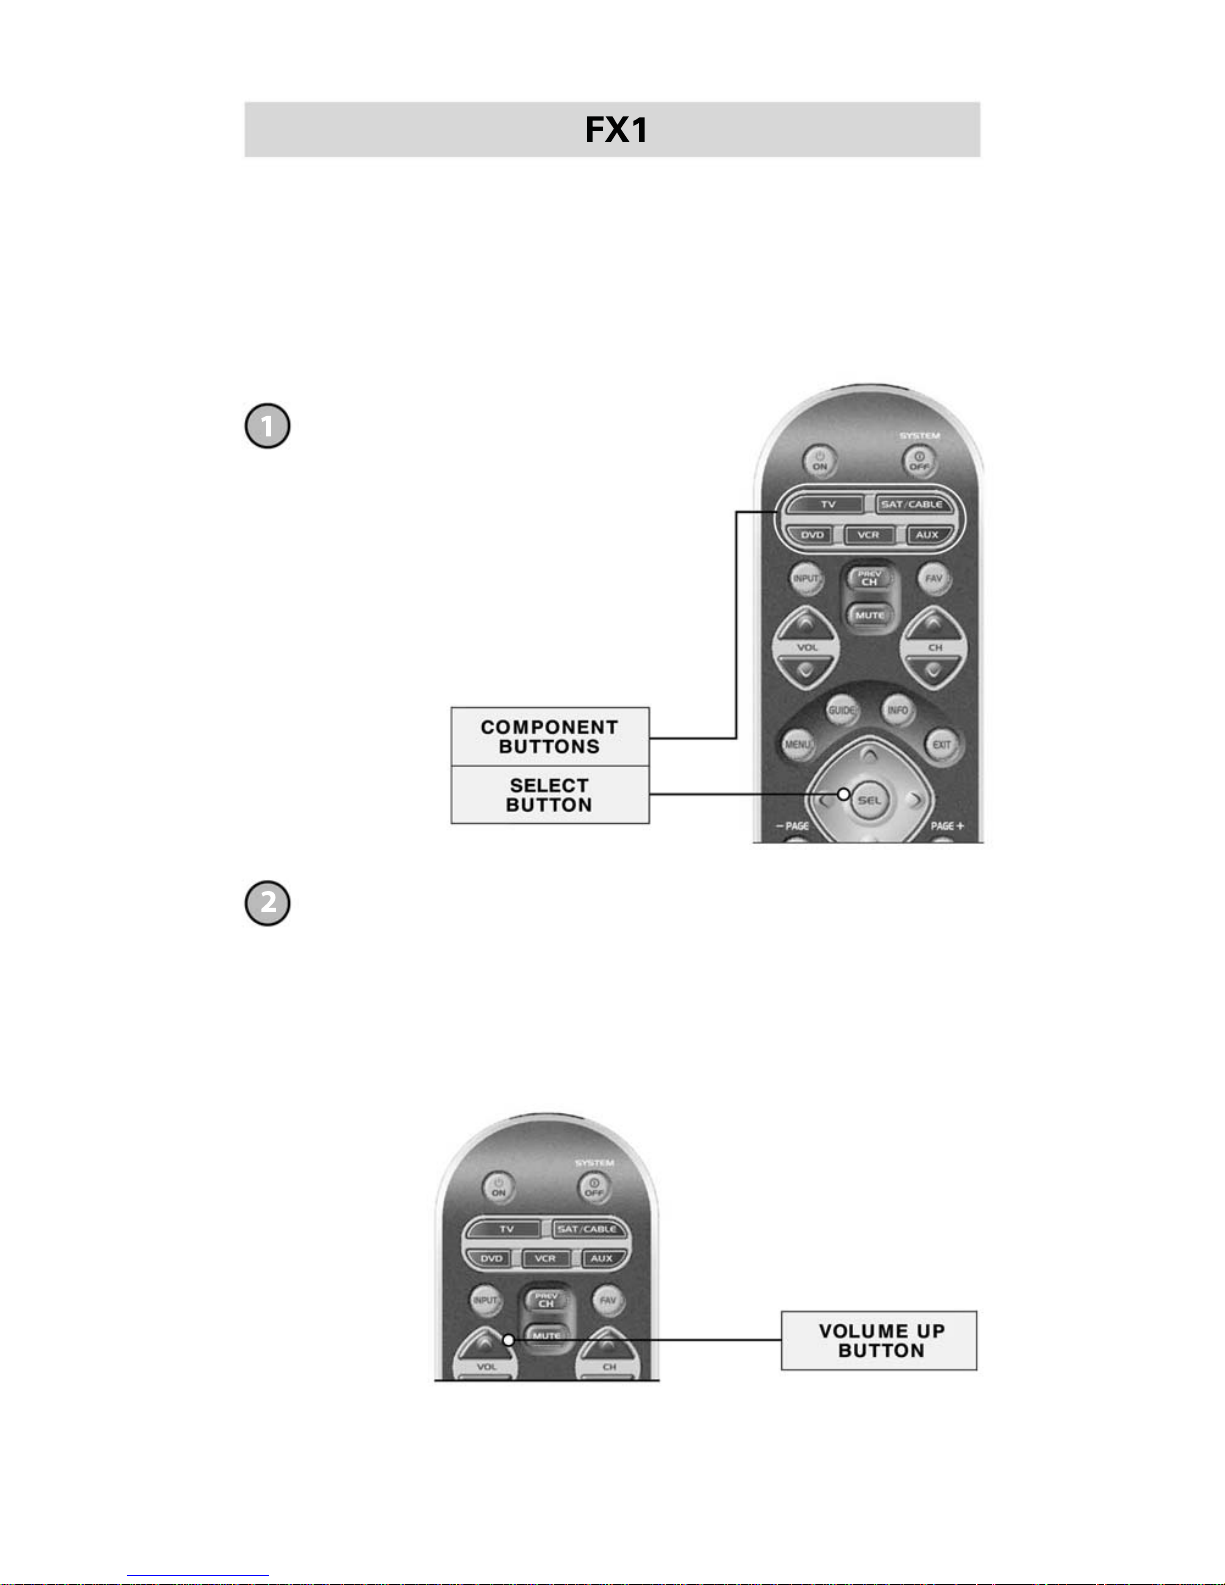
Press the Component button (in this case the button that says
TV) and the SELECT (SEL) button at the same time. Hold down
both buttons for 3 seconds until the TV Component button light
turns on.
IMPORTANT: You have 20 seconds to
perform the next step while you are
in programming mode. If you do not
press a button within 20 seconds, the
LED light will turn off. The remote
will exit the programming mode
and you will have to start over.
Page 7

5
Point the remote toward the component (in this example
the TV) and punch in the 3-digit-code that you wrote down
for that specific component. Use the Number buttons 0~9
on the remote to punch in the code. The TV LED light will
blink each time a number is pressed.
If the 3-digit code number you just punched in is the correct
number, the component you are trying to program will turn
off. If it did not turn off, enter the next code number from
your list until it does turn off.
IMPORTANT: If you have tried all the set-up codes in the
list and the component still did not turn off after Step 5,
the Auto-Search Method (page 7) will help you program.
Page 8

6
Once you’ve entered the code number and the component has
turned off, press the POWER button on your remote to turn the
component back on.
Once you’ve entered a correct code you must save it. Press the
component button you just programmed (in this case TV) one
more time to save the code number. The component button LED
light will blink three times to confirm that the code was successfully stored. Now when you press the TV component button,
all of the buttons will work with your TV.
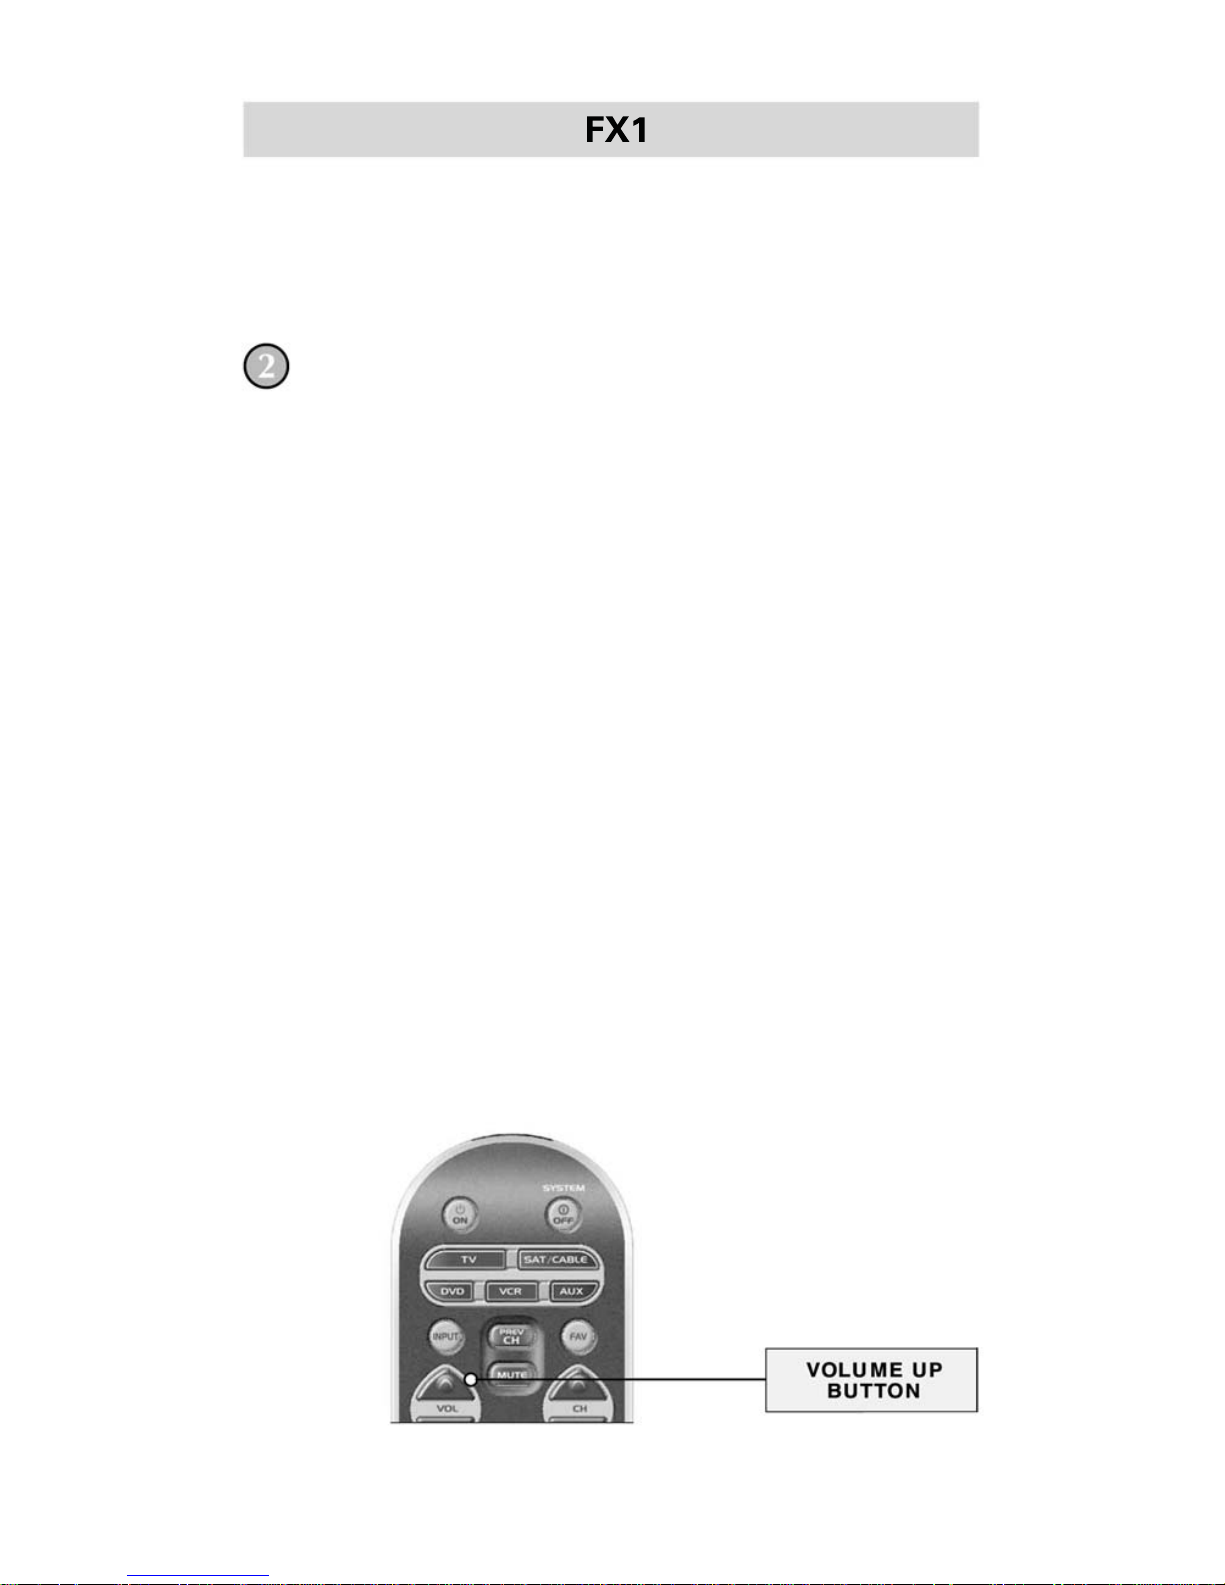
Now it’s time to test the VOLUME and CHANNEL buttons
(or PLAY and STOP buttons for VCR and DVD) to make sure
they all work. For example, perhaps your Sony TV turned
off with code number 147, but the volume controls did not
work properly. In this case, try the next code number listed
for that component. Repeat Step 5 using the next code
number until you find a perfect match.
Program the remaining components by repeating steps 3
through 7.
IMPORTANT: If the Code Entry Method did not work with
your components, try the Auto-Search Method next as
outlined on page 7.
Page 9
7
Auto-Search Method
The Auto-Search Method is a way you can scan through
all of the codes in the table to find the right code for your
component.
Using your old remote, turn on the component you want to
program with the FX1... let’s say your TV.
Press down on both the Component button (in this case the button that says TV) and the SELECT (SEL) button at the same time
for 3 seconds until the TV component button LED light turns on.
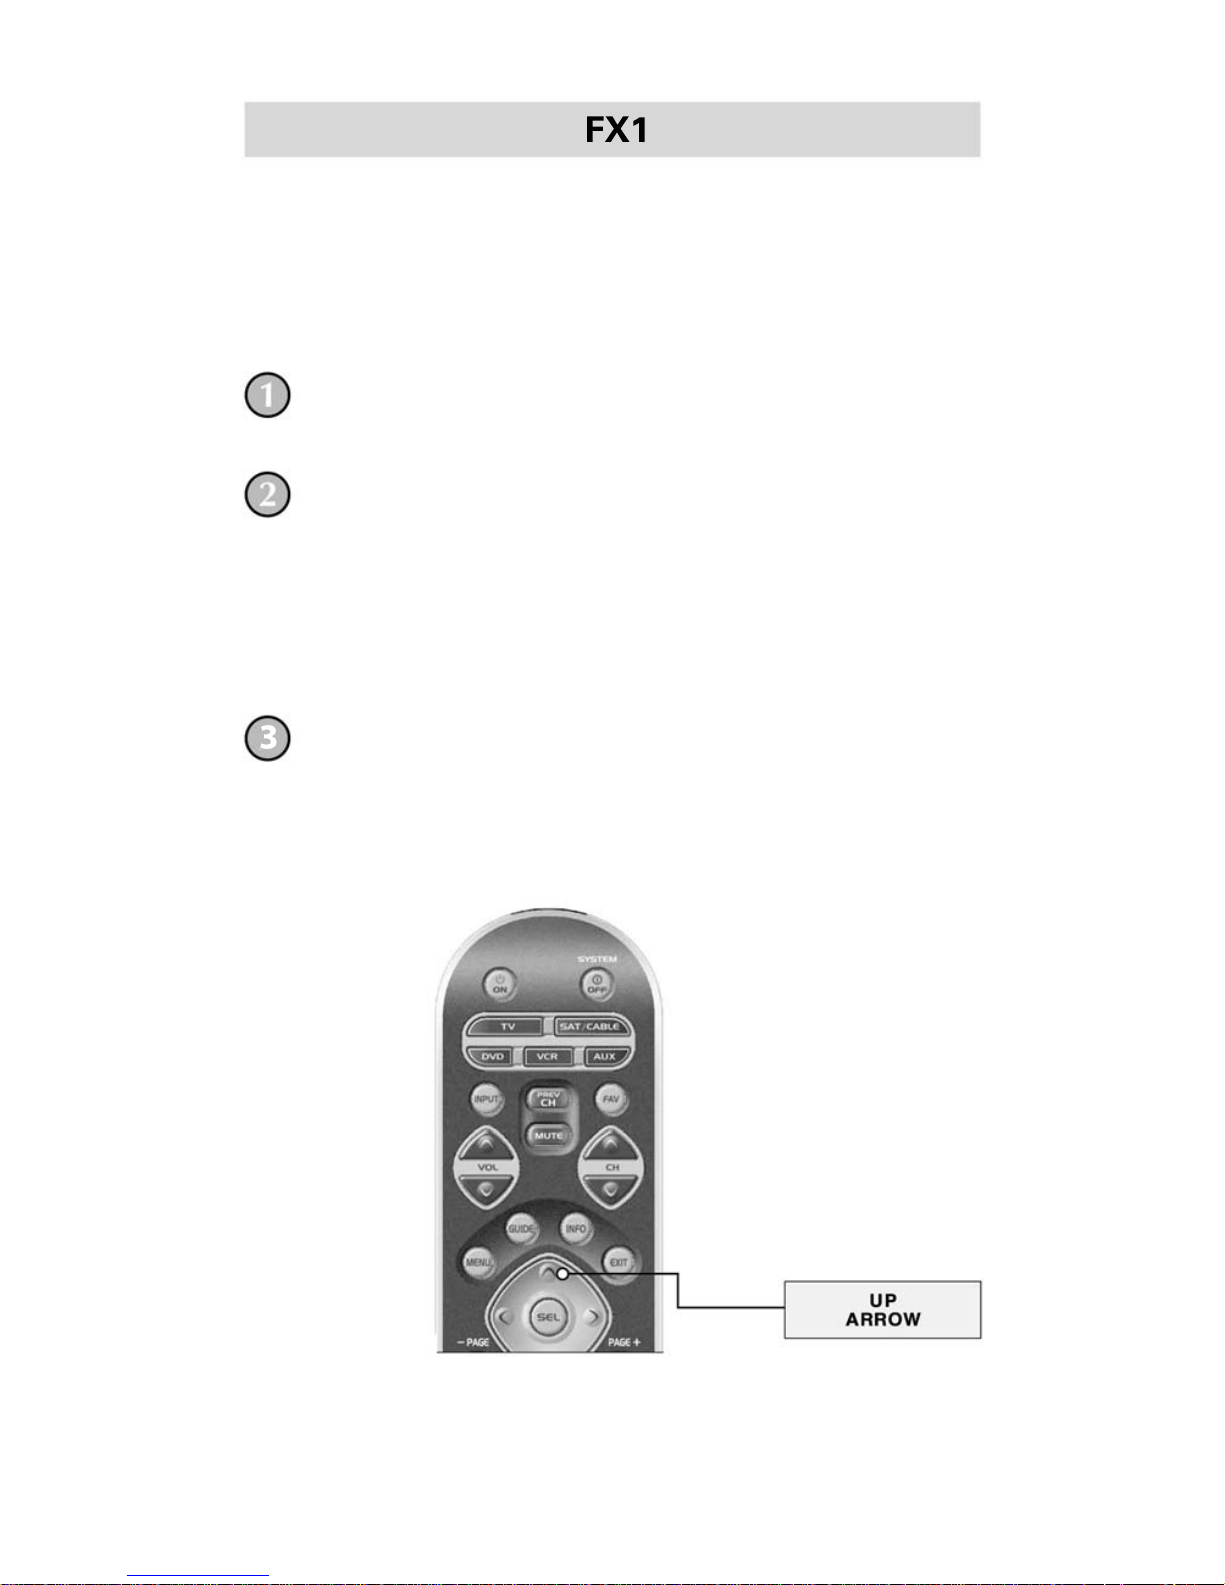
Press the UP arrow button once. Each time the UP arrow is
pressed, the code will count up one code number and send a
Power OFF signal. When the correct code is sent out, the component will turn off.
IMPORTANT: If you do not press a button within 20
seconds the LED light will turn off. The remote will exit
the programming mode and you will have to start over.
Page 10
8
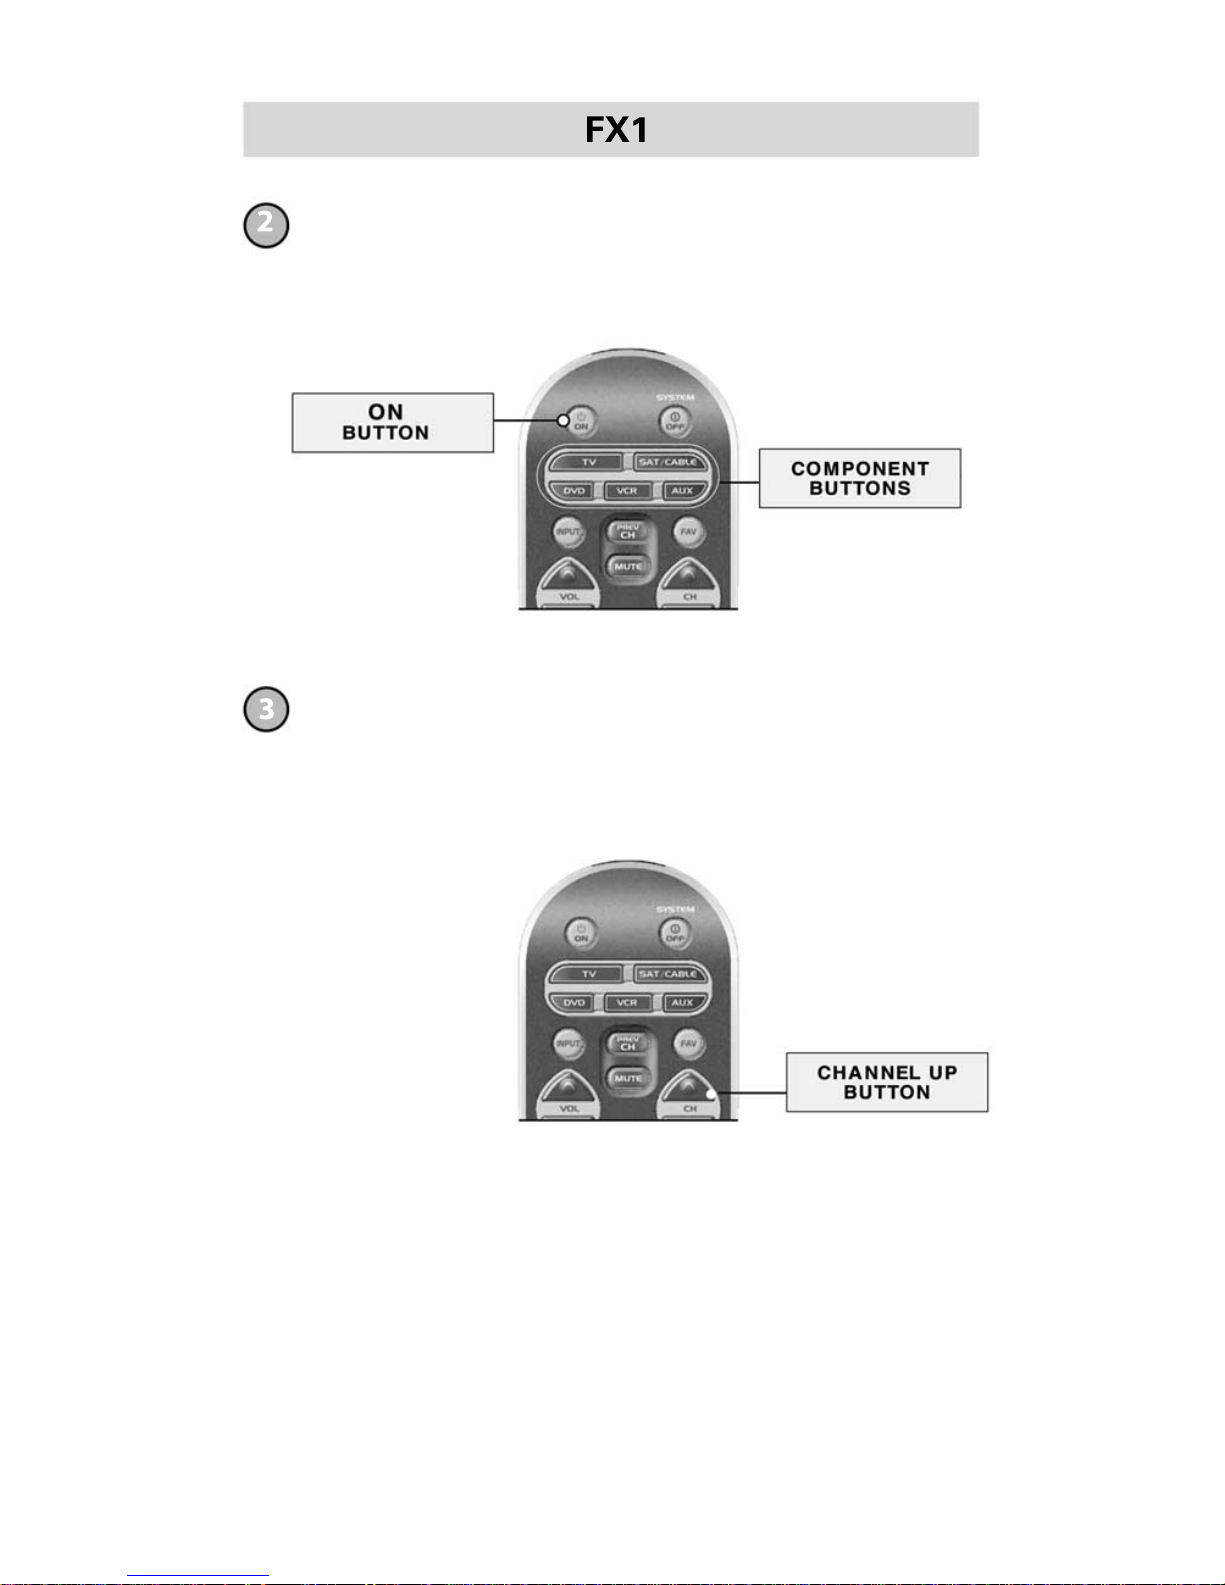
Press the ON button on the FX1 to turn the component back
on. Now you can test the VOLUME and CHANNEL buttons
(or PLAY and STOP buttons for VCR and DVD) to make sure
they all work. If any of the buttons do not work properly, you
need to find a new code. Continue pressing the Up arrow
button until you find a code that turns off the component
makes the VOLUME or PLAY buttons respond correctly.
Once you have found the right code, you must save it by
pressing the component button (in this case TV). The component LED light will blink three times to confirm that the code
was successfully stored.
NOTE: Use this method for those components you cannot
program with the Code Entry Method.
Page 11
9
Finding a Component Button’s Set-up Code Number
If you used the Auto-Search Method to program a
component, you may not know the code number you
programmed. Here is the way for you to identify that
code number so you can write it down in the back of
this manual for future reference.
Press and hold both the SEL and the Component
button you would like to verify at the same time for
approximately three seconds until the Component
LED light turns on.
Page 12
10
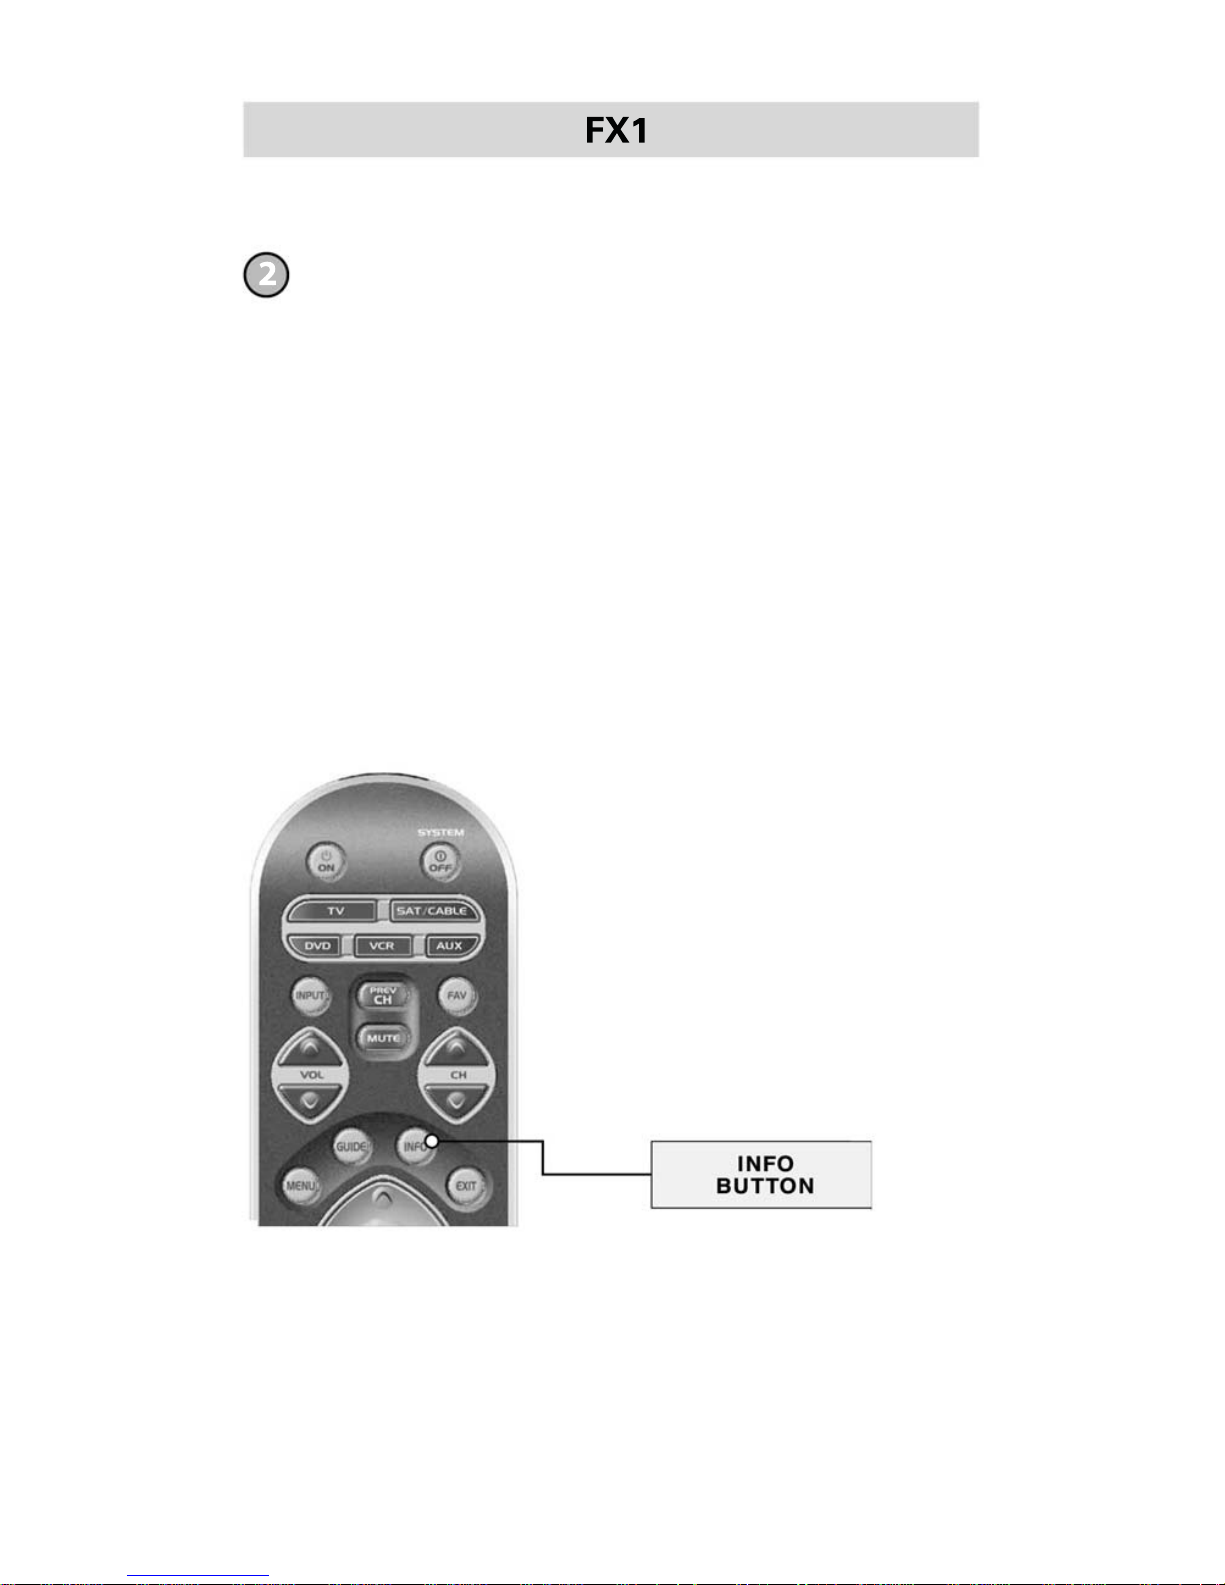
Press the INFO button and count the number of times the
Component LED light blinks. This number indicates the first
digit of the code. Next it will pause for about one second and
begin blinking again to indicate the number of the second
digit. Then once again it will pause then blink to indicate
the number of the third digit.
Example: One blink, pause, eight blinks, pause, three
blinks indicates code number 183.
Note: Ten (10) blinks represent the number 0.
Page 13
11
Advanced Features
SimpleSound™ Volume Control
SimpleSound is one of the most exciting features of the FX1.
It gives you total volume control over ALL the components in
your system, even those without their own built-in volume
control, such as TiVo, DVDs and VCRs. SimpleSound saves
you from the inconvenience of constantly switching between
component modes just to control volume.
First you should identify which device in your system will be
used to deliver sound. In a basic system, the sound may
come from your TV speaker. In a more advanced system, the
sound may come from your audio components (such as a
Surround Sound Receiver or Home Theatre system).
Now, let’s set-up SimpleSound. Here’s how:
Press and hold the button that corresponds
to the Component you want to add volume
control to (such as a DVD or VCR) and the
SELECT (SEL) button at the same time for
about three seconds until the Component
LED light turns on.
Page 14
12
IMPORTANT: If you do not press a button within 20 seconds
the LED light will turn off. The remote will exit the programming mode and you will have to start over.
Repeat Steps 1-2 for all other Components.
(Note: SimpleSound is what’s technically referred to as
a “Punch Through” feature and is not limited to volume
control. It can also be applied to other groups of buttons.
If you find yourself switching to a particular component
mode frequently to access a particular control, consider
using Punch Through. Follow the same procedure as above.
When you get to Step 2, pressing the first button listed in the
groups below will program all of the buttons in the group.
VOLUME: VOLUME UP, VOLUME DOWN AND MUTE
CHANNEL: CHANNEL UP, CHANNEL DOWN AND PREVIOUS
CHANNEL Number (0-9)
VCR/DVD: PLAY, STOP, PAUSE, REWIND, FAST FORWARD,
SKIP+, SKIP-, RECORD
DVD/SAT OSD: MENU, GUIDE, INFO, EXIT, UP, DOWN, LEFT,
RIGHT, SEL
Press the VOLUME UP button and then press either the TV
or AUDIO component button that you want to use for volume.
The Component LED light will blink three times to confirm that
it is saved. This sets up three buttons (Volume Up, Volume Down
and MUTE) as a group for that component.
Page 15

13
MacroPower™
MacroPower makes several devices work together by pressing one button. Imagine the convenience of turning on your
TV, your DVD player and your Surround Sound receiver by
pressing a single button on your FX1. What could normally
take three remotes and three button pushes, the FX1 can
accomplish with the press of one button. We call that
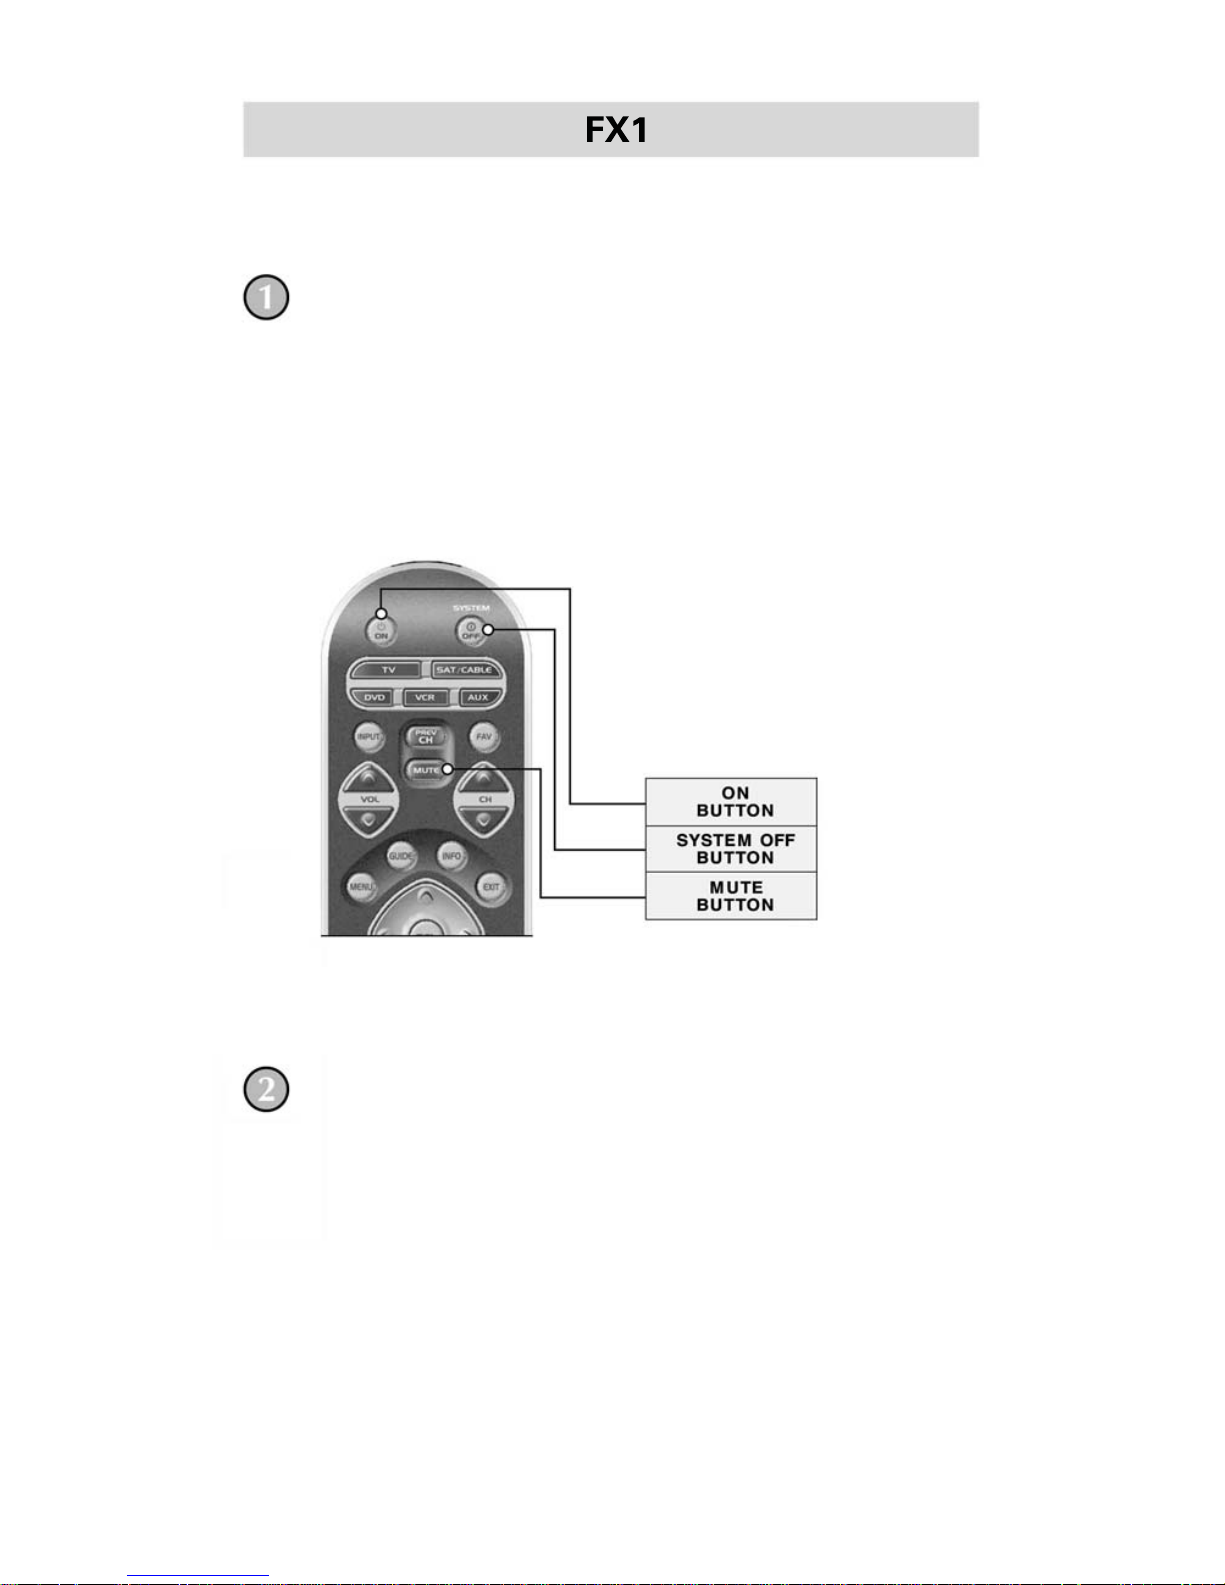
MacroPower. Any of the Power On or the System Off
buttons can be programmed for MacroPower control.
To set it up, follow these easy steps:
IMPORTANT: If you do not press a button within 20 seconds
the LED light will turn off. The remote will exit the programming mode and you will have to start over
To program MacroPower commands for the Power ON button,
press the Power ON button and the MUTE button together and
hold them down for about 3 seconds until one of the component
button LED lights turns on.
Page 16
14
Press the component button you want to turn on and then the
Power ON button; repeat for all other components in the order
you want them to turn on. The LED light will blink once for each
time you press the Power ON button.
Once you’ve entered all the Power On commands, press
the Channel Up button to save your MacroPower commands.
The component button LED light will blink three times to
confirm that the programming has been successfully saved.
SUGGESTION: Most of the components have the same
signal to turn the power On and Off. You may want to
program MacroPower only in the On button and save the
System Off button to turn components On or Off individually.
Note: If you want to program MacroPower for the power
OFF button, follow the same steps used for Power ON
programming.
Page 17
15
Erasing Advanced Features
You can erase SimpleSound programming, MacroPower
commands, or re-set the remote to original factory
default settings.
Erasing SimpleSound Commands
Repeat Steps 1-2 to erase SimpleSound commands from
other components.
Press and hold the Component button
you wish to erase volume control from
(such as a DVD or VCR) and the Select
(SEL) button at the same time for about
three seconds until the Component LED
light turns on.
Press the Volume Up button and then the same component
button from Step 1. The component LED light will blink
three times to confirm the erasure.
Page 18
16
Erasing MacroPower Commands
For erasing MacroPower commands on the POWER ON or
SYSTEM OFF button, press and hold either the POWER ON
or SYSTEM OFF button you wish to erase and the MUTE
button simultaneously for 3 seconds until the component
LED light turns on.
Press the Channel UP button to erase and exit the Erase
mode. The component LED light will blink three times to
confirm the erasure.
IMPORTANT: If you do not press a button within 20 seconds
the LED light will turn off. The remote will exit the set-up
mode and you will have to start over.
Repeat Steps 1-2 to erase MacroPower commands
from other components.
Page 19
17
Resetting the Remote to Original Factory Default Settings
You can reset your FX1 remote to the original factory
default settings.
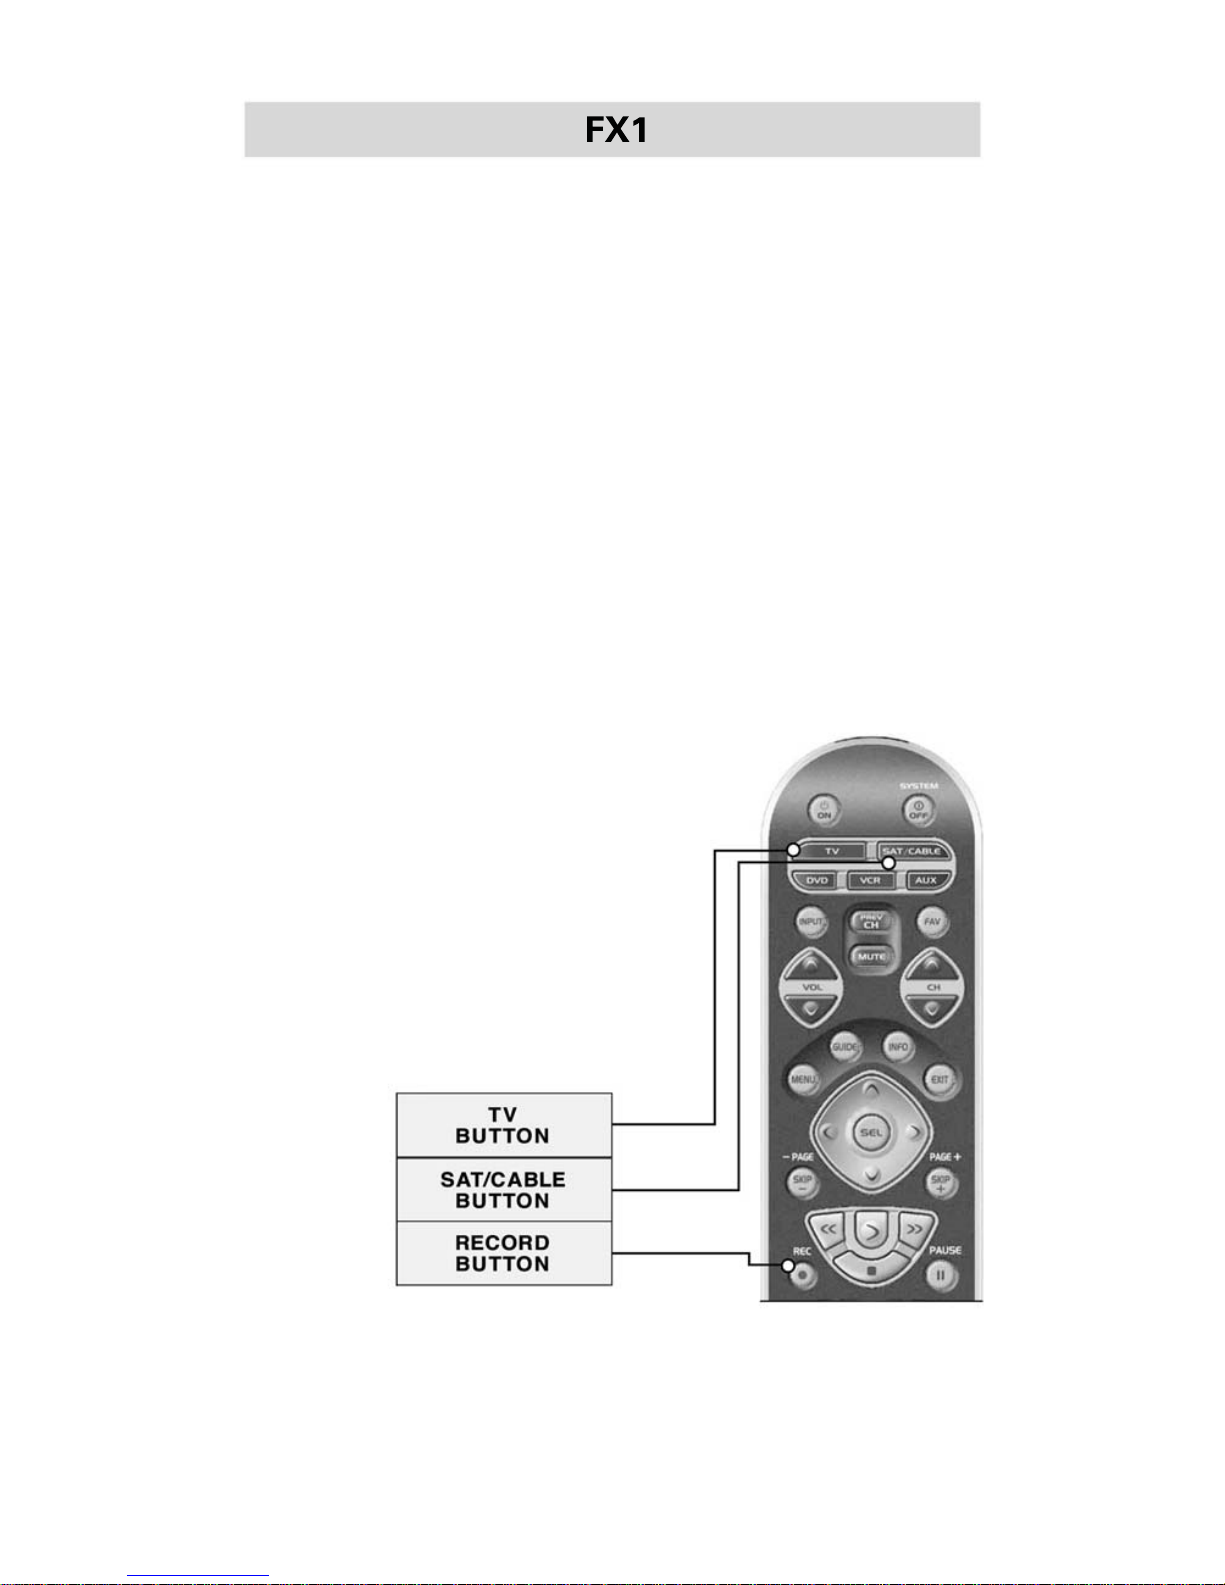
Press and hold both the TV and RECORD buttons for
about five seconds until the SAT/CABLE component LED
light blinks five times. All programming and set-up codes
that you have entered into the remote will be erased and
the FX1 will return to the original factory default settings.
Warning
This procedure will erase all programming and set-up
codes that you have entered into the remote.
Page 20

18
Pre-Programmed Code Tables
The FX1’s Pre-Programmed code library is classified by
category (TV, VCR, DVD, etc.). Each category actually
includes many types of components. For example, the
SAT category includes satellite receivers and digital
video recorders like TiVo and Replay.
Within each category, the code numbers are listed in rows
by brand (Sony, Panasonic, B & K, etc.). Some brands have
more than one three digit code. Circle the correct row and
refer to it while you perform setup operations.
TV: TVs, Plasmas, Projectors and
Monitors pages
SAT/ Satellite Receivers, TiVo, pages
CABLE Replay and other DVR Receivers.
Cable TV Tuner/Descrambler
DVD DVD Players and DVD Recorders
VCR VCRs and TV/VCR Combos
AUX Amps, Preamps and A/V Receivers,
Lighting Controls and Multimedia
PC Controls
pages 19-23
pages 24-27
pages 28-30
pages 31-33
pages 34-38
Following the Code Table is a Command Locator which will
help you understand command locations on various types
of components.
Page 21

19
Page 22

20
Page 23

21
Page 24

22
Page 25

23
Page 26

24
Page 27

25
Page 28

26
Page 29

27
Page 30

28
Page 31

29
Page 32

30
Page 33

31
Page 34

32
Page 35

33
Page 36

34
Page 37

35
Page 38

36
Page 39

37
Page 40

38
Page 41

39
The FX1 Remote Control
Frequently Asked Questions
If the batteries run out, will I lose my programmed settings?
No. The FX1 stores all programming and setup information
in non-volatile FLASH memory. You can remove and replace
batteries at your convenience—the FX1 will remember all of
your settings.
What is MacroPower?
MacroPower makes several devices work together by pressing one button. It’s a very useful way to make a lot of things
happen with a single button push. For example, in most
home theaters, to watch television the user must turn on the
TV, then turn on the Cable Box or the Satellite Receiver, then
turn on the Surround Sound system. Instead of pressing all of
those buttons one at a time, MacroPower enables you to turn
on all of these components, in the sequence you want, with
one button push. For more information on why and how you
should program MacroPower commands, refer to page 13 in
this manual.
What if my remote control stops working or no longer works
from a distance?
Replace the batteries with fresh AA-size alkaline batteries.
Who can I contact for more information?
The Universal Remote Control technical support and
customer service staff are ready to answer any questions
you might have. Contact us by e-mail:
Service@UniversalRemote.com or call us at 1-914-835-4484
Monday-Friday, 9AM to 6PM (Eastern Time).
Page 42

USA Limited Warranty Statement
UNIVERSAL REMOTE CONTROL, INC. warrants this product
against defects in material or workmanship for a period of
one (1) year and as set forth below. Universal Remote
Control will, at its sole option, repair the product using new
or comparable rebuilt parts, or exchange the product for a
comparable new or rebuilt product.
This warranty does apply to the following:
• Units purchased from unauthorized resellers.
• Units purchased second-hand (used).
• Units installed or deployed for rental
or commercial use.
• Damage caused by misuse, neglect, or acts of nature.
• Products that have been modified or incorporated
into other products.
• Products purchased more than 12 months ago.
Specifications
IR Range (Line-of-Sight via Infrared) 30~50 feet,
depending on operating environment
Weight: About 6.9 oz. (with batteries)
Size: 2 1/8” x 1 1/8” x 8 3/4”
Batteries: Two AA alkaline batteries (included)
40
Page 43

Manual del
propietario
del FX1
Total Control (Control total)
Page 44

¡Felicidades!
Lo felicitamos por haber comprado el control remoto
preprogramado FX1 de Universal Remote Control.
Ahora tiene a su disposición el poder de utilizar el sistema
completo de entretenimiento en el hogar con un control
remoto de uso sencillo. El FX1 se puede usar con miles
de componentes de audio y video, debido a la amplia biblioteca de códigos preprogramados en el control remoto.
Por consiguiente... dispóngase a tomar asiento, relajarse y
simplificar sus experiencias de entretenimiento en el hogar.
Este Manual del propietario se diseñó para ayudarle a programar su control remoto FX1 mediante un proceso simple
de guía paso por paso. Todo lo que necesitará saber sobre
la programación del FX1 se encuentra en este manual.
Manual del propietario del FX1 © 2006 Universal Remote Control, Inc.
Este documento está protegido por las leyes de derechos de autor de los Estados Unidos y,
a nivel internacional, por la Convención de Berna. Ninguna parte de este manual se podrá
copiar ni reproducir de ningún modo sin el consentimiento previo por escrito de Universal
Remote Control, Inc. Aunque se ha tenido un cuidado razonable para asegurar la exactitud
de la información contenida en este documento, Universal Remote Control, Inc., no será
responsable de errores ni omisiones operacionales, técnicos o editoriales que haya en
este manual. La información y las especificaciones que contiene éste último pueden
estar sujetas a cambios sin previo aviso. MacroPower, SimpleSound y FX1 son marcas
registradas de Universal Remote Control, Inc. Todas las demás marcas y otros nombres
de productos son marcas comerciales o registradas de sus respectivos propietarios.
500 Mamaroneck Avenue, Harrison, NY 10528
Teléfono: (914) 835-4484 Fax: (914) 835-4532
Page 45

El control remoto FX1
Contendio
Comienzo
Control de hasta cinco componentes............................................... 42
Activación de botones de componentes...……………................ 42
Instalación de baterías………………….......…………..…….... 42
Ubicación de botones del FX1……………………………..…... 43
Configuración del FX1…………………………………............... 44
Método de introducción de códigos ................................................ 44-46
Método de autobúsqueda………………........................................ 47-48
Obtención de un número de código de configuración
de componente .................................................................................... 49-50
Características avanzadas…………………………………....... 51
SimpleSound™ y otros “Punch Throughs”………………..….... 51-52
MacroPower™……………………………………………......... 53-54
Borrado de características avanzadas……………………….... 55
Borrado de comandos de SimpleSound™ …………...............… 55
Borrado de comandos de MacroPower™…………………….. 56
Regreso del FX1 a los valores originales por defecto .................. 57
Tablas de códigos preprogramados …………………………... 58
TV……………………………………………………………… 19-23
SAT/CABLE…………………………………………………….. 24-27
DVD…….........…………………………………………………. 28-30
VCR…………………………………………………………...... 31-33
AUX…………………………………………………................... 34-38
Preguntas frecuentes.......................................................................... 59
Garantía.................................................................................................. 60
Especificaciones.................................................................................. 60
41
Page 46

42
Comienzo
Control de hasta cinco (5) componentes
El FX1 se diseño para controlar hasta cinco componentes
diferentes de audio y video y para hacer funcionar
componentes virtualmente de todas las marcas de audio,
televisión, DVD, VCR, cable y satélite.
Una pulsación activa todos los botones de un componente
Una vez que haya programado el FX1 para todos sus
componentes, lo único que tendrá que hacer es oprimir
una tecla de componente y todos los botones del FX1
funcionarán con el componente que haya pulsado. Por
ejemplo, si ha pulsado la tecla del componente de TV,
todos los botones del control remoto FX1 controlarán su
televisor. Si pulsa el botón del componente DVD, todos
los botones del FX1 controlarán el DVD.
Cada vez que oprima cualquiera de los
botones del
control remoto,
se encenderá
la luz LED
en el botón de
componente para
indicar cuál de ellos
está controlando.
Instalación de baterías
Oprima la lengüeta con
cuidado y levante la cubierta
del compartimiento de baterías
situado en la parte posterior
del control remoto. Inserte las
dos baterías AA (incluidas en
el paquete)
asegurándose
de que
coincidan
los símbolos
positivo (+) y negativo (-) como se muestra en el diagrama.
Vuelva a poner la cubierta en su lugar.
Instalación de
baterías
BOTÓN DE
TELEVISIÓN
Page 47

43
Ubicación de botones
BOTÓN DE FLECHA
ASCENDENTE
BOTÓN DE FLECHA
DESCENDENTE
BOTONES DE
FUNCIONES
BOTÓN DE
ENCENDIDO
BOTÓN DE APAGA-
DO DEL SISTEMA
BOTONES DE
COMPONENTES
Page 48

44
Configuración de su FX1
Hay dos modos en los que puede controlar el control remoto:
• El método de introducción de códigos (página 46)
• El método de autobúsqueda (página 47)
El método de introducción de códigos le permite ajustar el
FX1 utilizando nombres de marcas. Su programación es sencilla y rápida. El método de autobúsqueda explora todas las
marcas del control remoto. Se deberá utilizar cuando no
funcione el método de introducción de códigos.
Método de introducción de códigos
Encuentre los números de los códigos de tres dígitos asignados
a su marca en las listas que aparecen en la parte posterior de
este manual. Por ejemplo, si desea encontrar un código para un
televisor Sony, localice primeramente la categoría TV y, luego,
busque la marca Sony
Una vez que haya encontrado los códigos de tres dígitos para el
componente que desee hacer que funcione con su FX1, anótelos
TODOS en un papel. Es importante que anote todos los
números de códigos porque sólo funcionará para usted uno de
ellos.
A continuación, encienda el componente que desee programar
con el control remoto; por ejemplo, para programar su televisor
encienda su aparato.
Pulse y mantenga oprimidos el botón de componente (en este
caso el de TV) y el botón SELECT (SELECCIÓN) al mismo tiempo, durante unos 3 segundos, y se encenderá la luz LED del
botón del componente TV.
IMPORTANTE: Ahora tendrá a su
disposición 20 segundos para efectuar
el paso siguiente mientras esté en el
modo de programación. Si no oprime
un botón en un lapso de 20 segundos,
la luz LED se apagará y saldrá del modo
de configuración, de modo que tendrá
que volver a comenzar la operación.
BOTONES DE
COMPONENTES
BOTÓN SELECT
(SELECCIÓN)
Page 49

45
Apunte el control remoto hacia el componente que desee
programar (en este ejemplo: el televisor) e introduzca el código
de tres dígitos que anotó para el componente de que se trate.
Utilice para ello los botones de 0 a 9 del control remoto para
introducir el código. La luz LED del botón TV parpadeará cada
vez que se pulse un número.
Si el código de tres dígitos que ha introducido
es correcto, el componente que esté tratando de
programar se apagará. Si no lo hace así, siga
introduciendo números de códigos de su lista
hasta que se apague.
IMPORTANTE: Si prueba con todos los códigos de
configuración de la lista y el componente todavía
no se apaga después del paso 5, le servirá de
ayuda el método de autobúsqueda (página 47).
BOTÓN SELECT
(SELECCIÓN)
Page 50

46
Una vez que haya introducido el número de código y que se
haya apagado el componente, oprima el botón ENCENDIDO del
control remoto para volver a activarlo.
A continuación podrá probar los botones de VOLUMEN y CANALES (o los de MARCHA y DETENCIÓN
para el VCR o el DVD), con el fin de comprobar que
funcionen bien. Por ejemplo, es posible que su televisor Sony se apague al usar el código 147; pero
que los controles de volumen no funcionen bien.
En este caso, pruebe el siguiente número de código
proporcionado para el componente. Repita el paso
5, utilizando los números de código siguientes,
hasta que encuentre una correspondencia perfecta.
Una vez que haya encontrado el código correcto, deberá
almacenarlo. Oprima para ello otra vez el botón del componente
que acaba de programar (en este caso, TV). El botón LED del
componente parpadeará tres veces para confirmar que el código
se ha almacenado correctamente. Después de ello, cuando pulse
el botón del componente TV, todos los botones del control
remoto funcionarán con su televisor.
A continuación, programe el resto de sus
componentes repitiendo los pasos 3 a 7.
IMPORTANTE: Si el método de introducción de
códigos no funciona con sus componentes, pruebe
a continuación con el método de autobúsqueda,
como se indica en la página 47.
Page 51

47
Con su control remoto antiguo, encienda el componente que
quiera programar con el FX1... por ejemplo, su televisor.
Pulse y mantenga oprimidos el botón de Componente (en este
caso el de TV) y el botón SELECT (SELECCIÓN) al mismo tiempo, durante unos 3 segundos. Se encenderá la luz LED del
botón TV.
IMPORTANTE: Si no oprime un botón en un lapso
de 20 segundos, la luz LED se apagará, saldrá del
modo de programación y tendrá que volver a
comenzar la operación.
Pulse una vez el botón de cursor de FLECHA ASCENDENTE.
Cada vez que se oprima éste último, el código ascenderá un
número y enviará una señal de DESACTIVACIÓN. Cuando se
envíe el código correcto, el componente se apagará.
Método de autobúsqueda
El método de autobúsqueda es un modo en el que
podrán explorar otros códigos de la tabla para encontrar
el que sea apropiado para su componente.
BOTÓN DE FLECHA
ASCENDENTE
Page 52

48
Oprima el botón ON (ENCENDIDO) del FX1 para volver a activar
el componente. A continuación podrá probar los botones de
VOLUMEN y CANALES (para el televisor) y los de MARCHA y
DETENCIÓN (PLAY y STOP) (para VCR y DVD) para asegurarse
de que funcionen bien. Si alguno de ellos no lo hace, deberá
encontrar un nuevo código. Para ello, siga oprimiendo el botón
de FLECHA ASCENDENTE hasta encontrar un código que haga
que se apague el componente y que funcionen adecuadamente
los botones de VOLUMEN y PLAY (REPRODUCCIÓN).
Una vez que haya encontrado el código correcto, almacénelo,
oprimiendo otra vez el botón del componente (en este caso, el
televisor). La luz LED del componente parpadeará tres veces
para confirmar el almacenamiento del código.
NOTA: Use este método para los componentes que
no pueda programar por el método de introducción
de códigos.
Page 53

49
Si utilizó el método de autobúsqueda para
programar un componente, es posible que no
sepa en realidad cuál es el número correcto.
He aquí un modo que le permitirá identificar
qué número de código es, con el fin de que
pueda anotarlo en la parte posterior de este
manual para consultas futuras.
Pulse y mantenga oprimidos al mismo tiempo el botón SEL
y el del componente que desee verificar durante aproximadamente tres segundos, hasta que se encienda la luz LED del
componente.
Obtención de un código de configuración
de componente
BOTONES DE
COMPONENTES
BOTÓN SELECT
(SELECCIÓN)
Page 54

50
Pulse el botón INFO y cuente la cantidad de veces que
parpadeará la luz LED del componente. Esta cantidad indica el
primer dígito del código. Luego, hará una pausa de un segundo
y volverá a parpadear para indicar la cantidad del segundo dígito.
Finalmente, volverá a parpadear para indicar el tercer dígito.
Ejemplo: Un parpadeo, pausa, ocho parpadeos, pausa
y tres parpadeos indica el número de código 183.
Observe que diez (10) parpadeos indican el número 0.
BOTÓN INFO
Page 55

51
BOTONES DE
COMPONENTES
BOTÓN SELECT
(SELECCIÓN)
Características avanzadas
Control de volumen de SimpleSound™
SimpleSound es una de las características más
nuevas e interesantes del FX1. Le proporciona control
total de volumen de TODOS los componentes de su
sistema, incluso de los que no tengan un control de
volumen propio integrado, tales como TiVo, DVD y
VCR. SimpleSound le libera de las molestias y los
inconvenientes de pasar constantemente de un
modo de componente a otro tan sólo para controlar
el volumen.
Primeramente, deberá identificar qué dispositivo de
su sistema se utilizará para producir el sonido. En un
sistema básico, el sonido puede proceder del altoparlante de su televisor. En un sistema más avanzado,
puede provenir de un componente de audio (como
un Surround Sound Receiver (receptor de sonido
circundante) o un sistema de Teatro hogareño
(Home Theatre)).
A continuación, configuremos SimpleSound. He aquí
como hacerlo:
Pulse y mantenga oprimidos
tanto el botón de componente al
que desee agregarle control de
volumen (como un DVD o VCR)
y el SEL (Select o Selección)
durante aproximadamente tres
segundos, hasta que se encienda
la luz LED del componente.
Page 56

52
IMPORTANTE: Si no oprime un botón en un lapso de 20
segundos, la luz LED se apagará. El control remoto saldrá del modo de programación y tendrá que volver a
comenzar la operación.
Repita los pasos 1 y 2 para todos los demás componentes.
NOTA: SimpleSound es lo que se denomina característica
“Punch Through” (“de estampado”) y no se limita al control
de volumen. Se puede aplicar también a otros grupos de
botones. Si pasa con frecuencia a un componente dado
para utilizar un componente determinado para tener acceso
a un control en particular, considere la posibilidad de utilizar
Punch Through. Siga el mismo procedimiento anterior.
Cuando llegue al paso 2, pulse el primer botón indicado en
los grupos que siguen y se programarán todos los botones:
VOLUMEN: AUMENTO, REDUCCIÓN DE VOLUMEN Y MUDO
CANAL: CANAL SUPERIOR, INFERIOR Y PREVIO. Número (0-9)
VCR/DVD: MARCHA, DETENCIÓN, PAUSA, REEMBOBINADO,
AVANCE RÁPIDO, SALTO+, SALTO-, GRABACIÓN
DVD/SAT OSD: MENÚ, GUÍA, INFORMACIÓN, SALIDA,
ASCENSO, DESCENSO, IZQUIERDA,
DERECHA, SEL.
PASO 2: Pulse el botón de AUMENTO DE VOLUMEN (VOLUME
UP) y, luego, ya sea el de TV o AUDIO que desee usar para el
volumen. La luz LED del componente parpadeará tres veces
para confirmar su almacenamiento. Esto ajusta un grupo de
tres botones (aumento, reducción de volumen y MUDO) para
el componente de que se trate.
BOTON DE AUMENTO
DE VOLUMEN
Page 57

53
MacroPower™
MacroPower hace que varios dispositivos funcionen juntos al pulsar un botón. Imagínese que podrá encender su
televisor, su reproductora de DVD y su receptor de sonido
circundante (surround sound) mediante la pulsación de
un solo botón del FX1. Lo que requeriría normalmente
tres controles remotos y tres botones pulsados, el FX1 lo
puede realizar mediante la pulsación de un solo botón. A
esto le llamamos MacroPower. Cualquiera de los botones
de Encendido o Apagado de sistema se puede programar
para el control de MacroPower. Para su configuración,
siga estos pasos sencillos:
Para programar comandos de MacroPower para el
botón de ENCENDIDO (ON), pulse y mantenga oprimidos durante aproximadamente tres segundos el botón
de ENCENDIDO (ON) y el MUDO (MUTE), hasta que se
encienda una de las luces LED de los componentes.
IMPORTANTE: Si no oprime un botón en un
lapso de 20 segundos, la luz LED se apagará.
El control remoto saldrá del modo de programación y tendrá que volver a comenzar la
operación.
BOTÓN DE
ENCENDIDO (ON)
BOTÓN MUDO
(MUTE)
Page 58

54
Pulse el botón del componente que desee encender y, luego,
el botón de ENCENDIDO (ON) y repita lo mismo para todos los
demás componentes en el orden que desee que se enciendan.
La luz LED parpadeará una vez por cada pulsación del botón de
ENCENDIDO (Power ON).
Una vez que haya introducido todos los comando de encendido,
pulse el botón de Canal arriba (Channel Up) para almacenar sus
comandos de MacroPower. La luz LED del componente parpadeará
tres veces para confirmar que la programación se ha almacenado
correctamente.
SUGERENCIA: La mayoría de los componentes tienen la
misma señal para encender y apagar. Puede desear programar sólo MacroPower en el botón de Encendido y reservar
el de Apagado del sistema para encender o apagar
componentes individualmente.
Nota: Si desea programar MacroPower para el botón
de APAGADO, repita los mismos pasos utilizados para
programar el ENCENDIDO (Power ON).
BOTONES DE
COMPONENTES
BOTÓN DE
ENCENDIDO (ON)
BOTÓN DE CANAL
ARRIBA
(CHANNEL UP)
Page 59

55
Borrado de características avanzadas
Podrá borrar la programación de SimpleSound, comandos
de MacroPower o, si lo desea, hacer que el control remoto
regrese a los parámetros originales de fábrica por defecto.
Borrado de comandos de SimpleSound
Repita los pasos 1 y 2 para borrar comandos de
SimpleSound de otros componentes.
Pulse y mantenga oprimidos el botón
del componente del que desee borrar el
control de volumen (como DVD o VCR)
y el SEL (SELECT o SELECCIÓN), al
mismo tiempo, durante aproximadamente tres segundos, hasta que se
encienda la luz LED del componente.
Pulse el botón de Aumento de volumen (Volume Up) y el
mismo de componente del paso 1. La luz LED del componente parpadeará tres veces para confirmar el borrado.
BOTONES DE
COMPONENTES
BOTÓN SELECT
(SELECCIÓN)
BOTON DE AUMENTO
DE VOLUMEN
Page 60

56
Borrado de MacroPower
Para borrar comandos de MacroPower en el botón de
ENCENDIDO (POWER ON) o el de APAGADO (SYTEM OFF), pulse
y mantenga oprimidos el botón ya sea de ENCENDIDO (POWER
ON) o el de APAGADO (SYSTEM OFF) y el de MUTE (MUDO), al
mismo tiempo, durante tres segundos, y se encenderá la luz
LED del componente.
Pulse el botón de Canal arriba (Channel Up) para borrar y salir
del modo de borrado. La luz LED del componente parpadeará
tres veces para confirmar el borrado.
IMPORTANTE: Si no oprime un botón en un lapso de
20 segundos, la luz LED se apagará, saldrá del modo de
configuración y tendrá que volver a comenzar la operación.
Repita los pasos 1 y 2 para borrar comandos de MacroPower
de otros componentes.
BOTON DE
ENCENDIDO (ON)
BOTÓN DE APAGA-
DO (SYSTEM OFF)
BOTÓN DE
MUDO (MUTE)
Page 61

57
Regreso del FX1 a valores originales de fábrica por defecto
Podrá restaurar el FX1 a sus valores originales de fábrica
por defecto.
Pulse y mantenga oprimidos el botón de TV y el de
GRABACIÓN (RECORD) durante aproximadamente cinco
segundos, hasta que la luz del componente SAT/CABLE
parpadee cinco veces. Toda la programación y los códigos
de configuración que haya introducido en el control remoto
se borrarán y el FX1 regresará a los parámetros originales
de fábrica por defecto.
Advertencia:
Este procedimiento borrará toda la programación y los
códigos de configuración que haya introducido en el
control remoto.
BOTÓN
TV
BOTÓN
SAT/CABLE
BOTÓN RECORD
(GRABACIÓN)
Page 62

58
Tablas de códigos preprogramados
La biblioteca de códigos preprogramados del FX1 se
divide en categorías (TV, VCR, DVD, etc.). Cada una de
éstas últimas comprende en realidad muchos tipos de
componentes. Por ejemplo, la de SAT incluye receptores
satelitales y grabadoras digitales de video, como TiVo
y Replay.
Dentro de cada categoría, los números de códigos se
enumeran en hileras por marcas (Sony, Panasonic, B & K,
etc.). Algunas marcas tienen más de un código de tres
dígitos para que los pruebe. Encierre en un círculo la
hilera correcta y consúltela mientras efectúa operaciones
de configuración.
TV TV, plasmas, proyectores y monitores.
SAT/ Receptores satelitales, TiVo, Replay y
CABLE Otros receptores de DVR TV de cable,
sintonizadores y descifradores.
DVD Reproductoras y grabadoras de DVD.
VCR VCR y combos de TV/VCR.
Después d la tabla de códigos
hay un Localizador de mandos
que le ayudará a entender las
ubicaciones de los mandos
en varios tipos de componentes.
AUX Amplificadores, preamplificadores
y receptores de A/V, controles de
iluminación y PC multimedios.
Receptores de A/V y auxiliares
páginas 19-23
páginas 24-27
páginas 28-30
páginas 31-33
páginas 34-38
Page 63

59
El control remoto FX1
Preguntas frecuentes
¿Perderé mis ajustes si se agotan las baterías?
No. El FX1 almacena todos sus ajuste en memoria FLASH
no volátil. Podría retirar las baterías durante varios meses,
reemplazarlas cuando lo desee y, de todos modos, el FX1
recordará todavía sus ajustes.
¿Qué es MacroPower?
MacroPower es un modo muy útil para hacer que sucedan
varias cosas mediante la pulsación de un botón. Por ejemplo, en la mayoría de los teatros del hogar (Home Theaters),
para ver televisión, el usuario debe encender el televisor,
luego activar el convertidor del cable o el receptor satelital
y, a continuación, activar el sistema Surround Sound para
tener sonido. En lugar de pulsar todos esos botones, uno
tras otro, MacroPower permite que encienda todos esos
componentes, en la secuencia que desee, mediante la
pulsación de un botón. Para obtener más información
sobre por qué y cómo debería programar comandos de
MacroPower, consulte la página X de este manual.
{Match page number to TOC}
¿Qué sucede si mi control remoto no funciona ya desde
cierta distancia?
Reemplace las baterías con otras nuevas alcalinas
de tamaño AA.
¿A quién puedo dirigirme para obtener más respuestas?
El personal de Remote Control Technical Support y
Customer Service (Respaldo Técnico de Universal Remote
Control y el Servicio a los Clientes) está listo para responder
a las preguntas que desee hacerles. Contáctenos por correo
electrónico en: Service@UniversalRemote.com o llámenos
al teléfono 1-914-835-4484
Page 64

60
Declaración de garantía limitada en Estados Unidos
UNIVERSAL REMOTE CONTROL, INC., garantiza este
producto contra defectos de fabricación o mano de obra
durante un periodo de un año (1) y como se indica a
continuación. A su exclusiva opción, Remote Control
reparará el producto utilizando piezas nuevas o reconstruidas comparables o cambiará el producto por otro nuevo
o reconstruido comparable.
Esta garantía no cubre los conceptos que siguen:
• Unidades adquiridas de revendedores no autorizados.
• Unidades adquiridas de segunda mano (usadas).
• Unidades instaladas o presentadas para usos
comerciales o rentas.
• Daños por mal uso, negligencia o desastres naturales
• Productos que se hayan modificado o incorporado en
otros dispositivos
• Productos adquiridos hace más de 12 meses
Especificaciones
Gama de IR (Línea de visión por medio de infrarrojos)
9 a 15 m (30 a 50 pies) dependiendo del ambiente funcional
Peso: Aproximadamente 195 g
(6.9 onzas) (con baterías)
Tamaño: 54 x 28.6 x 222 mm (2.125 x 1.125 x 8.75 pulgadas)
Baterías: Dos baterías alcalinas AA (incluidas)
 Loading...