

Page 1

Dolphin
TM
Water-Proof Remote Control
Balboa
Instruments
Incorporated
Page 2

2 3
TABLE OF CONTENTS
Introduction . . . . . . . . . . . . . . . . . . . . . . . .3
Features And Functions . . . . . . . . . . . . . . . .4
Key Charts . . . . . . . . . . . . . . . . . . . . . . . . . .5
Installing Batteries . . . . . . . . . . . . . . . . . . . .7
Programming TV Control . . . . . . . . . . . . . . .8
Setup Codes for TVs . . . . . . . . . . . . . . . . . . .8
Programming VCR Control . . . . . . . . . . . . .12
Setup Codes for VCRs . . . . . . . . . . . . . . . . .12
Programming TV/VCR Combo Control . . . . .16
Setup Codes for TV/VCRs . . . . . . . . . . . . . .17
Programming Cable Converter
(or DBS Receiver) Control . . . . . . . . . . . . .18
To Unlock the Cable Key . . . . . . . . . . . . . . .18
To Program the Cable Key . . . . . . . . . . . . . .18
To Lock the Cable Key . . . . . . . . . . . . . . . .19
Setup Codes for Cable Converters . . . . . . . .19
Setup Codes for DBS Receivers . . . . . . . . . .20
Programming Channel Control Lock . . . . . .21
To Activate Channel Control Lock . . . . . . . .21
To De-Activate Channel Control Lock . . . . . .21
Programming Audio Control . . . . . . . . . . . .22
Setup Codes for CD Players . . . . . . . . . . . . .23
Setup Codes for DVD Players . . . . . . . . . . .24
Setup Codes for Stereo Receivers . . . . . . . .24
Setup Codes for Stereo Amplifiers . . . . . . . .25
Setup Codes for DBS Audio Services . . . . . .25
Searching For Your Code . . . . . . . . . . . . . .26
Checking The Codes . . . . . . . . . . . . . . . . . .27
Re-Assigning Device Keys . . . . . . . . . . . . . .28
Changing Volume Lock . . . . . . . . . . . . . . . .29
To Change Volume Lock to the CABLE Mode 29
To Change Volume Lock to the TV Mode . . .29
To Change Volume Lock to the VCR Mode . .29
To Change Volume Lock to the RCVR Mode .29
Using the Learning Feature . . . . . . . . . . . . .30
Using the IR/RF Command Center . . . . . . . .32
Specifications . . . . . . . . . . . . . . . . . . . . . .34
Compliance with FCC Rules and Regulations 35
Troubleshooting . . . . . . . . . . . . . . . . . . . . .36
INTRODUCTION
The Universal Dolphin™ Remote is Balboa’s latest
generation remote control. It is designed with
sophisticated technology that will allow you to
consolidate many of your existing remote controls
along with the entertainment system in your spa.
It’s packed with easy-to-use features such as:
• Preprogrammed to operate the cable converter
supplied by your cable system provider
• Preprogrammed technology for easy setup
• Instant “Tune-In”keys for assignment to your
favorite channels
• Color-coded keys to quickly locate popular
functions
• Code library for video and audio components
• Code Search to help program control of older
or discontinued components
• Learning function to allow programming with
another infrared (IR) remote.
• Combination IR and RF (radio frequency)
capability that can send commands, through
the optional RF base station, to devices in
another room.
Before you can use your new remote control, you
will need to program it to operate the specific
home entertainment components you wish to
control. Follow the instructions detailed in this
manual to set up your Dolphin Remote and enjoy
your new remote control.
Page 3
4
5
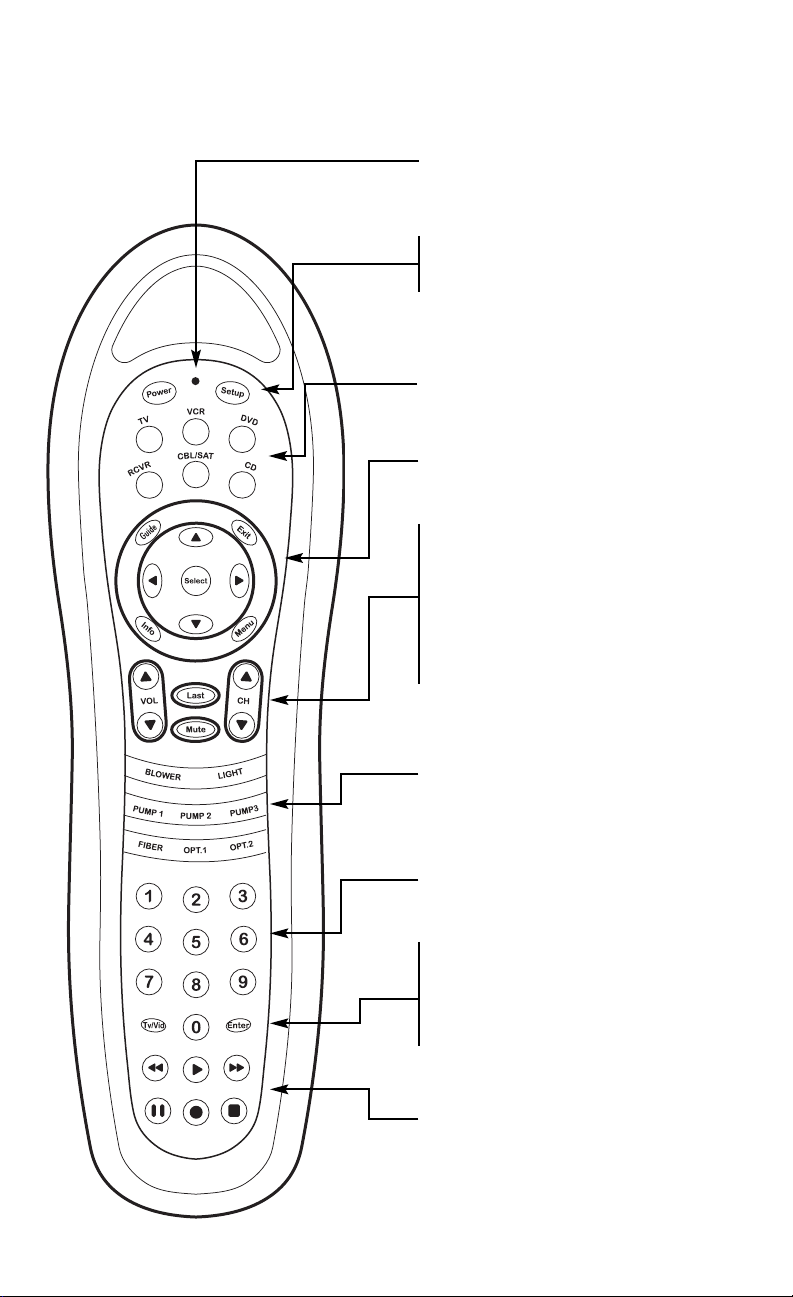
FEATURES AND FUNCTIONS
Use the illustration below to locate the Dolphin
features and study the key locations (on the next
two pages) to learn how they function.
The LED (red light) blinks to show that the remote
control is working and is sending signals.
Press POWER once to turn on or off the selected
home entertainment component.
Use SETUP for all programming sequences.
Press AUDIO, VCR, TV, or CBL once to select a
home entertainment component to control.
See next page for descriptions of the buttons in
this circular area of the remote
Use volume + (or volume -) to raise (or lower)
the sound volume.
Use CH + (or CH -) to select the next higher (or
lower) channel.
Press MUTE once to turn sound off or on.
Press LAST once to recall the last channel and to
page back one screen in the main menu.
Use the GREEN phosphorescent buttons to control
available spa functions.
Use the keypad (0 ~ 9) to directly select channels
(e.g., 09 or 31).
Press TV/VCR once to switch the VCR to view TV
channels or tape.This key will also control the
input select feature on most TVs.
Press ENTER once after entering channel numbers
on some TV models.
In the VCR and TV modes, use the REW, PLAY, FF,
REC, STOP, and PAUSE keys to control your VCR.
To record a program, press REC twice.
Continued on next page…
Page 4
7
Use GUIDE to display the program guide.
Use EXIT to exit out of your cable converter’s
menu and guide.
Use the four directional keys to move the cursor in
the program guide and menu screens.
Use SELECT/OK to choose options,PPV events, and
to tune programs from the program guide.
Use INFO to display current channel and program
information.
Press MENU once to display your cable converter’s
screen menu.
FEATURES AND FUNCTIONS
…Continued
INSTALLING BATTERIES
1. On the back of the Dolphin Remote, remove
the screws that hold the battery cover in place
and lift off the battery cover.
2 Obtain two (2) fully-charged AA alkaline
batteries.
Match the + and – marks on the batteries to
the + and – marks in the battery case, then
insert the new batteries.
3. Press the battery cover back into place, being
careful to align the rubber seal.
4. Replace the screws that hold the cover by
carefully starting each one without tightening it.
Once they are all started, snug up one screw
and then do the same to the screw on the
opposite side of the door. Repeat this in a
crossing pattern until all screws are snug. Do
not over-tighten them. This will assure an
adequate water seal around the battery door.
4. Test the unit by pressing POWER and any mode
key (e.g. AUDIO,VCR, TV, or CBL). If the
batteries are inserted correctly, the LED will
blink once.
NOTE:
Whenever batteries need replacement, the
Dolphin will blink twice with every key press.
Simply replace the batteries and the remote will
be restored to its full functionality, complete
with your favorite settings.
(5)
AA
AA
Page 5

8
9
PROGRAMMING TV CONTROL
NOTE: If you own a TV/VCR combination, skip thi
section and perform “Programming TV/VCR
Combo Control” on page 16.
Locate the brand name of your TV in the Setup
Codes For TVs section below, and write it in the
following space.
TV Brand:
The brands are listed in alphabetical order with
the most popular codes listed first.You will use one
of these codes to program the Dolphin to operate
your TV:
1. Turn on the TV.
On the Dolphin, press TV once. Press and hold
SETUP until the LED blinks twice, then release
SETUP.
3. Enter the first four-digit code for your TV. If you
perform this procedure correctly, the LED will
blink twice.
NOTE: If the LED did not blink twice after entering
the code’s last digit, then repeat steps 2 through 3
and try entering the same code again.
4. Aim the Dolphin at your TV and press POWER
once. The TV should turn off. If it does not
respond, repeat steps 2-3, trying each code for
your brand until you find one that works. If it
still does not work, try searching for the code
(see Searching For Your Code on page 26).
5. Write your TV code in the boxes below for
future reference.
■■ ■■ ■■ ■■
NOTE: Remember, to use the Dolphin to operate
your TV, press TV first.
Baysonic 0180
Belcor 0019
Bell & Howell 0154, 0016
Bradford 0180
Brockwood 0019
Broksonic 0236,0463, 0003
CXC 0180
Candle 0030, 0056, 0046, 0186
Carnivale 0030
Carver 0054
Celebrity 0000
Cineral 0451, 0092
Citizen 0060, 0030, 0056, 0039, 0046, 0092,
0186, 0280
Clairtone 0185
Concerto 0056
Contec 0180, 0185
Craig 0180
Crosley 0054
Crown 0180, 0039
Curtis Mathes 0047, 0054, 0154, 0051, 0451, 0093,
0060, 0030, 0145, 0056, 0016, 0039,
0166, 0466
Daewoo 0451, 0019, 0039, 0092, 0623, 0624
Daytron 0019
Denon 0145
Dumont 0017, 0019
Dwin 0720, 0774
Electroband 0000, 0185
Emerson 0154, 0236, 0463, 0180, 0282, 0178,
0019, 0179, 0039, 0038, 0177, 0185,
0280, 0623, 0624
Envision 0030
Fisher 0154, 0159
Fujitsu 0179
Funai 0180, 0179, 0171
Futuretech 0180
GE 0047, 0051, 0451, 0093, 0282, 0178,
0021, 0055, 0027, 0135
Gibralter 0017, 0030, 0019
GoldStar 0030, 0178, 0019, 0056, 0001, 0032
Gradiente 0053, 0056
Grunpy 0180,0179
Hallmark 0178
Harley Davidson 0179
Harman/Kardon 0054
Harvard 0180
Hitachi 0145, 0056, 0032, 0038, 0151
Infinity 0054
Inteq 0017
JBL 0054
JCB 0000
JVC 0053
Janeil 0046
Setup Codes for TVs:
A-Mark 0003
AOC 0030, 0019, 0003, 0052, 0185
Abex 0032
Admiral 0093
Adventura 0046
Aiko 0092
Akai 0030
Alaron 0179
Ambassador 0177
Anam 0180
Anam National 0055
Archer 0003
Audiovox 0451, 0180, 0003, 0092, 0623
Page 6

11
10
KEC 0180
KTV 0180, 0030, 0039, 0185, 0280
Kaypani 0052
Kenwood 0030, 0019
Kloss 0024, 0046
LG 0056
LXI 0047, 0054, 0154, 0156, 0178
Logik 0016
Luxman 0056
MEI 0185
MGA 0150, 0030, 0178, 0019
MTC 0060, 0030, 0019, 0056, 0185
Magnavox 0054,0030, 0179, 0020, 0024, 0096,
0186, 0187, 0386
Majestic 0016
Marantz 0054, 0030
Matsushita 0250
Megatron 0178, 0145, 0003
Memorex 0154, 0250, 0150, 0178, 0056, 0016
Midland 0047, 0017, 0051, 0039, 0032, 0135
Minutz 0021
Mitsubishi 0093, 0150, 0178, 0019
Motorola 0093, 0055
Multitech 0180
NAD 0156, 0178, 0166
NEC 0030,0019, 0056, 0497
NTC 0092
Nikko 0030, 0178, 0092
Noshi 0018
Onwa 0180
Optimus 0154, 0250, 0166
Optonica 0093,0165
Orion 0236, 0463, 0179
Panasonic 0051,0250, 0055
Penney 0047, 0156, 0051, 0060, 0030, 0178,
0021, 0019, 0018, 0056, 0039, 0003,
0027, 0032, 0135
Philco 0054, 0463, 0030, 0145, 0019, 0020,
0096
Philips 0054
Pilot 0030, 0019, 0039
Pioneer 0038, 0166
Portland 0019, 0039, 0092
Prism 0051
Proscan 0047
Proton 0178, 0003, 0052, 0466
Pulsar 0017, 0019
Quasar 0051, 0250, 0165, 0055
RCA 0047, 0051, 0093, 0019, 0018, 0038,
0090, 0135
Radio Shack 0047, 0154, 0165, 0180, 0030, 0178,
0019, 0056, 0039, 0032
Realistic 0154, 0165, 0180, 0030, 0178, 0019,
0056, 0039, 0032
Rhapsody 0185
Runco 0017, 0030, 0497
SSS 0180, 0019
Sampo 0030, 0039, 0032, 0052
Samsung 0060, 0030, 0178, 0019, 0056, 0032
Samsux 0039
Sansei 0451
Sansui 0463
Sanyo 0154, 0146, 0159
Scimitsu 0019
Scotch 0178
Scott 0236, 0180, 0178, 0019, 0179
Sears 0047, 0054, 0154, 0156, 0178, 0179,
0056, 0146, 0159, 0171
Semivox 0180
Semp 0156
Sharp 0093, 0165, 0039, 0386
Shogun 0019
Signature 0016
Simpson 0186, 0187
Sony 0000, 0080
Soundesign 0180, 0178, 0179, 0186
Spectricon 0003
Squareview 0171
Starlite 0180
Supre-Macy 0046
Supreme 0000
Sylvania 0054, 0030, 0020, 0096
Symphonic 0171
TMK 0178, 0056, 0177
Tandy 0093
Tatung 0055, 0003
Technics 0051, 0250
Technol Ace 0179
Techwood 0051, 0056, 0003
Teknika 0054, 0180, 0150, 0060, 0019, 0179,
0056, 0016, 0039, 0092, 0186
Telefunken 0056
Toshiba 0154, 0156, 0060
Tosonic 0185
Totevision 0039
Universal 0027
Vector Research 0030
Victor 0053
Vidikron 0054
Vidtech 0178, 0019
Viking 0046
Wards 0054, 0165, 0030, 0178, 0021, 0019,
0179, 0056, 0016, 0020, 0027, 0080,
0096
White-
Westinghouse 0623, 0624
Yamaha 0030, 0019
Zenith 0017, 0016, 0092
Zonda 0003
Page 7

13
12
PROGRAMMING
VCR CONTROL
NOTE: If you own a TV/VCR combination, skip this
section and perform “Programming TV/VCR
Combo Control” on page 16.
Locate the brand name of your VCR in the Setup
Codes For VCRs section below, and write it in the
following space.
VCR Brand:
The brands are listed in alphabetical order with
the most popular codes listed first.You will use one
of these codes to program the Dolphin to operate
your VCR:
1. Turn on your VCR and insert a video cassette.
2. On the Dolphin, press VCR once. Press and
hold SETUP until the LED blinks twice, then
release SETUP.
3. Enter the first four-digit code for your VCR. If
you perform this procedure correctly, the LED
will blink twice.
NOTE: If the LED did not blink twice after entering
the code’s last digit, then repeat steps 2 through 3
and try entering the same code again.
4. Aim the Dolphin at your VCR and press POWER
once.The VCR should turn off. If your VCR
remote control does not have a POWER key,
press PLAY. If the VCR does not respond, repeat
steps 2-3, trying each code listed for your
brand until you find one that works. If the VCR
still does not work , try searching for the code
(see Searching For Your Code on page 26).
5. Write your VCR code in the boxes below for
future reference.
■■ ■■ ■■ ■■
NOTE: Remember, to use the Dolphin to operate
your VCR, press VCR first.
Beaumark 0240
Bell & Howell 0104
Broksonic 0184, 0121, 0209, 0002,
CCE 0072, 0278
Calix 0037
Canon 0035
Capehart 0020
Carver 0081
Cineral 0278
Citizen 0037, 0278
Colt 0072
Craig 0037, 0047, 0240, 0072, 0271
Curtis Mathes 0060, 0035, 0041, 0162
Cybernex 0240
Daewoo 0045, 0278, 0020, 0561
Daytron 0020
Denon 0042
Dynatech 0000
Electrohome 0037
Electrophonic 0037
Emerex 0032
Emerson 0037, 0184, 0000, 0121, 0043, 0209,
0002, 0278, 0061, 0208, 0212, 0479,
0561
Fisher 0047, 0104, 0054, 0066
Fuji 0035, 0033
Funai 0000
GE 0060, 0035, 0048, 0240, 0202
Garrard 0000
Go Video 0526
GoldStar 0037, 0038
Gradiente 0000, 0008
HI-Q 0047
Harley Davidson 0000
Harman/Kardon 0081, 0038
Harwood 0072
Headquarter 0046
Hitachi 0000, 0042, 0041, 0105
JVC 0067, 0041, 0008
Jensen 0041
KEC 0037, 0278
KLH 0072
Kenwood 0067, 0041, 0038
Kodak 0035, 0037
LXI 0037
Lloyd’s 0000, 0208
Logik 0072
MEI 0035
MGA 0240, 0043, 0061
MGN Technology0240
MTC 0240, 0000
Magnasonic 0278
Setup Codes for VCRs:
Admiral 0048
Adventura 0000
Aiko 0278
Aiwa 0037, 0000, 0307
Akai 0041, 0061, 0106
American High 0035
Asha 0240
Audiovox 0037
Page 8

15
14
Magnavox 0035, 0039, 0081, 0000, 0149
Magnin 0240
Marantz 0035, 0081
Marta 0037
Matsushita 0035, 0162
Memorex 0035,0037, 0048, 0039, 0047, 0240,
0000, 0104, 0162, 0046, 0307
Minolta 0042, 0105
Mitsubishi 0048, 0067, 0043, 0061
Motorola 0035, 0048
Multitech 0000, 0072
NEC 0104, 0067, 0041, 0038
Nikko 0037
Nikon 0034
Noblex 0240
Olympus 0035
Optimus 0037, 0048, 0104, 0162
Optonica 0062
Orion 0184, 0002, 0479
Panasonic 0035, 0162, 0077, 0225
Penney 0035, 0037, 0240, 0042, 0038, 0054
Pentax 0042, 0105
Philco 0035, 0209, 0479
Philips 0035, 0081, 0062
Pilot 0037
Pioneer 0067
Portland 0020
Profitronic 0240
Proscan 0060, 0202
Protec 0072
Pulsar 0039
Quarter 0046
Quartz 0046
Quasar 0035, 0162, 0077
RCA 0060, 0035, 0048, 0240, 0042, 0149,
0077, 0105, 0106, 0202
Radio Shack 0000
Radix 0037
Randex 0037
Realistic 0035, 0037, 0048, 0047, 0000, 0104,
0062, 0046, 0066
Ricoh 0034
Runco 0039
STS 0042
Samsung 0240, 0045
Sanky 0048, 0039
Sansui 0000, 0067, 0041, 0271, 0479
Sanyo 0047, 0240, 0104, 0046
Scott 0184, 0045, 0121, 0043, 0212
Sears 0035, 0037, 0047, 0000, 0042, 0104,
0046, 0054, 0066, 0105
Semp 0045
Sharp 0048, 0062
Shintom 0072
Shogun 0240
Singer 0072
Sony 0035, 0032, 0000, 0033, 0034
Sylvania 0035, 0081, 0000, 0043
Symphonic 0000
TMK 0240, 0208
Tatung 0041
Teac 0000, 0041
Technics 0035, 0162
Teknika 0035, 0037, 0000
Thomas 0000
Toshiba 0045, 0043, 0066, 0212
Totevision 0037, 0240
Unitech 0240
Vector 0045
Vector Research 0038
Video Concepts 0045, 0061
Videosonic 0240
Wards 0060, 0035, 0048, 0047, 0081, 0240,
0000, 0042, 0072, 0149, 0062, 0212
White7Westinghouse 0278
XR-1000 0035, 0000, 0072
Yamaha 0038
Zenith 0039, 0000, 0033, 0034
Page 9

17
16
PROGRAMMING
TV/VCR COMBO CONTROL
Locate the brand name of your TV/VCR Combo in
the Setup Codes For TV/VCR Combos section
below, and write it in the following space.
TV/VCR Combol Brand:
The brands are listed in alphabetical order with
popular codes listed first.You will use one of these
codes to program the Dolphin to operate your
TV/VCR Combo:
1. Turn on your TV/VCR Combo and insert a video
cassette.
2. On the Dolphin, press VCR once. Press and
hold SETUP until the LED blinks twice, then
release SETUP.
3. Enter the first four-digit code for your TV/VCR
Combo. If you perform this procedure
correctly, the LED will blink twice.
NOTE: If the LED did not blink twice after entering
the code’s last digit, then repeat steps 2 through 3
and try entering the same code again.
4. Aim the Dolphin at your TV/VCR Combo and
press POWER once.The unit should turn off. If
it does not respond, repeat steps 2-3, trying
each code listed for your brand until you find
one that works. If it still does not work, try
searching for the code (see Searching For Your
Code on page 26).
5. If you’ve located a TV/VCR setup code that
works your TV/VCR Combo and a separate TV
code is also listed, you’ll need to program this
code into the Dolphin to access volume control
(see Programming TV Control on
page 8).
If there is no separate TV code listed, you will need
to perform the following steps to access volume
control:
a. Press and hold SETUP until the LED blinks
twice, then release SETUP.
b. Enter 9 - 9 - 3. The LED will blink twice.
c. Press VCR once. The LED will blink twice.
6. Write your TV/VCR Combo code in the boxes
below for future reference.
■■ ■■ ■■ ■■
NOTE: Remember, to use the Dolphin to operate
your TV/VCR Combo, press VCR first.
Setup Codes for
TV/VCR Combos:
American High 0035 (for TV use 0051)
Brocksonic 0002, 0294,
Colt 0072
Curtis Mathis 0035 (for TV use 0051)
Daewoo 0278
Emerson 0002, 0294, 0479
Funai 0000
GE 0035 (for TV use 0051),
0060 (for TV use 0047),
0048 (for TV use 0093),
0240
Hitachi 0035 (for TV use 0051),
0000
HQ 0000
Lloyds 0000
MGA 0240
Magnavox 0081 (for TV use 0054),
0035 (for TV use 0051),
0000
Magnin 0240
Memorex 0037, 0162 (for TV use 0250)
Mitsubishi 0048 (for TV use 0093)
Orion 0002, 0294, 0479
Panasonic 0035 (for TV use 0051),
0162 (for TV use 0250)
Penney 0035 (for TV use 0051),
0240,
0162 (for TV use 0250)
Quasar 0035 (for TV use 0051),
0162 (for TV use 0250)
RCA 0060 (for TV use 0047),
0035 (for TV use 0051),
0048 (for TV use 0093)
Sansui 0000, 0479
Sanyo 0240
Sears 0000, 0037
Sharp 0048 (for TV use 0093)
Sony 0032 (for TV use 0000)
Symphonic 0000
Zenith 0000
Page 10

19
18
PROGRAMMING CABLE
CONVERTER (OR SATELLITE
RECEIVER) CONTROL
Before you program the control to operate a cable
or satellite converter, you’ll need to perform the
following instructions to unlock the cable key,
enter in a new code, and lock the cable key again.
To unlock the Cable key:
1. Turn on the Cable Converter or DBS Receiver.
2. On the Dolphin, press CBL once. Press and
hold SETUP until the LED blinks twice, then
release SETUP.
3. Enter 9 - 9 - 7. The LED will blink twice.
4. Press CH – once. The LED will blink twice.
To program the Cable key:
1. Locate the brand name of your Cable Converter
(or Direct Broadcast Satellite Receiver) in the
Setup Codes For Cable Converters (or Setup
Codes For DBS Receivers) section starting on
the next page, and write it in the appropriate
space.
Cable Converter Brand:
or
DBS Receiver Brand:
The brands are listed in alphabetical order with
the most popular codes listed first.You will use one
of these codes to reprogram the Dolphin to
operate your Cable Converter or DBS Receiver.
On the Dolphin, press CBL once. Press and hold
SETUP until the LED blinks twice, then release
SETUP.
Enter the first four-digit code for your Cable
Converter or DBS Receiver. If you perform this
procedure correctly, the LED will blink twice.
NOTE: If the LED did not blink twice after entering
the code’s last digit, then repeat steps 2 through 3
and try entering the same code again.
Aim the Dolphin at your Cable Converter or DBS
Receiver and press POWER once. The unit should
turn off. If it does not respond, repeat steps 2-3,
trying each code listed for your brand until you
find one that works. If it still does not work , try
searching for the code (see Searching For Your
Code on page 26).
5. Write your Cable Converter or DBS Receiver
code in the boxes below for future reference.
■■ ■■ ■■ ■■
NOTE: Remember, to use the Dolphin to operate
your Cable Converter or DBS Receiver, press
CABLE first.
To lock the Cable key:
1. On the Dolphin, press CBL once. Press and
hold SETUP until the LED blinks twice, then
release SETUP.
2. Enter 9 - 9 - 7.The LED will blink twice.
3. Press CH + once.The LED will blink twice.
Setup Codes for
Cable Converters:
ABC 0003, 0008, 0017, 0013
ABC Cable 0033
Americast 0899
Contec 0019
General
Instrument 0476, 0276, 0810
GoldStar 0144
Hamlin 0020, 0259
Jerrold 0003, 0012, 0476, 0276, 0810
Macom 0033
Memorex 0000
Movie Time 0063
NSC 0063
Oak 0019
Optimus 0021
Panasonic 0000, 0107, 0021
Paragon 0000
Pioneer 0144, 0533
Pulsar 0000
Quasar 0000
RCA 0021
Regal 0020, 0259
Runco 0000
Samsung 0144
Scientific
Atlanta 0008, 0477, 0017, 0277, 0774, 0877
Sprucer 0021
Starcom 0003
TV86 0063
Tocom 0012, 0013
Toshiba 0000
Viewstar 0063
Zenith 0000, 0525, 0899
Page 11

2120
Setup Codes for
DBS Receivers:
AlphaStar 0772
Echostar 0775
Expressvu 0775
General
Instrument 0627, 0361, 0869
HTS 0775
Hitachi 0819
Hughes 0749
JVC 0775
Jerrold 0627, 0361
Magnavox 0724, 0722
Memorex 0724
Next Level 0869
Panasonic 0701
Philips 0724, 0722
Primestar 0627, 0361
RCA 0566
Sony 0639
Star Choice 0869
Toshiba 0790
Uniden 0724, 0722
Zenith 0856
PROGRAMMING
CHANNEL CONTROL LOCK
By activating this feature, the Dolphin will only
allow access to the channel control capabilities of
your cable converter. This will guarantee that you
do not inadvertently change the channel on your
TV or VCR.
To Activate Channel Control Lock:
1. On the Dolphin, press and hold SETUP until the
LED blinks twice, then release SETUP.
2. Enter 9 - 9 - 6. The LED will blink twice.
3. Press CH (Up) once.The LED will blink twice.
4. Now, regardless of what mode you select (i.e.,
TV, VCR, or CBL), only the channel control
capability of your cable converter will be
accessible.
NOTE: This feature does not affect the Audio mode.
To De-Activate Channel Control Lock:
1. On the Dolphin, press and hold SETUP until the
LED blinks twice, then release SETUP.
2. Enter 9 - 9 - 6. The LED will blink twice.
3. Press CH (down) once. The LED will blink
twice.
4. The Dolphin will again provide TV and VCR
channel control capabilities while in the TV or
VCR mode.
Page 12

23
22
PROGRAMMING
AUDIO CONTROL
Using the Dolphin’s RCVR mode, you can also
control an audio component, such as CD or DVD
player, a stereo receiver, a stereo amplifier, or a
DBS audio service.
Locate the brand name of your audio component
in the one of accompanying code lists (starting on
the next page).Write it in the appropriate space.
CD Player Brand:
or
DVD Player Brand:
or
Stereo Receiver Brand:
or
Stereo Amplifier Brand:
or
DBS Audio Brand:
The brands are listed in alphabetical order with
popular codes listed first.You will use one of these
codes to program the Dolphin to operate your
audio component:
1. Turn on the audio component (or DBS receiver
to control its audio service).
2. On the Dolphin, press AUDIO once. Press and
hold SETUP until the LED blinks twice, then
release SETUP.
3. Enter the first four-digit code for your audio
component. If you perform this procedure
correctly, the LED will blink twice.
NOTE: If the LED did not blink twice after
entering the code’s last digit, then repeat
steps 2 through 3 and try entering the same
code again.
4. Aim the Dolphin at your audio component and
press POWER once.The unit should turn off. If
it does not respond, repeat steps 2-3, trying
each code listed for your brand until you find
one that works. If it still does not work , try
searching for the code (see Searching For Your
Code on page 26).
5. Write your audio component code in the boxes
below for future reference.
■■ ■■ ■■ ■■
NOTE: Remember, to use the Dolphin to operate
your audio component, press RCVR first.
Setup Codes for CD Players:
Aiwa 0157, 0124
Burmester 0420
California
Audio Lab 0029
Carver 0157, 0179
DKK 0000
Denon 0003, 0873
Emerson 0305
Fisher 0179
Garrard 0420, 0393
Genexxa 0032, 0305
Harman/Kardon 0173
Hitachi 0032
JVC 0072
Kenwood 0028, 0037, 0190, 0826, 0681
Krell 0157
LXI 0305
Linn 0157
MCS 0029
MTC 0420
Magnavox 0157, 0305
Marantz 0029, 0157, 0180
Mission 0157
NSM 0157
Onkyo 0101, 0868
Optimus 0000, 0032, 0179, 0305, 0037, 0420,
0145, 0468
Panasonic 0029, 0303
Parasound 0420
Philips 0157
Pioneer 0032, 0305, 0468
Proton 0157
QED 0157
Quasar 0029
RCA 0179, 0305, 0053
Realistic 0179, 0420, 0180
Rotel 0157, 0420
SAE 0157
Sansui 0 157, 0305
Sanyo 0179
Scott 0305
Sears 0305
Sharp 0037, 0180
Sherwood 0180
Sony 0000, 0185, 0490
Soundesign 0145
Tascam 0420
Teac 0420, 0393, 0180
Technics 0029, 0303
Victor 0072
Wards 0157, 0053
Yamaha 0036, 0187
Yorx 0461
Page 13

2524
Setup Codes for DVD Players:
JVC 0558
Kenwood 0534
Magnavox 0503
Mitsubishi 0521
Onkyo 0503
Panasonic 0490
Philips 0503, 0539
Pioneer 0525, 0571
Proscan 0522
RCA 0522
Samsung 0573
Sony 0533
Technics 0490
Toshiba 0503
Yamaha 0490
Zenith 0503
Setup Codes for
Stereo Receivers:
ADC 0531
Aiwa 0158, 0189, 0121
Capetronic 0531
Carver 0189
Curtis Mathes 0080
Denon 0004
Garrard 0463
Harman/Kardon 0110, 0189
JBL 0110
JVC 0074
Kenwood 0027, 0186
Linn 0189
MCS 0039
Magnavox 0531, 0189
Marantz 0039, 0189
Onkyo 0135
Optimus 0531, 0670, 0186
Panasonic 0039, 0309
Philips 0189
Pioneer 0531, 0014, 0150, 0630, 0080
Quasar 0039
RCA 0531
Sansui 0189
Sharp 0186
Sony 0158
Soundesign 0670
Teac 0463
Technics 0039, 0309
Victor 0074
Wards 0158, 0014, 0189, 0080
Yamaha 0176, 0186
Setup Codes for
Stereo Amplifiers:
Carver 0269
Curtis Mathes 0300
Denon 0160
JVC 0331
Linn 0269
Magnavox 0269
Marantz 0269
Panasonic 0308
Philips 0269
Pioneer 0013, 0300
Sony 0689
Technics 0308
Victor 0331
Wards 0013
Yamaha 0354
Setup Codes for
DBS Audio Services:
Jerrold 0459, 0520
Scientific Atlanta 0460
Starcom 0459
Page 14

2726
SEARCHING FOR YOUR CODE
If your TV, VCR, Cable Converter or Audio
Component does not respond to the Dolphin after
trying all of the codes listed for your brand, or if
your brand is not listed at all, try searching for
your code.
For example, to search for a code for your TV:
1. Turn on your TV.
2. On the Dolphin, press and hold SETUP until the
LED blinks twice, then release SETUP.
3. Enter 9 - 9 - 1.The LED will blink twice.
4. Aim the remote control at the the TV and slowly
alternate between pressing POWER and TV.
Stop when the TV turns off.
NOTE: In the search mode, the Dolphin will
send IR codes from its library to the selected
component, starting with the most popular
code first.
5. Press SETUP once to lock in the code.
6. To search for the codes of your other
components, repeat steps 1 through 5, but
substitute the appropriate key (i.e., VCR, CBL,
or AUDIO) for the (VCR,Cable, or Audio)
component you are searching for.
CHECKING THE CODES
If you have set up the Dolphin using the
“Searching For Your Code” procedure, you may
need to find out which four-digit code is operating
your equipment:
For example, to find out which code is operating
your TV:
1. Turn on your TV.
2. On the Dolphin, press and hold SETUP until the
LED blinks twice, then release SETUP.
3. Enter 9 - 9 - 0.The LED will blink twice.
4. To view the code for the first digit, press 1
once. Wait 3 seconds and count the number of
LED blinks (e.g., 3 blinks = 3) and write down
the number in the leftmost TV Code box below.
NOTE: If a code digit is “0”, the LED will not
blink.
5. Repeat step 4 three more times for remaining
digits. Use 2 for the second digit, 3 for the third
digit, and 4 for the fourth digit. Finish writing
down the code in the TV Code boxes below.
6. To check for the codes of your other
components, repeat steps 1 through 5, but
substitute the appropriate key (i.e., VCR, CBL,
or RCVR) for the (VCR,Cable, or Audio)
component you are checking.Write down the
codes in the appropriate boxes below.
TV Code
■■ ■■ ■■ ■■
VCR Code
■■ ■■ ■■ ■■
CABLE Code
■■ ■■ ■■ ■■
AUDIO Code
■■ ■■ ■■ ■■
Page 15

28
RE-ASSIGNING DEVICE KEYS
The Dolphin can be set up to control a second TV
or VCR, or any combination of four home
entertainment components. For example, to have
the Dolphin control a TV, a Cable Converter, and
two VCRs, you will need to re-assign the unused
AUDIO key to operate the second VCR as follows:
1. On the Dolphin, press and hold SETUP until the
LED blinks twice, then release SETUP.
2. Enter 9 - 9 - 2.The LED will blink twice.
3. Press VCR once, then press AUDIO once.
4. The AUDIO key is now ready to be
programmed for your second VCR. See
Programming VCR Control on page 12.
To re-assign other device keys, repeat steps 1
through 4 by substituting the key sequence from
the following chart for a desired component:
To Re-Assign Perform Key Sequence
TV as 2nd VCR key: SETUP - 9 - 9 - 2 - VCR - TV
TV as 2nd Audio key: SETUP - 9 - 9 - 2 - AUDIO - TV
TV as 2nd Cable key: SETUP - 9 - 9 - 2 - CBL - TV
TV back to TV SETUP - 9 - 9 - 2 - TV - TV
VCR as 2nd TV key: SETUP - 9 - 9 - 2 - TV - VCR
VCR as 2nd Audio key: SETUP - 9 - 9 - 2 - AUDIO - VCR
VCR as 2nd Cable key: SETUP - 9 - 9 - 2 - CBL - VCR
VCR back to VCR: SETUP - 9 - 9 - 2 - VCR - VCR
AUDIO as 2nd TV key: SETUP - 9 - 9 - 2 - TV - AUDIO
AUDIO as 2nd VCR key: SETUP - 9 - 9 - 2 - VCR - AUDIO
AUDIO as 2nd Cable key: SETUP - 9 - 9 - 2 - CBL - AUDIO
AUDIO back to AUDIO: SETUP - 9 - 9 - 2 - AUDIO - AUDIO
Upon completion of a re-assignment, the LED will
blink twice to confirm your selection.At that time,
you will also need to program the Dolphin to
control the new component (see previous sections
on Programming TV Control, Programming VCR
Control, Programming Cable Control, or
Programming Audio Control).
29
CHANGING VOLUME LOCK
The Dolphin is set to control volume of a
component through your TV while in the TV,VCR,
or Cable mode. However, in the Audio mode, you
have separate control of of your audio
component’s volume.
If your TV is not remote controllable, or if you
would like the volume to be controlled by a
different component, you can change the Volume
Lock setting to control a volume through a nonassociated mode (e.g., through the cable in the TV
mode).
To change Volume Lock to the CABLE mode:
1. On the Dolphin, press and hold SETUP until the
LED blinks twice, then release SETUP.
2. Enter 9 - 9 - 3 and then press CBL once.The
LED will blink twice.
3. Now,whenever you press Volume +, Volume –,
or MUTE on the Dolphin, volume will be
controlled by your Cable Converter.
To change Volume Lock to the TV mode:
1. On the Dolphin, press and hold SETUP until the
LED blinks twice, then release SETUP.
2. Enter 9 - 9 - 3 and then press TV once. The
LED will blink twice.
3. Now,whenever you press Volume +, Volume –,
or MUTE on the Dolphin, volume will be
controlled by your TV.
To change Volume Lock to the VCR mode:
1. On the Dolphin, press and hold SETUP until the
LED blinks twice, then release SETUP.
2. Enter 9 - 9 - 3 and then press VCR once. The
LED will blink twice.
3. Now,whenever you press Volume +, Volume –,
or MUTE on the Dolphin, volume will be
controlled by your VCR.
To change Volume Lock to the RCVR mode:
NOTE: Performing these steps will allow you to
access the volume control of your audio
component in all modes.
1. On the Dolphin, press and hold SETUP until the
LED blinks twice, then release SETUP.
2. Enter 9 - 9 - 3 and then press AUDIO once. The
LED will blink twice.
3. Now,whenever you press Volume +, Volume –,
or MUTE on the Dolphin, volume will be
controlled by your audio component.
Page 16

3130
USING THE
LEARNING FEATURE
You can program the buttons to add functions that
are unique to your home entertainment devices
(e.g.,VCR Tracking Up or Down).
NOTE: Please have your original remote controls
handy before programming learning. Be sure to
press each key within 10 seconds of the previous
entry. If not, the remote control will exit the
programming mode.
Programming A Learning Key
1. Press and hold SET until the LED (red light)
blinks twice, then release SET.
2. Enter 9 - 7 - 5.The LED will blink twice.
3. Press a device key once (e.g., TV) to assign a
mode for learning.
4. Press an open learning key once (e.g., Jets) to
store a feature to be learned. The LED will blink
rapidly for 4 seconds. If the LED does not blink
rapidly, go back to step 1 and start again.
5. Place your original remote control (e.g., TV
remote control) head-to-head (about 2" apart)
from the Dolphin Remote Control.
6. On your original remote control, press and hold
the key feature to be learned until the LED on the
Dolphin Remote Control blinks twice. If the LED
does not blink twice, repeat steps 3 through 6.
7. To learn functions onto other learning keys,
repeat steps 3 through 6.
8. To lock in new feature(s) on the Dolphin
Remote Control, press and hold SET until the LED
blinks twice, then release SET.
9. To test a learned feature, press a device key
(e.g., TV) once where the learning mode was
assigned. Then press the learning key (e.g., Jets)
where the learned feature is stored.
Deleting Functions From The Learning Keys:
1. Press and hold SET until the LED (red light)
blinks twice, then release SET.
2. Enter 9 - 7 - 6. The LED will blink twice.
3. Press the device key once where the learned
feature is stored (e.g., TV).
4. Press the learning key (e.g., Jets) to be deleted
twice. The LED will blink twice after the second
press.
5. To clear additional functions stored on other
learning keys, repeat steps 1 through 4 (in this
section).
Original Remote
Point the original
remote toward the
LED bump that is
marked with a dot
in front of it.
Page 17

32
USING THE
IR/RF COMMAND CENTER
The Dolphin Remote Control (URC-9811) can be
used with an optional IR/RF Command Center
which receives radio-frequency (RF) signals from
the Dolphin, anywhere in your home, up to 100
feet away*.
Once it is set up, the IR/RF Command Center will
convert the RF signals into Infrared (IR) signals to
control your home theater devices.
NOTE: The Dolphin remote control transmits both
an IR and an RF signal simultaneously. It is your
option whether you want to install the IR/RF
Command Center for extended remote control
range. If you choose to do so, during testing do
not aim the HT Pro Plus remote control at your
home entertainment devices to verify that RF
transmission is working.
NOTE: The RF signal transmitted by the Dolphin
remote control, only works with the IR/RF
Command Center.
Setting Up The IR/RF Command Center
1. Find a location approximately 8 feet in front of
your home theater devices. It should provide
(line-of sight) access to your equipment and a
power outlet to plug in the IR/RF Command
Center.
2. Plug in the IR/RF Command Center’s power
cord and raise the telescoping antenna.
3. Position the IR/RF Command Center so the
black IR Lens is aimed at your home theater
devices.
4. To test the IR/RF Command Center, take the
Dolphin into another room in your home, up
to100 feet away. Select a device key (e.g., TV)
and press it once.Then press POWER once.
The device (e.g., TV) should turn on. If it does not
turn on, review the steps 1 through 3 and make
any adjustments.Try step 4 again. If you continue to
have a problem, perhaps there is an IR line-of
sight problem. Try adding the IR Signal Extension
Cord. Also review the tips in Optimizing IR/RF
Command Center Reception.
Adding The IR Signal Extension Cord
Included with the IR/RF Command Center is an IR
Signal Extension Cord for use with a home theater
device that is not in direct line-of-sight of the IR/RF
Command Center.
If you are having problems remotely controlling a
home theater device from another room, try
performing the following installation:
1. Plug the 4-foot IR Signal Extension Cord into
the back of the IR/RF Command Center.
2. Run the IR Signal Extension Cord to the device
that is not in line-of-sight of the IR/RF
Command Center.
3. Using the supplied double-sided tape, attach
the IR Signal Extension Cord so that its LED is
over or next to the IR sensor of your home
theater device.
LED
4. Test the installation by again taking the HT Pro
Plus remote control into another room in your
home, up to 100 feet* away. Select a device key
(e.g., TV) and press it once.Then press POWER
once.
The IR/RF Command Center will convert the RF
signal from the HT Pro Plus remote control into an
IR signal and transmit that signal through the IR
Signal Extension Cord to turn on your device (e.g.,
TV).
If it does not turn on, try repositioning the LED
until the device can be controlled, then re-attach
the LED.
Optimizing IR/RF Command Center
Reception
Here are some adjustment tips for optimizing the
operation of your IR/RF Command Center:
• Aim the HT Pro Plus remote control toward the
room where the IR/RF Command Center is
located.
• Do not position the IR/RF Command Center
near metal objects, such as heat ducts.Metal
can absorb RF signals.
• Make sure the batteries in the HT Pro Plus
remote control are fully charged.Try replacing
them if you are not sure (see Installing
Batteries on page 4). Weak batteries will affect
the signal range.
• Make sure that the HT Pro Plus remote control
is not being affected by other RF transmissions
(e.g., garage door openers, cordless
telephones, etc.).
NOTE: The tests for range limits of the HT Pro Plus
remote control and the IR/RF Command Center
were conducted in open-air distance tests. Actual
signal distance will be based on the construction of
the building the unit is being used in, as well as
other factors, such as outside interference.
*Distance may vary
Page 18

3534
SPECIFICATIONS
Remote Control Power
2 AAA Batteries
IR/RF Console Power
120 Vac
Remote Control to IR/RF Console Range
up to 100 Feet (30.48 m)*
IR/RF Command Console to Device Range
25 Feet (7.62 m) ± 30°
Remote Control Dimensions (H x W x D)
9-2⁄16 x 2-10⁄16 x 1-3⁄16 in.
232 x 65 x 31 mm
IR/RF Command Console Dimensions
(H x W x D)
1-9⁄16 x 5 -1⁄16 x 4 in
39.7 x 128.6 x 101.6 mm
Remote Control Weight (without Batteries)
8 oz (220 g)
IR/RF Command Console Weight
10.4 oz (300 g)
NOTE: Specifications are typical. Individual units
might vary.
Specifications are subject to change and
improvement without notice.
*Distance may vary
COMPLIANCE WITH FCC
RULES AND REGULATIONS
This equipment has been tested and found to
comply with the limits for a class B digital device,
pursuant to part 15 of the FCC Rules.
These limits are designed to provide reasonable
protection against harmful interference in a
residential installation.This equipment generates,
uses and radiates radio frequency energy and if not
installed and used in accordance with the
instructions,may cause harmful interference to
radio communications.However, there is no
guarantee that interference will not occur in a
particular installation.
If this equipment does cause harmful interference
to radio or television reception, which can be
determined by turning the equipment off and on,
the user is encouraged to try and correct the
interference by one or more of the following
measures:
• Reorient or relocate the receiver antenna.
• Increase the separation between the equipment
and the receiver.
• Connect the equipment into an outlet that is
different from that to which the receiver is
connected.
• Consult the dealer or an experienced
radio/television technician for help.
The user is cautioned that changes and
modifications made to the equipment without the
approval of the manufacturer could void the user’s
authority to operate his equipment.
FCC Authorization Label
This device complies with part 15 of the FCC Rules.
Operation is subject to the following two
conditions:
1. This device may not cause harmful interference
and
2. This device must accept any interference
received, including interference that may cause
undesired operation.
FCC ID #: MG3URC033
IR/RF LCD 8-Device With Learning: Dolphin
Page 19

36
TROUBLESHOOTING
PROBLEM: LED does not blink when you press a key.
SOLUTION: Replace the batteries with two (2) new AA
alkaline batteries (see page 7).
PROBLEM: LED blinks when you press a key, but home
entertainment component does not
respond.
SOLUTION: Make sure you are aiming the Dolphin at
your home entertainment component and
that you are within 15 feet of the
component you are trying to control.
PROBLEM: The Dolphin does not control home
entertainment components or commands
are not performing properly.
SOLUTION: Try all listed codes for the component
brand being set up. Make sure all
components can be operated with an
infrared remote control.
PROBLEM: TV/VCR combo does not respond properly.
SOLUTION: Use the VCR codes for your brand. Some
combo units may require both a TV code
and a VCR code for full operation (see
page 16).
PROBLEM: No volume on a second TV.
SOLUTION: Follow instructions in Changing Volume
Lock (see page 30).
PROBLEM: CH+ , CH– , and LAST do not work for
your RCA TV.
SOLUTION: Due to RCA design (1983-1987), only the
original remote control will operate these
functions.
PROBLEM: Changing channels does not work properly.
SOLUTION: If original remote control required
pressing ENTER to change channels, press
ENTER on the Dolphin after entering a
channel number.
PROBLEM: Tried “Search Method” and still could not
find a working code.
SOLUTION: Try the “Search Method” again after
clearing out the device key as follows:
Press and hold ENTER until red light blinks
twice, then release.Next enter 9 - 9 -
2.Then press and release the device key to
be cleared twice.
PROBLEM: Remote control does not turn on Sony or
Sharp TV/VCR Combo.
SOLUTION: For power on, these products require
programming TV codes on the Dolphin.
For Sony, use TV code 0000 and VCR code
0032. For Sharp, use TV code 0093 and
VCR code 0048.
 Loading...