


USER'S MANUAL 990-057
Revision K, May 2004
Use with Firmware Release V1.19 or higher
MODEL HF2
2 kHz HIGH FREQUENCY
RESISTANCE WELDING POWER SUPPLY
MODEL NUMBER STOCK NUMBER
HF2/230 1-264-03
HF2/380 1-264-03-01
HF2/460 1-264-03-02
HF2/208 1-264-03-03
HF2S/230 1-265-03
HF2S/380 1-265-03-01
HF2S/460 1-265-03-02
HF2S/208 1-265-03-03
Units with the built-in Weld Sentry Option also require User's Manual No. 990-291
Please be sure to read all personnel and equipment
safety precautions noted in this manual.
WARNING

1998, 2002 Unitek Miyachi Corporation
The engineering designs, drawings and data contained herein are the proprietary work of
UNITEK MIYACHI CORPORATION and may not be reproduced, copied, exhibited or
otherwise used without the written authorization of UNITEK MIYACHI
CORPORATION.
Printed in the United States of America.
REVISION RECORD
Revision EO Date Basis of Revision
A ENRG-RLSE 3/95 Released original manual.
B None 9/95 Reorganize manual into chapters.
C None 1/96 Amend to Firmware V1.17 or higher.
D None 2/96 Update cover stock numbers
E None 4/97 Amend to Firmware V1.19 or higher.
F 17472 6/98 1. Remove existing calibration procedure and reference User Calibration
Procedure 994-001.
2. Miscellaneous corrections.
3. Remove SAVE error.
G
H 19012 9/01 1. Include EO# 118951 in manual.
J 19146 1/02 1. Include EO# 19012.
K 20016 5/04 Updated wire data.
18951 8/01
1. Include EO# 17693 in manual.
2. Add latest version of Operator Guide.
2. Add latest version of Operator Guide.
2. Miscellaneous Corrections.
3. Add Appendix F, Quality Resistance Welding Solutions, and Appendix
G, Replacement of Programmed Integrated Circuits.
MODEL HF2 2kHz HIGH FREQUENCY RESISTANCE WELDING POWER SUPPLY
ii 990-057

FOREWORD
The purpose of this manual is to supply operating, maintenance and service personnel with the
information needed to properly and safely operate, maintain and service the Unitek Peco Model HF2 2
kHz High Frequency Resistance Welding Power Supply.
Should questions arise, or if you have suggestions for improving this manual, please contact:
Unitek Miyachi Corporation
1820 South Myrtle Avenue
P.O. Box 5033
Monrovia, CA 91017-7133
Telephone:(626) 303-5676
FAX:(626) 358-8048
E-mail: info@unitekmiyachi.com
NOTICE
Unitek Miyachi Corporation may be released from all warranty obligations if repairs or modifications
are made by persons other than its own service personnel, or authorized representatives' personnel,
unless such repairs or modifications are specifically authorized in writing by the Unitek Miyachi
Corporation.
WARNING
Contact with voltages present in this power supply may cause serious or fatal injuries. Please read the
manual completely and note all cautions and warnings before attempting to install, operate or maintain
the power supply.
MODEL HF2 2kHz HIGH FREQUENCY RESISTANCE WELDING POWER SUPPLY
990-057 iii

CONTENTS
Page
CHAPTER 1: DESCRIPTION............................................................................................................ 1-1
HF2 description........................................................................................................................................ 1-1
CHAPTER 2: GENERAL SET-UP..................................................................................................... 2-1
Required Connections.............................................................................................................................. 2-1
Physical Space Requirements ........................................................................................................... 2-1
HF2 Weld Control Dimensions ........................................................................................................ 2-1
HF2 Weld Transformer Dimensions ................................................................................................2-1
Power Line Voltage, Current, And Wire Size Requirements........................................................... 2-2
Insulation Requirements .................................................................................................................. 2-2
Power Line Fuse Requirements ........................................................................................................ 2-2
HF2 Weld Transformer Electrical Specifications............................................................................. 2-3
HF2 Welding System Maximum Secondary Loop Resistance......................................................... 2-4
HF2 Maximum Secondary Loop Resistance Measurement ............................................................. 2-4
HF2 Weld Control To HF2 Weld Transformer Connections ........................................................... 2-4
HF2 Weld Transformer To Weld Head Connections....................................................................... 2-5
Weld Sentry Option .......................................................................................................................... 2-5
Help Screen Languages .................................................................................................................... 2-5
CHAPTER 3: WELDING SYSTEM SET-UP ................................................................................... 3-1
Welding System Set-Up Guide................................................................................................................ 3-1
General Programming Instructions.......................................................................................................... 3-1
Unitek Peco Force Fired, Foot Actuated Weld Head System.................................................................. 3-2
Weld Head Set-Up............................................................................................................................ 3-2
Firing Switch Cable Connection....................................................................................................... 3-2
Quick Start Programming Guide ..................................................................................................... 3-2
Unitek Peco Force Fired, Single Air Actuated Weld Head System ........................................................ 3-4
Weld Head Set-Up............................................................................................................................ 3-4
Firing Switch Cable Connection....................................................................................................... 3-4
Weld Head Valve Driver No. 1 Connection ............................................................................................ 3-4
Foot Switch Connection ................................................................................................................... 3-4
Single Air Regulator Adjustment (Model 80 Series) ....................................................................... 3-5
Dual Air Regulator Adjustments (Model 180 And Model 90 Series).............................................. 3-6
Quick Start Programming Guide ...................................................................................................... 3-6
Unitek Peco Force Fired, Dual Air Actuated Weld Head System........................................................... 3-8
General Information.......................................................................................................................... 3-8
HF2 Control, Jumper Modifications................................................................................................. 3-8
Weld Head Set-Up............................................................................................................................ 3-8
Firing Switch Cable Connection....................................................................................................... 3-9
MODEL HF2 2kHz HIGH FREQUENCY RESISTANCE WELDING POWER SUPPLY
iv 990-057

CONTENTS (Continued)
Page
CHAPTER 3: WELDING SYSTEM SET-UP (Continued)
Weld Head Valve Driver Connections .......................................................................................... 3-10
Foot Switch Connection ................................................................................................................. 3-10
Dual Air Regulator Adjustments .................................................................................................... 3-11
Quick Start Programming Guide .................................................................................................... 3-15
Non-Force Fired, Single Air or Cam Actuated Weld Head System............................................... 3-17
LC To HF2 Control Electrical Connections .................................................................................. 3-17
PLC Timing Diagram ..................................................................................................................... 3-18
Quick Start Programming Guide .................................................................................................... 3-18
Non-Force Fired, Multiple Air Actuated Weld Head System ........................................................ 3-20
CHAPTER 4: CONTROLS ................................................................................................................. 4-1
HF2 Weld Control - Front Panel ............................................................................................................ 4-1
HF2 Weld Control - Rear Panel Inputs and Outputs ............................................................................... 4-3
Power ................................................................................................................................................ 4-3
Fuses F1 and F2 ............................................................................................................................... 4-3
Sensing Port ..................................................................................................................................... 4-3
Sensing Port - Connector Pin Assignments .................................................................................... 4-4
Output .............................................................................................................................................. 4-4
Foot Switch Connector .................................................................................................................... 4-5
Single-Level Foot Switch ......................................................................................................... 4-5
Two-Level Foot Switch ............................................................................................................4-5
Firing Switch Operation .......................................................................................................................... 4-6
Mechanical Firing Switch Cable ..................................................................................................... 4-6
Optical Firing Switch Connector ..................................................................................................... 4-6
Mechanical Firing Switch - 3-Wire Connection .............................................................................. 4-6
Opto Coupler Firing Switch - 3-Wire Connection .......................................................................... 4-6
Control Signals Connector ............................................................................................................... 4-7
Control Signals - Pin Assignments .................................................................................................. 4-8
Control Signals - Remote Weld Schedule Selection Input .............................................................. 4-9
Control Signals - Emergency Stop Input ......................................................................................... 4-9
Control Signals - Process Inhibit Input .......................................................................................... 4-10
Control Signals - Output Relays .................................................................................................... 4-10
Relay K1 ........................................................................................................................................ 4-10
Relay K2 ........................................................................................................................................ 4-10
Accessory Port ............................................................................................................................... 4-10
Air Valve 1 and Air Valve 2 Driver Connectors ..................................................................................4-11
Air Valve 1 Driver ......................................................................................................................... 4-11
Air Valve 2 Driver ......................................................................................................................... 4-11
MODEL HF2 2kHz HIGH FREQUENCY RESISTANCE WELDING POWER SUPPLY
990-057 v

CONTENTS (Continued)
Page
CHAPTER 5: PROGRAMMING MODES........................................................................................ 5-1
Help Screens ..........................................................................................................................................5-1
Machine States ........................................................................................................................................ 5-1
Weld Graph Run State ............................................................................................................................. 5-1
Basic Weld Monitor Run State ................................................................................................................ 5-2
Alphanumeric Run State.......................................................................................................................... 5-2
No Weld State ......................................................................................................................................... 5-2
Standby State .......................................................................................................................................... 5-2
Alarm State ............................................................................................................................................. 5-3
Fire State ................................................................................................................................................. 5-3
Menu State .............................................................................................................................................. 5-3
Program State .......................................................................................................................................... 5-4
Weld Graph Program State ..................................................................................................................... 5-4
Alphanumeric Program State .................................................................................................................. 5-5
Output Relays .......................................................................................................................................... 5-6
Relay 1 - Dual Air Head Operation ........................................................................................................ 5-7
CHAPTER 6: ADVANCED WELDING FUNCTIONS ................................................................... 6-1
Weld Functions ....................................................................................................................................... 6-1
Basic Weld ............................................................................................................................................. 6-2
Weld / Repeat .......................................................................................................................................... 6-3
Quench/Temper ....................................................................................................................................... 6-4
Pre/Postheat ............................................................................................................................................ 6-5
Up/Down Slope ....................................................................................................................................... 6-7
Braze .................................................................................................................................................. 6-8
Rollspot .................................................................................................................................................. 6-9
Seam ................................................................................................................................................ 6-10
Dual Pulse ............................................................................................................................................. 6-11
Pulsation ................................................................................................................................................ 6-13
CHAPTER 7: SPECIAL FEATURES ............................................................................................... 7-1
System Options ....................................................................................................................................... 7-1
Weld Counter .......................................................................................................................................... 7-8
Copy a Schedule ..................................................................................................................................... 7-9
System Security ...................................................................................................................................... 7-9
System Help ......................................................................................................................................... 7-11
Weld Sentry .......................................................................................................................................... 7-11
Calibrate HF2 ........................................................................................................................................ 7-11
Reset to Defaults ................................................................................................................................... 7-11
Installation ............................................................................................................................................. 7-13
Transformer Model ............................................................................................................................... 7-13
MODEL HF2 2kHz HIGH FREQUENCY RESISTANCE WELDING POWER SUPPLY
vi 990-057

CONTENTS (Continued)
Page
CHAPTER 8: WELD MONITORING .............................................................................................. 8-1
Basic Weld Monitor General Description................................................................................................ 8-1
Weld Current and Weld Voltage Measurements .................................................................................... 8-2
Data Output Capabilities ......................................................................................................................... 8-2
Weld Monitoring Suggestions ................................................................................................................. 8-2
Basic Weld Monitor Programming.......................................................................................................... 8-3
Energy Limit Monitor General Description............................................................................................. 8-4
Energy Limit Monitor Programming....................................................................................................... 8-5
CHAPTER 9: RS-485 DATACOM .................................................................................................... 9-1
Description ............................................................................................................................................. 9-1
RS485 Serial Port Connections ............................................................................................................... 9-2
Datacom Software Installation................................................................................................................. 9-2
F1:Setup .................................................................................................................................................. 9-4
F2:Collect Data ....................................................................................................................................... 9-5
F3:Erase Data .......................................................................................................................................... 9-5
F4:Exit` ................................................................................................................................................... 9-5
APPENDIX A: TECHNICAL SPECIFICATIONS ........................................................................ A-1
APPENDIX B: RECOMMENDED SPARE PARTS ........................................................................B-1
APPENDIX C: ALARM MESSAGES.................................................................................................C-1
APPENDIX D: HELP SCREEN LANGUAGES ............................................................................. D-1
APPENDIX E: THE BASICS OF RESISTANCE WELDING .........................................................E-1
APPENDIX F: QUALITY RESISTANCE WELDING SOLUTIONS:
DEFINING THE OPTIMUM PROCESS ................................................................................... F-1
APPENDIX G: REPLACEMENT OF PROGRAMMED INTEGRATED CIRCUITS .............. G-1
INDEX ............................................................................................................................................ Index-1
MODEL HF2 2kHz HIGH FREQUENCY RESISTANCE WELDING POWER SUPPLY
990-057 vii


CHAPTER 1
DESCRIPTION
The Unitek Peco High Frequency Inverter (HF2) is a 2 KHz, three-phase, state-of-the-art inverter
welding control for joining precision small parts at high speed with controllable rise times using 2 KHz
output pulses superimposed on pure DC welding energy. High speed (250 micro-second) digital
feedback automatically controls weld current, voltage, or power, providing more welding consistency
compared to traditional direct energy (AC) or stored energy (CD) technologies. Microprocessor
technology automatically compensates for changes in workpiece resistance, load inductance, weld
transformer saturation, and ñ 13% changes in line voltage. The HF2 uses IGBT power device
technology for precisely controlling the weld energy at both high and low energy levels.
Easy to use constant weld current, voltage or power feedback ensures repeatable welding and has proven
to extend electrode life in many applications by a factor of five or more. A selectable weld energy
limiting feature also contributes to repeatable welds and high nugget quality. The user can program the
HF2 using a graphical or numerical interface. The Weld Graph Program Mode (Figure 1-1) emulates
many of the popular word processing programs by using the front panel cursor keys to easily modify any
time period, current, voltage, or power value. The Weld Graph Run Mode (Figure 1-2) gives the user
instant visual feedback on the actual current, voltage or power used to make each weld.
Figure 1-1. Program Mode Figure 1-2. Actual Weld Current
The HF2's exclusive, context sensitive, User Help Screens quickly guide the user through even the most
complex program. Each weld schedule can use any one of 10 different Weld Functions, thus matching
the appropriate weld energy profile to the application.
Simple automated welding control is easily accomplished using the BCD Remote Schedule Select
feature. For more complex automation processes, a host computer can use the HF2 Bi-Directional
RS422/RS485 Communications Port to select HF2 Weld Schedules and receive average weld current
and weld voltage data for each weld. Refer to the separate RS-485 Datacom Manual, P/N: 990-058, for
Advanced RS-485 Datacom operation. The 2 KHz operating frequency ensures that the HF2 Weld
Transformers are light weight and compact, providing a significant advantage when they are built into
robotics or automatic machines.
MODEL HF2 2 KHz HIGH FREQUENCY RESISTANCE WELDING POWER SUPPLY
990-057 1-1


CHAPTER 2
GENERAL SET-UP
REQUIRED CONNECTIONS
Physical Space Requirements
Unitek Peco recommends that the HF2 Weld Control and HF2 Weld Transformer be installed in a well
ventilated area that is free from excessive dust, acids, corrosive gases, salt and moisture. Allow
sufficient clearance around both sides and back of the HF2 Weld Control and HF2 Weld Transformer so
that cooling air may flow properly. Figure 2-1 shows the cooling airflow pattern for the HF2 Weld
Control. Figure 2-2 shows the cooling airflow pattern for the HF2 Weld Transformer.
Figure 2-1. HF2 Weld Control
Air Flow Pattern
HF2 Weld Control Dimensions
Width (in/cm) Height (in/cm) Depth (in/cm) Weight (lbs/Kg)
10.5 / 26.7 8.5 / 21.5 15.0 / 38.1 42 / 19
HF2 Weld Transformer Dimensions
Model Height (in/cm) Width (in/cm) Depth (in/cm) Weight (lbs/Kg)
X2/2000A 7.0 / 17.6 5.4 / 13.8 11.0 / 28.0 14.3 / 6.5
X3/4000A 7.2 / 18.3 7.2 / 18.3 13.4 / 34.0 28.6 / 13
X5/3000A 7.5 / 18.9 7.2 / 18.3 14.2 / 36.0 31 / 14
X11/4000A 7.5 / 18.9 7.2 / 18.3 17.9 / 45.5 46 / 21
X11/4/460A 7.4 / 18.8 7.2 / 18.3 18.9 / 48.5 55 / 25
X3/4/380A 7.2 / 18.3 7.2 / 18.3 13.4 / 34.0 28.6 / 13
X3/4/460A 7.2 / 18.3 7.2 / 18.3 13.4 / 34.0 28.6 / 13
Figure 2-2. HF2 Weld Transformer
Air Flow Pattern
MODEL HF2 2 kHz HIGH FREQUENCY RESISTANCE WELDING POWER SUPPLY
990-057 2-1

CHAPTER 2: GENERAL SETUP
Power Line Voltage, Current, and Wire Size Requirements
WARNING: The HF2 Weld Control and HF2 Weld Transformer are assembled at the factory for
operation at a specific input power line voltage. Serious damage can result if these units are used on
different voltage other than the voltage for which they are wired. The HF2 weld transformer input
voltage must match the HF2 weld control power line voltage.
Use the following table to select the correct power line circuit breaker and wire gauge size. To
minimize peak power losses, use single unbroken wire lines. Note: To minimize peak power losses,
Unitek Peco recommended wire gauge sizes exceed the USA National Electrical Code
recommendations.
3-Phase Service
Voltage (RMS)
208V to 230V 50A AWG 8 @ 133 strands
380V to 460V 30A AWG 10 @ 105 strands
Insulation Requirement
Oil-resistant synthetic rubber rated at 90°C and 600V.
Power Line Fuse Requirements
Service Voltage Fuse Size: F1, F2 Unitek Peco P/N
3-Phase Service Breaker
Current (RMS)
Copper Wire Gauge Size
(AWG)
208, 230, 380 3AG, 440 V, 2 A 330-071
460 3AG, 500 V, 2 A 330-100
MODEL HF2 2 kHz HIGH FREQUENCY RESISTANCE WELDING POWER SUPPLY
2-2 990-057

CHAPTER 2: GENERAL SETUP
HF2 Weld Transformer Electrical Specifications
Model Input Volts
(Rms)
X3/4/380A 380 9 6 6.5 4,000 500
X3/4/460A 460 9 6 6.5 4,000 500
X3/4000A 230 9 6 6.5 4,000 500
X9/6000A 230 19 6 9.3 (32:1 TR) 4,900 500
Input kva
(Rms)
Duty Cycle ( %) Peak Open Ckt
Output Voltage
Peak Output
Max. (Amps)
Max Sec
Resist. (μΩ)
X11/4/460A 380 4 5 11.8 (44:1 TR)
10.0 (52:1 TR)
8.6 (60:1 TR)
7.5 (68:1 TR)
X11/4000A 230 15 5 10.7
460 4 5 14.3 (44:1 TR)
12.1 (52:1 TR)
10.5 (60:1 TR)
9.2 (68:1 TR)
10.0 (52:1 TR)
8.6 (60:1 TR)
8.7
8.8
8.9
TRANSFORMER SPECIFICATION NOTES:
1 For the Model X11/4/460A, turns ratios
(TR) are selectable by a switch on the
transformer rear panel.
2 HF2 Weld Control Input voltage selection
must be jumpered at E12 on the HF2 Weld
PCB as shown in Figure 2-3. E12 is
located at the center of the PCB left edge.
4,000
4,000
4,000
4,000
4,000
4,000
4,000
4,000
4,000
4,000
4,000
1,300
1,100
950
825
1,300
1,100
950
825
1,300
1,100
3 Maximum weld time at Maximum Short
Circuit Current is 50 milliseconds.
MODEL HF2 2 kHz HIGH FREQUENCY RESISTANCE WELDING POWER SUPPLY
990-057 2-3
Figure 2-3. Voltage Jumpers

CHAPTER 2: GENERAL SETUP
HF2 Welding System Maximum Secondary Loop Resistance
To use the HF2 Weld Control and HF2 Weld Transformer system to its maximum capability, the
Maximum Secondary Loop Resistance must not exceed the values listed in the preceding table.
Exceeding these maximums will produce a "FEEDBACK RANGE EXCEEDED" alarm.
HF2 Maximum Secondary Loop Resistance Measurement (Figure 2-4)
1 Connect a four terminal micro-ohmmeter
as shown in Figure 2-4.
2 Put the parts to be welded between the
electrodes.
3 Measure the total loop resistance which
includes both Weld Cables, Weld Head,
Electrodes, and parts.
4 If the total loop resistance exceeds the
table value, use:
A) Larger diameter Weld Cables
Figure 2-4. Secondary
Resistance Measurement
B) Shorter length Weld Cables, or
C) Copper Bus Bars to connect the HF2 Weld Transformer to the Weld Head. If these
suggestions do not work, then a different Weld Transformer Model may be required.
CAUTION: For product safety, the system power cable and all inter-unit cabling should be as short as
possible, and be dressed so that all cables stay separated.
HF2 Weld Control to HF2 Weld Transformer Connections (Figure 2-5)
The HF2 Weld Control must always be connected
to the HF2 Weld Transformer as shown in Figure 25, regardless of what Weld Head System is used.
1 Connect the HF2 Weld Control POWER
Cable to the line voltage source as
specified in Chapter 2, Power Line
Voltage, Current, and Wire Size
Requirements.
2 Connect the HF2 Weld Control OUTPUT
Cable to the matching connector on the
HF2 Weld Transformer.
3 Connect the HF2 Weld Control SENSING
PORT Cable to the matching connector on
the HF2 Weld Transformer.
MODEL HF2 2 kHz HIGH FREQUENCY RESISTANCE WELDING POWER SUPPLY
2-4 990-057

CHAPTER 2: GENERAL SETUP
HF2 Weld Transformer to Weld Head Connections (Figure 2-6)
1 Connect the Upper Weld Cable to the
Positive Terminal on the HF2 Weld
Transformer.
2 Connect the Lower Weld Cable to the
Negative Terminal on the HF2 Weld
Transformer.
3 Attach the Voltage Sensing Cable
connector to the HF2 Weld Transformer
INPUT connector.
4 Attach each lead at the opposite end of
the Voltage Sensing Cable to each
Electrode Holder. Note: Polarity is not
important.
5 Strain relief each Voltage Sensing lead to its corresponding Electrode Holder so that the lead
will not break or move under heavy production operating conditions.
Figure 2-6. HF2 Weld Transformer to
Weld Head Connections
6 Do not attach the Firing Switch Cable at this time. This procedure is covered in Chapter 3.
Weld Sentry Option
A small tag displaying the message WELD SENTRY INSTALLED will be attached to the front panel of
the HF2 Weld Control if the optional Weld Sentry Module has been installed. Refer to the separate
Weld Sentry User's Manual, 990-291 for Weld Sentry operation.
The Built-in Weld Sentry Module can be added to the HF2 Weld Control after purchase by ordering the
HF2 Weld Sentry Module, P/N 3-130-01-01.
Help Screen Languages
Integrated circuit chip U2 on the Main printed circuit board varies in memory capacity according to the
help screen languages available. Refer to Appendix D for special jumpering instructions relative to the
installation of IC chip U2.
MODEL HF2 2 kHz HIGH FREQUENCY RESISTANCE WELDING POWER SUPPLY
990-057 2-5


CHAPTER 3
WELDING SYSTEM SET-UP
Welding System Set-Up Guide
To complete the welding system installation, select the welding system that best matches your Weld
Head configuration using the Welding System Set-Up Guide listed below:
Welding System Set-Up Guide Page
Unitek Equipment Force Fired, Foot Actuated Weld Head 3-2
Unitek Equipment Force Fired, Single Air Actuated Weld Head 3-4
Unitek Equipment Force Fired, Dual Air Actuated Weld Head 3-9
Non-Force Fired, Single Air or Cam Actuated Weld Head 3-17
Non-Force Fired, Multiple Air Actuated Weld Heads Not Released
General Programming Instructions
The following nomenclature and symbols will be used for programming the HF2 Weld Control:
1 Press and release HF2 Weld Control front panel keys that are enclosed by [ ] symbols.
2 Use the vertical cursor keys [ ] in conjunction with the horizontal cursor keys [ ] to
select or highlight a requested Menu Option, followed by the [ENTER] key.
3 Words shown in UPPER CASE ITALIC letters indicate flashing Menu Options on the HF2
Weld Control LCD Display.
MODEL HF2 2 kHz HIGH FREQUENCY RESISTANCE WELDING POWER SUPPLY
990-057 3-1

CHAPTER 3: WELDING SYSTEM SET-UP
UNITEK EQUIPMENT FORCE FIRED,
FOOT ACTUATED WELD HEAD SYSTEM
Weld Head Set-up
1 Adjust the Weld Head Force Adjust
Knob to produce 5 units of force as
displayed on the Force Indicator. For a
complete description of force control
and its effect on the welding process,
please refer to your Weld Head manual.
2 Install electrodes in Weld Head
Electrode Holders.
Firing Switch Cable Connection
Connect the Weld Head Firing Switch Cable
Connector to the matching cable connector
on the rear of the HF2 Weld Control.
Quick Start Programming Guide
1 Set the HF2 Weld Control front panel
WELD/NO WELD switch to NO
WELD.
Figure 3-1. Firing Switch Cable Connection
2 Turn the circuit breaker switch located
on the HF2 Weld Control rear panel to
ON. After a series of power up screens,
the last RUN screen displayed will
appear. Press the [CHNG] key to access
the Weld Graph RUN screen for the
BASIC WELD Function.
3 Press [MENU]. The MAIN MENU
screen will appear.
MODEL HF2 2 kHz HIGH FREQUENCY RESISTANCE WELDING POWER SUPPLY
3-2 990-057

CHAPTER 3: WELDING SYSTEM SET-UP
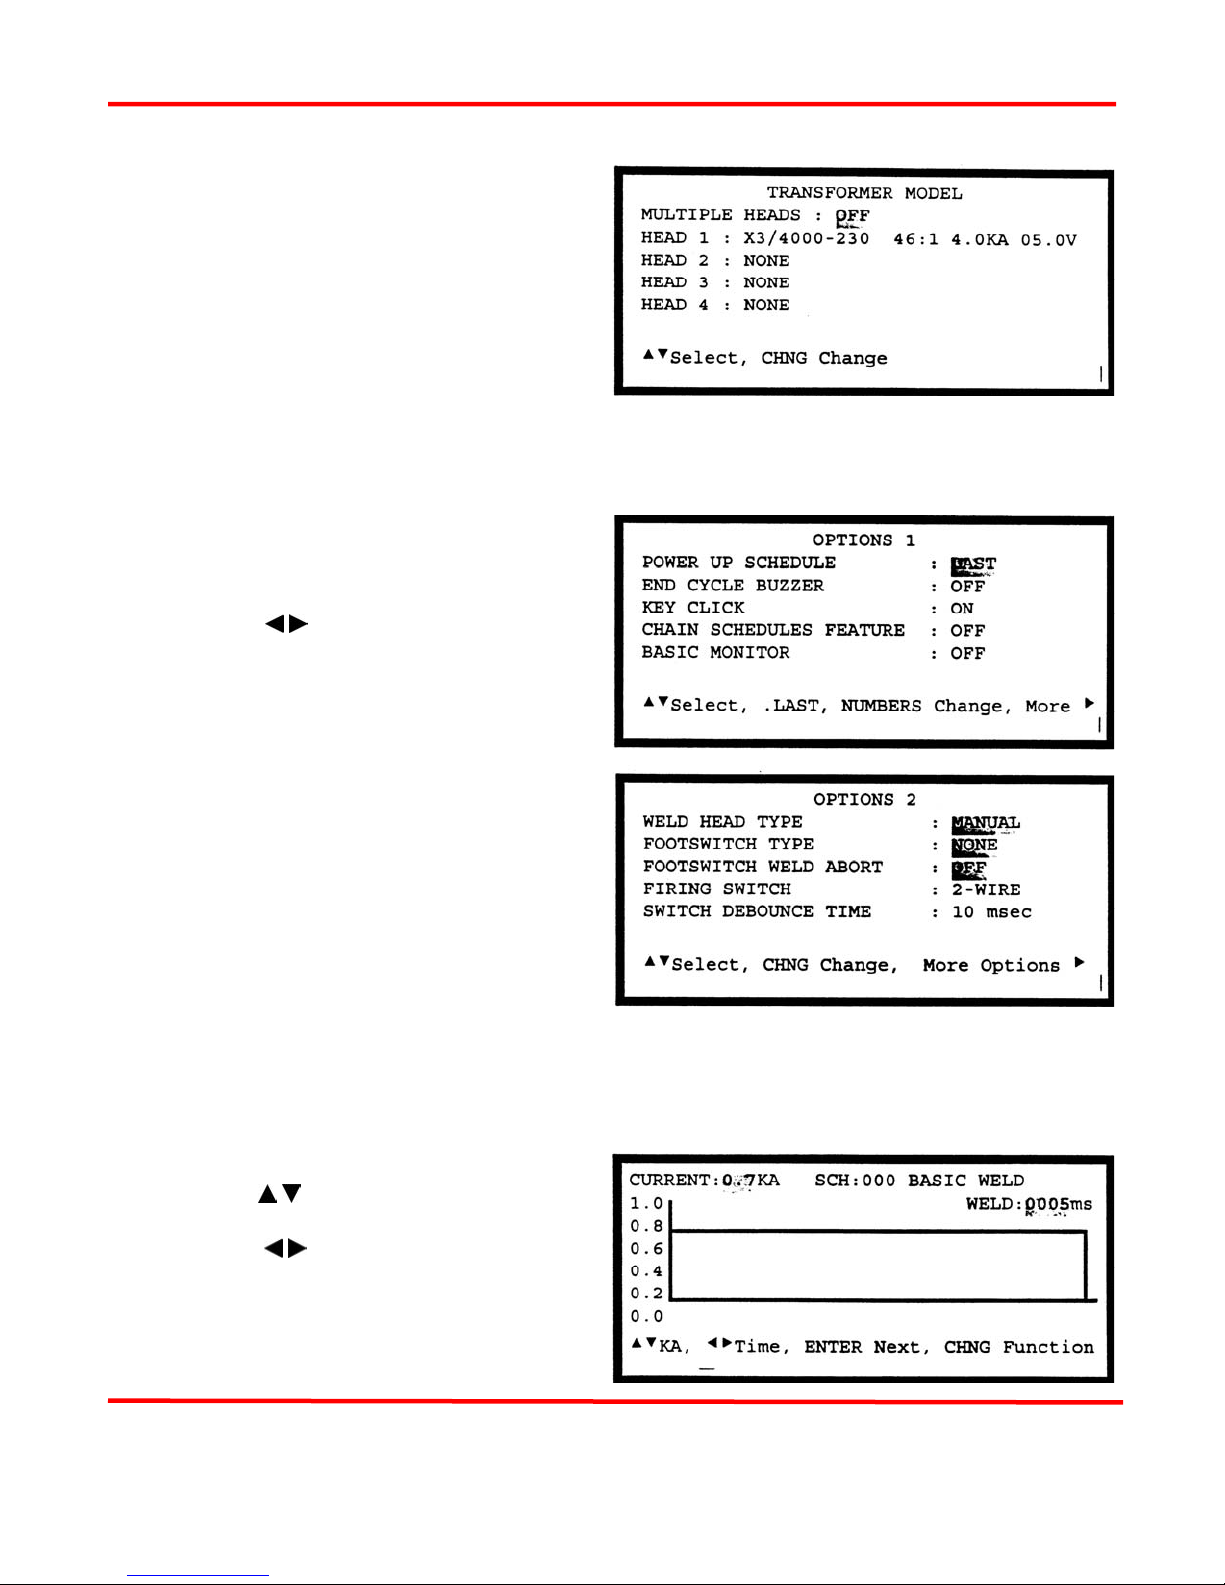
4 Select TRANSFORMER MODEL.
The TRANSFORMER MODEL screen
appears.
5 Select MULTIPLE HEADS: OFF. If
the display reads ON, then press
[CHNG] until OFF is displayed.
6 Select HEAD 1 : X3/4000-230.
X3/4000-230 is the default Transformer
Model number. Press [CHNG] until
the correct Transformer Model that you
have purchased appears.
7 Press [RUN] to return to the Graphical RUN screen.
8 Set the HF2 Weld Control front panel WELD/NO WELD switch to WELD.
9 Make a test weld by pressing on the Weld Head foot actuator until the HF2 Weld Control fires.
The default WELD time of 1 ms and the default CURRENT of 0.5 kA may not be sufficient to
make a good weld.
10 Press [PROG]. Use the vertical cursor
keys [VW] to increase the weld
CURRENT. Use the horizontal cursor
keys [ ] to increase or decrease the
WELD time. In this example, weld
CURRENT has been increased to 0.7
kA and WELD time has been increased
to 5ms.
11 Press [SAVE] to save your program. You are now back in the Weld Graph RUN State.
12 Make additional test welds and then reprogram WELD time and weld CURRENT as necessary
to make a good weld. Try to use the minimum time and current necessary to make a good weld
so that the weld joint heat affected zone will be minimized.
13 Up to 128 different weld schedules can be created and saved. To recall any specific weld
schedule, press the up or down vertical arrow keys [VW] until the desired schedule number
appears on the display screen. A faster technique for recalling a specific schedule is to input
the Schedule number using the number keys.
MODEL HF2 2 kHz HIGH FREQUENCY RESISTANCE WELDING POWER SUPPLY
990-057 3-3

CHAPTER 3: WELDING SYSTEM SET-UP
UNITEK EQUIPMENT FORCE FIRED,
SINGLE AIR ACTUATED WELD HEAD SYSTEM
Weld Head Set-up (Figure 3-2)
1 Adjust the Weld Head Force Adjust
Knob to produce 5 units of force as
displayed on the Force Indicator. For a
complete description of force control
and its effect on the welding process,
please refer to your Weld Head manual.
2 Install electrodes in Weld Head
Electrode Holders.
3 Connect a properly filtered air line to
the Inlet Air Line on the Weld Head Air
Valve Driver Solenoid assembly which
is located on the back of the Weld
Head. Use 0.25 inch O.D. by 0.17 inch
I.D. plastic hose with a rated burst
pressure of 250 psi. A lubricator should
only be used with automated
installations. Turn on the air system and check for leaks.
Firing Switch Cable Connection (Figure 3-2)
Figure 3-2. Single Air Actuated
Weld Head Connections
Connect the Weld Head Firing Switch Cable Connector to the matching cable connector on the rear of
the HF2 Weld Control.
Weld Head Valve Driver No. 1 Connection (Figure 3-2)
A single air actuated Weld Head has one Solenoid Valve Driver Cable for automatic actuation and
timing control by the HF2 Weld Control. The HF2 Weld Control will automatically recognize the
solenoid voltage of the Weld Head. Connect the 4 pin black plastic connector on the cable to the
matching Air Valve 1 Driver connector located on the HF2 Weld Control rear panel.
Foot Switch Connection (Figure 3-2)
1 Connect a Model FS1L, 1-Level, or a Model FS2L, 2-Level Foot Switch to the FOOT
SWITCH connector located on the HF2 rear panel. The HF2 will automatically recognize
which model of Unitek Equipment Foot Switch has been connected.
2 1-Level Foot Switch - The l-Level Foot Switch must be fully depressed by the operator. When
the Foot Switch closes, the HF2 energizes the Air Actuated Weld Head, causing the Upper
Electrode to descend and apply force to the parts. If the Foot Switch is released before the
Weld Head applies the Preset Firing Force, the HF2 will automatically return the Upper
Electrode to its up position.
MODEL HF2 2 kHz HIGH FREQUENCY RESISTANCE WELDING POWER SUPPLY
3-4 990-057

CHAPTER 3: WELDING SYSTEM SET-UP
3 2-Level Foot Switch - When a 2-Level Foot Switch is pressed to the first level, the HF2
energizes the Air Actuated Weld Head, causing the Upper Electrode to descend and apply force
to the parts. If the Foot Switch is released before the operator presses the Foot Switch to the
second level, the HF2 will automatically return the Upper Electrode to its up position so that
the parts can be repositioned. Once the second level has been reached and the Force Firing
Switch in the Weld Head has closed, Weld Current will flow and the HF2 will automatically
return the Upper Electrode to its up position.
Single Air Regulator Adjustment (Model 80 Series Weld Heads - Figure 3-2)
1 Set the HF2 Weld Control front panel
WELD/NO WELD switch to NO WELD.
2 Turn the Power Switch located on the
HF2 Weld Control rear panel to ON.
After a series of power up screens, the
last RUN screen displayed will appear.
Press the [CHNG] key to access the Weld
Graph RUN screen for the BASIC
WELD function.
3 Turn the Air Regulator Clockwise (CW)
to produce 10 psi on the Pressure Gauge.
4 Press and hold the Foot Switch
completely down to close all switch
levels. The lower right hand corner of
the display should show the status
message STANDBY .
5 Continuing turning the Air Regulator
Clockwise (CW) until the HF2
automatically returns the Upper Electrode
to its "up position". The lower right hand
corner of the display should now show
the status message END if you have
not released the Foot Switch. Release the
Foot Switch.
6 Note: You have 10 seconds to make the
Air Regulator adjustment or a buzzer
alarm will sound and the HF2 will
automatically return the Upper Electrode
to its up position. The status message
changes from STANDBY to
ALARM FIRING SWITCH . Press
[RUN] to clear the alarm and then repeat
steps 4 and 5.
MODEL HF2 2 kHz HIGH FREQUENCY RESISTANCE WELDING POWER SUPPLY
990-057 3-5

CHAPTER 3: WELDING SYSTEM SET-UP
7 Adjust the Down Speed Control Knob so the Upper Electrode descends smoothly onto the
parts.
8 Adjust the Up Speed Control Knob so that the Upper Electrode Holder does not impact upon
returning to in "up position".
Dual Air Regulator Adjustments (Model 180 Series and Model 90 Series Weld Heads Figure 3-2)
1 Turn the Air Regulator located on the right-hand side of the Weld Head Clockwise (CW) to
produce 10 psi on the Pressure Gauge.
2 Adjust the left-hand side Air Regulator following steps 4, 5, and 6 for the Single Air Regulator
Adjustment.
3 Re-adjust the right-hand side Air Regulator to produce the same air pressure as finally used on
the left-hand side Air Regulator.
4 Repeat steps 7 and 8 for the Single Air Regulator Adjustment.
Quick Start Programming Guide
1 Press [MENU]. The MAIN MENU screen will appear.
2 Select TRANSFORMER MODEL.
The TRANSFORMER MODEL screen
appears.
3 Select MULTIPLE HEADS: OFF. If
the display reads ON, then press
[CHNG] until OFF is displayed.
4 Select HEAD 1 : X3/4000-230.
X3/4000-230 is the default Transformer
Model number. Press [CHNG] until
the correct Transformer Model that you have purchased appears.
5 Press [RUN] to return to the Weld Graph RUN State.
6 Set the HF2 Weld Control front panel WELD/NO WELD switch to WELD.
7 Make a test weld by pressing on the Weld Head foot actuator until the HF2 Weld Control fires.
The default WELD time of 1 ms and the default CURRENT of 0.5 KA may not be sufficient to
make a good weld.
8 Press [PROG]. Press [ENTER] to
change SQUEEZE to WELD, as
displayed in the upper right corner. Use
the vertical cursor keys [] to
increase the weld CURRENT. Use the
horizontal cursor keys [ ] to
increase or decrease the WELD time.
In this example, weld CURRENT has
been increased to 0.7 KA and WELD
time has been increased to 0.5 ms.
MODEL HF2 2 kHz HIGH FREQUENCY RESISTANCE WELDING POWER SUPPLY
3-6 990-057

CHAPTER 3: WELDING SYSTEM SET-UP
9 Press [SAVE] to save your program. You are now back in the Weld Graph RUN State.
10 Make additional test welds and then re-program WELD time and weld CURRENT as necessary
to make a good weld. Strive to use minimum time and current necessary to make a good weld
so that the weld joint heat affected zone will be minimized.
11 Up to 128 different weld schedules can be created and saved. To recall any specific weld
schedule, press the up or down vertical arrow keys [ ] until the desired schedule number
appears on the display screen. A faster technique for recalling a specific schedule is to input
the Schedule number using the number keys.
MODEL HF2 2 kHz HIGH FREQUENCY RESISTANCE WELDING POWER SUPPLY
990-057 3-7

CHAPTER 3: WELDING SYSTEM SET-UP
UNITEK EQUIPMENT FORCE FIRED,
DUAL AIR ACTUATED WELD HEAD SYSTEM
General Information
Dual Air Actuated Weld Head System operation uses sequential action to activate one Weld Head and
then a second weld head using a single HF2 Weld Control and HF2 Weld Transformer. The operator
must close and release the Foot Switch to initiate each sequential weld. Sequential Weld Head
activation ensures that only one weld current path exists at a single point in time. To use multiple Weld
Heads simultaneously, refer to Chapter 3, Non-Force Fired, Multiple Air Actuated Weld Head System.
HF2 Weld Control, Jumper Modifications (Figure 3-3)
Warning: Before modifying jumpers, disconnect the 3-phase input power to the HF2 to prevent
serious injury.
1 Remove the HF2 Weld Control cover.
2 The HF2 Weld Control PCB is located
on the right-hand side of the HF2 Weld
Control. Locate Jumpers E10 and E11
by looking in the lower right-hand
corner of the HF2 Weld Control PCB.
3 Using a needle nose pliers, move
Jumpers E10 and E11 from the RELAY
position to the HEAD2 position.
4 Replace the HF2 Weld Control cover.
5 Connect 3 phase input power to the
HF2.
Figure 3-3. HF2 Jumper Modifications
Weld Head Set-up (Figure 3-4)
1 Connect the Upper Weld Cable from each Weld Head to the Positive Terminal on the HF2
Weld Transformer.
2 Connect the Lower Weld Cable from each Weld Head to the Negative Terminal on the HF2
Weld transformer.
3 Adjust each Weld Head Force Adjust Knob to produce 5 units of force as displayed on the
Force Indicator. For a complete description of force control and its effect on the welding
process, please refer to your Weld Head manual.
4 Install electrodes in each Weld Head Electrode Holder.
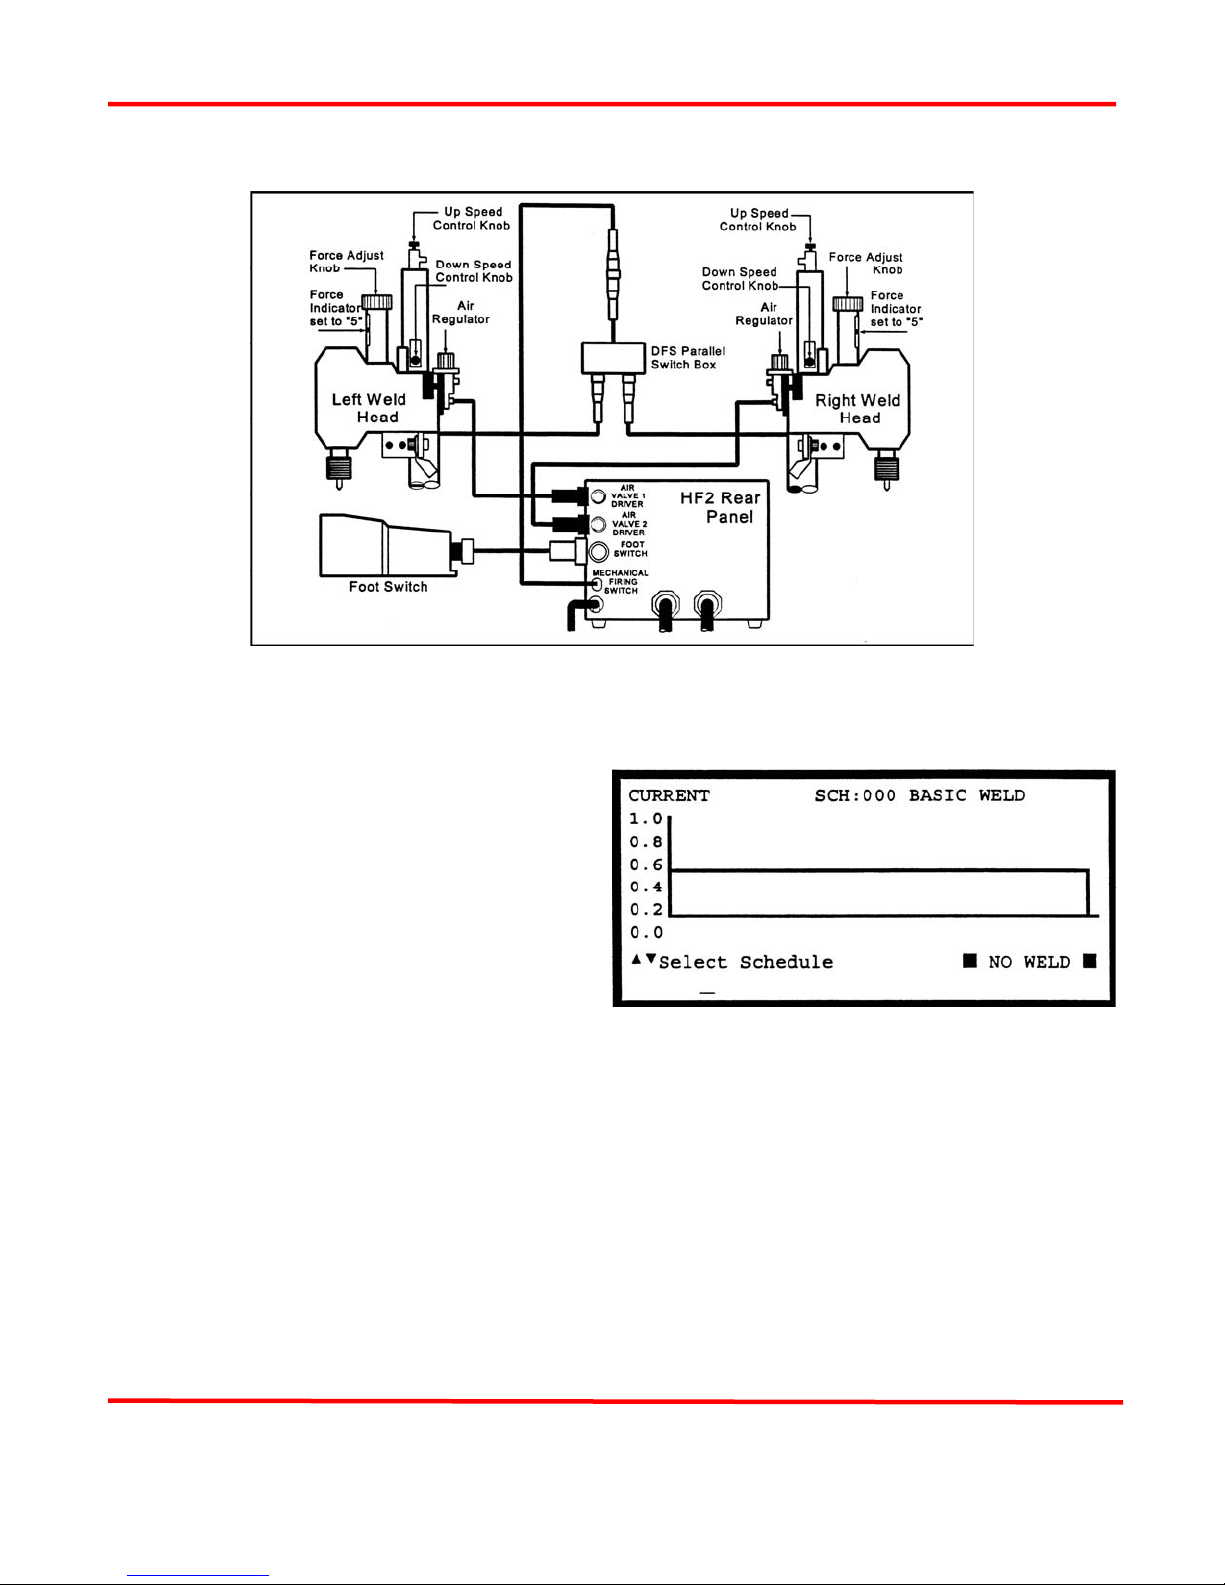
5 Parallel two sets of twisted wire cables to the clip end of the standard Voltage Sensing Cable
that is connected to the Weld Transformer front panel. Connect one twisted wire cable to the
Left Weld Head electrodes and the other twisted wire cable to the Right Weld Head electrodes.
MODEL HF2 2 kHz HIGH FREQUENCY RESISTANCE WELDING POWER SUPPLY
3-8 990-057

CHAPTER 3: WELDING SYSTEM SET-UP
Figure 3-4. Weld Cable and Air Line Connections for Dual Air Actuated Weld Heads
6 Connect a properly filtered air line to the Inlet Air Line on the Weld Head Air Valve Driver
Solenoid assembly which is located on the back of the Weld Head. Use 0.25 inch O.D. by 0.17
inch I.D. plastic hose with a rated burst pressure of 250 psi. Run separate air lines to each Inlet
Air Line. Do not split a single 0.25 O.D. line into two lines or the Weld Heads will not have
sufficient air flow to work properly. A lubricator should only be used with automated
installations. Turn on the air system and check for leaks.
Firing Switch Cable Connection (Figure 3-5)
Connect the Weld Head Firing Switch Cable Connector on each Weld Head to the matching connectors
on the Model DFS Parallel Switch Box. Connect the Model DFS Firing Switch Cable to the matching
cable connector on the rear of the HF2 Weld Control.
MODEL HF2 2 kHz HIGH FREQUENCY RESISTANCE WELDING POWER SUPPLY
990-057 3-9

CHAPTER 3: WELDING SYSTEM SET-UP
Weld Head Valve Driver Connections (Figure 3-5)
1 Each air actuated Weld Head has one Solenoid Valve Driver Cable for automatic actuation and
timing control by the HF2 Weld Control. The HF2 Weld Control will automatically recognize
the solenoid voltage of your Weld Head. Connect the 4 pin black plastic connector on the Left
Weld Head Solenoid Valve Driver Cable to the matching Air Valve 1 Driver connector located
on the HF2 Weld Control rear panel.
2 Connect the 4 pin black plastic connector on the Right Weld Head Solenoid Valve Driver
Cable to the matching Air Valve 2 Driver connector located on the HF2 Weld Control rear
panel.
Foot Switch Connection (Figure 3-5)
1 Connect a Model FS1L, 1-Level, or a Model FS2L, 2-Level Foot Switch to the FOOT
SWITCH connector located on the HF2 rear panel. The HF2 will automatically recognize
which model of Unitek Equipment Foot Switch has been connected.
2 1-Level Foot Switch -- The l-Level Foot Switch must be fully depressed by the operator.
When the Foot Switch closes, the HF2 energizes the Air Actuated Weld Head, causing the
Upper Electrode to descend and apply force to the parts. If the Foot Switch is released before
the Weld Head applies the Preset Firing Force, the HF2 will automatically return the Upper
Electrode to its up position.
3 2-Level Foot Switch -- When a 2-Level Foot Switch is pressed to the first level, the HF2
energizes the Air Actuated Weld Head, causing the Upper Electrode to descend and apply force
to the parts. If the Foot Switch is released before the operator presses the Foot Switch to the
second level, the HF2 will automatically return the Upper Electrode to its up position so that
the parts can be repositioned. Once the second level has been reached and the Force Firing
Switch in the Weld Head has closed, Weld Current will flow and the HF2 will automatically
return the Upper Electrode to its up position.
MODEL HF2 2 kHz HIGH FREQUENCY RESISTANCE WELDING POWER SUPPLY
3-10 990-057
CHAPTER 3: WELDING SYSTEM SET-UP
Dual Air Regulator Adjustment (Model 188 - Figure 3-5)
Figure 3-5. Dual Air Actuated Weld Heads Electrical Connections
1 Set the HF2 Weld Control front panel WELD/NO WELD switch to NO WELD.
2 Turn the Power Switch located on the
HF2 Weld Control rear panel to ON.
After a series of power up screens, the
last RUN screen displayed will appear.
Press the [CHNG] key to access the
Weld Graph RUN screen for the BASIC
WELD Function.
MODEL HF2 2 kHz HIGH FREQUENCY RESISTANCE WELDING POWER SUPPLY
990-057 3-11

CHAPTER 3: WELDING SYSTEM SET-UP
3 Press [MENU]. The MAIN MENU
screen will appear.
4 Select TRANSFORMER MODEL. The
TRANSFORMER MODEL screen
appears.
5 Select MULTIPLE HEADS: OFF. If
the display reads ON, press [CHNG]
until OFF is displayed.
6 Select HEAD 1 : X3/4000-230.
X3/4000-230 is the default Transformer
Model number. Press [CHNG] until
the correct Transformer Model that you
have purchased appears.
7 Press [MENU] to return to the MAIN
MENU screen.
8 Select OPTIONS. The OPTIONS 1 screen
appears.
9 Press [ ] to select the OPTIONS 2
screen.
10 Select WELD HEAD TYPE: AUTO.
Press [CHNG] until the DUAL AIR
option appears.
11 Press [MENU] to return to the MAIN
MENU.
MODEL HF2 2 kHz HIGH FREQUENCY RESISTANCE WELDING POWER SUPPLY
3-12 990-057
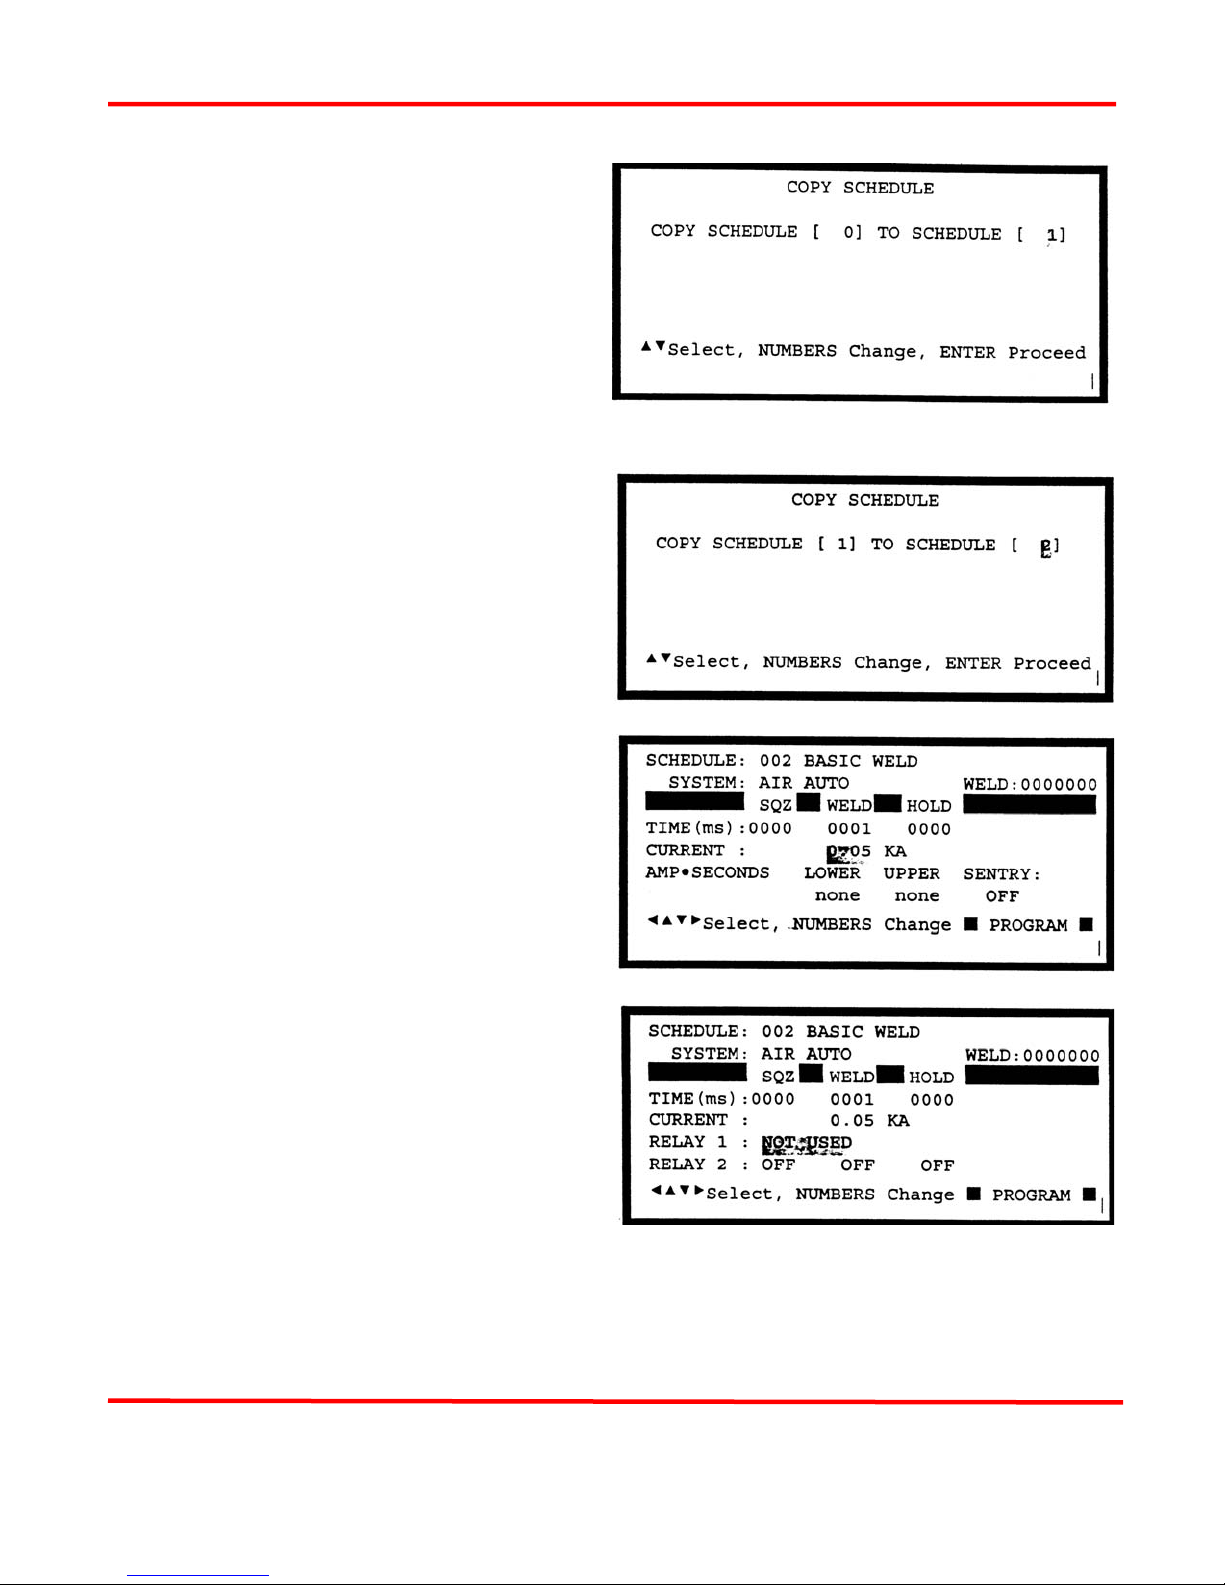
12 Select COPY A SCHEDULE. The
COPY SCHEDULE screen will appear.
13 Select the last flashing 0 of TO
SCHEDULE [ 0] and use the number
keys to change the flashing 0 TO
SCHEDULE [ 1].
14 Press [ENTER] to complete the
schedule copy process and to
automatically return to the Weld Graph
RUN State.
15 Press [MENU] to return to the MAIN
MENU.
16 Select COPY A SCHEDULE. The
COPY SCHEDULE screen will appear.
17 Select the last flashing 1 of TO
SCHEDULE [ 1] and use the number
keys to change the flashing 1 TO
SCHEDULE [ 2].
CHAPTER 3: WELDING SYSTEM SET-UP
18 Press [ENTER] to complete the
schedule copy process and to
automatically return to the Weld Graph
RUN State.
19 Press [PROGRAM] twice to select the
Alphanumeric PROGRAM screen.
20 Press the down vertical cursor key [W]
until the RELAY 1: NOT USED and
RELAY 2: OFF option items appear.
21 Select RELAY 1: NOT USED. Press [CHNG] to select the AIR HEAD 2 option.
MODEL HF2 2 kHz HIGH FREQUENCY RESISTANCE WELDING POWER SUPPLY
990-057 3-13

CHAPTER 3: WELDING SYSTEM SET-UP
22 Press [SAVE] to update Schedule 2,
then press [CHNG] to automatically
return to the Weld Graph RUN State.
You are now ready to adjust the Right
Weld Head Air Regulators.
23 Turn both Air Regulators located on the
right-hand side of the Right Weld Head
Clockwise (CW) to produce 10 psi on
the Pressure Gauge.
24 Press and hold the Foot Switch
completely down to close all switch
levels. The lower right hand corner of
the display should show the status
message STANDBY .
25 Turn the Air Regulator that feeds the
Top Right Air Cylinder on the Right
Weld Head Clockwise (CW) until the
HF2 automatic-ally returns the Upper
Electrode to its up position. The lower
right hand corner of the display should
now show the status message END if
you have not released the Foot Switch.
Release the Foot Switch.
26 NOTE: You have 10 seconds to make
the Air Regulator adjustment or a
buzzer alarm will sound and the HF2
will automatically return the Upper
Electrode to its up position. The status
message changes from STANDBY to
ALARM FIRING SWITCH . Press
[RUN] to clear the alarm, then repeat
steps 24 and 25.
27 Re-adjust the Air Regulator that feeds the Bottom Right Air Cylinder on the Right Weld
Head to produce the same air pressure as finally used on the Top Air Regulator on the Right
Weld Head.
28 Adjust the Right Weld Head Down Speed Control Knob so the Right Weld Head Upper
Electrode descends smoothly onto the parts.
MODEL HF2 2 kHz HIGH FREQUENCY RESISTANCE WELDING POWER SUPPLY
3-14 990-057
CHAPTER 3: WELDING SYSTEM SET-UP
29 Adjust the Right Weld Head Up Speed Control Knob so that the Right Weld Head Upper
Electrode Holder does not impact upon returning to in up position.
30 Press [ W ] to select SCH:001 BASIC WELD. You are now ready to adjust the Left Weld
Head Air Regulators.
31 Repeat steps 24 through 29 for the Dual Air Weld Head System, All Regulator Adjustments
for the Left Weld Head.
Quick Start Programming Guide
1 Make a test weld using Schedule 1 by pressing on the Weld Head foot actuator until the HF2
Weld Control fires. The default WELD time of 1 ms and the default CURRENT of 0.5 KA
may not be sufficient to make a good weld.
2 Press [PROG]. Press [ENTER] to
change SQUEEZE to WELD, as
displayed in the upper right corner. Use
the vertical cursor keys [
increase the weld CURRENT. Use the
horizontal cursor keys [ ] to
increase or decrease the WELD time.
In this example, weld CURRENT has
been increased to 0.7 KA and WELD
time has been increased to 0.5 ms.
] to
3 Make additional test welds and then re-program WELD time and weld CURRENT as necessary
to make a good weld. Try to use the minimum time and current necessary to make a good weld
so that the weld joint heat affected zone will be minimized.
4 Press [SAVE] to save the updated Schedule 1. You are now back in the Weld Graph RUN
State.
5 Press [>] to select SCH:002 BASIC WELD. You are now ready to make test welds using the
Right Weld Head.
6 Repeat steps 1 through 3 using the Right Weld Head.
7 Press [SAVE] to save the updated Schedule 2. You are now back in the Weld Graph RUN
State and ready to turn on the Chaining Feature, which will enable Schedule 1 to automatically
sequence to Schedule 2, then back to Schedule 1.
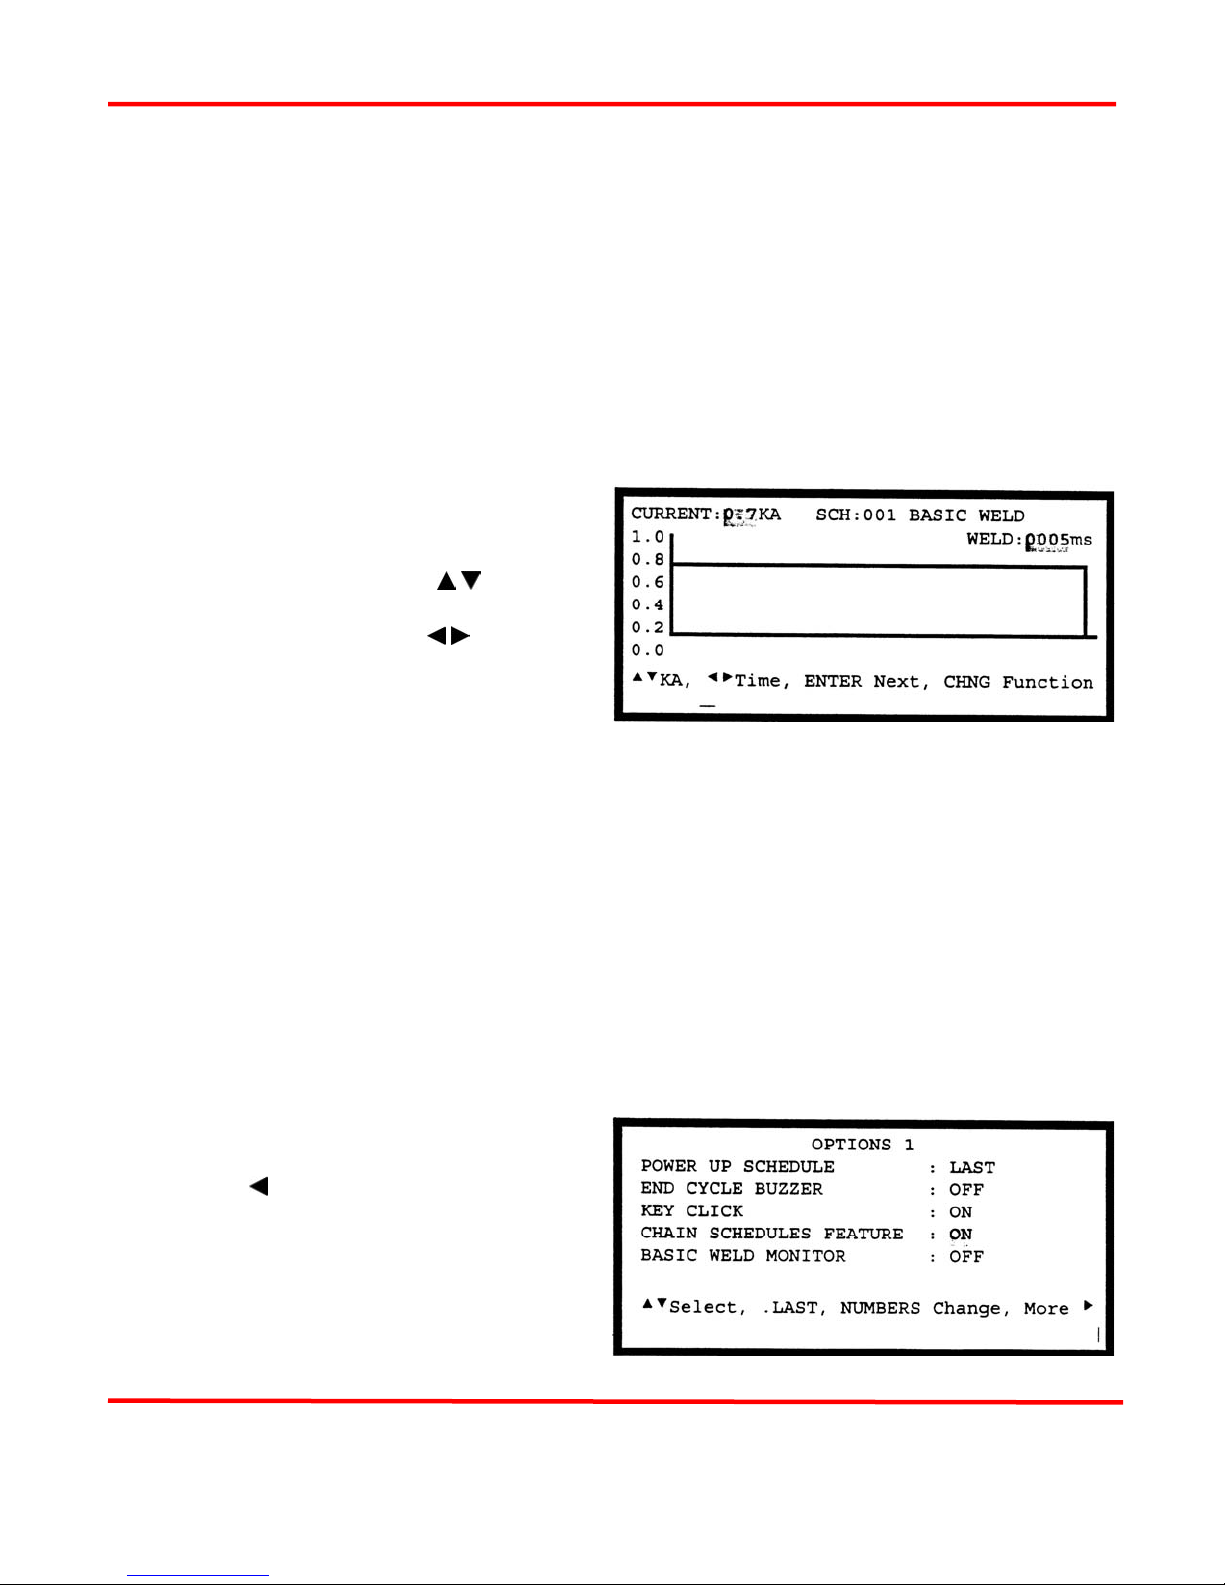
8 Press [MENU] and then select
OPTIONS. Use the horizontal cursor
key [
] to select the OPTIONS 1
screen.
9 Select CHAIN SCHEDULES
FEATURE: OFF. Press [CHNG] to
change to ON.
10 Press [RUN] to return to the Weld
Graph RUN State.
MODEL HF2 2 kHz HIGH FREQUENCY RESISTANCE WELDING POWER SUPPLY
990-057 3-15

CHAPTER 3: WELDING SYSTEM SET-UP
11 Press [PROGRAM] twice to select the
Alphanumeric PROGRAM screen for
Schedule 2.
12 Verify that NEXT: 001 is correctly
displayed so that Schedule 2 will
automatically advance to Schedule 1
after one weld has been completed. If
you want to make more than one weld
using Schedule 2 before advancing to
Schedule 1, change STEP : 00001 to the
desired number of welds.
13 Press [SAVE] to save the updated Schedule 2.
14 Press [ W ] to select SCH:001 BASIC WELD.
15 Press [PROGRAM] once to select the Alphanumeric PROGRAM screen for Schedule 1.
16 Select NEXT: 001. Change 001 to 002
so that Schedule 1 will automatically
advance to Schedule 2 after one weld
has been completed. If you want to
make more than one weld using
Schedule 1 before advancing to
Schedule 2, change STEP : 00001 to the
desired number of welds.
17 Press [SAVE] to save the updated Schedule 1. Press [CHNG] to return to the Weld Graph
RUN State. You are now ready to make alternating welds, beginning with Schedule 1, by just
pressing on the Foot Switch to activate each weld.
MODEL HF2 2 kHz HIGH FREQUENCY RESISTANCE WELDING POWER SUPPLY
3-16 990-057
CHAPTER 3: WELDING SYSTEM SET-UP
NON-FORCE FIRED, AIR OR CAM ACTUATED WELD HEAD SYSTEM
PLC to HF2 Weld Control Electrical Connections (Figure 3-6)
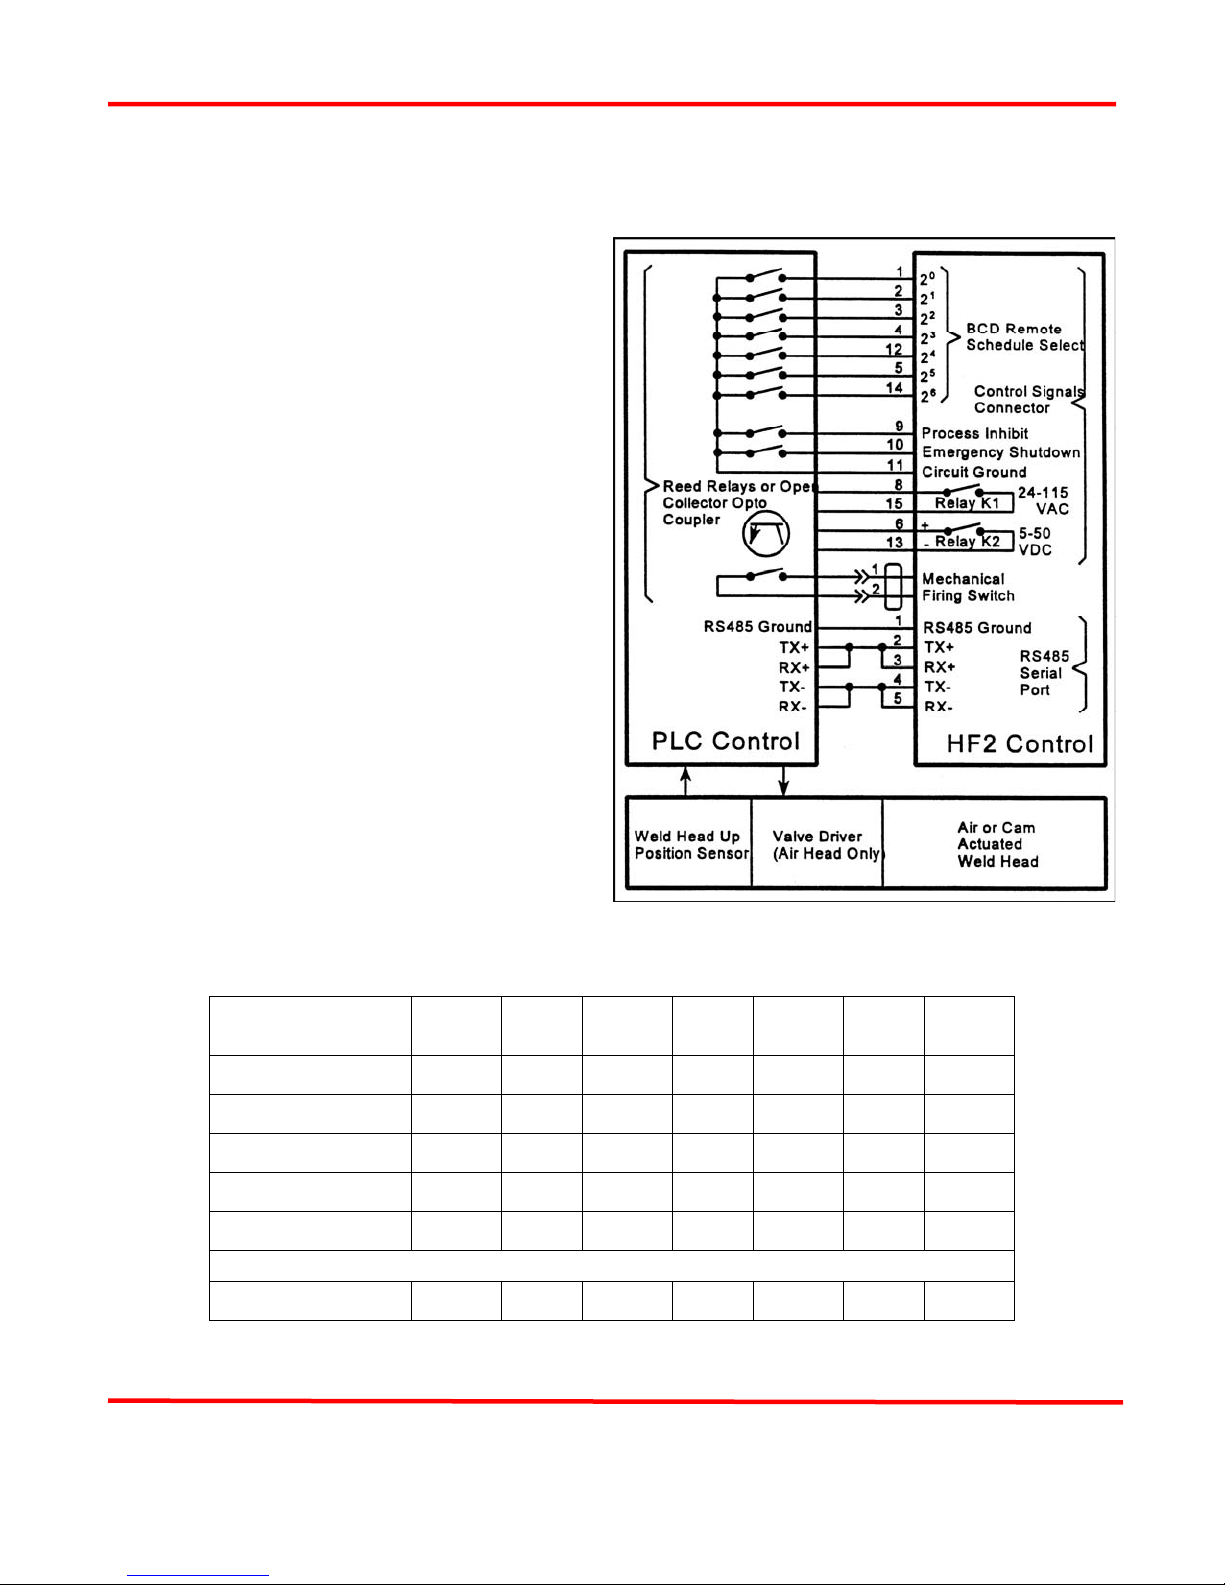
1 Connect your Programmable Logic
Control (PLC) or Host Computer output
control signals to the HF2 Weld Control
inputs using reed relays or the open
collector of an opto coupler. The
emitter of each opto coupler must be
connected to The HF2 Weld Control
Rear Panel Control Signals connector,
Pin 11.
2 For a complete description of how to
program Relay 1 and Relay 2, reference
Chapter 5, Programming Modes,
Output Relays.
3 For a complete description on how to use
the RS-485 Datacom feature, reference
Chapter 9, RS-485 Datacom.
4 All weld schedules must be entered and
saved using the HF2 Weld Control
Front Panel keys. After saving the
desired weld schedules, each schedule
can be recalled prior to initiating the
welding process cycle by closing the
binary Remote Schedule Select lines
according to the following table:
WELD
SCHEDULE
0 0 0 0 0 0 0 0
1 1 0 0 0 0 0 0
2 0 1 0 0 0 0 0
3 1 1 0 0 0 0 0
4 0 0 1 0 0 0 0
Binary progression from 5 to 126
127 1 1 1 1 1 1 1
20
Pin 1
21
Pin 2
Figure 3-6. PLC to HF2 Weld Control
Electrical Connections
22
Pin 3
23
Pin 4
24
Pin 12
25
Pin 5
Pin 14
26
NOTE: 0 = Open; 1 = Closed
MODEL HF2 2 kHz HIGH FREQUENCY RESISTANCE WELDING POWER SUPPLY
990-057 3-17

CHAPTER 3: WELDING SYSTEM SET-UP
PLC Timing Diagram (Figure 3-7)
Figure 3-7. PLC Timing Diagram.
Quick Start Programming Guide
1 Set the HF2 Weld Control front panel
WELD/NO WELD switch to NO
WELD.
2 Turn the Power Switch located on the
HF2 Weld Control rear panel to ON.
After a series of power up screens, the
last RUN screen displayed will appear.
Press the [CHNG] key to access the
Weld Graph RUN screen for the BASIC
WELD Function.
3 Press [MENU]. The MAIN MENU
screen will appear.
MODEL HF2 2 kHz HIGH FREQUENCY RESISTANCE WELDING POWER SUPPLY
3-18 990-057
CHAPTER 3: WELDING SYSTEM SET-UP
4 Select TRANSFORMER MODEL.
The TRANSFORMER MODEL screen
appears.
5 Select MULTIPLE HEADS: OFF. If
the display reads ON, press [CHNG]
until OFF is displayed.
6 Select HEAD 1 : X3/4000-230.
X3/4000-230 is the default Transformer
Model number. Press [CHNG] until
the correct Transformer Model that you have purchased appears.
7 Press [MENU] to return to the MAIN MENU screen.
8 Select OPTIONS. The OPTIONS 1 or
OPTIONS 2 screen appears. This
example shows the OPTION 1 screen.
9 Press [ ] to select the OPTIONS 2
screen.
10 Select WELD HEAD TYPE: AUTO.
Press [CHNG] until the MANUAL
option appears. Note: FOOTSWITCH
TYPE: AUTO will automatically
change to NONE.
11 Select FOOTSWITCH WELD ABORT:
ON. Press [CHNG] until the OFF
option appears.
12 12.Press [RUN] to return to the Weld
Graph RUN State.
13 Set the HF2 Weld Control front panel WELD/NO WELD switch to WELD.
14 Make a test weld by pressing on the Weld Head foot actuator until the HF2 Weld Control fires.
The default WELD time of 1 ms and the default CURRENT of 0.5 KA may not be sufficient to
make a good weld.
15 Press [PROG]. Use the vertical cursor
keys [
] to increase the weld
CURRENT. Use the horizontal cursor
keys [ ] to increase or decrease
the WELD time. In this example, weld
CURRENT has been increased to 0.7
KA and WELD time has been increased
to 0.5 ms.
MODEL HF2 2 kHz HIGH FREQUENCY RESISTANCE WELDING POWER SUPPLY
990-057 3-19

CHAPTER 3: WELDING SYSTEM SET-UP
16 Press [SAVE] to save your program. You are now back in the Weld Graph RUN State.
17 Make additional test welds and then re-program WELD time and weld CURRENT as necessary
to make a good weld. Try to use the minimum time and current necessary to make a good weld
so that the weld joint heat affected zone will be minimized.
18 Up to 128 different weld schedules can be created and saved. To manually recall any specific
weld schedule, press the up or down vertical arrow keys [ ] until the desired schedule
number appears on the display screen. A faster technique for recalling a specific schedule is to
input the Schedule number using the number keys.
19 To recall any weld schedule automatically, use the binary Remote Schedule Select Control
Lines as discussed under the step 4 of the PLC to HF2 Weld Control Electrical Connections
section.
NON-FORCE FIRED, MULTIPLE AIR ACTUATED WELD HEAD SYSTEM
This system configuration is not released.
MODEL HF2 2 kHz HIGH FREQUENCY RESISTANCE WELDING POWER SUPPLY
3-20 990-057

CHAPTER 4
CONTROLS
HF2 Weld Control - Front Panel (Figure 4-1)
Figure 4-1. HF2 Weld Control Front Panel
KEY DESCRIPTION
[KEYPAD] Use the numeric keys to enter numeric information. Use the [ . ] to enter decimal
values.
[KEYPAD] Use the numeric keys to change weld schedules without the need to use the
[ ] keys. For example, pressing [1] [0] will recall weld schedule 10.
[ ] In the RUN State, press [ ] to select a higher number weld schedule or press
] to select a lower number weld schedule.
[
[ ] In PROGRAM and MENU States, use both [ ] to move up and down on the
LCD Display to select user options.
[
] In the PROGRAM and MENU States, use [ ] to select user options.
MODEL HF2 2 kHz HIGH FREQUENCY RESISTANCE WELDING POWER SUPPLY
990-057 4-1

CHAPTER 4: CONTROLS
[PROG] In the RUN State, press [PROG] to enter the Graphical PROGRAM State to make
changes to the selected weld schedule fields. Press [PROG] a second time to
make changes using the Alphanumeric PROGRAM State. Press [PROG] a third
time to make changes to the Weld Sentry programs related to the selected weld
schedule. Press [PROG] a fourth time to return to the HF2 Graphical Program
screen.
[RUN] In the PROGRAM State, press [RUN] to exit the PROGRAM State without
saving the changed weld schedule. The changed weld schedule will become
Weld Schedule 0 and will not be written to permanent memory. Welding parts is
done in the RUN State.
[RUN] In the MENU State, press [RUN] to exit the MENU State and begin welding
parts.
[SAVE] In the PROGRAM State, press [SAVE] to save the selected weld schedule and its
related Weld Sentry programs to permanent memory. The HF2 Weld Control will
then automatically exit the PROGRAM State and return to the RUN State.
[SAVE] has no function in the RUN State.
[MENU] In either the RUN or PROGRAM States, press [MENU] to provide a menu list of
user options which are common to all weld schedules.
[HELP] Press this key whenever you need HELP or additional information on any user
menu option or flashing user programmable field. The HF2 contains a built-in
operating manual. Press [HELP] a second time to return to the original State.
[CHNG] In the PROGRAM State, press [CHNG] to restore the previous contents of a user
programmable field.
[CHNG] In the MENU State, press [CHNG] to select different menu options.
[CHNG] In the RUN State, press [CHNG] to change the Graphical RUN State screen to the
Alphanumeric RUN State screen.
[ENTER] Press [ENTER] after keying in numeric program data.
WELD/NO WELD Weld current will not flow when this switch is in the NO WELD position.
SWITCH However, operation in the NO WELD switch position permits the HF2 to initiate
and execute a complete welding sequence without weld current flowing.
Operating the HF2 in the NO WELD position is required to adjust Unitek Peco
Weld Heads. This switch must be in the WELD position in order to make a weld.
MODEL HF2 2 kHz HIGH FREQUENCY RESISTANCE WELDING POWER SUPPLY
4-2 990-057
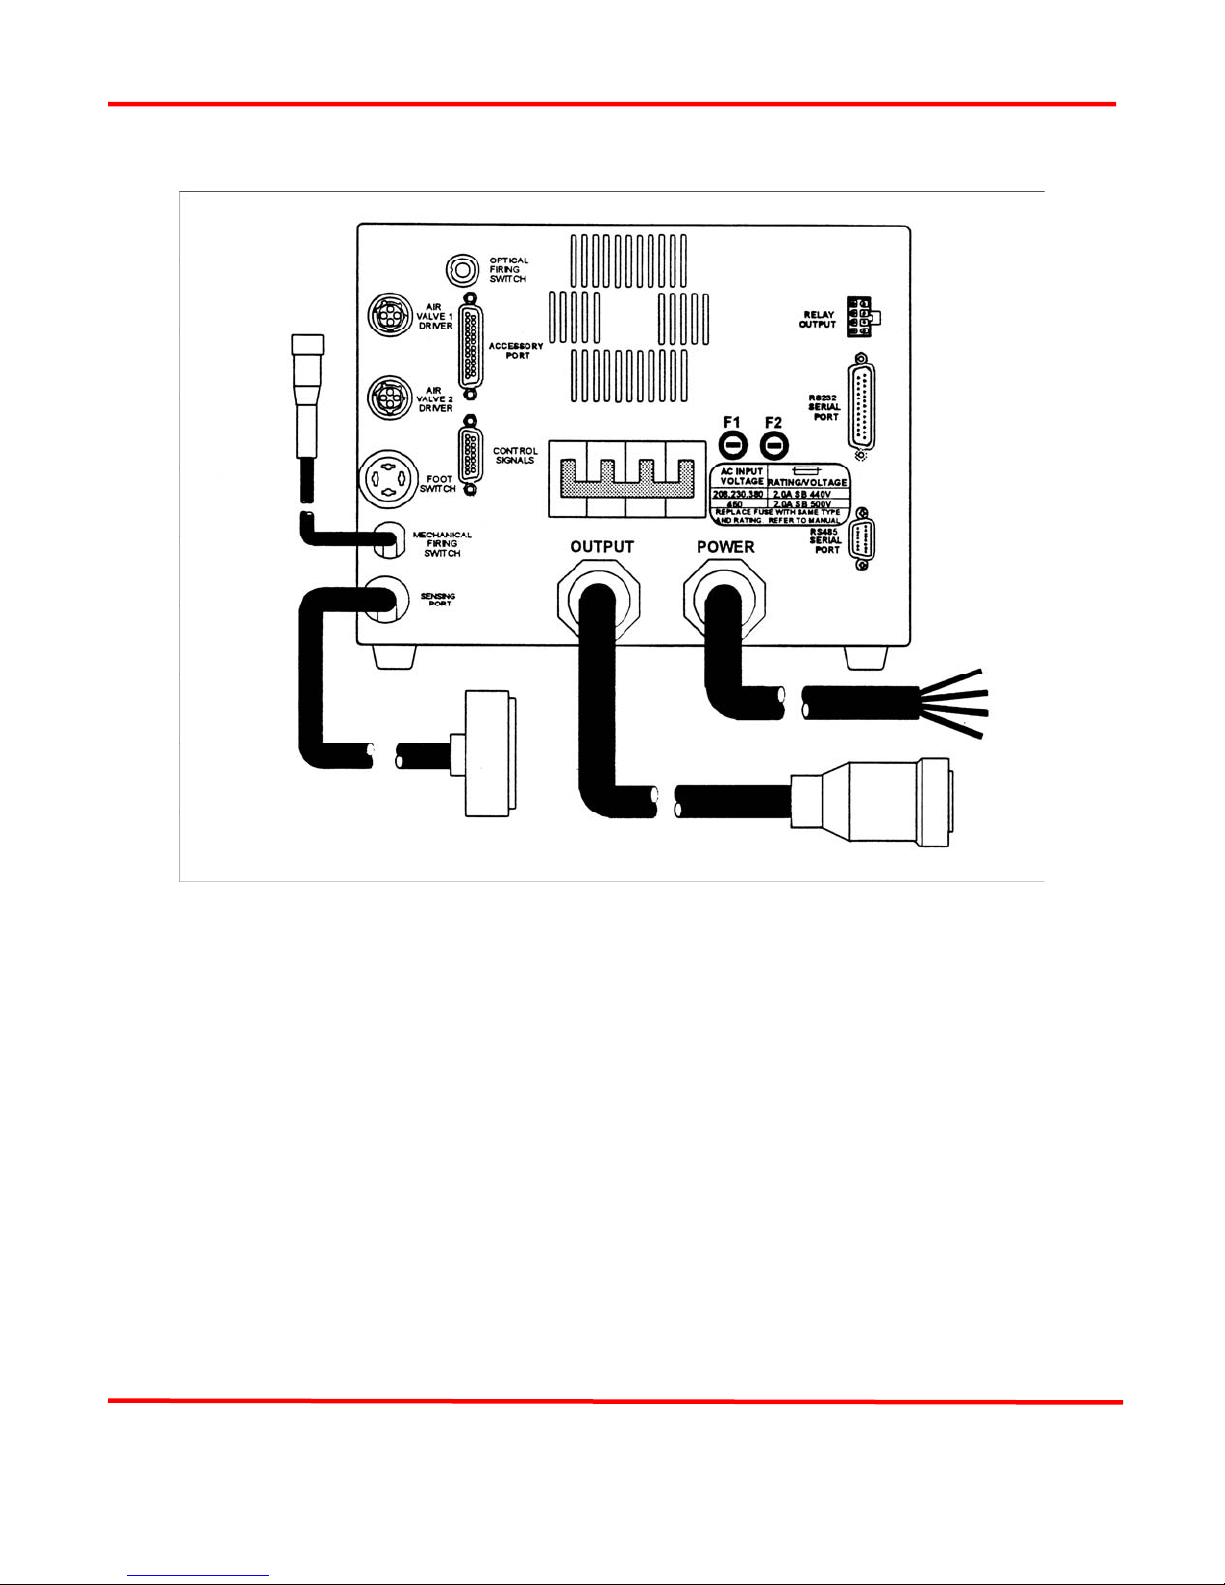
HF2 Weld Control - Rear Panel Inputs and Outputs
CHAPTER 4: CONTROLS
Figure 4-2. HF2 Weld Control Rear Panel
• POWER - Refer to Chapter 2, Power Line Voltage, Current, and Wire Size Requirements, for
complete instructions on how to properly apply power to the HF2 Weld Control.
• FUSES F1, F2 - Refer to Chapter 2, Power Line Fuse Requirements for complete
specifications for Power Line Fuse sizes.
• SENSING PORT
The Sensing Port contains both input and output lines for communicating to the HF2 Weld
Transformer and the MA-600 Multiple Weld Head Selection Box. The connector attached to
the end of the Sensing Port Cable is a 16 pin Honda, P/N: MC16LSF, (Unitek P/N: 250-235).
This connector mates with the connector on the HF2 Weld Transformer.
MODEL HF2 2 kHz HIGH FREQUENCY RESISTANCE WELDING POWER SUPPLY
990-057 4-3

CHAPTER 4: CONTROLS
Sensing Port - Connector Pin Assignments
Pin No. Wire Color Description
1 Red Secondary Weld Current Measurement
2 Red +12 VDC
3 Red Secondary Weld Voltage Measurement
4 Red Weld Transformer Select Line 2 (For MA-600)
5 Red Weld Transformer Thermo Switch
6 Red Weld Transformer Select Line 4 (For MA-600)
7 Red Digital Signal Ground
8 Black 230 VAC Weld Transformer Fan
9 Black Secondary Weld Current Measurement Return
10 Black Weld Transformer Select Line 1 (For MA-600)
11 Black Secondary Weld Voltage Measurement Return
12 Black Weld Transformer Select Line 3 (For MA-600)
13 Black Weld Transformer Thermo Switch Return
14 Black Future Expansion
15 Red Future Expansion
16 Red 230 VAC Weld Transformer Fan Return
OUTPUT
The Output Cable feeds high voltage, pulse width modulated, primary weld current to the primary
winding of the HF2 Weld Transformer. The connector attached to the end of the Output Cable is an
AMP 206136-1 (Unitek P/N: 520-115). The mating connector on the HF2 Weld Transformer is an
AMP 206137-1 (Unitek P/N: 550-071).
Pin No. Wire Color Description
1 Black Primary HF2 Weld Transformer
2 Red Primary HF2 Weld Transformer
4 Green Chassis Ground
6 White Primary HF2 Weld Transformer Return
7 Orange Primary HF2 Weld Transformer Return
MODEL HF2 2 kHz HIGH FREQUENCY RESISTANCE WELDING POWER SUPPLY
4-4 990-057
CHAPTER 4: CONTROLS
FOOT SWITCH Connector
HF2 Weld Control FOOT SWITCH connector uses a 4-pin Amphenol 91-PC4F (Unitek P/N: 550-1-
006) bulkhead connector that mates with an Amphenol 91-MC4M (Unitek P/N: 520-1-009).
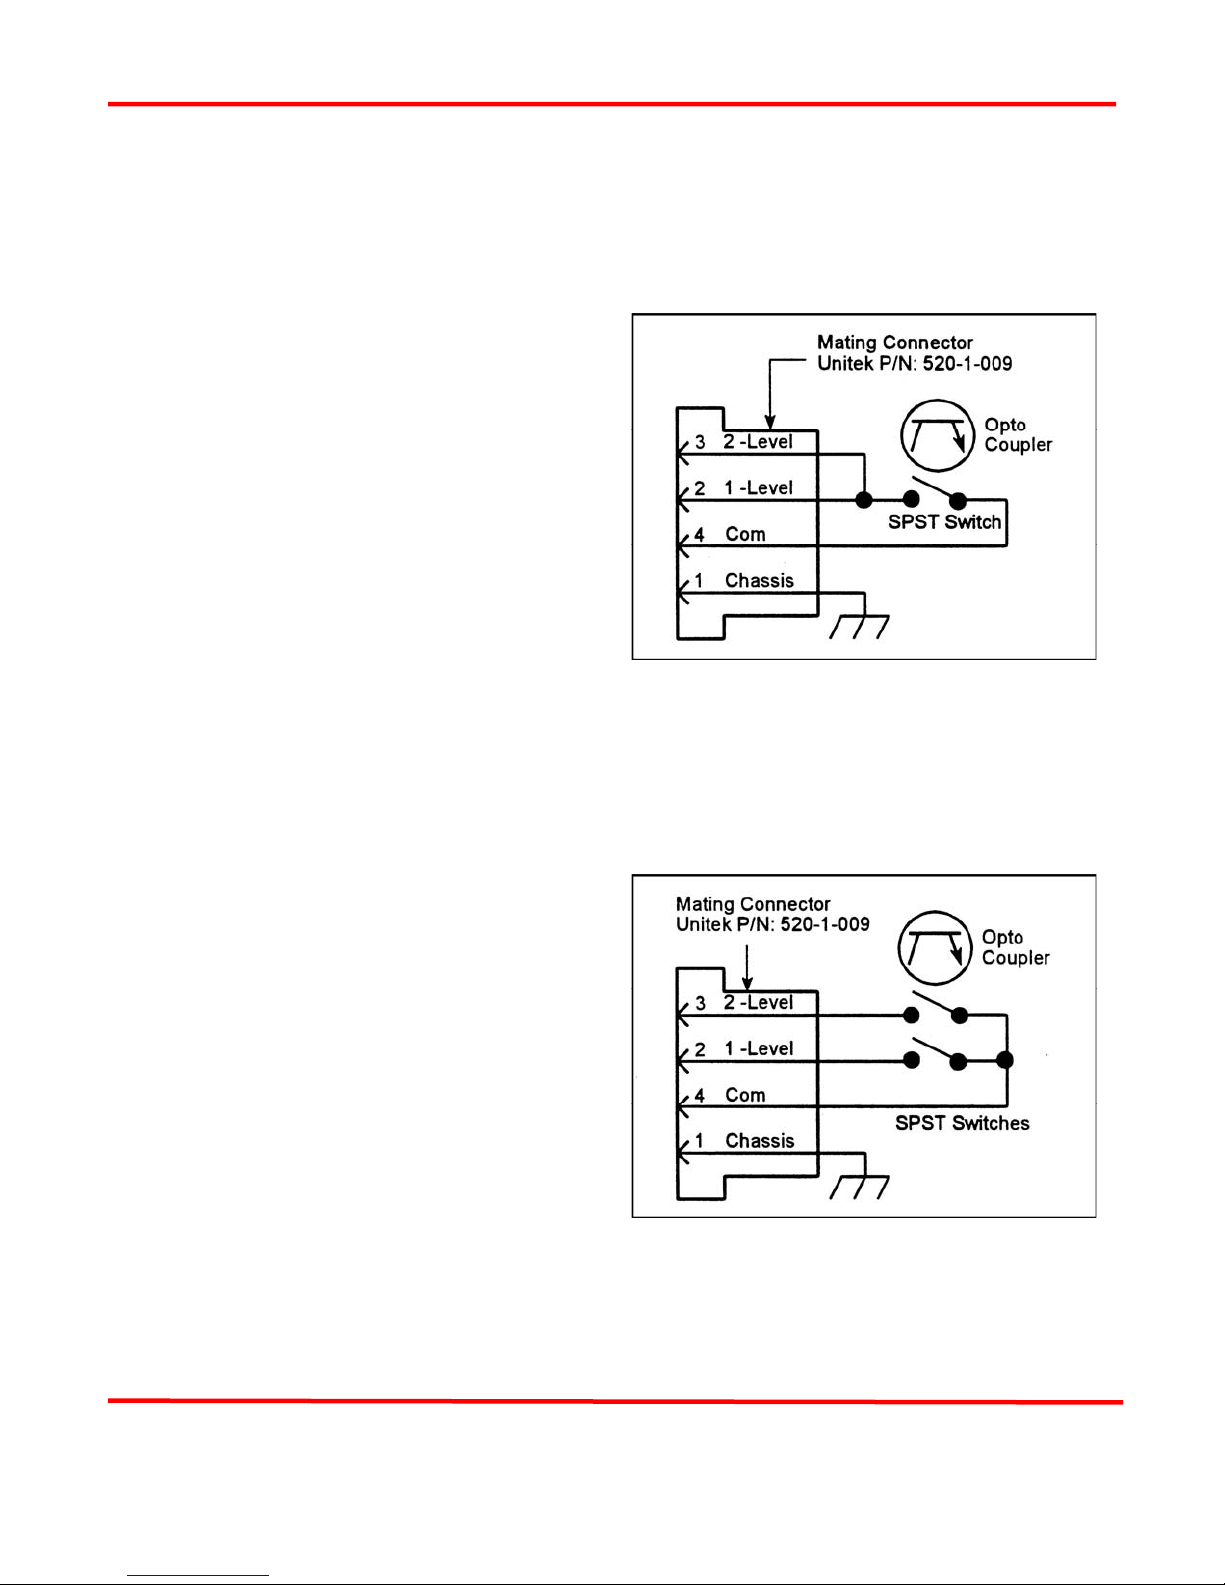
Single-Level Foot Switch (Figure 4-3)
1 A Single-Level Foot Switch must be
fully depressed by the operator. When
the Foot Switch closes, the HF2 Weld
Control energizes the Air Actuated
Weld Head, causing the Upper
Electrode to descend and apply force to
the parts. If the Foot Switch is released
before the Weld Head applies the Preset
Firing Force, the HF2 Weld Control
will automatically return the Upper
Electrode to its up position.
2
Connect a Unitek Model FS1L Foot
Switch, reed relay, or the open collector
of an opto coupler to the Foot Switch
connector to initiate the welding process. The emitter of the opto coupler must be connected to
Pin 4.
Figure 4-3. Single-Level Foot Switch
3 When using a non-Unitek Peco Foot Switch, connect Pin 2 to Pin 3.
Two-Level Foot Switch (Figure 4-4)
1 When a Two -Level Foot Switch is
pressed to the first level, the HF2 Weld
Control energizes the Air Actuated
Weld Head, causing the Upper
Electrode to descend and apply force to
the parts. If the Foot Switch is released
before the operator presses the Foot
Switch to the second level, the HF2
Weld Control will automatically return
the Upper Electrode to its up position so
that the parts can be re-positioned.
Once the second level has been reached
and the Force Firing Switch in the Weld
Head has closed, Weld Current will
Figure 4-4. Two-Level Foot Switch
flow and the HF2 Weld Control will automatically return the Upper Electrode to its up position.
2 Connect a Unitek Model FS2L Foot Switch, reed relay, or the open collector of an opto
coupler to the Foot Switch connector to initiate the welding process. The emitter of the opto
coupler must be connected to Pin 4.
MODEL HF2 2 kHz HIGH FREQUENCY RESISTANCE WELDING POWER SUPPLY
990-057 4-5

CHAPTER 4: CONTROLS
Firing Switch Operation
The HF2 Weld Control can use: (a) a Single Pole, Single Throw Switch (SPST); (b) a Single Pole,
Double Throw (SPDT 3-wire) Switch; or (c) an Optical Switch as an input signal to indicate when the
Weld Head has applied the proper force to the parts. Weld Heads with single pole Firing Switches
should be connected to the Mechanical Firing Switch Connector. A 3-Wire Switch or Optical Firing
Switch, either of which should be connected to the Optical Firing Switch Connector, eliminate switch
bounce, which causes false triggering, and should be used when the welding speed exceeds 1.5 welds
per second.
MECHANICAL FIRING SWITCH Cable
1 The Mechanical Firing Switch Cable is
5 feet long, Type 2/C, 600 volt cable
and contains 2 shielded, twisted 22
AWG conductors of high-flex stranded
wire. The Firing Switch Connector is a
2-pin Amphenol 80-MC2FI (Unitek
P/N: 520-011), with strain relief that
mates with an Amphenol 80-MC2M
(Unitek P/N: 520-001). Pin 2 is Digital
Ground.
2 Connect a Unitek Model Weld Head
Firing Switch, reed relay, or the open
collector of an opto coupler to the Foot
Switch connector to initiate weld
Figure 4-5. Mechanical Firing Switch
current. The emitter of the opto coupler must be connected to Digital Ground, Pin 2.
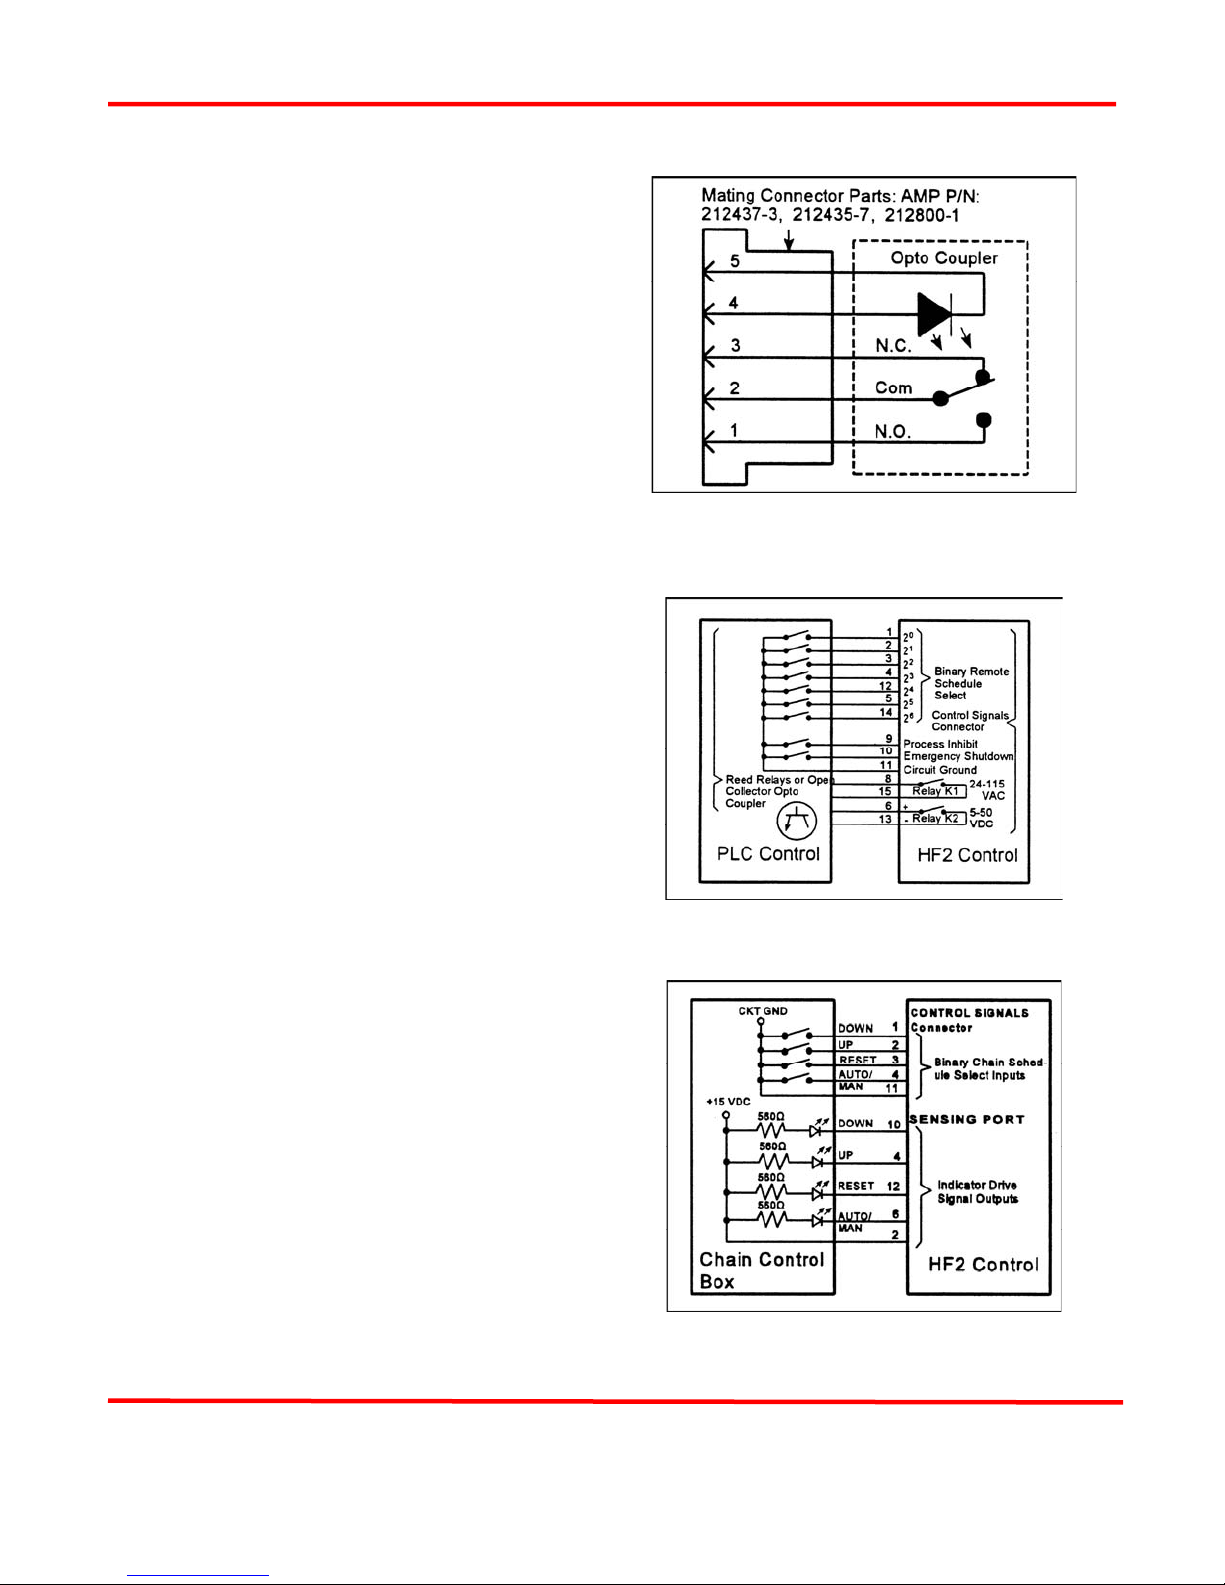
OPTICAL FIRING SWITCH Connector
The Optical Firing Switch Connector is a 5 pin
AMP 212044-1 (Unitek P/N: 550-064) bulkhead
connector and mates with an AMP Assembly
consisting of an AMP 212437-3 Plug, 212435-7
Ferrule and 212800-1 Strain Relief. The Optical
Firing Switch can be used in two configurations
for initiating a welding process: a) Single Pole
Double Throw (SPDT 3-wire); or b) Opto
Coupler.
Mechanical Firing Switch - 3-Wire
Connection
A SPDT (3-wire) mechanical switch can be
connected to the Optical Firing Switch connector
Figure 4-6. Wire Firing Switch
to eliminate the use of Switch Debounce Time when welding at rates of 1.5 welds/second.
MODEL HF2 2 kHz HIGH FREQUENCY RESISTANCE WELDING POWER SUPPLY
4-6 990-057
Opto Coupler Firing Switch - 3-Wire Connection
A SPDT opto coupler switch can be connected to
the Optical Firing Switch connector to eliminate the
use of Switch Debounce Time when welding at
rates of greater than 1.5 welds/second.
CONTROL SIGNALS Connector
1 A 15-pin, sub-miniature "D" Control
Signals Connector includes inputs for:
(a) Remotely selecting weld schedules 1
through 127; (b) Inhibiting the HF2
Weld Control from beginning a new
welding process; and (c) Invoking an
Emergency Stop Condition which
abruptly terminates the welding process.
The Control Signals inputs
and outputs are designed to be used
with a Programmable Logic Control
(PLC) (see Figure 4-8) or a Host
Computer in automated environments.
Figure 4-7. Opto Coupler Firing Switch
CHAPTER 4: CONTROLS
2 When an external chain control box is
connected to the Control Signals
Connector in place of a PLC, chained weld
schedules can be implemented semiautomatically with an external chain
control box (see Figure 4-9).
3
The Control Signals Connector also
includes outputs for: a) One DC Solid
State Relay; and b) One AC Solid State
Relay.
4 The 15 pin connector is a Viking
DMRST15RA05CG (Unitek P/N: 2501-195). The mating connector is a
TRW Cinch Connector comprised of a
DA-15P (Unitek P/N: 250-1-199) male
connector and a DE-51210-1 (Unitek
P/N: 250-1-200) plastic junction shell.
The mating connector is included in the
HF2 Weld Control Shipping Kit.
Figure 4-8. Control Signals Connection
MODEL HF2 2 kHz HIGH FREQUENCY RESISTANCE WELDING POWER SUPPLY
990-057 4-7
Figure 4-9. Remote Chain Control Box
Input/Output Signals

CHAPTER 4: CONTROLS
5 Connect a reed relay, or the open collector of an opto coupler to the Control Signals connector
to initiate the selection process. The emitter of the opto coupler must be connected to Pin 11.
Keep the selected input closed to maintain the selection.
Control Signals - Pin Assignments
Pin No. I/O Description
1 Input PLC input: Remote Weld Schedule Selection, Control Line 20
Chain control box (CCB) input: Schedule Down (decrement number)
2 Input PLC input: Remote Weld Schedule Selection, Control Line 21
CCB input: Schedule Up (increment number)
3 Input PLC input: Remote Weld Schedule Selection, Control Line 22
CCB input: Reset (set schedule # to power up schedule #)
4 Input PLC input: Remote Weld Schedule Selection, Control Line 23
CCB input: Auto/Manual (enable/disable chain function)
5 Input Remote Weld Schedule Selection, Control Line 25
6 Out-put Relay K2, + 5-50 VDC (User must supply power)
7 NC
8 Out-put Relay K1, 24-115 VAC (User must supply power)
9 Input Process Inhibit
10 Input Emergency Stop
11 Input Circuit Ground
12 Input Remote Weld Schedule Selection, Control Line 24
13 Out-put Relay K2, + 5-50 VDC Return
14 Input Remote Weld Schedule Selection, Control Line 26
15 Out-put Relay K1, 24-115 VAC Return
MODEL HF2 2 kHz HIGH FREQUENCY RESISTANCE WELDING POWER SUPPLY
4-8 990-057

CHAPTER 4: CONTROLS
Control Signals - Remote Weld Schedule Selection Input
All weld schedules must be entered and saved using the HF2 Weld Control Front Panel keys. After
saving the desired weld schedules, each schedule can be recalled prior to initiating the welding process
cycle. Using the PLC (Figure 4-8), remote weld schedule selection (chain schedule feature turned off)
can be implemented by closing the binary Remote Schedule Select lines according to the following
table:
WELD
SCHED
0 0 0 0 0 0 0 0
1 1 0 0 0 0 0 0
2 0 1 0 0 0 0 0
Binary progression from 3 to 126
127 1 1 1 1 1 1 1
NOTE: 0 = Open; 1 = Closed
Using a remote chain control box in place of the PLC, a semi-automatic chain weld schedule can be
used to control the remote schedule select lines through the Control Signals Connector in accordance
with the following table:
Pin No. Function Description
0
2
Pin 1 21 Pin 2 22 Pin 3 23 Pin 4 24 Pin 12 25 Pin 5 26 Pin 14
1 Schedule Down Decrement the schedule number
2 Schedule Up Increment the schedule number
3 Reset Set the schedule number = power up schedule number
4 Auto/Manual Enable (Auto)/disable (Manual) the chain schedule function
Note: If (Manual) is selected on pin 4, the chain control box will override the HF2 chain schedule on/off
function and weld schedules can be selected manually from the chain control box (see Figure 4-9).
Control Signals - Emergency Stop Input (Figure 4-8)
Connect a reed relay, or the open collector of an opto coupler to Pin 10 of the Control Signals connector
to immediately terminate the welding process. No welding process can be initiated until the switch
closure has been removed. The emitter of the opto coupler must be connected to Pin 11.
MODEL HF2 2 kHz HIGH FREQUENCY RESISTANCE WELDING POWER SUPPLY
990-057 4-9

CHAPTER 4: CONTROLS
Control Signals - Process Inhibit Input (Figure 4-8)
Connect a reed relay, or the open collector of an opto coupler to Pin 9 of the Control Signals connector
to prevent a new welding process from beginning. No welding process can be initiated until the switch
closure has been removed. The emitter of the opto coupler must be connected to Pin 11.
Control Signals - Output Relays (Figure 4-8)
There are two output relays which can be used to provide status or timing signals to a user
Programmable Logic Control (PLC) or Host Computer. Relay K1 can switch a 24 to 115 VAC signal.
Relay K2 can switch a 5 to 50 VDC signal. When used for status signals, these relays can be
independently programmed to close (a) when the HF2 Weld Control is initiated; (b) when any portion of
the welding process is completed; (c) when the Firing Switch opens; or (d) when the HF2 Weld Control
is waiting for the welding process sequence to start.
Relay K1 (Figure 4-10)
1 Connect a 24 to 115 VAC voltage
source and PLC load to Pins 8 and 15
on the Control Signals Connector.
Maximum relay current is limited to
250 ma.
2 Relay K1 is also used to control the Air
Valve 2 Driver for sequentially
activating a second Air Actuated Weld
Head. Refer to Chapter 3, Unitek Peco,
Force Fired, Dual Air Actuated Weld
Head System for complete instructions
to set up and operate two sequential
action Air
Figure 4-10. Relay K and K2 Connections
Actuated Weld Heads. When MENU, OPTIONS 2, WELD HEAD TYPE: is set to DUAL
AIR, the options for RELAY 1 must be either AIR HEAD 2 or NOT USED. Air Valve 2
Driver will be actuated in any Schedule in which RELAY 1 is defined as AIR HEAD 2. Air
Valve 1 Driver is actuated in any Schedule in which RELAY 1 is defined as NOT USED.
Relay K2 (Figure 4-10)
Connect a 5 to 50 VDC voltage source and PLC load to Pins 6 (Positive) and 13 (Negative) on the
Control Signals Connector. Maximum relay current is limited to 250 ma.
Accessory Port (Figure 4-2)
A 25-pin, sub-miniature D-type connector, located on the rear panel, is provided to control other
devices contemplated for future expansion.
MODEL HF2 2 kHz HIGH FREQUENCY RESISTANCE WELDING POWER SUPPLY
4-10 990-057

CHAPTER 4: CONTROLS
AIR VALVE 1 and AIR VALVE 2 Driver Connectors (Figure 4-11 and Figure 4-12)
Air Valve 1 Driver (Figures 4-11 and 4-12)
Each Air Valve Driver uses a 4-pin black plastic
AMP 206430-1 (Unitek P/N: 550-062) bulkhead
connector. The mating plug is an AMP 2064291 (Unitek P/N: 520-107) which uses a cable
clamp, Amp 206358-2 (Unitek P/N: 245-084)
and 3 male pins AMP 66361-2 (Unitek P/N: 253-
055). When using a non-Unitek Peco Air
Actuated Weld Head, connect Pin 2 to Pin 4.
The HF2 Weld Control can sequentially operate
two separate Air Actuated Weld Heads using Air
Valve 1 Driver and Air Valve 2 Driver outputs.
Air Valve 1 Driver (Figures 4-11 and 4-12)
The output of Air Valve 1 Driver is 12 VA at
115 or 24 volts VAC. The HF2 Weld Control
automatically applies the correct solenoid
voltage to the Air Actuated Weld Head
connected to the Air Valve 1 Driver.
Air Valve 2 Driver (Figure 4-12)
Figure 4-11. 115 VAC Weld Head Solenoid
Air Valve 2 Driver provides 24 VAC at 12 VA
to power a second Air Actuated Weld Head. To
provide 24 VAC to Air Valve 2 Driver, jumpers
E10 and E11 on the control board must be
Figure 4-12. 24 VAC Weld Head Solenoid
moved to the correct positions. Refer to Chapter
3, Unitek Peco, Force Fired, Dual Air
Actuated Weld Head System for complete instructions to set up and operate two sequential action Air
Actuated Weld Heads. Note: When Air Valve 2 Driver is used, Relay K1 cannot be used for marking
weld periods or activating alarm conditions.
MODEL HF2 2 kHz HIGH FREQUENCY RESISTANCE WELDING POWER SUPPLY
990-057 4-11


CHAPTER 5
PROGRAMMING MODES
Help Screens
NOTE: We offer our non-English speaking users
help screens written in various languages (refer to
Appendix D). For further information, please
contact the factory.
1 The HF2 Weld Control offers the user
context sensitive HELP when running or
programming. Press [HELP] whenever
you want information about a Menu
Option or program variable. Press
[HELP] again to return to the original
screen. For example, if you press
[HELP] from the RUN State,
information on the function of the Weld
Graph and Alphanumeric screens will
appear.
2 To read the second page of help
information, press the right horizontal
cursor key [ ].
3 To return to the first page of help information, press the left horizontal cursor key [ ].
Machine States
The HF2 Weld Control has eight Machine States: RUN, NO WELD, STANDBY, ALARM, FIRE,
MENU, PROGRAM, and HELP. The NO WELD State represents the positional status of the
WELD/NO Switch on the front panel. The STANDBY, ALARM, and FIRE states are functions of
MECHANICAL FIRING, OPTICAL FIRING, and FOOT SWITCH input states. The operator can
force the HF2 Weld Control into the RUN, MENU, PROGRAM, and HELP states by pressing the
[RUN], [MENU], [PROG] or [HELP] keys.
Weld Graph RUN State
In the Weld Graph RUN State, the HF2 Weld
Control is ready to make a weld. You can select,
but not change, any weld schedule by using the
vertical cursor keys [
Panel. Weld schedules may also be selected by
using the numeric keypad to key in the desired
weld schedule number: 000 through 127.
] or [ ] on the Front
MODEL HF2 2 kHz HIGH FREQUENCY RESISTANCE WELDING POWER SUPPLY
990-057 5-1

CHAPTER 5: PROGRAMMING MODES
Basic Weld Monitor Run State
When MENU, OPTIONS 1, WELD MONITOR:
is set to BASIC, pressing [CHNG] will cause the
display screen to switch from the Weld Graph
RUN screen to the Basic Weld Monitor RUN
screen. Setting WELD MONITOR to LIMIT
causes the Energy Limit Monitor screen to be
displayed. See Chapter 7 and Chapter 8 for
detailed instructions.
Pressing [CHNG] again causes the Basic Weld Monitor RUN screen to switch to the Alphanumeric
RUN screen. Pressing [CHNG] once more returns the display screen to the Weld Graph RUN screen.
Alphanumeric RUN State
Pressing [CHNG] will cause the display screen
to change from the Basic Weld Monitor RUN
screen, if this option has been set to ON, to the
Alphanumeric RUN screen. Pressing [CHNG]
again will return the HF2 Weld Control to the
Weld Graph screen. Welding can be performed
in any RUN screen.
NO WELD State
Switching the WELD/NO WELD front panel
switch to the NO WELD position prevents weld
current from flowing but does permit the HF2
Weld Control to performing its electronic
functions. Use the NO WELD State when
adjusting the air regulators on Air Actuated
Weld Heads.
STANDBY State
The HF2 Weld Control is waiting for a
mandatory event to occur such as: (a) the Firing
Switch in a Unitek Peco Air Actuated Weld
Head to close; (b) the second level of a 2-Level
Foot Switch to close; or (c) waiting to be reset to
another schedule after a STOP Command in a
Chained Schedule.
MODEL HF2 2 kHz HIGH FREQUENCY RESISTANCE WELDING POWER SUPPLY
5-2 990-057

ALARM State
The HF2 Weld Control automatically recognizes
many alarm conditions which are described in
detail under Appendix C, Alarm Messages. The
ALARM FIRING SWITCH screen shown on the
right is displayed when the Firing Switch of a
Unitek Peco Air Actuated Weld Head does not
close within 10 seconds.
FIRE State
Once weld current is flowing, the HF2 Weld
Control is in the Fire State. Weld current can be
terminated by: (a) removing the first level of a
single-level Foot Switch; (b) removing the
second level of a two-level Foot Switch; or (c)
shorting the Emergency Stop Control Signals
Input Pin 10 to Pin 11. Completion of the Firing
State is indicated by momentary appearance of
the END status message as shown in the example
to the right.
MENU State
CHAPTER 5: PROGRAMMING MODES
Pressing [MENU] puts the HF2 Weld Control in
the MENU State, which offers you different
options common to all weld schedules such as
how the HF2 Weld Control interfaces with the
Firing Switch, Foot Switch, and Weld Head.
Like a tree with many branches, there are
multiple Menu levels. Each new level is
accessed by making an option selection, then
pressing [ENTER]. To return to a previous
Menu level, press [MENU]. For a complete
description on Menu Options, refer to Chapter 7,
System Options.
MODEL HF2 2 kHz HIGH FREQUENCY RESISTANCE WELDING POWER SUPPLY
990-057 5-3
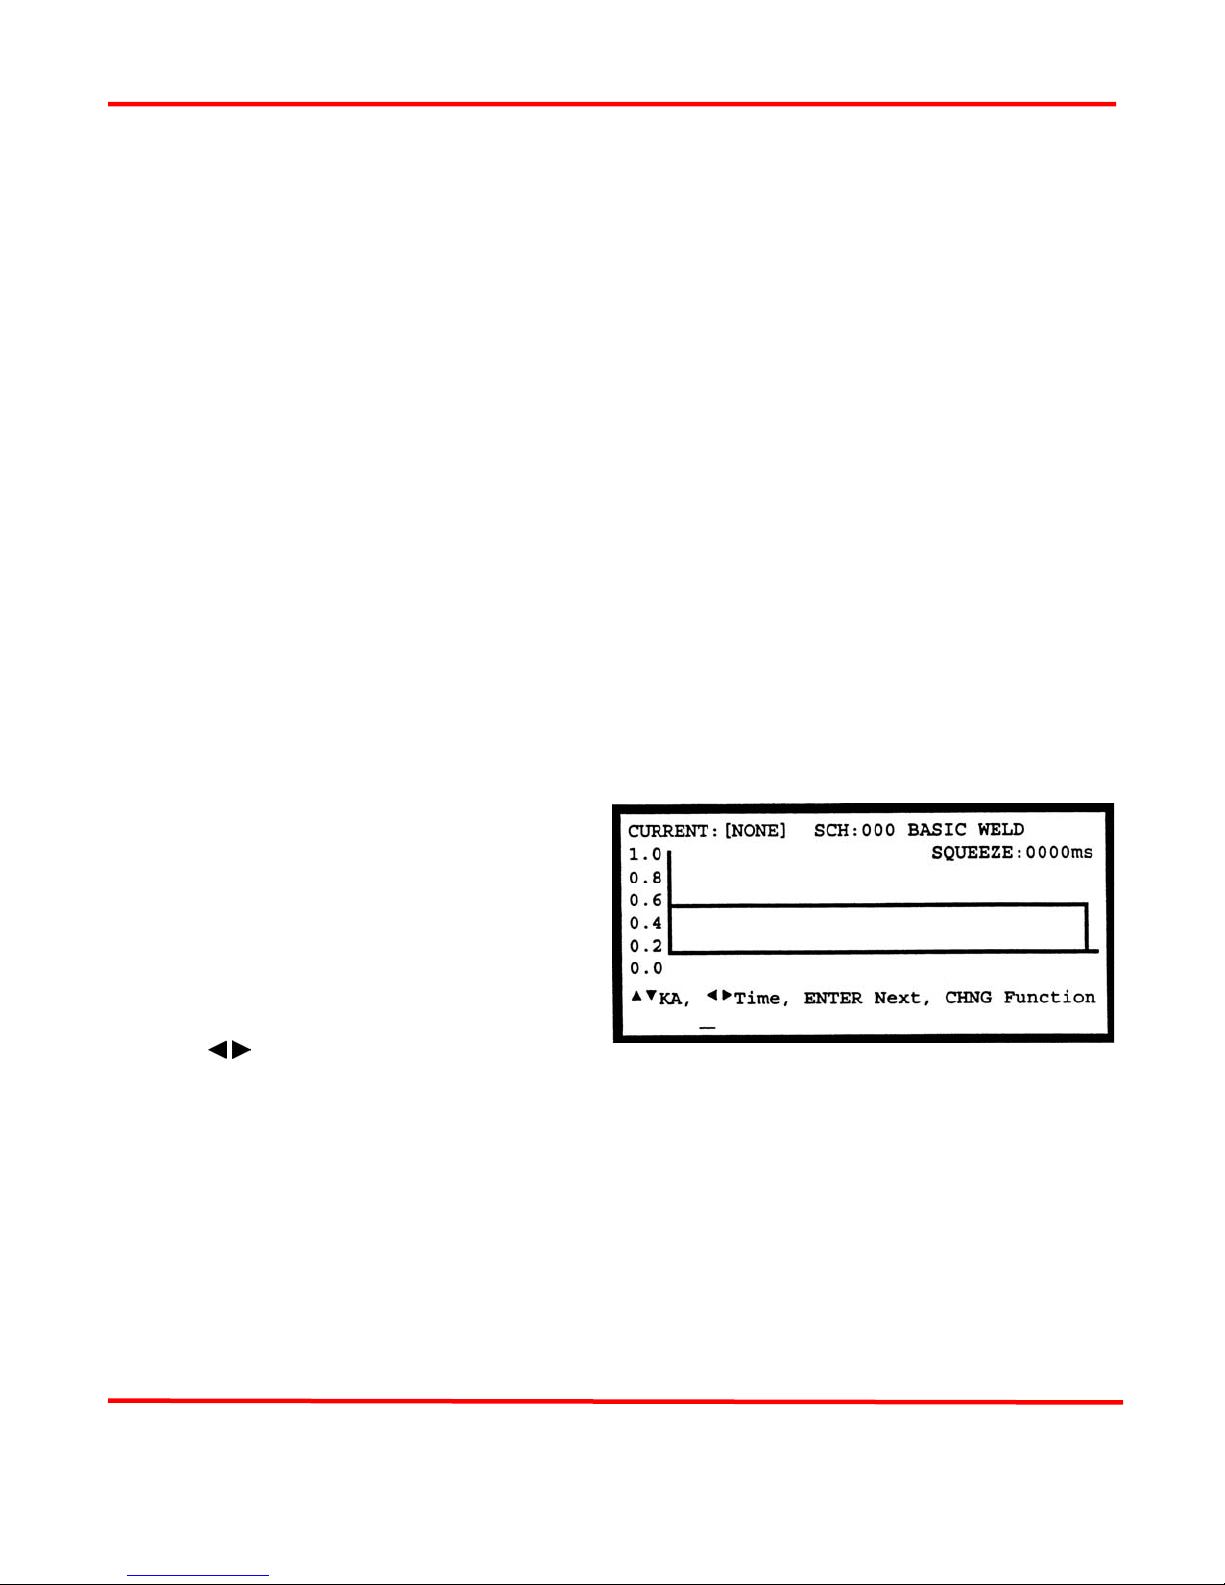
CHAPTER 5: PROGRAMMING MODES
PROGRAM State
1 In the PROGRAM State, the HF2 Weld Control allows the user to change and save any weld
schedule. In those units which include the Weld Sentry Option, the PROGRAM State also
allows the user to change the Measurement Unit, the Limits related to each Weld Sentry
program, as well as the other parameters associated with the Weld Sentry.
2 A single weld schedule uses one Weld Function. A Weld Function is defined as a series of user
programmable time periods, some of which have programmable weld current, voltage, or
power levels. Some periods such as SQUEEZE, COOL, QUENCH, HOLD, and OFF do not
have any weld current values associated with them. For a complete description of all Weld
Functions, their time periods, and limit values, refer to Chapter 6, Advanced Welding
Functions.
3 SQUEEZE Time is automatically included as a weld schedule program variable when MENU
OPTIONS 2, WELD HEAD TYPE: is set to AUTO, AIR, or DUAL AIR and an Air Actuated
Weld Head is connected to the HF2 Weld Control. Squeeze Time allows sufficient time for a
non-force fired Weld Head to apply the required weld force to the work pieces. Squeeze Time
is not normally used with Unitek Peco force fired Weld Heads. The weld period will start as
soon as the Squeeze Time expires. Squeeze Time can be set to any number between 0 and 2000
ms.
NOTE: There are two methods of programming the HF2 Weld Control: (a) use the Weld
Graph PROGRAM State; or (b) use the Alphanumeric PROGRAM State.
Weld Graph PROGRAM State
1 Use the vertical cursor keys [ VW ] to
select the weld schedule that you want
to modify. Press [PROG] to enter the
Weld Graph PROGRAM State.
2 Press [ENTER] to select the period that
you want to modify. Note: the upper
right-hand corner shows the selected
period. Use the horizontal cursor keys
[ ] to increase or decrease the
period time base which is also
displayed in the upper right-hand corner following the selected period. You can also change
the period time base by using the keypad to directly enter the exact time. Periods such as
SQUEEZE, COOL, QUENCH, HOLD, and OFF do not have any weld current, voltage, or
energy values. This example shows an Air Actuated Weld Head schedule with the SQUEEZE
period set to 0000 ms.
MODEL HF2 2 kHz HIGH FREQUENCY RESISTANCE WELDING POWER SUPPLY
5-4 990-057

3 Periods such as WELD, WELD1,
WELD2, and TEMPER have user
programmable time base values and
weld current, voltage, or energy values.
To change the Feedback Type for any
of these weld periods, press the keypad
decimal point [.] multiple times until the
upper left-hand portion of the screen
shows the desired Feedback Type. This
example shows a WELD period of 15
ms with the weld CURRENT set to 0.5
kA.
4 To change the weld current, use the
vertical cursor keys [ VW ] to increase
or decrease the weld CURRENT. Note:
when holding the vertical cursor keys
down to change the weld CURRENT,
the horizontal bar representing the weld
CURRENT will not move to its new
position until the vertical cursor keys
[ ] are released. However, the weld CURRENT value displayed in the upper left-hand
corner will automatically scroll during this change process. In this example, weld CURRENT
has been increased to 0.7 kA and WELD time has been increased to 20 ms.
CHAPTER 5: PROGRAMMING MODES
5 Press [SAVE] to save the updated weld schedule. You are now back in the Weld Graph RUN
State.
Alphanumeric PROGRAM State
1 Use the vertical cursor keys [ VW ] to select the weld schedule that you want to modify. From
the Weld Graph RUN State or Basic Weld Monitor RUN State, press [PROG] multiple times to
enter the Alphanumeric PROGRAM State. If you are already in the Alphanumeric PROGRAM
State, press [PROG] once.
2 Use the vertical cursor keys [ VW ] and
horizontal cursor keys [ ] to select
the program value that you want to
change. Use [CHNG] to select
CURRENT, VOLTAGE or POWER
Feedback. Use the numeric keypad to
enter variable values. This example
shows the alpha-numeric version of
weld schedule 000 in the middle of this
page. Weld CURRENT is set to 0.7 kA and WELD time to 20 ms.
3 Press [SAVE] to save the updated weld schedule.
MODEL HF2 2 kHz HIGH FREQUENCY RESISTANCE WELDING POWER SUPPLY
990-057 5-5

CHAPTER 5: PROGRAMMING MODES
4 Press [CHNG] To operate the HF2 Weld Control in the Weld Graph State.
Output Relays
The HF2 Weld Control has two solid state relays which can be used to provide status or timing signals
to a user Programmable Logic Control (PLC). For a full description on how to connect Relay K1 and
Relay K2, refer to Chapter 4, Control Signals, Output Relays.
1 Relay K1 and Relay K2 can only be programmed in the Alphanumeric PROGRAM State.
2 Use the vertical cursor keys [ VW ] to select the weld schedule that you want to modify. From
the Weld Graph RUN State or Basic Weld Monitor RUN State, press [PROG] multiple times to
enter the Alphanumeric PROGRAM State. If you are already in the Alphanumeric PROGRAM
State, press [PROG] once.
3 Press [ W ] until the RELAY 1 and
RELAY 2 legends are displayed. Both
relays can be activated in the
SQUEEZE, WELD, and HOLD
periods. Press [CHNG] to select ON.
In this example, RELAY 1 will turn on
during the WELD period.
4 There are four more RELAY 1 options
listed under the SQZ period column.
Press [CHNG] to select the RUN
STATE option. In this example, notice
that the RELAY 1 options for the
WELD and HOLD periods disappear.
Selecting the RUN STATE option will
cause RELAY 1 to always be on when
the HF2 is not making a weld.
5 Press [CHNG] until the ALARM (NO)
option appears. An ALARM condition
causes RELAY 1 to switch from the
normally open (NO) state to the closed
state. RELAY 1 automatically opens
when the alarm condition is cleared by
pressing [RUN] or when the next
welding sequence begins.
6
Press [CHNG] until the ALARM (NC)
option appears. An alarm condition
causes RELAY 1 to switch. An alarm
condition causes RELAY 1 to switch from the normally closed state (NC) to the normally open
state. RELAY 1 automatically closes when the alarm condition is cleared by pressing [RUN] or
when the next welding sequence begins.
MODEL HF2 2 kHz HIGH FREQUENCY RESISTANCE WELDING POWER SUPPLY
5-6 990-057
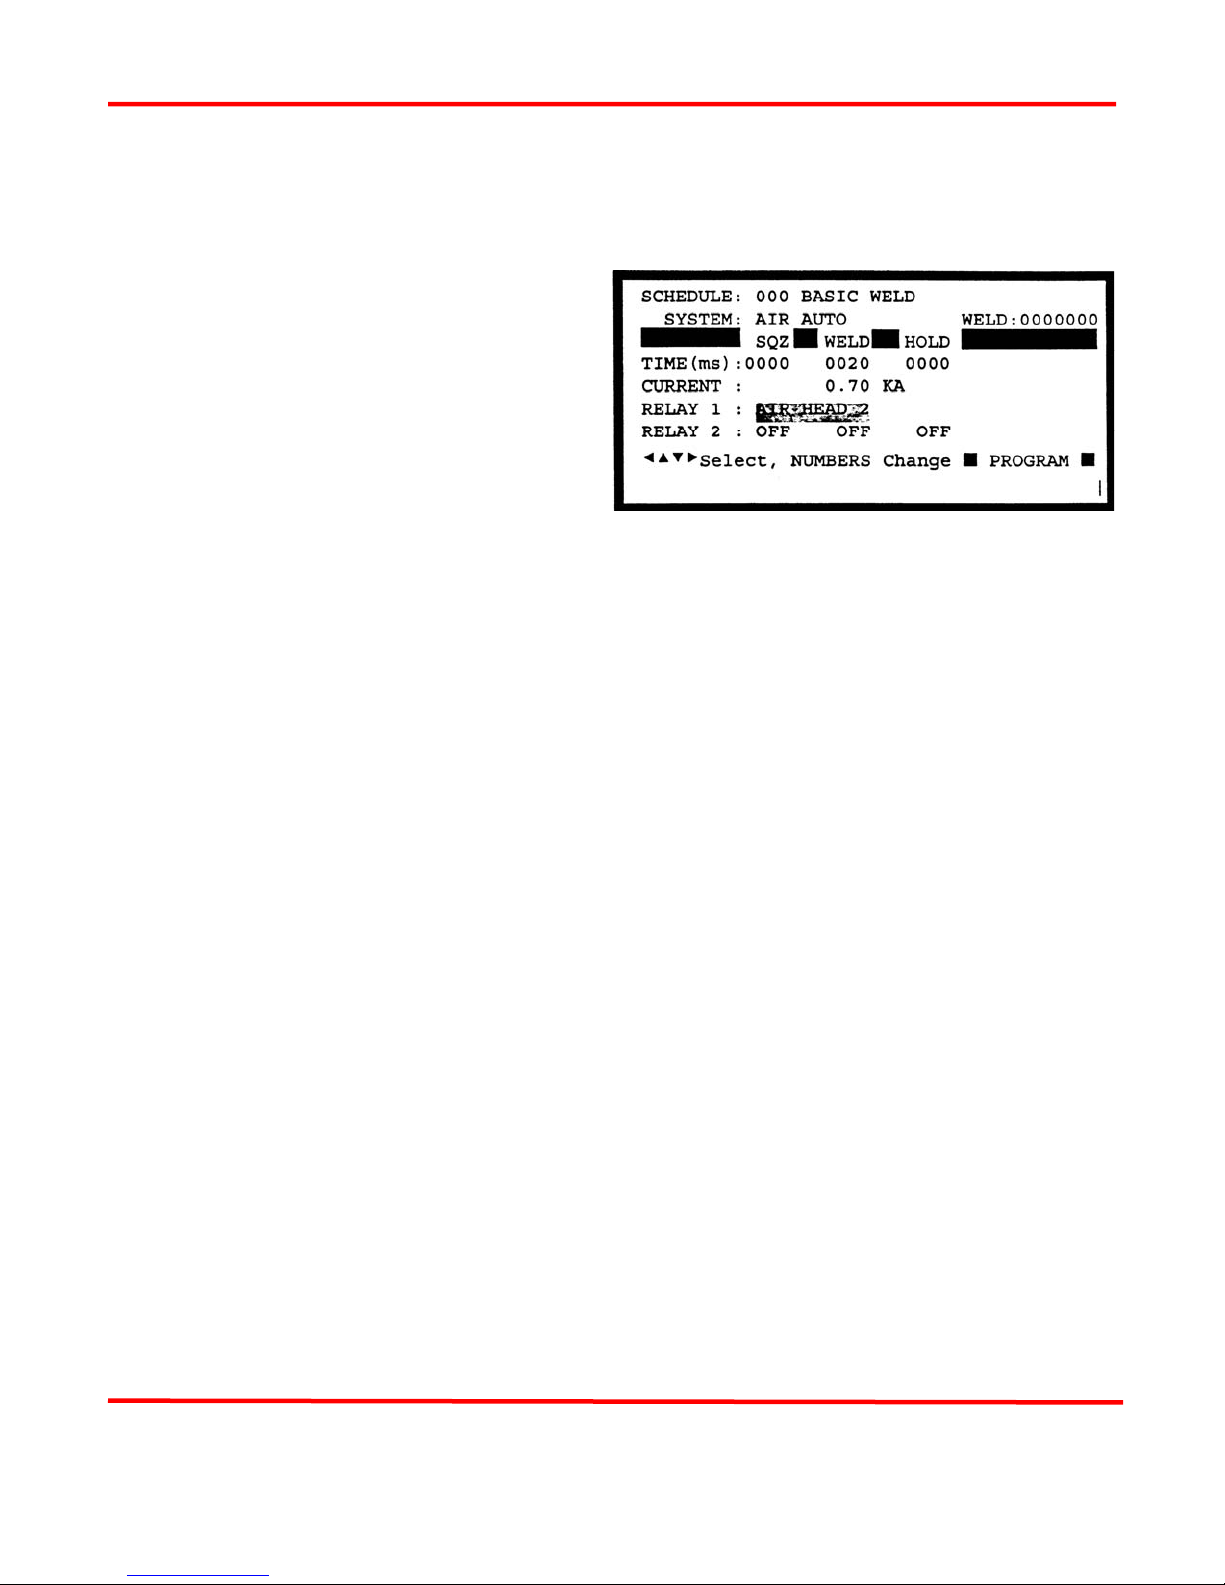
CHAPTER 5: PROGRAMMING MODES
7 Press (CHNG] until the END PROCESS option appears. RELAY 1 automatically turns ON
for a period of 20 msec after the last TIME period.
RELAY 1 - Dual Air Head Operation
1 RELAY 1 has one additional option not
shared with RELAY 2. RELAY 1 is
also used to control the Air Valve 2
Driver for sequentially activating a
second Air Actuated Weld Head. Refer
to Chapter 3, Unitek Peco, Force Fired,
Dual Air Actuated Weld Head System
for complete instructions to set up and
operate two sequential action Air
Actuated Weld Heads.
2 When MENU OPTIONS 2, WELD HEAD TYPE: is set to 'DUAL AIR", the options for
RELAY 1 must be either AIR HEAD 2 or NOT USED. Air Valve 2 Driver will be actuated in
any Schedule in which RELAY 1 is defined as AIR HEAD 2. Air Valve 1 Driver is actuated in
any Schedule in which RELAY 1 is defined as NOT USED. This example shows RELAY 1
set to turn on AIR HEAD 2.
3 Press [SAVE] to save the updated weld schedule.
4 Press [CHNG] to operate the HF2 Weld Control in the Weld Graph State.
MODEL HF2 2 kHz HIGH FREQUENCY RESISTANCE WELDING POWER SUPPLY
990-057 5-7


CHAPTER 6
ADVANCED WELD FUNCTIONS
Weld Functions
A weld function is a unique heat profile created by weld current, voltage, or power that is applied over a
fixed time period, to resistance weld different parts. Welding applications requiring the use of
specialized weld functions include: (a) parts plated with cadmium, tin, zinc, or nickel; b) parts with
heavy oxide coatings such as aluminum; (c) parts that are round or not flat; or (d) parts made of
refractory metals such as molybdenum or tungsten.
The HF2 Weld Control is shipped with ten pre-programmed weld functions that are saved in Weld
Schedules 001 through 010. While these factory pre-programmed weld functions do not contain
sufficient weld time or weld energy for most welding applications, they are a useful starting point to
begin welding. Please note that WELD/REPEAT will only work with Air Actuated Weld Heads. The
table below lists each Weld Function and its general application.
Weld Function
Pre-Prog
Schedule
Typical Application
BASIC WELD 001 Make single spot welds on simple flat parts without plating.
WELD/REPEAT 002 Make multiple semi-automatic spot welds using an operator.
QUENCH/TEMPER 003 Spot weld flat or round parts that have minimum plating thickness.
PRE/POSTHEAT 004 Forge weld heavily oxidized or refractory parts such as molybdenum or tungsten.
UP/DOWNSLOPE 005 Weld round parts, parts that are not flat, spring steel parts, or heavily plated or
oxidized parts such as aluminum.
BRAZE 006 Reflow two parts together using a braze material.
ROLLSPOT 007 Make automated multiple weld spots using automatic feeders and PLC or host
computer.
SEAM 008 Make automated hermetic seam welds using automatic feeders, and PLC or host
computer control.
Make manual or semi-automatic non-hermetic seam welds using an operator.
DUAL PULSE 009 Use for best control of miniature and small parts spot welding with or without
plating.
PULSATION 010 Use only for spot welding simple parts where the total weld energy or weld time
required to make an acceptable weld using any other Weld Function is marginal.
Using the Pulsation Weld Function can damage the crystal structure of the parts.
MODEL HF2 2 kHz HIGH FREQUENCY RESISTANCE WELDING POWER SUPPLY
990-057 6-1
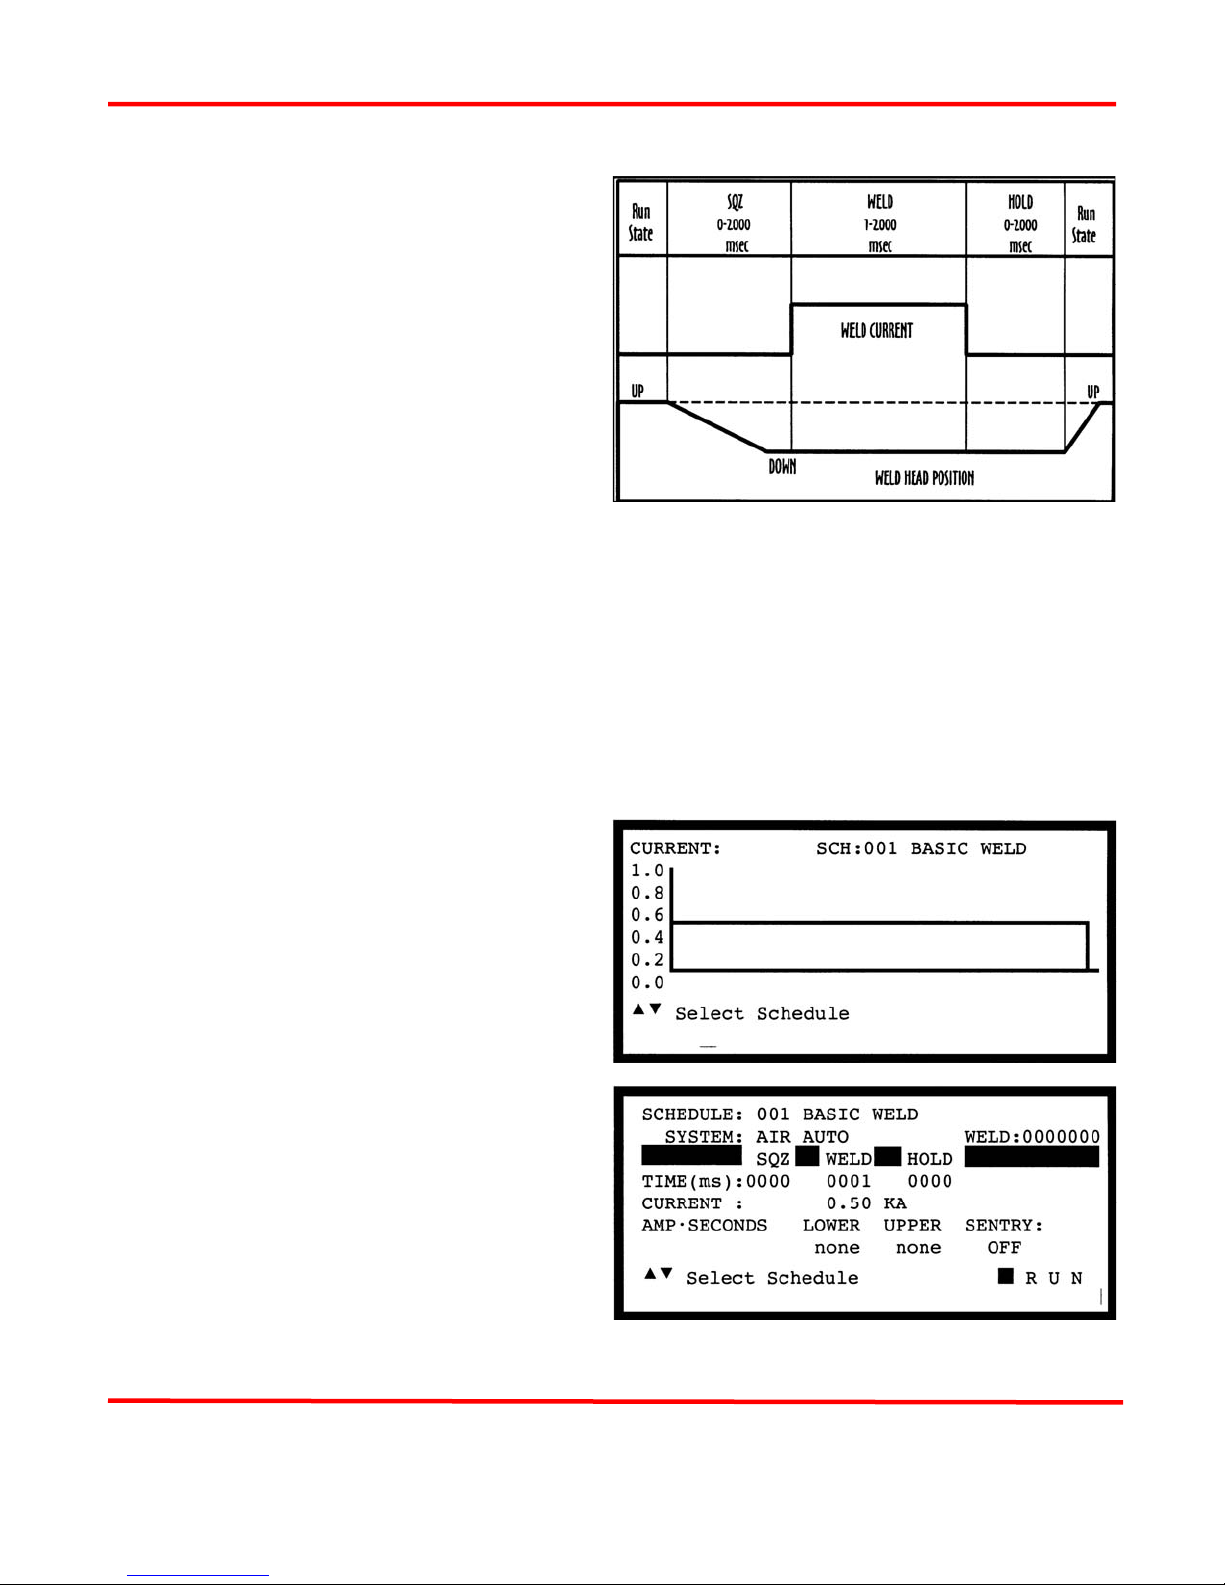
CHAPTER 6: ADVANCED WELD FUNCTIONS
BASIC WELD (Figure 6-1)
Basic Weld is a term used by the industry to
describe the simplest heat profile used in the
majority of resistance spot welding applications.
Use Basic Weld to make single spot welds on flat
parts that do not have any plating or heavy oxides.
Basic Weld can be used with Unitek Peco Force
Fired Manual or Air Actuated Weld Heads. For
Manually Actuated Weld Heads, weld current
begins when the Force Firing Switch closes. For
Force Fired Air Actuated Weld Heads, weld current
begins when both levels of a two-level Foot Switch
are closed and the Force Firing Switch in the Air
Actuated Weld Head closes.
When Basic Weld is used with a Non-Force Fired Air Actuated Weld Head, the Squeeze (SQZ) Period
must be used to allow sufficient time for the electrodes to close and apply the required weld force to the
parts before the Weld Period begins. Weld current begins when the Squeeze Period ends and both levels
of a two-level Foot Switch are closed.
Figure 6-1. Basic Weld
When Basic Weld is used with any type of Air Actuated Weld Head, the Hold Period can be used to
automatically keep the electrodes closed on the parts after weld current has terminated for the purpose of
providing additional heat sinking or parts cooling. Squeeze and Hold Periods have no meaning with
Manually Actuated Weld Heads and do not appear on either the weld schedule Program or Run screens.
Basic Weld - Weld Graph Run Screen
(Figure 6-2)
Weld Schedule 001 is pre-programmed at the
factory for Basic Weld operation. The HF2
Weld Control automatically recognizes the
presence of a Manually or Air Actuated Weld
Head before the first weld is made.
Basic Weld - Alphanumeric Run Screen
(Figure 6-3)
To simultaneously view all pre-programmed
time periods and energy settings, press [CHNG]
to select the Alphanumeric Run screen. The 7
digit Weld Counter is displayed in the upper
right corner.
MODEL HF2 2 kHz HIGH FREQUENCY RESISTANCE WELDING POWER SUPPLY
6-2 990-057
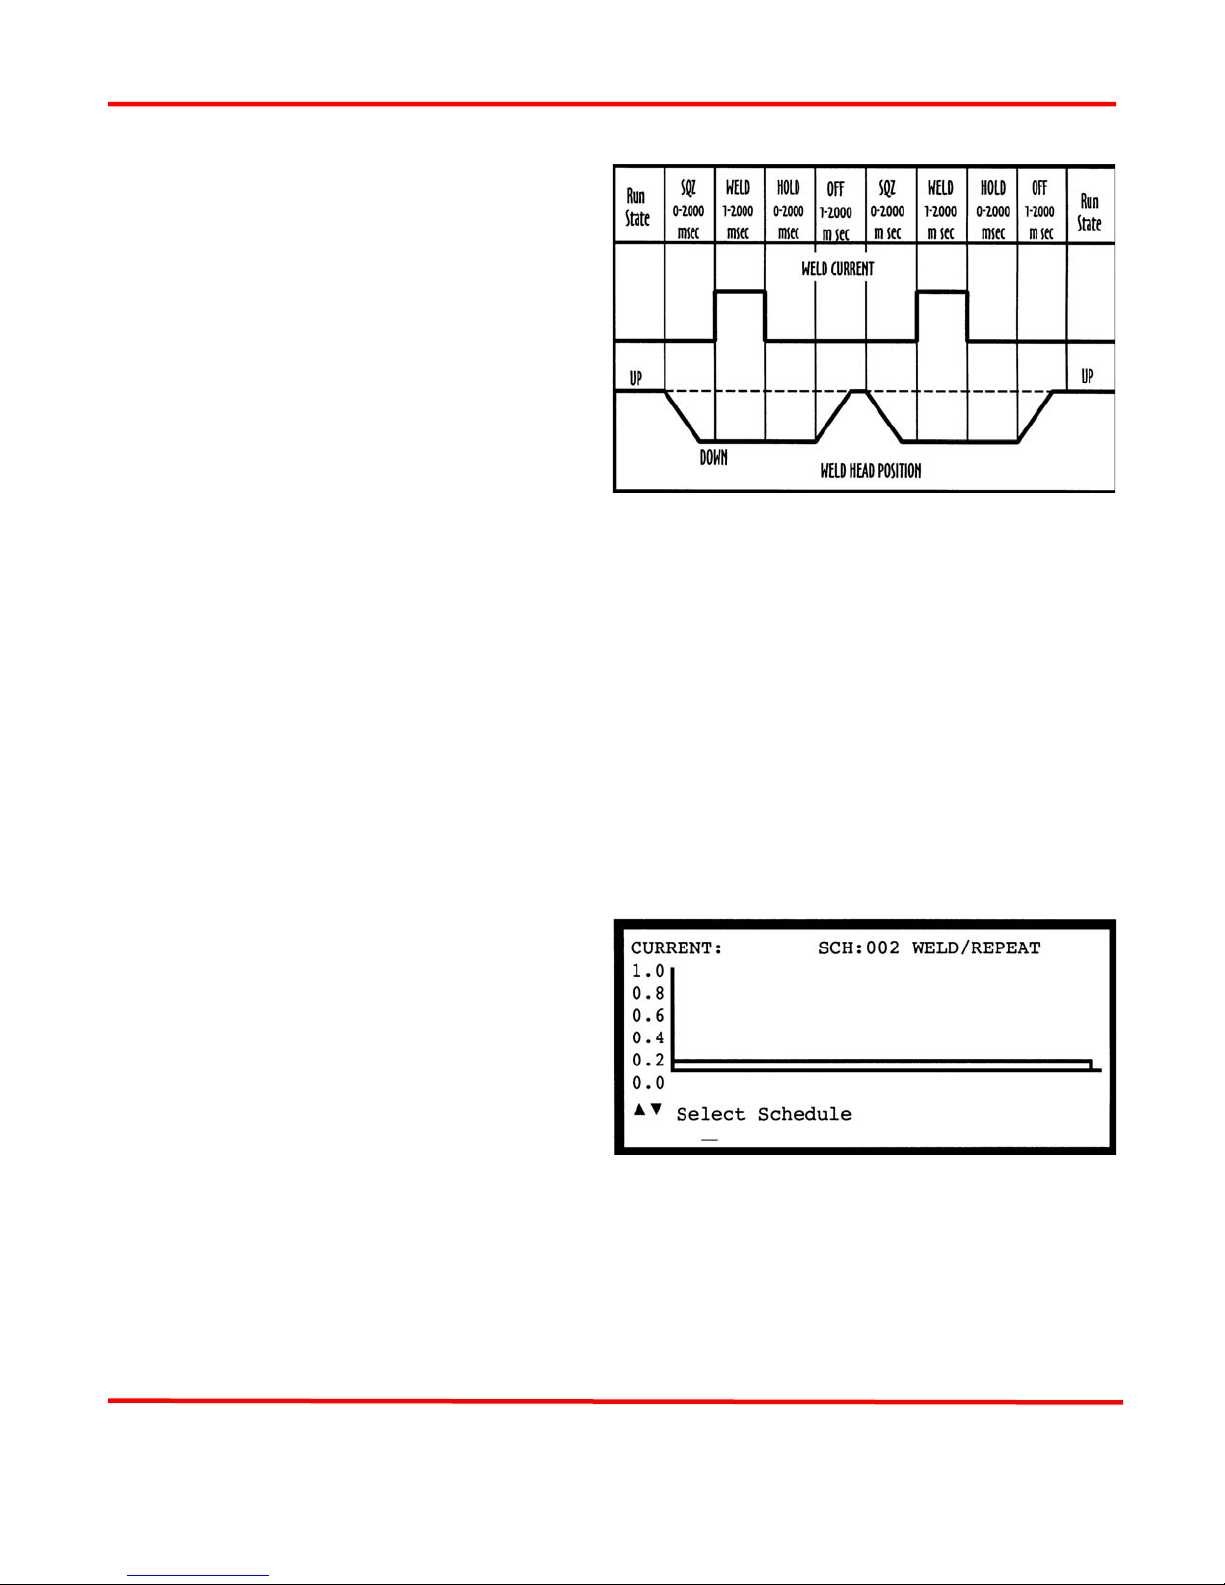
CHAPTER 6: ADVANCED WELD FUNCTIONS
WELD/REPEAT (Figure 6-4)
Weld/Repeat provides a repeat capability for
simple automated Air Actuated Weld Head
applications using an operator. This weld
function is ideal for volume production, which
requires a single schedule.
Weld/Repeat can only be used with an Air
Actuated Weld Head. For Force Fired Air
Actuated Weld Heads, weld current begins when
both levels of a two-level Foot Switch are closed
and the Force Firing Switch in the Air Actuated
Weld Head closes.
When Weld/Repeat is used with a Non-Force Fired Air Actuated Weld Head, the Squeeze (SQZ) Period
must be used to allow sufficient time for the electrodes to close and apply the required weld force to the
parts before the Weld Period begins. Weld current begins when the Squeeze Period ends and both levels
of a two-level Foot Switch are closed.
When Weld/Repeat is used with any type of Air Actuated Weld Head, the Hold Period can be used to
automatically keep the electrodes closed on the parts after weld current has terminated for the purpose of
providing additional heat sinking or parts cooling. Squeeze and Hold Periods have no meaning with
Manually Actuated Weld Heads and do not appear on either the weld schedule Program or Run screens.
Off Period, which is applicable only to Weld/Repeat, sets the cycling rate between spot welds by
controlling how long the electrodes remain open to allow the parts to be repositioned before the entire
weld process repeats.
Weld/Repeat Weld Graph Run Screen
(Figure 6-5)
Figure 6-4. Weld/Repeat
Weld schedule 002 is pre-programmed at the
factory for Weld/Repeat operation and will only
function using an Air Actuated Weld Head.
MODEL HF2 2 kHz HIGH FREQUENCY RESISTANCE WELDING POWER SUPPLY
990-057 6-3

CHAPTER 6: ADVANCED WELD FUNCTIONS
Weld/Repeat Alphanumeric Run Screen
(Figure 6-6)
To simultaneously view all pre-programmed
time periods and energy settings, press [CHNG]
to select the Alphanumeric Run screen. The 7
digit Weld Counter is displayed in the upper
right corner.
QUENCH/TEMPER (Figure 6-7)
Quench/Temper is typically used to weld flat-toflat, round-to-round, or round-to-flat parts
together that are plated. Properly used,
Quench/Temper can significantly reduce weld
splash and electrode sticking.
Figure 6-6. Weld/Repeat
Alphanumeric Screen.
In the normal application of Quench/Temper, the
Weld Period provides sufficient heat to displace
the plating or oxides, seat the electrodes against
the base metals, and force the parts into intimate
contact. The Quench Period allows time to
dissipate the heat generated during the Weld
Period. The Temper Period completes the
structural weld. The Temper Period weld
current should be greater than the Weld Period weld current by a factor of two or three since the first
bond significantly reduces the resistance of the interface between the parts.
Another use for Quench/Temper is to control grain refinement in the parts. In this application, the Weld
Period weld current makes the structural weld. The parts cool during the Quench Period. The low level
Temper Period weld current completes the heat treating process by providing sufficient heat to permit
grain realignment. In this application, the weld current magnitudes for both the Weld and Temper
Periods are completely opposite to those shown in Figure 6-7. 410 stainless steel is one of the materials
which must be heat treated (annealed) in order to eliminate the brittle, crystalline structure caused by the
weld current. This application of Quench/Temper is not usually used in the form just described for
welding small parts.
Quench/Temper can be used with Unitek Peco Force Fired Manual or Air Actuated Weld Heads. For
Manually Actuated Weld Heads, weld current begins when the Force Firing Switch closes. For Force
Fired Air Actuated Weld Heads, weld current begins when both levels of a two-level Foot Switch are
closed and the Force Firing Switch in the Air Actuated Weld Head closes.
Figure 6-7. Quench/Temper
MODEL HF2 2 kHz HIGH FREQUENCY RESISTANCE WELDING POWER SUPPLY
6-4 990-057

CHAPTER 6: ADVANCED WELD FUNCTIONS
When Quench/Temper is used with a Non-Force Fired Air Actuated Weld Head, the Squeeze (SQZ)
Period must be used to allow sufficient time for the electrodes to close and apply the required weld force
to the parts before the Weld Period begins. Weld current begins when the Squeeze Period ends and both
levels of a two-level Foot Switch are closed.
When Quench/Temper is used with any type of Air Actuated Weld Head, the Hold Period can be used to
automatically keep the electrodes closed on the parts after weld current has terminated for the purpose of
providing additional heat sinking or parts cooling. Squeeze and Hold Periods have no meaning with
Manually Actuated Weld Heads and do not appear on either the weld schedule Program or Run screens.
Quench/Temper - Weld Graph Run Screen
(Figure 6-8)
Weld schedule 003 is pre-programmed at the
factory for Quench/Temper operation. The HF2
Weld Control automatically recognizes the
presence of a Manually or Air Actuated Weld
Head before the first weld is made.
Figure 6-8. Quench/Temper -
Weld Graph Run Screen
Quench/Temper - Alphanumeric Run
Screen (Figure 6-9)
To simultaneously view all pre-programmed
time periods and energy settings, press [CHNG]
to select the Alphanumeric Run screen. The 7
digit Weld Counter is displayed in the upper
right corner.
PRE/POSTHEAT (Figure 6-10)
Pre/Postheat is very similar to Quench/Temper.
Pre/Postheat is also typically used to weld flat-toflat, round-to-round, or round-to-flat parts together
that may or may not be plated. In addition, Pre/
Postheat works well to create forge type welds
when welding refractory materials such as
molybdenum and tungsten together.
Pre/ Postheat is the most versatile of all of the weld
functions. The user can construct a custom weld
function by controlling the three Periods, Preheat,
Weld, and Postheat and their related weld currents.
Figure 6-9. Quench/Temper -
Alphanumeric Screen
Figure 6-10. Pre/Post Heat
MODEL HF2 2 kHz HIGH FREQUENCY RESISTANCE WELDING POWER SUPPLY
990-057 6-5
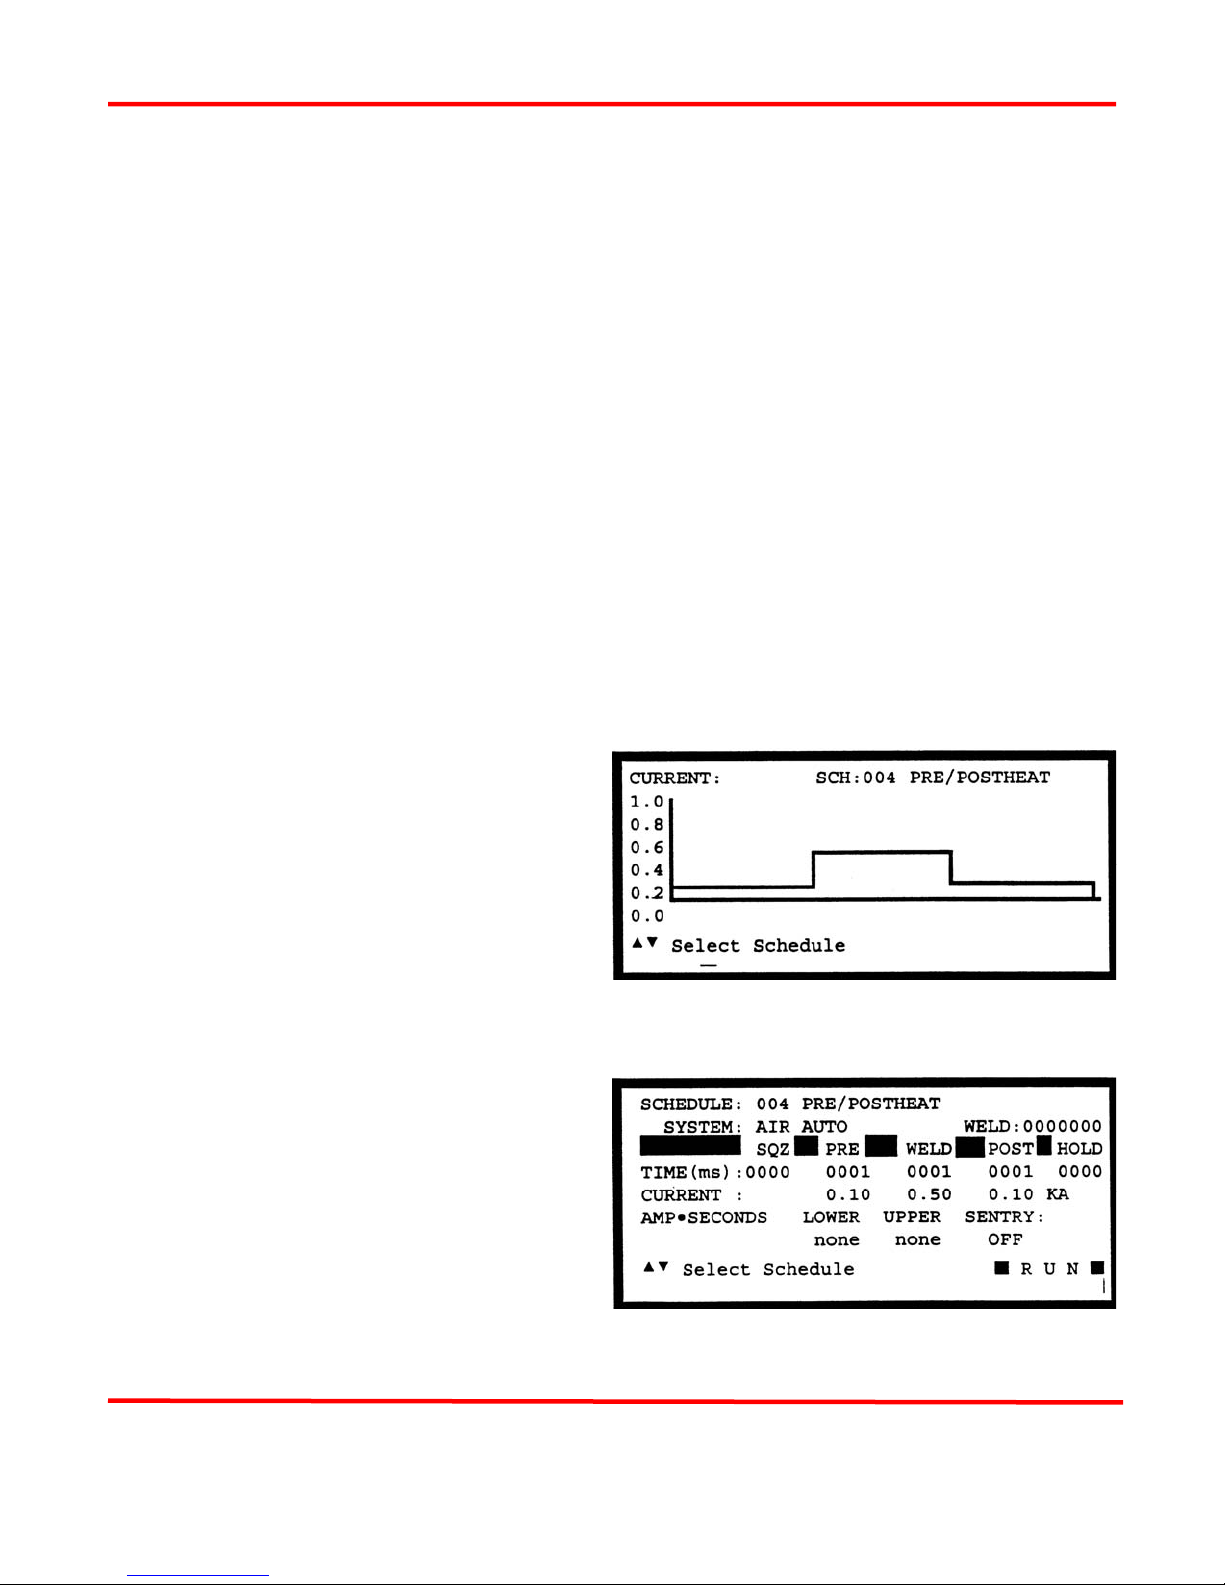
CHAPTER 6: ADVANCED WELD FUNCTIONS
Weld Periods not required can be set to zero. Properly used, Pre/Postheat can significantly reduce weld
splash and electrode sticking.
In the normal application of Pre/Postheat, the Preheat Period provides sufficient heat to displace the
plating or oxides, seat the electrodes against the base metals, and force the parts into intimate contact.
The Preheat Period should be two or three times longer than the Weld Period, which completes the
structural weld. The Weld Period weld current should be greater than the Preheat Period weld current
by a factor of two or three since the first bond significantly reduces the resistance of the interface
between the parts. The Postheat Period immediately follows to provide grain refinement in the parts.
Pre/Postheat can be used with Unitek Peco Force Fired Manual or Air Actuated Weld Heads. For
Manually Actuated Weld Heads, weld current begins when the Force Firing Switch closes. For Force
Fired Air Actuated Weld Heads, weld current begins when both levels of a two-level Foot Switch are
closed and the Force Firing Switch in the Air Actuated Weld Head closes.
When Pre/Postheat is used with a Non-Force Fired Air Actuated Weld Head, the Squeeze (SQZ) Period
must be used to allow sufficient time for the electrodes to close and apply the required weld force to the
parts before the Weld Period begins. Weld current begins when the Squeeze Period ends and both levels
of a two-level Foot Switch are closed.
When Pre/Postheat is used with any type of Air Actuated Weld Head, the Hold Period can be used to
automatically keep the electrodes closed on the parts after weld current has terminated for the purpose of
providing additional heat sinking or parts cooling. Squeeze and Hold Periods have no meaning with
Manually Actuated Weld Heads and do not appear on either the weld schedule Program or Run screens.
Pre/Postheat - Weld Graph Run Screen
(Figure 6-11)
Weld schedule 004 is pre-programmed at the
factory for Pre/Postheat operation. The HF2
Weld Control automatically recognizes the
presence of a Manually or Air Actuated Weld
Head before the first weld is made.
Pre/Postheat - Alphanumeric Run Screen
(Figure 6-12)
To simultaneously view all pre-programmed
time periods and energy settings, press [CHNG]
to select the Alphanumeric Run screen. The 7
digit Weld Counter is displayed in the upper
right corner.
Figure 11. Pre/Postheat
Weld Graph Screen
Figure 12. Pre/Postheat
Alphanumeric Screen
MODEL HF2 2 kHz HIGH FREQUENCY RESISTANCE WELDING POWER SUPPLY
6-6 990-057
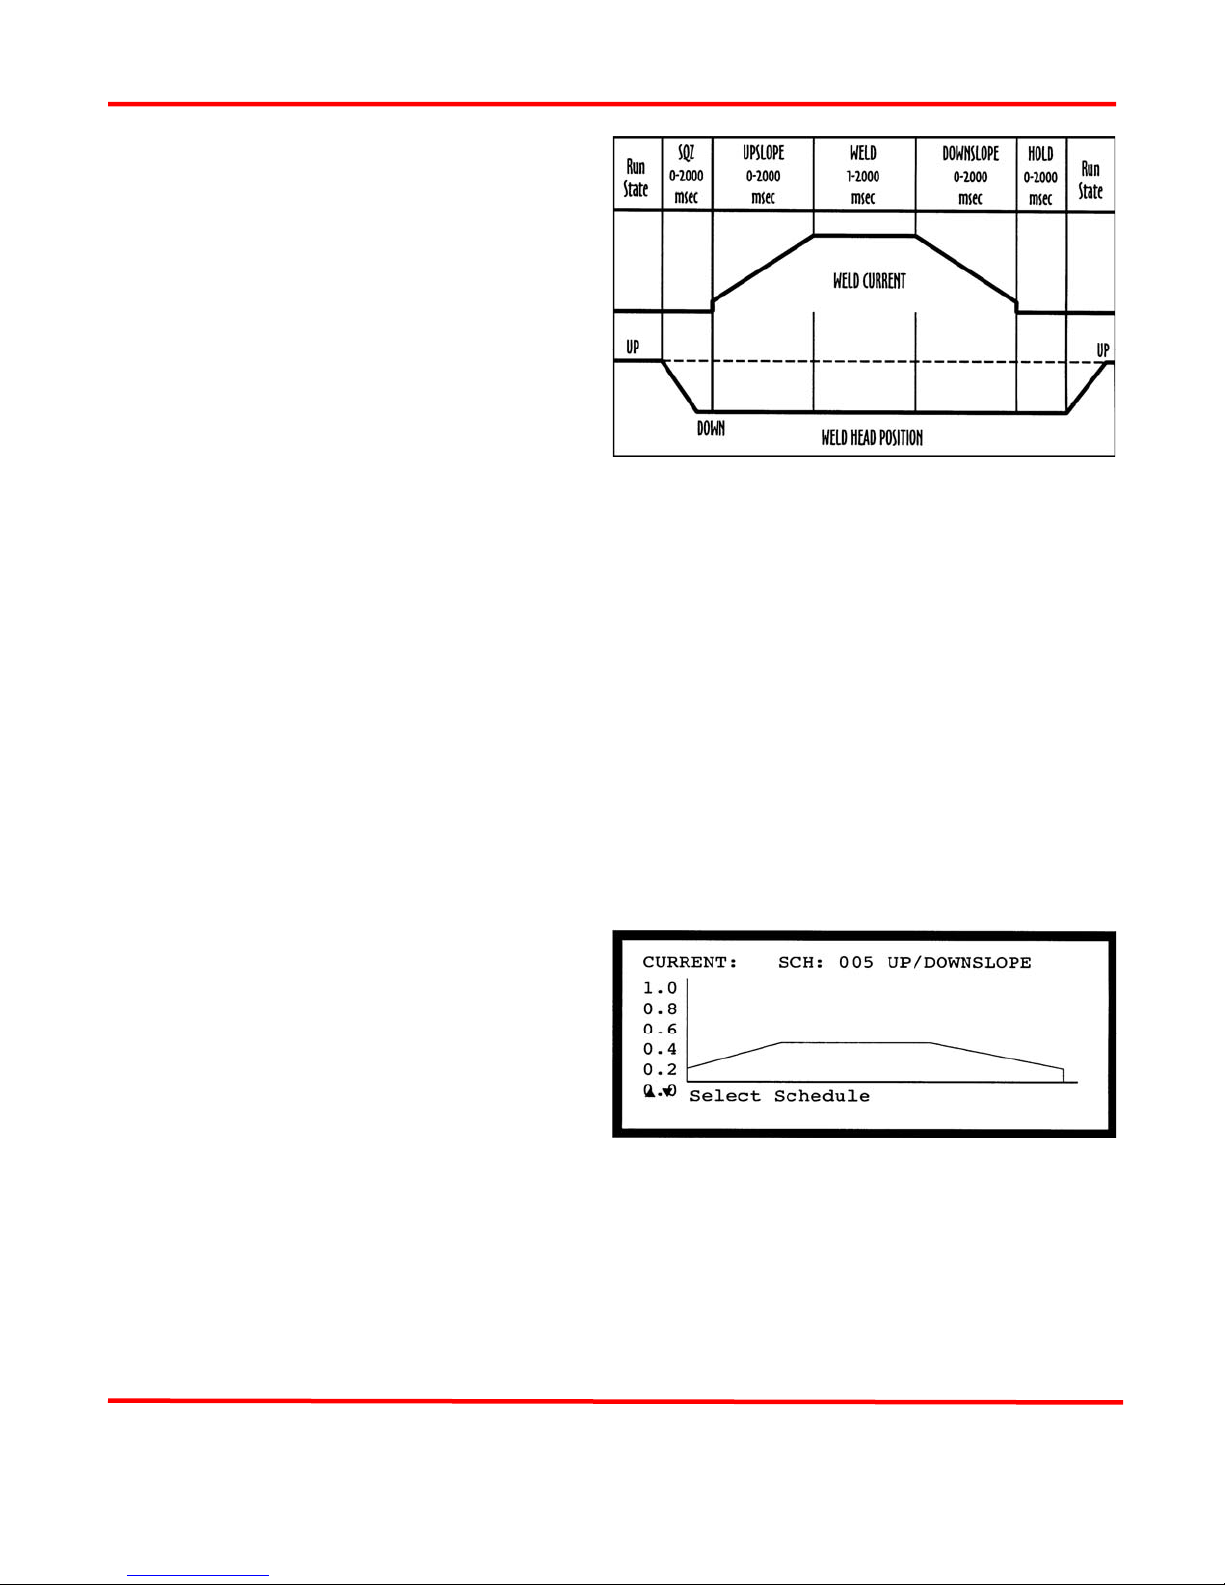
CHAPTER 6: ADVANCED WELD FUNCTIONS
UP/DOWNSLOPE (Figure 6-13)
Up/Downslope facilitates welding material
combinations such as aluminum-to-aluminum or
platinum-to-tungsten. Up Slope allows a reduction
in electrode force, resulting in a cleaner appearance
by reducing electrode indentation, material pickup
and electrode deformation. Up Slope can also be
used to displace plating and/or oxides, reduce
flashing and spitting, or reduce thermal shock when
welding parts containing glass-to-metal seals.
Downslope assists in the grain refinement of certain
heat-treatable steels and prevents cracking in
aluminum and other materials by reducing the
cooling rate.
Up/Downslope can be used with Unitek Peco Force Fired Manual or Air Actuated Weld Heads. For
Manually Actuated Weld Heads, weld current begins when the Force Firing Switch closes. For Force
Fired Air Actuated Weld Heads, weld current begins when both levels of a two-level Foot Switch are
closed and the Force Firing Switch in the Air Actuated Weld Head closes.
Figure 13. Pre/Postheat
Alphanumeric Screen
When Up/Downslope is used with a Non-Force Fired Air Actuated Weld Head, the Squeeze (SQZ)
Period must be used to allow sufficient time for the electrodes to close and apply the required weld force
to the parts before the Weld Period begins. Weld current begins when the Squeeze Period ends and both
levels of a two-level Foot Switch are closed.
When Up/Downslope is used with any type of Air Actuated Weld Head, the Hold Period can be used to
automatically keep the electrodes closed on the parts after weld current has terminated for the purpose of
providing additional heat sinking or parts cooling. Squeeze and Hold Periods have no meaning with
Manually Actuated Weld Heads and do not appear on either the weld schedule Program or Run screens.
Up/Downslope - Weld Graph Run Screen
(Figure 6-14)
Weld schedule 005 is pre-programmed at the
factory for Up/Downslope operation. The HF2
Weld Control automatically recognizes the
presence of a Manually or Air Actuated Weld
Head before the first weld is made.
Figure 14. Up/Downslope
Weld Graph Screen
MODEL HF2 2 kHz HIGH FREQUENCY RESISTANCE WELDING POWER SUPPLY
990-057 6-7
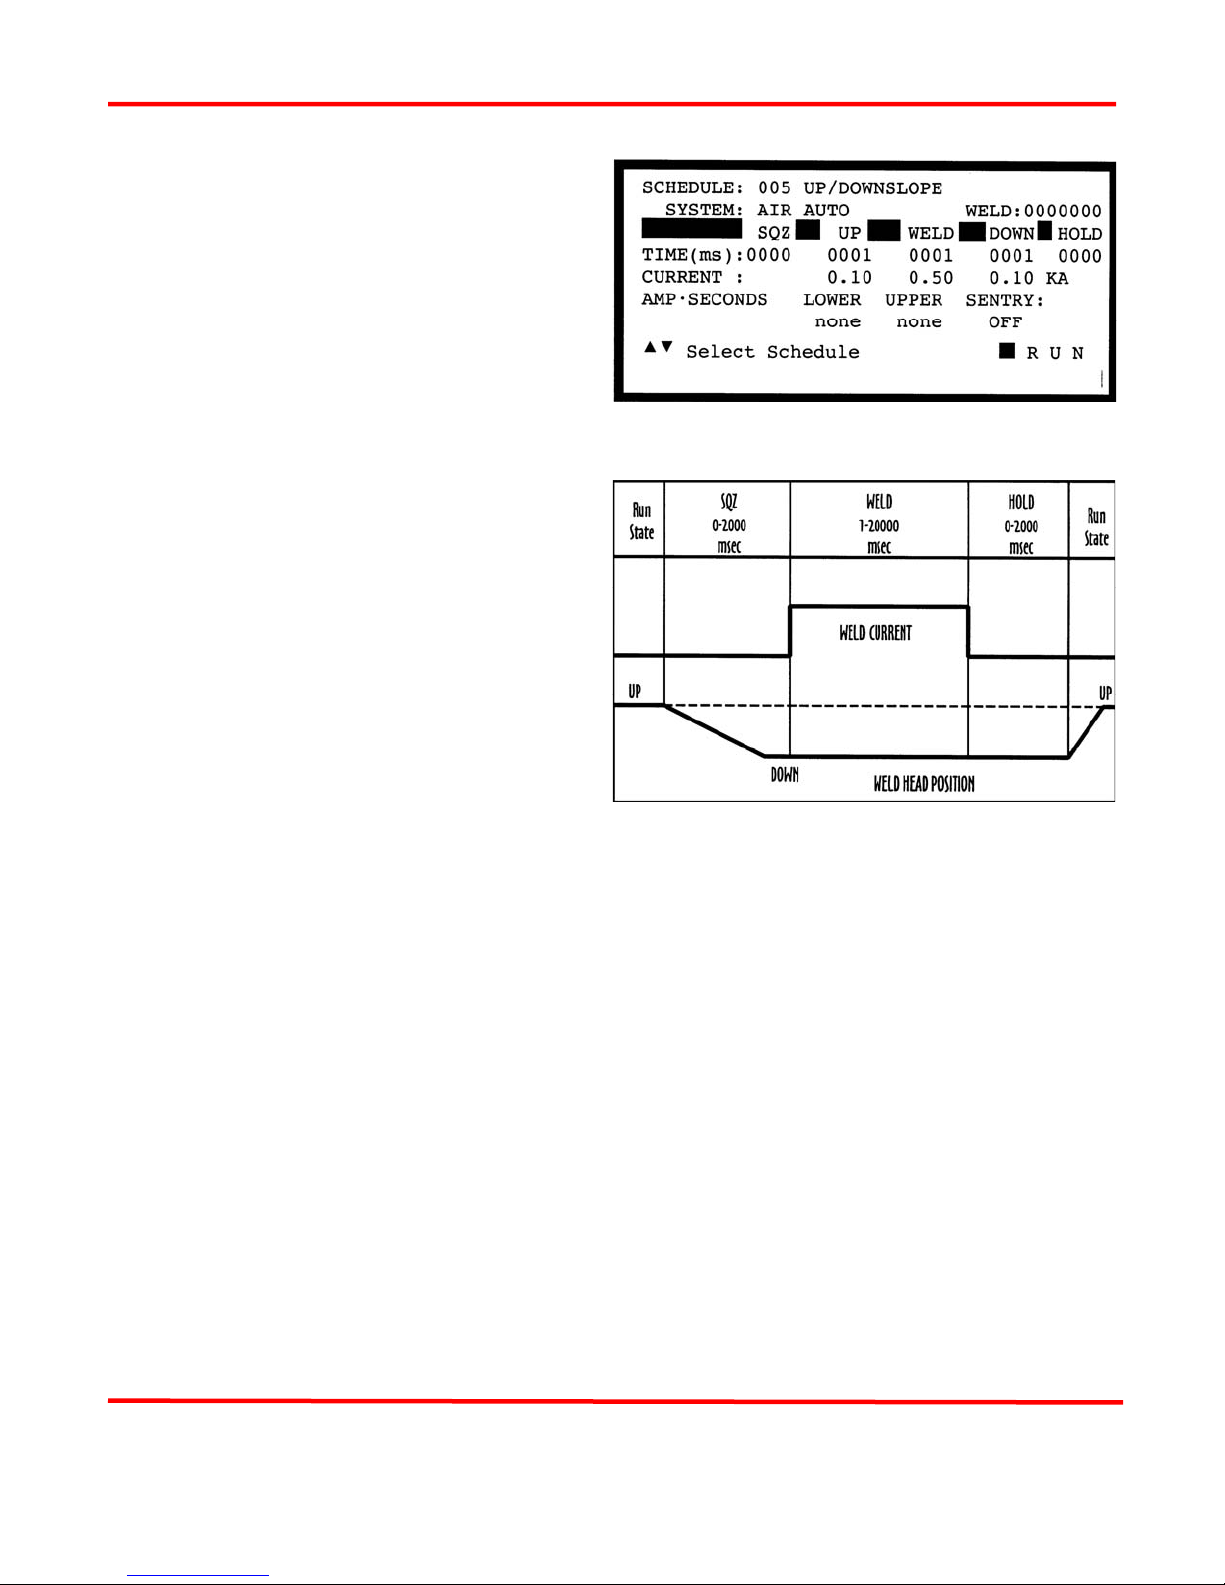
CHAPTER 6: ADVANCED WELD FUNCTIONS
Up/Downslope - Alphanumeric Run
Screen (Figure 6-15)
To simultaneously view all pre-programmed
time periods and energy settings, press [CHNG]
to select the Alphanumeric Run screen. The 7
digit Weld Counter is displayed in the upper
right corner.
Figure 15. Up/Downslope
BRAZE (Figure 6-16)
This function is ideal for brazing two parts
together using a brazing alloy as a "sandwich"
between the parts. The brazing alloy can be preformed for convenient handling or can be a tin or
solder plating on both parts. To ensure complete
solidification of the brazing alloy, use the Hold
Period to cool the parts.
Alphanumeric Run Screen
CAUTION - It is easy to exceed the duty cycle
rating for the HF2 Weld Transformer using the
Braze weld function. Refer to Chapter 2, HF2
Weld Transformer Electrical Specifications.
Braze can be used with Unitek Peco Force Fired Manual or Air Actuated Weld Heads. For Manually
Actuated Weld Heads, weld current begins when the Force Firing Switch closes. For Force Fired Air
Actuated Weld Heads, weld current begins when both levels of a two-level Foot Switch are closed and
the Force Firing Switch in the Air Actuated Weld Head closes.
When Braze is used with a Non-Force Fired Air Actuated Weld Head, the Squeeze (SQZ) Period must
be used to allow sufficient time for the electrodes to close and apply the required weld force to the parts
before the Weld Period begins. Weld current begins when the Squeeze Period ends and both levels of a
two-level Foot Switch are closed.
When Braze is used with any type of Air Actuated Weld Head, the Hold Period can be used to
automatically keep the electrodes closed on the parts after weld current has terminated for the purpose of
providing additional heat sinking or parts cooling. Squeeze and Hold Periods have no meaning with
Manually Actuated Weld Heads and do not appear on either the weld schedule Program or Run screens.
Figure 16. Braze
MODEL HF2 2 kHz HIGH FREQUENCY RESISTANCE WELDING POWER SUPPLY
6-8 990-057

CHAPTER 6: ADVANCED WELD FUNCTIONS
Braze - Weld Graph Run Screen
(Figure 6-17)
Weld schedule 006 is pre-programmed at the
factory for Braze operation. The HF2 Weld
Control automatically recognizes the presence of
a Manually or Air Actuated Weld Head before
the first weld is made.
Braze - Alphanumeric Run Screen
(Figure 6-18)
To simultaneously view all pre-programmed
time periods and energy settings, press [CHNG]
to select the Alphanumeric Run screen. The 7
digit Weld Counter is displayed in the upper
right corner.
Figure 6-17. Braze - Weld Graph
Run Screen
Figure 6-18. Braze - Alphanumeric
Run Screen
ROLLSPOT (Figure 6-19)
Rollspot is a special form of seam welding.
Typically, upper and lower wheel electrodes, in
conjunction with an automatic parts feeder, are
used to make a Rollspot weld. Because of the
weld current shunting effect after the first weld,
set the Weld2 Period weld current greater than
Weld1 by a factor of 20% to 50%. Use the
larger percentage for closer spacing. Assuming
the rotational speed of the wheel is fixed, the
Weld2 Period controls the length of the spot and
the Cool Period controls the distance between
spots.
CAUTION: It is easy to exceed the duty cycle rating for the HF2 Weld Transformer using the Rollspot
weld function. Refer to Chapter 2, HF2 Weld Transformer Electrical Specifications.
Rollspot can be used with Unitek Peco Force Fired Manual or Air Actuated Weld Heads. For Manually
Actuated Weld Heads, weld current begins when the Force Firing Switch closes. For Force Fired Air
Actuated Weld Heads, weld current begins when both levels of a two-level Foot Switch are closed and
the Force Firing Switch in the Air Actuated Weld Head closes.
Figure 6-19. Rollspot.
MODEL HF2 2 kHz HIGH FREQUENCY RESISTANCE WELDING POWER SUPPLY
990-057 6-9
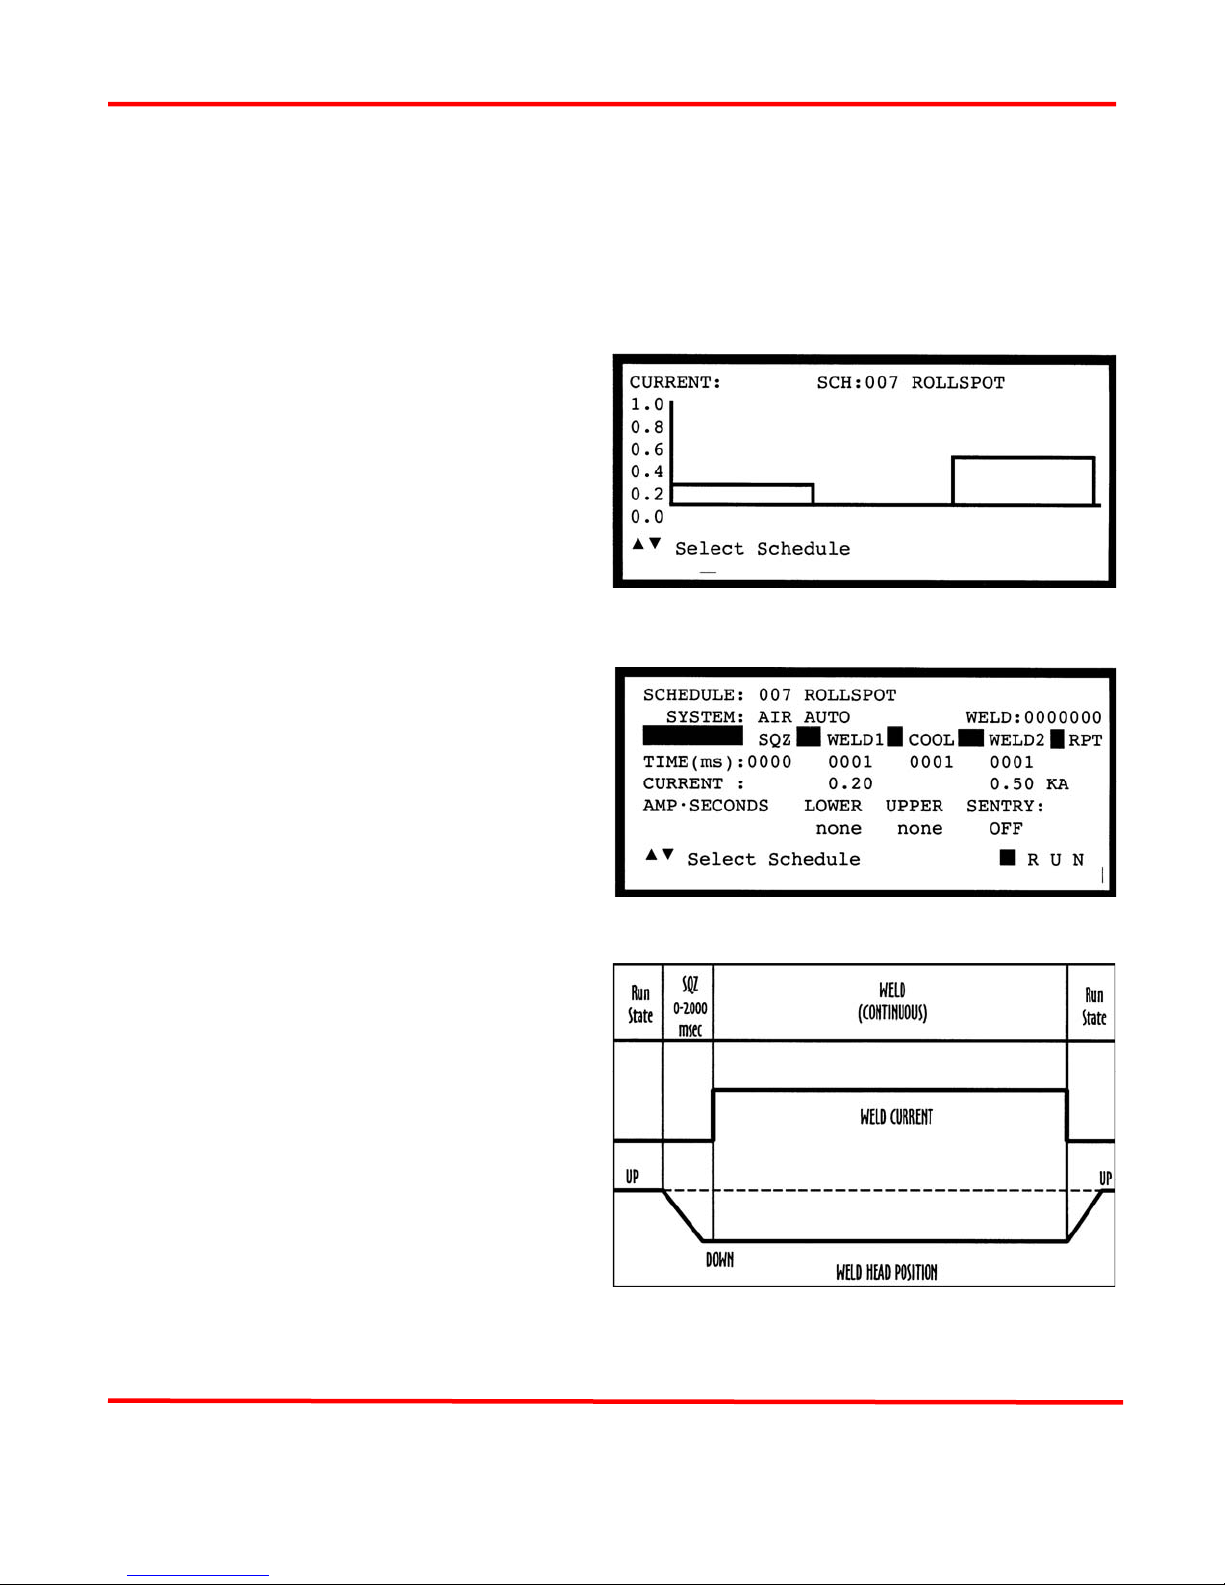
CHAPTER 6: ADVANCED WELD FUNCTIONS
When Rollspot is used with a Non-Force Fired Air Actuated Weld Head, the Squeeze (SQZ) Period
must be used to allow sufficient time for the electrodes to close and apply the required weld force to the
parts before the Weld Period begins. Weld current begins when the Squeeze Period ends and both levels
of a two-level Foot Switch are closed.
Rollspot welding continues for as long as all switches remain closed. Hold has no meaning with
Manually Actuated Weld Heads and does not appear on either the weld schedule Program or Run
screens.
Rollspot - Weld Graph Run Screen
(Figure 6-20)
Weld schedule 007 is pre-programmed at the
factory for Rollspot operation. The HF2 Weld
Control automatically recognizes the presence of
a Manually or Air Actuated Weld Head before
the first weld is made.
Figure 6-20. Rollspot -
Weld Graph Run Screen
Rollspot - Alphanumeric Run Screen
(Figure 6-21)
To simultaneously view all pre-programmed
time periods and energy settings, press [CHNG]
to select the Alphanumeric Run screen. The 7
digit Weld Counter is displayed in the upper
right corner.
SEAM (Figure 6-22)
Seam can be used to make automated hermetic
seam welds using automatic feeders, and PLC or
host computer control. Seam can also be used to
make manual or semi-automatic non-hermetic
seam welds using an operator.
CAUTION: It is easy to exceed the duty cycle
rating for the HF2 Weld Transformer using the
Rollspot weld function. Refer to Chapter 2, HF2
Weld Transformer Electrical Specifications.
Figure 6-21. Rollspot -
Weld Graph Run Screen
MODEL HF2 2 kHz HIGH FREQUENCY RESISTANCE WELDING POWER SUPPLY
6-10 990-057
Figure 6-22. Seam
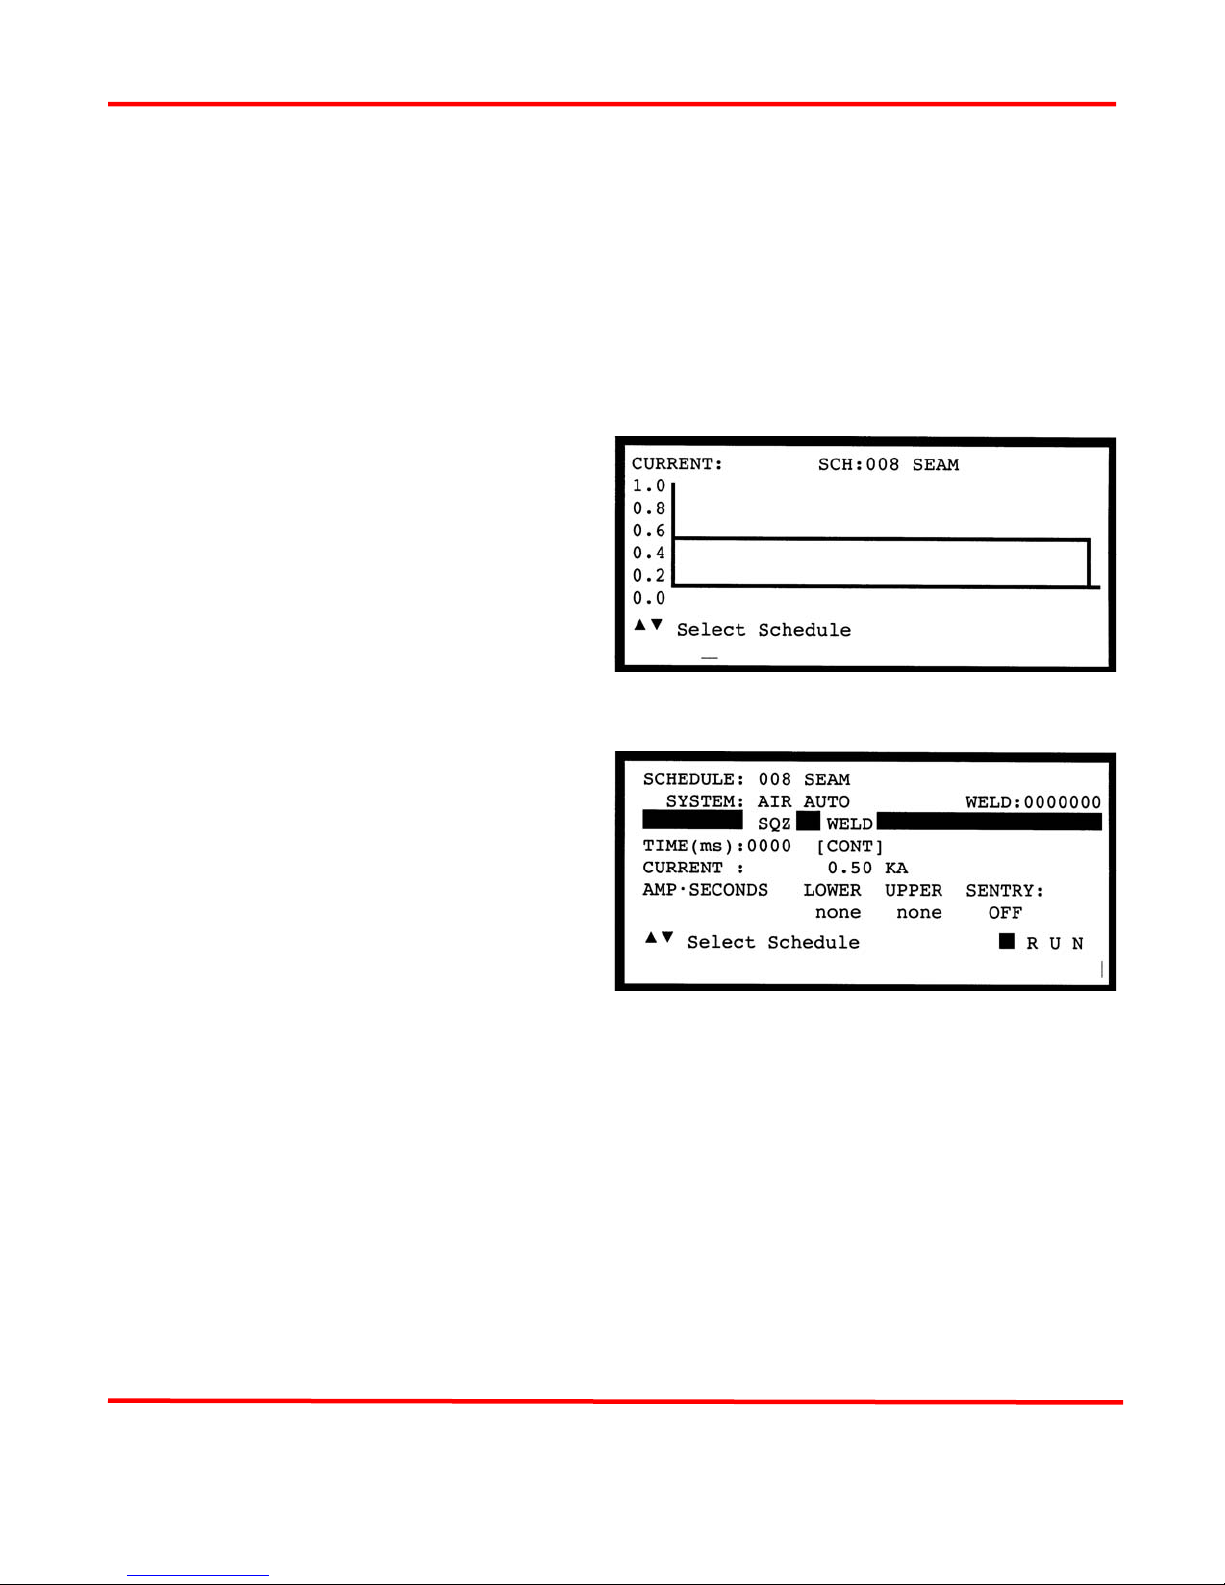
CHAPTER 6: ADVANCED WELD FUNCTIONS
Seam can be used with Unitek Peco Force Fired Manual or Air Actuated Weld Heads. For Manually
Actuated Weld Heads, weld current begins when the Force Firing Switch closes. For Force Fired Air
Actuated Weld Heads, weld current begins when both levels of a two-level Foot Switch are closed and
the Force Firing Switch in the Air Actuated Weld Head closes.
When Seam is used with a Non-Force Fired Air Actuated Weld Head, the Squeeze (SQZ) Period must
be used to allow sufficient time for the electrodes to close and apply the required weld force to the parts
before the Weld Period begins. Weld current begins when the Squeeze Period ends and both levels of a
two-level Foot Switch are closed. Weld Current flows as long as all switches remain closed.
Hold Period has no meaning with Manually Actuated Weld Heads and does not appear on either the
weld schedule Program or Run screens.
Seam - Weld Graph Run Screen
(Figure 6-23)
Weld schedule 008 is pre-programmed at the
factory for Seam operation. The HF2 Weld
Control automatically recognizes the presence of
a Manually or Air Actuated Weld Head before
the first weld is made.
Seam - Alphanumeric Run Screen
(Figure 6-24)
To simultaneously view all pre-programmed
time periods and energy settings, press [CHNG]
to select the Alphanumeric Run screen. The 7
digit Weld Counter is displayed in the upper
right corner.
Figure 6-23. Seam
Weld Graph Run Screen
Figure 6-24. Seam
Alphanumeric Run Screen
MODEL HF2 2 kHz HIGH FREQUENCY RESISTANCE WELDING POWER SUPPLY
990-057 6-11

CHAPTER 6: ADVANCED WELD FUNCTIONS
DUAL PULSE (Figure 6-25)
Dual Pulse combines the best features of
Up/Downslope with Quench/Temper. Use Dual
Pulse for best welding control of flat-to-flat, roundto-round, or round-to-flat small parts that may or
may not be plated.
Adding Up Slope to the front of each weld period
allows a reduction in electrode force, resulting in a
cleaner appearance by reducing electrode
indentation, material pickup and electrode
deformation. Up Slope will also help to displace
plating and/or oxides, reduce flashing and spitting,
or reduce thermal shock when welding parts
containing glass-to-metal seals.
In the normal application of Dual Pulse, the Weld1 Period provides sufficient heat to displace the plating
or oxides, seat the electrodes against the base metals, and force the parts into intimate contact. The Cool
Period allows time to dissipate the heat generated during the Weld1 Period.
Figure 6-25. Dual Pulse
The Weld2 Period completes the structural weld. The Weld2 Period weld current should be greater than
the Weld1 Period weld current by a factor of 2 or 3 since the first bond significantly reduces the
resistance of the interface between the parts. The only use for the Down Slope Period following the
Weld2 Period is to control grain refinement in brittle parts by slowing reducing the Weld2 Period weld
current to zero during the Down Slope Period.
Dual Pulse can be used with Unitek Peco Force Fired Manual or Air Actuated Weld Heads. For
Manually Actuated Weld Heads, weld current begins when the Force Firing Switch closes. For Force
Fired Air Actuated Weld Heads, weld current begins when both levels of a two-level Foot Switch are
closed and the Force Firing Switch in the Air Actuated Weld Head closes.
When Dual Pulse is used with a Non-Force Fired Air Actuated Weld Head, the Squeeze (SQZ) Period
must be used to allow sufficient time for the electrodes to close and apply the required weld force to the
parts before the Weld Period begins. Weld current begins when the Squeeze Period ends and both levels
of a two-level Foot Switch are closed.
When Dual Pulse is used with any type of Air Actuated Weld Head, the Hold Period can be used to
automatically keep the electrodes closed on the parts after weld current has terminated for the purpose of
providing additional heat sinking or parts cooling. Squeeze and Hold Periods have no meaning with
Manually Actuated Weld Heads and do not appear on either the weld schedule Program or Run screens.
MODEL HF2 2 kHz HIGH FREQUENCY RESISTANCE WELDING POWER SUPPLY
6-12 990-057

CHAPTER 6: ADVANCED WELD FUNCTIONS
Dual Pulse - Weld Graph Run Screen
(Figure 6-26)
Weld schedule 009 is pre-programmed at the
factory for Dual Pulse operation. The HF2 Weld
Control automatically recognizes the presence of
a Manually or Air Actuated Weld Head before
the first weld is made.
Dual Pulse - Alphanumeric Run Screen
(Figure 6-27)
To simultaneously view all pre-programmed
time periods and energy settings, press [CHNG]
to select the Alphanumeric Run screen. The 7
digit Weld Counter is displayed in the upper
right corner. Note: when programming the Dual
Pulse weld function that uses an Air Actuated
Weld Head, press [ ] to scroll the program
screen to the right to access the Down and Hold
periods.
Figure 6-26. Dual Pulse -
Weld Graph Run Screen
Figure 6-27. Dual Pulse -
Alphanumeric Run Screen
PULSATION (Figure 6-28)
Pulsation allows the HF2 Weld Control and
largest HF2 Weld Transformer to be used for
applications normally requiring more weld
energy by pumping in more total weld heat
through the use of many sequential weld pulses.
The first Weld Period is followed by an
alternating sequence of Cool and Weld Periods.
The Pulsation number defines how many
Cool/Weld Periods will follow the first Weld
Period. Using the Pulsation can damage the
crystal structure of the parts by making them
more brittle.
Figure 6-28. Pulsation
Pulsation can be used with Unitek Peco Force Fired Manual or Air Actuated Weld Heads. For Manually
Actuated Weld Heads, weld current begins when the Force Firing Switch closes. For Force Fired Air
MODEL HF2 2 kHz HIGH FREQUENCY RESISTANCE WELDING POWER SUPPLY
990-057 6-13
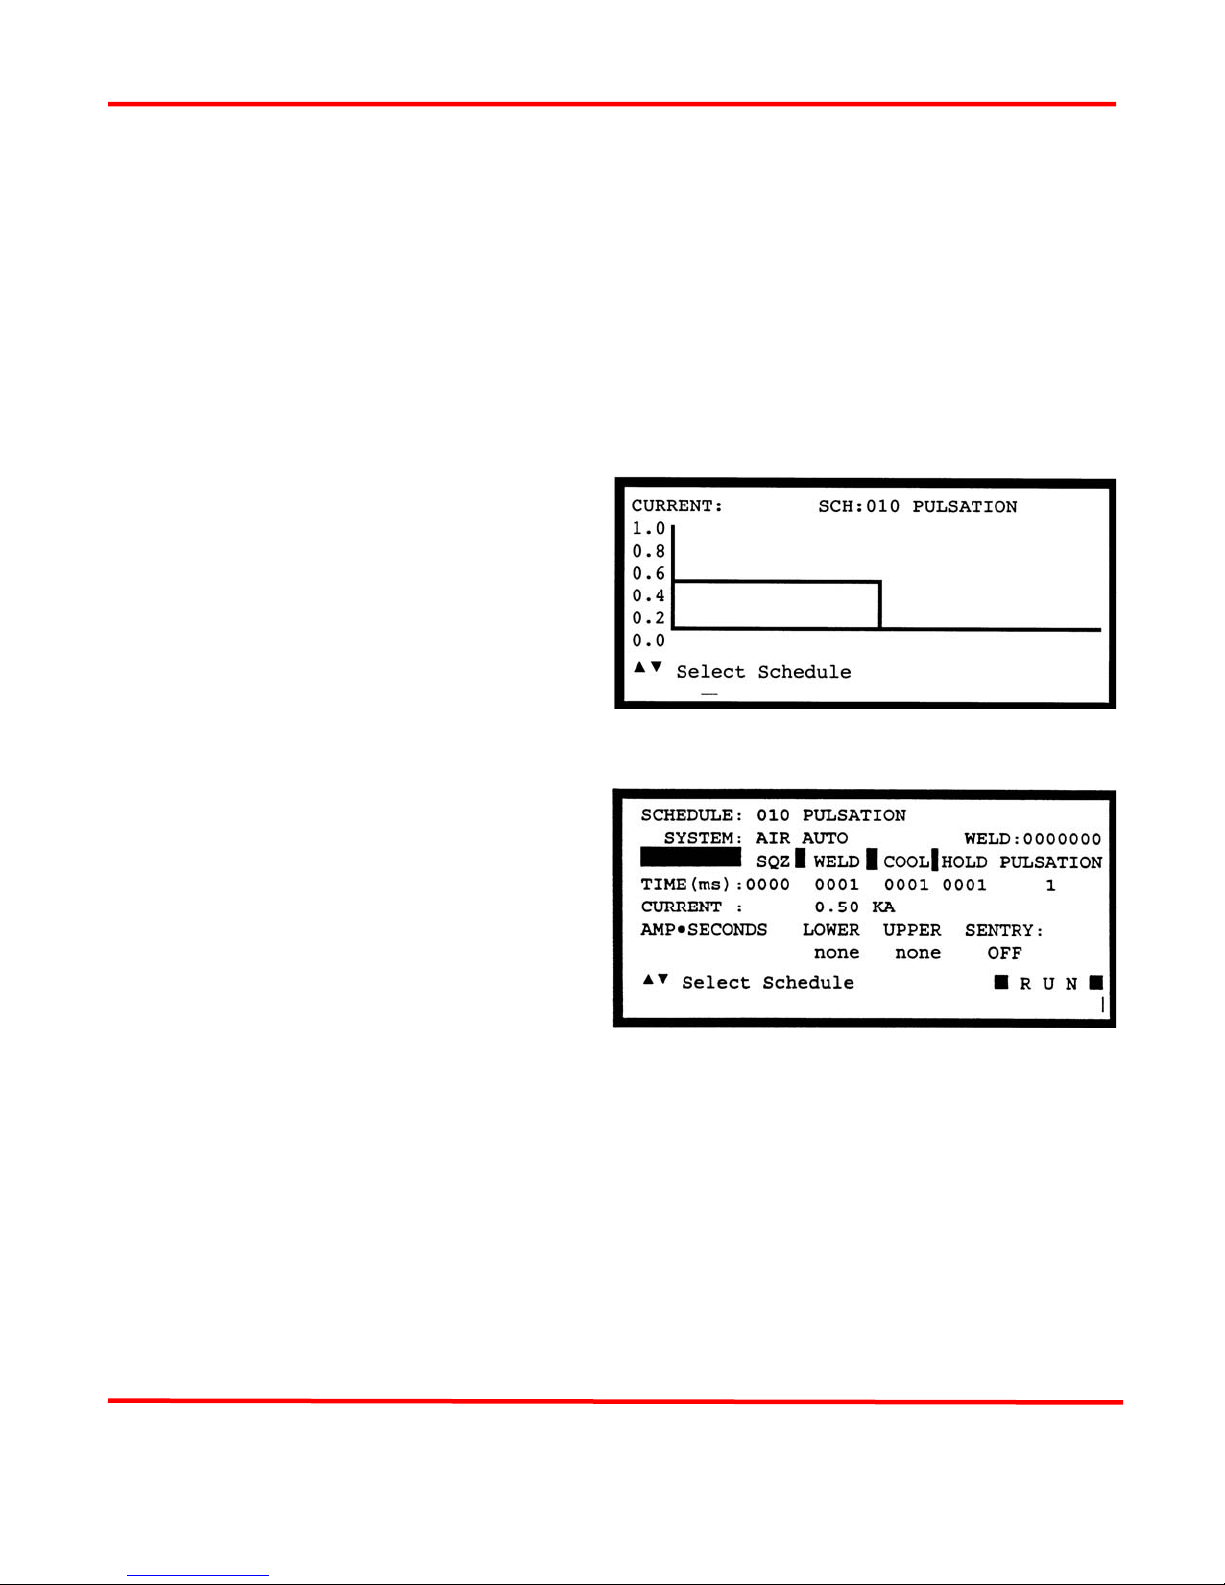
CHAPTER 6: ADVANCED WELD FUNCTIONS
Actuated Weld Heads, weld current begins when both levels of a two-level Foot Switch are closed and
the Force Firing Switch in the Air Actuated Weld Head closes.
When Pulsation is used with a Non-Force Fired Air Actuated Weld Head, the Squeeze (SQZ) Period
must be used to allow sufficient time for the electrodes to close and apply the required weld force to the
parts before the Weld Period begins. Weld current begins when the Squeeze Period ends and both levels
of a two-level Foot Switch are closed.
When Pulsation is used with any type of Air Actuated Weld Head, the Hold Period can be used to
automatically keep the electrodes closed on the parts after weld current has terminated for the purpose of
providing additional heat sinking or parts cooling. Squeeze and Hold Periods have no meaning with
Manually Actuated Weld Heads and do not appear on either the weld schedule Program or Run screens.
Pulsation - Weld Graph Run Screen
(Figure 6-29)
Weld schedule 010 is pre-programmed at the
factory for Pulsation operation. The HF2 Weld
Control automatically recognizes the presence of
a Manually or Air Actuated Weld Head before
the first weld is made.
Pulsation - Alphanumeric Run Screen
(Figure 6-30)
To simultaneously view all pre-programmed
time periods and energy settings, press [CHNG]
to select the Alphanumeric Run screen. The 7
digit Weld Counter is displayed in the upper
right corner.
Figure 6-29. Pulsation
Weld Graph Run Screen
Figure 6-30. Pulsation
Alphanumeric Run Screen
MODEL HF2 2 kHz HIGH FREQUENCY RESISTANCE WELDING POWER SUPPLY
6-14 990-057
 Loading...