

Page 1
ILLUSTRATED PARTS LIST
CATALOGO ILUSTRADO DE PARTES
HIGH SPEED ONE NEEDLE, THREE THREAD, PLAIN FEED
OVERSEAMING SEWING MACHINES
MAQUINAS INDUSTRIALES DE COSER ALTA VELOCIDAD, UNA AGUJA,
TRES HILOS , CAMA PLANA
MANUAL NO. PT0503
STYLES/ ESTILOS
39500TYA
39500TYB
02/25/09
Page 2

INSTRUCTIONS AND ILLUSTRATED PARTS LIST
MANUAL NO. PT0503
FOR 39500 SERIES MACHINES
INSTRUCCIONES Y LISTADO ILUSTRADO DE
CATALOGO NO. PT0503
PARTES PARA MAQUINAS ESTILO 39500
First Edition Copyright 2006
by
Union Special
Rights Reserved in All Countries
PREFACE
This catalog has been prepared to guide you while
operating 39500 series machines and arranged to simplify
ordering spare parts.
This catalog explains in detail the proper settings for
operation of the machines. Illustrations are used to show
the adjustments and reference letters are used to point
out specific items discussed.
Careful attention to the instructions and cautions for
operating and adjusting these machines will enable you
to maintain the superior performance and reliability
designed and built into every Union Special bag sewing
machine.
Adjustments and cautions are presented in sequence so
that a logical progression is accomplished. Some
adjustments performed out of sequence may have an
adverse effect on the function of the other related parts.
This manual has been comprised on the basis of available
information. Changes in design and / or improvements
may incorporate a slight modification of configuration in
illustrations or cautions.
Primer Edición © 2006
por
Union Special
Derechos Reservados en todos los países
INTRODUCCION
Este catálogo fue preparado para guiar al usuario en la
operación de maquinas de la serie 39500 y ayudar a
simplificar la elaboración de los pedidos de los repuestos.
Este catálogo explica detalladamente los ajustes para la
operación de la maquina. Las ilustraciones sirven para
demostrar los ajustes y las letras en referencia indican
los puntos específicos discutidos.
Una cuidadosa atención a las instrucciones y las
precauciones operando y ajustando estas maquinas le
va a permitir mantener el mejor funcionamiento y la
confiabilidad que caracteriza las maquinas cerradoras
de sacos de Union Special.
Los ajustes y precauciones son presentados en
secuencia para que se consiga una progresión lógica.
La ejecución de algunos ajustes fuera de la secuencia
puede causar un efecto adverso para el funcionamiento
de otras partes relacionadas.
Este manual se comprende a base de la información
actual. Cambios en diseño y/o mejoras pueden significar
leves modificaciones de la configuración de las
ilustraciones o precauciones.
On the following pages will be found illustrations and
terminology used in describing the instructions and the
parts for your machine.
In addition to the instructions and to the mandatory rules
and regulations for accident prevention and environmental protection in the country and place of use
of the machine / unit, the generally recognized technical
rules for safe and proper working must also be observed.
The instructions are to be supplemented by the
respective national rules and regulations for accident
prevention and environmental protection.
En las paginas siguientes se encuentran ilustraciones y
terminologías usadas en la descripción de las
instrucciones y las piezas de la maquina.
Adicionalmente a las instrucciones, las reglas y
regulaciones obligatorias para prevenir accidentes y la
protección ambiental del país y lugar donde se encuentra
la maquina/unidad, hay que considerar las reglas
técnicas para un trabajo seguro y adecuado.
Las instrucciones hay que complementarlas con las
respectivas reglas y regulaciones nacionales contra
accidentes y protección del ambiente.
2
Page 3

TABLE OF CONTENTS
INDICE
PAGE
PREFACE 2
INTRODUCCION 2
SAFETY RULES / REGLAS DE SEGURIDAD 4-5
IDENTIFICATION OF MACHINES / IDENTIFICACION DE LAS MAQUINAS 6
APPLICATION OF THIS CATALOG / APLICACION DE ESTE CATALOGO 6
STYLES OF MACHINES / ESTILOS DE LAS MAQUINAS 6
OILING / LUBRICACION 7
NEEDLES / AGUJAS 7
CHANGING NEEDLES / CAMBIO DE AGUJAS 9
THREAD STAND / PORTA CONOS 9
THREADING / ENHEBRADO 9
TO THREAD LOWER LOOPER / ENHEBRAR EL LOOPER INFERIOR 9
TO THREAD UPPER LOOPER / ENHEBRAR EL LOOPER SUPERIOR 10
TO THREAD NEEDLE / ENHEBRAR LA AGUJA 10
THREAD TENSION / TENSION DE LOS HILOS 10
PRESSER FOOT PRESSURE / PRESION DEL PIE PRENSATELAS 11
FEED ECCENTRICS / EXENTRICO DEL TRANSPORTE 11
ASSEMBLING AND ADJUSTING SEWING PARTS / MONTAJE, AJUSTE PIEZAS QUE FORMAN LA COSTURA 11
SETTING THE NEEDLE / AJUSTE DE LA AGUJA 11
SETTING THE LOWER LOOPER / AJUSTE DEL LOOPER INFERIOR 12
SETTING THE REAR NEEDLE GUARD / AJUSTE DEL GUARDA AGUJAS TRASERO 12
SETTING THE FRONT NEEDLE GUARD / AJUSTE DEL GUARDA AGUJAS DELANTERO 12
SETTING THE UPPER LOOPER / AJUSTE DEL LOOPER SUPERIOR 12
SETTING THE UPPER LOOPER (CONTINUED) / AJUSTE DEL LOOPER SUPERIOR (CONTINUACION) 13
SETTING THE FEED DOG / AJUSTE DEL TRANSPORTADOR 13
SETTING THE STITCH LENGTH / AJUSTE DEL LARGO DE LA PUNTADA 14
SETTING THE PRESSER FOOT / AJUSTE DE LA PRESION DEL PIE PRENSATELAS 14
STARTING TO OPERATE / ARRANQUE DE LA MAQUINA 15
UPPER LOOPER THREAD CONTROL / AJUSTE DEL HILO DEL LOOPER SUPERIOR 15
NEEDLE THREAD CONTROL / AJUSTE DEL HILO DE LA AGUJA 15
LOWER LOOPER THREAD CONTROL / AJUSTE DEL HILO DEL LOOPER INFERIOR 16
POSITIONING THE PURL / AJUSTE DE LA POSICION DE LA UNION DE LOS HILOS DE LOS LOOPERS 16
THREAD TENSIONS / TENSIONES DE LOS HILOS 16
SPECIAL ADJUSTMENTS / AJUSTES ESPECIALES 17
TO REMOVE CRANKSHAFT / DESMONTAJE DEL CIGUEÑAL 17-18
MAINFRAME, MISCELLANEOUS COVERS AND PLATES 20-21
CUBIERTA PRINCIPAL, CUBIERTAS MISCELANEAS Y PLACAS 20-21
MAINFRAME, MISCELLANEOUS COVERS AND PLATES 22-23
CUBIERTA PRINCIPAL, CUBIERTAS MISCELANEAS Y PLACAS 22-23
CRANKSHAFT MECHANISM AND BUSHINGS 24-25
MECANISMO DEL CIGUEÑAL Y BOCINAS 24-25
NEEDLE DRIVE AND FEED MECHANISM 26-27
ACCIONADOR DE LA AGUJA Y DIENTES DE ARRASTRE 26-27
UPPER AND LOWER LOOPER DRIVING PARTS 28-29
PARTES DE ACCIONAMIENTO DE LOS LOOPERS SUPERIOR E INFERIOR 28-29
THROATPLATE, PRESSER FOOT, PRESSER FOOT LIFTER AND NEEDLE GUARDS 30-31
PLANCHA DE AGUJA, PIE PRENSATELAS, LEVANTADOR DEL PIE PRENSATELAS Y GUARDA AGUJAS 30-31
THREAD TENSION BRACKET, HEMMER AND MISCELLANEOUS EYELETS 32-33
SOPORTE DE LA TENSION, DOBLADILLADOR Y GUIA HILOS MISCELANEOS 32-33
THREADSTAND 34-35
PORTA CONOS 34-35
NUMERICAL INDEX OF PARTS 36-37
INDICE NUMERICO DE PARTES 36-37
NOTES / NOTAS 38-39
3
Page 4
SAFETY RULES
INDICACIONES DE SEGURIDAD
1. Before putting the machines described in this manual into
service, carefully read the instructions. The starting of
each machine is only permitted after taking notice of the
instructions and by qualified operators.
IMPORTANT! Before putting the machine into service, also
read the safety rules and instructions from the motor
supplier.
2. Observe the national safety rules valid for your country.
3. The sewing machines described in this instruction manual
are prohibited from being put into service until it has been
ascertained that the sewing units which these sewing
machines will be built into, have conformed with the
provisions of EC Machinery Directive 98/37/EC, Annex II
B.
Each machine is only allowed to be used as foreseen.
The foreseen use of the particular machine is described
in paragraph "STYLES OF MACHINES" of this instruction
manual. Another use, going beyond the description, is
not as foreseen.
4. All safety devices must be in position when the machine
is ready for work or in operation. Operation of the
machine without the appertaining safety devices is
prohibited.
1. Antes de poner en marcha las maquinas descritas
en este manual, hay que leer cuidadosamente las
instrucciones. El arranque de cada maquina
solamente se permite después de haber leído las
instrucciones y por personal calificado.
IMPORTANTE! También hay que leer las reglas de
seguridad y las instrucciones del fabricante del
motor.
2. Observe las reglas nacionales de seguridad
que rigen para su país.
3. No se puede poner en marcha la maquina descrita
en este manual hasta que se confirme que la unidad
de coser esta conforme con el reglamento del
Directivo de las Maquinas de la Comunidad Europea
98/37/EC, Anexo II B.
La maquina solamente se puede utilizar para su
uso previsto. El uso previsto esta descrito en el
capitulo ESTILO DE MAQUINAS de este manual de
instrucciones. Otro uso, diferente de la descripción,
no esta previsto.
4. Todos los dispositivos de seguridad tienen que
estar en su sitio cuando la maquina este lista para
trabajar u operando. La operación de la maquina
sin los dispositivos de seguridad esta prohibida.
5. Wear safety glasses.
6. In case of machine conversions and changes all valid
safety rules must be considered. Conversions and
changes are made at your own risk.
7. The warning hints in the instructions are marked with one
of these two symbols.
8. When doing the following the machine has to be
disconnected from the power supply by turning off the
main switch or by pulling out the main plug.
8. 1 When threading needle(s), looper, spreader etc.
8.2 When replacing any parts such as needle(s),
presser foot, throat plate, looper, spreader, feed
dog, needle guard, folder, fabric guide etc.
8. 3 When leaving the workplace and when the work
place is unattended.
8. 4 When doing maintenance work.
8.5 When using clutch motors with or without actua-
tion lock, wait until motor is stopped totally.
5. Utilice lentes de seguridad.
6. En el caso de una modificación de la maquina hay
que tomar en cuenta las reglas de seguridad.
Modificaciones y cambios corren por su riesgo.
7. Las indicaciones de precaución estan marcadas con
cualquiera de estos dos simbolos
8. Para las siguientes maniobras hay que desconectar
la maquina del suministro eléctrico apagando el
interruptor principal o desconectando el enchufe
principal:
8.1 Enhebrando las agujas, looper, etc.
8. 2 Reemplazando piezas como agujas, pie prensa
tela, plancha de aguja, looper, diente de
arrastre, guarda aguja, dobla dillador, etc.
8. 3 Cuando salga de su puesto de trabajo y no se
encuentre nadie para atender la maquina.
8. 4 Durante trabajos de mantenimiento .
8.5 Si esta utilizando motores de embrague,
4
Page 5

9. Maintenance, repair and conversion work (see item 8)
must be done only by trained technicians or special
skilled personnel under condsideration of the
instructions.
9. Mantenimiento, reparación y trabajos de conversión
(vease No. 8) solamente pueden ser efec tuados por
técnicos entrenados o por personal especializado
bajo consideración de las instrucciones.
Only genuine spare parts approved by UNION SPECIAL have to be used for repairs. These parts are
designed specifically for your machine and manufactured with utmost precision to assure long lasting service.
10 . Any work on the electrical equipment must be done by
an electrician or under direction and supervision of
special skilled personnel.
11 . Work on parts and equipment under electrical power is
not permitted. Permissible exceptions are described in
the applicable section of standard sheet EN 50 110 /
VDE 0105.
12. Before doing maintenance and repair work on the
pneumatic equipment, the machine has to be disconnected from the compressed air supply. In case of
existing residual air pressure after disconnecting from
compressed air supply (e.g. pneumatic equipment with
air tank), the pressure has to be removed by bleeding.
Exceptions are only allowed for adjusting work and
function checks done by special skilled personnel.
Solamente repuestos originales y aprobados por
Union Special pueden ser utilizados para
reparaciones.
10 . Cualquier trabajo con el equipo eléctrico tiene que
ser ejecutado por un electricista o bajo la supervisión
de personal especialmente entrenado.
11 . No esta permitido trabajar en piezas y equipos con la
electricidad conectada. Excepciones permitidas están
descritas en EN 50110 / VDE 0105.
12. Antes de hacer mantenimiento o reparaciones del
equipo neumático, hay que desconectar la maquina
de la alimentación del aire comprimido. En el caso
que exista una presión de aire residual después de
desconectar la maquina (por ejemplo equipos con
tanques de aire), la presión tiene que ser eliminada
abriendo las válvulas. Excepciones están solamente
permitidas para trabajos de ajuste y revisión de
funciones por personal especialmente entrenado.
5
Page 6

IDENTIFICATION OF MACHINES
IDENTIFICACION DE LAS MAQUINAS
Each UNION SPECIAL machine is identified by a style number on a
name plate on the machine. Style numbers are classified as standard
and special. Standard style numbers have one or more letters suffixed,
but never contain the letter "Z". Example: "Style 39500TYB". Special
Style numbers contain the letter "Z".
When only minor changes are made in a standard machine, a "Z" is
suffixed to the Standard Style number.
Example: "Style 39500TYB 3280 A".
Styles of machines similar in construction are grouped under a class
number which differs from the Style number, in that it contains no
letters.
Example: "Class 39500"
APPLICATION OF CATALOG
This catalog applies specifically to the Standard Styles of machines
as listed herein. It can also be applied with descretion to some Special
Styles of machines in class 39500. Reference to direction, such as
right, left, front, back, etc., are given from the operator's position
while seated at the machine. Operating direction of handwheel is
clockwise.
The parts are illustrated and listed at the back of this catalog. On the
page opposite the illustration will be found a listing of parts with their
numbers, description and and the number of pieces required.
Numbers in the first column are reference numbers only and merely
indicate the position of that part in the illustration. Reference numbers
should never be used in ordering parts. Always use the part number
listed in the second column.
STYLES OF MACHINES
Single needle, two or three thread overedging machine. Two looper.
Cam driven plain feed. Fully automatic lubrication. Oil cooled means
a built-in fan which acts maintenance free.
Cada máquina UNION SPECIAL está identificada con un número
de estilo que está estampado en una palca fijada a la máquina.
Estos números de estilos estan clasificados como estándares y
especiales. Números de estilos estándares contienen una o más
letras en el sufijo, pero nunca la letra "Z". Por ejemplo: "Estilo
39500TYB". Estilos especiales contienen la letra "Z".
Cuando se han hecho cambios menores a una máquina
estándard, una "Z" se agrega al sufijo del número estándard.
Ejemplo "Estilo 39500TYB 3280 A".
Estilos de maquinas de construccion similar estan agrupados
bajo un numero de clase que es diferente del número del estilo
y que no contiene letras. Ejemplol: "Clase 39500".
APLICACION DE ESTE CATALOGO
Este catálogo aplica especificamente a los estilos estándares de
máquina listados en él. Puede aplicarse también con cierta
discreción a otros estilos de máquina de la clase 39500. Las
referencias a dirección, tales como derecha, izquierda, frente, atrás,
etc. se refieren a cuando el operador está sentado al frente de la
maquina. La operacion del volante es en la direccion de las agujas
del reloj.
Las partes estan listadas e ilustradas al final de este catálogo. En la
página opuesta a la ilustración encontrará una lista con el número
de parte, descripción y la cantidad requerida. Los números de la
primera columna son referenciales para indicar la ubicación de la
pieza en el dibujo y no deben usarse cuando ordene piezas de
repuesto. Ordene siempre con el número de parte indicado en la
segunda columna.
ESTILOS DE MAQUINAS
Una aguja, dos o tres hilos, máquina de sobrehilado. Dos loopers.
Alimentador excéntrico plano. Lubricación automática. Ventilador
incorporado que mantiene el aceite frio, libre de mantenimiento.
39500TYA: For seaming and hemming polypropylene or
polyethylene mesh bags, bags made of woven
polypropylene or polyethylene tapes and foil laminated
woven polypropylene orpolyethylene fabrics. Width of
rolled hem approx. 8 - 9 mm (9/32" - 23/64") (width of
hem varies depending on material). The hem is
penetrated by the needle.
Stitch type and seam spec.: 504 SSp-1
Seam width: 7mm (9/32")
Width of hem: 5/16 (23/64")
Stitch range: 4 - 6 S.P.I. = 4.2 - 6.4mm
Standard setting: 4 S.P.I. = 6.4mm
Feed: Plain Feed
Teeth cut: 10 T.P.I.
Standard needle: 154 GAS - 140 / 054
Loopers with large eye
Maximum speed: 5000 Stitches / min.
(depending on stitch length and type of operation)
39500TYB: Similar to 39500TYA except with swing out folder
39500TYA: Para coser y doblar sacos de malla de polipropileno o
poliétileno, sacos hechos de polipropileno tejido o cintas
de poliétileno y laminados de polipropileno tejido o telas
de polipropileno. Dobladillador de aproximádamente 89mm.
(El ancho del dobladillador varia dependiendo del
material) El dobladillado es penetrado por la aguja.
Tipo de costura: 504 SSp-1
Ancho de la costura: 7mm
Ancho del doblado: 7mm
Largo de la puntada: 4-6 ppp = 4.2-6.4mm
Ajuste estándard: 4 ppp = 6.4mm
Transporte: Transporte simple
Distancia de los dientes: 2.6mm
Aguja estándard: 154 GAS - 140 / 054
Looper de ojo largo
Velocidad máxima: 5000 puntadas / min.
(Depediendo del largo de la puntada y tipo de
operación)
39500TYB: Como la 39500TYA, pero con folder movible.
6
Page 7

OILING
LUBRICACION
CAUTION! Oil was drained from machine when shipped, so reservoir
must be filled before beginning to operate. Oil capacity of class
39500 is approx. eight ounces (240ml). A straight mineral oil of a
saybolt viscosity of 90 to 125 seconds at 100° farenheit should be
used.
Machine is filled with oil at spring cap in top cover. Oil level is checked
at sight gauge on front of machine. Red bulb on oil level indicator
should show between gauge lines when machine is stationary.
Machine is automatically lubricated. No oiling is necessary, other
than keeping main reservoir filled. check oil daily before the morning
start; add oil if required.
The oil drain plug screw is located at the back of machine near
bottom edge of base. It is a magnetic screw designed to
accumulate possible foreign materials which may have entered
the crank case. It should be removed and cleaned perodically.
NEEDLES
Each UNION SPECIAL needle has both a type and size number. The
type number denotes the kind of shank, point, length, groove, finish
and other details. The size number, stamped on the needle shank,
denotes largest diameter of blade, measured in hundredths of a
millimeter respectively in thousandths of an inch, midway between
shank and eye. Collectively, the type and size number represent
the complete symbol, which is given on the label of all needles
pakaged and sold by Union Special.
PRECAUCION! Se removió el aceite de la máquina antes del
despacho, por lo tanto, hay que rellenar el tanque antes de
poner la máquina en marcha. La capacidad de aceite de la
máquina 39500es de aproximadamente 240ml. Use solo aceite
mineral con una viscosidad saybol de 90 a 125 segundos a 100°
farenheit.
La máquina se llena con aceite por la tapa de resorte superior. El
nivel de aceite se revisa en el indicador localizado en la parte
frontal de la máquina. El nivel de aceite apropiado se alcanza
cuando aparezca en el centro de las 2 lineas rojas del indicador.
La máquina se lubrica automáticamente. Solo hay que mantener
lleno el tanque de aceite. Revise diariamente antes de comenzar
a trabajar la máquina, preferiblemente en la mañana, y agregue
aceite según sea necesario.
El tapón de drenaje de aceite se encuentra enla parte posterior
de la máquina, cerca de la base. Es un tornillo magnético
designado para acumular la mayor cantidad posible de material
y sucio para que no entren en la máquina. Debe ser limpiado
frecuentemente.
AGUJAS
Cada aguja tiene un número del tipo y del grosor. El número del
tipo determina el cabo, la punta, el largo, la ranura, la
determinación y otros detalles. El número del grosor, troquelado
en el cabo de la aguja, significa el diámetro máximo de la aguja,
expresado en centésimos de un milímetro o milésimos de
pulgada, entre el cabo y el ojo de la aguja. En conjunto los números
del tipo y del grosor representan el símbolo completo, que
aparece en la etiqueta de los empaques de las agujas, que
vende UNION SPECIAL.
The standard recommended needle for styles 39500TYA and TYB is
type 154 GAS.
Below is the description and sizes available of the recommended
needles.
Type No. Description and sizes
154 GAS Round shank, round point, curved blade,
standard length, single groove, struck groove,
spotted, chromium plated and is available in
sizes: 90 / 036, 100 / 040, 110 / 044, 125 / 049
140/054, 150/060.
To have needle orders promptly and accurately filled, an empty
package, a sample needle, or the type and size number should be
forwarded. Use description on label. A complete order would read:
"1000 needles, type 154 GAS, size 140 / 054"
Selection of proper needle size is determined by the size of thread
used. Thread should pass freely through needle eye in order to
produce a good stitch formation.
Success in the operation of UNION SPECIAL machines can be
secured only by use of needles packaged under our brand name,
UNION SPECIAL, which is backed by a reputation for producing
highest quality needles in material and workmanship for more than
three quarters of a century.
La aguja común para las maquinas 39500TYA y TYB es la 154
GAS.
A continuación encuentran la descripción y los grosores disponibles:
Tipo número Descripción y grosores
154 GAS Cabo redondo, punta redonda, curva, largo
estándard, ranura sencilla, estriada, cromada
y disponible en t amaños:
90 / 036, 100 / 040, 110 / 044, 125 / 049
140/054, 150/060.
Para asegurar que los pedidos de las agujas se cumplan rápido
y correctamente, se recomienda enviar un empaque vacío,
una muestra de una aguja o indicar los números del tipo o del
grosor. Un pedido completo seria: „1000 agujas, tipo 154GAS,
grosor 140 / 054"
La selección de la aguja apropiada esta determinada por el
grosor del hilo utilizado. El hilo debería pasar libremente por el ojo
de la aguja, para permitir una buena formación de la puntada.
El éxito en la operación de las máquinas UNION SPECIAL se
asegura utilizando sólo agujas empacadas bajo nuestra marca,
7
Page 8
8
Page 9

CHANGING NEEDLES
CAMBIO DE AGUJAS
Release pressure on presser foot by turning presser foot
release bushing (AG, Fig 1) and swing presser arm (U) out of
position. Turn handwheel in operating direction until the
needle is at its lowest point of travel. Using hexagonal socket
wrench No. 21388AU, furnished with machine, loosen needle
clamp nut about 1/4 turn. Turn handwheel again until the
needle is at high position; withdraw the needle.
To replace the needle, leave needle holder at high position,
insert the needle in holder until they rest against stop pin.
Keeping needle with your left hand in this position, turn
handwheel until holder is again at its low point of travel; then
retighten nut.
Return presser arm (U, Fig. 1) to position, relock presser
foot release bushing (AG).
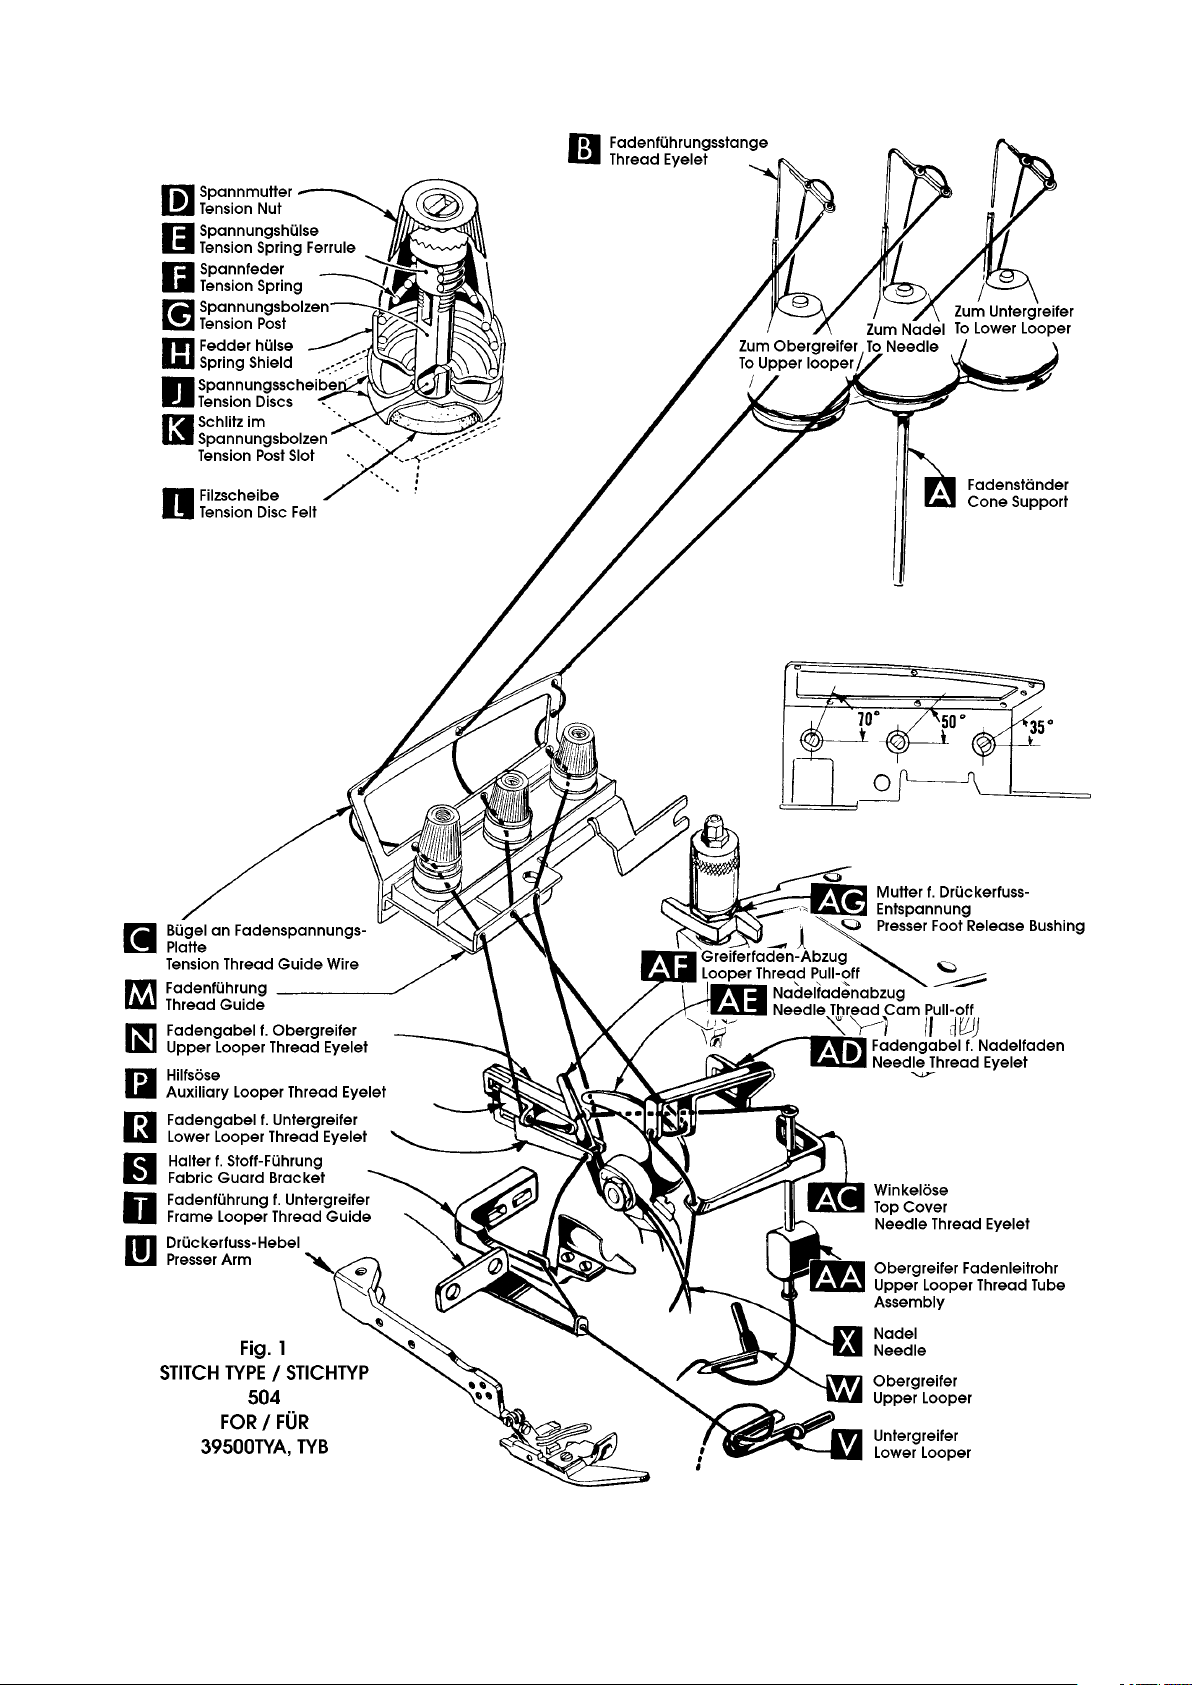
THREAD STAND
After thread comes from cones on cone support (A, Fig1) it
is brought up through back hole of thread eyelet bars (B),
then down through the front hole of thread eyelet bars.
Next it is threaded through the upper holes of tension thread
guide (C) from front to back and then through the lower holes
from back to front. The threads continue between tension
discs (J), through tension post slot (K) in tension post (G)
and on through front thread (M).
Quite la presión del pie prensatela girando el manguito (AG,
Fig. 1) hacia la izquierda. Gire el brazo del pie prensatela
(U) hacia la izquierda. Gire el volante en dirección de
operación hasta que la aguja se encuentre en su punto muerto
inferior. Suelte la tuerca que fija la aguja con la llave
hexagonal No. 21338AU que viene con los accesorios,
girándola aproximadamente ¼“ hacia la izquierda. Siga
girando el volante hasta que la aguja se encuentre en su
punto muerto superior y quite la aguja.
En esta posición elevada de la barra de la aguja se inserta la
aguja nueva hasta que el cabo toque el pasador tope.
Mantenga con la mano izquierda la aguja en esta posición,
gire el volante hasta que la aguja llegue a su punto muerto
inferior y apriete la tuerca que fija la aguja otra vez.
Regrese el brazo del pie prensatela (U, Fig. 1) a su posición
normal y gire el manguito (AG) hacia la derecha.
PORTA CONOS
Se enhebra el hilo desde los conos en los platos (A, Fig1)
desde abajo hacia arriba a trabes del ojete trasero en la barra
guía hilo (B) y después desde arriba hacia abajo a trabes del
ojete delantero.
Después se enhebra el hilo a través del ojete superior en la
guía de tensión (C) desde adelante hacia atrás y
posteriormente a través del ojete inferior desde atrás hacia
delante. Los hilos pasan entre los discos de tensión (J) a
través de la ranura (K) en el poste de tensión (G) y siguen
por la guía de hilo delantera (M).
THREADING
Only parts involved in threading are shown in the threading
diagram (Fig. 1).
Parts are placed in their relative positions for clarity.
It will simplify threading to follow the recomended sequence
of threading lower looper first, upper looper second and needle
third.
Before beginning to thread, swing cloth plate open, turn
handwheel in operating direction until needle (X) is in high
position, release pressure on presser foot by turning presser
foot release bushing (AG), and swing presser arm (U) out of
position.
Be sure the threads, as they come from the tension thread
guide (C), are between the tension discs (J) and in diagonal
slots (K) in tension posts (G). The tension posts should be
positioned so the tension post slot will be at the approximate
angle for the different threads as indicated in Fig. 1.
ENHEBRADO
La ilustración para enhebrar (Fig. 1) demuestra solamente
las piezas por las cuales pasa el hilo.
Para un mejor entendimiento se muestran esas piezas
esquemáticamente.
Se facilita el proceso de enhebrar cuando se proceda con la
maquina 39500TYA de la siguiente manera: primero el looper
inferior, segundo el looper superior y tercero la aguja.
Antes de enhebrar se gira la tapa en que reposa la tela hacia
la izquierda, se gira el volante en sentido de operación hasta
que la aguja (X) se encuentre en su punto muerto superior,
la presión del pie prensatela se quita girando el manguito
(AG) hacia la izquierda y se gira el brazo del pie prensatela
(U) hacia la izquierda.
Debería fijarse que los hilos que vienen desde la guía de
tensión (C), se encuentren entre los discos de tensión (J) y
pasen por la ranura en el poste de tensión (G). Los postes
de tensión deberían ser ajustados para que las ranuras en
los postes tengan aproximadamente el mismo ángulo como
se demuestra en la Fig. 1.
9
Page 10

TO THREAD LOWER LOOPER
ENHEBRAR EL LOOPER INFERIOR
Thread lower looper thread through the right eyelet of front
thread guide (M, Fig. 1).
Double end of thread and lead it through both eyes of lower
looper thread eyelet (R) from right to left.
NOTE: Thread must pass in front of looper thread pull-off
(AF). Lead thread behind fabric guard (S) and through eyelet
hole of frame looper thread guide (T). Turn handwheel in
operating direction until heel of lower looper (V) is all the
way to the left; then thread through both eyes from left to
right. Left eye of lower looper can be threaded easily if
tweezers are in left hand.
TO THREAD UPPER LOOPER
Thread lower looper thread through the left eyelet of front
thread guide (M, Fig. 1).
Turn handwheel until point of upper looper (W, Fig. 1) is all
the way left. Lead thread through auxiliary looper thread eyelet
(P) from back to front, then through both eyes of upper looper
thread eyelet (N) from left to right.
NOTE: Thread must pass in front of looper thread pull-off
(AF). After pulling up upper looper thread tube assembly (AA),
lead thread under neck of top cover casting and down through
thread tube assembly (AA). Pull thread out bottom of tube;
push tube down, then insert thread through upper looper eye
from back to front.
Enhebre el hilo del looper inferior a través del ojete derecho en la
guía del hilo delantera (M, Fig. 1).
Tome el final del hilo doblado y enhébrelo de derecha a izquierda
a través de los ojetes en la horquilla inferior del hilo (R).
NOTA: El hilo debe estar encima del alimentador de hilo (AF).
Pase el hilo detrás del guarda tela (S) y a través del ojete del
guía hilo (T) del looper inferior. Gire el volante en sentido de
operación hasta que el looper inferior (V) se encuentre en su
posición a la extrema izquierda y enhebre los dos ojos del looper
desde la izquierda hacia la derecha. El ojo izquierdo del looper
inferior se enhebra más fácil, agarrando la pinza con la mano
izquierda.
ENHEBRAR EL LOOPER SUPERIOR
Enhebre el hilo del looper superior a través del ojete izquierdo en
la guía del hilo delantera (M, Fig. 1).
Gire el volante hasta que la punta del looper superior (W, Fig. 1)
se encuentre en su posición a la extrema izquierda. Enhebre el
hilo desde atrás hacia delante a través de la guía adicional (P) y
después desde la izquierda hacia la derecha a través de los dos
ojetes en la horquilla del looper superior (N).
NOTA: El hilo debe estar encima del alimentador de hilo (AF).
Hale el tubito (AA) que guía el hilo hacia arriba y i.e. el hilo debajo
del cuello en la tapa de la maquina hacia el tubito (AA) y a través
del tubito hacia abajo. Hale el hilo fuera del tubito, empuje el
tubito otra vez hacia abajo y enhebre el ojo del looper superior
desde adelante hacia atrás.
CAUTION: Be sure upper looper thread is under lower
looper thread when passing from tube assembly to upper
looper eye.
TO THREAD THE NEEDLE
Thread needle thread through the middle eyelet of front thread
guide (M, Fig. 1). Turn handwheel in operating direction until
needle (X) is at its highest position. Insert needle thread from
right to left, through both eyes of needle thread eyelet (AD),
under neck of top cover casting; then down through hole in
top cover needle thread eyelet (AC). Thread needle from the
front.
THREAD TENSION
The amount of tension on needle and looper threads is
regulated by the tension nuts (D, Fig. 1). Tension on threads
should be only enough to secure proper stitch formation.
PRECAUCION: El hilo del looper superior tiene que pasar en su
recorrido desde el tubito guía hilo hacia el ojo del looper debajo
del hilo del looper inferior.
ENHEBRAR LA AGUJA
Enhebre el hilo de la aguja a través del ojete de en medio en
la guía del hilo delantera (M, Fig. 1). Gire el volante en sentido
de operación hasta que la aguja (X) se encuentre en su punto
muerto superior. Enhebre el hilo desde la derecha hacia la
izquierda por los dos ojetes en la horquilla de hilo (AD) debajo
del cuello en la tapa de la maquina, después desde arriba
hacia abajo por el ojete en el guía hilo (AC) en la tapa de la
maquina y finalmente desde atrás hacia delante por el ojo
de la aguja.
TENSION DE LOS HILOS
Las tensiones de los hilos de la aguja y de los looper se ajustan
con la tuerca del ajuste de la tensión (D, Fig. 1). La tensión ebria
ser solamente tan fuerte para que se forma una puntada correcta.
10
Page 11
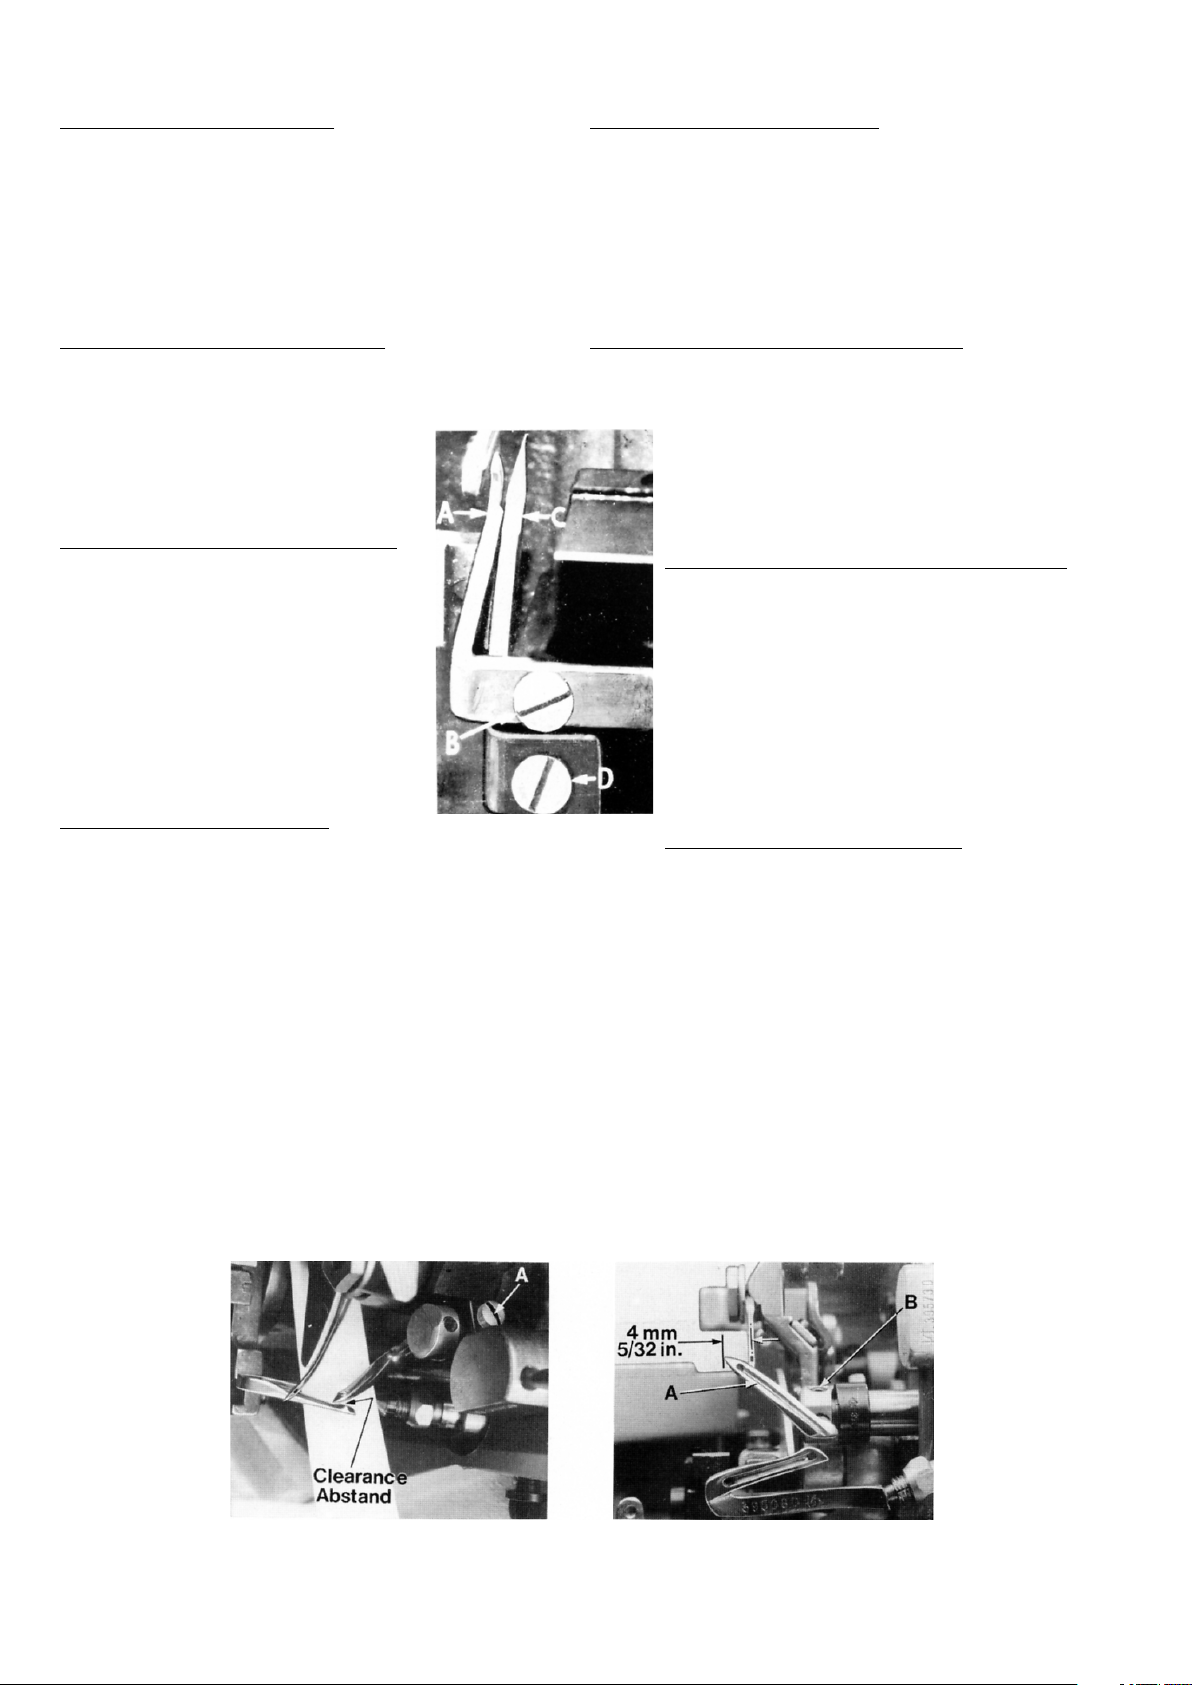
PRESSER FOOT PRESSURE
PRESION DEL PIE PRENSATELAS
Sufficient presser foot pressure to
feed work uniformly should be
maintained. Should it be necessary
to increase or decrease amount of
pressure on presser foot, loosen lock
nut (A Fig. 2) and turn adjusting
screw (B). Adjusting screw has a right
hand thread so tightening increases
pressure, loosening decreases
pressure. When pressure adjusting
screw (B) has been properly set,
tighten lock nut (A). With presser foot
resting on throat plate, position
locking nut (C) so that its under
surface is approximately 0.8mm to
1.6mm (1/32" to 1/16") from the top
surface of adjusting screw (B). Set
cap (D) against locking nut (C).
FEED ECCENTRICS
Feed eccentrics used in styles covered in this catalog have
been selected to produce approximately 4 stitches per inch.
It will be noted that the part number of main feed eccentric is
No. 39540B4. Minor numbers of the part symbol indicate
approximately the numbers of stitches obtainable when using
that eccentric.
ASSEMBLING AND ADJUSTING SEWING PARTS
Before assembling and adjusting the sewing parts, remove
cloth plate, fabric guard, chip guard, then proceed the
following suggested sequence:
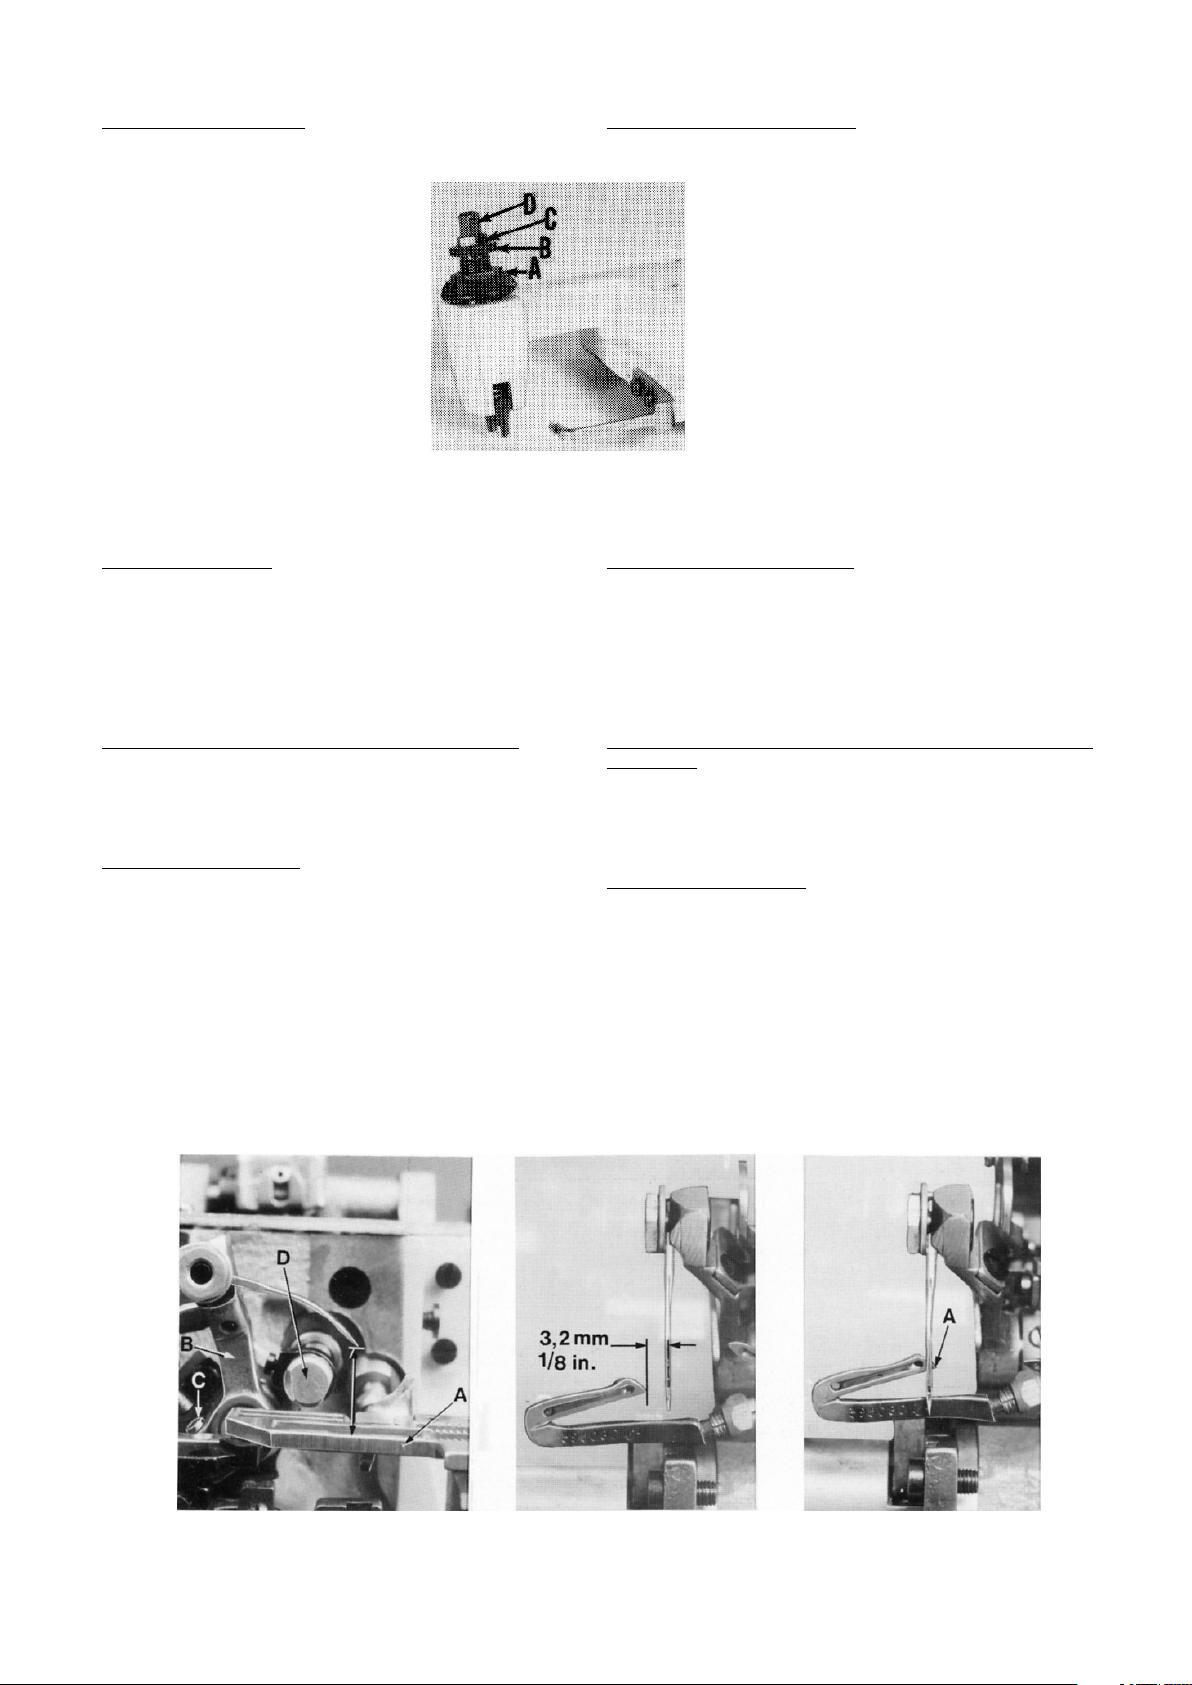
SETTING THE NEEDLE
With throat plate assembled in position, needle should center
in the front end of needle slot. When needle is at its highest
position, needle point should be set between 17/34" - 35/64"
(13.5 - 14mm) above the throat plate (A, Fig. 3). For this
adjustment gauge G21227F can be advantageously used.
To align the needle or to set the height above the throat plate,
move needle driving arm (B, Fig. 3) by loosening clamp screw
(C).
Remove throat plate.
FIG. 2
Para conseguir un transporte uniforme del
material, se requiere suficiente presión del pie
prensatela. Para aumentar o disminuir la presión
del pie prensatela hay que soltar la tuerca de
seguridad (A, Fig. 2) y girar el tornillo de ajuste (B).
El tornillo tiene una rosca hacia la derecha, así
que girando hacia la derecha aumenta y girando
hacia la izquierda disminuye la presión. Una vez
logrado el ajuste requerido, apriete la tuerca de
seguridad (A) otra vez. Con el pie prensatela
reposando en la placa de la aguja, ajuste la
tuerca de fijación (C) de tal manera, para que
entre su parte inferior y la parte superior del tornillo
de ajuste (B) quede una distancia de 1/32" a 1/
16" (0,8 mm a 1,6 mm). Gire la tuerca tapa (D)
contra la tuerca de fijación (C).
EXCENTRICO DE TRANSPORTE
Las maquinas de este catalogo están equipadas con
excéntricos 39540B4, que producen 4 puntadas por pulgada.
El número después de la letra indica las puntadas
aproximadas por pulgada.
MONTAJE Y AJUSTE DE LAS PIEZAS QUE FORMAN LA
COSTURA
Antes de montar y ajustar las piezas que forman la costura,
remueva la tapa porta-tela, el guarda-tela, el protector de
desperdicios y proceda de la siguiente manera:
AJUSTE DE LA AGUJA
Con la plancha de la aguja en su sitio, la aguja debería entrar en
el centro de su hueco en la plancha de la aguja. Cuando la aguja
se encuentre en su punto muerto superior, la punta de la aguja
debería encontrarse a una distancia de 17/34" a 35/64" (13,5
mm – 14 mm) encima de la plancha de la aguja (A, Fig. 3). Para
este ajuste se puede utilizar el calibrador G21227F. Para alinear
la aguja o para ajustar su distancia a la plancha de la aguja,
suelte el tornillo (C, Fig. 3) y ajuste la palanca (B) de la aguja
adecuadamente.
Remueva la plancha de la aguja.
FIG. 3 FIG. 4 FIG. 5
11
Page 12
SETTING THE LOWER LOOPER
AJUSTE DEL LOOPER INFERIOR
Now insert lower looper (A, Fig. 4) into bar (B). With lower looper
at the left end of its stroke, set looper point 3.2mm (1/8") from
the center of the needle, using looper gauge No. 21225-1/8.
When the lower looper (A) on its travel left to right passes the
needle, the needle should be deflected approximately 0.10mm
(.004") to the front (towards the operator). (Fig. 5).
SETTING THE REAR NEEDLE GUARD
Set the rear needle guard with its edge (L, Fig. 6) horizontal. Set
it so close to the needle that the point of lower looper just touches
the needle without deflecting it. Screw (B) is
used to set rear needle guard. Make sure there
is no interference between rear needle guard
and lower looper.
SETTING THE FRONT NEEDLE GUARD
Assemble front needle guard (C, Fig. 6). Set
front needle guard as close as possible to
needle without touching it, about 0.10mm
(.004") distance.
Screw (D) is used for adjusting and setting
front needle guard.
It is important to set the front needle guard
as high as possible without touching the throat
plate.
Ahora coloque el looper inferior (A, Fig.4) en su barra (B). Cuando
el looper inferior se encuentre en su posición de extrema izquierda,
ajuste la punta del looper a una distancia de 1/8" (3,2 mm) al
centro de la aguja. Utilice para esto el calibrador del looper No.
21225-1/8.
Cuando el looper inferior (A) pase desde la izquierda hacia la
derecha por la aguja, el debería desviar la aguja por .004" (0,10
mm) hacia delante (hacia la operaria) (Fig. 5).
AJUSTE DEL GUARDA AGUJAS TRASERO
Ajuste el borde del guarda aguja trasero en forma horizontal (A,
Fig. 6). Colóquelo lo más cercano de la aguja para que la punta
del looper apenas toque la aguja, pero no la desvíe más.
El guarda aguja posterior se fija con el tornillo (B).
Asegúrese que el guarda aguja no interfiera con el looper
inferior.
AJUSTE DEL GUARDA AGUJAS DELANTERO
Monte el guarda aguja delantero (C, Fig.6). Coloque el
guarda aguja delantero lo mas cercano a la aguja, pero
sin tocarla, aproximadamente .004" (0,10 mm).
Con el tornillo (D) se ajusta y se fija el guarda aguja
delantero.
Es importante que el guarda aguja delantero se
encuentre lo mas cerca posible debajo de la plancha de
la aguja sin tocarla.
SETTING THE UPPER LOOPER
Insert upper looper (A, Fig. 8) in its holder.
Screw (B, Fig. 8) holds upper looper in its
holder and permits it to be pushed in or out or turned around its
shank. Insert upper looper holder into upper looper shaft, if it is
not already in place. Screw (A, Fig. 7) on clamp holds the upper
looper holder in the shaft.
By pushing looper holder in or pulling it out of upper looper
shaft and/or by turning the looper around its shank, set upper
looper point to cross lower looper to the left of the lower looper
eye with 0.05 to 0.1 mm (.002" to .004") clearance (Fig. 7).
FIG. 6
AJUSTE DEL LOOPER SUPERIOR
Coloque el looper superior (A, Fig.8) en su porta-looper.
Con el tornillo (B, Fig. 8) se fija el looper superior en el portalooper y permite moverlo hacia adentro o afuera o girarlo alrededor
de su eje. Si no esta montado, coloque ahora el porta-looper en
la barra del looper. Con el tornillo (A, Fig. 7) se fija el porta looper
en la barra del looper.
Empujando o halando el porta-looper en la barra del looper y/o
girando el looper por su eje, se ajusta la punta del looper superior
en tal manera, para que cruza el looper inferior a la izquierda del
ojo del looper inferior a una distancia de .002" a .004" (0,005
mm – 0,1 mm). (Fig. 7).
FIG. 7
FIG. 8
12
Page 13

SETTING THE UPPER LOOPER
(Continued)
AJUSTE DEL LOOPER SUPERIOR
(Continuación)
Next turn handwheel until looper is at the left end of its travel.
At this position, the distance between the center line of the left
needle and the looper point should be 4 mm (5/32") (Fig, 8). In
this position the looper point must be at the left side of the needle.
If resetting is necessary, do it by shifting the upper looper holder
(D, Fig. 3) in its shaft to the right or to the left.
For example, dimension 4.0 mm (5/32") can be increased by
pulling the upper holder, to the left, out of upper looper shaft.
After these changes, it may be necessary to turn upper
looperaround its shank slightly to maintain the condition shown
in (Fig. 7).
Check setting to avoid interference between upper looper and
needle on needle downstroke. If needle rubs the back of upper
looper, pull looper out of its holder slightly and rotate it a little
counterclockwise, looking from left end of machine.
Reset, to maintain dimensions of (Fig. 7, and 8).
SETTING THE FEED DOG
Como siguiente paso, gire el volante hasta que el looper superior
se encuentre en su posición de extrema izquierda.
En esta posición la distancia entre el centro de la aguja hasta
la punta del looper debería ser 5/32" (4 mm) (Fig. 8). La punto
del looper debe encontrarse ahora a la izquierda de la aguja.
Si hace falta un reajuste, se puede lograrlo moviendo el portalooper (D, Fig. 3) en el eje del looper hacia la derecha o hacia
la izquierda.
Por ejemplo se incrementa la medida de 5/32" (4,0 mm) (Fig.
8) halando el porta-looper hacia la izquierda fuera del eje del
looper.
Después de estos cambios podría ser necesario girar el portalooper por su eje para lograr el ajuste mostrado en (Fig. 7).
Revise para que la aguja cuando esta bajando, no es desviada
por el looper superior. Si la aguja esta rozando la parte posterior
del looper superior, debería sacarlo un poco hacia afuera del
porta-looper y girarlo un poco en sentido contra la reloj - visto
desde la parte izquierda de la maquina.
Reajuste las distancias según (Fig. 7 y Fig. 8)
AJUSTE DEL TRANSPORTADOR
Set the main and the chaining feed dogs (A and B, fig. 9) so that
the top surfaces of teeth all lay in the same place. This can be
checked by laying a rule on the feed dog teeth. After mounting
throat plate, feed dogs should be leveled with throat plate surface
by rotating feed tilting adjusting pin (C, Fig. 9). This pin raises
or lowers the back end of feed bar. The feed dogs must be aligned
when their teeth just appear above the throat plate surface.
Screw (D, Fig. 9) locks the feed tilting adjusting pin.
Now set the feed dogs so that their teeth project 1.2 mm (3/64")
over the throat plate.
Coloque el transportador principal y el transportador diferencial
(A y B, Fig. 9) en tal manera para que las puntas de los dientes
estén en un nivel. Esto se puede revisar colocando una regla.
Después de montar la plancha de la aguja se ajusta el nivel del
transportador principal girando el pasador (C, Fig. 9) para el
ajuste de la inclinación del transportador. Con este pasador se
levanta o se baja la parte trasera del soporte del transportador.
El transportador tiene que ser ajustado en el momento cuando
los dientes sobresalen la plancha de la aguja.
Con el tornillo (D, Fig. 9) se fija el pasador del ajuste del
transportador.
Ajuste el transportador en tal manera para que los dientes
sobresalgan 3/64" (1,2 mm) sobre la plancha de la aguja.
FIG. 9
13
Page 14
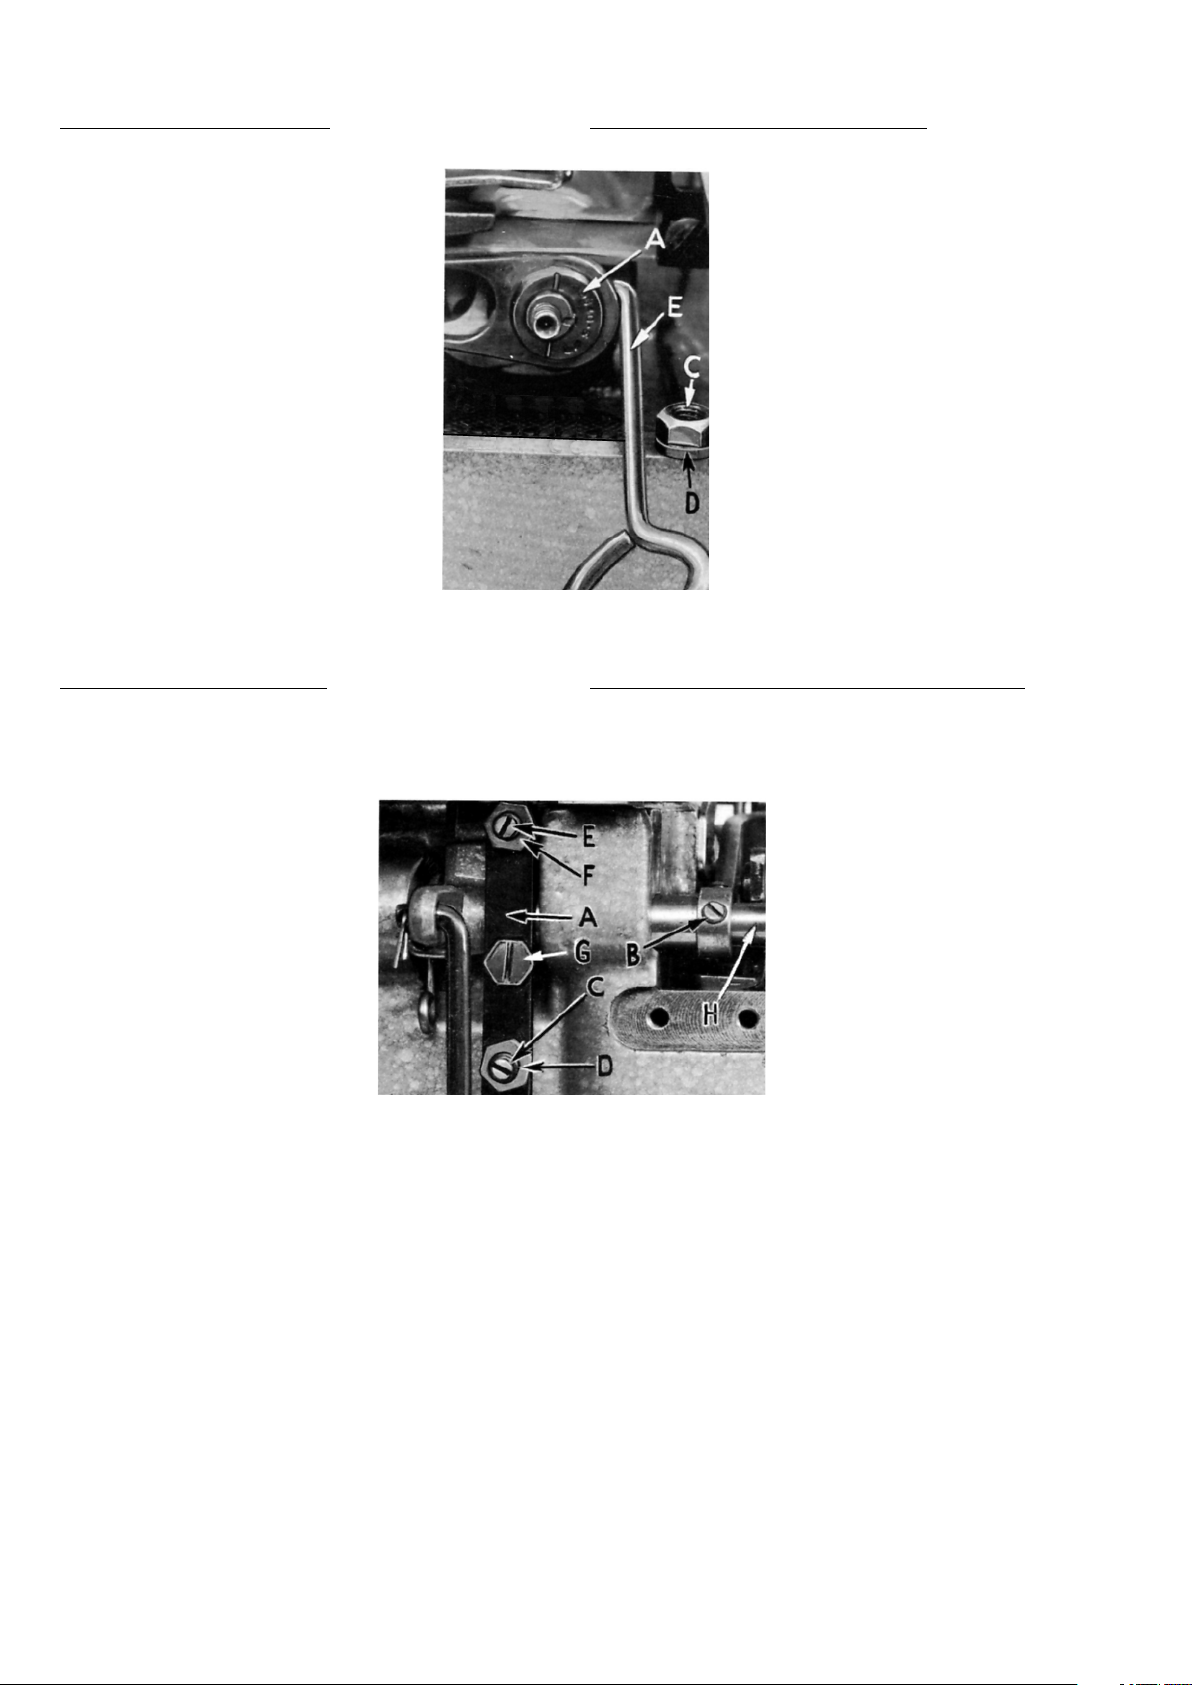
SETTING THE STITCH LENGTH
AJUSTE DEL LARGO DE LA PUNTADA
The stitch length is determined by the used
feed eccentric. The machines covered in this
catalog are usually equiped with eccentric
39540TY4.
When mounting the feed eccentric be careful
not to damage the shaft and the key. Retighten
the nut (C).
To change the feed eccentrics, remove nut (C)
and washer (D).
Turn handwheel in operating direction until the
key slot in the eccentric is toward the front.
Using eccentric extractor (E), supplied with
machine, seize behind the eccentrics as
shown and withdraw them carefully from the
shaft.
It is easier to withdraw the eccentrics by
turning the handwheel slightly back and forth.
FIG. 10
SETTING THE PRESSER FOOT
Assemble the presser foot to presser arm. With needle in high
position, swing presser arm into sewing position and set the
presser foot to align needle holes (front and back) and flat on
the throat plate. The front edge of needle hole in presser foot
must be aligned with front edge of
needle hole in throat plate. It is also
important that the bottom of the
presser foot be flat on the throat plate.
If necessary, presser foot can be
realigned with throat plate slots by
shifting the foot lifter lever shaft (H, Fig.
11). To move the shaft, loosen collar
screws (B, Fig. 11) and clamp screw
(G) and then shift the foot lifter lever
shaft to the left or right as required.
Retighten collar screwa and clamp
screw.
El largo de la puntada esta determinado por el
excéntrico del transporte. Las maquinas de este
catalogo son normalmente equipadas con un
excéntrico 39540TY4.
En el montaje del excéntrico hay que tomar
precaución para no dañar el eje y la cuña. Apriete
la tuerca (C) otra vez.
Para el cambio del excéntrico del transporte hay
que remover la tuerca (C) y la arandela (D).
Gire el volante en sentido de operación hasta
que la ranura de la cuña esta en posición hacia
delante.
Posicione el gancho (E), que esta suministrado
con la maquina, detrás del excéntrico y
remuévalo del eje con cuidado.
Remover el excéntrico se hace más fácil girando
el volante suavemente hacia delante y hacia
atrás.
AJUSTE DE LA PRESION DEL PIE PRENSATELAS
Monte el pie prensatela en el brazo del pie. Con la aguja en su
posición de arriba, ponga el brazo del pie en la posición de costura
y ajuste el pie prensatela de manera que coincidan los huecos
para la aguja y el pie repose plano en la plancha de la aguja. El
borde delantero en el hueco para la aguja
en el pie prensatela debería coincidir con
el borde delantero del hueco para la aguja
en la plancha de la aguja. También es
importante para que la parte inferior del
pie prensatela este nivelado con la
plancha de la aguja. Si hace falta se puede
ajustar el pie prensatela a los huecos de
la aguja en la plancha de la aguja
moviendo el eje del levantador de
prensatela (H, Fig. 11). Para mover el eje
suelte los tornillos (B, Fig. 11) en el anillo
y el tornillo de sujeción (G) y mueva el eje
hacia la izquierda o hacia la derecha.
Apriete los tornillos en el anillo y el tornillo
de sujeción otra vez.
The foot lifter lever arm (A, Fig. 11)
and the collar (B) secure the shaft. Be sure the presser arm
does not bind and rise when presser foot release bushing is
unlocked.
Adjust lifter lever stop screw (C) so that presser foot can be
raised no higher than upper looper will permit; then lock the nut
(D). Threr should be from 1.6 to 3.2mm (1/16" to 1/8") free motion
of foot lifter lever before the presser foot begins to rise. This
adjustment should be made with screw (E) and locked with nut
(F). Reassemble the chip guard, fabric guard and cloth plate.
FIG. 11
(A, Fig.11) y el anillo de ajuste (B) aseguran la posición del eje
El brazo para levantar el pie prensatela
lateralmente. Asegúrese que el brazo no este trabado y se levante
cuando se suelte el manguito de la presión de pie prensatela.
Ajuste el tornillo tope (C) para la palanca del levantador del pie
prensatela en tal manera para que no se pueda levantar el pie
más que el looper superior lo permite. Apriete después la tuerca
(D) otra vez. La palanca del levantador del pie prensatela debería
tener un juego libre de 1/16"-1/8" (1,6 mm – 3,2 mm) antes de
que el pie se levante. Este ajuste se logra con el tornillo (E) y se
asegura con la tuerca (F). Coloque el protector de desperdicios,
el guarda-tela y la tapa porta-tela otra vez.
14
Page 15

STARTING TO OPERATE
ARRANQUE DE LA MAQUINA
Be sure that style 39500TYB is threaded according to the
threading diagram (Fig. 1).
Next set looper eyelets (N and R, Fig. 1) about horizontal and
in the middle of their front to back locations.
Check if a light thread tension exists.
Operate machine slowlt, without presser foot in place, to make
sure that the chain forms and moves off the tongue freely. Swing
presser foot into position, insert material and sew slowly.
UPPER LOOPER THREAD CONTROL
Before proceeding to adjust upper looper thread eyelet (N, Fig.
1) balance all two or three tensions to give a normal appearing
stitch. Moderate change in these tensions will not markedly
effect the purl.
During needle down stroke, forward stroke of looper thread
pull-off (AF) will draw upper looper thread through the tension.
When normal amount of looper thread is drawn, upper looper
thread will have almost all slack taken up as looper thread
pull-off (AF) reaches its most rearward position.
Revise si su maquina 39500 fue enhebrada correctamente según
la ilustración (Fig. 1)
Coloque las horquillas de guía (N y R, Fig. 1) para el hilo del
looper en posición horizontal, aproximadamente a la mitad de la
ranura.
Revise para que haya una leve tensión para los hilos.
Empiece a trabajar la maquina a velocidad lenta, sin el pie
prensatela en posición de trabajo y asegúrese que se forme la
cadeneta de los hilos y se suelta libremente de la lengüeta de la
plancha de la aguja. Coloque el pie prensatela en posición de
trabajo y empiece a coser una prueba en el material.
AJUSTE DEL HILO DEL LOOPER SUPERIOR
Antes de ajustar la horquilla (N, Fig.1) de la alimentación del hilo,
la tensión de los dos o tres hilos debería estar tal ajustada para
que se produzca una punta regular. Pequeños cambios no varían
la formación de la puntada significativamente.
Durante el movimiento de la aguja hacia abajo, el alimentador
(AF) hala el hilo a través de los tensores. Halando la cantidad
correcta el hilo suelto del looper superior se consume casi
completamente cuando el alimentador llega a su posición extrema
en su recorrido hacia atrás.
NEEDLE THREAD CONTROL
While sewing on material, check needle thread control as
follows: Usually all needle thread is drawn on needle down
stroke. At top of needle stroke, thread should be just tight enough
to feed chain off stitch tongue. Stitch tends to pull down slightly
if excessive thread is pulled on the up stroke. With needle at
bottom of stroke, position needle thread eyelet (AD, Fig. 1) so
that needle thread cam pull-off (AE) just contacts needle thread.
On all styles it is desirable to adjust the needle thread pull-off
eyelet well-forward (toward the operator) to delay, slightly, the
tightening of the needle thread.
AJUSTE DEL HILO DE LA AGUJA
Revise la regulación del hilo de la aguja como sigue: normalmente
la cantidad necesaria de hilo se alimenta en el recorrido de la
aguja hacia abajo. El hilo necesita solamente tanta tensión en la
posición superior de la aguja para que se suelte de la lengüeta de
la plancha de la aguja. La puntada tiende a ser halada hacia abajo
cuando se alimente demasiado hilo durante el movimiento de la
aguja hacia arriba. Cuando la aguja este en su posición extrema
inferior, ajuste la horquilla (AD, Fig.1) del hilo de tal manera para
que el alimentador (AE) del hilo de la aguja toque el hilo apenas.
Se recomienda de mover el ojete del alimentador del hilo de la
aguja lo máximo posible hacia delante (hacia el operario) para
atrasar la alimentación un poco.
15
Page 16

LOWER LOOPER THREAD CONTROL
AJUSTE DEL HILO DEL LOOPER INFERIOR
With material under presser foot, set lower looper thread
eyelet (R, Fig. 1) back far enough so thread has a little slack
when looper thread pull-off (AF) reaches its most rearward
position. Looper thread pull-off (AF) is set about 3.2mm (1/
8") distance behind needle thread cam pull-off (AE). Frame
looper thread guide (T) should be set with its eyelet
approximately 3.2mm (1/8") to the right of lower looper (V)
heel eyelet at the time lower looper is at extreme left end of
its travel.
While sewing on material, check drawing off of looper thread
as follows: A portion of lower looper thread should be drawn
through the tension before lower looper thread comes off
upper looper. To increase amount of thread drawn through
the tension while lower looper thread is on upper looper, move
lower looper thread eyelet (R) down, keeping the same
amount of pull-off action.
POSITIONING THE PURL
To move the purl more under the edge, both looper thread
eyelets (N and R, Fig. 1) should be raised keeping the same
amount of pull-off. Usually it is better to have slightly more
pull-off on upper thread than on lower thread.
If it becomes necessary to move looper thread pull-off (AF)
be sure to take up all end play in needle drive shaft before
tightening. If upper looper is located so that it is higher over
throat plate than recommended in (Fig. 9) the purl will tend
to form near top edge. If upper looper is too low, the purl will
form nearer the bottom edge.
THREAD TENSIONS
Before proceeding, balance both tensions to give a normal
appearing stitch. Moderate change in these tensions will not
markedly affect the purl.
The needle thread tension required is a function of needle
thread and material being sewn. In general, lower looper
thread tension should be set as high as possible without
causing needle thread to be pulled down. Upper looper thread
tension should be increased as long as the elasticity of the
chain increases, or until the purl is pulled too far over the
top.
Con material debajo del pie prensatela, ajuste la horquilla (R,
Fig. 1) del hilo suficientemente hacia atrás, para que el hilo este
algo flojo cuando el alimentador (AF) llegue a su posición extrema
en su recorrido hacia atrás. El alimentador para el hilo el looper
(AF) se ajusta a una distancia de 1/8" (3,2 mm) detrás del
alimentador (AE) del hilo de la aguja. El ángulo del ojete inferior
(T) debería ser ajustado en tal forma para que su ojete izquierdo
se encuentre aproximadamente a 1/8" (3,2 mm) del ojo del looper
inferior, cuando este se encuentre en su posición de extrema
izquierda.
Cosiendo material se puede revisar la alimentación de hilo del
looper como sigue: Una parte del hilo del looper inferior debería
haber pasado por los tensores antes de que el hilo del looper
inferior es suelto por el looper superior. Para aumentar la cantidad
del hilo que pasa por los tensores mientras el hilo del looper
inferior se encuentre en el looper superior, hay que mover la
horquilla (R) del hilo del looper inferior hacia abajo, manteniendo
la misma cantidad del hilo suministrado.
AJUSTE DE LA POSICION DE LA UNION DE LOS HILOS
DE LOS LOOPERS
Para mover la unión de los hilos de los loopers mas hacia la
parte inferior del borde de la tela, los dos alimentadores deberían
ser ajustados hacia arriba con la misma cantidad de hilo
suministrado. Normalmente es mas conveniente de alimentar
mas hilo del looper superior que hilo del looper inferior.
Si hace falta un ajuste del alimentador (AF), hay que tomar en
consideración que no haya juego en el eje del accionamiento
del movimiento de la aguja antes de apretar el tornillo de fijación
otra vez. Si el looper superior tiene una distancia mayor a la
plancha de la aguja que recomendada en la (Fig. 9), la unión de
los hilos se encuentra encima del borde de la tela. Si la posición
del looper superior es demasiado bajo, la unión se encuentra en
la parte inferior del borde de la tela.
TENSION DE LOS HILOS
Antes de seguir, hay que equilibrar las dos tensiones de hilo
para que se forme una puntada normal. Pequeños cambios en
una de la dos tensiones no varían la formación de la puntada
significativamente.
La tensión del hilo de la aguja depende de la características del
hilo y del material y tiene que ser ajustado adecuadamente. En
general la tensión del hilo de looper inferior debería ser lo máximo
posible sin que se hale el hilo de la aguja. La tensión del hilo
del looper superior se puede aumentar hasta que se incremente
la elasticidad de la cadeneta de los hilos o hasta que la unión de
los hilos es halada a la parte superior del borde de la tela.
When using big thread spools be sure that the thread passes
freely from spool to machine. The thread must run from
spool with a slight pull and is not allowed to tangle with
each other.
Un cuidado especial requiere el uso de los cono grandes. El hilo
tiene que salir libremente del cono y no debe torcerse o trabarse.
16
Page 17

SPECIAL ADJUSTMENTS
AJUSTES ESPECIALES
SKIPPING: For occassional skipping, check and/or adjust as
outlined below:
1. Recheck lower looper or spreader respectively
- needle setting. See paragraph "Setting needle"
Page 8.
2. Recheck spreader - lower looper crossing. See
paragraph "Setting the spreader" on page 7.
3 . Check clearance between needle and the upper
looper. See that looper moves far enough left past
needle.
Setting 1 and 2 should be made quite carefully. If it can be
determined by appearance that skip is defini-tely not a needle
loop skip, reposition looper thread eyelet (R) by lowering it
slightly and bringing eyelet holes in close to bend in looper
thread pull-off (AF). After this change, increase looper thread
tension as much as possible without distorting stitch.
PUNTADAS FALSAS: Con puntadas falsas eventuales revise
y/o ajuste como sigue:
1. Revise el ajuste del looper inferior o el looper ciego
contra la aguja. Vea el capitulo „AJUSTE DE LA
AGUJA“ en pagina 8.
2. Revise el cruce del looper ciego con el looper inferior.
Vea el capitulo „AJUSTE DEL LOOPER SUPERIOR“
EN PAGINA 7.
3. Revise la distancia entre la aguja y el looper superior.
Revise si el looper superior pase con suficiente
distancia detrás de la aguja.
Los ajustes de 1 y 2 deberán realizarse con cuidado. Cuando
se puede determinar por la apariencia que la puntada falsa
no fue causada por malformación del lazo del hilo de la aguja,
se puede ajustar la guía (R) del hilo del looper hacia abajo y
llevar los ojetes en el guía hilo mas cerca a la curva del
alimentador del hilo de looper. Después de este ajuste
incremente la tensión del hilo a lo máximo posible, sin
deformar la puntada.
TO REMOVE CRANKSHAFT
Crankshaft can be withdrawn easier if these steps are
followed:
1. Drain oil by removing plug screw located on back of
machine near bottom edge of base.
2. Remove top and bottom covers of machine.
3. Remove feed eccentric nut (A, Fig. 13) and washer
(B), then with the aid of the eccentric extractor, slip
off the eccentrics (C).
4. Remove key (D).
DESMONTAJE DEL CIGUEÑAL
El desmontaje del cigüeñal se facilita respetando las siguientes
advertencias:
1. Drene el aceite
2. Remueva la tapa superior e inferior de la maquina
3. Remueva la tuerca (A, Fig.13) y arandela (B), después con la
ayuda del gancho remueva los excéntricos (C).
4. Remueva la cuña (D)
17
Page 18

TO REMOVE CRANKSHAFT (CONTINUED)
DESMONTAJE DEL CIGUEÑAL (CONTINUACION)
5. Remove the three counterweights (E). Identify these
counterweights so that they will be reassembled in the
proper places.
6. Remove screw (F) which holds crankshaft split bearing.
This screw is accessible through bottom of bed casting.
7. Remove caps of bearings on crankshaft at points G, H
and J. When reassembling bearing caps make sure they
are in their original position. Trade marks are stamped
on both halves of the caps and both trade marks should
be on the sameside of the bearings. Also, screws should
be reassembled in the same holes from which they were
removed.
CAUTION: For fastening the screws for crankshaft ball
bearing retaining plate a torquemeter screw driver
adjusted to 1.75 ft lb should if available be used.
8. Remove screw (L, Fig. 13) which holds inner right
crankshaft bearing. This screw is accessible through
bottom of bed casting.
9. Loosen two screws (M) in fan collar; remove both halves
of cooling fan.
5. Remueva los tres contrapesos (E). Esos hay que marcar
cuidadosamente para que en el montaje serán colocados
otra vez en su sitio.
6. Remueva el tornillo (F), con que esta fijado el cojinete del
cigüeñal. Se puede alcanzarlo a través del fondo de la
carcasa.
7. Remueva las tapas de las bielas en los puntos G, H y J. En
el montaje las tapas deben ser fijadas otra vez en su sitio.
En cada parte de la biela está grabado el logotipo de la
fábrica y en el montaje los logotipos tienen que estar en el
mismo lado. También los tornillos tienen que ser usados
otra vez en su mismo sitio.
PRECAUCION: Los tornillos de las bielas deberían ser
apretados con torquimetro, ajustado a 2,45 Nm.
8. Remueva el tornillo (L, Fig. 13), con que esta fijado el
cojinete derecho interior y que también se puede alcanzar
por el fondo de la maquina.
9. Suelte los dos tornillos (M) en el anillo de ajuste del
ventilador y remueva las dos partes del ventilador.
10. Remove screw (N); take off pulley cap (P).
11. Loosen two screws (R); remove pulley (S).
12. Remove three screws (T); take off bearing retaining
plate (U); also, spacer collars (V) and (W) may be
removed at this time.
13 . Crankshaft may now be removed.
14. If necessary to replace ball bearing (X), it can be
pressed off shaft on an arbor press. In replacing bearing
it must be pressed on carefully until it seats against
ground thrust washer (Y).
15. Carefully observing reverse of the foregoing operations
hould simplify reassembly of crankshaft. Checking
exploded view drawings for location of various parts
and constant testing for binds during reassembly will
also prove helpful.
16. Before reassembling, throughly clean and dry top and
bottom covers and gaskets. Before reassembling
bottom cover make sure that spring pressed oil wick
which lubricates left crankshaft bearing is inserted in
hole in casting and that it contacts shaft. The wick stands
vertically on its spring against bottom cover. Coat oil
drain plug with a sealing compound before
reassembling to prevent oil leakage. No. 1 Crane Lead
Seal is recommended.
10.Remueva el tornillo (N) y quite la tapa del volante.
11.Suelte los dos tornillos (R) remueva el volante (S).
12.Ahora tiene que remover los tres tornillos (T). Quite la tapa
del rodamiento de bola (U) y adicionalmente los anillos
distanciadores (V) y (W).
13. Ahora se puede sacar el cigüeñal de la maquina.
14. Si fuera necesario de cambiar el rodamiento de bola (X), se
debería sacarlo con una prensa especial para ejes o con un
extractor de rodamientos de su sitio. El rodamiento nuevo
hay que colocarlo cuidadosamente hasta que reposa contra
el anillo (Y)
15. El montaje se ejecuta en operación reversa. Es útil de
revisar los elementos separadamente para descubrir
trabas y garantizar que se muevan libremente.
16. Antes de colocar las tapas hay que limpiar y secarlas
cuidadosamente, igual como las superficies de las
empaquetaduras. Revise que la mecha con resorte que
sirve para la lubricación del rodamiento izquierdo se
encuentre en la perforación de la carcasa y que la mecha
toque el cigüeñal. El resorte de la mecha debería estar
tocando la superficie de la tapa en noventa grados. Ponga
un material de selladura adecuada en el tornillo donde se
drena el aceite.
18
Page 19

VIEWS AND DESCRIPTION
OF PARTS
VISTAS Y DESCRIPCIONES
DE LAS PARTES Y PIEZAS
19
Page 20
20
Page 21

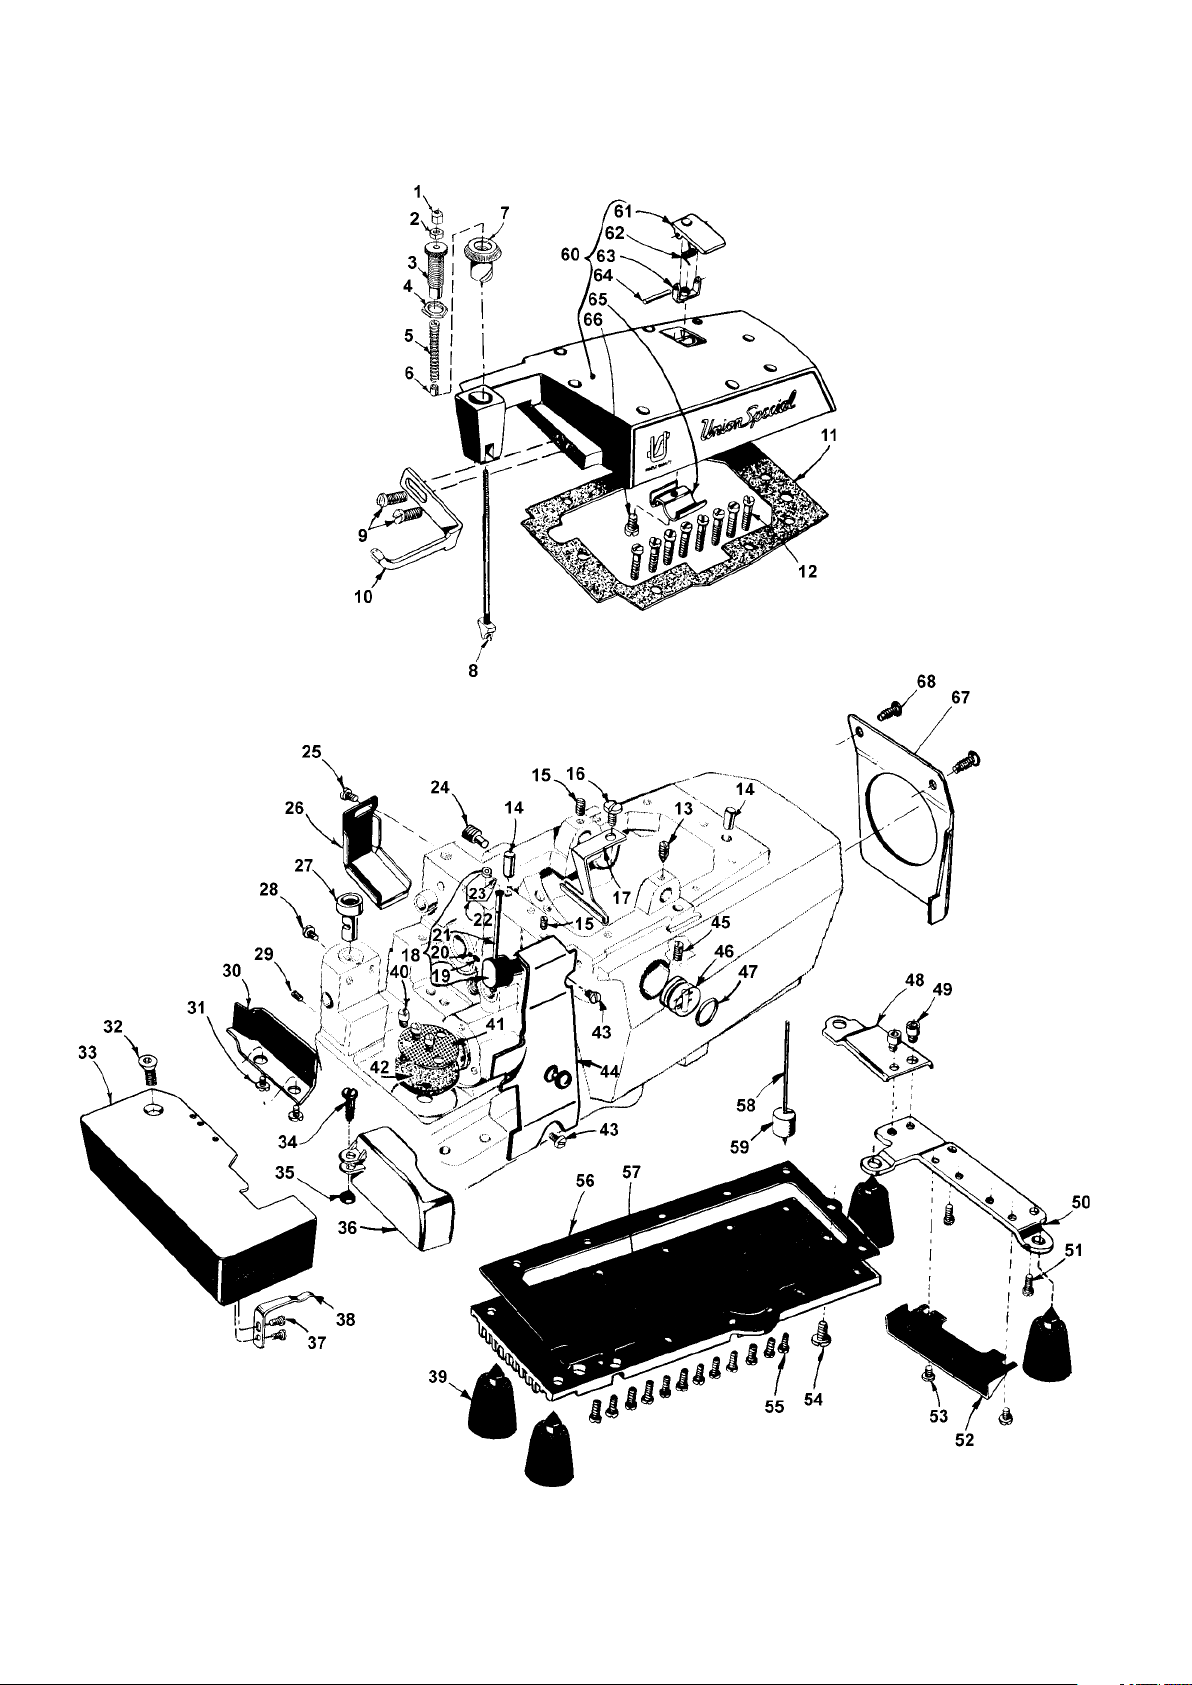
MAIN FRAME, MISCELLANEOUS COVERS AND PLATES
CUBIERTA PRINCIPAL, CUBIERTAS MISCELANEAS Y PLACAS
Ref. No.
Ref. No.
1.
2.
3.
4.
5.
6.
7.
8.
9.
10.
11.
12.
13.
14.
15.
16.
17.
18.
19.
20.
21.
22.
23.
24.
25.
26.
27.
28.
29.
30.
31.
32.
33.
-
34.
Part No.
Parte No.
39557B
39557E
39557C
39557F
39557
43557
39556A
39557A
22569B
39563F
39582XJ
22541
22565S
667D8
22565
22569
39594R
29477MX
39568J
22743
39568AN
39568AP
1096
22571E
90
39534R
39501K
22569
22565F
39578F
138
22657D12
39501DF
A10018B
86X
Description Descripción Amt. Req.
Cant. Req.
Cap Nut
Locking Nut
Adjusting Screw
Lock Nut
Presser Spring
Spacer
Presser Foot Release Bushing
Presser Spring Plunger
Screw
Top Cover Needle Thread Eyelet
Gasket, for Top Cover
Screw
Screw
Dowel Pin
Screw
Screw
Oil Collector Plate
Thread Tube Assembly
Spring
Screw
Thread Tube
Stop Collar
Screw
Plug Screw
Screw
Oil Shield
Stud for Cloth Plate
Screw
Screw
Fabric Guard
Screw
Screw
Cloth Plate, for Style 39500TYA
Cloth Plate, for Style 39500TYB
Screw
Tuerca Tapa
Tuerca retenedora
Tornillo ajustador
Tuerca retenedora
Resorte de presión
Espaciador
Bocina para soltar el Pie prensatelas
Resorte pasador posición
Tornillo
Cubierta superior del pasahilo de la aguja
Empaquetadura, para cubierta superior
Tornillo
Tornillo
Pasador de sujeción
Tornillo
Tornillo
Placa recolectora de aceite
Conj. Tubo de enhebrado
Resorte
Tornillo
Tubo de enhebrado
Abrazadera
Tornillo
Tornillo tapa
Tornillo
Cubierta de la aceitera
Perno de la tapa porta tela
Tornillo
Tornillo
Guarda tela
Tornillo
Tornillo
Plancha de tela, solo para 39500TYA
Plancha de tela, solo para 39500TYB
Tornillo
1
1
1
1
1
1
1
1
2
1
1
8
1
2
1
1
1
1
1
1
1
1
1
1
1
1
1
1
1
1
2
1
1
1
1
21
Page 22

22
Page 23

MAIN FRAME, MISCELLANEOUS COVERS AND PLATES
CUBIERTA PRINCIPAL, CUBIERTAS MISCELANEAS Y PLACAS
Ref. No.
Ref. No.
35.
36.
37.
38.
39.
40.
41.
42.
43.
44.
45.
46.
47.
48.
49.
50.
51.
52.
53.
54.
55.
56.
57.
58.
59.
60.
61.
62.
63.
64.
65.
66.
67.
68.
Part No.
Parte No.
41071G
39582FC
90
39532A
51295B
22569A
39594G
39594H
22569D
39578AD
22894AE
39593H
660-243
39582G
22653D4
39582BM
22541B
39582BL
22569D
22586T
22569
39582XK
39582BW
39593D
39593C
39582AJ
39582AF
39582V
39582AG
51-103BLK
39582W
22562A
21375BB
80
Description
Nut
Cover
Screw
Latch Spring
Isolator
Screw
Oil Filter Screen
Oil Filter
Screw
Chip Guard
Screw
Oil Sight Gauge
Oil Gauge Seal Ring
Bottom Cover Extension
Screw
Base Plate
Screw
Air Duct, outer
Screw
Screw
Screw
Gasket for Bottom Cover
Bottom Cover
Oil Gauge Indicator
Oil Gauge Float
Top Cover
Oil Filler Cup
Spring
Hinge Bracket
Hinge Pin
Oil Guard
Screw
Belt Guard
Screw
Descripción Amt. Req.
Tuerca
Cubierta
Tornillo
Resorte pestillo
Aislante
Tornillo
Pantalla del filtro de aceite
Filtro de aceite
Tornillo
Protector de desperdicios
Tornillo
Visor del indicador de aceite
Empaquetadura del indicador de aceite
Extensión de la cubierta inferior
Tornillo
Placa base
Tornillo
Ducto de aire, externo
Tornillo
Tornillo
Tornillo
Empaquetadura de la cubierta inferior
Cubierta inferior
Indicador de aceite
Flotante del indicador de aceite
Cubierta superior
Tapa para llenar el aceite
Resorte
Soporte bisagra
Pasador de bisagra
Guarda del aceite
Tornillo
Guarda correa
Tornillo
Cant. Req.
1
1
1
2
4
3
1
1
2
1
1
1
1
1
2
1
2
1
2
1
14
1
1
1
1
1
1
1
1
1
1
1
1
2
23
Page 24

24
Page 25

CRANKSHAFT MECHANISM AND BUSHINGS
MECANISMO DEL CIGUEÑAL Y BOCINAS
Ref. No.
Ref. No.
10.
11.
12.
13.
14.
15.
16.
17.
18.
19.
20.
21.
22.
23.
24.
25.
26.
27.
28.
29.
30.
31.
32.
33.
34.
35.
36.
37.
38.
39.
40.
41.
42.
43.
44.
45.
46.
47.
48.
49.
Part No.
Parte No.
1.
39521J
2.
22650CD4
3.
22569Y
4.
39590H
5.
660-835
6.
39590G
7.
39590J
8.
39591L
9.
39591H
22894D
39590Y
660-443
660-764
39590P
39590AC
97A
29477KE
29477MC
22768C
22596H
22587M
51-228BLK
39541A
40-46
39536FN
39591B
22747B
39591A
39591K
87U
39594N
39593J
666-280
RI-37
660-885
56393V
56393G
643-480BLK
666-94
39590AB
39590T
39544Z
39552P
39573AA
39555R
39555P
39573K
39552U
Description Descripción
Pulley
Screw
Screw
Crankshaft Ball Bearing Retaining Plate
Crankshaft Ball Bearing
Crankshaft Ball Bearing Housing
Thrust Washer
Crank Chamber Cooling Fan
Crank Chamber Cooling Fan Collar
Screw
Crankshaft Bearing
"O" Ring
"O" Ring
Screw
Crankshaft Split Bearing
Screw
Crankshaft and Needle Driving Arm Crank
Assembly
Needle Driving Arm Crank and
Connecting Rod Assembly
Volante
Tornillo
Tornillo
Placa retenedora cojinete del cigueñal
Cojinete del cigueñal
Cubierta del cojinete del cigueñal
Arandela contra juego
Cámara del ventilador
Abrazadera de la cámara del ventilador
Tornillo
Cojinete del cigueñal
Empaquetadura
Empaquetadura
Tornillo
Cojinete del cigueñal
Tornillo
Conj. del Eje del Cigueñal y barra
accionadora de la aguja
Conj. Eje del brazo accionador y varilla
de conexión
Screw
Screw
Screw
Vent Plug
Key
Tapón de ventilación
Cuña
Metering Pin, See chart A Page 24
Washer
Nut
Crankshaft Counterweight, right
Screw
Crankshaft Counterweight, middle
Crankshaft Counterweight, left
Screw
Oil Splasher
Tube, pump
Oil Return Tube
Wire Ring
Clamp
Spring
Filter
Oil Tube
Oil Wick and Spring
Crankshaft Bushing, left
Crankshaft Bushing, inner left
Lower Looper Bar Bushing
Needle Driving Arm Crank Bushing, right
Upper Knife Driving Arm Bushing, right
Foot Lifter Shaft Bushing, right
Foot Lifter Shaft Bushing, left
Upper Knife Driving Arm Bushing, left
Needle Driving Arm Crank Bushing, left
Arandela
Tuerca
Contrapeso del cigueñal, derecho
Tornillo
Contrapeso del cigueñal, medio
Contrapeso del cigueñal, izquierdo
Tornillo
Distribuidor de aceite
Tubo de la bomba
Tubo de retorno del aceite
Aro de cable
Sujetador
Resorte
Filtro
Tubo de aceite
Fieltro del aceite y resorte
Bocina del cigueñal, izquierda
Bocina del cigueñal, interna izquierda
Bocina de la barra del looper inferior
Bocina barra accionadora aguja, derecha
Bocina accionador cuchilla sup., derecha
Bocina eje levantador pie, derecha
Bocina eje levantador pie, izquierda
Bocina accionador cuchilla sup., izquierda
Bocina barra accionadora aguja, izquierda
Tornillo
Tornillo
Tornillo
Amt. Req.
Cant. Req.
1
2
3
1
1
1
1
1
1
2
1
1
1
1
1
2
1
1
1
1
2
1
1
1
1
1
1
1
6
1
1
3
3
1
1
1
1
1
1
1
1
1
1
1
1
1
1
1
1
Metering pins have been selected according to
flow requirements. Each machine has been fitted
with a pin that will provide approximately 10 to 15
milligrams of oil flow per minute. Recommended
clearance between the metering pin and the
crankshaft is .001" to .002" for speeds of 5500RPM
or less. Refer to Chart "A" for pin numbers and sizes.
25
Page 26

26
Page 27

NEEDLE DRIVE AND FEED MECHANISM
ACCIONADOR DE LA AGUJA Y DIENTES DE ARRASTRE
Ref. No.
Ref. No.
10.
11.
12.
13.
14.
15.
16.
17.
18.
19.
20.
21.
22.
23.
24.
25.
26.
27.
28.
29.
30.
31.
32.
33.
34.
35.
36.
37.
38.
39.
40.
41.
42.
43.
44.
45.
46.
Part No.
Parte No.
1.
39578PB
2.
8372A
3.
22569B
4.
87
5.
39578AJ
6.
39535C
7.
22565F
8.
22569
9.
39535J
29476PT
39535D
22541
39534AF
22569G
39538
39505BW
A10019
A10019B
J87J
22528
39536C
39536TY
39540TY4
G39635MB
39680
93A
39536E
258
40-46
14077A
-
14077
39551H
154GAS
39552Z
-
39552AV
22596E
39551J
-
39551F
39568AM
22513
39568AC
-
39568AL
88B
660-207
39552AG
A10024B
39594N
87U
39563G
A10024A
87U
Description Descripción
Fabric Guard Mounting Bracket
Washer
Screw
Screw
Fabric Guard
Feed Adjusting Pin
Screw
Screw
Guide Block for Feed Bar
Feed Bar Assembly
Feed Bar Guide, right
Screw
Thrust Washer for Feed Bar
Screw
Feed Lift Block
Feed Dog, for 39500TYA
Feed Dog, 10 teeth per inch
marked "KM", for 39500TYB
Chaining Feed Dog, marked "KL", for
39500TYB
Screw, Feed Dog Chaining Section
39500TYB
Screw
Connection Bushing
Driving Connection for Feed Bar
Feed Driving Eccentric
Feed Bar Guide, left
Support for Throat Plate
Screw
Nut
Nut
Washer
Nut, for 39500TYA
Nut, for 39500TYB
Needle Clamp Washer, for 39500TYB
Needle
Needle Driving Arm, for 39500TYA
Needle Driving Arm, for 39500TYB
Screw
Needle Clamp Stud, for 39500TYA
Needle Clamp Stud, for 39500TYB
Looper Thread Pull-off
Screw
Looper Thread Pull-off Lever, for
39500TYA
Looper Thread Pull-off Lever, for
39500TYB
Screw
Oil Seal Ring, for 39500TYB
Oil Seal Ring, for 39500TYA
Needle Driving Shaft
Oil Splasher
Screw
Needle Thread Cam Pull-off, for
39500TYA
Needle Thread Cam Pull-off, for
39500TYB
Screw
Soporte montado del guarda tela
Arandela
Tornillo
Tornillo
Guarda tela
Pasador de ajuste del alimentador
Tornillo
Tornillo
Bloque guía de la barra alimentadora
Conj. barra alimentadora
Guía barra alimentadora, derecha
Tornillo
Arandela elimina juego barra alimentadora
Tornillo
Bloque levantador alimentador
Transportador, para 39500TYA
Transportador, 2.6mm marcado "KM", para
39500TYB
Transportador, marcado "KL" para
39500TYB
Tornillo, Transportador , para
39500TYB
Tornillo
Bocina conexión
Conector empuje barra alimentadora
Excéntrica alimentador
Guía barra alimentadora, izquierda
Soporte plancha de aguja
Tornillo
Tuerca
Tuerca
Arandela
Tuerca, para 39500TYA
Tuerca, para 39500TYB
Arandela sujeción aguja, para 39500TYB
Aguja
Brazo empuje aguja, para 39500TYA
Brazo empuje aguja, para 39500TYB
Tornillo
Perno de soporte aguja, para 39500TYA
Perno de soporte aguja, para 39500TYB
Tira hilo del looper
Tornillo
Palanca tira hilo del looper, para
39500TYA
Palanca tira hilo del looper, para
39500TYB
Tornillo
Sello aceite, para 39500TYB
Sello aceite, para 39500TYA
Eje de empuje de la aguja
Distribuidor de aceite
Tornillo
Tira hilo de la aguja, para
39500TYA
Tira hilo de la aguja, para
39500TYB
Tornillo
Amt. Req.
Cant. Req.
1
6
2
2
1
1
1
2
1
1
1
2
1
3
1
1
1
1
1
1
1
1
1
1
1
1
1
1
1
1
1
1
1
1
1
1
1
1
1
1
1
1
1
1
1
1
1
1
1
1
1
1
27
Page 28
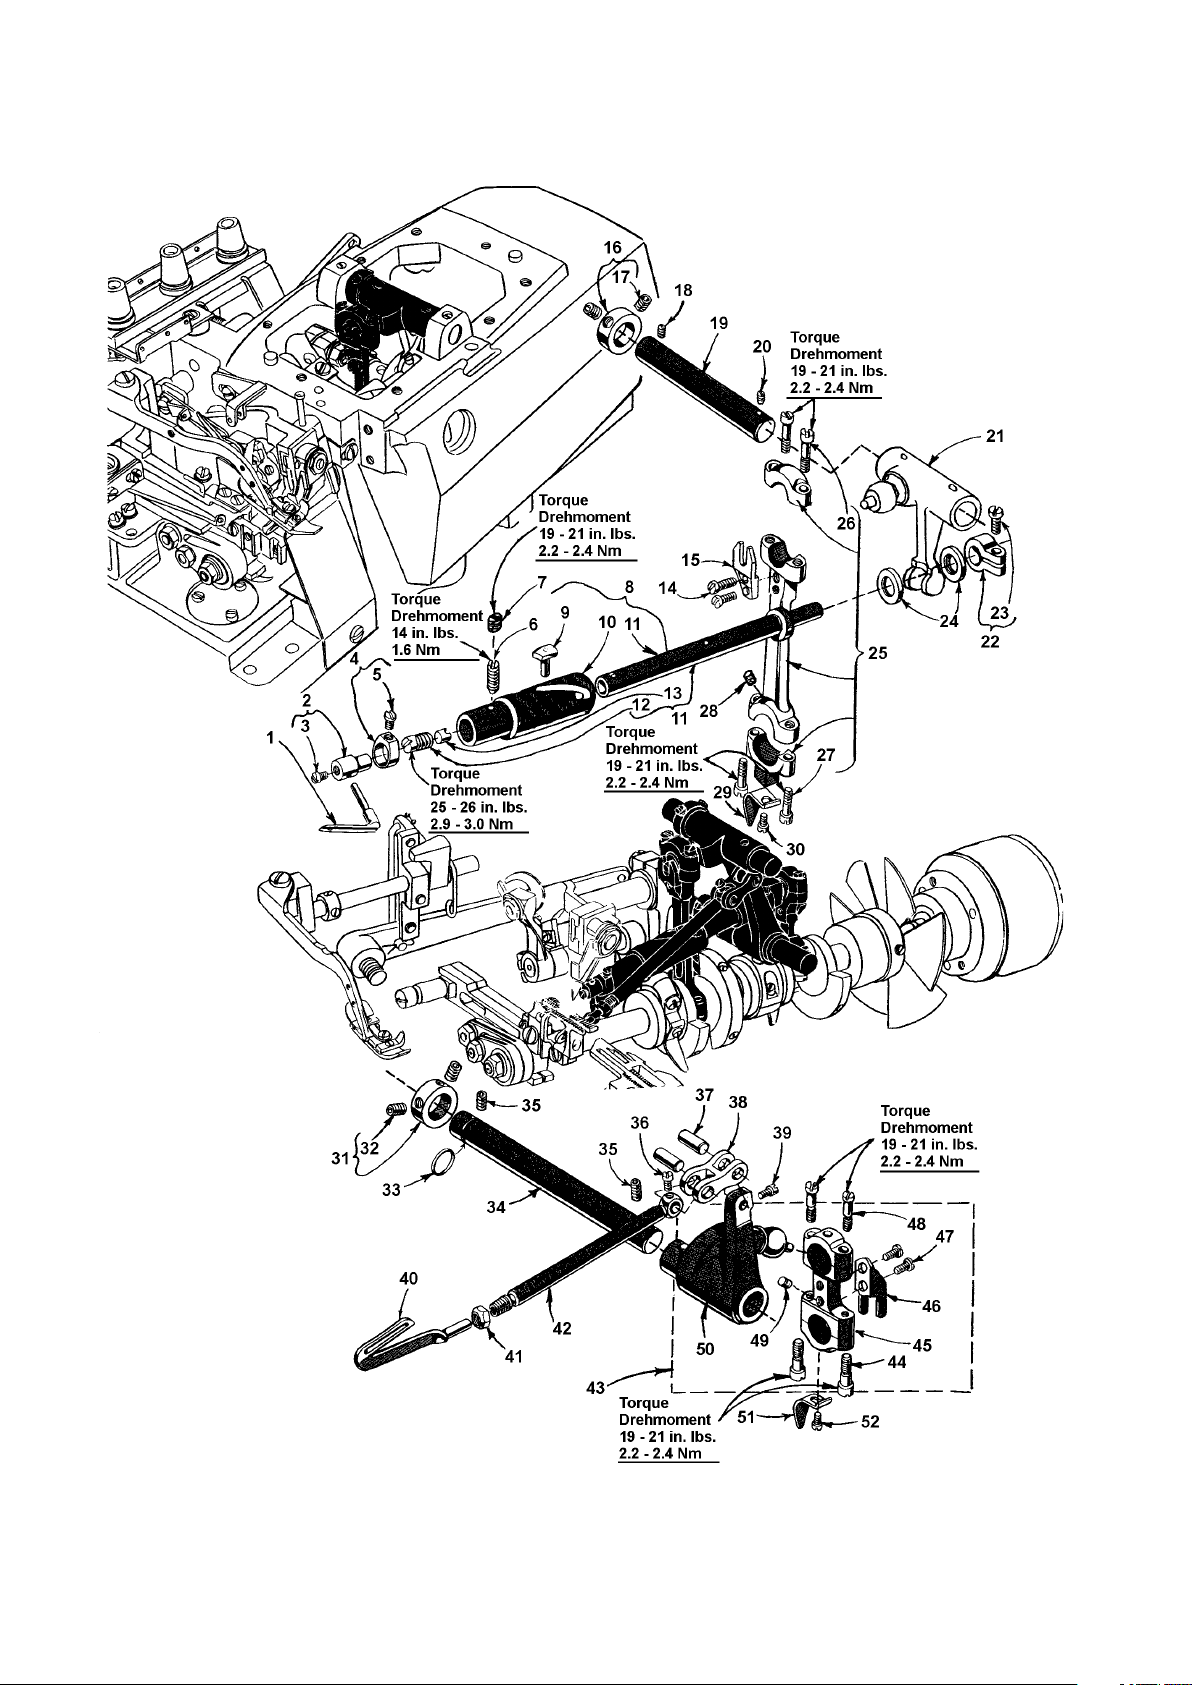
28
Page 29

UPPER AND LOWER LOOPER DRIVING PARTS
PARTES DE ACCIONAMIENTO DE LOS LOOPERS SUPERIOR E INFERIOR
Ref. No.
Ref. No.
1.
2.
3.
4.
5.
6.
7.
8.
9.
10.
11.
12.
13.
14.
15.
16.
17.
18.
19.
20.
21.
22.
23.
24.
25.
26.
27.
28.
29.
30.
31.
32.
33.
34.
35.
36.
37.
38.
39.
40.
41.
42.
43.
44.
45.
46.
47.
48.
49.
50.
51.
52.
Part No.
Parte
39508E
39543AR
22894Y
39543A
77
22565H
1025A
29126EC
39543T
39543S
39543K
22503F
39543E
97
39544J
482C
22894C
22565
39543X
22565S
39543W
39543M
22562A
39543P
39543AX
22729AB
22729AB
666-255
39594N
87U
482C
22894C
660-206
39544V
22894AE
77
39544D
39544B
77
39508D
39151
39544
29126DF
22729E
39544AA
39544S
97
22729AB
666-255
39544U
39594N
87U
Description Descripción
Upper Looper
Upper Looper Holder
Screw
Upper Looper Holder Collar
Screw
Screw
Screw
Upper Looper Drive Assembly
Cam Follower
Bushing and Cam Guide
Upper Looper Drive Shaft
Screw
Locking Clamp
Screw
Guide Fork
Collar
Screw
Screw
Upper Looper Drive Lever Shaft
Screw
Upper Looper Drive Lever
Clamp Collar
Screw
Thrust Washer
Drive Lever Connecting Rod
Screw
Screw
Felt
Oil Splasher
Screw
Collar
Screw
"O"Ring
Lower Looper Driving Shaft
Screw
Screw
Link Pin
Connecting Link
Screw
Lower Looper
Nut
Lower Looper Bar
Lower Looper Bar Driving Lever and
Connecting Rod Asembly
Screw
Connecting Rod
Guide Fork
Screw
Screw
Felt
Driving Lever
Oil Splasher
Screw
Looper superior
Sujetador del looper superior
Tornillo
Abrazadera del sujetador del looper superior
Tornillo
Tornillo
Tornillo
Conj. accionador Looper superior
Leva
Bocina y guía leva
Eje accionador Looper superior
Tornillo
Retenedor
Tornillo
Tridente guía
Abrazadera
Tornillo
Tornillo
Palanca eje accionador Looper superior
Tornillo
Palanca accionadora Looper superior
Abrazadera retenedora
Tornillo
Arandela contrajuego
Varilla conectora accionador looper
Tornillo
Tornillo
Fieltro
Distribuidor de aceite
Tornillo
Abrazadera
Tornillo
Empaquetadura
Eje accionador Looper inferior
Tornillo
Tornillo
Pasador de conexión
Conector
Tornillo
Looper inferior
Tuerca
Barra looper inferior
Conj. accionador Looper inferior y varilla de
conexión
Tornillo
Varilla de conexión
Tridente guía
Tornillo
Tornillo
Fieltro
Palanca accionadora
Distribuidor de aceite
Tornillo
Amt. Req.
Cant. Req.
1
1
1
1
1
1
1
1
1
1
1
1
1
2
1
1
2
1
1
1
1
1
1
2
1
2
2
1
1
1
1
2
1
1
2
1
2
1
1
1
1
1
1
2
1
1
2
2
1
1
1
1
29
Page 30

30
Page 31

THROAT PLATE, PRESSER FOOT, PRESSERFOOTLIFTER AND NEEDLE GUARDS
SPLANCHA DE AGUJA, PIE PRENSATELAS, LEVANTADOR DEL PIE PRENSATELAS Y GUARDA AGUJAS
Ref. No.
Ref. No.
1.
2.
3.
4.
5.
6.
7.
8.
9.
10.
11.
12.
13.
14.
15.
16.
17.
18.
19.
20.
21.
-
22.
23.
24.
25.
26.
27.
28.
28A.
29.
30.
-
31.
32.
-
33.
34.
35.
36.
37.
38.
39.
40.
41.
Part No.
Parte No.
39855
39555B
39555D
660-142
39555F
39555C
12538
22597
22852A
12865
88
22566B
39655
258A
22791H
39656B
39556K
87U
605A
A10021A
39520BZ
39520BZ1
39530AR
22781
90
39656G
605C
39530AP
39530AS
39530AS1
96508
A10023B
39524BT
22524
A10023A
GA39530MF
87U
A10025C
22892B
14077
39525P
22585A
39525R
39580A
22653B12
Description Descripción
Presser Foot Lifter Lever
Spring
Foot Lever Intermediate Lever
Cotter Pin
Foot Lifter Lever Connecting Link
Foot Lifter Lever Arm
Lock Nut
Screw
Screw
Collar
Screw
Screw
Foot Lifter Lever
Nut
Screw
Presser Arm
Chain Cutting Knife
Screw
Screw
Presser Foot Hold Down Plate
Presser Foot Assembly, for 39500TYB
Presser Foot Assembly, for 39500TYA
Shank
Screw
Screw
Holder
Screw
Tongue
Bottom, for 39520BZ
Bottom, for 39520BZ1
Pin
Throat Plate, for 39500TYB
Throat Plate, for 39500TYA
Screw
Stitch Tongue, for 39500TYB
Stitch Tongue, for 39500TYA
Screw
Bushing, for 39500TYB
Screw
Nut
Needle Guard, rear
Screw
Needle Guard, front
Throat Plate Support
Screw
Palanca levantador del pie prensatelas
Resorte
Palanca levantadora intermedia prensatelas
Pasador doble
Conector palanca levantadora prensatelas
Brazo palanca levantadora prensatelas
Tuerca retenedora
Tornillo
Tornillo
Abrazadera
Tornillo
Tornillo
Palanca levantadora prensatelas
Tuerca
Tornillo
Brazo presionador
Cuchilla cortadora de cadeneta
Tornillo
Tornillo
Placa sujetadora prensa telas
Conj. pie prensatelas, para 39500TYB
Conj. pie prensatelas, para 39500TYA
Tronco
Tornillo
Tornillo
Sujetador
Tornillo
Lengueta
Parte baja, para 39520BZ
Parte baja, para 39520BZ1
Pasador
Plancha de aguja, para 39500TYB
Plancha de aguja, 39500TYA
Tornillo
Lengueta de puntada, para 39500TYB
Lengueta de puntada, para 39500TYA
Tornillo
Bocina
Tornillo
Tuerca
Guarda agujas trasero
Tornillo
Guarda agujas delantero
Soporte plancha de aguja
Tornillo
Amt. Req.
Cant. Req.
1
1
1
2
1
1
2
2
1
1
2
1
1
1
1
1
1
1
2
1
1
1
1
1
1
1
1
1
1
1
1
1
1
1
1
1
2
1
1
1
1
2
1
1
2
31
Page 32

32
Page 33

THREAD TENSION BRACKET, HEMMER AND MISCELLANEOUS EYELETS
SOPORTE DE LA TENSION, DOBLADILLADOR Y GUIA HILOS MISCELANEOS
Ref. No.
Ref. No.
1.
2.
3.
4.
5.
6.
7.
8.
9.
10.
11.
12.
-
-
13.
14.
-
15.
16.
17.
18.
19.
20.
21.
22.
23.
24.
25.
26.
27.
28.
29.
30.
31.
32.
33.
34.
Part No.
Parte No.
G39503MF8
39503C
22735
12957E
G5003A1
22585C
GA39503MF8
22569C
22848
39503M
23199E
39592AA
39592AB
39592AC
39592AK
39592AR5
39592AR8
30592AD
39592AF
39592AL
8372A
39592AH
22847B
22806A
39592AG3
39592AM
93A
39568E
39568B
39568L
39568D
22569B
43139A
39668W
73X
22569D
39563H
Description
Hemmer Assembly, for 8 - 9 mm
(5/16" - 23/64") wide hem
Standard on 39500TYB
Guide Bracket
Screw
Spring Washer
Holder
Screw
Hemmer alone, width of rolled hem
8 - 9 mm (5/16" - 23/64")
Screw
Screw
Guide Bracket
Folder, for style 39500TYA
Needle Thread Tension Nut, green
Needle Thread Tension Nut, blue
Needle Thread Tension Nut, red
Tension Spring Ferrule
Thread Tension Spring
Thread Tension Spring
Tension Disc
Tension Disc Felt
Tension Post
Washer
Nut
Screw
Screw
Tension Post Mounting Bracket
Tension Post Bar
Screw
Upper Looper Thread Eyelet
Lower Looper Thread Eyelet
Upper Looper Thread Eyelet
Thread Eyelet Bracket
Screw
Nut
Lower Looper Thread Eyelet
Screw
Screw
Needle Thread Eyelet
Descripción
Conj. dobladillador, para 8 - 9 mm
ancho de costura
Estándard en 39500TYB
Soporte guía
Tornillo
Arandela resorte
Sujetador
Tornillo
Dobladillador solo, ancho del dobladillo de
8 - 9 mm
Tornillo
Tornillo
Soporte guía
Doblador, para 39500TYA
Tuerca de la tension del hilo de la aguja, verde
Tuerca de la tension del hilo de la aguja, azul
Tuerca de la tension del hilo de la aguja, rojo
Resorte distanciador de la tensión
Resorte de la tensión del hilo
Resorte de la tensión del hilo
Disco de la tension
Filetro del disco de la tensión
Poste de la tensión
Arandela
Tuerca
Tornillo
Tornillo
Soporte montado del poste de la tensión
Barra del poste de la tensión
Tornillo
Pasa hilo del looper superior
Pasa hilo del looper inferior
Pasa hilo del looper superior
Soporte del pasa hilo
Tornillo
Tuerca
Pasa hilo del looper inferior
Tornillo
Tornillo
Pasa hilo del hilo de la aguja
Amt. Req.
Cant. Req.
1
1
1
1
1
1
1
1
1
1
1
1
1
1
3
1
2
2
3
3
3
3
1
1
1
1
2
1
1
1
1
1
2
1
2
1
1
33
Page 34

34
Page 35

THREAD STAND AND MISCELLANEOUS TOOLS
PORTACONOS Y HERRAMIENTAS MISCELANEAS
Ref. No.
Ref. No.
1.
2.
3.
4.
5.
6.
7.
8.
Part No.
Parte No.
21101W3
421D34
660-264
12288403
21227DR
21388AU
116
28604R
Description
Thread Stand
Chain
"S" Hook
Thread Tweezers, curved
Feed Eccentric Hook
Socket Wrench, Size 3/8"
Single Ended Open Jaw Wrench,
Size 9/32"
Machine Oil
Descripción
Porta conos
Cadena
Gancho sujetador en forma de "S"
Pinzas para hilos, curvas
Gancho Sujetador alimentador excéntrica
Llave, tamaño 9/32"
Llave sencilla, abierta,
tamaño 9/32"
Aceite para máquina de coser
Amt. Req.
Cant. Req.
1
1
1
1
1
1
1
1
35
Page 36

NUMERICAL INDEX OF PARTS
INDICE NUMERICO DE PARTES
Part No.
Parte No.
Page
Pág.
1025A ............. 29
1096 ............... 21
116 ................. 35
12288403 ......... 35
12538 ............. 31
12865 ............. 31
12957E ........... 33
138 ............... 21
14077 ........ 27, 31
14077A ........... 27
154GAS ........... 27
21101W3 ......... 35
21227DR ......... 35
21375BB ......... 23
21388AU ......... 35
22503F ........... 29
22513 ............. 27
22524 ............. 31
22528 ............. 27
22541 ........ 21, 27
22541B ........... 23
22562A ...... 23, 29
22565 ........ 21, 29
22565F ...... 21, 25
22565F ........... 27
22565H ........... 29
22565S ...... 21, 29
22566B ........... 31
22569 ... 21, 23, 27
22569A ........... 23
22569B ...... 21, 27, 33
22569C ........... 33
22569D ...... 23, 33
22569G ........... 27
22569Y.............25
22571E ........... 21
22585A ........... 31
22585C ........... 33
22586T ........... 23
22596E ........... 27
22596H ........... 25
22597 ............. 31
22650CD4 ....... 25
22653B12 ....... 31
22653D4 ........ 23
22657D12 ....... 21
22729AB ....25, 29
22729E ........... 29
22735 ............. 33
22743 ............. 21
22747B ........... 25
22768C ........... 25
22781 ............. 31
22791H ........... 31
22806A ........... 33
22847B ........... 33
Part No.
Parte No.
Page
Pág.
22848 ............. 33
22852A ........... 31
22892B ........... 31
22894AE .... 23, 29
22894C ........... 29
22894D ........... 25
22894Y ........... 29
23199E ........... 33
258 ........... ... 27
258A ............. 31
28604R ........... 35
29126DF ......... 29
29126EC ......... 29
29476PT ......... 27
29477MB ......... 25
29477MC ......... 25
29477MX ......... 21
39151 ............. 29
39501DF ......... 21
39501K ........... 21
39503C ........... 33
39503M ........... 33
39505BW ......... 27
39508D ........... 29
39508E ........... 29
39520BZ ......... 31
39520BZ1 ....... 31
39521J ........... 25
39524BT ......... 31
39525P ........... 31
39525R ........... 31
39530AP ......... 31
39530AR ......... 31
39530AS ......... 31
39530AS1 ....... 31
39532A ........... 23
39534AF ......... 27
39534R ........... 21
39535C ........... 27
39535D ........... 27
39535J ........... 27
39536C ........... 27
39536E ........... 27
39536FN............25
39536TY ......... 27
39538 ............. 27
39540TY4 ....... 27
39541A ........... 25
39543A ........... 29
39543AR ......... 29
39543AX ......... 29
39543E ........... 29
39543K ........... 29
39543M ........... 29
39543P ........... 29
39543S ........... 29
39543T ........... 29
Part No.
Parte No.
Page
Pág.
39543W ........... 29
39543X ........... 29
39544 ............. 29
39544AA ........ 29
39544B ........... 29
39544D ........... 29
39544J ........... 29
39544S ........... 29
39544U ........... 29
39544V ........... 29
39544Z ........... 25
39551F ........... 27
39551H ........... 27
39551J ........... 27
39552AG ......... 27
39552AV ......... 27
39552P ........... 25
39552U ........... 25
39552Z ........... 27
39555B ........... 31
39555C ........... 31
39555D ........... 31
39555F ........... 31
39555P ........... 25
39555R ........... 25
39556A ........... 21
39556K ........... 31
39557 ............. 21
39557A ........... 21
39557B ........... 21
39557C ........... 21
39557E ........... 21
39557F ........... 21
39563F ........... 21
39563G ........... 27
39563H ........... 33
39568AC ......... 27
39568AL........27
39568AM ......... 27
39568AN ......... 21
39568AP ......... 21
39568B ........... 33
39568D ........... 33
39568E ........... 33
39568J ........... 21
39568L ........... 33
39573AA ......... 25
39573K ........... 25
39578AD ......... 23
39578AJ ......... 27
39578F ........... 21
39578PB ......... 27
39580A ........... 31
39582AF ......... 23
39582AG ......... 23
39582AJ ......... 23
39582BL ......... 23
Part No.
Parte No.
Page
Pág.
39582BM ......... 23
39582BW ......... 23
39582FC ......... 23
39582G ........... 23
39582V ........... 23
39582W ........... 23
39582XJ ......... 21
39582XK ......... 23
39590AB ......... 25
39590AC ......... 25
39590G ........... 25
39590H ........... 25
39590J ........... 25
39590S ........... 25
39590T ........... 25
39590Y ........... 25
39591A ........... 25
39591B ........... 25
39591H ........... 25
39591K ........... 25
39591L ........... 25
39592AA ......... 33
39592AB ......... 33
39592AC ......... 33
39592AD...........33
39592AF ......... 33
39592AG3 ....... 33
39592AH ......... 33
39592AK ......... 33
39592AL ......... 33
39592AM ......... 33
39592AR5 ....... 33
39592AR8 ....... 33
39593C ........... 23
39593D ........... 23
39593H ........... 23
39593J ........... 25
39594G ........... 23
39594H ........... 23
39594N ...... 25, 27
39594N ........... 29
39594R ........... 21
39655 ............. 31
39656B ........... 31
39656G ........... 31
39668W ........... 33
39680 ............. 27
39855 ............. 31
40-46 ....... 25, 27
41071G ........... 23
421D34 ........... 35
43139A ........... 33
43557 ............. 21
482C ............. 29
51-103BLK ....... 23
51-228BLK ....... 25
51295B ........... 23
36
Page 37

NUMERICAL INDEX OF PARTS
INDICE NUMERICO DE PARTES
Part No.
Parte No.
Page
Pág.
56393G ........... 25
56393V ........... 25
605A ............. 31
605C ............. 31
643-480BLK ..... 25
660-142 ......... 31
660-206 ......... 29
660-207 ......... 27
660-243 ......... 23
660-264 ......... 35
660-443 ......... 25
660-764...........25
660-835 ......... 25
660-885 ......... 25
666-255 ......... 29
666-280 ......... 25
666-94 ........... 25
667D8 .......... 21
73X ............... 33
77 ............... 29
80 ............... 23
8372A ...... 27, 33
86X ............... 21
87 ............... 27
87U .......... 25, 27
87U .......... 29, 31
88 ............... 31
88B .............. 27
90 ....... 21, 23, 31
93A .......... 27, 33
96508 .............. 31
97 ................. 29
97A ............... 25
A10018B ......... 21
A10019 ........... 27
A10019B ......... 27
A10021A ......... 31
A10023A ......... 31
A10023B ......... 31
A10024A ......... 27
A10024B ......... 27
A10025C ......... 31
G39503MF8 ..... 33
G39635MB ...... 27
G5003A1 ........ 33
GA39503MF8 .... 33
GA39530MF ...... 31
J87J ............. 27
RI-37 ........... 25
Part No.
Parte No.
Page
Pág.
37
Page 38

NOTES
NOTAS
38
Page 39

NOTES
NOTAS
39
Page 40

 Loading...