

Unify OpenStage 15 TDM, OpenStage 20 TDM, OpenStage 60 TDM, OpenStage 30 TDM, OpenStage 80 TDM Service Information-trace Manual
...Page 1

Version 3.0 Unify Service Information
OpenStage 15/20/30/40/60/80 TDM
Service Information- Trace Guide
Unify PH HQ GVS 1
Ausgabe: 3.0
Datum: 28.11.2014
Author: Andreas Hoffmann
Responsible: Andre Bergmann
Status: Released
Unify GmbH & Co. KG reserves the righttomakechangesand improvements to the products and anyof the features of
the products described in this document without priornotice. The contents of this document are provided “as is”. Except
as required by applicable law, no warranties of any kind, eitherexpress or implied, including, but not limited to, the implied
warranties of merchantability and fitnessfor a particularpurpose, are made in relation to the accuracy, reliability or
contents of this document. Unify GmbH & Co. KG reserves the right to revise this document or withdraw it at any time
without prior notice.
WARNING: THIS DOCUMENT (OR DATA) CONTAINS INFORMATION THAT IS PROPRIETARY INTELLECTUAL
PROPERTY AND/OR TRADE SECRET OF UNIFY GmbH & Co. KG AND MAY ONLY BE VIEWED BY AUTHORIZED
PERSONS. UNAUTHORIZED VIEWING OR DISCLOSURE IS STRICTLY PROHIBITED. No part of this material may be
copied or reproduced, in whole or in part, in any form (including photocopying and/or storage in any medium by electronic
means and whether or not transiently or incidentally to some other use of this document) without the written permission of
Unify GmbH & Co. KG.
Copyright 2013 Unify GmbH & Co. KG. All rights reserved.
Service Information 1 of 40 OpenStage TDM Trace Guide
Page 2

Version 3.0 Unify Service Information
Table of contents
1 IMPORTANT INFORMATION......................................................................................................... 4
2 REASON FOR THIS HOW-TO......................................................................................................... 4
3 TRACE SETTINGS ............................................................................................................................. 4
3.1 TRACE COMPONENT DESCRIPTION ................................................................................................. 4
3.2 EXAMPLES FOR TRACE SETTINGS ................................................................................................... 7
4 WEB BASED MANAGEMENT (WBM) ONLY OS_HI.................................................................. 8
4.1 PRE-CONDITIONS ........................................................................................................................... 8
4.2 START THE WBM .......................................................................................................................... 8
4.3 ACTIVATE INTERNAL PHONE TRACES (EXAMPLE FOR STANDARD TRACE: CALL VIEW,
COMMUNICATIONS AND CSTA SERVICES).................................................................................................. 9
4.4 MAKE THE PHONE TRACE..............................................................................................................10
4.5 READ OUT THE INTERNAL PHONE TRACES.....................................................................................11
4.6 DEACTIVATE THE PHONE TRACE ...................................................................................................12
4.7 ACTIVATE CORE DUMP (SET BY DEFAULT) ....................................................................................13
4.8 DOWNLOAD CORE DUMP...............................................................................................................14
4.9 DELETE OLD CORE DUMPS ............................................................................................................15
5 OPENSCAPE 4000: NECESSARY INFORMATION TO REPORT.............................................16
6 OPENSCAPE 4000: PHONE EXCEPTION LOG OS_LO.............................................................17
7 OPENSCAPE 4000: PHONE TRACE OS_HI..................................................................................19
7.1 CREATION OF TRACE CONFIGURATION TEMPLATE (EXAMPLE FOR STANDARD TRACE: CALL VIEW,
COMMUNICATIONS AND CSTA SERVICES).................................................................................................19
7.2 TRANSFER THE TRACE CONFIGURATION TO THE PHONE ................................................................20
7.3 MAKE THE PHONE TRACE..............................................................................................................20
7.4 TRANSFER THE PHONE TRACE TO THE OPENSCAPE 4000 ..............................................................21
7.5 DOWNLOAD THE TRACE FROM THE OPENSCAPE 4000 ..................................................................22
7.6 DEACTIVATE THE PHONE TRACE ...................................................................................................23
8 OPENSCAPE 4000: SYSTEM TRACE REGARDING PHONE ISSUES.....................................23
8.1 HOW TO TRACE MESSAGES TO/FROM SINGLE ENDPOINTS..............................................................24
9 HIPATH 3000 / OPENSCAPE BUSINESS: NECESSARY INFORMATION TO REPORT......26
10 HIPATH 3000 / OPENSCAPE BUSINESS: PHONE EVENT (EXCEPTION) LOG OS_LO27
11 HIPATH 3000 / OPENSCAPE BUSINESS (X3 X5 X8): PHONE TRACE OS_HI .................29
11.1 ACTIVATE PHONE TRACE (EXAMPLE FOR STANDARD TRACE: CALL VIEW, COMMUNICATIONS AND
CSTA SERVICES) .......................................................................................................................................29
11.2 MAKE THE PHONE TRACE..............................................................................................................31
11.3 DOWNLOAD PHONE TRACE ...........................................................................................................31
11.4 DEACTIVATE THE PHONE TRACE ...................................................................................................32
12 HIPATH 3000: SYSTEM TRACE REGARDING PHONE ISSUES........................................33
12.1 ACTIVATE SYSTEM TRACE ............................................................................................................33
12.2 MAKE THE TRACE AND STOP TRACE..............................................................................................35
12.3 DOWNLOAD SYSTEM TRACE..........................................................................................................35
12.4 DEACTIVATE SYSTEM TRACE ........................................................................................................37
Service Information 2 of 40 OpenStage TDM Trace Guide
Page 3

Version 3.0 Unify Service Information
13 OPENSCAPE BUSINESS: SYSTEM TRACE REGARDING PHONE ISSUES.....................39
13.1 ACTIVATE SYSTEM TRACE ............................................................................................................39
13.2 MAKE THE TRACE AND STOP TRACE..............................................................................................39
13.3 DOWNLOAD SYSTEM TRACE..........................................................................................................40
13.4 DEACTIVATE SYSTEM TRACE ........................................................................................................40
14 OPTIMON UP0 TRACE ...............................................................................................................40
Service Information 3 of 40 OpenStage TDM Trace Guide
Page 4

Version 3.0 Unify Service Information
1 Important information
It is important to deactivate the trace settings manually at every phone again after
downloading the trace. Otherwise the phone performance will be heavy negative
influenced. Refer to chapter 4.6 (WBM) or 7.6 (OpenScape 4000 TSDM) or 11.4
(HiPath 3000 Manager E and OpenScape Business Manager E).
At OpenStage TDM only the trace functions are supported in connection with
the Web Based Management. To save much time, I would use always the
WBM, instead of the systems to make a phone trace.
2 Reason for this How-To
The development needs nearly every time a phone trace to analyze a phone problem.
The OpenStage 60/80 TDM, in the following called OS_Hi, are able to trace internal
processes that show the development what is going wrong. OpenStage 15/20/30/40,
in the following called OS_Lo, only write exception logs, which should be
downloaded for any phone problems.
This How-To describes the steps at OS_Hi for activating / reading out / deactivating
those traces with OpenScape 4000, HiPath 3000, OpenScape Business and Web
Based Management. For OS_Lo and OS_Hi it describes how to download the
exception log.
With this How-To in hands the requester must onlydefine which traces he needs for
OS_Hi. Sometimes it could be necessary that to make other traces, by order of the
development.
3 Trace settings
3.1 Trace component description
The following trace components/points can be chosen for a phone trace.
Administration
This deals with the changing and setting of parameters within the phone
database, from both the User and Admin menus
Application framework
All applications within the phone e.g. Call view, Call log or Phonebook are run
within the application framework. It is responsible for the switching: between
different applications and bringing them into and out of focus as appropriate.
Service Information 4 of 40 OpenStage TDM Trace Guide
Page 5

Version 3.0 Unify Service Information
Application Menu
This is where applications to be run on the phone can be started and stopped.
Bluetooth Service
This handles the Bluetooth interactions between external Bluetooth devices and
the phone.
Call log
This deals with the Call log application which displays the call history of the
phone.
Call view
This handles the representation of telephony calls on the phone screen.
Communications
This is involved in the passing of call related information and signaling to and
from the CSTA service.
Component registrar
Irrelevant for OpenStage TDM.
CSTA service
Any CSTA messages, are handled by this service. CSTA messages are used
within the phone by all services as a common call progression and
control :protocol.
Data Access service
This service allows other services to access the data held within the phone
database.
Desktop
The desktop service is responsible for the shared parts of the phone display.
Primarily these are the status bar at the top of the screen and the FPK :labels.
Digit Analysis service
This analyses and modifies digit streams which are sent and received by the
phone e.g. canonical conversion.
Directory service
This performs a look up service for data in the phonebook, trying to match
incoming and outgoing numbers with entries in the phonebook.
Health service
This monitors other parts of the phone for diagnostic purposes and provides a
logging interface for the other services in the phone.
Help
The help function is handled by this service.
Service Information 5 of 40 OpenStage TDM Trace Guide
Page 6

Version 3.0 Unify Service Information
HFA Service Agent
Irrelevant for OpenStage TDM.
Instrumentation service
This is used by the Husim phone tester to exchange data with the phone for
remote control, testing and monitoring purposes.
Journal service
The Journal service is responsible for saving and retrieving call history
information which is used by the Call log application.
Media control service
This service provides the control of media streams (voice, tones, ringing etc.)
within the phone.
Media Processing service.
This is a layer of software between the media control service and the tone
generation and voice engine services. It is also involved in switching of :audio
devices such as the handset and loudspeaker.
OBEX service
This is involved with Bluetooth accesses to the phone
Openstage Client Management
This provides a means by which other services within the phone can interact with
the database.
Phonebook
This is responsible for the phonebook application within the phone.
Performance Marks
Irrelevant for OpenStage TDM.
Password management service
This is used to verify passwords used in the phone.
Physical interface service
This handles any interactions with the phone via the keypad, mode keys, fixed
feature buttons, clickwheel and slider.
Service framework
This is the environment within which other phone services operate. It is involved
in the starting and stopping of services.
Service registry
This keeps a record of all services which are currently running inside the phone
Sidecar service
This handles interactions between the phone and any attached sidecars.
Service Information 6 of 40 OpenStage TDM Trace Guide
Page 7

Version 3.0 Unify Service Information
Tone generation
This service handles the generation of the tones and ringers on the phone
.
Transport service
Irrelevant for OpenStage TDM.
vCard parser service
This trace is for sending/receiving vCards via the Bluetooth interface.
Voice engine service
This provides a switching mechanism for voice streams within the phone. It is
also involved in QDC, Music on Hold and voice instrumentation.
Voice mail
Irrelevant for OpenStage TDM.
Web Server service
This provides the web access to the phone.
USB Backup service
This is for the backup/restore feature via USB devices.
Voice recognition
The Voice recognition service is for the voice dialing feature
Clock Service
Irrelevant for OpenStage TDM.
Please note:
For normal diagnostic operations these traces should never be enabled (If
logging is enabled for these components, the phone becomes very slow):
Service Framework
Service Registry
OpenStage client management
3.2 Examples for trace settings
good default trace configuration
o Call view
o CSTA service
o Communications
Audio related issues (missing ringtone, internal tone)
o Digit Analysis service
o Media control service
Service Information 7 of 40 OpenStage TDM Trace Guide
Page 8

Version 3.0 Unify Service Information
o Media Processing service.
o Tone generation
o Call view
Phonebook (name/number match)
o CSTA service
o Digit Analysis service
o Directory service
o Phonebook
Call log (wrong/missing call log entry’s)
o CSTA service
o Call log
o Communications
o Journal service
4 Web Based Management (WBM) only OS_Hi
The phone trace and also the core file can be configured and downloaded with the
WBM.
4.1 Pre-conditions
A RNDIS driver, to be found on SWS under OpenStage Manager, must be installed
on the PC. Run “RNDIS_V2_Rx.x.x_Setup.exe” and follow the installer’s instructions.
Do not plug in the USB cable before the installer asks to do it. Do not change the
USB port after installation, because the phone will only work on the USB port where
the phone was plugged in during the RNDIS Driver installation. In default the phone
IP is 192.168.200.1 and for the RNDIS network interface the default IP set by the
RNDIS Wizard is 192.168.200.2. If you have changed the phone IP in the phone
Admin menu you have to change the RNDIS network interface IP to the same range
like the new phone IP.
4.2 Start the WBM
When the phone is connected via the USB cable to the PC, you can reach the WBM
out of the Internet Explorer with the following link:
https://192.168.200.1/index.cmd?user=Admin
Service Information 8 of 40 OpenStage TDM Trace Guide
Page 9
Version 3.0 Unify Service Information
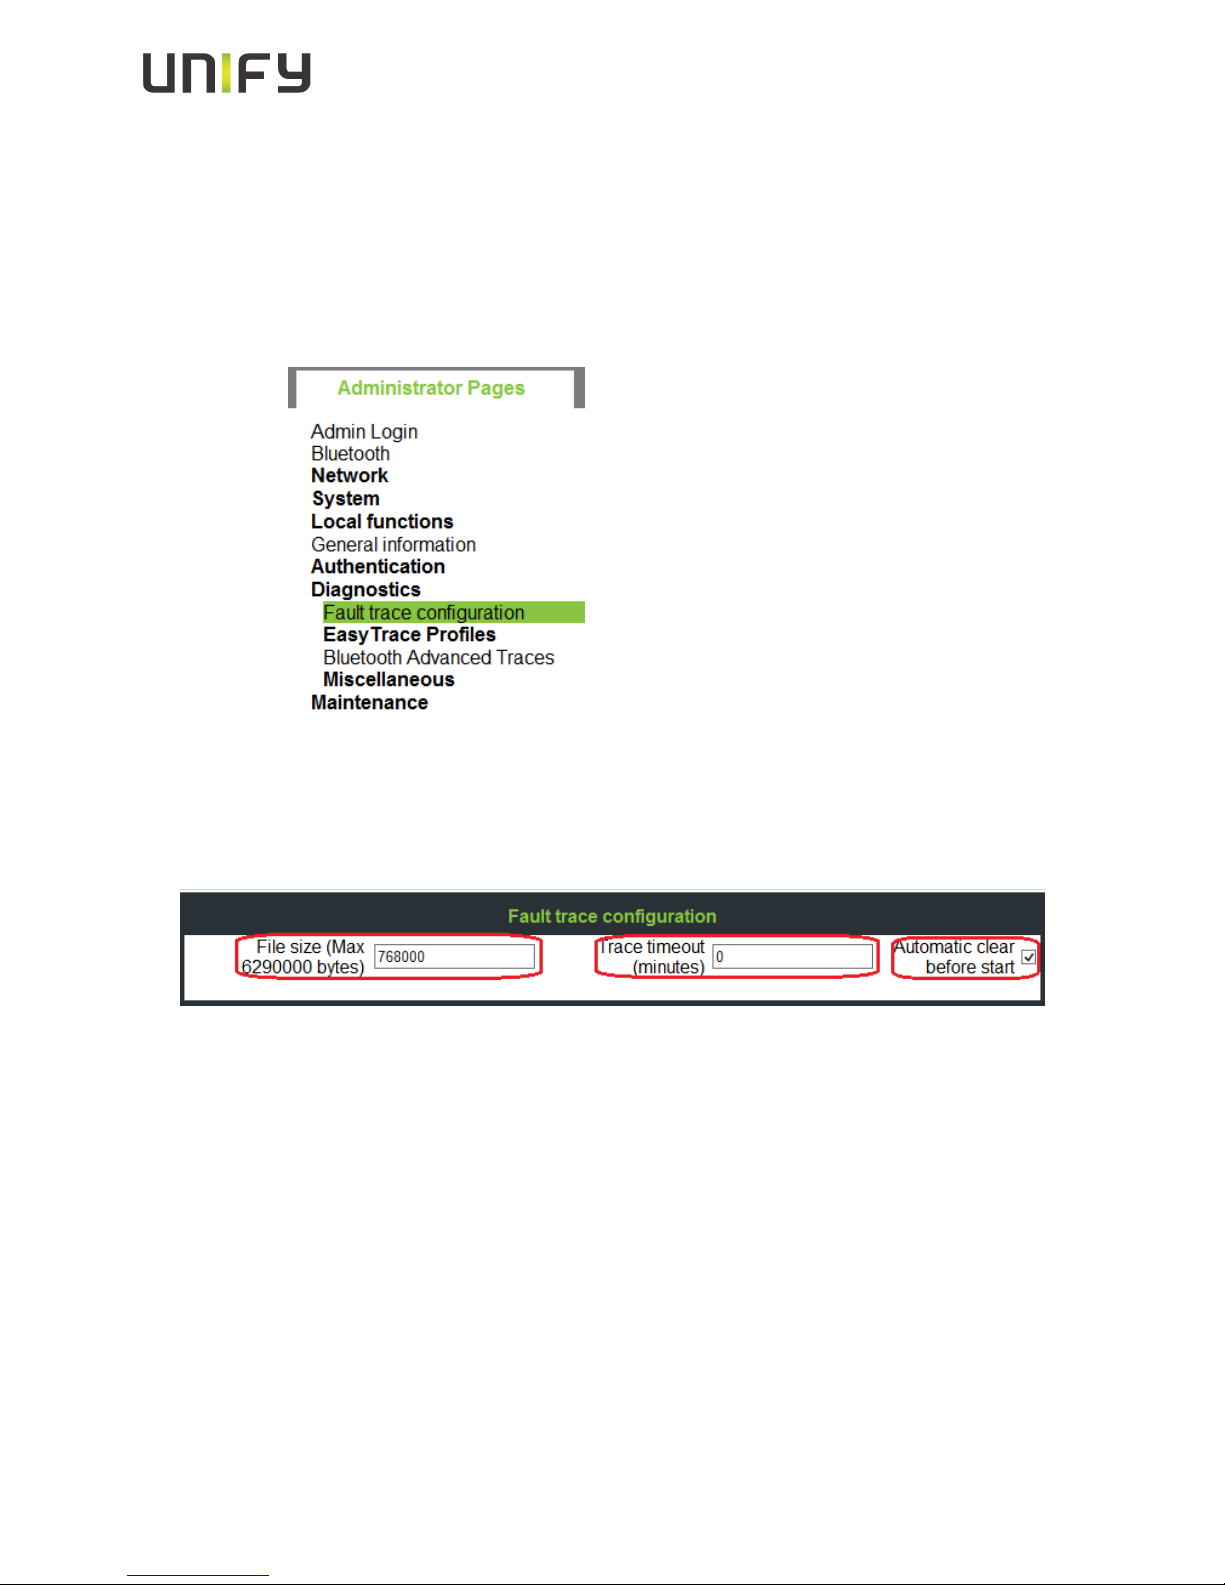
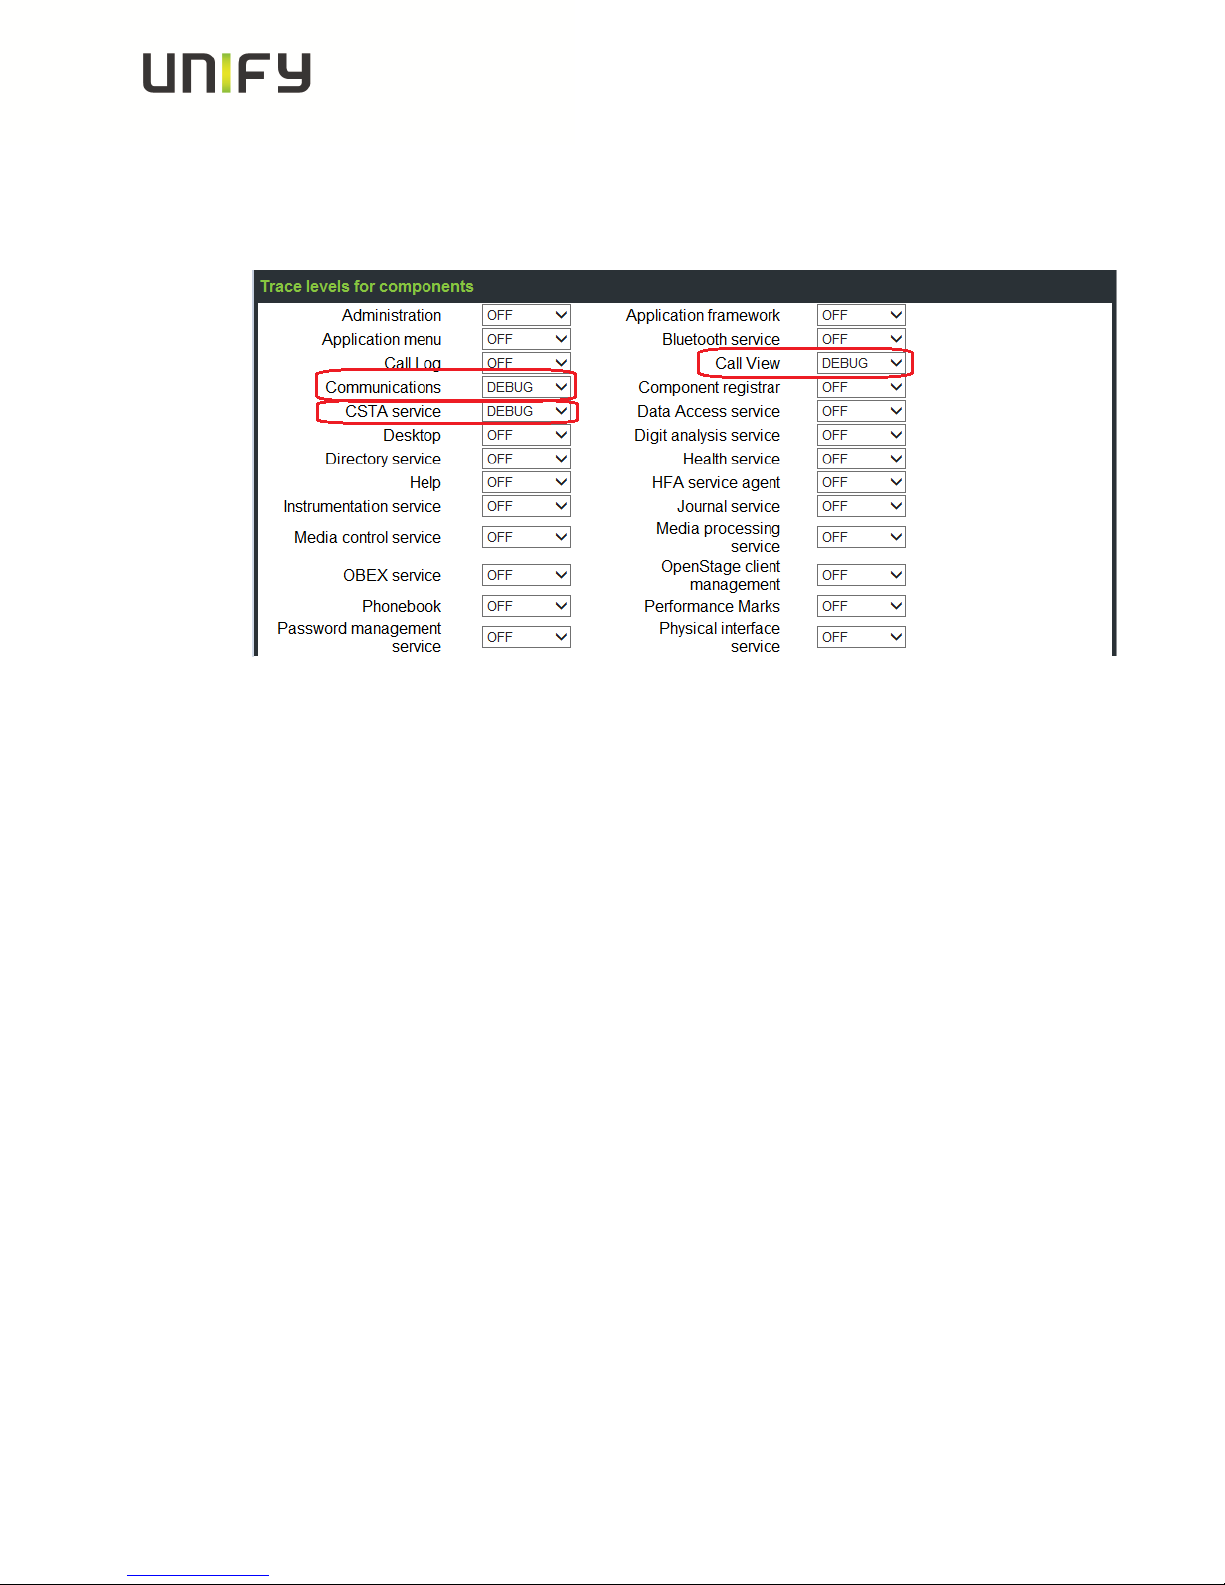
4.3 Activate internal phone traces (example for standard trace:
Call view, Communications and CSTA Services)
o Log-in to the WBM as administrator
o Select the Fault trace configuration menu under Diagnostics
o Set File size to 768000
o Set Trace timeout to 0 (disable trace timeout)
o Check the box for Automatic clear before start
Service Information 9 of 40 OpenStage TDM Trace Guide
Page 10
Version 3.0 Unify Service Information
o Set Call view, Communications, CSTA services and/or other necessary trace
points to DEBUG
o Click the Submit Button
4.4 Make the phone trace
Now, if the trace configuration is transferred to the phone, reproduce the scenario
which should be traced at the phone. If the problem is reproduced, do not make
any further user inputs at the phone because that would overwrite the traced
problem.
Service Information 10 of 40 OpenStage TDM Trace
Guide
Page 11
Version 3.0 Unify Service Information
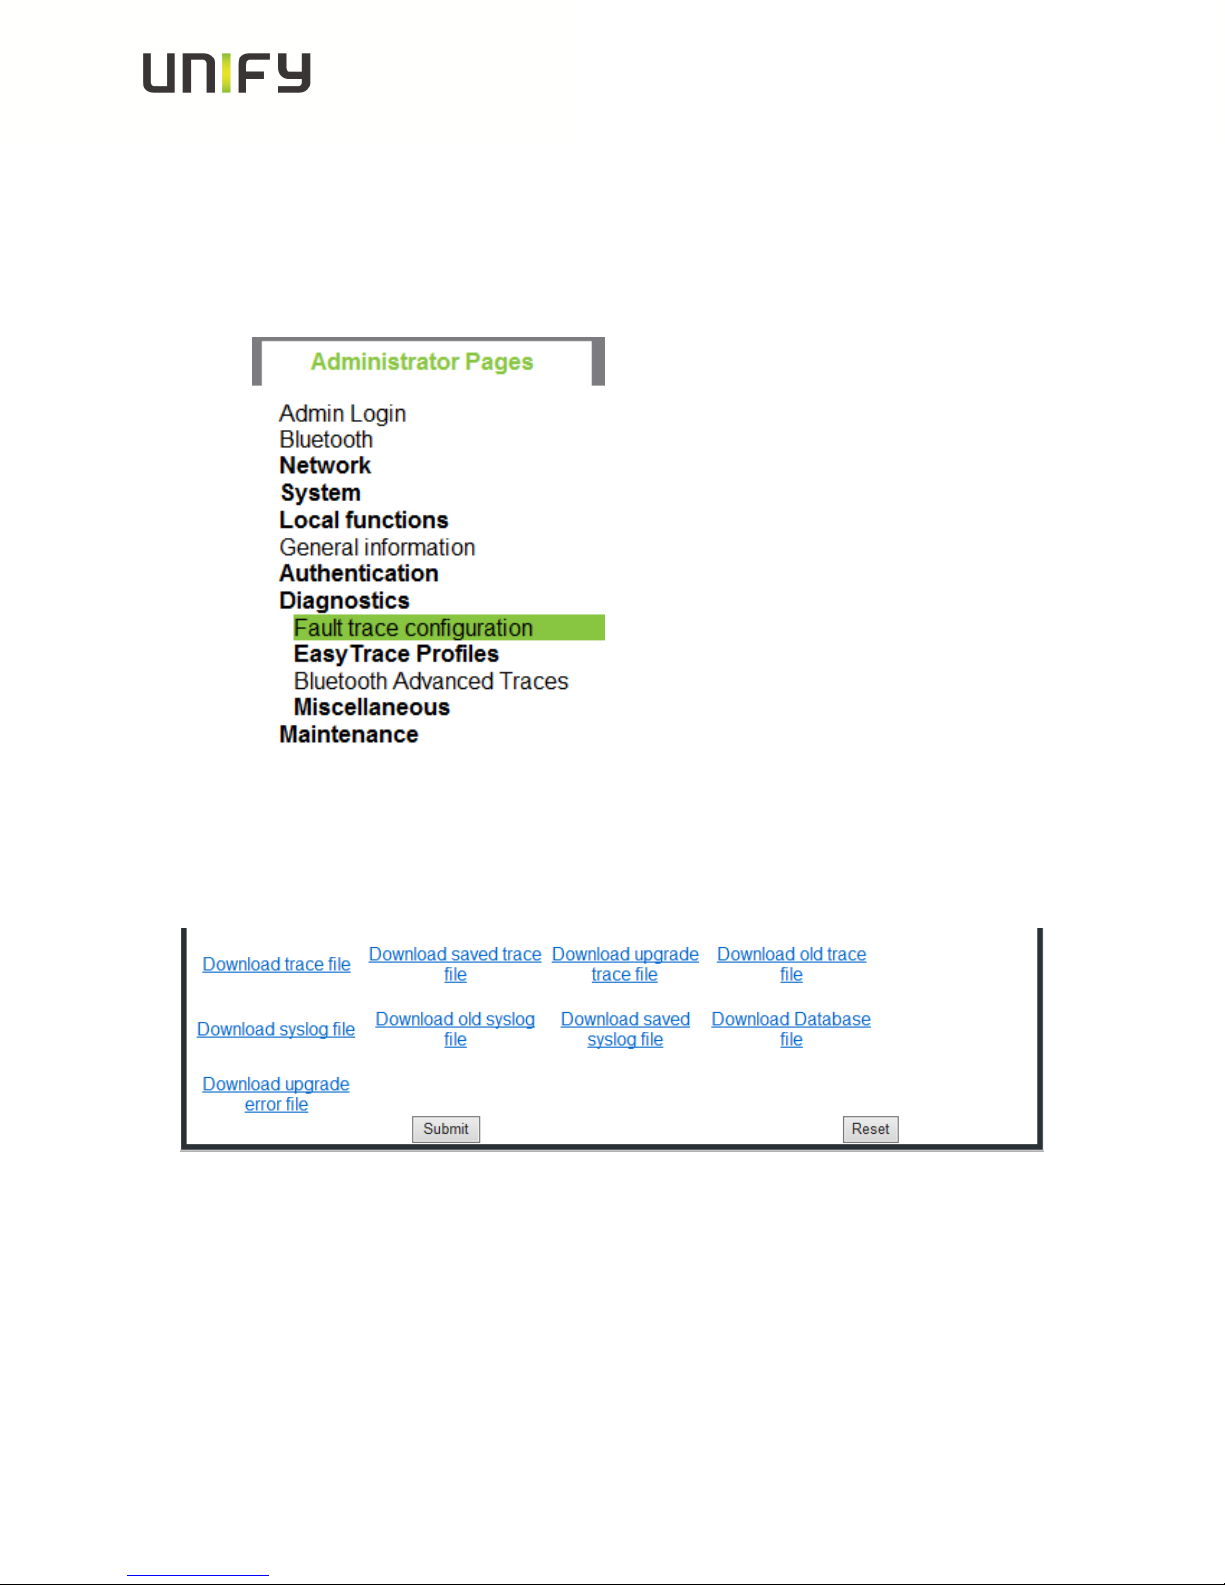
4.5 Read out the internal phone traces
o Log-in to the WBM as administrator
o Select the Fault trace configuration menu under Diagnostic
Now it is possible to download 11 different trace files
o Click on a trace file
o Save under… popup opens, save trace
o trace file
The trace data according to the settings specified for the services.
o old trace file
The trace file is stored only in RAM. When the trace file has reached its
size limit, it will be saved as old trace file, and the current exception file is
emptied for future messages.
Service Information 11 of 40 OpenStage TDM Trace
Guide
Page 12

Version 3.0 Unify Service Information
o saved trace file
Normally, the trace file is saved only in the phone RAM. When the phone
restarts in a controlled manner, the trace file will be saved in permanent
memory
o upgrade trace file
The trace log created during a software upgrade.
o upgrade error file
The error messages created during a software upgrade.
o syslog file
Contains system messages (eg. Dhcp requests,boot,network
changes,ntpclient,kernel,LLDP)
o old syslog file
The syslog file is only in RAM.When the syslog file has reached its size
limit, it will be saved as old syslog file, and the current syslog file is
emptied for future messages.
o saved syslog file
Normally, the trace file is saved only in the phone RAM. When the phone
restarts in a controlled manner, the trace file will be saved in permanent
memory
o Database file
Phone Database
4.6 Deactivate the phone trace
It is very important to deactivate the phone trace points manually, set all traces
to OFF and transfer it to the phone. Otherwise the phone performance will be
heavy negative influenced.
o Make all steps like at 4.3, but set all trace points to OFF
Service Information 12 of 40 OpenStage TDM Trace
Guide
Page 13

Version 3.0 Unify Service Information
4.7 Activate core dump (set by default)
The core dump is important to see what is going wrong.
Normally the phone automatically generates a core dump if the phone crash’s.
o Log-in to the WBM as administrator
o Select the Core Dump menu under Miscellaneous
o Activate the checkbox for “Enable core dump”
o Press Submit
Service Information 13 of 40 OpenStage TDM Trace
Guide
Page 14

Version 3.0 Unify Service Information
4.8 Download core dump
o Log-in to the WBM as administrator
o Select the Core Dump menu under Miscellaneous
o Click on relevant core dumps
o Save under… popup opens, save trace
Service Information 14 of 40 OpenStage TDM Trace
Guide
Page 15

Version 3.0 Unify Service Information
4.9 Delete old core dumps
Delete all old, already downloaded core files to give phone memory free.
o Log-in to the WBM as administrator
o Select the Core Dump menu under Miscellaneous
o Activate the checkbox for “Delete core dump”
o Press Submit
Service Information 15 of 40 OpenStage TDM Trace
Guide
Page 16

Version 3.0 Unify Service Information
5 OpenScape 4000: Necessary Information to report
Very important for the analysis of phone problems is to verify, whether expected
messages from the system are send to the phone and backward.
Very detailed description of the scenario will help to be able to reproduce the error, if
possible.
List of helpful information:
Number of effected endpoint
Physical Line of effected endpoint
OpenScape 4000 Up0-Traces from the effected line
Phonetrace at the effected phone from event
Time / Date of observed event
detailed description of the event (other involved endpoints, number etc)
e.g. who called whom, conference, transfer
parts of regen, which may be important for the scenario
Service Information 16 of 40 OpenStage TDM Trace
Guide
Page 17

Version 3.0 Unify Service Information
6 OpenScape 4000: Phone Exception Log OS_Lo
The phone exception log from the phone you can download with the TSDM (TDM
Software Deployment Manager) of the OpenScape 4000 Assistant under Software
Management.
o Open TSDM
o Open Manual & Scheduled
o Check the Select box for the phone (only one phone)
o Select Exception Log at Transfer
o Start Transfer
o Enter a job name
o Select OK
o Wait until the Status progress changes from 100% to an empty field
o Open Manage Files
o Select the tab Exception Log
Service Information 17 of 40 OpenStage TDM Trace
Guide
Page 18

Version 3.0 Unify Service Information
o Mark the log file which should be downloaded
o Press Download
It belongs now to the browser settings if the exception log will be directly opened in
an editor which you have to save or a save under… popup opens.
Service Information 18 of 40 OpenStage TDM Trace
Guide
Page 19

Version 3.0 Unify Service Information
7 OpenScape 4000: Phone Trace OS_Hi
The phone trace can be configured and downloaded with the TSDM (TDM Software
Deployment Manager) of the OpenScape 4000 Assistant. Please note, that it is not
possible to readout the actual activated trace configuration of the phone with
TDSM. It needs much of time to make traces with TSDM, better use the WBM.
7.1 Creation of trace configuration template (example for
standard trace: Call view, Communications and CSTA
Services)
o Open TSDM
o Open Trace
o Set File size to 768000
o Set Trace timeout to 0 (disable trace timeout)
o Select the checkbox for Automatic clear before start
o Set Call view, Communications, CSTA services and/or other necessary trace
points to DEBUG
o Press Save
o Enter a meaningful name for the template and select OK
Service Information 19 of 40 OpenStage TDM Trace
Guide
Page 20

Version 3.0 Unify Service Information
7.2 Transfer the trace configuration to the phone
o Open TSDM
o Open Manual & Scheduled
o Select the checkbox Select for the phone (only one phone)
o Select Trace Configuration at Transfer
o Select the trace configuration template file (see 5.1) at Source
o Start Transfer
o Enter a job name
o Select OK
o Wait until the Status progress changes from 100% to an empty field
7.3 Make the phone trace
Now, if the trace configuration is transferred to the phone, reproduce the scenario
which should be traced at the phone. If the problem is reproduced, do not make
any further user inputs at the phone because that would overwrite the traced
problem.
Service Information 20 of 40 OpenStage TDM Trace
Guide
Page 21

Version 3.0 Unify Service Information
7.4 Transfer the phone trace to the OpenScape 4000
o Open TSDM
o Open Manual & Scheduled
o Select the checkbox Select for the phone (only one phone)
o Select Trace at Transfer
o Start Transfer
o Enter a job name
o Select OK
o Wait until the Status progress changes from 100% to an empty field
Service Information 21 of 40 OpenStage TDM Trace
Guide
Page 22

Version 3.0 Unify Service Information
7.5 Download the trace from the OpenScape 4000
o Open TSDM
o Open Manage Files
o Select the tab Trace
o Mark the trace file which should be downloaded
o Press Download
o Save under… popup opens, save trace
Service Information 22 of 40 OpenStage TDM Trace
Guide
Page 23

Version 3.0 Unify Service Information
7.6 Deactivate the phone trace
It is very important to deactivate the phone trace points manually with a trace
configuration template, which has set all traces to OFF. Otherwise the phone
performance will be heavy negative influenced.
o Make all steps like at 5.1, but set all trace points to OFF
o Make all steps like at 5.2, with the before at 6.6 created template
8 OpenScape 4000: System Trace regarding phone
issues
This describes how you can make a system trace for a phone issue. It is useful to
make the system trace at the same time with the phone trace.
The trace can be stopped at any phone of the system which has a programmed DDS
key (in the following example the number 12345 has to be stored on the DDS key). It
is not possible to stop the trace while dialing 12345 manually. The number in this
example 12345 must be free and not reserved in the WABE. The trace will be stored
on the system’s hard drive under the filename you enter down. The trace
configuration can be entered and run always at a OpenScape 4000 system, it is not
influencing the system performance. The AMO language is English.
/* stop on speed dial with "12345" (a DDS key with the number 12345 has to be programmed
at least on one phone)
exec-tracs:bp;
res,all;
flagtr,off;
selmsg,pp,g1,all;
msglen,pp,g1,32;
selmsg,cp,g1,all;
msglen,cp,g1,48;
selmsg,rcv,g1,cd1,dest,40;
selmsg,rcv,g1,cd2,src,40,ne;
selmsg,stop,g1,cd1,dest,6c; /* CP message
selmsg,stop,g1,cd2,ev,30; /* SCR message
selmsg,stop,g1,cd3,byte,13,5; /* byte counter or number length
selmsg,stop,g1,cd4,byte,14,01; /* stop on called party 12345
selmsg,stop,g1,cd5,byte,15,02;
selmsg,stop,g1,cd6,byte,16,03;
selmsg,stop,g1,cd7,byte,17,04;
selmsg,stop,g1,cd8,byte,18,05;
on,hd,:diag:<filename>,99,y,y;
end
Should the number length be shorter, for example 4 digits “1234” delete the row with
the green 05. Should the number be longer, for example 6 digits “123456” at the row:
selmsg,stop,g1,cd9,byte,19,06;
and edit the line with /* byte counter or number length at the end from 5 to 6.
Service Information 23 of 40 OpenStage TDM Trace
Guide
Page 24

Version 3.0 Unify Service Information
8.1 How to trace messages to/from single endpoints
English AMO language, example for the station number 64766:
Bold lines are the commands & values to be entered.
<cha-funct:slang=eng;
<exec-disps:bp;
*lst,sw,loden,stno,64766,vce;
LTG LTU PBC/SLOT CCT L I N E PHYS_LINE SU DI/TSI SI LODEN
1T 17T 11T 9T 16T 1862T 746H 1718T 6B6H 0H 1H 0H 356H
1T 17T 11T 9T 16T 1862T 746H 1718T 6B6H 1H 1H 0H 357H
1T 17T 11T 9T 16T 1862T 746H 1718T 6B6H 2H 1H 0H 358H
1T 17T 11T 9T 16T 1862T 746H 1718T 6B6H 3H 1H 0H 359H
1T 17T 11T 9T 16T 1862T 746H 1718T 6B6H 0H 2H 4H 35AH
…………………..
*end
<
The red marked phys_line is needed later for the trace, in this example 6B6:
6B6 06 High Byte and B6 Low Byte
exec-tracs:bp; (trace in background)
* res,all;
* selmsg,sw,g1,cd1,byte,06,<Low Byte>; example: …,06,B6;
* selmsg,sw,g1,cd1,byte,07,<High Byte>; example: …,07,06;
* msglen,sw,g1,300;
* on,hd,:diag:<Tracefilename>,200,y,y;
* end
do the scenario with the phone/phones
exec-tracs:bp;
* off;
* end
------------------------------------exec-tracs:bp; (trace command remains open)
* res,all;
* selmsg,sw,g1,cd1,byte,06,<Low Byte>; example: …,06,B6;
* selmsg,sw,g1,cd1,byte,07,<High Byte>; example: …,07,06;
* msglen,sw,g1,300;
* on,hd,:diag:<Tracefilename>,200,y,y;
do the scenario with the phone/phones
* off;
* end
Service Information 24 of 40 OpenStage TDM Trace
Guide
Page 25

Version 3.0 Unify Service Information
Traces of more lines, e.g. 9EB and 9EF:
exec-tracs:bp;
* res,all;
* selmsg,sw,g1,cd1,byte,06,<Low Byte>; example: …,06,EB&EF;
* selmsg,sw,g1,cd1,byte,07,<High Byte>; example: …,07,09;
Service Information 25 of 40 OpenStage TDM Trace
Guide
Page 26

Version 3.0 Unify Service Information
9 HiPath 3000 / OpenScape Business: Necessary
information to report
Very important for the analysis of phone problems is to verify, whether expected
messages from the system are send to the phone and backward.
Very detailed description of the scenario will help to be able to reproduce the error, if
possible.
List of helpful information:
Number of effected endpoint
KDS of the system
HiPath 3000 / OpenScape Business Traces configured for messages to/from
phone
Phonetrace at the effected phone from event
Time / Date of observed event
detailed description of the event (other involved endpoints, number etc)
e.g. who called whom, conference, transfer
Service Information 26 of 40 OpenStage TDM Trace
Guide
Page 27

Version 3.0 Unify Service Information
10 HiPath 3000 / OpenScape Business: Phone Event
(Exception) Log OS_Lo
The phone event log from the phone you can download with the HiPath ManagerE of
the HiPath 3000 / OpenScape Business under Maintenance.
o Log-in to the Manager as User group: Development
o Open Transfer
o Select checkbox Maintenance
o Press Maintenance
Service Information 27 of 40 OpenStage TDM Trace
Guide
Page 28

Version 3.0 Unify Service Information
o Open tab OpenStage Phones
o Open tab Event Log
o Select OpenStage device
o Select Browse to enter a meaningful name and save directory
o Press Phone PC
o Wait until the Event Log is downloaded
o Press Open (unnecessary, already stored in directory)
o Select Event Log, it will be opened in an editor (unnecessary, already stored in
directory)
o Save Event Log (unnecessary, already stored in directory)
Service Information 28 of 40 OpenStage TDM Trace
Guide
Page 29

Version 3.0 Unify Service Information
11 HiPath 3000 / OpenScape Business (X3 X5 X8): Phone
Trace OS_Hi
The phone trace can be configured and downloaded with the Manager E of the
HiPath 3000 /OpenScape Business.
OpenScape Business S and X1 could not be configured via Manager E, for OS_HI
configuration see chapter 4.
Please note, that it is not possible to readout the actual activated trace
configuration of the phone with TDSM. It needs much of time, better use the
WBM.
11.1 Activate phone trace (example for standard trace: Call view,
Communications and CSTA Services)
o Log-in to the Manager as User group: Development
o Open Transfer
o Select checkbox Maintenance
o Press Maintenance
Service Information 29 of 40 OpenStage TDM Trace
Guide
Page 30

Version 3.0 Unify Service Information
o Open tab OpenStage Phones
o Open tab Trace
o Select OpenStage device
o Set File size to 768000
o Set Timeout to 0 (disable trace timeout)
o Select the checkbox for Automatic clear before start
o Select the checkbox for Enable core dump
o Set Call view, Communications, CSTA services and/or other necessary trace
points to Debug
o Press PC Phone
o Wait until the trace configuration is transferred to the phone
Service Information 30 of 40 OpenStage TDM Trace
Guide
Page 31

Version 3.0 Unify Service Information
11.2 Make the phone trace
Now, if the trace configuration is transferred to the phone, reproduce the scenario
which should be traced at the phone. If the problem is reproduced, do not make
any further user inputs at the phone because that would overwrite the traced
problem.
11.3 Download phone trace
o Log-in to the Manager as User group: Development
o Open Transfer
o Select checkbox Maintenance
o Press Maintenance
Service Information 31 of 40 OpenStage TDM Trace
Guide
Page 32

Version 3.0 Unify Service Information
o Open tab OpenStage Phones
o Open tab Trace
o Select OpenStage device
o Select Browse to enter a meaningful name and directory
o Press Phone PC
o Wait until the trace downloaded to the choosen directory above
11.4 Deactivate the phone trace
It is very important to deactivate the phone trace points manually, set all trace
levels to OFF and transfer it to the phone. Otherwise the phone performance
will be heavy negative influenced.
o Make all steps like at 9.1, but set all trace points to Off
Service Information 32 of 40 OpenStage TDM Trace
Guide
Page 33

Version 3.0 Unify Service Information
12 HiPath 3000: System Trace regarding phone issues
This describes how you can make a system trace for a phone issue. It is useful to
make the system trace at the same time with the phone trace. It is very
important to deactivate the system trace after tracing!
12.1 Activate system trace
o Log-in to the Manager as User group: Development
o Open Transfer
o Select checkbox Maintenance
o Press Maintenance
Service Information 33 of 40 OpenStage TDM Trace
Guide
Page 34

Version 3.0 Unify Service Information
o Open tab Tracer settings
o Press Set Default
o For OpenStage 10/15/20/30, optiset and optiPoint
Activate checkbox and set Trace level to 9 at DH-UPN and Display
o For OpenStage 40/60/80
Activate checkbox and set Trace level to 9 at DH-UPN and DH-CORENET-TS
o Press Write data
o Press Trace start
Service Information 34 of 40 OpenStage TDM Trace
Guide
Page 35

Version 3.0 Unify Service Information
12.2 Make the trace and stop trace
Now Reproduce the scenario. If the problem is reproduced, do not make any
further user inputs at the phone because that would overwrite the traced
problem. Stop the trace in the mask of 12.1 by pressing Trace stop.
12.3 Download system trace
o Log-in to the Manager as User group: Development
o Open Transfer
o Select checkbox Maintenance
o Press Maintenance
Service Information 35 of 40 OpenStage TDM Trace
Guide
Page 36

Version 3.0 Unify Service Information
o Open tab DMA
o Select checkbox Read all service data
o Press Execute
o Chose output path
o Enter trace file name
o Press Next
Service Information 36 of 40 OpenStage TDM Trace
Guide
Page 37

Version 3.0 Unify Service Information
12.4 Deactivate system trace
o Log-in to the Manager as User group: Development
o Open Transfer
o Select checkbox Maintenance
o Press Maintenance
Service Information 37 of 40 OpenStage TDM Trace
Guide
Page 38

o Open tab Tracer settings
o Press read Data
o Press Set default
o Press delete Tracememory
o Press Write data
Version 3.0 Unify Service Information
Service Information 38 of 40 OpenStage TDM Trace
Guide
Page 39

Version 3.0 Unify Service Information
13 OpenScape Business: System Trace regarding phone
issues
This describes how you can make a system trace for a phone issue. It is useful to
make the system trace at the same time with the phone trace. It is very
important to deactivate the system trace after tracing!
13.1 Activate system trace
Use OpenScape Business Assistant (WBM-Interface)
Via Service Center -> Diagnostics -> Trace
or Expert mode -> Maintenance -> Traces -> Trace-Profiles
set profiles (if not just set)
Basic
Voice_Fax_connection
Calls_with_System_device_Upn
For OpenStage 10/15/20/30 and optiPoint
via Expert mode -> Maintenance -> Traces -> Trace Components
set component (if not just set)
FP_DISPLAY 9
(Please notice the status of the listed profile / component before changing them to be
able to set back to the previous active profiles / component after tracing is finished)
13.2 Make the trace and stop trace
Now Reproduce the scenario. If the problem is reproduced, do not make any
further user inputs at the phone because that would overwrite the traced
problem.
Service Information 39 of 40 OpenStage TDM Trace
Guide
Page 40

Version 3.0 Unify Service Information
13.3 Download system trace
Use OpenScape Business Assistant (WBM-Interface)
Via Expert mode -> Maintenance -> Traces -> Trace Log
To limit the data to that from the event, use
“Own Selection” and the necessary time range.
Deliver the complete trace file.
13.4 Deactivate system trace
Use OpenScape Business Assistant (WBM-Interface)
Via Service Center -> Diagnostics -> Trace
or Expert mode -> Maintenance -> Traces -> Trace-Profiles
Set back profiles / component to the status before changes from 13.1.
Basic
Voice_Fax_connection
Calls_with_System_device_Upn
For OpenStage 10/15/20/30 and optiPoint
via Expert mode -> Maintenance -> Traces -> Trace Components
FP_DISPLAY 9
14 OptiMon Up0 Trace
This kind of trace is only needed by order of GVS or development!With OptiMon you
can trace directly on an Up0-line. You need the special OptiMonBox hardware and
the OptiMon program. If it is not available in the region, it will be delivered from the
Client & Devices GVS together with an instruction.
Service Information 40 of 40 OpenStage TDM Trace
Guide
 Loading...