

Page 1

OpenScape Desk Phone CP400
OpenScape Key Module 400
OpenScape Voice
User Guide SIP
A31003-C1000-U101-2-7619
Page 2

Our Quality and Environmental Management Systems are
implemented according to the requirements of the ISO9001 and
ISO14001 standards and are certified by an external certification
company.
Copyright © Unify Soft ware and Solutions GmbH & Co . KG 5/2016
Mies-van-der-Rohe-Str. 6, 80807 Munich/Germany
All rights reserved.
Reference No.: A31003-C1000-U101-2- 7619
The information provided in this document contains merely general descriptions or
characteristics of performance which in case of actual use do not always apply as
described or which may change as a result of further development of the products.
An obligation to provi de the respective chara cteristics shall only exist if expressly agreed in
the terms of contract.
Availability and technical specifications are subject to change without notice.
Unify, OpenScape, OpenStage and HiPath are registered trademarks of Unify Software and
Solutions GmbH & Co. KG. All other company, brand, product and service names are
trademarks or registered trademarks of their respective holders.
unify.com
Page 3
Important information 3
7
7
7
Important information
For safety reasons, the telephone should only be supplied with power:
• using the original power supply unit.
Reference No.: L30250-F600-C14x (x: 1=EU, 2=US, 3=UK) or
• in a LAN with PoE (Power over Ethernet), which complies with the IEEE 802.3af
standard.
Never open the telephone or a key module. Should you encounter any problems,
consult your administrator.
Use only original accessories. The use of other accessories may be hazardous and
will render the warranty, extended manufacturer's liability and the CE marking inval
id.
Trademarks
The compliance of the equipment according to EU directives is confirmed by the CE
mark. This Declaration of Conformity and, where applicable, other existing declarations of conformity as well as further information on regulations that restrict the usage of substances or affect the declaration of substances used in products can be
found in the Unify Expert WIKI at
http://wiki.unify.com under the section “Declarations of Conformity”.
All electrical and electronic products should be disposed of separately from the municipal waste stream via designated collection facilities appointed by the government or the local authorities.
-
The correct disposal and separate collection of your old appliance will help prevent
potential negative consequences for the environment and human health. It is a pre
condition for reuse and recycling of used electrical and electronic equipment.
For more detailed information about disposal of your old appliance, please contact
your city office, waste disposal service, the shop where you purchased the product
or your sales representative.
The statements quoted above are only fully valid for equipment that is installed and
sold in the countries of the European Union and is covered by the European Direc
tive 2002/96/EC. Countries outside the European Union may have other regulations
regarding the disposal of electrical and electronic equipment.
-
-
Page 4

4 Important information
Location of the telephone
• The telephone should be operated in a controlled environment with an ambient temperature between 5°C and 40°C.
• To ensure good speakerphone quality, the area in front of the microphone (front right) should be
kept clear. The optimum speakerphone distance is 50 cm.
• Do not install the telephone in a room where large quantities of dust accumulate; this can considerably reduce the service life of the telephone.
• Do not expose the telephone to direct sunlight or any other source of heat, as this is liable to
damage the electronic components and the plastic casing.
• Do not operate the telephone in damp environments, such as bathrooms.
Product support on the Internet
Information and support for our products can be found on the Internet at:
http://www.unify.com/.
Technical notes, current information about firmware updates, frequently asked questions and lots
more can be found on the Internet at:
http://wiki.unify.com/l.
Page 5

Contents 5
Contents
Important information. . . . . . . . . . . . . . . . . . . . . . . . . . . . . . . . . 3
Trademarks . . . . . . . . . . . . . . . . . . . . . . . . . . . . . . . . . . . . . . . . . . . . . . . . . . . . . . . . . . . . . . . . . 3
Location of the telephone . . . . . . . . . . . . . . . . . . . . . . . . . . . . . . . . . . . . . . . . . . . . . . . . . . . . . . . 4
Product support on the Internet. . . . . . . . . . . . . . . . . . . . . . . . . . . . . . . . . . . . . . . . . . . . . . . . . . 4
General information . . . . . . . . . . . . . . . . . . . . . . . . . . . . . . . . . 11
About this manual . . . . . . . . . . . . . . . . . . . . . . . . . . . . . . . . . . . . . . . . . . . . . . . . . . . . . . . . . . . 11
Icons used in the manual . . . . . . . . . . . . . . . . . . . . . . . . . . . . . . . . . . . . . . . . . . . . . . . . . . . .12
Displays for describing operation . . . . . . . . . . . . . . . . . . . . . . . . . . . . . . . . . . . . . . . . . . . . . . . 12
Selected action . . . . . . . . . . . . . . . . . . . . . . . . . . . . . . . . . . . . . . . . . . . . . . . . . . . . . . . . . . . 12
Action not selected. . . . . . . . . . . . . . . . . . . . . . . . . . . . . . . . . . . . . . . . . . . . . . . . . . . . . . . . . 13
Conversation display . . . . . . . . . . . . . . . . . . . . . . . . . . . . . . . . . . . . . . . . . . . . . . . . . . . . . . . 13
Service . . . . . . . . . . . . . . . . . . . . . . . . . . . . . . . . . . . . . . . . . . . . . . . . . . . . . . . . . . . . . . . . . . . . 15
Intended use . . . . . . . . . . . . . . . . . . . . . . . . . . . . . . . . . . . . . . . . . . . . . . . . . . . . . . . . . . . . . . . 15
Telephone type . . . . . . . . . . . . . . . . . . . . . . . . . . . . . . . . . . . . . . . . . . . . . . . . . . . . . . . . . . . . . 15
Speakerphone quality and display legibility . . . . . . . . . . . . . . . . . . . . . . . . . . . . . . . . . . . . . . . 15
Getting to know the OpenScape Desk Phone CP400 . . . . . . . 16
The user interface of your OpenScape Desk Phone CP400. . . . . . . . . . . . . . . . . . . . . . . . . . . . 16
Ports on the underside of the phone . . . . . . . . . . . . . . . . . . . . . . . . . . . . . . . . . . . . . . . . . . . . . . 17
Using network ports more efficiently . . . . . . . . . . . . . . . . . . . . . . . . . . . . . . . . . . . . . . . . . . . 18
OpenScape Key Module 400 . . . . . . . . . . . . . . . . . . . . . . . . . . . . . . . . . . . . . . . . . . . . . . . . . . 18
Keys and controls . . . . . . . . . . . . . . . . . . . . . . . . . . . . . . . . . . . . . . . . . . . . . . . . . . . . . . . . . . . . 19
Softkeys . . . . . . . . . . . . . . . . . . . . . . . . . . . . . . . . . . . . . . . . . . . . . . . . . . . . . . . . . . . . . . . . . 19
Audio controls . . . . . . . . . . . . . . . . . . . . . . . . . . . . . . . . . . . . . . . . . . . . . . . . . . . . . . . . . . . . 19
Mode keys . . . . . . . . . . . . . . . . . . . . . . . . . . . . . . . . . . . . . . . . . . . . . . . . . . . . . . . . . . . . . . . 19
Navigator . . . . . . . . . . . . . . . . . . . . . . . . . . . . . . . . . . . . . . . . . . . . . . . . . . . . . . . . . . . . . . . . 20
Dialpad. . . . . . . . . . . . . . . . . . . . . . . . . . . . . . . . . . . . . . . . . . . . . . . . . . . . . . . . . . . . . . . . . . 21
Graphic display . . . . . . . . . . . . . . . . . . . . . . . . . . . . . . . . . . . . . . . . . . . . . . . . . . . . . . . . . . . . . . 23
Conversations . . . . . . . . . . . . . . . . . . . . . . . . . . . . . . . . . . . . . . . . . . . . . . . . . . . . . . . . . . . . 23
Main menu . . . . . . . . . . . . . . . . . . . . . . . . . . . . . . . . . . . . . . . . . . . . . . . . . . . . . . . . . . . . . . . 23
Presence . . . . . . . . . . . . . . . . . . . . . . . . . . . . . . . . . . . . . . . . . . . . . . . . . . . . . . . . . . . . . . . . 24
Context-dependent displays . . . . . . . . . . . . . . . . . . . . . . . . . . . . . . . . . . . . . . . . . . . . . . . . . . . . 25
Action with Softkey. . . . . . . . . . . . . . . . . . . . . . . . . . . . . . . . . . . . . . . . . . . . . . . . . . . . . . . . . 25
Action via dialpad. . . . . . . . . . . . . . . . . . . . . . . . . . . . . . . . . . . . . . . . . . . . . . . . . . . . . . . . . . 26
Action with navigation key . . . . . . . . . . . . . . . . . . . . . . . . . . . . . . . . . . . . . . . . . . . . . . . . . . . 26
Page 6

6 Contents
Operating your OpenScape Desk Phone CP400. . . . . . . . . . . 27
Navigating in menus . . . . . . . . . . . . . . . . . . . . . . . . . . . . . . . . . . . . . . . . . . . . . . . . . . . . . . . . . . 27
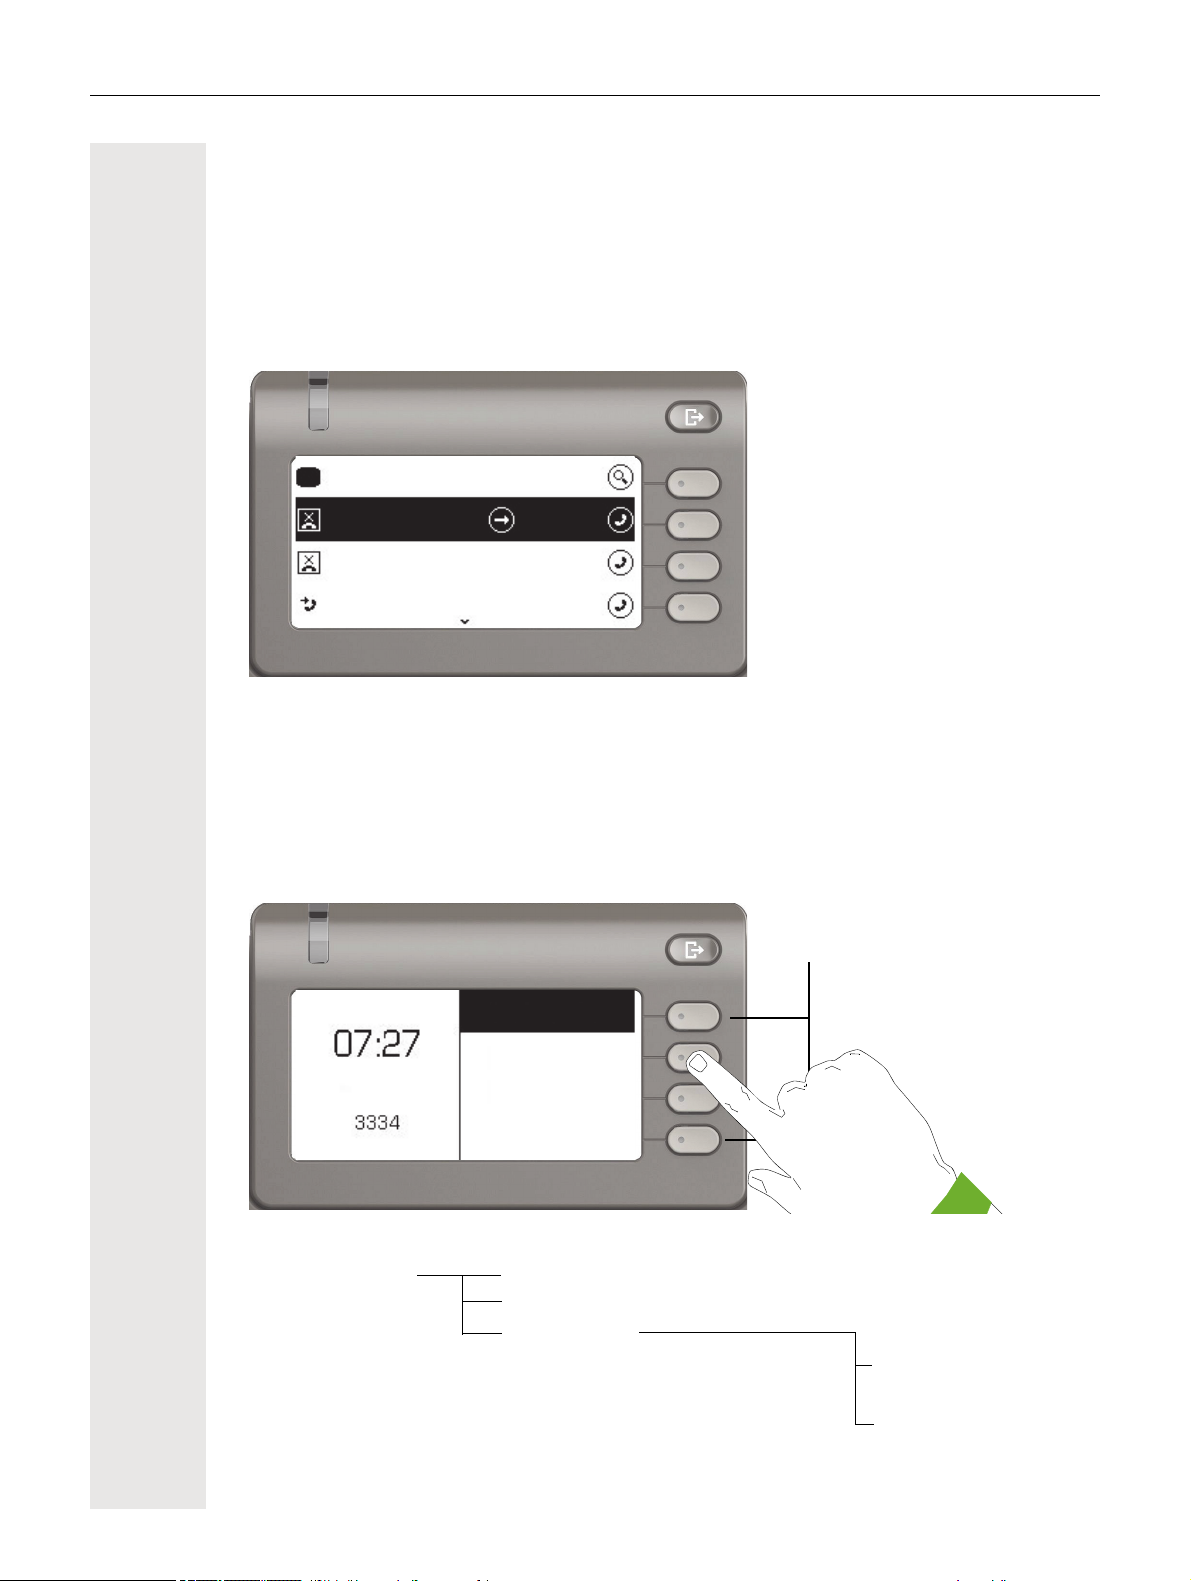
Conversations . . . . . . . . . . . . . . . . . . . . . . . . . . . . . . . . . . . . . . . . . . . . . . . . . . . . . . . . . . . . . . . 28
Opening details of a conversation or conducting a call . . . . . . . . . . . . . . . . . . . . . . . . . . . . . 29
Creating or editing conversations . . . . . . . . . . . . . . . . . . . . . . . . . . . . . . . . . . . . . . . . . . . . . 30
Searching for conversations . . . . . . . . . . . . . . . . . . . . . . . . . . . . . . . . . . . . . . . . . . . . . . . . . 33
Deleting conversations. . . . . . . . . . . . . . . . . . . . . . . . . . . . . . . . . . . . . . . . . . . . . . . . . . . . . . 34
Telephony interface. . . . . . . . . . . . . . . . . . . . . . . . . . . . . . . . . . . . . . . . . . . . . . . . . . . . . . . . . . . 35
Telephony view . . . . . . . . . . . . . . . . . . . . . . . . . . . . . . . . . . . . . . . . . . . . . . . . . . . . . . . . . . . 35
Programmable keys on the OpenScape Desk Phone CP400 and OpenScape Key Module 400
37
Corporate directory . . . . . . . . . . . . . . . . . . . . . . . . . . . . . . . . . . . . . . . . . . . . . . . . . . . . . . . . . . . 38
Answering machine (voicemail) . . . . . . . . . . . . . . . . . . . . . . . . . . . . . . . . . . . . . . . . . . . . . . . . 38
Settings . . . . . . . . . . . . . . . . . . . . . . . . . . . . . . . . . . . . . . . . . . . . . . . . . . . . . . . . . . . . . . . . . . . . 39
User settings . . . . . . . . . . . . . . . . . . . . . . . . . . . . . . . . . . . . . . . . . . . . . . . . . . . . . . . . . . . . . 40
Overview of user settings. . . . . . . . . . . . . . . . . . . . . . . . . . . . . . . . . . . . . . . . . . . . . . . . . . . . 44
Administration . . . . . . . . . . . . . . . . . . . . . . . . . . . . . . . . . . . . . . . . . . . . . . . . . . . . . . . . . . . . 44
Control and monitoring function . . . . . . . . . . . . . . . . . . . . . . . . . . . . . . . . . . . . . . . . . . . . . . . . . 45
Basic functions. . . . . . . . . . . . . . . . . . . . . . . . . . . . . . . . . . . . . 46
Incoming calls . . . . . . . . . . . . . . . . . . . . . . . . . . . . . . . . . . . . . . . . . . . . . . . . . . . . . . . . . . . . . . 46
Answering a call via the handset . . . . . . . . . . . . . . . . . . . . . . . . . . . . . . . . . . . . . . . . . . . . . . 46
Answering a call via the loudspeaker (speakerphone mode) . . . . . . . . . . . . . . . . . . . . . . . . 46
Answering a call via the headset . . . . . . . . . . . . . . . . . . . . . . . . . . . . . . . . . . . . . . . . . . . . . . 47
Switching from handset to speakerphone mode . . . . . . . . . . . . . . . . . . . . . . . . . . . . . . . . . . . . . 48
Switching from speakerphone mode to the handset . . . . . . . . . . . . . . . . . . . . . . . . . . . . . . . . . 48
Switching from headset to speakerphone mode . . . . . . . . . . . . . . . . . . . . . . . . . . . . . . . . . . . . 48
In standard mode . . . . . . . . . . . . . . . . . . . . . . . . . . . . . . . . . . . . . . . . . . . . . . . . . . . . . . . . . . 48
In US mode . . . . . . . . . . . . . . . . . . . . . . . . . . . . . . . . . . . . . . . . . . . . . . . . . . . . . . . . . . . . . . 49
Open listening . . . . . . . . . . . . . . . . . . . . . . . . . . . . . . . . . . . . . . . . . . . . . . . . . . . . . . . . . . . . . . 49
Placing a call on hold . . . . . . . . . . . . . . . . . . . . . . . . . . . . . . . . . . . . . . . . . . . . . . . . . . . . . . . 49
Ending a call . . . . . . . . . . . . . . . . . . . . . . . . . . . . . . . . . . . . . . . . . . . . . . . . . . . . . . . . . . . . . . . 53
Group call . . . . . . . . . . . . . . . . . . . . . . . . . . . . . . . . . . . . . . . . . . . . . . . . . . . . . . . . . . . . . . . . . . 54
Listening to voicemail . . . . . . . . . . . . . . . . . . . . . . . . . . . . . . . . . . . . . . . . . . . . . . . . . . . . . . . . . 56
Making calls . . . . . . . . . . . . . . . . . . . . . . . . . . . . . . . . . . . . . . . . . . . . . . . . . . . . . . . . . . . . . . . . 57
Off-hook dialing . . . . . . . . . . . . . . . . . . . . . . . . . . . . . . . . . . . . . . . . . . . . . . . . . . . . . . . . . . . 57
On-hook dialing . . . . . . . . . . . . . . . . . . . . . . . . . . . . . . . . . . . . . . . . . . . . . . . . . . . . . . . . . . . 58
Redial . . . . . . . . . . . . . . . . . . . . . . . . . . . . . . . . . . . . . . . . . . . . . . . . . . . . . . . . . . . . . . . . . . . . . 59
Activating/deactivating the microphone. . . . . . . . . . . . . . . . . . . . . . . . . . . . . . . . . . . . . . . . . . . . 60
Consulting a second party. . . . . . . . . . . . . . . . . . . . . . . . . . . . . . . . . . . . . . . . . . . . . . . . . . . . . 60
Ending a consultation call . . . . . . . . . . . . . . . . . . . . . . . . . . . . . . . . . . . . . . . . . . . . . . . . . . . 61
Switching to the held party (alternating). . . . . . . . . . . . . . . . . . . . . . . . . . . . . . . . . . . . . . . . . 62
Putting on hold and retrieving alternately or simultaneously . . . . . . . . . . . . . . . . . . . . . . . . . 62
Connecting parties . . . . . . . . . . . . . . . . . . . . . . . . . . . . . . . . . . . . . . . . . . . . . . . . . . . . . . . . . 63
Calling back a missed call. . . . . . . . . . . . . . . . . . . . . . . . . . . . . . . . . . . . . . . . . . . . . . . . . . . . . 63
Call forwarding. . . . . . . . . . . . . . . . . . . . . . . . . . . . . . . . . . . . . 64
Standard call forwarding . . . . . . . . . . . . . . . . . . . . . . . . . . . . . . . . . . . . . . . . . . . . . . . . . . . . . . 64
Using call forwarding . . . . . . . . . . . . . . . . . . . . . . . . . . . . . . . . . . . . . . . . . . . . . . . . . . . . . . . 64
Activating or deactivating immediate call forwarding . . . . . . . . . . . . . . . . . . . . . . . . . . . . . . . 65
Saving destination phone numbers for call forwarding . . . . . . . . . . . . . . . . . . . . . . . . . . . . . 65
Copying and pasting destination phone numbers . . . . . . . . . . . . . . . . . . . . . . . . . . . . . . . . . 66
Activating/deactivating call forwarding . . . . . . . . . . . . . . . . . . . . . . . . . . . . . . . . . . . . . . . . . . 68
Defining the ring duration before call forwarding on no reply. . . . . . . . . . . . . . . . . . . . . . . . . 69
Call forwarding chain. . . . . . . . . . . . . . . . . . . . . . . . . . . . . . . . . . . . . . . . . . . . . . . . . . . . . . . . . 69
Page 7

Contents 7
Programmable keys. . . . . . . . . . . . . . . . . . . . . . . . . . . . . . . . . 70
List of available functions . . . . . . . . . . . . . . . . . . . . . . . . . . . . . . . . . . . . . . . . . . . . . . . . . . . . . . 70
Programming a key . . . . . . . . . . . . . . . . . . . . . . . . . . . . . . . . . . . . . . . . . . . . . . . . . . . . . . . . . . . 71
Initiating programming . . . . . . . . . . . . . . . . . . . . . . . . . . . . . . . . . . . . . . . . . . . . . . . . . . . . . . 71
Beginning programming. . . . . . . . . . . . . . . . . . . . . . . . . . . . . . . . . . . . . . . . . . . . . . . . . . . . . 72
Programming enhanced functions . . . . . . . . . . . . . . . . . . . . . . . . . . . . . . . . . . . . . . . . . . . . . 72
Using keys. . . . . . . . . . . . . . . . . . . . . . . . . . . . . . . . . . . . . . . . . . . . . . . . . . . . . . . . . . . . . . . . . . 74
Example 1: Calling saved number . . . . . . . . . . . . . . . . . . . . . . . . . . . . . . . . . . . . . . . . . . . . . 74
Example 2: Activating/deactivating Call waiting. . . . . . . . . . . . . . . . . . . . . . . . . . . . . . . . . . . 74
Example 3: Holding and retrieving . . . . . . . . . . . . . . . . . . . . . . . . . . . . . . . . . . . . . . . . . . . . . 74
Example 3: Immed ring . . . . . . . . . . . . . . . . . . . . . . . . . . . . . . . . . . . . . . . . . . . . . . . . . . . . .74
Resetting keys. . . . . . . . . . . . . . . . . . . . . . . . . . . . . . . . . . . . . . . . . . . . . . . . . . . . . . . . . . . . . . . 75
Enhanced phone functions . . . . . . . . . . . . . . . . . . . . . . . . . . . 76
Incoming calls . . . . . . . . . . . . . . . . . . . . . . . . . . . . . . . . . . . . . . . . . . . . . . . . . . . . . . . . . . . . . . 76
Rejecting a call. . . . . . . . . . . . . . . . . . . . . . . . . . . . . . . . . . . . . . . . . . . . . . . . . . . . . . . . . . . . 76
Deflecting a call . . . . . . . . . . . . . . . . . . . . . . . . . . . . . . . . . . . . . . . . . . . . . . . . . . . . . . . . . . . 76
Configuring call forwarding . . . . . . . . . . . . . . . . . . . . . . . . . . . . . . . . . . . . . . . . . . . . . . . . . .78
Call waiting (second call) . . . . . . . . . . . . . . . . . . . . . . . . . . . . . . . . . . . . . . . . . . . . . . . . . . . 79
Transferring a call . . . . . . . . . . . . . . . . . . . . . . . . . . . . . . . . . . . . . . . . . . . . . . . . . . . . . . . . . 83
CTI calls . . . . . . . . . . . . . . . . . . . . . . . . . . . . . . . . . . . . . . . . . . . . . . . . . . . . . . . . . . . . . . . . . 85
Making calls . . . . . . . . . . . . . . . . . . . . . . . . . . . . . . . . . . . . . . . . . . . . . . . . . . . . . . . . . . . . . . . . 87
Dialing with the selected dialing key . . . . . . . . . . . . . . . . . . . . . . . . . . . . . . . . . . . . . . . . . . . 87
Dialing from conversations. . . . . . . . . . . . . . . . . . . . . . . . . . . . . . . . . . . . . . . . . . . . . . . . . . .87
Using autodial delay. . . . . . . . . . . . . . . . . . . . . . . . . . . . . . . . . . . . . . . . . . . . . . . . . . . . . . . . 88
Immediate dialing. . . . . . . . . . . . . . . . . . . . . . . . . . . . . . . . . . . . . . . . . . . . . . . . . . . . . . . . . . 90
Dialing using the hot or warm line function . . . . . . . . . . . . . . . . . . . . . . . . . . . . . . . . . . . . . . 90
Callback . . . . . . . . . . . . . . . . . . . . . . . . . . . . . . . . . . . . . . . . . . . . . . . . . . . . . . . . . . . . . . . . . . . 91
Requesting callback. . . . . . . . . . . . . . . . . . . . . . . . . . . . . . . . . . . . . . . . . . . . . . . . . . . . . . . . 91
Responding to a callback. . . . . . . . . . . . . . . . . . . . . . . . . . . . . . . . . . . . . . . . . . . . . . . . . . . .91
Permitting a callback . . . . . . . . . . . . . . . . . . . . . . . . . . . . . . . . . . . . . . . . . . . . . . . . . . . . . . . 92
Setting up conversations . . . . . . . . . . . . . . . . . . . . . . . . . . . . . . . . . . . . . . . . . . . . . . . . . . . . 93
Conference . . . . . . . . . . . . . . . . . . . . . . . . . . . . . . . . . . . . . . . . . . . . . . . . . . . . . . . . . . . . . . . . . 95
Local conference . . . . . . . . . . . . . . . . . . . . . . . . . . . . . . . . . . . . . . . . . . . . . . . . . . . . . . . . . . 95
Page 8

8 Contents
MultiLine. . . . . . . . . . . . . . . . . . . . . . . . . . . . . . . . . . . . . . . . . . 98
Line/trunk keys . . . . . . . . . . . . . . . . . . . . . . . . . . . . . . . . . . . . . . . . . . . . . . . . . . . . . . . . . . . . . 98
Primary line . . . . . . . . . . . . . . . . . . . . . . . . . . . . . . . . . . . . . . . . . . . . . . . . . . . . . . . . . . . . . . 98
Secondary line . . . . . . . . . . . . . . . . . . . . . . . . . . . . . . . . . . . . . . . . . . . . . . . . . . . . . . . . . . . . 99
Phantom line . . . . . . . . . . . . . . . . . . . . . . . . . . . . . . . . . . . . . . . . . . . . . . . . . . . . . . . . . . . . . 99
Line utilization . . . . . . . . . . . . . . . . . . . . . . . . . . . . . . . . . . . . . . . . . . . . . . . . . . . . . . . . . . . . 99
LED displays . . . . . . . . . . . . . . . . . . . . . . . . . . . . . . . . . . . . . . . . . . . . . . . . . . . . . . . . . . . . . 99
Incoming calls . . . . . . . . . . . . . . . . . . . . . . . . . . . . . . . . . . . . . . . . . . . . . . . . . . . . . . . . . . . . . . 100
Answering calls for the primary line . . . . . . . . . . . . . . . . . . . . . . . . . . . . . . . . . . . . . . . . . . . 100
Answering calls for a secondary line . . . . . . . . . . . . . . . . . . . . . . . . . . . . . . . . . . . . . . . . . . 100
Making calls . . . . . . . . . . . . . . . . . . . . . . . . . . . . . . . . . . . . . . . . . . . . . . . . . . . . . . . . . . . . . . . 101
Manual line seizure . . . . . . . . . . . . . . . . . . . . . . . . . . . . . . . . . . . . . . . . . . . . . . . . . . . . . . . 101
Automatic line seizure . . . . . . . . . . . . . . . . . . . . . . . . . . . . . . . . . . . . . . . . . . . . . . . . . . . . . 102
Dialing the last dialed number . . . . . . . . . . . . . . . . . . . . . . . . . . . . . . . . . . . . . . . . . . . . . . . 102
Forwarding calls for the primary line . . . . . . . . . . . . . . . . . . . . . . . . . . . . . . . . . . . . . . . . . . 102
During calls . . . . . . . . . . . . . . . . . . . . . . . . . . . . . . . . . . . . . . . . . . . . . . . . . . . . . . . . . . . . . . . . 103
Making and receiving calls on a single line . . . . . . . . . . . . . . . . . . . . . . . . . . . . . . . . . . . . . 103
Making and receiving calls with multiple lines . . . . . . . . . . . . . . . . . . . . . . . . . . . . . . . . . . . 103
Lines with hot or warm line function. . . . . . . . . . . . . . . . . . . . . . . . . . . . . . . . . . . . . . . . . . . 104
Direct station selection keys . . . . . . . . . . . . . . . . . . . . . . . . . . . . . . . . . . . . . . . . . . . . . . . . . . . 105
Calling a subscriber directly . . . . . . . . . . . . . . . . . . . . . . . . . . . . . . . . . . . . . . . . . . . . . . . . . 105
Call pickup . . . . . . . . . . . . . . . . . . . . . . . . . . . . . . . . . . . . . . . . . . . . . . . . . . . . . . . . . . . . . . 106
Deflecting a call to a DSS subscriber. . . . . . . . . . . . . . . . . . . . . . . . . . . . . . . . . . . . . . . . . . 107
LED display on DSS keys . . . . . . . . . . . . . . . . . . . . . . . . . . . . . . . . . . . . . . . . . . . . . . . . . . 107
Making calls in an executive/secretary team. . . . . . . . . . . . . . . . . . . . . . . . . . . . . . . . . . . . . . . 108
Sample scenario . . . . . . . . . . . . . . . . . . . . . . . . . . . . . . . . . . . . . . . . . . . . . . . . . . . . . . . . . 108
Accepting a call . . . . . . . . . . . . . . . . . . . . . . . . . . . . . . . . . . . . . . . . . . . . . . . . . . . . . . . . . . 109
Connecting a call . . . . . . . . . . . . . . . . . . . . . . . . . . . . . . . . . . . . . . . . . . . . . . . . . . . . . . . . . 110
Settings for MultiLine (keyset). . . . . . . . . . . . . . . . . . . . . . . . . . . . . . . . . . . . . . . . . . . . . . . . . 111
Setting the time for a delayed ringer . . . . . . . . . . . . . . . . . . . . . . . . . . . . . . . . . . . . . . . . . . 112
Entering a number for the hot and warm line function . . . . . . . . . . . . . . . . . . . . . . . . . . . . . 113
Rollover for a line . . . . . . . . . . . . . . . . . . . . . . . . . . . . . . . . . . . . . . . . . . . . . . . . . . . . . . . . . . . 114
Corporate directory . . . . . . . . . . . . . . . . . . . . . . . . . . . . . . . . . . . . . . . . . . . . . . . . . . . . . . . 115
Searching for contacts via conversations . . . . . . . . . . . . . . . . . . . . . . . . . . . . . . . . . . . . . . 115
Call logging . . . . . . . . . . . . . . . . . . . . . . . . . . . . . . . . . . . . . . . . . . . . . . . . . . . . . . . . . . . . . 116
Privacy/security . . . . . . . . . . . . . . . . . . . . . . . . . . . . . . . . . . . 118
Deactivating the ringer or setting to beep . . . . . . . . . . . . . . . . . . . . . . . . . . . . . . . . . . . . . . . . 118
Deactivating the ringer temporarily for incoming calls and reactivating it . . . . . . . . . . . . . . 119
Do not disturb . . . . . . . . . . . . . . . . . . . . . . . . . . . . . . . . . . . . . . . . . . . . . . . . . . . . . . . . . . . . . 119
Enabling do not disturb via a key . . . . . . . . . . . . . . . . . . . . . . . . . . . . . . . . . . . . . . . . . . . . . 119
Enabling do not disturb via the Presence menu . . . . . . . . . . . . . . . . . . . . . . . . . . . . . . . . . 120
Allowing "Do not disturb" . . . . . . . . . . . . . . . . . . . . . . . . . . . . . . . . . . . . . . . . . . . . . . . . . . . 120
Security . . . . . . . . . . . . . . . . . . . . . . . . . . . . . . . . . . . . . . . . . . . . . . . . . . . . . . . . . . . . . . . . . . . 121
User password . . . . . . . . . . . . . . . . . . . . . . . . . . . . . . . . . . . . . . . . . . . . . . . . . . . . . . . . . . . 121
Locking the phone . . . . . . . . . . . . . . . . . . . . . . . . . . . . . . . . . . . . . . . . . . . . . . . . . . . . . . . . 124
Page 9

Contents 9
Individual phone configuration . . . . . . . . . . . . . . . . . . . . . . . 126
Display . . . . . . . . . . . . . . . . . . . . . . . . . . . . . . . . . . . . . . . . . . . . . . . . . . . . . . . . . . . . . . . . . . 126
Adjusting the display to a comfortable reading angle . . . . . . . . . . . . . . . . . . . . . . . . . . . . . 126
Adjusting the display brightness . . . . . . . . . . . . . . . . . . . . . . . . . . . . . . . . . . . . . . . . . . . . . 126
Adjusting the display contrast . . . . . . . . . . . . . . . . . . . . . . . . . . . . . . . . . . . . . . . . . . . . . . . 127
Screensaver . . . . . . . . . . . . . . . . . . . . . . . . . . . . . . . . . . . . . . . . . . . . . . . . . . . . . . . . . . . . . . . 128
Activating the screensaver. . . . . . . . . . . . . . . . . . . . . . . . . . . . . . . . . . . . . . . . . . . . . . . . . . 128
Automatic screensaver activation . . . . . . . . . . . . . . . . . . . . . . . . . . . . . . . . . . . . . . . . . . . . 129
Energy saving mode . . . . . . . . . . . . . . . . . . . . . . . . . . . . . . . . . . . . . . . . . . . . . . . . . . . . . . 130
Date and time . . . . . . . . . . . . . . . . . . . . . . . . . . . . . . . . . . . . . . . . . . . . . . . . . . . . . . . . . . . . . . 131
Reading the time . . . . . . . . . . . . . . . . . . . . . . . . . . . . . . . . . . . . . . . . . . . . . . . . . . . . . . . . . 131
Reading the date . . . . . . . . . . . . . . . . . . . . . . . . . . . . . . . . . . . . . . . . . . . . . . . . . . . . . . . . . 131
Time display format . . . . . . . . . . . . . . . . . . . . . . . . . . . . . . . . . . . . . . . . . . . . . . . . . . . . . . . 132
Date display format . . . . . . . . . . . . . . . . . . . . . . . . . . . . . . . . . . . . . . . . . . . . . . . . . . . . . . . 133
Setting daylight saving time . . . . . . . . . . . . . . . . . . . . . . . . . . . . . . . . . . . . . . . . . . . . . . . . . 134
Automatic daylight saving time . . . . . . . . . . . . . . . . . . . . . . . . . . . . . . . . . . . . . . . . . . . . . . 135
Audio. . . . . . . . . . . . . . . . . . . . . . . . . . . . . . . . . . . . . . . . . . . . . . . . . . . . . . . . . . . . . . . . . . . . . 136
Volumes . . . . . . . . . . . . . . . . . . . . . . . . . . . . . . . . . . . . . . . . . . . . . . . . . . . . . . . . . . . . . . . . 136
Settings . . . . . . . . . . . . . . . . . . . . . . . . . . . . . . . . . . . . . . . . . . . . . . . . . . . . . . . . . . . . . . . . 137
Special ringers . . . . . . . . . . . . . . . . . . . . . . . . . . . . . . . . . . . . . . . . . . . . . . . . . . . . . . . . . . . 143
Activating/deactivating the ringer . . . . . . . . . . . . . . . . . . . . . . . . . . . . . . . . . . . . . . . . . . . . . 144
Adjusting the volume during a call . . . . . . . . . . . . . . . . . . . . . . . . . . . . . . . . . . . . . . . . . . . . 144
Tone and indication with an unsecured voice connection . . . . . . . . . . . . . . . . . . . . . . . . . . 145
Key click . . . . . . . . . . . . . . . . . . . . . . . . . . . . . . . . . . . . . . . . . . . . . . . . . . . . . . . . . . . . . . . . . . 146
Setting the language and country . . . . . . . . . . . . . . . . . . . . . . . . . . . . . . . . . . . . . . . . . . . . . . . 147
Display language . . . . . . . . . . . . . . . . . . . . . . . . . . . . . . . . . . . . . . . . . . . . . . . . . . . . . . . . . 147
Country-specific setting . . . . . . . . . . . . . . . . . . . . . . . . . . . . . . . . . . . . . . . . . . . . . . . . . . . . 149
Network information . . . . . . . . . . . . . . . . . . . . . . . . . . . . . . . . . . . . . . . . . . . . . . . . . . . . . . . . . 150
Resetting user data . . . . . . . . . . . . . . . . . . . . . . . . . . . . . . . . . . . . . . . . . . . . . . . . . . . . . . . . . 152
Initiating the reset. . . . . . . . . . . . . . . . . . . . . . . . . . . . . . . . . . . . . . . . . . . . . . . . . . . . . . . . . 152
Call recording. . . . . . . . . . . . . . . . . . . . . . . . . . . . . . . . . . . . . 153
Recording modes . . . . . . . . . . . . . . . . . . . . . . . . . . . . . . . . . . . . . . . . . . . . . . . . . . . . . . . . . . 153
Explanations of recording . . . . . . . . . . . . . . . . . . . . . . . . . . . . . . . . . . . . . . . . . . . . . . . . . . . . . 154
Recordable calls . . . . . . . . . . . . . . . . . . . . . . . . . . . . . . . . . . . . . . . . . . . . . . . . . . . . . . . . . 154
Non-recordable calls . . . . . . . . . . . . . . . . . . . . . . . . . . . . . . . . . . . . . . . . . . . . . . . . . . . . . . 154
Enhanced functions . . . . . . . . . . . . . . . . . . . . . . . . . . . . . . . . . . . . . . . . . . . . . . . . . . . . . . . 154
The following features are not supported. . . . . . . . . . . . . . . . . . . . . . . . . . . . . . . . . . . . . . . 154
Recording tips . . . . . . . . . . . . . . . . . . . . . . . . . . . . . . . . . . . . . . . . . . . . . . . . . . . . . . . . . . . 154
Recording calls . . . . . . . . . . . . . . . . . . . . . . . . . . . . . . . . . . . . . . . . . . . . . . . . . . . . . . . . . . . . . 155
Automatic call recording. . . . . . . . . . . . . . . . . . . . . . . . . . . . . . . . . . . . . . . . . . . . . . . . . . . . 155
Manual call recording. . . . . . . . . . . . . . . . . . . . . . . . . . . . . . . . . . . . . . . . . . . . . . . . . . . . . . 155
Call recording with AutoStart . . . . . . . . . . . . . . . . . . . . . . . . . . . . . . . . . . . . . . . . . . . . . . . . 156
Controlling call recording . . . . . . . . . . . . . . . . . . . . . . . . . . . . . . . . . . . . . . . . . . . . . . . . . . . 156
Consultation during call recording . . . . . . . . . . . . . . . . . . . . . . . . . . . . . . . . . . . . . . . . . . . . 157
Second call during call recording . . . . . . . . . . . . . . . . . . . . . . . . . . . . . . . . . . . . . . . . . . . . . 157
Call recording while alternating . . . . . . . . . . . . . . . . . . . . . . . . . . . . . . . . . . . . . . . . . . . . . . 158
Your call is paused and reconnected during the recording.. . . . . . . . . . . . . . . . . . . . . . . . . 158
Setting up a conference during recording . . . . . . . . . . . . . . . . . . . . . . . . . . . . . . . . . . . . . . 158
Adding conference participants during the recording. . . . . . . . . . . . . . . . . . . . . . . . . . . . . . 159
Your call is included in a conference during the recording. . . . . . . . . . . . . . . . . . . . . . . . . . 159
Page 10

10 Contents
Diagnostic data . . . . . . . . . . . . . . . . . . . . . . . . . . . . . . . . . . . 160
Web interface (WBM). . . . . . . . . . . . . . . . . . . . . . . . . . . . . . . 162
Launching the web interface . . . . . . . . . . . . . . . . . . . . . . . . . . . . . . . . . . . . . . . . . . . . . . . . . . . 162
Administrator settings . . . . . . . . . . . . . . . . . . . . . . . . . . . . . . . . . . . . . . . . . . . . . . . . . . . . . 163
User Pages . . . . . . . . . . . . . . . . . . . . . . . . . . . . . . . . . . . . . . . . . . . . . . . . . . . . . . . . . . . . . 163
User menu . . . . . . . . . . . . . . . . . . . . . . . . . . . . . . . . . . . . . . . . . . . . . . . . . . . . . . . . . . . . . . 164
Fixing problems . . . . . . . . . . . . . . . . . . . . . . . . . . . . . . . . . . . 167
Caring for your telephone . . . . . . . . . . . . . . . . . . . . . . . . . . . . . . . . . . . . . . . . . . . . . . . . . . . . 167
Troubleshooting . . . . . . . . . . . . . . . . . . . . . . . . . . . . . . . . . . . . . . . . . . . . . . . . . . . . . . . . . . . . 167
Labeling keys . . . . . . . . . . . . . . . . . . . . . . . . . . . . . . . . . . . . . . . . . . . . . . . . . . . . . . . . . . . . . . 168
Index . . . . . . . . . . . . . . . . . . . . . . . . . . . . . . . . . . . . . . . . . . . 169
Page 11

11
General information
About this manual
This document contains general descriptions of the technical options, which may
not always be available in individual cases. The required features must therefore
be individually defined in the terms of the contract.
If a particular function on your phone is not available to you as described, this
may be due to one of the following reasons:
• The function is not configured for you and your telephone. Please contact your
system administrator.
• Your communication platform does not feature this function. Please contact
your sales partner for information on how to upgrade.
This User Guide is intended to help you familiarize yourself with the OpenScape
Desk Phone CP400 and all of its functions. It contains important information on
the safe and proper operation of the OpenScape Desk Phone CP400. These in
structions should be strictly complied with to avoid operating errors and ensure
optimum use of your multifunctional telephone in the network.
-
This User Guide should be read and followed by every person installing, operating or programming the OpenScape Desk Phone CP400.
For your own protection, please read the section dealing with safety in detail. Follow the safety instructions carefully in order to avoid endangering
yourself or other persons and to prevent damage to the unit.
These operating instructions are designed to be simple and easy to understand,
providing clear step-by-step instructions for operating the OpenScape Desk
Phone CP400.
Administrative tasks are dealt with in a separate manual. The Quick Reference
Guide contains quick and reliable explanations of frequently used functions.
Page 12

12
ñ
Answer
Reject
Deflect
Andre-Marie Ampere
3336
Incoming call
Icons used in the manual
Tips
z Refers to a setting performed via the web interface.
Indicates additional important information in relation to handling.
Indicates intervention required by the administrator.
Displays for describing operation
A dark background is not rendered for some display images in order to ensure
legibility in the User Guide.
Selected action
Original illustration on display
¹ Incoming call
Andre-Marie Ampere
3336
Answer
Step-by-step illustration in the User Guide
A dark background is not used in the step-by-step illustration in order to ensure
legibility in the User Guide.
The information area on the left is shown in a left-aligned field.
O
_
Z The selected function can alternatively be confirmed using the Z key on the
When an action is selected, it will be shown right-aligned in green. The action is
executed by selecting the Softkey.
navigator (
page 20).
Page 13
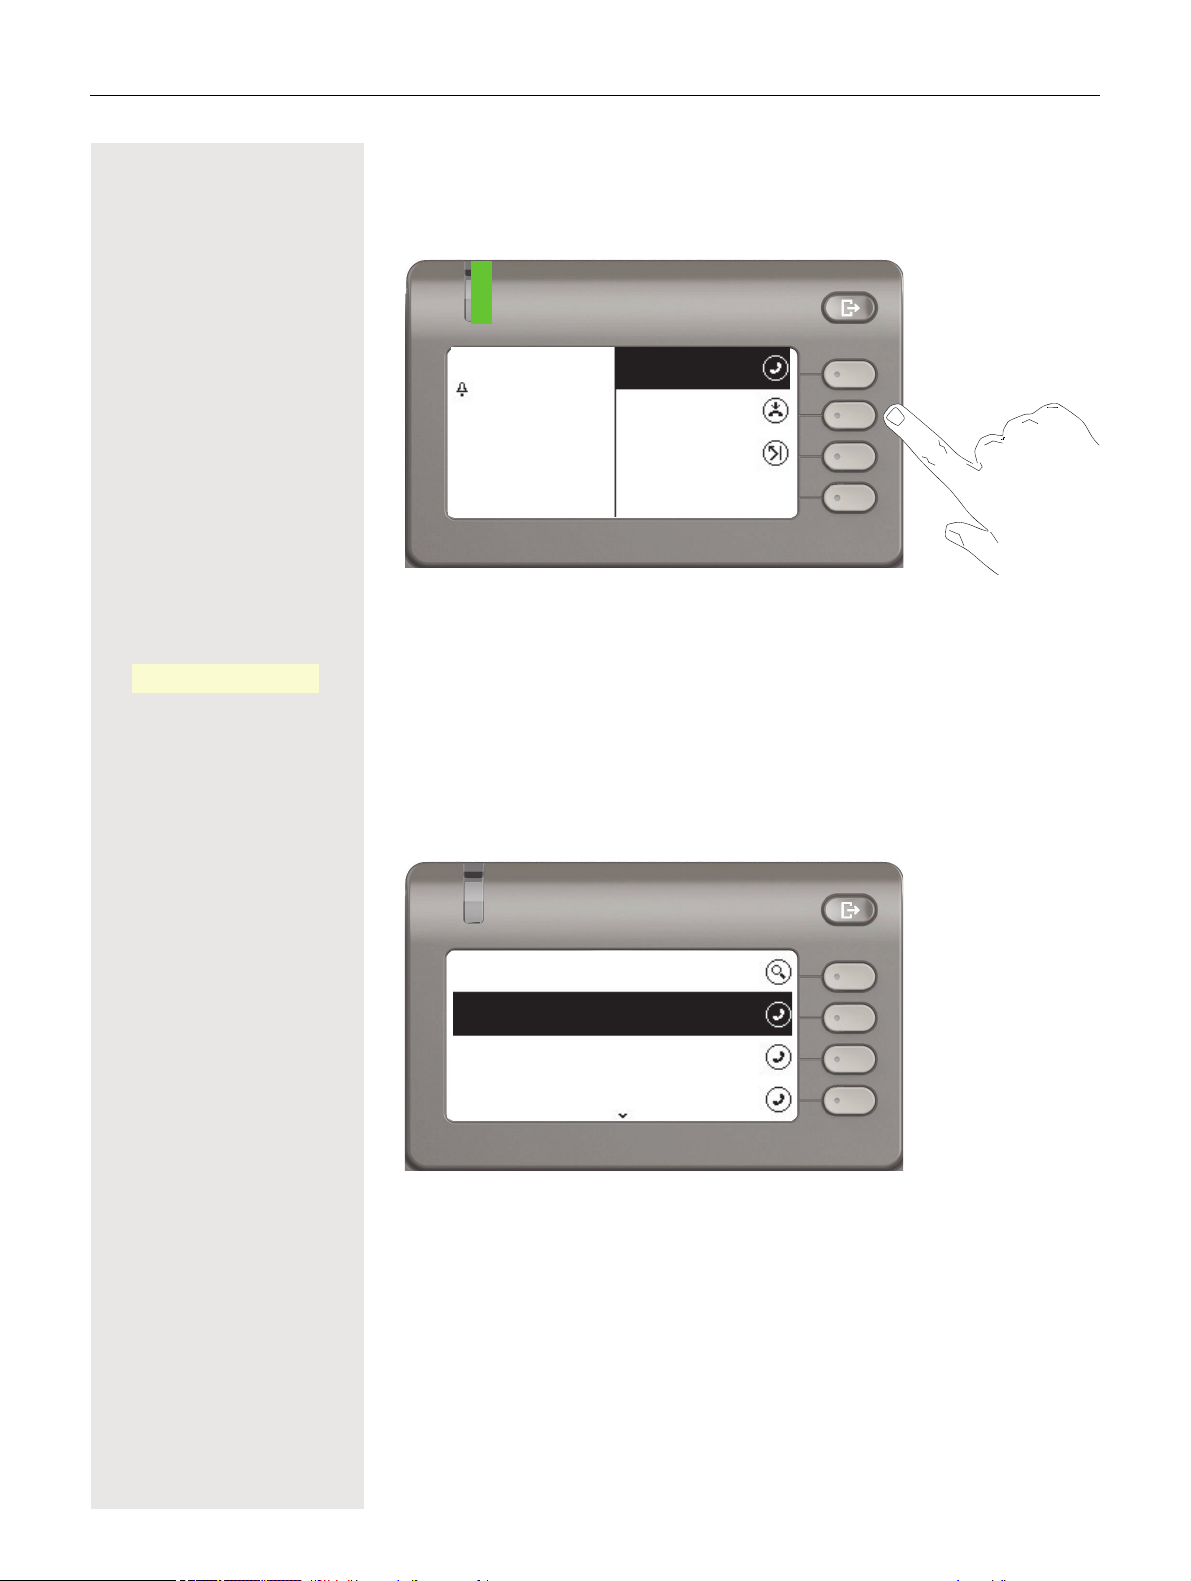
Action not selected
333
Answer
Reject
Deflect
Andre-Marie Ampere
Incoming call
Conversations
Daniel Bernoulli
b
9:44 AM
Andre-Marie Ampere
b
8:45 AM
Georg Simon Ohm
10:50 AM
-
c
Illustration on display
Step-by-step illustration in the User Guide
13
Reject
P
_
When an action is not selected, it will be shown right-aligned in a light color. The
associated Softkey is also shown. The action can be executed by pressing the
softkey without the action being selected.
Conversation display
When the phone is idle, the first entry in the conversation list is selected.
Page 14

14
Information displayed for a selected conversation
Daniel Bernoulli - 11:22
Received call {1} (1:35:50)
b
Daniel Bernoull
Andre-Marie Ampere
Received call {1}(
b
Andre-Marie Ampere
-
O
11:22
O
€ μ Make selection from the list and move entries in the list using the navigator keys.
O
_
If a conversation (contact and history at the same time) is selected in the list, it
will be highlighted in green. This description is only used if it aids understanding.
This is usually what is displayed:
Confirm the selected contact with the Softkey to establish the connection or with
the
« key to open the context menu.
Information displayed for a non-selected conversation
O
_
A conversation is displayed in a light color if it is not selected. This description is
only used if it aids understanding. This is usually what is displayed:
Call directly with the Softkey to establish the connection.
Navigation and action in lists
€ Press and hold to skip to the end of the list.
μ Press and hold to skip to the start of the list.
Call waiting
^ Go back.
« Open contacts and details. Switch to next lower level.
_ Execute the Softkey action in the list element.
Z Performs the same function as with the Softkey but only affects a selected ele-
ment.
OpenScape Desk Phone CP400 and OpenScape Key Module 400
Functions and phone numbers can be programmed on the keys for the phone
and key module.
_
The OpenScape Desk Phone CP400 or OpenScape Key Module 400 key shown
here is referred to as a Funktionstaste in the User Guide. Note the information
on
page 168 with respect to the key labeling.
Page 15

15
Service
The service department can only help you if you experience problems or
defects with the phone itself.
Should you have any questions regarding operation, your specialist retailer or network administrator will be glad to assist you. For queries regarding
connection of the telephone, please contact your network provider.
If you experience problems or defects with the phone, please dial the service
number for your country.
Intended use
The OpenScape Desk Phone CP400 phone is a desktop unit designed for voice
transmission and for connection to the LAN. It can also be used as a workstation
device. Any other use is regarded as unintended.
Telephone type
The identification details (exact product designation and serial number) of your
telephone can be found on the nameplate on the underside of the base unit.
Specific details concerning your communication platform can be obtained from
your administrator.
Please have this information ready when you contact the service department regarding faults or problems with the product.
Speakerphone quality and display legibility
• To ensure good speakerphone quality, the area in front of the telephone (front
right) should be kept clear.
The optimum handsfree distance is approx. 50 cm.
• Proceed as follows to optimize display legibility:
– Turn the phone and tilt the display so that you have a frontal view of the
display while eliminating light reflexes.
Page 16
16
1
Tuesday 24 Sep 2015
Conversations
Voicemail
Settings
2
3
4
5
6
7
8
9
10
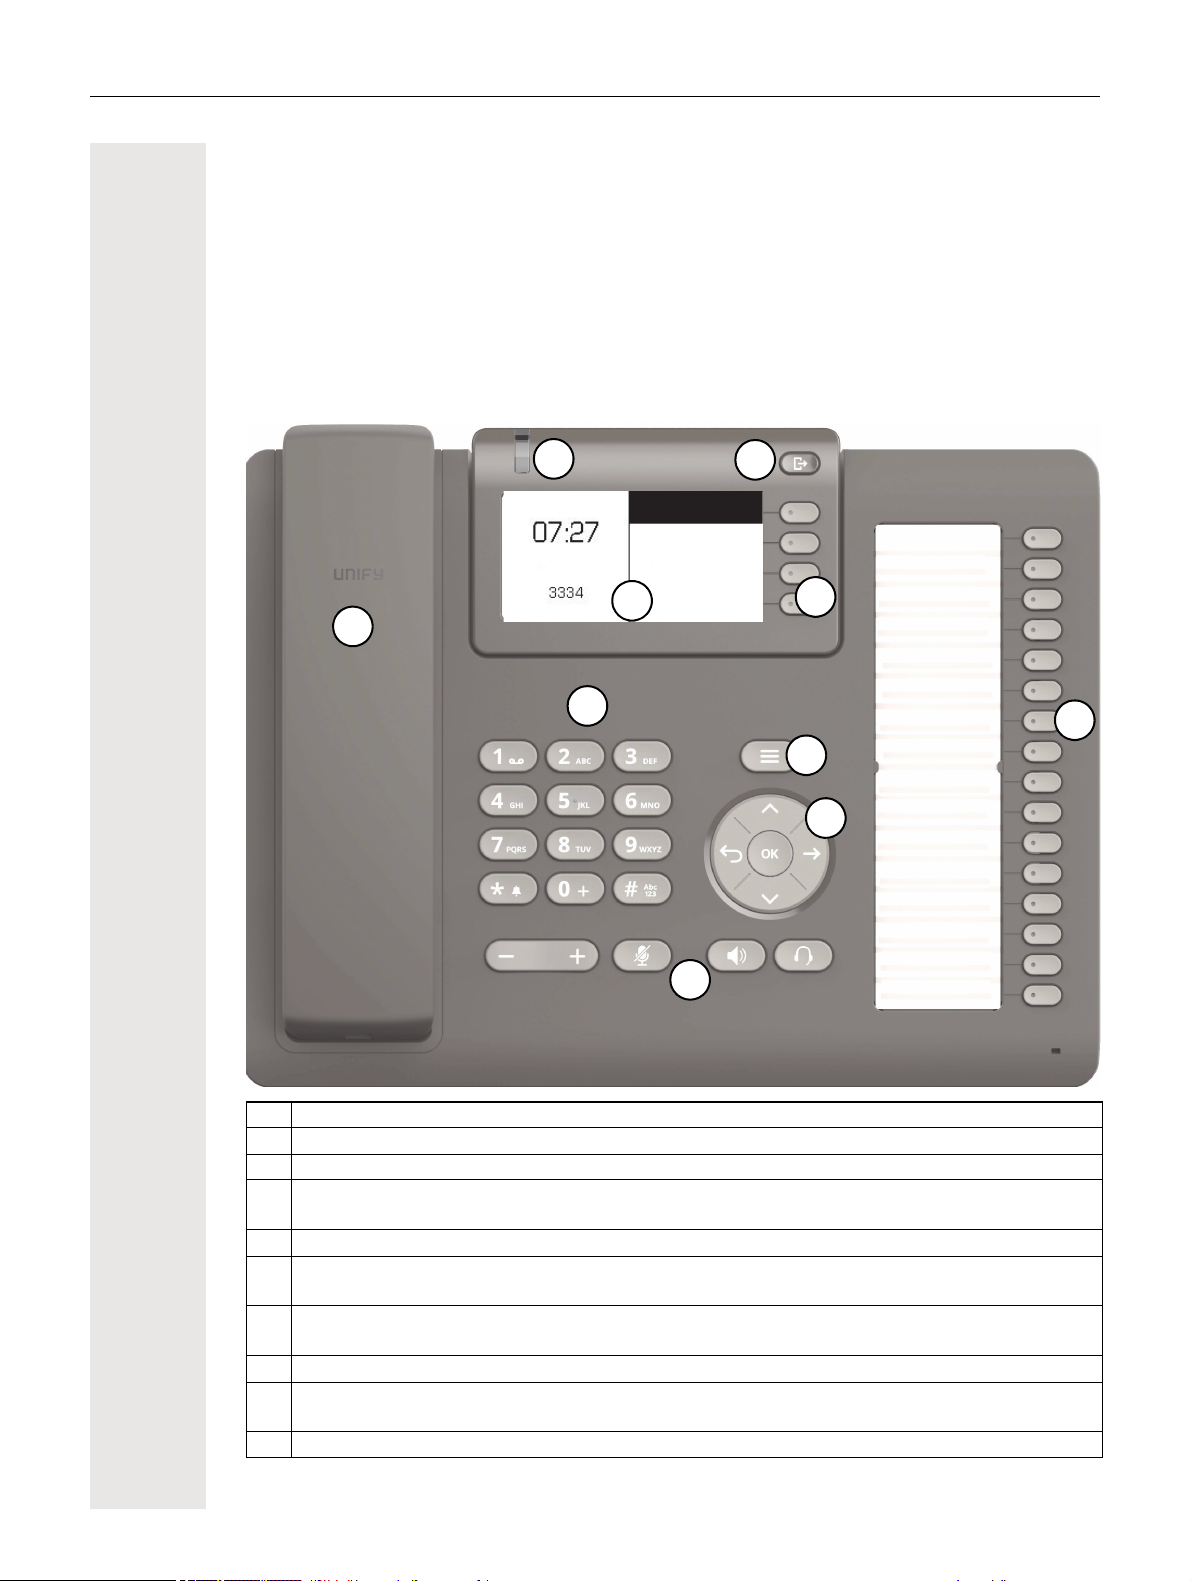
Getting to know the OpenScape Desk Phone CP400
The following sections describe the most frequently used controls and displays.
The user interface of your OpenScape Desk Phone CP400
1 You can make and receive calls as normal using the handset.
2 The graphic display permits intuitive operation of the phone page 23.
3 Use the menu key to open the main menu.
Use the navigator to navigate conveniently through the applications on your telephone
4
5 You can use the Softkeys to activate a function or open a menu page 19.
6
7
8 The dialpad can be used to enter phone numbers and write text page 21.
9
10 Programmable function keys for functions and selected dialing.
page 20.
The audio keys are provided to allow you to optimally configure the audio features on your
telephone
Incoming calls, new voice messages or missed calls are visually signaled via the Notifica-
tion LED.
Use the Out-of-Office / Call Forwarding key to open a menu, for example in order to set
up immediate call forwarding or to activate do not disturb
page 19.
page 24.
Page 17
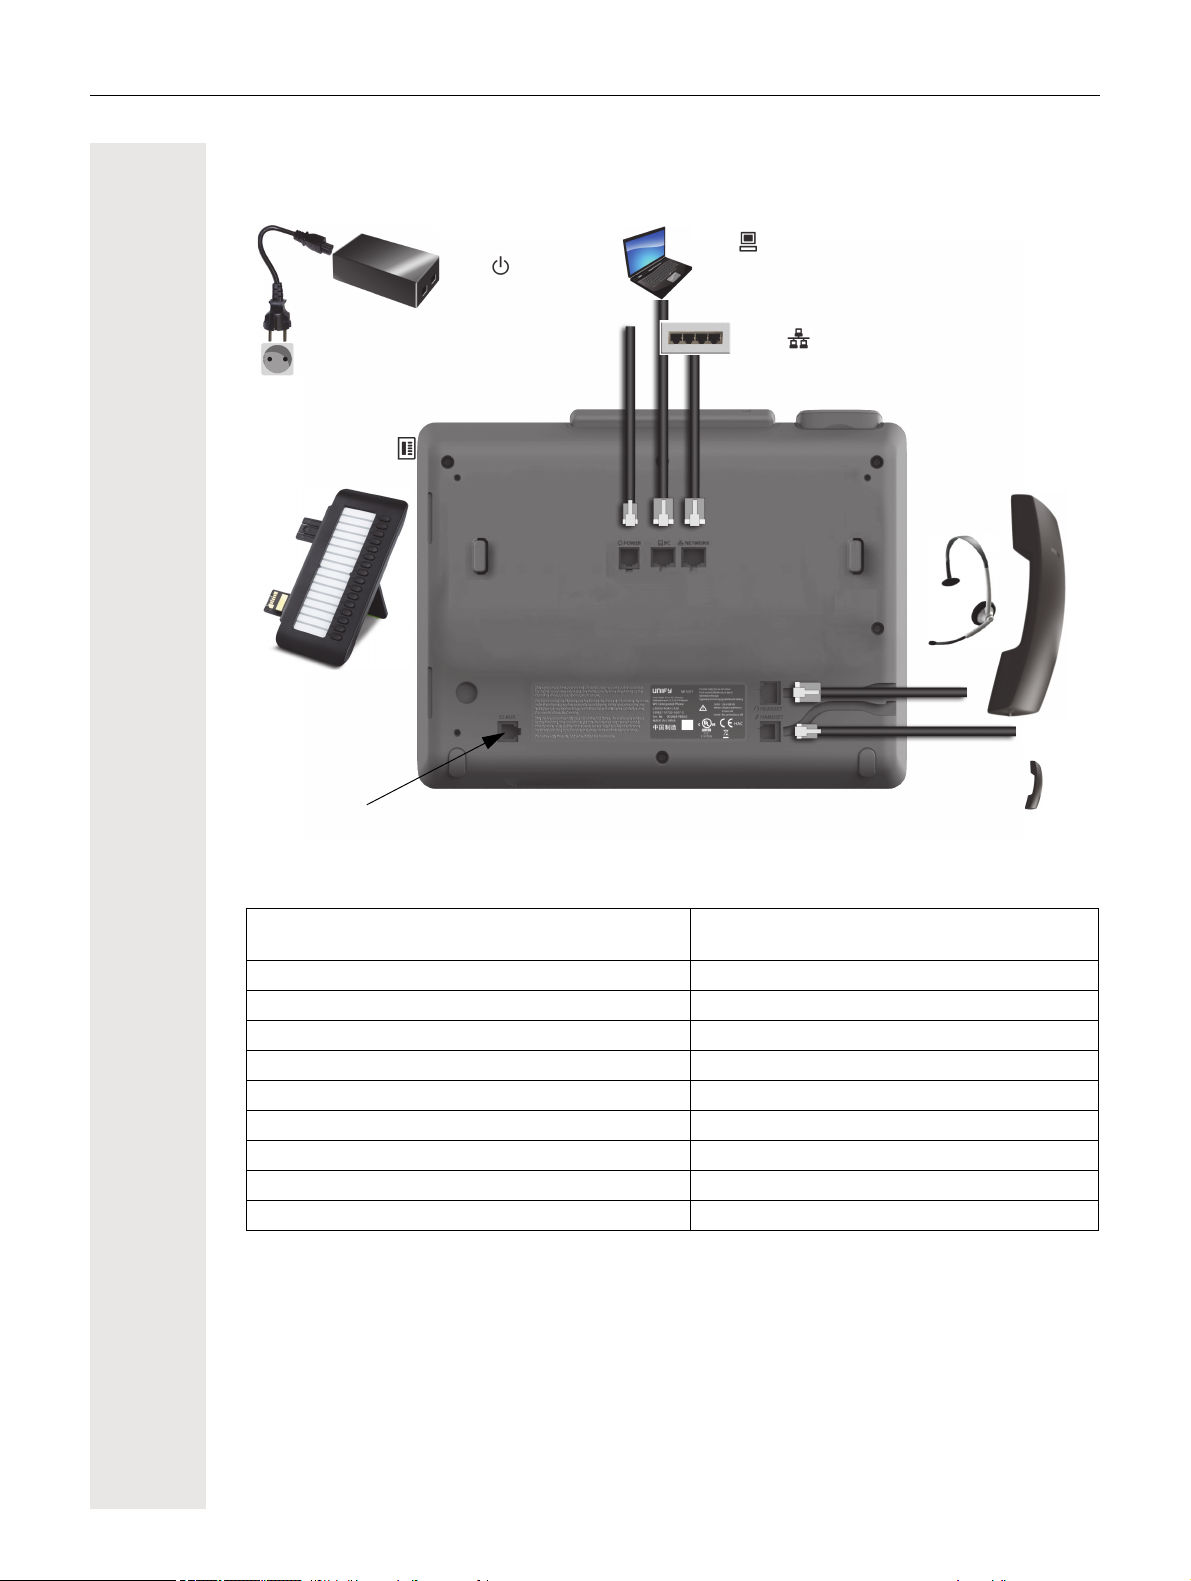
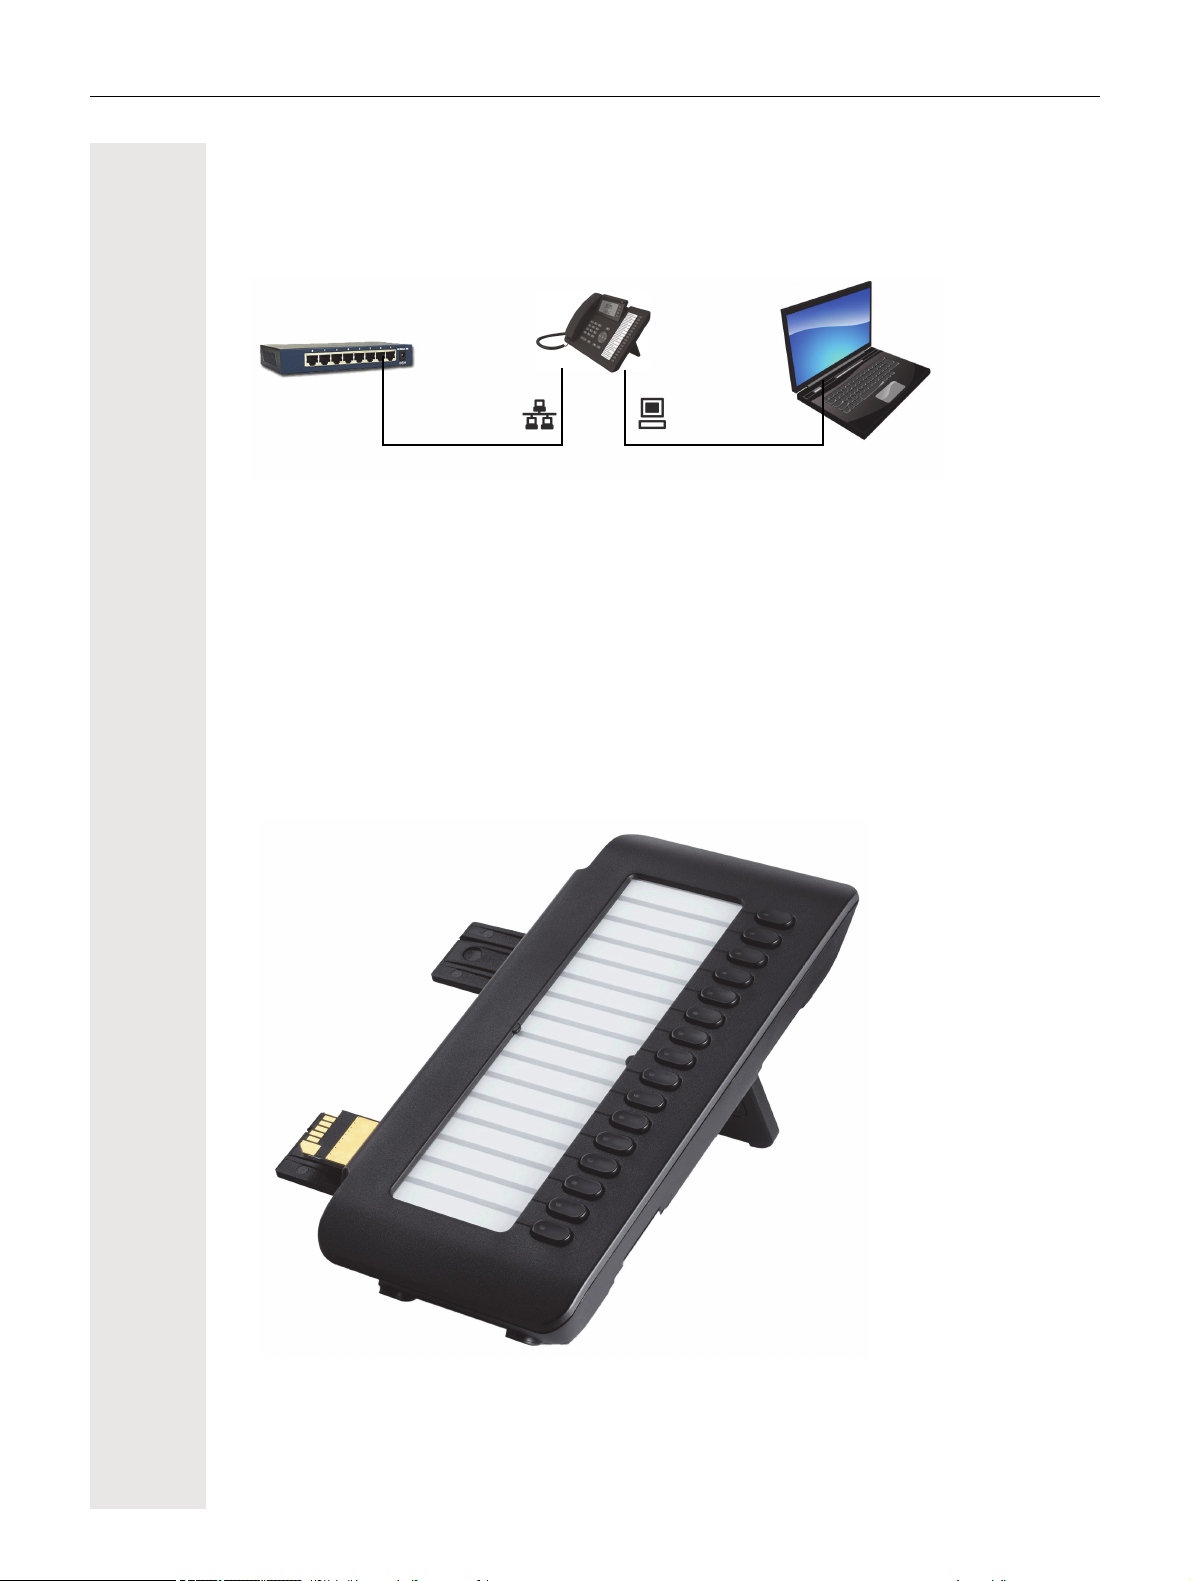
Ports on the underside of the phone
Headset
Handset
Network switch
PC
(e.g. Phone Manager)
Key module
Service interface
Power supply
unit
(if necessary)
Country-specific cable
17
Properties of your OpenScape Desk Phone CP400
Display type
Illuminated display
Full-duplex speakerphone function
Headset
Interface for key module
10/100 Mbps switch page 18
1000 Mbps switch page 18
Web-Based Management (WBM)
Notification LED (red/green/orange)
OpenScape Key Module 400 optional
Grayscales
240*120
;
;
;
;
;
;
;
;
;
Page 18
18
OpenScape Desk Phone CP400 Network switch PC
Using network ports more efficiently
The OpenScape Desk Phone CP400 has a Gigabit Ethernet switch. This means that you can also
connect a PC with a Gigabit LAN port to the LAN directly via the phone. The option for connecting
the telephone and PC must first be activated on the telephone by your administrator.
Using this connection option saves one network port for each switch used and requires shorter
network cables.
OpenScape Key Module 400
The OpenScape Key Module 400 is a key module attached to the side of the phone that provides
an additional 16 programmable function keys at two levels.
These keys can be programmed and used according to your needs page 37.
The diagram shows the OpenScape Key Module 400. You can attach up to two additional OpenScape Key Module 400s.
Page 19

Keys and controls
Softkeys
Key Function when key is pressed
19
_
Activates the function of the left display option or opens another menu. Used in the Team
menu as a line key.
Audio controls
Audio keys
Key Function when key is pressed
:/É
./Ê
;/Æ
Volume
Use the controls to adjust the properties of your phone, for example the volume.
Activate/deactivate the loudspeaker page 46.
Activate/deactivate the headset page 47.
Activate/deactivate microphone (also for speakerphone mode) page 60.
Mode keys
You can switch to the relevant application using these keys.
Key Function when key is pressed
@
\
Toggle between current screen and main menu page 23.
Switch to Presence and back page 24.
Page 20
20
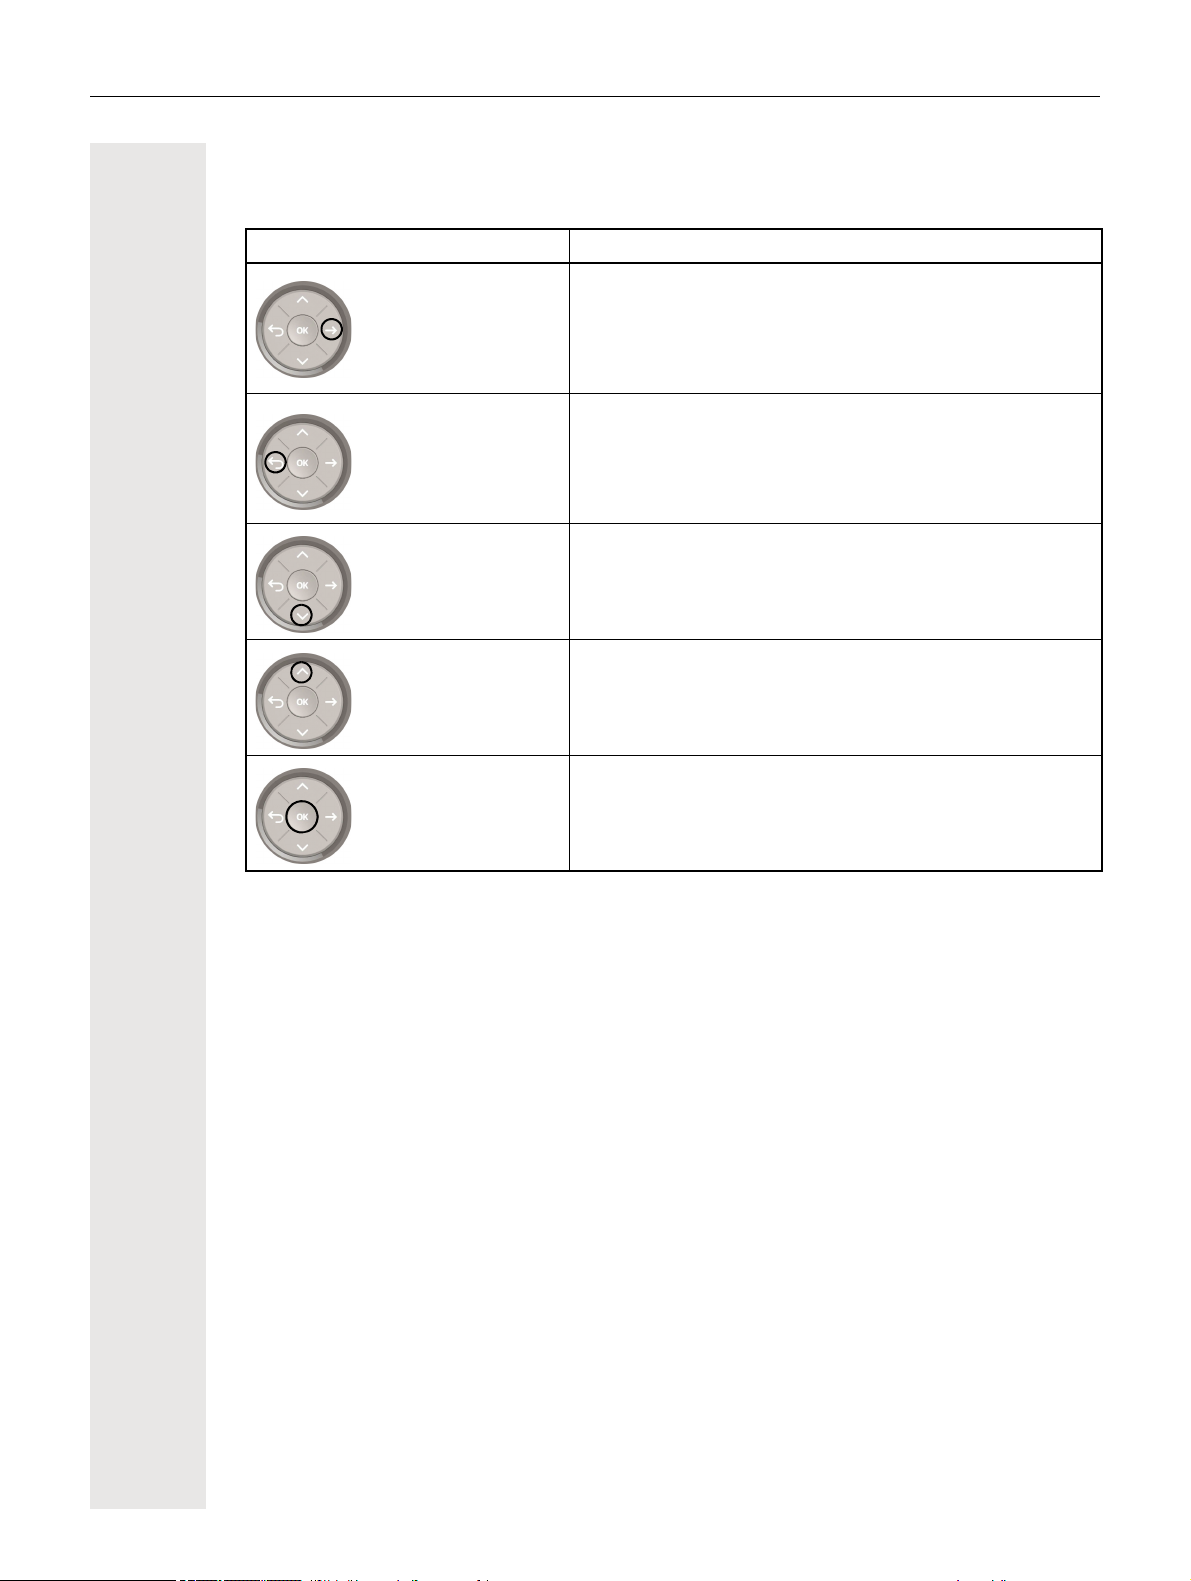
Navigator
This control allows you to navigate in lists and perform actions in the selected area.
Operation Functions when key is pressed
Press the « key.
In conversation mode:
• Open the subscriber information
In settings:
• Go down one level
Press the ^ key.
Press the € key.
Press the μ key.
Press the Z key.
In lists and menus:
• One level back
In input fields:
• Delete character to the left of the cursor
In lists and menus:
• Scroll down
• Press and hold: Skip to the end of the list/menu
In lists and menus:
• Scroll up
• Press and hold: Skip to the start of the list/menu
Execute an action for the selected entry.
Page 21
21
Softkeys
33
3334
Wednesday
Paul Baum
Wednesday
3336
31 Sep
Move cursor left
Move cursor right
Company:
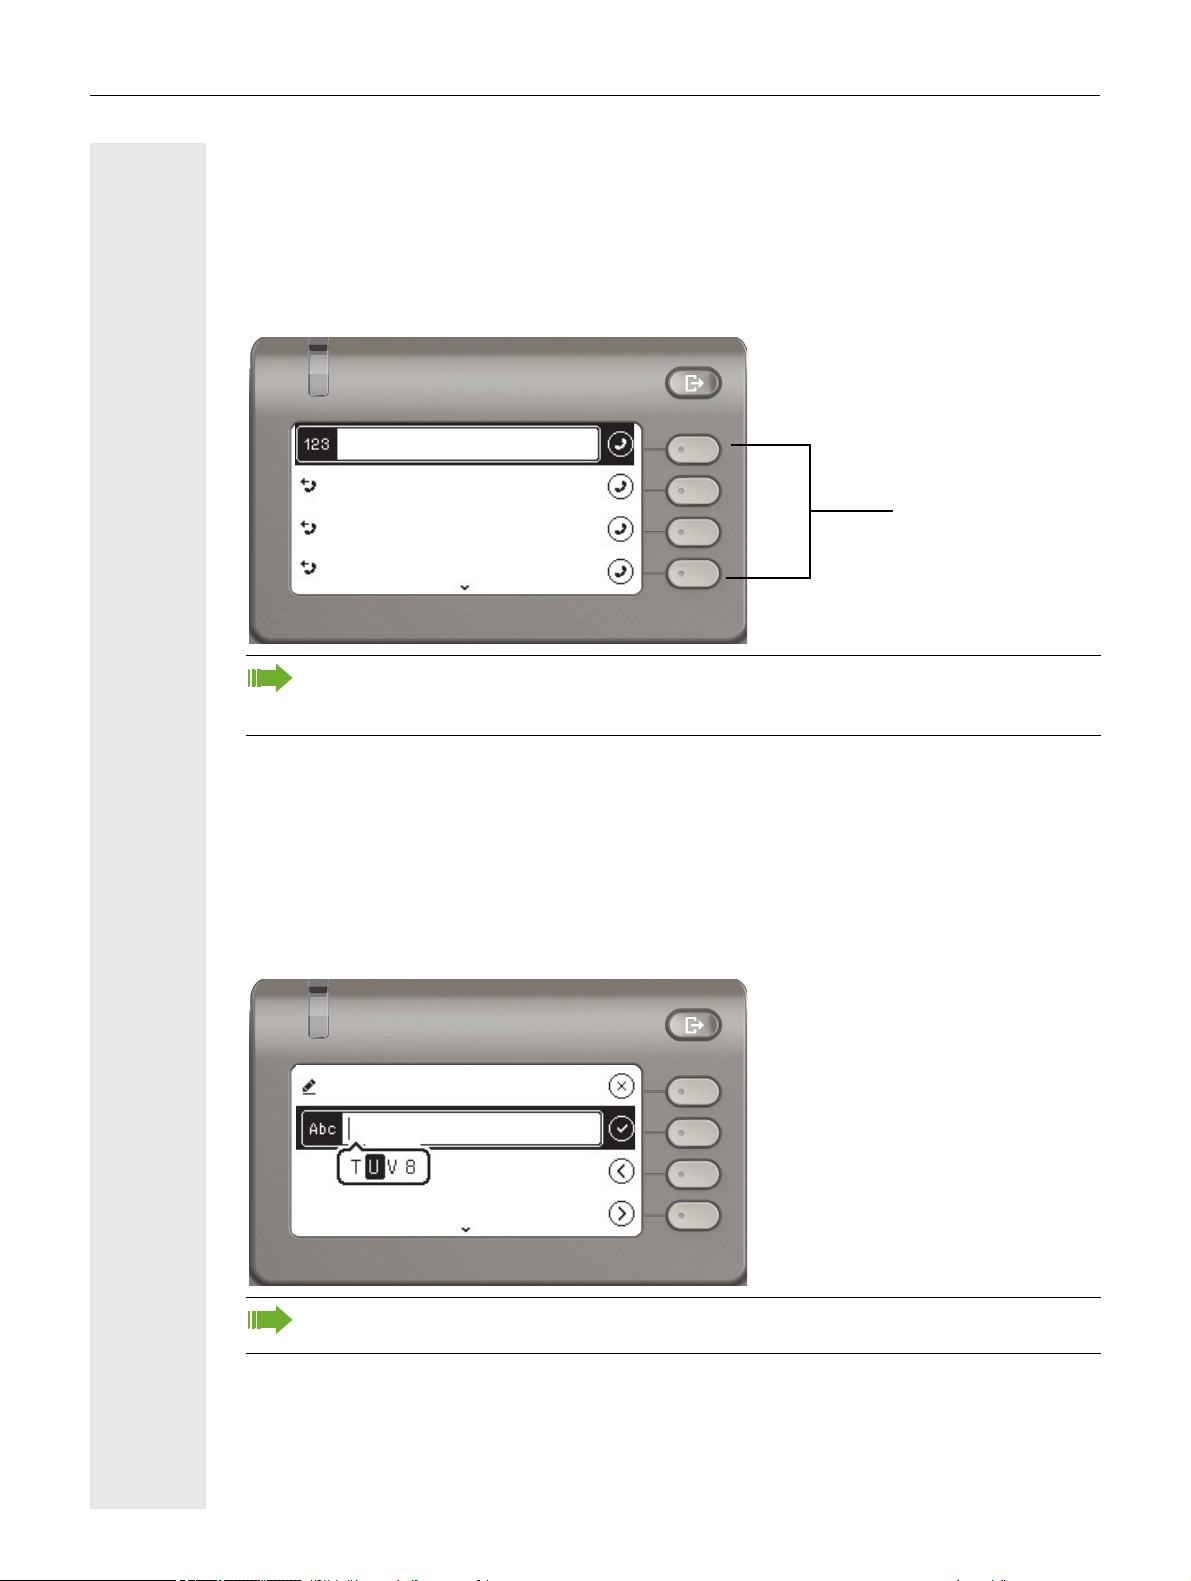
Dialpad
Numeric input
If you enter a number when the telephone is in idle mode, for example, an input field opens automatically for numeric input. Only the digits 0 to 9 as well as the * and # characters can be entered
via the keypad in "123 mode" (indicated at the left margin of the input field).
Alphabetic labeling of dial keys is also useful when entering vanity numbers (letters associated with the phone number's digits as indicated on the telephone spell a name, e.g. 0700 PATTERN = 0700 - 687837).
Text input
In cases where text input is possible, you can use the dialpad to input text, punctuation and special
characters in addition to the digits 0 to 9 and the hash and asterisk symbols. To do this, press the
numerical keys repeatedly.
Example: To enter the letter "U" in the "Company" field, press the number 8 key on the dialpad
twice. All available characters for this key are displayed during input. After a short while, the char
acter in focus is displayed in the input field.
-
To enter a digit in an alphanumeric input field, press the relevant key and hold it down. You
no longer need to scroll through the entire list of possible characters.
Page 22
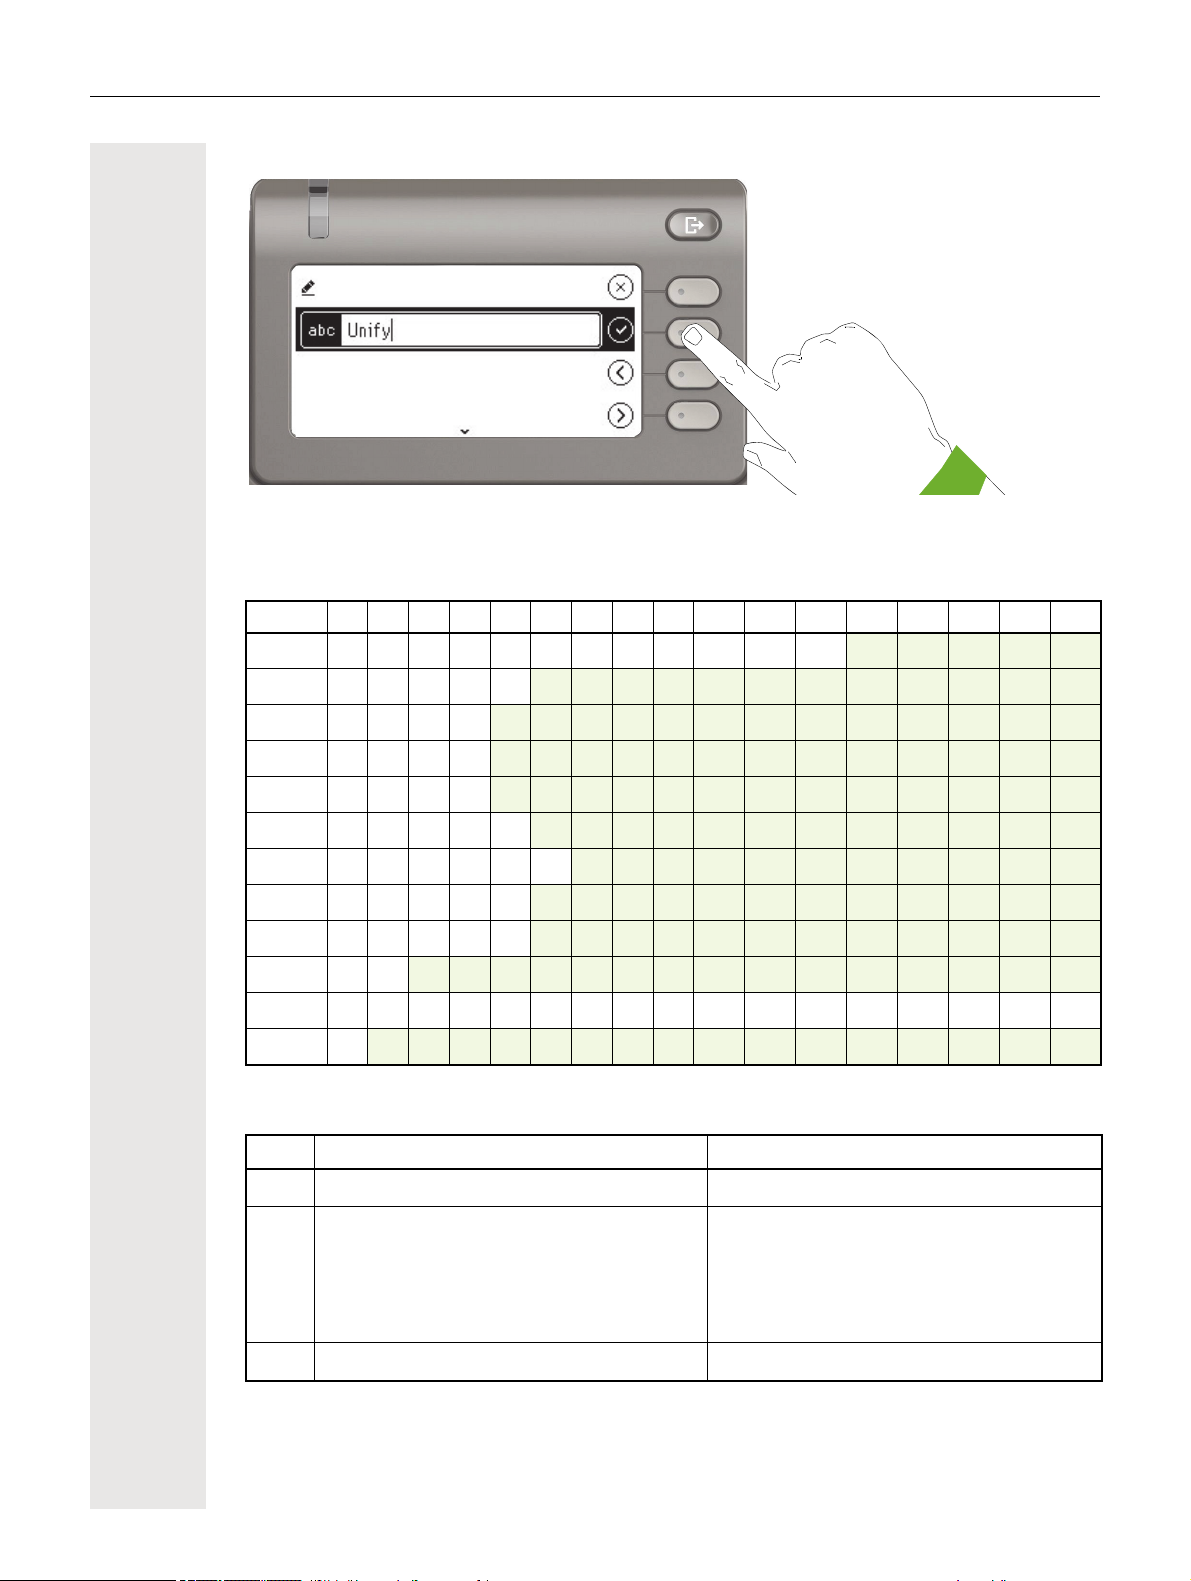
22
Move cursor left
Move cursor right
Company:
Complete your input:
Press the Softkey for Q to complete your input.
Character overview (depends on the current language setting)
Key 1x 2x 3x 4x 5x 6x 7x 8x 9x 10x 11x 12x 13x 14x 15x 16x 17x
1
2
3
4
5
6
7
8
9
0
*
1 ï ; = $ \ & [ ] { } %
a b c 2 ä
d e f 3
g h i 4
j k l 5
m n o 6 ö
p q r s 7 ß
t u v 8 ü
w x y z 9
0 +
. *
1
# , ? ! ’ “ + - ( ) @ / : _
#
Multi-function keys:
Key Function during text input Function when held down
*
#
1
Type special characters Deactivate the ringer page 118
Switch between uppercase and lowercase
text and number entry
• Abc mode
• ABC mode
• 123 mode
Type special characters (not in 123 mode) Call the answering machine
Activate the telephone lock page 124
Page 23
23
Conversations
3334
11:12 AM
Paul Baum
10:57 AM
3336
10:37 AM
2
Softkeys
Tuesday 24 Sep 2015
Conversations
Settings
Voicemail
Graphic display
Your OpenScape Desk Phone CP400 is equipped with a color graphic display page 17.
Conversations
The conversations list appears in the start display and is a collection of contact data and data from
the call log. See from
page 28 for detailed information.
Main menu
Use the @ key to access the main menu from any situation. The time, day of the week and date
as well as the subscriber's own phone number are displayed. The main menu can do much more,
as can be seen from the screenshot. As the name suggests it is the starting point for the entire
menu tree. However, as telephony has priority on a telephone, the start display shows the conver
sations list.
@ Main menu Conversations g Start display
Voicemail
Settings
User settings
Administrator settings
(Admin)
-
Page 24
24
Out-of-Office / Call Forwarding
Presence
Do not disturb
3334
Forward all calls
Lock phone
In addition, different icons represent different situations and options:
Icon Meaning
u
›
!
œ
The ringer is deactivated page 118
The ringer is set to a beep page 118
The "Do not disturb" function is activated page 119
The phone lock is activated page 124
Presence
To access the "Presence" menu, press the \ key above the Softkeys. You are offered the fol-
lowing selection:
Personal Presence via the phone is temporarily suspended with call forwarding or do not disturb.
Page 25
25
Andre-Marie Ampere
30:07
Conversations
Paul Baum
Wednesday
31 Sep
3336
1
b
b
b
Search for...
Andre-Marie Ampere
Wednesday
Paul Baum
31 Sep
3336
29 Sep
Softkeys
Call
Contact details
Delete
6:55 AM
Yesterday
Tuesday
Andre-Marie Ampere
Context-dependent displays
Depending on the situation, the graphic display on your OpenScape Desk Phone CP400 shows
different content, to which you can respond intuitively.
Action with Softkey
Press the top softkey to start an alphanumeric search page 33.
Use the Softkey to dial the respective subscriber. You can choose a conversation beforehand us-
ing the navigator keys € and μ and open the details of the conversation with the « key
page 29.
Page 26
26
Softkeys
33
Andre-Marie Ampere
Wednesday
Paul Baum
Wednesday
3336
31 Sep
Call
Contact details
Delete
6:55 AM
Yesterday
Tuesday
Andre-Marie Ampere
3336
Action via dialpad
Press any key on the dialpad to start dialing a phone number with automatic phone number
search.
As soon as you enter the first digits, an input field opens for selecting the phone number and you
will be shown conversations that match the input to date in the corresponding positions. If the con
versation is already shown in the list before your input is complete, you can dial the number immediately using the associated Softkeys page 29 or start a call with a new number.
-
Action with navigation key
You can open a selected conversation using the navigator's « key in order to see the associated
details
page 25.
Page 27

27
Operating your OpenScape Desk Phone CP400
The following descriptions provide an overview of how to operate your phone.
Before looking at the functions and settings, you should set up the User password to protect
your phone against unauthorized use
Navigating in menus
Activating an application
You can use the mode keys page 19 to toggle, for example, between the main menu and Con-
versations or to open the Presence menu.
Browsing lists
You can use the navigator keys to scroll through entries and confirm the functions you want
page 20.
page 121.
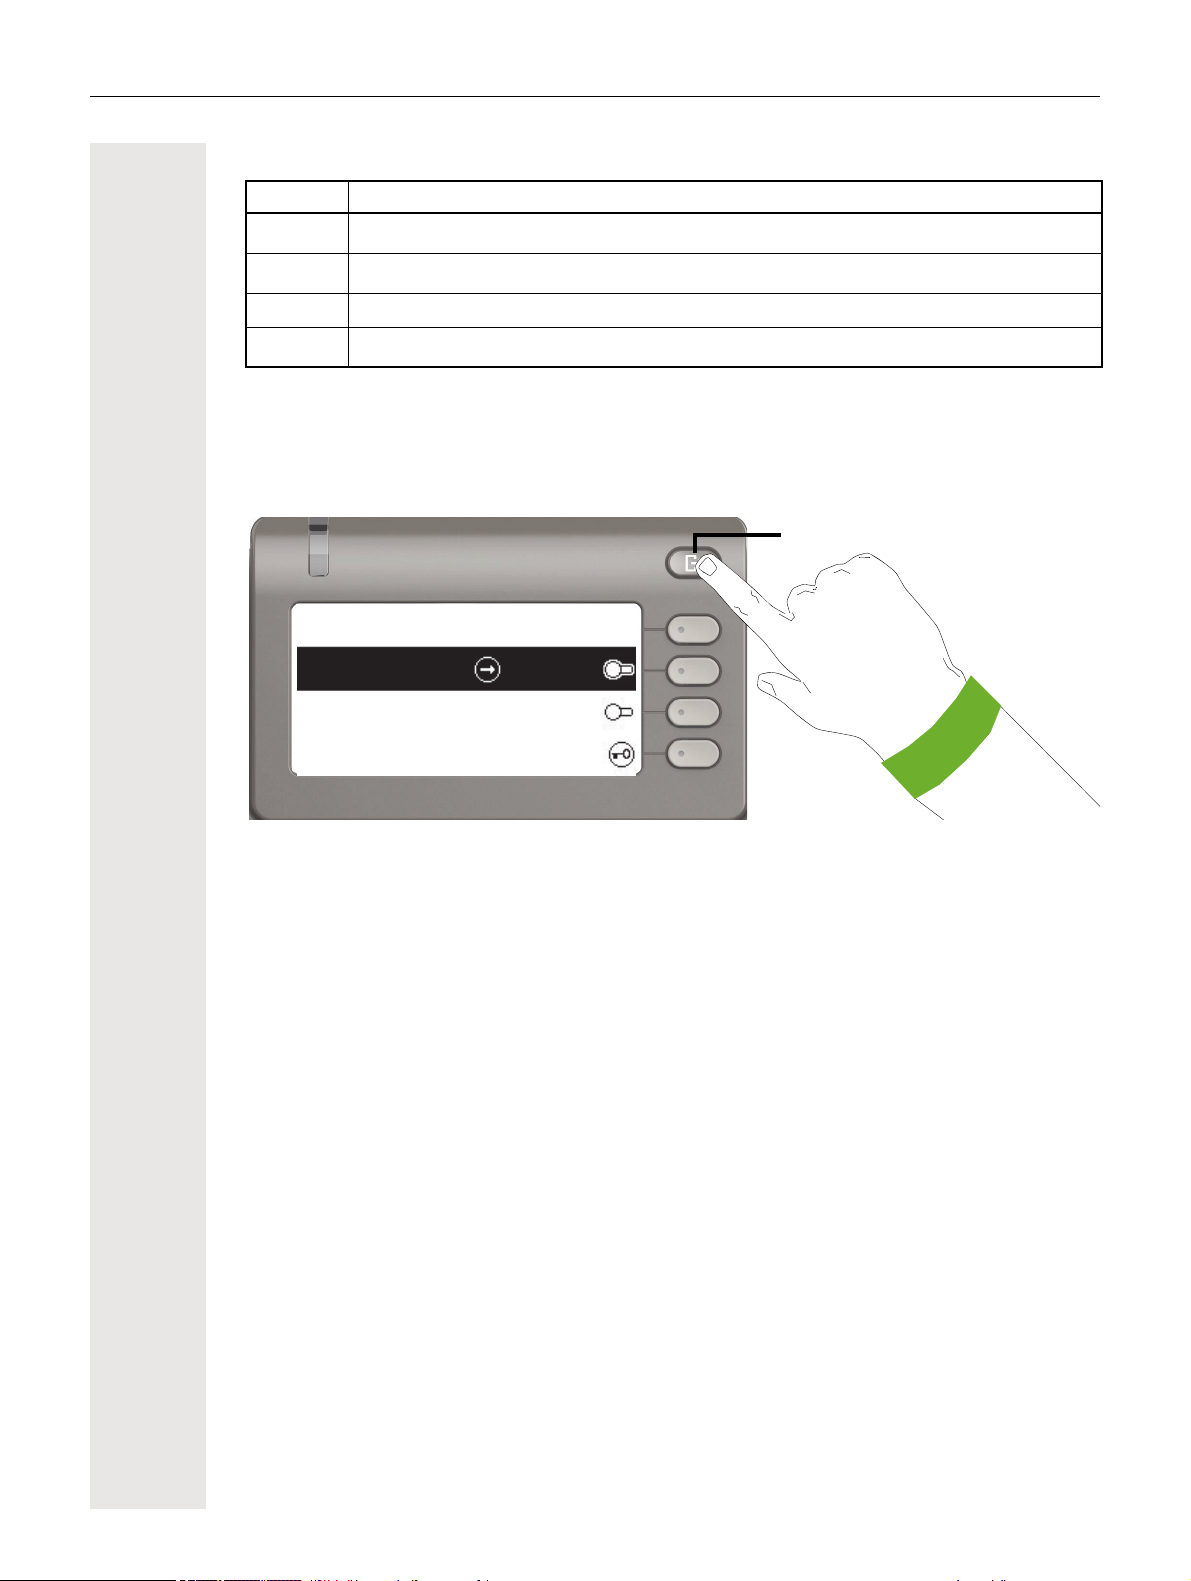
Opening context menus
If the arrow - appears beside a selected entry, a context menu is available for this entry
page 25.
Page 28

28
Selected call
Andre-Marie Ampere
30:07
Conversations
Paul Baum
Wednesday
31 Sep
3336
1
Conversations
A conversation is a contact with a call history. New conversations are created or updated for
• a previously answered call
• a dialed call
• a missed call
• an Exchange entry following automatic synchronization
• an entry from a corporate directory if a new number was used (LDAP)
If you activated use of Circuit ( page 93), then only conversations from Circuit will be included in
the conversations. The list is identical to that in your browser.
The list is ordered chronologically based on the last event. The latest entry appears at the top of
the list. Active calls are displayed before the conversations.
The status of a conversation is displayed with an icon.
Icon Message sent
g
º
‰
b
c
%
ž
Ÿ
Active call
Missed call (current)
Missed call (old)
Dialed call
Answered call
Voicemail
You forwarded the call
Your call was forwarded
Page 29
29
Daniel Bernoulli
26 Nov
Georg Simon Ohm
Andre-Marie Ampere
-
26 Nov
26 Nov
Conversations
b
b
b
1
Call
Contact details
Delete
6:55 AM
Yesterday
Tuesday
Andre-Marie Ampere
3336
Andre-Marie Ampere
3336
12:21 AM
Add participant
Transfer
Pickup
Contact details
g
Opening details of a conversation or conducting a call
You can open a selected conversation using the navigation key « or start a call using the softkey
_ or the navigation key Z. You start a call using the softkey _ if the conversation has not
been selected.
If you open the details of the conversation using the « key, you will be shown the following:
You can also query the contact details for a conversation during the call.
Use the € key to navigate to the Contact details option and select this option using the Softkey.
Page 30
30
3333
-
c
1:22 PM
Albert Einstein
Alessandro Volta
Yesterday
Yesterday
Conversations
b
o
Call
Contact details
Delete
6:55 AM
Yesterday
Tuesday
3333
3333
3333
Last name:: 3333
Work x: 1: 3333
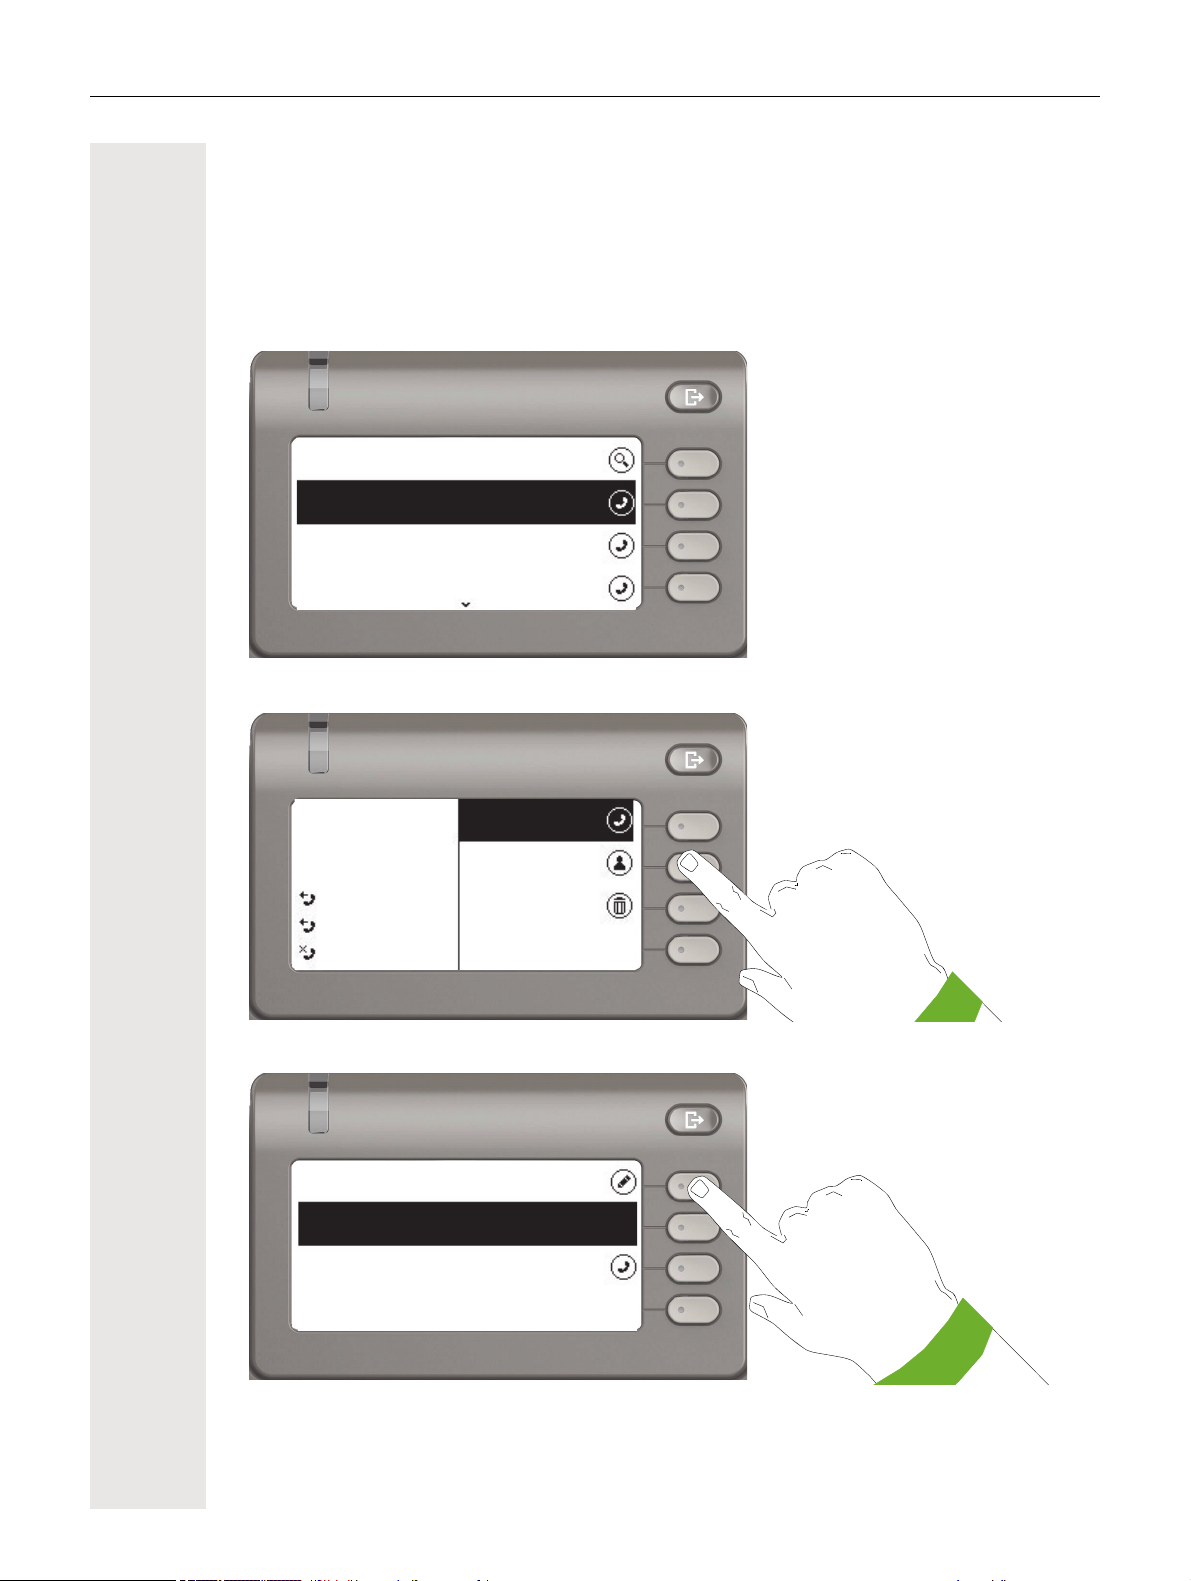
Creating or editing conversations
Conversations are created based on dialed or answered calls. New contacts are synchronized
with the phone when connected to Exchange. When you search for a subscriber using LDAP
page 115, this contact is transferred to conversations.
For example, you receive a call from a subscriber for whom a conversation does not yet exist in
the list. When you have hung up again, this subscriber appears in your list with phone number only.
Open the details of the conversation using the « key.
Use the Softkey to open the "Contact details" menu.
Press the Softkey for K to access edit mode.
Page 31

You can complete the following fields for a contact:
3333
Last name:: 3333
Work x: 1: 3333
First name:
Last name:
Einstein
Move cursor left
Move cursor right
• Last name:
• First name:
•Work x:
•Work x:
• Mobile:
•Home:
• Company:
• Address x:
• Address x:
•Role:
• Email:
•Avatar:
31
Press the Softkey for K to enter the last name.
Delete the digits using the ^ key and enter the last name. Press the Softkey in the input field to
complete input for this field.
Page 32

32
3333
Last name:: Einstein
Work x: 1: 3333
First name:
First name:
Albert
Move cursor left
Move cursor right
3333
Last name:: Einstein
Work x: 1: 3333
First name: Albert
Use the € or μ key to switch, for example, to "First name" and enter the first name here if
appropriate.
Enter the first name and complete the input for this field with the Softkey.
Save the contact data. You can add missing entries subsequently. The following information is
shown on the display, for example, the next time you call this contact.
Page 33

33
Reject
Answer
Deflect
Albert Einstein
3333
Incoming call
Search for...
Daniel Bernoulli
Wednesday
Andre-Marie Ampere
31 Sep
Georg Simon Ohm
29 Sep
c
Daniel Bernoulli
Wednesday
Andre-Marie Ampere
31 Sep
Georg Simon Ohm
29 Sep
33
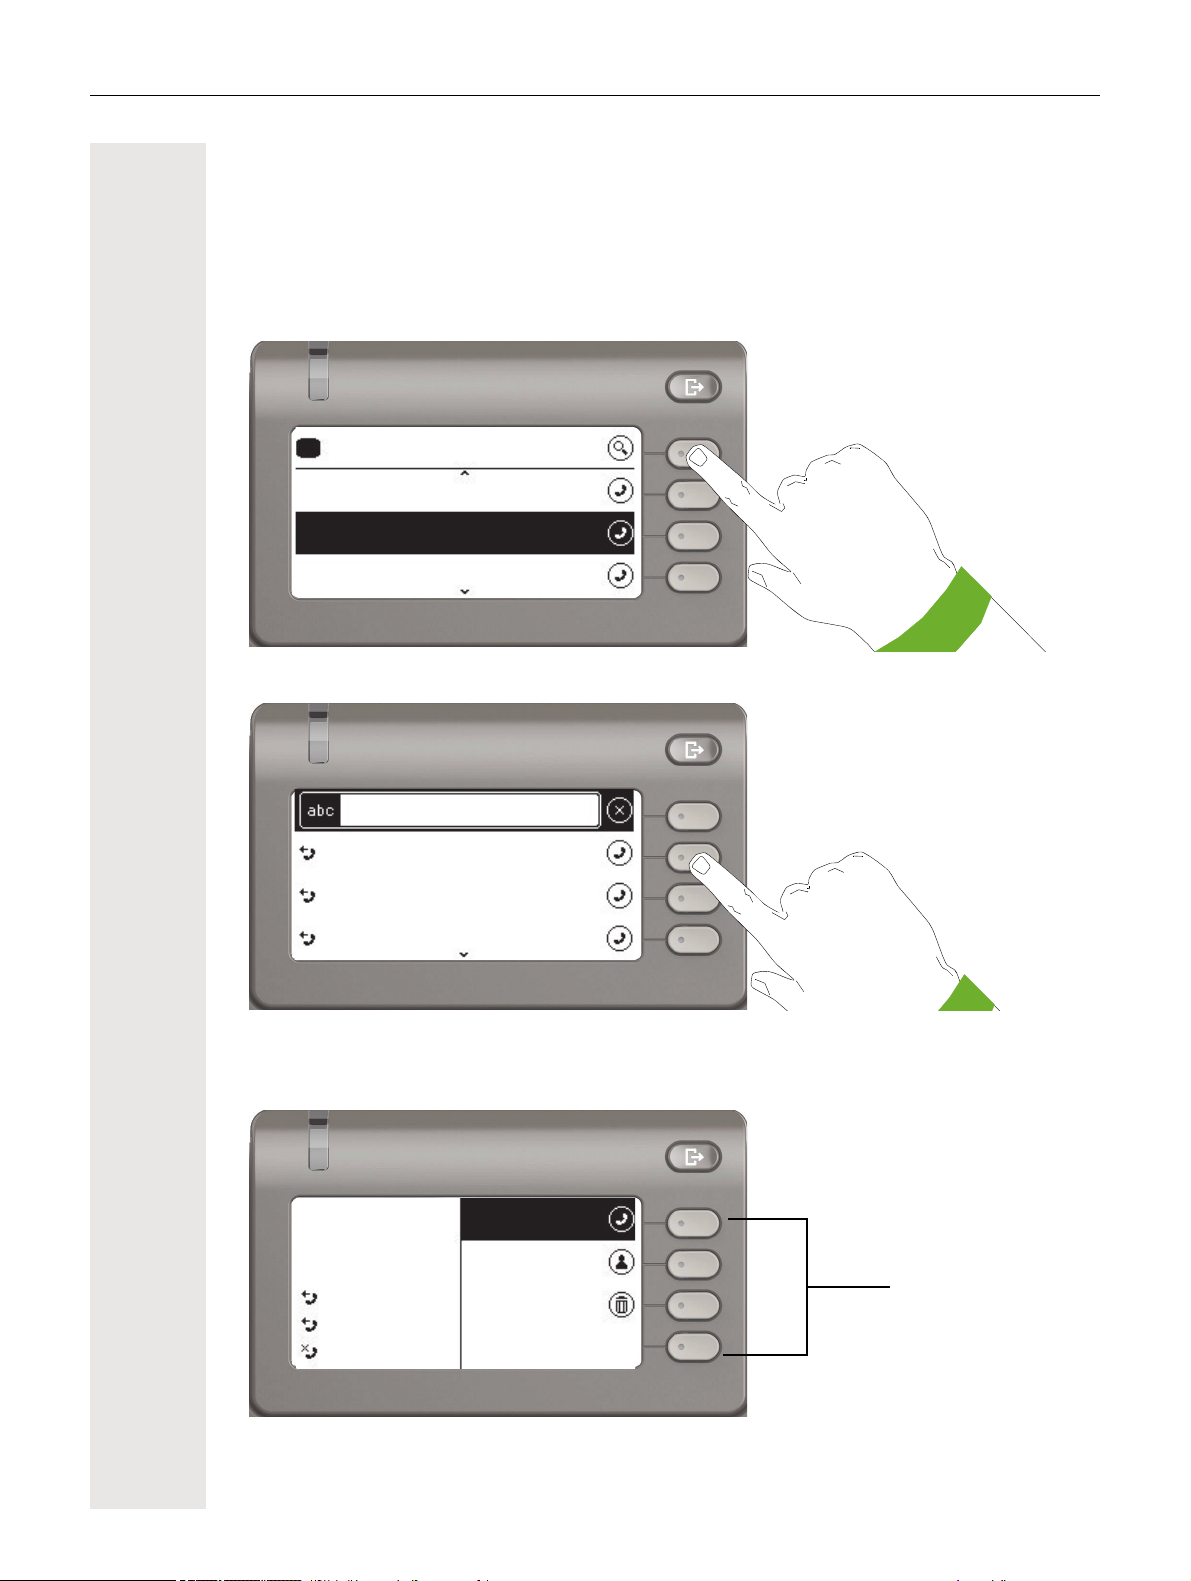
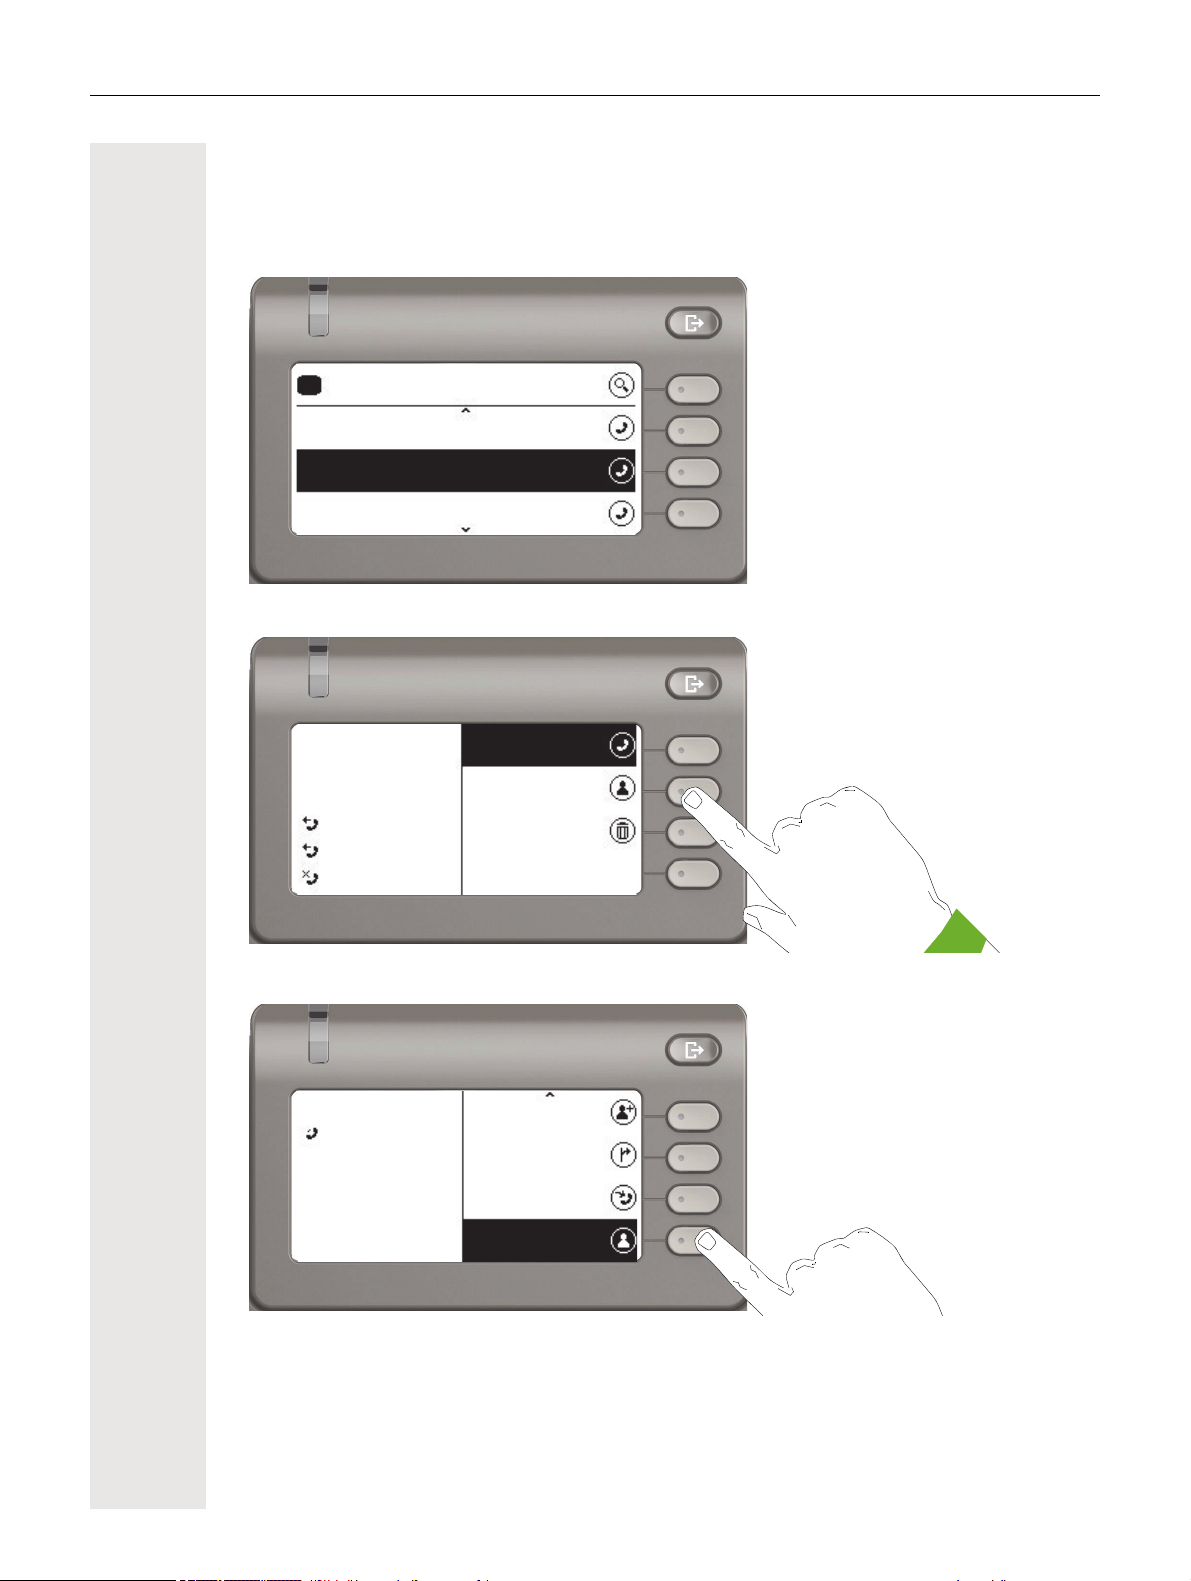
Searching for conversations
You have a number of options available to you for initiating a search for conversations. If you want
to call the located contact for the conversation immediately and you know the phone number
roughly then you can
• lift the handset or
• press the speaker key or
• press the headset key.
To search in your conversations list, open an alphanumeric input field by pressing the Softkey for
A,
or choose a purely numeric input field for the search by entering a digit.
Page 34

34
11
-
c
1:22 PM
Albert Einstein
Alessandro Volta
Yesterday
Yesterday
Conversations
b
o
Call
Contact details
Delete
11
11
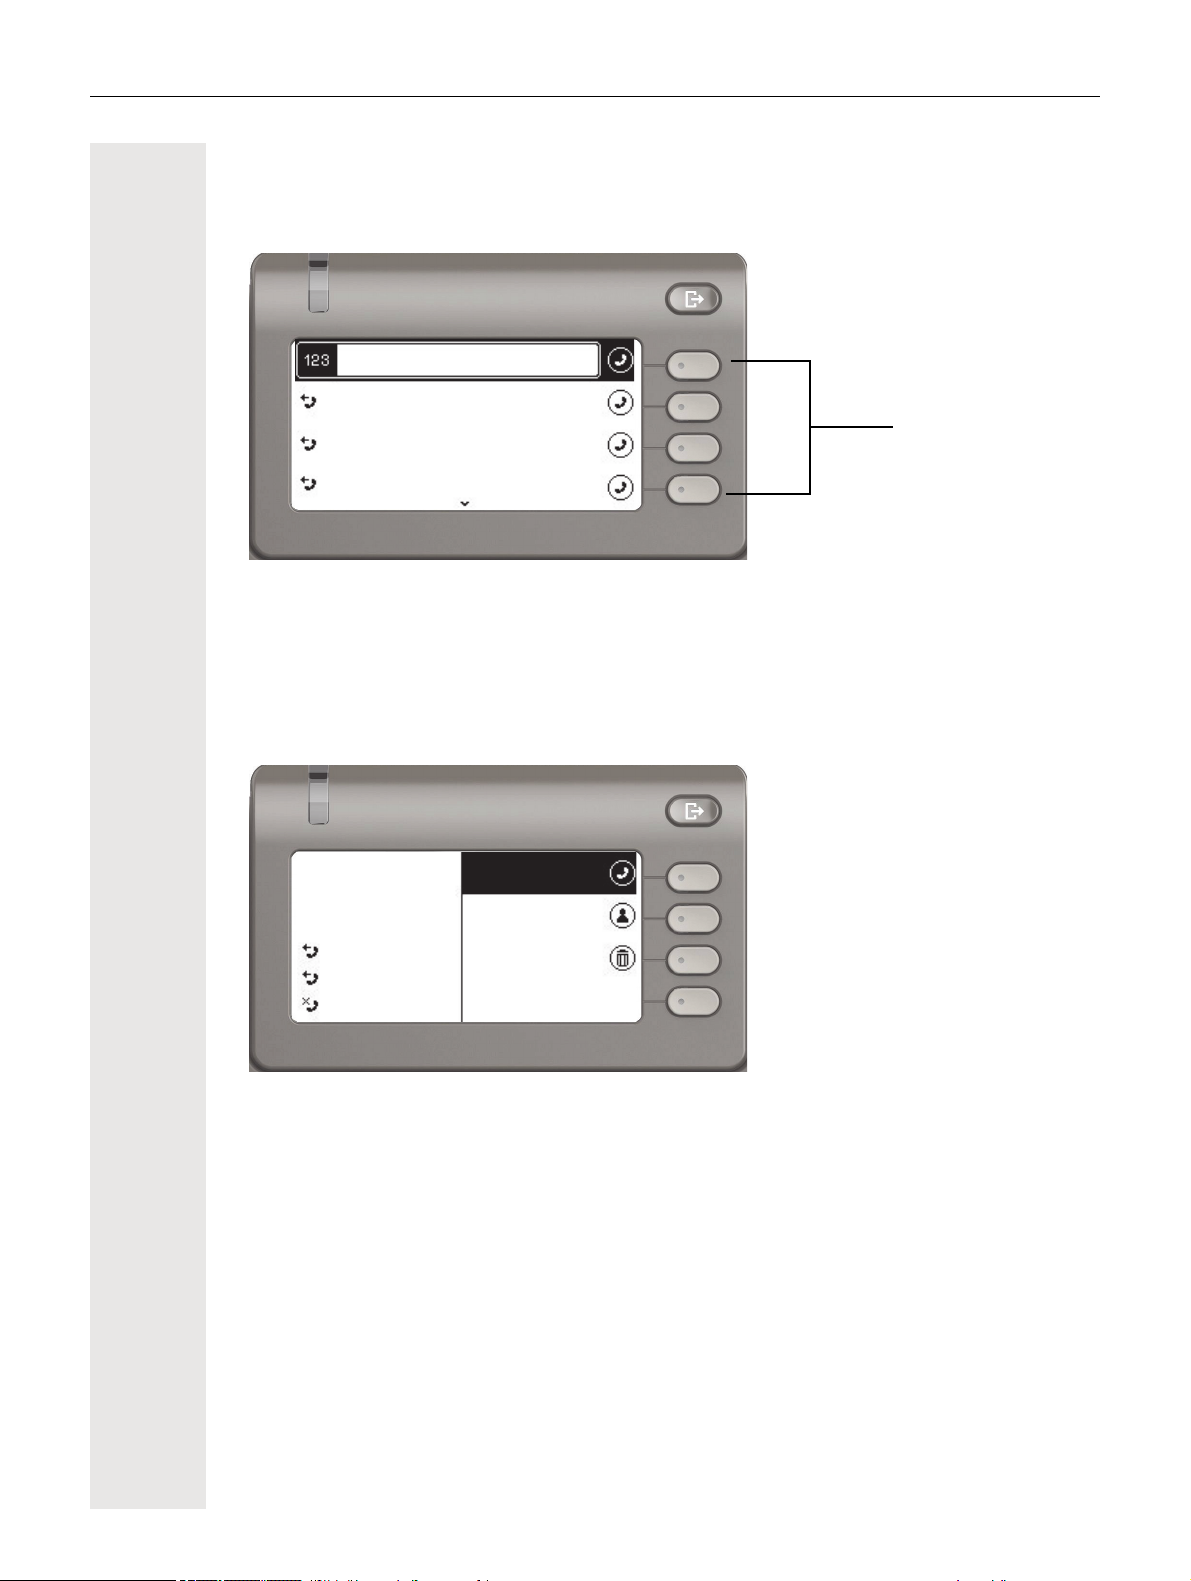
Use the # key to switch from numeric to alphanumeric input when you have opened the search
field with the Softkey
A . You can immediately dial a located subscriber whose phone number
contains the number 33 in this case, for example, by pressing the Softkey.
Deleting conversations
If you misdial, for example, or cancel dialing prematurely, an entry will still be created in the conversations list. You can delete this entry again immediately. Entries for incoming calls that you no
longer need can also be removed from the list.
p_p
Open the relevant entry using the navigator key «.
Press the Softkey for Ö to delete the entry. There is no confirmation prompt.
Page 35

35
Select a function
using the Softkey
Reject
Answer
Deflect
Andre-Marie Ampere
3336
Incoming call
No function
Notification LED
flashes
Andre-Marie Ampere
3336
12:21 AM
End
Hold
Consult
Add participant
g
Select a function
using the Softkey
Notification LED
lights permanently
Arrow for further
options
Telephony interface
Telephony view
Incoming call
Your phone rings and the call display flashes. In addition to the "classic" telephone functions, additional information and functions are offered on the display:
When conducting a call:
Page 36

36
Indicates an active call
Andre-Marie Ampere 30:07
Conversations
Paul Baum
Wednesday
3336
31 Sep
1
Reject
Answer
Deflect
3333
3333
Incoming call
Status icon for
calls
}
Switching to a different menu during a call
You can use the ^ key while on a call to switch to the Conversations menu.
Use the @ key to open the main menu and from there, for example, change the Brightness of
the display in the Settings. If you want to activate Do not disturb quickly, you can use the
to switch temporarily to the Presence menu and then return.
\ key
Icons in call states
Icon Meaning
ë
‹
g
k
e
–
+
The phone rings.
After dialing, the other subscriber's phone rings.
The call is active.
The call has been disconnected.
You have placed the call on hold (e.g. consultation hold).
Your call partner has placed the call on hold.
The voice connection is secure.
The voice connection is not secure.
Detailed descriptions of the various functions can be found in the sections "Basic functions"
page 46 and "Enhanced phone functions" page 76.
Page 37

37
ñ
Programmable keys on the OpenScape Desk Phone CP400 and OpenScape Key Module 400
The OpenScape Desk Phone CP400 and OpenScape Key Module 400 each have 16 keys to
which you can assign functions or numbers at two levels. Use the programmed level key to switch
to the required level when using a function or selected dialing key.
Increase the number of programmable function or selected dialing keys by connecting an additional OpenScape Key Module 400 page 18.
Depending on how they are programmed, you can use the keys as:
• function key page 70
• Selected dialing key
• Line key
• DSS key
Press the key to activate the programmed function or dial the stored number page 74.
Your OpenScape Desk Phone CP400 and OpenScape Key Module 400 are delivered with label
strips. Write functions or names in the white fields on the label strips. You can also use the Key
Labeling tool already available online for this purpose
The status of a function is also shown by the LED on the corresponding key.
page 98
page 105
page 70
page 168.
Line and direct station selection (DSS) keys can only be programmed by the administrator
via the program/service menu
page 44.
Meaning of LED displays on function keys
LED Meaning of function key
_Off The function is deactivated.
LED is flash-
£
¤
1 In this manual, flashing key LEDs are identified by this icon, regardless of the flashing interval. The flashing
interval represents different statuses, which are described in detail in the corresponding sections of the
manual.
1
ing
On The function is activated (e.g. green or red).
Indicates the status of the function (e.g. green or red).
Page 38

38
Corporate directory
If you have access to a corporate directory or LDAP database (consult your administrator), you
can search for contacts in it via conversations. LDAP is queried automatically when a phone num
ber is dialed.
Answering machine (voicemail)
Depending on the type and configuration of your communications platform (contact the administrator), messages from configured services are displayed in this application.
Listening to messages
If new messages are available, they will be displayed at the top position in the list of conversations
and highlighted.
-
Page 39

Settings
Conversations
Settings
Voicemail
User settings
Administrator settings (Admin)
Settings
Cancel
User settings
Use the @ key to open the main menu and then switch to the settings.
39
The menu consists of a configuration area both for users and for administrators.
The first time you open the user settings you have to enter the User password page 121.
Page 40

40
Date and time
Audio
User settings
Configuration
Allow call waiting
Allow DND
Handling
Busy when dialling
User settings
Menu
You can adjust local settings for your OpenScape Desk Phone CP400 using the "User" menu.
The menu structure consists of several levels.
You can also configure all of the settings using your OpenScape Desk Phone CP400's web
interface
page 162.
Switches
The menus contain switches for activating and deactivating functions. Example:
Press the Softkey "Allow do not disturb" to enable the function. The switch is moved to the right.
Alternatively you can use the
actuate the switch.
€ and μ keys to select the option and confirm with Z to
Page 41

Press the Softkey for Q to save your new setting.
Allow call waiting
Allow DND
Handling
Busy when dialling
Join in conferences
Connected calls
Allow hold reminder
Hold reminder delay
Hold reminder delay
Parameters
You can set values in some submenus.
41
Press the Softkey for K to open the setting.
Press the Softkey for the value 4 for example. The setting is changed and you return to the previous menu.
Page 42

42
Join in conferences
Connected calls
Allow hold reminder
Hold reminder delay
Program keys
Screensaver
Display
Phone
Brightness
Contrast
Display
Press the Softkey for Q to save your new setting.
Level
You can use menus with levels to adjust the volume or brightness, for example. An example of
display brightness is given here. Switch to the telephone settings menu
and open the display menu with the Softkey.
Open the menu for the brightness setting.
Page 43

43
Increase
Brightness
Decrease
Increase
Brightness
Decrease
Brightness
Contrast
Display
Adjust the brightness to the desired level. Use the " key to do this. The display is adjusted im-
mediately.
Complete the setting by pressing the Softkey for Q.
Save your new settings.
Page 44

44
Overview of user settings
Settings menu Options Go to
Date and time page 131
Volumes page 136
Audio
Configuration
Phone
Locality
Security Change user password page 121
Network information page 150
Diagnostic information page 160
Reset phone page 152
Settings page 137
Special ringers page 143
Call forwarding page 64
Enhanced phone functions page 76
Keyset
Screensaver page 129
Display page 126
Programming keys page 70
Country page 147
Language page 147
Administration
You can access the administration area via the "Admin" function and by entering the administration
password.
Refer to the administration manual for your phone for more detailed information on this topic.
During a software update, the phone must not be disconnected from the power supply unit,
the LAN line or the phone line.
An update action is indicated by messages on the display and/or by flashing LEDs.
Page 45

45
Control and monitoring function
A control or monitoring function can be activated on your phone for service purposes by remote
maintenance.
Control function
Your administrator has the option to activate and deactivate features of the phone via remote
maintenance. During maintenance, the handset, microphone, loudspeaker and headset are deac
tivated. You are additionally informed on the display that the control function is active.
Monitoring function
In order to detect malfunctioning of a phone, for example, your administrator can install a monitoring function. You can use your phone as normal during monitoring. However you will first be informed about the operation with a message on the display and prompted to allow monitoring.
If your administrator has activated a function on your phone, which continuously transmits operating data to a server, you will see the flashing icon in the upper display line.
Activating a diagnostic call
-
In the event of connection problems with a specific destination, the administrator may ask you to
enter an activation code before the number of the subscriber, which can be used to initiate tracing
of the call data on the phone. The activation code, which must be provided to you by the adminis
trator and which comprises a leading asterisk, followed by three digits and the hash sign as the
terminating character, must be entered before the actual phone number. At the end of the call, the
call-related data is sent for further analysis to the DLS server, which then passes it to the "Open
Scape Voice Trace Manager".
-
-
Page 46

46
ñ
Basic functions
Please read the introductory chapters "Getting to know your OpenScape
CP400"
carefully before performing any of the steps described here on your phone.
Incoming calls
The telephone rings if the ringtone is active. The Notification LED also flashes.
If transmitted, calling party information (name, phone number) appears in the in
formation section on the left-hand side of the display.
Any settings you are currently making on the phone will be interrupted by
an incoming call. You can use the
in the menu structure where you were interrupted, unless the password
validity period has expired.
If you have set a pattern melody page 139 or a ringer page 138 on
your phone, it is possible that your administrator may have preset a different ringer depending on the call type (e.g. an external or internal call).
page 16 and "Operating your OpenScape CP400“ page 27
@ key at any time to return to the point
-
¹ Incoming call
Thomas Meier
1234954
¹ Incoming call
Thomas Meier
1234954
Answering a call via the handset
The phone rings. The caller is displayed.
^ Lift the handset.
if nec. " Adjust the call volume page 19.
Answering a call via the loudspeaker (speakerphone mode)
The phone rings. The caller is displayed. The Notification LED flashes.
Answer
O
_
Press the Softkey.
or
: Press the key shown. The key lights up. The speakerphone function is activated.
if nec. " Adjust the call volume page 19.
Page 47

47
ñ
Suggestions for using speakerphone mode:
• Adjust the call volume while speakerphone mode is active.
• The ideal distance between the user and the phone in speakerphone mode is
50 cm.
Answering a call via the headset
Prerequisite: A headset is connected.
Make sure your headset port is set up properly page 142.
Answering calls via the headset key
¹ Incoming call
Thomas Meier
1234954
Auto-Headset
The phone rings. The caller is displayed. Only the LED on the ² key flashes
² Press the key shown.
if nec. " Adjust the call volume page 19.
Answering calls automatically via the headset
The administrator has additionally configured a function key with the "AutoHeadset" function (AICS Zip tone) (
_
Press the function key to activate automatic call answering. The key LED and
the headset key illuminate.
A short acoustic signal is heard on the headset for a call and the connection is
established.
If you want to manually answer calls again, deactivate the automatic answering
function using the "Auto-Headset" key. Both keys are off.
page 70).
Page 48

48
Switching from handset to speakerphone mode
Take note of the two different processes and activate your preferred mode
as appropriate
Prerequisite: You are conducting a call via the handset and the microphone and
loudspeaker functions have been activated by the administrator.
Open listening in standard mode
: and ] Hold down the key and replace the handset. Then release the key and proceed
with your call.
Open listening in US mode (default setting)
If open listening is set to US mode, you do not have to hold down the loudspeaker key when replacing the handset to switch to speakerphone mode.
: Press the key shown.
page 141.
] Replace the handset. Proceed with your call.
+
A secure voice communication is indicated by a padlock icon on the graphic display.
Switching from speakerphone mode to the handset
Prerequisite: You are conducting a call in speakerphone mode.
^ Lift the handset.
É The key shown is no longer lighting.
Switching from headset to speakerphone mode
In standard mode
: Press and hold the key (open listening is activated).
. Press the key shown. Speakerphone mode is activated.
Page 49

In US mode
: Press the key shown.
. Press the key shown. Speakerphone mode is activated.
Open listening
People present in the room can silently monitor your call. Let the other party
know that you have turned on the loudspeaker.
Prerequisite: You are conducting a call via the handset.
Activating
: Press the key shown.
Deactivating
É Press the illuminated key.
49
Hold
Hold
Switching to speakerphone mode
É Hold down the illuminated key and replace the handset.
Placing a call on hold
You can use this function to place an ongoing call on hold, for instance to prevent
the other party overhearing a conversation with a colleague in the same room.
The held party hears music on hold.
I
_
_
Press the Softkey. The call is now on hold.
or
Press the function key. The key illuminates. (The "Hold" key has to be configured page 70).
It is documented in the main menu and in the conversations menu that a call is
on hold. The call display lights up orange at the same time.
If you do not retrieve the held call after a defined time interval, a reminder
beep sounds three times. Only the two functions "Retrieve held call" and
"End" are shown on the display. The call display flashes orange and the
phone rings. The relevant settings can be found on
page 51.
page 50 and
Page 50

50
Retrieving a held call:
Settings
$
User settings
$
Configuration
Hold
Reconnect
End
C
P
_
¤
_
Press the Softkey. You resume the call.
or
Press the illuminated "Hold" function key. (The "Hold" key has to be programmed page 70.)
Disconnecting a held call:
Press the Softkey to disconnect the held call.
Activating/deactivating the hold reminder tone
z You can also configure this setting via the WEB interface page 162.
@ Press the key shown if appropriate.
_
-
_
if nec. j Enter and confirm the User password.
-
_
Open using the Softkey.
Open using the Softkey.
Open using the Softkey.
Connected calls
Allow hold reminder
-
_
¢_
Q
_
Open using the Softkey.
Enable or disable using the Softkey.
Save the setting with the Softkey.
Page 51

Setting the hold reminder time
Use "Hold reminder" to specify when you want to receive an automatic reminder
about a held call. The minimum time value is 3, in other words the reminder is
output after three minutes. The maximum value is 15 minutes.
z You can also configure this setting via the WEB interface page 162.
@ Press the key shown if appropriate.
51
Settings
$
User settings
$
Configuration
Connected calls
Hold reminder delay
_
-
_
if nec. j Enter and confirm the User password.
-
_
-
_
Open using the Softkey.
Open using the Softkey.
Open using the Softkey.
Open using the Softkey.
€ Switch to Hold reminder delay. The current setting is displayed.
3
5
K
¥
Q
_
_
_
Open using the Softkey.
Confirm with the Softkey to set the new time.
Save the setting with the Softkey.
Page 52

52
Activating/deactivating Hold and hang-up
This function works in the following call scenarios:
• You have placed a call on hold and hang up.
• You are conducting a consultation call and the second party hangs up.
• You have answered a second call and you or the second party hangs up.
You can use "Hold and hang-up" to determine whether you will be prompted immediately or after a defined time to retrieve the held call.
This function cannot be used on multi-line phones.
z You can also configure this setting via the WEB interface page 162.
@ Press the key shown if appropriate.
Settings
$
User settings
$
Configuration
Connected calls
Hold and hang-up
_
-
_
if nec. j Enter and confirm the User password.
-
_
-
_
Open using the Softkey.
Open using the Softkey.
Open using the Softkey.
Open using the Softkey.
€ Switch to Hold and hang-up.
¢_
Q
_
Enable or disable using the Softkey.
Save the setting with the Softkey.
Page 53

Music on hold
If the Music on hold option is active, music is played back when you are placed
on hold by another party.
z You can also configure this setting via the WEB interface page 162.
@ Press the key shown if appropriate.
53
Settings
$
User settings
$
Configuration
Connected calls
Music on hold
Disconnect
_
-
_
if nec. j Enter and confirm the User password.
-
_
-
_
Open using the Softkey.
Open using the Softkey.
Open using the Softkey.
Open using the Softkey.
€ Switch to Music on hold.
¢_
Q
_
Enable or disable using the Softkey.
Save the setting with the Softkey.
Ending a call
à
_
Press the Softkey.
or
Ê Press the key shown. The key LED goes out.
or
É Press the key shown. The key LED goes out.
or
] Replace the handset.
Page 54

54
ñ
ñ
Group call
Your administrator can incorporate multiple telephones in a call pickup group. If
your telephone belongs to a pickup group, you can also accept calls intended for
other members of the group.
A group call is displayed on the phone. The administrator may have made the
following settings for signaling:
Telephone status Ring on group call =
Yes
Ringer on Silent ringing Ringer
Speaker
in
connection
Ringer off Silent ringing Nothing Nothing
in
connection
Handset Ringer
Speaker
Handset
Open listening
Headset Ringer
Headset
Open listening
Speakerphone
mode
Handset Nothing Beep
Handset
Open listening
Headset Nothing Beep
Headset
Open listening
Speakerphone
mode
Beep
Handset and loudspeaker
Speaker
Beep
Headset and loudspeaker
Beep
Speaker
Beep
Handset and loudspeaker
Beep
Headset and loudspeaker
Beep
Speaker
Ring on group call = No
Beep
Speaker
Beep
Handset
Beep
Handset and loudspeaker
Beep
Headset
Beep
Headset and loudspeaker
Beep
Speaker
Handset
Beep
Handset and loudspeaker
Headset
Beep
Headset and loudspeaker
Beep
Speaker
The volume settings can be found from page 136.
Further administrator settings for group calls:
• The group call can be picked up both by lifting the handset and via the
"Pickup call" menu option.
• The group call can be picked up via the "Pickup call" menu option but not
by just lifting the handset.
• A key is programmed for Call pickup.
• A message is output on the display with the Call pickup key when a
group call is waiting.
Picking up the group call only using the key
Your administrator has set up the group call such that it is only displayed
by the Anrufübernahme key flashing. The phone can also ring when idle.
Page 55

55
ñ
A group call is waiting. The Anrufübernahme key flashes. The group call is not
shown on the display.
Call pickup
¹ Incoming call
Pickup call
O
£
_
Press the function key.
The group call is now shown on the display:
Pickup: Caller
for: Party
is displayed.
The pop-up menu opens:
Picking up a group call immediately
Your administrator has set up the group call such that it will be shown immediately on the display.
A group call is waiting and is shown on the display:
Pickup: Caller
for: Party
is displayed.
Picking up a group call
A group call is signaled.
Confirm with the Softkey.
Call pickup
Ignore
or
^ Lift the handset (only if the appropriate function is set by your administrator).
or
_
Press the function key or press it again if call answering was initiated via the key.
The speakerphone function is activated. Prerequisite: The "Call pickup" key was
programmed on the connected key module.
Ignoring a group call
]
_
Press the Softkey. The phone stops signaling the group call. It can still be answered however from the conversations list.
Page 56

56
Listening to voicemail
To use this function, you need to have a voice mailbox set up on your communication platform for voicemails (see page 38).
The call display lights up to signal new messages. It only extinguishes when all
messages have been picked up.
Picking up messages
@ Press the key shown if appropriate.
Voicemail
_
Open using the Softkey.
Page 57

Making calls
If you allowed the option "Busy When Dialing" page 89, you will not be
interrupted by an incoming call. In this case, the caller hears the busy signal.
You make a call by entering the phone number of the relevant party using the
dialpad or by searching for this party in the permanent conversations list. Con
versations include:
• Dialed and received calls
• Subscribers from Circuit
• Subscribers from Exchange
• Subscribers from a corporate directory
If you cannot find received or dialed calls in the list, check if the call log is activated.
Off-hook dialing
^ Lift the handset.
57
-
©
Dial a number...
©
082631565
Peter Maier O
A
The input field in Conversations is opened in numeric mode.
j Enter the phone number.
O
Z Confirm that the phone number is complete or wait until the autodial delay ex-
pires (see page 88).
or
_
The required contact is shown in the list. Confirm with the Softkey. The connection is set up.
Page 58

58
On-hook dialing
The connection is set up with on-hook dialing via a connected headset or via the
loudspeaker (speakerphone mode). The line is seized before dialing. Use the
search function in Conversations if appropriate (
j Enter digits via the dialpad.
or
. Press the key if a headset is connected.
or
: Press the key shown.
page 33).
©
123456789
©
Georg Simon Ohm O
©
123456789
A
j Enter or complete the phone number.
O
Z Confirm that the phone number is complete or wait until the autodial delay ex-
pires (see page 88).
or
_
The required conversation is shown in the list. Confirm with the Softkey. The
connection is set up.
Entering the phone number first
First enter the number. The loudspeaker or headset key illuminates when you
enter the first digit.
j Enter the phone number. If necessary, correct input using the navigation keys.
O
Z Confirm that the phone number is complete or wait until the autodial delay ex-
pires (see page 88).
Georg Simon Ohm O
_
or
The required conversation is shown in the list. Confirm with the Softkey. The
connection is set up.
Page 59

Redial
No history is created for contacts if the call log or Exchange is deactivated.
Conversations that have been dialed manually or searched for via LDAP
are likewise not created. Previous entries have been deleted.
Redialing from conversations
The last active conversations always appear at the top.
Only calls for the primary line are received on multi-line phones
page 98.
μ€ Select the required contact from the Conversations menu ( page 28).
59
Georg Simon Ohm
Georg Simon Ohm
Redial
- O
O
_
_
Confirm the conversation with the Softkey. The connection is set up.
or If the subscriber is currently visible in the list
Confirm immediately with the Softkey. The connection is set up.
Redialing via the function key
Prerequisite: The "Redial" function key is configured.
_
Press the function key. The connection to the last subscriber dialed is established.
Page 60

60
Activating/deactivating the microphone
You can temporarily switch off the handset microphone to prevent the other party
from listening in while you consult with someone in your office for example.
Prerequisite: You are conducting a call.
Deactivating the microphone
; Press the key shown.
Activating the microphone
Æ Press the key shown.
Consulting a second party
You can call a second party while a call is in progress. The connection to the first
party is placed on hold.
g 2:40 AM
Klaus Maier
3336
Georg Simon Ohm
Add participant
Consult
Prerequisite: You are conducting a call.
The connection is set up to a subscriber.
E
_
Press the Softkey. You switch to input.
j Enter the phone number of the second party.
or
O
q
_
_
Search for the subscriber in conversations ( page 33) and confirm with the
Softkey. The connection is set up.
or Starting a conference
Press the Softkey.
j Enter the phone number of the second party.
or
Georg Simon Ohm
Start conference
O
r
_
_
Search for the subscriber in conversations ( page 33) and confirm with the
Softkey. The connection is set up.
Press the Softkey – the conference is started.
Page 61

Ending a consultation call
ñ
You end the consultation
61
End & reconnect
Retrieve held call
Auto-Headset
P
_
Press the Softkey. The consultation call is disconnected. The call with the first
party is resumed.
The second party hangs up
If the second party hangs up, you will be prompted to retrieve the first call again
Ù
_
if "Hold and hang-up" is disabled (
main on hold until you receive this prompt after a defined time interval.
Press the Softkey. You are reconnected with the first party.
page 52). Otherwise, the first call will re-
Ending the consultation with an active headset
The administrator has additionally configured a key with the "Auto-Headset" function (AICS Zip tone) on a key module or in the Favourites menu
(
page 70).
_
[ You are conducting a consultation call and the second party hangs up. You are
Press the function key to activate automatic call answering. This key and the
headset key illuminate.
automatically reconnected with the waiting first party. The prompt "Retrieve held
call" does not appear.
Page 62

62
Switching to the held party (alternating)
Prerequisite: You are conducting a consultation call page 60 or have accept-
ed a second call page 79. You are in the call connection menu.
Alternate
End & reconnect
Hold
R
P
I
_
_
_
Press the Softkey.
You can switch back and forth between two parties by repeatedly confirming "Alternate".
Ending an alternate operation
Press the Softkey. The active call is disconnected.
Putting on hold and retrieving alternately or simultaneously
Prerequisite: You are conducting a consultation call page 60 or have accept-
ed a second call page 79. You are in the call connection menu.
Putting an active call on hold
Press the Softkey. The consultation or second call and the first call are put on
hold.
Retrieving the first call
Andre-Marie Ampere
Daniel Bernoulli
Reconnect
Reconnect
^ Press the key shown to switch to Conversations.
-
C
_
_
Select the Softkey to open the first call in the conversations list.
Press the Softkey. You are connected with the other party. The consultation or
second call continues on hold.
Retrieving the second call
^ Press the key shown to switch to Conversations.
-
C
_
_
Select the Softkey to open the second call in the conversations list.
Press the Softkey. You are connected with the second party. The first call remains on hold.
Page 63

63
Connecting parties
You can connect the first party with the party you consulted, clearing down your
connection to both parties in the process.
Prerequisite: You are conducting a consultation call page 60 and you are in
the call menu of an active call.
Settings
$
User settings
$
Configuration
Complete transfer
] or É Replace the handset or, if you are in speakerphone mode, press the loudspeak-
D
_
Press the Softkey. The other two parties are now connected to one another. You
can now hang up.
or Connecting by hanging up
Prerequisite: Call joining must also be allowed page 63.
er key. The other two parties are now connected to one another.
Allowing call joining
z You can also configure this setting via the WEB interface page 162.
@ Press the key shown if appropriate.
_
-
_
if nec. j Enter and confirm the User password.
-
_
Open using the Softkey.
Open using the Softkey.
Open using the Softkey.
Connected calls
Allow call joining
Connected calls
Daniel Bernoulli
-
¢_
Q
- O
_
_
Open using the Softkey.
Activate with the Softkey.
Save the setting by selecting the Softkey.
Calling back a missed call
Contacts who have tried to reach you are identified accordingly in the conversations list and appear at the top of the list. In addition to the menu name, i.e. Conversations, the number of missed calls is shown against a red background
page 28.
The Notification LED lights up red if the administrator has made the setting accordingly. In addition to the menu name, i.e. Conversations, the number of
missed calls is shown.
@ Press the key shown, if appropriate, to switch to Conversations.
_
A contact is indicated as a missed call with º. Select the contact and confirm to
call the contact.
Page 64

64
Call forwarding
Depending on the settings made by the administrator, standard call forwarding
may be configured for the phone or alternatively a forwarding call by type option
that is supported by OpenScape Voice.
Standard call forwarding
You can forward calls for your phone to another phone. You can also change,
activate and deactivate call forwarding during a call. The Forwarding function
must be approved by the administrator.
On multi-line telephones page 98, you can only configure call forwarding for the primary line.
Three forwarding conditions can be programmed in the forwarding menu:
• Unconditional
•On Busy
• On No reply (after xs)
Because of its direct impact, "Unconditional" call forwarding has the highest priority followed by "No reply (after xs)" and then "Busy".
Active call forwarding for "Unconditional" is indicated in the main menu on the
graphic display.
The Forwarding menu offers you three types of call forwarding.
Unconditional
Busy
No reply (after xs)
A phone number may already be assigned to each call forwarding type. For example, a Destination could then be Destination 12345. Call forwarding cannot
be activated if the phone number is not registered.
Alternatively, call forwarding can be programmed on one or more keys with
a fixed destination and a predefined forwarding or call type
-
-
-
Destination phone number
Destination phone number
Destination phone number
page 73.
Using call forwarding
The following functions are available for activating and deactivating call forwarding and configuring it in accordance with your requirements:
• ”Activating or deactivating immediate call forwarding” page 65
• ”Saving destination phone numbers for call forwarding”
• ”Copying and pasting destination phone numbers”
• ”Activating/deactivating call forwarding”
• ”Defining the ring duration before call forwarding on no reply”
page 68
page 65
page 66
page 69
Page 65

Activating or deactivating immediate call forwarding
All calls are forwarded regardless of other settings. The prerequisite for forwarding is that a forwarding destination has been entered. If no destination has been
entered, you will be forwarded automatically to enter a destination when you at
tempt to activate forwarding.
\ Press the key shown to open the Presence menu.
Activating forwarding for all calls to one destination
65
-
Forward all calls
Forward all calls
Forward all calls
-
¦_
-
¢_
-
¦_
Activate with the Softkey.
All calls are forwarded.
\ Exit the menu.
Saving destination phone numbers for call forwarding
You can alternatively enter the call forwarding settings via the user menu
(
page 78) or also using the WEB interface page 162. If a number was
entered first, it can no longer be deleted via the local telephone settings
rather can only be overwritten.
Entering a destination for Forward all calls
\ Open the Presence menu.
Destination
©
3335
3338
« Open the "Forward to" menu.
K
_
Q
_
j Enter/change the destination phone number. Confirm your input with the Soft-
Q
_
Use the Softkey to open the editor for the destination phone number.
If no destination or your desired destination has not been preset, enter the destination number using the dialpad.
key.
or
Confirm a preset destination with the Softkey.
Page 66

66
Managing call forwarding
\ Open the Presence menu.
Forward all calls
Unconditional
Destination
-
Forwarding controls
-
¦_
« Open the "Forward to" menu.
-
_
Open the Forwarding controls menu.
Three types of call forwarding are offered in the Forwarding menu:
• Unconditional
•Busy
• No reply (after xs)
You can check at this point whether a call forwarding type is already activated.
€μ Select the forwarding type.
¦_
Here for instance Unconditional.
« And open it.
K
_
Open the editor ( page 21).
©
335
Unconditional
Forward all calls
-
335
¢_
-
¢_
Q
_
The input field is displayed.
j Enter/change the destination phone number and conclude your input by select-
ing the Softkey.
¿
_
Exit the menu for entering the destination.
Activate call forwarding if appropriate with the Softkey.
Copying and pasting destination phone numbers
The current destination phone number for a call forwarding type is copied. For
example, the current destination phone number for All Calls should also become
the current destination phone number for No reply.
\ Open the Presence menu.
« Open the "Forward to" menu.
Forwarding controls
-
_
Open the Forwarding controls menu.
Page 67

€μ Select the forwarding type.
67
Unconditional
Destination
©
335
Busy
Destination
-
33
¢_
Here for instance Unconditional.
« And open it.
Open the input field with the Softkey ( page 21).
The input field is displayed.
Copy the content of the input field with the Softkey.
Exit the editor with the Softkey.
Return to the Forwarding menu with the Softkey.
Copy
K
Q
S
]
¿
_
_
_
_
_
€μ Select the forwarding type.
-
_
Here for instance Busy.
« And open it.
K
_
Open the input field with the Softkey ( page 21).
© Q
€μ Select Paste.
Paste
S
©
335
Q
Q
_
_
_
_
The input field is displayed.
Paste the contents of the clipboard using the Softkey.
Conclude your input with the Softkey.
Save the changes with the Softkey and switch to the Forwarding menu.
Page 68

68
Activating/deactivating call forwarding
Prerequisite: A destination has to be entered first in order to activate the forwarding type.
\ Open the Presence menu.
All calls
Busy
Busy
-
Forwarding controls
336
-
336
-
¦_
The forwarding type "All calls" should be disabled if you want to use the call type
"Busy".
« Open the "Forward to" menu.
-
_
Open the Forwarding controls menu.
Three types of call forwarding are offered in the Forwarding menu:
• Unconditional
•Busy
• No reply (after xs)
€μ Select the forwarding type.
¦_
¢_
Forwarding type Busy is disabled.
Activate with the Softkey.
\ Exit the Presence menu.
Page 69

Defining the ring duration before call forwarding on no reply
You can define how long the phone should ring before "No reply (after xs)" call
forwarding activates.
This setting is only available if the "Server features" function was deactivated by the administrator.
\ Open the Presence menu.
69
All calls
No reply (after xs)
Delay (seconds)
©
16
-
Forwarding controls
-
¦_
« Open the "Forward to" menu.
-
_
Open the Forwarding controls menu.
€μ Select the forwarding type.
¦_
Here for instance No reply (after xs).
« And open it.
€μ Select Set delay (seconds).
K
_
Q
_
j Enter the required time in seconds and confirm your entry with the Softkey.
Q
_
Open the input field with the Softkey ( page 21).
The input field is displayed.
Save your input. The new time is displayed.
\ Exit the Presence menu if appropriate.
Call forwarding chain
Sometimes calls to a subscriber are forwarded to another subscriber who also
has call forwarding or DND activated. This can create a call forwarding chain
consisting of several telephones where the last member of the chain is your
phone.
The following forwarding information is shown on your telephone's display:
• Who is calling.
• Who forwarded first or last.
• The reason for the forwarding is displayed by an icon.
You can set whether the subscriber who forwarded first or last is displayed (see
page 78).
Page 70

70
Programmable keys
You can assign a series of functions for the phone to programmable keys on the
OpenScape CP 400 and an additional OpenScape Key Module 400 to suit your
requirements. The OpenScape Key Module 400 comes with 16 keys, in the
same way as the OpenScape CP 400, all of which can be programmed on two
separate levels
the web interface page 162.
You can toggle between the two key levels using a programmed shift key.
List of available functions
1. Unallocated 21.Deflecting
2. Selected dialling 22.Shift
3. Redial 23.Conference
4. Forward all calls 24.Headset
5. Forward no reply 25.Do not disturb
6. Forward busy 26.Group pickup
7. Forwarding: all calls 27.Repertory dial
8. Forwarding: internal calls 28.Directed pickup
9. Forwarding: external calls 29.Release
10.Forwarding busy: all calls 30.Callback
11. Forwarding busy: internal calls
12.Forwarding busy: external calls
13.Forwarding no reply: all calls 33.Call waiting
14.Forwarding no reply: internal calls 34.Immediate ring
15.Forwarding no reply: external calls 35.Vorschau
16.Ringer off 36.Anwendung starten
17.Hold 37.Call recording
18.Alternate 38.Built in fwd
19.Blind transfer call 39.Pause callbacks
20.Transfer call 40.Resume callbacks
page 37. The keys can also be programmed conveniently via
31.Cancel callbacks
32.Consult
Page 71

Programming a key
Initiating programming
Directly via the key
71
Settings
$
User settings
$
Phone
Program keys
Hold down the function key to which a function is to be assigned until the programming prompt is displayed.
If the prompt is not displayed or a programmed function is not executed,
you can only launch key programming via the user menu (ask your admin
istrator about the current setting).
Press the Softkey to open the programming.
or Via the user menu
You can also program keys via the user menu.
OK
_
_
@ Press the key shown if appropriate.
_
-
_
if nec. j Enter and confirm the User password.
-
_
-
_
Open using the Softkey.
Open using the Softkey.
Open using the Softkey.
Open using the Softkey. You are prompted to press the key you wish to program.
-
_
Press the function key you want to program with a function. The key LED lights
up constantly.
Page 72

72
Beginning programming
Normal
Shifted
Unallocated
Unallocated
Do not disturb
Label
K
K
¥
K
¾ Q
Q
_
_
Open using the Softkey.
or
Open using the Softkey.
€ Choose the function to be programmed on the key.
_
_
_
j Enter the label you want for the function and confirm with the Softkey.
_
Confirm with the Softkey to set the function, for example Do not disturb.
If you do not want to accept the standard label for the function:
Open using the Softkey.
The input field is displayed.
Save the programming with the Softkey.
Programming enhanced functions
Normal
OK
Unallocated
Selected dialling
Label
Selected dialing
Hold down the function key to which a function is to be assigned until the programming prompt is displayed.
If the prompt is not displayed or a programmed function is not executed,
you can only launch key programming via the user menu (ask your admin
istrator about the current setting).
Confirm with the Softkey.
Open using the Softkey.
Q
K
_
_
_
€ Choose the function to be programmed on the key.
¥
K
_
_
Confirm with the Softkey to set the function. If you do not accept the standard
label for the function, rather use the name of the subscriber:
Open using the Softkey.
-
¾ Q
_
The input field is displayed.
j Enter the label you want and confirm with the Softkey.
Page 73

73
Setting
K
¾ Q
Q
Q
OK
Normal
Unallocated
K
_
_
Use the Softkey to open the input field for the destination phone number.
The input field is displayed.
j Enter the subscriber's destination phone number and confirm with the Softkey.
_
Save the programming with the Softkey.
Configuring a fixed forwarding key
_
_
_
Hold down the function key to which a function is to be assigned until the programming prompt is displayed.
If the prompt is not displayed or a programmed function is not executed,
you can only launch key programming via the user menu (ask your admin
istrator about the current setting).
Confirm with the Softkey.
Open using the Softkey.
Call forwarding depending on the forwarding type
-
Forward all calls
Label
¥
K
¾ Q
Q
€ Choose one of the forwarding types to be programmed on the key:
• Forward all calls
• Forward no reply
• Forward busy
_
_
_
j Enter the key label you want and confirm with the Softkey.
_
Confirm with the Softkey to set the call forwarding type.
If you do not want to accept the standard labeling:
Open using the Softkey.
The input field is displayed.
Save the programming with the Softkey.
Page 74

74
Using keys
A function or selected dialing can be programmed on the first or the second level.
Shift
Party
Call waiting
_
_
¤
Press "Shift" if appropriate to switch level.
Example 1: Calling saved number
Prerequisite: The idle menu is shown on the display.
Press the function key for a saved number. The connection is set up.
Example 2: Activating/deactivating Call waiting
You can press a key to activate or deactivate call waiting functionality, even
during a call. The prerequisite for this is that a second call is permitted
(
page 81). A second call is allowed by default.
Press the function key. The key LED is no longer illuminated. The second call
function is deactivated. The call is rejected or forwarded.
Example 3: Holding and retrieving
Hold
Hold
Immediate ring
_
£
_
You can hold a call using a key and retrieve it again.
Press the function key. The key LED lights up red. The call is now on hold.
Press the function key. The key LED is no longer illuminated. The call is retrieved.
Example 3: Immed ring
This function allows you to switch the preset delay ( page 112) on and off for
all line keys. By default the delay is set, the key does not illuminate.
Press the function key. The key illuminates. The delayed ringer is disabled. An
incoming call rings immediately regardless of what delay time is configured.
Page 75

Resetting keys
Here you can reset keys you configured back to factory settings (see also
page 152).
@ Press the key shown if appropriate.
75
Settings
$
User settings
$
Reset
Key programming
Reset selected user data
_
-
_
if nec. j Enter and confirm the User password.
-
_
¦_
-
_
Open using the Softkey.
Open using the Softkey.
Open using the Softkey.
Activate with the Softkey if appropriate if you really want to delete the contents
of the programmed keys.
Select the Softkey to delete the key programming immediately. The contents of
the keys you configured are deleted.
Keys that can only be configured by the administrator remain unchanged.
Page 76

76
Enhanced phone functions
Incoming calls
Rejecting a call
You can reject an incoming call.
Prerequisite: An incoming call is displayed or signaled. The function is approved by the administrator.
123456789
©
Deflect to...
Reject
Deflect
P
_
Press the Softkey. The caller hears a busy signal.
The rejected caller is saved in the conversations list as a missed call. You
can then call this party back at a later time.
Deflecting a call
Using call deflection
Prerequisite: An incoming call is displayed or signaled. The function is approved by the administrator.
D
_
Ô
_
A
j Enter the alternative phone number.
Press the Softkey. The conversations view is opened.
If a destination phone number is programmed, it will appear as the top entry in
the list
or If you did not save a phone number when programming call deflection, or if you
want to use a different destination, you are now prompted to enter a destination
phone number for call deflection.
page 77. Press the Softkey to dial this number.
©
082631565
Ô
_
Confirm with the Softkey. The call is deflected.
Page 77

Permitting call deflection
ñ
z You can also configure this setting via the WEB interface page 162.
@ Press the key shown if appropriate.
77
Settings
$
User settings
$
Configuration
$
Incoming calls
Deflect
Allow deflection
Default destination
_
-
_
if nec. j Enter and confirm the User password.
-
_
-
_
-
_
¢_
K
_
Open using the Softkey.
Open using the Softkey.
Open using the Softkey.
Open using the Softkey.
Open using the Softkey.
Activate with the Softkey.
Open the setting by selecting the Softkey.
j Enter the phone number to which the subscriber is to be deflected and confirm
(see
page 21).
Entering a destination phone number is not mandatory when call deflection is active. To forward a call, you will be prompted in the case of the unsaved destination phone number to enter a destination number or select a
corresponding subscriber from the conversations list.
Deflect to DSS
or Deflecting to a DSS number
¢_
A call can be deflected to a direct station selection (DSS) subscriber using the
DSS key, if the key is configured and the deflect function is activated by your ad
ministrator page 107.
Information only, as set by the administrator: on or off.
-
Page 78

78
Configuring call forwarding
You can also enter the call forwarding settings via the "Presence" key
(
page 65).
z You can also configure this setting via the WEB interface page 162.
@ Press the key shown if appropriate.
Settings
$
User settings
$
Configuration
$
Incoming calls
$
Forwarding
Settings
_
-
_
if nec. j Enter and confirm the User password.
-
_
-
_
-
_
Open using the Softkey.
Open using the Softkey.
Open using the Softkey.
Open using the Softkey.
Open using the Softkey.
Configuring call forwarding
-
_
Open using the Softkey.
For a description of the settings, see section ”Standard call forwarding”
page 64.
Setting alerts
You can activate and deactivate visual and audible alerts in the Forwarding Alerts for calls that have been forwarded to you
Alerts
Visual
Audible
Forwarding party
Display last
-
_
¢_
or
¢_
or
K
_
¥
_
Q
_
Open using the Softkey.
Enable or disable using the Softkey.
Enable or disable using the Softkey.
Open with the Softkey. The current setting is displayed.
You will be offered the following options:
• Display last
• Display first
Confirm with the Softkey, for example "Display last" to switch.
Save all settings with the Softkey.
Page 79

79
ñ
Call waiting (second call)
You can accept a second incoming call in the course of an ongoing call. The caller hears the on-hook signal while you hear a call-waiting signal tone. You can
reject, forward or accept the second call. You can block the second call or the
signal tone
Answering a second call
Prerequisite: You are conducting a call and call waiting is allowed page 81.
page 81.
t Incoming call
Thomas Meier
1234954
Answer
O
_
The phone rings. The caller is displayed.
Press the Softkey. You can talk to the second party.
The connection to the first party is on hold.
You can still
• toggle between the first and second call or
• put on hold and retrieve the second and first call alternately
• initiate a conference
Consultation call from second call
If the second call is your active call you can initiate a consultation call from it.
The administrator must have approved the consultation in the second call.
From a consultation call in the second call you can
• initiate a conference
• toggle between the second call and a consultation call
• put on hold and retrieve the second and consultation call successively
page 62
• transfer a call
• disconnect the calls again
page 62 or
End & reconnect
Ignore
à
H
_
_
During a consultation in the second call, the first call is parked and can only be
unparked if the consultation or second call was ended or these calls were con
nected.
Disconnecting the second call
Press the Softkey. The call to this subscriber is disconnected and the call to the
first subscriber is reconnected.
Ending the second call End & reconnect by hanging up
If you or the second call partner hangs up, you will be prompted to retrieve the
first call again if "Hold and hang-up" is disabled (
call will remain on hold until you receive this prompt after a defined time interval.
page 52). Otherwise, the first
Ignoring the second call
Prerequisite: You are conducting a call and call waiting is allowed page 81.
Press the Softkey.
-
Page 80

80
The caller still hears the on-hook signal. You can subsequently Answer, Reject
or Deflect the second call via Conversations. Your administrator must have al
lowed for a corresponding wait time for this in the system so that the call is not
terminated or forwarded prematurely.
While the ignored second call continues to wait, from the active call you can:
• initiate a consultation call
• initiate a conference
• toggle between the consultation call and your call partner
• transfer a call
A third call would be rejected with the busy signal. If you have disconnected the
first call, the ignored second call rings like a normal call.
-
Rejecting a second call
Prerequisite: You are conducting a call and call waiting is allowed page 81.
Reject
Deflect
Complete transfer
í
_
Press the Softkey.
The second call is rejected. The caller hears the busy signal. The call is indicated as "missed" in Conversations.
Deflecting a second call
Prerequisite: You are conducting a call and call waiting is allowed page 81.
Ô
_
Press the Softkey.
j Enter the phone number and confirm. You can also select and call the relevant
subscriber from Conversations at this point.
The second call is deflected to the destination specified.
Connecting parties
Prerequisite: You have answered the second call.
D
_
Press the Softkey. The other two parties are now connected to one another. You
can now hang up or dial another number for instance.
or Connecting by hanging up
Prerequisite: Connecting by hanging up is activated (ask your administrator)
and "Toggle associate" must be enabled (
page 82).
] or É Replace the handset or, if you are in speakerphone mode, press the loudspeak-
er key. The other two parties are now connected to one another.
Page 81

Allowing call waiting
If the call waiting (second call) function is deactivated, a caller hears the
busy signal if you are already conducting a call.
Prerequisite: The option was programmed by your administrator.
z You can also configure this setting via the WEB interface page 162.
@ Press the key shown if appropriate.
81
Settings
$
User settings
$
Configuration
$
Incoming calls
Handling
Allow call waiting
_
-
_
if nec. j Enter and confirm the User password.
-
_
-
_
-
_
¢_
Q
_
Open using the Softkey.
Open using the Softkey.
Open using the Softkey.
Open using the Softkey.
Open using the Softkey.
Enable or disable using the Softkey.
Save the setting with the Softkey.
Assuming Allow call waiting is activated, you can toggle a configured key to
switch call waiting on/off (
page 74).
Page 82

82
Connecting subscribers by hanging up
Set the "Toggle associate" function to Yes if you want to connect to a second or
pickup call by hanging up.
z You can also configure this setting via the WEB interface page 162.
@ Press the key shown if appropriate.
Settings
$
User settings
$
Configuration
Connected calls
Toggle associate
_
-
_
if nec. j Enter and confirm the User password.
-
_
-
_
Open using the Softkey.
Open using the Softkey.
Open using the Softkey.
Open using the Softkey.
€ Switch to "Toggle associate".
¢_
Q
_
Enable or disable using the Softkey.
Save the setting with the Softkey.
Page 83

83
Transferring a call
You can transfer your current call to another party with or without consultation.
Blind transfer
Prerequisite: You are conducting a call. The "Allow call transfer" and "Transfer
on ring" options are allowed
page 84.
Transfer
Consult
Complete Xfer
D
_
Press the Softkey.
j Enter and confirm the phone number of the second party to whom you want to
transfer the call. You can also select and call the subscriber from conversations
at this point.
The list of conversations is displayed after the call is successfully transferred.
Transferring with consultation
You can announce a call to a recipient before transferring it.
Prerequisite: You are conducting a call. The options "Allow call transfer" and
"Transfer on ring" are allowed
E
_
Press the Softkey.
j Enter and confirm the phone number of the second party to whom you want to
transfer the call. You can also select and call the subscriber from conversations
at this point.
Announce the call you want to transfer.
D
_
Press the Softkey.
If the party does not answer:
page 84.
Complete transfer
D
You do not have to wait for the second party to answer before you can transfer
the call.
_
Press the Softkey.
or Replace the handset or, if speakerphone mode is active, press the illuminated
É key to transfer the call.
If the party does not answer, you will be called back by the first party after a defined time.
Page 84

84
Allowing call transfer
z You can also configure this setting via the WEB interface page 162.
@ Press the key shown if appropriate.
Settings
$
User settings
$
Configuration
Connected calls
Allow call transfer
_
-
_
if nec. j Enter and confirm the User password.
-
_
-
_
Open using the Softkey.
Open using the Softkey.
Open using the Softkey.
Open using the Softkey.
€ Switch to Allow call transfer.
¢_
Q
_
Enable or disable using the Softkey.
Save the setting with the Softkey.
Page 85

CTI calls
ñ
Beep on auto-answer
When you dial a number with a CTI application (e.g. Outlook) and auto-answer
is activated, the phone switches automatically to speakerphone mode. If autoanswer is deactivated, the phone first rings and you have to press the loud
speaker key or lift the handset in order to set up the call. This setting also defines
whether or not incoming calls are automatically accepted. If the function is ac
tive, an alert beep sounds when a call is automatically accepted.
Information on the operation of the configured CTI application can be found in
the corresponding operating instructions.
z You can also configure this setting via the WEB interface page 162.
The option was programmed by your administrator.
@ Press the key shown if appropriate.
85
-
-
Settings
$
User settings
$
Configuration
$
Incoming calls
CTI calls
AutoAnswer
AutoAnswer beep
_
-
_
if nec. j Enter and confirm the User password.
-
_
-
_
-
_
¢_
and
Open using the Softkey.
Open using the Softkey.
Open using the Softkey.
Open using the Softkey.
Open using the Softkey.
Enable or disable using the Softkey.
€ Switch to AutoAnswer beep.
¢_
Q
_
Enable or disable using the Softkey.
Save the setting with the Softkey.
Page 86

86
ñ
Beep on auto-reconnect
You can reconnect a held call both via the CTI application and via the phone. A
beep sounds when you toggle between an active call and a held call when the
function is active.
z You can also configure this setting via the WEB interface page 162.
The option was programmed by your administrator.
@ Press the key shown if appropriate.
Settings
$
User settings
$
Configuration
$
Incoming calls
CTI calls
AutoReconnect beep
_
-
_
if nec. j Enter and confirm the User password.
-
_
-
_
-
_
Open using the Softkey.
Open using the Softkey.
Open using the Softkey.
Open using the Softkey.
Open using the Softkey.
€ Switch to AutoReconnect beep.
¢_
Q
_
Enable or disable using the Softkey.
Save the setting with the Softkey.
Page 87

87
Making calls
Dialing with the selected dialing key
You can program frequently used phone numbers on programmable keys
page 70. If you press a selected dialing key, the associated contact or phone
number is displayed and the connection is set up.
Prerequisite: A function key for selected dialing is programmed page 70.
Party
Georg Simon Ohm
_
Press the function key for a saved number. The connection is set up.
Dialing from conversations
The conversations list contains:
• Dialed, received and missed calls
• Subscribers from Circuit (if activated)
• Subscribers from Exchange (if activated)
• Subscribers from the corporate directory (if already activated by the administrator)
If you cannot find redials or received or dialed calls in the list, check if the call
log is activated.
The conversations list is displayed on the screen. If the contact you want is not
visible, then select with
μ€ or search by entering the phone number or name.
- O
_
Confirm the selected conversation with the Softkey. The phone number is dialed.
or
Georg Simon Ohm
O
_
If visible, confirm immediately with the Softkey for the conversation. The phone
number is dialed.
Page 88

88
Using autodial delay
A number is automatically dialed after a set delay starting from the entry of the
number's last digit. The autodial delay can be used:
• when dialing in idle mode
• when deflecting an incoming call
• during a consultation
• when transferring an answered call.
The delay can be reduced by performing one of the following activities:
• Pressing the Z key. This always works.
• Lifting the handset. This only works if the phone number was entered when the
phone was idle or if it was entered for a consultation call when the handset was
off hook.
If an emergency number is preset by your administrator, the autodial delay
for this phone number is reduced to one second.
Settings for autodial delay
z You can also configure this setting via the WEB interface page 162.
The setting does not affect automatic emergency number dialing.
Settings
$
User settings
$
Configuration
Outgoing calls
Autodial delay (s)
If you select Autodial delay (s), you must either confirm with the Softkey or wait
until the autodial delay expires to set up a call when dialing with the handset on
hook.
@ Press the key shown if appropriate.
_
-
_
if nec. j Enter and confirm the User password.
-
_
-
_
3
K
_
Open using the Softkey.
Open using the Softkey.
Open using the Softkey.
Open using the Softkey.
The current setting is displayed. Open using the Softkey.
€ Select a new time.
5
¥
_
Confirm with the Softkey to set the new time.
Q
_
Save the setting by selecting the Softkey.
Automatic dial delay does not work if you are using a dial plan and Immediate ring is configured (see page 90). The number is automatically dialed as soon as the string entered matches an entry in the dial plan.
Page 89

Allowing Busy when dialling
If you activate this function, an incoming call received while you are dialing is rejected. The caller then hears the busy signal.
z You can also configure this setting via the WEB interface page 162.
@ Press the key shown if appropriate.
89
Settings
$
User settings
$
Configuration
Outgoing calls
Busy when dialling
_
-
_
if nec. j Enter and confirm the User password.
-
_
-
_
¢_
Q
_
Open using the Softkey.
Open using the Softkey.
Open using the Softkey.
Open using the Softkey.
Enable or disable using the Softkey.
Save the setting with the Softkey.
This setup option can also be found in the "Incoming calls" > "Handling"
menu.
Allowing Transfer on ring
If this option is allowed, you can activate call transfer by replacing the handset
even before the called party answers.
z You can also configure this setting via the WEB interface page 162.
Settings
$
User settings
$
Configuration
Outgoing calls
Transfer on ring
@ Press the key shown if appropriate.
_
-
_
if nec. j Enter and confirm the User password.
-
_
-
_
Open using the Softkey.
Open using the Softkey.
Open using the Softkey.
Open using the Softkey.
€ Switch to Transfer on ring.
¢_
Q
_
Enable or disable using the Softkey.
Save the setting with the Softkey.
Page 90

90
ñ
Immediate dialing
Immediate dialling should only be activated if your administrator has configured
and approved a dial plan.
Immediate dialling is deactivated by default. For this reason after entering the
number you must either confirm the "Immediate dialling" option or wait until the
dial delay expires to set up the connection. If Immediate ring is configured, your
call is automatically dialed as soon as the string entered matches an entry in the
dial plan.
Activating or deactivating immediate dialing
z You can also configure this setting via the WEB interface page 162.
@ Press the key shown if appropriate.
Settings
$
User settings
$
Configuration
Outgoing calls
Immediate dialling
_
-
_
if nec. j Enter and confirm the User password.
-
_
-
_
Open using the Softkey.
Open using the Softkey.
Open using the Softkey.
Open using the Softkey.
€ Select the "Immediate dialling" function.
¢_
Q
_
Activate with the Softkey.
Save the setting by selecting the Softkey.
Dialing using the hot or warm line function
Your administrator can configure a hot line or warm line for your phone.
If you lift the phone's handset or press the loudspeaker key,
• immediately in the case of a hot line or
• after a defined period of time in the case of a warm line, a number specified by
you is dialed immediately.
Examples:
• The phone in the elevator immediately dials the reception number.
• The phone at a patient's bed dials the ward number after one minute, for example, if no other number is dialed.
Page 91

91
ñ
Callback
You can request a callback if the subscriber called is busy or if nobody answers.
You receive a callback when the other party's line becomes free.
This option is only available if both you and your administrator have activated the function ( page 92).
On multi-line telephones page 98, only the callback requests for your
primary line are logged.
Requesting callback
! Busy
Thomas Meier
1234954
Cancel callbacks
Callback
B
O
_
_
Prerequisite: The subscriber called is busy or nobody answers.
Press the Softkey.
Deleting callback requests
You can delete scheduled callback requests if you no longer need to return a
call, for example, because you have met the other party in person.
Prerequisite: A callback was requested.
Press the Softkey. All callback requests are deleted.
Responding to a callback
Prerequisite: A callback was requested. Your phone rings and the subscriber
information appears on the graphic display.
Accepting a callback
Accept
Reject
O
O
_
_
Press the Softkey.
Rejecting a callback
The Reject function is approved by the administrator.
Press the Softkey.
The callback request is deleted. The caller's phone number is added to the
missed calls list.
Page 92

92
Permitting a callback
Prerequisite: The Callback function is approved by the administrator.
z You can also configure this setting via the WEB interface page 162.
@ Press the key shown if appropriate.
Settings
$
User settings
$
Configuration
Outgoing calls
Callback
_
-
_
if nec. j Enter and confirm the User password.
-
_
-
_
¢_
Q
_
Open using the Softkey.
Open using the Softkey.
Open using the Softkey.
Open using the Softkey.
Activate with the Softkey.
Save the setting by selecting the Softkey.
Page 93

Setting up conversations
The content of conversations is determined by assigned subscriber lists. You
can assign the content of Circuit or the local entries from Exchange and the call
er list in conversations. Activating Circuit excludes Exchange and the local caller
list.
Activating Circuit
To use your Circuit account in conversations, you have to enter the server address and your access details.
z You can also configure this setting via the WEB interface page 162.
@ Press the key shown if appropriate.
93
-
Settings
$
User settings
$
Configuration
Circuit
Server
¾
eu.yourcircuit.com
Username
¾
email@example.com
_
-
_
if nec. j Enter and confirm the User password.
-
_
-
_
K
_
Q
_
Open using the Softkey.
Open using the Softkey.
Open using the Softkey.
Open using the Softkey.
Open using the Softkey.
The input field is displayed.
j Enter the URL for the Circuit server and conclude your input with the Softkey.
K
Q
_
_
Open using the Softkey.
The input field is displayed.
j Enter your e-mail address used for Circuit and conclude your input with the Soft-
key.
Password
©
**********
K
Q
_
_
Open using the Softkey.
The input field is displayed.
j Enter your password used for Circuit and conclude your input with the Softkey.
If your details are correct, conversations are switched immediately to the Circuit
subscriber list.
¿
_
Exit the menu.
Page 94

94
Adjusting Exchange
To use your Exchange account in conversations, you have to enter the server
address and your access details.
z You can also configure this setting via the WEB interface page 162.
@ Press the key shown if appropriate.
Settings
$
User settings
$
Configuration
Microsoft® Exchange
Server
¾
EXACSY.com
Username
¾
email@example.com
_
-
_
if nec. j Enter and confirm the User password.
-
_
-
_
K
_
Q
_
Open using the Softkey.
Open using the Softkey.
Open using the Softkey.
Open using the Softkey.
Open using the Softkey.
The input field is displayed.
j Enter the URL for the Exchange server and conclude your input with the Softkey.
K
Q
_
_
Open using the Softkey.
The input field is displayed.
j Enter your e-mail address used for Exchange and conclude your input with the
Softkey.
Password
©
**********
Folder (optional)
¾
Output
K
Q
_
_
Open using the Softkey.
The input field is displayed.
j Enter your password used for Exchange ActiveSync and conclude your input
with the Softkey.
K
Q
_
_
Open using the Softkey.
The input field is displayed.
j Enter the folder with the destination data and conclude your input with the Soft-
key.
Q
_
Save the configuration.
Page 95

95
Conference
Local conference
This type of conference is also referred to as a three-party conference. It involves up to three participants.
Prerequisite: You are conducting a consultation call page 60 or have accept-
ed a second call page 79 and the conference function is allowed page 96.
Initiating a local conference
You can initiate a conference by calling the "Conference" function in the
context menu of either the active or held call. You can alternatively press
a configured Conference key.
User
Start conference
Participants
+ or —
r
_
If you are already involved in a secure connection with a party when you
initiate a consultation call, the original party is placed on hold. The new
consultation connection can be either secure or unsecured. However, the
first connection remains secure even if all three parties are now joined to
gether in a conference.
The entire conference is nonsecure if the connection to at least one of the
parties is not secure.
The relevant padlock icon appears in the "Conference" row.
Press the Softkey – the conference is started. You are connected to both parties
at once. The conference is displayed.
Querying information on subscribers
r
_
Press the Softkey to display the subscribers.
€ Select the subscriber.
-
The subscriber is busy.
« Open the subscriber information.
-
Page 96

96
Ending a local conference
Allowing call partners to continue a conference after you exit
Prerequisite: The function "Allow joining in a local conference" ( page 97)
was activated.
Settings
$
User settings
Exit conf.
P
_
Press the Softkey.
or
] or É Replace the handset or, if you are in speakerphone mode, press the loudspeak-
er key. Both call partners remain connected. You are disconnected from the conference call.
Disconnecting a party
End conf.
à
_
Press the Softkey. Both connections are cleared down – the conference is
cleared down.
Allowing a local conference
This option allows or blocks the "Local conference" function.
z You can also configure this setting via the WEB interface page 162.
@ Press the key shown if appropriate.
_
-
_
if nec. j Enter and confirm the User password.
Open using the Softkey.
Open using the Softkey.
$
Configuration
Connected calls
Allow conferences
-
-
_
_
Open using the Softkey.
Open using the Softkey.
€ Switch to Allow conferences.
¢_
Q
_
Enable or disable using the Softkey.
Save the setting with the Softkey.
Page 97

Allowing joining in a conference
You can use this option to decide whether or not your call partners are allowed
to join calls after you exit the conference call.
z You can also configure this setting via the WEB interface page 162.
@ Press the key shown if appropriate.
97
Settings
$
User settings
$
Configuration
Connected calls
Join in conferences
_
-
_
if nec. j Enter and confirm the User password.
-
_
-
_
¢_
Q
_
Open using the Softkey.
Open using the Softkey.
Open using the Softkey.
Open using the Softkey.
Enable or disable using the Softkey.
Save the setting with the Softkey.
Page 98

98
3336
Available
Team
In a call
Line 1
Line 2
Line 3
Line/trunk keys
Other keys
available
MultiLine
The next section describes the settings for a MultiLine phone and how to use a
MultiLine phone. To simplify understanding, we recommend first reading the
Section "
page 111 for a detailed description of the settings.
Line/trunk keys
Line or DSS keys can be configured by your administrator on the programmable
keys of the OpenScape Desk Phone CP400 and a OpenScape Key Module 400.
You can also use and monitor these line keys via the Team menu.
The Team menu could look as follows for example:
Operating your OpenScape Desk Phone CP400 ( page 27)". Re fe r t o
These line keys cannot be changed or deleted by the user.
Each key that is assigned the function "line" corresponds to one line. This means
up to 16 lines can be configured on the function keys of the OpenScape Desk
Phone CP400.
A distinction is made here between primary, secondary and phantom lines. Each
of these line types can be used on a private or shared basis
page 99.
Primary line
All multi-line telephones have a primary line. This line can be reached in the usual manner via your public phone number. Incoming calls to your number are signaled on this line.
To avoid conflict between individual multi-line phones, the functions "Do
not disturb" and "Call forwarding" can only be used for the primary line.
Page 99

99
Secondary line
A secondary line on your phone is used as a primary line by another subscriber
in the line trunk group. Your primary line, which is configured on another tele
phone in a line trunk group, simultaneously functions as the secondary line on
that telephone.
-
Phantom line
Phantom lines are not used as primary lines by any telephones in a line trunk
group. Phantom lines are established, for example, when the number of lines
provided by a communications system exceeds the number of available tele
phones.
-
Line utilization
• Private line: A line that is used by a single telephone. This line cannot be used
as a secondary line by another telephone.
• Shared line: A line that is configured on multiple telephones. The line status
is displayed for all telephones that share this line. If, for example, a shared line
is being used by a telephone, a status message indicating that this line is busy
is displayed on all other telephones sharing the line.
• Direct call line: A line with a direct connection to another telephone.
The status of a line can be identified in the Team menu by the icons and the color
of the LEDs on the line keys
page 98:
LED displays
LED Meaning
_
£
¤
¤
LED off: The phone is in idle mode.
Flashing green:
• Incoming call on the line page 100
• "Hold reminder" is activated
LED flickering green:
• Outgoing call on the line
• The incoming call was prioritized and selected in accordance with
the "Automatic line selection for incoming calls" option
Flickering: The line is on "Hold".
Flashing: Call forwarding is activated.
LED lights green: The line is busy.
LED lights orange: The line is on "Hold".
page 50
Page 100

100
Incoming calls
Answering calls for the primary line
ë Incoming call
Thomas Meier
1234954
Line 1
ë Incoming call
Thomas Meier
1234954
Answer
ø
O
£
_
The phone rings. The caller and the relevant line are displayed. The Notification
LED flashes.
Press the flashing key for the primary line and use speakerphone mode.
or
Press the Softkey and use speakerphone mode.
or
^ Lift the handset. You have answered the call.
Answering calls for a secondary line
Prerequisite: The secondary line is configured on your multi-line telephone.
ù
The phone rings. The caller and the relevant line are displayed. The Notification
LED flashes.
Using the handset
Line 2
Answer
^ Lift the handset.
You have answered the call.
Using the line keys
Press the flashing key for the secondary line and use speakerphone mode.
or
Press the Softkey and use speakerphone mode.
O
£
_
The line that rings is automatically selected. If calls are ringing on more
than one line, you will be connected to the line that has been ringing the
longest.
 Loading...