

Page 1

OpenScape Desk Phone CP200/CP205
OpenScape Voice
OpenScape 4000
User Guide SIP
A31003-C1000-U100-6-7619
Page 2

Our Quality and Environmental Management Systems are
implemented according to the requirements of the ISO9001 and
ISO14001 standards and are certified by an external certification
company.
Copyright © Unify Software and Solutions GmbH & Co. KG 11/2017
Mies-van-der-Rohe-Str. 6, 80807 Munich/Germany
All rights reserved.
Reference No.: A31003-C1000-U100-6-761 9
The information provided in this document contains merely general descriptions or
characteristics of perfo rmance which in case of actual use do not always apply as
described or which may change as a result of further development of the products.
An obligation to provide the respective cha racteristics shall only exist if expressly agreed in
the terms of contract.
Availability and technical specifications are subject to change without notice.
Unify, OpenScape, OpenStage and HiPath are registered trademarks of Unify Software and
Solutions GmbH & Co. KG. All other company, brand, product and service names are
trademarks or registered trademarks of their respective holder s.
unify.com
Page 3
Important information 3
7
7
7
Important information
For safety reasons, the telephone should only be supplied with power:
• using the original power supply unit.
• over a LAN with PoE (Power over Ethernet), which complies with the IEEE
802.3af standard.
Never open the telephone. Should you encounter any problems, consult your administrator.
Use only original accessories.
The use of other accessories is hazardous and will render the warranty, extended
manufacturer's liability and the CE and other markings invalid.
Trademarks
The device conforms to the EU Directive as attested by the CE marking. The CE Declaration of Conformity and, where applicable, other existing declarations of conformity as well as further information on regulations that restrict the usage of substances
in products or affect the declaration of substances used in products can be found in
the Unify Expert WIKI at http://wiki.unify.com/
http://wiki.unify.com in the section "Declarations of Conformity".
The adjacent symbol indicates that any electrical and electronic products installed
and sold in countries of the European Union to which the WEEE2 Directive 2012/19/
EU applies should be disposed of separately from the municipal waste stream in appropriate collection systems.
Information concerning the proper disposal of your Unify product in the business-tobusiness market segment is available from your local sales representative in Unify or
partner sales.
Care and cleaning instructions
• Never spray the phone with liquids as the penetrating fluids can lead to malfunctions or may
damage the device.
• Do not use substances such as alcohol, chemicals, solvents or scouring agents, as these substances can lead to surface damage.
• Clean the phone with a soft and slightly damp cloth.
Online documentation
This document along with additional information is available online at: http://www.unify.com/
Support.
Technical notes, current information about firmware updates, frequently asked questions and lots
more can be found on the Internet at: http://wiki.unify.com/
.
Software update
During a software update, the phone must not be disconnected from the power supply unit and/or
the LAN. An update action is indicated by messages on the display and/or by flashing LEDs.
Page 4

4 Important information
Location of the telephone
• The telephone may only be operated using the LAN cabling internally in the building. The device
should be connected to the IP infrastructure using a shielded LAN cable: Cat-5 for 100 Mb/s or
Cat-6 for 1000 Mb/s. Make sure in the building installation that this cable shielding is earthed.
• The telephone is designed for operation in a protected environment within a temperature range
of 5 °C to 40 °C.
• Do not install the telephone in a room where large quantities of dust accumulate; this can considerably reduce the service life of the telephone.
• Do not expose the telephone to direct sunlight or any other source of heat, as this is liable to
damage the electronic components and the casing.
• Do not install the telephone in bathrooms or shower rooms.
Product-oriented environmental protection
Unify is committed in terms of its product strategy to bringing environmentally friendly products to
market, taking account of the entire product life cycle. Unify strives to acquire the relevant environmental labels for its products in the event that the environmental label programs permit qualification for individual Unify products.
ENERGY STAR is a U.S. Environmental Protection Agency voluntary program
that helps businesses and individuals save money and protect our climate through superior energy efficiency.
Products that earn the ENERGY STAR prevent greenhouse gas emissions by
meeting strict energy efficiency criteria or requirements set by the U.S. Environmental Protection Agency.
Unify is an ENERGY STAR partner participating in the ENERGY STAR program
for Enterprise Servers and Telephony.
The Unify product OpenScape DeskPhone CP200 has earned the ENERGY
STAR.
Learn more at
The OpenScape DeskPhone CP200 (SIP), OpenScape DeskPhone CP400 (SIP)
and OpenScape DeskPhone CP600 (SIP) telephones have been awarded with
the BLAUE ANGEL label in Germany.
The proprietor of this environmental label is the German Federal Ministry for the
Environment, Nature Protection and Reactor Safety.
VoIP Telephones with the BLUE ANGEL fulfill high standards in regard of energy
efficiency, environmental friendly use of materials and a sustainable repair and
recycling concept.
Further information in regard of the environmental compatibility of the products
can be found here
http://www.unify.com/de/about/green-enterprise.aspx
http://www.blauer-engel.de/en/products_brands/search_products/produkttyp.php?id=559
energystar.gov.
Special setting instructions for energy-efficient use of telephones can be found on
page 131.
Page 5

Contents 5
Contents
Important information. . . . . . . . . . . . . . . . . . . . . . . . . . . . . . . . . 3
Trademarks . . . . . . . . . . . . . . . . . . . . . . . . . . . . . . . . . . . . . . . . . . . . . . . . . . . . . . . . . . . . . . . . . 3
Care and cleaning instructions . . . . . . . . . . . . . . . . . . . . . . . . . . . . . . . . . . . . . . . . . . . . . . . . . . 3
Online documentation . . . . . . . . . . . . . . . . . . . . . . . . . . . . . . . . . . . . . . . . . . . . . . . . . . . . . . . . . 3
Software update . . . . . . . . . . . . . . . . . . . . . . . . . . . . . . . . . . . . . . . . . . . . . . . . . . . . . . . . . . . . . 3
Location of the telephone . . . . . . . . . . . . . . . . . . . . . . . . . . . . . . . . . . . . . . . . . . . . . . . . . . . . . . . 4
Product-oriented environmental protection . . . . . . . . . . . . . . . . . . . . . . . . . . . . . . . . . . . . . . . . . 4
General information . . . . . . . . . . . . . . . . . . . . . . . . . . . . . . . . . 10
About this manual . . . . . . . . . . . . . . . . . . . . . . . . . . . . . . . . . . . . . . . . . . . . . . . . . . . . . . . . . . . 10
Icons used in the manual . . . . . . . . . . . . . . . . . . . . . . . . . . . . . . . . . . . . . . . . . . . . . . . . . . . . 10
Service . . . . . . . . . . . . . . . . . . . . . . . . . . . . . . . . . . . . . . . . . . . . . . . . . . . . . . . . . . . . . . . . . . . . 11
Intended use . . . . . . . . . . . . . . . . . . . . . . . . . . . . . . . . . . . . . . . . . . . . . . . . . . . . . . . . . . . . . . . 11
Telephone type . . . . . . . . . . . . . . . . . . . . . . . . . . . . . . . . . . . . . . . . . . . . . . . . . . . . . . . . . . . . . 11
Speakerphone quality and display legibility . . . . . . . . . . . . . . . . . . . . . . . . . . . . . . . . . . . . . . . 11
Remote configuration for cloud service providers . . . . . . . . . . 12
From factory defaults to operational telephone. . . . . . . . . . . . . . . . . . . . . . . . . . . . . . . . . . . . . 12
Starting up the telephone. . . . . . . . . . . . . . . . . . . . . . . . . . . . . . . . . . . . . . . . . . . . . . . . . . . .12
Canceling the Remote configuration . . . . . . . . . . . . . . . . . . . . . . . . . . . . . . . . . . . . . . . . . . . 13
Getting to know the OpenScape Desk Phone CP200/CP205 . 14
The user interface of your telephone . . . . . . . . . . . . . . . . . . . . . . . . . . . . . . . . . . . . . . . . . . . . . 14
Navigation keys . . . . . . . . . . . . . . . . . . . . . . . . . . . . . . . . . . . . . . . . . . . . . . . . . . . . . . . . . . . 16
Programmable function keys . . . . . . . . . . . . . . . . . . . . . . . . . . . . . . . . . . . . . . . . . . . . . . . . . 17
Dialpad. . . . . . . . . . . . . . . . . . . . . . . . . . . . . . . . . . . . . . . . . . . . . . . . . . . . . . . . . . . . . . . . . . 18
Display . . . . . . . . . . . . . . . . . . . . . . . . . . . . . . . . . . . . . . . . . . . . . . . . . . . . . . . . . . . . . . . . . . . . 20
Idle mode . . . . . . . . . . . . . . . . . . . . . . . . . . . . . . . . . . . . . . . . . . . . . . . . . . . . . . . . . . . . . . . . 20
Displays on the status line for adjusting the volume . . . . . . . . . . . . . . . . . . . . . . . . . . . . . . . 21
Context-dependent displays . . . . . . . . . . . . . . . . . . . . . . . . . . . . . . . . . . . . . . . . . . . . . . . . . 22
Voicemail . . . . . . . . . . . . . . . . . . . . . . . . . . . . . . . . . . . . . . . . . . . . . . . . . . . . . . . . . . . . . . . . 23
Call logging . . . . . . . . . . . . . . . . . . . . . . . . . . . . . . . . . . . . . . . . . . . . . . . . . . . . . . . . . . . . . . . . . 24
Additional notes on Call logging. . . . . . . . . . . . . . . . . . . . . . . . . . . . . . . . . . . . . . . . . . . . . . . 24
Settings . . . . . . . . . . . . . . . . . . . . . . . . . . . . . . . . . . . . . . . . . . . . . . . . . . . . . . . . . . . . . . . . . . . . 25
Phonebooks . . . . . . . . . . . . . . . . . . . . . . . . . . . . . . . . . . . . . . . . . . . . . . . . . . . . . . . . . . . . . . . 25
User settings . . . . . . . . . . . . . . . . . . . . . . . . . . . . . . . . . . . . . . . . . . . . . . . . . . . . . . . . . . . . . 26
Control and monitoring function . . . . . . . . . . . . . . . . . . . . . . . . . . . . . . . . . . . . . . . . . . . . . . . . 27
Ports on the underside of the phone . . . . . . . . . . . . . . . . . . . . . . . . . . . . . . . . . . . . . . . . . . . . . . 28
Using network ports more efficiently . . . . . . . . . . . . . . . . . . . . . . . . . . . . . . . . . . . . . . . . . . . 28
Telephone settings. . . . . . . . . . . . . . . . . . . . . . . . . . . . . . . . . . 29
Display contrast. . . . . . . . . . . . . . . . . . . . . . . . . . . . . . . . . . . . . . . . . . . . . . . . . . . . . . . . . . . . . 29
Volumes . . . . . . . . . . . . . . . . . . . . . . . . . . . . . . . . . . . . . . . . . . . . . . . . . . . . . . . . . . . . . . . . . . 29
Key click . . . . . . . . . . . . . . . . . . . . . . . . . . . . . . . . . . . . . . . . . . . . . . . . . . . . . . . . . . . . . . . . . . 30
Settings that impact energy efficiency. . . . . . . . . . . . . . . . . . . . . . . . . . . . . . . . . . . . . . . . . . . . . 31
Page 6

6 Contents
Making calls . . . . . . . . . . . . . . . . . . . . . . . . . . . . . . . . . . . . . . . 32
Incoming calls . . . . . . . . . . . . . . . . . . . . . . . . . . . . . . . . . . . . . . . . . . . . . . . . . . . . . . . . . . . . . 32
Answering a call via the handset . . . . . . . . . . . . . . . . . . . . . . . . . . . . . . . . . . . . . . . . . . . . . . 32
Answering a call via the loudspeaker (speakerphone mode) . . . . . . . . . . . . . . . . . . . . . . . . 32
Answering a call via the headset . . . . . . . . . . . . . . . . . . . . . . . . . . . . . . . . . . . . . . . . . . . . . . 33
Rejecting a call. . . . . . . . . . . . . . . . . . . . . . . . . . . . . . . . . . . . . . . . . . . . . . . . . . . . . . . . . . . . 33
Deflecting a call . . . . . . . . . . . . . . . . . . . . . . . . . . . . . . . . . . . . . . . . . . . . . . . . . . . . . . . . . . . 33
Responding to a callback. . . . . . . . . . . . . . . . . . . . . . . . . . . . . . . . . . . . . . . . . . . . . . . . . . . . 34
Making calls . . . . . . . . . . . . . . . . . . . . . . . . . . . . . . . . . . . . . . . . . . . . . . . . . . . . . . . . . . . . . . . 34
Off-hook dialing . . . . . . . . . . . . . . . . . . . . . . . . . . . . . . . . . . . . . . . . . . . . . . . . . . . . . . . . . . . 34
On-hook dialing . . . . . . . . . . . . . . . . . . . . . . . . . . . . . . . . . . . . . . . . . . . . . . . . . . . . . . . . . . . 35
Dialing with the selected dialing key . . . . . . . . . . . . . . . . . . . . . . . . . . . . . . . . . . . . . . . . . . . 35
Redialing via the function key . . . . . . . . . . . . . . . . . . . . . . . . . . . . . . . . . . . . . . . . . . . . . . . . 35
Calling back a missed call . . . . . . . . . . . . . . . . . . . . . . . . . . . . . . . . . . . . . . . . . . . . . . . . . . .36
Requesting callback . . . . . . . . . . . . . . . . . . . . . . . . . . . . . . . . . . . . . . . . . . . . . . . . . . . . . . . 37
Using autodial delay. . . . . . . . . . . . . . . . . . . . . . . . . . . . . . . . . . . . . . . . . . . . . . . . . . . . . . . . 37
During a call . . . . . . . . . . . . . . . . . . . . . . . . . . . . . . . . . . . . . . . . . . . . . . . . . . . . . . . . . . . . . . . . 38
Activating/deactivating the microphone . . . . . . . . . . . . . . . . . . . . . . . . . . . . . . . . . . . . . . . . . 38
Changing the volume . . . . . . . . . . . . . . . . . . . . . . . . . . . . . . . . . . . . . . . . . . . . . . . . . . . . . . .38
Switching from handset to speakerphone mode . . . . . . . . . . . . . . . . . . . . . . . . . . . . . . . . . . 38
Switching from speakerphone mode to the handset . . . . . . . . . . . . . . . . . . . . . . . . . . . . . . . 39
Open listening . . . . . . . . . . . . . . . . . . . . . . . . . . . . . . . . . . . . . . . . . . . . . . . . . . . . . . . . . . . . 39
Consulting a second party . . . . . . . . . . . . . . . . . . . . . . . . . . . . . . . . . . . . . . . . . . . . . . . . . . . 39
Switching to the held party (alternating). . . . . . . . . . . . . . . . . . . . . . . . . . . . . . . . . . . . . . . . . 40
Conference . . . . . . . . . . . . . . . . . . . . . . . . . . . . . . . . . . . . . . . . . . . . . . . . . . . . . . . . . . . . . . 40
Putting on hold and retrieving alternately or simultaneously . . . . . . . . . . . . . . . . . . . . . . . . . 41
Connecting parties . . . . . . . . . . . . . . . . . . . . . . . . . . . . . . . . . . . . . . . . . . . . . . . . . . . . . . . . . 42
Placing a call on hold . . . . . . . . . . . . . . . . . . . . . . . . . . . . . . . . . . . . . . . . . . . . . . . . . . . . . . . 42
Call waiting (second call) . . . . . . . . . . . . . . . . . . . . . . . . . . . . . . . . . . . . . . . . . . . . . . . . . . .43
Transferring a call . . . . . . . . . . . . . . . . . . . . . . . . . . . . . . . . . . . . . . . . . . . . . . . . . . . . . . . . . 45
Ending a call . . . . . . . . . . . . . . . . . . . . . . . . . . . . . . . . . . . . . . . . . . . . . . . . . . . . . . . . . . . . . 46
Configuring call forwarding . . . . . . . . . . . . . . . . . . . . . . . . . . . . . . . . . . . . . . . . . . . . . . . . . . . . 46
Setting alerts . . . . . . . . . . . . . . . . . . . . . . . . . . . . . . . . . . . . . . . . . . . . . . . . . . . . . . . . . . . . . 47
Phonebooks and Konversationen . . . . . . . . . . . . . . . . . . . . . . . . . . . . . . . . . . . . . . . . . . . . . . . 48
Personal phonebook . . . . . . . . . . . . . . . . . . . . . . . . . . . . . . . . . . . . . . . . . . . . . . . . . . . . . . .48
Deleting all contacts. . . . . . . . . . . . . . . . . . . . . . . . . . . . . . . . . . . . . . . . . . . . . . . . . . . . . . . . 49
Corporate directory . . . . . . . . . . . . . . . . . . . . . . . . . . . . . . . . . . . . . . . . . . . . . . . . . . . . . . . . 50
Listening to voicemail . . . . . . . . . . . . . . . . . . . . . . . . . . . . . . . . . . . . . . . . . . . . . . . . . . . . . . . . . 53
Programmable keys. . . . . . . . . . . . . . . . . . . . . . . . . . . . . . . . . 54
List of available functions . . . . . . . . . . . . . . . . . . . . . . . . . . . . . . . . . . . . . . . . . . . . . . . . . . . . . . 54
Programming a key . . . . . . . . . . . . . . . . . . . . . . . . . . . . . . . . . . . . . . . . . . . . . . . . . . . . . . . . . . . 55
Initiating programming . . . . . . . . . . . . . . . . . . . . . . . . . . . . . . . . . . . . . . . . . . . . . . . . . . . . . .55
Beginning programming. . . . . . . . . . . . . . . . . . . . . . . . . . . . . . . . . . . . . . . . . . . . . . . . . . . . . 56
Programming enhanced functions . . . . . . . . . . . . . . . . . . . . . . . . . . . . . . . . . . . . . . . . . . . . . . 56
Repertory dialing . . . . . . . . . . . . . . . . . . . . . . . . . . . . . . . . . . . . . . . . . . . . . . . . . . . . . . . . . . 56
Konversationen . . . . . . . . . . . . . . . . . . . . . . . . . . . . . . . . . . . . . . . . . . . . . . . . . . . . . . . . . . . 57
Configuring a fixed forwarding key. . . . . . . . . . . . . . . . . . . . . . . . . . . . . . . . . . . . . . . . . . . . . 58
Configuring a variable call forwarding key . . . . . . . . . . . . . . . . . . . . . . . . . . . . . . . . . . . . . . . 59
Using programmed keys . . . . . . . . . . . . . . . . . . . . . . . . . . . . . . . . . . . . . . . . . . . . . . . . . . . . . . . 60
Example 1: Calling saved number . . . . . . . . . . . . . . . . . . . . . . . . . . . . . . . . . . . . . . . . . . . . . 60
Example 2: Activating/deactivating Call waiting. . . . . . . . . . . . . . . . . . . . . . . . . . . . . . . . . . . 60
Example 3: Immediate ring . . . . . . . . . . . . . . . . . . . . . . . . . . . . . . . . . . . . . . . . . . . . . . . . . . 60
Resetting programmed keys . . . . . . . . . . . . . . . . . . . . . . . . . . . . . . . . . . . . . . . . . . . . . . . . . . . .61
Page 7

Contents 7
Making calls in the team . . . . . . . . . . . . . . . . . . . . . . . . . . . . . 62
Group call . . . . . . . . . . . . . . . . . . . . . . . . . . . . . . . . . . . . . . . . . . . . . . . . . . . . . . . . . . . . . . . . . 62
Picking up a group call with the call pickup key . . . . . . . . . . . . . . . . . . . . . . . . . . . . . . . . . . . 63
Picking up a group call immediately via the pop-up menu . . . . . . . . . . . . . . . . . . . . . . . . . . . 63
Picking up a group call. . . . . . . . . . . . . . . . . . . . . . . . . . . . . . . . . . . . . . . . . . . . . . . . . . . . . . 63
Ignoring a group call . . . . . . . . . . . . . . . . . . . . . . . . . . . . . . . . . . . . . . . . . . . . . . . . . . . . . . . 63
Direct station selection keys . . . . . . . . . . . . . . . . . . . . . . . . . . . . . . . . . . . . . . . . . . . . . . . . . . . . 64
Calling a subscriber directly . . . . . . . . . . . . . . . . . . . . . . . . . . . . . . . . . . . . . . . . . . . . . . . . . .64
Call pickup . . . . . . . . . . . . . . . . . . . . . . . . . . . . . . . . . . . . . . . . . . . . . . . . . . . . . . . . . . . . . . . 64
Deflecting a call to a DSS subscriber. . . . . . . . . . . . . . . . . . . . . . . . . . . . . . . . . . . . . . . . . . . 65
LED display on DSS keys . . . . . . . . . . . . . . . . . . . . . . . . . . . . . . . . . . . . . . . . . . . . . . . . . . . 65
MultiLine . . . . . . . . . . . . . . . . . . . . . . . . . . . . . . . . . . . . . . . . . . . . . . . . . . . . . . . . . . . . . . . . . . . 66
Line/trunk keys. . . . . . . . . . . . . . . . . . . . . . . . . . . . . . . . . . . . . . . . . . . . . . . . . . . . . . . . . . . . 66
Incoming calls . . . . . . . . . . . . . . . . . . . . . . . . . . . . . . . . . . . . . . . . . . . . . . . . . . . . . . . . . . . . 67
Making calls . . . . . . . . . . . . . . . . . . . . . . . . . . . . . . . . . . . . . . . . . . . . . . . . . . . . . . . . . . . . . . 68
During calls . . . . . . . . . . . . . . . . . . . . . . . . . . . . . . . . . . . . . . . . . . . . . . . . . . . . . . . . . . . . . . 69
Settings for MultiLine (keyset) . . . . . . . . . . . . . . . . . . . . . . . . . . . . . . . . . . . . . . . . . . . . . . . . 72
Rollover for a line . . . . . . . . . . . . . . . . . . . . . . . . . . . . . . . . . . . . . . . . . . . . . . . . . . . . . . . . . . 74
Making calls in an executive/secretary team. . . . . . . . . . . . . . . . . . . . . . . . . . . . . . . . . . . . . . . 75
Mobility function . . . . . . . . . . . . . . . . . . . . . . . . . . . . . . . . . . . 76
Logging on to another telephone . . . . . . . . . . . . . . . . . . . . . . . . . . . . . . . . . . . . . . . . . . . . . . 76
Ending the mobility function on a telephone (log off) . . . . . . . . . . . . . . . . . . . . . . . . . . . . . . . 76
Privacy/security . . . . . . . . . . . . . . . . . . . . . . . . . . . . . . . . . . . . 77
Do not disturb . . . . . . . . . . . . . . . . . . . . . . . . . . . . . . . . . . . . . . . . . . . . . . . . . . . . . . . . . . . . . . 77
Enabling do not disturb via a key . . . . . . . . . . . . . . . . . . . . . . . . . . . . . . . . . . . . . . . . . . . . . . 77
Enabling do not disturb via the idle menu . . . . . . . . . . . . . . . . . . . . . . . . . . . . . . . . . . . . . . . 77
Allowing "Do not disturb" . . . . . . . . . . . . . . . . . . . . . . . . . . . . . . . . . . . . . . . . . . . . . . . . . . . .78
Security . . . . . . . . . . . . . . . . . . . . . . . . . . . . . . . . . . . . . . . . . . . . . . . . . . . . . . . . . . . . . . . . . . . . 79
User password . . . . . . . . . . . . . . . . . . . . . . . . . . . . . . . . . . . . . . . . . . . . . . . . . . . . . . . . . . . . 79
Locking the phone . . . . . . . . . . . . . . . . . . . . . . . . . . . . . . . . . . . . . . . . . . . . . . . . . . . . . . . . . 82
Other settings and functions . . . . . . . . . . . . . . . . . . . . . . . . . 84
Audio settings . . . . . . . . . . . . . . . . . . . . . . . . . . . . . . . . . . . . . . . . . . . . . . . . . . . . . . . . . . . . . . 84
Room character . . . . . . . . . . . . . . . . . . . . . . . . . . . . . . . . . . . . . . . . . . . . . . . . . . . . . . . . . . . 84
Ringer . . . . . . . . . . . . . . . . . . . . . . . . . . . . . . . . . . . . . . . . . . . . . . . . . . . . . . . . . . . . . . . . . . 84
Pattern melody. . . . . . . . . . . . . . . . . . . . . . . . . . . . . . . . . . . . . . . . . . . . . . . . . . . . . . . . . . . . 85
Pattern sequence. . . . . . . . . . . . . . . . . . . . . . . . . . . . . . . . . . . . . . . . . . . . . . . . . . . . . . . . . . 85
Opening listening mode . . . . . . . . . . . . . . . . . . . . . . . . . . . . . . . . . . . . . . . . . . . . . . . . . . . . . 86
Setting headset port use . . . . . . . . . . . . . . . . . . . . . . . . . . . . . . . . . . . . . . . . . . . . . . . . . . . .86
Special ringers . . . . . . . . . . . . . . . . . . . . . . . . . . . . . . . . . . . . . . . . . . . . . . . . . . . . . . . . . . . . 87
Activating/deactivating the ringer . . . . . . . . . . . . . . . . . . . . . . . . . . . . . . . . . . . . . . . . . . . . . . 88
Tone and indication with an unsecured voice connection . . . . . . . . . . . . . . . . . . . . . . . . . . . 88
Display language. . . . . . . . . . . . . . . . . . . . . . . . . . . . . . . . . . . . . . . . . . . . . . . . . . . . . . . . . . . . 89
Time display format. . . . . . . . . . . . . . . . . . . . . . . . . . . . . . . . . . . . . . . . . . . . . . . . . . . . . . . . . . 90
Date display format . . . . . . . . . . . . . . . . . . . . . . . . . . . . . . . . . . . . . . . . . . . . . . . . . . . . . . . . . . . 91
Country-specific settings . . . . . . . . . . . . . . . . . . . . . . . . . . . . . . . . . . . . . . . . . . . . . . . . . . . . . . . 92
Setting daylight saving time . . . . . . . . . . . . . . . . . . . . . . . . . . . . . . . . . . . . . . . . . . . . . . . . . . . 92
Setting the difference between daylight saving and standard time . . . . . . . . . . . . . . . . . . . . 93
Automatic daylight saving time . . . . . . . . . . . . . . . . . . . . . . . . . . . . . . . . . . . . . . . . . . . . . . . . . . 94
Setting the date and time . . . . . . . . . . . . . . . . . . . . . . . . . . . . . . . . . . . . . . . . . . . . . . . . . . . . . . 95
Setting the time . . . . . . . . . . . . . . . . . . . . . . . . . . . . . . . . . . . . . . . . . . . . . . . . . . . . . . . . . . . 95
Setting the date . . . . . . . . . . . . . . . . . . . . . . . . . . . . . . . . . . . . . . . . . . . . . . . . . . . . . . . . . . . 95
Page 8

8 Contents
Network information . . . . . . . . . . . . . . . . . . . . . . . . . . . . . . . . . . . . . . . . . . . . . . . . . . . . . . . . . . 96
Resetting user data . . . . . . . . . . . . . . . . . . . . . . . . . . . . . . . . . . . . . . . . . . . . . . . . . . . . . . . . . . . 97
Initiating the reset. . . . . . . . . . . . . . . . . . . . . . . . . . . . . . . . . . . . . . . . . . . . . . . . . . . . . . . . . . 97
Programming call forwarding . . . . . . . . . . . . . . . . . . . . . . . . . . . . . . . . . . . . . . . . . . . . . . . . . . .98
Standard call forwarding . . . . . . . . . . . . . . . . . . . . . . . . . . . . . . . . . . . . . . . . . . . . . . . . . . . .98
Using call forwarding . . . . . . . . . . . . . . . . . . . . . . . . . . . . . . . . . . . . . . . . . . . . . . . . . . . . . . . 98
Activating or deactivating immediate call forwarding . . . . . . . . . . . . . . . . . . . . . . . . . . . . . . . 99
Saving destination phone numbers for call forwarding . . . . . . . . . . . . . . . . . . . . . . . . . . . . 100
Copying and pasting destination phone numbers . . . . . . . . . . . . . . . . . . . . . . . . . . . . . . . . 101
Assigning a destination phone number for call forwarding . . . . . . . . . . . . . . . . . . . . . . . . . 102
Activating/deactivating call forwarding . . . . . . . . . . . . . . . . . . . . . . . . . . . . . . . . . . . . . . . . . 103
Defining the ring duration before call forwarding on no reply. . . . . . . . . . . . . . . . . . . . . . . . 104
Call forwarding chain . . . . . . . . . . . . . . . . . . . . . . . . . . . . . . . . . . . . . . . . . . . . . . . . . . . . . . 104
Call forwarding by call type . . . . . . . . . . . . . . . . . . . . . . . . . . . . . . . . . . . . . . . . . . . . . . . . . 105
CTI calls . . . . . . . . . . . . . . . . . . . . . . . . . . . . . . . . . . . . . . . . . . . . . . . . . . . . . . . . . . . . . . . . . . 106
Beep on auto-answer. . . . . . . . . . . . . . . . . . . . . . . . . . . . . . . . . . . . . . . . . . . . . . . . . . . . . . 106
Beep on auto-reconnect. . . . . . . . . . . . . . . . . . . . . . . . . . . . . . . . . . . . . . . . . . . . . . . . . . . . 107
Activating and deactivating the hold reminder tone . . . . . . . . . . . . . . . . . . . . . . . . . . . . . . . . . 108
Setting the hold reminder time . . . . . . . . . . . . . . . . . . . . . . . . . . . . . . . . . . . . . . . . . . . . . . . . 108
Activating/deactivating Hold and hang-up. . . . . . . . . . . . . . . . . . . . . . . . . . . . . . . . . . . . . . . . . 109
Music on hold . . . . . . . . . . . . . . . . . . . . . . . . . . . . . . . . . . . . . . . . . . . . . . . . . . . . . . . . . . . . . . 110
Allowing call joining. . . . . . . . . . . . . . . . . . . . . . . . . . . . . . . . . . . . . . . . . . . . . . . . . . . . . . . . . 110
Permitting call deflection . . . . . . . . . . . . . . . . . . . . . . . . . . . . . . . . . . . . . . . . . . . . . . . . . . . . . . 111
Allowing call waiting . . . . . . . . . . . . . . . . . . . . . . . . . . . . . . . . . . . . . . . . . . . . . . . . . . . . . . . . . 112
Connecting subscribers by hanging up . . . . . . . . . . . . . . . . . . . . . . . . . . . . . . . . . . . . . . . . . . . 113
Allowing call transfer . . . . . . . . . . . . . . . . . . . . . . . . . . . . . . . . . . . . . . . . . . . . . . . . . . . . . . . . 113
Settings for autodial delay. . . . . . . . . . . . . . . . . . . . . . . . . . . . . . . . . . . . . . . . . . . . . . . . . . . . . 114
Allowing Busy when dialling . . . . . . . . . . . . . . . . . . . . . . . . . . . . . . . . . . . . . . . . . . . . . . . . . . . 115
Allowing Transfer on ring . . . . . . . . . . . . . . . . . . . . . . . . . . . . . . . . . . . . . . . . . . . . . . . . . . . . 115
Activating/deactivating immediate dialing . . . . . . . . . . . . . . . . . . . . . . . . . . . . . . . . . . . . . . . . . 116
Permitting a callback . . . . . . . . . . . . . . . . . . . . . . . . . . . . . . . . . . . . . . . . . . . . . . . . . . . . . . . . . 117
Allowing a conference . . . . . . . . . . . . . . . . . . . . . . . . . . . . . . . . . . . . . . . . . . . . . . . . . . . . . . . 117
Allowing joining in a conference . . . . . . . . . . . . . . . . . . . . . . . . . . . . . . . . . . . . . . . . . . . . . . . . 118
Call logging . . . . . . . . . . . . . . . . . . . . . . . . . . . . . . . . . . . . . . . . . . . . . . . . . . . . . . . . . . . . . . . . 119
Dialing an entry . . . . . . . . . . . . . . . . . . . . . . . . . . . . . . . . . . . . . . . . . . . . . . . . . . . . . . . . . . 119
Deleting all entries . . . . . . . . . . . . . . . . . . . . . . . . . . . . . . . . . . . . . . . . . . . . . . . . . . . . . . . . 119
Call logging – activating/deactivating. . . . . . . . . . . . . . . . . . . . . . . . . . . . . . . . . . . . . . . . . . 120
Call recording . . . . . . . . . . . . . . . . . . . . . . . . . . . . . . . . . . . . . . . . . . . . . . . . . . . . . . . . . . . . . . 122
Recording modes. . . . . . . . . . . . . . . . . . . . . . . . . . . . . . . . . . . . . . . . . . . . . . . . . . . . . . . . . 122
Explanations of recording . . . . . . . . . . . . . . . . . . . . . . . . . . . . . . . . . . . . . . . . . . . . . . . . . . 123
Recording calls . . . . . . . . . . . . . . . . . . . . . . . . . . . . . . . . . . . . . . . . . . . . . . . . . . . . . . . . . . 124
Diagnostic data . . . . . . . . . . . . . . . . . . . . . . . . . . . . . . . . . . . . . . . . . . . . . . . . . . . . . . . . . . . . . 129
Individual settings that impact energy efficiency . . . . . . . . . . . . . . . . . . . . . . . . . . . . . . . . . . . 131
Page 9

Contents 9
Web interface (WBM). . . . . . . . . . . . . . . . . . . . . . . . . . . . . . . 132
General . . . . . . . . . . . . . . . . . . . . . . . . . . . . . . . . . . . . . . . . . . . . . . . . . . . . . . . . . . . . . . . . . . 132
Launching the web interface . . . . . . . . . . . . . . . . . . . . . . . . . . . . . . . . . . . . . . . . . . . . . . . . . . . 132
Administrator Settings . . . . . . . . . . . . . . . . . . . . . . . . . . . . . . . . . . . . . . . . . . . . . . . . . . . . . 132
User Pages . . . . . . . . . . . . . . . . . . . . . . . . . . . . . . . . . . . . . . . . . . . . . . . . . . . . . . . . . . . . . 133
User menu . . . . . . . . . . . . . . . . . . . . . . . . . . . . . . . . . . . . . . . . . . . . . . . . . . . . . . . . . . . . . . 134
Fixing problems . . . . . . . . . . . . . . . . . . . . . . . . . . . . . . . . . . . 137
Caring for your telephone . . . . . . . . . . . . . . . . . . . . . . . . . . . . . . . . . . . . . . . . . . . . . . . . . . . . 137
Troubleshooting . . . . . . . . . . . . . . . . . . . . . . . . . . . . . . . . . . . . . . . . . . . . . . . . . . . . . . . . . . . . 137
Contact partner in case of problems . . . . . . . . . . . . . . . . . . . . . . . . . . . . . . . . . . . . . . . . . . . . . 137
Labeling keys . . . . . . . . . . . . . . . . . . . . . . . . . . . . . . . . . . . . . . . . . . . . . . . . . . . . . . . . . . . . . 138
Repair and recycling concept, extending performance capability
139
Recycling and disposal of equipment in the OpenScape Desk Phone family. . . . . . . . . . . . . 139
Repair reliability and spare part supply. . . . . . . . . . . . . . . . . . . . . . . . . . . . . . . . . . . . . . . . . . 140
Extending performance capability . . . . . . . . . . . . . . . . . . . . . . . . . . . . . . . . . . . . . . . . . . . . . . 140
Local user menu . . . . . . . . . . . . . . . . . . . . . . . . . . . . . . . . . . 141
Opening the user menu on the phone. . . . . . . . . . . . . . . . . . . . . . . . . . . . . . . . . . . . . . . . . . . . 141
User menu display . . . . . . . . . . . . . . . . . . . . . . . . . . . . . . . . . . . . . . . . . . . . . . . . . . . . . . . . . 141
Key functions . . . . . . . . . . . . . . . . . . . . . . . . . . . . . . . . . . . . . . . . . . . . . . . . . . . . . . . . . . . . 150
Special features for operation on an OpenScape 4000. . . . . 152
Passively supported functions. . . . . . . . . . . . . . . . . . . . . . . . . . . . . . . . . . . . . . . . . . . . . . . . . 152
Unsupported functions . . . . . . . . . . . . . . . . . . . . . . . . . . . . . . . . . . . . . . . . . . . . . . . . . . . . . . . 152
Index . . . . . . . . . . . . . . . . . . . . . . . . . . . . . . . . . . . . . . . . . . . 153
Page 10

10 General information
General information
About this manual
This document contains general descriptions of the technical options, which may
not always be available in individual cases. The required features must therefore
be individually defined in the terms of the contract.
If a particular function on your phone is not available to you as described, this
may be due to one of the following reasons:
• The function is not configured for you and your telephone. Please contact your
system administrator.
• Your communication platform does not feature this function. Please contact
your Unify sales partner for information on how to upgrade.
Your telephone can be operated on an OpenScape 4000 telephone system. Individual telephone features may deviate on an OpenScape 4000 from those described.
This icon in a section heading indicates that the feature is not available on
an OpenScape 4000 telephone system.
Other special features in relation to operation on an OpenScape 4000 can
be found on
This User Guide is intended to help you familiarize yourself with the
OpenScape Desk Phone CP200/CP205 and all of its functions. It contains important information on the safe and proper operation of the
OpenScape Desk Phone CP200/CP205. These instructions should be strictly
complied with to avoid operating errors and ensure optimum use of your multifunctional telephone in the network.
This User Guide should be read and followed by every person installing, operating or programming the OpenScape Desk Phone CP200/CP205.
For your own protection, please read the section dealing with safety in detail. Follow the safety instructions carefully in order to avoid endangering
yourself or other persons and to prevent damage to the unit.
This User Guide is designed to be simple and easy to understand, providing
clear step-by-step instructions for operating the
OpenScape Desk Phone CP200/CP205.
page 152.
Icons used in the manual
Settings
Operations and settings that can be made both at the phone and over the web
interface are indicated by an icon and page reference.
V refers to an operation or setting performed directly on the phone
z refers to an operation or setting performed via the web interface
Page 11

General information 11
Service
The service department of Unify Software and Solutions GmbH & Co. KG can
only help you if you experience problems or defects with the phone itself. Should
you have any questions regarding operation, your specialist retailer or network
administrator will gladly help you.
For queries regarding connection of the telephone, please contact your network
provider.
If you experience problems or defects with the phone, please dial the service
number for your country.
Intended use
The OpenScape Desk Phone CP200/CP205 phone is a desktop unit designed
for voice transmission and for connection to the LAN. It can also be used as a
workstation device. Any other use is regarded as unintended.
Telephone type
The identification details (exact product designation and serial number) of your
telephone can be found on the nameplate on the underside of the base unit.
Specific details concerning your communication platform can be obtained from
your administrator.
Please have this information ready when you contact our service department regarding faults or problems with the product.
Speakerphone quality and display legibility
• To ensure good speakerphone quality, the area in front of the telephone (front
right) should be kept clear. The optimum distance is approx. 50 cm.
• Proceed as follows to optimize display legibility:
– Turn the phone to tilt the display to ensure you have a frontal view of the
display and avoid light reflections.
– Adjust the contrast as required
page 29.
Page 12

12
Remote configuration for cloud service providers
From factory defaults to operational telephone
This section describes the remote configuration process, from the initial factory
defaults to the operational telephone. If your telephone is already operational,
please continue reading from Section "Getting to know the
OpenScape Desk Phone CP200/CP205 (
You can start up your new OpenScape Desk Phone CP200/CP205 yourself using a remote maintenance function. The prerequisites for this are:
• The administrator has provided you with a PIN for the initial start-up
• You have a LAN connection with access to the Internet
• You have a new OpenScape Desk Phone CP200/CP205 that you want to start
up using the remote maintenance function
page 14)".
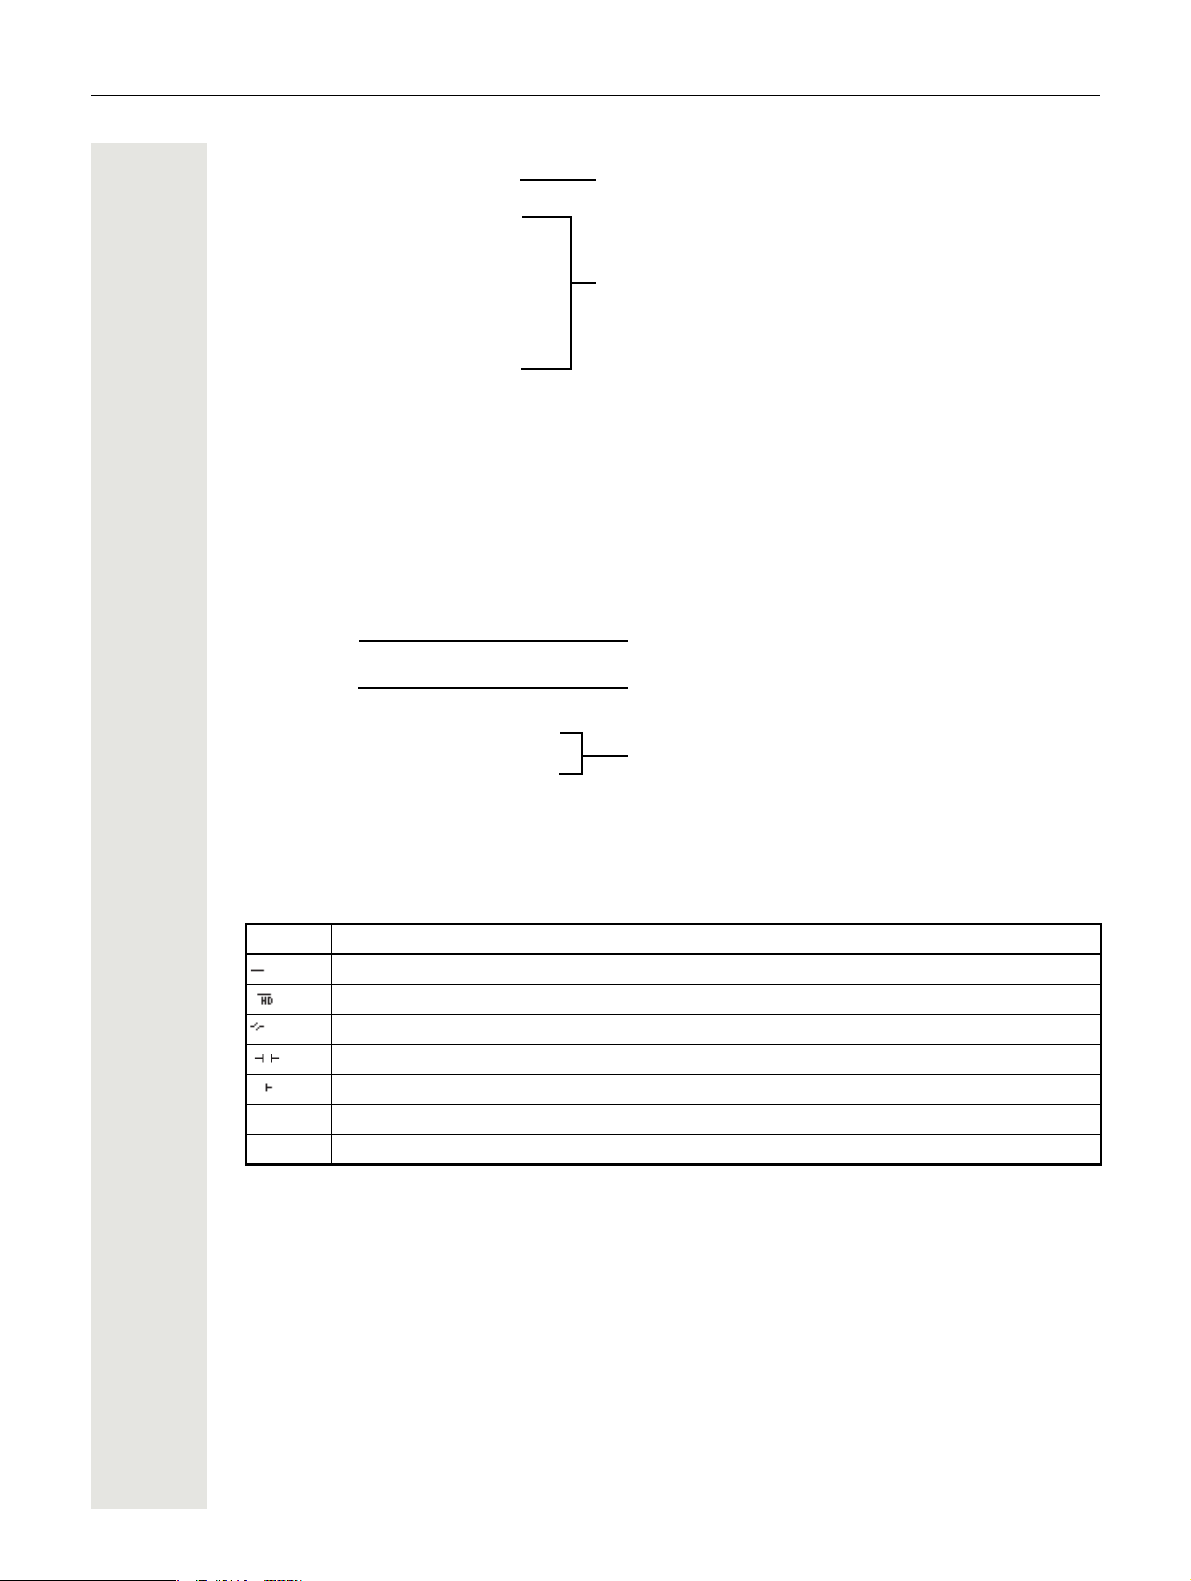
©
©
Enter PIN...
123456789
Starting up the telephone
Connect the telephone to the LAN. If the power is not supplied by the LAN cable,
connect a power supply if appropriate (the power supply is not needed with
PoE). The telephone should now boot.
The telephone recognizes based on the stated conditions that a remote configuration is to be performed and starts this process.
Entering the Deployment PIN
The first time you start up the telephone, it will automatically check the remote
configuration requirements. If the requirements are fulfilled,
Q
j Enter the PIN you received from your Fachpersonal. Only numeric characters
Q
_
you will be prompted to enter the Deployment PIN (cloud PIN).
are accepted.
Confirm with the Softkey shown.
Page 13

Asking redirect server...
Configuring phone...
Deployment done
13
Starting the remote configuration
Once you have entered a valid PIN, the remote configuration of your telephone
starts automatically. You are shown the following messages on the display:
The configuration is concluded and the telephone is operational with the required settings. You can now make calls.
New operating system software may be downloaded and installed during the remote configuration. If this happens, reboot the telephone following the configuration.
Canceling the Remote configuration
You can stop the process in order to continue the configuration manually before
entering the PIN or after entering an invalid PIN.
1. The remote configuration is concluded once you enter a valid PIN. The pro-
cess can no longer be canceled at this stage.
2. If an error still occurs even though a correct PIN has been entered, you can
repeat the remote configuration by simply restarting the telephone.
3. You can likewise repeat the process following a cancellation by restarting the
telephone, assuming you have not already started the manual configuration.
Cancel
"
Abort deployment
Confirmed
"
Deployment aborted
Q
Q
_
_
Press the Softkey.
The following message is displayed:
Press the Softkey shown to confirm that the process is to be canceled.
The following message is displayed:
The telephone is set to the factory defaults at this time and has to be configured
manually by you or your administrator or the remote configuration repeated by
restarting the telephone.
Page 14
14
1
8
2
3
4
5
6
7
3
Getting to know the OpenScape Desk Phone CP200/CP205
The following sections describe the most frequently used controls and displays.
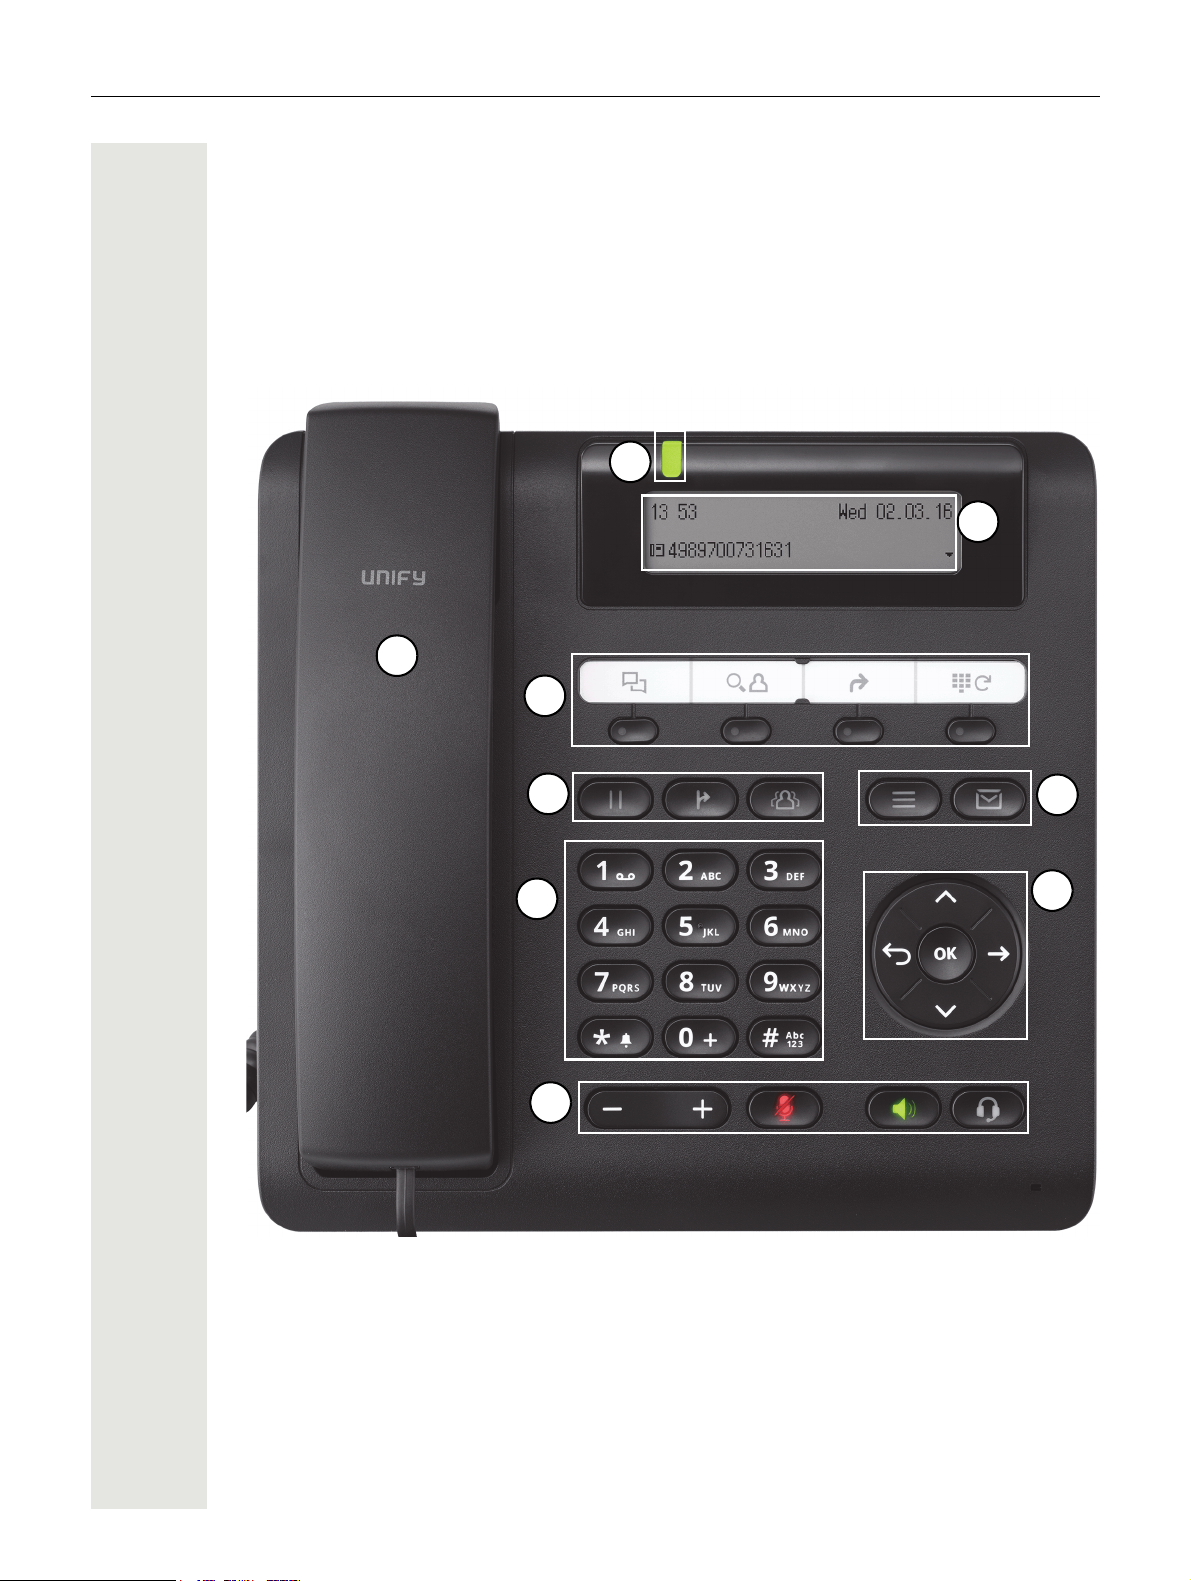
The user interface of your telephone
Page 15

1 You can make and receive calls as normal using the handset.
15
2
The display provides intuitive support for telephone operation (two lines with up to 33
characters each).
The function keys (cannot be reprogrammed) allow you to call up the following frequent-
ly used functions during a call:
Â: Provides access to the call log with lists of missed calls, dialed calls, received calls
and forwarded calls and allows voicemails to be managed.
@: Provides access to the user menu for locally controlling the phone settings.
3
:: Activates/deactivates the speakerphone function.
.: Activates/deactivates the headset function.
": Increases/decreases the speaker/headset volume page 21.
;: Activates/deactivates the microphone. This function is useful to prevent the other
party from listening in under certain circumstances, for example when consulting with
someone else in the room or in case of annoying background noise.
4
5
You can use the navigation keys to navigate conveniently through the various phone
functions, applications and configuration menus.
The function keys (can be reprogrammed by the administrator via the WBM) allow you
to call up the following frequently used functions during a call:
Ã: Transfer a call to another subscriber.
Á: Enable access to the conference functions.
Ä: Hold or retrieve the active call.
6The dialpad can be used to enter phone numbers and write text.
You can customize your telephone by assigning phone numbers and functions to the
programmable keys.
Preset default values:
7
8 Incoming calls and new voicemails are visually signaled via the LED de notificação.
• Conversations (caller list)
• Phonebook
•Forwarding
•Redial
Page 16
16
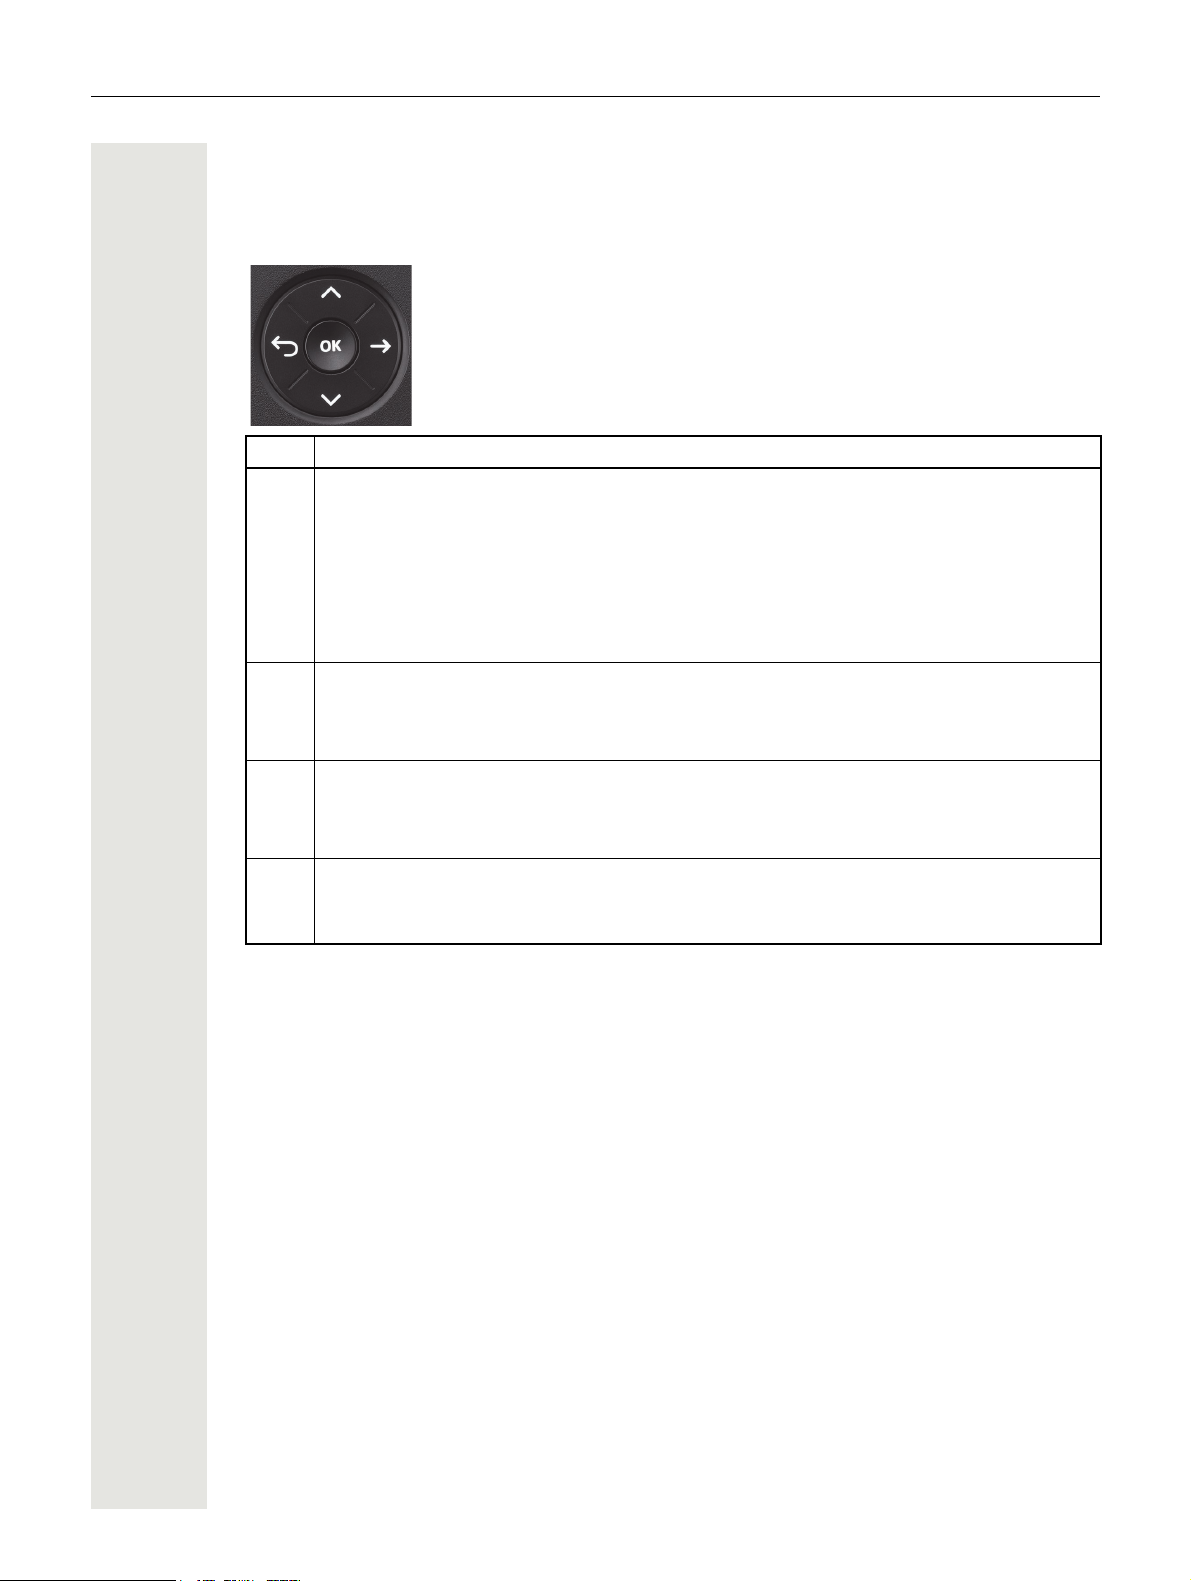
Navigation keys
This control allows you to move between input fields and navigate in lists and menus. You use the
Z button to confirm options and launch functions:
Key Functions when key is pressed
In lists and menus:
• One level back
^
μ
€
Z
Entry selected:
• Cancel action
In input fields:
• Delete character to the left of the cursor
In lists and menus:
• Scroll up
Press and hold: Skip to the start of the list/menu
In lists and menus:
• Scroll down
Press and hold: Skip to the end of the list/menu
Entry selected:
• Perform action
• Confirm your selection
Page 17
17
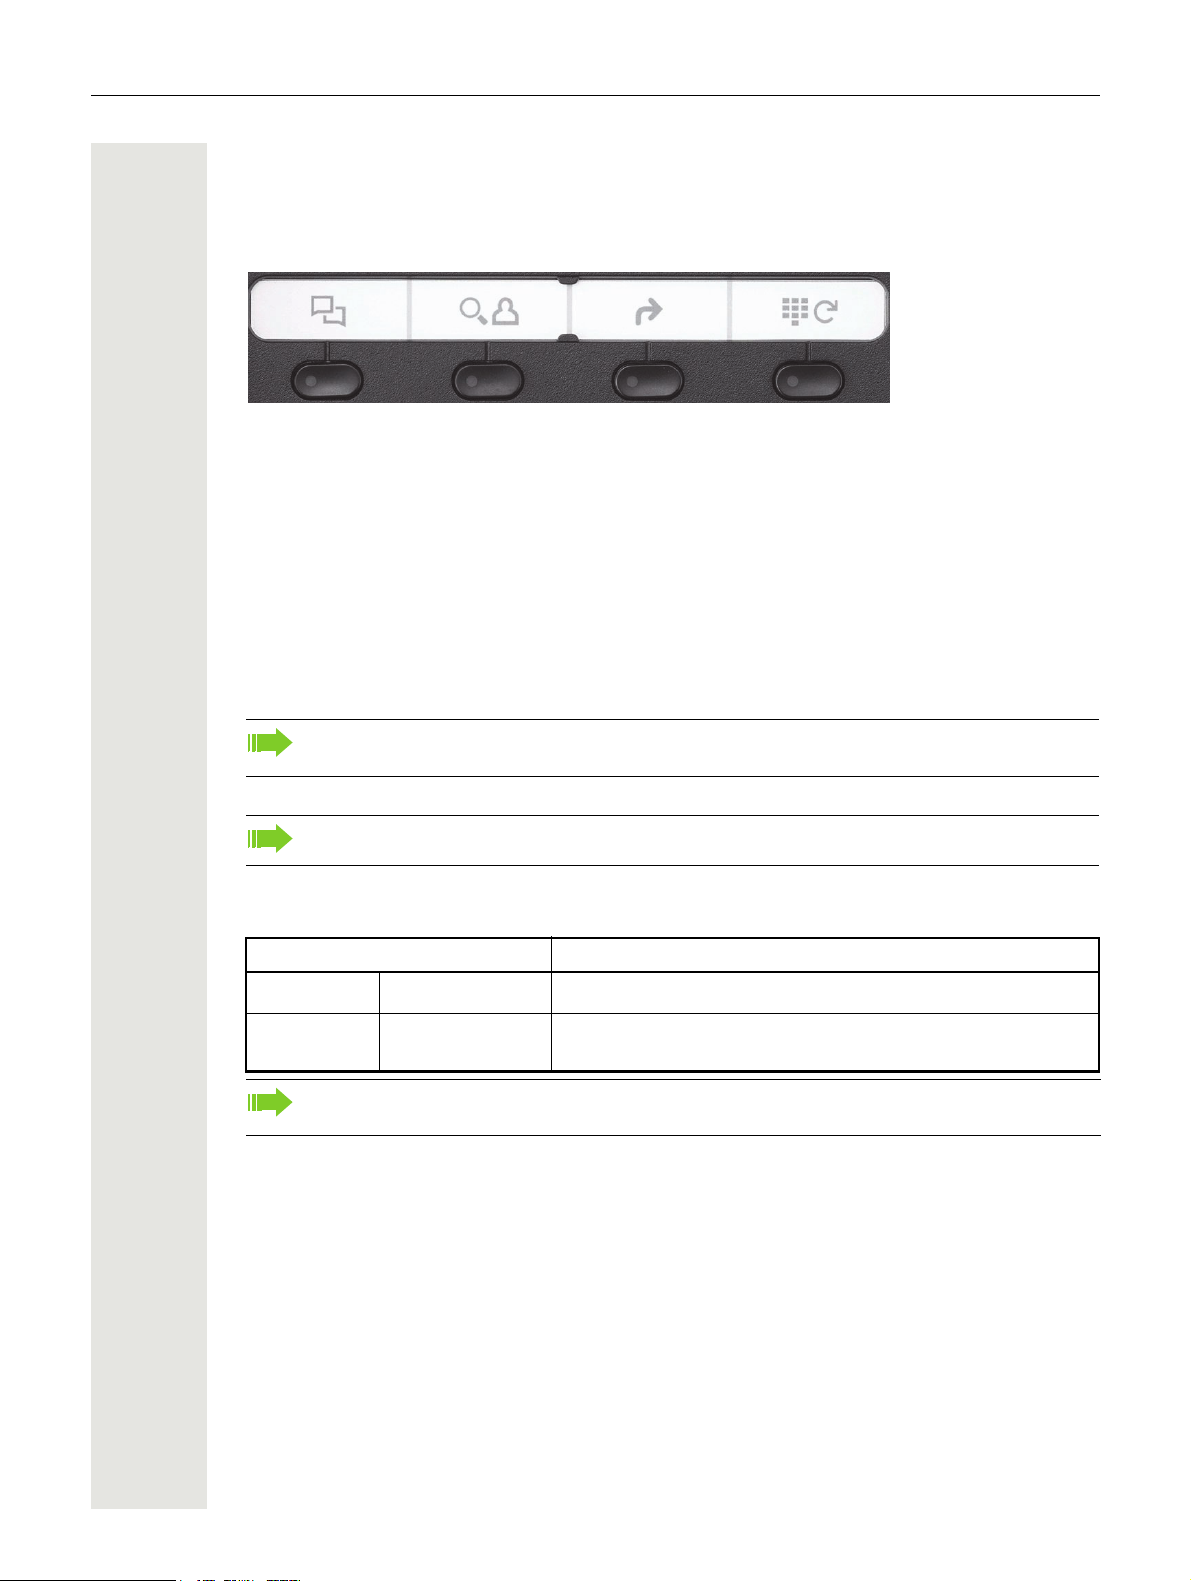
Programmable function keys
Your OpenScape Desk Phone CP200/CP205 has four fixed function keys (with LED), which you
can reprogram with different functions or phone numbers at any time.
The icons represent the following functions:
• Conversations
• Phonebook
• Forwarding
• Redial x
Depending on how they are programmed, you can use the keys as follows:
• Function keys
• Selected dialing keys
A function can be programed for each key as well as a phone number at the second level.
page 55
page 56
The status of a function is shown by the LED display for the corresponding function key.
Line and direct station selection (DSS) keys can only be programmed by the administrator
via the program/service menu.
You will find information on the labeling of the function keys on page 138
Meaning of LED displays on function keys
LED Meaning of function key
Off The function is deactivated.
_
Lights up green/
¤
red
Some of the programmable keys on multi-line phones can be set up as trunk or line keys
page 66.
The function is activated.
Page 18
18
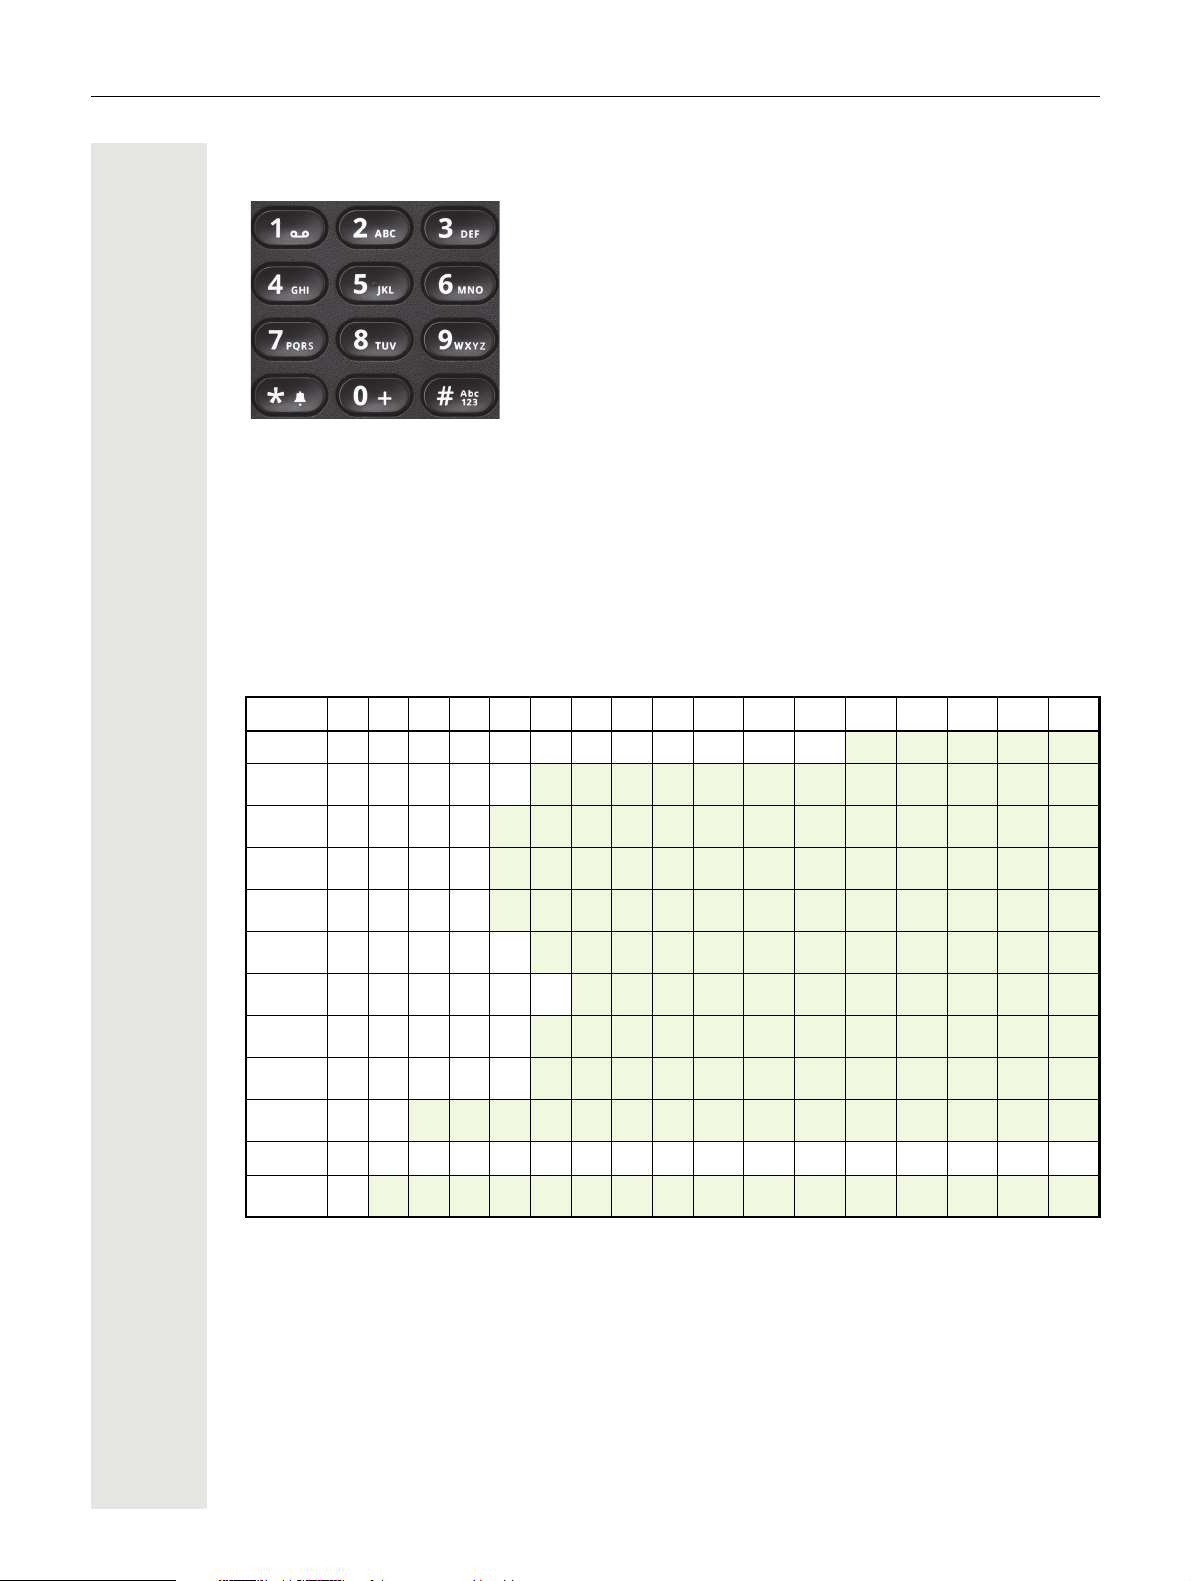
Dialpad
You can only use the digits 1 to 9 and 0 as well as the * and # characters when dialing a number.
To delete digits press
In situations where text input is possible, for example when entering the user password, you can
also use the dial keys to enter text in addition to the digits and special characters mentioned. To
do this, press the numerical keys repeatedly.
^.
Example: To enter the letter "h", press the number
text, all characters available for the key pressed and the character selected are briefly displayed.
4 key on the keypad twice. When entering
Character overview (depends on the current language setting)
Key 1x 2x 3x 4x 5x 6x 7x 8x 9x 10x 11x 12x 13x 14x 15x 16x 17x
1
1
2
3
4
5
6
7
8
9
0
3
*
#
1 Special characters (not in 123 mode)
2 Space
3 Extended character
4 Toggle between uppercase and lowercase and number entry
2
1
abc2ä
def 3
gh i4
jkl5
mn o6 ö
pqr s7ß
tuv8ü
wx y z 9
0+
.*1#,? !’“+ - ( ) @ / : _
4
;=$\&[ ] { } %
Page 19

19
Multi-function keys
Key Function during text input Function when held down
*
#
1
Alphabetic labeling of dial keys is also useful when entering vanity numbers (letters associated
with the phone number's digits as indicated on the telephone spell a name, e.g. 0700 - PATTERN
= 0700 - 687837).
Type special characters
Switch between uppercase
and lowercase text and number entry
Type special characters (not in
123 mode).
• 2 seconds: Ringer off
• 3 seconds: Beep rather than ringtone
Activate the telephone lock
Call answering machine
page 82
Text editor
Additional options are available in the text editor. This is used when programming a forwarding
destination, for example. In this way, you can, for example, move the cursor freely and copy or
insert text.
You can select further editor functions via the Navigationstasten and confirm each one using
• OK: Applies changes and closes the editor
• Delete: Deletes characters from right to left
• Cancel: Discards changes and exits the editor
• Mode (# can also be used here to switch):
– 123: Digits only
– ABC: Uppercase letters only
– Abc: First letter in uppercase, subsequent letters in lowercase
– abc: Lowercase letters only
• Move cursor left: Moves the cursor to the left
• Move cursor right: Moves the cursor to the right
• Copy: Copies the entire content to the clipboard
• Paste: Inserts the entire content from the clipboard at the cursor position
Z:
Page 20
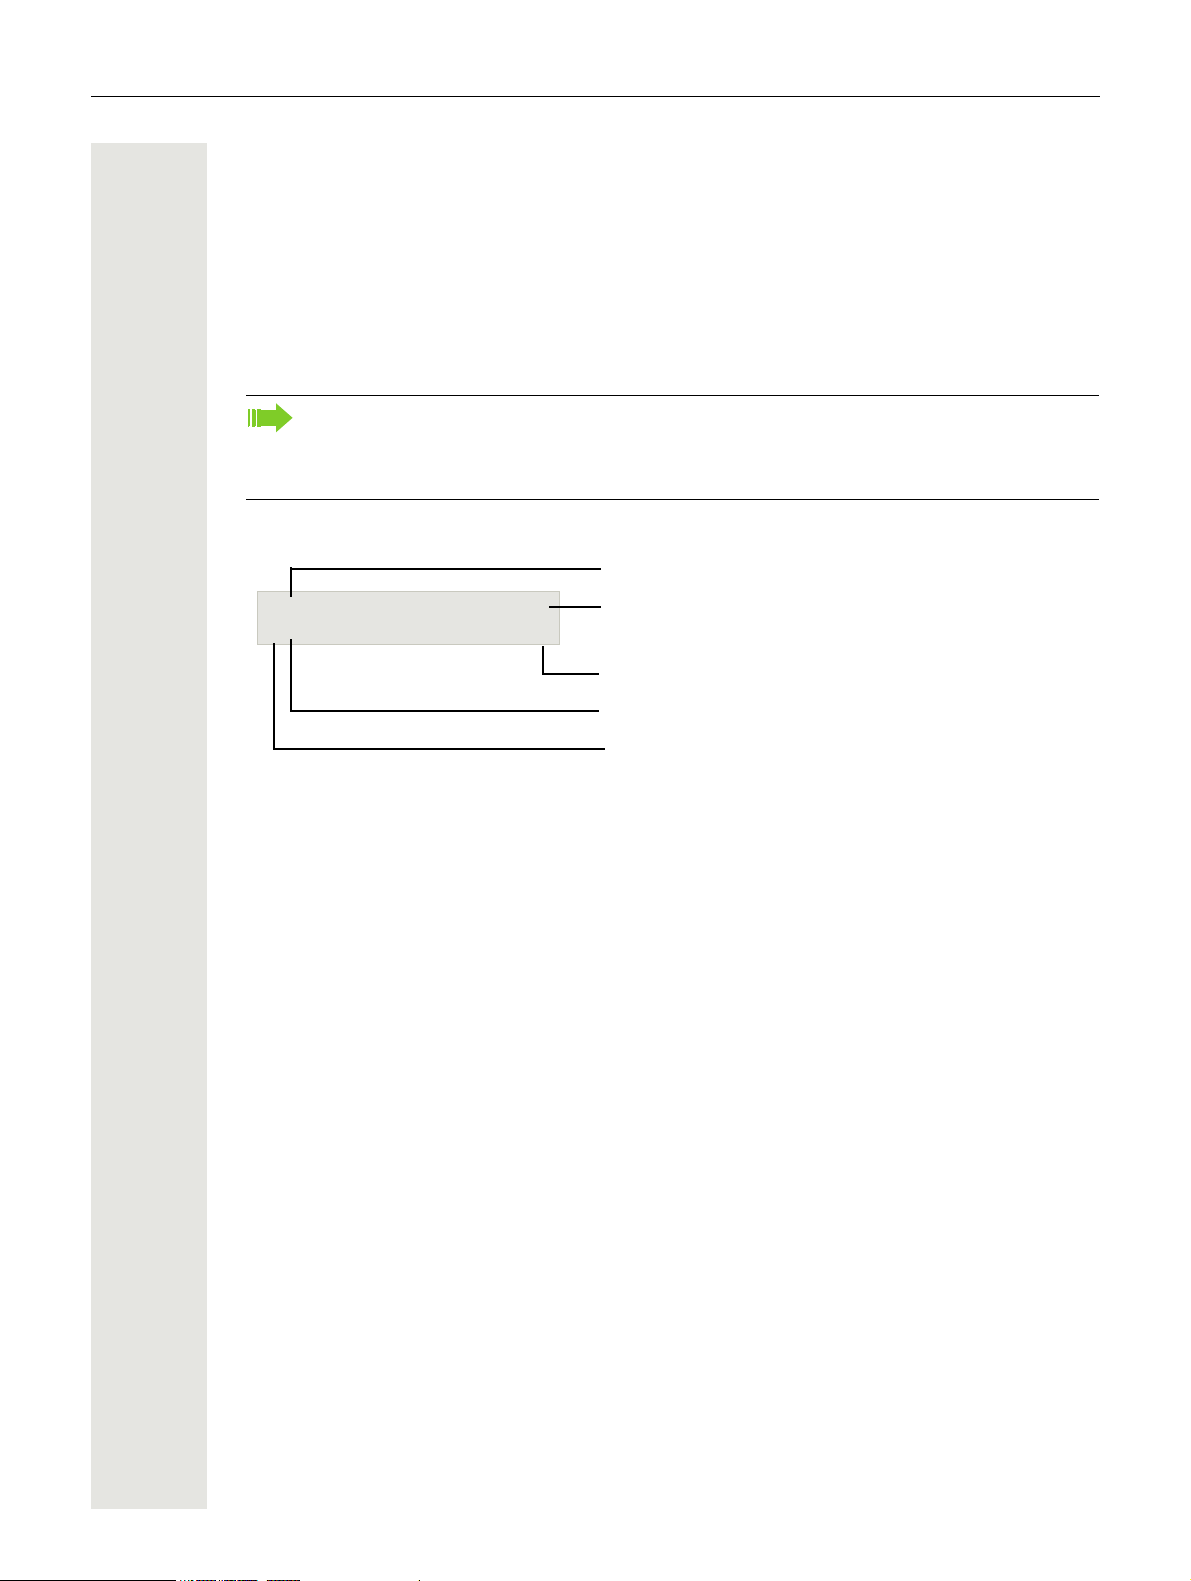
20
Status icon
B f
Time
Date
Open the idle menu
Own phone number
10:59 Wed 08 01.14
Display
Your OpenScape Desk Phone CP200/CP205 comes with a black-and-white LCD display. Adjust
the contrast to suit your needs (
Idle mode
If there are no calls taking place or settings being made, your OpenScape Desk Phone CP200/
CP205 is in idle mode.
Press the  button to go back, for example, to the idle display from a call list ( page 23).
The idle display can be accessed again from the Program/Service menu (
the
@ key. You can also configure a "Show phone display" key for both of these instances
(see
page 55) in order to access the idle mode screen again.
Example:
page 29).
page 25) with
Idle menu
The idle menu opens when you press € or Z Navigationstasten page 16 in idle mode.
You can call up various functions here. Entries may vary.
The idle menu may contain the following entries:
• Redial x?
• Ringer off?
• Do not disturb on?
• Mobile logon?
• Cancel callbacks?
• Directed pickup
• Back?
Page 21
21
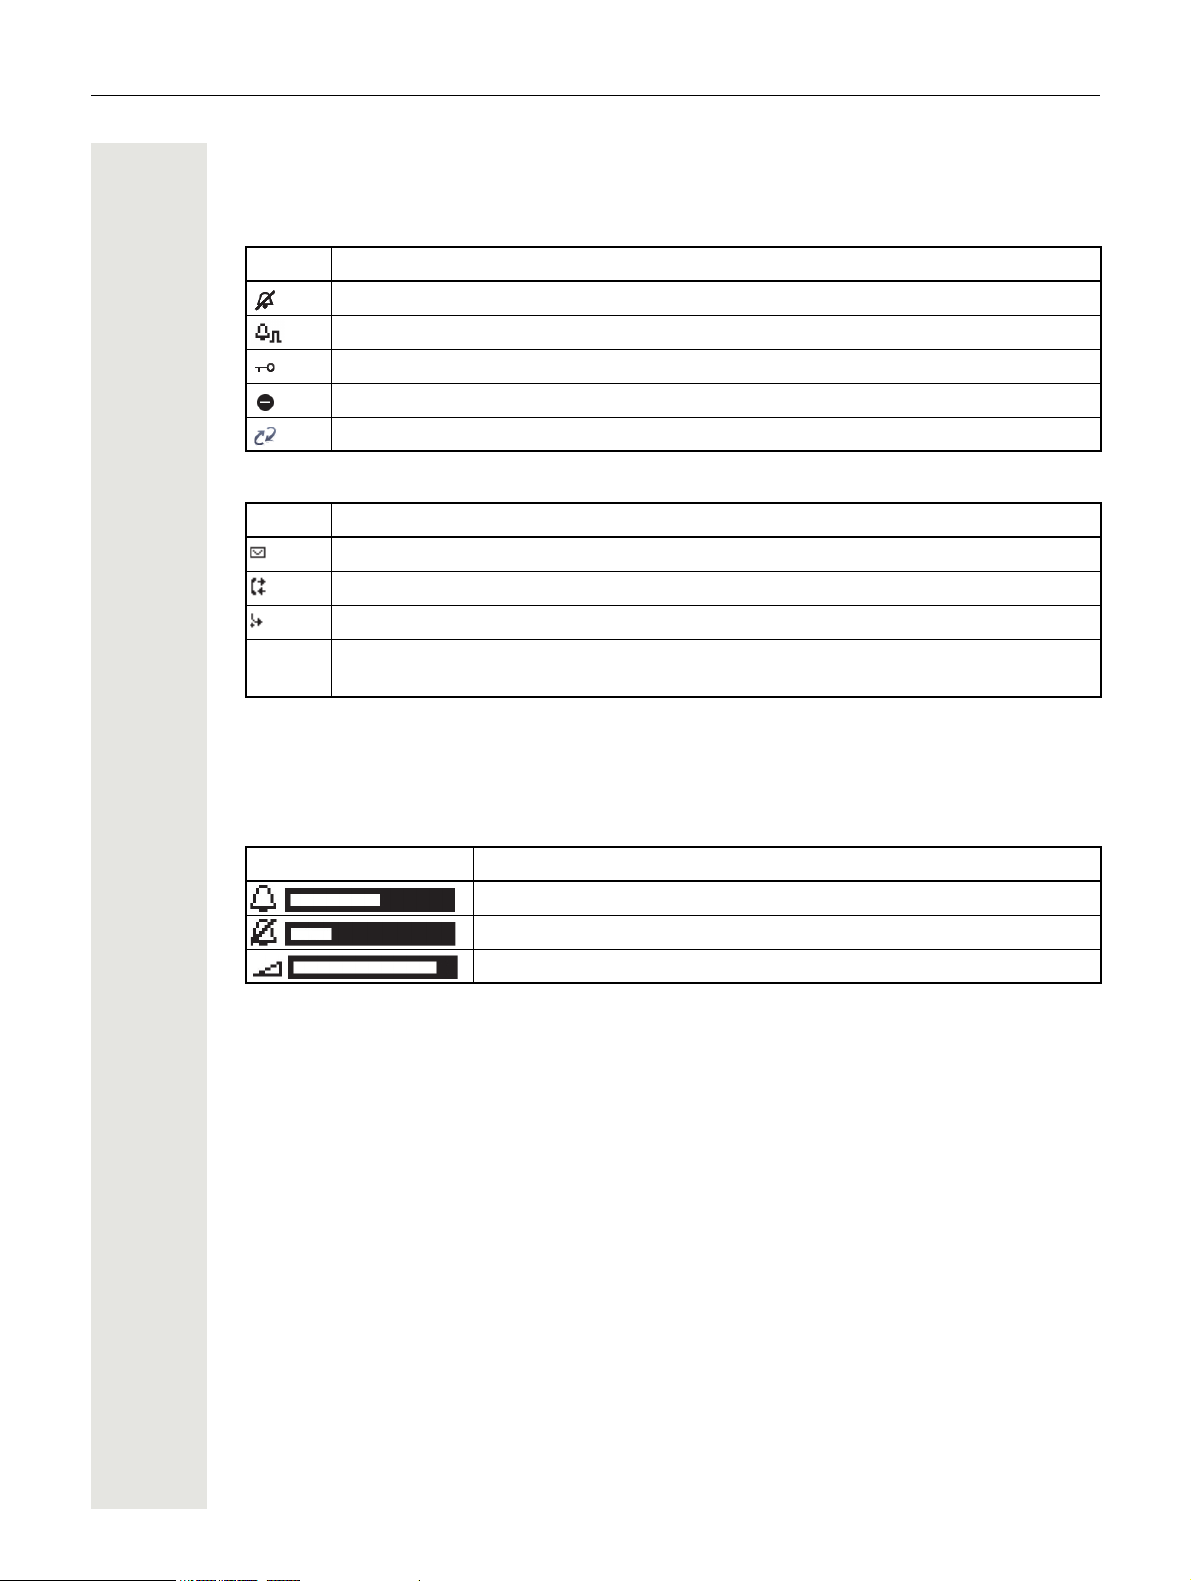
Icons in the idle display
In the first line, the time, weekday and date are displayed in addition to icons for different situations
and options:
Icon Meaning
The ringer is deactivated.
The ringer is set to a beep.
The phone lock is activated.
The "Do not disturb" function is activated.
A mobile user is logged on to the telephone.
Your attention will be drawn to events in the second line:
Icon Meaning
You received new voice messages.
New entries have been added to the call lists.
Local call forwarding is active.
B
An advisory icon in front of own phone number (replaced, for example, by call forwarding or Mobility icon).
Displays on the status line for adjusting the volume
When you adjust the ringer, handset and speaker volume using the " key, you will see the
following displays in the status line:
Display Meaning
Ringer volume in 10 levels
Ringer volume in 10 levels when the ringer is switched off
Handset or speaker volume in 10 levels
Page 22
22
02
First menu entry
(selected on callup)
Consultation?
Hold?
Disconnect?
Directed pickup?
Blind transfer call?
Other menu options
(hidden)
Start conference?
Context-dependent displays
Depending on the situation at hand, the display on your OpenScape Desk Phone CP200/CP205
displays different content, to which you can respond intuitively.
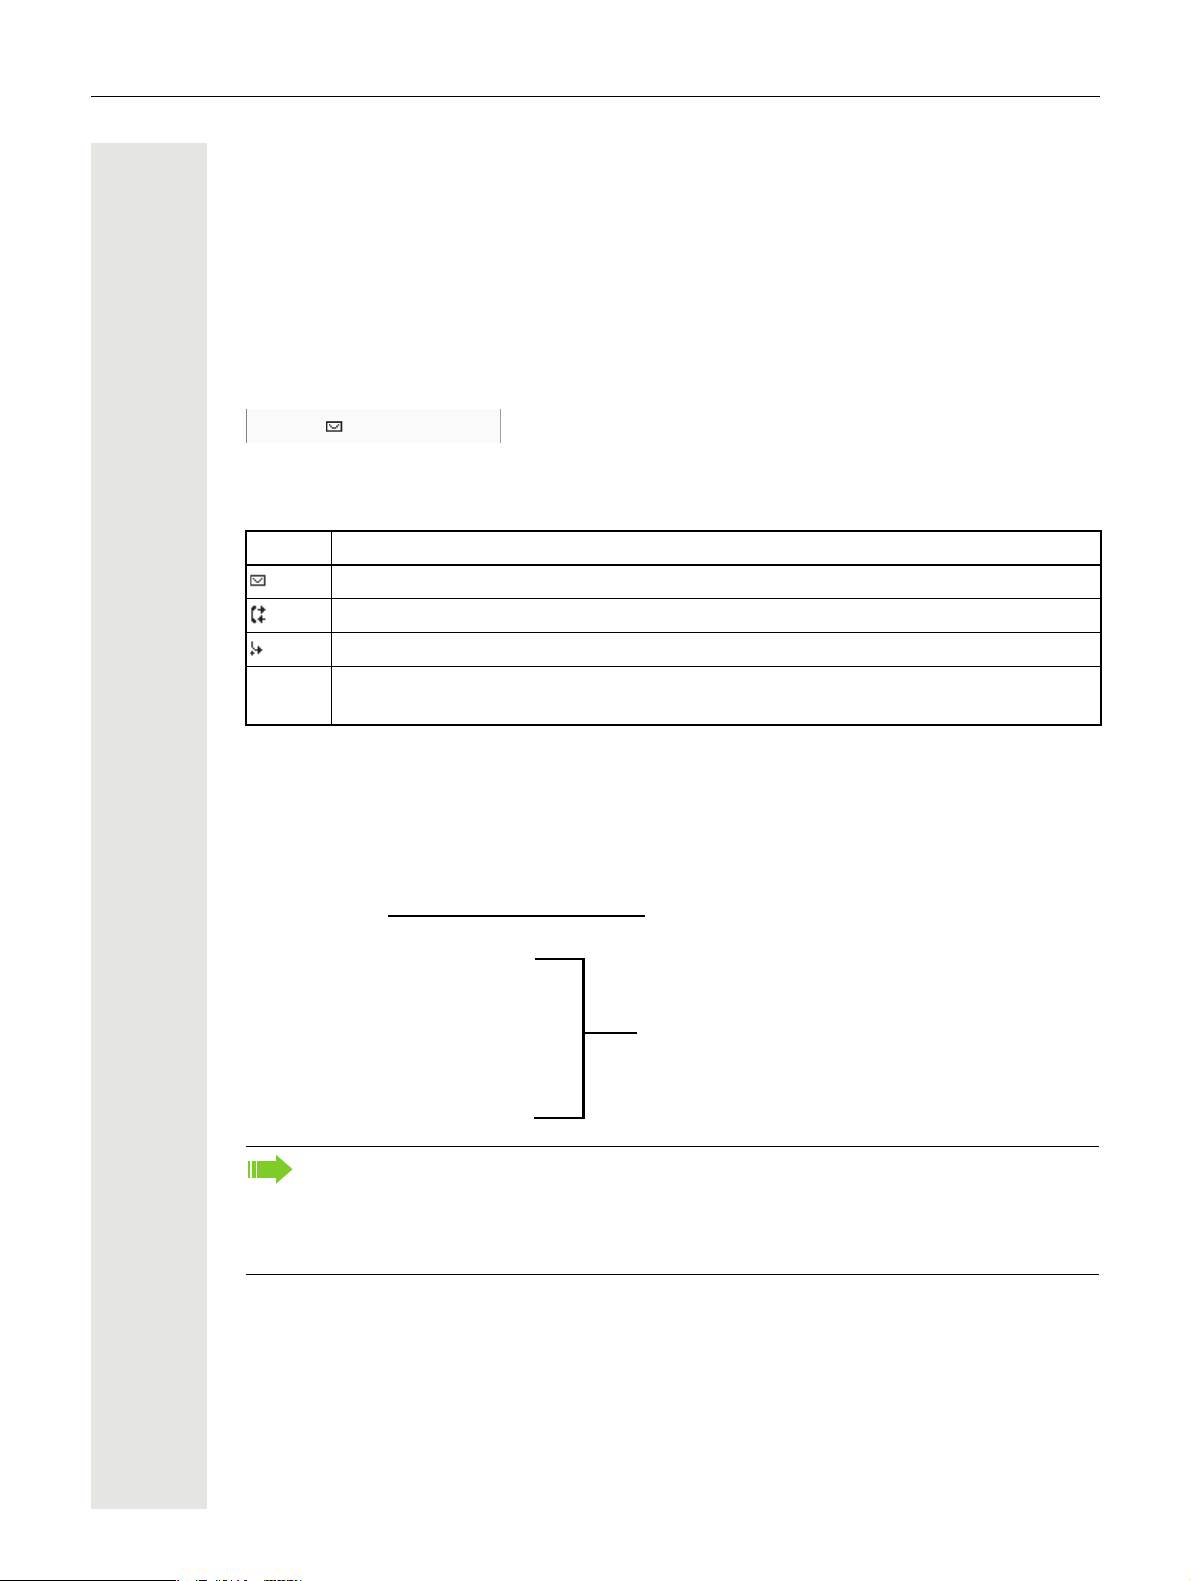
Information on current events
The following icons appear centered on the display when your phone is idle and draw your attention to current properties or events.
Example: You missed two calls in your absence.
You have two new voice messages that you can open by pressing the
Icons for events
Icon Meaning
You received new voice messages.
New entries have been added to the call lists.
Local call forwarding is active.
B
A status icon in front of your own phone number (replaced, for example, by call forwarding or Mobility icon).
È key page 24.
Context menus
If an arrow appears beside an entry in the second line, a context menu is available whose options
you can select using the
available is situation-specific.
Navigationstasten μ or € ( page 16). The range of functions
Press the È button to go back, for example, to the telephony interface from a call list
(
page 23). The telephony interface can be accessed again from the Program/Service
menu (
for both of these instances (see
screen again.
page 25) with the @ key. However, you can set up a "Show phone display" key
page 55) in order to access the telephony interface
Idle display context menu
You receive the following functions (if activated) by pressing the Z or € keys. The current
function is displayed in the second display line. The other functions are hidden and can be selected using the Navigationstasten
€ or μ.
Page 23
23
First entry (selected when you call up
the menu, if you have already dialed
a phone number)
Other menu options (hidden)
Redial x 1234
Ringer off
Mobile logon
Cancel callbacks
Directed pickup
Do not disturb off
012345|
Redial x
Retrieve held call
Dial
Other possible menu options (hidden)
Second display line
(current option)
First display line
{
}
Functions during a call
In many operating situations you are offered appropriate functions or advisories in the second line
of the display. Other available functions remain hidden and can be selected using the Navigationstasten
Example: You set up a consultation call. The second line displays the first of three dependent functions. Search for the appropriate function and confirm this with
€ or μ.
Z.
The menu with the functions closes automatically after you have executed an action. To delete
info-only messages, press the
^ key.
Icons during a call
Icon Meaning
The call is active.
High-quality voice connection (G.722).
The call has been disconnected.
You have placed the call on hold (e.g. consultation hold).
Your call partner has placed the call on hold.
The voice connection is secure.
The voice connection is not secure.
Voicemail
If configured (contact the relevant administrator), this provides you with access to your mailbox
system e.g. HiPath Xpressions.
If your system is appropriately configured, activating this function opens the menu for voicemail
page 53.
Page 24

24
Call logging
The following call lists are stored under Call logging and can be accessed via the preset "Conversations" function key (
• Missed (x): Missed calls
• Dialled (x): Dialed calls (with or without connection)
• Received (x): Answered calls
• Forwarded (x): Forwarded calls
The number of missed calls and unchecked calls is shown on the idle display. Missed calls are not
saved and displayed if Call logging is disabled
Call logging function must be activated in order to display call lists page 120. Call logging
must also be activated for the customary last number redial function. If Call logging is not
activated, the message "Key function unavailable" is shown when you press the function
key.
Each call list may contain up to 30 entries. Once this limit is reached, the oldest entry in the list is
overwritten. Multiple calls from the same number are only listed once.
The following data is saved, for example, for missed calls:
• Phone number/name depending on available data.
• Number of call attempts.
• The time of the last call attempt for each listed caller, in relation to the current day, otherwise the
date of the last call attempt.
page 17):
page 120.
The administrator may have made special settings for missed calls. To indicate new missed calls,
• the LED on the function key flashes or
• the LED de notificação lights up or
• the LED on the function key flashes and the LED de notificação illuminates
• you also receive a message on the display
Entries can only be saved if the caller ID is displayed as a name, number or both. If the caller ID
is not transferred, the call is saved as "Unknown".
You can delete all the entries in the respective call list
can dial it immediately by confirming
page 119.
page 119. After selecting an entry, you
Additional notes on Call logging
• Missed calls are not signaled if Call logging is disabled page 120.
• If missed calls for this connection were answered by other subscribers, these calls are not listed
in the Missed (x) list or are marked with a checkmark in accordance with the Call logging setting
page 121.
• Forwarded calls of all types are logged under "Forwarded (x)" and not as "Missed (x)". This is
regardless of how the parameter for missed calls is defined.
Page 25

25
Settings
Press the @ key to open the Settings menu.
• User
•Admin
User
Setting options are provided here that allow you to adapt the telephone to your individual requirements.
Admin
Once the admin password has been entered, this menu is available to the relevant administrator.
You can use the Navigationstasten to navigate through the menus as described on
page 16.
Phonebooks
Press the function key _ under Phonebooks to open the phonebooks. This menu contains the
following entries:
Personal
You can create your own local phonebook under Personal containing up to 100 entries
The data for a subscriber includes the last name, first name and phone number.
Corporate phonebook
If you have the option of using a corporate directory, you can use the phonebook function key and
the
^ key to find subscribers page 50. As a prerequisite for this, your administrator must have
set up the appropriate access. You can configure a separate function key for opening the corporate
directory.
page 48.
Page 26

26
User settings
In the User menu (see page 141), settings options are provided that allow you to adapt the telephone to your individual requirements.
Select a menu using the Navigationstasten:
• "Date and time"
•"Audio"
• "Configuration" e.g.
• "Phone"
• "Locality"
•"Security"
• "Network information"
• "Diagnostic information"
•"Reset"
If you are in one of these menus or submenus, depending on the situation, you have the following
options to leave the menus:
• Save & exit (If you have made a setting and want to keep it)
• Exit (discard changes) (If you have made a setting that you do not want to use after all or if you
do not want to set any of the options)
• Back (If you want to leave the main menu or submenu)
• Press and hold the
• You exit the menu by pressing the
page 84
page 29
page 97
page 95
page 78 or page 111
page 89
page 79 or page 82
page 96
page 129
€ key to access the option to leave the current menu level.
@ key and return to idle mode page 20.
Interrupting editing in the menu
You can interrupt editing in the menu, for example to call someone or to answer a call. Pressing
the
@ key takes you back to the point in the menu from which you exited.
This is only possible for a limited period, however, which is defined by the administrator using the
inactivity timeout setting. If the configured time expires, you need to re-enter your password when
opening the menu and manually go to the required point in the menu.
Interrupting editing:
• By pressing the
• If you receive a call during editing and answer it, you automatically change to the call view (see
also
page 23).
To go back to editing mode in the menu, press the
Å key, you interrupt editing, leave the menu and return to idle mode page 20.
@ key again.
Page 27

27
Network information
Information about the IP address or name that was assigned to the phone in the network and
therefore the HTML address of the web interface.
V View information on the phone page 96.
Contact your administrator for further information on the network information values listed
here.
Diagnostic information
V Provides information on all of the important settings of the telephone. Can provide valuable help
in support situations
page 129.
Reset phone
V Personal settings made via the telephone menu or the web interface can be reset to factory set-
tings
page 97.
Control and monitoring function
A control or monitoring function can be activated on your phone for service purposes by remote
maintenance.
Control function
Your administrator has the option to activate and deactivate features of the phone via remote
maintenance. During maintenance, the handset, microphone, loudspeaker and headset are deactivated. You are additionally informed on the display that the control function is active.
Monitoring function
In order to detect malfunctioning of a phone, for example, your administrator can install a monitoring function. You can use your phone as normal during monitoring. However you will first be informed about the operation with a message on the display and prompted to allow monitoring.
If your administrator has activated a function on your phone, which continuously transmits operating data to a server, you will see the flashing icon in the upper display line.
Activating a diagnostic call
In the event of connection problems with a specific destination, the administrator may ask you to
enter an activation code before the number of the subscriber, which can be used to initiate tracing
of the call data on the phone. The activation code, which must be provided to you by the administrator and which comprises a leading asterisk, followed by three digits and the hash sign as the
terminating character, must be entered before the actual phone number. At the end of the call, the
call-related data is sent for further analysis to the DLS server, which then passes it to the "OpenScape Voice Trace Manager".
Page 28
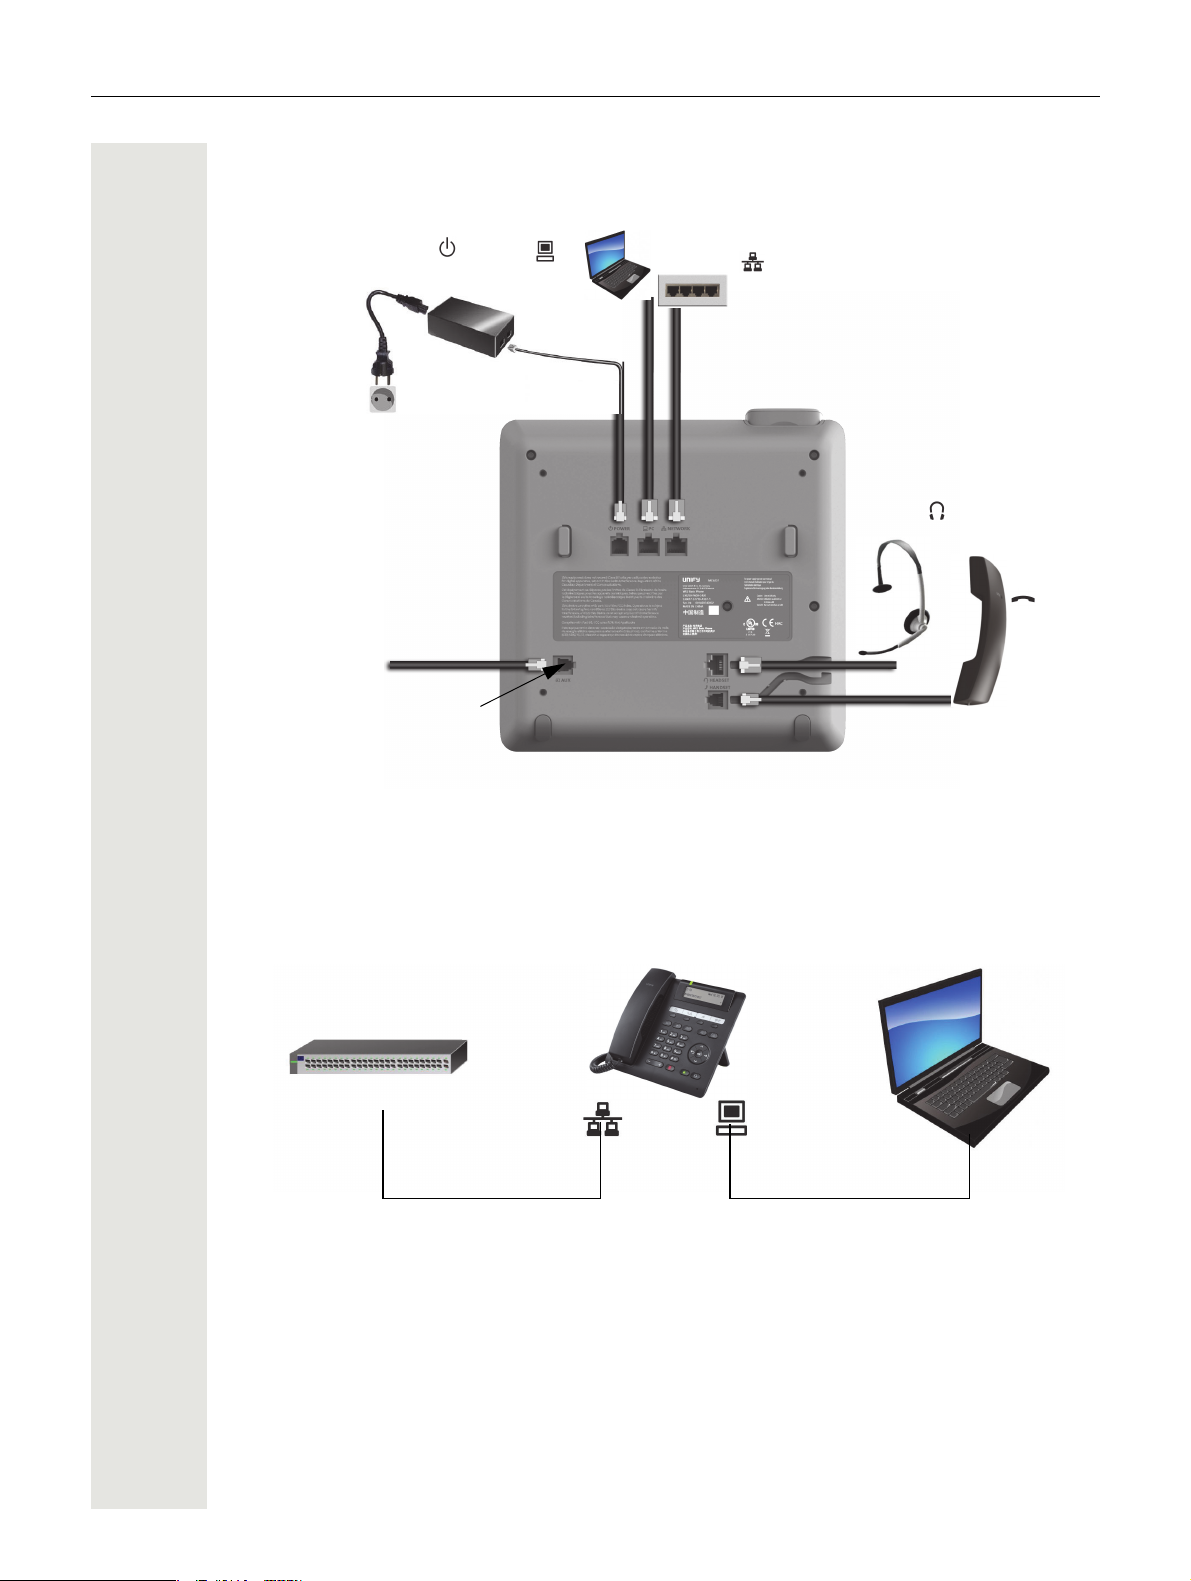
28
Service interface
Headset
Handset
PC
Network switch
Country-specific cable
Power supply unit
(if necessary)
OpenScape Desk Phone CP200/CP205
Network switch PC
Ports on the underside of the phone
Using network ports more efficiently
The OpenScape Desk Phone CP200/CP205 has a built-in Ethernet switch. This means that you
can also connect a PC with a LAN port to the LAN directly via the phone. The option for connecting
the telephone and PC must first be activated on the telephone by your administrator.
Using this connection option saves one network port for each switch used and allows shorter network cables to be used when arranged correctly.
Page 29

Telephone settings
User
Phone?
Display ? f
Contrast: = f
Save & exit l
User
Audio
Volumes?
Display contrast
The display has multiple contrast levels that you can set according to your light
conditions.
z You can also configure this setting via the (LED de notificação) WEB-Oberfläche
page 132.
@ Press the key shown.
Select and confirm the option shown.
if nec. j Enter and confirm the user password.
Select and confirm the option shown.
Select and confirm the option shown.
29
Select and confirm the option shown.
μ or € Set and confirm the contrast.
Select and confirm the option shown.
Volumes
Use this selection to set the following volumes in 10 levels:
• Loudspeaker
• Ringer
• Handset
• Headset
• Handsfree
• Rollover
Example: Handset
@ Press the key shown.
Select and confirm the option shown.
if nec. j Enter and confirm the user password.
Select and confirm the option shown.
Select and confirm the option shown.
Page 30

30
Handset f
Save & exit l
User
Phone
Key click
Volume
Medium
Keys
Keypad only
All keys
Save & exit
Select and confirm the option shown.
μ or € Set and confirm the volume.
Select and confirm the option shown.
Key click
You can select here whether a tone should be heard when a key is pressed. You
can also decide whether this should apply for all keys or only those on the keypad. In addition, you can adjust the tone volume or disable the tone.
z You can also configure this setting via the WEB-Oberfläche page 132.
@ Press the key shown.
Select and confirm the option shown.
if nec. j Enter and confirm the User password.
Select and confirm the option shown.
Select and confirm the option shown.
Setting the volume for Key click
Select and confirm the option shown.
For instance, select and confirm a medium volume setting. You can choose between the following three options:
•Low
• High
• Off (no click)
Key selection
Select and confirm the option shown.
Select and confirm if only the keys for entering characters are to be affected.
or
Select and confirm the option shown.
Confirm the option shown.
Page 31

31
Settings that impact energy efficiency
You can actively reduce energy consumption by making the following settings
on your telephone and therefore contribute in an important way to protecting the
environment.
• You can reduce the ringer volume, display brightness and contrast – the default settings on delivery are 50%.
Page 32

32
ñ
Accept? l
Making calls
Incoming calls
The telephone rings if the ringtone is active. The LED de notificação also flashes. If transmitted, calling party information (name, phone number) appears on
the display.
Any settings you are currently making on the phone will be interrupted by
an incoming call. You can use the
point in the menu where you were interrupted, unless the time for the password has expired.
If you have set a pattern melody page 85 or a ringer page 73 on your
phone, it is possible that your administrator may have preset a different
ringer depending on the call type (e.g. an external or internal call).
Answering a call via the handset
@ key at any time to return to the
The phone rings. The caller is displayed.
If the phone number is stored in the local telephone, the associated name
is shown on the display (must be activated by the administrator).
^ Lift the handset.
if nec. " Adjust the call volume.
Answering a call via the loudspeaker (speakerphone
mode)
The phone rings. The caller is displayed.
The
± key flashes green.
Confirm the option shown.
É key lights up green.
The
or
: Press the key shown. The key illuminates. The speakerphone function is activat-
ed.
if nec. " Adjust the call volume.
Suggestions for using speakerphone mode:
• Adjust the call volume while speakerphone mode is active.
• The ideal distance between the user and the phone in speakerphone mode is
50 cm.
Page 33

Answering a call via the headset
Accept? l
ñ
ñ
Reject? f
Deflect m
089008844 l
The phone rings. The caller is displayed.
The
² and ± flash green.
Z Confirm the option shown.
or
. Press the key shown. The key lights up. The headset is activated.
if nec. " Adjust the call volume.
Answering calls automatically via the headset
The administrator has additionally configured a key with the "Auto-Headset" function (AICS Zip tone).
_ Press the "Auto-Headset" function key to activate automatic call answering.
The
Ê and É light up green.
33
A short acoustic signal is heard on the headset for a call and the connection is
established.
If you want to manually answer calls again, deactivate the automatic answering
function using the "Auto-Headset" key. Both keys are off.
Rejecting a call
You can reject an incoming call.
"Reject" must be authorized by the administrator.
An incoming call is displayed or signaled.
Select and confirm the option shown.
The caller hears a busy signal.
If the rejected caller's phone number is transmitted, it is saved in the call
list. You can then call this party back at a later time.
Deflecting a call
Prerequisite: An incoming call is displayed or signaled. "Deflect" must be allowed.
Select and confirm the option shown.
If a destination phone number is stored (
firm it. The call is deflected.
page 111), you can select and con-
Page 34

34
ñ
Accept l
Reject? f
Deflect? m
Dial
Redial x ##? l
or If you did not set a phone number when programming call deflection, you are
now prompted to enter a destination phone number for call deflection.
j Enter and confirm the destination phone number. The call is deflected.
Responding to a callback
The Reject and Deflect functions are authorized by the administrator.
Prerequisite: A callback was requested. Your phone rings and the subscriber
information appears on the screen.
Accepting a callback
Select and confirm the option shown.
Rejecting a callback
Select and confirm the option shown.
The callback request is deleted. The caller's phone number is added to the
missed calls list.
Forwarding a callback (not OpenScape Voice)
Select and confirm the option shown.
j Enter the phone number and confirm.
If you allowed the option "Busy When Dialing" page 115, you will not be
interrupted by an incoming call. In this case, the caller hears the busy signal.
You can also use enhanced functions, such as call lists or the personal or corporate directory, in order to call a subscriber
page 48.
Making calls
Off-hook dialing
^ Lift the handset.
j Enter the phone number. If necessary, correct input using the navigation keys
page 16.
Confirm or wait until the dial delay expires (see
page 37).
or
Confirm the option shown1. ## represents the last number dialed.
The connection is set up.
1. Please note the information in relation to the call log page 35.
Page 35

If you are using a dial plan and Immediate dialling is set up (see
Redial x ##? l
Dial
page 116), dialing is automatically performed as soon as the character
string entered matches an entry in the dial plan.
If a connection is temporarily unreachable, you will hear a special information tone (short tone sequence). The fault can be rectified quickly, so try
again to dial this phone number after an appropriate time.
On-hook dialing
The connection is set up with on-hook dialing or via the loudspeaker (speakerphone mode).
: Press the key shown.
j Enter the phone number. If necessary, correct input using the navigation keys
page 16.
Z Press or wait until the dial delay expires (see page 37).
35
or
Confirm the option shown1. ## represents the last number dialed.
Entering the phone number first
First enter the phone number. The loudspeaker key illuminates when you enter
the first digit.
j Enter the phone number. If necessary, correct input using the navigation keys
page 16.
Confirm or wait until the dial delay expires (see
The connection is set up.
If you are using a dial plan and Immediate dialling is set up (see
page 116), dialing is automatically performed as soon as the character
string entered matches an entry in the dial plan.
page 37).
Dialing with the selected dialing key
You can program frequently used phone numbers on programmable keys
(
page 55). If you press a selected dialing key briefly, the associated contact
or phone number appears and dialing is initiated.
Party
_
Prerequisite: A selected dialing key is programmed
Press the programmed selected dialing key. Dialing is initiated.
page 55.
Redialing via the function key
1. Please note the information in relation to the call log page 35.
Page 36

36
Dialled l
998324 01.01 f
Dial l
Missed (x) l
998324 01.01m
Dial l
You must have activated Call logging in order to use the "Dialed" call list.
This also applies for redialing the last number dialed
logging is disabled, you will be shown the message "Key function unavailable" on the display when you try to execute the last number redial function
using a correspondingly programmed function key.
page 120. If Call
Þ_
Press the function key to open Konversationen.
Select and confirm the option shown. The Dialled (x) call list opens.
If entries are saved, select and confirm the required entry.
Confirm the option shown. The phone number associated with the list entry is
dialed.
Calling back a missed call
Calls received while you are absent are indicated by a message on the idle display (
page 21). The ¤ function key also illuminates if the administrator has
set the option to do this.
Missed calls are logged in the missed calls list. This list provides information on
the missed call and lets you call back the number directly (Call logging
page 24). Missed calls are not saved and displayed if Call logging is disabled
page 120.
On multi-line telephones page 66, only the calls missed on your primary
line are logged.
Þ_
Press the function key to open Konversationen.
Select and confirm the required call list.
Select and confirm the entry you want.
Confirm the option shown.
The phone number associated with the entry is dialed.
Page 37

37
Callback? m
Cancel callbacks? f
Requesting callback
You can request a callback if the subscriber called is busy or if nobody answers.
You receive a callback when the other party's line becomes free.
This option is only available if both you and your administrator have activated the function (
This function is available with restrictions on an OpenScape 4000, see
page 152.
Prerequisite: The subscriber is busy or nobody answers.
Select and confirm the option shown.
Deleting callback requests
You can delete scheduled callback requests if you no longer need to return a
call, for example, at the end of the working day.
Prerequisite: At least one callback was requested. The phone is idle.
Select and confirm the option shown.
All callback requests are deleted.
page 117).
Using autodial delay
A number is automatically dialed after a set delay starting from the entry of the
number's last digit. The autodial delay can be used:
• when dialing in idle mode
• during a consultation
• when transferring an answered call.
The delay can be reduced by performing one of the following activities:
Z • Press the key shown. This always works.
^ • Lifting the handset. This only works if the phone number was entered when the
phone was idle or if it was entered for a consultation call when the handset was
off hook.
If an emergency number is preset by your administrator, the autodial delay
for this phone number is reduced to one second.
Page 38

38
ñ
During a call
Activating/deactivating the microphone
To prevent the other party from listening in while you consult with someone in
your office, for example, you can temporarily switch off the handset microphone
or the handsfree microphone.
Prerequisite: You are conducting a call.
Deactivating the microphone
; Press the key shown.
Activating the microphone
Æ Press the illuminated red key.
Changing the volume
You can change the volume of the handset or the loudspeaker during the call.
g You are conducting a call.
" Adjust the volume using the toggle key page 25.
Switching from handset to speakerphone mode
Take note of the two different processes and activate your preferred setting as appropriate
Prerequisite: You are conducting a call via the handset.
The microphone and loudspeaker functions are activated by your administrator.
Open listening in standard mode
: and \ Hold down the key and replace the handset. Then release the key and proceed
with your call.
Open listening in US mode
page 86.
: Press the key shown.
\ Replace the handset. Proceed with your call.
Page 39

Switching from speakerphone mode to the handset
Consult? l
Conference
Prerequisite: You are conducting a call in speakerphone mode.
^ Lift the handset. The É key is no longer lighting.
Open listening
You can let other people in the room join in on the call. Let the other party know
that you have turned on the loudspeaker.
Prerequisite: You are conducting a call via the handset.
Activating
: Press the key shown.
Deactivating
É Press the illuminated key.
39
Switching to speakerphone mode
: and \ Hold down the key and replace the handset. Then release the key and proceed
with your call.
Consulting a second party
You can call a second party while a call is in progress. The connection to the first
party is placed on hold.
Prerequisite: You are conducting a call.
Confirm the option shown.
j Enter and confirm the second party's phone number.
If you want to use a call list or one of the phonebooks for the consultation
call, select Hold instead of Consult in the context menu or press the
key and then open a required entry in a list
Alternatively, you can open a call list or a phonebook without using the
Consult or Hold functions - the active call is automatically put on Hold.
or Start a conference
Select and confirm the connection in the context menu if you intend to set up a
conference with the new user. You can also use the
page 48.
Á key in this case.
Ä
Page 40

40
Disconnect & return? f
Retrieve held call
ñ
Alternate? l
Disconnect & return? f
Ending a consultation call
You end the consultation
Select and confirm the option shown.
The consultation call is disconnected. The call with the first party is resumed.
The second party hangs up
If the second party hangs up, you will be prompted to retrieve the first call again
if "Hold and hang-up" is disabled (
main on hold until you receive this prompt after a defined time interval.
Confirm the option shown. You are reconnected with the first party.
If the call is kept on hold, you can retrieve the call via the context menu
before the set time expires.
Ending the consultation with an active headset
The administrator has additionally configured a key with the "Auto-Headset" function (AICS Zip tone).
page 109). Otherwise, the first call will re-
Auto-Headset
_
Press the "Auto-Headset" function key to activate automatic call answering. This
key and the
Ê key illuminate.
[ You are conducting a consultation call and the second party hangs up. You are
automatically reconnected with the waiting first party. The prompt "Retrieve held
call" does not appear.
Switching to the held party (alternating)
Prerequisite: You are conducting a consultation call page 39 or have accept-
ed a second call
Select and confirm the option shown.
In the first display line, the phone number or name and the duration of the active
connection are displayed.
You can switch back and forth between two subscribers by repeatedly selecting and confirming "Alternate".
Ending an alternate operation
Select and confirm the option shown.
The active call is disconnected and the held call is restored.
page 43.
Conference
Prerequisite: You are conducting a consultation call page 39 or have accept-
ed a second call
page 43 and the conference function is active page 117.
Page 41

Establishing a conference
Conference?
Exit conf.? l
End conf.? f
41
{ or }
If you are already involved in a secure connection with a party when you
initiate a consultation call, the original party is placed on hold. The new
consultation connection can be either secure or unsecured. However, the
first connection remains secure even if all three parties are now joined together in a conference.
The entire conference is nonsecure if the connection to at least one of the
parties is not secure.
The relevant padlock icon appears in the "Conference" row.
Select and confirm the option shown in the context menu. You are connected to
both parties at once. Alternatively you can press the
Á key.
Leaving a conference
Allowing call partners to continue a conference after you exit
Prerequisite: The ”Allowing joining in a conference”
tivated.
Select and confirm the option shown in the context menu. Both call partners re-
main connected. You are disconnected from the conference call.
or
^
or É Replace the handset or, if you are in speakerphone mode, press the loudspeak-
er key. Both call partners remain connected. You are disconnected from the conference call.
Seite 118 function is ac-
Disconnecting a party
Select and confirm the option shown in the context menu.
Both connections are cleared down – the conference is cleared down.
Putting on hold and retrieving alternately or simultaneously
Putting an active call on hold
Prerequisite: You have a single-line phone and are conducting a consultation
call
page 39 or have answered a second call page 43.
Ä Press the key shown. The key flashes. The consultation or second call and the
first call are put on hold.
Retrieving the first call
μ Switch to the first call.
Ç Press the flashing key. You are connected with the other party. The consultation
or second call continues on hold.
Page 42

42
Complete Xfer? f
Hold ? f
Reconnect ? l
Retrieving the second call
€ Switch to the held consultation or second call.
Ç Press the flashing key. You are connected with the other party. The first called
was put on "Hold" again.
Connecting parties
You can connect the first party with the party you consulted, clearing down your
connection to both parties in the process.
Prerequisite: You are conducting a consultation call
is allowed
Select and confirm the option shown.
The active and held calls are joined. You are disconnected from the call.
page 110.
page 39 and call joining
or Connecting by hanging up
] or : Replace the handset or, if you are in speakerphone mode, press the loudspeak-
er key. The other two parties are now connected to one another.
Placing a call on hold
You can use this function to place an ongoing call on Hold, for instance to prevent the other party overhearing a conversation with a colleague in the same
room.
Prerequisite: You are conducting a call.
Select and confirm the option shown in the connection's context menu.
or
Ä Press the key shown. The key illuminates.
If you do not retrieve the held call after a defined time interval, a reminder
beep sounds three times and a prompt to retrieve the call or disconnect
appears on the display. The settings for this can be found on
and
page 108.
page 108
Line 1
Retrieving a held call
Select and confirm the option shown in the connection's context menu.
or
Ç Press the illuminated key.
Using line keys
On a multi-line telephone, you can also use the line keys to place ongoing calls
on Hold.
_
Press the corresponding line key. The line key LED starts flickering. The call is
now on hold.
Retrieving a held call:
Page 43

43
Retrieve held call ? l
Disconnect ? f
Accept l
Line 1
¤
Press the corresponding line key. The line key LED lights up. The call is retrieved.
The LED display page 67 indicates that the call is on "Hold" to other
multi-line telephones where this line is also configured. These phones can
then pick up the call.
Held call wait status
After placing a call on hold, you can replace the handset and then decide whether to retrieve the call or disconnect.
Prerequisite: You placed a call on hold and replaced the handset or pressed
the loudspeaker key in speakerphone mode.
A recall follows immediately and a pop-up menu appears on the display:
Select and confirm the option shown to retrieve the call in speakerphone mode.
or
Select and confirm the option shown to disconnect the held call.
If you enabled Hold and hang-up" ( page 109), the call is placed on hold
for a defined time interval (
with a recall to retrieve the call or disconnect. You can however retrieve the
call or disconnect via the context menu before the defined time expires.
page 108) before the prompt is displayed
This function cannot be used on multi-line phones.
Call waiting (second call)
You can accept a second incoming call in the course of an ongoing call. The caller hears the on-hook signal while you hear a call-waiting signal tone. A bell appears on the display and next to it the phone number of the caller is shown.
You can ignore or accept the second call. Before you accept the second call, you
can end the first call or place it on hold for subsequent retrieval.
You can block the second call or the signal tone (
Answering a second call
Prerequisite: You are conducting a call and call waiting is allowed
(
page 112).
Select and confirm the option shown.
You can talk to the second party.
The connection to the first party is on hold.
During the call with the second party, additional functions are available for selection:
• Alternate (see
• Complete transfer (see
• Conference (see
• Blind transfer (see
• Hold (see
• Put on hold and retrieve second and first call successively
page 40),
page 42),
page 40),
page 45),
page 42).
page 112).
page 41
Consultation call from second call
If the second call is your active call you can initiate a consultation call from it.
Page 44

44
ñ
Disconnect & return? m
Ignore? f
Reject? f
The administrator must have approved the consultation in the second call.
From a consultation call in the second call you can
• initiate a conference
• toggle between the second call and a consultation call
• put on hold and retrieve second and first call successively
• transfer a call
• disconnect the calls again
During a consultation in the second call, the first call is parked and can only be
unparked if the consultation or second call was ended or these calls were connected.
Disconnecting the second call
Select and confirm the option shown in the second call's context menu. The call
to this subscriber is disconnected and the call to the first subscriber is reconnected.
page 41
Ending the second call by hanging up
If you or the second call partner hangs up, you will be prompted to retrieve the
first call again if "Hold and hang-up" is disabled (
first call will remain on hold until you receive this prompt after a defined time interval.
page 109). Otherwise, the
Ignoring the second call
Prerequisite: You are conducting a call and call waiting is allowed
(
page 112).
Select and confirm the option shown.
The caller still hears the on-hook signal. You can subsequently Accept, Reject
or Deflect the second call via the context menu.
While the ignored second call continues to wait, from the active call you can:
• make a consultation call
• initiate a conference
• toggle between the consultation call and your call partner
• transfer a call
A third call would be rejected with the busy signal.
If you have disconnected the first call, the ignored second call rings like a normal
call.
Rejecting a second call
Prerequisite: You are conducting a call and call waiting is allowed
(
page 112).
Select and confirm the option shown.
The second call is rejected. The caller hears the busy signal. The caller's phone
number is added to the missed calls list.
Deflecting a second call
Prerequisite: You are conducting a call and call waiting is allowed
(
page 112).
Page 45

Select and confirm the option shown.
Deflect? m
Complete Xfer
ñ
Blind transfer call? f
45
or If you did not set a phone number when programming call deflection, you are
j Enter and confirm the destination phone number.
or Connecting by hanging up
] or É
If a destination phone number is stored (
firm it. The call is deflected.
now prompted to enter a destination phone number for call deflection.
The second call is deflected to the destination specified. You are reconnected
with the first party.
page 111), you can select and con-
Connecting parties
Select and confirm the option shown. The other two parties are now connected
to one another. You can now hang up or dial another number for instance.
Connecting by hanging up is activated (consult your administrator) and
"Switch assignment" must be set to "Yes" (
Replace the handset or, if you are in speakerphone mode, press the loudspeaker key. The other two parties are now connected to one another.
page 113).
Transferring a call
You can transfer your current call to another party with or without consultation.
Prerequisite: You are conducting a call. The options "Allow call transfer" and
"Transfer on ring" are allowed (
Blind transfer
You can choose between easy transfer with the à key or blind transfer via
the menu.
Easy transfer
à Press the key shown.
j Enter and confirm the phone number of the second party to whom you want to
transfer the call. You can also select and call a subscriber here from a call list or
from one of the two phonebooks
à Press the key shown again.
Blind transfer
Select and confirm the option shown.
j Enter the phone number of the second party to whom you want to transfer the
call. You can also select and call a subscriber here from a call list or from one of
the two phonebooks
page 48.
page 113).
page 48.
Z Confirm or wait until the autodial delay expires.
The display returns to idle following successful transfer.
Page 46

46
Consultation? l
Complete Xfer? f
Disconnect m
Transferring with consultation
You can announce a call to a recipient before transferring it.
You can choose between easy transfer with the
the menu.
Easy transfer
à key or blind transfer via
à Press the key shown.
j Enter and confirm the phone number of the second party to whom you want to
transfer the call.
As soon as the second party has answered, you can announce the transfer of
the call. You can also select and call a subscriber here from a call list or from one
of the two phonebooks
page 48.
à Press the key shown again.
The display returns to idle following successful transfer.
Blind transfer
Select and confirm the option shown. The call is placed on hold.
j Enter the phone number of the party to whom you want to transfer the call. You
can also select and call a subscriber here from a call list or from one of the two
phonebooks
page 48.
Announce the call you want to transfer.
Select and confirm the option shown.
If the party does not answer:
You do not have to wait for the second party to answer before you can transfer
the call.
Replace the handset or, if speakerphone mode is active, press the illuminated
É key to transfer the call.
If the party does not answer, you will be called back by the first party.
Ending a call
Select and confirm the option shown.
or If you are conducting a call via the handset:
\ Replace the handset.
or In speakerphone mode:
É Press the illuminated green key.
or If you are conducting a call via the headset:
Ê Press the illuminated green key.
Configuring call forwarding
Page 47

You can also enter the call forwarding settings via the Forwarding key
User
Configuration
Incoming calls
Forwarding?
Settings?
User
Configuration
Incoming calls
Forwarding?
Alerts
Visual alerts= No f
Yes l
Audible alerts= No f
(
page 99).
This is how you set local call forwarding on an OpenScape 4000.
z You can also configure this setting via the WEB-Oberfläche page 132.
@ Press the key shown.
Select and confirm the option shown.
if nec. j Enter and confirm the user password.
Select and confirm the option shown.
Select and confirm the option shown.
Select and confirm the option shown.
Configuring call forwarding
Select and confirm the option shown.
47
For a description of the settings, see section ”Standard call forwarding”
Seite 98.
Setting alerts
Use the Call forward alerts menu to enable and disable visual and audible alerts
for call forwarding (not possible with the Forwarding key).
z You can also configure this setting via the WEB-Oberfläche page 132.
@ Press the key shown.
Select and confirm the option shown.
if nec. j Enter and confirm the user password.
Select and confirm the option shown.
Select and confirm the option shown.
Select and confirm the option shown.
Select and confirm the option shown.
Select and confirm the option shown.
Select and confirm Yes/No in the context menu.
or
Select and confirm the option shown.
Page 48

48
Yes l
Forwarding party m
Display last f
Save & exit l
New contact?
Save & exit
Niels, Bohr
Details
Last name
Save & exit
Select and confirm the option shown.
or
Select the option shown.
Select and confirm Display last/Display first.
Select and confirm the option shown.
Phonebooks and Konversationen
Personal phonebook
The personal phonebook is restricted to 100 entries.
Creating a new contact
z You can create contacts more conveniently via the WEB-Oberfläche
Ý_
j Fill in the three fields
z You can edit contacts more conveniently via the WEB-Oberfläche page 132.
Ý_
page 132.
Press the Softkey.
Select and confirm the option shown.
•Last name
•First name
•Number
accordingly.
Select and confirm to save the phonebook entry.
Editing a contact
Press the Softkey shown to open the local phonebook.
Select and confirm the relevant entry.
Select and confirm the option shown.
Select and confirm, for example the "Last name" field.
j Change and confirm.
Select and confirm the option shown.
Page 49

Deleting a contact
Niels, Bohr
Delete
Delete?
Cancel?
Delete all?
Delete all entries?
Cancel?
z You can delete contacts more conveniently via the WEB-Oberfläche
page 132.
49
Ý_
or
z You can delete contacts more conveniently via the WEB-Oberfläche
Ý_
Press the Softkey shown to open the local phonebook.
Select and confirm the relevant entry.
Select and confirm the option shown.
Confirm the option shown.
Select and confirm to cancel the process.
Deleting all contacts
page 132.
Press the Softkey shown to open the local phonebook.
Select and confirm the option shown.
Confirm the option shown.
or
Select and confirm to cancel the process.
Page 50

50
Angela, Merkel
U
JL5(Abc)
K
Kirsch, Erika
UK(5)
pq s7ß(abc)
r
Kramer, Elisabeth
ñ
Find
Searching for a contact
Ý_
j Enter the first letter of the name you are searching for, e.g. K.
Press the Softkey shown to open the local phonebook.
The last entry used is displayed.
The first name found with the initial letter K is displayed after a short time. If you
are looking for a name that begins with Kr, also enter the second letter in the
search field:
The first name with the initial letters Kr is displayed.
You can also browse the phonebook with the navigation keys until you reach the
required party
page 16.
Ý_
^ Press the Delete key to return to the main menu.
Z Press the key shown to open the "Corporate phonebook" Telephone book.
Corporate directory
The corporate directory is an LDAP database. You can search the database for contact entries if you can access this database over your network
and your access was correctly configured by your administrator.
You can search for contacts using the name (simple search) or different criteria
for an entry (advanced search), for example job title or address.
Searching for a contact
Press the Softkey shown to open the local phonebook.
Select and confirm the option shown.
The following 11 search fields can be used:
•Last name
•First name
•Office 1
•Office 2
• Mobile
•Home
• Company
Page 51

51
Last name
Find
Details
Delete
Qualifier
Back
• Address 1
• Address 2
• Professional role
•E-mail
Select and confirm the required search field (e.g. "Last name").
j Enter a search text. If you only enter the first letter of the last name, for example,
all entries with this initial letter are displayed.
Select and confirm when you have completed one or more search fields. The
search begins. If the entry you searched for is found, you can dial or view the
entry details.
Advanced phonebook editing
Viewing entries
Prerequisite: You found and selected an entry (see above).
Select and confirm the option shown. All fields of the entry are displayed.
Resetting the search fields
Prerequisite: The search fields are listed.
Select and confirm the option shown. You can now enter new search criteria for
a search.
Defining a qualifier before a search
Prior to a search, you can select which qualifiers should also appear in the output list.
Select and confirm the option shown. You may choose between the following criteria:
• No qualifier
• Job function
• Address 1
•Email
• Business 1
• Mobile
• Business 2
•Private
• Company
• Address 2
μ€Z Select and confirm the desired qualifier.
Select and confirm to close the list.
Quick search
Ý_
Press the Softkey shown to open the local phonebook.
^ Press the Delete key to return to the main menu.
Z Press the key shown to open the "Corporate phonebook" Telephone book.
Page 52

52
U
Enter the name(Abc)
UK
JL5 (Abc)
K
Kirsch, Erika
UKr
pq s7ß(abc)
r
j Enter the first letter of the name you are looking for, e.g. "K".
If you do not enter any further characters, all available names with the corresponding initial letter are displayed after a predefined period of time or after
pressing = to confirm.
You can restrict the output by entering the second and other letters. The #
key is used to switch between letters and numbers. The
to delete individual characters.
bd keys are used
You can control the search individually by entering extended characters. To select extended characters, first press the * key.
Rule list:
Character Description
# Searches for the exact string before the extended character.
, You can enter first and last name separately using a comma. A
search is carried out for the last name (possibly using a wildcard)
and the first name with the first character after the comma.
* Wildcard. This searches for the character entered and all possi-
ble subsequent characters.
You enter this character by selecting it in the extended characters.
Quick search using parts of a search string
If the administrator adds a field to the template for the corporate directory and
assigns this field to an existing search field, you can use any strings in a last
name, for example, for the search.
To list all entries, for example, in which the string "er" appears in the Last name
field, enter this character combination when prompted to enter the name.
Once the output list is available with entries that match this condition, you can
now skip to the first corresponding entry by entering the initial letter of the last
name.
Please consult your administrator to establish whether an additional field
has been added to the template for the corporate directory and which
search field it has been assigned to. Note that a traditional quick search
will return unintended results in this case.
Page 53

53
Call Mailbox
Listening to voicemail
To use this function, you need to have a voice mailbox set up on your communication platform for voicemails (see
page 23).
The message key
pears on the display. The LED only extinguishes when all messages have been
picked up.
È flashes to indicate new messages and the F icon ap-
Listening to voicemail
 Press this key when the phone is in idle mode. The Messages menu opens. The
key illuminates red.
€ Choose to call the mailbox if appropriate.
Confirm the option shown to call the mailbox. Follow the voice instructions. You
may need to enter a password.
Querying voicemail
€μ You can use the Navigator keys to query information as to which and how many
voicemails are stored.
• Newx (1)
• Urgent-Newx (1)
• Oldx (1)
• Urgent-Oldx (1)
Listening directly to voicemails
You can also call the mailbox directly without using the menu. The mailbox answers even if there are no messages waiting.
^ Lift the handset.
 Press the key shown. The mailbox answers. Follow the voice instructions. You
may need to enter a password.
You can call the mailbox any time you see the "Please dial" prompt on the
display.
Page 54

54
Programmable keys
The phone features a range of functions that can, if required, be stored on programmable keys.
The phone comes with four programmable keys, all of which can be programmed on two separate levels.
You should assign the "Shift" function to one of these keys to be able to switch
between the two key levels.
The keys are preassigned in the as-delivered state (see
The keys can also be programmed via the WEB-Oberfläche (
page 17).
page 132).
List of available functions
1. Unallocated 22.Conference
2. Selected dialling 23.DND
3. Repeat dialling 24.Group pickup
4. CF unconditional 25.Repertory dial
5. CF no reply 26.Line
6. CF busy 27.Feature toggle
7. CF unconditional - any 28.Mobility
8. CF no reply - any 29.Directed pickup
9. CF busy - any 30.Release
10.CF unconditional - ext. 31.Callback
11. CF unconditional - int. 32.Cancel callbacks
12.CF no reply - ext. 33.Consultation
13.CF no reply - int. 34.DSS
14.CF busy - ext. 35.Call waiting
15.CF busy - int. 36.Immediate ring
16.Ringer off 37.Call recording
17.Hold 38.AICS Zip tone
18.Alternate 39.Server feature
19.Blind transfer call 40.BLF
20.Transfer call 41.Send URL
21.Deflect 42.2nd alert
1 The feature is not available on an OpenScape 4000 telephone system. See also
1
1
1
1
1
page 152.
Page 55

Programming a key
ñ
OK
User
Phone
Program keys
z You can also program the keys via the WEB-Oberfläche page 132.
Initiating programming
Directly via the function key
Must be activated by the administrator.
55
_
Hold down one of the four keys to which a function is to be assigned until the
programming prompt is displayed.
If the prompt is not displayed, you can only launch key programming via
the user menu (consult your administrator about the current setting).
Confirm to begin programming. The key illuminates continuously.
or Via the user menu
You can also program keys via the user menu.
@ Press the key shown.
Confirm the option shown.
if nec. j Enter and confirm the User password.
Select and confirm the option shown.
Select and confirm the option shown. You are prompted to press the key you
wish to program.
_
Press one of the four keys you want to program with a function. The key illuminates continuously.
Page 56

56
Normal
Shifted
Do not disturb
Save & exit
OK
Normal = f
Repertory dial f
Setting f
Save & exit l
Beginning programming
Select and confirm the option shown to program or change the first level.
or
Select and confirm the option shown to program the second level.
Select and confirm the required function in the list (e. g. Do not disturb).
Select and confirm the option shown. Relabel the key field if appropriate
(
page 138)
Programming enhanced functions
Repertory dialing
_
Hold down one of the four keys to which the function is to be assigned until the
programming prompt is displayed.
Confirm to begin programming. The key illuminates continuously.
Select and confirm the option shown to program the first level for instance.
Select and confirm the required function.
Select and confirm this option to enter a destination phone number.
j Enter and confirm a subscriber's destination phone number.
You can select and insert special characters in the dialing sequence:
« Clear call
¬ Pause
~ Make consultation
» Make normal call
The menu also offers the following functions:
•OK
• Cancel
• Mode: ABC, Abc, abc, 123 or HEX
• Move cursor left
• Move cursor right
•Copy
•Paste
Select and confirm the option shown. Relabel the key field if appropriate
(
page 138)
The repertory dial can be up to 40 characters long.
Page 57

Konversationen
OK
Normal = f
Conversations f
Save & exit l
z You can also program the keys via the WEB-Oberfläche page 132.
The following call lists can be found under Konversationen:
• Missed (x)
• Dialled (x)
• Received (x)
• Forwarded (x)
The key can only be used if Konversationen is activated.
57
Þ_
Hold down one of the four keys to which the function is to be assigned until the
programming prompt is displayed.
Confirm to begin programming. The key illuminates continuously.
Select and confirm the option shown to program the first level for instance.
Select and confirm the required function.
Select and confirm the option shown. Relabel the key field if appropriate
(
page 138)
Page 58

58
OK
Normal = f
Forward all calls f
CF unconditional - any f
Setting f
Save & exit l
Configuring a fixed forwarding key
z You can also program the keys via the WEB-Oberfläche page 132.
ß
_
Hold down one of the four keys to which a function is to be assigned until the
programming prompt is displayed.
If the prompt is not displayed or a programmed function is not executed,
you can only launch key programming via the user menu (consult your administrator about the current setting).
Confirm to begin programming. The key illuminates continuously.
Select and confirm the option shown to program the first level for instance.
Call forwarding depending on the forwarding type
Select a forwarding type:
• Forward all calls
• Forward no reply
•Forward busy
Select and confirm the required function.
Call forwarding depending on the call type
If use of system-assisted functions has been enabled by the administrator and
the Forwarding Int/Ext function activated, call forwarding by call type functionality will be available to you. Forwarding in this case is dependent on the forwarding type and additionally on the call type.
Select a forwarding type:
• CF unconditional - any
• CF unconditional - int.
• CF unconditional - ext.
• CF busy - any
•CF busy - int.
• CF busy - ext.
• CF no reply - any
• CF no reply - int.
• CF no reply - ext.
Select and confirm this option to enter the forwarding destination.
j Enter and confirm the phone number of the forwarding destination.
Select and confirm the option shown. Relabel the key field if appropriate
(
page 138)
Page 59

Configuring a variable call forwarding key
OK
Normal = f
Built in fwd f
Save & exit l
With "Variable call forwarding" key you can
• Immediately activate or deactivate the call forwarding for "All calls"
• Edit the call forwarding
Ideally you should use the previously configured forwarding key for forwarding.
z You can also program the keys via the WEB-Oberfläche page 132.
page 100
59
page 99
ß
_
Hold down one of the four keys to which a function is to be assigned until the
programming prompt is displayed.
Confirm to begin programming. The key illuminates continuously.
Select and confirm the option shown to program the first level for instance.
Select and confirm the option shown.
Select and confirm the option shown. Relabel the key field if appropriate
page 138)
(
Page 60

60
Using programmed keys
The use of programmed functions depends on the phone's status. The relevant
display appears once you have pressed a key.
Example 1: Calling saved number
Prerequisite: The idle menu is displayed on the graphic display.
Party
Call waiting
Immediate ring
_
¤
_
Press one of the four keys with the saved contact. The connection setup is
shown on the display.
Example 2: Activating/deactivating Call waiting
You can press a key to activate or deactivate call waiting functionality, even
during a call. The prerequisite for this is that a second call is permitted
(
page 112). A second call is allowed by default.
Press one of the four keys with the "Call waiting" function. The key is no longer
illuminated. The second call function is deactivated. The call is rejected or forwarded.
Example 3: Immediate ring
This function allows you to switch the preset delay ( page 72) on and off for all
line keys. By default the delay is set, the key does not illuminate.
Press one of the four keys with the "Immediate ring" function. The key illuminates. The delay ringer is disabled. An incoming call rings immediately regardless of what delay time is configured.
Page 61

Resetting programmed keys
User
Reset
Function key data m
Yes f
Reset phone
Here you can reset keys you configured back to factory settings (see also
page 97).
@ Press the key shown.
Confirm the option shown.
if nec. j Enter and confirm the user password.
Select and confirm the option shown to switch to the Reset user data menu.
Select the option shown.
Select and confirm the option shown to delete the content of all keys.
Select and confirm "Reset selected user data". The contents of the keys you
configured are deleted.
61
Keys that can only be configured by the administrator remain unchanged.
Page 62

62
ñ
Making calls in the team
Group call
Your administrator can incorporate multiple telephones in a call pickup
group. If your telephone belongs to a pickup group, you can also accept
calls intended for other members of the group.
A group call is displayed on the phone. The administrator may have made the
following settings for signaling:
Telephone status Ring on
group call = Yes
Ringer on Silent ringing Ringer
Speaker
in
connection
Ringer off Silent ringing Nothing Nothing
in
connection
Handset Ringer
Speaker
Handset
Open listening
Open listening Beep
Speakerphone
mode
Handset Nothing Beep
Handset
Open listening
Open listening Beep
Speakerphone
mode
Beep
Handset and loudspeaker
Speaker
Beep
Speaker
Beep
Handset and loudspeaker
Speaker
Beep
Speaker
Ring on group call = No
Beep
Speaker
Beep
Handset
Beep
Handset and loudspeaker
Beep
Speaker
Beep
Speaker
Handset
Beep
Handset and loudspeaker
Beep
Speaker
Beep
Speaker
The volume settings can be found from
Further administrator settings for group calls:
• The group call can be picked up both by lifting the handset and via the "Pickup
call" menu option.
• The group call can be picked up via the "Pickup call" menu option but not by
just lifting the handset.
• A key is programmed for call pickup.
• A pop-up menu is opened with the Call pickup key when a group call is waiting.
page 29.
Page 63

Picking up a group call with the call pickup key
ñ
ñ
Pickup call? l
Ignore? f
The "Call pickup" key is configured ( page 54). Your administrator has
set up the group call such that it is only displayed by the Group pickup key
flashing. The phone can also ring when idle.
A group call is waiting. The Group pickup key flashes. The group call is not
shown on the display.
63
Group pickup
¤
Press the Softkey shown.
The group call is now shown on the display with
Pickup: Caller
for: Party
The pop-up menu opens:
Picking up a group call immediately via the pop-up menu
Your administrator has set up the group call such that it will be shown immediately on the display and the pop-up menu will open.
• A group call is waiting and is shown on the display with
Pickup: Caller
for: Party
Picking up a group call
The pop-up menu opens:
Confirm the option shown.
Group pickup
^
_
or
Lift the handset (only if the appropriate function is set by your administrator).
or
Press the key or press it again if call answering was initiated via the key. The
speakerphone function is activated.
Ignoring a group call
Select and confirm the option shown. The phone stops signaling the group call.
Page 64

64
ñ
Direct station selection keys
Apart from line keys, the administrator can also configure direct station selection
(DSS) keys. You can use a DSS key to call an internal station directly, pick up
calls for this station or forward calls directly to it.
This function is not available to you on an OpenScape 4000, see
page 152.
Calling a subscriber directly
You cannot use DSS if the user is on another call (flashing LED).
Calling from the idle menu
DSS 1
DSS 1
_
_
Press the relevant DSS key. The key lights up and a connection is established.
The administrator can configure the DSS key so that the connection is also
established when the DSS subscriber has activated do-not-disturb or call
forwarding.
Consultation with the DSS subscriber
Prerequisite: You are conducting a call.
The DSS key is configured by the administrator for consultations.
Press the relevant DSS key for the consultation. The key lights up and a connection is established. If the subscriber answers, you can toggle, transfer the first
call or initiate a conference.
If the administrator has configured transfer instead of consultation, you
can only transfer the current call to the DSS subscriber.
Call pickup
You can pick up calls for the DSS subscriber. If a call is waiting on their line, the
LED flashes.
Indirect pickup
Prerequisite: The auto-answer function is deactivated page 106.
DSS 1
£
^ or : Lift the handset or press the : key. You are connected with the other party.
Press the DSS key. The call is routed to your primary line and rings.
Page 65

Rejecting a call
ñ
Reject f
The administrator must activate the reject option for DSS keys and autoanswer must be deactivated
page 106.
65
DSS 1
DSS 1
DSS 1
DSS 1
_
_
£
£
Press the DSS key. The call is routed to your primary line and rings.
Select and confirm the option shown in the pop-up menu.
The caller hears a busy signal.
Direct pickup
Prerequisite: The auto-answer function is activated page 106.
Press the DSS key. The call is routed to your primary line and you are immediately connected with the other party via speakerphone.
Deflecting a call to a DSS subscriber
Prerequisite: The deflect function must be approved for DSS keys. For information on the current setting, see
If you receive a call on one of your lines, you can immediately deflect it to the
DSS subscriber.
Your phone rings and a line key flashes.
Press the relevant DSS key. The call is deflected to the DSS subscriber. If the
DSS subscriber does not answer, you can pick up the call by pressing the DSS
key.
page 111.
LED display on DSS keys
DSS key Meaning
_
£
¤
Off: The phone is in idle mode.
Blinking green: You can accept a call for the DSS subscriber via
the key. The call is routed to your primary line when the call is accepted.
Lighting green: The line is busy. Provided that second call is activated you can still reach the DSS subscriber via the key. It can
accept your call as a second call.
Page 66

66
MultiLine
The following is a description of the telephony scenarios for multi-line phones.
Refer to
Line/trunk keys
Line or DSS keys can be configured by your administrator on programmable
keys on the OpenScape Desk Phone CP200/CP205. These line keys cannot be
changed or deleted by the user.
Each key programmed with the "Line" function corresponds to a line. This
means up to 3 lines can be configured on the function keys. A distinction is made
here between primary, secondary and phantom lines. Each of these line types
can be used on a private or shared basis
Primary line
page 72 for a detailed description of the settings.
This function is not available to you on an OpenScape 4000, see
page 152.
page 66.
All multi-line telephones have a primary line. This line can be reached in the usual manner via your public phone number. Incoming calls to your number are signaled on this line.
To avoid conflict between individual multi-line phones, the functions "Do
not disturb" and "Call forwarding" can only be used for the primary line.
Secondary line
A secondary line on your phone is used as a primary line by another subscriber
of the line trunk group. Your primary line, which is configured on another telephone of a line trunk group, simultaneously functions as the secondary line on
that telephone.
Phantom line
Phantom lines are not used as primary lines by any telephones in a line trunk
group. Phantom lines are established, for example, when the number of lines
provided by a communications system exceeds the number of available telephones.
Line utilization
• Private line: A line that is used by a single telephone. This line cannot be used
as a secondary line by another telephone.
• Shared line: A line that is configured on multiple telephones. The line status
is displayed for all telephones that share this line. If, for example, a shared line
is being used by a telephone, a status message indicating that this line is busy
is displayed on all other telephones.
• Direct call line: A line with a direct connection to another telephone.
The status of a line can be established in the team menu from the icons and the
color of the line key LEDs
page 67:
Page 67

LED displays
Accept? l
LED Meaning
67
_
£
¤
¤
LED off: The phone is in idle mode.
Flashing green:
• Incoming call on the line
• "Hold reminder" is activated
LED flickering green :
• Outgoing call on the line
• The incoming call was prioritized and selected in accordance with
the "Automatic line selection for incoming calls" option
Fast blinking: The line is on "Hold".
Flashing: Call forwarding is activated
LED lights green: The line is busy.
LED lights orange: The line is on "Hold".
page 67
page 108
Incoming calls
Depending on your individual settings, you will be notified of incoming calls
page 84.
Answering calls for the primary line
Line 1
In this case, the telephone behaves in the same way as a single-line telephone
page 32.
Answering calls for secondary lines
Prerequisite: The secondary line is configured on your multi-line telephone.
Using the handset
^ Lift the handset.
[ Conduct call.
The line that rings is automatically selected. If calls are ringing on more
than one line, you will be connected to the line that has been ringing the
longest.
Using the line keys
£
Press the flashing line key. Speakerphone mode.
or
Confirm the option shown. Speakerphone mode.
Page 68

68
ñ
Redial x 12345? l
Making calls
You must seize a line before you can make calls on a multi-line telephone.
Line seizure can be configured on an individual basis. Your administrator can determine if the lines on your telephone can be automatically seized and with
which priority.
If you have seized a secondary line, this line is reserved for you for making
calls for a specific period as defined by the administrator. No other user
can seize this line during this period, even if the line is also assigned to this
user's telephone.
Manual line seizure
^ or : Lift the handset or : Press the key shown.
Line 1
_
Press the required line key.
j Enter the phone number or use redial, for example. The connection is set up.
Automatic line seizure
Your administrator has configured automatic line seizure.
^ or : Lift the handset or : Press the key shown.
Line 2
¤
The line defined during configuration is seized.
j Enter the phone number. The connection is set up.
Dialing the last dialed number
Regardless of the line used, the last number dialed on your telephone is displayed for redialing in the selected number's context menu.
^ or : Lift the handset or : Press the key shown.
Line 1
_
Press the required line key. (
Redial is offered on the display as long as a number has been dialed previously:
Confirm the option shown. The connection is set up.
page 68).
Page 69

69
ñ
ñ
Forwarding calls for the primary line
Call forwarding can only be activated for the primary line. Which call forwards
are possible, how they are configured and activated can be found from
page 98.
Call forwarding information
Your administrator has activated "Forwarding shown".
If you have activated one of the forwarding types on your phone for the primary
line and a subscriber calls, a popup window with the following information opens:
• Who is calling.
• The forwarding destination.
Dialing using the hot or warm line function
Your administrator can configure a hot line or warm line for your phone.
If you lift the phone's handset or press the loudspeaker key, a number is dialed
• immediately in the case of a hot line or
• after a defined period of time in the case of a warm line,
• for the line specified by the administrator.
Examples:
• The phone in the elevator immediately dials the reception number.
• The phone at a patient's bed dials the ward number after one minute, for example, if no other number is dialed.
During calls
Making and receiving calls on a single line
If you only use one line on your multi-line telephone to make calls, and you receive calls on the same line, the phone operates in the same way as a singleline telephone:
• Number redial
• Consultation
• Toggle/Connect
• Callback
•Hold
• Call waiting (second call)
• Transfer call
• Conference
Functions available exclusively for the primary line:
• Call lists
• Voicemail
• Forward calls
• Do not disturb
page 42
page 35
page 39
page 40
page 37
page 43
page 45
page 40
page 24
page 23
page 98
page 77
Depending on your individual settings, you will be notified of incoming calls
page 84.
Page 70

70
ñ
Making and receiving calls with multiple lines
Accepting a waiting call
Depending on the settings for "Rollover", you will be notified of incoming
calls
page 74.
Prerequisite: You are conducting a call. At the same time, a call is incoming on
another line.
[ Call on line 1.
Line 2
Line 1
Line 1
_
Press line key for line 2. The call on line 1 is placed on hold.
All multi-line users that share the line on which the call is being held
(
page 66) can now pick up the held call. To prevent other users from an-
swering the held call, you must place the call on "Consultation" hold
page 39.
Depending on the setting made by your administrator, you may have to
press the line key twice to accept the call on the other line. The first call is
either placed on hold or released depending on the setting.
[ Conduct call on line 2.
\ End call on line 2.
_
Press line key for line 1.
[ Retrieve call on line 1.
Putting a line on hold
On a multi-line telephone you can use the line keys to place calls on hold.
Prerequisite: You are conducting a call.
_
Press the call-line key.
Line 1
£
• The line key LED flashes.
• The line LED displays the hold status on all multi-line phones to which the line
is connected.
• On phones connected to the line, a user can press the relevant line key and
accept the held call.
During a consultation call or after accepting a waiting call the hold function cannot be used.
Lines with hot or warm line function
Your administrator can configure a hot or warm line for the primary and
secondary line.
The function is activated when on
• the primary line
you lift the phone's handset or press the line or loudspeaker key
• the secondary line
you press the line key.
Page 71

A number specified by you is dialed immediately with a hot line and after a spe-
User
Configuration
Keyset
Lines?
Line f
Hot/warm dest.? = nnnn f
Save & exit l
cific time with a warm line.
Examples:
• The phone in the elevator immediately dials the reception number.
• The phone at a patient's bed dials the ward number after one minute, for example, if no other number is dialed.
Entering a number for the hot and warm line function
Specify which number should be dialed when the hot or warm line function is activated.
z You can also configure this setting via the WEB-Oberfläche page 132.
@ Press the key shown.
Select and confirm the option shown.
if nec. j Enter and confirm the User password.
71
Select and confirm the option shown.
Select and confirm the option shown.
Select and confirm the option shown.
Select and confirm the line you want.
Select and confirm the option shown.
j Enter and confirm the destination.
Select and confirm the option shown.
Connecting
A subscriber from a line trunk group is on a call. The subscriber's primary line is
configured as a secondary line on your phone. This line now has the status
"busy". You can connect to the call by pressing the illuminated key for this line
(see also
Prerequisite: A secondary line is set up on your multi-line phone, the option to
connect to the call is activated for your phone and "system conference" is set up
for your system.
page 66).
Line 1
¤
If a preview is set up and activated for the relevant line (
to press the line key a second time following the preview in order to connect.
The key of a secondary line illuminates – it is busy. You want to connect to the
call.
page 73), you have
Page 72

72
User
Configuration
Keyset
Lines
Line 1 f
Ring delay f
Save & exit l
Press the illuminated line key. A conference is established. You are connected
to the parties on the secondary line. The key continues to illuminate and the conference is shown on the display.
If there is already a conference on the secondary line you are connected
to this conference. The conference is shown on the display.
You can now:
• Put the secondary line on hold
• Leave the conference on the secondary line
• Make a consultation call
• Accept a second call
• Alternate between a new call party and a conference on the secondary line.
• Include a call party from a consultation or a second call in the conference.
Settings for MultiLine (keyset)
The details for each keyset line contain supplementary information for the user.
The following uneditable fields are displayed:
•Address
– Displays the phone number for the line
• Ringer on/off
– Displays whether this line's ringer is active
• Selection sequence
– Displays the priority of each line seizure when the handset is lifted or the
loudspeaker key for this line is pressed
Setting the time for a delayed ringer
Specify the length of time before a held call should be signaled on a line.
z You can also configure this setting via the WEB-Oberfläche page 132.
@ Press the key shown.
Select and confirm the option shown.
if nec. j Enter and confirm the User password.
Select and confirm the option shown.
Select and confirm the option shown.
Select and confirm the option shown.
Select and confirm the required line (for example line 1).
Select and confirm the option shown.
j Enter and confirm a delay value.
Select and confirm the option shown.
Page 73

You can activate and deactivate the set delay time for all line keys using a func-
User
Configuration
Keyset
Lines
Line 1 f
Ringer file = abc.mp3 f
abc.mp3? f
Save & exit l
Ringer melody = 2 f
Save & exit l
Ringer sequence = 2 f
Save & exit l
tion key
page 60.
Setting the ringer for lines
If special ringers have been configured by the administrator for lines, you can
adjust these here to suit your requirements.
z You can also configure this setting via the WEB-Oberfläche page 132.
@ Press the key shown.
Select and confirm the option shown.
if nec. j Enter and confirm the User password.
Select and confirm the option shown.
Select and confirm the option shown.
Select and confirm the option shown.
73
Select and confirm the required line (for example, line 1).
Selecting the ringer
Select and confirm the option shown.
[1]
Confirm the option shown. Select the required ringer file
or pattern. You will im-
mediately hear the associated ringer melody. Confirm the current ringer file.
Select and confirm the option shown.
Selecting the pattern melody
The following setting is only effective if you selected "Pattern" under the ringer
option.
Select and confirm the required pattern melody
[1]
between 1 and 8 (e.g. 4). You
will immediately hear the corresponding Ringer melody. Confirm the selected
Ringer melody.
Select and confirm the option shown.
Selecting the pattern sequence
The following setting is only effective if you selected "Pattern" under the ringer
option.
Select the required Ringer sequence in the context menu between 1 and 6 (e.g.
2). You will immediately hear the set Ringer melody with the selected Ringer sequence. Confirm the selected setting.
Select and confirm the option shown.
Line preview
Prerequisite: You are already on a call on one line and a further call rings on a
secondary line. You have programmed a sensor key with the "PreView" function
page 73.
1. The phone displays the current setting
Page 74

74
ñ
ñ
ñ
Preview for a call
Your administrator has deactivated the permanent PreView function.
PreView
Line 1
PreView
_
£
_
Press the "PreView" key. The key illuminates. The PreView function is temporarily activated.
Press the flashing line key. A popup window opens and you receive information
about the caller. Press the line key again to accept the call or wait until the popup
closes itself after a specified period of time.
The preview function is switched off and has to be switched on again for a further
operation.
Permanent preview
Your administrator has deactivated the permanent PreView function.
Press the "PreView" key. The PreView for all lines with "Line preview" remains
active until you press the "PreView" key again.
If the PreView has been deactivated, a call is answered immediately on a
line when the line key is pressed, without first showing caller information.
Rollover for a line
Z
Z
Z
Z k
Line 1
Line 1
Line 1
Line 1
Line 1
£
£
£
£
£
Your administrator can determine how rollover calls are to be signaled.
Only the relevant line key flashes.
or
You hear a special advisory tone via the currently active microphone and the
corresponding line key flashes.
or
The ringer melody set sounds briefly (approx. 3 seconds) via the loudspeaker
and the corresponding line key flashes.
or
You hear a short notification tone.
The ringer melody is not played in speakerphone mode.
The phone rings. The corresponding line key flashes and a pop-up menu with
the available information is shown.
Page 75

Making calls in an executive/secretary
ñ
team
An executive-secretary team is configured by your administrator and may
include up to four executive and up to two secretary telephones. You will
find additional information on this function in the executive/secretary documentation.
This function is not available to you on an OpenScape 4000, see
page 152.
75
Page 76

76
Mobile logon? f
Please enter mobility ID
Enter password
Mobile logoff? f
Mobile logoff
Mobility function
The mobility function allows you to use another telephone as if it were your own.
You use your customary phone number and all contacts as well as telephone
settings are available to you on the other phone.
Logging on to another telephone
Prerequisite: The mobility function is available on this telephone.
Select and confirm the option shown in the idle display context menu. The Mo-
bility logon dialog appears.
You are prompted to enter your Mobility ID.
j Enter and confirm your Mobility ID – usually a phone number.
You are prompted to enter your mobility password.
j Enter and confirm the mobility password.
Wait until all contacts and telephone settings have been loaded. If you were already logged on to a telephone with the mobility function, you will be logged off
from here automatically.
Ending the mobility function on a telephone (log off)
Prerequisite: You are logged on to a telephone with the mobility function.
Select and confirm the option shown in the idle display context menu.
You briefly have the option to cancel the logoff, otherwise the logoff process is
launched.
Wait until all contacts and telephone settings have been saved.
Page 77

77
Do not disturb on f
Do not disturb off f
Privacy/security
Do not disturb
If "Do not disturb" is activated, your telephone will not ring. The caller hears the
busy signal or an appropriate announcement.
On multi-line telephones ( page 66) you can only activate the "Do not
disturb" function for your primary line.
Enabling do not disturb via a key
Do not disturb
Do not disturb
_
¤
Press the Softkey to deactivate the ringer.
Press the illuminated Softkey once more to deactivate the ringer.
You can also activate the "Do not disturb" function during a call or deactivate it when an incoming call is being signaled.
or
Enabling do not disturb via the idle menu
Select and confirm the option shown in the idle menu. The "Do not disturb" icon
appears
or
Select and confirm the option shown. The do not disturb icon is deleted.
page 21.
Page 78

78
User
Configuration
Incoming calls?
Handling? f
Allow DND = No f
Yes l
Save & exit l
Allowing "Do not disturb"
z You can also configure this setting via the WEB-Oberfläche page 132.
@ Press the key shown.
Select and confirm the option shown.
if nec. j Enter and confirm the user password.
Select and confirm the option shown.
Select and confirm the option shown.
Select and confirm the option shown.
Select and confirm the option shown.
Select and confirm the option shown.
Select and confirm the option shown.
Page 79

79
Security
User password
Your User password protects your individual configurations, including your language settings. You can also use the User password to lock your telephone
page 82.
The administrator may have configured the following settings:
• The password is deactivated: You do not have the option of configuring user
settings. The message "Password is disabled" is displayed.
• The password is temporarily locked: You do not have the option of configuring
user settings at this time. The message "Password is suspended" is displayed.
• After initially logging on to a user area, you may have to replace the default
password with a new password.
• A password can have a predefined period of validity: You will have to create a
new password when the period ends. The message "Change (x days left)" will
alert you to this at the appropriate time. The message "Password has expired"
appears when the validity period is over. Confirm "Passwort ändern" and
change the password as described in this section.
• If you repeatedly enter the wrong password (2 to 5 times), additional attempts
are blocked. You can make another attempt after a predefined time.
• It is possible that you will not be able to re-use a previously used password for
a period of time, which means you have to create another "new password".
• Your administrator can tell you about the rules for what and how many charac-
ters can or must be used in the password.
Page 80

80
User
Security?
Change user password l
Aktuelles Passwort l
New password f
Confirm password f
Save & exit l
Changing the password
The preset password "000000" corresponds to a blank password. In other
words, the phone cannot be locked and the user menu is not password
protected. (see also
page 81)
z The User password can also be modified via the WEB-Oberfläche page 132.
@ Press the key shown.
Select and confirm the option shown.
if nec. j Enter and confirm the user password.
Select and confirm the option shown.
Select and confirm the option shown.
Select and confirm the option shown.
j Enter the current password (at least six characters) and confirm (text entry, see
page 18).
Select and confirm the option shown.
j Enter a new password (at least six characters) and confirm (text entry, see
page 18).
Select and confirm the option shown.
j Enter and confirm the new password once more.
Select and confirm the option shown.
Page 81

Deactivating the password prompt
User
Security?
Change user password l
Aktuelles Passwort l
New password f
Confirm password
Save & exit l
You can deactivate the phone's password prompt if a password has already
been configured.
The deactivation of the password prompt does not affect the WEBOberfläche
As long as the password prompt is deactivated, you do not have access to
user settings via the WEB-Oberfläche.
If you deactivate the password prompt, you can no longer lock the phone
page 82 and the user menu is not password protected.
page 132 or CTI applications that use a password prompt.
@ Press the key shown.
Select and confirm the option shown.
if nec. j Enter and confirm the user password.
Select and confirm the option shown.
Select and confirm the option shown.
81
Select and confirm the option shown.
j Enter the current password (at least six characters) and confirm (text entry, see
page 18).
Select and confirm the option shown.
j Enter six zeros ("000000") to deactivate the password prompt. Confirm your in-
put (at least six characters (text input, see
Select and confirm the option shown.
page 18)).
j Enter six zeros ("000000") once again and confirm.
Select and confirm the option shown.
Page 82

82
Confirm lock?
User
Security?
Phone lock? f
Phone lock No l
Yes ? l
Save & exit l
Locking the phone
You can lock your phone to protect it against unauthorized access. In this way,
no one can make calls or change your user settings unless they know your user
password.
Predefined numbers from the dial plan can still be dialed when the phone is
locked - for more information consult your administrator.
You can only lock the phone if you set a user password ( page 79). The
password for this must not be the default setting "000000".
Check if necessary whether the telephone lock function has been activated for you by the administrator.
Activating the phone lock
# Hold down the key shown.
Confirm the option shown. The "Locked phone" icon appears on the display
page 21.
or
@ Press the key shown.
Select and confirm the option shown.
j Enter and confirm the user password.
Select and confirm the option shown.
Select and confirm the option shown.
Select and confirm the option shown.
Select and confirm the option shown.
Select and confirm the option shown.
The phone is locked.
If an emergency number is entered on the phone by the administrator,
Emergency call appears on the display for selection when you have activated the lock. You can also enter the emergency number via the dialpad.
Page 83

83
User unlock?
Admin unlock?
Unlocking the phone
The display shows: Phone locked.
There are two options available for unlocking the phone:
• Unlock user
• Unlock admin
Select and confirm if you know the user password. You are prompted to enter
the user password.
or
Select and confirm if you only know the administrator password. You are prompted to enter the administrator password.
j Enter and confirm the User password or administrator password. The phone is
unlocked if the password was correct.
If the telephone is locked, an emergency number entered by the administrator can be dialed using the dialpad or the Emergency call option.
If the phone is locked, selected dialing keys cannot be used. This also applies even if the emergency number is saved on this key.
Page 84

84
User
Audio
Settings?
Room character = Normal f
Save & exit l
User
Audio
Settings?
Ringer file = abc.mid f
abc.mid? f
Other settings and functions
Audio settings
Optimize the audio settings of your OpenStage for your work environment and
according to your personal requirements.
Room character
To ensure that the other party can hear you properly in speakerphone mode, you
can adjust the phone to the room acoustics by choosing one of the following
room character conditions: "Normal", "Echoing", "Muffled".
z You can also configure this setting via the WEB-Oberfläche page 132.
@ Press the key shown.
Select and confirm the option shown.
if nec. j Enter and confirm the user password.
Select and confirm the option shown.
Select and confirm the option shown.
Select and confirm the room character (for example, "Normal").
Select and confirm the option shown.
Ringer
If your administrator has loaded suitable files to the phone, you can select a realtone file in "*.mid" and "*.wav" format for the ringer. If no individual audio files are
available, the "pattern" ringer is preset.
z You can also configure this setting via the WEB-Oberfläche page 132.
@ Press the key shown.
Select and confirm the option shown.
if nec. j Enter and confirm the user password.
Select and confirm the option shown.
Select and confirm the option shown.
Select and confirm the option shown.
[1]
Confirm the option shown. Select the required ringer file
mediately hear the associated ringer melody. Confirm the current ringer file.
or pattern. You will im-
Page 85

Select and confirm the option shown.
Save & exit l
User
Audio
Settings?
Ringer melody = 2 f
Save & exit l
User
Audio
Settings?
Ringer sequence = 2 f
Save & exit l
Pattern melody
z You can also configure this setting via the WEB-Oberfläche page 132.
85
Prerequisite: You have chosen the "pattern" ringer, see
page 84.
@ Press the key shown.
Select and confirm the option shown.
if nec. j Enter and confirm the user password.
Select and confirm the option shown.
Select and confirm the option shown.
[1]
Select and confirm the required pattern melody
will immediately hear the corresponding Ringer melody. Confirm the selected
Ringer melody.
Select and confirm the option shown.
between 1 and 8 (e.g. 4). You
Pattern sequence
z You can also configure this setting via the WEB-Oberfläche page 132.
Prerequisite: You have chosen the "pattern" ringer, see
page 84.
@ Press the key shown.
Select and confirm the option shown.
if nec. j Enter and confirm the user password.
Select and confirm the option shown.
Select and confirm the option shown.
Select the required Ringer sequence in the context menu between 1 and 6 (e.g.
2). You will immediately hear the set Ringer melody with the selected Ringer sequence. Confirm the selected setting.
Select and confirm the option shown.
1. The phone displays the current setting
Page 86

86
User
Audio
Settings?
Open listening = Standard mode f
Save & exit l
User
Audio
Settings?
Headset socket=Wired headset
Save & exit l
Opening listening mode
Select the mode here that you prefer for open listening (see page 38).
z You can also configure this setting via the WEB-Oberfläche page 132.
@ Press the key shown.
Select and confirm the option shown.
if nec. j Enter and confirm the user password.
Select and confirm the option shown.
Select and confirm the option shown.
Select and confirm the setting you want ("standard mode" or "US mode").
Select and confirm the option shown.
Setting headset port use
Select the type of headset port here.
z You can also configure this setting via the WEB-Oberfläche page 132.
@ Press the key shown.
Select and confirm the option shown.
if nec. j Enter and confirm the user password.
Select and confirm the option shown.
Select and confirm the option shown.
Select and confirm the setting you want ("Wired headset", "Cordless headset" or
"Conference unit").
Select and confirm the option shown.
Page 87

Special ringers
ñ
User
Audio
Special ringers
Internal f
Available Yes
Ringer file
ABC.wav
You can set special ringers for four different call types. The call type is signaled
by the telephone system, recognized by the phone and prioritized accordingly.
You can configure the following call types:
• Internal
• External
• Recall (e.g. callback)
•Emergency
• Special 1
• Special 2
• Special 3
The special ringers are configured by the administrator.
z You can also configure this setting via the WEB-Oberfläche page 132.
@ Press the key shown.
Select and confirm the option shown.
87
if nec. j Enter and confirm the user password.
Select and confirm the option shown.
Select and confirm the option shown.
The setting sequence is the same for all 4 types.
The settings for "Internal" are described below:
Select and confirm the option shown.
"Yes" shows that the administrator has enabled the special ringers.
Select and confirm the option shown.
Confirm the option shown. Select the required ringer file
mediately hear the associated ringer melody. Confirm the current ringer file.
[1]
or pattern. You will im-
1. The phone displays the current setting
Page 88

88
Ringer melody
4
Ringer sequence
2
Save & exit l
ñ
User
Configuration
Connected calls
Secure call alert = No
Yes
Save & exit
Settings for "pattern"
If you selected "Pattern" as the ringer, you can make further settings for the pattern melody and pattern sequence:
Select and confirm the option shown.
Select the required pattern melody
ately hear the corresponding Ringer melody. Confirm the selected Ringer melody.
Select and confirm the option shown.
Select the required Ringer sequence between 1 and 6 (e.g. 2). You immediately
hear the set Ringer melody with the selected Ringer sequence. Confirm the selected setting.
Select and confirm the option shown.
Activating/deactivating the ringer
You can see whether the function is activated or deactivated from the corresponding icon in the status bar on the display
* Hold down the key shown.
Tone and indication with an unsecured voice connection
Use this option to activate an alerting tone that you hear when a secure voice
connection with the party you are currently talking to ceases to be secure. The
message "Nonsecure connection" also appears.
[1]
between 1 and 8 (e. g. 4). You will immedi-
page 20.
Secure connection setup is the preference set by your administrator.
z You can also configure this setting via the WEB-Oberfläche page 132.
@ Press the key shown.
Select and confirm the option shown.
if nec. j Enter and confirm the User password.
Select and confirm the option shown.
Select and confirm the option shown.
Select and confirm the option shown.
Select and confirm the option shown in the context menu.
Select and confirm the option shown.
Page 89

Display language
User
Locality?
Speech = Deutsch f
English f
Save & exit l
Ceština
Use this menu option to select the language for operator prompting.
z You can also configure this setting via the WEB-Oberfläche page 132.
@ Press the key shown.
Select and confirm the option shown.
if nec. j Enter and confirm the user password.
Select and confirm the option shown.
Select and confirm the option shown. The language set is displayed.
Select and confirm to set the required language, in our example English.
Select and confirm the option shown.
You may choose from the following languages:
1. Bahasa Indonesia
2. Bahasa Malaysia
3. Brasileiro
4. Català
5.
6. Cymraeg
7. Dansk
8. Deutsch
9. English
10.English(US)
11.Español
12.Français
13.Hrvatski
14.Italiano
15.Latviešu Valoda
16.LietuviÝŠ Kalba
17.Magyar
18.Nederlands
19.Norsk
20.Polski
21.Português
22.RomânƒÉ
23.Slovenčina
24.Slovenski Jezik
25.Srpski Jezik
26.Suomi
27.Svenska
28.
29.Türkçe
30.
89
Page 90

90
Русски
User
Locality?
Time format = 24 hour m
12 Hour (AM/PM) f
Save & exit l
31.
32.
33.
34.
35.
36.
Time display format
z You can also configure this setting via the WEB-Oberfläche page 132.
@ Press the key shown.
Select and confirm the option shown.
if nec. j Enter and confirm the user password.
Select and confirm the option shown.
Select and confirm the option shown. The format set is displayed.
Select and confirm the time format (12- or 24-hour display).
Select and confirm the option shown.
Page 91

Date display format
User
Locality?
Date format = dd.mm.yy f
yy-mm-dd f
Save & exit l
z You can also configure this setting via the WEB-Oberfläche page 132.
@ Press the key shown.
Select and confirm the option shown.
if nec. j Enter and confirm the user password.
Select and confirm the option shown.
Select and confirm the option shown. The format set is displayed.
Select and confirm the format you want.
Select and confirm the option shown.
91
Page 92

92
User
Locality?
Country = DE f
US f
Save & exit l
User
Country-specific settings
Adapt your phone settings to suit the relevant country-specific conditions (for example transmission parameters).
z You can also configure this setting via the WEB-Oberfläche page 132.
@ Press the key shown.
Select and confirm the option shown.
if nec. j Enter and confirm the user password.
Select and confirm the option shown.
Select and confirm the option shown. The country set is displayed.
[1]
Select and confirm to set the required country
Select and confirm the option shown.
You may choose from the following countries:
, in our example US.
1. Argentina AR 20.Luxembourg LU
2. Australia AT 21.Mexico MX
3. Austria AU 22.Netherlands NL
4. Belgium BE 23.New Zealand NZ
5. Brazil BR 24.Norway NO
6. Canada CA 25.Poland PL
7. China CN 26.Portugal PT
8. Chile CL 27.Russian Federation RU
9. Croatia HR 28.Singapore SG
10.Czech Republic CZ 29.Slovakia SK
11.Denmark DK 30.South Africa ZA
12.Finland FI 31.Spain ES
13.France FR 32.Sweden SE
14.Germany DE 33.Switzerland CH
15.Hungary HU 34.Thailand TH
16.India IN 35.Turkey TR
17.Ireland IE 36.United Kingdom GB
18.Italy IT 37.United States US
19.Japan JP 38.Vietnam VN
Setting daylight saving time
Prerequisite: Auto DST is deactivated page 94.
z You can also configure this setting via the WEB-Oberfläche page 132.
@ Press the key shown.
Select and confirm the option shown.
if nec. j Enter and confirm the user password.
1. The phone displays the current setting
Page 93

Select and confirm the option shown.
Date and time?
Daylight saving = No f
Yes l
Save & exit l
User
Date and time?
Difference (mins) = 60 f
Save & exit l
Select and confirm the option shown. The time set is displayed.
Confirm the option shown.
Select and confirm the option shown.
Setting the difference between daylight saving and standard time
Prerequisite: Auto DST is deactivated page 94.
Enter the difference to be used for daylight saving time.
z You can also configure this setting via the WEB-Oberfläche page 132.
@ Press the key shown.
Select and confirm the option shown.
93
if nec. j Enter and confirm the user password.
Select and confirm the option shown.
Select and confirm the option shown. The difference set is displayed.
j Enter and confirm the difference between daylight and standard time in minutes.
Select and confirm the option shown.
Page 94

94
User
Date and time?
Automatic daylight saving time
The Auto DST setting is provided for information purposes and can only be
changed by your administrator.
z You can also access this information via the WEB-Oberfläche page 132.
@ Press the key shown.
Select and confirm the option shown.
if nec. j Enter and confirm the user password.
Select and confirm the option shown.
Daylight saving time must be manually set if a
page 92.
No is entered for Auto DST
Page 95

Setting the date and time
User
Date and time?
Time = 14:44 f
Save & exit l
User
Date and time?
Date = 20.02.2007 f
Save & exit l
This function allows you to select one of three different display modes for the
date and manually set the time if necessary.
z You can also configure these settings via the WEB-Oberfläche page 132.
Setting the time
@ Press the key shown.
Select and confirm the option shown.
if nec. j Enter and confirm the user password.
Select and confirm the option shown.
Select and confirm the option shown. The time set is displayed.
j Enter and confirm the time.
95
Select and confirm the option shown.
Setting the date
@ Press the key shown.
Select and confirm the option shown.
if nec. j Enter and confirm the user password.
Select and confirm the option shown.
Select and confirm the option shown. The date set is displayed.
j Enter and confirm the date.
Select and confirm the option shown.
Page 96

96
User
Network information
Network information
This overview in the user area of the Program/Service menu provides you with
information about the IP address of the phone and the HTML address of the
WEB-Oberfläche. It also provides real-time data about the network activity of the
phone.
@ Press the key shown.
Select and confirm the option shown.
if nec. j Enter and confirm the user password.
Select and confirm the option shown. You can browse the following overview:
Phone address: Name or number of telephone.
Web address: HTTP address of WEB-Oberfläche. This address is specified in
the address line of the Internet browser and is used to call the WEB-Oberfläche
of the phone in the browser.
IPv4 address: Displays the IP address or name that was assigned to the phone
in the network.
IPv6 Global Address: Displays the global IPv6 address
LAN/PC-RX: The network or PC interface data packets received are illustrated
dynamically as columns.
LAN/PC-TX: The network or PC interface data packets sent are illustrated dynamically as columns.
LAN/PC autonegotiated: [Yes|No]: Displays whether the network or PC interface data transfer rate is set to automatic (Yes) or manual (No).
LAN/PC information: [10|100|1000] Mbit/s: Data transfer rate of the network
or PC interface. If an interface is not in use, Link down is displayed.
Page 97

Resetting user data
User
Reset
Reset all user data?
Cancel?
The following user-specific settings, which you changed via the phone menu or
the WEB-Oberfläche, can be reset to factory settings.
• Display contrast
• Language setting
• Audio settings
– Volumes
–Settings
• Call lists
– All entries are deleted.
• Programmable keys
– All personalized programming is deleted (see also
Important: All listed data is reset without a warning tone.
Initiating the reset
@ Press the key shown.
Confirm the option shown.
97
page 61).
if nec. j Enter and confirm the user password.
Select and confirm the option shown.
Select and confirm the option shown. The user data is reset to factory settings.
or
To cancel the process.
Page 98

98
ñ
Programming call forwarding
Depending on the settings made by the administrator, standard call forwarding may be configured for the phone or alternatively a forwarding call
by type option that is supported by OpenScape Voice .
The Forwarding function must be approved by the administrator.
Standard call forwarding
You can forward calls for your phone to another phone. You can also change,
activate and deactivate call forwarding during a call.
On multi-line telephones ( page 66), you can only configure call forwarding for the primary line.
Three forwarding conditions can be programmed in the forwarding menu:
• Uncond’l
•Busy
• On No reply (xs)
Because of its direct impact, "Uncond’l" call forwarding has the highest priority
followed by "No reply" and then "Busy".
If active, "Uncond’l" call forwarding is indicated on the display when the phone
is idle.
Forwarded calls can be logged in a call list (see
The Forwarding menu offers you three types of call forwarding.
page 24).
Uncond’l Destination phone number
Busy Destination phone number
No reply (xs) Destination phone number
A phone number may already be assigned to each call forwarding type. For example, a Destination could then be Destination 12345.
Alternatively, call forwarding can be programmed on one or more keys with
a fixed destination and a predefined forwarding or call type
page 58.
Using call forwarding
The following functions are available for activating and deactivating call forwarding and configuring it in accordance with your requirements:
• ”Activating or deactivating immediate call forwarding”
• ”Saving destination phone numbers for call forwarding”
• ”Editing favorites”
• ”Copying and pasting destination phone numbers”
• ”Assigning a destination phone number for call forwarding”
• ”Activating/deactivating call forwarding”
• ”Defining the ring duration before call forwarding on no reply”
Seite 101
Seite 103
Seite 99
Seite 100
Seite 101
Seite 102
Seite 104
Page 99

99
Activating or deactivating immediate call forwarding
Prerequisite: Ideally you have configured the original forwarding key for "Variable call forwarding" (see
for call forwarding via the user menu (
ure the key so that you can use the following enhanced functions.
page 59). Otherwise you can configure the settings
page 46). It is recommended to config-
ß
_
Press the function key to open forwarding.
Deactivating call forwarding
If call forwarding was activated for example for Uncond’l, it will now be automatically deactivated.
or Activating forwarding to last destination
The pop-up menu opens:
The message:
"Set forward on to" is displayed with the number of the last forwarding destination and you have the following options:
• Accept
• Set a forwarding destination
• Edit call forwarding
• Cancel
Page 100

100
Accept? l
Set a forwarding destination f
Edit call forwarding? f
Uncond’l? l
Enter destination? f
Using last forwarding destination
Select and confirm the option to use the last saved destination for example for
All calls again. Call forwarding to this destination is immediately activated for All
calls and the key illuminates.
or Activating with variable destination phone numbers
If you want to use a new forwarding destination:
Select and confirm the option shown.
j Enter and confirm the new destination phone number.
or Confirm the last destination phone number saved (it will be displayed).
Call forwarding to this destination is immediately activated for example for Uncond’l and the key illuminates.
Saving destination phone numbers for call forwarding
ß
_
You can alternatively enter the call forwarding settings via the user menu
(
page 46) or also using the WEB-Oberfläche page 132.
Press the function key to open forwarding.
The pop-up menu opens:
The message:
"Set forward on to" is displayed with the number of the last forwarding destination and you have the following options:
• Accept
• Set a forwarding destination
• Edit call forwarding
• Cancel
Select and confirm the option shown within 3 seconds.
Three types of call forwarding are offered in the settings menu:
• Uncond’l
•Busy
• No reply (xs)
You can check at this point whether Busy or No reply (xs) call forwarding
is already activated.
Saving a destination phone number
Select and confirm the forwarding type (here for instance Uncond’l).
Select and confirm the option shown.
j Enter/edit and confirm the destination phone number.
 Loading...