

Page 1
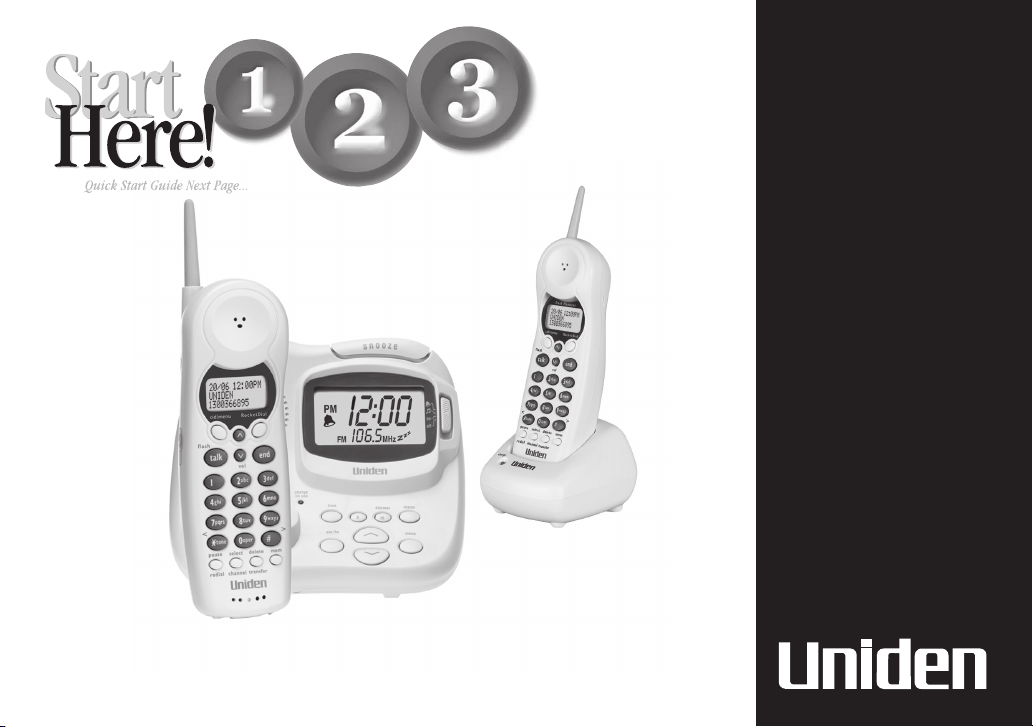
QuickStart
Guide
XSR
917/918
900 MHz
Caller ID
10 Number Memory
Rocketdial
plus
Clock/Alarm
Radio
Page 2
This symbol
indicates
important
operating
and servicing
instructions.
The earcapof
this telephone
may attractand
retainsmall
metallicobjects.
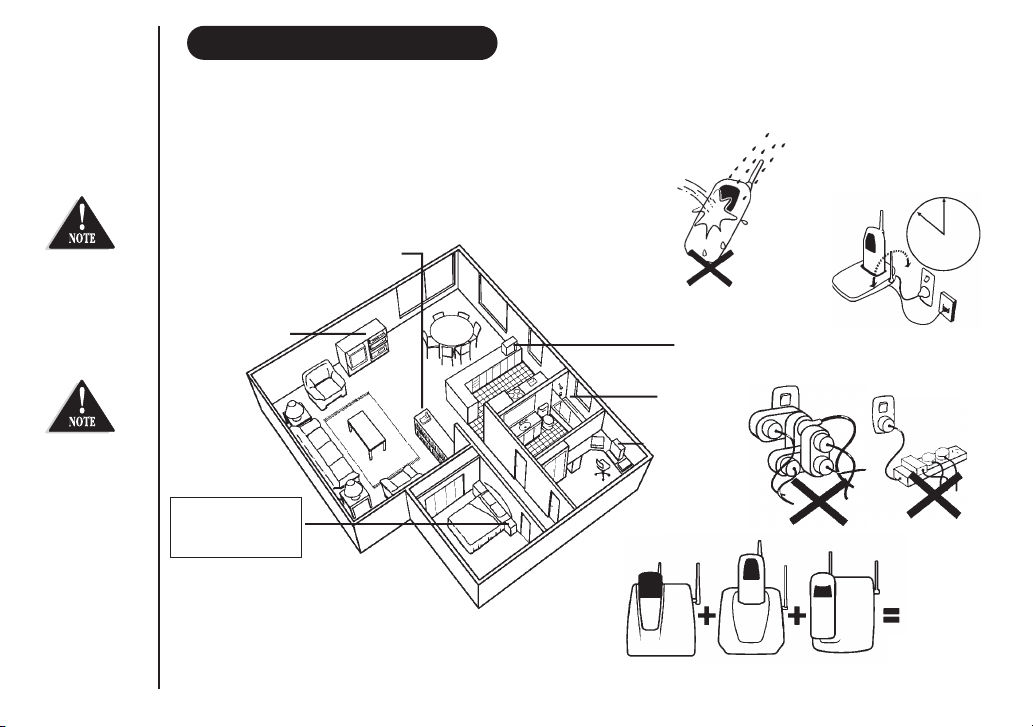
INSTALLATION
INSTALLATION & SAFETY
Choosing the best location for your phone.
When choosing a location for your phone there are a number of appliances the phone should not be near, and areas you should avoid.
CHARGE the new phone
for 20 - 25 hrs.
AVOID -
AVOID -
other cordless phones
AVOID Television sets and
other electronic
appliances
CHOOSE a location next
to your bed
Moisture
AVOID -
Microwave
AVOID -
Moisture
Computers
ovens
AVOID -
DON’T overload the
power outlet.
AVOID multi power
boards.
AVOID -
connecting
more than
Note: Ringing will not be impaired by adding extra cordless handsets.
Page i
3
phones as ringing
may be impaired
Page 3
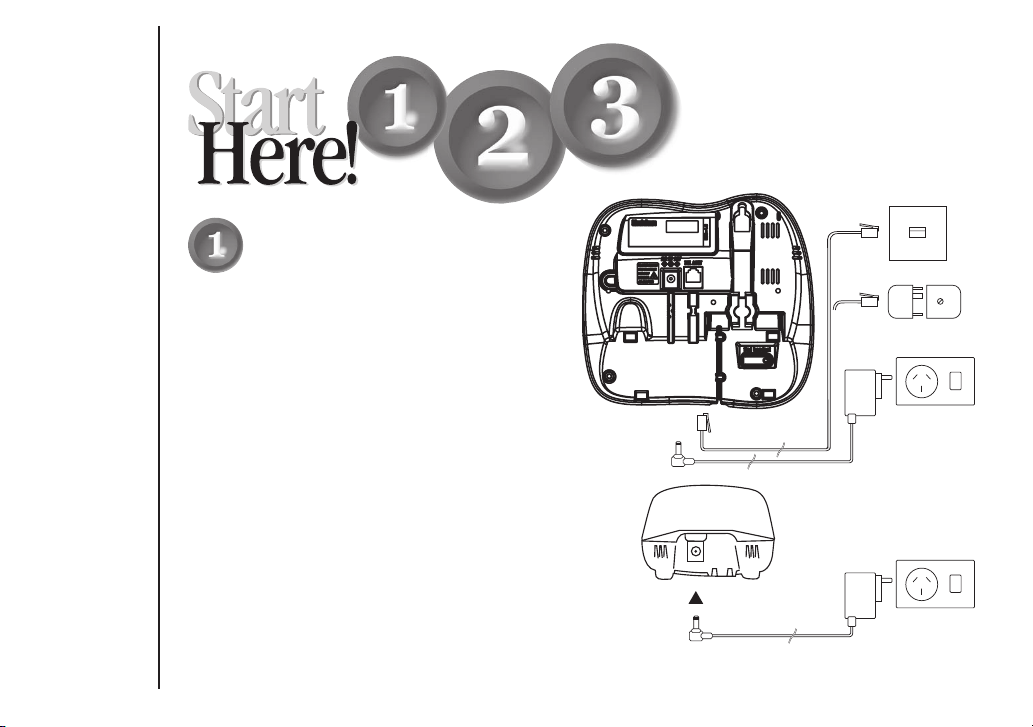
Installing the Base Unit
l
Plug the telephone cord into the Base Unit, then into
the telephone socket on the wall.
Plug the AC Adaptor cord into the Base Unit, then the
l
AC Adaptor into the wall power point.
Press the AC Adaptor cord into the curved recess under
l
the Base Unit.
l Radio Antennae:
The AM antenna is built into the main base.
The FM antenna is the thin wire located at the rear of
the main base. Unwind the antenna wire, keep straight
and extended for radio use.
Installing the Charge Cradle (XSR918 only)
Main Base
New Zealand
Australia
TelLine Adaptor (Not supplied)
Power Point
INSTALLATION
l Plug the ACAdaptor cordinto the ChargeCradle,
then the ACAdaptor intothe wall powerpoint.
Page ii
AC adaptor
Power Point
Page 4
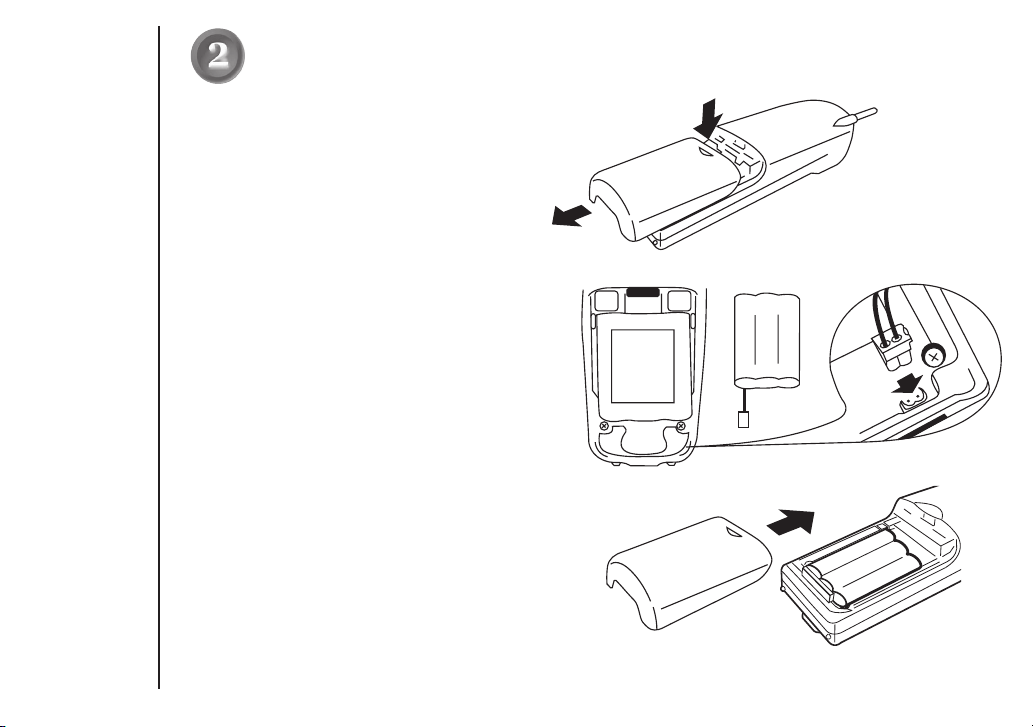
Installing the Handset Battery
l Pressthe battery coverand slide itoff.
l Connect the battery plug to the socket at the rear of
the battery compartment.
Make sure the plug is the right way round.
The RED and BLACK battery wires must match the RED
and BLACK printed on the phone case for the plug to fit
properly. Press firmly until it clicks into place.
l Positionthe battery in the compartmentand slide the
cover into place.
BLACK
RED
Repeat process for secondhandset
Place one handset on the main base and place the
l
other handset on the extra charging cradle. It does
not matter which handset is placed on the main
INSTALLATION
base and extrachargingcradle.
Charging the handset
l Charge thehandsets uninterrupted for 20-25hourseach.
(XSR918 only)
Page iii
Page 5
If the transferred
call is not picked
up after 5 minutes,
the call will be
disconnected.
INSTALLATION
Making a Call
Registering Your 2nd HandsetBefore Using (XSR918 only)
After fully charging the handsets, remove the handset from the
extra charging cradleand place it on the main base. (The
LED will beginto flashindicating registration is occurring).
Wait forat least 5 seconds before removing the extra handsetfrom
the base.
main
The registration has been completed, and your dual handset
cordless phone isready foruse.
l
Pick up thehandset andpress . Dial thephone number
OR
Dial the phonenumber -then press
Tohang up- press
l
OR
Place the handseton theBase Unit.
status
Answering a Call
l Handset on theBase Unit:
Remove the handsetfrom thebase and
speak ( ).AutoTalk
l
Handset off theBase Unit:
Pick up thehandset, pressany key andspeak.
Tohang up- press
l
OR
Place the handseton theBase Unit.
Call Transfers
TO TRANSFER CALLS (XSR918 only)
To transfer your call from handset 1 to handset 2:
l
l
l
l
transfer
Press .
The call is placed on hold on the first handset, while handset 2 begins to ring.
The call is transferred when the 2nd handset is answered.
Repeat the process to transfer the call back to handset 1. Calls can be transferred from either handset.
Page iv
Page 6
4
!
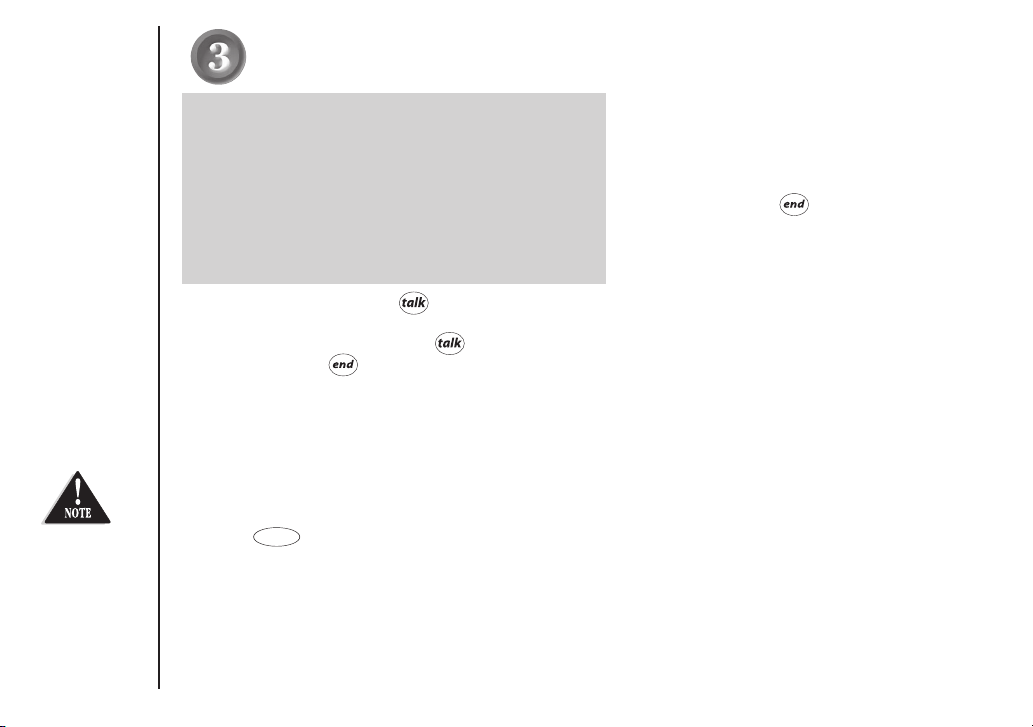
To turn ON the radio, move the slide switch to the 'on' position.
!
Select modulation by pressing
!
Search for the desired station frequency by pressing Channel or
!
You can automatically search for the next available station frequency by pressing Channel or
for 1 second.
!
Press to search for a higher frequency and to search for a lower frequency.
!
The radio's volume can be adjusted using the Volume knob on the side of the base.
For Radio Reception;
!
AM Radio: The AM antenna is built into the main
base, simply rotate the base for clearest reception.
!
FM Radio: The FM Antenna is the thin wire located at
the rear of the main base. Unwind the antenna wire.
Keep the antenna wire straight and adjust the position
for clearest reception.
! To turn OFF the radio, move the slide switch to the
'off' position.
INSTALLATION
Using the Radio
Page v
Page 7
5
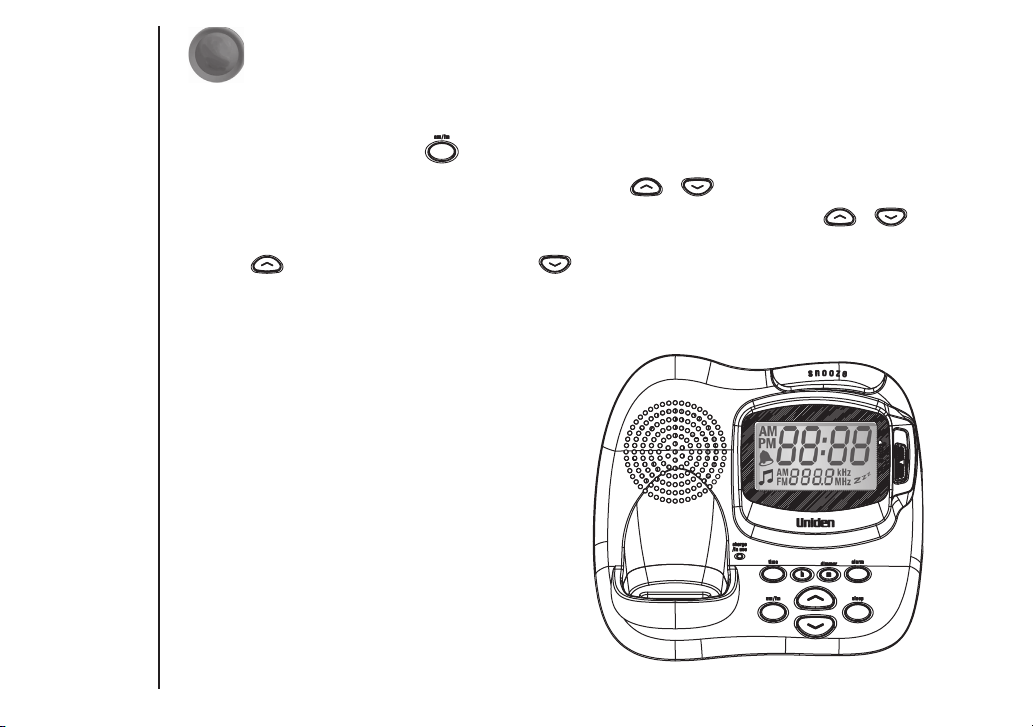
To change the hour setting, press while pressing .
!
Each press of while pressing increments the hour display by one hour. PM displays for an
!
afternoon time. AM is not displayed.
To change the minute setting, press while pressing .
!
Each press of while pressing increments the minute display by one minute.
!
INSTALLATION
Setting the Clock
Page vi
Page 8

CONTENTS
Installation & Safety
Quick Start Guide
Installing the Base Unit..........................................................................ii
Installing the Handset Battery...............................................................iii
Making a Call.........................................................................................iv
Answering a Call ....................................................................................iv
Call Transfers.........................................................................................iv
Using the Radio................................................................. .....................v
Setting the Clock....................................................................................vi
Contents................................................................................ ...............vii
Getting Started
Controls and Functions..........................................................................1
Uniden Company Philosophy.................................................................3
Welcome/Features..................................................................................3
Included in your Package.......................................................................4
Mounting the Base Unit on a wall ..........................................................5
Battery Maintenance ..............................................................................6
Installing the Beltclip .............................................................................6
Headset Installation ...............................................................................6
Using your Phone
Setting Menu Options.............................................................................7
Auto Talk................................................................................................7
Pop Up Name .........................................................................................7
Making and Receiving Calls....................................................................8
Adjusting the Handset Ringer Volume and Earpiece Volume .................9
Redial.....................................................................................................9
Traveling Out-of-Range...........................................................................9
Selecting a different channel................................................................10
Find Handset........................................................................................10
Call Waiting/Flash.................................................................................10
Memory Dialing
Storing Phone Numbers and Names....................................................11
Making Calls with Memory Dialing.......................................................12
..............................................................................i
Memory Dialing from Talk Mode .........................................................12
Chain Dialing .......................................................................................12
Editing a Stored Name and/or Phone Number.....................................13
Erasing a Stored Name and/or Phone Number....................................13
Call Transfer.........................................................................................14
Rocketdial
Rocketdial ............................................................................................15
Storing and Editing the Rocketdial.......................................................15
Making Calls with Rocketdial................................................................15
Deleting the Rocketdial ........................................................................15
Caller ID
Caller ID...............................................................................................16
When the Telephone Rings...................................................................16
Viewing the Caller ID Message List .......................................................17
Deleting Information from the Caller ID List .......................................17
Deleting a Caller ID Message................................................................17
Deleting all Caller ID Names and Numbers..........................................17
Calling a Party from the Caller ID List..................................................18
Dial Edit ...............................................................................................18
Storing Caller ID messages in Memory Dialing ....................................18
Using your Radio
Setting the Clock
Setting the Alarm/Buzzer
Using the Snooze Function
Using the Sleep Function
Display Brightness
Troubleshooting
................................................................................................25
Memo
Warranty
...............................................................................................27
Page vii
.................................................................................19
...... ...........................................................................20
....... ...........................................................20
..... ...........................................................22
...................................................................22
..............................................................................23
..................................................................................24
Page 9
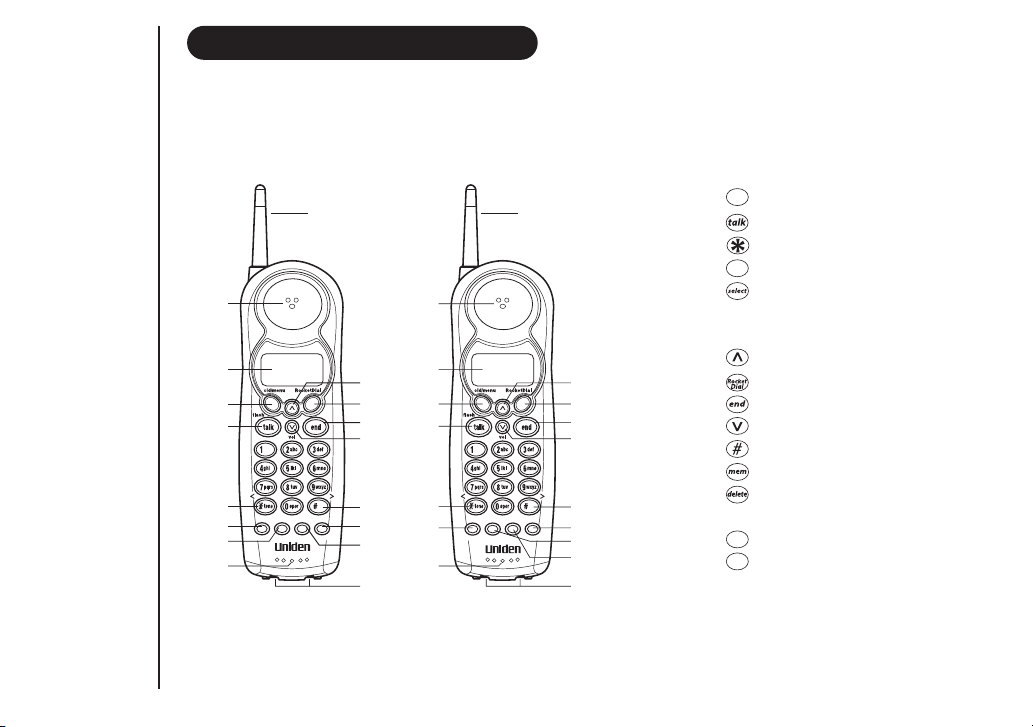
CONTROLS AND FUNCTIONS
cid
redial
transfer
2
3
4
5
6
pause
redial select
delete
channel mem
7
8
9
10
11
12
13
14
15
16
17
XSR917 XSR918
2
3
4
5
6
7
9
Dual Handset
pause select delete
redial channel transfer
1. Handset antenna
2. Handset earpiece
3. LCD display
/menu
11
4. key
5. /flash key
6. /< key
7. /pause key
8. key (XSR917 only)
9. Handset microphone
and ringer speaker
10. Volume up key
10
11
12
13
11. key
12. key
13. Volume down key
14. /> key
15. key
14
mem
15
18
19
17
16. /channel key
17. Handset charging contacts
select
18. /channel key (XSR918 only)
19. /delete key (XSR918 only)
(XSR917 only)
GETTING STARTED
Page 1
Page 10
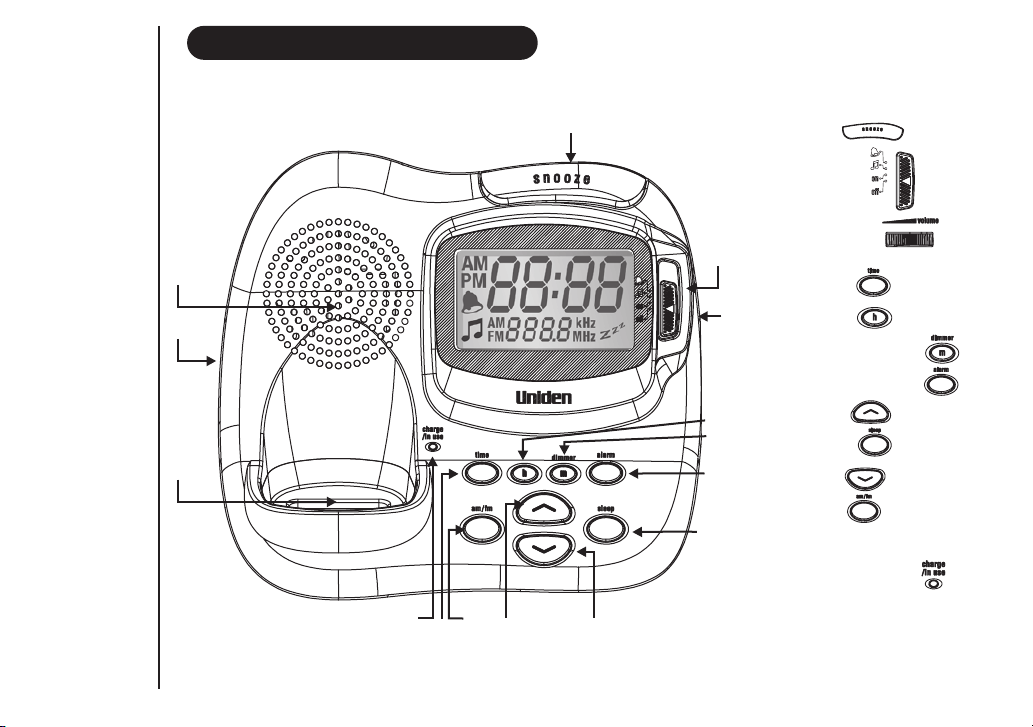
CONTROLS AND FUNCTIONS
14
15
12
GETTING STARTED
13
1
9
11
44
8 10
Page 2
1 Snooze
2 Slide Switch
3 Volume Knob
2
4TimeKey
3
5 Hour Key
6 Minute/Dimmer Key
7 Alarm (alarm) Key
8 Channel Key
5
6
9 Sleep Key
7
10 Channel Key
11 AM/FM Key
12 Base Charging Contacts
13 Charge/In use LED
14 Base Speaker
15 Find handset Key (at underside)
Page 11

To bring outstanding wireless communication products to
people's lives throughout the world.
Congratulations on your purchase of this Uniden cordless telephone. This is designed for reliability, long life and
outstanding performance utilising the latest in 900MHz Technology.
FEATURES
l
Multiple Handsets (up to 2 with XSR918)
900MHz SCR Technology (Sound Clarity and Range)
l
l
Caller ID Display*
Pop Up Name - Caller Name Identification #
l
30 Caller ID Memories
l
Alphanumeric Memory Dialing
l
Super Chat Battery - 10 Hours Talk Time
l
Maxi-Sound - Extra Loud Handset Volume Control
l
Rocketdial - One Touch VIP Dial
l
12 Days Standby Time XSR918, 20 Days XSR917
l
* Caller ID feature only works if you subscribe to the service by your local telephone company.
There is usually a fee for this service.
# Pop Up Name feature only works if you subscribe to your telephone company Caller ID service and
GETTING STARTED
record names into your phones memory.
UNIDEN COMPANY PHILOSOPHY
WELCOME
NOTES
l
LCD Back Light
Wall or Desk Mountable
l
Page/Find Handset Feature
l
AutoTalk
l
32 Digit Redial
l
Pause
l
Flash
l
2 Type Tone Ringer
l
!
3 Step Ringer Volume Control
!
Clock/Radio
!
Alarm with Snooze
Page 3
Page 12

INCLUDED IN YOUR PACKAGE
Make sure you have received the following items in the package. If any of these items are missing or damaged, contact the
Uniden Parts Department.
XSR917 only includes one(1) item of each shown below, except for the charge cradle which is not included.
Rechargeable Battery
GETTING STARTED
Super Chat
elephone
T
Belt Clip
Cord
charge
Charge Cradle
QuickStart
Guide
Owners Manual
Page 4
AC Adaptor
XSR
917/918
900MHz
CallerID
10Number Memor y
Rocketdial
plus
Clock/Alarm
Radio
pause
redial channel
select
delete
mem
transfer
Base Unit
select
pause
delete
redial channel
transfer
Handset
mem
Page 13

MOUNTING THE BASE UNIT ON A WALL
Direct wall mounting
Youcan mountyour phone directlyto thewall. Before doingthis, considerthe following:
• Avoidelectricalcables, pipes orother itemsbehind the mountinglocation thatcould cause ahazard
when inserting screwsinto thewall.
• Mountyour phone withindistance ofa working phonejack.
• Makesure the wallmaterial iscapable of supportingthe weightof the baseand handset.
• Usescrews with anchoringdevices suitablefor the wallmaterial wherethe base unitwill beplaced.
1. Insert twomounting screws intoa wall(with their
appropriate anchoring device),10cm apart.Allow
about 3mm betweenthe walland screw headsfor
mounting the phone.
2. Plug theAC adaptor intothe BaseUnit and theninto a
power point.
3. Plug thetelephone cord intothe BaseUnit and theninto
the telephone socketon thewall.
4. Align themounting slots onthe basewith the mounting
posts on thewall.
Then push inand downuntil the phoneis firmlyseated.
GETTING STARTED
Page 5
Page 14

BATTERY MAINTENANCE
Use only the
genuine Uniden
Super Chat
Battery supplied
with your phone.
Replacement
Super Chat
Batteries are
available
through the
Uniden Parts
Department.
If you are using
an optional
headset, you
must still use the
handset keypad
for phone
operations.
GETTING STARTED
Battery usetime (per charge)
• 10 • 12days when handsetis inthe standby mode.XSR918,20 DaysXSR917.
hours continuous use
When the Battery chargebecomes low
If the phone is not in use, the ' ' flashes and none of the keys will operate. If the phone is in use, the '
Battery'
unit for charging.
• You cannotovercharge thebattery.
• You mayreturn the handsetto thecharger aftereachcall or whenthe battery islow.
flashes and thehandset beeps. Completeyourconversation asquickly as possible andreturnthe handsetto the base
Low Battery Low
Cleaning the chargingcontacts
To maintain a good charge, it is important to clean the charging contacts on the handset base unit and additional charge cradle
with a drycloth or apencil eraserabout once amonth. Donot use anyliquids orsolvents.
INSTALLING THE BELTCLIP
To attachthe beltclip:
Insert the beltclipinto theholes on eachside ofthe handset. Press down untilit clicks.
To removethe beltclip:
Pullboth sides ofthe beltclipto release thetabs fromthe holes.
Headset Jack
HEADSET INSTALLATION
Yourphone maybe used withan optionalheadset. Tousethis feature,
simply plug theheadset intothe headset jack.
Page 6
Page 15

Functions will
cid
need to be
programmed in
both handsets
separately.
(XSR918 only)
SETTING MENU OPTIONS
Options available include AutoTalk and Pop Up Name.
AUTOTALK
AutoTalk allows youto answerthe phone withoutpressingthe button. If thephonerings when Autotalkis on,simply remove
the handset from the base and the phone automatically answers thecall. If thephone rings whenAutotalk is off, you must press
answer the call.to
POP UP NAME
If thedisplayed Caller ID telephonenumber is the sameas a numberstored in memory, thenthe storedname will also be
displayed with thecaller IDtelephone number.
To changeyour Auto Talk and Pop UpName (Name Tag)
1. Press andhold . The followingscreenappears.
/menu
exactly
1 Auto Talk
2 Name Tag
2. Use and or a number key and to movethe pointerto the selectionthat youwould like tochange.
Press totoggle between'On' and 'Off'for AutoTalk and Pop UpName(Name Tag).
3. Press andreturn the handsetto thebase unit. Thehandset returnsto the standbymode.
:On
:On
1 2
USING YOUR PHONE
Page 7
Page 16

MAKING AND RECEIVING CALLS
Handset On Base Handset Off Base/Charger
Refertopage7
"Setting Menu
Options" to turn
on the Autotalk
feature if desired.
USING YOUR PHONE
To answer a call
To make a call
To hang up
To redial
Pick up the handset ( ) or pickAutotalk on
up the handset and press .
1. Pick upthe handset.
2. Press .
3. Listen for the dial tone.
4. Dial the number.
OR
1. Pick upthe handset.
2. Dial the number, then press .
Press , or return the handset to the
base/charger ( )Auto Standby .
1. Pick up the handset.
2. Press .
3. Listen for the dial tone.
4. Press .
OR
1. Pick upthe handset.
2. Press , then press .
Page 8
Press , any number,
or .()Autotalk on
1. Press .
2. Listen for dial tone.
3. Dial the number.
OR
Dial the number then
press .
Press , or return the handset
to the base/charger
()Auto Standby .
1. Press .
2. Listen for the dial tone.
3. Press .
OR
Press , then press .
Page 17

The transfer ring
tone and volume
can not be
adjusted.
ADJUSTING THE HANDSET RINGER VOLUME AND EARPIECE VOLUME
Handset ringer toneand volume
Press or in standby mode to select one of five ringer tones and volume
combinations. The telephone will keep this setting for all future calls.
Earpiece Volume
Pressing or during a call will change the earpiece volume of the handset. The
telephone will keep this setting for all future calls.
Settings will
need to be
programmed in
both handsets
separately.
(XSR918 only)
USING YOUR PHONE
Ringer Mute
You can temporarily mute the ringer tone. When the handset is off the base and the phone is
ringing, press . The ringer tone will return to normal with the next incoming call.
REDIAL
The key redials the last number dialed. The redialed number can be up to 32 digits long.
1. Press .
2. Press . The last number dialed will be called.
or
Press , then . The last number dialed will be called.
TRAVELLING OUT-OF-RANGE
During a call, noise will increase if you move your handset too far from your base unit. If the range limit of your base unit is
exceeded, your callwill terminatewithin five minutes.
Page 9
Page 18

You must
subscribe
through your
local telephone
company to
receive Call
Waiting services.
SELECTING A DIFFERENT CHANNEL
If you encounter interference while using your phone, you can manually change the phone's channel for clear
operation. This function works only when the phone is in use.
Press /channel (for XSR918) or /channel (for XSR917). ' appears on the display, indicating the
phone is changing to another channel.
Scanning'
FIND HANDSET
To locate a handset/s (while it's off the base), press under the base. The handset/s
beeps for 60 seconds.
Handset/s will ring when paged. Paging is cancelled by pressing any key on either
handset.
OR Press again to cancel paging.
CALL WAITING/FLASH
If the call waiting tone sounds during a call:
AUSTRALIA:
NEW ZEALAND:
Press /flash, then to switch between callers.
Press /flash to switch between callers.
USING YOUR PHONE
Page 10
Page 19

STORING PHONE NUMBERS AND NAMES
0
9
transfer
transfer
transfer
In memory
dialling operation,
you must press
a key within 30
seconds or the
phone will return
to standby.
The pause
feature is useful
for long distance
calling, credit
card dialling or
sequences of
numbers that
require a pause
between digits.
MEMORY DIALING
Memory Dialingallowsyou to dialanumber using justa fewkey presses. Your XSR917/918stores
up to 10names/numbers ineach handset.
1. Press andhold , ' ' is displayed.
Memory Store
2. Press or orenter a number ( - )to selectthe memory location where
you would liketo storethe number.
3. Press .' ' is displayedon thescreen and acursor flashesindicating that
Store Name
the display isready fora name tobe entered.
If the screen shown to the right appears, the selected memory location is already stored. Then
you musteither editthe entry in thislocation, delete the entry in thislocation (page 13) or select
" " to chooseanother location.
Go Back
4. Use theAlphaNumeric keys toenter aname. The namecannot exceed14 characters.
• Use and to move thecursor tothe desired location.
• Use /delete to deletecharacters asneeded.
• Press andhold /delete to deleteall thecharacters.
• If aname isnot required, goto step5.
5. Press ,' ' is displayed.The cursorflashesindicating thatthe display
Store Number
isreadyforthenumbertobeentered.
6. Use the number keys to enter the phone number. The phone number cannot exceed 20
digits. Usethe /pause toenter a pause in the dialing sequenceif required.The display
shows a ' '. Each pause counts as one digit and represents a two second delay of time
P
between the digits.Use /delete to deletedigits asneeded.
7. Press , you will hear a confirmation tone, and the following screen appears. Memory
storage is complete. For example, if you store anumber into the memory location number
1, the displayshows' '. After about2 seconds, ' '
Memory 1 Stored Memory Store
is displayed. Repeatsteps 2-7to store morenumbers.
8. Press to returnto standbymode.
Memory Store
1
2
Store Name
Edit Memory 1
Delete Memory 1
Go Back
Store Number
Store Number
8002971023
Memory 1 Stored
Memory Store
1 UNIDEN AUS
2 <Memory 2>
Page 11
Page 20

MAKING CALLS WITH MEMOR Y DIALING
Memory dialing from Standby Mode.
0
9
0
9
0
909
1. Press . The handset displays your programmed memory locations.
2. Press or , or enter the number ( - ) to select the memory location you
would like to dial.
3. Press 'Talk' and the volume settings are displayed. Then the displayed number is
dialed.
Display a ProgrammedNumber
Press . Thehandsetdisplays your programmedmemory locations.
Use and to toggle betweenthenamesand numbers displayed.
1
Numbers stored
in one handset
can not be
accessed from
the other.
UNIDEN AUS 1 0800123456789
2 JOE BLOGGS
3 JOHN DOE
MEMORY DIALING FROM TALK MODE
1. Press . 'Talk' and the volume setting appears.
2. Press .
3. Enter anumber( - ) toselect the memorylocation of thedesiredphone number. Theselectedphone number isdisplayed.
Then the numberis dialed.If the memorylocation selected doesnot havea number stored,a seriesof beeps is sounded.
4. Tohangup, press .
CHAIN DIALING
On certain occasions after dialing a number, you may be required to enter an access code such as your account number for
phone banking. You can enter this number into a memory location for later use by doing the following:
1.
MEMORY DIALING
Store the access code into one of the memory locations ( - ) following the steps on page 11.
2.
Dial the party or service main number.
3.
When you need to enter the special number, press followed by the memory location ( - ).
2 5452930
3 6567983
Page 12
1
UNIDEN AUS
2 JOE BLOGGS
3 JOHN DOE
Talk
0800123456789
Page 21

0
9
EDITING A STORED NAME AND/OR PHONE NUMBER
0
9
transfer
transfer
1. Press and hold . ' ' is displayed.
2. Press or , or enter a number ( - ) to select the memory location you would like to edit.
3. Press . The memory location is displayed.
4. Press to select ' '. The cursor flashes indicating that the display is ready for the name to be edited.
When a name has not been stored, the cursor appears at the beginning of the second line.
5. Use the number keys, , , or /delete to edit the name. To edit only the phone number, skip this step.
6. Press . The cursor flashes indicating that the display is ready for the number to be edited.
7. Use the number key, /pause and /delete to edit the phone number. The phone number cannot exceed 20
digits. If you don't want to change the phone number, skip this step.
8. Press . You hear a confirmation tone. Memory Storage is complete. For example, if you store a name and number
into memory location number 1, the display shows ' '. After about 2 seconds,
' is displayed.
Store
9. Press to return to standby mode.
ERASING A STORED NAME AND/OR PHONE NUMBER
1. Press and hold . ' ' is displayed.
2. Press or or enter a number ( - ) to select the memory location you would like to erase.
3. Press .
4. Press to move the pointer down to ' '.
5. Press .
6. Press to move the pointer to ' '.
7. Press . A confirmation tone is sounded.
8. After about 2 seconds, ' ' is displayed. You may delete the information in another memory location
(return to step2) orpress to return tostandby mode.
MEMORY DIALING
Memory Store
Edit Memory
Memory Store
Yes
Memory Store
Memory 1 Stored '
Delete Memory
Memory
Page 13
Page 22

CALL TRANSFER (XSR918 only)
CALL TRANSFERS
To have the ability to transfer calls from one handset to the other handset:
Setup:
Remove the first handset from the main base unit.
l
Place the second handset on the main base unit for 5 seconds to initiate the automatic digital security code
l
setting.
TO TRANSFER CALLS
To transfer your call from handset 1 to handset 2:
l
l
l
transfer
Press / Delete.
The call is placed on hold on the first handset, while handset 2 begins to ring. The call is transferred when
the 2nd handset is answered.
Repeat the process to transfer the call back to handset 1. Calls can be transferred from either handset.
MEMORY DIALING
Page 14
Page 23

ROCKETDIAL
Memory
Location for
Rocketdial is
independent
from memory
location for
memory dial.
If the Rocketdial
does not have a
stored number,
the handset will
beep rapidly and
the phone will
not dial.
ROCKETDIAL
You can store your most frequent dialed number in the Rocketdial location on each handset. The Rocketdial allows you to dial a
number with onekey press(there is noneed topress . The phonewill automaticallydial the numberstored).
STORING AND EDITING THE ROCKETDIAL
1. When the phone is in standby mode, press and hold . The following
display appears.
Number
If the following screen appears, there is a number already stored.
Press to to select ' ' then press .
2. Store the number by following step 6 under "Storing Phone Numbers and Names" on
page 11.
3. Press . A confirmation tone is sounded, and ' ' appears.
Memory storage is complete.
'
''
Edit Number
Edit Number
Number Stored
'
Store
Store Number
Edit
Number
Delete
Go Back
Store Number
800
Number
MAKING CALLS WITH ROCKETDIAL
When thephoneis inthe standby mode,simply press . Thenumberstored intheRocketdial
memory locationisinstantly dialed.
DELETING THE ROCKETDIAL
1. When thephoneis inthe standbymode, pressand hold .The following displayappears.
2. Press or to select ' '.
3. Press . The following display appears.
4. Press to move the pointer to ' '.
5. Press . A . After
about 2 seconds, the handset returns to standby mode.
confirmation tone is sounded, and the following display appears
Delete Number
Yes
Edit Number
Delete
Go Back
Delete Number?
Yes
No
Number Deleted
Number
Page 15
Page 24

CALLER ID
Youmust subscribeto aCaller ID service touse thesefacilities. Whenthe telephonerings, theCaller IDfeature allowsyou to view
the caller's nameand phonenumber on thedisplay beforeyou answer thetelephone.
The handset displays the phonenumber ofthe incoming call, the name,time and number of calls.Additionally, you can dial the
displayed number andstore theinformation for memorydialing.
WHEN THE TELEPHONE RINGS
When theCaller IDmessage isreceived, thedisplay showsthe caller'sphone number along with the date and time. The incoming
call information isstored in theCaller ID record.If the Caller ID service includes the callers name, the caller's name appears on
the display (currentlynotsupported in Australiaor NewZealand).
If you answer a
call before the
Caller ID
message is
received
(Example: before
the second ring),
the Caller ID
message will not
appear.
CALLER ID
Here are sometypical displays:
When the mobile phone
number and date are received.
When a private number is
received.
The dateand timereceived
Caller's name
Caller's phonenumber
21/12 12:30PM
Mobile
0295979035
21/12 12:30PM
Private
Page 16
21/12 12:30PM
JIM STATEN
0295979035
When invalid data is
received.
When an unknown number is
received.
When a call is coming from a
payphone (Australia only).
Incomplete Data
21/12 12:30PM
Unavailable
21/12 12:30PM
Payphone
Page 25

VIEWING THE CALLER ID MESSAGE LIST
transfer
transfer
transfer
transfer
cid
cid
cid
In Caller ID
operation, if no
key is pressed for
more than 30
seconds,anerror
tone sounds and
the telephone
returns to the
standby mode.
If you get an
incoming call or
page, the deleting
operation is
cancelledsoyou
can answer the
call or page.
CALLER ID
Caller ID
numbers need to
be deleted from
each handset
separately.
The Caller IDlist storesinformation for upto 30incoming calls -even unansweredcalls.
1. Press . The summaryscreen appears. Thescreen showsthe number ofnew messagesand total messages.
/menu
2. Press to displaythe latestCaller ID message.
3. Press to seethe nextmessage. Or press to seethe previousmessage.
4. Press to returnto standbymode.
DELETING INFORMATION FROM THE CALLER ID LIST
The XSR917/918 stores up to 30 messages. If the phone receives the 31st message, the oldest one in the list is automatically
deleted. Caller IDdata canalso be deletedmanually.
DELETING A CALLER ID MESSAGE
1. Press . Display the message to be deleted from the
/menu
Caller ID listby pressing or .
2. Press /delete.
3. Press or to select' ' or' '.
Yes No
4. Press or /delete.
When the pointer isat ' ':
Yes
A tone sounds and the Caller ID message is deleted.
The next CallerID messageis then displayed.
When the pointer isat ' ':
No
The display returnsto CallerID message.
DELETING ALL CALLER ID NAMES AND NUMBERS
1. Press .
2. Press /delete.
3. Press or to select' ' or ' '.
4. Press or
/menu
/delete.
Yes No
When the pointer isat ' ':
Yes
A tone sounds all stored Caller ID messages are
deleted.
When the pointer isat ' ':
No
The display returnsto thesummary screen.
Page 17
Page 26

0
9
CALLING A PARTY FROM THE CALLER ID LIST
transfer
cid
cid
Youcan placea call fromthe CallerID list.
You cannot store
aCallerID
message if no
phone number
appears in the
message.
CALLER ID
1. Press . Selectthephone number thatyou wantto dial bypressing or .
2. Press .Thedisplayed phone numberdials automatically.
/menu
DIAL EDIT
Youcantemporarily edit theCallerID number thatisdisplayed by pressing . Acursor appearsin thedisplay. Press /delete
to move thecursor left, make yourchanges andthen press .Thiswill not changethe numberin the CallerID listmemory.
STORED CALLER ID MESSAGES IN MEMORY DIALING
Messages shownin the Caller IDlist can bestored in memory dialing. Usingthe incoming callinformation (i.e., CallerIDlist), the
phone number ofthe partyon the CallerID canbe stored inmemory.
1. Press . Select thephone numberto be storedfrom theCaller ID listby pressing or .
2. Press .
3. Press or to entera number( - )to selectthe memory locationtobe stored.
4. Press .You hear aconfirmation toneand the numberis storedin memory.Thedisplay returns tothe CallerID list.
5. Press toreturnto standby mode.
If amessage hasalready beenstored inthe selectedmemory number location, a confirmation screen is displayed.Press to
select ' '. Press to replace. Thedisplayreturnsto the CallerIDlist.Yes
/menu
Page 18
Page 27

To turn ON the radio
Move the slide switch to the on position.
The current frequency (station) is displayed under the clock display.
The station frequency shown will be the same as the one used last time.
kHz MHzis displayed while receiving AM and is displayed while receiving FM.
To turn OFF the radio
Move the slide switch to the off position.
The frequency will disappear from the display.
To change bands (AM-FM)
Press to toggle. The station frequency shown will be the same as the one
used last time.
Volume & Frequency
RADIO
The radio's volume can be adjusted using the Volume knob.
The receiving frequency can be changed by pressing or . The frequency
steps are +/- 9kHz for AM and +/- 0.1MHz for FM.
CH (Channel) Search
You can automatically search for the next available station or channel frequency
by pressing or for 1 second. Press to search for a higher frequency
and to search for a lower frequency.
USING YOUR RADIO
Page 19
Page 28

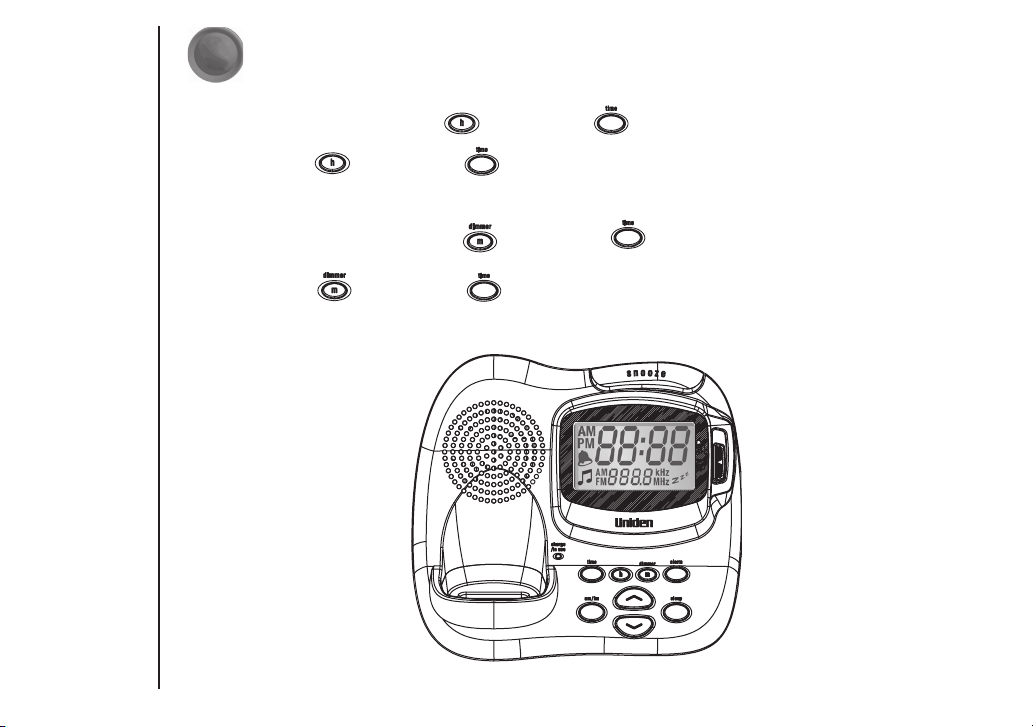
To change the hour setting, press while pressing
Each press of while pressing increments the hour display by one
hour (12 hour clock). PM displays for afternoon time. AM is not displayed.
To change the minute setting, press while pressing . Each press of
For quick step up & cycle, press and hold or while pressing
for more than 1 seconds.
The current time will display with flashing colon
To set the Alarm time, press or while pressing .
RADIO
The operation is the same as setting the Clock time above. You can check the
Alarm time by pressing .
SETTING THE CLOCK
while pressing increments the minute display by one minute.
SETTING THE ALARM/BUZZER TIME
Page 20
Page 29

When
alarm/buzzer
activates only the
(Snooze), (find
handset) and
slide sw are
usable.
RADIO
SETTING THE ALARM/BUZZER ON
To set the Alarm/Buzzer ON, move slide switch to or position.
The position is for Buzzer and the icon shows on the display.
The position is for Alarm and the icon shows on the display.
Once turned on the Alarm/Buzzer will trigger once the current time matches the
Alarm/Buzzer time.
The Alarm (radio) will activate using the radio station frequency used last.
The volume of the Alarm depends on the radio volume set (see Using Your Radio
- Volume & Frequency, page 19)
The Buzzer volume is constant.
The Alarm will activate for 10 minutes and the Buzzer will activate for 5 minutes.
After this time they will deactivate and the set mode will continue.
TURNING THE ALARM/BUZZER OFF
To turn off the Alarm or Buzzer, move slide switch to 'on' or 'off' position.
If slide switch is moved to or position then activation will change to the
selected setting and the activation time (5 or 10 minutes) will restart.
Page 21
Page 30

USING THE SNOOZE FUNCTION
The Snooze function stops the Alarm/Buzzer momentarily. The Alarm/Buzzer
starts again after 10 minutes.
When the Alarm/Buzzer activates you can select the Snooze function by pressing
the button.
You can keep selecting the Snooze function up to 6 times. When you select
Snooze for the 6th time the Alarm/Buzzer deactivates and Alarm set mode starts.
Moving the slide switch to the 'on' or 'off' position cancels Snooze function.
USING THE SLEEP FUNCTION
The Sleep function allows you to set a time delay to turn the radio off.
The available sleep times (delayed turn off) are 60,45,30 & 15 minutes.
RADIO
To Set Sleep Time
The Sleep function can be set up in any slide sw position except 'on'.
Press to enter Sleep mode. Press repeatedly to select desired time
delay. The sleep time (60,45,30,15) will display during selection.
The display shows Zzz to indicate Sleep function set. You can check the
remaining time by pressing .
Move the slide sw to any position to turn off the Sleep function.
Page 22
Page 31

The brightness of the LCD can be set as High, Low or Off.
Press to select the desired brightness.
RADIO
DISPLAY BRIGHTNESS
Page 23
Page 32

TROUBLESHOOTING
TROUBLESHOOTING
The charge/Inuse LED won’t
illuminate when the hand
set is placed on the base.
The cordless phone audio
sounds weak and/ or scratchy.
Can’t make or receive calls.
The
handset doesn't ring or
a
receive page.
Handset number 1 or
number 2 not working.
TheCallerIDdoesnotdisplay.
The radio/clock/alarm does
not function.
!
Make sure the AC adaptor is plugged into each base and wall outlet.
Make sure the handset is properly seated in the base.
!
Make sure the charging contacts on each handset and base are clean.
!
Move the handset and/or base to a different location away from metal objects
!
or appliances and try again.
Press /channel while on a call to change the operating channel.
!
Make sure that you are not too far away from the base.
!
Check both ends of the telephone line cord are plugged in firmly.
!
Make sure the AC adaptor is plugged into the base and wall outlet.
!
Disconnect the AC adaptor for a few minutes, then reconnect it.
!
Make sure that you are not too far from the base.
!
Charge the handset.
!
The battery pack may be weak. Charge the battery for 20-25 hours.
!
The handset may be too far away from the base unit.
!
Place the base unit away from appliances or metal objects.
!
!
Place one handset at a time on the main base for 5 seconds each.
!
The handset was picked up before the second ring.
!
The call was placed through a switchboard.
!
Call your local telephone company to verify your Caller ID service is current.
!
Make sure the AC adaptor is plugged into the base.
!
Adjust the volume control knob.
!
For AM radio simply rotate the base for clearest reception.
!
For FM radio keep the antenna wire straight and adjust the position for clearest reception.
If you stillhave a problem.
Australia: www.uniden.com.au NewZealand: www.uniden.co.nz
TROUBLESHOOTING
Page 24
Page 33

MEMO
MEMO
Page 25
Page 34

MEMO
MEMO
Page 26
Page 35

WARRANTY
One Year Limited Warranty
Important:
Warrantor: UnidenAustraliaPtyLimitedA.B.N. 58 001 865498
ELEMENT OF WARRANTY:
the Product), to be freefrom defectsinmaterialsandcraftsmanship withonly thelimitationsorexclusions set outbelow.
WARRANTYDURATION:
retail sale.This warranty willbe deemed invalid ifthe product is;(A) Damaged or notmaintained as reasonable andnecessary, (B) Modified, alteredor
used aspart ofany conversionkits, subassemblies,or any configurationsnot sold by Uniden.(C) Improperly installed, (D)Repaired by someone other
than anauthorised UnidenRepair Agentfor adefect ormalfunction covered by this warranty. (E) Usedin conjunctionwith anyequipment orparts or
as part ofa systemnotmanufacturedbyUniden, (F) Warranty isonlyvalid in originalcountry of purchase.
PARTSCOVERED:
STATEMENT OF REMEDY:
its discretion, will repair thedefect orreplace theproduct and return it to you withoutcharge for parts or service. THIS WARRANTY DOES NOT COVER
OR PROVIDEFOR THEREIMBURSEMENT ORPAYMENT OFINCIDENTAL OR CONSEQUENTIAL DAMAGES. THISGUARANTEEIS INADDITION TOAND
DOES NOT INANY WAY AFFECTYOURRIGHTSUNDER THE CONSUMERGUARANTEE ACT.
PROCEDURE FOR OBTAINING PERFORMANCE OR WARRANTY:
should be shippedor delivered,freightpre-paid,with evidence of originalpurchase (eg.acopyofthe sales docket),to thewarrantorat:
Evidence of originalpurchase isrequiredforwarranty service.
Uniden New ZealandLimited
Uniden warrants tothe originalretail ownerfor theduration ofthis warranty, its XSR917/918(herein after referred to as
This warrantytothe originalretail owner only, shallterminate and beof no furthereffect 12 monthsafterthe dateof original
This warranty coversfor one(1) year,the BaseUnit and Handsetonly.All accessories (AC Adaptoretc) arecoveredfor90days only.
In theevent that theproduct does not conformto this warrantyat any timewhile this warrantyis in effect,the warrantor at
In the event that the product does not conform to this warranty, the Product
WARRANTY
UNIDEN AUSTRALIA PTY LIMITED
SERVICE DIVISION
345 Princes Highway,
Rockdale NSW 2216
Fx (02) 9599 3278
www.uniden.com.au
Customers in otherstates shouldshipordeliverthe Productfreight pre-paid totheir nearestUnidenAuthorisedRepairCentre (Contact Unidenfor the
nearest WarrantyAgentto you).
Page 27
UNIDEN NEW ZEALAND LIMITED
SERVICE DIVISION
150 Harris Road,
East Tamaki, Auckland
Fx (09) 274 4253
www.uniden.co.nz
Page 36

PRODUCT
YOU
A UNIDEN
THANK
FOR PURCHASING
© 2004 Uniden Australia Pty Limited
Uniden New Zealand Limited
Printed in China
UCZZ01438ZZ
 Loading...