

Page 1
Quick Start
Guide
XSA955
AND
XSA965
Digital Answering
Machine
900 MHz
Caller ID
10 Number
Memory
Plus
Rocket Dial
Page 2
INSTALLATION & SAFETY
This symbol
indicates
important
operating
and servicing
instructions.
The earcapof
this telephone
may attractand
retainsmall
metallicobjects.
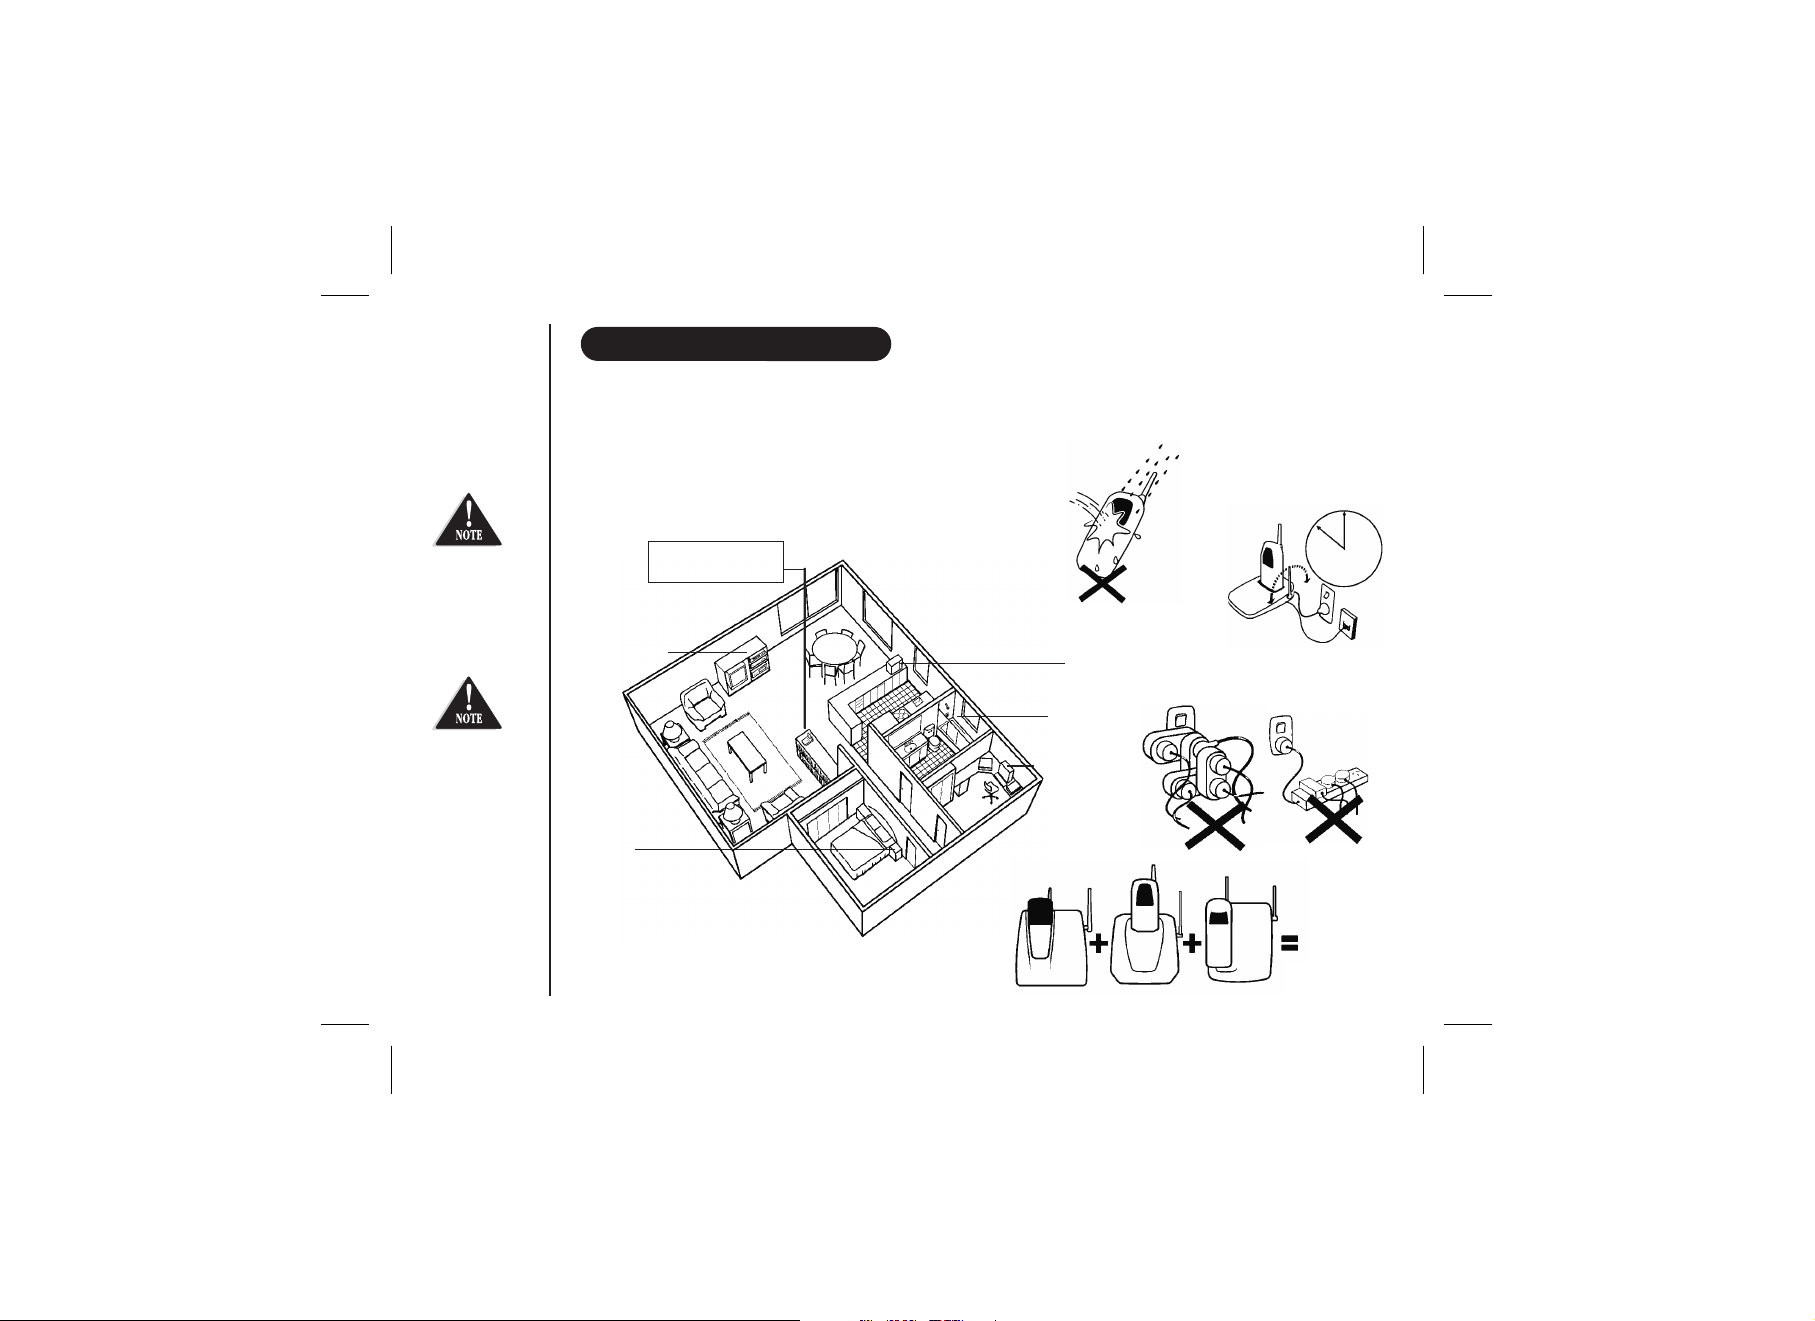
INSTALLATION
Choosing the best location for your phone.
When choosing a location for your phone there are a number of appliances the phone
should not be near, and areas you should avoid.
CHOOSE a central location
AVOID Television sets and
other electronic
appliances
AVOID -
other cordless phones
AVOID Moisture
AVOID -
Microwave
AVOID -
Moisture
Computers
ovens
AVOID -
DON’T overload the
power outlet.
CHARGE the new phone
for 20 - 25 hrs.
AVOID multi power
boards.
AVOID -
connecting
more than
Note: Ringing will not be impaired by adding extra cordless handsets.
Page i
3
phones as ringing
may be impaired
Page 3

Make sure the AC
Adaptor/s remains
switched ON at all
times. Use only
the Uniden AC
Adaptor/s supplied
with this unit.
INSTALLATION
This pageis a very condensed version of the Owners Manual. It is designedto allowyou to get your phone installed and operating
as quickly aspossible -however it doesnot attemptto explain anyof theadvanced features ofthe XSA955and XSA965.
Start
Start
Here!
Here!
New Zealand
Installing the Base Unit
l
Plug the telephone cord into the Base
Unit, then into the telephone socket on
the wall.
Plug the AC Adaptor cord into the Base
l
Unit, then the AC Adaptor into the wall
power point.
Press the AC Adaptor cord into the
l
curved recessunderthe Base Unit.
Raise theantenna.
l
Power point
AC adaptor
Telephone cord
Australia
Tel Line Adaptor
(Not supplied)
INSTALLATION
Installing the Charge Cradle
(XSA965 Only)
l Plug the ACAdaptor cordinto the ChargeCradle,
then the ACAdaptor intothe wall powerpoint.
AC adaptor
Power point
Page ii
Page 4
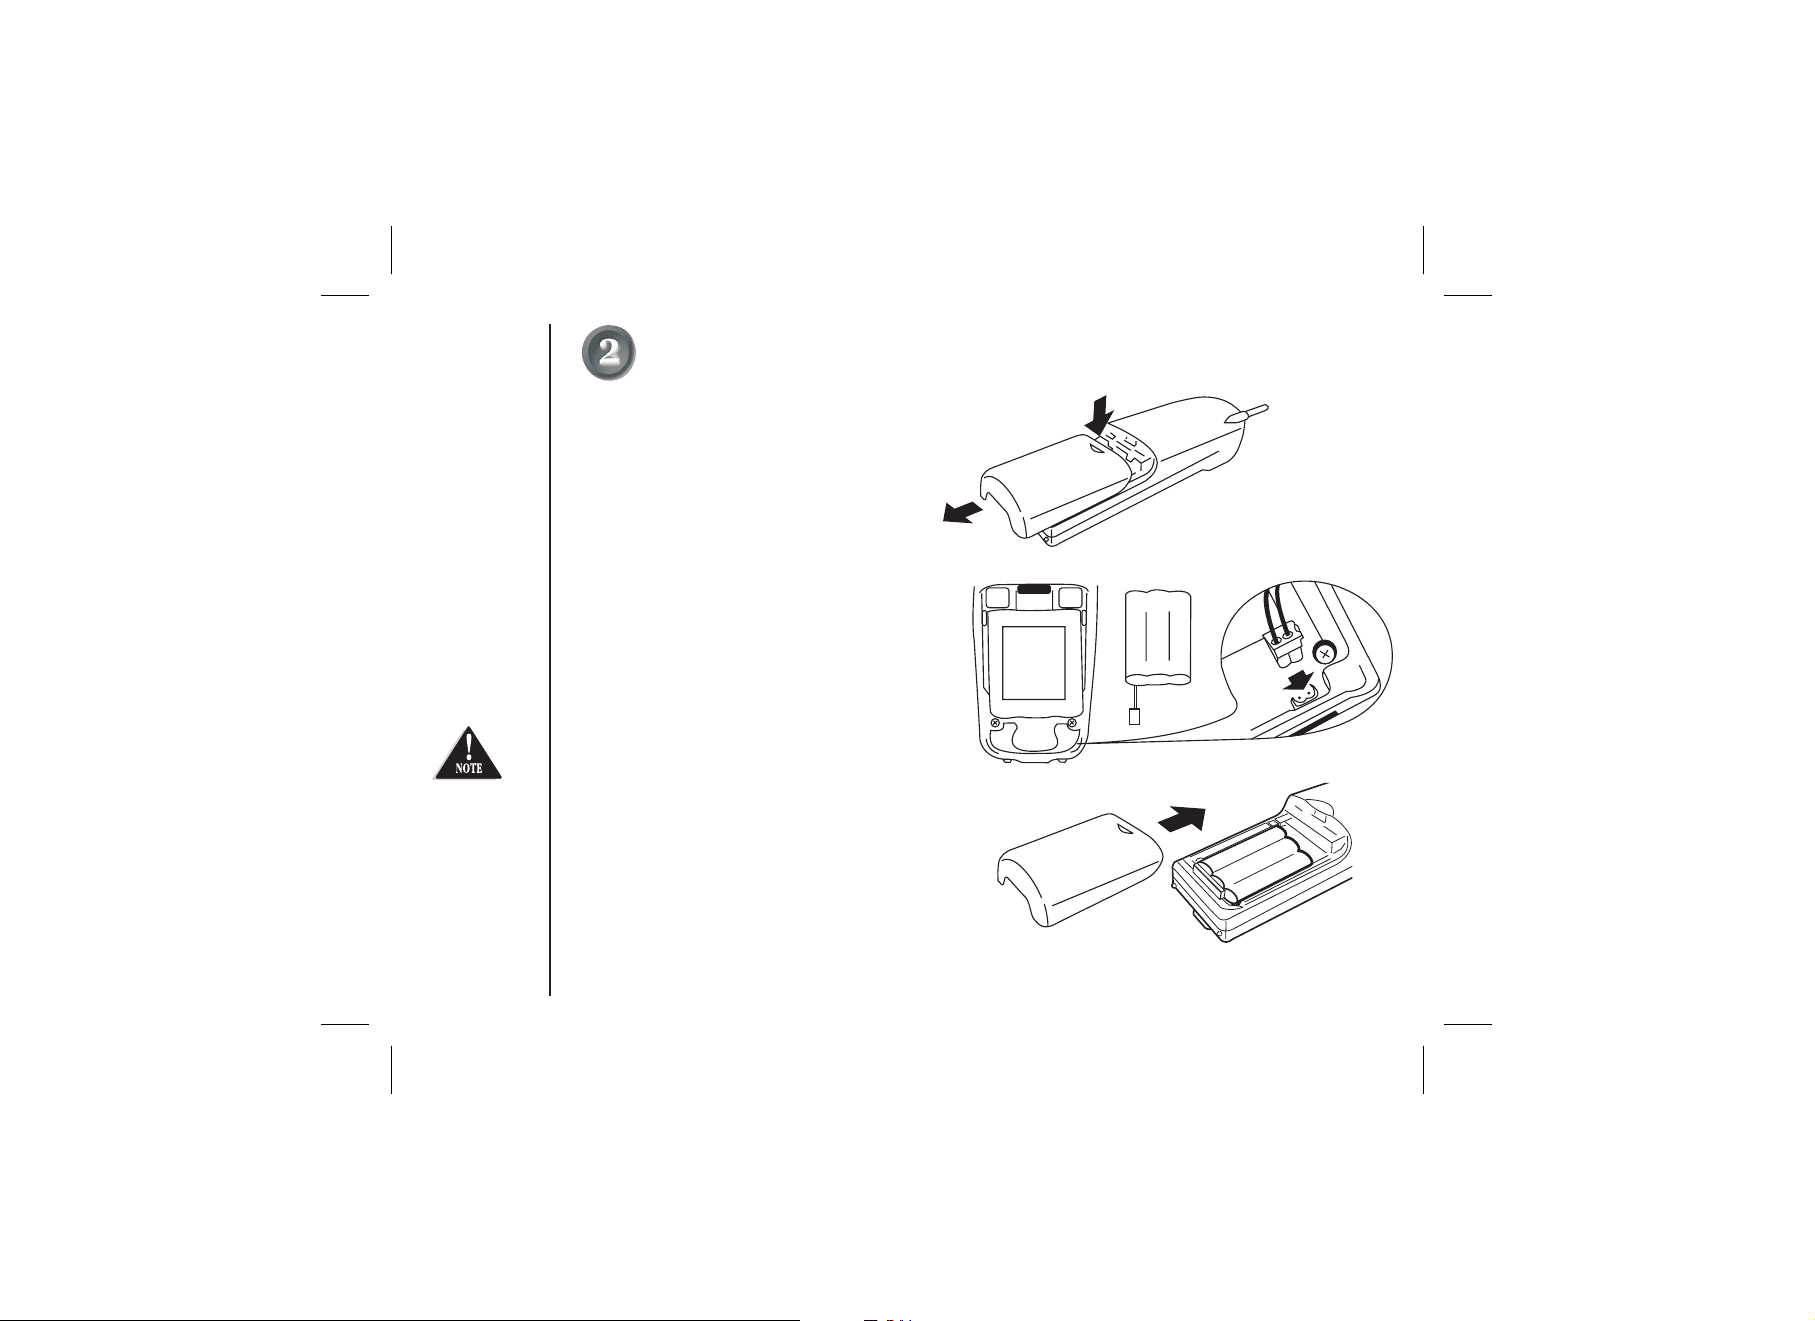
You must charge
the batteries
continuously for
20 hours before
using the phone.
INSTALLATION
Installing the Handset Battery
l Pressthe battery coverand slide itoff.
l
Connect the batteryplug to thesocket atthe rear of
the battery compartment.
Make sure theplug isthe right wayround.
l
The RED and BLACK battery wires must match the
l
RED and BLACK printed on the phone case for the
plug to fitproperly.
Pressfirmly until itclicks intoplace.
l
l Positionthe battery in the compartmentand slide the
cover into place.
XSA965 only - Repeatprocess forsecondhandset.
Place one handset on the main base and place the
l
other handset in the extra charging cradle. It does
not matter which handset is placed on the main
base and extrachargingcradle.
Page iii
BLACK
RED
Page 5
IMPORTANT
l
l
Answering a Call
l Handset on theBase Unit:
l
l
GETTING STARTED
Making a Call
XSA965 Only: RegistrationofDual Handset
l
After fully charging the handsets, remove the handset from the extra charging cradle and
place it on the main base. (The LED will begin to flash indicating registration is
occurring).
Waitforat least 5seconds beforeremoving the extrahandset fromthe base.
l
The registration hasbeen completed,and your dualhandset cordlessphone is readyfor use.
Pick up thehandset andpress . Dial thephone number
OR
Dial the phonenumber -then press
Tohang up- press
OR
Place the handseton theBase Unit.
Remove the handsetfrom thebase and speak( ).AutoTalkOn
Handset off theBase Unit:
Pick up thehandset, press and speak.
Tohang up- press
OR
Place the handseton theBase Unit.
status
main
Page iv
Page 6

Setting Up the Answering System
Your outgoing
message can be
recorded up to 30
seconds long.
GETTING STARTED
To turnthe answering systemon:
l
To recordyour outgoing message:
l
l
l
l
Answer
Press - the pre-recordedgreeting willplay and yoursystem isready to acceptcalls.
on
Pressand hold . After youhear ashort tone, releasethe key.
"Record Greeting" isannounced followedby a longtone.
Record your greetingwhile speakingwithin 15cm ofthe base.
When finished, press again.
Using the Answering System
To playyour message:
l
Press - new messagesplay first.
To repeata message:
l
Press during playback ofmessages.
To skipa message:
l
Press anytime during playback to skip to the next message. The system beeps and begins to play the next
message.
To deletemessages:
l
Delete one message:
Press during a message.The systembeeps and beginsto playthe next message.
l
Delete all messages:
After reviewingall messages.Press , "Todeleteall messages, pressdelete again"is announced.
Press again.
Page v
Page 7

If the transferred
call is not picked
up after 5 minutes,
the call will be
disconnected.
CALL TRANSFER
To have the ability to transfer calls from one handset to the other handset:
Initial Setup:
(Important: XSA965 Only -
page iv).
TO TRANSFER CALLS
To transfer your call from handset 1 to handset 2:
l
l
l
l
transfer
Press .
The call is placed on hold on the first handset, while handset 2 begins to ring. The call is transferred when
the 2nd handset is answered.
Repeat the process to transfer the call back to handset 1. Calls can be transferred from either handset.
If the transferredcallis not answered,you canretrieve the callby pressing or .
- XSA965 Only
Please make sure you have registered your dual handset - refer to instructions on
transfer
GETTING STARTED
Page vi
Page 8

CONTENTS
Installation & Safety
Quick Start Guide
Installation ......................................................................................ii
Contents
.......................................................................................................vii
Getting Started
Controls and Functions ...................................................................1
Welcome..........................................................................................3
Included in your Package................................................................4
Mounting the Base Unit on a wall....................................................5
Installing the Beltclip ......................................................................5
Headset Installation.........................................................................5
Battery Maintenance .......................................................................6
Using your Phone
Setting Menu Options ......................................................................7
Autotalk ...........................................................................................7
Pop Up Name...................................................................................7
Making and Receiving Calls .............................................................8
Adjusting the Handset Ringer Volume and Earpiece Volume...........9
Redial ..............................................................................................9
Travelling Out-of-Range...................................................................9
Selecting a Different Channel ........................................................10
Find Handset.................................................................................10
Call Waiting/Flash..........................................................................10
Memory Dialing
Storing Phone Numbers ................................................................11
Making Calls with Memory Dialing ................................................12
Memory Dialing from Talk Mode...................................................12
Chain Dialing.................................................................................12
Editing a Stored Name and/or Phone Number..............................13
Erasing a Stored Name and/or Phone Number .............................13
Call Transfer..................................................................................14
Rocketdial
Rocketdial......................................................................................15
Storing and Editing the Rocketdial ................................................15
Making Calls with Rocketdial.........................................................15
Deleting the Rocketdial..................................................................15
.....................................................................................i
Page vii
Caller ID
Caller ID .......................................................................................16
When the Telephone Rings...........................................................16
Viewing the Caller ID Message List................................................17
Deleting Information from the Caller ID List................................17
Deleting a Caller ID Message ........................................................17
Deleting all Caller ID Names and Numbers ..................................17
Calling a Party from the Caller ID List ..........................................18
Dial Edit........................................................................................18
Stored Caller ID Messages in Memory Dialing ..............................18
Answering System
Answering System.........................................................................19
Turning the Answering System On/Off..........................................19
Setting the Time............................................................................20
Setting a Personal Security Code (PIN).........................................20
Setting the Ring Time....................................................................21
Setting the Message Record Time .................................................21
Announce Only Feature ................................................................22
Setting the Message Alert Tone......................................................22
Setting Your Outgoing Message (Greeting)....................................23
Setting the Base Ringer Volume....................................................24
Adjusting the Speaker Volume Level.............................................24
Using Your Answering System.......................................................25
Playing Your Messages..................................................................25
Repeating a Message.....................................................................25
g a Message.......................................................................26
Skippin
g a Message .......................................................................26
Deletin
Voice Memo..................................................................................27
Remote Access Away From Home.................................................28
Turn on the Answering System Remotely......................................29
Notes.............................................................................................30
Remote Operation Card ................................................................31
Troubleshooting
Warranty
..... .....................................................................................................35
Notes
........................................................................................33
.....................................................................................................34
Page 9
cid/
menu
redial
2
transfer
3
STARTED
4
5
6
7
8
9
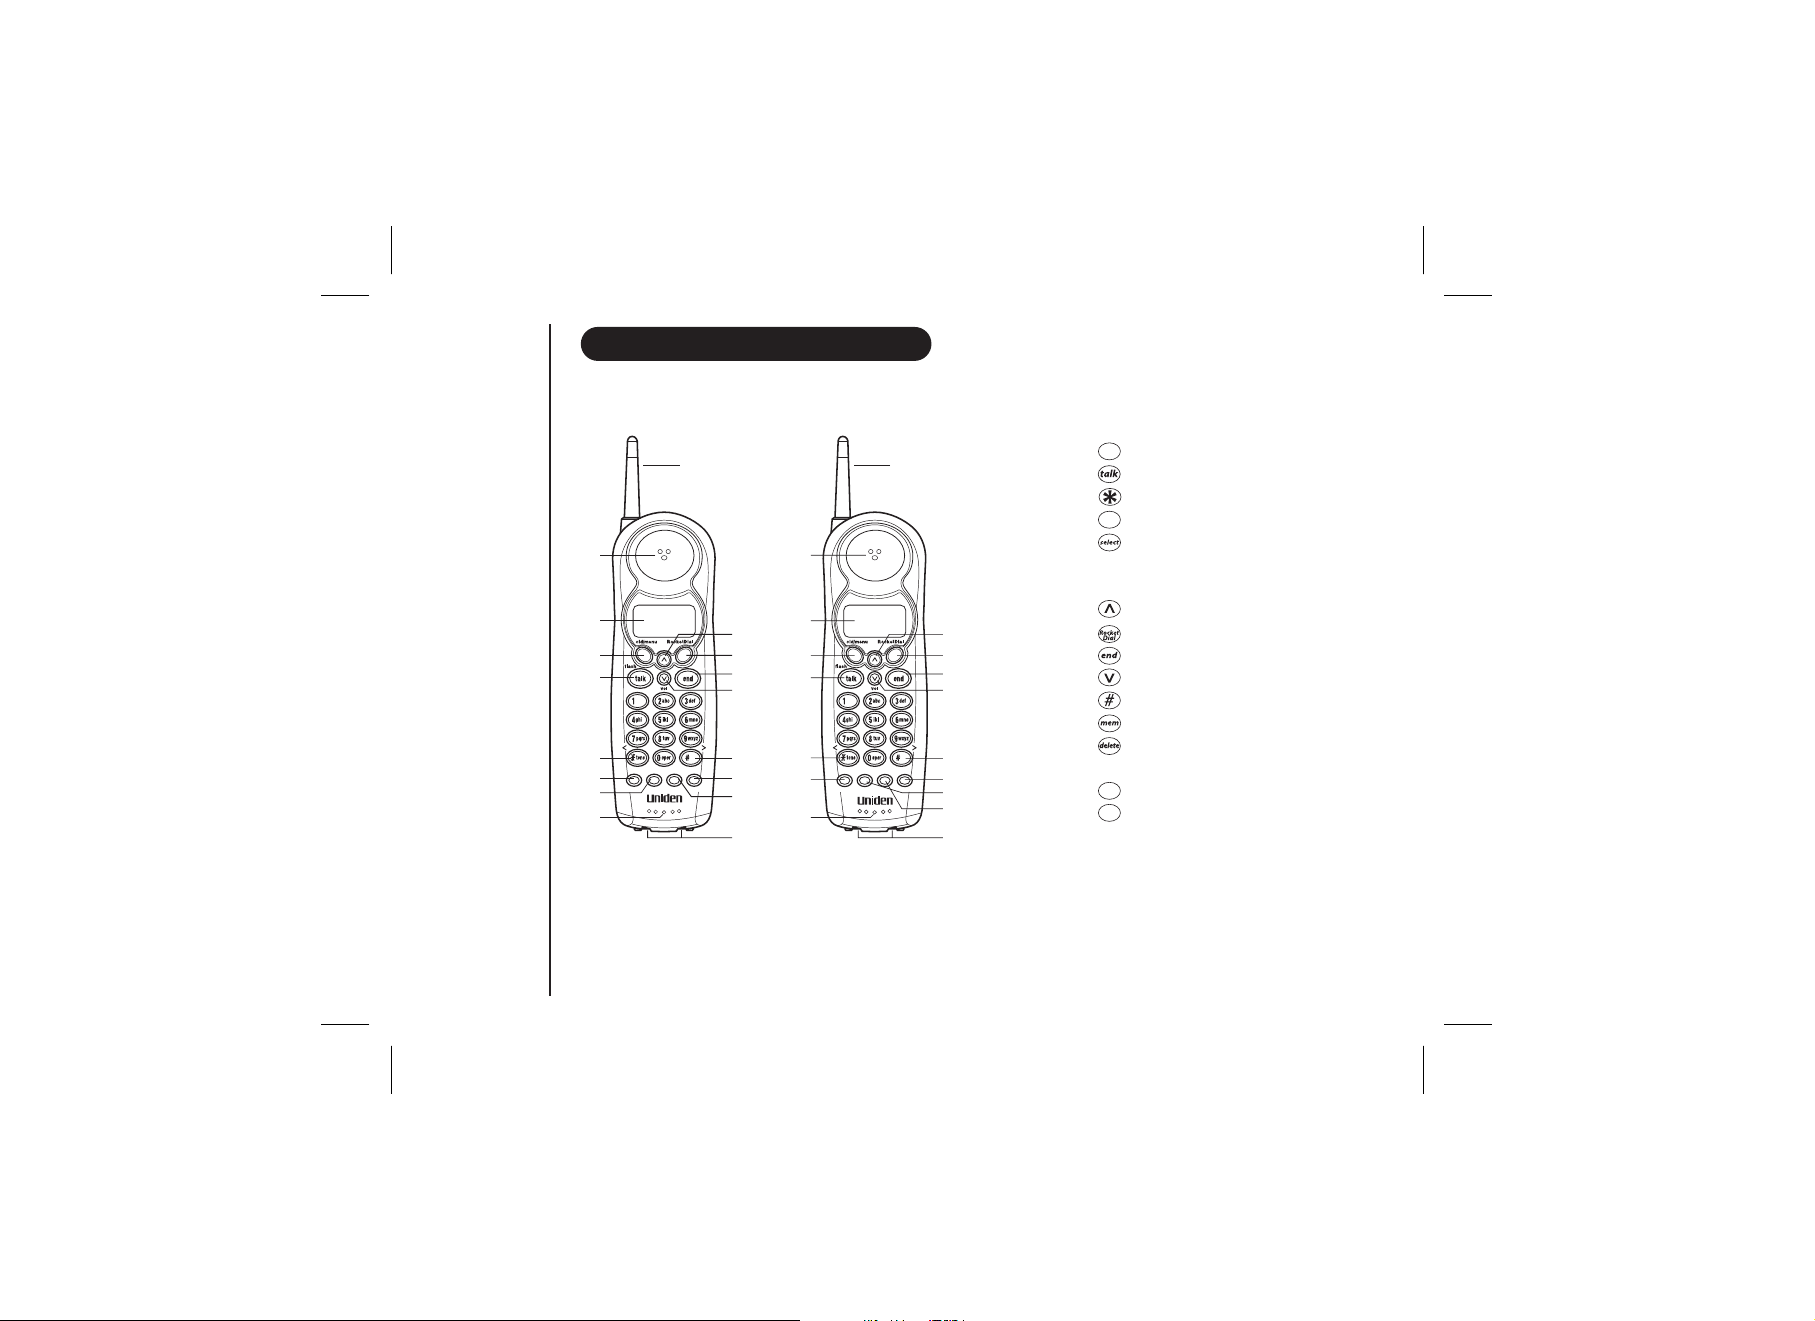
CONTROLS AND FUNCTIONS
2
Dual Handset
10
11
12
13
pause
redial select
delete
channel mem
14
15
16
17
XSA955 XSA965
3
4
5
6
7
9
pause select delete
redial channel transfer
1. Handset antenna
2. Handset earpiece
3. LCD display
11
4. key
5. /flash key
6. /< key
7. /pause key
8. key
9. Handset microphone
and ringer speaker
10. Volume up key
10
11
12
13
11. key
12. key
13. Volume down key
14. /> key
15. key
14
mem
15
18
19
17
16. /channel key
17. Handset charging contacts
select
18. /channel key (XSA965 only)
19. /delete key (XSA965 only)
GETTING
Page 1
Page 10
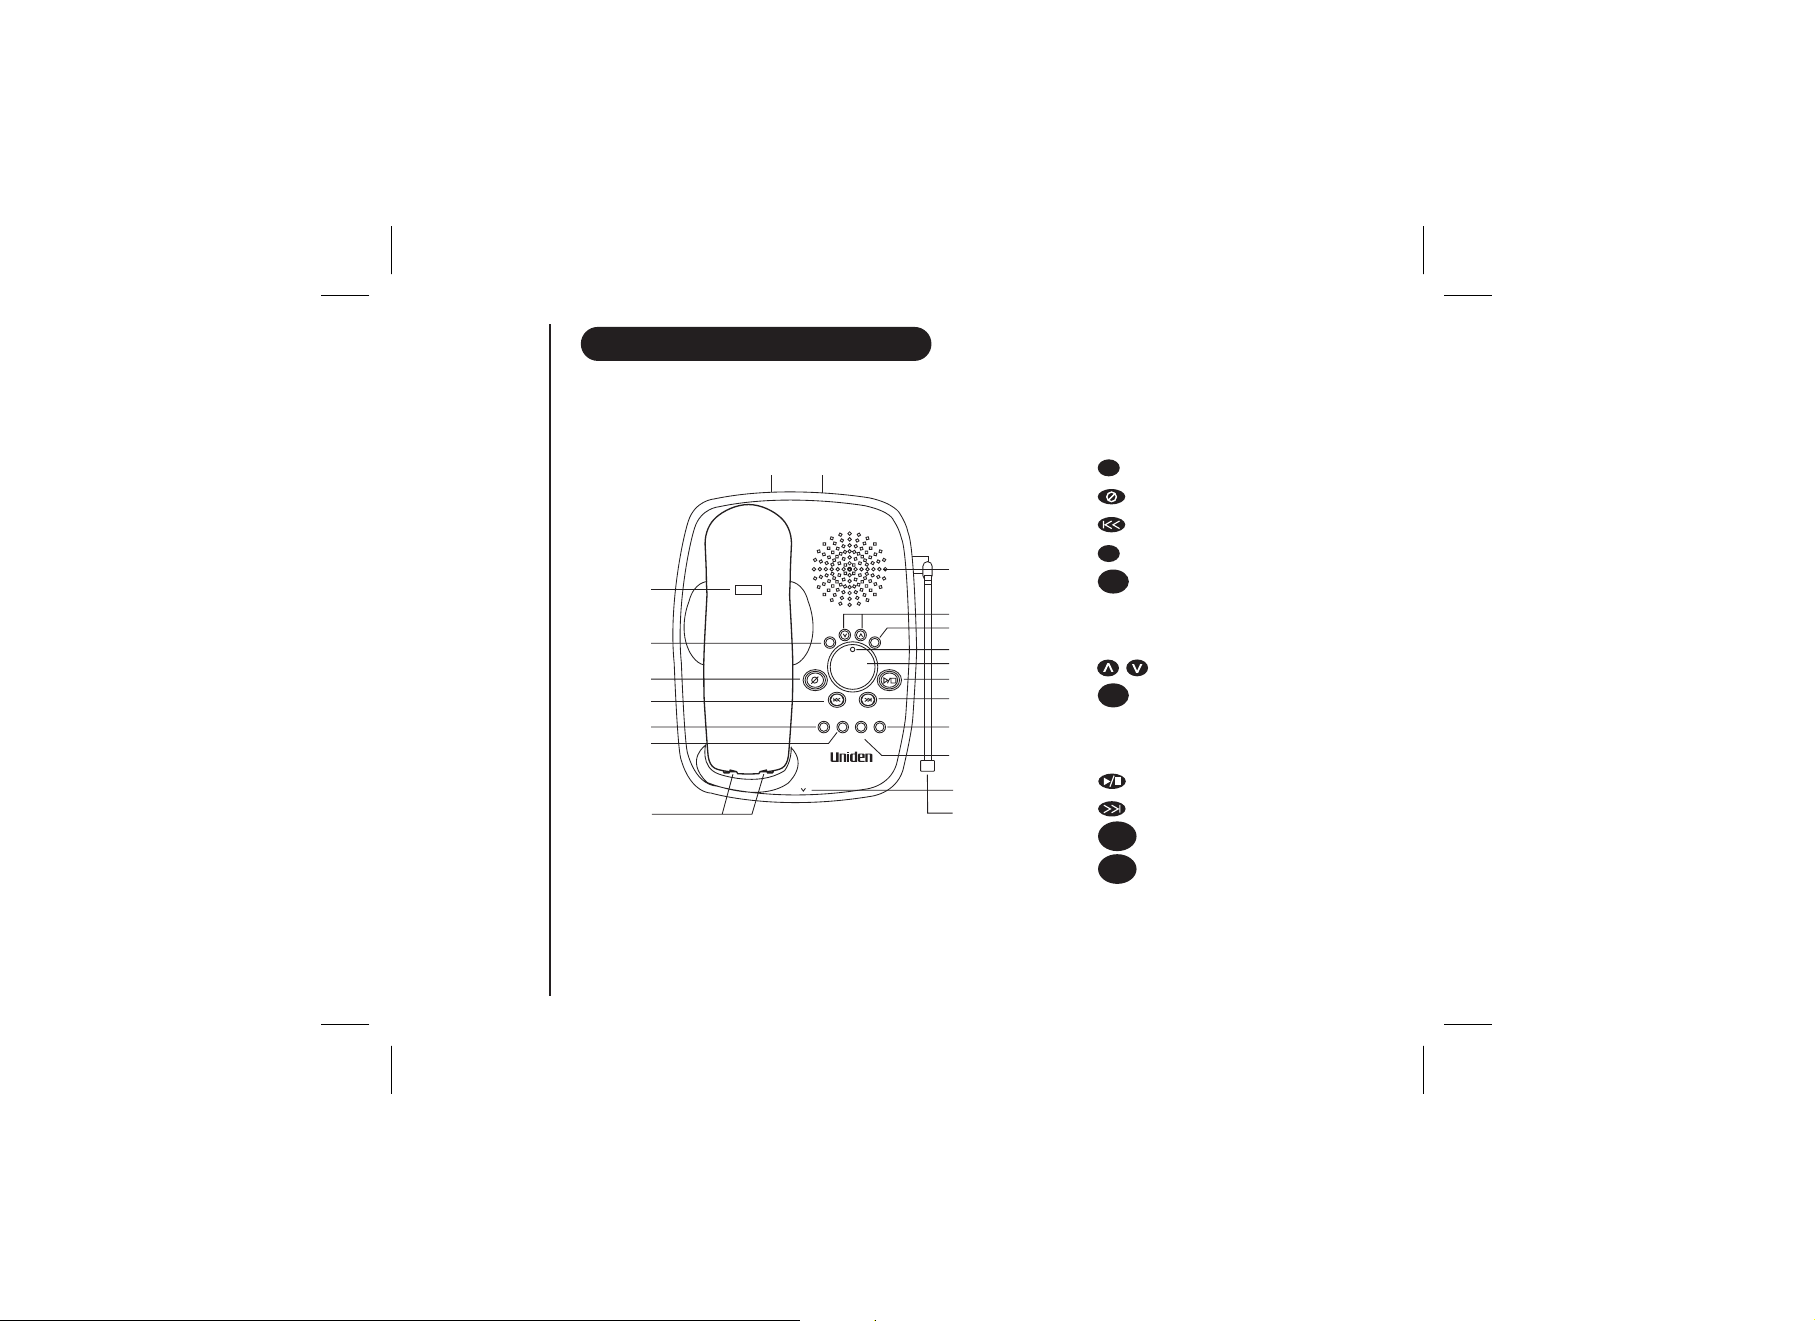
CONTROLS AND FUNCTIONS
STARTED
GETTING
23
24
25
26
27
28
29
21 22
delete play/stop
mic
volume
set/
ringer
status
88
repeat/rew
skip/ff
findhs memo greeting answer
900MHz
Dual Handset
21.
Telephone line jack
22. AC Adaptor input
23. Handset retainer clip
set
24. /ringer key
25. key
26. epeat/rew key
30
31
menu
on/off
32
33
34
35
36
37
38
39
40
27. key
28. key
29. Base charging contacts
30. Base speaker
31. Speaker volume keys
32. key
33. Status LED
34. Message counter display
35. Play/Stop key
36. skip/ff key
37. /off key
38. key
find
memo
menu
Answer
on
greeting
r
/
39. Microphone
40. Base Antenna
Page 2
Page 11

Congratulations on your purchase of this Uniden cordless telephone. This Product is designed for reliability, long life and
outstanding performance utilising the latest in 900MHz Technology.
FEATURES
l
l
l
l
l
l
l
STARTED
l
l
l
NOTES
* Caller ID feature only works if you subscribe to the service by your local telephone company.
# Pop Up Name feature only works if you subscribe to your telephone company Caller ID service and
WELCOME
Multiple Handsets (up to 2, XSA965 only)
900MHz SCR Technology (Sound Clarity and Range)
Caller ID Display*
Digital Telephone Answering Device
Pop Up Name - Caller Name Identification #
30 Caller ID Memories
Alphanumeric Memory Dialing
Super Chat Battery
Maxi-Sound - Extra Loud Handset Volume Control
Rocketdial - One Touch VIP Dial
There is usually a fee for this service.
record names into your phones memory.
l
LCD Back Light
Wall or Desk Mountable
l
Page/Find Handset Feature
l
AutoTalk
l
32 Digit Redial
l
Pause
l
Flash Button (Call Waiting Compatible)
l
2 Type Tone Ringer
l
2 Step Ringer Volume Control
l
GETTING
Page 3
Page 12
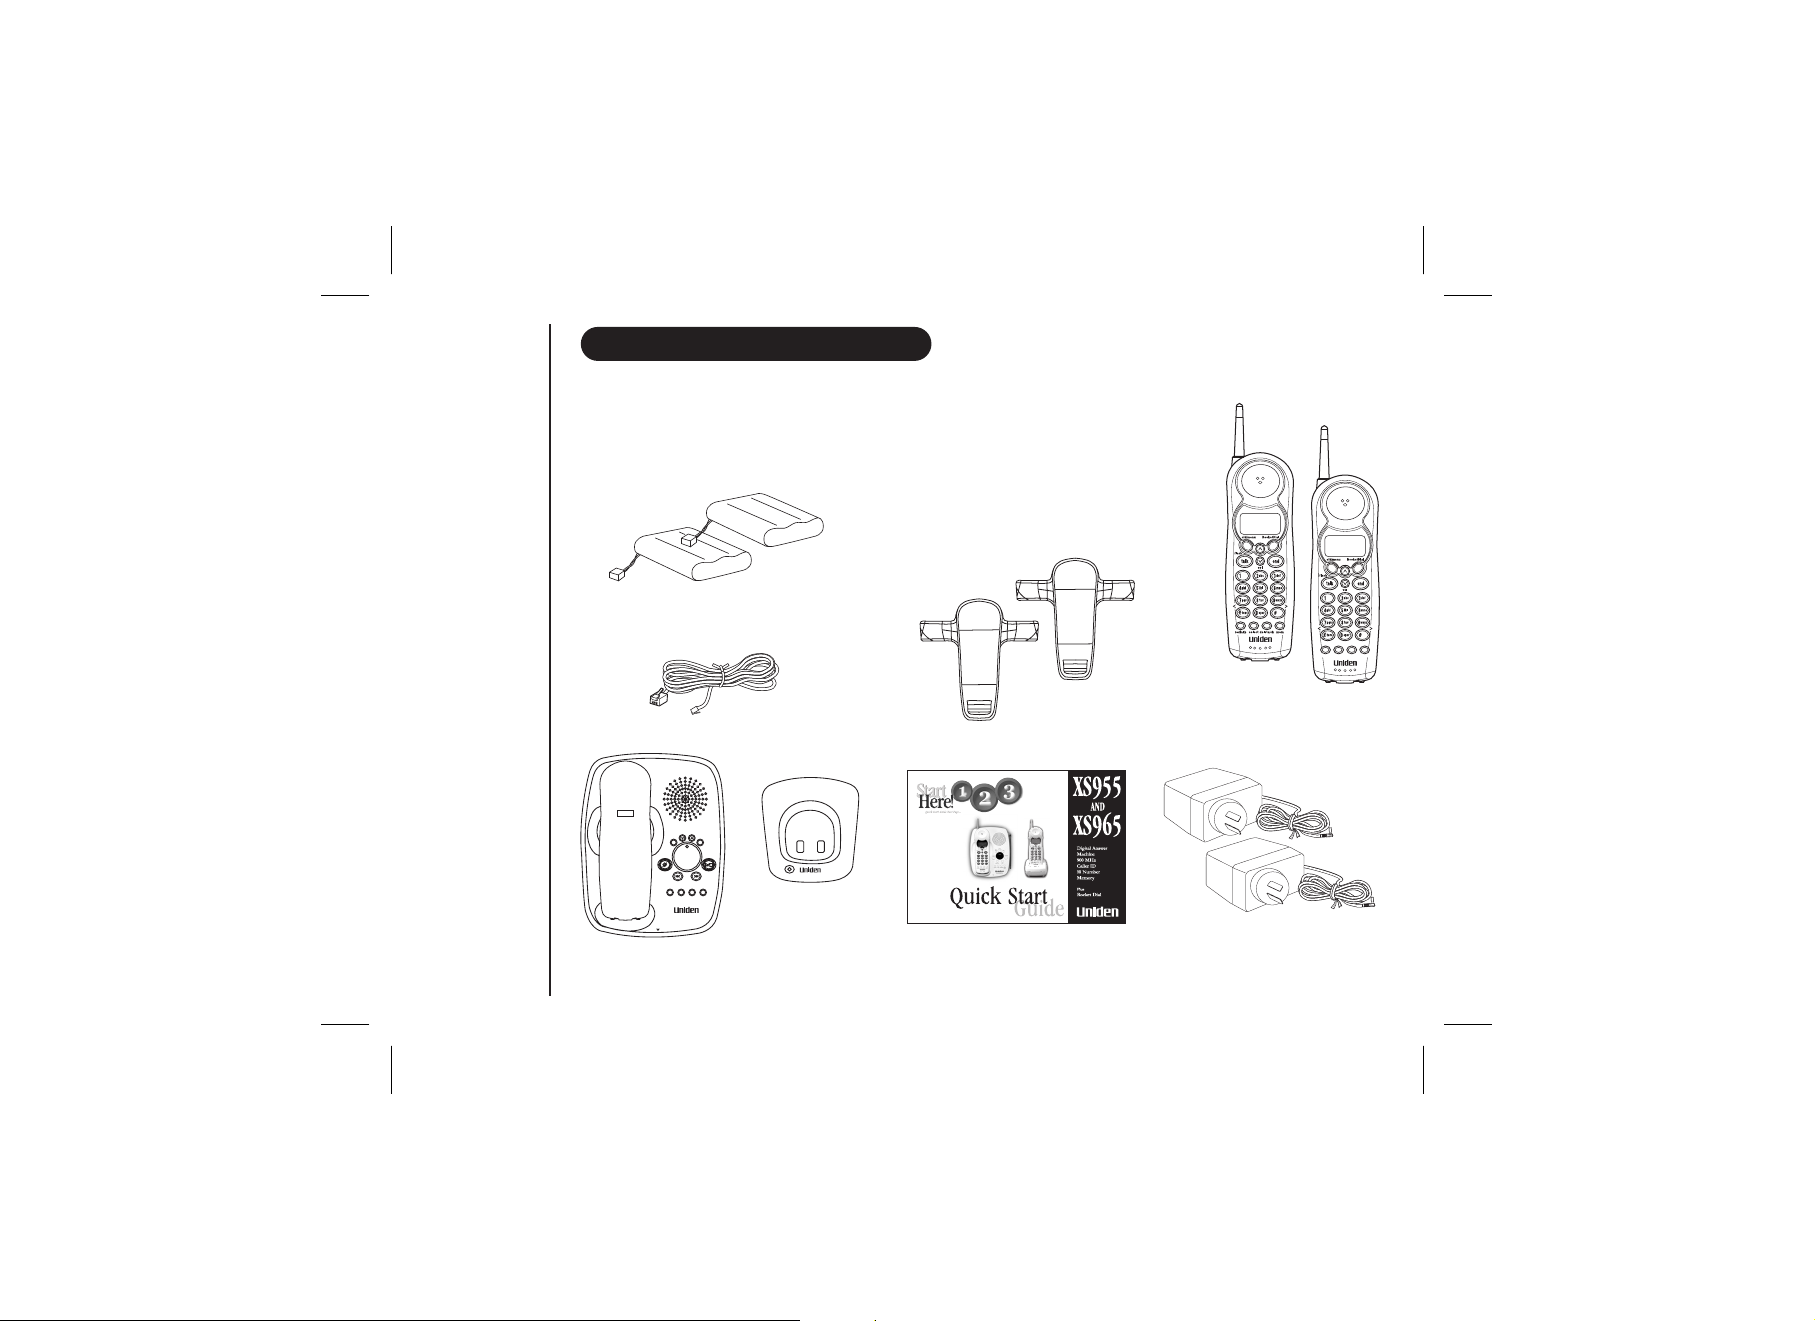
INCLUDED IN YOUR PACKAGE
Make sure you have received the following items in the package. If any of these items are
missing or damaged, contact the Uniden Parts Department.
NOTES
Rechargeable Battery
STARTED
GETTING
Main Base
Super Chat
elephone
T
volume
set/
ringer
menu
status
delete play/stop
88
repeat/rew
skip/ff
findhs memo greeting answer
on/off
900MHz
mic
Rechargeable Battery
Cord
charge
Charge
Cradle
(XSA965 only)
2nd Super Chat
(XSA965 only)
Belt Clip
Owners Manual
2nd Belt Clip
(XSA965 only)
Handset
2nd Handset
(XSA965 only)
AC Adaptor
2nd AC Adaptor
(XSA965 only)
DualHandset
pause select delete
redial channel transfer
mem
Page 4
Page 13
If you are using
an optional
headset, you
must still use the
handset keypad
for phone
operations.
STARTED
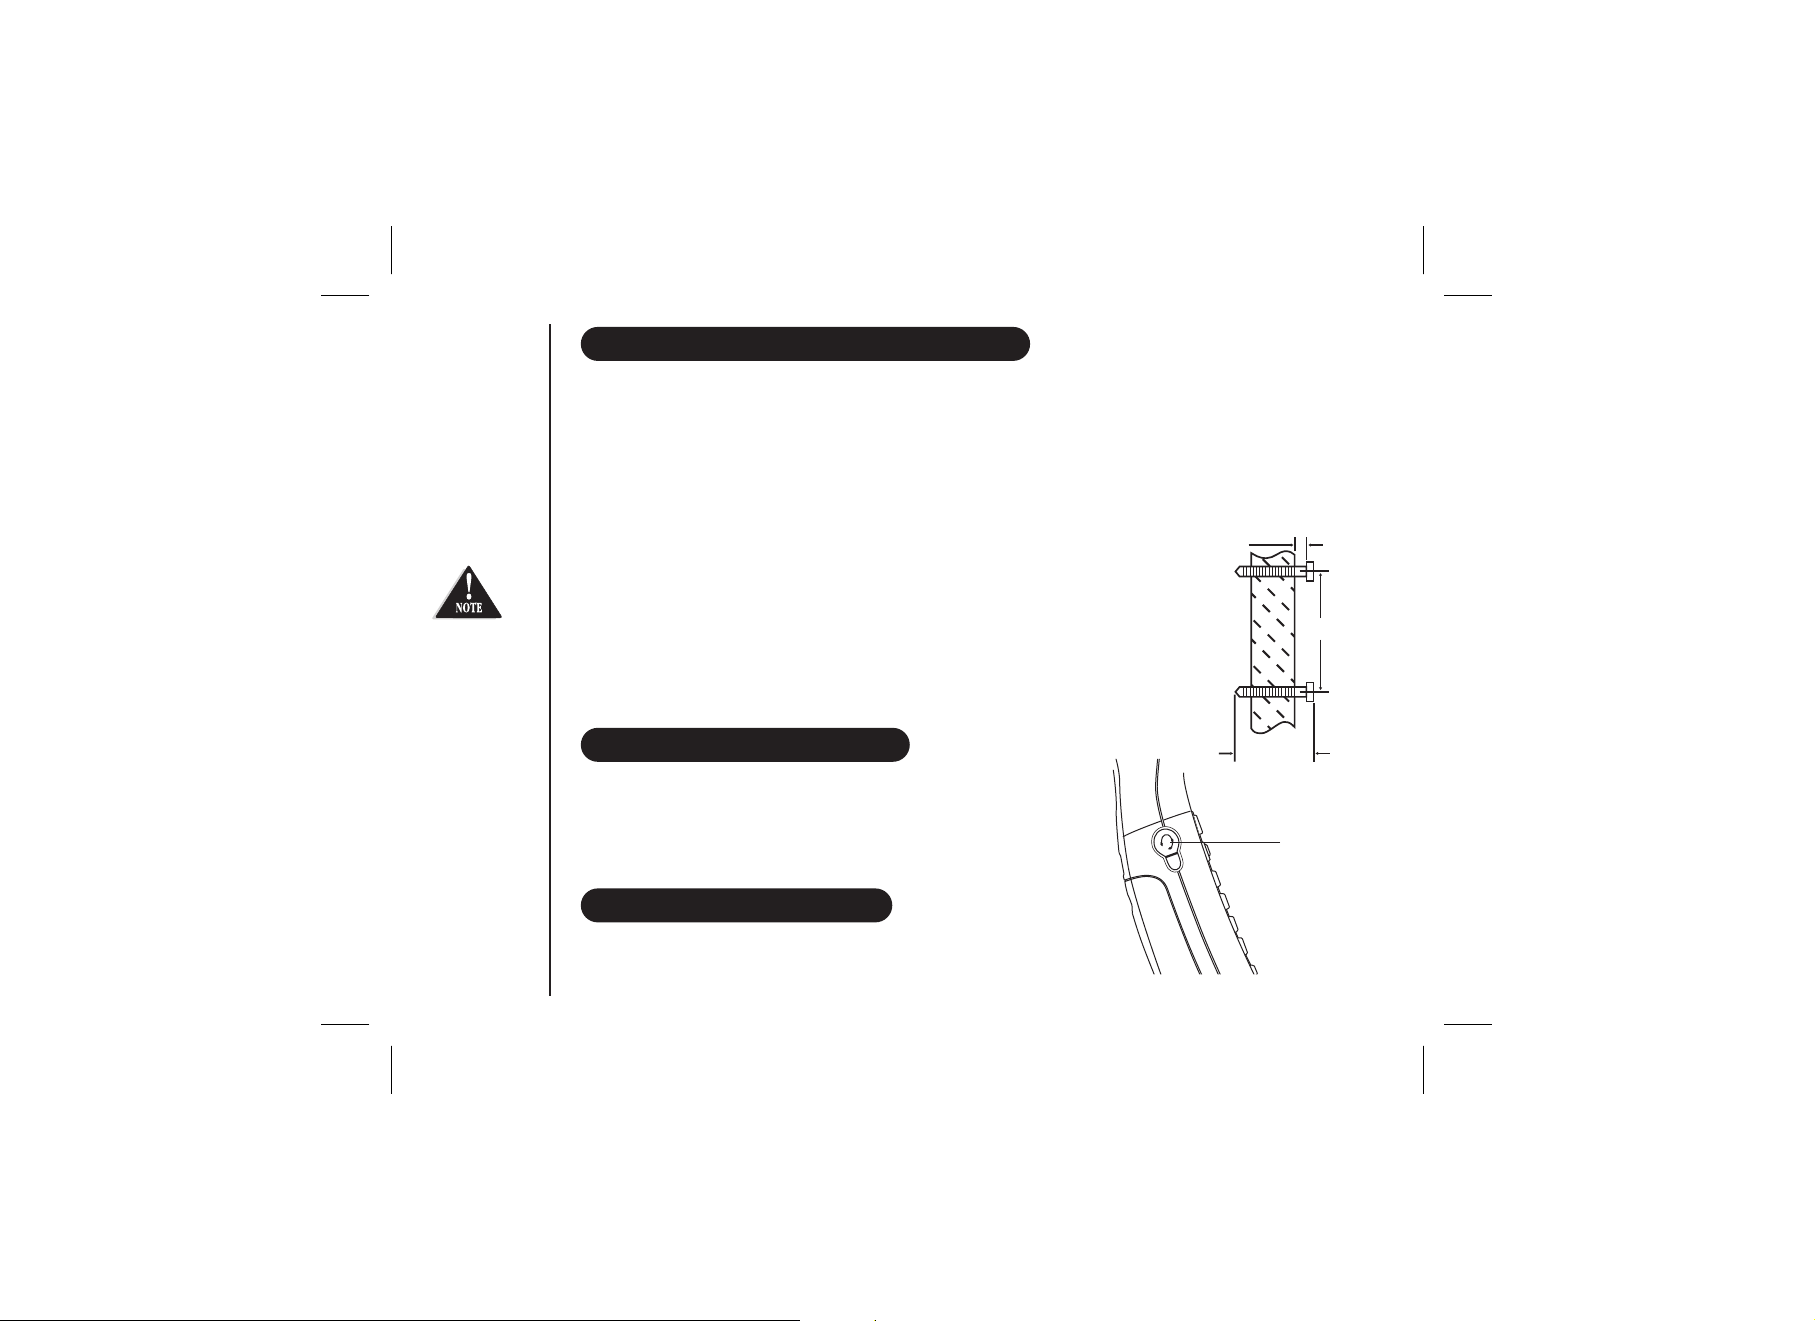
MOUNTING THE BASE UNIT ON A WALL
DirectWallMounting
Youcan mountyour phone directlyto thewall. Before doingthis, considerthe following:
• Avoid electrical cables, pipes or other items behind themounting location that could cause a hazard when inserting screws
into the wall.
• Mount your phonewithin distanceof a workingphone jack.
• Make sure thewall materialis capable ofsupporting theweight of thebase andhandset.
• Use screws withanchoring devicessuitable for thewall materialwhere the baseunit willbe placed.
1. Inserttwo mountingscrews into awall (withtheir appropriate anchoringdevice), 85mmapart.
Allow about 3mmbetween thewall and screwheads formounting the phone.
2. Plugthe ACadaptor into theBase Unitand then intoa powerpoint.
3. Plugthe telephonecord into theBase Unitand then intothe telephonesocket on thewall.
4. Alignthe mountingslots on thebase withthe mounting postson thewall.
5. Thenpush inand down untilthe phoneis firmly seated.
INSTALLING THE BELTCLIP
To attachthe beltclip:
Insert the beltclipinto theholes on eachside ofthe handset. Press down untilit clicks.
To removethe beltclip:
Pullboth sides ofthe beltclipto release thetabs fromthe holes.
TOP
3mm
85mm
35mm
Headset Jack
HEADSET INSTALLATION
GETTING
Yourphone maybe used withan optionalheadset. Tousethis feature,
simply plug theheadset intothe headset jack.
Page 5
Page 14

Use only the
SPECIAL
NOTE
genuine Uniden
Super Chat
Battery supplied
with your phone.
Replacement
Super Chat
Batteries are
available
through the
Uniden Parts
Department.
STARTED
GETTING
TTERY MAINTENANCE
BA
Battery usetime (per charge)
XSA955
• 10 • 20days when handsetis inthe standby mode
hours continuous use
XSA965
hours continuous use
• 10 • 12days when handsetis inthe standby mode
When the Battery chargebecomes low
If the phone is not in use, ' ' flashes and none of the keys will operate. If the phone is in use, ' '
flashes and the handset beeps. Complete your conversation as quickly as possible and return the handset to the base unit for
charging.
• You cannotovercharge thebattery.
• You mayreturn the handsetto thecharger aftereachcall or whenthe battery islow.
Low Battery Low Battery
Cleaning the battery contacts
Tomaintain a good charge, it is importantto clean the battery contacts on the handsetand base unitwith a dry cloth or a pencil
eraser about oncea month.Do not useany liquidsor solvents.
Genuine Handset Batteries
The high quality rechargeable batteries supplied with your phone will perform for up to two years or more. In
order toenjoy the bestperformance fromyour phone, werecommend youreplace your batteriesevery twoyears
with a genuineUniden battery.
Simply visit ourwebsite toorder a replacementbattery:
Uniden Australia PTY Limited Uniden New Zealand Limited
Service Division Service Division
www.uniden.com.au www.uniden.co.nz
Page 6
Page 15

SETTING MENU OPTIONS
cid/menu
Options available include AutoTalk and Pop Up Name.
AUTOTALK
AutoTalk allows you to answer the phone without pressing the button. If the phone rings when Autotalk is on, simply
remove the handset from the base and the phone automatically answers the call. If the phone rings when Autotalk is off, you
must press answer the call.to
XSA965 only:
Functions will
need to be
programmed in
both handsets
separately.
POP UP NAME
If the displayed Caller ID telephone number is the same as a number stored in memory, then the stored name will
also be displayed with the caller ID telephone number.
To change your AutoTalk and Pop Up Name (Name Tag)
1. Press and hold . The following screen appears.
1 Auto Talk
2 Name Tag
2. Use and or a number key ( and ) to move the pointer to the selection that you would like to
change. Press to toggle between ' ' and ' ' for AutoTalk and Pop Up Name (Name Tag).
3. Press and return the handset to the base unit. The handset returns to the standby mode.
USING YOUR PHONE
:On
:On
exactly
1 2
On Off
Page 7
Page 16

MAKING AND RECEIVING CALLS
Handset on Base Handset Off Base
Refertopage7
"Autotalk" to turn
on/off the Autotalk
feature.
USING YOUR PHONE
To answer a call
To make a call
To hang up
To redial
Pick up the handset ( ) or pickAutotalk on
up (Autotalk off).the handset and press
1. Pick up the handset.
2. Press .
3. Listen for the dial tone.
4. Dial the number..
OR
1. Pick up the handset.
2. Dial the number, then press .
1. Pick up the handset.
2. Press .
3. Listen for the dial tone.
4. Press .
OR
1. Pick up the handset.
2. Press , thenpress .
Page 8
Press , any number,
or .()Autotalk on
1. Press .
2. Listenfor dial tone.
3. Dial the number..
OR
Dial the number then
press .
Press , or return the handset
to the base or extra charging
cradle ( )AutoStandby .
1. Press .
2. Listenfor the dialtone.
3. Press .
OR
Press thenpress .
,
Page 17

XSA965 only:
Settings will need
to be
programmed in
both handsets
separately.
ADJUSTING THE HANDSET RINGER VOLUME AND EARPIECE VOLUME
Handset ringer toneand volume
Press or in standby mode to select one of five ringer tones and volume
combinations. The telephone will keep this setting for all future calls.
Earpiece Volume
Pressing or during a call will change the earpiece volume of the handset. The
telephone will keep this setting for all future calls.
Ringer Mute
You can temporarily mute the ringer tone. When the handset is off the base and the
phone is ringing,press . The ringer tone will return to normal with the next
incoming call.
REDIAL
The key redials the last number dialed. The redialed number can be up to 32 digits long.
1. Press .
2. Press . The last number dialed will be called.
TRAVELLING OUT-OF-RANGE
During acall, noisewill increaseif youmove your handset too far from your base unit. If the range limit
of your baseunit isexceeded, your callwill terminatewithin five minutes.
USING YOUR PHONE
Page 9
Page 18

SELECTING A DIFFERENT CHANNEL
If you encounter interference while using your phone, you can manually change the phone's channel for clear
operation. This function works only when the phone is in use.
Press /channel. 'Scanning' appears on the display, indicating the phone is changing to another channel.•XSA955:
• XSA965: Press /select. 'Scanning' appears on the display, indicating the phone is changing to another channel.
FIND HANDSET
To locate the handset (while it's off the base), press on the base. The handset
beeps for 60 seconds.
channel
volume
set/
ringer
delete play/stop
menu
status
You must
subscribe
through your
local telephone
company to
receive Call
Waiting services.
USING YOUR PHONE
XSA955 Only:
Paging is cancelled by pressing any key or when the handset is returned to the base.
XSA965 Only:
Both handsets will ring when paged. Paging is cancelled by pressing any key on either
handset.
CALL WAITING/FLASH
If the call waiting tone sounds during a call:
AUSTRALIA:
NEW ZEALAND:
Press /flash, then to switch between callers.
Press /flash to switch between callers.
Page 10
repeat/rew
find hs memo greeting answer
skip/ff
on/off
Page 19

STORING PHONE NUMBERS
0
9
In memory
dialling operation,
you must press
a key within 30
seconds or the
phone will return
to standby.
The pause
feature is useful
for long distance
calling, credit
card dialling or
sequences of
numbers that
require a pause
between digits.
MEMORY DIALING
Memory Dialing allows you to dial a number using just a few key presses. Your
XSA955/XSA965 stores up to 10 names/numbers in each handset.
1. Press and hold , ' ' is displayed.
2. Press or or enter a number ( - ) to select the memory location where
you would like to store the number.
3. Press . ' ' is displayed on the screen and a cursor flashes indicating
that the display is ready for a name to be entered.
If the screen shown to the right appears, the selected memory location is already stored. Then
you must either edit the entry in this location, delete the entry in this location (page 13)
or select " " to choose another location.
4. Use the Alpha Numeric keys to enter a name. The name cannot exceed 14 characters.
• Use and to move the cursor to the desired location.
• Use to delete characters as needed.
• Press and hold to delete all the characters.
• If a name is not required, go to step 5.
5. Press , ' ' is displayed. The cursor flashes indicating that the
display is ready for the number to be entered.
6. Use the number keys to enter the phone number. The phone number cannot exceed 20
digits. Use the /pause to enter a pause in the dialing sequence if required. The
display shows a ' '. Each pause counts as one digit and represents a two second delay of
time between the digits. Use to delete digits as needed.
7. Press , you will hear a confirmation tone, and the following screen appears. Memory
storage is complete. For example, if you store a number into the memory location
number 1, the display shows ' '. After about 2 seconds,
' ' is displayed. Repeat steps 2-7 to store more numbers.
8. Press to return to standby mode.
Go Back
Memory Store
Memory Store
Store Name
Store Number
P
Memory 1 Stored
Memory Store
1
2
Store Name
Edit Memory 1
Delete Memory 1
Go Back
Store Number
Store Number
8002971023
Memory 1 Stored
Memory Store
1 UNIDEN AUS
2 <Memory 2>
Page 11
Page 20

MAKING CALLS WITH MEMORY DIALING
0
9
0
9
090
9
XSA965 only:
Numbers stored
in one handset
can not be
accessed from
the other.
Memory dialing from Standby Mode.
1. Press . The handset displays your programmed memory locations.
2. Press or , or enter the number ( - ) to select the memory location you
would like to dial.
3. Press 'Talk' and the volume settings are displayed. Then the displayed number is
dialed.
Display a ProgrammedNumber
Press . The handsetdisplays yourprogrammed memory locations.
Use and to togglebetweenthe names andnumbers displayed.
1
UNIDEN AUS 1 0800123456789
2 JOE BLOGGS
3 JOHN DOE
MEMORY DIALING FROM TALK MODE
1. Press . 'Talk' and the volume setting appears.
2. Press .
3. Enter a number ( - ) toselect thememory location ofthedesired phone number. Theselected phone numberisdisplayed.
Then the numberis dialed.If the memorylocation selected doesnot havea number stored,a seriesof beeps is sounded.
4. To hang up,press .
CHAIN DIALING
On certain occasions after dialing a number, you may be required to enter an access code such as your account number for
phone banking. You can enter this number into a memory location for later use by doing the following:
1.
MEMORY DIALING
Store the access code into one of the memory locations ( - ) following the steps on page 11.
2.
Dial the party or service main number.
3.
When you need to enter the special number, press followed by the memory location ( - ).
2 5452930
3 6567983
Page 12
1
UNIDEN AUS
2 JOE BLOGGS
3 JOHN DOE
Talk
0800123456789
Page 21

0
9
EDITING A STORED NAME AND/OR PHONE NUMBER
0
9
1. Press and hold . ' ' is displayed.
2. Press or , or enter a number ( - ) to select the memory location you would like to edit.
3. Press . The edit screen is displayed.
4. Press again to select ' '. The cursor flashes indicating that the display is ready for the name
to be edited
5. Use the number keys, , , or to edit the name. To edit only the phone number, skip this step.
6. Press . The cursor flashes indicating that the display is ready for the number to be edited.
7. Use the number key, /pause and to edit the phone number. The phone number cannot exceed 20 digits.
If you don't want to change the phone number, skip this step.
8. Press . You hear a confirmation tone. Memory Storage is complete. For example, if you store a name and number
into memory location number 1, the display shows ' '.
9. Press to return to standby mode.
ERASING A STORED NAME AND/OR PHONE NUMBER
1. Press and hold . ' ' is displayed.
2. Press or or enter a number ( - ) to select the memory location you would like to erase.
3. Press . The edit screen is displayed with the memory location number that you have selected.
4. Press to move the pointer down to ' '.
5. Press .
6. Press to move the pointer to ' '.
7. Press or . A confirmation tone is sounded, and is displayed.
8. After about 2 seconds, ' ' is displayed. You may delete the information in another memory location
(return to step 2) or press to return to standby mode.
MEMORY DIALING
Memory Store
Edit Memory X
Memory 1 Stored
Memory Store
Delete Memory X
Yes
'Memory X Deleted'
Memory Store
Page 13
Page 22

CALL TRANSFER
To have the ability to transfer calls from one handset to the other handset:
Initial Setup:
(Important: XSA965 Only -
page iv).
TO TRANSFER CALLS
To transfer your call from handset 1 to handset 2:
l
l
l
l
transfer
Press .
The call is placed on hold on the first handset, while handset 2 begins to ring. The call is transferred when
the 2nd handset is answered.
Repeat the process to transfer the call back to handset 1. Calls can be transferred from either handset.
If the transferredcallis not answered,you canretrieve the callby pressing or .
- XSA965 Only
Please make sure you have registered your dual handset - refer to instructions on
transfer
MEMORY DIALING
Page 14
Page 23

ROCKETDIAL
The Memory
Location for
Rocketdial is
independent
from the memory
location used for
memory dialling.
If the Rocketdial
does not have a
stored number,
the handset will
beep rapidly and
the phone will
not dial.
ROCKETDIAL
Youcan storeyour most frequent dialed number in the Rocketdial location.The Rocketdialallows youto diala number with one
key press (thereis noneed to press . Thephone will automaticallydial thenumber stored).
Store Number
STORING AND EDITING THE ROCKETDIAL
1. When the phone is in standby mode, press and hold . is
displayed.
If the screen shown to the right appears, there is a number already stored. Press to
select ' '.
Edit Number
2. Store the number by following step 6 under "Storing Phone Numbers" on page 11.
3. Press . A confirmation tone sounds. Memory storage is complete. '
Stored
' is displayed.
''Store Number
Number
Edit
Number
Delete
Go Back
Store Number
800
Number
MAKING CALLS WITH ROCKETDIAL
When thephoneis inthe standby mode,simply press .The number storedin theRocketdial
memory locationisinstantly dialed.
Edit Number
DELETING THE ROCKETDIAL
1. When the phone is in the standby mode, press and hold . The following display appears.
2. Press to select ' '.
3. Press . The following display appears.
4. Press to move the pointer to ' '.
5. Press or .
. After 2 seconds, the handset returns to standby mode.
sounds
Delete Number
Yes
' ' is displayed and a confirmation tone
Number Deleted
Delete
Go Back
Delete Number?
Yes
No
Number Deleted
Number
Page 15
Page 24

CALLER ID
You must subscribe to a Caller ID service to use these facilities. When the telephone rings, the Caller ID feature allows you to
view the caller's name and phone number on the display before you answer the telephone. The handset displays the phone
number of the incoming call, the name, time and number of calls. Additionally, you can dial the displayed number and store
the information for memory dialing.
WHEN THE TELEPHONE RINGS
When the Caller ID message is received, the display shows the caller's phone number along with the date and time. The
incoming call information is stored in the Caller ID record. If the Caller ID service includes the callers name, the caller's
name appears on the display (currently not supported in Australia or New Zealand).
If you answer a
call before the
Caller ID
message is
received (i.e:
before the second
ring), the Caller
ID message will
not appear.
USING YOUR PHONE
Here are sometypical displays:
When the mobile phone
number and date are received.
When a private number is
received.
The dateand timereceived
Caller's name
Caller's phonenumber
21/12 12:30PM
Mobile
0295979035
21/12 12:30PM
Private
Page 16
21/12 12:30PM
JIM STATEN
0295979035
When invalid data is
received.
When an unknown number is
received.
When a call is coming from a
payphone (Australia only).
Incomplete Data
21/12 12:30PM
Unavailable
21/12 12:30PM
Payphone
Page 25

cid/
menu
VIEWING THE CALLER ID MESSAGE LIST
cid/
menu
cid/
menu
In Caller ID
operation, if no
key is pressed for
more than 30
seconds, an error
tone sounds and
the telephone
returns to the
standby mode.
If you get an
incoming call or
page, the deleting
operation is
cancelledsoyou
can answer the
call or page.
XSA965 only:
Caller ID
numbers need to
be deleted from
each handset
separately.
USING YOUR PHONE
The Caller IDlist storesinformation for upto 30incoming calls -even unansweredcalls.
1. Press . Thesummary screenappears.The screen showsthe numberof new messagesand totalmessages.
2. Press to displaythe latest CallerID message.
3. Press to seethe next message.Or press to see theprevious message.
4. Press to returnto standby mode.
DELETING INFORMATION FROM THE CALLER ID LIST
The XSA955/XSA965 stores up to 30 messages. If the phone receives the 31st message,the oldest one in the list isautomatically
deleted. Caller IDdata canalso be deletedmanually.
DELETING A CALLER ID MESSAGE
1. Press . Display the message to be deleted from the
Caller ID listby pressing or .
2. Press .
3. Press or to select' 'or ' '.
Yes No
4. Press or .
When the pointer isat ' ':
Yes
A tone sounds and the Caller ID message is deleted.
The next CallerID messageis then displayed.
When the pointer isat ' ':
No
The display returnsto CallerID message.
DELETING ALL CALLER ID NAMES AND NUMBERS
1. Press .
2. Press .
3. Press or to select' 'or' '.
Yes No
4. Press or .
Page 17
When the pointer isat ' ':
Yes
A tone sounds all stored Caller ID messages are
deleted.
When the pointer isat ' ':
No
The display returnsto thesummary screen.
Page 26

CALLING A PARTY FROM THE CALLER ID LIST
cid/
menu
0
9
cid/
menu
New Zealand:
Calling from the
Caller ID list
may not be
functional.
You cannot store
aCallerID
message if no
phone number
appears in the
message.
Youcan placea call fromthe CallerID list.
1. Press . Selectthe phone numberthat youwant to dialby pressing or .
2. Press . Thedisplayed phone numberdials automatically.
DIAL EDIT
Youcan temporarily edit the Caller ID numberthat isdisplayed by pressing . A cursor appears in the display. Press to
move the cursorleft,make your changesand thenpress . Thiswill notchange the numberin theCaller ID listmemory.
STORED CALLER ID MESSAGES IN MEMORY DIALING
Messages shownin the Caller IDlist can bestored in memory dialing. Usingthe incoming callinformation (i.e., CallerIDlist), the
phone number ofthe partyon the CallerID canbe stored inmemory.
1. Press . Selectthe phone numberto bestored from theCaller IDlist by pressing or .
2. Press .
3. Press or or entera number( - ) toselect thememory locationto bestored.
4. Press . Aconfirmation tone soundsand thenumber is storedin memory.The displayreturns to the CallerIDlist.
5. Press to returnto standby mode.
If amessage hasalready beenstored inthe selectedmemory number location, a confirmation screen is displayed.Press to
select ' '.Press to replace.The displayreturns to theCaller IDlist.Yes
USING YOUR PHONE
Page 18
Page 27

ANSWERING SYSTEM
answer on
answer on
You can use your answering systems to leave a voice memo message for others who use the phone, or to announce a special
message to callers when you're away from your phone.
FEATURES
ll
Digital Tapeless Recording 13 minutes of Recording Time
Call Screening Selecting Outgoing Messages
ll
Time and Day Announcement Remote Message Retrieval
ll
Toll Saver Voice Memo
ll
Digital TapelessRecording allows youto quickly review, save ordelete the messagesyouchoose. You willnever have toworry about
a tapewearing out,jamming orresetting improperly. The Integrated Answering System is easy and convenient to use, but
through all ofthe instructions carefully.
read
TURNING THE ANSWERING SYSTEM ON/OFF
please
volume
set/
ringer
menu
1. To turn the answering system on, press . The current greeting message will be
played and you will hear a confirmation tone. The message counter displays the number
of messages stored in memory. If the display flashes, then there are new messages
waiting for you.
2. To turn the answering system off, press /off. ' ', is announced
and the message counter display will no longer be illuminated.
USING YOUR PHONE
Page 19
Answer Off
delete play/stop
status
repeat/rew
find hs memo greeting answer
skip/ff
on/off
Page 28

SETTING THE TIME
1. Press . ' ' is announced along with the current time. The message counter displays the
current numbers [ ] through [ ] indicating the day of the week.
2. Press or until the correct day is announced. The numbers are
displayed on the base.
3. Press .
4. The current recorded hour is announced. Press or until you hear the correct hour
setting. The numbers [ ] through [ ] are displayed on the base as each hour is announced.
Press and hold
Skip/ff
''or
Repeat/rew
''
to quickly scroll
through the
numbers on the
display.
5. Press .
6. The current recorded minute is announced. Press or until you hear the correct minute
setting. The numbers [ ] through [ ] are displayed on the base as each minute is announced.
7. Press .
8. The current recorded AM or PM setting is announced. Press or until you hear the
correct AM or PM setting. The message counter displays [ ] or [ ].
9. Press . A confirmation tone sounds, then the announcement 'Time' and the time and day are
announced for your review. The base LED displays the number that corresponds with the day of
the week.
10. Press to exit menu options.
SETTING A PERSONAL SECURITY CODE (PIN)
To play your messages from a remote location, you will need to enter a two-digit Personal Identification Number (PIN) code (00-
99). To select a PIN, perform the following steps:
1. Press twice. ' ' and the current PIN code is announced as it is displayed on the base.
The PIN code is
set to '80' when
you purchase the
XSA955/XSA965.
USING YOUR PHONE
2. Press or until the desired number appears.
3. Press to select the PIN code. A confirmation tone sounds, then the announcement ' ' and the new
PIN code is announced.
4. Press to exit menu options.
5. Record your PIN code on pages 31 and 35 for future reference.
menu
set
set
set
set
menu
set
play
Time
17
112
00 59
Security Code
Page 20
AP
17
[ ] through [ ]
Security Code
volume
set/
ringer
delete play/stop
repeat/rew
find hs memo greeting answer
menu
status
skip/ff
on/off
Page 29

SETTING THE RING TIME
The ring time setting allows you to set the number of rings the caller hears before your
answering system plays the outgoing message. You can set the ring time to answer after six, nine
or twelve rings. Setting (Toll Saver), the answering system picks up after six rings if you have
new messages, and after nine rings if there are none. This way, if you make a long distance call
to check your messages, you can hang up after the seventh ring to avoid billing charges.
volume
set/
ringer
delete play/stop
menu
status
When using the
Announce Only
feature, you may
want to change
your outgoing
message, if the
message prompts
the caller to leave
a message. The
prerecorded
message changes
automatically.
USING YOUR PHONE
1. Press three times. You hear ' ' and the current ring time ([ ] 6, [ ] 9,
menu
12
[ ] 12, [ ] Toll Saver), and it is displayed on the base.
Ring Time 6 9
2. Press or until the desired ring time appears.
3. Press /ringer to select the new ring time, a confirmation tone sounds, then the
set
announcement ' ' and the new ring time is announced.
Ring Time
4. Press to exit menu options.
SETTING THE MESSAGE RECORD TIME
You have three record time options. The options ' ' or ' ' set the
duration for recording incoming messages. ' ' answers the call with the
preset greeting or your personal greeting but prevents the caller from leaving a message.
1. Press four times. ' ' is announced and the current recording time
menu
14 A
([ ] 1 minute, [ ] 4 minutes, [ ] Announce Only and it is displayed on the base.
Record Time
2. Press or until the desired time appears.
3. Press to select the new recording time, a confirmation tone sounds, then the
set
announcement ' ' and the new recording time is announced.
Record Time
4. Press to exit menu options.
1 minute 4 minutes
Announce Only
Page 21
repeat/rew
find hs memo greeting answer
set/
ringer
delete play/stop
repeat/rew
find hs memo greeting answer
volume
status
skip/ff
on/off
menu
skip/ff
on/off
Page 30

ANNOUNCE ONLY FEATURE
The ' ' feature plays a prerecorded outgoing message, "Hello, no one is
Announce Only
available to take your call. Please call again," but it will not allow the caller to leave a message.
SETTING THE MESSAGE ALERT TONE
The Message Alert feature lets you know that you have new messages by sounding a short
beeping tone. If the Message Alert has been set to ' ' and a new message has been received,
the alert tone will sound every 15 seconds. Set the Message Alert tone to ' ' or ' ' by
using the
1. Press five times. ' ' is announced and the current setting
following procedure:
menu
OF On
([ ] Off or [ ] On), and it is displayed on the base.
2. Press or to select.
3. Press to select the new setting, a confirmation tone sounds, then the
set
announcement ' ' and the current setting you have selected is
announced. When the first new message is received, the beeping tone will begin to
sound.
4. Press /stop to exit menu options.
To quickly turn ' ' tone off, press any key on the base unit and the
l
tone will automatically deactivate. To reset, go back into the menu setup mode.
When all new messages are played using the remote playback feature (page 28) the
l
' ' tone will automatically deactivate.
Message Alert
USING YOUR PHONE
Message Alert
Message Alert
Message Alert
On
Page 22
On Off
volume
set/
ringer
delete play/stop
repeat/rew
find hs memo greeting answer
menu
status
skip/ff
on/off
Page 31

greeting
greeting
greeting
To delete the
greeting
personal greeting,
press
during the
announcement
and the system
announces
"Greeting has
been deleted."
SETTING YOUR OUTGOING MESSAGE (GREETING)
When you receive a call, the answering system automatically plays either a preset message or
your own greeting.
Preset Message
The followingmessage is prerecorded, "Hello, no one isavailable totake yourcall. Please leave a
message after thetone."
Recording A Personal OutgoingMessage (Greeting)
1. Press and hold . ' ' is announced and a confirmation
tone is heard. [- - ] flashes on the message counter. Release key.
2. Start recordingyour message. You have 30 seconds,and the messagecounter starts tocount
30 1
down [ ] to[ ] every second.
3. When you are finished recording your greeting, press , a confirmation tone
sounds, and then your greeting plays back for you.
Record Greeting
MEMORY DIALING FROM TALK MODE
Choosing Between theTwo Outgoing Messages
Press . Then press again when the outgoing message is played. This
switches between the prerecorded greeting or the personal greeting. After finishing playing
back the message, a confirmation tone is heard.
USING YOUR PHONE
Page 23
Page 32

SETTING THE BASE RINGER VOLUME
set
set
When you have
set the base
ringer to off and
the handset is on
the base, you will
still hear the
ringer from the
handset.
When you press
at9or
at 0, an error tone
sounds.
You have three ringer options. One allows you to turn the ringer off. The other two are volume
levels.
1. Press /ringer. You hear the ringer at the current volume level ([ ] High, [ ] Low,
OF Off
[ ] Off) (if you set the base ringer volume to off, ' ' is announced) and it is displayed
Hi Lo
on the base.
2. Press /ringer while the current ring volume is being played until the desired ringer
option appears.
3. The systemdisplays newringer volume.
ADJUSTING THE SPEAKER VOLUME LEVEL
You can adjust the volume of the Answering System speaker by pressing the 'Volume' keys on
the base. Press for louder or for softer while the base speaker is being used.
The numbers 0-9 are displayed on the base indicating the volume levels. 0 being the softest
and 9 being the loudest.
volume
set/
ringer
delete play/stop
repeat/rew
find hs memo greeting answer
menu
status
skip/ff
on/off
USING YOUR PHONE
Page 24
Page 33

USING YOUR ANSWERING SYSTEM
When the
answering system
FL
is full, ' ' is
displayed on the
base, and the
system announces
"No Remaining
Time". You should
delete some
messages so that
the system can
record new
messages.
To stop playing
your messages,
press at any
time.
USING YOUR PHONE
The message counter displays thenumber of messagesstored in memory. If the display flashes,
then there arenewmessages waiting foryou.The flashing numberrepresentsthe numberof new
messages, not total messages. After you play all your new messages, you can then play your old
messages.
PLAYING YOUR MESSAGES
1. Press . The systemannounces thenumber of newand old messages.The LEDdisplays
the number of new messages. The day and time that each message was received is
announced after the message is played. The message counter displays the number of
current messagesstored.
When all new messages have been played, a confirmation tone sounds and "
of Messages
" is announced.The systemreturns to standby.
End
2. After you have reviewed your new messages, you can play your old messages by again
pressing . Onceyouhave listened toa newmessage, it becomesan oldmessage. The old
messages will beplayed inthe order inwhich theywere received.
REPEATING A MESSAGE
1. While a message is being played, press , to replay the message. If you have several
messages, press repeatedly untilyoureturn to themessage youwant to replay.
2. Press at any time to stop reviewing messages and return to standby. The message
counter shows thenumber ofmessages stored inmemory.
Toquickly scrollbackwards through amessage, pressand hold .
Page 25
volume
set/
ringer
delete play/stop
repeat/rew
find hs memo greeting answer
set/
ringer
delete play/stop
repeat/rew
find hs memo greeting answer
status
volume
status
menu
skip/ff
on/off
menu
skip/ff
on/off
Page 34

SKIPPING A MESSAGE
1. Press to reviewyourmessages.The number ofmessagesisannounced.
2. Press at anytime to skip to the next message. Eachtime is pressed, the system
scans forward one message. If you have several messages, press to find the message
you want toplay.
3. Press , at any timeto stop reviewingyour messagesand return tostandby. The message
counter shows thenumber ofmessages stored inmemory.
volume
set/
ringer
delete play/stop
menu
status
When you press
you are
permanently
deleting the
message. Once
deleted, the
message cannot
be replayed.
Toquickly scrollforwards throughamessage,press and hold .
DELETING A MESSAGE
Tomaintain maximumrecording time, deleteany oldmessages.
1. Press to reviewyourmessages.
2. Press anytime duringthemessage to delete.
3. A confirmationtone soundsafter themessage hasbeen deleted.
Youcan alsodelete all themessages.
1. Press . "To deleteallmessages, press deleteagain" isannounced.
2. Press again. Aconfirmationtone sounds afterallthemessages have been deleted.
If youtry todelete allmessages without firstlistening toyour new messages,you willhear several
short beeps followed by the announcement "Please playback all messages". This protects you
from accidentally erasingmessages youhave not yetreviewed.
USING YOUR PHONE
Page 26
repeat/rew
find hs memo greeting answer
set/
ringer
delete play/stop
repeat/rew
find hs memo greeting answer
volume
status
skip/ff
on/off
menu
skip/ff
on/off
Page 35

The voice memo
function is
completely
independent of the
greeting message.
The voice memo
messages are
recorded as
incoming
messages.
VOICE MEMO
The voice memo function allows the user to record messages (up to 10 minutes).
1. Press and hold . " " is announced and a
confirmation tone sounds. [- -] flashes on the message counter.
2. Start your recording.
3. When you have finished, press , or to stop recording. A confirmation tone
sounds and the system returns to standby.
memo
Record memo message
memo
volume
set/
ringer
delete play/stop
repeat/rew
find hs memo greeting answer
menu
status
skip/ff
on/off
USING YOUR PHONE
Page 27
Page 36

REMOTE ACCESS AWAY FROM HOME
2
0
You must enter a
command within
15 seconds of
entering command
waiting mode or
the answering
system
automatically
hangs up and
returns to standby.
USING YOUR PHONE
You can operate your answering system from a remote location using any touch-tone telephone. Use this
function to check for recorded messages, to play or delete messages, even to record a new greeting
message.
1. Call your telephone number.
2. During the greeting message, press and enter your PIN code (Factory Setting: 80).
(See "Setting a Personal Security Code", page 20)
3. The answering system announces the current time and the number of messages stored in memory.
Then you hear "To play incoming messages, press . For help, press ".
4. You may continue to listen to the Help Guidance, or you may select a command from the following
chart:
Command Function
then Repeat aMessage
1
then Playing IncomingMessages
2
then Skipping aMessage
3
then Deleting aMessage
4
then Stop Operation
5
*For Memo Record and Greeting Message Record function, the first time you enter the corresponding
command, it starts the Recording function. If you want to stop the recording, enter the command again.
5. After all of the Help Guidance prompts have played, you hear intermittent beeps indicating that the
system is in the command waiting mode. You may enter another command at this time from the
chart.
6. When you are finished, hang up to exit the system. The answering system automatically returns to
standby.
Command Function
then Answering SystemOn
then Memo Record/Stop*
then Greeting MessageRecord/Stop*
then Answer SystemOff
then Help Guidance
Page 28
6
7
8
9
0
Page 37

TURN ON THE ANSWERING SYSTEM REMOTELY
0
2
If youhave forgotten toturn on youranswering system, youcan turn iton remotely fromany touch-tone
telephone.
1. Call your telephone number.
2. After 15 rings, the system will answer. A tone sounds.
3. Press and then enter your PIN code. The answering system announces the number of
messages stored in memory. You hear "To play incoming messages, press . For help
press ."
4. Press then to turn the answering system on. You will hear the outgoing message and a
confirmation tone sounds.
5. Hang up the phone and subsequent calls will be answered by the system.
6
USING YOUR PHONE
Page 29
Page 38

NOTES
NOTES
Page 30
Page 39

REMOTE OPERATION CARD
2
0
2
0
2
0
2
0
Handy wallet sizedinstructionsfor easy useof remoteanswer machine functions.
Remote Operation Card - Uniden XSA955 and XSA965
Remote access away from home:
1. Call your telephone number.
2. During the greeting message, press and enter your PIN code.
3. The answering system announces the current time and the number of
messages stored in memory. Then you hear "To play incoming messages,
press . For help, press ".
4. You may continue to listen to the Help Guidance, or you may select a
command from the chart.
*For Memo Record and Greeting Message Record function, the first time
you enter the corresponding command, it starts the Recording function. If
you want to stop the recording, enter the command again.
USING YOUR PHONE
Pin Code:
Pin Code:
Page 31
Remote Operation Card - Uniden XSA955 and XSA965
Remote access away from home:
1. Call your telephone number.
2. During the greeting message, press and enter your PIN code.
3. The answering system announces the current time and the number of
messages stored in memory. Then you hear "To play incoming messages,
press . For help, press ".
4. You may continue to listen to the Help Guidance, or you may select a
command from the chart.
*For Memo Record and Greeting Message Record function, the first time
you enter the corresponding command, it starts the Recording function. If
you want to stop the recording, enter the command again.
Pin Code:
Page 40

Handy wallet sizedinstructionsfor easy useof remoteanswer machine functions.
REMOTE OPERATION CARD
Command Function Command Function
1
then Repeat a Message
2
then Playing Incoming Messages
3
then Skipping a Message
4
then Deleting a Message
5
then Stop Operation
6
then Answering System On
7
then Memo Record/Stop*
8
then Greeting Message Record/Stop*
9
then Answer System Off
0
then Help Guidance
Command Function Command Function
1
then Repeat a Message
2
then Playing Incoming Messages
3
then Skipping a Message
4
then Deleting a Message
5
then Stop Operation
6
then Answering System On
7
then Memo Record/Stop*
8
then Greeting Message Record/Stop*
9
then Answer System Off
0
then Help Guidance
1
then Repeat a Message
2
then Playing Incoming Messages
3
then Skipping a Message
4
then Deleting a Message
5
then Stop Operation
6
then Answering System On
7
then Memo Record/Stop*
8
then Greeting Message Record/Stop*
9
then Answer System Off
0
then Help Guidance
1
then Repeat a Message
2
then Playing Incoming Messages
3
then Skipping a Message
4
then Deleting a Message
5
then Stop Operation
6
then Answering System On
7
then Memo Record/Stop*
8
then Greeting Message Record/Stop*
9
then Answer System Off
0
then Help Guidance
Page 32
USING YOUR PHONE
Page 41

TROUBLESHOOTING
TROUBLESHOOTING
The status light won’t
illuminatewhen thehandset
is placed on the base.
The audiosounds weak
and/ orscratchy.
Can’t makeor receive calls.
The handset doesn't ring or
receive a page.
Handset number 1 or
number 2 not working
(XSA965 only)
TROUBLESHOOTING
If you stillhave a problem.
• Make sure the AC adaptor is plugged into the base and wall outlet
Make sure the handset is properly seated in the base.
•
Make sure the charging contacts on the handset and base are clean.
•
Move the handset and/or base to a different location away from
•
metal objects or appliances and try again.
•
Make sure that you are not too far away from the base.
•
XSA955 only -
operating channel.
XSA965 only -
•
operating channel.
• Checkbothendsof the telephonelinecordarepluggedin firmly.
• Make suretheAC adaptoris pluggedinto the baseand wall outlet.
• Disconnect the ACadaptor for a few minutes, then reconnect it.
• Make surethat youarenot toofar fromthe base.
• Charge thehandset.
• The battery pack may beweak.Chargethe battery for 20-25hours.
• The handset may be too faraway fromthe baseunit.
• Place thebaseunit away from appliances or metalobjects.
• Place one handset at a time on the main base for 5 seconds each.
Australia: www.uniden.com.au New Zealand: www.uniden.co.nz
Page 33
Press /channel while on a call to change the
Press /channel while on a call to change the
Page 42

WARRANTY
One Year Limited Warranty
Important:
Warrantor: Uniden Australia PtyLimited A.B.N.58001865498
the Product), to be freefrom defectsinmaterialsandcraftsmanship withonly thelimitationsorexclusions set outbelow.
WARRANTY DURATION:
retail sale. Thiswarranty will be deemedinvalid if theproduct is; (A) Damaged or not maintained as reasonable and necessary, (B) Modified, altered or
used as part of any conversion kits, subassemblies, or any configurations not soldby Uniden. (C)Improperly installed, (D)Repaired by someoneother
than an authorised Uniden RepairAgent fora defector malfunctioncovered bythis warranty. (E) Used inconjunction withany equipmentor partsor as
part of asystem notmanufacturedbyUniden,(F) Warrantyisonly valid in originalcountryofpurchase.
PARTSCOVERED:
STATEMENT OFREMEDY:
discretion, will repair the defect or replace the product and return it to you without charge for parts or service. THIS WARRANTY DOES NOT COVER OR
PROVIDE FOR THEREIMBURSEMENT ORPAYMENT OF INCIDENTAL OR CONSEQUENTIAL DAMAGES.THIS GUARANTEE IS IN ADDITIONTO AND DOES
NOT IN ANYWAYAFFECT YOURRIGHTS UNDER THE CONSUMERGUARANTEE ACT.
PROCEDURE FOR OBTAINING PERFORMANCE OR WARRANTY:
be shipped ordelivered, freightpre-paid,withevidenceof original purchase(eg. acopyofthesales docket), tothe warrantorat:
Evidence of originalpurchase isrequiredforwarranty service.
Uniden New ZealandLimited
Uniden warrants to theoriginal retailowner forthe durationof thiswarranty, its XSA955/ (herein after referred to as
This warranty to the original retail owner only, shall terminate and be of nofurther effect 12 months after the date of original
This warranty coversfor one(1) year,the BaseUnit and Handsetonly.All accessories (AC Adaptoretc) arecoveredfor90days only.
In theevent that theproduct does notconformto thiswarranty at anytimewhile thiswarrantyis ineffect, the warrantoratits
In the event that theproduct doesnot conformto thiswarranty, the Product should
XSA965ELEMENT OFWARRANTY:
WARRANTY
Customers in otherstates shouldshipordeliverthe Productfreight pre-paid totheir nearestUnidenAuthorisedRepairCentre (Contact Unidenfor the
nearest WarrantyAgentto you).
UNIDEN AUSTRALIA PTY LIMITED
SERVICE DIVISION
345 Princes Highway,
Rockdale NSW 2216
Fx (02) 9599 3278
www.uniden.com.au
Page 34
UNIDEN NEW ZEALAND LIMITED
SERVICE DIVISION
150 Harris Road,
East Tamaki, Auckland
Fx (09) 274 4253
www.uniden.co.nz
Page 43

NOTES
Foryourfuturereference,please fill in thepanel belowandattachyour PurchaseReceipt/Sales Docket.
Serial:
(found on the bottom of the product or on the box)
Date of Purchase:
Name & AddressofDealer:
PIN Code:
NOTES
Page 35
Page 44

PRODUCT
YOU
A UNIDEN
FOR PURCHASING
THANK
© Uniden Australia Pty Limited
Uniden New Zealand Limited
Printed in China
UCZZ01389ZA
 Loading...