

Uniden XS 916 Quick Start Manual
XS
916
900 MHz
Caller ID
Dual Handset
10 Number
Memory
Rocketdial
Plus
Guide
Quick Start

INSTALLATION
Choosing the best location for your phone.
When choosing a location for your phone there are a number of appliances the phone should not be near, and areas you should avoid.
This symbol
indicates
important
operating
and servicing
instructions.
Page i
The earcapof
thistelephone
may attractand
retainsmall
metallicobjects.
3
AVOID multi power
boards.
CHARGE the new phone
for 20 - 25 hrs.
AVOID connecting
more than
DON’T overload the
power outlet.
AVOID Moisture
CHOOSE a central location
AVOID Television sets and
other electronic
appliances
AVOID -
Microwave
ovens
AVOID -
Moisture
AVOID -
Computers
AVOID other cordless phones
Note: Ringing will not be impaired by adding extra cordless handsets.
phones as ringing
may be impaired
INSTALLATION & SAFETY
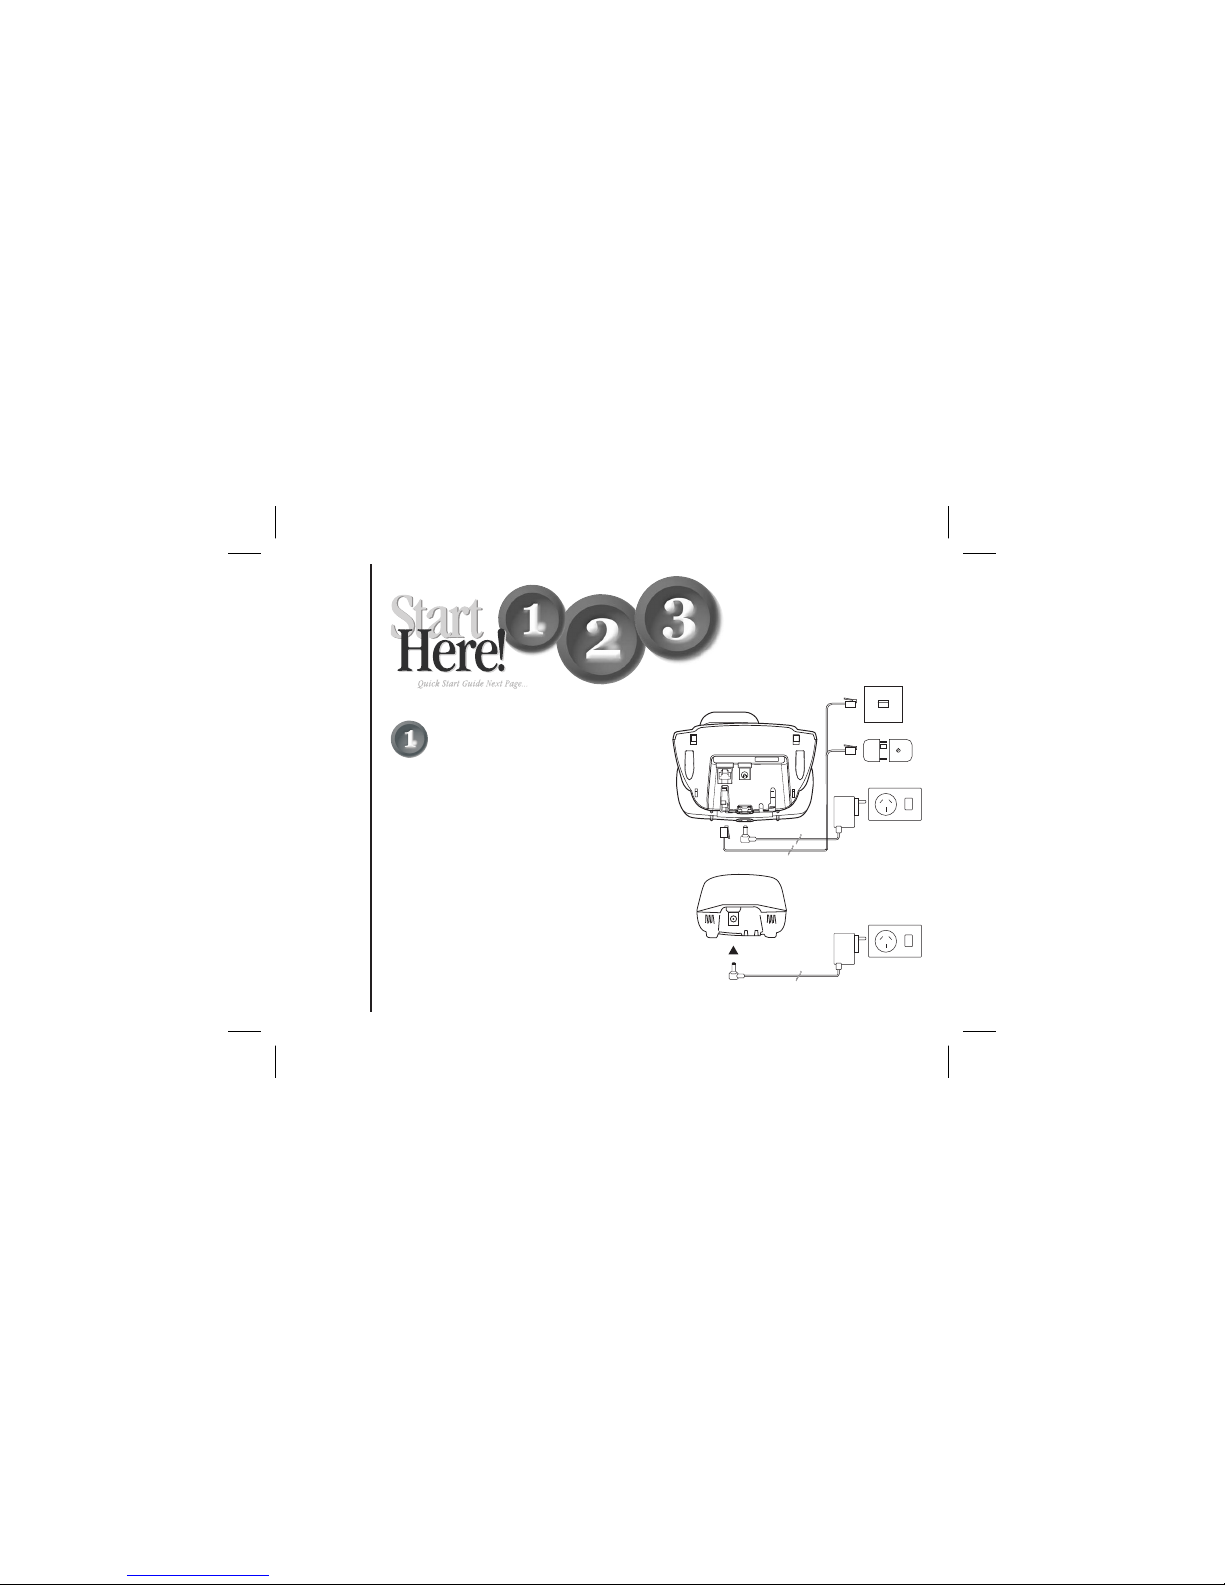
Installing the Base Unit
Page i i
INSTALLATION
l
l
l
Plug the telephone cord into the Base Unit, then into
the telephone socket on the wall.
Plug the AC Adaptor cord into the Base Unit, then the
AC Adaptor into the wall power point.
Press the AC Adaptor cord into the curved recess under
the Base Unit.
Installing the Charge Cradle
l Plug theAC Adaptorcord into theCharge Cradle,
then theAC Adaptorinto the wallpower point.
AC adaptor
New Zealand
Australia
TelLine Adaptor (Not supplied)
Power Point
Main Base
Power Point
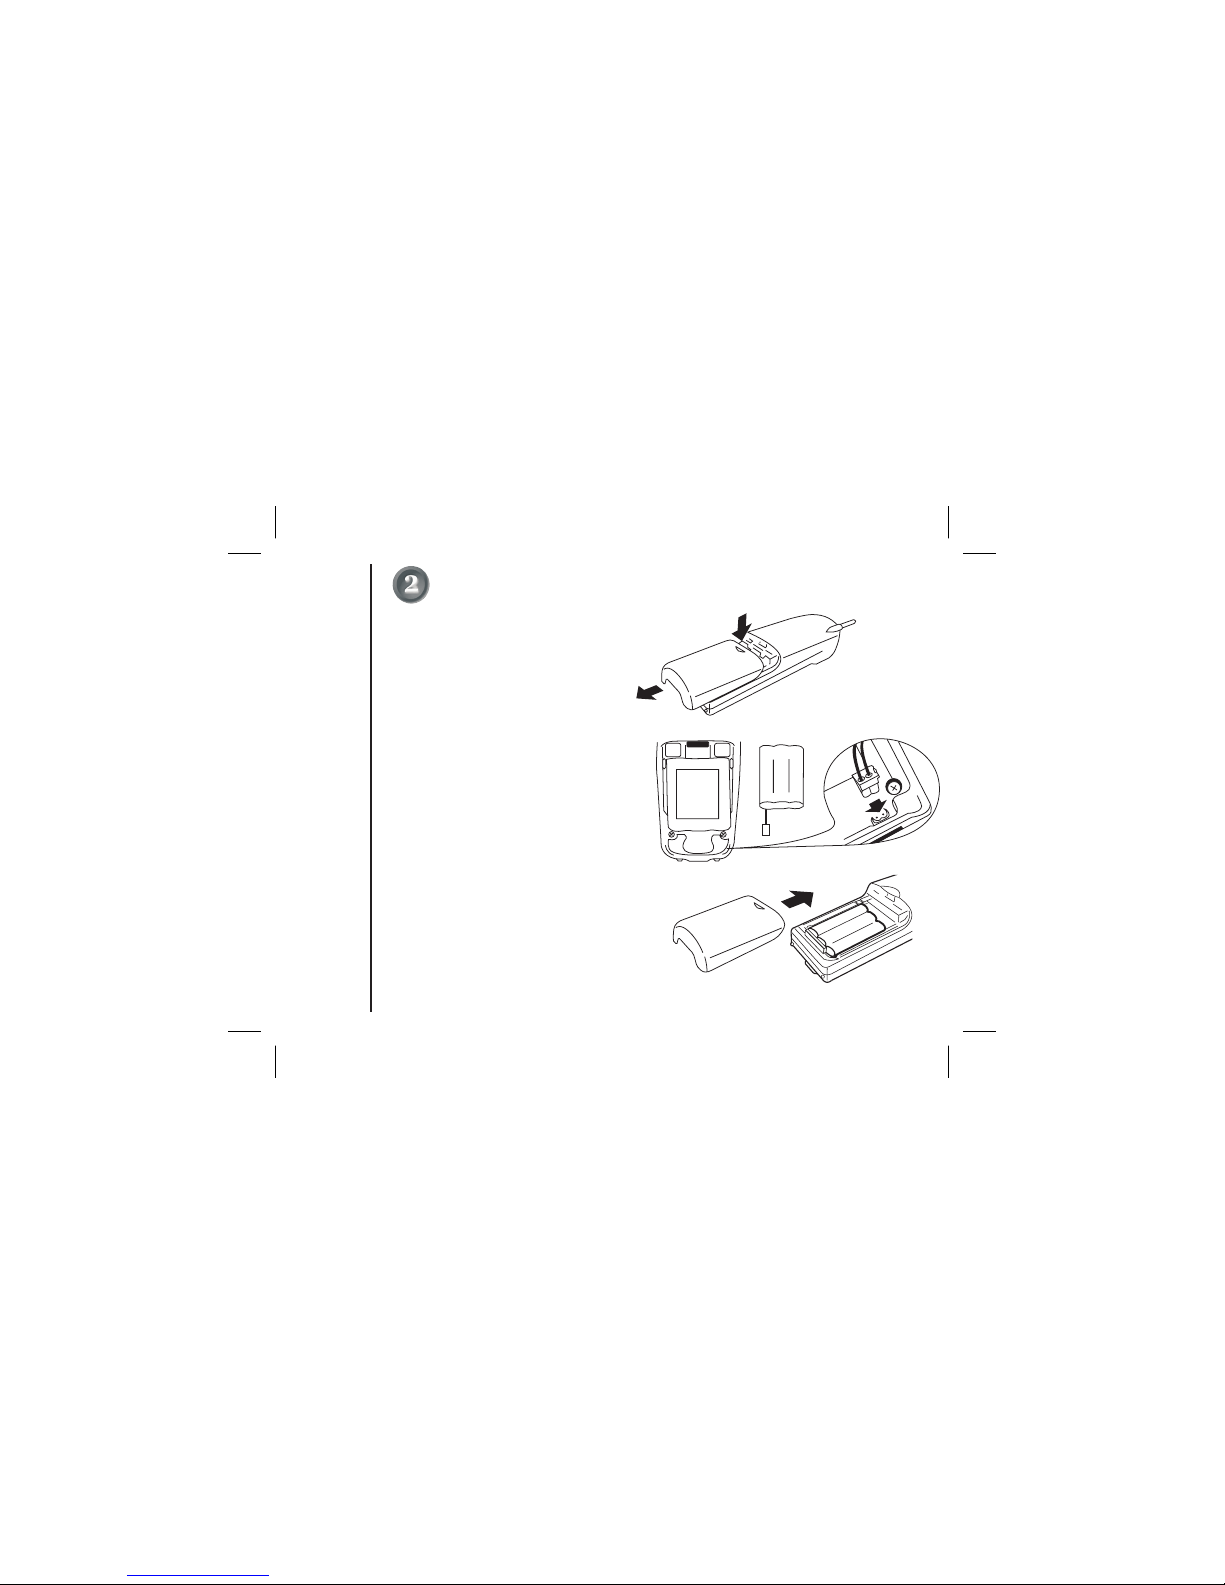
Installing the Handset Battery
Page i ii
INSTALLATION
l Press thebattery coverand slide itoff.
l Connect the battery plug to the socket at the rear of
the battery compartment.
The RED and BLACK battery wires must match the RED
and BLACK printed on the phone case for the plug to fit
properly. Press firmly until it clicks into place.
Make sure the plug is the right way round.
l Positionthe battery in thecompartment and slidethe
cover intoplace.
Repeat processfor secondhandset
Place one handset on the main base and place the
other handset in the extra char ging cradle. It does
not matter which handset is placed on the main
base andextra chargingcradle.
l
BLACK
RED
Charging thehandset
l Charge thehandsets uninterrupted for20-25 hourseach.

INSTALLATION
Making a Call
Page i v
After fully charging the handsets, remove the handset from the
extra chargingcradle and place it on the main base. (The
LED willbegin toflash indicating registrationis occurring).
Wait forat least 5 seconds beforeremoving the extra handset from
the base.
The registration has been completed, and your dual handset
cordless phoneis readyfor use.
status
main
l
l
Pick upthe handsetand press . Dialthe phonenumber
OR
Dial thephone number- then press
Tohang up- press
OR
Place thehandset onthe Base Unit.
Answering a Call
l Handset onthe BaseUnit:
Remove thehandset fromthe base and
speak ( ).Auto Talk
l
l
Handset offthe BaseUnit:
Pick upthe handset,press and speak.
Tohang up- press
OR
Place thehandset onthe Base Unit.
Call Transfers
If the transferred
call is not picked
up after 5 minutes,
the call will be
disconnected.
TO TRANSFER CALLS
To transfer your call from handset 1 to handset 2:
Press .
The call is placed on hold on the first handset, while handset 2 begins to ring.
The call is transferred when the 2nd handset is answered.
Repeat the process to transfer the call back to handset 1. Calls can be transferred from either handset.
l
l
l
transfer

Installation & Safety
Quick Start Guide
Getting Started
Using your Phone
..............................................................................i
Installing the Base Unit .............................................................ii
Installing the Handset Battery ..................................................iii
Making a Call ............................................................................iv
Answering a Call........................................................................iv
Contents.....................................................................................v
Controls and Functions .............................................................1
Welcome/Features.....................................................................2
Included in your Package ..........................................................3
Mounting the Base Unit on a wall..............................................4
Battery Maintenance..................................................................5
Installing the Beltclip.................................................................5
Headset Installation...................................................................5
Setting Menu Options ................................................................6
Auto Talk....................................................................................6
Pop Up Name.............................................................................6
Making and Receiving Calls .......................................................7
Adjusting the Handset Ringer Volume and Earpiece Volume.....8
Redial ........................................................................................8
Travelling Out-of-Range.............................................................8
Selecting a different channel .....................................................9
Find Handset .............................................................................9
Call Waiting/Flash......................................................................9
Call Transfers............................................................................iv
Uniden Company Philosophy ....................................................2
CONTENTS
Page v
Memory Dialing
Rocketdial
Caller ID
Troubleshooting
Memo
Warranty
Storing Phone Numbers and Names .......................................10
Making Calls with Memory Dialing ..........................................11
Memory Dialing from Talk Mode.............................................11
Chain Dialing...........................................................................11
Editing a Stored Name and/or Phone Number ........................12
Erasing a Stored Name and/or Phone Number .......................12
Call Transfer............................................................................13
Storing and Editing the Rocketdial ..........................................14
Making Calls with Rocketdial...................................................14
Deleting the Rocketdial............................................................14
When the Telephone Rings......................................................15
Viewing the Caller ID Message List...........................................16
Deleting Information from the Caller ID List...........................16
Deleting a Caller ID Message ...................................................16
Deleting all Caller ID Names and Numbers.............................16
Calling a Party from the Caller ID List .....................................17
Dial Edit...................................................................................17
Storing Caller ID messages in Memory Dialing .......................17
..................................................................................18
................................................................................................19
...............................................................................................21
Rocketdial................................................................................14
Caller ID ..................................................................................15

select
pause
redial channel
delete
transfer
mem
GETTING STARTED
CONTROLS AND FUNCTIONS
Page 1
18
19
20
1. Handset antenna
2. Handset earpiece
3. LCD display
4. key
5. /flash key
. /channel key
9. Handset microphone
and ringer speaker
17. Handset charging contacts
18. Status light
6. /< cursor key
7. /pause key
8
10. Volume up key
11. key
12. key
13. Volume down key
14. /> key
15. key
16. /delete key
19. handset key
20. Base charging contacts
21. Telephone line jack
22. AC adaptor input
3
2
4
5
6
7
8
9
10
11
12
13
14
15
16
17
1
21 22
cid/
menu
redial
talk
transfer
find
charge

WELCOME
Congratulations on your purchase of this Uniden cordless telephone. This is designed for reliability, long life and
outstanding performance utilising the latest in 900MHz Technology.
l
l
l
Multiple Handsets (up to 2))
900MHz SCR Technology (Sound Clarity and Range)
12 Days Standby Time
l
l
l
l
l
l
l
Caller ID Display*
Pop Up Name - Caller Name Identification #
30 Caller ID Memories
Alphanumeric Memory Dialing
SuperChatBattery-9HoursTalkTime
Maxi-Sound - Extra Loud Handset Volume Control
Rocketdial - One Touch VIP Dial
Page 2
* Caller ID feature only works if you subscribe to the service by your local telephone company.
There is usually a fee for this service.
# Pop Up Name feature only works if you subscribe to your telephone company Caller ID service and
record names into your phones memory.
l
l
l
l
l
l
l
l
l
LCD Back Light
Wall or Desk Mountable
Page/Find Handset Feature
AutoTalk
32 Digit Redial
Pause
Flash Button
2 Type Tone Ringer
3 Step Ringer Volume Control
FEATURES
NOTES
To bring outstanding wireless communication products to
people's lives throughout the world.
UNIDEN COMPANY PHILOSOPHY
GETTING STARTED

charge
select
pause
redialchannel
delete
transfer
mem
select
pause
redialchannel
delete
transfer
mem
Page 3
Make sure you have received the following items in the package. If any of these items are missing or damaged, contact the
Uniden Parts Department.
INCLUDED IN YOUR PACKAGE
AC Adaptor
T
elephone
Cord
Belt Clip
Super Chat
Rechargeable Battery
Charge Cradle
Owners Manual
Base Unit
Handset
GETTING STARTED
 Loading...