

Page 1
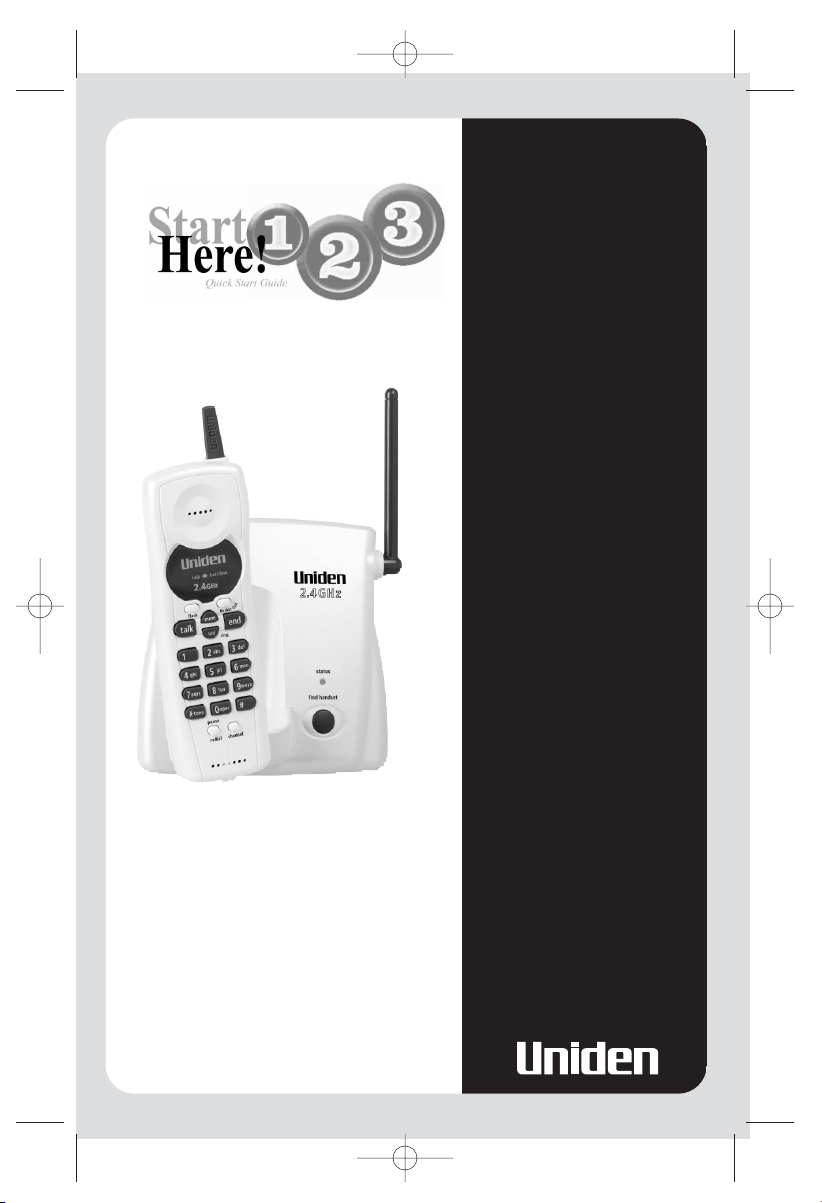
XS210
2.4 GHz
SCR TECHNOLOGY
CORDLESS PHONE
MANUAL
OWNERS
XS210.Qx 10/6/03 5:27 PM Page 1
Page 2
1
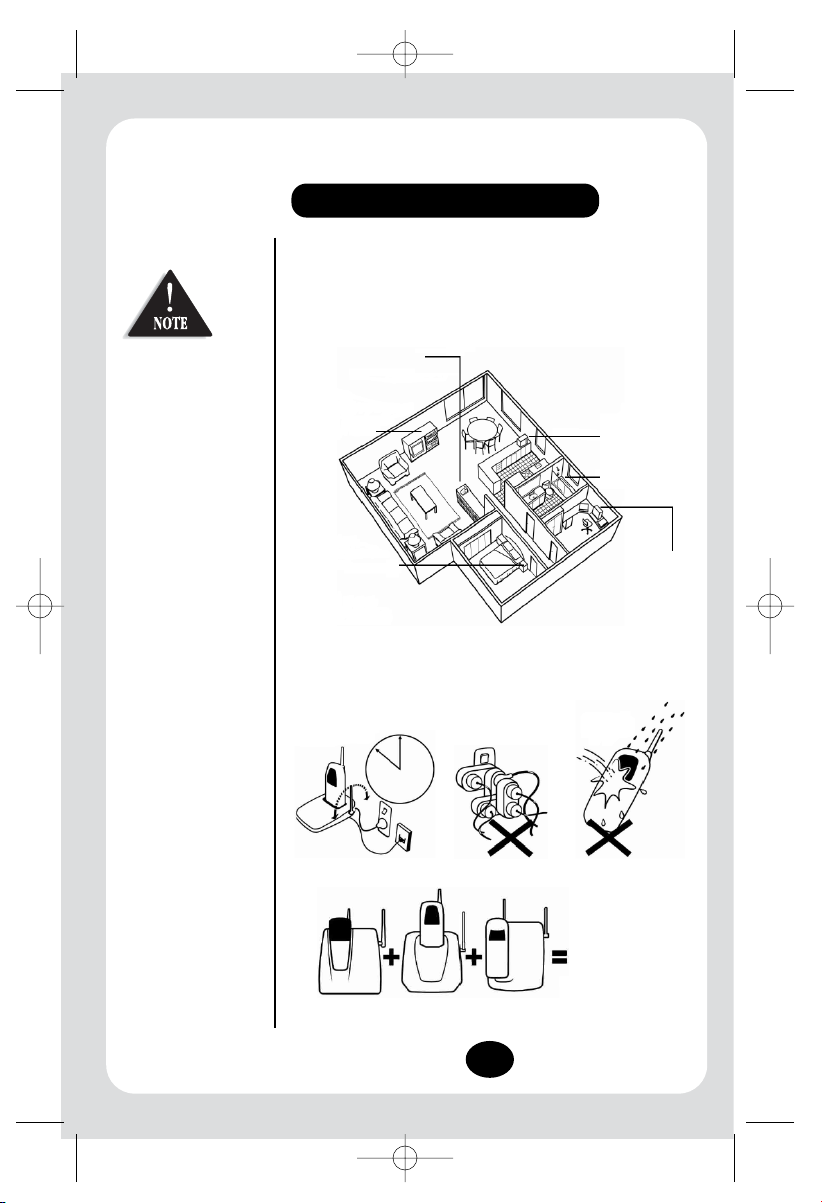
Choosing the best location for your XS210
When choosing a location for your phone there are a number of appliances
the phone should not be near, and areas you should avoid.
This symbol indicates
important operating and
servicing instructions.
AVOID -
Connecting more
than
3
phones as Ringing
may be impaired.
AVOID -
Television sets and
other electronic
appliances
CHOOSE -
a central location
AVOID -
Microwave
ovens
AVOID -
Computers
AVOID -
Moisture
AVOID -
Other Cordless
phones
PRECAUTIONS
INSTALLATION & SAFETY
AVOID -
moisture
DON’T -
overload the
power outlet.
CHARGE -
the new phone for 15
- 20 hrs. and raise the
antenna before
making a call.
XS210.Qx 10/6/03 5:27 PM Page 2
Page 3
2
This page is a very condensed version of the Owners Manual. It is
designed to allow you to get your phone installed and operating as
quickly as possible - however it does not attempt to explain any of the
advanced features of the XS210 .
Make sure the AC Adaptor
remains switched ON at all
times.
Use only the Uniden AC
Adaptor supplied with this
unit.
Installing
the Base Unit
●
Plug the telephone cord into the Base Unit, then into the
telephone socket on the wall.
●
Plug the AC Adaptor cord into the Base Unit, then the AC
Adaptor into the wall power point.
●
Press the AC Adaptor cord into the curved recess under
the Base Unit.
●
Raise the antenna.
AC Adaptor
Telephone Cord
Power point
Australia
New Zealand
XS210.Qx 10/6/03 5:33 PM Page 3
Page 4
3
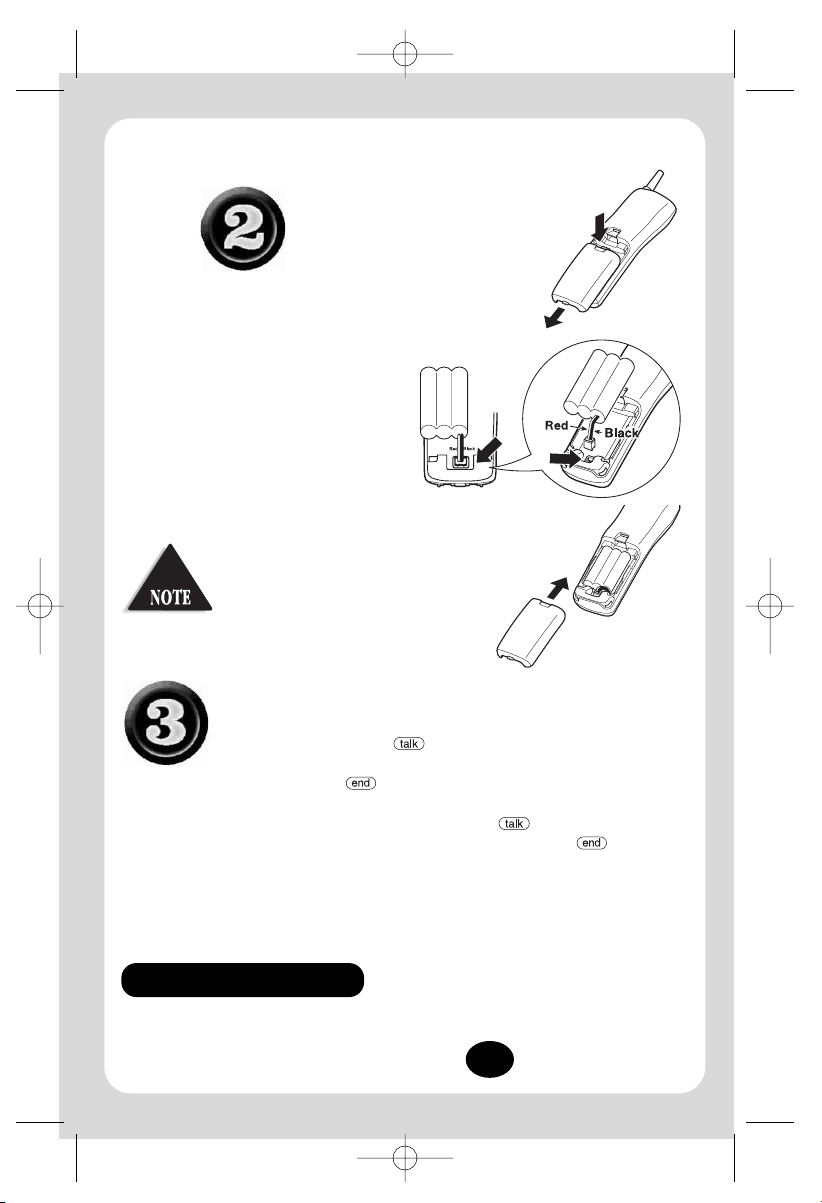
Installing the
Handset Battery
Storing a Number
Please refer to pages 7 & 8 for details of how to store numbers in your phone’s memory and how to call stored
numbers.
To bring outstanding wireless communication products to people's lives throughout the world.
Making a Call
●
Pick up the handset and press .
Dial the phone number.
●
To hang up - press
OR
Place the handset on the base Unit.
Answering a Call
●
Handset on Base Unit:
Remove the handset from the base and
speak (Auto Talk).
●
Handset off the Base Unit:
Press and speak.
●
To hang up - press or place the
handset on the base unit.
Place the handset on the base Unit and
charge it uninterrupted for 15-20 hours.
●
Position the battery in the compartment and
slide the cover back into place.
●
Connect the battery plug to the socket in the battery
compartment.
Make sure the plug is the right way round.
Press firmly until it clicks into place.
●
Press the battery cover and slide it off.
COMPANY PHILOSOPHY
XS210.Qx 10/6/03 5:27 PM Page 4
Page 5

4
1. Handset antenna
2. Handset earpiece speaker
3.
talk/batt low LED - indicates when phone is in use or the battery is low
4. - accesses call waiting (if available)
5. - answers or places calls
6. - redials the last number / adds a timed pause in a memory
dialing sequence.
7. Handset Microphone
8. - enters or recalls numbers in memory
9. - one touch priority key
10. - hangs up a phone call / mutes the ringing tone temporarily
11. - sets the ringer tone and earpiece volume
12. - selects another channel for clearer reception
13. Handset charging contacts
14. Base antenna
15.
status LED
16. - locates the handset
17. Base charging contacts
CONTROLS AND FUNCTIONS
15
14
16
1
3
2
4
5
6
7
12
13
11
10
9
8
17
• Base
• Handset
• AC Adapter
• Telephone Cord
• Rechargeable Battery
INCLUDED WITH YOUR PHONE
and
(tone and oper) are not
functional in New Zealand
or Australia.
XS210.Qx 10/6/03 5:27 PM Page 5
Page 6

5
Battery use time (per charge)
From fully charged
• Up to seven hours continuous use
• Up to fourteen days when the handset is in the standby mode
Low Battery Alert
If the phone is not in use, the talk/batt low LED flashes when the
battery pack is low.
If the phone is in use, the talk/batt low LED flashes and the handset
beeps. Complete your conversation as quickly as possible and return the
handset to the base for charging.
Cleaning the battery charging contacts
To maintain a good charge, it is
important to clean the charging
contacts on both the handset and
base unit once a month.
Use a dry cloth to clean.
BATTERY MAINTENANCE
For optimum
performance, be sure to
return the handset to
the base unit after each
telephone call.
Use only the Uniden
Battery (BT-905)
supplied with your
phone. Replacement
batteries are also available
through the Uniden
Parts Department.
• The key
redials the last number
dialed.
• The redialed number can
be up to 24 digits long.
Making and Receiving Calls
Answer call
Make call
Hang up Press or return the handset to the base (Auto Standby).
Redial
Ringer Mute None
Handset Off Base
Press , any number key,
, or .
1) Press .
2) The talk/batt low LED
flashes and turns on.
3) Listen for the dial tone.
4) Dial the number.
1) Press .
2) Listen for the dial tone.
3)
Press to dial the
last dialed num
ber.
Press
when ringing.
USING YOUR PHONE
Handset On Base
When the phone rings, remove the
handset from the base (Auto Talk).
1) Remove the handset from the
base and press .
2) The talk/batt low LED
flashes and turns on.
3) Listen for the dial tone.
4) Dial the number.
1) Remove the handset from the
base and press .
2) Listen for the dial tone.
3) Press to dial the
last dialed number.
XS210.Qx 10/6/03 5:27 PM Page 6
Page 7

6
To locate the handset (while it’s off the base), press on the base.
The handset beeps for 60 seconds.
Paging is canceled when pressing any handset key, on the
base or return the handset to the base.
PAGE
Ringer tone
When the phone is in standby mode, pressing the key on the
handset selects the handset ringer tone. "Press to listen to the first
tone. While the first tone is still ringing, press again to hear the
second tone. Repeat process to toggle between the two tone options."
Earpiece volume
The handset earpiece volume settings (Low, Medium and High) can only be
adjusted during a call. Press the key repeatedly to select Low,
Medium and High. When you hang up, the phone keeps the last volume
setting selected.
Ringer mute
The key can be used to temporarily mute the ringer tone. When the
handset is off the base and the phone is ringing, press the key and
the ringer tone will be temporarily silenced. The call will not be answered,
and the ringer tone will return to normal starting with the next incoming
call.
ADJUSTING THE RINGER AND EARPIECE VOLUME
During a call, as you begin to move your handset too far from your base
unit, noise increases. If you pass the range limits of the base unit, your call
will terminate within 1 minute.
TRAVELING OUT-OF-RANGE
If you encounter interference while using your phone, you can manually
change the phone’s channel for clear operation. This function works only
when the phone is in use.
Press . The talk/batt low LED flashes, indicating the phone is
changing to another channel. There are twenty channels to choose from.
SELECTING A DIFFERENT CHANNEL
XS210.Qx 10/6/03 5:27 PM Page 7
Page 8

7
If a pause is needed during the dialing sequence for services such as
Telephone banking, Press "pause/redial" to insert a pause. Each pause
counts as a digit and represents a two second delay in time between digits as
they are sent.
Your cordless phone has 1 Rocket Dial memory location and 10 additional
memory locations for storing important telephone numbers. You can store
your most frequent dialed number in the one-touch Rocket Dial location.
Memory Dial
1) Remove the handset from the base.
2) Press . The talk/batt low LED
flashes.
3) Enter the phone number, up to 20 digits.
4) Press again.
5) Press memory location ( ) on the keypad
to store the number.
A tone indicates that the number is stored. If you enter a number in a
location that has a previously stored number it will overwrite the existing
number without warning.
Rocket Dial
Follow step 1-4 above then at Step 5. Press on the keypad to
store to your number into the Rocket Dial location.
STORING A PHONE NUMBER IN MEMORY
DIALING A STORED NUMBER
You have 30 seconds after
pressing to enter
the number you wish to
store.
Otherwise, the handset will
beep rapidly.
If you select a memory
location that does not have a
stored number, the handset
will beep rapidly and the
phone will not dial.
If the call waiting tone sounds during a call:
AUSTRALIA: Press , then to switch
between callers.
NEW ZEALAND: Press to switch between
callers.
FLASH AND CALL WAITING
You must subscribe through
your local telephone
company to the Call Waiting
Service.
PAUSE
Using the memory location features
1) Press , then press .
2) Enter the memory location ( ) on the keypad. The stored number
automatically dials.
The pause button counts as
one digit. Pressing
more than
once increases the length of
pause between numbers.
XS210.Qx 10/6/03 5:27 PM Page 8
Page 9

8
The memory locations on the handset are not limited to phone numbers.
You can also store a group of numbers (up to 20 digits) that you need to
enter once your call connects. This is referred to as Chain Dialing.
An example of this is a bank account number. Once you have called your bank,
and are prompted to enter the account number, simply press and the
location number
()
where the special number has
been stored.
Store your special number in memory as you would store a phone number
(Refer to “Storing a Phone Number in Memory” on page 7).
CHAIN DIALING
1) Remove the handset from the base unit.
2) Press twice.
3) Press or the memory location ( ). A tone indicates
that the stored number is erased from memory.
ERASING A STORED NUMBER FROM MEMORY
The digital security code is an identification code used to connect the
handset and the base unit. Normally, setting the code is not necessary.
The first time you charge your handset, the security code is automatically set.
In the rare situation that you suspect another cordless telephone is using the
same security code, you can change the code.
1) Remove the handset from the base unit. Press and hold on
the base.
2) The handset begins emitting a paging sound. While holding
, place the handset in the base unit. The paging sound
stops. Leave the handset in the base for more than 3 seconds. A new
random security code is set.
CHANGING THE DIGITAL SECURITY CODE
If the handset battery pack
is completely discharged or
the battery pack is removed,
the digital security code will
be lost. If this happens, a
new security code is set
automatically next time the
battery pack is charged.
One-touch Rocket Dial
Your phone is equipped with “One-touch Rocket
Dial” for instant dialing. It is used to dial the phone
number stored in the one-touch Rocket Dial location
(See “Storing a Phone Number in Memory” on page
7).
To instantly dial the phone number stored in the one-touch Rocket Dial
location, simply press . (There is no need to press . The
phone will automatically dial).
If you press
and a phone number is not
stored in the one-touch
Rocket Dial location, the
phone will beep rapidly and
will not dial.
XS210.Qx 10/6/03 5:27 PM Page 9
Page 10

9
If your cordless telephone is not performing to your expectations, please try
these simple steps.
TROUBLESHOOTING
Symptom
The status
LED won’t illuminate when
the handset is placed
in the base.
The audio sounds weak
and/or scratchy.
Can’t make or receive
calls.
Handset doesn’t ring or
receive a page.
Severe noise
interference
Your phone has been
exposed to moisture or
liquid
If you still have
a problem
Suggestion
• Make sure the AC adapter is plugged into the base
and a wall outlet.
• Make sure the handset is properly seated in the
base.
• Make sure that the charging contacts on the
handset and on the base are clean.
• Move the handset and/or base to a different
location away from metal objects or appliances
and try again.
• Press to help eliminate background
noise.
• Check both ends of the telephone line cord.
• Make sure the AC adapter is plugged into the base
and a wall outlet.
• Make sure that the base antenna is in the vertical
position.
• Disconnect the AC adapter for a few minutes, then
reconnect it.
• Change the digital security code (See page 8).
• Make sure that the handset is not too far from the
base.
• The battery pack may be weak. Charge the battery
for 15-20 hours.
• The handset may be too far away from the base.
• Place the base away from appliances or metal
objects.
• Change the digital security code (See page 8).
• Keep the handset away from microwave ovens,
computers, remote control toys, wireless
microphones, alarm systems, intercoms, room
monitors, fluorescent lights, and electrical
appliances.
• Move to another location or turn off the source of
interference.
• Return to your local service agent immediately.
• www.uniden.com.au (AUSTRALIA) or
• www.uniden.co.nz (NEW ZEALAND)
Do not attempt to service
this unit yourself. Servicing
must be performed by
qualified personnel.
XS210.Qx 10/6/03 5:27 PM Page 10
Page 11

10
One Year Limited Warranty
Important: Evidence of original purchase is required for warranty service.
Warrantor: Uniden Australia Pty Limited ABN 58 001 865 498
Uniden New Zealand Limited
ELEMENT OF WARRANTY: Uniden warrants to the original retail owner for
the duration of this warranty, its XS210 (hereinafter referred to as the Product), to
be free from defects in materials and craftsmanship with only the limitations or
exclusions set out below. Warranty is only available in the original country of sale.
WARRANTY DURATION: This warranty to the original retail owner only, shall
terminate and be of no further effect 12 months after the date of original retail
sale. This warranty will be deemed invalid if the product is; (A) Damaged or not
maintained as reasonable and necessary, (B) Modified, altered or used as part of
any conversion kits, subassemblies or any configurations not sold by Uniden, (C)
Improperly installed, (D) Repaired by someone other than an authorised Uniden
Repair Agent for a defect or malfunction covered by this warranty, (E) Used in
conjunction with any equipment or parts or as part of a system not manufactured
by Uniden.
PARTS COVERED: This warranty covers for one (1) year, the Base/Charging
Unit and Handset only. All accessories (AC Adaptor, battery etc.) are covered for 90
days only.
STATEMENT OF REMEDY: In the event that the product does not conform to
this warranty at any time while this warranty is in effect, the warrantor at its
discretion, will repair the defect or replace the product and return it to you without
charge for parts or service. THIS WARRANTY DOES NOT COVER OR PROVIDE
FOR THE REIMBURSEMENT OR PAYMENT OF INCIDENTAL OR
CONSEQUENTIAL DAMAGES. THIS GUARANTEE IS IN ADDITION TO AND DOES
NOT IN ANY WAY AFFECT YOUR RIGHTS UNDER THE CONSUMER GUARANTEE
ACT.
PROCEDURE FOR OBTAINING PERFORMANCE OR WARRANTY: In the
event that the product does not conform to this warranty, the Product should be
shipped or delivered, freight pre-paid, with evidence of original purchase (eg. a
copy of the sales docket), to the warrantor at:
WARRANTY
WARRANTY
UNIDEN AUSTRALIA PTY LIMITED
SERVICE DIVISION
345 Princes Highway,
Rockdale NSW 2216
Ph (02) 9599 3577 Fx (02) 9599 3278
Ph: 1300 366 895
www.uniden.com.au
UNIDEN NEW ZEALAND LIMITED
SERVICE DIVISION
150 Harris Road,
East Tamaki, Auckland
Ph (09) 273 8377 Fx (09) 274 4253
Ph: 0800 4 UNIDEN
(864 336)
www.uniden.co.nz
Customers in other States should ship or deliver the Product freight pre-paid to their nearest
Uniden Authorised Repair Centre. See Unidens Website for the nearest Repair Centre.
XS210.Qx 10/6/03 5:27 PM Page 11
Page 12

THANK YOU
FOR PURCHASING A UNIDEN PHONE
© 2003
Uniden Australia Pty Limited
Uniden New Zealand Limited
Printed in China UPZZ01022ZZ
XS210.Qx 10/6/03 5:27 PM Page 12
 Loading...