

Uniden XDECT 7015 Owner's Manual

XDECT 7015


XDECT 7015 base and
cordless handset
Base AC adapter
(PS-S0635YL3)
Telephone
cord
Charger AC
adapter
AAD-600S(M)
Battery
cover
XDECT 7005
accessory
handset &
charger
If you purchased
model number:
You should
have:
XDECT 7015 None
XDECT 7015+1 1 of each
XDECT 7015+2 2 of each
XDECT 7015+3 3 of each
XDECT 7015+4 4 of each
XDECT 7015+5 5 of each
You might also find:
Rechargeable
battery pack
(BT-694 or BT-694s)
Battery
cover
Rechargeable
battery pack
(BT-694 or BT-694s)
1
If any items are missing or damaged, contact your place of
purchase immediately. Never use damaged products!
Need Help? Get answers at our website: www.uniden.com.
au for Australian model or www.uniden.co.nz for New Zealand
model.
XDECT 7015 Series User's Guide
What's in the box?

2
Important Safety Instructions!
When using your telephone equipment, basic safety precautions should
always be followed to reduce the risk of fire, electric shock and injury to
persons, including the following:
This unit is NOT waterproof.
-
DO NOT expose this unit to rain or moisture.
Do not use this product near water, for example, near a bath tub, wash bowl,
-
kitchen sink or laundry tub, in a wet basement or near a swimming pool.
Avoid using a telephone (other than a cordless type) during an electrical
-
storm. There may be a remote risk of electric shock from lightning.
Do not use the telephone to report a gas leak in the vicinity of the leak.
-
Use only the power cord and batteries indicated in this manual. Do not
-
dispose of batteries in a fire. They may explode. Check with local codes for
possible special disposal instructions.
Do not place the handset in any charging cradle without the battery installed
-
and the battery cover securely in place.
SAVE THESE INSTRUCTIONS!
What's in the manual?
Installing Your Phone ...................... 3
Charge the Battery ......................... 3
Connect the Telephone Cord ........ 4
Getting to Know Your Phone.......... 5
Parts of the Base ............................ 5
Parts of the Handset ....................... 6
Reading the Handset Display ....... 7
Using the Handset Menus ............... 8
Entering Text on Your Phone ...... 10
Using Your Phone .......................... 11
Changing the Volume .................. 11
Using the Redial List .................... 12
Using Caller ID and Call Waiting .. 12
Using the Phonebook ................... 13
Chain Dialing ................................ 14
Finding a Lost Handset ................ 14
Using Special Features .................. 15
Using Voice Message Notification 1 5
Using Multi-Handset Features ...... 16
Expanding Your Phone ................ 16
Using Conference Calling ............ 16
Using Privacy Mode ..................... 16
Using Call Transfer ....................... 17
Using the Intercom ....................... 17
Solving Problems ........................... 18
Weak or Hard To Hear Audio ..... 19
Noise or Static On The Line ......... 19
Resetting and Registering
Handsets..................................... 20
Handling Liquid Damage ............. 21
Important Information ................... 22
Terms Used In This Guide ........... 22
Specifications ............................... 22
Battery Information ...................... 23
Mount the Base Unit on a Wall .... 24
One-year Limited Warranty ......... 25
3
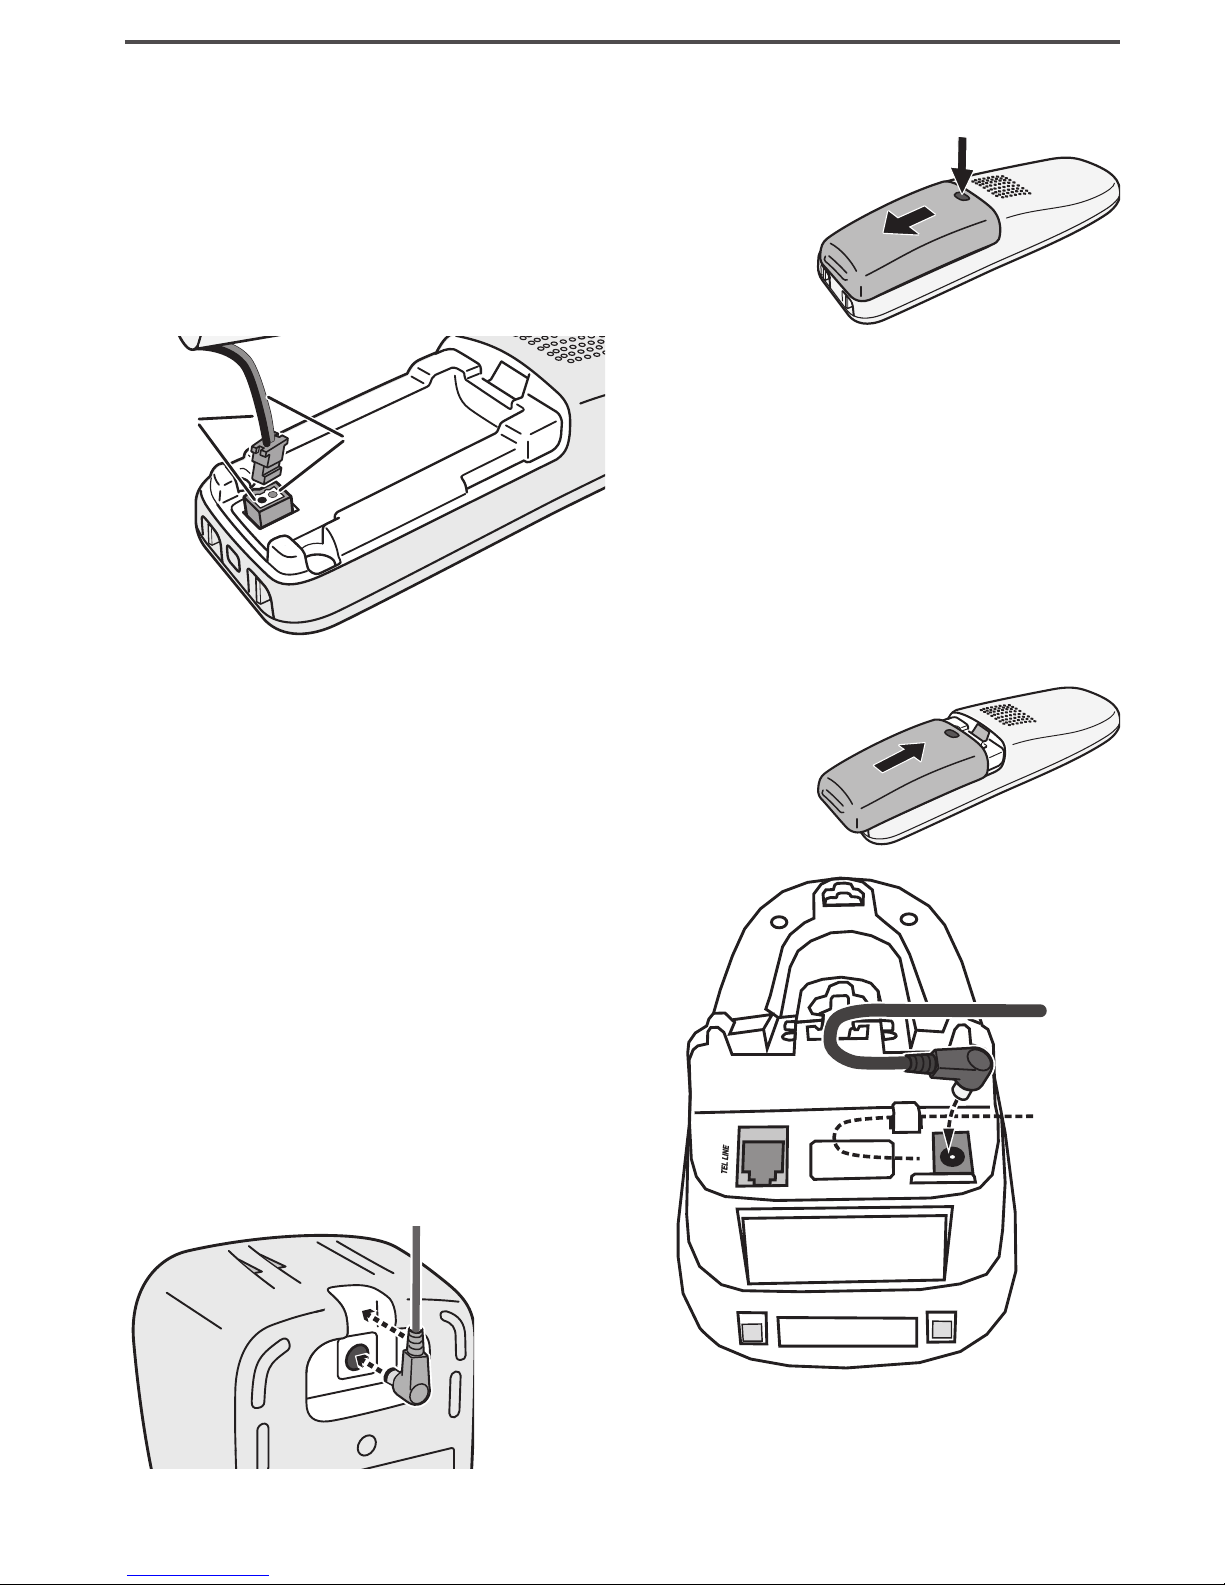
Installing Your Phone
Charge the Battery
1) Unpack all handsets, battery packs, and
battery covers. If any battery cover is
already on the handset, press in on the
notch and slide the cover down and off.
Line up the red and black 2)
wires on the battery pack
with the label inside the
handset.
Push the connector in until 3)
it clicks into place; tug
gently on the wires to
make sure the battery pack
is securely connected.
4) Place the cover over the battery
compartment and slide it up into place.
Connect the base AC adapter to the 5)
DC IN
6V
jack on the rear of the base. Route the
cord through the molded wiring channel as
shown.
If you have accessory 6)
handsets, connect a
charger AC adapter to each
charger's
DC IN 9V
jack and
set the plug into the notch
as shown. (These adapters
might already be
connected.)
Plug the other end of each adapter 7)
into a standard 240V AC power outlet.
Red
Black
4
8) Place a handset in the base and any accessory handset(s) in the
charger(s) with the display(s) facing forward. The
CHARGE
light on the base and each charger
should all turn on.
If... Try...
the
CHARGE
light does
not turn on
reseating the handset.
-
checking the AC adapter connection.
-
seeing if the outlet is controlled by a
-
wall switch.
Charge all handsets completely (about 15
hours) before using them.
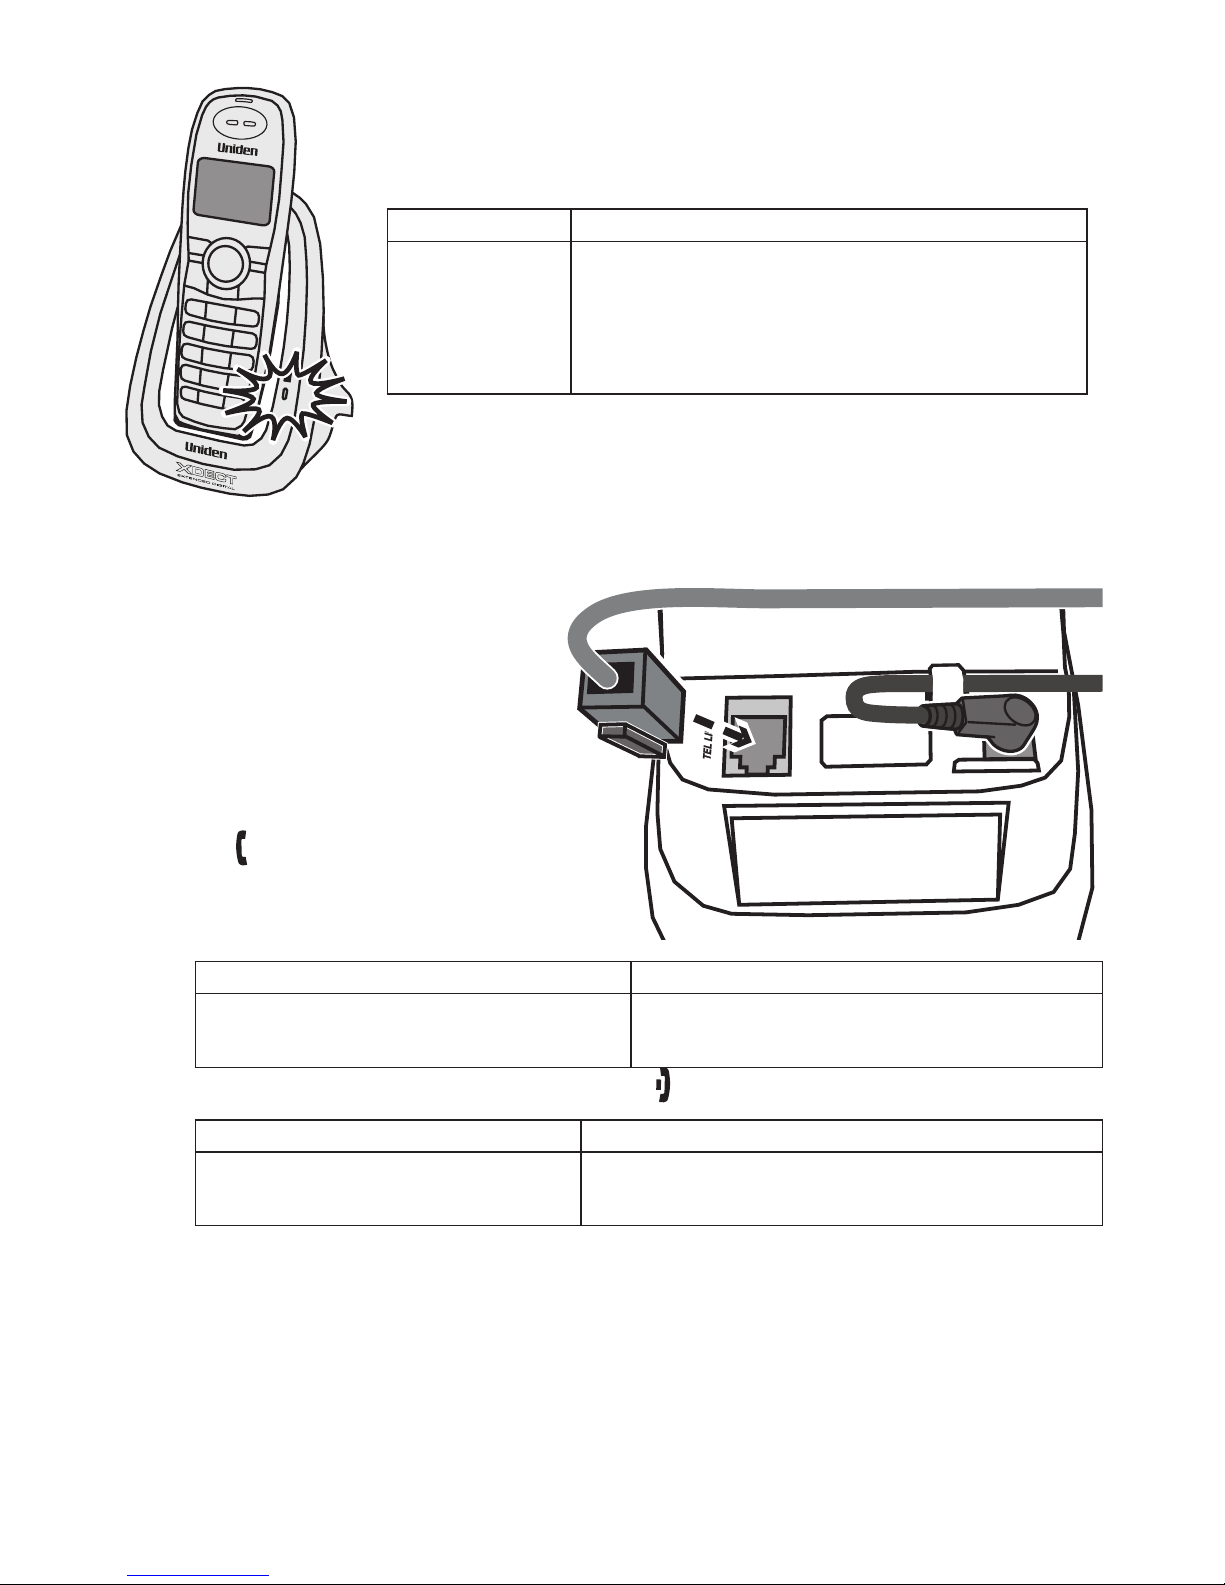
Connect the Telephone Cord
Use the telephone cord to
connect the
TEL LINE
jack to a
standard telephone wall jack.
Test the connection
Pick up the handset from 1)
the cradle and press
TALK ( )/FLASH
. You should
hear a dial tone, and the
display should say
Talk
.
If... Try...
you don't hear a dial tone or the
display says
Check Tel Line
checking the connection between
the base and the phone jack.
Make a quick test call. (Press 2)
END ( )
to hang up.)
If... Try...
there's a lot of noise or static
see page 19 for tips on avoiding
interference.
Test any accessory handsets the same way. If you can't get a 3)
dial tone or the handset display says
Unavailable
, try moving the
handset closer to the base or resetting it (see page 20). Charge
all handsets completely (about 15 hours) before using them.
To Mount the Base Unit on a Wall: please refer to page 24.
5
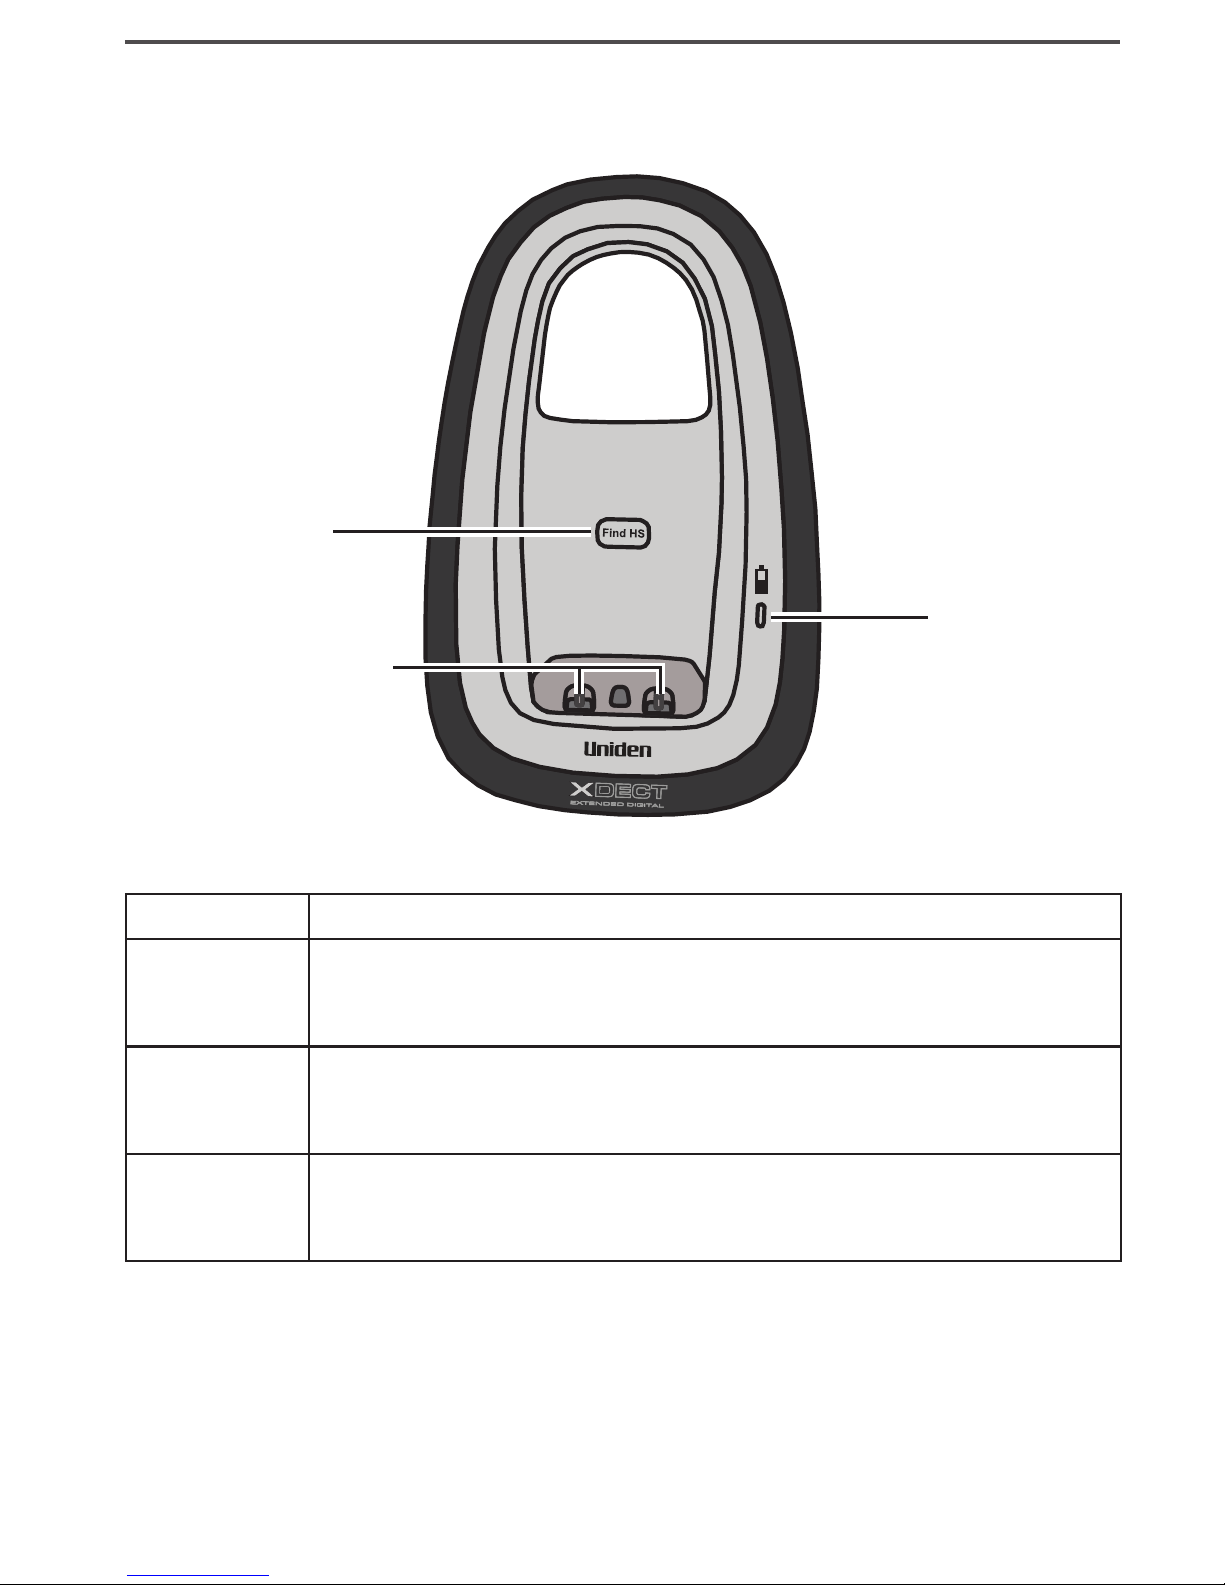
Getting to Know Your Phone
Parts of the Base
Base keys and how they work
Key name What it does
FIND HANDSET
In standby: page all handsets so you can find a lost one.
-
CHARGE LED
Indicates charging when handset is in the cradle.
-
CHARGING
CONTACTS
Charge contacts with handset locator.
-
Find Handset
Charge LED
Charging Contacts
6
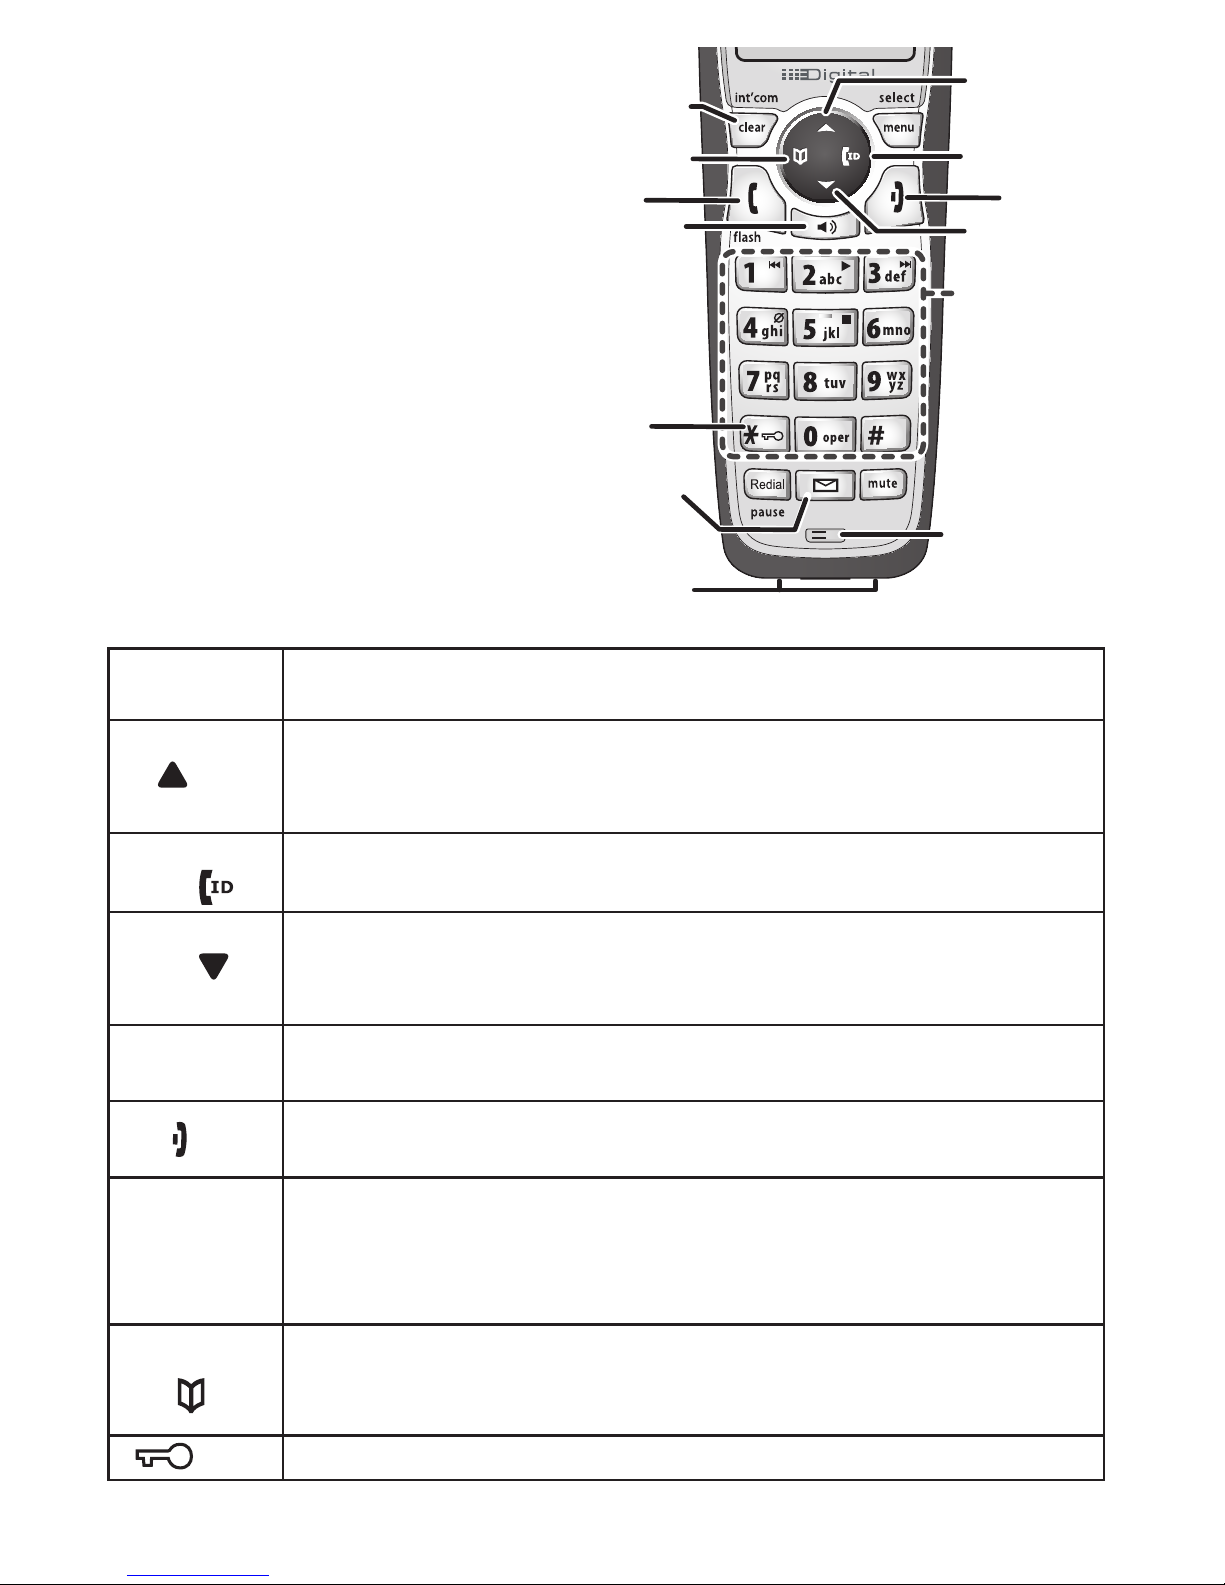
Parts of the Handset
If the key name is spelled out
on the key itself, it's not
labeled in the drawing to
the right.
Handset keys and how
they work
Key name
(and icon)
What it does
UP ( )
In standby: increase the ringer volume.
-
During a call: increase the call volume.
-
In the menu or any list: move the cursor up one line.
-
CALLER ID/
RIGHT ( )
In standby or during a call: open the Caller ID list.
-
During text entry: move the cursor to the right.
-
DOWN ( )
In standby: decrease the ringer volume.
-
During a call: decrease the call volume.
-
In the menu or any list: move the cursor down one line.
-
MENU/SELECT
In standby: open the menu.
-
In the menu or any list: select the highlighted item.
-
END ( )
During a call: hang up.
-
In the menu or any list: exit & go to standby.
-
CLEAR/
INTERCOM
In standby: page another handset using the intercom.
-
During a call: put the call on hold & start a call transfer.
-
While entering text: delete one character, or press & hold to
-
delete all the characters.
PHONEBOOK/
LEFT ( )
In standby or during a call: open the phonebook.
-
In the menu: go back to the previous screen.
-
During text entry: move the cursor to the left.
-
*/ LOCK
In standby: press and hold to lock or unlock the keypad.
-
Microphone
Tw elvekey dial
pad
Display
Charging
contacts
Earpiece
UP
PHONEBOOK/
LEFT
SPEAKER
DOWN
CALLER ID/
RIGHT
MESSAGES
CLEAR/
INTERCOM
KEYPAD LOCK
TALK/FLASH
END

7
Key name
(and icon)
What it does
TALK ( )/FLASH
In standby: start a telephone call (get a dial tone).
-
During a call: switch to a waiting call.
-
SPEAKER ( )
Switch a normal call to the speakerphone (& back).
-
REDIAL/PAUSE
In standby: open the redial list.
-
While entering a phone number: insert a 2-second pause.
-
MUTE
During a call: mute the microphone.
-
While the phone is ringing: mute the ringer for this call only.
-
MESSAGE ( )
In standby: access your voice mail (see page 15).
-
Reading the Handset Display
12:00A
Handset #1
New CID: 5
Handset
banner
Status icons
Caller ID
count
Time
The table below shows the possible icons
and what they mean. Since the icons
appear based on what you're doing with
the phone, you won't ever see all of these
icons at the same time.
Icon What it means
The ringer is turned off: this handset will not ring when a call
comes in.
You have a voice message waiting (see the section titled
"Using Voice Message Notification" on page 15).
Privacy Mode is on: no other handset can join your call.
The speakerphone is on.
The microphone is muted, & the caller can't hear you.
T-coil mode is on. (See "Do you use a T-coil hearing aid?" on
page 19.)
The battery is 1) fully charged, 2) half charged, 3) getting low,
or 4) empty.
 Loading...