

UNIDEN XDECT 7005WP Owner's Manual

Not pictured:
Factory installed
-
rechargeable battery
Belt clip
-
AC adapter
(AAD-600S(M))
XDECT 7005WP waterproof accessory handset
and water resistant charger
Need Help? Get answers at our website: www.uniden.com.au for Australian
model or www.uniden.co.nz for New Zealand model.
Important Safety Precautions!
When using your telephone equipment, basic safety precautions should always be followed
to reduce the risk of re, electric shock and injury to persons, including the following:
The charger is NOT waterproof: Do not use or place the charger near water (e.g., near a bath
tub, wash bowl, kitchen sink or laundry tub, in a wet basement or near a swimming pool).
If the charger falls into the water, unplug the AC adapter before removing it from the water.
After you remove the charger from the water, contact Customer Service (see our website for
contact information).
Wipe excess water o of the handset before returning it to the charger.
Avoid using a telephone (other than a cordless type) during an electrical storm. There may be a
remote risk of electric shock from lightning.
Do not use the telephone to report a gas leak in the vicinity of the leak.
Use only the power cord and batteries indicated in this manual.
Do not dispose of batteries in a re. They may explode. Check with local codes for possible
special disposal instructions.
Do not place the handset in any charging cradle without the battery installed and the battery
cover securely in place.
SAVE THESE INSTRUCTIONS!
XDECT 7005WP Waterproof Accessory Handset
Owner's Manual
What's in the box?
2
Understanding the Waterproof Handset
The handset complies with JIS7 water submersion specifications. It can remain
submerged under 1m of water for up to 30 minutes without damage or loss of
functionality.
If the handset falls into water, just remove it; you can continue using the handset
as normal.
The handset will still receive calls even if it is under water, but you probably won't
be able to hear the ringer or the earpiece. To avoid any accidents, do not try to
use the handset while it is still under water.
If you notice that the sound is distorted after your handset is submerged in water,
there might still be water around the speaker and microphone. Just shake the
handset to clear the water, and the sound should return to normal.
Don't place the handset where it will be subjected to direct sunlight for long
periods of time.
Installing Your Handset
Charge the Battery
The handset's rechargeable battery is already installed. Before you can charge the
battery, you have to power it on.
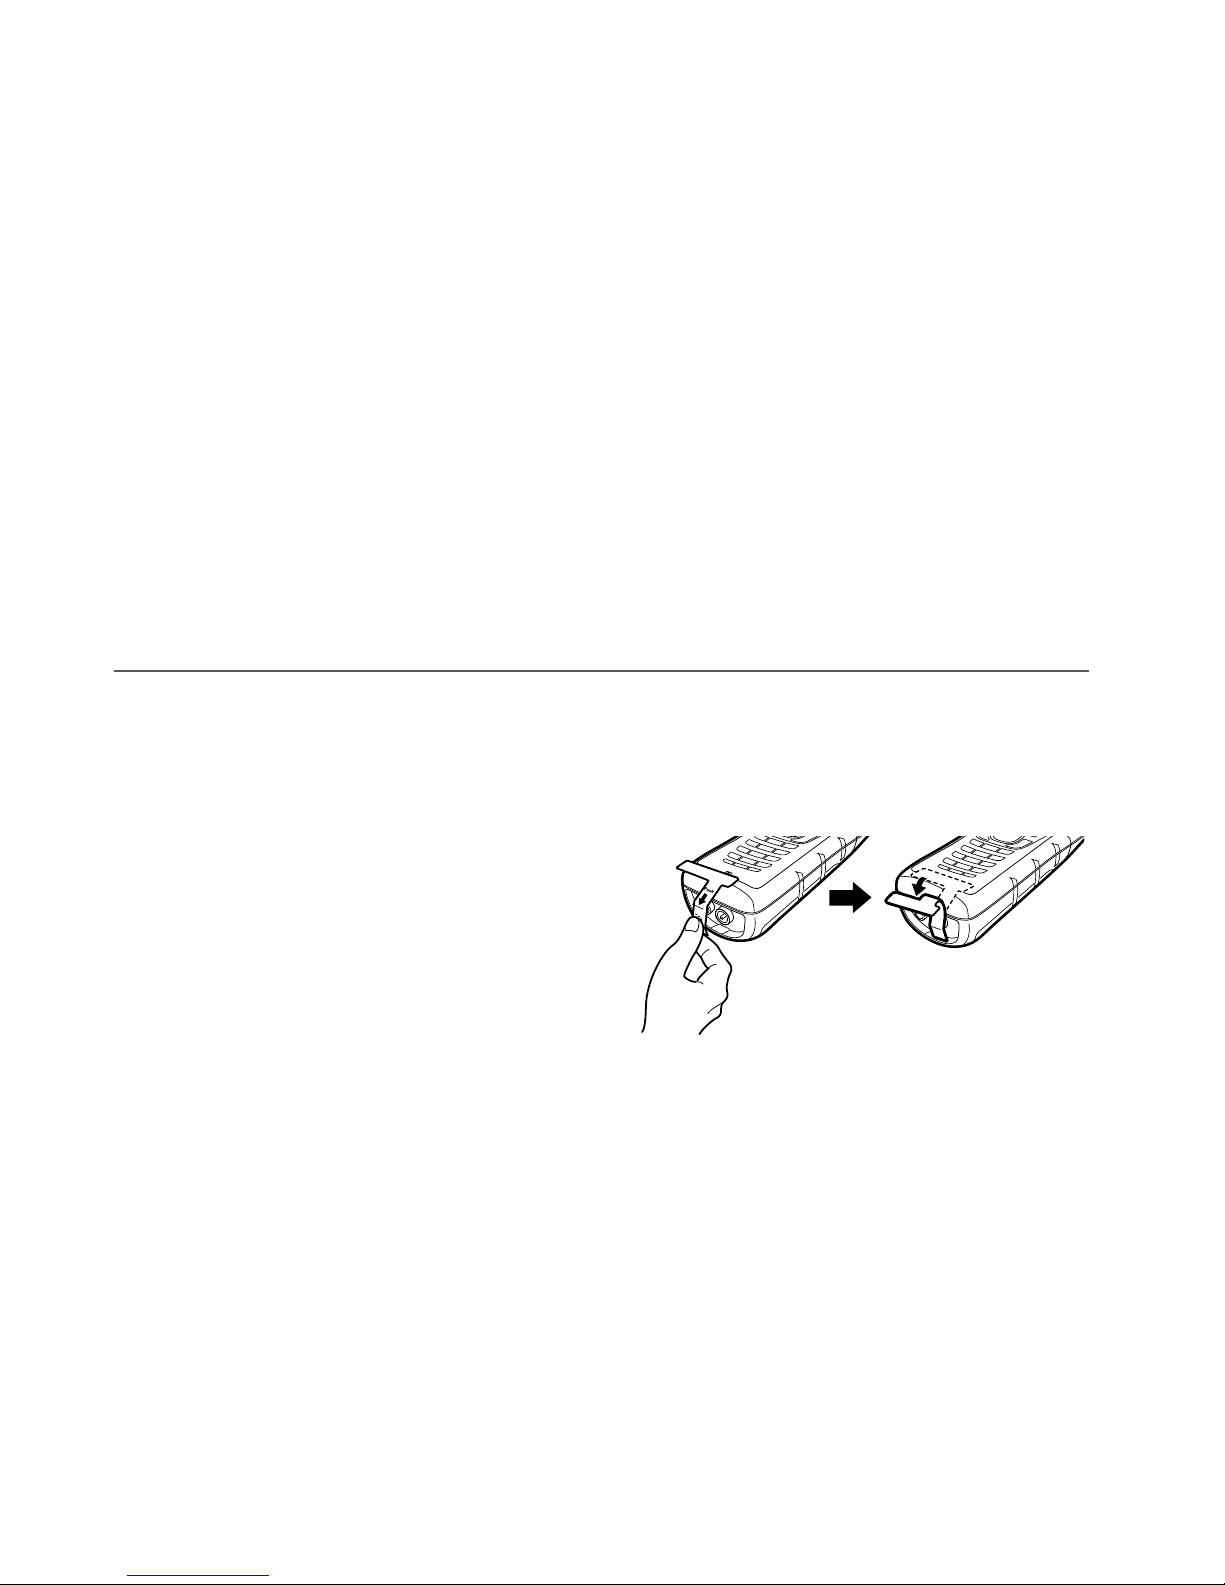
Remove the cardboard spacer.1)
Press the power on/off (activation) pin 2)
according to the directions on the label.
Remove the label once the handset is powered on.3)
Save the power on/off pin in case you need to change the handset's power
status later (i.e., to power offw the handset when it will not be used for a
long time). Use the plastic power on/off pin or a blunt-tipped object like an
uncurled paper clip to press the power on/off toggle through the rubber seal.
Do not use a sharp object; sharp objects might puncture the rubber seal and
jeopardize the handset's waterproof status.
Connect the AC adapter to the charger's 4)
DC IN 9V
jack and set the cord into the
notch. (This adapter might already be connected.)
Plug the other end of the adapter into a standard 240V AC power outlet.5)
3
Place the handset in the charger with the display facing forward. The display on 6)
the handset should turn on.
If... Try...
the handset display
does not turn on
Checking the AC adapter connection.
-
Seeing if the outlet is controlled by a wall switch.
-
Check handset activation at step 2 above.
-
Charge the handset completely (about 16 hours) before using it.
Registering to a Base
The accessory handset won't work until you register it to a base!
Compatible Bases
This handset is designed for use with Uniden's XDECT 7015 and XDECT 7055 bases.
Other compatible Uniden bases include the SSE25, SSE27, DECT 2015 and DECT2035
models. Some features may not be available when using the XDECT 7005WP with
these other bases. For the most up-to-date list of which bases this handset is
compatible with, see our website.
Registration Methods
If the other base has
an LCD display:
If the other base DOES NOT have
an LCD display:
On the base, open the menu.1)
Select 2)
Register Handset
. The
display should say
Handset
Registering
.
Disconnect the base AC adapter.1)
On the base, press and hold 2)
FIND
while you reconnect the adapter.
On the handset, press and hold 3)
HASH #
until the display says
Handset
Registering
(about 2 seconds).
After about 30 seconds, the handset display should say
Registration Complete
.
 Loading...