

Page 1

WIN1200 Series
Owner’s Manual
OWNER’S MANUAL
Page 2

Table of Contents
Welcome ..................................................................3
111 Notice ............................................................3
System Requirements ..........................................4
Manual Conventions.............................................4
Terminology Used in this Manual .........................5
Product Overview ...................................................6
Phone Features....................................................6
Windows Live™ Messenger Interface Features ...6
Parts of the Handset.............................................7
Parts of the Base..................................................8
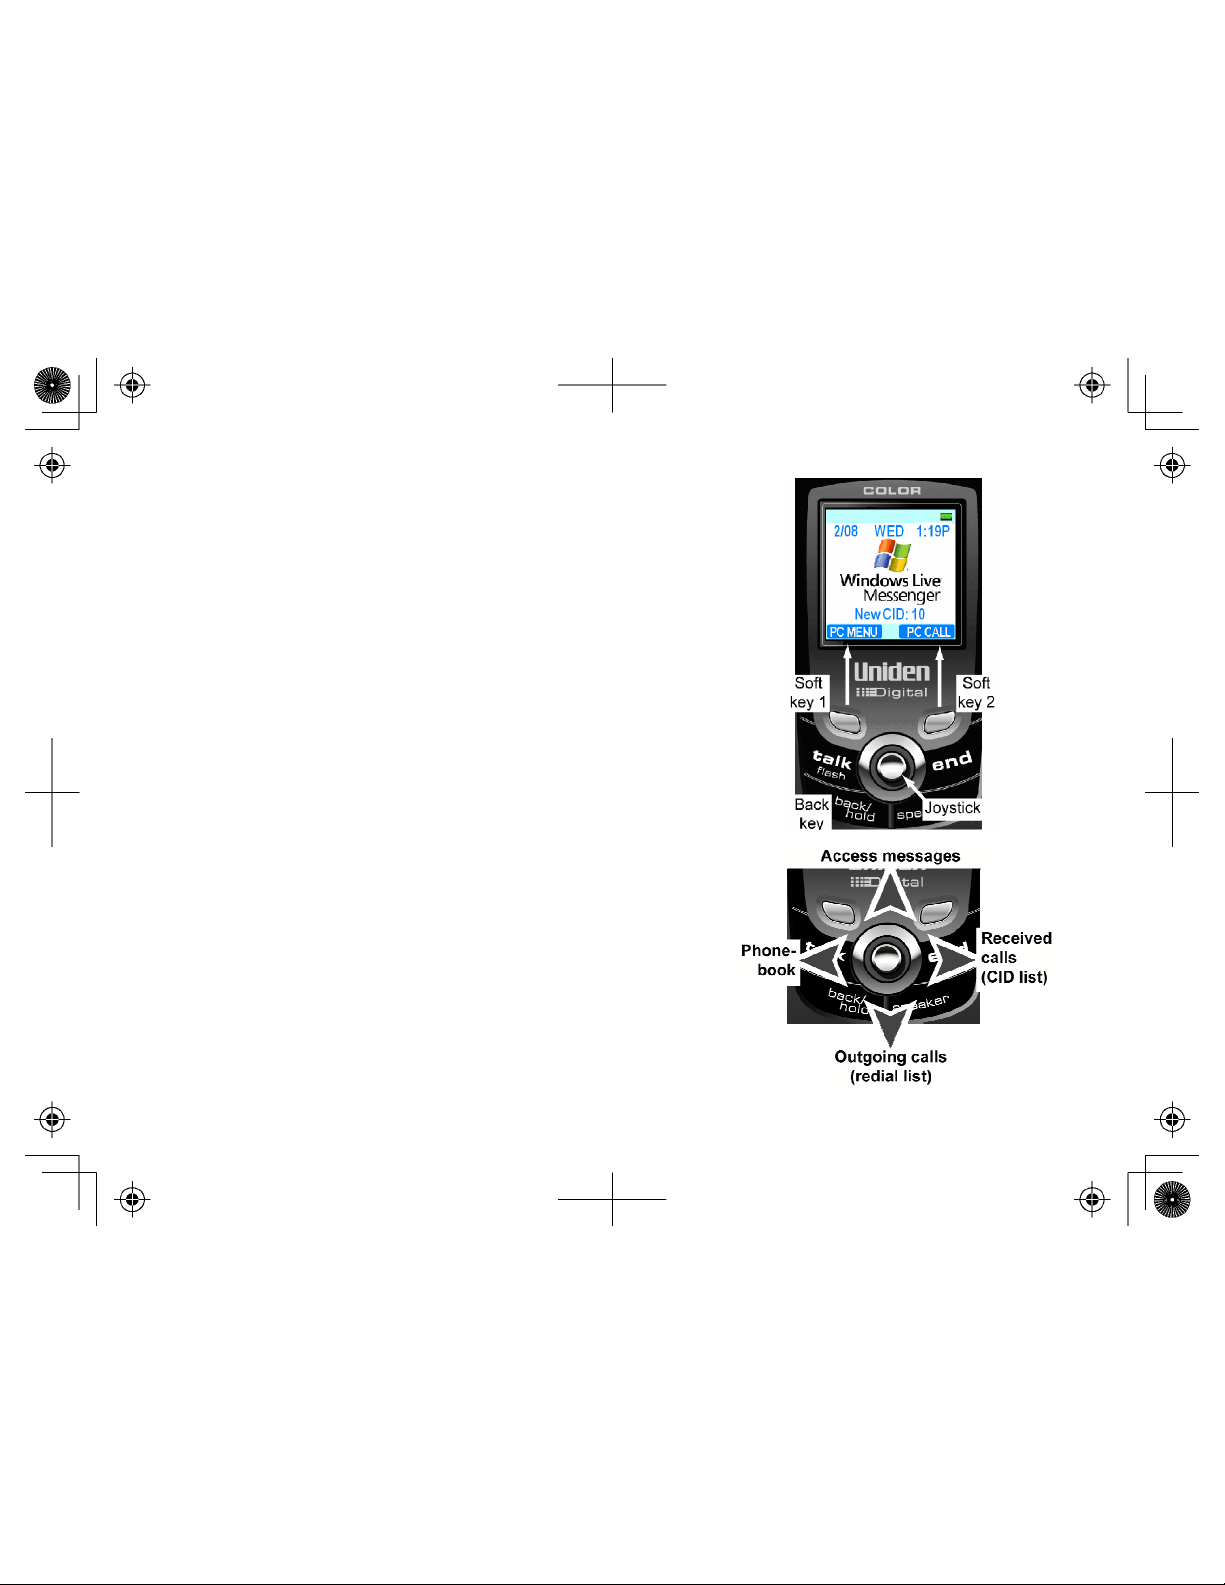
Using the Handset Interface...................................9
Status Icons..........................................................9
Using Soft Keys..................................................10
Using the Joystick ..............................................10
Entering Text from Your Handset .......................11
Installing the Phone..............................................12
Choosing the Best Location................................12
Installing the Handset Battery.............................13
Installing the Belt Clip .........................................13
Connecting the Base and Charging the Handset14
Connecting the Phone Line ................................15
Registering for and Downloading Windows Live™
Messenger .................................................16
Connecting to Your Computer ............................17
Setting Up the Phone............................................18
Sending Windows Live™ Messenger Alerts to Your
Phone ........................................................19
Activating Caller ID on Call Waiting ....................20
Activating Unique ID and Personal Ring ............20
1
Setting Up Your Voice Mail ................................ 21
Setting the Date and Time ................................. 22
Activating Name Tagging................................... 22
Activating Insert 0 .............................................. 23
Setting Up Your Contact List and Phonebook... 24
Creating and Editing Contacts on Your Computer25
Viewing Your Contact List on the Phone............ 26
Downloading Contacts to the Phonebook .......... 26
Finding an Entry in the Phonebook .................... 27
Creating Entries in the Phonebook .................... 28
Storing Caller ID or Redial Numbers in the
Phonebook ................................................ 29
Deleting Phonebook Entries .............................. 30
Checking the Number of Phonebook Entries and
Speed Dial Assignments ........................... 30
Working with Phonebook Groups ...................... 31
Customizing Your Phone..................................... 32
Selecting a Wall Paper Picture .......................... 32
Turning on the Animation Display ...................... 32
Selecting a Display Color Scheme..................... 33
Selecting a Handset Ring Tone ......................... 33
Activating the Key Touch Tone .......................... 34
Activating Auto Talk ........................................... 35
Activating Any Key Answer ................................ 35
Using Your Phone ................................................ 36
Making a Call from the Windows Live™ Messenger
Contact List ............................................... 37
Making a Call from the Handset Phonebook...... 38
Making a Call with Handset Speed Dial ............. 38
Page 3

Switching to the Handset Speakerphone During a
Call ............................................................ 38
Using Call Waiting ................................................ 39
Changing Your Online Status.............................. 40
Checking Your Voice Mail and Email Messages 40
Using the Call History Lists................................. 41
Making a Call from the Windows Live Messenger
Call History Lists........................................ 41
Clearing the Call History List.............................. 42
Making a Call from the Handset Caller ID and
Redial List.................................................. 42
Deleting Caller ID and Redial Records .............. 42
Using the Calendar............................................... 43
Scheduling a reminder ....................................... 43
Receiving reminders .......................................... 45
Managing reminders .......................................... 45
Finding the Handset ............................................. 46
Adjusting the Ringer Volume............................... 46
Adjusting the Alert Notification Tone Volume ..... 46
Adjusting the Earpiece and Speaker Volume .... 47
Adjusting the Audio Tone................................... 47
Adjusting the Display Contrast ........................... 48
Using Hold and Conference ................................ 48
Placing a Call on Hold........................................ 48
Holding a Three-way Conference ...................... 49
Using Special Features ........................................ 50
Muting the Microphone ...................................... 50
Installing the Optional Headset...........................50
Maintenance .......................................................... 51
Specifications .....................................................51
Power Failures ...................................................51
Battery Life .........................................................51
Low Battery Alert ................................................51
Battery Replacement and Handling....................52
Change the Batteries Annually ...........................52
Clean the Battery Contacts.................................52
Troubleshooting.................................................... 53
Resetting the Handset........................................53
Resetting the Base .............................................53
Resetting the Voice Mail Waiting Light ...............54
Changing the Digital Security Code....................54
Traveling Out of Range ......................................54
Common Issues .................................................54
Liquid Damage ...................................................56
Precautions! .......................................................... 57
Important Safety Instructions..............................57
Menu Quick Reference .........................................58
Windows Live™ Messenger Menu Options........58
Phone Setup Options .........................................59
Index ...................................................................... 61
One Year Limited Warranty…………………………. 62
2
Page 4

Welcome
Thank you for purchasing Uniden's Windows Live™ Messenger phone. The WIN1200 lets you make free PC to PC
calls to other Windows Live™ Messenger users, low-cost Internet calls to regular phone numbers via Windows Live™
web calling*, and regular phone calls through a standard phone line. Sign up for a Windows Live™ Messenger
account and download Windows Live™ Messenger: it's easy to do, the software is free, and there's no activation fee.
•
To download Windows Live™ Messenger or get more information about the service, visit
http://get.live.com/messenger/overview
•
To get more information about Windows Live™ web call feature, open Window Live Messenger™ and select
Tools Billing Information Phone Calls from the main menu.
*NOTE: The web calling feature is provided by Windows Live™ Messenger and is subject to availability.
Windows Live™ web calling is a paid service provided by a third party. You must activate an account
before you can use this service.
•
To get answers to questions about your phone or to check for updates to this manual, visit www.uniden.com.au
for the Australian model or www.uniden.co.nz for the New Zealand model.
111 Notice
Windows Live™ Messenger voice chat feature does not provide 111 service. Your phone must be connected to an
active telephone line to make 111 emergency calls.
3
Page 5

System Requirements
In order to use the Messenger Phone, you must have the following:
•
Microsoft® Windows® XP.
•
Windows Live Messenger 8.0 software and account.
•
Microsoft Internet Explorer version 6 SP1 or later (but it does not need to be your default browser).
•
Available USB port on your computer.
•
An active broadband Internet connection.
•
To make and receive PC calls, your computer must be turned on and signed in to Windows Live™ Messenger.
•
To make and receive regular calls, your phone must be connected to an active telephone wall jack.
•
If your online contacts do not also have a Messenger Phone, they must have at least have MSN Messenger or
Windows Live™ Messenger, and they must have a compatible microphone and speaker (or a multimedia
headset) connected to your computer.
Manual Conventions
This manual uses several different type styles to help you distinguish between different parts of the phone:
•
SMALL CAPITALS
•
ALL CAPITALS indicates text on the display, such as menu options, prompts, and confirmation messages
•
ITALIC CAPITALS indicates a port or connection label on the phone base
•
lower case bold text indicates a status light on the phone base
•
Upper and Lower case bold indicate the title of a soft key (see Using Soft Keys on page 10)
indicates an actual key or button on the phone
4
Page 6
Terminology Used in this Manual
Caller ID (CID)
CIDCW (Caller ID on Call Waiting)
Standby
Talk mode
PC Call
Regular Phone Call
Windows Live™ Web Call
NOTE: The web calling feature is
provided by Windows Live™
Messenger and is subject to
availability.
Contact List
Phonebook
Available from your telephone provider, CID shows you the names and
numbers of incoming callers.
Available from your telephone provider, CIDCW shows you incoming
caller information while you're on another call.
The handset is not in use. If it is off the cradle, no dial tone is present.
A telephone line or PC call has been activated on the handset, enabling
a dial tone.
A call made through Windows Live™ Messenger to another user's
computer. In order to make and receive PC calls, your phone must be
connected to your computer through the USB cable, and your computer
must be turned on and signed in to Windows Live™ Messenger.
A call made through your local telephone company to another regular
telephone number. In order to make and receive regular phone calls,
your phone must be connected to an active telephone wall jack through
the RJ-11 telephone cord.
A low-cost call made through Windows Live™ Messenger to a regular
telephone number. Windows Live™ web calling is a paid service
provided by a third party. You must activate an account before you can
use this service. For more information, open Window Live Messenger™
and select Tools Billing Information Phone Calls from the main
menu.
The list instant message IDs and phone numbers stored in Windows
Live™ Messenger on your computer.
The list of names and phone numbers stored in the handset's memory.
5
Page 7

Product Overview
Phone Features
•
5.8 GHz digital phone
•
Advanced phonebook features
-
Store 100 names with four numbers per entry
-
Create phonebook groups
-
Set personalized ring tones and wallpaper for
people in your phonebook
-
Save 10 phonebook entries to speed dial
keys
•
Handset speakerphone
* These features reply on the Caller ID service to function. You'll need to subscribe to the Caller ID feature with your
phone company before you can use them. There is usually a fee for this service.
Windows Live™ Messenger Interface Features
•
Make and receive PC to PC calls through the
Windows Live™ Messenger voice chat feature
•
Hold 3-way conferences with Windows Live™
Messenger, a regular land line, and a handset
•
See your Windows Live™ Messenger contacts and
their status directly on the handset
•
100-number caller ID* memory with alphabetical
sort
•
Name Tagging (POP ID)*
•
Unique ID/Personal Ring*
•
Calendar with programmable reminders
•
24 ringer options (16 ringer tones, 8 melodies)
•
Last 20 number redial
•
Won't interfere with 802.11b and 802.11g wireless
networks
•
Download your Windows Live™ Messenger
contact list to your phonebook
•
Change your status
•
Get notifications of emails, contacts coming
online, and IM requests
6
Page 8
Parts of the Handset
1. Voice Mail Waiting Indicator
2. Volume up key
3 Volume down key
4.
TALK/FLASH
5.
BACK/HOLD
6. */
TONE
key
key
key
7. Handset earpiece
8. Soft Keys
9.
END
key
10. Joystick
11.
SPEAKER
key
12. # key (pound)
13. Handset microphone
14. Handset charging contacts
15. Handset antenna
16. Beltclip hole
17. Speakerphone speaker and
ringer
18. Headset jack cover
19. Handset battery
compartment
7
Page 9
Parts of the Base
1.
FIND HS
key (find handset)
2. usb light
3. charge light
4. phone light
5. Base charging contacts (inside cradle)
6. Power connection (DC IN 9V)
7. AC adaptor channel guide
8 Phone connection (TEL-LINE)
9. USB connection (USB)
8
Page 10
Using the Handset Interface
When the phone is in standby, the handset display shows the following items:
← Status icons
← Date, day of the week, and time
← Wallpaper
← Caller ID summary
← Current soft key functions
Status Icons
The table below lists the icons the handset uses to tell you the status of your phone.
Icon Phone is in... Description
Standby/Talk
Talk
Talk
Standby
Standby
The battery icons shows the battery charge level: full, medium, low,
and empty.
The mute icon appears while the handset microphone is muted.
The speaker icon appears when the handset speaker phone is in use.
The envelope icons tell you that you have new messages on your
local phone provider's voice mail service, on your computer, or both.
The ringer off icons tells you if ringer is turned off for regular phone
calls, PC calls, or both types of calls.
9
Page 11
Using Soft Keys
Your handset has two soft keys that change function during the
operation of the phone. The text right above the soft key indicates
that key's current function. For example, when the phone is in
standby mode, pressing soft key 1 opens the Windows Live™
Messenger option menu. When the phone is in the Windows
Live™ Messenger menu, pressing soft key 1 makes a selection.
The instructions in this manual will always give the name of the
soft key you need to press. Be sure to look at the screen so you
know which soft key you need.
Using the Joystick
The handset's joystick lets you move the cursor on the display
and easily access the most commonly used features. With the
phone in standby, move the joystick to the left to open the
phonebook. Move the joystick to the right to open the Caller ID
list. Move the joystick down to open the redial list, and up to go to
your voice mail. Try placing your thumb on top of the joystick and
move to the four positions to get the feel of how it moves and
operates.
You will also use the joystick to move the cursor and highlight
different options on the screen; the highlighted option appears in
reversed out text, and the current setting for that option appears
at the bottom of the screen. To select the highlighted option, press
straight down on the center of the joystick (you can also press the
Select soft key).
10
Page 12
Entering Text from Your Handset
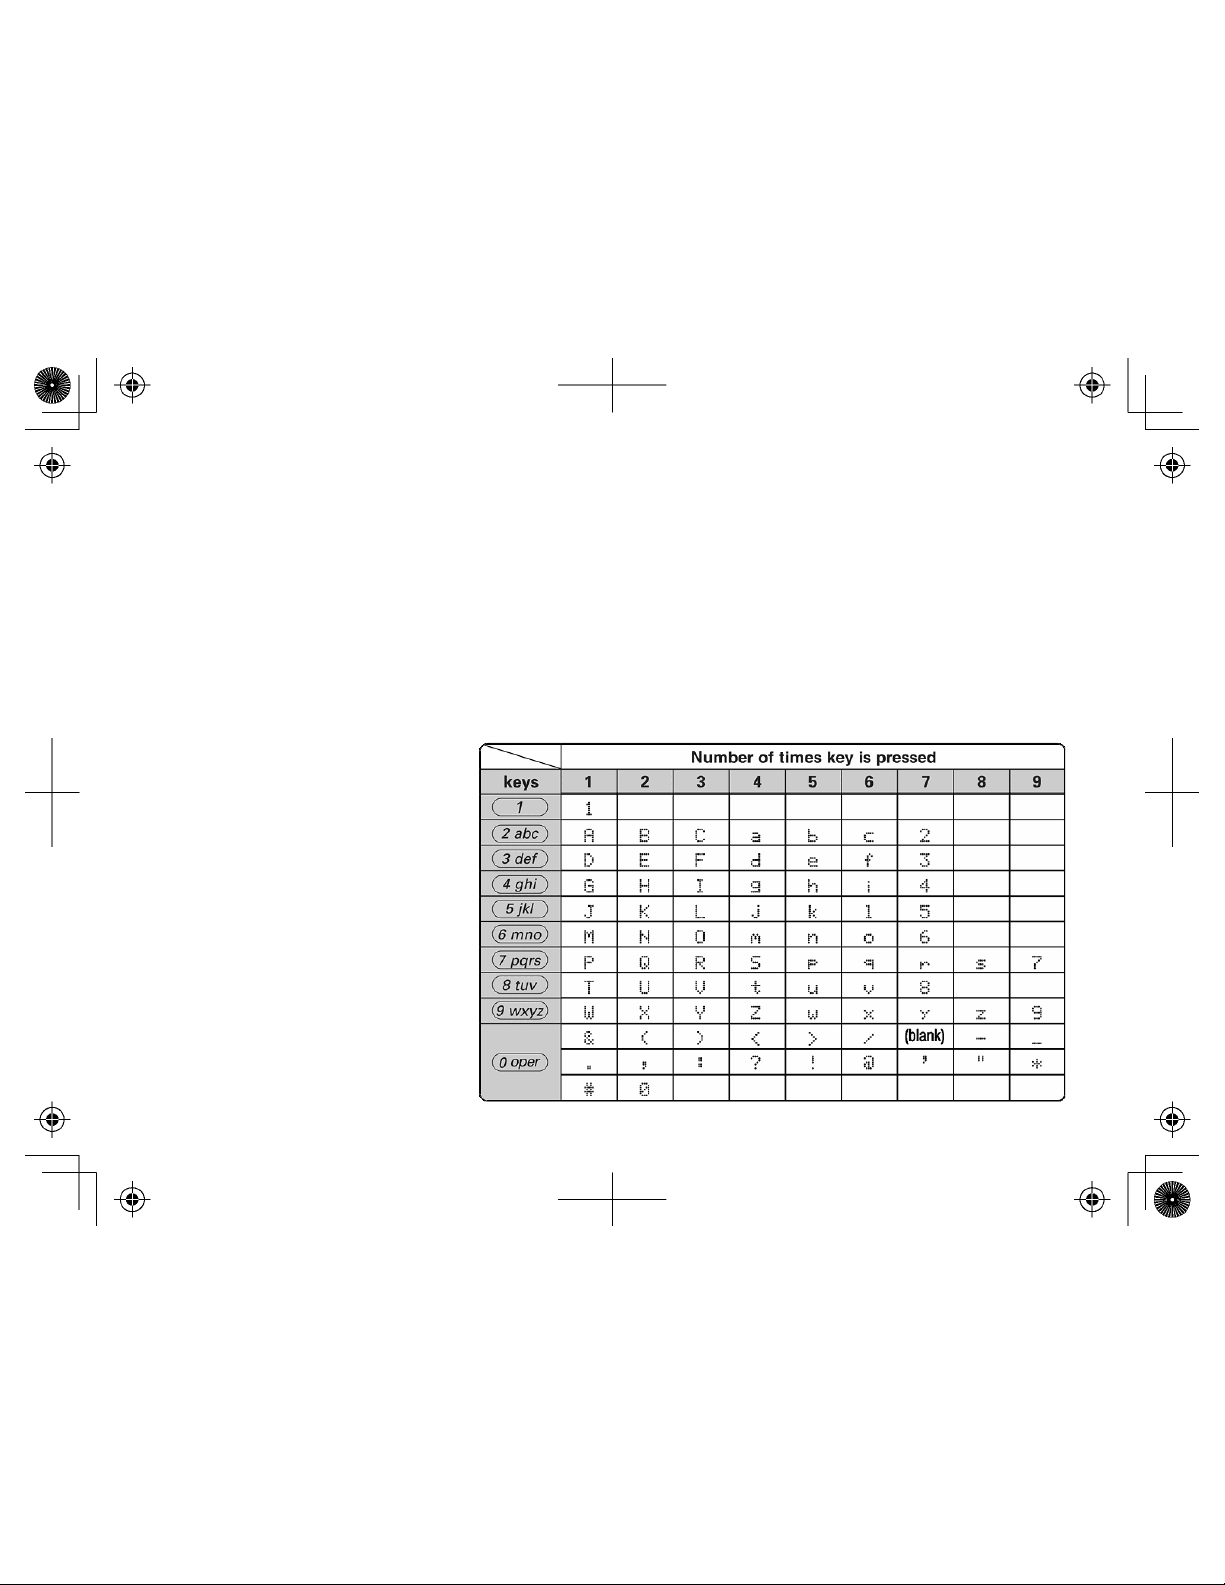
You can use the number keypad to enter text by referring to the letters printed on each number key. When you press
the number key in a text entry field, the phone displays the first letter printed on the number key. Press the number
key twice to display the second letter and three times to display the third. Here are some hints for entering text.
•
Capital letters are displayed first, then lower case letters, then the number on the key.
•
If two letters in a row use the same number key, enter the first letter, then use the joystick to move the cursor to
the next position to enter the second letter.
•
If you make a mistake while entering a name, use the joystick to move the cursor to the incorrect character.
Press the Delete soft key to erase the wrong character, then enter the correct character.
•
To delete all characters, press and hold the Delete soft key.
The table below shows the available characters; the steps show you how to enter the word Movies as an example.
1. Press 6 once to enter M.
2. Use the joystick to move the
cursor to the right.
3. Press 6 six times to enter o.
4. Press 8 six times to enter v.
5. Press 4 six times to enter i.
6. Press 3 five times to enter e.
7. Press 7 eight times to enter s.
8. Press the center of the joystick
when you're finished.
11
Page 13

Installing the Phone
Choosing the Best Location
When choosing a location for your new phone, here are some important guidelines you should consider:
•
Find a place that is close to a standard phone jack, a computer with a USB port, and a power
outlet that is not controlled by a wall switch.
•
The base and handset should be kept away from sources of electrical noise such as motors,
microwave ovens, and fluorescent lighting.
•
Don't place the base in direct sunlight or subject it to high temperatures. The battery may not
charge properly.
•
For better reception, place the base as high as possible.
•
The base should be placed in an open area for optimum range and reception.
•
If your home has specially wired alarm equipment connected to a phone line, be sure that
installing the system does not disable your alarm equipment. If you have questions about what will
disable alarm equipment, contact your telephone company or a qualified installer.
12
Page 14
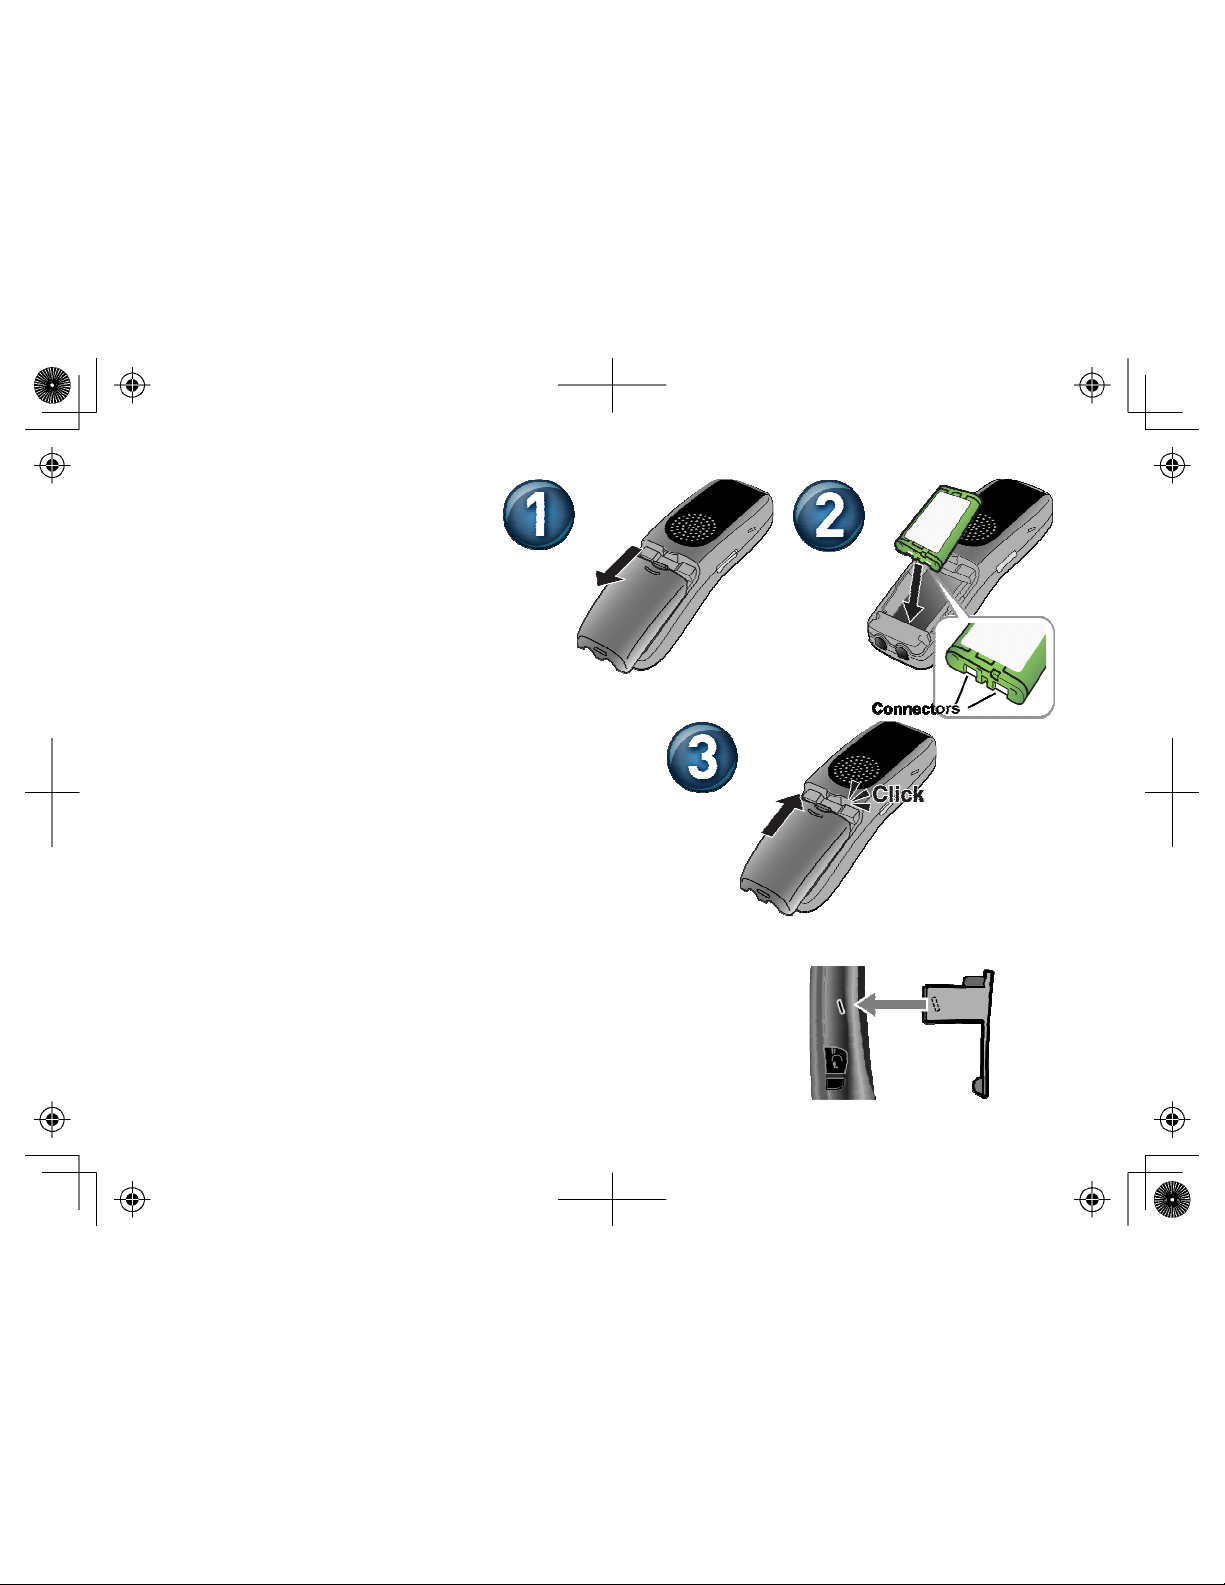
Installing the Handset Battery
Follow the steps below to install the battery.
1. Remove the cover from the
handset battery compartment.
Press in on the finger indention
and slide the cover downward.
2. Place the battery pack in the
battery compartment with the
green side up and the silver
connectors on the battery facing
the bottom of the handset.
NOTE: Use only the Uniden
BT-0003 rechargeable battery
pack with your phone.
3. Place the battery case cover back on
the handset and slide it upwards until
it clicks into place.
Installing the Belt Clip
Line up the holes on each side of the handset. To attach the belt clip, insert
into the holes on each side of the handset. Press down until it clicks.
To remove the belt clip, pull either side of the belt clip to release the tabs
from the holes.
13
Page 15
all outlet.
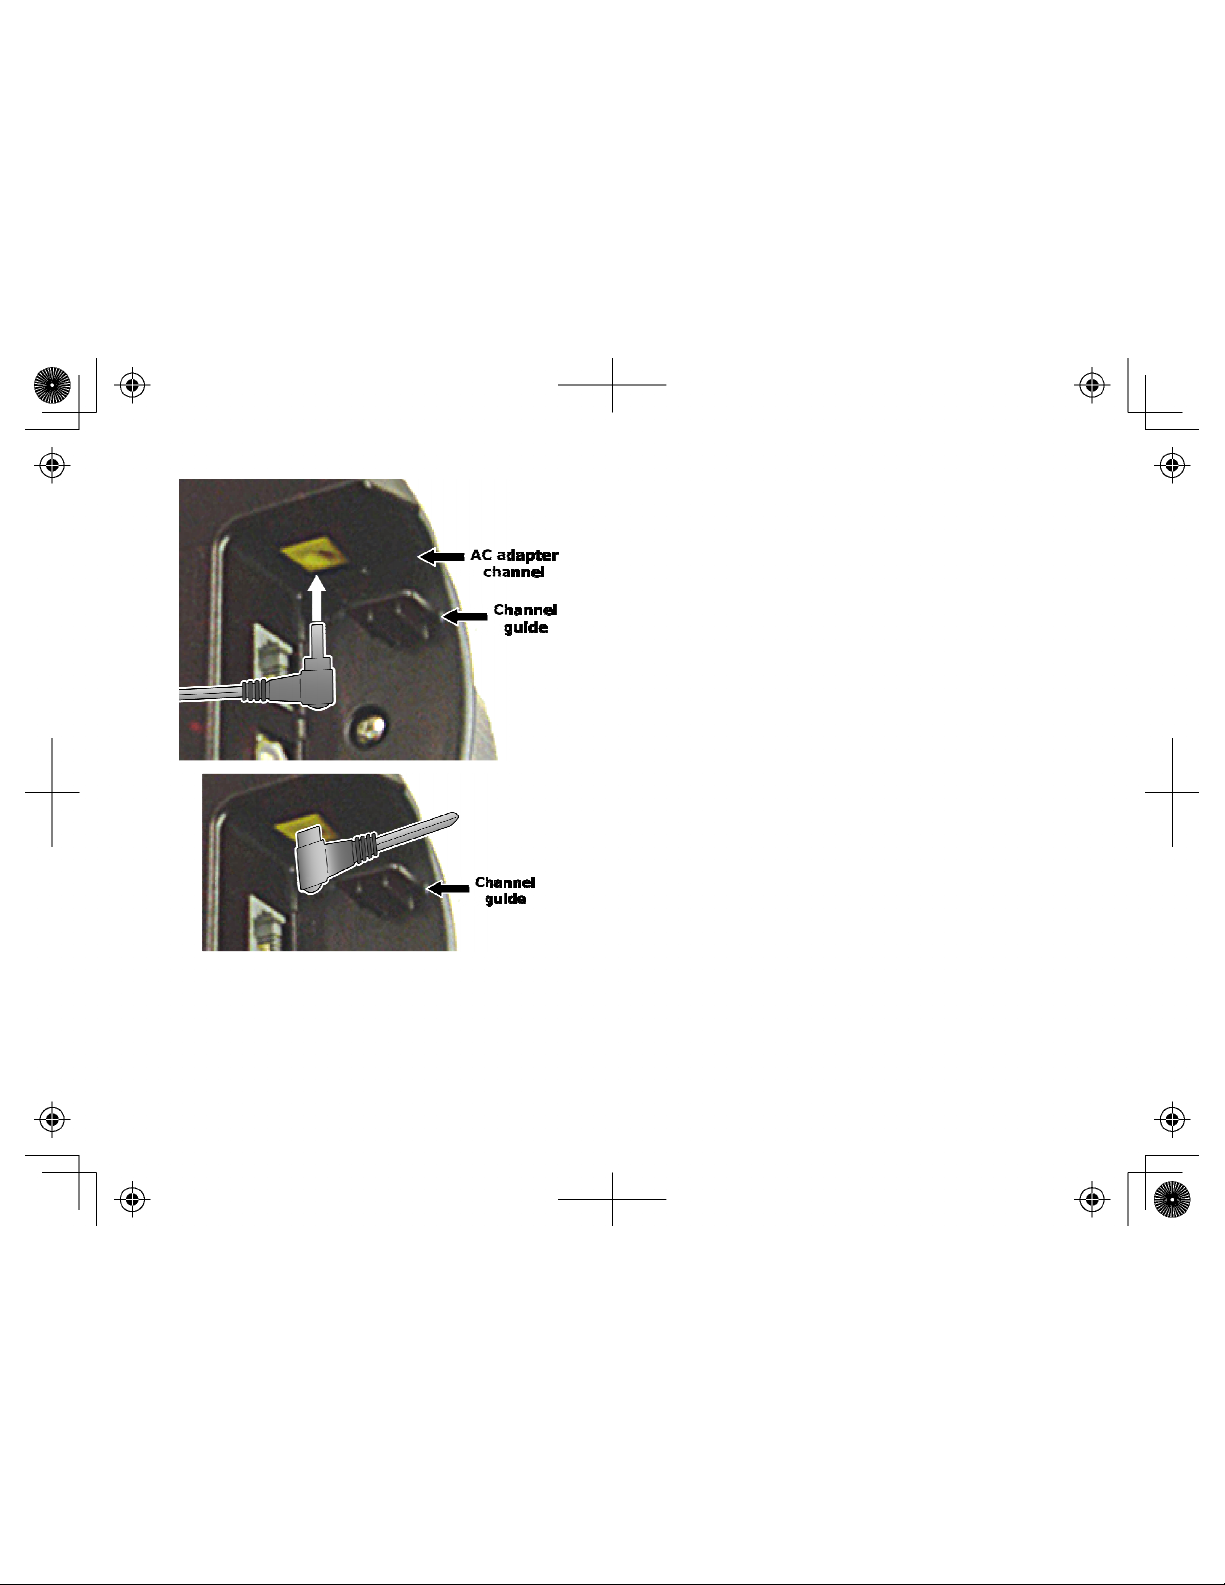
Connecting the Base and Charging the Handset
CAUTION: To avoid risk of fire and shock, use
only the Uniden AAD-255 AC adaptor.
NOTE: Do not place the power cord where it
creates a trip hazard or where it could become
chafed and create a fire or electrical hazard.
1. Connect the AC adaptor to the yellow power connector
(labeled DC IN 9V).
A) Place the AC adaptor behind the adaptor channel
guide and line it up with the yellow power connector.
4. Make sure that the charge Light comes on. If the LED does not come on, make sure the AC adaptor is
plugged in and the handset makes good contact with the charging contacts.
5. Charge your handset at least 15 hours before plugging into the phone line.
NOTE: For optimum battery life, make sure the handset is fully charged before plugging in
the phone line.
B) Push the adaptor into the connector.
C) Turn the adaptor towards the rear of the base so the
adaptor head fits in the AC adaptor channel.
2. Connect the AC adaptor to a standard 240V AC w
3. Place the handset in the base with the LCD screen facing
forward.
14
Page 16

Connecting the Phone Line
NOTE: You must connect your phone to an active telephone line to make 111 emergency calls.
Once the battery pack is fully charged, use the included telephone cord to
connect the phone jack (labeled TEL LINE) to a standard telephone jack. If
your phone line also has High Speed Internet please ensure you are using
an approved line filter before connecting the telephone cord.
Try making a call. Press
come on and you should hear a dial tone. Dial the number when you hear
the dial tone. If you can't get a dial tone or your test call does not connect,
follow the troubleshooting steps below.
Troubleshooting the Phone Connection
1. Make sure the AC adaptor cord is securely connected to the DC IN
9V jack and a standard power outlet. Place the handset in the base
and make sure the charge light comes on.
2. Make sure the battery is fully charged. (If you don't see the "battery
full" icon, make sure the battery is properly connected).
3. Make sure the telephone is securely connected to the TEL-LINE jack and to an active telephone wall jack.
TALK/FLASH
. The phone light on the base should
15
Page 17

Registering for and Downloading Windows Live™ Messenger
The phone works with Windows Live™ Messenger versions 8.0 and later.
NOTE: If you already have a version of MSN®
Messenger installed, open your Messenger
program and make sure the top of the
window says Windows Live™ Messenger. If
the top of your Messenger window does not
say Windows Live ™ Messenger, follow the
instructions below to install the latest
version.
1. Open a web browser window and go to
2. Click the SIGN IN link at the top right corner of the window. This opens the sign in page.
3. If you already have an active MSN® Messenger account, sign in with your email address and password.
If you do not have an active Windows Live™ or MSN® Messenger account, click SIGN UP NOW and follow
the instructions on the screen to create an account.
4. Follow the links to download the new Windows Live™ Messenger, then follow the instructions on the screen to
install the software.
5. After you have installed Windows Live™ Messenger, click on the START menu and open the program.
6. When the sign-in screen appears, enter the email address and password you used to create your account.
http://get.live.com/messenger/overview
16
.
Page 18
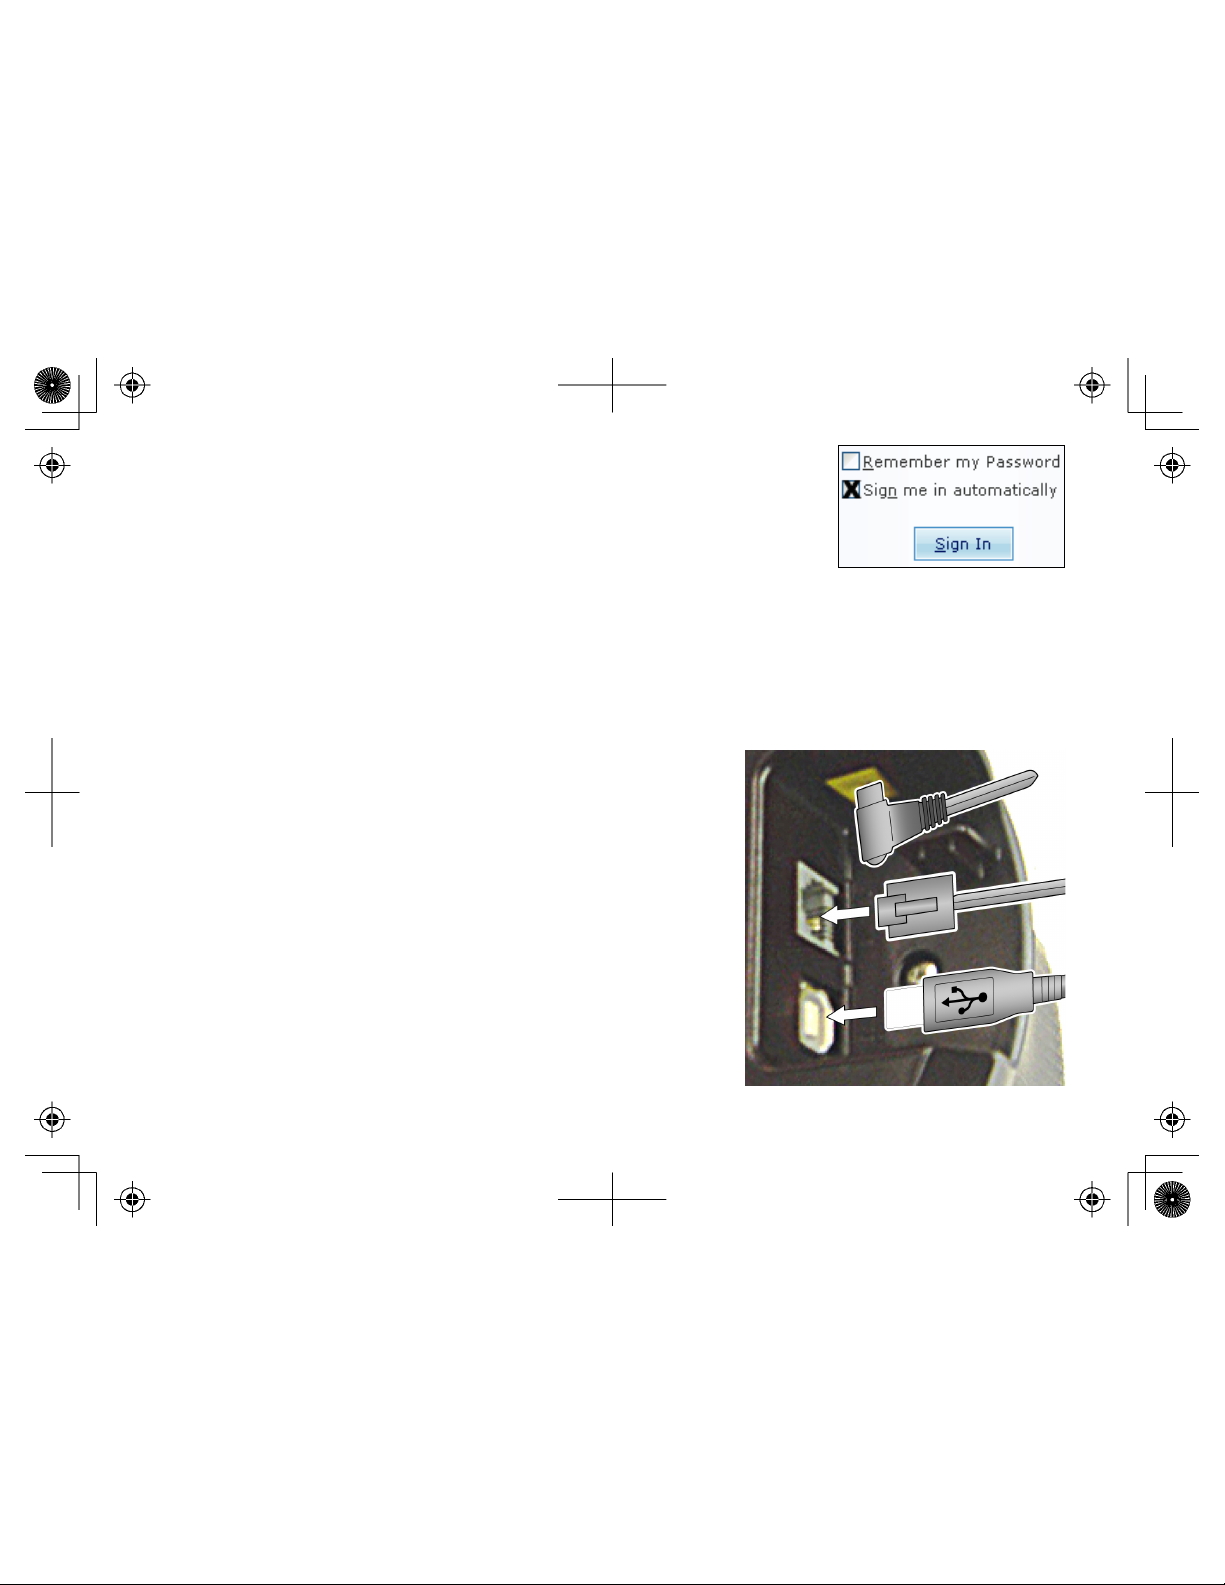
7. Be sure to select the SIGN ME IN AUTOMATICALLY checkbox at the bottom
of the screen.
8. Click the SIGN IN button at the bottom of the screen to log in to Windows
Live™ Messenger.
While your handset is charging, you might want to spend some time getting familiar with the new Windows Live™
Messenger features. Update your contacts, organize them in groups, and add any phone numbers you want to save to
the phone (see Creating and Editing Contacts on page 25 or click the Help menu at the top of the main window).
Connecting to Your Computer
After your handset battery is fully charged, follow the steps below to
connect your phone to your computer:
1. Turn on your computer and open Windows Live™ Messenger.
NOTE: The messenger phone works with Windows Live™
Messenger versions 8.0 and later. If the top of your
Messenger window does not say Windows Live™
Messenger, see page 16.
2. Use the included USB cable to connect the USB port on the
phone to a USB port on your computer. You should see a popup window in the lower right corner of your screen that says
FOUND NEW HARDWARE. You will not have to install any
software or drivers: these install automatically.
3. From the standby screen, press the PC Call soft key. The usb
light on the base comes on, and the screen displays your
contact list. If you can't see your contact list, follow the
troubleshooting steps below.
17
Page 19
Troubleshooting the USB Connection
1. Make sure the USB cord is securely connected to the USB port and to a standard USB port on your computer.
2. Make sure that you have the latest version of Windows Live™ Messenger (version 8.0 or higher).
3. Try logging in to the Windows Live™ Messenger service on your computer. If you can't log in on your
computer, click on the Help menu at the top of the Windows Live™ Messenger main window.
4. If you can log in to Windows Live™ Messenger, on your computer, unplug the phone's USB cable and plug it
in again
5. If you connected the phone to a USB hub or switch, try connecting it directly to your computer.
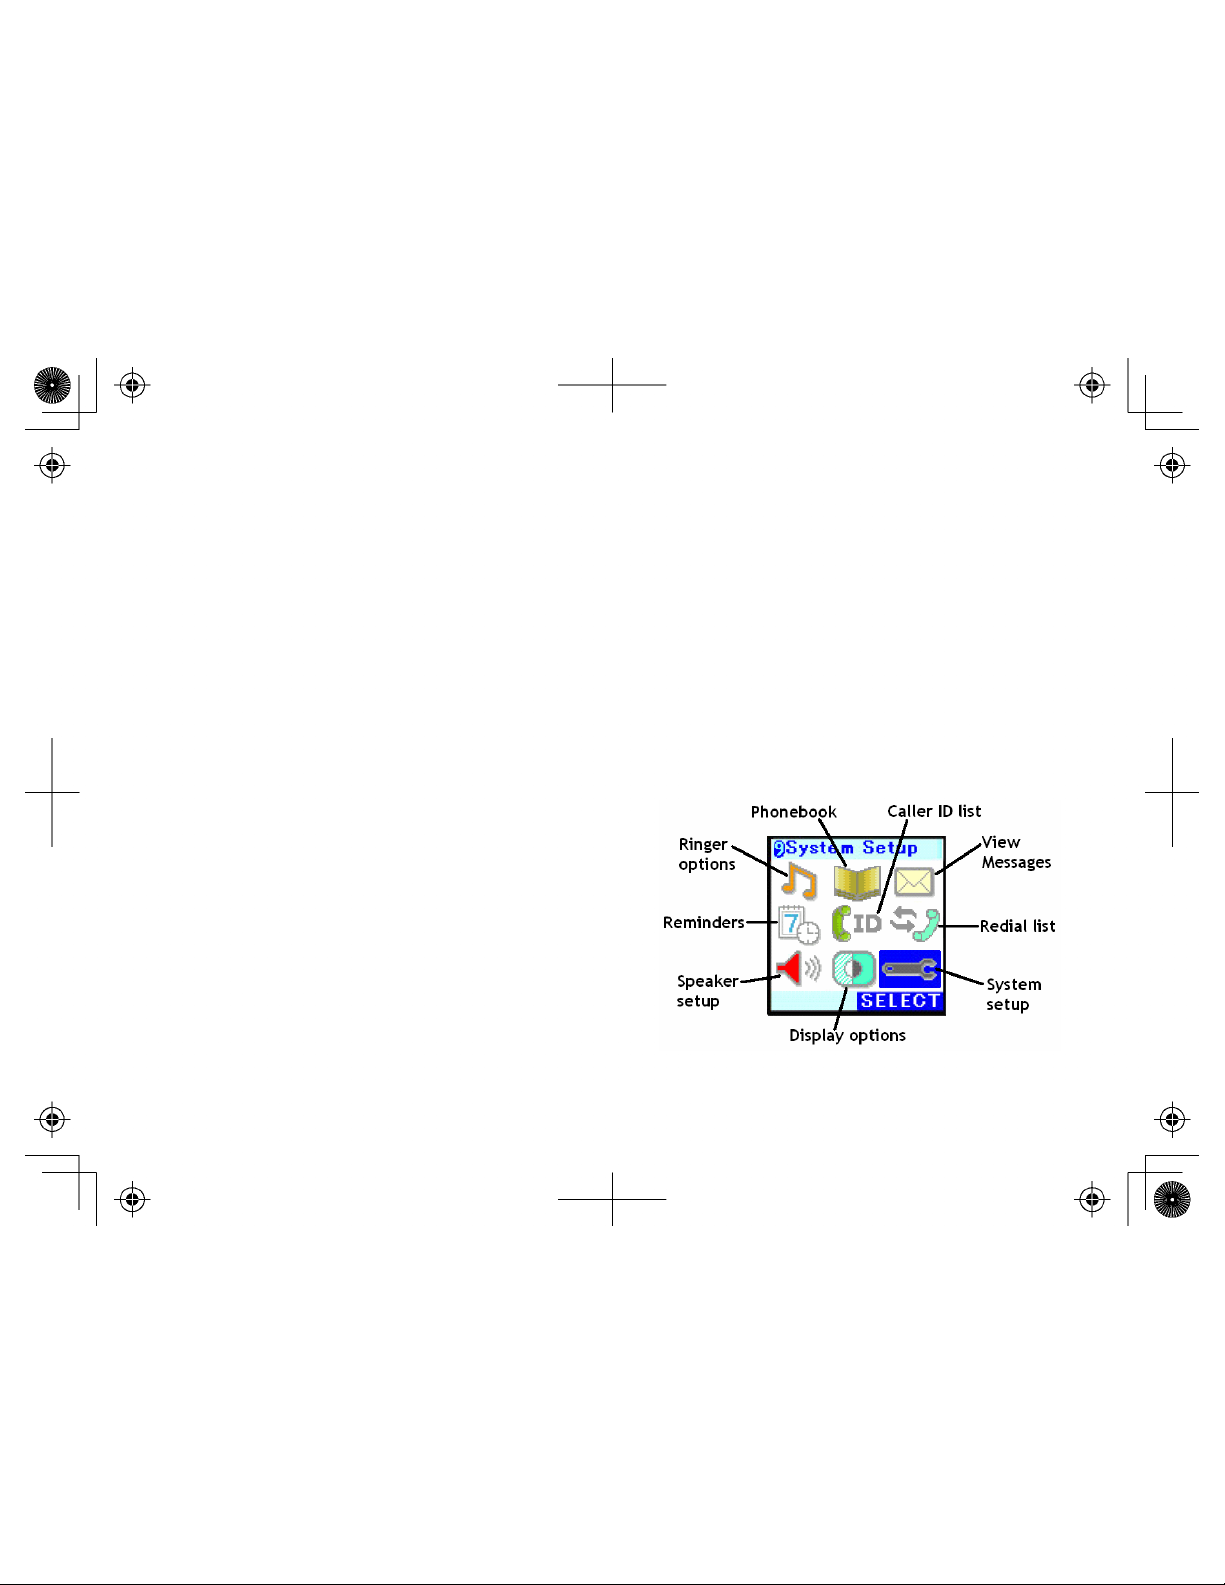
Setting Up the Phone
The phone's standard settings work for most customers. And even if you do need to change a setting, you should only
have to change it once.
•
To open the phone setup menu, press the center of
the joystick straight down when the phone is in
standby.
•
When you're in a menu, move the joystick to highlight
the different options; the highlighted option appears
in reversed out text.
•
To select a highlighted option, press straight down on
the center of the joystick or press the Select soft key.
•
To go back to the previous menu screen, press
BACK/HOLD
•
To exit the menu and return to standby, press
•
If you do not press a key within 30 seconds, the phone will time out and exit the menu.
.
END
.
18
Page 20
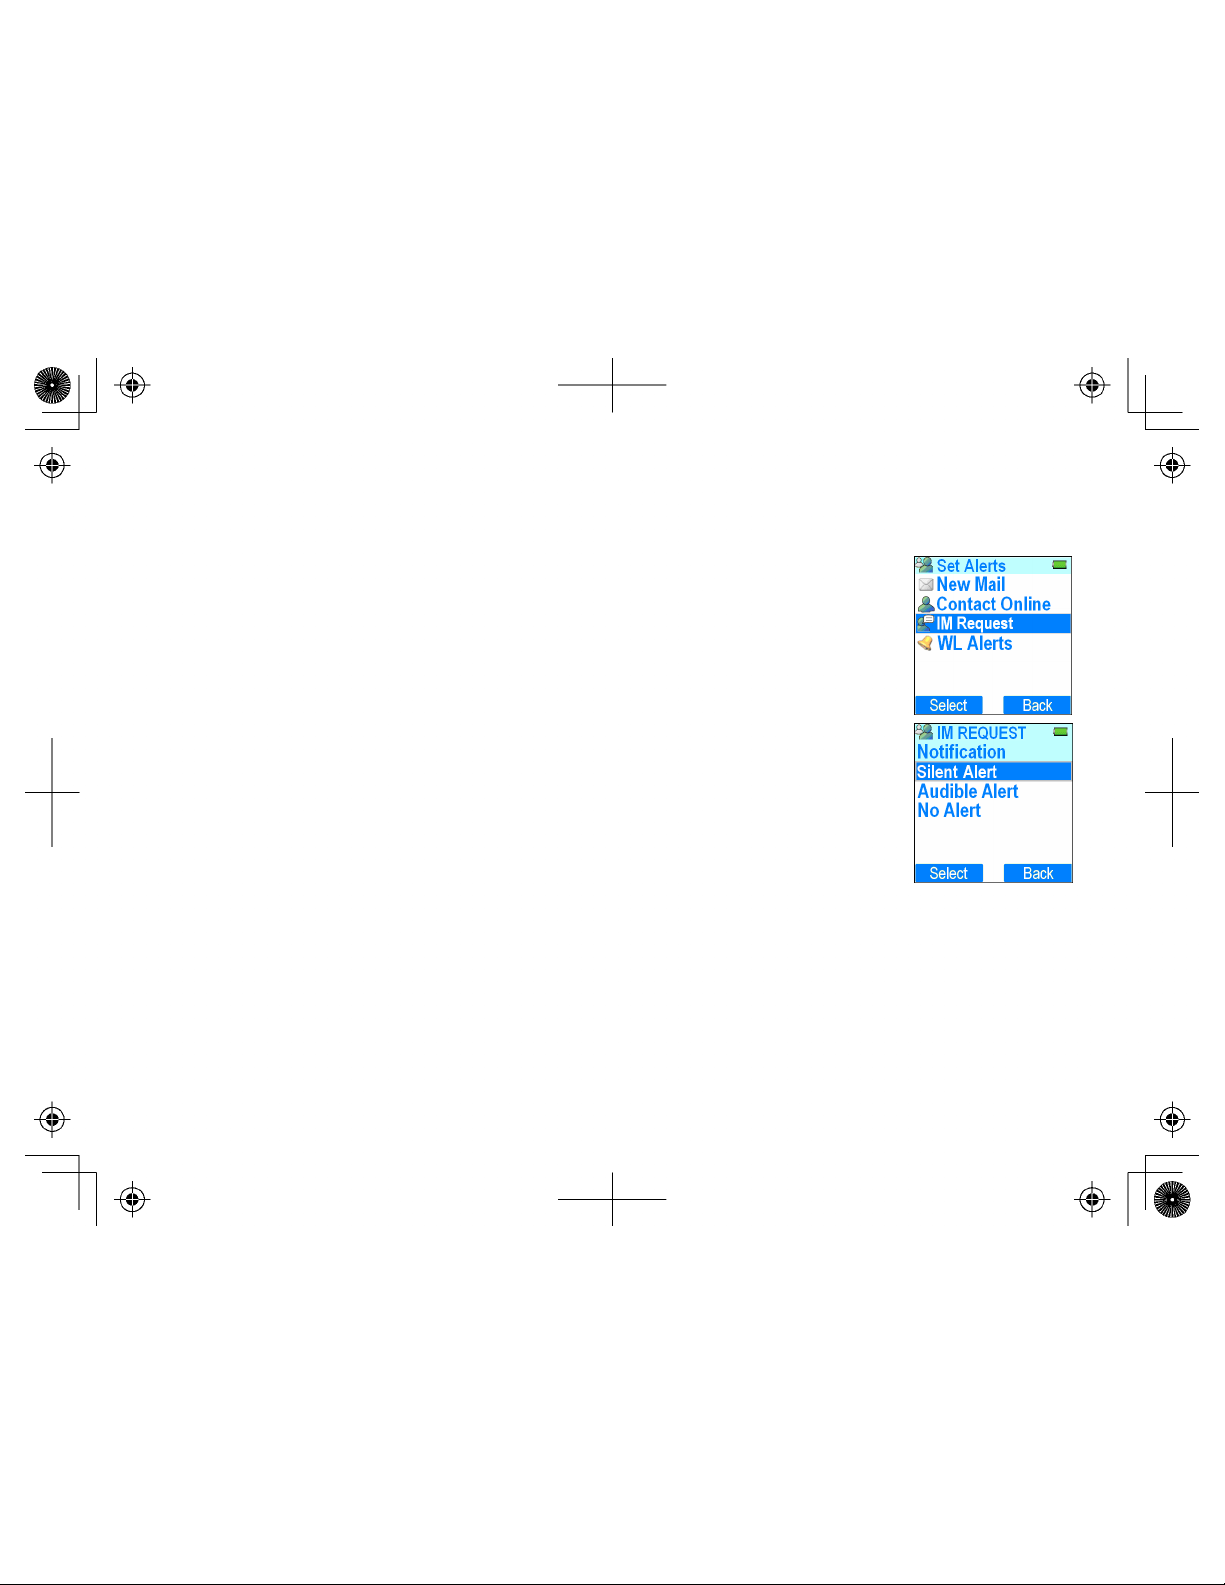
Sending Windows Live™ Messenger Alerts to Your Phone
You can choose which types of Windows Live™ Messenger alerts you want to receive on your handset.
1. With the phone in standby, press the PC Menu soft key. This opens the Windows Live™ Messenger menu.
2. Select the SET ALERTS menu, then choose from the following alerts:
A) NEW MAIL alerts you when you receive a new email.
B) CONTACT ONLINE alerts you when one of your contacts comes online.
C) IM REQUEST alerts you when you receive an instant message invitation.
D) WL ALERT alerts you when you receive a service or system message.
3. Select the type of notification you want when an alert of this type is received:
A) SILENT ALERT: The handset displays the alert notification screen but does not
sound the alert tone.
B) AUDIBLE ALERT: The handset displays the alert notification screen and sounds
the alert tone.
C) NO ALERT: This type of alert will not be sent to the handset at all.
4. Press the center of the joystick or the Select soft key when you're finished. You will hear a confirmation tone.
19
Page 21

Activating Caller ID on Call Waiting
Your phone supports Caller ID on Call Waiting, so you can see the name and number of someone who calls when
you're already on the line. You'll need to subscribe to these features with your phone company before you can use
them. To let your phone support these features, follow the steps below:
1. With the phone in standby, press the center of the joystick and select the system setup icon .
2. Select the GLOBAL SETUP menu, and then the CALL WAITING submenu.
3. Select ON to activate Caller ID on Call Waiting.
4. Press the center of the joystick or the Select soft key. You will hear a confirmation
tone.
Activating Unique ID and Personal Ring (Distinctive Ring)
You can assign special ringer tones and picture displays to entries in your handset phonebook so you know who's
calling. You'll need to subscribe to the Caller ID feature with your phone company for Unique ID and Personal Ring to
work.
When your phone gets a call from someone with an assigned unique ID, it uses the special ringer tone and changes
the picture display. To turn on Unique ID, follow these steps (see Creating Entries in the Phonebook on page 28 for
instructions on choosing a ringer and picture display for each phonebook entry):
20
Page 22

1. Press the center of the joystick and select the system setup icon .
2. Select the HANDSET SETUP menu, and then the UNIQUE ID submenu.
3. Move the cursor to select ON or OFF.
4. Press the center of the joystick or the Select soft key. You will hear a confirmation tone.
Setting Up Your Voice Mail
If you subscribe to a voice mail service, you can use your phone to access your voice mailbox. The new message
LED flashes whenever you have messages waiting in your voice mailbox. If you program your access number into
your phone, you can simply push the four-way function key up to access your voice mail. When you subscribe to the
service, your voice mail provider will provide you with the access number and the required signaling tone. For the New
Zealand model, the voice mail number has been preprogrammed to 083210.
Programming Your Voice Mail Access Number
Your voice mail service provider will supply you with the access number. To program your access number for easy
access, follow the steps below:
1. Press the center of the joystick and select the system setup icon .
2. Select the HANDSET SETUP menu, and then the EDIT VOICE MAIL submenu.
If a voice mail access number has already been programmed, it will appear in the display. To delete this
number, press and hold the Delete soft key.
3. Use the number keypad to enter the phone number; the phone number can contain up to 20 digits.
If you need the phone to pause between digits when it’s dialing (for example, to enter an extension or an
access code), press the Pause soft key to insert a two-second pause. You will see a P in the display. You can
also use more than one pause together if two seconds is not long enough. Each pause counts as one digit.
4. Press the center of the joystick when you are finished. You will hear a confirmation tone.
21
Page 23

Setting the Date and Time
When you connect your phone to your computer and browse your contact list, the phone automatically updates its
date and time to the date and time on your computer. You should only have to set the date and time if your computer
is not connected. To change the date and time shown in the display, follow the steps listed below.
1. With the phone in standby, press the center of the joystick and select the system setup icon .
2. Select the GLOBAL SETUP menu, and then the DATE & TIME submenu.
3. To change the date, just use the number keypad to enter the new date. To change the time, move the cursor
to the second line, and use the number keypad to enter the new time. Use * to change from AM to PM. Press
the center of the joystick when you're finished.
Activating Name Tagging
Name Tagging works with the caller display number from Caller ID. You'll need to subscribe to the Caller ID feature
with your phone company for Name Tagging to work.
When the phone rings, the received caller display number is compared to numbers stored in the phonebook. If there is
a match then any name stored with the phonebook number will be displayed. To change the Name Tagging setting,
follow the steps listed below.
1. With the phone in standby, press the center of the joystick and select the system setup icon .
2. Select the GLOBAL SETUP menu, and then the NAME TAGGING submenu.
3. Select ON to activate NAME TAGGING.
4. Press the center of the joystick or the Select soft key. You will hear a confirmation tone.
22
Page 24

Activating Insert 0
This feature adds “0” or “00” at the beginning of the number received from Caller ID. The default setting for New
Zealand is ON. The default setting for Australia is OFF. To change the Insert 0 setting, follow the steps listed below.
1. With the phone in standby, press the center of the joystick and select the system setup icon .
2. Select the GLOBAL SETUP menu, and then the INSERT 0 submenu.
3. Select ON to activate INSERT 0.
4. Press the center of the joystick or the Select soft key. You will hear a confirmation tone.
23
Page 25

Setting Up Your Contact List and Phonebook
With the Messenger Phone, you can store and manage all your contact information in Windows Live™ Messenger's
online contact list and then easily download the names and phone numbers directly to your handset's phonebook. The
contact list and the phonebook are completely independent: you can store names and phone numbers in your contact
list that are not in your phonebook, and vice versa. The table below lists the differences between the contact list and
the handset phonebook and how much information can be stored in each one.
Windows Live™ Messenger
Contact List
Information stored...
Computer required for
accessing data
Remotely accessible
Number of entries 300 100
Phone numbers per entry 4 4
Other information stored
Speed dial capability No Yes
Personal ring capability No Yes
online at the Windows Live™ Messenger
server.
Yes. The computer must be turned on and
logged in to the Windows Live™ Messenger
service via an Internet connection.
Yes, through any computer with an Internet
connection.
Home and work address, email address,
web site, notes
Handset Phonebook
in the handset's memory.
No
No
Personal ring and wallpaper
You can also use the handset phonebook entries and speed dial memory to store any group of numbers (such as an
account number or access code) that you may need to enter once your call connects.
24
Page 26

Creating and Editing Contacts on Your Computer
Follow the steps below to create and edit your Windows Live™ Messenger contacts.
1. On your computer, open Windows
Live™ Messenger.
2. To create a new contact, click the
add contact icon at the top of
the contacts window. To edit an
existing contact, right click on the
contact in the contacts window and
select EDIT CONTACT.
3. Click the CONTACT button on the
screen. You can enter the names
and phone numbers here. If you
want to enter other information,
such as addresses and notes,
browse through the other tabs on
this screen.
NOTE: When you download
contacts to your phone, only
those contacts who have
phone numbers are
downloaded.
4. When you're finished, click the
SAVE CONTACT button in the
bottom right corner of the window.
25
Page 27

Viewing Your Contact List on the Phone
Once you enter contacts into you contact list, you can see them directly on your handset.
1. With the phone in standby, press the PC Call soft key. The handset displays your
contact list with the last sorting order used.
2. To change the sorting order, press the Menu soft key. This opens the PC menu.
3. Move the cursor to select SORT CONTACTS and press the center of the joystick or the
Select soft key.
4. Choose whether to sort your contact list by name or by presence (whether a contact is
online, offline, or busy). If you have created groups in your contact list, you can also sort
the contact list by group. Press the center of the joystick or the Select soft key.
5. To change how your contacts are displayed, move the cursor to select VIEW
CONTACTS and press the center of the joystick or the Select soft key.
6. Choose the information about your contacts that you want to display: the nickname (or display name), the full
name, the email address, or the phone number. Press the center of the joystick or the Select soft key.
Downloading Contacts to the Phonebook
You can download names and phone numbers from your contact list to your phone. There are few things you should
know about how your contact list and your handset phonebook interact:
•
If you have more than 100 names on your contact list, the contact list will download the first 100 contacts.
•
If you create or edit phonebook entries directly on your handset, the contact list leaves those entries intact
when downloading. If you want the contact list to overwrite an entry in the handset phonebook, just delete that
entry from the phonebook before downloading the contact list.
26
Page 28

•
When the contact list downloads to the phonebook, the phone number entered in the
HOME PHONE field is placed in the first phone number slot, WORK PHONE is placed in
the second, MOBILE NUMBER in the third, and OTHER PHONE in the fourth.
1. With the phone in standby, press the PC Menu soft key.
2. Move the cursor to select DOWNLOAD NMBRS and press the center of the joystick or
the Select soft key.
3. When the phone asks you to confirm, press the OK soft key.
Finding an Entry in the Phonebook
Once you've downloaded your contacts to the phonebook, move the joystick down to scroll through the phonebook
from A to Z; move the joystick up to scroll through the phonebook from Z to A.
You can also use the letters on the number keys to jump to a name that starts with that letter. Press a number key (2
through 0) once for the first letter, twice for the second letter, and so on. The phonebook jumps to the first entry that
begins with the letter you entered; you can then move the joystick up and down to scroll to other entries. For example,
to search for an entry beginning with the letter M, press 6 once.
To close the phonebook, press
press
BACK/HOLD
.
BACK/HOLD
or
END
. If you are looking at the phonebook while you're on a call, always
27
Page 29

Creating Entries in the Phonebook
To store names and phone numbers directly into your handset phonebook, please follow these steps:
1. Move the joystick to the left, and then press the Phone soft key.
2. Press the Options key. Then select NEW ENTRY to create a new phonebook entry or
EDIT SELECTION to edit an existing entry.
3. Select the name icon to enter or edit the name for this entry.
Use the keypad to enter a name for this entry; the name can contain up to 16 characters.
(See Entering Text from Your Handset on page 11 for instructions on entering text.) If you
do not want to enter a name for this entry, your phone will store this entry as NO NAME.
Press the center of the joystick when you are finished, and your phone will return to the
edit phonebook entry screen.
4. Select one of the four phone number icons to enter or edit a phone number.
Use the number keypad to enter the phone number; the phone number can contain up to
20 digits. If you need the phone to pause between digits when it’s dialing (for example, to
enter an extension or an access code), press the Pause soft key to insert a two-second
pause. You will see a P in the display. You can also use more than one pause together if
two seconds is not long enough. Each pause counts as one digit. Press the center of the
joystick when you are finished.
After you enter the number, you can select an icon to remind you which number this is.
Choose from home, work, mobile or generic phone icons.
5. Select the personal ring icon to choose a special ring tone for this entry.
You can attach a special ring tone to each phonebook entry; the phone will use this ring
tone when this person calls from any of the listed phone numbers. Move the cursor to
select one of the 24 different ring tone options (see Selecting a Handset Ring Tone on
page 33 for a complete list of ring tones). As you scroll through the tones, you will hear a
sample of each tone. When you hear the ring tone you want to use, press the center of
the joystick or the Select soft key. If you don't want this entry to use a personal ring tone,
choose NO SELECTION; the phone will use your standard ring tone setting.
28
Page 30

6. Select the personal wall paper icon to choose a special wall paper picture for this entry.
You can attach a special picture to each phonebook entry; when this person calls from any of the listed phone
numbers, the phone will change the wall paper to the special picture. Move the cursor to select one of the 22
different wall paper options. As you scroll through the list, press the View soft key to see the highlighted
picture. When you see the picture you want to use, press the center of the joystick or the Select soft key. If
you do not want to use a personal wall paper for this phonebook entry, choose NO SELECTION; the phone
will use your standard wall paper.
7. Select the group icon to assign this entry to a phonebook group.
You can assign phonebook entries to one of 10 phonebook groups for easier sorting and searching. Use the
joystick to highlight the group you want to assign this entry to or NO SELECTION if you don't want to assign
this entry to a group. Press the center of the joystick or the Select soft key when you're finished.
NOTE: Phonebook groups are separate from Contact List groups. For more information on
renaming and using phonebook groups, see Working with Phonebook Groups on page 31.
8. Select the speed dial icon to assign this entry to a speed dial number.
Your handset has 10 speed dial numbers, 0 to 9. Use the cursor to select the speed dial number you want to
assign to this phonebook entry, and press the center of the joystick or the Select soft key. Choose NO
SELECTION if you do not want to assign this entry to a speed dial number. If the speed dial number is already
assigned to a phonebook entry, your phone will overwrite the previous speed dial assignment.
9. Press the Done soft key. A tone confirms that the new entry has been stored, and DONE! appears in the
display.
Storing Caller ID or Redial Numbers in the Phonebook
You can store Caller ID records or redial numbers in the phonebook so you can use them later. Go to the Caller ID or
redial list and select the number you want to store. (If the Caller ID information did not include the number, then you
will not be able to store it.)
1. When the phone is in standby, move the joystick to the right to open the Caller ID screen or down to open the
redial screen.
29
Page 31

2. Press the Phone soft key to open the handset's Caller ID or redial list.
3. Use the joystick to scroll through the Caller ID records or redial numbers. When you come to the information
you want to store, press the Options soft key and select ADD TO PHONEBOOK.
4. To save this number as a new phonebook entry, select NEW ENTRY. To add this phone number to an
existing phonebook entry, select STORE & EDIT.
Continue by following the steps for Creating Entries in the Phonebook on page 28.
Deleting Phonebook Entries
You can delete individual phonebook entries or delete all the phonebook entries at once.
1. When the phone is in standby, move the joystick to the left to go to the phonebook screen.
2. Press the Phone soft key to open the handset's phonebook.
3. To delete all the phonebook entries at once, press the Options soft key and select DELETE ALL. To delete a
single phonebook entry, use the joystick to select the entry you want to delete. Press the center of the joystick
to show the phonebook detail screen, then press the Options soft key and select DELETE SELECTION.
4. Your phone will ask you to confirm. Select YES. You will hear a confirmation tone, and DELETED! appears in
the display.
Checking the Number of Phonebook Entries and Speed Dial Assignments
1. Move the joystick to the left, and then press the Phone soft key.
2. Press the Options soft key.
3. Select PHONEBK CAPACITY to see the current number of phonebook entries and the number of available
phonebook entries.
4. Select CHECK DIAL to the current speed dial assignments.
30
Page 32

Working with Phonebook Groups
You can organize your phonebook entries into 10 groups. You can name the groups to help you remember what the
group contains, and you can have the phonebook display entries by groups instead of alphabetically. The phonebook
groups are independent of the groups in your contact list.
Changing the name of a group
1. When the phone is in standby, move the joystick to the left to go to the phonebook screen.
2. Press the Phone soft key to open the handset's phonebook, and then press the Options soft key.
3. Scroll down to EDIT GROUP NAME and press the center of the joystick or the Select soft key.
4. Scroll down to the group number you want to edit, press the center of the joystick or the Select soft key.
5. Use the number keypad to enter a name for this group. (See Entering Text from Your Handset on page 11 for
instructions on entering text.) Press the center of the joystick when you're finished.
Sorting the phonebook by groups
1. When the phone is in standby, move the joystick to the left to go to the phonebook screen.
2. Press the Phone soft key to open the handset's phonebook, and then press the Options soft key.
3. Scroll down to SORT and press the center of the joystick or the Select soft key.
4. Select GROUP from the sorting options and press the center of the joystick or the Select soft key.
31
Page 33

Customizing Your Phone
Selecting a Wall Paper Picture
You can choose from 23 pictures for your phone's primary wall paper.
1. Press the center of the joystick and select the display options icon .
2. Select the WALL PAPER submenu.
3. Move the cursor to select a picture to use as the display wall
paper. As you scroll through the list, press the View soft key to
see the highlighted picture.
4. When you see the picture you want to use, press the center of
the joystick or the Select soft key. You will hear a confirmation
tone, and the new wall paper appears on the standby screen.
Turning on the Animation Display
You can activate the animation display on the handset.
1. Press the center of the joystick and select the display options icon .
2. Select the ANIMATION TYPE submenu.
3. Select the animation you want to use. As you scroll through the list, press the View soft key to see a sample of
the animation. Select NO SELECTION if you want to turn the animation display off.
4. When you see the animation you want to use, press the center of the joystick or the Select soft key.
32
Page 34

Selecting a Display Color Scheme
You can choose from five color schemes your phone's display
1. Press the center of the joystick and select the display options icon .
2. Select the COLOR SCHEME submenu.
3. Move the cursor to select a color scheme. As you highlight each color scheme, the display will change to that
scheme as a preview.
4. When you see the color scheme you want to use, press the center of the joystick or the Select soft key. You
will hear a confirmation tone, and the phone will use the new color scheme until you change it again.
Selecting a Handset Ring Tone
You can set different ring tones for regular phone calls and PC calls; alerts use an additional tone that cannot be
changed or used as a ring tone. The available ring tones are listed below:
Melodies Ringers
Beethoven's Symphony #9 (BEETHOVEN9)
For Elise (ELISE)
Home Sweet Home (HM SWT HM)
William Tell Overture (WT OVERTURE)
Twinkle, Twinkle, Little Star (TWINKLE STAR)
Waltzing Matilda (W MATILDA)
Old MacDonald (OLD MACDLD)
We Wish You A Merry Christmas (MERRY-XMAS)
Bell
Flicker (default for regular phone calls)
Clatter
Coin Toss
Synthesize (default for PC calls)
Finish Line
Soft Alert
Wake Up
Lighting Bug
Bebop
Tone Board
Chirp
Party Clap
Reminder
Burble
TeleTone
33
Page 35

1. Press the center of the joystick and select the ringer options icon .
2. Select the RINGER TONES submenu.
3. To change the ring tone for regular phone calls, select the phone icon .
To change the ring tone for PC calls, select the computer icon . You can choose
the same ring tone for PC calls and regular phone calls.
4. Move the cursor to highlight a ring tone. As you highlight each ring tone, you will
hear a sample of that tone.
5. Press the center of the joystick or the Select soft key. You will hear a confirmation
tone, and the next time the phone rings, it will use the new ring tone.
Activating the Key Touch Tone
Key Touch Tone is the tone your keypad makes when keys are pressed. You can turn this tone on or off.
1. Press the center of the joystick and select the system setup icon .
2. Select the HANDSET SETUP menu, and then the KEY TOUCH TONE submenu.
3. Move the cursor to select ON or OFF.
4. Press the center of the joystick or the Select soft key. You hear a confirmation tone.
34
Page 36

Activating Auto Talk
Auto Talk allows you to answer the phone simply by removing the handset from the cradle. You do not have to press
any buttons to answer the call.
1. Press the center of the joystick and select the system setup icon .
2. Select the HANDSET SETUP menu, and then the AUTO TALK submenu.
3. Move the cursor to select ON or OFF.
4. Press the center of the joystick or the Select soft key. You will hear a confirmation
tone.
Activating Any Key Answer
Any Key Answer allows you to answer the phone by pressing any key in the twelve-key pad.
1. Press the center of the joystick and select the system setup icon .
2. Select the HANDSET SETUP menu, and then the ANY KEY ANSWER submenu.
3. Move the cursor to select ON or OFF.
4. Press the center of the joystick or the Select soft key. You will hear a confirmation
tone.
35
Page 37

If you ignore an incoming
Using Your Phone
From the handset From the handset speaker phone
Making a
regular
phone call
Making a
PC call
Answering
any call
Ignoring a
call
Hanging up
1. Remove the handset from the cradle.
2. Press
TALK/FLASH
and wait for the dial tone.
3. Dial the number.
OR
1. Remove the handset from the cradle.
2. Dial the number.
3. Press
TALK/FLASH
.
1. Remove the handset from the cradle.
2. Press the PC Call soft key to browse your
contact list.
3. Highlight the contact you want to call and press
the center of the joystick or the Select soft key.
4. Highlight the contact's email address and press
the center of the joystick or the Call PC soft key.
1. Pick up the handset. (If AutoTalk is on, the
phone will answer when you remove the
handset from the charging cradle.)
2. Press
TALK/FLASH
. (If Any Key Answer is on,
you can also press any key on the twelvenumber keypad.)
Press
END
during any incoming call to mute the ringer and ignore this call
PC call, the caller receives a notice that you have declined the call invitation.
Press
END
or return the handset to the cradle.
1. Remove the handset from the cradle.
2. Press
SPEAKER
and wait for the dial tone.
3. Dial the number.
OR
1. Remove the handset from the cradle.
2. Dial the number.
3. Press
SPEAKER
.
1. Make a PC call from the handset.
2. Once the call connects, press
SPEAKER
switch to the handset speakerphone.
(For regular phone calls only)
1. Pick up the handset.
2. Press
SPEAKER
.
to
36
Page 38

Making a Call from the Windows Live™ Messenger Contact List
You can use your contact list to make regular phone calls as well as PC to PC calls.
1. When the phone is in standby, press the PC Call soft key to open the contact list.
2. Use the joystick to highlight the contact you want to call and press the center of the joystick or the Select soft
key.
To make a PC to PC call
3. Highlight the contact's online ID (the email address) and press the Call soft key.
Windows Live™ Messenger will send your contact a voice call invitation.
4. When your contact accepts the invitation, Windows Live™ Messenger will connect
you. Speak as you would on a standard phone.
5. When you want to hang up, press
END
.
To call a regular phone number
3. Move the joystick down to select one of the phone numbers for this entry.
4. Press the Call soft key to dial the number through your regular phone line.
5. If you have activated a Windows Live™ web calling account, you will see the WL Call
soft key. Press the WL Call soft key to dial the number through Windows Live™ web
calling.
NOTE: The web calling feature is provided by Windows Live™ Messenger and is subject
to availability. Windows Live™ web calling is a paid service provided by a third party. You
must activate an account before you can use this service. For more information, open
Window Live™ Messenger and select Tools Billing Information Phone Calls from the
main menu.
37
Page 39

Making a Call from the Handset Phonebook
1. When the phone is in standby, move the joystick to the left to go to the phonebook screen.
2. Press the Phone soft key.
3. Use the joystick to highlight the phonebook entry you want to call and press the
center of the joystick.
4. Move the joystick right and left to select one of the four phone numbers for this entry.
5. Press
TALK/FLASH
NOTE: You can also press
or
SPEAKER
to dial the number.
TALK/FLASH
or
SPEAKER
before you open the
phonebook. Then, select the phonebook entry and press the Dial soft key.
Making a Call with Handset Speed Dial
1. When the phone is in standby, press and hold one of the number keys (0 through 9) until the assigned
phonebook entry appears in the display.
2. Press
TALK/FLASH
or
SPEAKER
to dial the number.
Switching to the Handset Speakerphone During a Call
To switch a normal call to the speakerphone, press
press
SPEAKER
again.
SPEAKER
38
. To switch from a speakerphone call to a normal call,
Page 40

Using Call Waiting
If you subscribe to Call Waiting service from your phone company, and a second call comes in when you are on the
phone, a call waiting tone will sound. (If you subscribe to Caller ID on Call Waiting, the handset displays the name and
phone number of the waiting call.)
For Australian Model:
Press
TALK/FLASH
will hear the new caller after a short pause. To return to the original caller, press
For New Zealand Model:
Press
TALK/FLASH
new caller after a short pause. To return to the original caller, press
NOTE: You must subscribe through your telephone provider to receive Call Waiting
services. Not all features are available in all areas.
and then 2 on the handset to accept the waiting call. The first caller is put on hold, and you
TALK/FLASH
on the handset to accept the waiting call. The first caller is put on hold, and you will hear the
TALK/FLASH
again.
and then 2 again.
39
Page 41

Changing Your Online Status
You can change your status on the Windows Live™ Messenger service directly from your
handset. Changing your status from the phone changes your status on you computer, also.
1. With the phone in standby, press the PC Menu soft key (if you're already browsing the
contact list, press the Menu soft key) and select SET STATUS.
2. Use the joystick to highlight the status you want to set and press the center of the
joystick or the Select soft key.
3. The phone returns to the main PC menu, and your new status is displayed both on the
top of the phone window and on your computer.
Checking Your Voice Mail and Email Messages
If you subscribe to voice mail service, the new message LED flashes and the new voice message icon appears
whenever you have messages waiting in your voice mailbox. To check your messages:
1. When the phone is in standby, move the joystick up to go to the messages screen.
2. Press the Phone soft key to dial your voice mail access number. (If you have not programmed your access
number into the phone, see Setting Up Your Voice Mail on page 21.)
The new email icon appears whenever you have new email messages. (To program your phone to sound an alert
tone when you receive email, see Sending Windows Live™ Messenger Alerts to Your Phone on page 19.)
1. When the phone is in standby, move the joystick up to go to the messages screen.
2. Press the PC soft key to see how many new email messages you have. Go to your computer to read and
respond to your email.
40
Page 42

Using the Call History Lists
Your phone provides two call history lists: The Windows Live™ Messenger call history list and the handset caller ID
and redial list. When you open the call history list, Windows Live™ Messenger retrieves the handset's caller ID and
redial lists and shows you both PC calls and regular phone calls on one screen.
The handset caller ID list only shows calls received directly from the phone line. Your phone can store up to 100 caller
ID numbers in its handset memory.
NOTE: You must subscribe to caller ID from your phone company to get incoming call
information on regular phone calls.
Making a Call from the Windows Live Messenger Call History Lists
1. When the phone is in standby, move the joystick to the right to go to the received
calls screen or down to go to the outgoing calls screen.
2. Press the PC soft key to go to the Windows Live™ Messenger received or outgoing
call list.
3. Use the joystick to highlight the record you want to call. Press the center of the
joystick or the Select soft key to see the details on this call record.
4. The call detail screen shows you the time and date of the call. If the call was a
Windows Live™ Messenger address, the screen also displays the contact's current
online status.
5. To dial this record, press the Redial soft key. If the record is a phone number, the
phone dials the number through your regular phone line. If the record is a Messenger
address, the phone sends the contact a PC call invitation.
41
Page 43

Clearing the Call History List
You can clear the Windows Live™ Messenger call history. This deletes all call history records.
1. With the phone in standby, press the PC Menu soft key. This opens the Windows Live™ Messenger menu.
2. Select the VIEW HISTORY menu. This opens the Call History menu.
3. Use the joystick to highlight CLEAR HISTORY and press the center of the joystick or the Select soft key
4. When the phone asks you to confirm, press the OK soft key. You will hear a confirmation tone.
Making a Call from the Handset Caller ID and Redial List
If your computer is turned off, you can make calls from the caller ID and redial lists on the handset.
1. When the phone is in standby, move the joystick to the right to go to the received calls (Caller ID) screen or
down to go to the outgoing calls (redial) screen.
2. Press the Phone soft key.
3. Highlight the Caller ID or redial record want to call and press the center of the joystick.
4. Press
TALK/FLASH
NOTE: You can also press
or
SPEAKER
to dial the number.
TALK/FLASH
or
SPEAKER
before you open the phonebook.
Deleting Caller ID and Redial Records
You can delete the handset's caller ID and redial records individually or delete all the records at once. When you
delete a caller ID or redial number, you delete it permanently.
1. When the phone is in standby, move the joystick to the right to go to the received calls (Caller ID) screen or
down to go to the outgoing calls (redial) list.
42
Page 44

2. Press the Phone soft key.
3. To delete all the records at once, press the Options soft key and select DELETE ALL.
To delete a single Caller ID or redial record, use the joystick to select the record you want to delete. Press the
Options soft key and select DELETE SELECTION.
4. Your phone will ask you to confirm. Select YES.
5. You will hear a confirmation tone, and DELETED! appears in the display.
Using the Calendar
Your phone has a built-in calendar that you can use to schedule reminders and
appointments (all the way through December 31, 2099). You can set alarms for
up to 30 different events.
Press the center of the joystick and select the reminder icon to open the
calendar. Today is highlighted. If any day has a reminder set for the morning, a
bar appears in the lower left of the date number; if a reminder is set for the
afternoon or evening, a bar appears in the lower right of the date number.
Scheduling a reminder
1. Press the center of the joystick and select the reminder icon to open the calendar.
2. Use the joystick to highlight the desired date and press the center of the joystick.
43
Page 45

3. If you have no reminders created for this date, press the Store soft key to create a reminder. If you already
have reminders for this date, press the Options soft key and select NEW ENTRY.
4. Select the time icon to enter the time you want this reminder to ring.
The date you picked in step 2 is already entered, but you can change it here if you
wish. Enter the time in 12-hour format; use */
the center of the joystick when you finish, and your phone returns to the edit reminder
screen.
NOTE: If you don't want to enter a title or select a ring tone, press the Done
soft key after you enter the date and time. The phone will save the entry and
return to the reminder list.
5. Select the title icon to enter a name or title for this reminder.
Use the keypad to enter a title for this reminder; the title can contain up to9 characters, and it will display on
the screen when the reminder rings. (See Entering Text from Your Handset on page 11 for instructions on
entering text.) If you don't enter a title, your phone will store this reminder as NONE. Press the center of the
joystick when you're finished, and your phone will return to the edit reminder screen.
6. Select the recurrence icon if you want this reminder to repeat on a regular schedule.
Select how often this reminder should repeat: DAILY, WEEKLY, MONTHLY, or YEARLY. If you don't want this
reminder to repeat, select NONE. Press the center of the joystick when you're finished, and your phone will
return to the edit reminder screen.
7. Select the ring tone icon to choose the ring tone you want the phone to use for this reminder.
Move the cursor to select one of the 24 different ring tone options (see Selecting a Handset Ring Tone on
page 33 for a complete list of ring tones). As you scroll through the tones, you will hear a sample of each tone.
When you hear the ring tone you want to use, press the center of the joystick or the Select soft key. If you
don't want this reminder to use a special ring tone, choose DEFAULT TONE.
TONE
to change from am to pm. Press
8. Select the message icon to enter any notes or messages for this reminder.
Enter any notes you want to attach to this reminder; the note can contain up to 80 characters, and you can
press a button to see it when the reminder rings. (See Entering Text from Your Handset on page 11 for
44
Page 46

instructions on entering text.) If you don't want to enter a note, your phone will store NONE on the note line.
Press the center of the joystick when you're finished, and your phone will return to the edit reminder screen.
9. When you are satisfied with the reminder information, press the Done soft key. You will hear a tone confirming
that the new entry has been stored, and DONE! appears in the display.
Receiving reminders
When the scheduled time and date arrive, the tone assigned to this reminder sounds and a pop-up screen appears.
•
To see detailed information on the reminder, press the View soft key.
•
To mute the reminder tone, press the Mute soft key.
•
To clear the pop-up screen, press
PRESS DISMISS appears in the screen. Press the Dismiss soft key, and the phone returns to standby.
END
when the reminder tone stops. TO DISMISS REMINDER DISPLAY
Managing reminders
To see all your scheduled reminders, open the calendar and press the Schedule soft key. The phone displays all
reminders in chronological order.
•
To see details of a reminder, move the cursor to highlight the reminder and press the
center of the joystick.
•
To edit a reminder, press the Edit soft key, then follow the steps in Scheduling a
reminder on page 43 to edit the date and time, title, reminder tone, and message.
•
To delete a reminder, open the reminder and press the Delete soft key.
•
To delete all reminders, open the calendar and press the Schedule soft key. Then
press the Options soft key and select DELETE ALL.
45
Page 47

Finding the Handset
If you can't find your handset, press
seconds, and PAGING appears on the handset display. To cancel paging, press
handset.
FIND HS
on the base when the phone is in standby. The handset will beep for 60
FIND HS
again or any key on the
Adjusting the Ringer Volume
You can adjust the ringer volume for PC calls and regular phone calls.
1. With the phone in standby, press the center of the joystick and select the ringer options icon .
2. Select the RINGER VOLUME submenu.
3. To change the ring volume for regular phone calls, select the phone icon . To
change the ring volume for PC calls, select the computer icon .
4. Move the cursor to select HIGH, LOW, or OFF. As you highlight each volume, you will
hear a sample of the ring tone at that volume.
5. Press the center of the joystick or the Select soft key. You will hear a confirmation tone, and the next time the
phone rings, it will use the new ring volume.
NOTE: If you turn the ringer volume off, the ringer off icon appears in the top left corner of
the screen.
Adjusting the Alert Notification Tone Volume
To change the volume of the alert tone, follow the steps below (to turn off the tone for specific types of alerts, see
Sending Windows Live™ Messenger Alerts to Your Phone on page 19):
46
Page 48

1. With the phone in standby, press the center of the joystick and select the ringer options icon .
2. Select the ALERT VOLUME submenu.
3. Move the cursor to select HIGH, LOW, or OFF.
4. Press the center of the joystick or the Select soft key. You will hear a confirmation tone, and the next time the
phone receives an alert notification, it will use the new alert tone volume.
Adjusting the Earpiece and Speaker Volume
You can adjust the earpiece and speaker volume by using the volume keys on the side of the handset.
Press the top button to make it louder and the bottom button to make it softer.
If you are at your computer, you can use the speaker volume control at the right side of the call window.
Adjusting the Audio Tone
If you aren't satisfied with the audio quality of your phone, you can adjust the audio tone. Your phone gives you three
audio tone options: low, natural and high; the default setting, Natural Tone, is recommended for hearing aid users.
Audio tone adjustments only apply to the earpiece, not the speakerphone. To adjust the audio tone:
1. With the phone in standby, press the center of the joystick and select the speaker setup icon .
2. Select the AUDIO TONE submenu.
3. Move the cursor to select HIGH TONE, NATURAL TONE, or LOW TONE.
4. Press the center of the joystick or the Select soft key. You will hear a confirmation tone.
47
Page 49

Adjusting the Display Contrast
You can adjust the contrast on the handset display to make it easier to read.
1. Press the center of the joystick and select the display options icon .
2. Select the LCD CONTRAST submenu.
3. Move the joystick to the right to increase the display contrast. Move it left to decrease the display contrast. As
you move the joystick, the test pattern displays at the new contrast setting.
4. When you see the display contrast setting you want to use, press the center of the joystick or the Select soft
key. You will hear a confirmation tone, and the phone returns to the display options menu.
5. Press
END
to exit the menu and return to standby.
Using Hold and Conference
Placing a Call on Hold
•
To place a regular phone call on hold, press
hold, press
•
To place a PC call on hold, press the Hold soft key. To return to the party on hold,
press the PC Call soft key.
NOTE: If you leave a regular phone call on hold for 5 minutes, the
phone rings to remind you. While a call is on hold, the phone can't
receive Caller ID or Call Waiting from the regular phone line.
TALK/FLASH
or
SPEAKER
.
BACK/HOLD
48
. To return to the party on
Page 50

Holding a Three-way Conference
You can hold a conference call with a caller on your regular phone line and a caller on a
PC call. To start a conference call, follow the steps below:
1. Make a PC call normally. After the call connects, put it on hold.
2. Now make a regular phone call. After the regular call connects, press the Options
soft key, and select CONFERENCE.
NOTE: Anytime you put both lines on hold, you can quickly
conference them together by pressing the volume up key on the
side of the phone.
To disconnect one party from a conference call, put the party you want to continue talking
with on hold (see Placing a Call on Hold on page 48). Press
party, and then return to party on hold to continue the call.
NOTE: If the party on the regular phone line hangs up from a conference call, you may
hear a fast busy signal. If this happens, put the PC call on hold and press
END
to hang up the other
END
.
49
Page 51

Using Special Features
Muting the Microphone
Mute turns off the microphone so the caller can't hear you. This only works while you are on a call.
While on a regular phone call
1. Press the Options soft key.
2. Use the joystick to select MUTE and press the center of the joystick or the Select soft key. MUTE ON and the
mute icon appear in the display.
3. To cancel muting, repeat the procedure. MUTE OFF appears.
While on a PC call
1. Press the Mute soft key. MUTE ON appears in the display.
2. To cancel muting, press the Unmute soft key. MUTE OFF appears.
Installing the Optional Headset
Your phone may be used with an optional headset. To use a headset,
open the rubber headset jack cover on the side of the handset and
insert the headset plug into the headset jack. (Headsets may be
purchased by calling the Uniden Parts Department. See back cover
page for contact information.)
50
Page 52

Maintenance
Specifications
Operating Temperature
AC Adaptor
Battery
0° C to +50° C (+32° F to +122° F)
Part Number
Input Voltage
Output Voltage
Part Number
Capacity
Base: AAD-255
Base: 240V AC, 50 Hz
Base: 9V DC @ 400 mA
BT-0003
3.6V DC @ 900 mAh
Power Failures
During a power failure, you will not be able to make or receive calls with the phone. To avoid damage from an
electrical spike when the power comes back on, we recommend you unplug your phone during power outages.
Battery Life
With average use, your battery talk time will be approximately 5 hours and standby time will be approximately 4 days.
For optimum performance, be sure to return the handset to the cradle after each call. If the handset is left off of the
base, the actual talk time duration will be reduced respective to the amount of time the handset is off the cradle.
Low Battery Alert
When the battery pack is very low, the phone is programmed to eliminate functions in order to save power. The
battery pack needs to be charged when the display shows LOW BATTERY and the empty battery icon. If the phone is
in standby, none of the keys will operate. If you are on a call, complete your conversation as quickly as possible, and
return the handset to the charging cradle.
51
Page 53

Battery Replacement and Handling
When the talk time becomes short, even after the battery is recharged, please replace the battery. With normal usage,
your battery should last about one year. A replacement Uniden adaptor or battery may be purchased by calling
Uniden's Parts department (see back cover page).
WARNING
To avoid the risk of personal injury or property damage from fire or electrical shock, use
only BT-0003 battery pack with your phone.
CAUTION
Do not remove the batteries from the handset to charge them.
Never throw the battery into a fire, disassemble them, or heat them.
Do not remove or damage the battery casing.
Change the Batteries Annually
Even when the battery pack is not being used, it will gradually discharge over a long period of time. With average use,
your phone’s battery should last approximately one year. To order replacement batteries, please contact Uniden’s
Parts Department (see back cover page).
Clean the Battery Contacts
To maintain a good charge, clean the charging contacts on the bottom
of the handset once a month. Dampen a cloth with plain water. Gently
rub the damp cloth over the charging contacts until all visible dirt is
removed. Dry the contacts thoroughly before returning the handset to
the charging cradle.
Caution: Do not use paint thinner, benzene, alcohol,
or other chemical products. Doing so may discolor
the surface of the telephone and damage the finish.
52
Page 54

Troubleshooting
Resetting the Handset
You may need to reset your handset when you want to change the digital security code or when you are instructed to
by one of Uniden's call center representatives.
1. Press and hold
2. Use the joystick to highlight DEREGISTER HS and press the center of the joystick or the Select soft key.
3. The phone will ask you to confirm the deregistration. Select YES. The handset will clear its registration
information from the base, and then delete the link to the base from its own memory.
4. When the base information is deleted, the handset displays MUST PLACE HANDSET IN BASE TO
REGISTER. MODELS MAY VARY, REFER TO OWNER’S MANUAL FOR HELP.
5. Place the handset in the base to reregister the handset.
If the handset cannot contact the base, it will display UNAVAILABLE. Make sure the handset is in range of the base
and the base is connected to power.
END
and # for at least 5 seconds, until the system reset menu displays.
Resetting the Base
You may need to reset your base if your handset has been damaged and you want to replace it or when you are
instructed to by one of Uniden's call center representatives.
1. Disconnect the AC adaptor.
2. Press and hold
begins to blink.
3. Place the handset in the base to reregister the handset.
FIND HS
while you reconnect the AC adaptor. Continue holding
53
FIND HS
until the charge light
Page 55

Resetting the Voice Mail Waiting Light
If the voice message waiting light continues blinking even after you've retrieved your messages, press and hold
HS
key until the light stops blinking.
FIND
Changing the Digital Security Code
The digital security code is an identification code used to connect the handset and the base. Your unit comes with a
preset security code. Resetting this code is not normally necessary. In the rare situation that you suspect another
cordless telephone is using the same security code or if you are instructed to change this code by a Call Center
Representative, reset the handset to change the code (see Resetting the Handset on page 53).
Traveling Out of Range
During a call, if you move your handset too far from your base, noise may increase. If you pass the range limit of the
base, the handset will beep, display OUT OF RANGE, and then go to standby. The base will maintain the connection
for 30 seconds after the handset goes out of range. If you move the handset back within range of the base within 30
seconds, press
TALK/FLASH
or
SPEAKER
to pick up the call again.
Common Issues
If your phone is not performing to your expectations, please try these simple steps first. If these steps do not solve
your problem, please visit our website at www.uniden.com.au (for Australian model) or www.uniden.co.nz (for New
Zealand model) for customer support.
Symptom Suggestion
•
The charge LED won't
come on when the handset
is placed in the base.
The audio sounds weak.
Make sure the AC adaptor is plugged into the base and wall outlet.
•
Make sure the handset is properly seated in the base.
•
Make sure the charging contacts on the handset are clean.
•
Move the handset and base away from metal objects or appliances.
•
Make sure that you are not too far from the base.
54
Page 56

The handset doesn't ring or
Symptom Suggestion
•
Make sure that you are not too far from the base.
•
Can't make or receive
regular phone calls.
Can't make or receive
Windows Live™
Messenger voice calls.
Severe noise interference.
The Caller ID does not
display.
receive a page.
Check both ends of the base telephone line cord.
•
Make sure the AC adaptor is plugged into the base and wall outlet.
•
Disconnect the AC adaptor and reconnect.
•
Make sure that you are not too far from the base.
•
Make sure you can sign in to Windows Live™ Messenger from your computer.
•
Make sure the USB cable is securely connected to both the base and a
standard USB port on your computer.
•
Disconnect the USB cable from your computer and reconnect it.
•
If you connected the USB cable through a USB hub or switch, try connecting it
directly to your computer.
•
Make sure the AC adaptor is plugged into the base and wall outlet.
•
Disconnect the AC adaptor and reconnect.
•
Keep the handset away from microwave ovens, computers, remote control toys,
wireless microphones, alarm systems, intercoms, room monitors, fluorescent
lights, and electrical appliances.
•
Move to another location or turn off the source of interference.
•
The call was placed through a switchboard.
•
Call your telephone provider to verify your Caller ID service is current. There
may be a problem with your Caller ID service.
•
Make sure that you are not too far from the base.
•
Charge the handset battery for 15 hours by placing the handset on the base.
•
Change the Digital Security Code (see page 54).
55
Page 57

Liquid Damage
Moisture and liquid can damage your cordless phone.
•
If the handset or base is exposed to moisture or liquid, but only the exterior plastic housing is affected, wipe off
the liquid, and use as normal.
•
If moisture or liquid has entered the plastic housing (i.e. liquid can be heard in the phone or liquid has entered
the handset battery compartment or vent openings on the base), follow the steps below:
Handset Base
1. Remove the battery cover and leave it off for ventilation.
2. Disconnect the battery pack. Leave the battery cover off and
the battery pack disconnected for at least 3 days.
3. Once the handset is completely dry, reconnect the battery
pack and the battery cover.
4. Recharge the handset's battery pack for 15 hours before
using.
IMPORTANT: You must unplug the telephone line while recharging the battery packs to avoid charge interruption.
CAUTION: DO NOT use a microwave oven to speed up the drying process. This will cause permanent damage to the
handset, base and the microwave oven. After following these steps, if your cordless telephone does not work, please
visit our website at www.uniden.com.au (for Australian model) or www.uniden.co.nz (for New Zealand model) for
customer support.
1. Disconnect the AC adaptor from the
base.
2. Disconnect the telephone cord and the
USB cable from the base.
3. Let dry for at least 3 days.
56
Page 58

Precautions!
Before you read anything else, please note the following:
Warning!
Uniden Australia Pty Ltd and Uniden NZ Ltd DOES NOT
represent this unit to be waterproof. To reduce the risk of fire,
electrical shock, or damage to the unit, DO NOT expose this
unit to rain or moisture.
Rechargeable Nickel-Metal-Hydride Battery
Warning
•
This equipment contains a rechargeable Nickel-MetalHydride battery. The rechargeable batteries contained in
this equipment may explode if disposed of in a fire.
•
Do not short-circuit the battery.
•
Do not charge the rechargeable battery used in this
equipment in any charger other than the one designed to
charge this battery as specified in the owner's manual.
Using another charger may damage the battery or cause
the battery to explode.
Rechargeable Batteries Must Be Recycled or Disposed of
Properly
Important Safety Instructions
When using your telephone equipment, basic safety
precautions should always be followed to reduce the risk of fire,
electric shock and injury to persons, including the following:
1.
Do not use this product near water, for example, near a
bath tub, wash bowl, kitchen sink or laundry tub, in a wet
basement or near a swimming pool.
2. Avoid using a telephone (other than a cordless type)
during an electrical storm. There may be a remote risk of
electric shock from lightning.
3. Do not use the telephone to report a gas leak in the
vicinity of the leak.
4. Use only the power cord and batteries indicated in this
manual. Do not dispose of batteries in a fire. They may
explode. Check with local authorities for possible battery
disposal instructions.
5. Do not disassemble any component of this product.
SAVE THESE INSTRUCTIONS
CAUTION!
Risk of explosion if battery is replaced by an incorrect type.
Dispose of used batteries according to the instructions. Do not
open or mutilate the battery, and disconnect the battery before
shipping this product.
Uniden works to reduce lead content in our PVC coated cords
in our products and accessories.
57
Page 59

Menu Quick Reference
Windows Live™ Messenger Menu Options
With the phone in standby, press the PC Menu soft key. Then move the cursor to select one of the following options:
Menu Functions For more
information
Set Status
View History
Sort Contacts
View Contacts
Download Nmbrs
Set Alerts
Mail Status
Set Area Code
Sign Out
Change status to away, busy, appear
offline, etc.
See incoming and outgoing call lists;
clear call history
Show contacts by group, by name, and
by presence (or current online status)
Display the contacts' display name, full
name, email address or phone number
Download contact list phone numbers to
the phone's local phonebook memory
Set alerts for new email, contacts coming
online, IM requests, and system alerts
See if you have new mail messages See page 40
Select your country for Windows Live™
Messenger.
Signs out of Windows Live™ Messenger
on both the phone and the computer
see page 40
see page 41
see page 26
see page 26
see page 26
See page 19
N/A
N/A
58
Page 60

Phone Setup Options
With the phone in Standby, press the center of the joystick straight down. Then move the cursor to select one of the
following icons:
System Setup Menu Options Standard Setting For more Information
Auto Talk On see page 35
Any Key Answer On
Handset
Global
Key Touch Tone On see page 34
Edit Voice Mail
Unique ID On see page 20
Date & Time 1/01/07 12:00A see page 22
Call Waiting Off see page 20
Name Tagging On see page 22
Insert 0
AUS(Empty)
NZ(083210)
AUS(Off)
NZ(On)
see page 35
see page 21
see page 23
Ringer Options Options Standard Setting For more Information
Ringer Volume
Ringer Tones
Alert Volume High see page 46
Phone line: High see page 46
Windows Live™ Messenger: High see page 46
Phone line: Flicker see page 33
Windows Live™ Messenger: Synthesize see page 33
59
Page 61

Speaker Setup Options Standard Setting For more Information
Earpiece Volume Level 4 Of 6 see page 47
Speaker Volume Level 4 Of 6
Audio Tone Natural Tone
see page 47
see page 47
Display Options Options Standard Setting For more Information
Wall Paper Windows Live see page 32
Color Scheme Sky Blue see page 33
LCD Contrast Level 5 Of 10 see page 48
Animation Type No Selection see page 32
60
Page 62

Index
111 calling................................. 3
Answering calls ....................... 36
Any key answer.......................35
AutoTalk.................................. 35
Base
Installing ..............................12
Parts of the base ...................8
Resetting .............................53
USB connection...................17
Battery
Installing ..............................13
Low battery alert.................. 51
Replacement and handling..52
Talk and standby time .........51
Belt clip ...................................13
Call waiting .............................39
Caller ID on call waiting .......... 20
Computer connection.............. 17
Conferencing...........................49
Date and time..........................22
Finding the handset ................46
Handset
Choosing a ringer ................ 33
Displays and icons ................ 9
Entering text ........................11
Finding ................................46
Joystick operation................10
Parts of the handset ..............7
Resetting ............................. 53
Soft key operation ...............10
Standby screen ..................... 9
Hanging up ............................. 36
Headset .................................. 50
Hold ........................................ 48
Insert 0.................................... 23
Installation............................... 12
Key touch tone........................ 34
Maintenance ...........................51
Making calls
Using speed dial.................. 38
Using the call history list...... 41
Using the Caller ID list......... 42
Using the contact list ...........37
Using the phonebook ..........38
Making calls ............................ 36
Mute
Microphone ......................... 50
Ringer (ignore a call) ........... 36
Name Tagging ........................22
Out of range............................ 54
Phonebook
and Contact list.................... 24
Creating new entries ...........28
Deleting entries ...................30
Downloading contacts .........26
Making calls from ................38
Storing Caller ID or redial
numbers........................... 29
Power failure operation ........... 51
Reminders .............................. 43
Ringer
Changing the ringer............. 33
Choosing a handset ringer ..33
Muting (ringer off) ................ 46
Personal ring ....................... 20
Safety notices .........................57
Security code .......................... 54
Software needed....................... 4
Speed dial
Making calls from ................38
Programming....................... 29
Text, entering.......................... 11
Voice mail ................... 21, 40, 54
Volume, adjusting .............46, 47
Windows Live™ Messenger
Alerts ................................... 19
Calling from the contact list .37
Changing your status ..........40
Contact list .................... 24, 25
Downloading contacts ......... 26
Downloading the software ...16
Version .................................. 4
Windows Live™web calling .3, 5,
37
61
Page 63

UNIDEN NEW ZEALAND LIMITED
UNIDEN AUSTRALIA PTY LIMITED
One Year Limited Warranty
Important: Evidence of original purchase is required for warranty service.
Warrantor: Uniden Australia Pty Limited A.B.N. 58 001 865 498, Uniden New Zealand Limited
Warranty is only valid in the original country of purchase.
ELEMENT OF WARRANTY: Uniden warrants to the original retail owner for the duration of this warranty, its Win1200 (herein after referred to as the
Product), to be free from defects in materials and craftsmanship with only the limitations or exclusions set out below.
WARRANTY DURATION:
of original retail sale. This warranty will be deemed invalid if the product is;
(A) Damaged or not maintained as reasonable and necessary,
(B) Modified, altered or used as part of any conversion kits, subassemblies, or any configurations not sold by Uniden,
(C) Improperly installed,
(D) Repaired by someone other than an authorized Uniden repair Agent for a defect or malfunction covered by this warranty,
(E) Used in conjunction with any equipment or parts or as part of a system not manufactured by Uniden, or
(F) Where the Serial Number label of the product has been removed or damaged beyond recognition.
Warranty only valid in the country of original retail/sale.
PARTS COVERED:
STATEMENT OF REMEDY:
warrantor at its discretion, will repair the defect or replace the product and return it to you without charge for parts or service.
This warrant does not cover or provide for the reimbursement or payment of incidental or consequential damages. This EXPRESS
WARRANTY is in addition to and does not in any way affect your rights under the TRADE PRACTICES ACT 1974 (Cth) (Australia) or
the CONSUMER GUARANTEES ACT (New Zealand).
PROCEDURE FOR OBTAINING PERFORMANCE OR WARRANTY: In the event that the Product does not conform to this warranty, the Product
should be shipped or delivered, freight pre-paid, with evidence of original purchase (eg. a copy of the sales docket), to the warrantor at:
SERVICE DIVISION
345 Princes Highway, Rockdale,
NSW 2216, AUSTRALIA
Fax: (02) 9599 3278
www.uniden.com.au
This warranty to the original retail owner only, shall terminate and be of no further effect ONE (1) year after the date
This warranty covers for one (1) year, the Product and included accessories.
In the event that the product does not conform to this warranty at any time while this warranty is in effect, the
SERVICE DIVISION
150 Harris Road, East Tamaki,
Auckland, NEW ZEALAND
Fax: (09) 274 4253
www.uniden.co.nz
62
Page 64

©2007 Uniden Australia Pty Limited/Uniden New Zealand Limited
Part Code UPZZ01827BB(0) Printed in China
 Loading...