

Uniden WDVR4-2 Owner's Manual
WIRELESS DIGITAL VIDEO RECORDER
WDVR4-2
WDVR4-2 HDD
OWNER’S MANUAL
© 2015 Uniden America Corporation
Issue 1, June 2015
Irving, Texas

CUSTOMER CARE
At Uniden®, we care about you!
If you need assistance, please do NOT return this product to your place of purchase. Our customer care
specialists are available to serve you.
Quickly find answers to your questions by:
1. Reading your owner’s manual.
2. Visiting our customer support website at www.uniden.com.
3. Calling our customer care specialists at 1-800-658-8068.
Images in this manual may differ slightly from your actual product.
Save your receipt/proof of purchase for warranty.
Uniden surveillance products are not manufactured and/or sold with the intent to be used for illegal purposes. Uniden expects consumer’s use of these
products to be in compliance with all local, state and federal law. For further information on video surveillance and audio recording legal requirements,
please consult your local, state and federal law.
© 2015. All rights allowed by law are hereby reserved.
Uniden is a registered trademark of Uniden America Corporation.
All trademarks and registered trademarks belong to their respective owners.

CONTENTS
CUSTOMER CARE ................................................................................................................................. 2
INTRODUCTION ..........................................................................................................5
ABOUT THIS MANUAL ....................................................................................................................... 5
INTRODUCTION .................................................................................................................................... 5
USING THE WDVR ................................................................................................................................ 5
FEATURES ............................................................................................................................................... 5
WHAT’S INCLUDED ............................................................................................................................. 6
ABOUT THE WDVR42 SYSTEM ...................................................................................................... 6
Wireless DVR Receiver .................................................................................................................................................6
Wireless Digital Outdoor PIR Camera .....................................................................................................................8
INSTALLING YOUR SYSTEM .......................................................................................9
SET UP YOUR WDVR SYSTEM.......................................................................................................... 9
INSTALLING YOUR CAMERA ........................................................................................................... 9
REMOTE OPERATION (Uniden’s WDVR APP) ..........................................................11
ADD SYSTEM TO THE APP ..............................................................................................................11
LIVE SCREEN/TASK BAR ..................................................................................................................11
Live Video Task Bar Icons ......................................................................................................................................... 12
LIVE VIDEO TASK BAR ICONS .................................................................................................................................. 12
OPERATION OVERVIEW ...................................................................................................................14
BASIC SYSTEM OPERATIONS - QUICK SELECT MENU BAR .....................................15
USING THE MOUSE ...........................................................................................................................15
QUICK SELECT MENU BAR OVERVIEW ......................................................................................15
CHANNEL SELECT FUNCTIONS ....................................................................................................15
MAIN MENU .........................................................................................................................................16
Camera Setup .............................................................................................................................................................. 17
Recording Schedule Setup ...................................................................................................................................... 18
Event List ...................................................................................................................................................................... 21
System Setup ............................................................................................................................................................... 22
Storage Setup .............................................................................................................................................................. 23
QUAD AND SMART QUAD .............................................................................................................24
Quad View ..................................................................................................................................................................... 24
Smart Quad View ........................................................................................................................................................ 25
Audio Indication ......................................................................................................................................................... 25
SINGLE CHANNEL OR ALL CHANNELS RECORD ...................................................................25
For Single Channel Recording ............................................................................................................................... 25
For All Channel Recording ...................................................................................................................................... 25

TROUBLESHOOTING .................................................................................................26
PRODUCT SPECIFICATION .......................................................................................29
APPENDIX A: COMPATIBILITY LIST .........................................................................30
APPENDIX B: RECORDING CAPACITY ......................................................................31
FCC COMPLIANCE .....................................................................................................31
IC COMPLIANCE ........................................................................................................31
ONE-YEAR LIMITED WARRANTY ..............................................................................31

5
WIRELESS DVR OWNER’S MANUAL
WDVR42 AND WDVR42 HDD
INTRODUCTION
ABOUT THIS MANUAL
The Wireless Digital Video Recorder (WDVR) system is currently available in 2 configurations: - HDD and
non-HDD. The WDVR receiver supports an optional external USB HDD, comes with an 8GB microSD
card, and supports an external USB hard drive (not included). The WDVR HDD receiver comes with an
internal 1TB HDD. Most operations are identical between the two configurations, and this manual refers
to the WDVR for simplicity. Features and operations unique to the WDVR or WDVR HDD are discussed
separately.
The WDVR system provides up to 4 video channels and can accommodate up to 4 digital video cameras.
This manual covers the 4 channel-2 camera configurations; hence, the model names are WDVR4-2 and
WDVR4-2 HDD.
INTRODUCTION
The WDVR system consists of a WDVR receiver and digital wireless cameras. The WDVR receiver stores
video and audio data from up to 4 cameras. You can view the data in real-time, later, or remotely via
mobile device(s) with an internet connection (smartphone, tablet, etc.).
The Digital Wireless Camera(s) wirelessly transfers compressed video and audio data in digital format.
This digital format offers an efficient, secure, and interference-free wireless connection to the WDVR
receiver. Transferring audio and video is secure and private, with no need to run cable(s) between the
receiver and the cameras. Installation is quick and easy.
USING THE WDVR
You can manage your system remotely (using Uniden’s WDVR app) or through the mouse (using an
internal management system in the WDVR receiver).
FEATURES
• 8GB microSD card (WDVR4-2 only)
• Supports external USB HDD (WDVR4-2 only)
• 1TB Internal HDD (WDVR4-2 HDD Only)
• Remote live access through Uniden’s free WDVR app, available on Apple’s App Store, Google Play, or
the Amazon App Store.
• Remote Snapshot & Record
• Event Notification/Email Alert
• Integrated Software
• Supports up to 4 weather-proof audio reception cameras at VGA (2 cameras included)
• Independant Camera Setup
• IR Cut Filter Switch
• PIR Motion Sensor
• Built-In Microphone
• High Quality VGA H.264 Video
• Night vision range up to 40 feet
6
• Transmission up to 500 feet
• HDMI Output
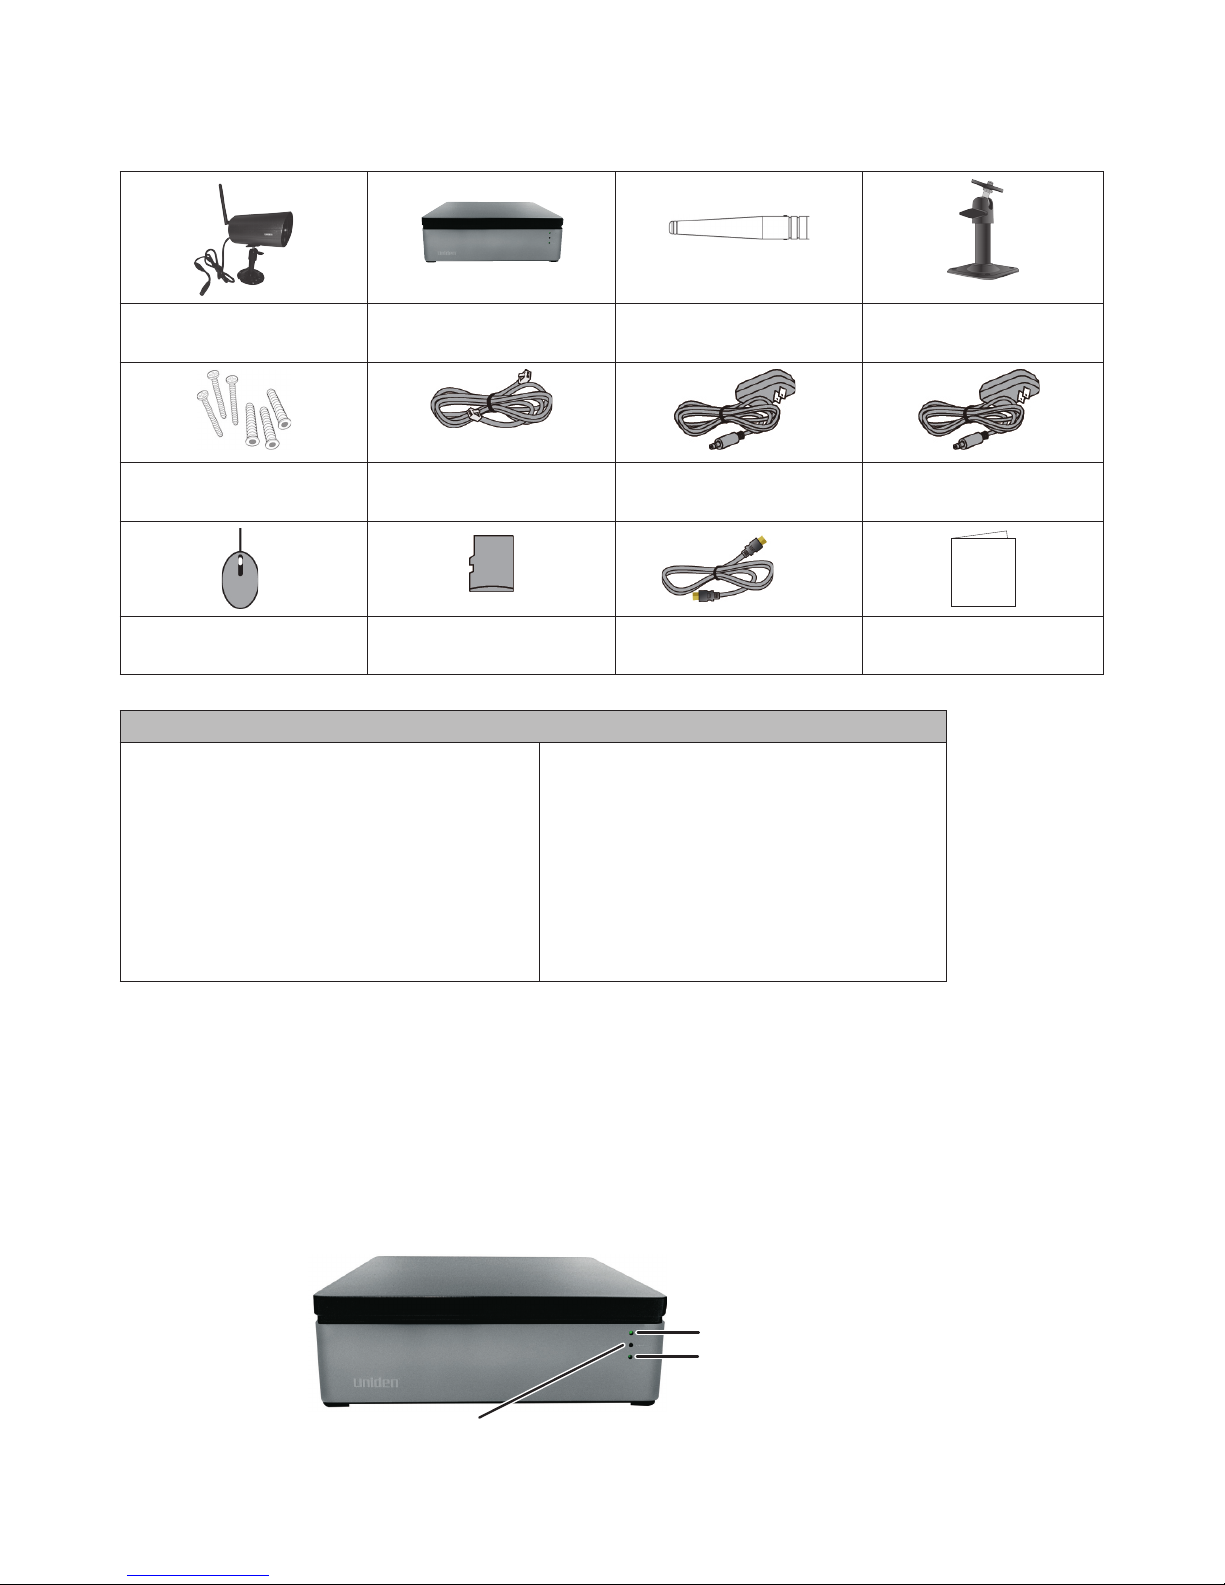
WHAT’S INCLUDED
Digital Wireless Outdoor
IR Camera (2)
WDVR Receiver (1) Camera/Receiver
Antenna (3)
Camera Stand (2)
Screw Pack for Camera
(2)
Ethernet Cable (1) Camera Power Adapter
5V/1A (2)
WDVR Power Adapter
12V/2A (1)
Quick Start Guide
Mouse 8GB MicroSD card (1)
(WDVR4-2 only)
HDMI Video Cable (1) Quick Start Guide
MINIMUM SYSTEM REQUIREMENT FOR DVR:
For Networking:
• DHCP enabled router
• Available port on router
• 1.5Mbps or above upload bandwidth
(both home and mobile device).
• iOS 5.0 or above.
• Android 4.1X or above, and 1.2GHz /
1.5GHz dual core or above.
For Recording:
• Max 2TB HDD supported.
For Display:
For best performance, use the HDMI
cable provided.
ABOUT THE WDVR42 SYSTEM
The WDVR4-2 system is comprised of a 4-channel WDVR receiver with 2 digital wireless cameras. It comes
in 2 configurations - an HDD system and a non-HDD system. Additional cameras are available from www.
uniden.com.
Wireless DVR Receiver
Front
Power
HDD Status
(WDVR4-2 HDD Only)
Link Status
(WDVR4-2 HDD Only)
7
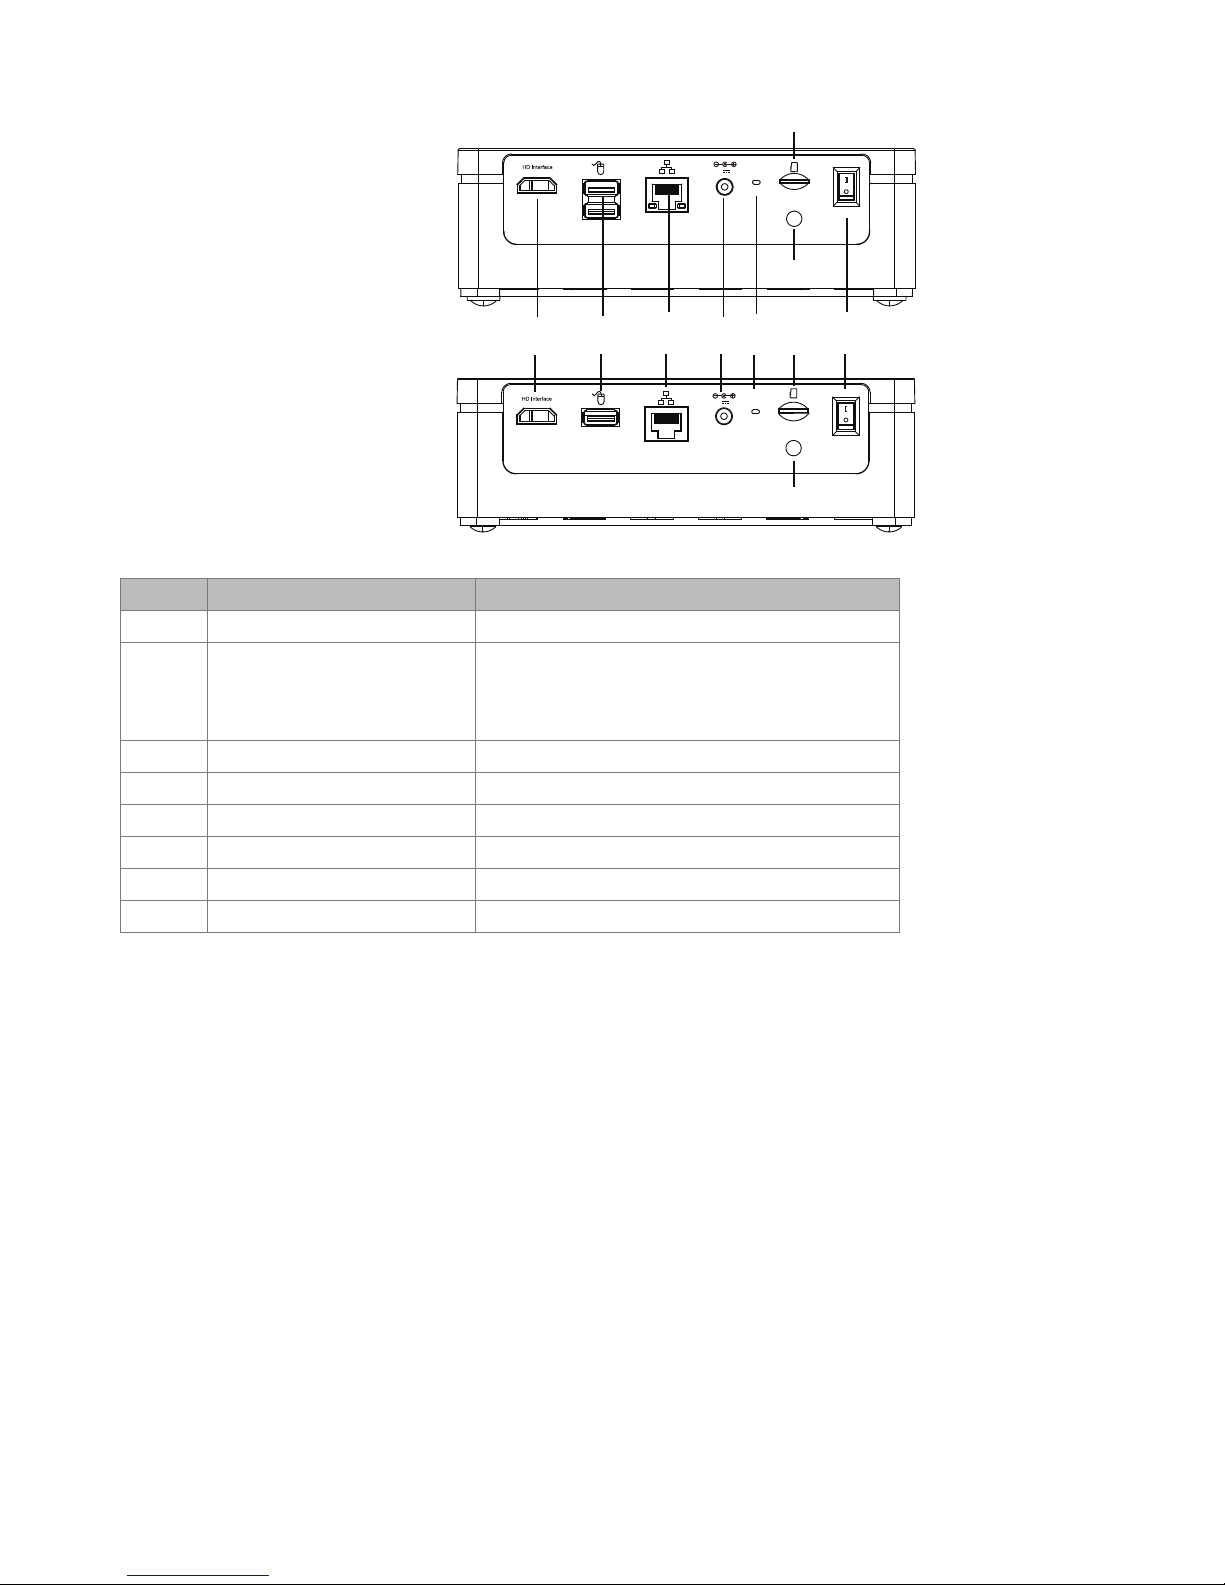
Back
RESET
HDD
ON
OFF
12V 2A
RESET
ON
OFF
12V 3A
WDVR4-2
WDVR4-2 HDD
1 2 8
7
543
6
7
6
ITEM NAME FUNCTION
1 HD Interface HDMI Video & Audio Output (TV)
2 USB Port Top USB port: Mouse
Bottom USB Port (WDVR4-2 Only): External
HDD
3
RJ45 Port
Internet Connection (Router)
4 Power Input DC 12V Adaptor
5 Reset
Reset System
6 MicroSD Card Slot Insert microSD Card
8 SMA Connector Receiver Antenna
7 Power On/Off Switch Power DVR Receiver On/Off
Note: Connect the HDMI cable to the TV and insert the microSD card before powering on the
WDVR.

8
Wireless Digital Outdoor PIR Camera
Front
ITEM NAME FUNCTION
1
2
3
4
5
6
7
8
9
10
1 Antenna Transmit / Receive Digital Wireless Audio /
Video Data
2 IR LEDs Night Vision
3 Lens Capture Image
4 Power Indicator Indicate Power On/Off Status
5 Pair Button Pair accessory camera to system
6 Power Connector Connect camera to power adapter.
7 Camera Stand Fasten Camera to Wall, Ceiling and/or Flat
Surface
8 PIR Passive Infrared sensor for detecting motion
9 Link Indicator Indicate Wireless Data Transfer Status
10 Light Sensor Detects light levels
Back
1
2
3
ITEM NAME FUNCTION
1 SMA Connector Antenna
2 Microphone Capture Audio
3 Power/Pair Cable Conduct Power to Camera
9
INSTALLING YOUR SYSTEM
Before you begin installing your system, keep in mind the following:
• Read the Quick Start Guide and this Owner’s Manual.
• Unpack all boxes carefully and verify that all the parts are present.
• Use only the enclosed power supplies. Camera or WDVR receiver damage caused by using incorrect
power supplies, voltage, or wiring is not covered by the warranty.
• Cutting any cable will also void the warranty.
• Do not drop, pierce, or dismantle the camera or receiver.
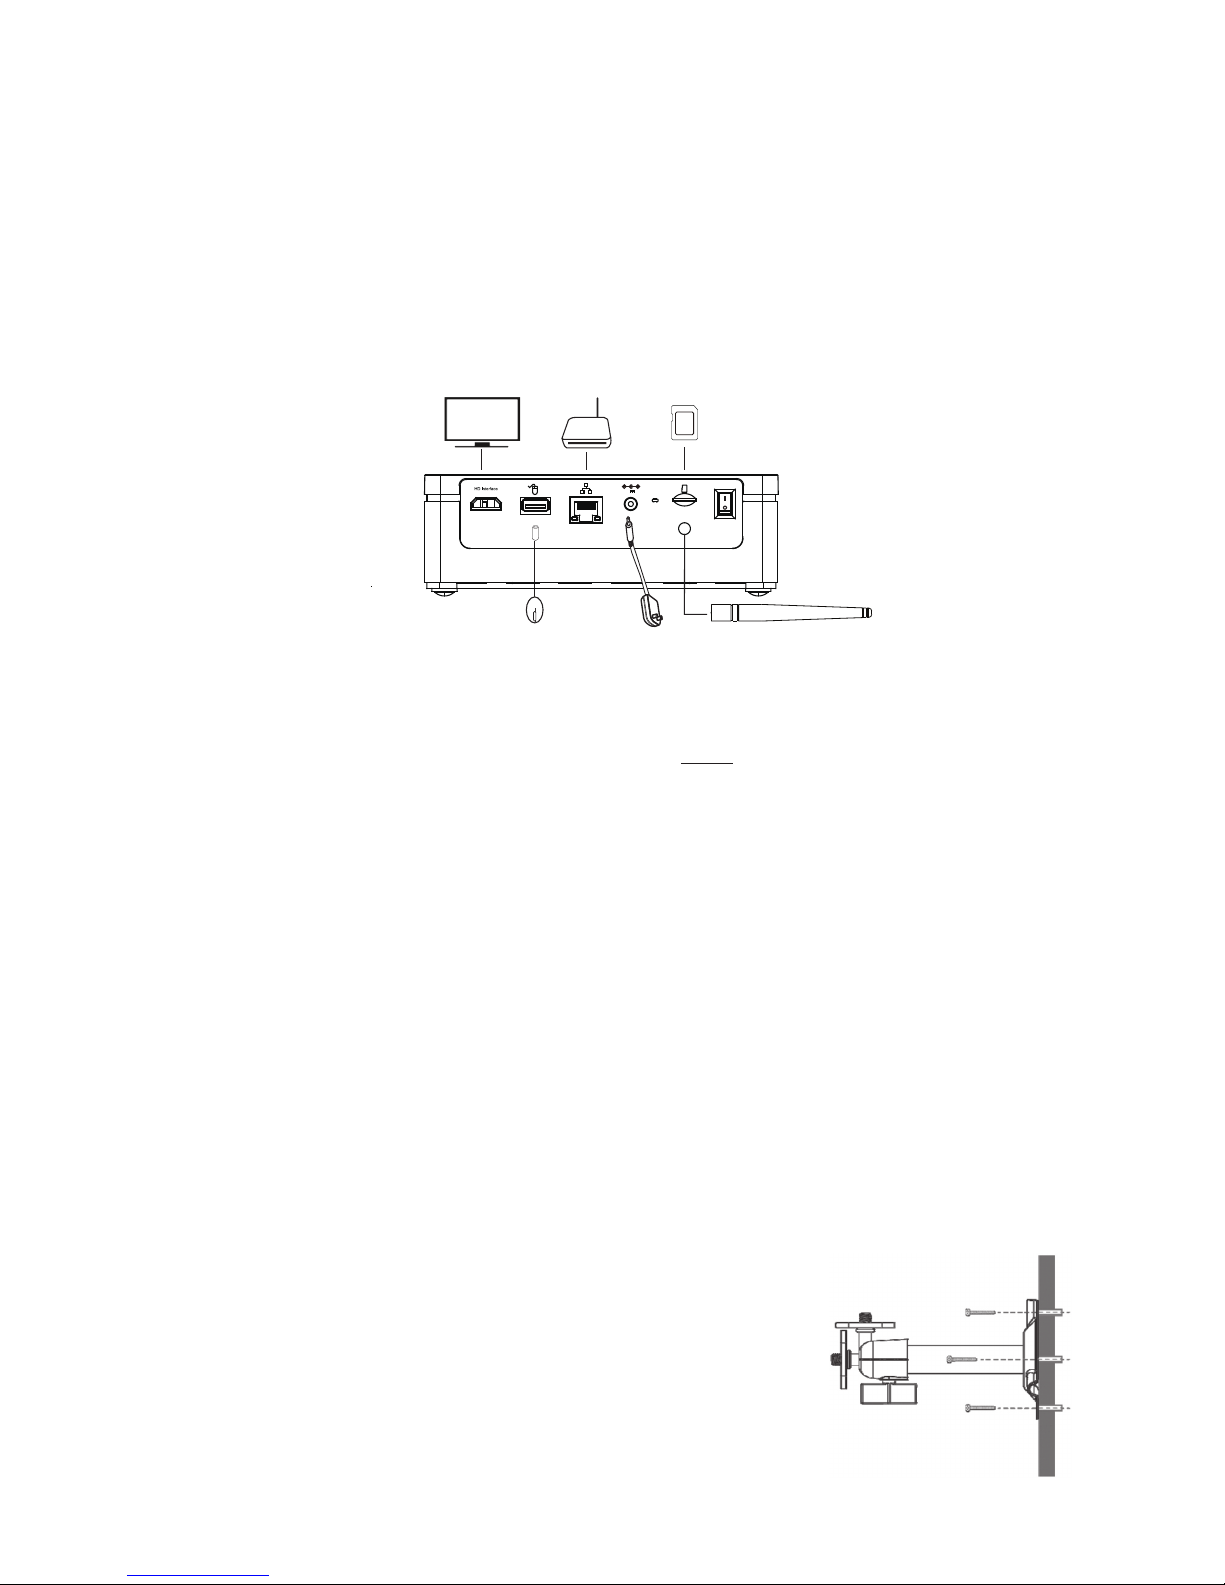
SET UP YOUR WDVR SYSTEM
1. Connect the antenna and mouse to the back of the WDVR receiver.
2. Connect the Ethernet cable from the WDVR receiver to the router.
3. Connect the HDMI cable from the receiver to the HDMI video connector on the TV/monitor. Use the
TV’s remote controller to adjust audio/alarm volume and to fine tune the camera’s image quality.
Camera image quality may vary among TV brands.
4. (WDVR4-2 Only) Insert memory card.
Note: Connect the HDMI cable to the TV and insert the microSD card before powering on the
Digital Wireless Receiver.
5. Connect the supplied power adaptor from the receiver to a power source (electric wall socket).
6. Power up the cameras.
Note: The cameras that come with your package are already paired to your receiver.
7. Power up the receiver. When the green POWER LED is steady on, the console is ready for use.
8. Turn on TV/monitor and switch to proper input sources.
Note: The HDMI interface automatically configures/adjusts the audio output to proper format
supported by TV/monitor. Please use TV volume adjustment to adjust the audio level. You may
need to reset TV input to pick up WDVR receiver’s HDMI signal.
Note: The USB port is designed for the USB mouse ONLY. Do not use it for any other purpose.
INSTALLING YOUR CAMERA
1. Find a suitable location to mount the camera.
2. Fix the camera stand to the wall using the supplied wall anchors and
screws.
SD
Router
(not included)
This image is the WDVR4-2 HDD. The
WDVR4-2 has 2 USB ports. Plug the mouse
into the top USB port.
RESET
ON
OFF
12V 2A
Antenna
Power

10
3. Loosen the thumb screw of the camera stand and secure the camera
body to the bracket. Make sure the camera is in an upright position
(relative to viewing).
4. Screw the antenna to the rear of the camera.
Ceiling Wall
5. Connect the supplied power adaptor to the camera and the power source. The camera’s red power
LED will light up. The camera is now ready for use.
6. Pair any additional additional cameras to the DVR through the Uniden WDVR app.
Note: The cameras that came with the package have already been paired to the wireless DVR.
 Loading...