

Page 1
®
RF REMOTE CONTROLLED
VEHICLE SECURITY SYSTEM
with Rolling Code and
Code Learning Te chnology
Operating Guide
Uniden New Zealand Limited
150 Harris Road
East Tamaki
Auckland New Zealand
Phone: 0800 864336 (sales)
Phone: 0800 486433 (service)
Fax: 09 274 0009
Email: service@uniden.co.nz
Uniden Australia Pty Limited
345 Princes Highway
Rockdale
NSW 2216 Australia
Phone: 02 9599 3577 (sales)
Phone: 1800 632 789 (service)
Fax: 02 9599 3278
Email: service@uniden.com.au
Page 2

®
VS1100XR Operating Guide
INTRODUCTION
CONGRATULATIONS
From the moment you purchased this UNIDEN Vehicle Security System, you became a part of the
UNIDEN family. You started taking advantage of over 30 years of advanced engineering. You
joined a team of engineers, technicians, designers, and people like yourself who know how
important protecting your vehicle is. You discovered the UNIDEN difference.
This difference is important because the UNIDEN VS1100XR is more than just an alarm. It is a
complete security and convenience system. It is like having your personal security guard and butler
on call in your vehicle, 24 hours a day.
But even the best security systems will not work properly without careful installation.
Therefore, the UNIDEN VS1100XR is designed for installation by your professional UNIDEN dealer.
He understands both his alarms and your needs, and will work hard to ensure the UNIDEN
VS1100XR does its job for you.
IMPORTANT
This UNIDEN VS1100XR security system contains many innovative features and unique functions.
Please read this Operating Guide carefully in order to understand all of this alarm’s security and
convenience features. Some features may require the addition of sensors or accessories not
included with this alarm. For more information, please consult your professional UNIDEN dealer.
NOTICE
The information and specifications printed in this manual are current at the time of publication.
However, the UNIDEN policy is one of continual development and improvement. For this reason,
UNIDEN reserves the right to change specifications without notice. UNIDEN is also not responsible
for misprints or typographical errors.
Copyright © 1999 UNIDEN® All rights reserved. This material may not be reproduced or copied, in
whole or in part, without the written permission of UNIDEN. This vehicle security system is protected
by patents in the U.S.A., Great Britain, Germany, Hungary, Taiwan, China, Japan, and Korea.
Other U.S.A. and international patents are pending.
WW
elcome to the family: UNIDENelcome to the family: UNIDEN
W
elcome to the family: UNIDEN
WW
elcome to the family: UNIDENelcome to the family: UNIDEN
, your dealer, your dealer
, your dealer
, your dealer, your dealer
, and you!, and you!
, and you!
, and you!, and you!
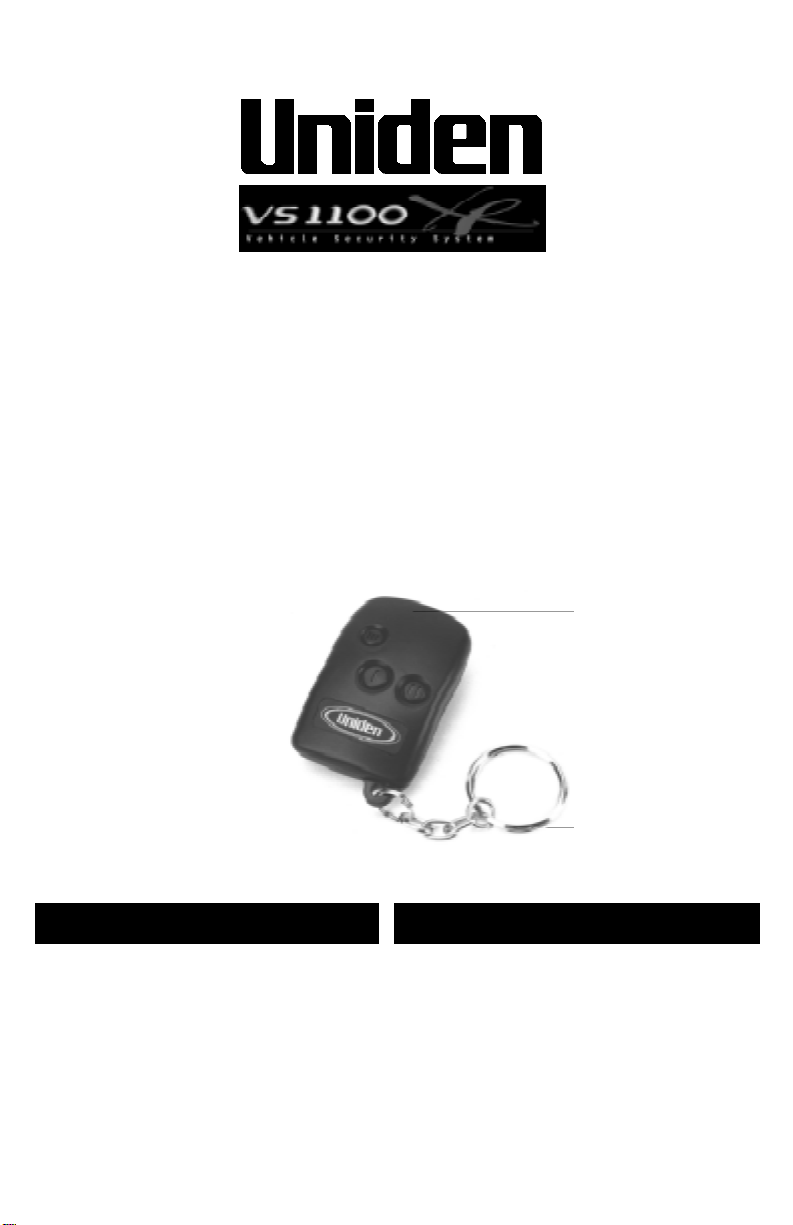
PARTS CHECK LIST
The following items are included in your alarm package;
* Alarm Brain
* 2 x 3 Button, Rolling Code Remote Controls
* 2 x Warning Decals
* Dual Stage Electromagnetic Shock Sensor
* Valet Switch
* Arm LED
* Multi Tone Siren with mounting screws
* 1 x Bonnet / Boot Pin Switch
* Wiring Loom with Engine Immobiliser Relay and Socket set
* Cable ties
- 1 x long (for securing shock sensor)
- 4 x short (for securing wiring)
Optional accessories are available to provide additional security and convenience.
Please refer to page 8 for more details.
Page 2
Page 3
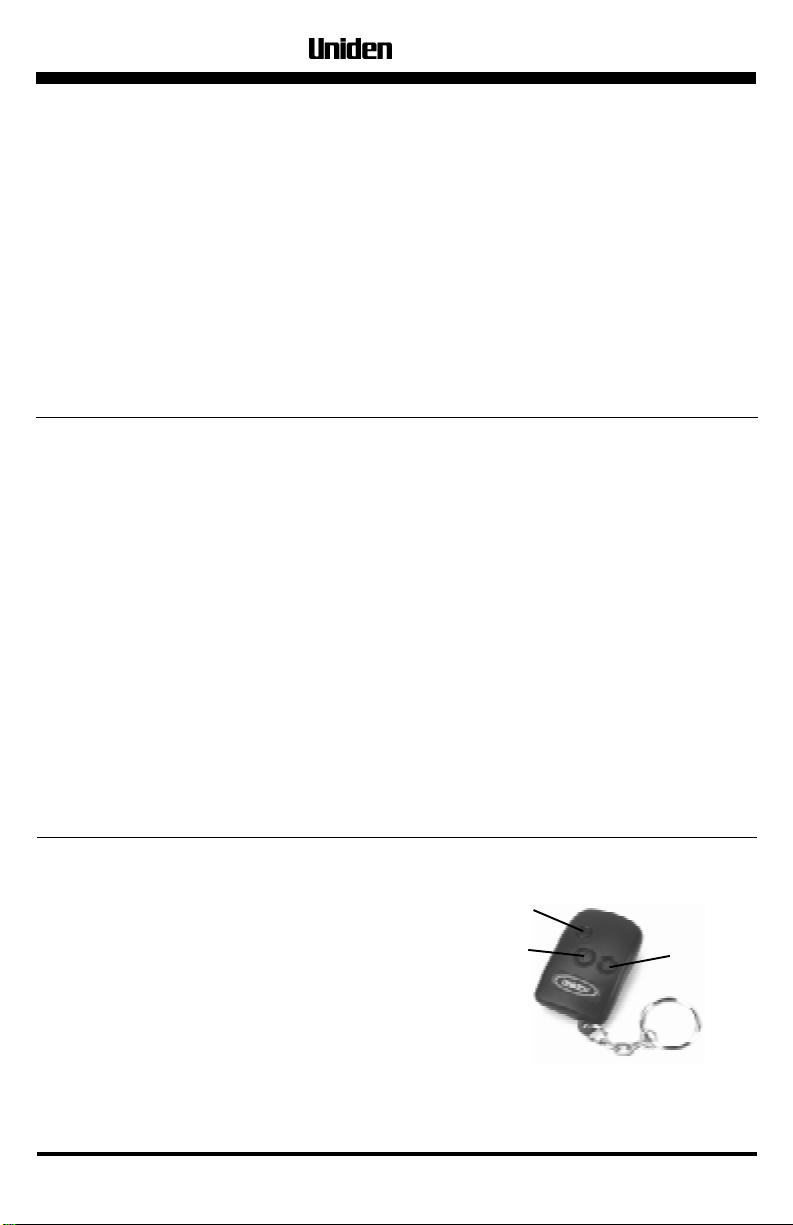
TABLE OF CONTENTS
Introduction ............................................. 2
T otal P rotection......................................... 3
Remote Control Functions ......................... 3
Arming .................................................... 4
Armed ..................................................... 4
Zone Bypass............................................. 4
Sensor Bypass .......................................... 5
Disarming................................................ 5
Emergency Call for Help (Panic) ................ 5
Valet ........................................................ 6
TOTAL PROTECTION
While your alarm is armed, your vehicle is
protected in the following ways;
l Potential thieves or vandals will be deterred
by the flashing LED and window decals.
l If the shock sensor detects light taps on the
vehicle, it will trigger the pre-intrusion alert
(the siren chirps 3 times and the parking
lights flash 3 times) to warn potential thieves
and vandals. However, if it detects a strong
shock to the vehicle, it will trigger the alarm
for 30 seconds. (See DUAL-STAGE SHOCK
SENSOR on page 7 for more details)
®
VS1100XR Operating Guide
Emergency Disarm ................................... 6
Silent arm/disarm..................................... 6
Power Door L ocks..................................... 6
Dual-stage Shock Sensor .......................... 7
Other Features ......................................... 7
Appendix 1 — Understanding the
Siren Chirps & Light Flashes .................. 7
Appendix 2 — Understanding the
LED flashes........................................... 8
Accessories .............................................. 8
l If a thief opens a door, the alarm immedi-
ately sounds the siren and flashes the
parking lights for 30 seconds. If the opened
door is not closed and current sensing has
not been selected, the siren and lights will
trigger up to three 30-second cycles, after
which the alarm will re-arm.
l The engine immobiliser prevents the engine
from being started with a key.
l The Automatic Engine Immobiliser will
disable the engine automatically after 10
minutes, even if you forget to set the alarm.
l Turning the ignition key ON will trigger the
alarm for 30 seconds.
l Optional UNIDEN glass-break & microwave
sensors and additional engine immobiliser
relays will offer additional protection. For
more info, please ask your UNIDEN dealer.
REMOTE CONTROL FUNCTIONS
1. Use button #1 to:
l Arm and disarm the alarm.
l Turn the siren ON in an emergency.
l Turn the siren OFF after activation.
l Lock/unlock power door locks.
l Bypass an open zone.
2. Use button #2 to:
l Silently arm or disarm the alarm.
l Operate a 2nd vehicle fitted with a
UNIDEN compatible alarm.
l Bypass the alarm's pre-intrusion
functions.
Button #3
Button #1
3. Use button #3 to:
l Control optional accessories such as a
garage door opener / house alarm
interface.
Button #2
Page 3
Page 4

®
VS1100XR Operating Guide
ARMING
There are two different ways to arm your alarm.
Tell your dealer which is best for you:
q Active Arming - (Default setting)
Means : Using the remote to arm the alarm.
1. Turn your ignition OFF and close all
doors.
2. Press remote control button #1.
l If the siren chirps and parking lights flash
once, the alarm is fully armed.
l If the siren chirps and parking lights flash
3 times, the alarm has armed, but is
waiting for the vehicle's delayed interior
lights to turn OFF (if your vehicle is so
equipped), or it is telling you that one of
the alarm's zones (door or bonnet or boot)
is either open or is not functioning
properly (see ZONE BYPAS S, below).
Also, check to make sure the interior light
switch was not accidentally left on.
q Passive Arming
Means : Relying on the last door closed to
arm the alarm.
Turn the ignition OFF, and open a door to exit
the vehicle.
When the last door is closed and the delayed
interior light turns OFF, (if your vehicle is so
equipped), the siren chirps and the parking
lights flash once. The LED now flashes
quickly .
l The alarm has now entered a 30 second
arming countdown, after which the siren
chirps and parking lights flash once more
to confirm the alarm is completely armed.
l If you wish, you can open a door during the
30-second arming countdown, and keep it
open for as long as needed. The LED turns
OFF while the door is opened. When
finished, once again close the last door, and
the siren will chirp and parking lights flash
once to show the 30-second arming
countdown has started again. The LED will
also begin to flash quickly.
l If you close the last open door, and the siren
does not chirp and parking lights do not
flash, you know that one or more doors are
not closed properly. This is a patented Quick
and Quiet Testing (Q.Q.T.™) feature.
l It prevents you from thinking your alarm is armed
when it may not be. In this case, double-check
that all the doors, as well as the bonnet and
boot, are closed properly, and that your
vehicle's interior lights are OFF. If you cannot
locate the problem, but need to arm the
alarm, then press button #1 to immediately
arm the alarm and bypass whatever zone is
open (see ZONE BYPASS, below).
NOTE — Under passive arming, you can force
your alarm to arm immediately any time during
the 30-second arming countdown by pressing
remote control button #1.
Note — There are references to opening or
closing a door throughout this manual.
"Door" also includes bonnet and boot, if they
are protected. Ask your dealer.
ARMED
When the 30-sec. arming countdown ends, or
when remote control button #1 is pressed to arm
the alarm, the siren chirps and parking lights
ZONE BYPASS
When you press button #1 to arm the alarm,
and the alarm responds with three chirps and
three light flashes, there are two possibilities:
A. Delayed interior lights — If your interior lights
do not immediately turn OFF when you close
your car door (in other words, your vehicle
has delayed interior lights), this is normal.
The alarm should protect all the openings
once the interior lights go OFF.
B. A zone was bypassed — In other words, the
alarm has armed, but a hardwired door is
not protected (either because it is open, or
Page 4
flash once, and the LED starts flashing
to show the alarm is armed.
because its door switch is broken). If the
bypassed door is later closed, it will be
restored (no siren chirp or light flash).
If your alarm indicates a bypassed zone, find the
cause as soon as possible to ensure your vehicle
is completely protected. For instance, if your
driver's door is not properly closed when you arm
your alarm, a thief may be able to open any
door without setting off the alarm.
NOTE — The three zone bypass confirm chirps
will not sound if chirp OFF is engaged. However,
the parking lights will still flash three times. (See
SILENT ARM / DISARM on page 6).
Page 5

SENSOR BYPASS
This is useful if you know, based on experience,
that your shock, glass-break, or other add-on
sensor will false trigger, such as when you park
near a construction site or other harsh environment.
To bypass your alarm's sensors,
1. Press button #1 to arm the alarm. The siren
chirps and the parking lights flash once (three
times if a zone is bypassed) to confirm
armed.
2. Within 3 seconds, press button #2.
The siren chirps 3 times and the parking
lights flash 3 times to confirm sensors are
bypassed.
DISARMING
To disarm the alarm, press button #1.
The siren chirps twice, the parking lights flash
twice, and the LED turns OFF.
q Auto Re-Arm - After disarming, if your
alarm has been set to auto re-arm, a 30
second automatic re-arming period begins.
After 30 secs. the alarm will automatically
re-arm.
Once re-armed, the siren chirps and the
parking lights flash one time, and the LED
starts flashing.
Note - Opening a door within 30 seconds
will cancel auto re-arm and the alarm will
be completely dis-armed.
q Auto Re-Lock - After disarming, if the
alarm has been connected with optional
central locking, the doors will re-lock
automatically after 30 seconds (unless a
door is opened).
®
VS1100XR Operating Guide
FIRST - Press
Button #1
The sensors are automatically restored next
time the alarm is armed.
Button #1
NEXT - Press
Button #2
(within 3
seconds)
EMERGENCY CALL FOR HELP (PANIC)
To trigger the alarm in an emergency (armed or
disarmed), press and hold remote control button
#1 for 3 seconds. The siren sounds and the
parking lights flash for about 30 seconds. Stop
the siren and the parking lights any time by
pressing button #1 again.
Regardless of whether the alarm was armed or
disarmed when panic was acticvated, the doors
will unlock (if the remote controlled door locks
are connected).
Button #1
Page 5
Page 6

®
VS1100XR Operating Guide
VALET
Sometimes you may not wish your alarm to
arm when you leave your vehicle. (For
instance, if you leave your vehicle with a valet
attendant, you may not want to teach him how
the alarm operates.). If your alarm is set for
active (remote control) arming, this is easy —
don’t press button #1, and the alarm will not
arm. However, if your alarm is set to arm
passively, use the valet mode to prevent it from
arming.
To enter Valet Mode
turn the ignition ON, and press and release
the VALET button 3 times. The alarm is now in
the valet mode. The siren chirps once to
confirm. (Ask your dealer where the Valet
Button is hidden)
- -
- First disarm the alarm,
- -
EMERGENCY DISARM
If you lose your remote control, you can disarm
your alarm with the ignition key and “VALET”
button. While your alarm is either armed or
triggered, turn the ignition switch ON, then
To exit Valet Mode
ignition ON, and press and
release the VALET button 3
times. The siren chirps twice to confirm valet is
exited and that the alarm is now disarmed.
While your alarm is in valet, the LED flashes
slowly when the ignition switch is OFF so
thieves think the alarm is armed. If you press
remote control button #1 while the alarm is in
valet, the doors will lock or unlock, and the
parking lights will flash four times. The alarm's
emergency call for help (panic) operates
normally.
NOTE — If you trigger the alarm by doing
emergency call for help (panic) while the alarm
is in valet, the alarm will exit Valet Mode.
press and release the VALET button 3 times.
The siren and the flashing lights stop, and the
alarm is disarmed. The alarm is now in Valet
Mode. To exit Valet Mode, follow the procedure
above.
- -
- Turn the
- -
SILENT ARM / DISARM
There are times, especially at night, when you
may not want to hear the siren chirps.
q One-time silent arm / disarm — Just
press button #2 any time before you need
the chirps to be silent. For instance, press
button #2 before you press button #1 to
arm or disarm the alarm, and the chirps
will not sound, but the parking lights will
still flash. The chirps are restored the next
time you press a remote control button.
q Chirp Control ON/OFF — Chirp OFF
provides permanent silent arm / disarm.
(This is a programmable feature. Please ask
your dealer if you wish to use this feature)
POWER DOOR LOCKS
Your alarm can automatically lock the doors when
armed, and unlock the doors when disarmed.
(Optional accessories may be required)
q Alarm Set For Active Arming - The doors
lock and unlock any time remote control
button #1 is pressed. For extra security, they
lock automatically if the alarm is triggered.
(Exception — See EMERGENCY CALL FOR
HELP, page 6.)
q Alarm Set For Passive Arming - The doors
lock 30 seconds after the last door is closed.
Page 6
FIRST - Press
Button #2
THEN - Press
Button #1
NONO
TETE
NO
TE — With Permanent silent arm / disarm,
NONO
TETE
all chirps are deleted
This includes arm, disarm, zone bypass,
and valet chirps.
Chirp delete does not affect the flashing park lights.
(Be careful not to leave the keys and remote controls
in the vehicle, though!).
l Ignition Controlled Door Lock — Your alarm
can also automatically lock the doors when you
turn the ignition ON and unlock when you turn
the ignition OFF. This is considered a very
important feature in areas where 'car jacking' is a
common occurrence.
This is a Programmable Feature. The Factory
default setting is OFF — please ask your dealer if
you wish to use this feature.
except pre-intrusion.
Page 7

®
VS1100XR Operating Guide
DUAL-STAGE SHOCK SENSOR
Your alarm includes a dual-stage shock sensor.
The first stage (pre-intrusion alert) warns thieves
the alarm is armed. For instance, the alarm will
chirp and parking lights flash 3 times if the
sensor detects a light bump to the vehicle.
However, if the thief attacks the vehicle with
sufficient force, the alarm will trigger. (Your
dealer can make the shock sensor more or less
sensitive to attack, depending on your vehicle.)
Note — that the shock sensor will not be ready
to trigger the alarm until four seconds after the
alarm is armed.
OTHER FEATURES
• Multi-Point Engine Immobiliser — This
alarm can support up to 3 engine immobiliser
relays. One is supplied as standard so that
when your alarm is armed, your vehicle will not
start.
• Automatic Engine Immobiliser — With the
engine immobiliser relay(s) fitted the engine will
be automatically disabled 10 minutes after the
ignition is switched off, (even if the alarm has
not been turned on via the remote control),
or, 10 minutes after the alarm has been disarmed with the remote control. With AEI
engaged, the LED will stay on constantly and
the engine will not start. To dis-engage AEI ;
1. Press button #1.
2. Start the engine within 10 minutes otherwise
AEI will re-engage and step 1 will need to be
repeated.
• Tamper Indicator — If your alarm was
triggered when you were away, the siren will
chirp four times and the parking lights flash four
times when you disarm your alarm. This
memory is automatically cancelled when you
turn the ignition switch ON.
• Triggered Zone Indication — With this feature,
your LED will flash for 30 seconds after you
disarm the alarm following an activation. The
number of flashes can be used to determine the
activated zone. Please refer to page 8 for more
details on this feature.
• 2nd car operation — With this feature, your
remote controls can operate a UNIDEN
compatible alarm in another car. Operation for
both cars is the same, except that the functions
of button #1 and button #2 are reversed in the
second car. (Optional — ask your dealer.)
Appendix 1 UNDERSTANDING THE
SIREN CHIRPS AND LIGHT FLASHES
A. 1 chirp/flash:
• When remote control button #1 is pressed,
the alarm is armed.
• When a door is closed, the alarm will arm in
30 sec. (passive arming).
• When valet mode is successfully entered.
• When learning mode is successfully entered.
• When remote control is successfully learned.
• 30 sec. after ignition switch is turned OFF
and all doors are closed (or 30 seconds
after delayed interior lights turn OFF), the
alarm is armed (passive arming with switch
sensing).
B. 2 chirps/flashes
• When remote control button #1 is pressed,
the alarm is disarmed.
• When valet mode is successfully exited.
• When learning mode is successfully exited.
C. 3 chirps/flashes
• When pressing remote control button #1 to
arm the alarm, indicates the alarm arms
even though it is not set properly (door not
closed, or broken switch, or interior light is
still ON, see ZONE BYPASS on page 4).
• When pressing remote control button #1
then button #2, indicates sensor's preintrusion function is bypassed.
• Pre-intrusion warns potential thieves or
vandals who trigger the first stage of a dualstage sensor that your vehicle is protected by
an alarm.
D. 4 flashes When remote control button #1
is pressed, indicates alarm in valet.
E. 4 chirps/4 flashes
• When the alarm is disarmed, indicates the
alarm was triggered while you were away.
• In Automatic Engine Immobilizer mode,
when you turn on IGN switch every time.
NONO
TETE
NO
TE — Chirps can be deleted. (see SILENT ARM
NONO
TETE
/ DISARM on page 6 for more information).
Page 7
Page 8

®
VS1100XR Operating Guide
Appendix 2 - UNDERSTANDING THE LED FLASHES
A. Arming indicator — Flashes quickly
during the 30-second re-arm or passive
arming countdown.
B. Door open indicator — OFF when a
hardwired door is opened during the 30second re-arm or passive arming
countdown.
C. Armed indicator — Flashes when the
alarm is armed.
D. Disarmed indicator — OFF when the
alarm is disarmed.
E. RF reception indicator — ON while the
remote control button is pressed.
F. Valet mode indicator — Flashes slowly if
the ignition switch is turned OFF.
G. AEI mode indicator—
Immobiliser is engaged the LED will be ON.
H. Triggered zone indicator — If the alarm
has been activated, the LED will flash for 30
secs. after the alarm has been disarmed.
EG...
1 flash — current sensor activation
2 flashes
3 flashes
4 flashes
— ignition/panic activation
— shock activation
— door /boot activation
If the Automatic Engine
Don't forget the ACCESSORIES!
3 Button Remote
(SEA933)
Get one for everyone
who drives your car.
(2 included with the
alarm)
Engine Immobiliser
Relay & Socket set
(SEA865)
Provides additional
protection by disabling
the vehicles starter
motor .
Dual-stage glass-
break sensor
(SEA857)
- Detects the highfrequency sound of
glass breaking.
Central Lock Interface
(SEA169) and
Door Lock Motor
(SEA170)
- Maybe required on
some vehicles. Check
with your dealer for
more information.
Garage Door and
House Alarm
interface (SEA910)
- Allows your remote to
control your garage
door opener or house
alarm.
Back up Battery Siren
(SEA400)
- Protects your car
even if the main
vehicle battery is cut.
Dual-stage
microwave sensor
(SEA259)
- Detects movement
inside vehicle.
Great for extra
protection and for
open-top vehicles.
Page 8
Make your alarm
YOUR alarm!
Your dealer has a wide variety of accessories
which can increase your alarm's security and
convenience. Ask for more information. And
insist on GENUINE UNIDEN accessories!
NOTE The accessories on this page are optional.
 Loading...