

Page 1
uniden
SUNDOWNER UH-088
UHFCB TRANSCEIVER
OWNER'S MANUAL
SCANNING
Page 2

Table of Contents
Controls / Indicators / Connectors
Controls........................................................................................................3
Indicators......................................................................................................4
Connectors...................................................................................................5
Introduction.......................................................................................................6
Included with your UH-088
Operation..........................................................................................................8
Setting the Squelch......................................................................................8
Selecting a Channel.....................................................................................9
Channel Auto Step.......................................................................................9
Transmitting................................................................................................10
Using Repeater Channels..........................................................................10
Scanning....................................................................................................13
Choosing a Priority Channel
Drop-Out Delay..........................................................................................15
Programming Scan Channels....................................................................16
Channel Seeking Operation.......................................................................17
Selective Calling.............................................................................................18
Tone Squelch (Receiver Quieting).............................................................19
Activating the Tone Squelch (Receiver Quieting)
Receiving Calls when in Quiet Mode.........................................................20
Tone Squelch Scanning
...............................................................................
...................................................................
......................................................................
......................................
............................................................................
3
15
20
21
7
SELCALL Programming
Service............................................................................................................23
Care and Maintenance
Notice.........................................................................................................24
Preventive Maintenance
T roubleshooting
Memory Backup.........................................................................................24
.................................................................................
...................................................................................
............................................................................
........................................................................................
22
24
24
24
Page 3

UHF CB Channel Information.........................................................................25
SIMPLEX Operating Mode.........................................................................25
DUPLEX Operating Mode..........................................................................26
Specifications..................................................................................................27
General.......................................................................................................27
Measurement Conditions...........................................................................28
T ransmitter Section...................................................................................28
Receiver Section........................................................................................28
SELCALL................................................................................................... 29
Warranty......................................................................................................... 30
Page 4
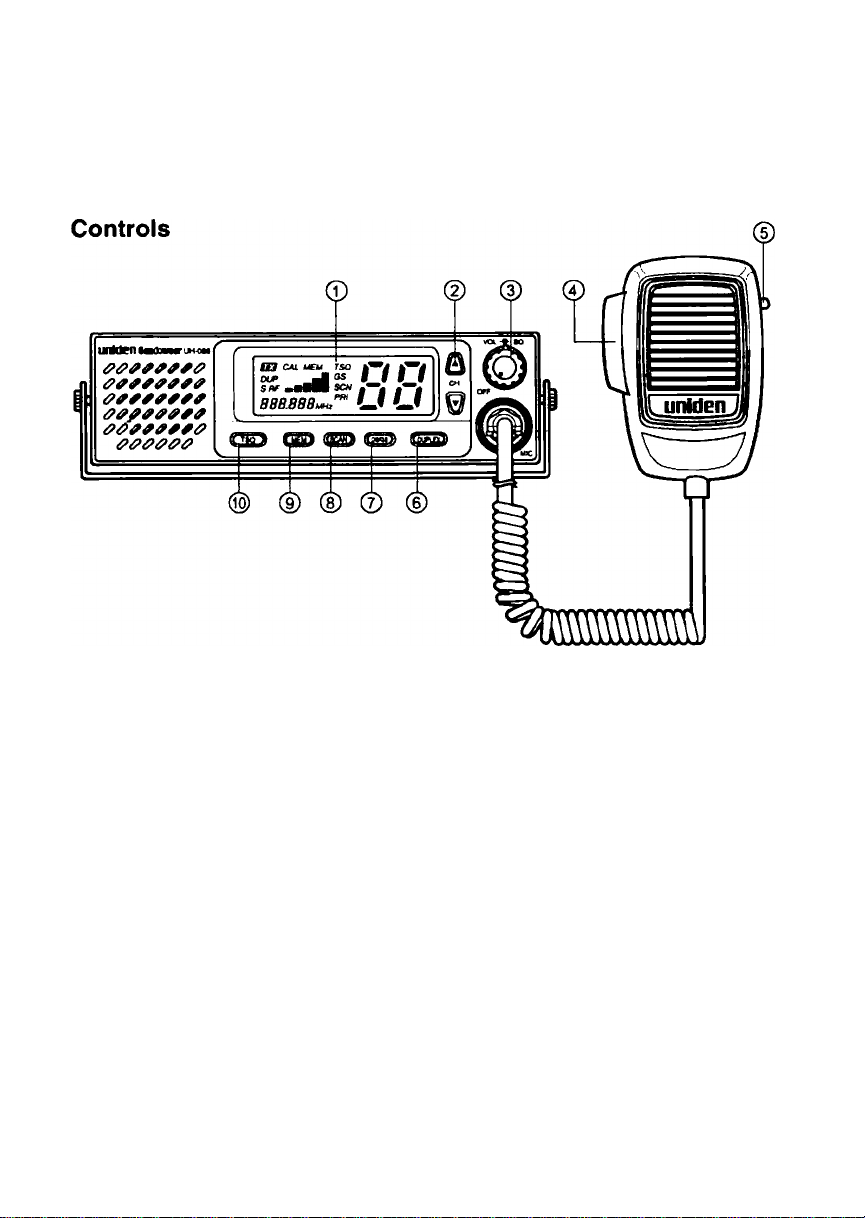
Controls / Indicators / Connectors
LIQUID CRYSTAL DISPLAY (LCD) PANEL - Indicators for TX, CAL, MEM, TSQ,
1.
GS (OS), SCN, PRI, Channel Number, Frequency, Signal Strength Level (S),
Transmit Power Level (RF) and DUP.
UP/DOWN CHANNEL SELECTOR - These controls are used to select the desired
2.
communication channel.
ON/OFF, VOLUME & SQUELCH CONTROLS
3.
ON/OFF & Volume Control (Centre Knob)
Turns the UH-088 power ON or OFF and adjusts the volume.
Squelch Control (Outer Ring)
Eliminates background noise in the absence of an incoming signal.
PUSH-TO-TALK (PTT) SWITCH - Press to transmit and release to receive.
4.
TONE CALL CONTROL BUTTON - Press to transmit SELCALL codes, it functions
5.
on condition that SELCALL option is installed.
DUPLEX Control
6.
Press this button momentarily to choose semi-duplex operation for Channels 1
through 8.
OPEN SCAN/GROUP SCAN CONTROL (OS/GS) - Switches operation between
7.
OPEN SCAN and GROUP SCAN Mode.
SCAN CONTROL (SCAN) - Press to activate Normal OS/GS scanning or press
8.
and hold to enable Seek Mode OS/GS Scanning.
Page 5

9. MEMORY CONTROL (MEM) - Places channel numbers into the memory scan list
(OS orGS).
10. TONE SQUELCH CONTROL (TSQ) - Controls Tone Squelched operation (quiet
Mode) on condition that SELCALL option is installed.
Indicators
(jp ^ ^
ita CAL MEM TSO
DUP ■■ GS-'
-SRF ■■■II SCN
n n
.S8S.888MH,'’f
u u
(ij)
11. Channel Indicator - Indicates the channel number currently selected. On TX
SELCALL usage the Channel Indicator becomes a Memory location indicator.
12. Scan Indicator (SCN) - SCN icon appears when Normal Scan mode is activated.
When Seek Mode Scanning is selected the SCN icon blinks.
13. Priority Indicator (PRI) - Indicates that Priority channel is active when continuously
lit or Flashes when it is regularly being checked for activity while GS scanning.
14. Frequency Indicator - Shows the frequency of the current seiected channel.
15. RECEIVE SIGNAL / RF LEVEL Indicator (S / RF) - Indicates the relative signal
strength level when receiving (S) or the relative transmit power (RF) when
transmitting.
16. DUPLEX Indicator (DUP) - The DUP icon appears when duplex operation is
selected.
17. TRANSMIT Indicator (TX) - TX appears when the PTT button on the microphone is
pressed and the radio is transmitting. The RF icon also appears at this time.
18. CALL Indicator (CAL) - The CAL icon appears when the UH-088 radio is called
using SELCALL. It also appears when SELCALL codes are being transmitted.
19. MEMORY Indicator (MEM) - MEM appears when the displayed channel is
programmed either in GS or OS Memory.
20. TONE SQUELCH Indicator (TSQ) - The TSQ icon wili appear when the selected
channel is set to operate in Quiet Mode, or flashes when the radio is called using
SELCALL.
21. GROUP SCAN Indicator (GS) - The GS icon appears when Group Scan Mode is
activated. Open Scan is indicated by the absence of the GS icon.
Page 6
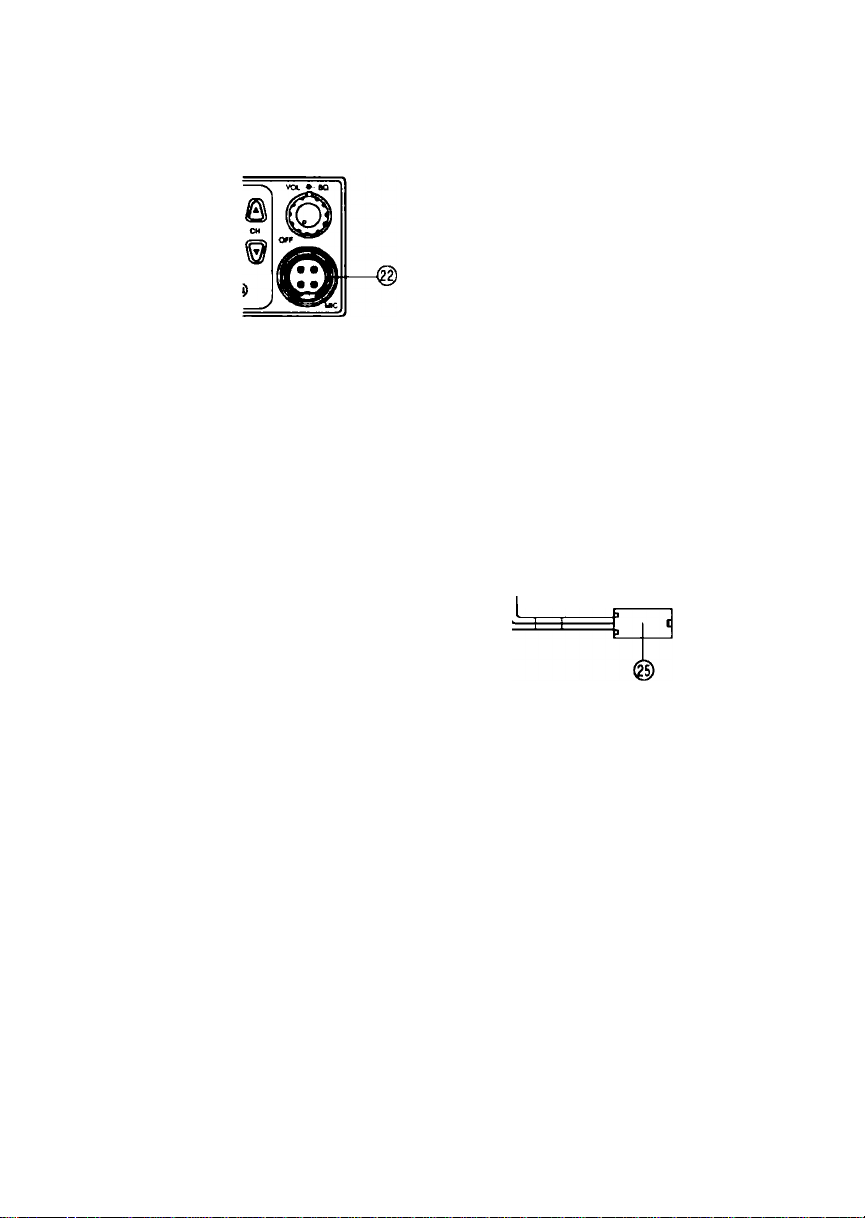
Connectors
Front Panel
22. MICROPHONE SOCKET
The microphone plug is inserted into this socket.
Back Panel
@—
o
EXT. SP.
POWER
■
23. EXTERNAL SPEAKER JACK - Used for remote receiver monitoring. When the
external speaker is connected, the internal speaker is automatically disconnected.
The connecting wire must use a 3.5mm miniature plug only.
24. ANTENNA CONNECTOR - Connect the Antenna here using a PL259 type
connector.
25. DC POWER CORD - DC power is connected to the transceiver through this jack. A
power cord is supplied with the transceiver.
Page 7

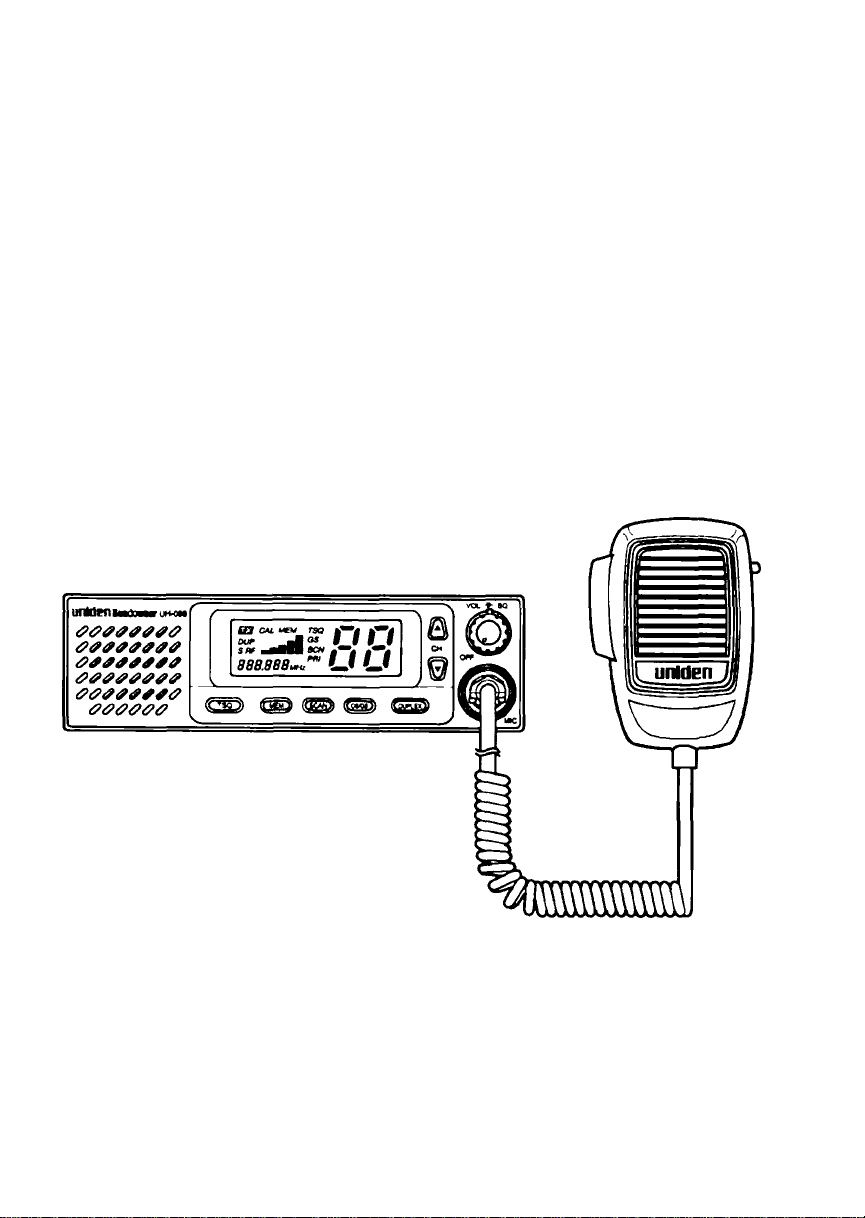
Introduction
The Uniden UH-088 UHF two way radio is designed to provide you with years of
trouble free service. Its rugged components and materials are capable of withstanding
harsh environments. The unit may be mounted in several convenient locations using
the universal mounting bracket.
You can be confident in your choice of radio equipment because the UH-088 offers,
Wide Liquid Crystal Display, Back-lit Control buttons, complete coverage of the UHF
CB Frequency Band, and much more.
We are certain that you will enjoy your UH-088. Please read this operating guide
carefully to ensure you gain the optimum performance of the unit.
General Features
• Full Coverage of the UHF CB Band
• 5 Watt Max. Transmitter
• External Speaker Jack
• Full Frequency Display
• Wide Liquid Crystal Display
• Back-lit Control Buttons
• Duplex Capability
• Open Scanning
• Group Scanning / Priority Channel Monitoring
• Channel Seek Mode
• Push Button Channel Control
• Front Fire Speaker
• SELCALL (Optional)
Specifications, features, and availability of optional Accessories are all subject to
change without prior notice.
Page 8
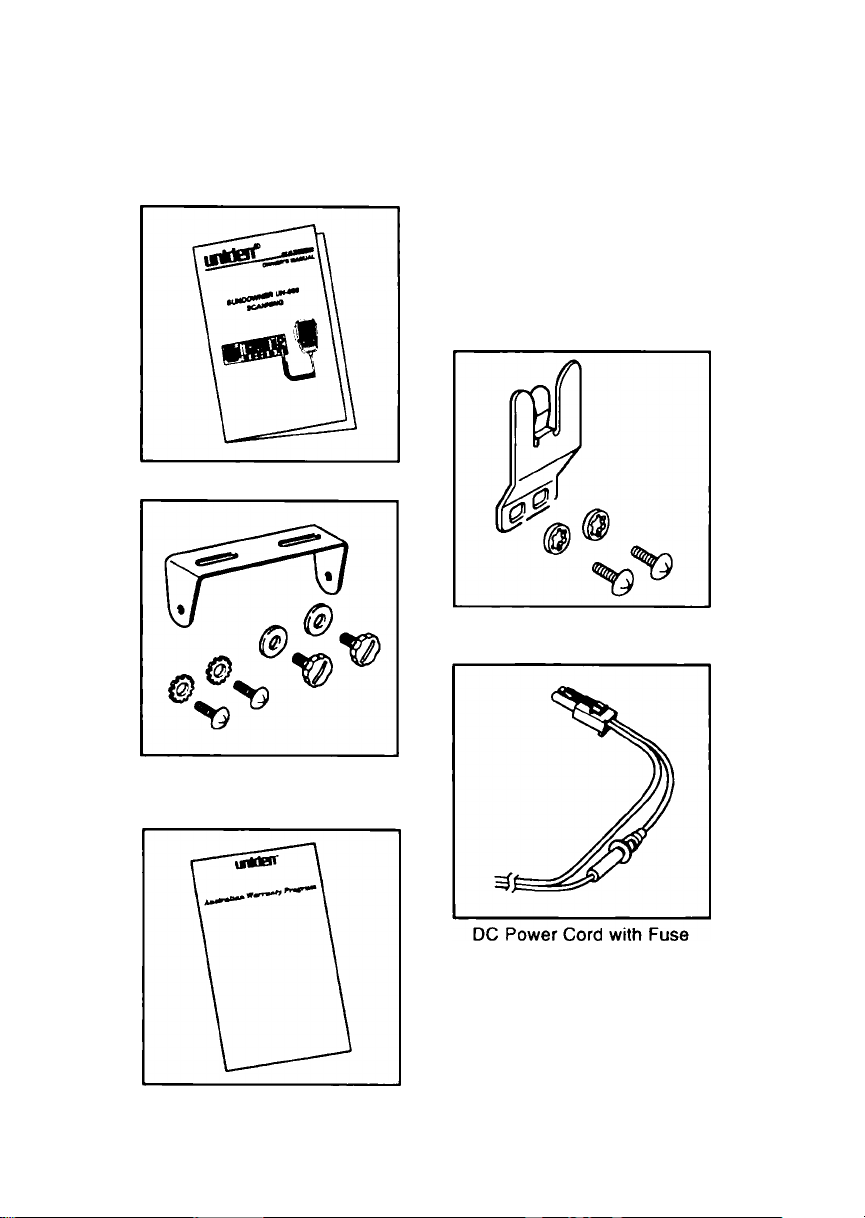
Included with your UH-088
UH-088 Owner's Manual
Microphone Hanger, Screws
and Washers
Mounting Bracket, Knobs,
Rubber Washer, Washer Stars
and Screws
Warranty Registration Sheet
Page 9
Operation
Setting the Squelch
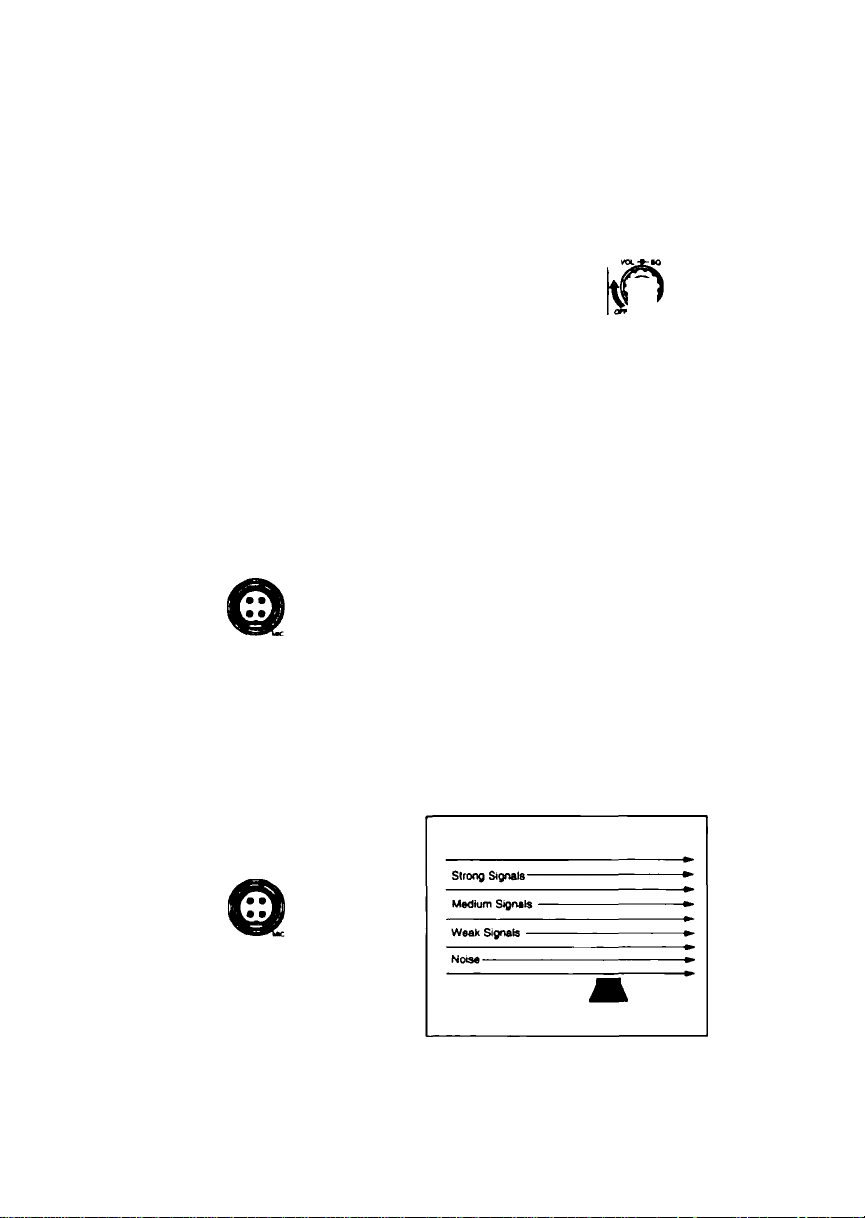
1. To turn the unit ON, rotate VOLUME clockwise.
Adjust volume to a comfortable level.
Note: You must select a channel which is not in use before setting the SQUELCH
control on your radio.
2. Think of the Squelch control as a gate. If you turn SQUELCH fully clockwise it
raises the "Squelch Gate” so high that no signals get through.
Strong Sigrtals Medium Signals Weak Siffla -
Nolee-
y
©
3. If you turn the SQUELCH fully counterclockwise it lowers the “Squelch Gate" so
that everything gets through - noise, weak signals, and strong signals.
Page 10
4v To set the "Squelch Gate" to the desired level, turn SQUELCH counterclockwise
until you hear noise. Then turn the SQUELCH clockwise just until the noise stops.
Now only strong signals get through.
Strong Signals -
Medium Signets -
Weak Signals •
1
Selecting a Channel
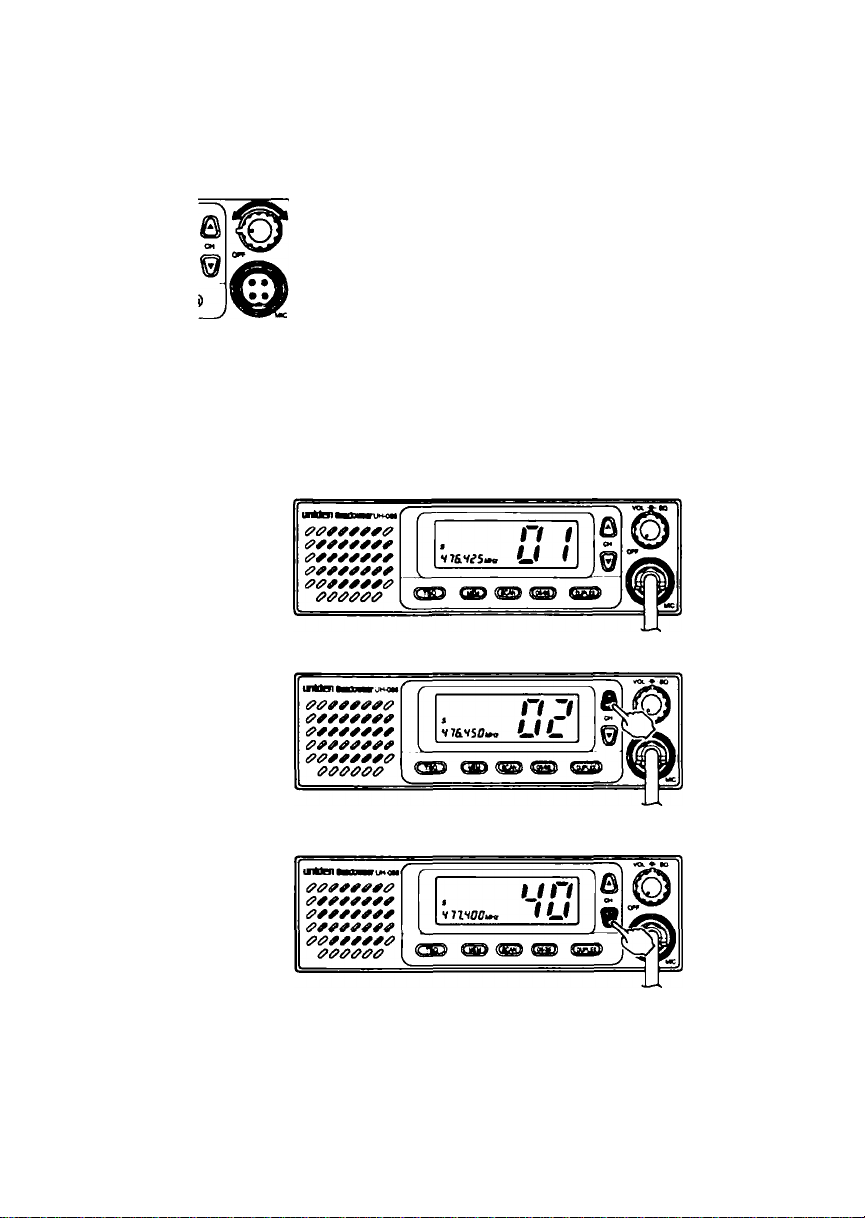
1. When you turn on the UH-088, the last channel used will appear on the LCD display,
eg. CH01
2a. Press ▲ to select a higher channel.
- or-
2b. Press ▼ to select a lower channel.
Channel Auto Step
To quickly change channels, press and hold ▼ or A .
Note: A short tone sounds when you press either T or A and the channel changes.
Another tone sounds when Channel Auto step begins.
Page 11

Transmitting
The UH-088 transmits on 40 UHF CB channels. For your reference, a listing of all the
available channels is printed on the back cover.
1. Select the desired channel,
eg. CHOI
2. To transmit, press the PTT switch to activate the transmitter.
¿mwwuvwwwwuuvv
Note: Hold the microphone 5-10 cm from your mouth and slightly to one side so that
your voice does not project directly into the microphone. Speak at a normal
voice level. Never raise your voice or shout into the microphone.
3. Release the PTT Switch, to end the transmission and listen for the reply.
Using Repeater Channels
UHF CB Repeaters are used to retransmit or relay your signal. Repeaters will extend
the range of your radio and overcome the shielding effect caused by solid obstructions.
In normal Simplex operation, your radio transmits on one particular frequency and
receives on that same frequency. If there is a barrier (i.e. valley) that partially blocks
your transmitted signal, the probability of another radio receiving the signal is very
slim. Valleys, tall ouildings, metallic structures,... etc. tend to act as a screen between
radios.
Standard Operation without
the aid of a repeater Station
Page 12

Operation with the aid of a repeater
The Signal coming from your radio is received by the Repeater Station and then re
transmitted at the same time on another channel. This operation is called “Duplexing".
Your UH-088 is designed with the capability to access and use repeater stations.
Channels 01 through 08 have the option to operate in Duplex Mode. When any of
these channels are set to operate in duplex mode during transmission, the UH-088
automatically sends the signal at a frequency 30 channels above the original. After
transmitting, the radio reverts back to its original operating frequency.
For example,
CHOI on Duplex Mode will Receive on CH 01 but Transmit on CH31
CH02 on Duplex Mode will Receive on CH 02 but Transmit on CH32 etc....
If you transmit on CHOI Duplex mode, you are actually transmitting on CH31, the
repeater station down-converts your signal and retransmits on CHOI.
To operate UH-088 in Duplex Mode,
eg. CHOI is being used in your area
for repeater use.
Press DUPLEX momentarily.
The DUP icon appears.
11
Page 13

Whenever you press the PTT Switch the UH-088 frequency display changes to CH31
frequency.
S n I
V77. nSMK, LJ f
Press DUPLEX again to deactivate the Duplex Operation. UH-088 will return to Simplex
operation.
12
Page 14

Scanning
The UH-088 has a scanning feature that allows you to search for active channels
automatically.
Furthermore, the UH-088 is designed to have two types of scanning; Open Scanning
(OS) and Group Scanning (GS), to give you flexibility and allow you to use the radio
more effectively.
To initiate scanning.
1. Assuming the unit is on CH17 when switched on.
2. Press SCAN and Scanning starts.
1. Open Scan (OS) Mode
Allows continuous scanning of channels stored in the
Open Scan memory. If an active channel is found,
scanning will stop on that channel.
Example. CH40 becomes active.
If the received signal ceases, the unit will wait for at
least 3 seconds for the signal to return, otherwise
scanning resumes.
To skip the active channel, press MEM momentarily.
Scanning resumes.
To deactivate SCAN, press the SCAN switch or the PTT Button.
Note: If SCAN is deactivated while in an active channel, the UH-088 will stay on
that active channel. If no other channels are active, the UH-088 will reinstate
the starting channel.
13
Page 15

2. Group Scan (GS) Mode
Allows you to monitor a Priority Channel while
scanning.
To use GS Mode Scanning, press the OS / GS key.
GS icon appears on the display. OS Mode is indicated
by the absence of the GS icon.
GS Scanning checks the Priority channel activity
regularly.
If the Priority channel becomes active the radio will
stay on that channel for as long as the signal is present.
If the received signal ceases, Priority scanning
continues after 3 seconds.
If scanning stops on a channel which is not a Priority
Channel, UH-088 will continue monitoring the Priority
Channel for activity while listening to the active one.
eg. CH40 becomes active.
To deactivate SCAN, press the SCAN key or the PTT Switch.
Note: If SCAN is deactivated while it is tuned at an active channel, the UH-088 will
stay on that active channel. If none of the channels are active, the
UH-088 will reinstate the Priority channel.
If GS Scanning is initiated when there are no channels programmed in GS
memory, an error tone will be heard and scanning will not start.
14
Page 16

Choosing a Priority Channei
The starting channel, when Group Scanning is initiated, is always the Priority Channel.
Changing the PRI channel setting while scanning,
eg. PRI Channel is CHI7 (476.825 MHz)
a. press A , to select a higher channel (scanning pauses)
as
8 SCN
- or -
press T , to select a lower channel
'nS£00k»i,'”
to
lU
OS
tC
tu
Drop-Out Deiay
While scanning, the UH-088 stops at a busy channel and receives a transmission.
When the received signal is over, the unit will wait for three seconds for the return of
the signal, otherwise, the radio resumes scanning.
15
Page 17

Programming Scan Channels
1. Select which Scanning Mode you
wish to use on the channel.
OS or GS Mode
Note: OS is indicated by the
absence of the GS icon.
2. Select the channel you want to
store.
3. Press and hold MEM for 1.5 sec. to
store. MEM icon appears and a
short tone beep is heard.
Hisses^
08
1
1 1
4. To remove the channel from Memory, press and hold MEM for 1.5 sec. once more.
Two successive beeps are heard and the MEM icon disappears.
16
Page 18

Channel Seeking Operation
Unlike normal scanning, CHANNEL SEEK is used more often when checking for
active channels.
If a signal is detected, while seeking, the UH-088 will tune to that signal for 4 seconds
only and then resumes Seeking Operation.
Changing from SCAN to SEEK Mode operation.
1. Firstly, activate SCAN mode.
Zi c
HTIJOOh
2. Press and hold SCAN until a "beep" is heard. The
SCN icon starts to flash.
3. If an active channel is detected the UH-088 will stop
on that channel for 4 seconds, (eg. CH17)
4. After 4 seconds, the UH-088 will start seeking again
for active channels.
5. If you find the channel interesting, simply press either
the PTT switch or the SCAN key to stop the operation
before the 4 second timer elapses.
When SCAN is pressed again SEEK is still the mode of operation.
To change back to SCAN, while SEEKING, press and hold
SCAN until a beep is heard. The SCN icon stops flashing. o o
03 ^ |*Y
msjBSOuH. f LJ
jfO
\<oo
I>f(
^uu
LIU
/
I I
u
Note: SEEK checks the same channel stored in SCAN memory. Thus, you can Seek
either in OS or GS Mode.
17
Page 19

Selective Calling
When you listen to UHF CB, you will hear all the conversations going on, which can
become annoying at times. Ideally you need a system that alerts you when the signal
is from someone you wish to communicate with.
>ou want your radio to be SELECTIVE about the people you talk tol
SELECTIVE CALLING is a special Squelch System which quiets your receiver unit
until it receives an encoded signal from another set which matches the one installed in
your set.
This means your set will remain quiet until the station you want to hear calls.
Note: • SELCALL is not initially installed in your set (each has to be individually
programmed), but may be purchased as an option.
• When you install SELCALL option, you should cut the Jumper wire (W1)
inside the UH-088.
18
Page 20

Tone squelch (Receiver Quieting)
Receiver Quieting, or Tone Squelch (TSQ), is actually SELCALL in action. When
activated, the UH-088 receiver is muted and you cannot hear any signals until the
mute is disengaged by reception of your Selcall code.
Refer to page 8 for explanation of how the squelch system works.
The Squelch discussed previously "screens“ the received signal level, however in
tone squelch mode, the squelch monitors the signal for your ID.
1. The Tone Squelch Control acts as an electronic lock. Activating the Tone squelch
closes this lock.
Regardless of how strong the received signal is, if it does not have the required
"electronic key" the gate will remain closed.
2. If the received signal contains the required key (which is your Radio ID), this
electronic lock will open.
The muting circuit is then deactivated on your radio and advises you that a call has
been received.
19
Page 21

Activating the Tone Squelch (Receiver Quieting)
1. Press the TSQ button. One beep is heard and the TSQ indicator appears on the
display, UH-088 is now progrannmed to operate in Quiet Mode.
In this mode, the microphone PTT is disabled until a signal with your Selcall ID is
received.
2. To deactivate quiet mode, press the TSQ button again. Two beeps are heard and
the TSQ indicator disappears from the display.
Pressing the SELCALL button will also deactivate Quiet Mode.
Receiving Calls when in Quiet Mode
The UH-088 will respond in the same way in Quiet Mode as when it is called while in
normal mode.
20
Page 22

Tone Squelch Scanning
To activate this feature, you can either initiate SCAN first then press TSQ or vice versa.
>
O O
uu
When a valid call is received, the unit cancels Tone Squelch scanning and an audible
alarm is emitted.
To deactivate Tone Squelch scanning, simply press SCAN and/or TSQ key.
Note: In order to increase the chance of being reached via SELCALL while Tone
Squelch scanning, it is advisable to minimize the number of channels in the
scan memory.
a
§
or
L
_
^ 0 0
’"UU
a
§
21
Page 23

SELCALL Programming
Please refer to the installation/programming procedure of the Optional Selcall Board.
22
Page 24

Service
Should you find it desirable or necessary to service your UH-088, we suggest you
contact the Uniden Dealer where your purchase was made. Your dealer will be able
to assist you with complete service information.
If you require service that is within the terms of your warranty, you should present a
copy of your receipt to your dealer to authenticate your claim.
If you find it inconvenient to obtain service assistance from a dealer, please pack your
radio in a suitable container that will provide adequate protection. Enclose a note
describing the problem and a copy of your receipt, and send the radio transportation
prepaid to:
Uniden Australia Pty Limited
Customer Service Division
345 Princes Highway
Rockdale NSW 2216
Ph. (02) 9599-3100
Fax (02) 9599-3278
n
23
Page 25

Care and Maintenance
Notice
If the UH-088 has been subjected to extreme high temperature (above 60°C) for a
prolonged period of time, blackening of the Liquid Crystal Display (LCD) may occur.
This is not a fault. Normal LCD operation resumes when the temperature stabilizes
back to standard operating conditions (0 to 55°C).
Preventive Maintenance
The following system checks should be made every six to twelve months:
1. Check the Standing Wave Ratio (SWR).
2. Inspect the tightness of all electrical connections.
3. Inspect the antenna coaxial cable for wear or breaks on the shielding.
4. Inspect the tightness of all screws and other mounting hardware.
Troubleshooting
Should the unit malfunction or perform poorly, follow the procedures indicated below:
1. If the transceiver is completely inoperative...
* Check the power cord and fuse.
2. If there is trouble with receiving...
* Check the VOLUME control setting.
* Be sure the SQUELCH is adjusted properly. Possibly the radio is over
squelched.
* Check that the radio is in an operational mode.
3. If there is trouble with transmitting...
* Check that the transmission line (coaxial cable) is securely connected to the
ANTENNA connector.
’ Check that the antenna is fully extended for proper operation.
* Check that all transmission line (coaxial cable) connections are secure and
free
of corrosion.
Memory Backup
A built-in capacitor protects the channels stored in the SUNDOWNER UH-088 memory
for up to 2 weeks after the DC power cable is disconnected.
24
Page 26

UHF CB Channel Information
This radio has been designed to provide a high level of performance in the Citizens
Band Radio Service, which is comprised of the following frequency assignments:
SIMPLEX Operating Mode
Channel
1
2
3
4
5
6
7
8
9
10
11
12
13
14
15
16
17
18
19
20
21
22
23
24
25
26
27
28
29
30
31
32
33
34
35
36
37
38
39
40
Channel Frequency in MHz
476.425
476.450
476.475
476.500
476.525
476.550
476.575
476.600
476.625
476.650
476.675
476.700
476.725
476.750
476.775
476.800
476.825
476.850
476.875
476.900
476.925
476.950
476.975
477.000
477.025
477.050
477.075
477.100
477.125
477.150
477.175
477.200
477.225
477.250
477.275
477.300
477.325
477.350
477.375
477.400
25
Page 27

DUPLEX Operating Mode
Channel
Assignment
CHI
CH2
CH3
CH4
CH5
CH6
CH7
CH8
Receive
Frequency (MHz)
476.425 477.175 (CH31)
476.450
476.475
476.500 477.250 (CH34)
476.525 477.275 (CH35)
476.550 477.300 (CH36)
476.575
476.600 477.350 (CH38)
Transmit
Frequency (MHz)
477.200 (CH32)
477.225 (CH33)
477.325 (CH37)
26
Page 28

General
Channels
Frequency Range
Crystal Oscillator
Microphone
Speaker
Antenna Connector
Jacks & Connectors
Controls
Indicators
Cabinet Size
Weight
Operating Temperature
Power Requirements
SMA Approval
Accessories
Specifications
;40
:476.425MHz to 477.40MHz
:4
; 600 ohm, Dynamic Type
: 8 ohm, 3.5W
: M-Type
: Mic 4P Metal
EXT SP 3.5<t)
DC Power 2P Type
: PRESS-TO-TALK Button (Microphone)
TONE CALL Button (Microphone)
SCAN/SEEK Button
OS/GS Button
OFFA/OLUME Control
SQUELCH Control
MEMORY Button
DUPLEX Button
TONE SQUELCH Button
CHANNEL UP/DOWN Button
; DUPLEX Indicator
TX Indicator
CALL indicator
TSQ Indicator
GROUP SCAN Indicator
MEMORY Indicator
CHANNEL Indicator
PRI Indicator
S/RF Level Indicator
SCAN Indicator
TX/RX FREQUENCY. Indicator
:W ; 172 mm
H : 52 mm
D : 145 mm
: 1.0 kg
: 0° to +55“C
:13.8 VDC Nominal
: Type accepted under AS/NZS 4365
:DC power cable with built-in-fuse, microphone,
microphone hanger, mounting bracket screw (2), washer
(2) for microphone hanger, microphone hanger screw (2),
washer star (2) for mounting bracket, rubber washer (2)
for mounting bracket, knob (2) for mounting bracket
27
Page 29

Measurement Conditions
Power Source
Antenna Impedance
Test Temperature
Modulation Frequency
Mean Signal Input Level
Reference Audio Output
Power
Reference Modulation
Deviation
Audio Output Load
: 13.8V (DC)
: 50 ohm
:25°C
: 1 kHz (RX/TX)
;1000 pV
: 500mW
; ±3 kHz deviation
: 8 ohms resistive
Transmitter Section
Frequency Tolerance at 25“C
(5 minutes after
turning on) : ±0.5 kHz
Carrier Power : 5W (max)
Spurious Emission : -40 dBm
Current Drain ; 1500mA
Modulation Frequency Response (1 kHz, 0 dB reference, at 1 kHz deviation)
Lower at 500 Hz : -6 dB
Upper at 2.0 kHz : +5 dB
Microphone Sensitivity
for 3 kHz Deviation : 1,5mV
Maximum Deviation
at 1 kHz
at 6 kHz
: ±4.5 kHz
: ±1.5 kHz (max)
Receiver Section
Sensitivity at 12dB SINAD
Overall Audio Fidelity
(1 kHz, 0 dB reference)
Lower at 500 Hz
Upper at 2 kHz
Adjacent Channel
Selectivity (±25 kHz)
Maximum Audio Output
Power
Audio Output Power at
10%THD
Hum & Noise Ratio at
Input ImV
Squelch Sensitivity at
Threshold
Squelch Sensitivity at
Tight
Image Rejection Ratio
IF Rejection Ratio
Oscillator Dropout
Voltage
0.23 pV or better
+4 dB
-6dB
70 dB
3W
2W
45 dB
0.1 pV
1 pV
55 dB
100 dB
9V
28
Page 30

Page 31

Warranty
Uniden Sundowner UH-088 UHF CB Radio
Australian One Year Warranty
Note: Please keep your sales docket as it provides evidence of warranty.
WARRANTOR: UNIDEN Australia Pty. Limited ACN 001 865 498
ELEMENTS OF WARRANTY: UNIDEN warrants to the original retail owner for the
duration of this warranty, its Sundowner UH-088 UHF CB Transceiver Radio (hereinafter
referred to as the Product) to be free from defects in materials and craftsmanship with
only the limitations or exclusions set out below.
WARRANTY DURATION: This warranty to the original retail owner only, shall terminate
and be of no further effect ONE(1) Year after the date of original retail sale. This warranty
will be deemed invalid if the product is; (A) Damaged or not maintained as reasonable
and necessary, (B) Modified, altered or used as part of any conversion kits,
subassemblies, or any configurations not sold by Uniden, (C) Improperly installed, (D)
Repaired by someone other than an authorized Uniden Repair Agent for a defect or
malfunction covered by this warranty, (E) Used in conjunction with any equipment or
parts or as part of a system not manufactured by Uniden, (F) Installed, programmed or
serviced by anyone other than an authorized Uniden Repair Agent, or (G) Where the
Serial Number label of the product has been removed or damaged beyond recognition.
PARTS COVERED: This warranty covers for 1 year, the Sundowner UH-088 UHF CB
Transceiver Unit only. All accessories, mounting bracket, DC cable, fuse, and
microphone are covered for 90 days.
STATEMENT OF REMEDY: In the event that the product does not conform to this
warranty at any time while this warranty is in effect, the warrantor at its discretion, will
repair the defect or replace the product and return it to you without charge for parts and
service. THIS WARRANTY DOES NOT COVER OR PROVIDE FOR THE
REIMBURSEMENT OR PAYMENT OF INCIDENTAL OR CONSEQUENTIAL
DAMAGES.
WARRANTY CARD: If a warranty card has been included with this product, please fill
it in and return it to us within 14 days of purchase. Your name and serial number of the
product will then be registered in our database and this will help us process your claim
with greater speed and efficiency should you require warranty service.
PROCEDURE FOR OBTAINING PERFORMANCE OR WARRANTY: In the event that
the Product does not conform to this warranty, the Product should be shipped or
delivered, freight prepaid, with evidence of original purchase, (eg/ a copy of the sales
docket, to the warrantor at:
UNIDEN AUSTRALIA PTY, LIMITED
SERVICE DIVISION
345 Princes Highway, Rockdale, NSW 2216
Ph (02) 9599 3100 FAX (02) 9599 3278
Customers in other states should ship or deliver the Product
freight pre-paid to the nearest Uniden Authorized Repair Centre.
(Contact Uniden for the Warranty Agent nearest you.)
30
Page 32

®
uniden
Australia Ry. Ltd.
345 Princes Highway, Rockdale. N.S.W.2216
Uniden« is a registered trademark of Uniden Corporation.
Features, specifications, and availability of optional accessories are all
Phone;(02) 9599 3100
Fax;(02) 9599 3278
subject to change without notice.
UTZZ01864AZ
I Copyright 1997 Uniden Australia Pty. Ltd.
 Loading...