

Page 1
unideif
SUNDOWNER UH057
Handheld UHF CB Radio
with User Programmable
Built-in SELCALL
uniden
UNIDEN AUSTRALIA PTY. LIMITED
345 Prrcess Higlwffly. Rockdale. NSW2216
Ph(0j)599-3100 FAX(0£)599-3278
OPERATING GUIDE
Page 2

Please read this Operating Guide carefully before operating this radio
Safety Information
DO NOT operate the transmitter of any radio equip
ment with the antenna touching, or close to the eyes,
face, or exposed body parts.
DO NOT iet chiidren operate any transmitter-equipped
radio equipment.
DO NOT operate the transmitter of any radio equip
ment unless all the Radio Frequency (RF) connectors
are secure and any open connectors are property
terminated.
Have your radio equipment serviced by a qualified
technician.
Nickel-Cadmium Battery Warning
This equipment contains a Nickel-Cadmium battery.
The Nickel-Cadmium battery contained in this equip
ment may explode if disposed of in a fire.
DO NOT short circuit the battery.
DO NOT charge the Nickel-Cadmium battery used in
this equipment in any other charger other than the one
designed to charge this battery. Using another
charger may damage the battery, or cause the battery
to explode.
Uniden** is a registered trademark of Uniden Corporation.
Features, Specificatiorrs, and availability of Optional
Accessories are all subject to change without notice.
Page 3

Table of Contents
Introduction..............................................................................
Description........................................................................
Warning
............................................................................
Licensing Requirements
Feature Highlights...................................................................
Unpacking.........................................................................
Optional Accessories
Controls and Indicators
Top Indicators and Display
Side Controls and Connectors..........................................
Front Controls
Numeric Keypad Controls and Function
Getting Started
Antenna.............................................................................
Battery Information............................................................
Installation
Recharging the Nickel-Cad mi urn Battery Pack.
Belt Clip Installation
Operation
Receive.............................................................................
Direct Channel Keying................................................
Auto-Squelch..............................................................
Channel Scan ............................................................
Drop Out Delay...........................................................
Priority Scan
Create a Channel Scan List with
Transmit............................................................................
Simplex / Duplex Communication.....................................
Low Battery Level Detection.............................................
Special Feature.......................................................................
SELECTIVE CALLING......................................................
SELCALL Operation
Receiver Quieting.......................................................
When a call is received..............
Tone Squeich Scanning
Tone Calling........................................
Group Calling..............................................................
Programming...........................................................................
Receiver SELCALL ID
Transmitter SELCALL !D
Other SELCALL Parameters
Tone Period................................................................
Lead-In Delay.............................................................
Lead-In Tone..............................................................
Programming Guide
...................................................................
........................................................................
..................................................................
....
...........................................................................
Channel Lock-Out Feature...................................
...................................................
........................................................
...........................................................
...............................................
...........................
..........................................................
...............................................................
.........................................................
................................
.............................................
.......................
......................................................
..................................................
............................................
...................................................
3
3
3
3
4
6
6
7
7
9
10
11
13
13
13
13
14
14
15
15
15
15
16
16
17
18
19
20
20
21
21
22
22
23
23
25
25
27
27
28
30
30
31
32
34
Page 1 UH-057
Page 4

Care and Maintenance.................................................. 35
Service
UHF CB Channel Information
...........................................................................
......................................
SIMPLEX Operating Mode.................................................... 37
DUPLEX Operating Mode
...................................................
36
37
38
Specifications................................................................ 39
General.................................................................................. 39
Transmitter........................................................................... 40
Receiver................................................................................ 40
SELCALL.............................................................................. 40
UH-057 Page 2
Page 5

Introduction
Welcome to the world of CB Radio Communication. You
have chosen the most reliable, highly engineered, uttraprecise piece of communication equipment.
Description
Your UN IDEM Sundowner UH-057 represents the most
advanced portable radio ever designed for use in the UHF
Citizens Band Radio Service. With Built-in SELCALL, this
radio allows you to call or to be called distinctively.
With its rugged physical and electrical design, this radb will
give a reliable years of trouble free service.
You are encouraged to thoroughly read the rest of this
operating guide to acquaint yourself with the superior
characteristic and operation of your transceiver. This full
featured radio operates on any of the 40 UHF frequencies
designated as Citizens Band Channels by the Spectrum
Management Agency.
WARNING
The Citizens Band Radio communication Service (CBRS)
is under the jurisdiction of the Australian Management
Agency (SMA). Any adjustment or alteration which will
change the performance of the transceiver's original SMA
type acceptance is STRICTIY PROHIBITED. Replace
ment or substitution of power or frequency determining
components e.g. Crystals, Transistors, ICs, Diodes, etc.
with other than those recommended by UNIDEN will
cause violation to the SMA type acceptance technical
requirement.
Licensing Requirements
Before using your transceiver, you must obtain a Citizens
Band Radio License from the Spectrum Management
Agency (SMA). Application forms and brochures relating to
CBRS are available at your nearest SMA office. Mail the
completed application form and the appropriate fee to the
Communications Manager, in the State or Territory in which
the station will be operated.
Pages UH-057
Page 6

Feature Highlights
Full 40 Channel UHF CB Coverage
Operates on any of the 40 Channels designated as
Citizens Band Channels by the Spectrum Manage
ment Agency.
Simplex/Duplex Communication
Allows the Uniden Sundowner UH-057 to operate
via a repeater station.
Two Level Switchable Transmitter Output Power
Lets you transmit at 1 Watt or 5 Watts for shortrange or long-range communication.
Auto-Squelch System
Eliminates unwanted noise when activated.
Liquid Crystal Display (LCD) with Backlight
Shows visual display of the current Channel and/or
Operation. Illuminated everytime a Key is pressed
for better visibility at night or under dim conditions.
TX/Busy LED
Lights RED when the unit is transmitting. Lights
GREEN when the received signal (on the current
channel) is strong enough to break the squelch.
Channel Scan
Provides rapid, automatic scanning of programmed
channels.
Priority Scan
Regularly monitors your chosen priority channel
every 1.5 seconds during scan mode.
User Programmable Channel Scan List (using LOCK
OUT switch)
Allows the user to customise the Channel Scan List
for faster scanning.
Battery Save
Conserves the Battery Power by putting the
receiver on “sleep" when monitoring inactive
channel.
Battery Low Detection
Informs the user when the battery level is low and
needs recharging.
SELCALL
Built-in Selcall (Selective Calling) System lets the
unit to call or be called selectively.
Numeric Keypad
Installed to give the users freedom to program his
own Selcall Codes or access other Selcall Func
tions.
UH-057
Page 4
Page 7

Receiver Quieting (Tone Squelch)
Prevents any unwanted signal in the channel from
being heard unless the required tone codes to open
the 'Quiet Condition’ is received.
CALL Alarm
When selectively called, emits an audible alarm to
notify the user that a caller is on the channel.
Acknowledge Tone
Sends a response tone automatically to the caller to
acknowledge a Selective Call.
Group Call
Capable of transmitting and responding to group
calls.
Direct Channel Keying
Gives the user option to select channels directly
using the Numeric Keypad.
Rechargeable Battery Pack
Eliminates the costly expense of frequent Battery
replacement.
Battery Free Memory
The programmed channels on the Scan List and
other unit settings are retained in memory when the
Battery Pack is removed from the unit.
Page 5
UH-057
Page 8

UNPACKING
Carefull/ check the package contents against the list:
Uniden Sundowner UH-057 UHF CB Radio
Flexible Antenna
AC Adaptor/Charger
Standard Nickel-Cadmium Battery Pack
Belt Clip
Wrist strap
This Operating Guide
If any of the items are missing or damaged, contact your
place of purchase immediately.
OPTIONAL ACCESSORIES
• Speaker-Microphone
A two-in-one combination for convenient transmit
ting and receiving.
• Spare Battery Pack
A replacement pack for your rechargeable battery
(Either standard or Heavy Duty Pack).
• Battery Pack Charger
Desktop Rapid Charger
UH-057
Page 6
Page 9

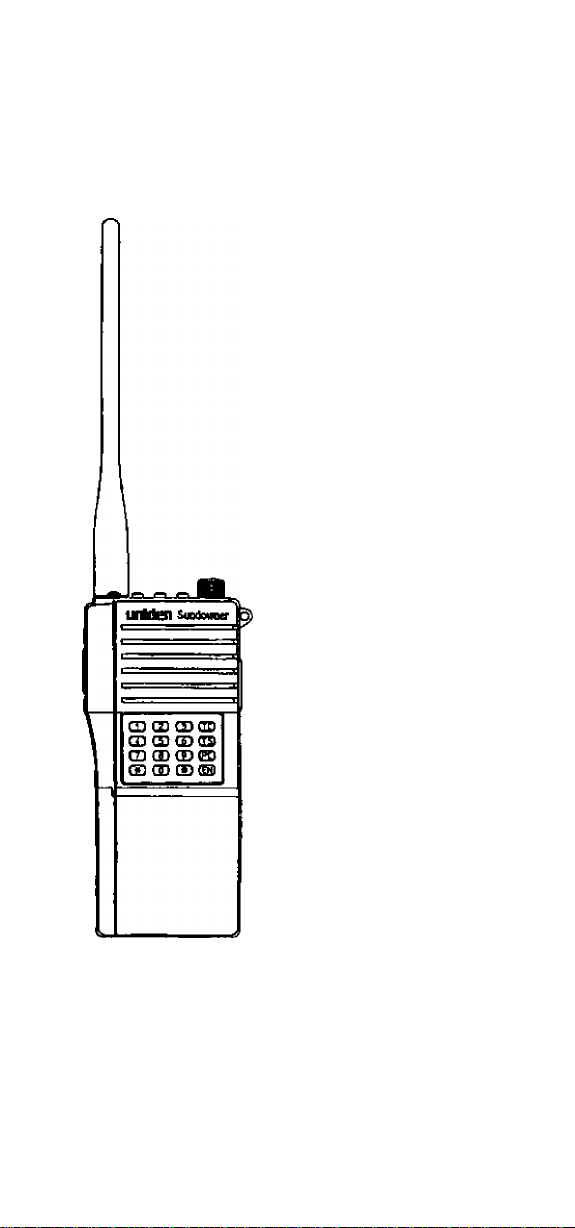
Controls and Indicators
ANTENNA
Connector
LCD Display
T»BUSY
Top indicators and Display
Antenna Connector
- conned the antenna to this TNC port
Lock-out Switch
- locks out a selected channel from channel scan.
Duplex Switch
- allows Simplex or Duplex Operation on Channels 1
through 8
Channel UP/DOWN Switches
- use to select a channel
On/Off Volume Control
- Rotate clockwise to turn the radio ON and increase
the volume. Rotate counter-clockwise to turn the
radio OFF or decrease the volume.
TX/Susy Indicator
- The RED LED tights when you press the PTT switch
(to transmit). It blinks when the battery is low and
needs recharging. The GREEN LED lights when the
received signal (on the current channel) is strong
enough to break the squelch.
Page 7
UH-057
Page 10

LCD Display
- the Liquid Crystal Display (LCD) has several
indicators that show the current operating mode. The
two digits at the right show the current selected
channel. The smaller, twoAhree-letter displays show
which features are enabled.
dup
CAL LO
PRI SCN
TSQ Tone Squelch Enabled
CAL Appears when an incoming tone
PRI Priority Channel Selected
DUP Duplex Channel Operation
LO Low Power TX Selected
SCN Scan feature enabled
code successfully opened the Tone
Squelch, or when TX Selcall codes
are being transmitted.
Selected
UH-057
Page 8
Page 11
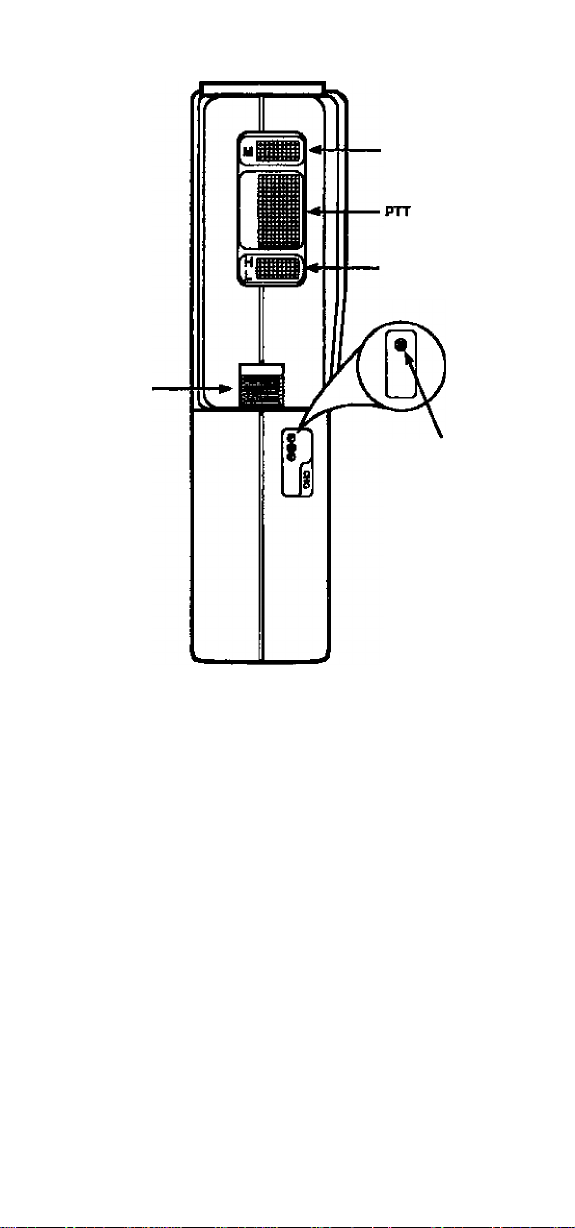
Battery Pack
Release Button
UONtTOfl Switch
(PusMo-Talk)
Switch
TX POWER HILO
Switch
AC Adaptor/
Charger Jack
Side Controls and Connectors
Battery Pack Release Button - To remove the Battery
Pack, push up on the release button and slide the Battery
Pack away from the radio.
Monitor Switch - Press to set the Auto-squelch feature ON
or OFF,
Push-to-Talk (PIT) Switch - Press and hold to talk.
Release to listen for a reply.
TX Power HI/LOW Switch - Press to set the Transmit
output power to HIGH (5W) or LOW(IW).
AC Adaptor/Charger Jack - Connect AC Adaptor/Charger
here
Page 9
UH-057
Page 12
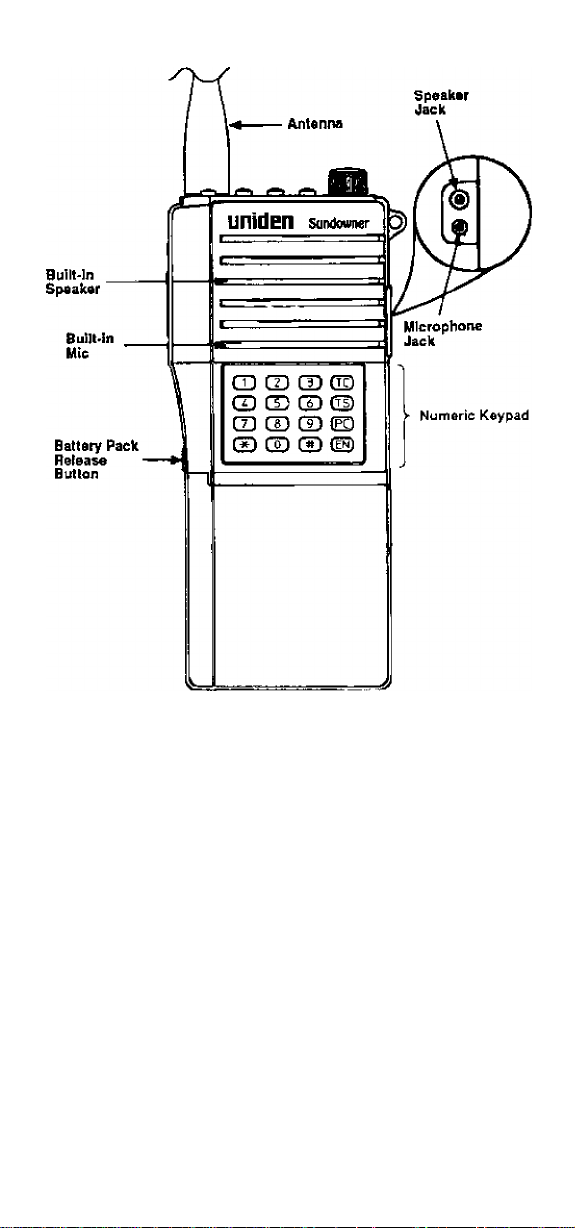
Front Controls
Built-in Speaker - Audio Output
Built-in Microphone - Speak into the microphone when
transmitting.
Speaker Jack - Connect optional external speaker here.
Microphone Jack - Connect optional external microphone
here.
Numeric Keypad - used for Direct Channel Keying, en
abling SELCALL Functions, selecting Priority Channel, and
programming SELCALL Codes,
UH-057
Page10
Page 13
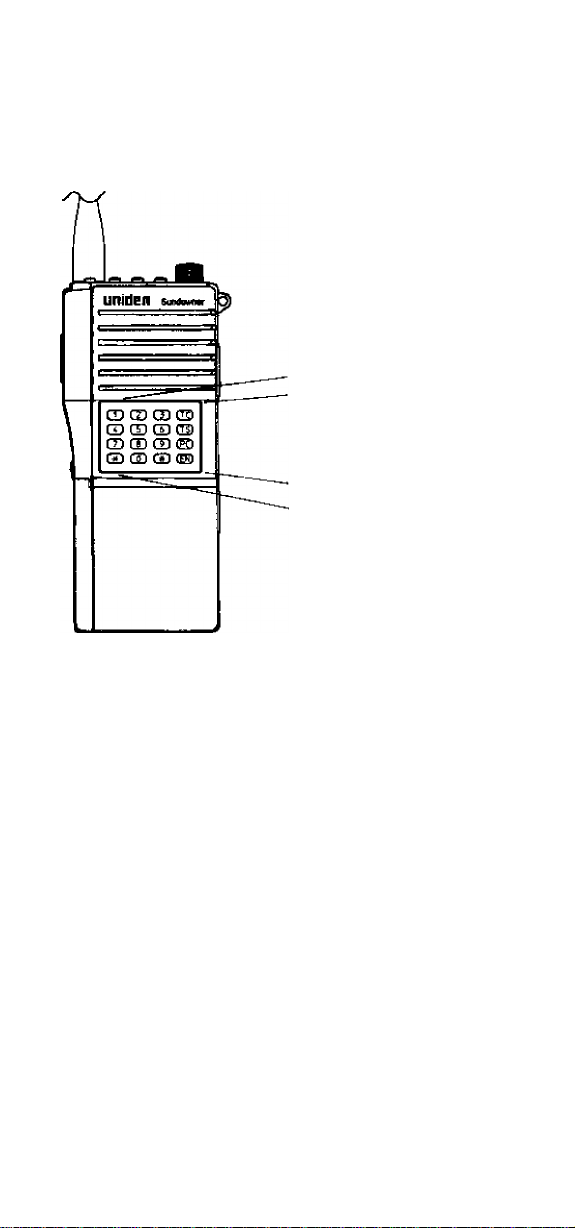
Numeric Keypad Controls and Functions
QD CD CD GD
CD CD E) GD
CD CD E) GD
CD CD CD GS)
CD to CD ■ NUMERIC Keys; Used to select channels,
enter special Receiver/Transmit Codes and
other SELCALL Parameters
CS> : ASTERISK Key; Press and hold for 1.5 sec
® : HASH Key; Press and hold for 1.5 sec to
to access Tone Period Programming
: Assigned as “D” tone when programming
RX ID, TX ID, or Lead-In tone.
enter Lead-In Delay Programming
; Assigned as "F" tone when programming
RX ID, TX ID, or Lead-In tone.
Page 11 UH-057
Page 14

(0>
<s>
©
<pg)
Note: When shipped from the factory, no SELCALL codes
ENTER Key; Press to enter the selected
Channel;
Press to store the RX/TX Code, Lead-In
Tone, Lead-In delay, and Tone Period
Setting when programming
Press and hold for 1.5 sec to enter special
programming modes.
Assigned as "E" tone when programming
Lead-In Tone ONLY.
TONE CALL Key; Press and hold for about
1.5 sec to transmit the transmitter ID (e.g,,
calling other radio by transmitting its
SELCALL ID)
Assigned as "A" tone when programming
RXID, TXIDof Lead-In Tone.
TONE SQUELCH Key; Press and hold for
about 1,5 sec to put the receiver on “Quite"
Mode,
Assigned as “B" Tone when programming
RX ID, TXID,or Lead-In Tone.
PRIORITY Key; Press this key to store or
remove the selected Priority channel to/
from the memory buffer.
Assigned as "C"tone when programming
RX ID,TX ID, or Lead-In Tone.
are stored in the memory. Error tone will be heard
everytime GD or Key is pressed. To program,
please see page 27.
See page 34 for Numeric Keypad SELCALL Tone
Assignment.
UH-057
Page 12
Page 15

Getting Started
Antenna
To attach the antenna to the TNG connector on top of your
radio, press down and rotate the antenna base clockwise
until it seats firmly into place.
Battery Information
The Sundowner UH-057 comes with a standard recharge
able Mi-Cd Battery Pack. An optional heavy duty recharge
able Ni-Cd Battery Pack is also available.
Installation
THE RECHARGEABLE NICKEL-CADMIUM BATTERY
PACK MUST BE CHARGED FULLY BEFORE USING IT
FOR THE FIRST TIME.
When installing or removing the rechargeable Battery Pack,
be sure that the power (ON/OFF Volume control) is turned
OFF.
To remove the Battery Pack, push up on the release button
and slide the Battery Pack away from the radio.
To replace, align the Battery Pack rails with the transceiver
and slide toward the transceiver unit until the Battery Pack
locks in place.
Page 13 UH-057
Page 16

Recharging the Nickel*CadmIum Battery Pack
Note: Before charging, be sure that the power (ON/OFF
Volume control) is turned OFF.
Recharge the NhCd Battery ONL Y when the unit
indicates a LOW BATTERY condition.
(TX LED blinks during TRANSMIT)
Insert the discharged Battery Pack in the rapid charger, or
connect the trickle charger to the side of the unit.
Using the trickle charger, the standard pack charges fully in
8 hours, and the heavy duty pack in 12 hours. If you have a
rapid charger, the standard pack charges fully in 1.5 hours,
and the heavy duty pack charges fully in 2 hours,
DO NOT leave the Batteries on charger for an extended
period of time.
Belt cup Installation
CAUTION:
DO NOT tighten the screws too tight, you could damage the
case.
UH-057
Page14
Page 17

Operation
RECEIVE
1. Turn the radio ON. Rotate the ON/OFF Volume control
clockwise until you hear the click. A channel number
should appear in the LCD Display.
2. Press the O or O switch or use the Numeric Keypad
to select the desired channel.
3. Press the monitor switch (Auto-squelch turns OFF).
4. Rotate the ON/OFF Volume control to adjust the speaker
volume to a comfortable level,
5. Press the Monitor switch (Auto-squelch turns ON),
Direct Channel Keying
Allows you to directly select a channel using the Numeric
Keypad.
Example 1: Selecting CFI5 directly
- Press then ©> ,
Example 2: Selecting CFI25 directly
-Press CD then •
Upon pressing the <|D Key, the LCD display and the unit
channel setting changes to CH25.
^ DOWN ^ '
Auto-Squeich
Automatically eliminates the unwanted "rushing" noise when
the unit is turned ON.
- press the Monitor Switch to set the Auto-squelch
feature ON or OFF
Note: To listen to weak signal transmissions, switch OFF
the Auto-squelch feature (Squelch is on minimum
level).
Page 15 UH-057
Page 18

Channel Scan
When you pressed the O Key for more than 1.5 seconds,
the scan feature starts and the SCN indicator appears on
the LCD.
Scanning stops automaticaliy on any active channel that is
not Locked-out, receives a cai! and you hear the caller.
To resume scanning, press the O Key.
If there is too much activity on a certain channel and you
wish to exclude ft from being scanned, simply press the
UP
UP
o Key (please see page 18 on how to create a channel
scan list).
To disable scanning:
- when on an active channel, press the O ^nd
the unit stays on the active channel.
- while scanning, press the O ot O Key. The unit
returns to the channel where scan function is acti
vated.
- press the PTT switch. When the unit is on an active
channel, it transmits on the same channel.
When scanning, the unit transmits on the channel
where scan function is activated.
SCN indicator disappears from the LCD Display.
UP OCWN
DCWN
Drop Out Delay
While scanning, the radio stops at a busy channel and
receives a transmission. When the received call is over, the
unit will wait for three seconds for the return of the signal.
Otherwise it resumes scanning.
UH-057 Page16
Page 19

Priority Scan
When a priority channel is selected and scan is activated,
the radio will monitor the prioritised channel regularly for
activity while scanning.
While scanning, if a signal is received on the priority channel
the radio will stay on that channel as long as the signal is
present. Otherwise, priority scanning resumes after 3
seconds.
However, if scanning stops on a channel which is not a
priority channel, the radio will continue on checking regularly
the priority channel for activity while monitoring the current
active channel.
To select a priority channel:
1. Enter the selected Priority channel using the Numeric
Keypad.
Example: Selecting CH20 as Priority Channel
- Press @ , ©
2. Then press the © Key.
After pressing the Key, the unit setting changes to
the selected priority channel and displays the PRt
indicator.
Note: Setting a Tone Squelched Channel as a Priority
■ Channel is not possible. Any prioritised Channel
when programmed to “Quiet" Mode will override the
priority setting.
Priority Scanning is inactive in TSQ Scan Mode.
To remove the Priority Channel setting
1. Manually or directly select the prioritised channel.
2. Momentarily press the © Key. The PRI indicator
disappears from the LCD display.
Page 17
UH-057
Page 20

Create a Channel Scan List with Channel Lock-Out Feature
You may have certain channels that you do not want to hear
every time you scan. These are channels that are busy in a
major portion of time, and the scanning stops at that
channel(s) often enough to interrupt the scan cycle. You
can Lock-out those channels so they are not scanned.
There are two ways to do this.
1. UsingtheOor O switches, manually select the
desired channel and press the O button. The lockedout channel blinks.
2. While scanning, when the unit stops on the channel you
wish to lock-out because of its too much activity, simply
press the O ^^d it will be automatically removed
from the scan list. Scanning resumes.
UP DOWN
UO
UO
To remove the lock-out condition from a channel, manually
select the channel and press O button again. The channel
stops blinking.
IJO ■
UH-057
Page 18
Page 21

TRANSMIT
1. The maximum transmit power output level of UH-057 is
5 watts.
To switch to low power, press the HI/LO switch. LO
appears on the LCD and the transmit power output level
is changed to 1 watt.
To switch back to High power, press the HI/LO switch
again. The TX power returns to high and the LO
indicator disappears from the LCD.
2. Before you transmit, listen for activity on the selected
channel.
3. Whan the channel is clear, press the PIT switch to
transmit. The TX LED comes on when you transmit.
Hold the radio with the microphone approximately two
inches in front of your mouth with the antenna at
approximately a 45-degree angle away from your head.
Speak in a clear, normal, conversational voice.
4. When you are finished speaking, release the PTT switch
and listen for an answer.
Page 19 UH-057
Page 22

Simplex / Duplex Communication
Duplex Operation allows the Uniden Sundowner UH-057 to
operate via a repeater station on Channels 1 through 8.
The set receives on these channels but transmits on
Channels 31 through 38 respectively.
When Duplex operation is disabled, the set receives and
transmits on the same channel, (Simplex Communication)
To activate Duplex operation on a Channel where Repeater
Service is available, select the channel and then press the
DIJP
O button. DUP indicator appears on the LCD Display.
To put the Duplex programmed channel back to-normal
Simplex operation, select the channel and press the O
button again. DUP indicator disappears trom the LCD
Display.
Low Battery Level Detection
Uniden Sundowner UH-057 has a built-in battery level
detector circuit. It evaluates your Battery Pack everytime
you transmit to determine whether the power inside the
Battery is still sufficient enough to support normal Receive
and Transmit communications.
The circuit will inform you in two ways.
1. When the PTT switch is pressed and the TX LED blinks.
It means the battery level is already low and needs
recharging. You can still transmit, however, you must
finish the conversation and have your battery charged
fully to resume normal operation.
2. When the Blinking TX LED went unnoticed and the
Battery goes down to where normal communication can
no longer be supported, the circuit will disable the PTT
switch and emit an error tone everytime you try to
transmit. Have the battery pack charged fully.
UH-057
Page 20
Page 23

Special Feature
SELECTIVE CALLING
Selective Calling (SELCALL) is a special Sequential Tone
Squelch System that allows the user to receive/transmit
calls selectively from/to an individual or a group, on a
shared busy channel.
The Sundowner UH-057 has Selective Calling (SELCALL)
system specially built-in. With exceptional features like
Receiver Quieting, Group Calling, and User Programmable
Parameters makes the Sundowner UH-057 superior to any
of its kind.
Receiver Quieting (Tone Squelch)
When enabled, it automatically mutes the receiver audio
circuit of the Radio. It will stay on its "Quiet Mode", as long
as the required Selcall tone code (SELCALL ID) to open the
muting circuit is not received.
Tone Squelch Scanning
Scans Tone Squelched Channels only.
Group Calling Capability
Transmits and Responds to Group Calls.
User-Programmable SELCALL Parameters
Gives the user freedom to program and configure the
SELCALL parameter for efficient Selective Calling communi
cation.
Page 2i
UH-057
Page 24

SELCALL OPERATION Receiver Quieting
Puts the receiver on "Quiet" Mode (also known as "Tone
Squelch” Mode), When enabled, the radio prevents any
unwanted conversations in the channel from being heard
unless the call is specifically directed to you and the
required SELCALL ID to open the "Quiet” condition is
received.
To enable:
1, Select the channel you want to put in Quiet Mode using
either the UP/DOWN Switch or the Numeric Keypad.
Example: Choosing CH20 as your CALL Channel
Press the Key for about 1,5 seconds. You will hear
2.
one beep and the TSQ inBicalor appears on the LCD
Display.
Under this condition, the PTT Switch is temporarily disabled.
If you wish to use the same channel for normal communica
tion, simply remove the Channel from Quiet Mode,
To deactivate the Quiet Condition:
t. Manually select the Tone Squelched Channel
2. Press the CD lor about 1.5 seconds. Two beeps
will be heard and the TSQ indicator disappears from the
LCD display.
UH-057
Page 22
Page 25

When a call is received...
While on TSQ Condition, when UH-057 receives a code
matching your SELCALL ID, it will do the following opera
tion.
1. Automatically responds to the caller by transmitting
Acknowledge tones.
2. Informs you that a caller is on the channel by emitting a
CALL ALARM (three successive tones in a regular
interval for 10 seconds.) and displays the CAL indicator.
3. Flashes the TSQ indicator for about 20 seconds allowing
you to use the PTT Switch. If you will not be able to
respond within the 20 second period, TSQ stops flashing
and Quiet operation resumes.
Responding to a call automatically removes the channel
from “Quiet" operation. The TSQ and CAL indicators
disappear from the LCD display.
Tone Squelch Scanning
If you are using two or more channels on TSQ Mode, you
can monitor all of these channels for selective calls by using
the TSQ Scanning.
To use this feature:
1. Select any programmed TSQ Channel.
UP
2. Press and hold the O switch for about 1.5 seconds.
TSQ scanning starts and the SCN indicator appears on
the LCD display.
Unlike Normal Scanning, TSQ Scanning checks the
detected carrier for SELCALL information. If no information
is seen, TSQ scanning resumes.
Page 23
UH-057
Page 26

When a call is received while TSQ Scanning, UH-057
lollows the same response as receiving a call on a Tone
Squelch Channel. It differs onl/ on the following.
1. If the call is not answered within the 20 second period,
TSQ Scanning resumes. CAL indicator remains on the
LCD.
To look for the channel where CALL is received;
a. Cancel TSQ Scanning by pressing either the Q ot
UP
°0 Key.
b. Using the O °r Q Key, browse through the TSQ
UP DOWN
Channels.
The CAL indicator marks the channel where the call is
received.
2. When answered, TSQ scanning is automatically
deactivated. The channel is removed from the Quiet
Operating Mode.
To deactivate TSQ Scanning:
1. Press either the O Of O Key. SCN indicator disap
UP DOWN
pears from the LCD and the unit returns to the Channel
prior to accessing TSQ Scanning.
2. When a SELCALL is received, press the PTT Switch.
Note: The chance of receiving and decoding Setail Call
effectively while TSQ Scanning can be increased in
many different ways. You can either lessen the
number of channels to be scanned to increase the
scanning speed, or change some of the SELCALL
Parameters (please see “Other parameters” on page
30). BE SURE THAT EVERY MEMBER OF YOUR
GROUP USES THE SAME SET-UP. OTHERWISE,
YOU WILL LESSEN THE CHANCE OF SELEC-
TIVEL Y CALLING EACH OTHER.
UH-057 Page 24
Page 27

Tone Calling
TonG calling enables you to selectively call other radios.
To do this, the SELCALL ID of the radio you are going to
call should be in the Transmitters SELCALL ID memory
(please see Programming Method on page 28),
To Call:
1. Select the channel where you and your group agreed to
use for Selective Calling.
2. Press and hold the Key for about 1.5 seconds.
One Long Beep will be heard and CAL indicator will
appear on the LCD Display while the SELCALL ID is
being transmitted automatically.
An acknowledge tone coming from the called radio will be
received if you had successfully made contact.
The Acknowledge Tone for the Sundowner UH-057 is a
successive three Low Tone beeps.
Group Calling
Sundowner UH'057 has group calling capability. It can
either respond to a group call or transmit a Group Calling
Code,
Group Calling enables you to call members of your group
simultaneously. However, you need to follow a certain
format on programming your TX SELCALL ID to do this.
TX SELCALL ID Eormat
To call
10 radios
100 radios
1000 radios
10000 radios
Page 25 UH-057
Transmitter SELCALL ID
[X]
[x] [X] [X] [A]
[X]
[X] [X] [A] [A]
[X]
[X] [A] [A] [A]
[A] [A] [A] [A]
[X]
Page 28

wh0fe: Ix] is a common SELCALL ID prefixes of your group
example:
If one group comprises of 10 members with SELCALL
IDs.
ranging from
to [1][21[3][4][9],
All in TSQ Mode at CH20
If someone transmits [1] [2) [3] [4] [A] on CH20, all of the
above unit will open their Tone Squelched Receiver.
Note: No Acknowledge tone will be received when Group
and,
|A] is the internationally assigned SELCALL tone to
identify the Group Call Code
[1] [2] [3] [4] [0],
[1][2] [3] [4] [1],
[1][2] [3] [4] [2],
[1][2] [3] [4] [3],
Call code is transmitted. If all radios wilt respond,
acknowledge tone will only “litter" the channel with
crisscrossing signal.
To use the Group Calling Feature effectively, your RX
SELCALL ID should be well arranged and assigned.
UH-057
Page 26
Page 29

Programming
SincG UH-057 can support either 5 tone or 6 tone signalling
format, you and your group must decide which format are
you going to use.
Receiver SELCALL ID
To program your own receiver SELCALL ID, do the follow
ing procedure.
1. Press and hold the Key for about 1.5 seconds.
Two beeps will be heard and the LCD displays:
2. Press the Key. The TSQ indicator appears on the
LCD Display. Flashing,
3. Enter your chosen SELCALL ID using the Numeric
Keypad.
Example: 1 2 3 4 5
Everytime you press the Numeric Keypad confirmation
tones will be heard. The SELCALL Tone assigned to the
pressed Key will be displayed on the LCD as shown:
(please see page 34 for the Numeric Key SELCALL
TONE assignment)
CD
CD
-5
CD
CD
CD
■ c®'-
■
Page 27 UH-057
Page 30

4. Press the (0) Key to complete the programming.
Two beeps will be heard and the unit returns to its
previous status prior to accessing Programming Mode.
If you decided to use the 6 Tone Format, simply enter the
sixth digit when programming before pressing the©) Key.
To remove the Receiver SELCALL ID from Memory:
1. Follow step 1 and 2 of Receiver SELCALL ID program
ming.
2. Press the ©) Key.
Programming ends and no ID will be stored in the
memory. Whenever the Key is pressed, error tone
will be heard.
Note: If you made an error in entering the ID, you must
abort the SELCALL programming and start over
again. To abort, press any key or switch not related
to SELCALL PROGRAMMING (e.g., PTTSwitch, UP
Key, HI/LOW Selector Switch... etc.)
Transmitter SELCALL ID
This ID is the Identification Code of the radio you want to
call. To program, do the following procedure.
1. Press the hold the ©i Key for about 1.5 seconds.
Two beeps will be heard and the LCD displays:
2. Press the Key. The CAL indicator appears on the
LCD Display, and flashing.
UH-057 Page 28
Page 31

3. Enter the Transmitter SELCALL ID using the Numeric
Keypad.
Example: 1 2 3 4 6
Everytime you press the numeric Keypad, conlirmation
tones will be heard. The SELCALL Tone assigned to the
pressed Keypad will be displayed on the LCD as shown:
(please see page 34 for the SELCALL TONE Key
Assignment)
CD
©
©
©
4. Press the © Key to complete the programming.
Two beeps will be heard and the unit returns to its
previous status prior to accessing Programming Mode.
If you and your group are using the 6 Tone Format, simply
enter the sixth digit before pressing the<Of Key.
To remove the Transmitter SELCALL ID from memory:
1. Follow steps 1 and 2 of Transmitter SELCALL ID
programming.
2. Press the © Key.
Programming ends and no ID will be stored in the
memory. Whenever the Key is pressed, error tone
will be heard.
;ci,L:
'CAL‘ •
s 1 /
CAL:
CAL-
!
=
3
-
H
-
B
Page 29
UH-057
Page 32

other SELCALL Parameters.
Aside from the Transmitter and Receiver ID, you should also
know some of the SELCALL Parameters. Though, this
parameters are not frequently changed understanding them
will probably help you on your future use.
Tone Period
Tone Period is the duration of one tone in a SELCALL ID
sequence. The setting of this parameter depends on your
application. On long distance communication for example,
where the signal strength of the transmitted information is
greatly reduced and affected by noise, it is more advisable
to use longer Tone Period. Long Tone Period gives the
decoder more time and information to check and evaluate
the code.
However, BE SURE THAT ALL RADIOS IN YOUR GROUP
USES THE SAME TONE PERIOD SETTING. Otherwise
you will not be able to selectively call one another.
Sundowner UH-057 allows you to select which tone period
is best for you. It offers the four most commonly used tone
period setting (20, 40, 70 or 100 mSec}. Giving you the
freedom to change this parameter, you can adapt easily to
the existing system in your group without the inconvenience
of having it serviced by the dealer.
To change the tone period setting,
1. Press the Cs? for about 1.5 seconds. The LCD displays:
2. Select your chosen Tone Period setting from the table
below.
Key LCD Display Tone Period
0 PO 20 mSec
1 PI 40 mSec
2 P2 70 mSec
3 P3 100 mSec
UH-057
Page 30
Page 33

For example, selecting 40 mSec
Press The LCD displays
3. Press the (|3) Key to complete the programming.
Two beeps will be heard and the unit returns to its
previous status prior to accessing Programming Mode.
Lead-In Delay
Lead-In delay is a SELCALL transmit parameter that
"wakes-up” and helps the receiver of the other radio to lock
onto the incoming signal. Everytime you Transmit a
SELCALL ID, Lead-In Delay attaches itself in the beginning
of the code sequence and makes the transmitter to be ON
longer prior to the code transmission. This sets the commu
nication link between the transmitter and the other receiver
more stable.
One major application of having a longer Lead-In Delay is
when you are Selectively Calling another radio via a
repeater station. Long Lead-In Delay helps to stabilise both
the communication link from your radio to the repeater
station and the communication link from the repeater to the
other radio.
To change the Lead-In Delay of your radio;
1. Press the for about 1.5 seconds. The LCD displays;
L
Page 31
UH-057
Page 34

2. SelGct your Lead-In Delay setting from the table below.
Key LCD Display Lead-tn Delay
0 LO
1 L1
2 L2
3
4 L4 4.0 Sec
For example, selecting 1.0 Sec as Lead-In Delay
Press CD - The LCD displays
^ “ II
L3 3.0 Sec
Period
0.5 Sec
1.0 Sec
2.0 Sec
LI,
3. Press the Key to complete the programming.
Two beeps will be heard and the unit returns to its
previous status prior to accessing Programming Mode.
Lead-In Tone
The Lead-In tone when programmed “rides” on the Lead-In
Delay, Hence, when transmitting a SELCALL ID a continu
ous tone will be heard by the receiver in the duration of the
Lead-In Delay.
Lead-In Tone’s main purpose is to increase the probability
of contact between your unit and the other radio WHEN
TSQ SCANNING.
Normally on TSQ Scanning, if a carrier is detected and the
unit sees no SELCALL information on its first "glance” at the
particular signal, scanning resumes.
But if the Lead-In Tone is present, the unit waits further until
the SELCALL ID is received.
UH-057
Page 32
Page 35

To program:
1. Press the (|3) Key tor about 1.5 sec.
Two beeps will be heard and the LCD displays:
2. Press the <S> Key. The PRI indicator appears on the
LCD display and flashing.
' *
PRI -
3. Select the Lead-tn Tone you want to use.
Example:
Selecting the Tone assigned to digit 1.
Press QD. The LCD displays:
' ''
PHI r
3. Press the Key to complete the programming.
Two beeps will be heard and the LCD returns to its
previous status prior to accessing Programming Mode.
To remove the Lead-In Tone;
1. Follow steps 1 and 2 of Lead-In Tone Programming.
2. Press and hold © Key for about 1.5 sec until you hear
the two beeps, the LCD will display "E" Tone but it will
not be programmed to the memory.
Be careful not to press the <© key twice.
Otherwise, "E" tone will be programmed as your Lead-In
Tone.
Note: Make sure that all members of your group wilt use
the same Lead-tn Tone. Else, you will lessen the
probability of receiving and successfully decoding a
setcall call while ISO Scanning.
Page 33
UH-057
Page 36

Programming Guide
Keypad Assignment when Programming
Key
TC
Tone
0
1
2
3
4
4
6
7
8
9
TC
TS
PR
EN
*
#
Default Setting (Factory Default)
A.
8
C.
D.
E.
0
2
3
4
4
6
7
8
9
A
B
C
— —
D
F
RX Selcall ID:
TX Selcall ID:
Tone Period;
Lead-In Delay;
Lead-In Tone:
TS
Lead-In
Tone
1
0
1
2
3
4
4
6
7
8
9
A
B
C
D
F
Tone
0
1
2
3
4
4 —
6 —
7 —
8 —
9 —
A —
B —
C —
E —
D —
F —
None
None
40 msec
500 msec
Tone “1"
Lead-In
Delay (S)
0.5
1.0
2.0
3.0
4.0
Tone
Period (n
20
40
70
100
_
_
IMPORTANT;
BE SURE THAT THE TONE FORMAT (5 TONE OR 6
TONE), TONE PERIOD SETTING AND THE LEAD-IN
TONE OF ALL THE RADIOS IN YOUR GROUP ARE ALL
THE SAME. ELSE, YOU WILL NOT BE ABLE TO
SELECTIVELY CALL ONE ANOTHER EFFECTIVELY.
UH-057
Page 34
Page 37

Care and Maintenance
Your Uniden Sundowner UH-057 is a precision piece o1
electronic equipment and you should treat it accordingly.
Due to the rugged design, very little maintenance is re
quired. However, a tew precautions should be observed:
• If your radio has been accidentally subjected to spray or
splash, you should immediately wipe it down with a soft
cloth dampened with fresh water.
• If the antenna has been damaged, you should not
transmit except in case of emergency. A defective
antenna may cause damage to your radio.
• You are urged to arrange a periodic performance check
with your Uniden Dealer.
Operator Troubleshooting
Should the unit malfunction or not perform properly, the
operator should perform the procedures indicated below.
1. If the transceiver is completely inoperative.
* Check the Battery
2.
If trouble is experienced with receiving.
* Check if the Radio is Switched-On
* Check the VOLUME control setting
* Check if the antenna is securely connected to the
antenna connector
3.
If trouble is experience with transmitting.
* Check if the antenna is securely connected to the
Antenna Connector
Page 35 UH-057
Page 38

Service
Should you find it desirable or necessary to have service
performed on your Uniden Sundowner UH-057, you are
urged to contact the Unkien Dealer from whom you made
your purchase. Your Uniden Dealer will be able to assist
you with complete service information,
tf you require service that is within the terms of your
warranty, you should present a copy of your receipt to your
dealer to authenticate your claim.
If you find it inconvenient to obtain service assistance from
your dealer, you may obtain service from Uniden Service
Division. If you want this service, please pack your radio in
a suitable container that will provide adequate protection.
Enclose a note describing the problem and a copy of your
receipt and send the radio (transportation prepaid) to;
uniden Australia Pty. Limited
SERVICE DIVISION
345 Princess Highway.
Rockdale, NSW 2216
UH-057
Page 36
Page 39

UHF CB CHANNEL INFORMATION
SIMPLEX Operating Mode
Channel Transmit
Assignment
1
2
3 476.475 476.475
4
5 476.525
6
7 476.575
8
9 476.625 476.625
10
11
12
13
14 476.750
15 476.775
16
17
18 476.850
19
Frequency(MHz) Frequency(MHz)
476,425 476.425
476.450 476.450
476.500 476.500
476,550 476.550
476.600 476.600
476.650 476.650
476.675 476.675
476.700 476.700
476,725 476.725
476.800 476.800
476.825 476.625
476.675 476.875
20 476.900 476.900
21
22
23 476.975
24
25
26
27
28
29 477.125 477,125
30 477.150 477,150
31
32
33
476.925
476,950 476.950
477.000 477,000
477.025 477 025
477.050
477.075 477.075
477.100 477.100
477.175 477.175
477.200 477.200
477.255 477.255
Receive
476,525
476,575
476.750
476.775
476.850
476.925
476,975
477.050
Page 37
UH-057
Page 40

SIMPLEX Operating Mode (Cont...)
Channol Transmit
Assignment Frequency(MHz)
34 477.250
35 477.275
36 477.300
37 477.325 477.325
38
39 477.375
40 477.400 477.400
477.350 477.350
Receive
Frequency(MHz)
477.250
477 275
477.300
477.375
DUPLEX Operating Mode
Channel
Assignment Frequency(MHz) Frequency{MHz)
1 477.175 476.425
2 477.200 476.450
3 477.225 476.475
4 477.250 476.500
5 477.275 476.525
6 477.300 476.550
7 477.325 476.575
8 477.350 476.600
Transmit
Receive
UH-057
Page 38
Page 41

Specifications
GENERAL
Channels
Frequency Range
Communication Mode
CH1 to сне
СН9Ю CH40
Frequency Control
Controls
Buttons
Status Indicator
Channel Display
Connectors
Size
Weight
Power Requirements
Antenna Impedance
Microphone
Speaker
Operating Temperature
Range
Shock and Vibration
SMA Approvals
40
476.425MHz to 477.4MHz
Simplex! Duplex
Simplex
Phase Locked Loop (PLL)
On/Off Volume Control,
On/Off Monitor Switch
HI/LOWTX Power Switch
UP Key, DOWN Key, I/O Key,
DUPLEX Key
TX LED at PTT On: RED
Continuous : Transmitting
Flashing : TX/Low Battery
TX LED at PTT Off; GREEN
Lights ON : Busy Channel
TSQ (Tone Squelch)
CAL (Call Received or
Transmitting Tones)
PRI (Priority CH Selected)
SCN (Scanning),
LO (Low TX Power Selected)
DUP (Duplex Communication)
Liquid Crystal Display
(LCD, Dual 7 Segment)
Antenna, External Speaker
External Microphone
AC Adaptor/Charger
62mm W X 37mm L x 150mm H
390 g.
7.2V DC
50 ohms, nominal
Built-in Electret type
8 ohms, 0.5W
O-C to +55“C
Meets Of Exceeds EIA Std,
RS152B and RS204C
Type accepted under MS250
Page 39
UH-057
Page 42

Transmitter
Power Output
HI
LOW
Modulation
Frequency Tolerance
at 25'’C
Mic. Sensitivity
at ±3kHz Dev.
Hum and Noise
(300Hz, 3kHz BPF)
(750^3 DeEmp}
Modulation Frequency Response
at 1kHz +1kHz Dev.
500Hz
2000Hz
Current Drain
at HIGH Power
4W (nominal), 5W (max.)
1W (nominal)
F3E, ±5kHz Deviation
±300 Hz (nominal)
4.5mV (nominal)
40dB
: -6dB
: +7dB
; 1800mA
Receiver
Sensitivity
at12dBSlNAD
Squelch Sensitivity
Audio-Frequency
Response (ref: 1kHz, ±3kHz Dev.)
500Hz : +6dB
2000Hz : -7dB
Total Harmonic Distortion
at Standard AF Output
(50mW at 4 ohm Load)
Hum and Noise : 40dB
Adjacent Channel
Selectivity
at ±25kHz
Image Rejection Ratio : 45dB
IF Rejection Ratio : 55dB
Current Drain
Max Volume : 250mA
Squelched : 50mA
: 0.35fi V (nominal)
: 0.20fi V (nominal)
(Auto-squelch: ON)
: 3%
: 60dB
SELCALL
Standard
Encode/Decode Format
Transmit Tones
Receive Tones
Tone Periods
Lead-In Delay
Lead-In Tone
UH-057
: CCIR International
5 or 6 Tones
0-9, A-D, F
0-9, A-D, F
20, 40, 70, 100 mSec
500 mSec, 1,2, 3, 4, Sec
0-9, A-F
Page 40
Page 43

WARRANTY
Uniden Sundowner UH-057 Handheld UHF CB Radio
Australian 1 Year Warranty
Note: Please keep your sales docket as it provides evidence of
warranty.
WARRANTOR: Uniden Australia Pty. Limited ACN 001 865 498
ELEMENTS OF WARRANTY: Uniden warrants to the original retail
owner tor the duration ol this warranty, its Sundowner UH-057 Handheld
UHF CB Transceiver Radio {hereinafter referred to as the Product), to
be tree from defects in materials and craftsmanship with only the
limitations or exclusions set out below.
WARRANTY DURATION: This warranty to the original retail owner
only, shall terminate and be of no further effect ONE (1) Year after the
dale of original retail sale. This warranty will be deem^ invalid if the
product is; (A) Damaged or not maintained as reasonable and
necessary. {B) Modified, altered or used as part of any conversion kits,
subassemblies, or any configurations r>ot sold by Uniden. (C) Improperly
installed, {D) Repaired by someone other than an authorized Uniden
Repair Agient lor a delect or malfunction covered by this warranty, {E)
Used in conjunction with any equipment or parts or as part of a system
nol nnanufactured by Uniden, {F) installed, programmed or serviced by
anyorte other than an authorized Uniden Repair Agent. (G) Where the
Serial Number label of the product has been removed or damaged
beyond recognition.
PARTS COVERED: This warranty covers for 1 year, the Sundowner
UH-057 Handheld UHF CB Tranceiver Unit only. All accessories, NICAD
Battery. AC Adaptor/Battery Charger, Antenna, Belt Clip, Wrist Strap are
covered for 90 days.
STATEMENT OF REMEDY: In the event that the product does not
conform to this warranty at any time while this warranty is in eftecl. the
warrantor at its dtscreUon, will repair the defect or replace the product
and return it to you without charge for parts and service.
THIS WARRANTY DOES NOT COVER OR PROVIDE FOR THE
REIMBURSEMENT OR PAYMENT OF INCIDENTAL OR CONSE
QUENTIAL DAMAGES.
WARRANTY CARD: It a warranty card has been included with this
product then please fill it in and return it to us within 14 days of
purchase. Your name and serial number ol the product will then be
registered in our database and this will help us process your claim with
greater speed and efticiency should you require warranty service.
PROCEDURE FOR OBTAINING PERFORMANCE OF WARRANTY: In
the event that the Product does not conform to this warranty, the
Product should be shipped or delivered, freight pre-paid, with evidence
of original purchase, {egf a copy of the sales docket), to the warrantor
at:
UNIDEN AUSTRALIA PTY. LIMITED
345 Princes Highway, Rockdale, NSW 2216
Customers in other Stales should ship or deliver the Product
freight pre paid to their nearest Uniden Authorized Repair Centre,
(Contact Uniden for the nearest Warranty Agent to you)
SERVICE DIVISION
Ph (02) 599 3100 FAX (02) 599 3278
Page 44

UNIDEN AUSTRALIA PTY. LTD.
345 Princes Midway, Rockdale. NSW 2216
Ph (Oe) 599 3100 FAX (02) 599 3278
UTZZ01857ZZ
Printed in the Philippines
 Loading...