

Page 1
UH-048XR
Operating
Guide
Page 2

➤ Do not operate the transmitter of any radio
equipment unless all the Radio Frequency (RF)
connectors are secured and any open connectors
are properly terminated.
➤ Do not operate the transmitter of any radio
equipment near electrical blasting caps or in an
explosive atmosphere.
➤ Do not let children operate any transmitter-
equipped radio equipment unless supervised.
➤ Have your radio equipment serviced by a qualified
Uniden technician.
➤ Do not operate the transmitter of any radio
equipment with the antenna touching or close to
the eyes, face, or exposed body parts.
The exclamation point within an
equilateral triangle is intended to alert the
user to the presence of important
operating and maintenance (servicing)
instructions in the literature
accompanying the appliance.
WARNING!
Page 3

Introduction
Features 1
Technical Support & Service 2
Included in your UH-048XR Package 3
Getting Started
Battery Installation 4
Low Battery Alert 5
Belt Clip 5
Wrist Strap 6
Operation
Power on/off 7
Volume 7
Selecting Channel 8
To Transmit and Receive 8
To Operate in Dual-Watch 9
Scanning 10
Continuous Tone Coded Squelch (CTCSS) 11
CTCSS Tone Display 12
Voice Activated (VOX) 13
VOX Recovery Time 13
Auto Keylock 14
Call Melody 15
Monitor 16
Battery Level Display 17
Battery Charge 18
UHF Channels and Frequencies 19
CTCSS Codes and Frequencies 20
Optional Accessories 20
Technical Specifications 21
Warranty 23
Controls & Indicators 25
CONTENTS
Page 4

The UH-048XR is a portable two-way UHF-CB radio.
It is compact, rugged and fits easily in your hand.
This hand held UHF radio will give you consistent,
outstanding performance in virtually all conditions
and situations. To ensure that you get the most from
the UH-048XR’s features, please read this operating
guide carefully before using the unit.
FEATURES
➤ 40 Channels
➤ 38 Built-in Continuous Tone Coded
Squelch System (CTCSS)
➤ 500mW Output Power
➤ Up to 3 km range*
➤ LCD Display
➤ Scan
➤ Monitor
➤ LCD Back Light (Auto On for 5 Sec)
➤ Auto Power Save
➤ Battery Level Indicator
➤ Built in Keypad Lock
➤ Key Lock On/Off
➤ Key Touch Tone On/Off
➤ 7 Different Ring Tones
➤ Auto Squelch Control
* Range varies depending on the environment 3km range is
noted in a flat open environment.
INTRODUCTION
1
Page 5

TECHNICAL SUPPORT AND SERVICE
Should you find it desirable or necessary to service
your UH-048XR, we suggest you contact the Uniden
dealer where you purchased your radio. Your dealer
will be able to assist you with the complete service
information.
If you require service that is within the terms of your
warranty, you should present a copy of your receipt to
your dealer to authenticate your claim.
If you find it inconvenient to obtain service assistance
from a dealer, please pack your radio in a suitable
packaging that will provide adequate protection to
your radio. Enclose a note describing the problem, a
copy of your receipt, and send it prepaid to:
AUSTRALIA: NEW ZEALAND:
Uniden Australia Pty Ltd Uniden New Zealand Ltd
Customer Service Division Customer Service Division
345 Princes Highway 150 Harris Road
Rockdale NSW 2216 East Tamaki, Auckland
Ph. (02) 9599-3577 Ph. (9) 273 8383
Fax. (02) 9599-3278 Fax. (9) 274 4253
Toll Free 1300 366 895 Toll Free 0800 4 UNIDEN
4 864336
Caution: Changes or modifications to this product not
expressly approved by Uniden; or operation of this product in
any way other than as detailed by this Operating Guide, can
void your warranty and authority to operate this product.
2
Page 6
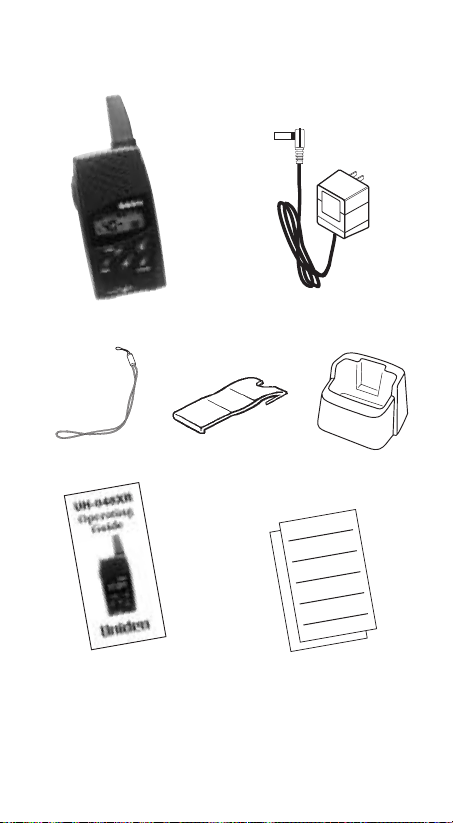
INCLUDED IN YOUR UH-048XR PACKAGE
3
Note: If any of these items are missing from the box, contact
your Uniden Dealer.
Wrist Strap Belt Clip Desk Top
Charger
UH-048XR AC Adaptor
Operating Guide Product Registration
Card & other printed
materials
Page 7
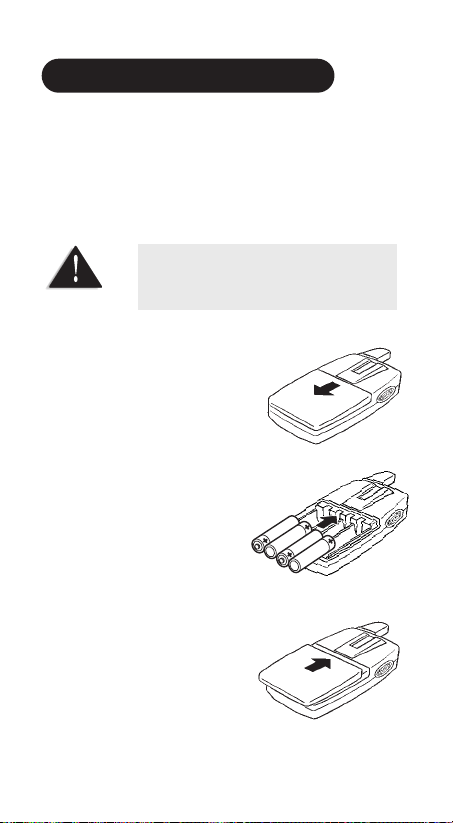
BATTERY INSTALLATION
Your UH048XR radio uses 4 AAA batteries (not
supplied) for power.
Please refer to page 14 should you wish to use
rechargeable batteries.
To install the
batteries:
1. Make sure your radio is
off.
2. Press battery cover
release. Slide cover off.
3. Insert 4 AAA batteries
(not supplied) according
to the polarity symbols
inside the battery
compartment.
4. Slide the battery cover
forward until it snaps
into place.
GETTING STARTED
4
Do not mix old and new batteries
for optimum performance.
Page 8
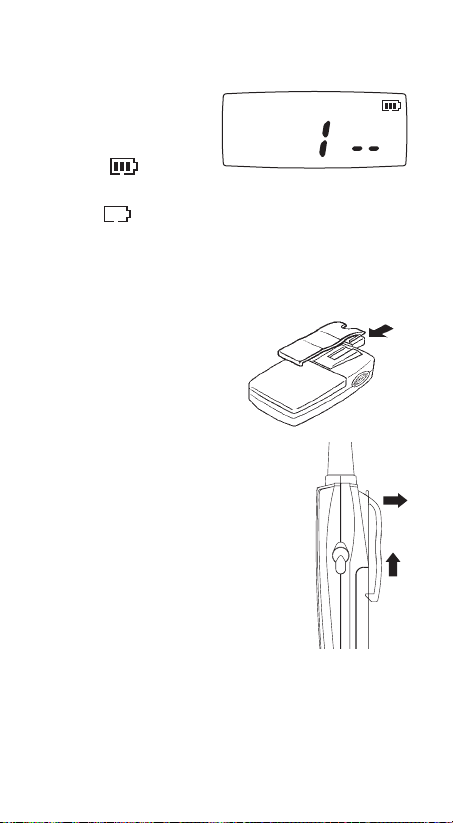
LOW BATTERY ALERT
The LCD on your radio
shows a battery meter
in the upper right
corner. icon
indicates a fully powered unit. As the batteries lose
power, will flash.
When the batteries in the unit are low replace the
batteries immediately to continue using the radio.
BELT CLIP
Because you will
probably use your radio
when you are out and
about, the unit comes
equipped with a belt clip to
securely fasten the unit to your
belt, pocket or bag.
To attach the belt clip:
Slide the belt clip until it snaps into
place.
To remove the belt clip:
To remove the belt clip. Press and hold belt clip
locker, slide the belt clip at the same time until
released.
5
Page 9
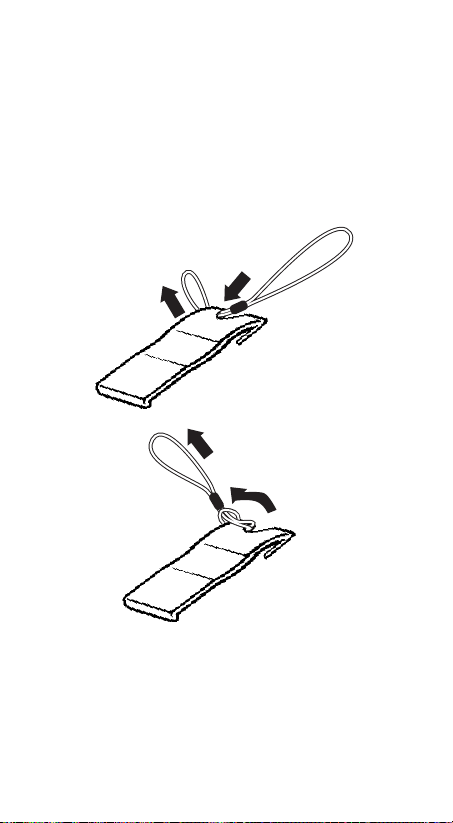
WRIST STRAP
1. Insert the short end of the strap through the belt
clip hole in the top of the belt clip.
2. Slip the long end through the loop to enclose the
clip in the strap and pull tight.
6
Page 10
➤ When you press any key (except PTT), a short
tone sounds.
➤ See the Controls and Indicators page at the back
of this operating guide for button and key
operations.
POWER ON/OFF
Press and hold
[Power/Enter] button
until a melody is heard.
A channel number and
battery level should appear on the display.
To turn the unit OFF, press and hold
[Power/Enter]
button until a melody is heard.
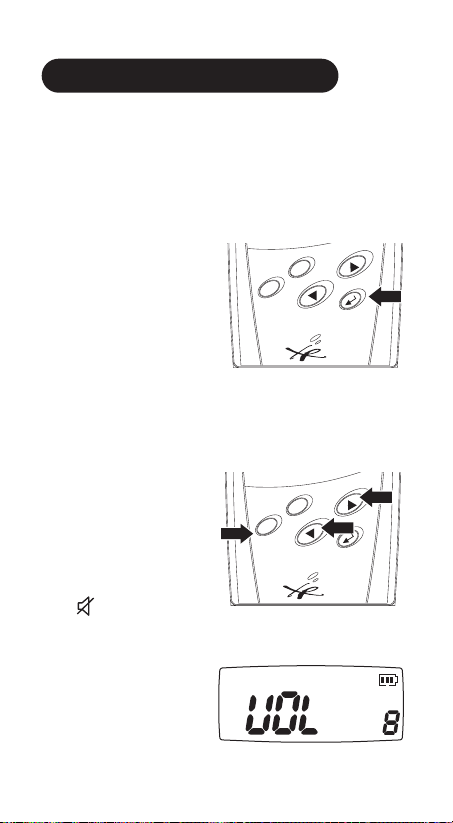
VOLUME
1. Press the [Monitor]
button to hear
background noise.
The “monitor” icon
will appear on
the display.
2. Press the
[▲] or [▼]
to set the volume
level. There are 8
level volume
settings.
OPERATION
7
Function
Monitor
UH048
Function
Monitor
UH048
Power/Enter
Power/Enter
Page 11

SELECTING CHANNEL
1. Press [Function] until
“ ” appears in the
large display. The current
channel flashes.
2. Press [▲] or [▼]
to select the desired
channel
3. Press []to
confirm your selection, otherwise, the radio will
automatically return to standby and the new channel
will be displayed.
Note: If you press and hold the [▲] or [▼], channel numbers
will scroll rapidly.
Note: If a step is not completed within 5 Secs., the UH048XR
will automatically return to standby. Thus, you have to
start again from the first step.
TO TRANSMIT AND RECEIVE
The UH-048XR uses the 40 UHF-CB Channels. For
your reference a list of the available channels and
corresponding frequencies is printed at the end of this
manual.
1. The maximum RF transmit power of UH-048XR
is 500 mWatts.
2. Before you transmit, listen for activity on the
selected channel.
3. When the channel is clear, press and hold the
[PTT] to transmit.
8
Monitor
Function
Power/Enter
Page 12

The TX indicators
and
appear on
the LCD.
Hold the radio with
microphone approximately
two inches in front of your
mouth with the antenna at
approximately 45˚ angle
away from your head. Speak in a clear, normal conversational voice.
4. When you have
finished speaking,
release the [PTT] and
listen for a response.
TX indicators will then disappear on the LCD.
The display shows and when a
transmission is being received by your radio.
TO OPERATE IN DUAL-WATCH MODE
This feature allows you to monitor two different
channels at the same time. If you pre-set any channel
by this function, other than the current channel in
use, the pre-set channel will be scanned every 0.5
seconds (together with the current channel) for any
transmission.
Press
[Function] button
repeatedly until [ ]
appears in the large display and the dual-watch icon
[ ]flashes.
9
PTT
Switch
Function
Function
Monitor
Power/Enter
Page 13

Press [▲] or [▼] to
select the additional
channel you wish to
monitor. Press []to
confirm your selection and to activate dual-watch
mode. Otherwise, the selected channel is automatically
accepted if no key is pressed after 5 Secs.
Note: Pressing [Function] will stop Dual-Watch Mode
operation.
SCANNING
This feature allows you to scan for an active channel
and communicate with the party transmitting.
1. Press
[Function] button until appears in the
large display and the auto channel scan icon
[ ] flashes.
2. Press
[▲] or [▼] to
select up or down.
Note: [▲] means scanning
goes from lower to
higher channel,
[
▼] means scanning goes from higher
to lower channel.
3. Press []to confirm your selection and to
activate the scan mode. Otherwise the status
selected is automatically accepted if no key is
pressed after 5 Secs.
10
Page 14

CONTINUOUS TONE CODED SQUELCH
SYSTEM (CTCSS)
CTCSS is a feature that allows a group to talk to each
other without hearing other users on the same
channel.
NOTE : Uniden discourages the use of CTCSS feature until the
Australian Communications Authority (ACA) grants the
use of CTCSS on CB frequencies.
Programming CTCSS Code
1. Press
[Function] button repeatedly until “[]”
appears in the large display.
2. Press
[▲] or [▼] to
select the desired
code.
3. Press
[]to confirm your selection. Otherwise,
the code selected is automatically accepted if no
key is pressed after 5 Secs.
Setting CTCSS to “OFF” allows the radio to receive all
transmissions on the selected channel regardless of
CTCSS tone.
11
Page 15

On the example below only radio 1 and 9 can
communicate or hear each other because they are
using the same or common CTCSS code.
CTCSS Tone Display
This feature allows you to select the preferred display
format for the CTCSS code setting. If frequency
was chosen, then the display in the CTCSS will be
shown as frequency. However, if the number was
chosen, then the code number will be displayed in
CTCSS function.
1. Press
[Function] button
until appears in
the large display.
2. Press
[▲] or [▼] to
change the format.
12
CH1
Code 1
1
2
3
CH1
Code 1
CH1
Code 7
CH1
No CTCSS Code
CODE 1
CODE 7
9
Page 16

3. Press []to confirm your selection. Otherwise,
the displayed state is automatically accepted if no
key is pressed after 5 Secs.
VOICE ACTIVATED (VOX)
VOX feature enables user to transmit automatically by
speaking on the microphone without pressing the
PTT switch.
To activate VOX:
1. Press
[Function] button until “[]” appears in
the large display and the VOX icon [ ] flashes.
2. Press
[▲] or [▼] to
change the sensitivity
or deactivate VOX.
3. Press
[]to
confirm your
selection. Otherwise, the status is selected
automatically if no key is pressed after 5 Secs.
Note: A headset microphone (not supplied) can be used with
this function.
VOX Recovery Time
This is the amount of time the UH048XR will hold the
transmission before it starts receiving signals.
To set the timing:
1. Press
[Function] button until “[]” appears
13
Page 17

in the large display and the VOX icon [ ]
flashes.
2. Press
[▲] or [▼] to
select the delay time.
3. Press
[]to
confirm your
selection. Otherwise the selected time is
automatically accepted when no key is pressed
after 5 Secs.
AUTO KEYLOCK
This feature prevents accidental channel change and
disturbance to the preferred settings of the user. Auto
Key Lock temporarily disables the UP, DOWN and
ENTER buttons.
To activate Automatic Keylock:
1. Press
[Function] button
until “[]”appears
in the large display
and the key-lock icon
flashes.
2. Press
[▲] or [▼] to
select Auto option.
3.
Press
[]to
confirm your selection. Otherwise, the selected
option is automatically accepted if no key is press
after 5 Secs.
14
Monitor
Function
Power/Enter
Page 18

The radio momentarily beeps as appears on
display and [▲] or [▼] and []immediately goes
into auto lock if no key is pressed within 10 Secs.
To deactivate keylock temporarily, press and hold
[Function] until
disappears. Keys will go into
auto lock again if no key is pressed within 10 Secs.
To deactivate permanently:
1. Press and hold
[Function] button until
disappears in the display.
2. Follow steps 1 to 3 for Activating Keylock but
select off in step 2.
CALL MELODY
This feature provides 7 selectable user call ringer
melodies to alert you of a calling party.
To set call melody:
1. Press [Function] button until and the CAL
icon appear on the display . The current
melody number appears in the small display and
the melody is played.
2. Press
[▲] or [▼] to
select the melody.
3.
Press
[]to
confirm your
selection. Otherwise, the selected melody is
automatically accepted if no key is press after
5 Secs.
15
Page 19

To use Call Melody:
Press
[PTT] twice. Call Melody will be heard on user’s
radio and on all radios using the same channel.
MONITOR
This feature enables users to listen in for weak
signals on the current channel at the press of the
[Monitor] button.
To use monitor,
• For brief listening, press
[Monitor]
• For continuous
listening. Press and
hold [Monitor] for 2
sec. A tone beep will
be heard and the receiver circuit will stay open,
letting in both the noise & weak signals.
• Display shows
icon.
• To return to normal
receive mode press
[Monitor] or [PTT] button.
16
Function
Monitor
Power/Enter
Page 20

BATTERY LEVEL DISPLAY
The icon in the top right hand corner of the
screen indicates the UH-048XR current battery
voltage level at all times. The battery level is
displayed in 3 levels:
17
LEVEL 3
Battery 100% full
LEVEL 2
Battery approx
70% capacity
LEVEL 1
Battery approx
30% capacity
Almost Empty
Page 21

BATTERY CHARGE
Warning Notice! This UH048XR is designed to
charge Ni-Cd batteries only.
Use only the power Adaptor AAD-048S with 4 AAA
size Ni-Cd batteries.
Turn the power off. Follow charging set-up below.
Note 1: To fully charge the battery, leave the AC Adaptor (AAD-
048S) charging for 14-16 hours.
Note 2: Disconnect the AC Adaptor from the unit when charging is
completed.
Note 3: When using the Desk Top Charger, the UH048XR must be
placed with its front view facing the short part of the charger.
Charging batteries other than
NiCd may damage the radio.
18
Function
Monitor
Power/Enter
UH048
OR
Page 22

* Emergency calling for simplex operation
Please do not use this channel in non-emergency cases.
# Back-up Emergency Channel
Ch. Freq. Usage Ch. Freq. Usage
01 476.425 Simplex 21 476.925 Simplex
02 476.450 Simplex 22 476.950 Simplex
03 476.475 Simplex 23 476.975 Simplex
04 476.500 Simplex 24 477.000 Simplex
05 *476. 525 Simplex 25 477.025 Simplex
06 476.550 Simplex 26 477.050 Simplex
07 476.575 Simplex 27 477.075 Simplex
08 476.600 Simplex 28 477.100 Simplex
09 476.625 Repeater 29 477.125 Simplex
10 476.650 Repeater 30 477.150 Simplex
11 #476.675 Back-up 31 477.175 Simplex
Emergency Channel
12 476.700 Repeater 32 477.200 Simplex
13 476.725 Repeater 33 477.225 Simplex
14 476.750 Repeater 34 477.250 Simplex
15 476.775 Repeater 35 477.275 Simplex
16 476.800 Repeater 36 477.300 Simplex
17 476.825 Repeater 37 477.325 Simplex
18 476.850 Repeater 38 477.350 Simplex
19 476.875 Repeater 39 477.375 Simplex
20 476.900 Repeater 40 477.400 Simplex
UHF CHANNELS & FREQUENCIES
19
Page 23

• AC Adaptor (AAD-048)
• Desk Top Charger (DTC-048)
• Speaker Microphone (SM-048)
• Headset Microphone (HM-048)
OPTIONAL ACCESSORIES
ACCESSORIES
Code No. Freq. (Hz) Code No. Freq. (Hz) Code No. Freq. (Hz)
00(‘oF’) OFF 13 103.5 26 162.2
01 67.0 14 107.2 27 167.9
02 71.9 15 110.9 28 173.8
03 74.4 16 114.8 29 179.9
04 77.0 17 118.8 30 186.2
05 79.7 18 123.0 31 192.8
06 82.5 19 127.3 32 203.5
07 85.4 20 131.8 33 210.7
08 88.5 21 136.5 34 218.1
09 91.5 22 141.3 35 225.7
10 94.8 23 146.2 36 233.6
11 97.4 24 151.4 37 241.8
12 100.0 25 156.7 38 250.3
CTCSS CODES & FREQUENCIES
20
Page 24

General
Channels Transmit 40
Receive 40
Oper. Temp. 0˚C - +55˚C
Antenna Fixed
Microphone Built-in Electret type
Display Liquid Crystal Display
Speaker Round Type
Power Source 4 x AAA Size Batteries
Size (without antenna)
99(H) x 51.7(W) x
24.4(D)mm
Weight 134g
(with Antenna & Battery)
Operating Time at 30 hrs (1000mAH Alkaline
Batteries)
5-5-90 Duty Cycle
20 hrs (600mAH Ni-Cd
Batteries)
Transmitter
Frequency Control Phase Locked Loop
Frequency Range 476.425 to 477.4 MHz
Frequency Stability ±5 ppm
Power Output 0.5W
Spurious Emissions -40 dBm
Current Drain 320mA
TECHNICAL SPECIFICATIONS
21
Page 25

Receiver
Receiver Type Dual Conversion
Super Heterodyne
Phase Locked Loop
System for Local
Oscillator
Frequency Range 476.425 to 477.4 MHz
Sensitivity @ 0.28 µV
20 dB SINAD
Squelch Sensitivity 0.19 µV (Threshold)
Audio Frequency
Response 500Hz, 5dB
(ref: 1KHz, ± 3KHz Dev.) 2000Hz, -6dB
Selectivity 60dB
Hum & Noise Ratio 40dB
Audio Output Drain 0.2W (10% THD)
Current Drain 150 mA
50mW output
Specifications shown are typical and subject to change without
notice.
22
Page 26

UNIDEN UH-048XR UHF CB RADIO
Limited One Year Warranty
Note: Please keep your sales docket as it provides evidence of
warranty.
Warrantor: Uniden Australia Pty Limited
ACN 001 865 498
Uniden New Zealand Limited
Elements of Warranty: Uniden warrants to the original retail owner
for the duration of this warranty, its UH-048XR UHF CB Transceiver
Radio (hereinafter referred to as the Product) to be free from defects
in materials and craftsmanship with only the limitations or exclusions
set out below.
Warranty Duration: This warranty to the original retail owner
only, shall terminate and be of no further effect ONE (1) Year after
the date of original retail sale. This warranty will be deemed invalid
if the product is; (A) Damaged or not maintained as reasonable
and necessary, (B) Modified, altered or used as part of any
conversion kits, subassemblies, or any configurations not sold by
Uniden, (C) Improperly installed, (D) Repaired by someone other
than an authorised Uniden Repair Agent for a defect or malfunction
covered by this warranty, (E) Used in conjunction with any
equipment or parts or as part of a system not manufactured by
Uniden, (F) Installed, programmed or serviced by anyone other
than an authorised Uniden Repair Agent, or (G) Where the Serial
Number label of the product has been removed or damaged
beyond recognition.
Parts Covered: This warranty covers for 1 year, the UHF CB
Transceiver Unit only. Accessories: Belt CLip and Wrist Strap are
covered for 90 days.
Statement of Remedy: In the event that the product does not
conform to this warranty at any time while this warranty is in effect,
the warrantor at its discretion, will repair the defect or replace the
product and return it to you without charge for parts and service.
This warranty does not cover provide for the reimbursement or
payment of incidental or consequential damages.
WARRANTY
23
Page 27

Warranty card: If a warranty card has been included with this
product, please fill it in and return it to us within 14 days of
purchase.
Procedure for obtaining performance or warranty: In the
event that the Product does not conform to this warranty, the
Product should be shipped or delivered, freight prepaid, with
evidence of original purchase, (eg. a copy of the sales docket),
to the warrantor at:
UNIDEN AUSTRALIA PTY LIMITED UNIDEN NEW ZEALAND LTD
Service Division Service Division
345 Princes Highway, 150 Harris Road,
Rockdale, NSW 2216 East Tamaki, Auckland
Ph (02) 9599 3577 Ph (9) 273 8383
Fax (02) 9599 3278 Fax (9) 274 4253
Toll Free 1300 366 895 Toll Free 0800 4UNIDEN
4864336
Customers in other states should ship or deliver the Product freight
pre-paid to the nearest Uniden Authorised Repair Centre. (Contact
Uniden for the Warranty Agent nearest you.)
24
Page 28

6
1
5
2
7
8
9
10
3
4
12
13
11
Power/Enter
Function
Monitor
UH048
CONTROLS & INDICATORS
25
Page 29

1. Detachable Belt Clip
2. Battery Cover
3. Antenna
4. PTT (Push-to-talk)
Button
5. External Mic/Speaker/
Charger Jack
6. LCD Display
7. Function Button
8. Monitor Button
9. Built-in Speaker
10. Down Button &
Volume Control
11. Up Button &
Volume Control
12. Power On/Off &
Enter Button
13. Built-in Microphone
26
A B C D E F G H I
A. Signal Strength
Indicator
B. Monitor Indicator
C. CTCSS Indicator
D. Auto Channel Scan
Indicator
E. Dual Watch Scan
Indicator
F. VOX Indicator
G. Keylock Indicator
H. Melody Indicator
I. Battery Level Indicator
J. TX Indicator
K. RX Indicator
L. Channel Indicator
M. CTCSS Code or
Frequency
J
K
L
M
Page 30

Page 31

Page 32

© 2000 Uniden Australia Pty Limited/
Uniden New Zealand Limited
 Loading...