

Uniden TRU5885/5885-2, TRU5885 Series, TRU5885-2 Series Owner's Manual


www.uniden.com

Contents
WELCOME/FEATURES 3
QUICK REFERENCE GUIDE 5
CONTROLS AND FUNCTIONS 6
GETTING STARTED 8
Read this First 8
Checking the Package Contents 9
Setting up the Phone 10
Terminology 14
Setting Caller ID Options 15
Selecting a Language 17
BASICS 18
Making and Receiving Calls 18
Redialing a Call 19
Ringer Volume Setup 20
Ringer Tone Setting 20
Distinctive Ringer Setup 21
Adjusting the Earpiece and Handset Speaker Volume 21
Mute Microphone 22
Tone Dialing Switch-over 22
Traveling Out-of-Range 22
Selecting a Different Channel 23
Find Handset 23
3-Way Conferencing 23
Transferring a Call 24
Flash and Call Waiting 25
New Message LED 25
PHONEBOOK 26
Storing Phone Numbers, Names,
Distinctive Rings, and Speed Dial 26
Steps for Entering Names and Special Characters 28
Viewing the Phonebook 30
Making Calls Using the Phonebook 31
Speed Dialing 31
[ 2 ]
Editing or Erasing a Stored Name, Phone Number
Distinctive Ring, and Speed Dial 32
RocketDial (One Touch Dialing) 33
Chain Dialing 34
Memory Dialing (base only) 34
CALLER ID 35
Viewing the Caller ID List 36
Deleting Information from the Caller ID List 37
Using the Caller ID Message List 38
Call Waiting Deluxe Features 39
THE INTEGRATED ANSWERING DEVICE 40
Turning the Answering System On/Off 40
Setting up your Answering System 41
Using your Answering System 47
Remote Operation 50
EXPANDING YOUR PHONE 53
How to Distinguish the Original Handset
and the Second Handset 53
Registering the Second Handset 53
Call Transfer Feature 54
Second Handset Operation 55
ADDITIONAL INFORMATION 57
Changing the Digital Security Code 57
Installing the Beltclip 58
Headset Installation 58
Note on Power Sources 59
Maintenance 59
General Information 60
TROUBLESHOOTING 61
PRECAUTIONS & WARRANTY 63
I.C. NOTICE 65
INDEX 66
REMOTE OPERATION CARD 67

Welcome
Congratulations on your purchase of the Uniden cordless telephone. This phone is designed
and engineered to exacting standards for reliability, long life and outstanding performance.
To enjoy the best performance from this phone’s features, please read this manual carefully
and save it for future reference.
Note: Some illustrations in this manual may differ from the actual unit for
explanation purposes.
As an Energy Star® Partner, Uniden has determined that this product or product
models meets the Energy Star® guidelines for energy efficiency.
Energy Star® is a U.S. registered mark.
Note: Energy Star® applies to TRU5885 only.
Features
• 5.8 GHz Spread Spectrum Technology
• Integrated Answering Device
(Trilingual Announcement Option)
• Two Handset Expandability
• Hands Free Speakerphone in the Handset
• Caller ID and Call Waiting Caller ID
• Dynamic Memory Location for Caller ID
Messages and Phonebook Locations
(up to 100 numbers in total)
• Trilingual Language Option (Handset)
• 4 Hour Talk Time
• 8 Day Standby Battery Life
• 3-Line, 16 Character Backlit Handset Display
• One Touch Dialing
• Call Transfer
• 32 Digit Redial / 3 Last Number Redial Locations
(handset only)
• 10 Distinctive Ring Options
(6 ringers and 4 melodies)
• Mute Feature
• Flash and Pause
• Find Handset
• Hearing Aid Compatible
• Tone/Pulse Dialing
• Handset Earpiece, Handset Speaker and
Ringer Volume Control
• 10 Number Memory on the Base
• Base Speakerphone with Keypad
• Base Speaker Volume
• 3-way Conference Operation
• Handset Remote Operation
• Call Timer
WELCOME/FEATURES [ 3 ]

The TRU5885 series features include AutoTalk™ and AutoStandby™. AutoTalk allows you to answer a call by just
removing the handset from the base so you don’t have to waste time pushing buttons. AutoStandby allows you to
hang up by simply returning the handset to the base.
To protect you against mis-billed calls, which might result from your phone being activated by other equipment,
the TRU5885 series has
Random Code™ digital security, which automatically selects one of over 65,000 digital
security codes for the handset and base.
RocketDial™ is a one touch speed dial key that automatically dials your most important or frequently called
number. The number dialed, is a preset number stored by the user.
Digital Spread Spectrum Technology utilizes a “wider frequency band” vs. a “single narrow band” used in standard
digital transmissions. The result is a more secure conversation with the clarity of digital sound, extended range,
and minimal interference from other cordless phones.
Be sure to visit our web site: www.uniden.com
Uniden® is a registered trademark of Uniden America Corporation.
AutoTalk, AutoStandby, Random Code, and RocketDial are trademarks of Uniden America Corporation.
WELCOME/FEATURES[ 4 ]
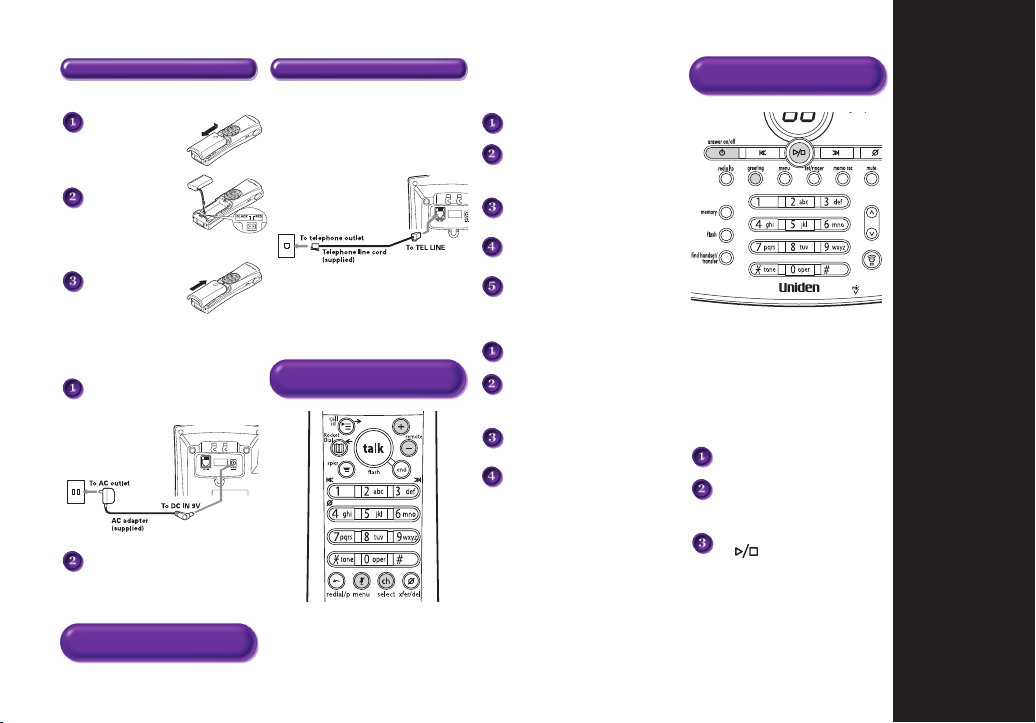
Step 1 Charging the Battery Step 2 Connecting
INSTALL THE HANDSET BATTERY
Remove the cover.
Connect the battery
pack connector with
the correct polarity.
Replace the cover.
PLUG INTO AC POWER
Plug the AC adapter cord into
the base unit and then to a
120V AC outlet.
Place the handset in the base.
You must charge the battery pack
continuously
Note:
for 15-20 hours
before using the phone.
CONNECT TO A PHONE LINE
When the handset battery pack is fully
charged, plug the telephone cord into
the base unit and then into a telephone
wall jack.
Your phone is set for tone dialing. If your
local network requires pulse dialing, please
see “Setting up the phone, Choose the
dialing mode” in your owner’s manual.
Step 3 Setting up the Caller
ID Options/Language
Note: Three Caller ID options
are available: Auto Talk, Caller
ID on Call Waiting (CIDCW) and
Area Code.
TO SELECT CALLER ID OPTIONS
Press menu/mute.
Press + or - to move the pointer to
“Caller ID Setup”, then
press select/ch.
+
Press
or -to move the pointer to
an option, then press
+
or -to change the
Press
option setting.
Press select/ch and return the
handset to the base.
select/ch
.
TO CHOOSE THE LANGUAGE
Press menu/mute.
Press + or - to move the pointer
to “Language”, then
press select/ch.
Press + or - to change the
option setting.
Press select/ch and return the
handset to the base.
Step 4 Setting up
Answering System
TO TURN THE ANSWERING
SYSTEM ON/OFF
Press answer on/off to turn On the
system. To turn Off the system, press
answer on/off again.
TO SET GREETING MESSAGE
Press and hold greeting.
Start recording your message.
Position yourself as near to the
base as possible.
When finished, press greeting
or .
Q
UICK
R
EFERENCE
G
UIDE
QUICK REFERENCE GUIDE [ 5 ]
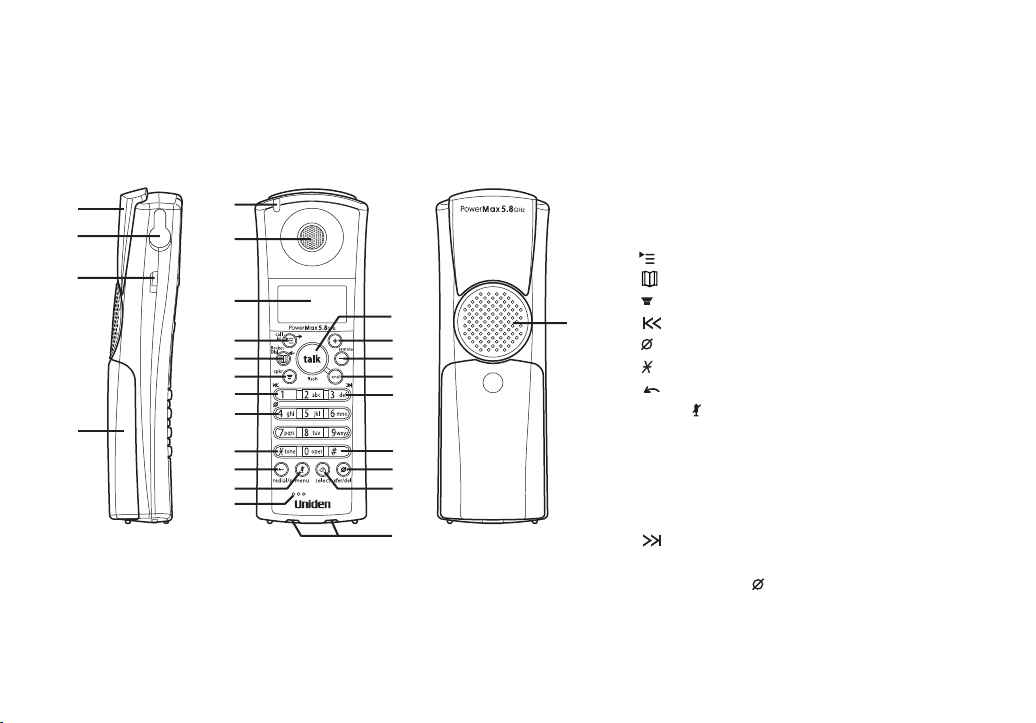
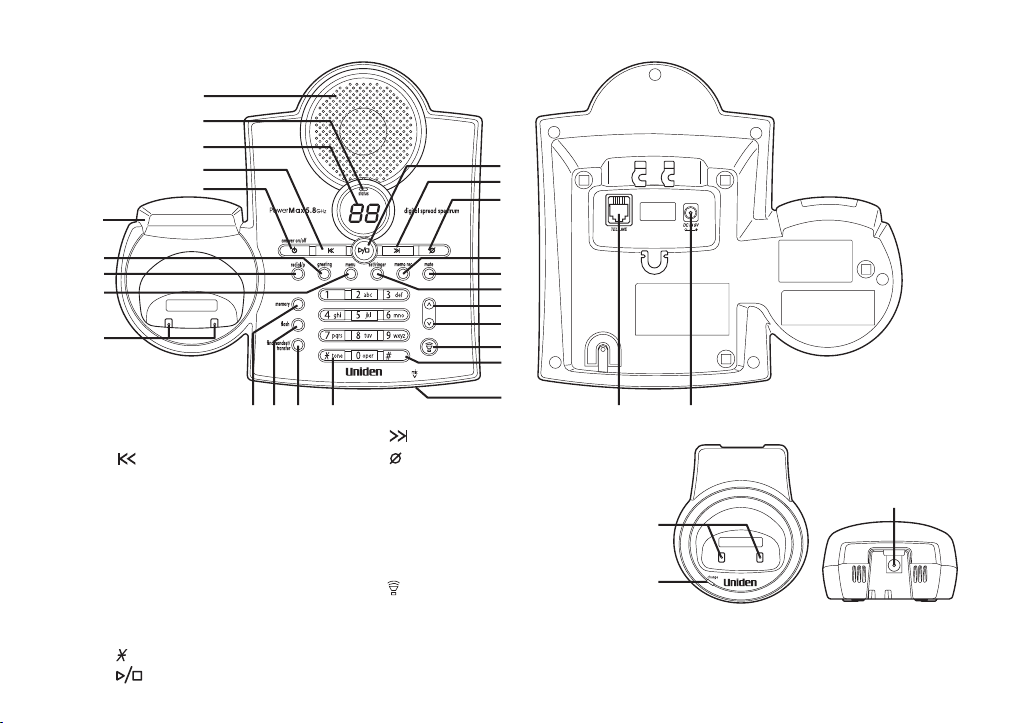
Controls and Functions
2
1
3
4
5
6
7
8
9
12
11
10
13
15
16
14
25
17
18
19
20
21
23
22
24
26
1. Handset Antenna
2. Headset Jack Cover
3. Beltclip Hole
4. Handset Battery Compartment
5. New Message LED
6. Handset Earpiece
7. LCD Display
8. call id (Caller ID)/
9. (Phonebook)/RocketDial/ (left cursor) Key
10. spkr (speaker) Key
11. (repeat)/1 Key
12. (delete) (for remote operation)/4 Key
13. /tone Key
14. redial/p (pause) Key
15. Menu/ (mute) Key
16. Handset Microphone
17. Talk/flash Key
+ (up) Key
18.
- (down)/remote Key
19.
20. End Key
21. (skip)/3 Key
# Key
22.
23. Xfer (transfer)/ del (delete) Key
24. Select/ch (channel) Key
25. Handset Charging Contacts
26. Hands Free Speaker
(right cursor) Key
CONTROLS AND FUNCTIONS[ 6 ]
37 38 39 40 52 53
44
43
42
41
28
27
29
30
31
32
45
46
33
34
35
36
47
48
49
50
51
54
(TRU5885-2 only)
55
56
27. Base Antenna
28. Base Speaker
29. Status LED
30. Message Counter Display
31. (repeat) Key
32. Answer on/off Key
33. Greeting Key
34. Redial/p (pause) Key
35. Menu Key
36. Base Charging Contacts
37. Memory Key
38. Flash Key
39. Find handset/transfer Key
40. /tone Key
41. (play/stop) Key
42. (skip) Key
43. (delete) Key
44. Memo rec Key
45. Mute Key
46. Set/ringer Key
47.
48.
49. (talk) Key/Speaker LED
50. # Key
51. Microphone
52. Telephone Line Jack
53. DC Power Input
(up) Key
^
v
(down) Key
CONTROLS AND FUNCTIONS [ 7 ]
54. Charging Contacts (TRU5885-2 only)
55. Charge LED (TRU5885-2 only)
56. DC Power Input (TRU5885-2 only)

Read this First
This cordless telephone must be set up before use. Follow these steps:
Step 1 (page 9)
Unpack the telephone and accessories.
Step 2 (page 10)
Next, choose the best location to set up the
base unit.
Step 3 (page 11 to 14)
Then, insert the battery pack into the handset.
Connect the base unit. You must charge the
battery pack
into the phone line and using the phone.
for 15-20 hours before plugging
Step 4 (page 15 to 17)
Finally, set the Caller ID options, and store your area
code in the memory to use the Caller ID service.
Choose the language of your display.
Note: Skip the area code setting if your calling area
requires 10-digit dialing.
GETTING STARTED[ 8 ]
About the digital security code
This cordless telephone uses a digital
security code to prevent unauthorized
access to your base unit. This security
code prevents other cordless handsets
from making calls through your base unit.
If you want to change the security code,
see page 57.

Checking the Package Contents
Make sure you have received the following items in the package. If any of these items
are missing or damaged, contact the Uniden Parts Department.
• Base unit (1)
• Handset [TRU5885 (1) / TRU5885-2 (2)*]
• AC adapter [TRU5885 (1) / TRU5885-2 (2)]
• Rechargeable battery [TRU5885 (1) / TRU5885-2 (2)]
• Telephone cord (1)
• Beltclip [TRU5885 (1) / TRU5885-2 (2)]
• Charger (1) [TRU5885-2 only]
Also included:
• This Owner’s Manual
• Other Printed Material
* For operations and restrictions on the second handset, read “Expanding Your Phone”
on page 53.
Uniden Parts Department
(800) 554-3988
Hours: M-F 7:00 a.m. to 5:00 p.m. CST.
We can also be reached on the web at
www.uniden.com.
GETTING STARTED
GETTING STARTED [ 9 ]
Setting up the Phone
Do the following steps:
A. Choose the best location C. Connect the base unit
B. Install the battery pack D. Choose the dialing mode
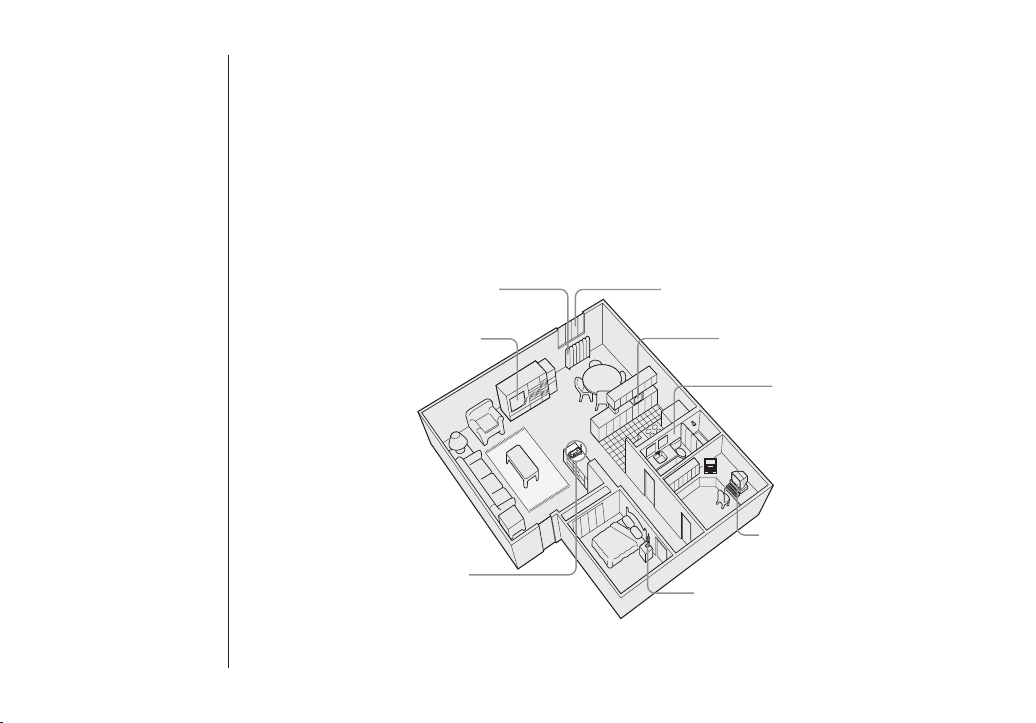
A. Choose the best location
Before choosing a location for your new phone, read “Installation Considerations” on
page 64. Here are some important guidelines you should consider:
Avoid heat sources, such as
radiators, air ducts, and sunlight
Avoid television sets and
other electronic equipment
Choose a central location
GETTING STARTED[ 10 ]
Avoid noise sources such as a window
by a street with heavy traffic
Avoid microwave ovens
Avoid excessive
moisture, extremely
low temperatures,
dust, mechanical
vibration, or shock
Avoid personal computers
Avoid other cordless telephones
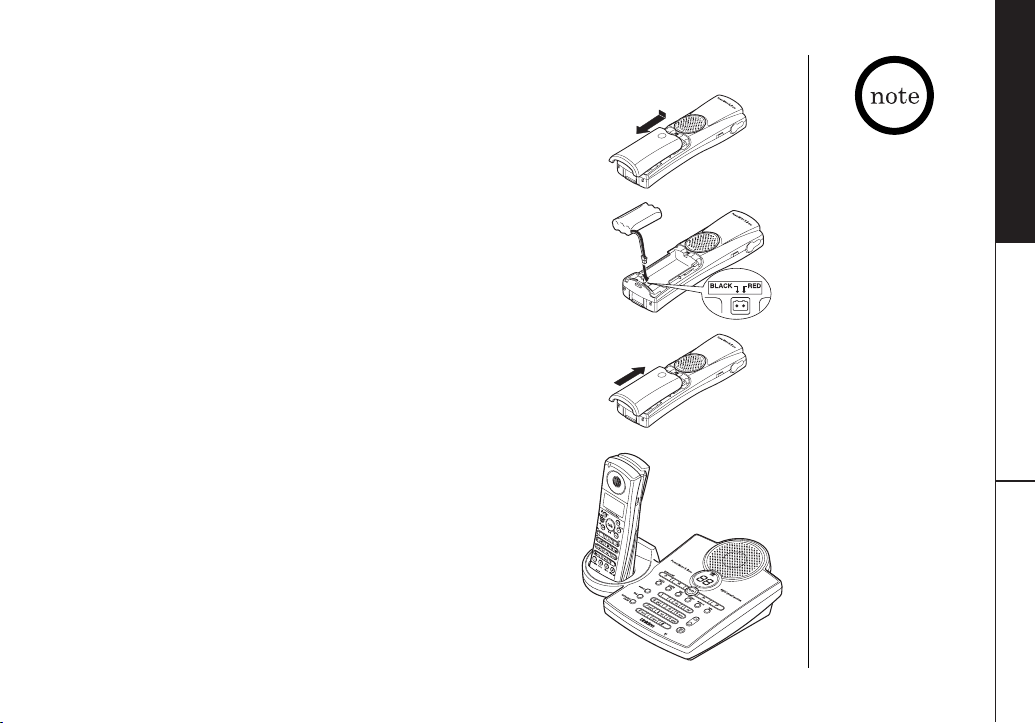
B. Install the battery pack
Charge the battery pack for at least 15-20 hours before
plugging the phone line into your base unit.
1) Press down on the battery cover release and slide the
cover down until it comes off.
2) Connect the battery pack connector observing the correct
polarity (black and red wires) to the jack inside the
battery compartment.
Do not exert any force on this connection. It could cause
damage to the battery or to the handset. The plastic
connectors will fit together in only one way. Once you
are certain that you have made a good connection, then
insert the battery pack into the battery compartment.
Do not pinch the wires.
3) Securely close the battery compartment cover by sliding
it up until it snaps into place.
4) Place the handset in the charging cradle with the keypad
facing forward.
• Use only the Uniden
battery (BT-446)
supplied with your
Replacement
phone.
batteries are also
available through
the Uniden Parts
Department.
(See page 9.)
• Recharge your phone on
a regular basis by
returning the handset to
the base after each
phone call.
GETTING STARTED
GETTING STARTED [ 11 ]
Battery use time (per charge)
Fully charged
• 4 hours continuous use
• 8 days when the handset is in the standby mode
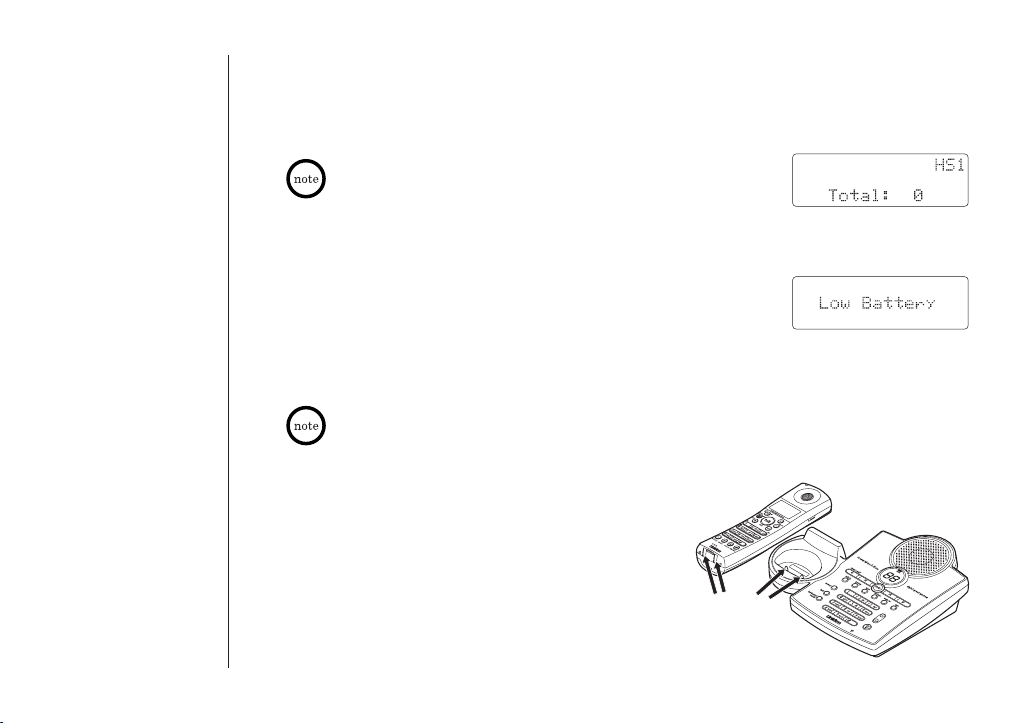
When you charge the handset, Caller ID summary screen and the name
of the handset,
charging the handset No. 2.
HS1 appears. For TRU5885-2, if HS2 appears, you are
Low battery alert
When the battery pack is very low and needs to be charged, the
phone is programmed to eliminate functions in order to save
power. If the phone is in the standby mode, ”
Low Battery”
appears on the LCD and none of the keys will operate. If the
phone is in use, ”
Low Battery” appears and the handset beeps.
Complete your conversation as quickly as possible and return the
handset to the base unit for charging.
The last number dialed in the redial memory is retained for up to 2
minutes while you replace the battery pack.
Cleaning the battery charging contacts
To maintain a good charge, it is important to
clean the battery contacts on the handset and
base unit with a dry cloth or a pencil eraser about
once a month.
Do not use any liquids or solvents.
contacts
GETTING STARTED[ 12 ]
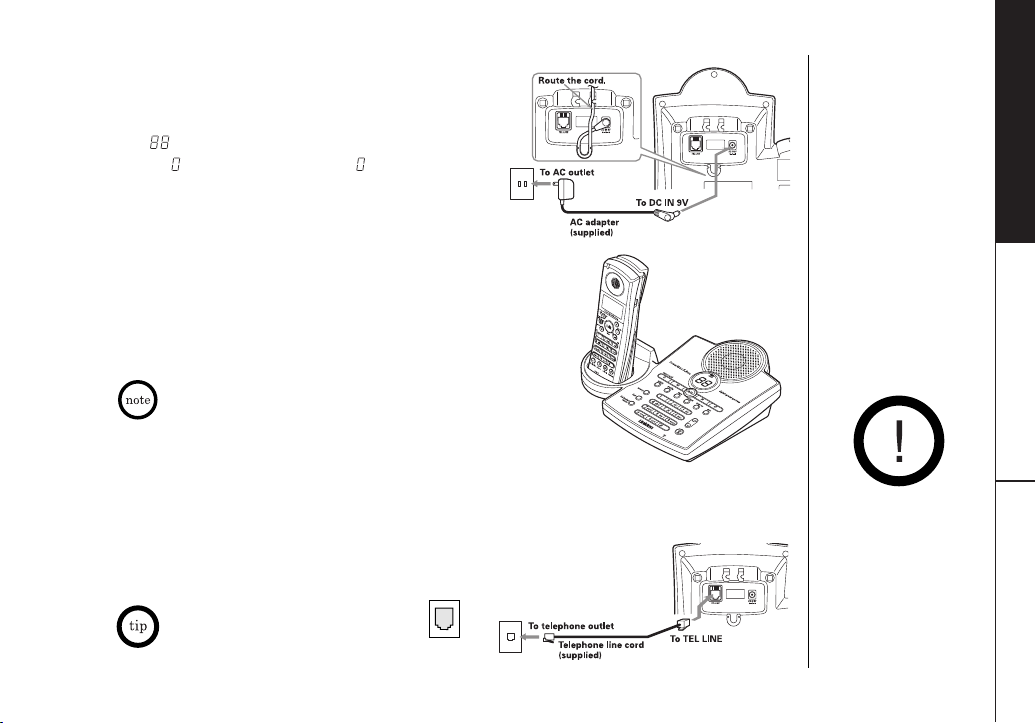
C. Connect the base unit
1) Connect the AC adapter to the DC IN 9V jack
and to a standard 120V AC wall outlet.
“” appears on the base, and it will change
to “” after a few seconds. “” indicates that
there are no messages in your answering system.
2) Set the base and charger (for TRU5885-2 only)
on a desk or tabletop, and place the handset in
the base unit as shown.
3) Make sure the
does not illuminate, check to see that the AC
adapter is plugged in and that the handset makes
good contact with the base charging contacts.
• Use only the supplied AD-313 AC adapter.
Do not use any other AC adapter.
• Connect the AC adapter to a continuous power supply.
• Place the base unit close to the AC outlet so that you can unplug
the AC adapter easily.
• After installing the battery pack in the handset, charge your handset at least 15-20 hours
before plugging into the phone line.
connect the telephone line cord to the base and telephone wall outlet.
4) Connect the telephone line cord to the
a telephone outlet once the handset is fully charged.
If your telephone outlet isn't modular
type, contact your telephone company
for assistance.
status LED illuminates. If the LED
Once the handset battery pack is fully charged,
TEL LINE jack and to
Modular
GETTING STARTED
Place the power cord so
that it does not create
a trip hazard or where it
could become chafed
and create a fire or
electrical hazard.
GETTING STARTED [ 13 ]

• If you are not sure of
your dialing system, set
the unit to tone dialing.
Make a trial call. If the
call connects, leave the
setting as is, otherwise
set the unit to pulse
dialing.
• If your phone system
requires pulse dialing
and you need to send
DTMF tones in certain
situations during a call,
you may “switch-over”
to tone dialing. (Refer
to “Tone Dialing Switchover” on page 22.)
D. Choose the dialing mode
Most phone systems use tone dialing, which sends DTMF tones through the phone lines.
However some phone systems still use pulse dialing such as in rural areas. The default
setting is tone dialing. Depending on your dialing system, set the mode as follows:
1) When the phone is in the standby mode, press
2) Press
+ or - to move the pointer to “Dial Mode”.
menu/mute.
3) Press select/ch and the display will show the current setting.
(The initial setting is Tone.)
4) Press
5) Press
6) Press
+ or - to change the selection.
select/ch, and you will hear a confirmation tone.
end to exit.
Terminology
Throughout this manual, terms such as Standby and Talk Mode are used. Below is the
terminology explanation.
Standby Mode - The handset is not in use, is off the base, and talk/flash or spkr have not
been pressed. A dial tone is not present.
Talk Mode - The handset is not in the base and talk/flash or spkr has been pressed
enabling a dial tone. “
Talk” appears on the display.
GETTING STARTED[ 14 ]
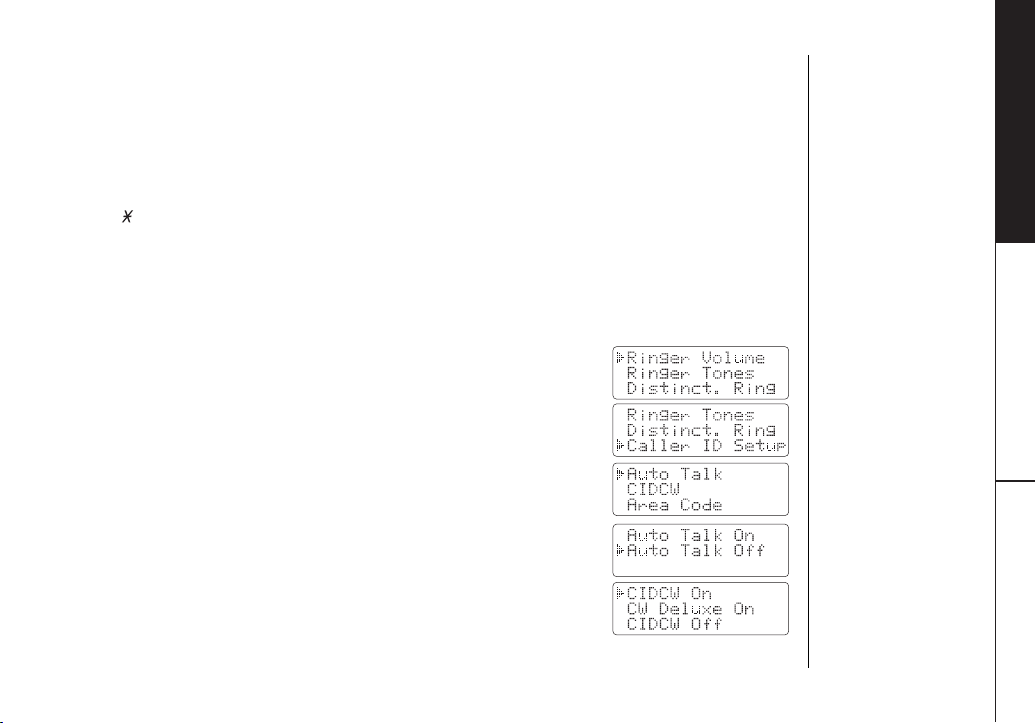
Setting Caller ID Options
There are three Caller ID setup options available: AutoTalk, CIDCW (Caller ID on Call
Waiting), and Area Code. See page 16 for Area Code setup instructions.
AutoTalk allows you to answer the phone without pressing
rings when AutoTalk is On, simply remove the handset from the base and the phone
automatically answers the call. Or if the handset is not in the base, press any number key,
/tone, or # to answer the call. If you set AutoTalk to Off, you must press talk/flash or
spkr to answer the call.
Caller ID on Call Waiting (CIDCW) performs the same as regular Caller ID on a call waiting
number. CW Deluxe allows you to handle call waiting calls in seven different ways. (See page 39.)
You must subscribe to CIDCW from your phone company in order to use this feature.
The CW Deluxe is a separate service available through your phone company.
To change your Caller ID options:
1) When the phone is in the standby mode, press
menu/mute.
talk/flash or spkr. If the phone
GETTING STARTED
2) Press
then press
3) Press
then press
4) Press
AutoTalk: “
CIDCW: “
5) Press
6) Press
+ or - to move the pointer to “Caller ID Setup”,
select/ch.
+ or - to choose “Auto Talk” or “CIDCW”,
select/ch.
+ or - to change the selection.
Auto Talk On” or “Auto Talk Off”
CIDCW On”, “CW Deluxe On” or “CIDCW Off”
select/ch, and you will hear a confirmation tone.
end to exit.
GETTING STARTED [ 15 ]
• If your calling area
requires 10-digit
dialing, do not program
this option.
• When the area code has
already been stored in
memory, the stored area
code will be displayed.
To change it, press
xfer/del three times.
Then enter the new
area code. Or you can
/RocketDial/
use
or call id/ to move
the cursor and edit
area code.
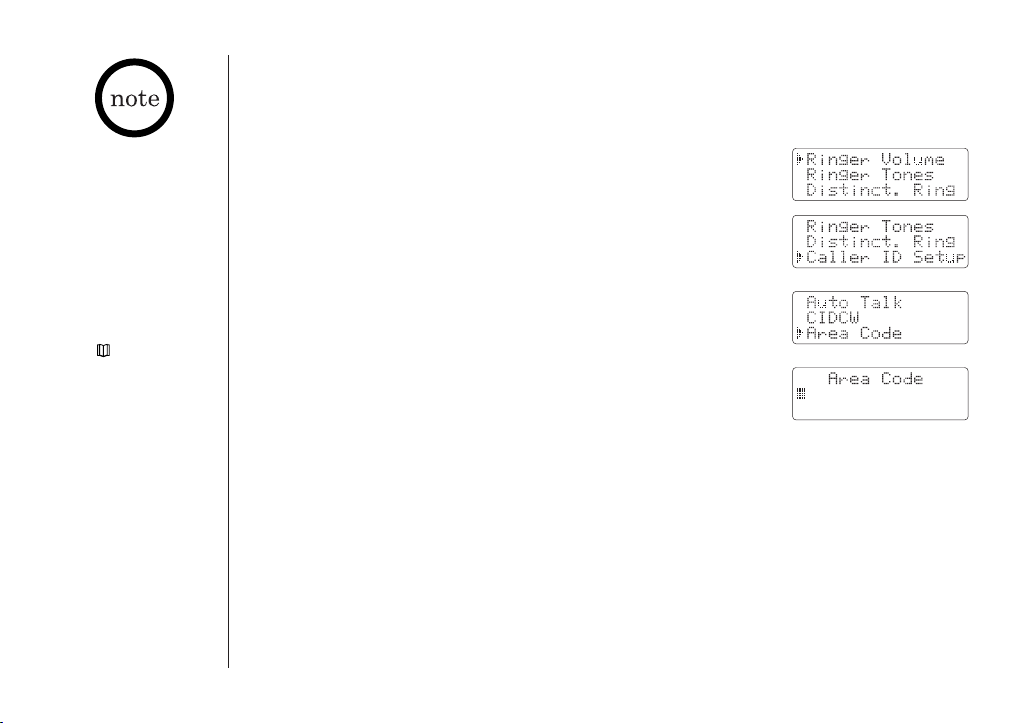
Entering Your Area Code
If you enter a 3-digit area code number in the “Area Code” option, your local area code
does not appear in Caller ID messages. For calls received from outside your local area code,
you will see a full 10-digit number.
1) When the phone is in the standby mode, press
2) Press
3) Press
+ or - to move the pointer to “Caller ID Setup”,
then press
select/ch.
+ or - to move the pointer to “Area Code”,
then press
select/ch.
4) Use the number keypad (0 to 9) to enter a 3-digit
area code.
menu/mute.
5) Press
6) Press
select/ch, and you will hear a confirmation tone.
end to exit.
GETTING STARTED[ 16 ]
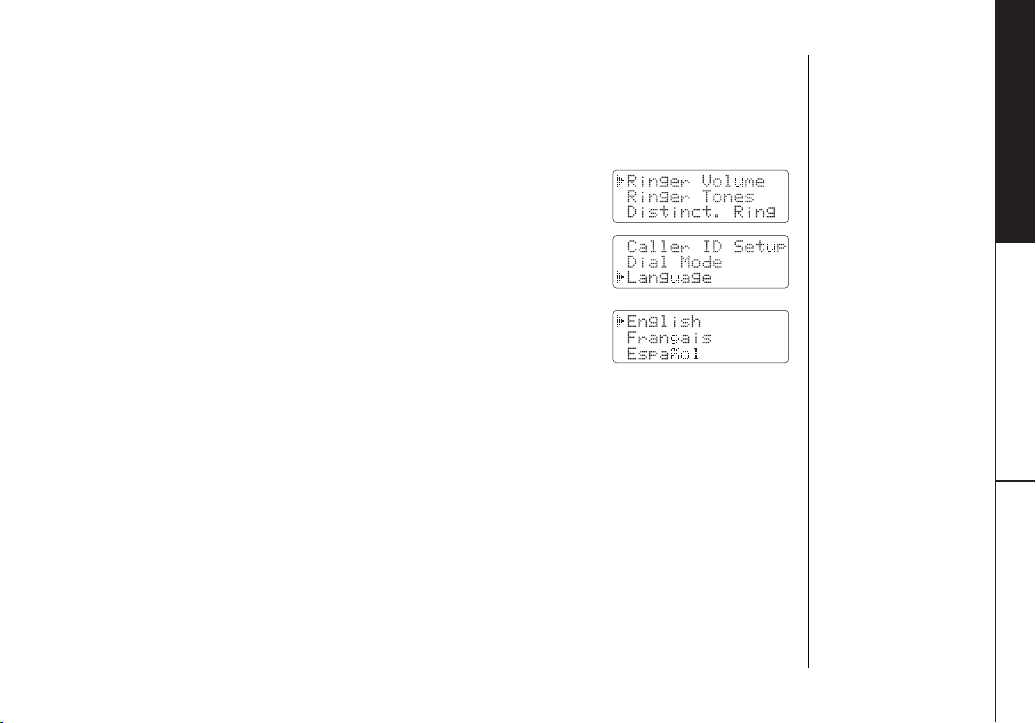
Selecting a Language
Language option can be used to choose the language of your display. You can select
English, French, or Spanish.
GETTING STARTED
1) When the phone is in the standby mode, press
2) Press
3) Press + or - to choose English, French (Français), or
4) Press
5) Press end to exit.
+ or - to move the pointer to “Language“,
then press
Spanish (Español).
select/ch.
select/ch, and you will hear a confirmation tone.
menu/mute.
GETTING STARTED [ 17 ]
• Refer to page 15
“Setting Caller ID
Options” to turn the
AutoTalk feature On if
desired. Any key answer
can be used only when
AutoTalk is set to On.
• The handset microphone
is located on the bottom
of the handset (see
“Controls and Functions”
on page 6). Position
yourself as near to the
handset as possible and
speak clearly.
• The base microphone is
located under the base.
Position yourself as near
to the base as possible
and speak clearly.
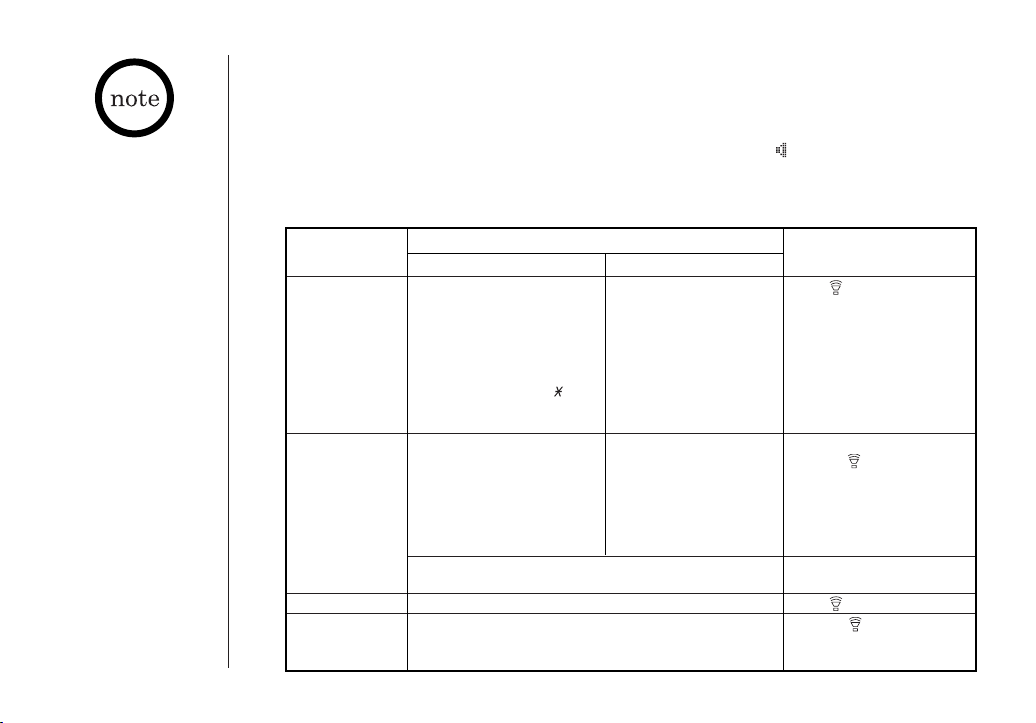
Making and Receiving Calls
On the handset, you may also use the speakerphone while talking on your phone. Using
the handset speakerphone is called “hands-free conversation”. This feature allows you to
easily communicate while performing other tasks, such as cooking. appears during
hands-free conversation.
You can easily switch a call from normal conversation to “hands-free conversation”.
To switch a call, press
To answer a call
To make a call
To hang up Press end, or return the handset to the base (AutoStandby). Press (talk).
To enter a pause When you dial the number, press
within the dialing “
sequence press
spkr during the call.
From the Handset From the base
Normal conversation Hands-free conversation
Handset on the Base Press (talk).
Pick up the handset (AutoTalk)
or pick up the handset and
press
talk/flash.
Handset off the Base Handset off the Base
Press any number key, /tone, Press spkr.
or
# (Any Key Answer),
or press talk/flash.
Handset off the Base Handset off the Base
1) Press talk/flash. 1) Press spkr. 1) Press (talk).
2) Listen for the dial tone. 2) Listen for the dial tone. 2) Listen for the dial tone.
3) Dial the number. 3) Dial the number. 3) Dial the number.
Dial the number, then Dial the number, then
press talk/flash. press spkr.
Note: If a call is not established, you will hear a beep
and “Unavailable” will appear in the display.
OR OR
redial/p. Pressing (talk).
P” appears in the display, which represents a pause. When you dial the number,
redial/p.
BASICS[ 18 ]
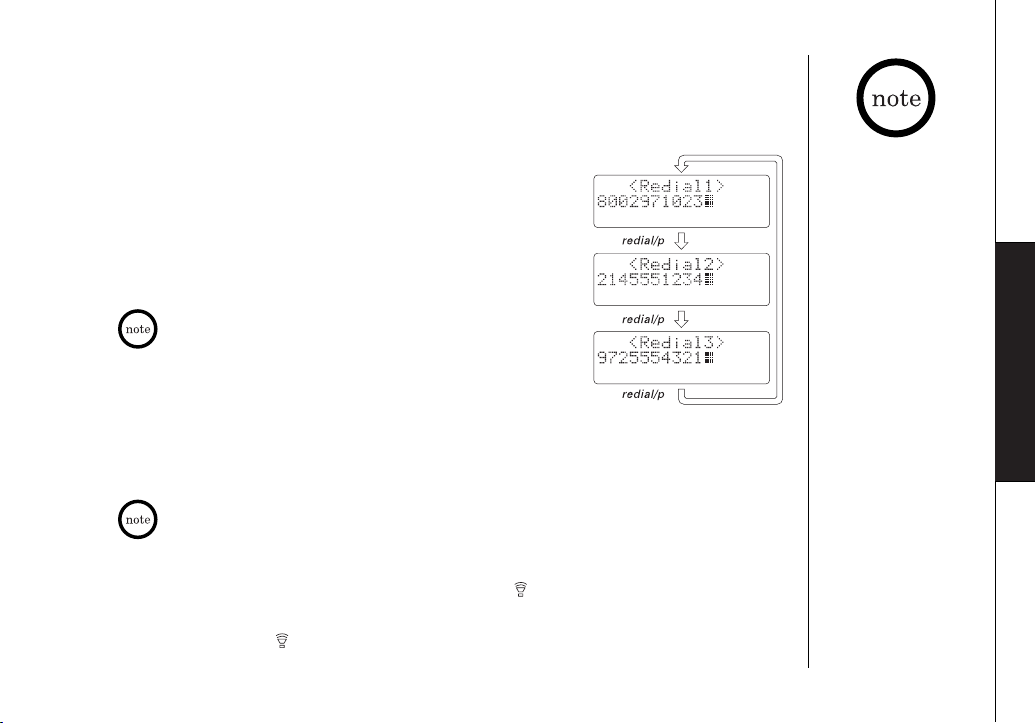
Redialing a Call
The last three phone numbers dialed can be quickly redialed.
Redialing from Standby Mode
1) Press redial/p. The phone number that was last dialed
appears on the display.
2) Press
3) Press
4) To hang up, press
Redialing from Talk Mode
1) Press talk/flash or spkr.
2) Press
3) To hang up, press
Redialing from the Base
1) To call the last number dialed from the base, press (talk).
2) Press
3) To hang up, press (talk).
redial/p again. Each press of redial/p will display
one of the last three numbers dialed.
talk/flash or spkr. The selected number is dialed.
end.
• If you have not pressed any key for 30 seconds, the phone
returns to standby mode.
• If you press
return to the standby mode.
end, the operation is canceled and the phone will
redial/p. The last number dialed will be displayed
and redialed.
end.
When using the redial feature in talk mode, only the last number
dialed will be displayed.
redial on the base. The last number dialed from the base is redialed.
• If the number exceeds
32 digits, only the first
32 digits are retained
in redial memory.
• If the redial memory is
empty, you will hear
a beep.
BASICS
BASICS [ 19 ]
• If you select “Ringer Off”,
<Ringer Off>”
“
appears on the display
when you make or
receive calls, or charge
the handset.
• If you set the ringer to
Off, the ringer tone will
not sound.
[ 20 ]
BASICS
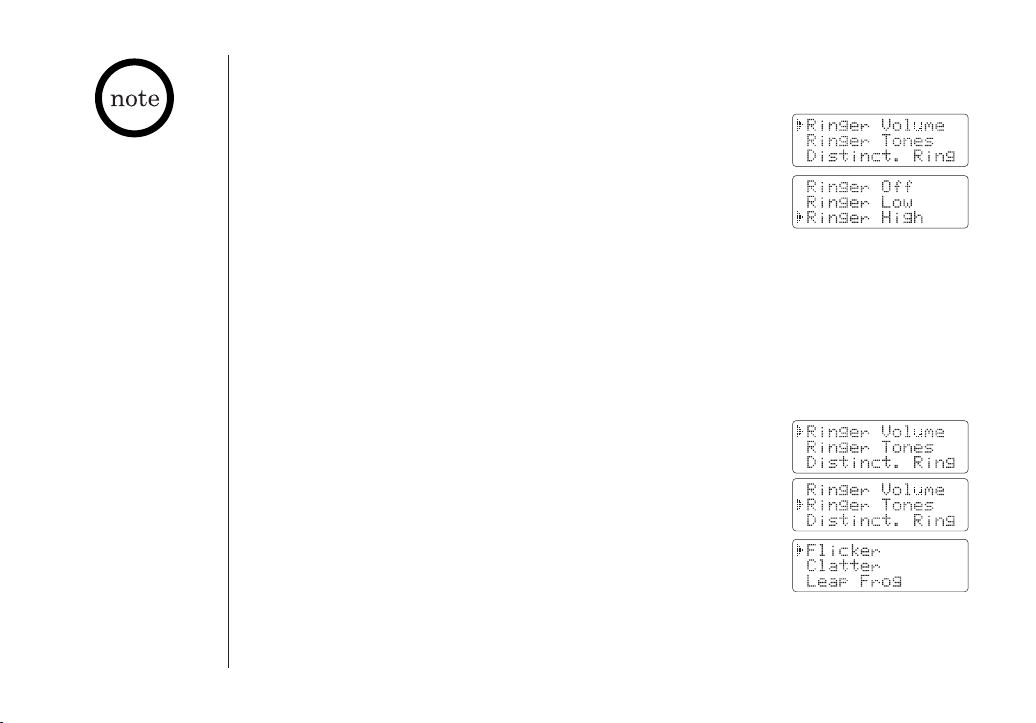
Ringer Volume Setup
1) When the phone is in the standby mode, press menu/mute.
2) Press
3) Press
4) Press
+ or - to move the pointer to “Ringer Volume”.
select/ch.
+ or - to move the pointer through the ringer settings
(Ringer Off, Ringer Low, or Ringer High).
You will hear a ringer or melody at the selected volume.
5) Press
6) Press
select/ch, you will hear a confirmation tone.
end to exit.
Ringer Mute (temporarily)
You can temporarily mute the ringer tone. When the handset is off
the base and the phone is ringing, press
return to the previous setting starting with the next incoming call.
end. The ringer tone will
Ringer Tone Setting
1) When the phone is in the standby mode, press menu/mute.
2) Press
3) Press
4) Press
5) Press
+ or - to move the pointer to “Ringer Tones”, then
select/ch.
press
You can choose from 6 ringers or 4 melodies:
- Ringers [Flicker, Clatter, Leap Frog, Ping Ball, Reminder,
Soft Alert]
- Melodies [Beethoven9, For Elise (Elise), Merry Christmas
(Merry-Xmas), Home Sweet Home (Hm Swt Hm)]
+ or - to move the pointer. You will hear the ringer or
the melody as you scroll through the options.
select/ch and you will hear a confirmation tone.
end to exit.
 Loading...