

Page 1

OWNER’S MANUAL
TRU346
2.4GHz Owners Manual TRU346 8/9/00 12:42 Page 2
Page 2

Contents
W elcome / Features inside front cover
Controls and Functions
2, 3
Getting Started
Read this firs t 4
Step 1: Checking t he pac kage cont ents 5
Step 2: Setting up the base unit 6
Step 3: Preparing the batt ery pack 9
Adjusting t he 10.14 er and earpiece v4 olume 11
Basics
Making a call 12
Receiving a call 14
Redialing a call 15
Tr aveling out-of-ra.14 e 16
Telephone Features
Memor y dialing
Storing phone numbers and names 17
Making calls with memor y dialing 19
Chain dialing 20
Editing a stor ed name and/or
phone number 21
Erasing a s tor ed name and phone number 24
Paging 25
Caller ID Features
Caller ID 26
When the t el ephone rings 28
Viewing t h4 e Caller ID Messa14 e list 29
Deleting infor mation fr4 om the Caller ID list 30
Using the Caller ID lis t 32
Using “Caller ID on call waiting“ service 34
Call W4 aiting features 35
Additional Information
Cha.1ing the digit al security code 36
Beltclip ins tallation 37
Headset installation 37
Note on power 4 sources 38
Maintenance 38
Troubleshooting 39
General Information 41
Index 42
TRU346 8/9/00 12:35 Page 2
Page 3

W elcome
Features
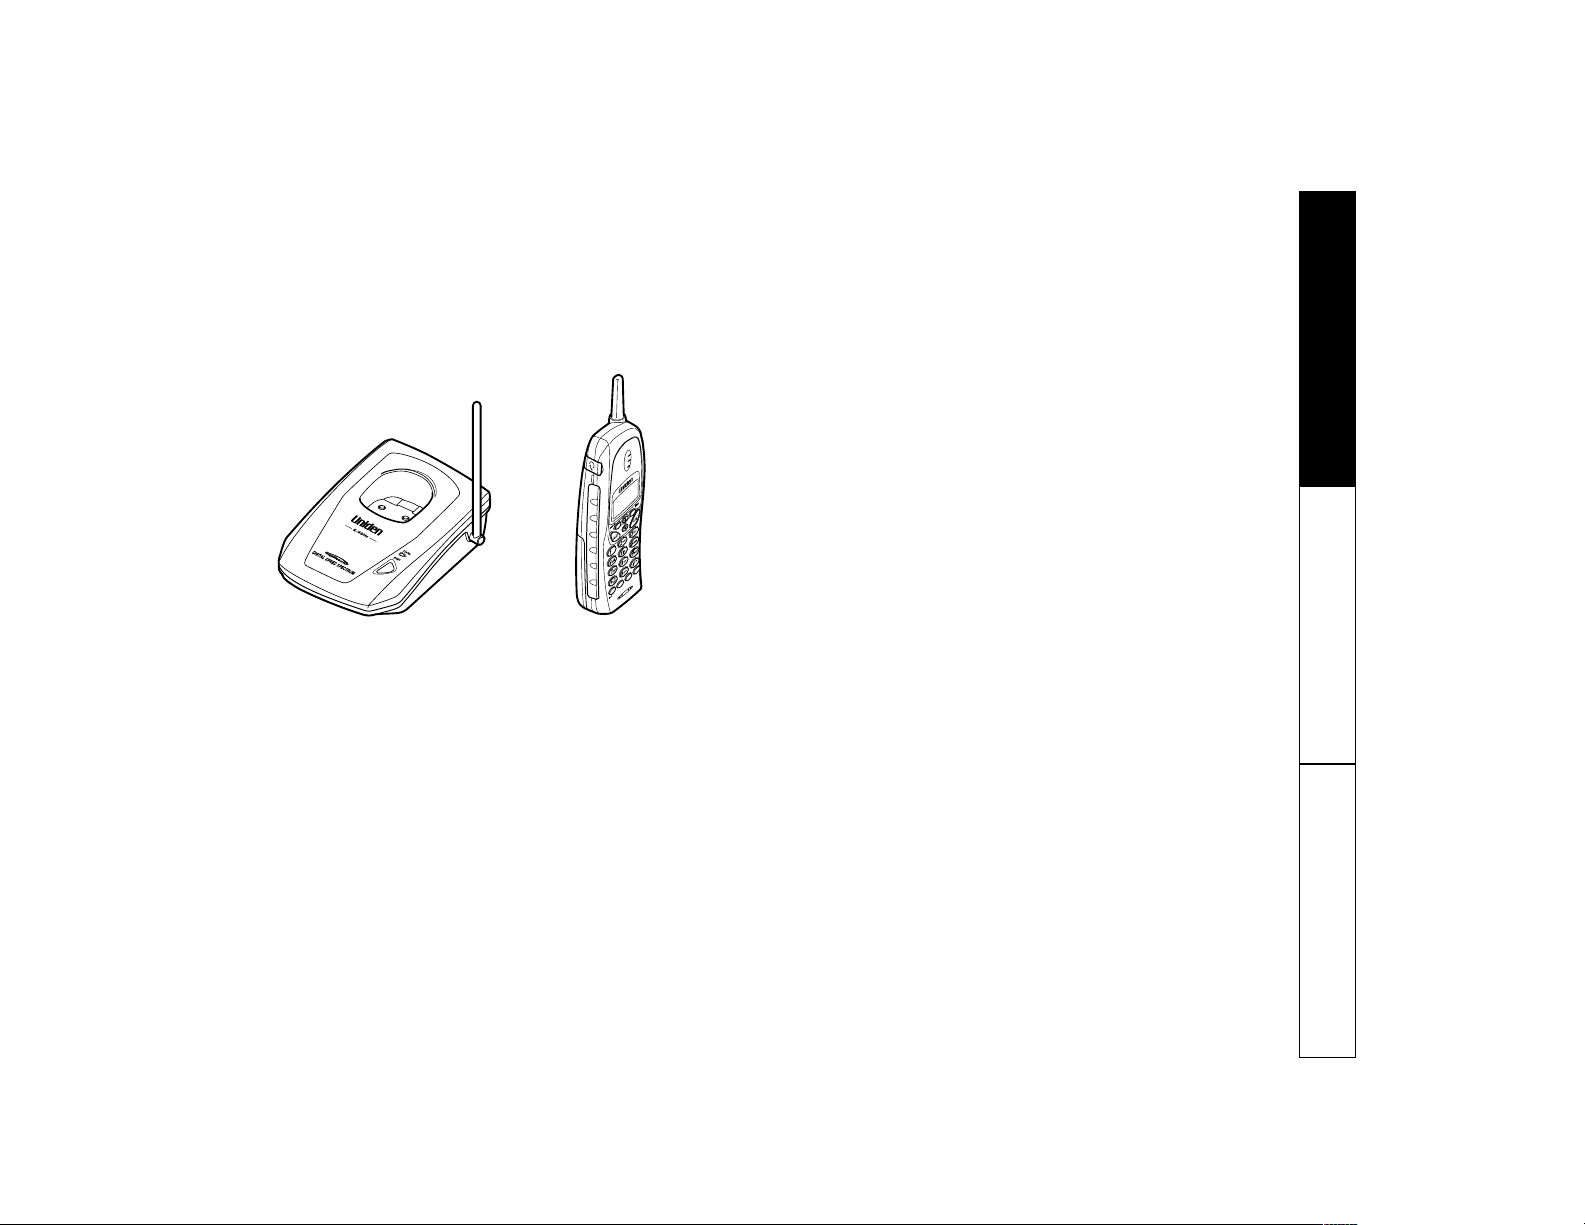
Congratulations on y our purchase of the TRU 346 cor dless telephone. This phone is
designed for r eliability, long life, and outs tanding per for mance utilizing the lat est in
2.4 GHz Spread Spectrum technology.
NNoottee:: SSoommee iilllluussttrraattiioonnss iinn tthhiiss mmaannuuaall mmaayy ddiiffffeerr ffrroomm tthhee aaccttuuaall uunniitt ffoorr
eexxppllaannaattiioonn ppuurrppoosseess..
• 2.4 GHz Spread Spectrum Technology
• Caller ID and Call Waiting Caller ID
• 50 Number Caller ID Memory
• Advanced Caller ID with Call Waiting Options
• Lighted Keypad
• 3-Line, 16 Character Backlit Handset Display
• 20 Enhanced Memor y Dial Locations
• 32 Digit Redia l
• 3 Redial Memories
• Flash
• Pause
• Pulse/Tone Dialing
• Page/Find
• 10 Day St andby Batte ry Lif e
• 6 Hour Talk Time
• Handset Earpiece and
Ringer Volume Control
• Hearing Aid Compatible
DDiiggiittaall SSpprreeaadd SSppeeccttrruumm TTeecchhnnoollooggyy
utilizes a “wider frequency band“ vs. a “single
narrof3 1 Tr- TDoaard3a-12.l(a-17.8(1)23.t(a-12.r(e)]T1a)838966 0 TD00 373 Tc0.0249 Twansmissatio. The 2(2.4 GH8(fW)-10.3(e1)22.8(t)-17.3(uencrit)-38.8ngSt)-15.5(e612.4(2236.wit)q)3.a)3(s(e)]TJa)838965 -1.0909 TD036291 Tc0.0256 Twnar 1122.8(r12.3(e)12.lea- Tatt)0.6(a)-1. comme(fW)-15(cediacommuniLocatio. The 8(r12.3sult iss. Memor12.3o)9.w12.6cumor12.3o)8(convSt)-10.3(e1r)8.nar
Page 4

CONTROLS AND FUNCTIONS[ 2]
Controls and Functions
1. Handset antenna
2. Headset jack cover
3. Handset batte r y compar tment
4. Handset earpiece
5. LCD display
6. Memor y key
7. Ta lk ke y
8. Volume/Cursor down key
9.
*
/tone key
10. Redial/P ause key
11. Options ke y
12. Handset microphone
13. Volume/Cursor up key
14. Flash key
15. Caller ID ke y
16. # ke y
17. Delete key
18. Select/Channel key
19. Handset c har ging contacts
Page 5
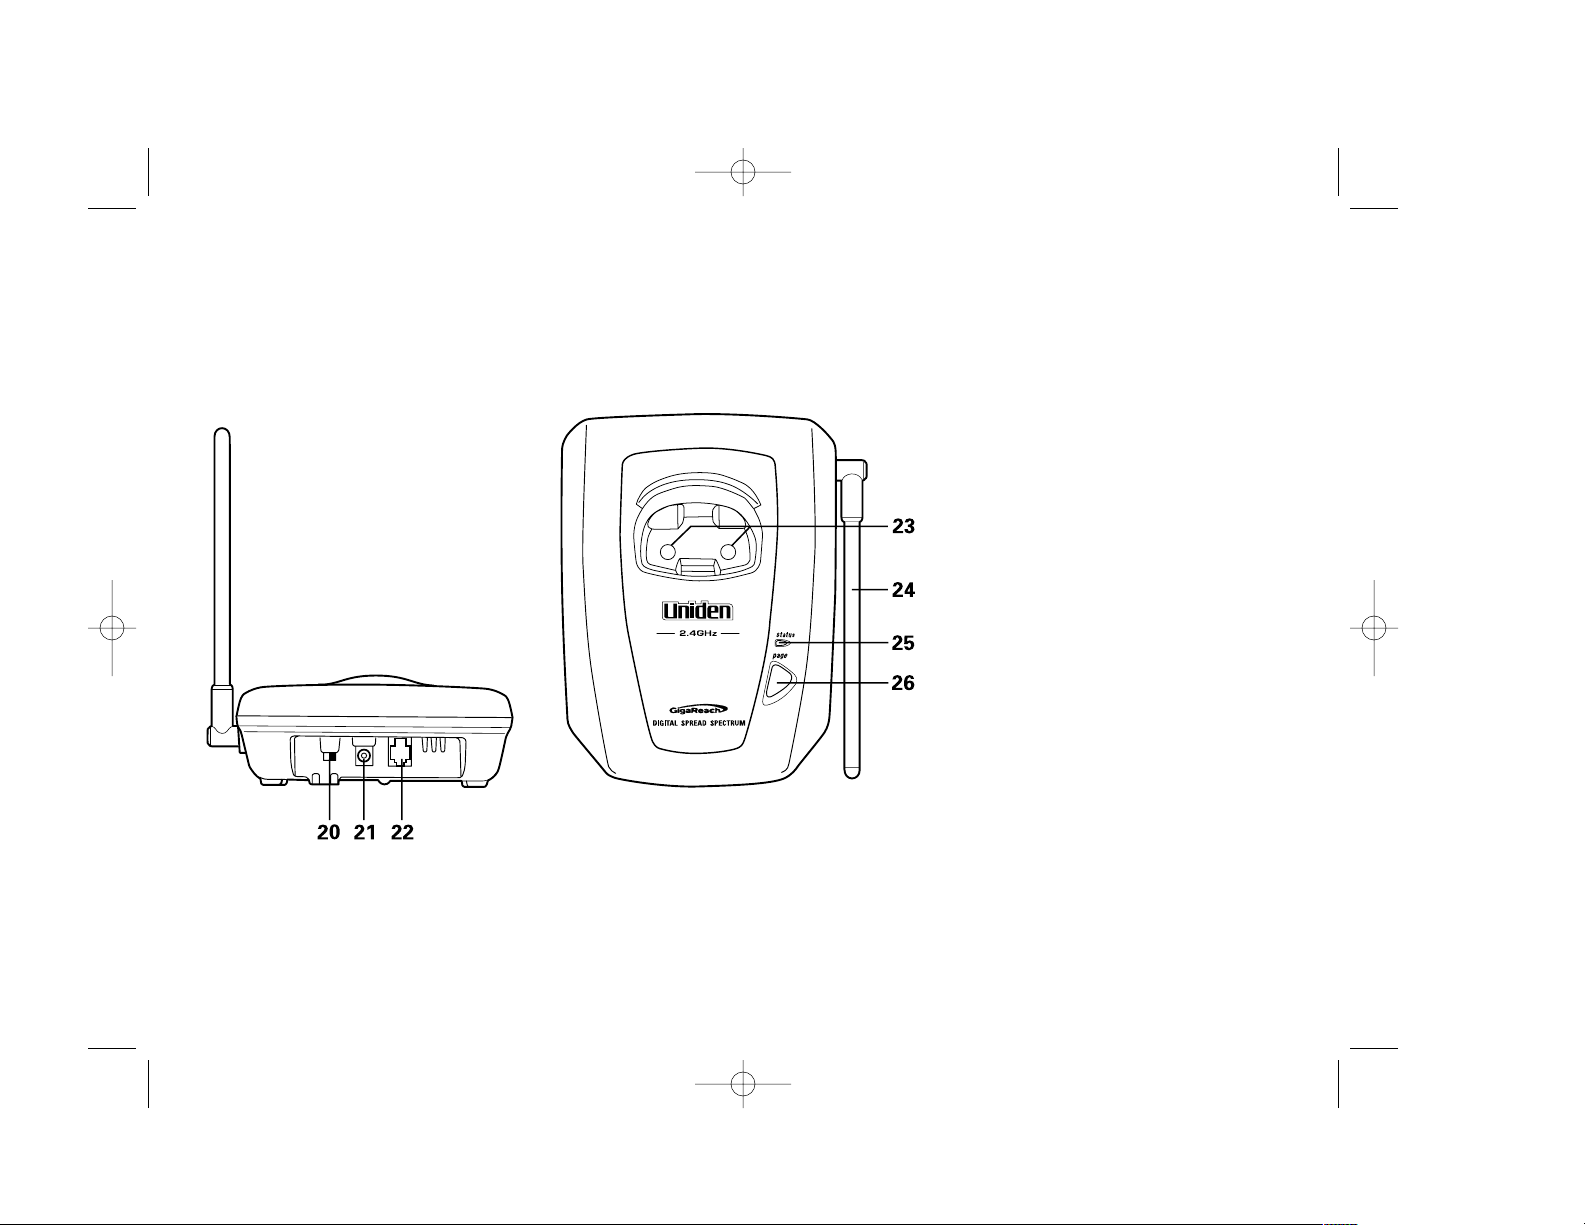
CONTROLS AND FUNCTIONS [ 3]
20. Pulse-Tone switch
21. DC po wer input
22. Phone jac k
23. Base c har ging cont acts
24. Base antenna
25. Status LED
26. Page key
TRU346 8/9/00 12:36 Page 3
Page 6

GETTING STARTED[ 4]
AAbboouutt tthhee ddiiggiittaall sseeccuurriittyy ccooddee
This cordless telephone uses a digit al
security code to prevent unaut horized
access to your base unit. This security
code prevents other cordless handsets
from making calls th rough your base unit.
A random security code will be assigned
automatically between your base unit and
handset when you char ge the batte r y pack
for the f i rs t time.
If y ou want to reset t he security code,
see page 36.
Read This First
This cordless telephone mus t be set up befo re use. Fo llow these st eps;
SStteepp 11
((ppaaggee 55))
Unpack and c heck the t el ephone
and accessories.
SStteepp 22
((ppaaggee 66 ttoo 88))
Next, choose t he best location
to set up the base unit.
SStteepp 33
((ppaaggee 99 ttoo 1100))
Then, inser t the batter y pack into
the handset. You must charg e the
battery pac k for
1155 hhoouurrss bbeeffoorree
uussiinngg tthhee pphhoonnee
.
Page 7
GETTING STARTED
GETTING STARTED [ 5]
Checking the Package Contents
•• TThhiiss OOwwnneerr´´ss MMaannuuaall
•• PPrreeccaauuttiioonnss aanndd IImmppoorrttaanntt SSaaffeettyy IInnssttrruuccttiioonnss
•• QQuuiicckk RReeffeerreennccee GGuuiiddee
•• RReeggiissttrraattiioonn CCaarrdd
•• BBaassee uunniitt •• HHaannddsseett
•• AACC aaddaapptteerr•• RReecchhaarrggeeaabbllee bbaatttteerryy
•• TTeelleepphhoonnee ccoorrdd
Page 8
AAvvooiidd eexxcceessssiivvee mmooiissttuurree,,
eexxttrreemmeellyy llooww tteemmppeerraattuurreess,,
dduusstt,, mmeecchhaanniiccaall vviibbrraattiioonn,, oorr sshhoocckk
[ 6]
Setting up the Base Unit
GETTING STARTED
AAvvooiidd hheeaatt ssoouurrcceess,, ssuucchh aass
rraaddiiaattoorrss,, aaiirr dduuccttss,, aanndd ssuunnlliigghhtt
AAvvooiidd tteelleevviissiioonn sseettss aanndd
ootthheerr eelleeccttrroonniicc eeqquuiippmmeenntt
AAvvooiidd nnooiissee ssoouurrcceess ssuucchh aass aa wwiinnddooww
bbyy aa ssttrreeeett wwiitthh hheeaavvyy ttrraaffffiicc
AAvvooiidd mmiiccrroowwaavvee oovveennss
AAvvooiidd ppeerrssoonnaall ccoommppuutteerrss
AAvvooiidd ootthheerr ccoorrddlleessss tteelleepphhoonneess
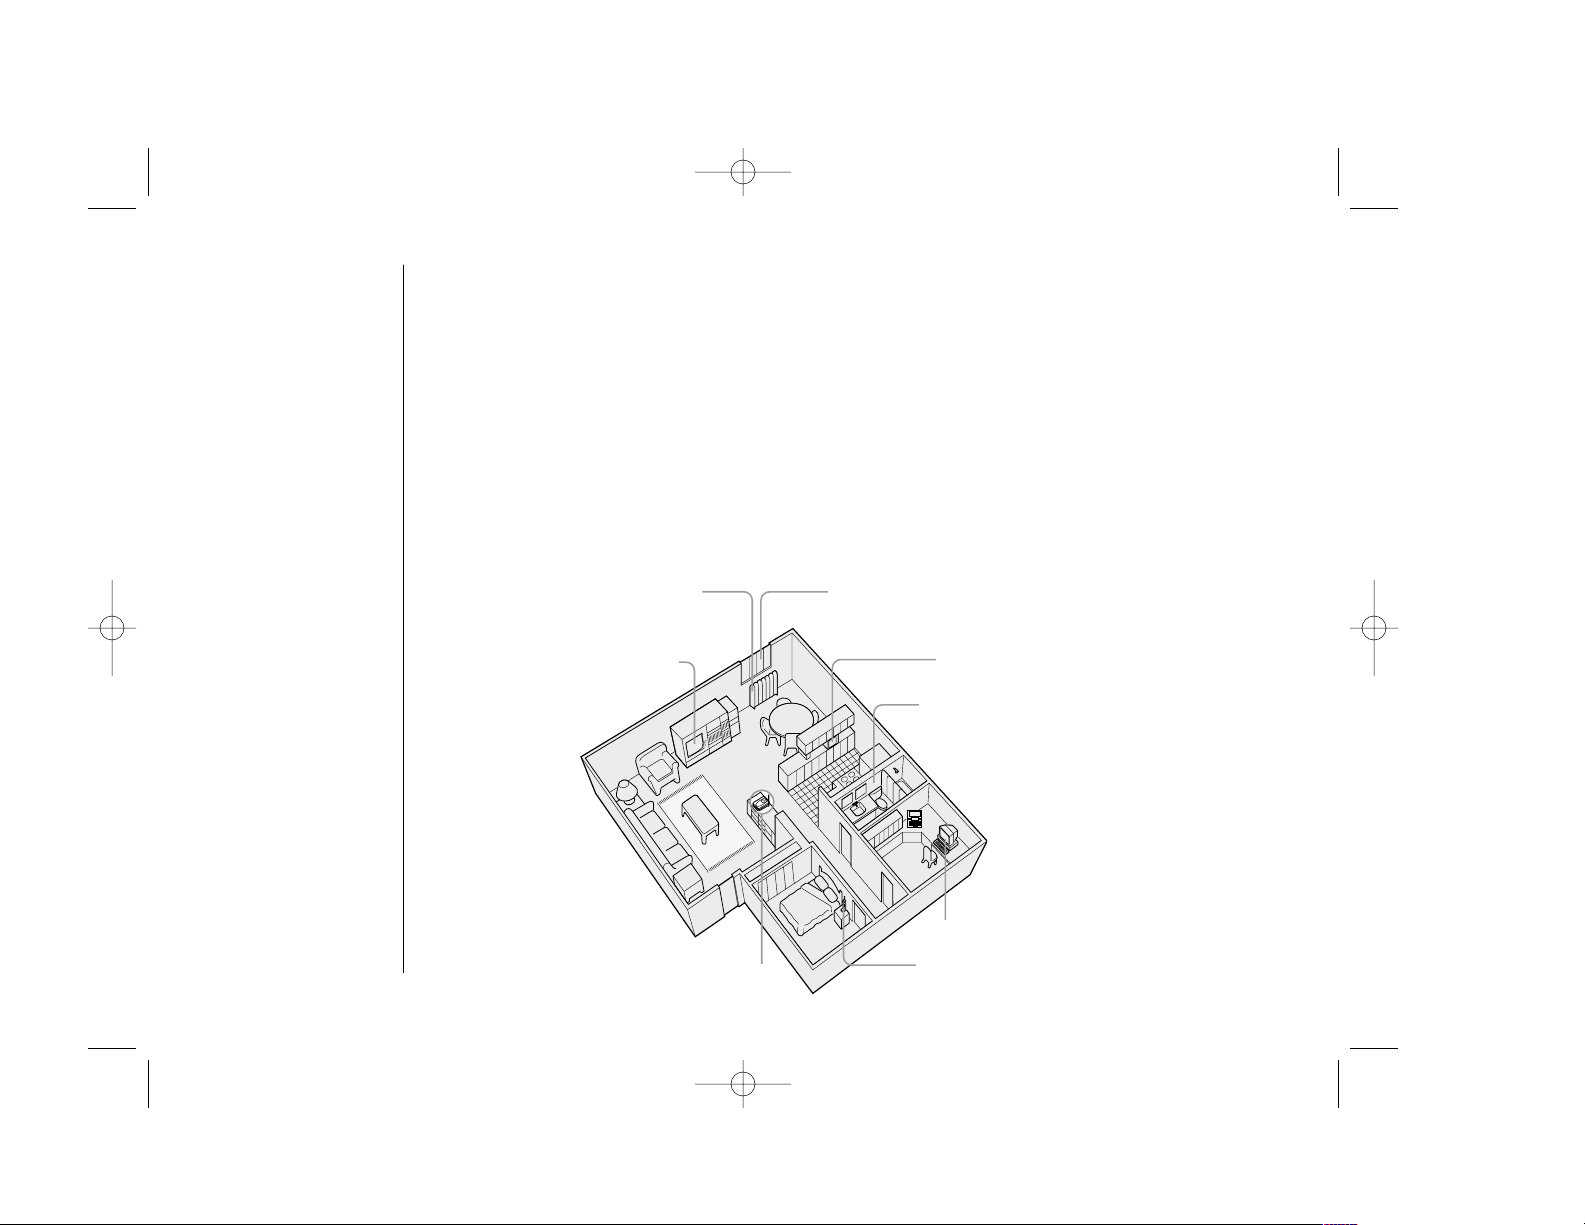
CChhoooossee aa cceennttrraall llooccaattiioonn
Do the f ol lowing s t eps.
• Choose the bes t location
• Connect the base unit
• Choose the dialing mode
CChhoooossee tthhee bbeesstt llooccaattiioonn
Befor e choosing a location for y our new phone, r ead t he INS TALLATION
CONSIDERATIONS included in the PRECAUTIONS AND IMPORTANT SAFETY
INSTRUCTIONS brochur e. Here are some impor t ant guidelines you should consider:
TRU346 8/9/00 12:36 Page 6
Page 9
GETTING STARTED
GETTING STARTED [ 7]
• After ins t alling t he batte r y pack in the handset, c harge your handset at
least
1155 hhoouurrss bbeeffoorree uussiinngg tthhee pphhoonnee
. Once the handset batt ery pack is
fully charged, connect the telephone line cor d to the base and telephone
wall outlet.
• The location should be close to bot h a phone jack and a continuous power
outlet which is not swit chable.
• Keep the base and handset away from sources of electrical noise suc h as
motors and fluorescent lighting.
• Be sur e there is suff icient space to r aise the base ant enna t o a
ver tical position.
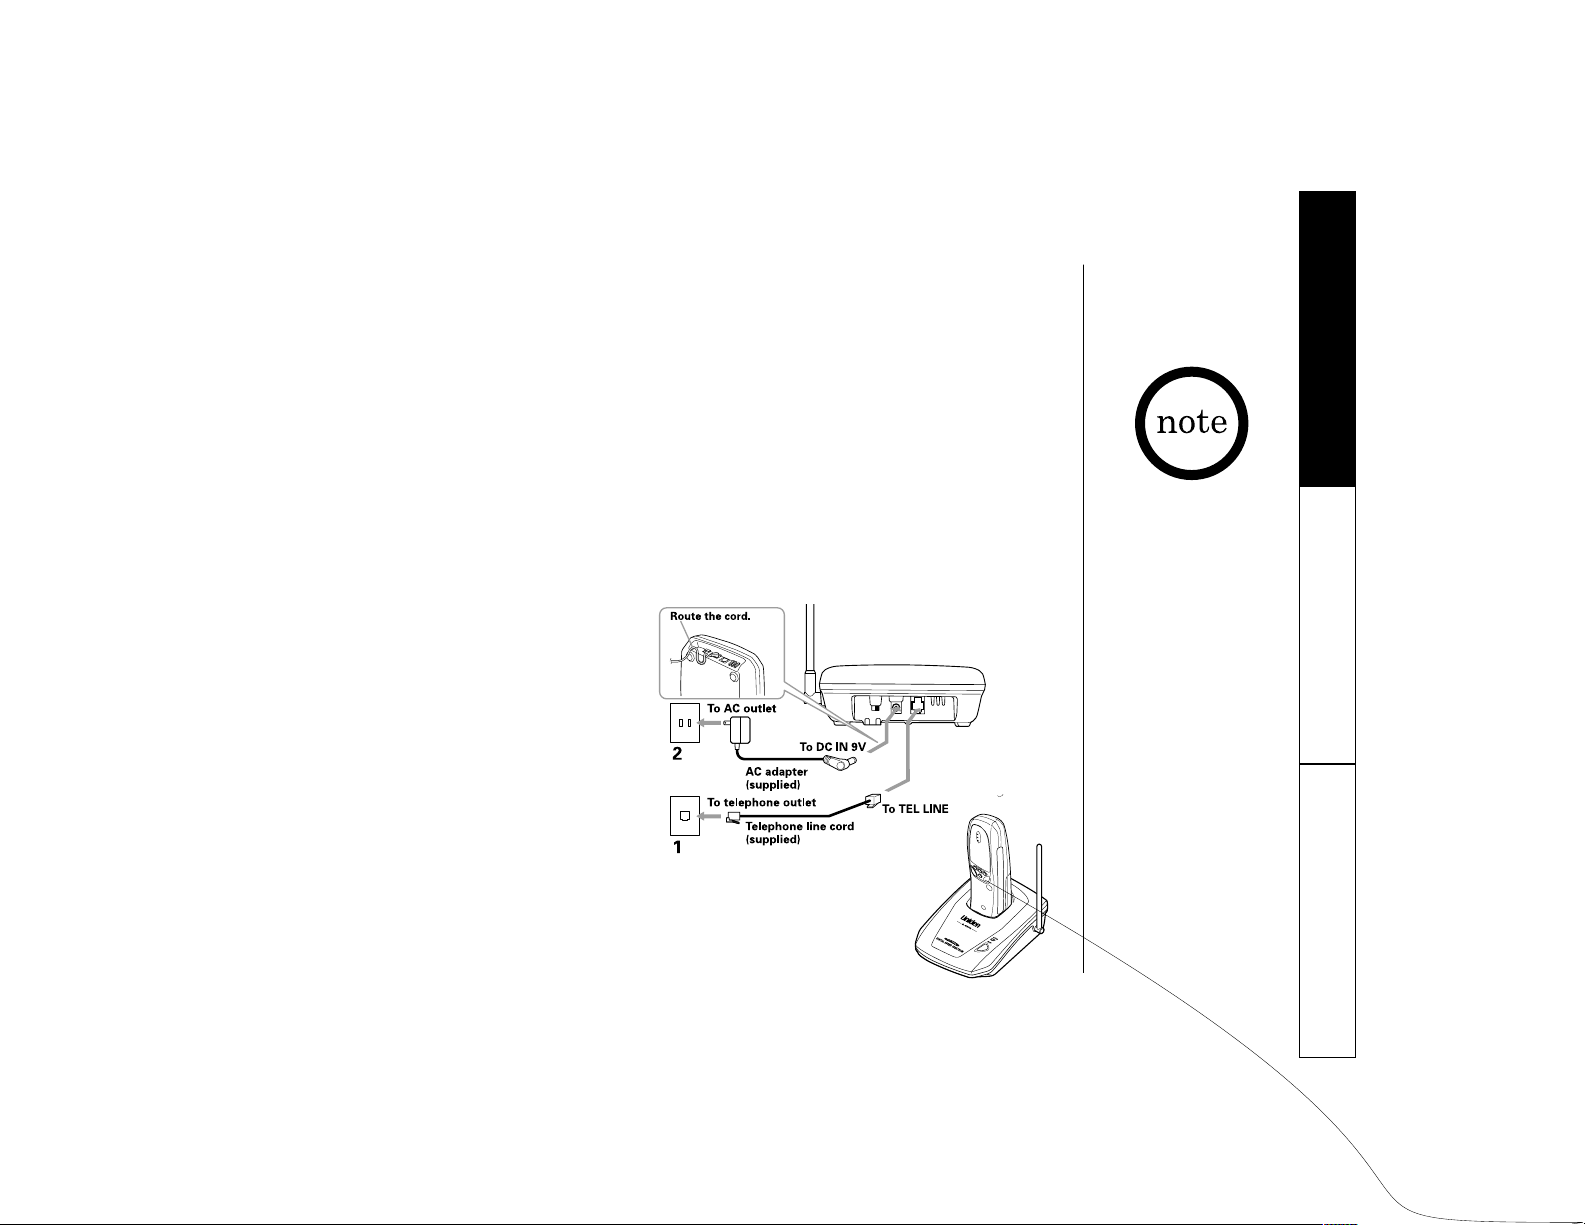
CCoonnnneecctt tthhee bbaassee uunniitt
1 Connect t he telephone line cord
to the
TTEELL LLIINNEE
jack and to a
telephone outlet.
2 Connect t he AC adapter t o the
DDCC IINN 99VV
jack and t o a st andard
120V AC wall outlet.
3 Set t he base unit on a desk or t abletop and place t he
handset on the base unit as shown.
Then raise t he antenna t o a ver tical position.
Place the power cord so it
does not create a trip
hazard or where it could
become chafed and
create a fire or
electrical hazard.
Page 10
GETTING STARTED[ 8]
Use only the supplied AD-311 AC adapter. Do not use any other
AC adapter.
Connect the AC adapter to a continuous power suppl y.
Place the base unit close t o the AC outlet so that you can un plug the
AC adapter easily.
If your telephone outlet isn´t modular,
contact y our t elephone company for assistance.
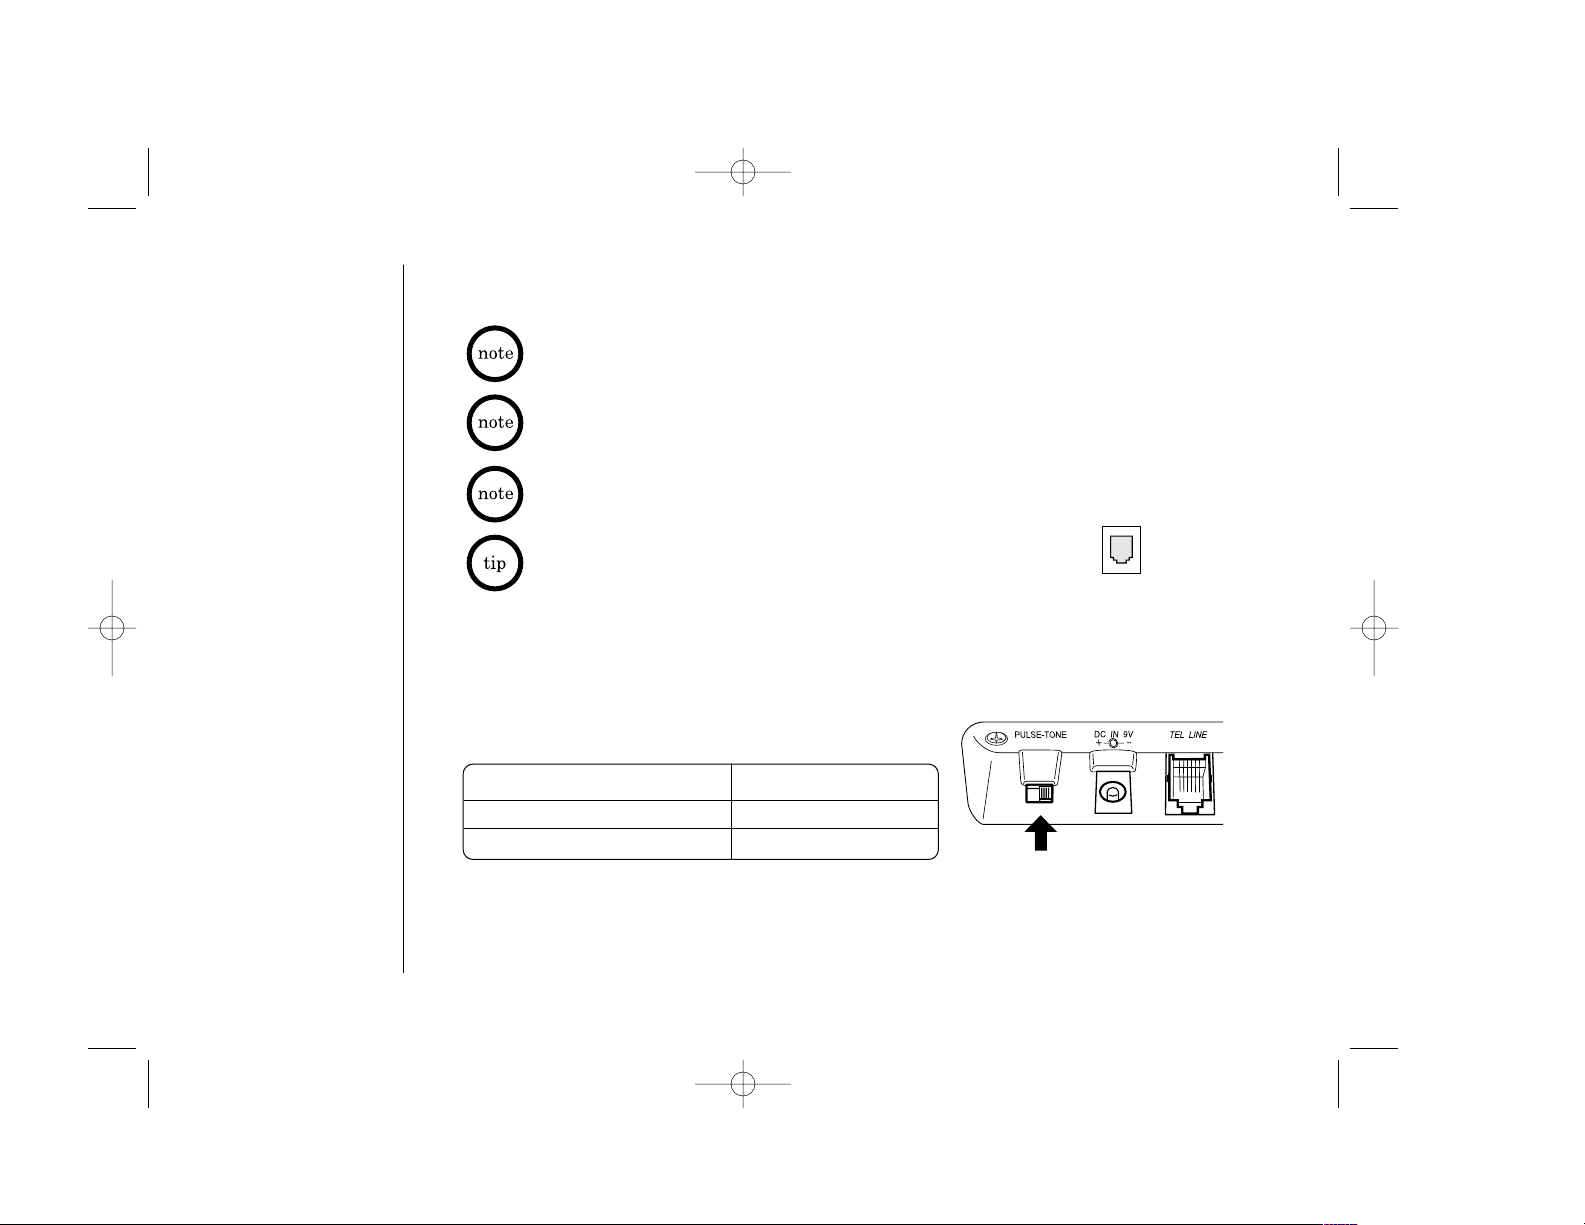
CChhoooossee tthhee ddiiaalliinngg mmooddee
Depending on your dialing sys tem,
set the
PPUULLSSEE--TTOONNEE
switch as f ol lo ws:
IIff yyoouu aarreenn´´tt ssuurree ooff yyoouurr ddiiaalliinngg ssyysstteemm
Make a trial call with t he PUL SE-TONE switch set t o
TTOONNEE
.
If t he call connects, leave the switch as is; oth er wise, set to
PPUULLSSEE
.
IIff yyoouurr ddiiaalliinngg ssyysstteemm iiss SSeett tthhee sswwiittcchh ttoo
Tone
TTOONNEE
Pulse
PPUULLSSEE
Modular
TRU346 8/9/00 12:36 Page 8
Page 11

GETTING STARTED [ 9]
CChhaarrggee tthhee bbaatttteerryy ppaacckk ffoorr aatt lleeaasstt 1155 hhoouurrss bbeeffoorree yyoouu ssttaarrtt uussiinngg yyoouurr pphhoonnee..
1 Press in on t he batt er y cover release and slide the
cover down until it comes off.
2 Connect t he batte r y pack connector wit h the cor rect
polarity (black and red wires), t hen inser t the
battery pack int o the batt er y compa r tment.
3 Securely close the batt ery comp ar tment co ver by
sliding it up until it snaps into place.
4 Place t he handset on the base as sho wn.
5 M ake s ure that t he
ssttaattuuss
LED lights. If the LED doesn´t
light, check t o see that t he AC adapter is plu gged in
and that t he handset mak es good contact wit h t he base
charging cont acts.
Use only the Uniden Batter y (BT-905) supplied
with your phone. R eplacement batteries are also
available thr ough the Uniden Pa r ts Depar tment.
(see page 5)
GETTING STARTED
Preparing the Battery Pack
4, 5
status LED
TRU346 8/9/00 12:36 Page 9
Page 12
GETTING STARTED[ 10 ]
BBaatttteerryy uussee ttiimmee ((ppeerr cchhaarrggee))
From fully charged
• Six hours continuous use.
• Ten days when the handset is in the s tandb y mode.
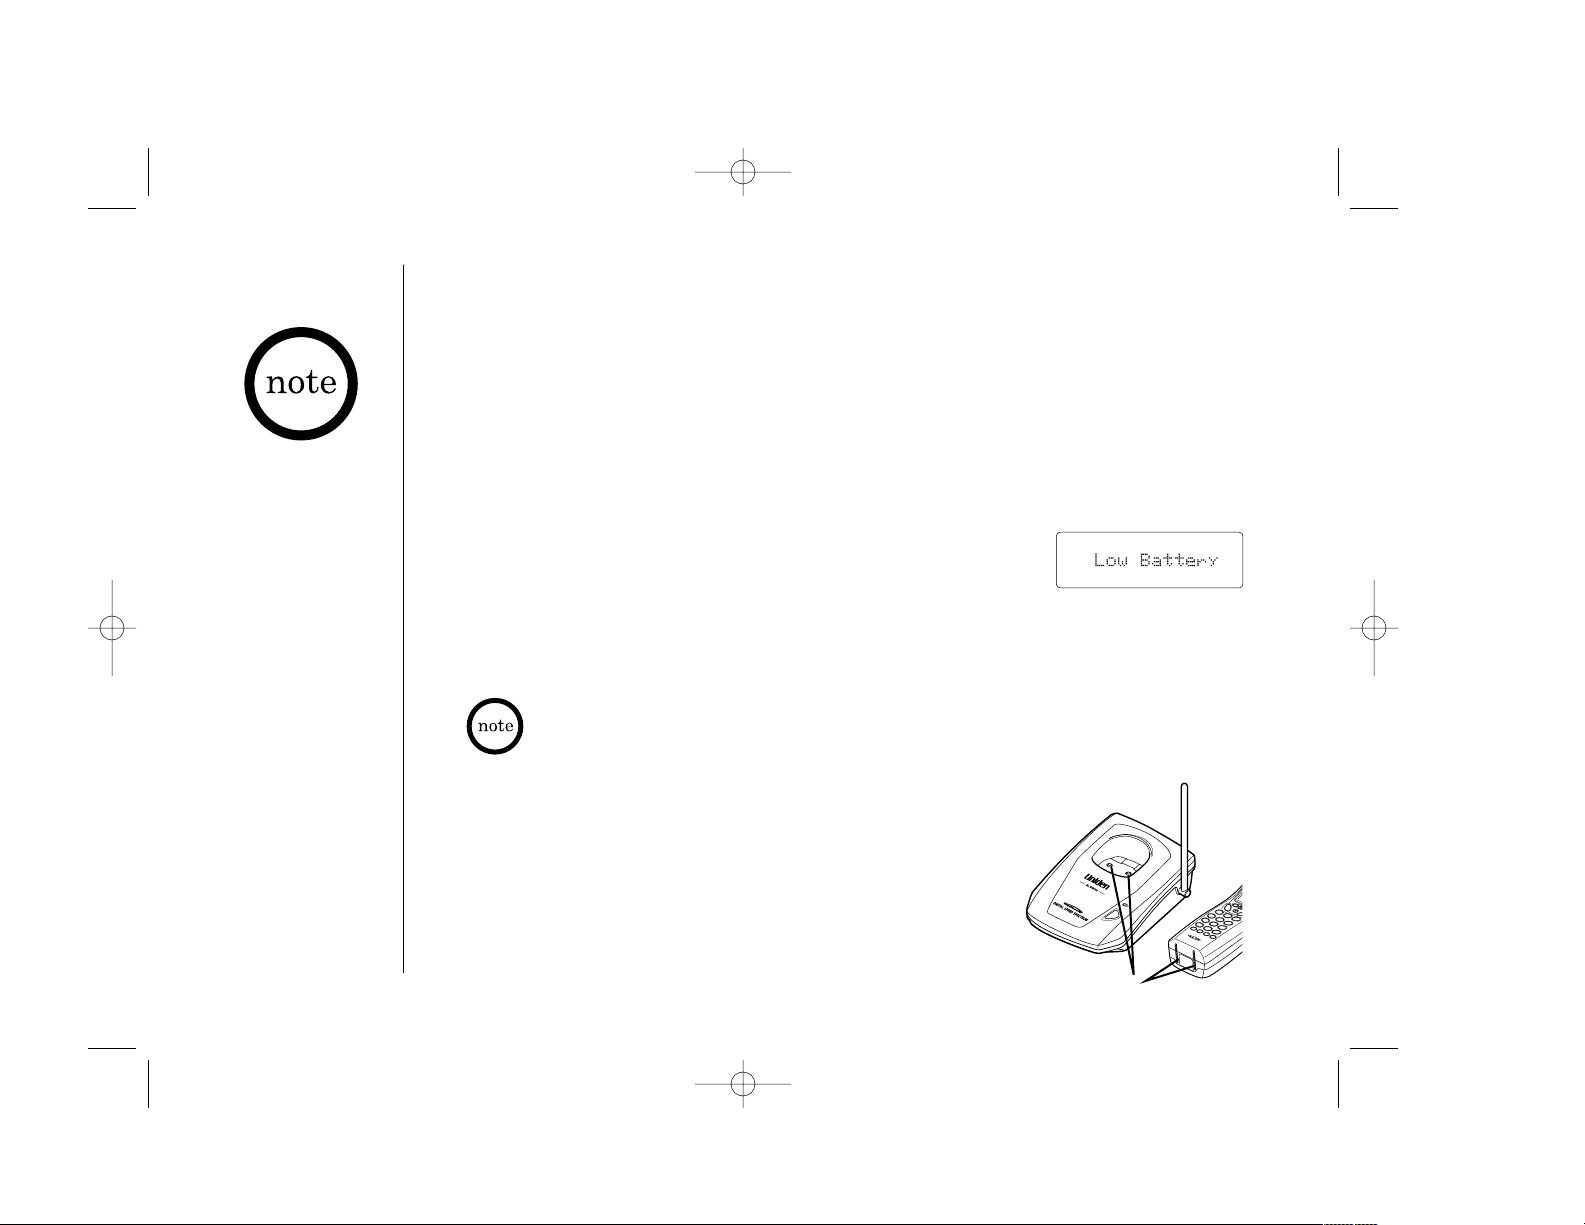
WWhheenn tthhee bbaatttteerryy cchhaarrggee bbeeccoommeess llooww
When the batt er y pac k is ver y lo w and needs to be
charged, t he phone is progr ammed t o eliminate functions
in order to save power. If the phone is not in use, “
Low
Battery“ f lashes and none of t he keys will operate.
If the phone is in use, “
Low Battery“ f lashes and the handset beeps.
Complete your conver sation as quickly as possible and retur n the handset to
the base unit f or charging.
The built-in memor y backup can hold numbers and names stor ed in
the memor y even if the battery pack is completely disc h a r ge d.
CClleeaanniinngg tthhee bbaatttteerryy ccoonnttaaccttss
To maint ain a good c ha rge, it is imp or t ant to
clean the batt er y cont acts on t he handset and
base unit with a dr y cloth or a pencil er aser
about once a month.
DDoo nnoott uussee aannyy lliiqquuiiddss oorr ssoollvveennttss..
• Even when the battery
pack is not being used,
it will gradually
discharge over a long
period of time.
For optimum
performance, be sure
to return the handset
to the base unit after a
telephone call for
charging the battery.
• The redial memory
numbers backup for up
to 2 minutes while you
replace the battery pack.
• If you must replace
the battery pack
during a telephone
call, complete the
replacement of the
battery pack within
30 seconds, and you
can return to the
original call.
contacts
TRU346 8/9/00 12:36 Page 10
Page 13
GETTING STARTED
GETTING STARTED [ 11 ]
Adjusting the Ringer and Earpiece Volume
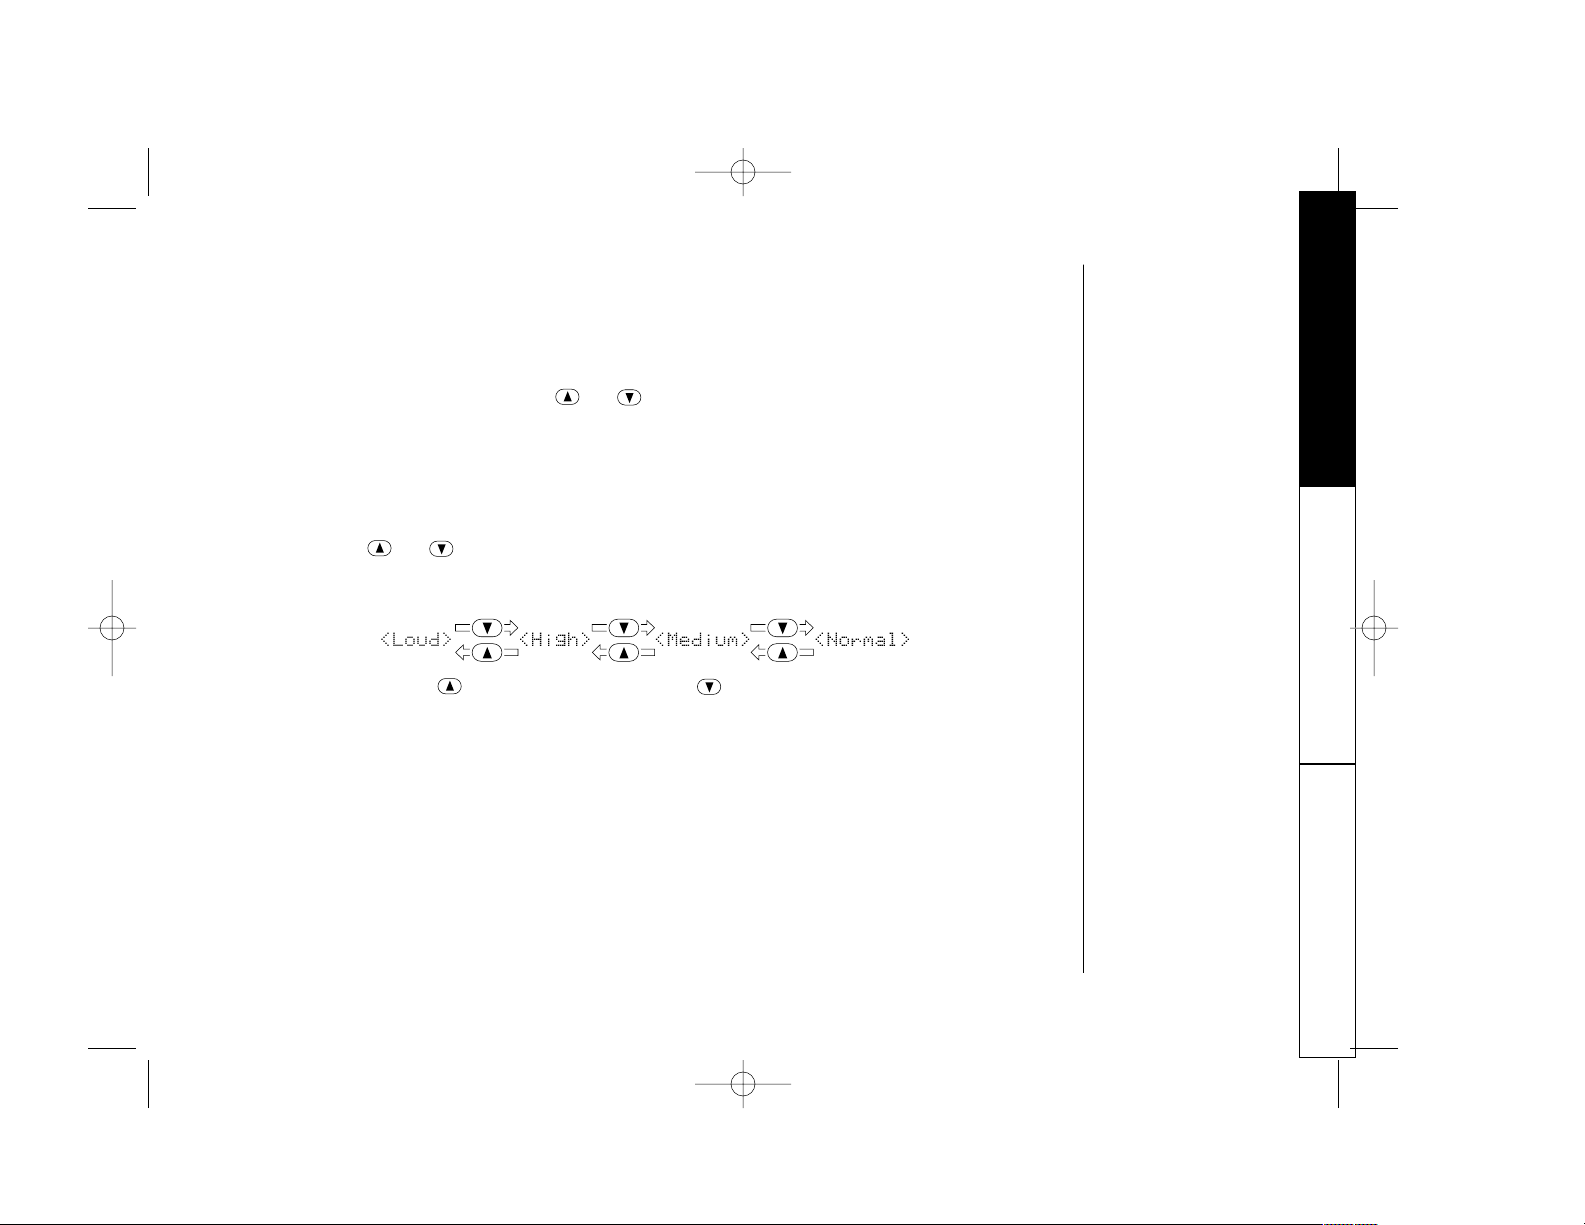
RRiinnggeerr ttoonnee aanndd vvoolluummee
The phone has four ringer t one and volume combinations.
In t he standb y mode, press or on the handset repeatedly.
The display shows the setting.
EEaarrppiieeccee vvoolluummee
Pressing or during a call will change the earpiece volume of t he
handset. This setting will remain in ef fect af ter t he telephone call has ended.
When you press in Loud mode or press in Normal mode, t he er ror
tone sounds.
TRU346 8/9/00 12:36 Page 11
Page 14
BASICS[ 12 ]
Making a Call
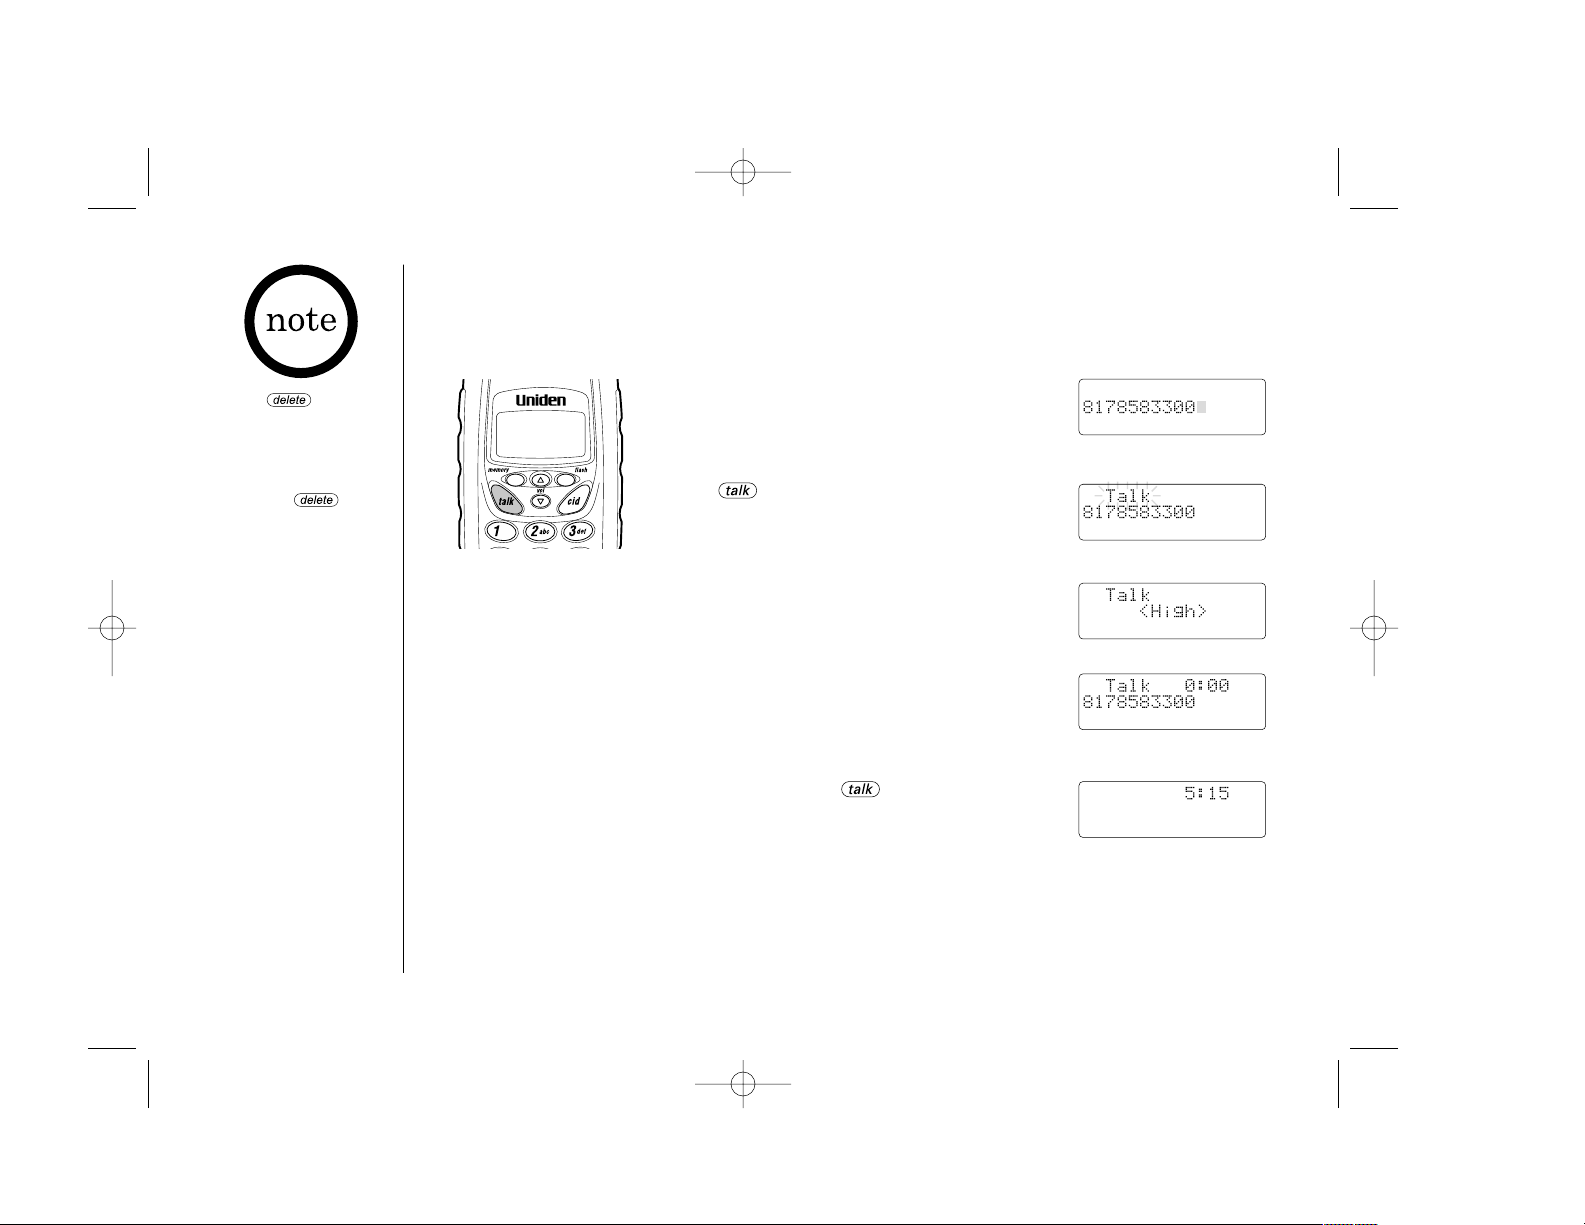
1 Enter the phone number.
(Up to 32 digits.)
Example: Enter 8178583300
2 Press .
“
Talk“ f lashes on the displa y.
Then the v olume setting is displayed.
Example: Volume level High
3 The number is dialed.
After about 5 seconds, t he call-time
display appears.
4 To hang up, press or place the
handset on the base. The call-time will
be displayed for about 5 seconds.
• Press if you
enter a wrong number
in step 1. To delete all
the nu mbers that you
have entered, press
and hold until
the display clears.
• You must press a key
within 20 seconds or
the phone will return
to standby.
DDiiaalliinngg ffrroomm ssttaannddbbyy
TRU346 8/9/00 12:36 Page 12
Page 15
BASICS [ 13 ]
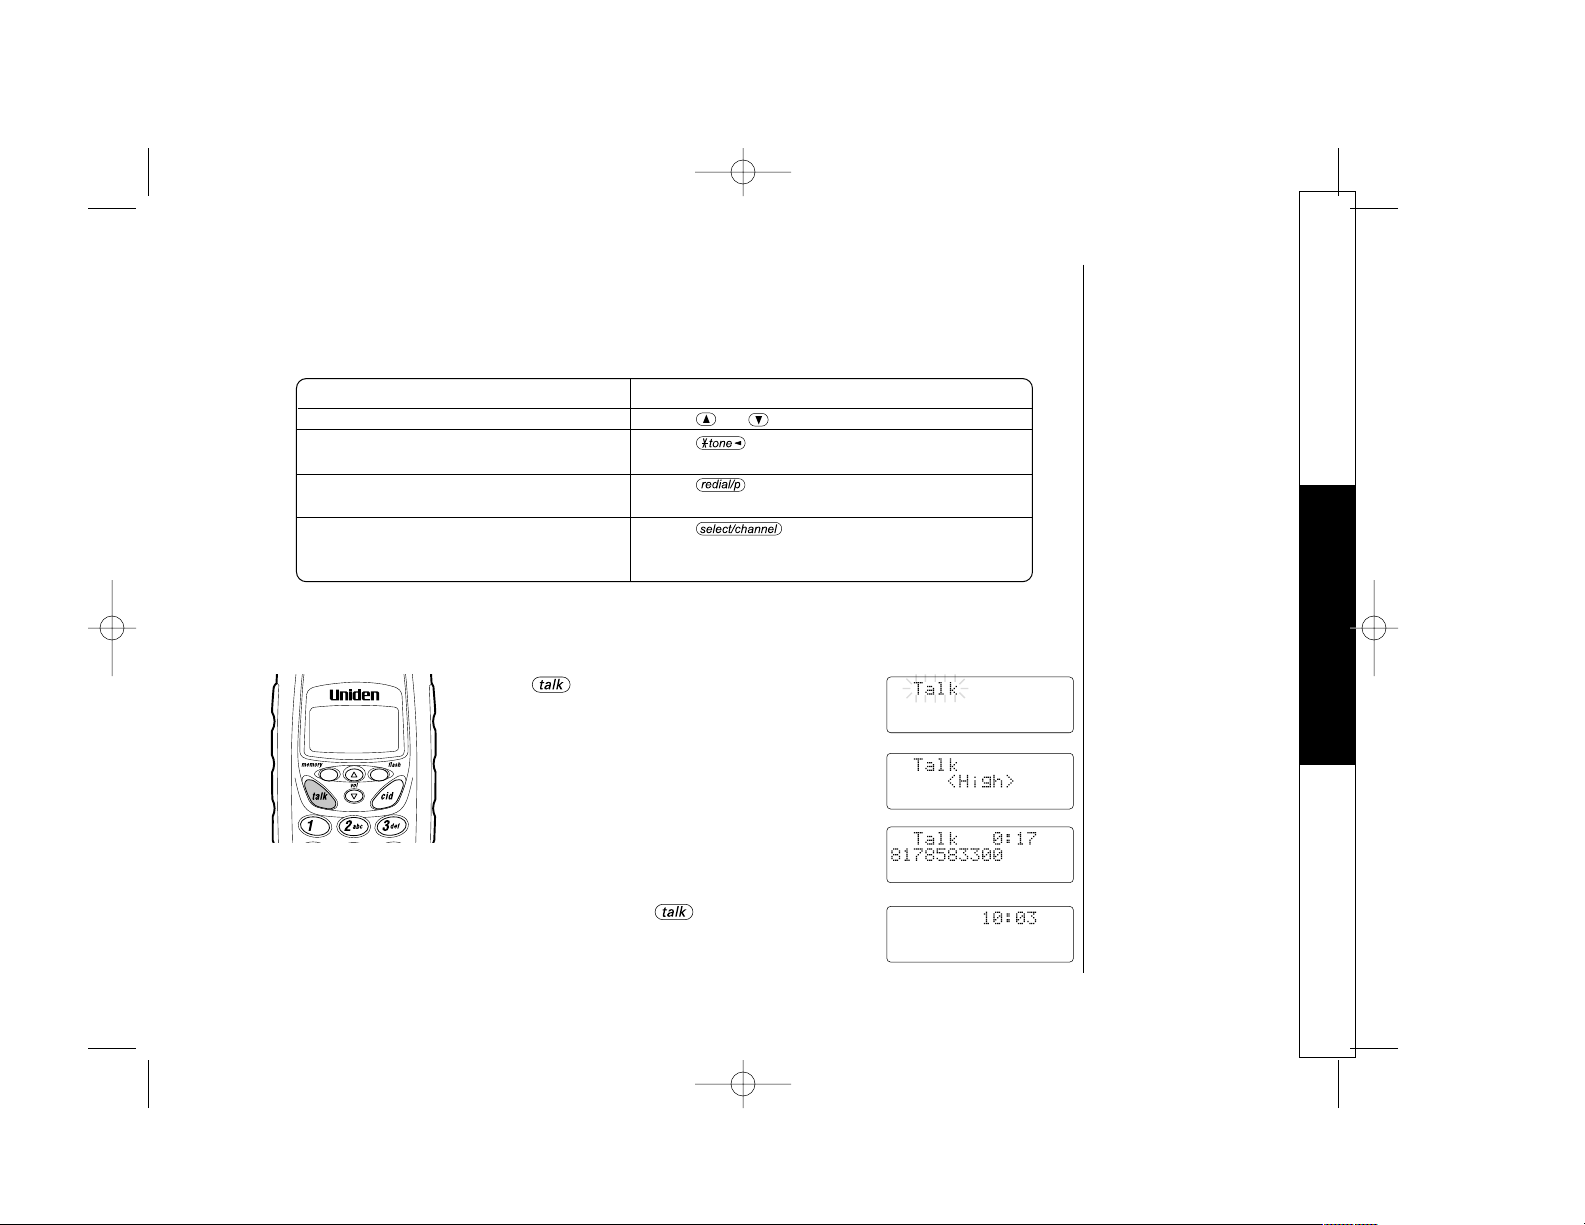
OOtthheerr OOppeerraattiioonnss
DDiiaalliinngg ffrroomm ttaallkk mmooddee
BASICS
1 Press .
“
Talk“ f lashes on the displa y.
Then the v olume setting is displayed.
Example: Volume level High
2 Dial t he phone number.
Example: Enter 8178583300
3 To hang up, press or place the
handset on the base. The call-time will
be displayed for about 5 seconds.
TToo DDoo tthhiiss
To adjust the earpiece v olume Press or during a call.
To temporarily swit ch t o t one dial Press . The foll owing number s
(When the base is set to pulse mode) will be sent as tone dialing.
To ent er a pause within t he Press . “
P“ appears in the displa y
dialing sequence which re pr esents a pause.
To imp rove the recep tion Press d uring a ca ll.
“
Scanning“ appears on the displa y.
If the operation fails, t he er ror t one sounds.
TRU346 8/9/00 12:36 Page 13
Page 16

BASICS[ 14 ]
Receiving a Call
FFrroomm tthhee hhaannddsseett
1 The phone rings. “ Incoming call“
appears on the display.
2 Press . “
Talk“ and volume setting
appear on the display.
3 Talk with the caller.
4 To hang up, press or place the
handset on the base.
The call time will be displayed for about
5 seconds.
AAuuttooTTaallkk wwhheenn rriinnggiinngg
When the AutoTalk setting is on and there is an incoming call, sim ply lif t the
handset from the base unit to answ er the pho ne. See “Setting Caller ID
options“ on page 26 for more details.
AAnnyy kkeeyy aannsswweerr wwhheenn rriinnggiinngg
When the AutoTalk setting is on and the handset is of f the base, press any
handset key to answer the incoming call.
CCaallll WWaaiittiinngg
NNoottee:: YYoouu mmuusstt ssuubbssccrriibbee ttoo CCaallll WWaaiittiinngg sseerrvviiccee ttoo uussee tthhiiss ffeeaattuurree..
When a call is received during a t elephone call already in progress, press
to switch t o the ne w call. If y ou also subscribe t o Call Waiting on Caller ID,
you will see the name and number of t he caller in call waiting. (See page 34.)
TRU346 8/9/00 12:36 Page 14
Page 17

BASICS [ 15 ]
Redialing a Call
The last three phone number s dialed can be quickly redialed.
RReeddiiaall ffrroomm ssttaannddbbyy
BASICS
1 Press .
The ph one num ber t hat w as la st dialed appears
on the display.
2 Press again.
Each press of will displa y one of the las t thr ee
numbers dialed.
3 Press . The number will be dialed.
Page 18

BASICS[ 16 ]
Traveling Out-of-Range
RReeddiiaall ffrroomm ttaallkk mmooddee
1 Press .
“
Talk“ and the volume setting appear
on the display.
2 Press .
The last number dialed will be displayed
and redialed.
3 To hang up, press or place the
handset on the base. The call-time will
be displayed for about 5 seconds.
Page 19

TELEPHONE FEATURES [ 17 ]
Storing Phone Numbers and Names
TELEPHONE FEATURES
Memor y Dialing allows you to dial a number using just a few key strokes. You
can store up to 20 phone numbers in the memor y.
Page 20

TELEPHONE FEATURES[ 18 ]
5 Press .
“
Store Number“ is displayed. The cursor flashes
indicating that t he display is ready f or the number to
be enter ed.
6 Use t he number keypad t o enter the phone number.
The phone number cannot exceed 20 digits.
• Use to enter a pause in the dialing sequence. The
display shows a “
P“. E a c h pause counts as one digit and
repr esents a two second delay in time between digits.
The pause feature is useful for long dist ance calling,
credit card dialing, or sequences t hat requi re a pause
between digits.
• U se to delete digits as needed.
7 Press .
The handset beeps and displays the confir mation screen.
Memor y stor age is complete.
For ex ample, if you s tore a name and number int o memor y
location number 07, the display shows “
Memory07
Stored“.
After about 2 seconds, “
Memory Store“ is displayed.
8 Press to return to s t andby mode.
TRU346 8/9/00 12:36 Page 18
Page 21

TELEPHONE FEATURES [ 19 ]
Making Calls with Memory Dialing
MMeemmoorryy ddiiaalliinngg ffrroomm ssttaannddbbyy
TELEPHONE FEATURES
1 Press .
The handset displays your programmed
memor y locations.
2 Press and or enter a two-digit
number (01 - 20) to select the memor y
location you would like to dial.
3 Press . “
Talk“ and the volume
setting appear on the display.
Then the displayed number is dialed.
DDiissppllaayy aa PPrrooggrraammmmeedd NNuummbbeerr
Use and to toggle betw een t he
names display and the numbers display.
Program name Program number
When the s to red phone number
has 14 or more digits, “e
Page 22

TELEPHONE FEATURES[ 20 ]
MMeemmoorryy ddiiaalliinngg ffrroomm ttaallkk mmooddee
1 Press .
“
Talk“ and the volume setting appear
on the display.
2 Press .
3 Ent er a two-digit number (0 1 - 20) to
select the memor y location of t he desired
phone number.
The selected phone number is displayed.
Then the num ber is dialed.
Page 23

TELEPHONE FEATURES [ 21 ]
Editing a Stored Name and/or Phone Number
TELEPHONE FEATURES
1 Press and hold until “Memory
Store“ is displayed.
2 Press and or enter a two-digit
number (01 - 20) to select the memor y
location you would like to edit.
3 Press .
The following screen appear s with the
memor y location number that y ou ha ve
selected in the display.
4 Press or to select “
Edit
Memory“, then press .
The following screen appear s.
The cursor f lashes indicating that t he
display is ready for the name t o be
edited. When a name has not been
stor ed, th e cur sor appears at the
beginning of the second line.
5 Press , , , , or to
edit the name. (See page 17.) To edit only
the phone number, skip this s tep.
Page 24

TELEPHONE FEATURES[ 22 ]
6 Press .
The following screens appear s.
The cursor f lashes indicating that t he
display is ready for the number t o
be edited.
7 Use t he number keypad, or
to edit th e phone number.
The phone number cannot exceed 20
digits. (See page 18.)
If you don´t want to chang e the phone
number, skip this step .
8 Press . The handset beeps and
displays the conf ir mation screen. The
memor y storage is complete.
For ex ample, if you s to re a name and
number into memor y location number 01,
the display shows
“
Memory01 Stored“.
After about 2 seconds, “
Memory
Store“ is displayed.
9 Press to return to s tandb y mode.
TRU346 8/9/00 12:37 Page 22
Page 25

TELEPHONE FEATURES [ 23 ]
DDiissppllaayy aa PPrrooggrraammmmeedd NNuummbbeerr
Use and to toggle between t he names display and the
numbers display.
• When t he s tor ed phone number has 14 or more digits, “\ “ is displayed next
to the 12th digit. Press to see the extr a digits and to r eturn.
TELEPHONE FEATURES
PPrrooggrraamm nnaammee PPrrooggrraamm nnuummbbeerr
TRU346 8/9/00 12:37 Page 23
Page 26

TELEPHONE FEATURES[ 24 ]
Erasing a Stored Name and Phone Number
1 Press and hold until “Memory
Store“ is displayed.
2 Press and or enter a two-digit
number (01 - 20) to select the memor y
location you would like to edit.
3 Press .
The following screen appear s with the
memor y location number that y ou ha ve
selected in the display
4 Pr ess to move t he point er down to the
“
Delete Memory“ command line.
5 Pr ess . The following
conf ir mation screen appears.
6 P res s to move t he point er t o “
Yes“.
7 Press or .
There is a conf ir mation t one and the
entry is deleted. The f ol lowing scre en
appears.
8 Af ter a f ew seconds the display returns
to the “
Memory Store“ s creen.
You may select anot her number to delet e
(return to step 2) or press to
return to s tandb y.
TRU346 8/9/00 12:37 Page 24
Page 27

TELEPHONE FEATURES [ 25 ]
Paging
TToo llooccaattee tthhee hhaannddsseett
TELEPHONE FEATURES
1 Press on the base.
2 The handset beeps f or 5 seconds.
The fo ll ow ing screen appear s;
3 Press an y key except on the
handset to end t he page.
When an incoming call is received during paging, paging is canceled
and the telephone is switched t o the incoming call.
If you pr ess during paging, t he handset will be placed in
off-hook (t alk) mode.
By holding for more
than 2 seconds, the
handset beeps for
60 seconds.
TRU346 8/9/00 12:37 Page 25
Page 28

CALLER ID FEATURES[ 26 ]
Caller ID
You mus t subscribe to Caller ID service t o use this feature.
When the t elephone rings, t he Caller ID featur e allows you t o view t he
caller´s name and phone number on the display before y ou answer the phone.
The handset displays the phone number of the incoming call, t he name, time,
and the number of calls. Additionally, you can dial the displa yed number and
sto re t he inf or mation f or memor y dialing.
SSeettttiinngg CCaalllleerr IIDD ooppttiioonnss
There are three Caller ID setup options available; t hey are AutoTalk, CIDCW
(Caller ID on Call Waiting), and Area Code.
AAuuttooTTaallkk
allows you to answer t he phone wit hout pressing . If t he phone
rings when AutoTalk is on, simply remove the handset from the base and the
phone automatically answe r s t he call. Or, if the handset is not on the base,
press any key to answer t he call. If the phone rings when A utoTalk is off, you
must press to answer the call.
CCaalllleerr IIDD oonn CCaallll WWaaiittiinngg ((CCIIDDCCWW))
per for ms the same as regular Caller ID on a
call waiting number. Call Waiting options allow you to handle call waiting
calls in seven dif ferent w ay s. (See page 35.)
If you ent er a 3-digit area code number in t he
AArreeaa CCooddee
option, your local
area code does not appear in Caller ID messages. When re viewing Caller ID
messages, you will see only the local seven digit number. For calls receiv ed
from outside your local ar ea code, you will see a full 10-digit number.
If your calling area r equ ires 10-digit dialing, do not program this option.
Y ou must subscribe to
Caller ID on Call Waiting in
order to use this feature.
TRU346 8/9/00 12:37 Page 26
Page 29

CALLER ID FEATURES [ 27 ]
TToo cchhaannggee yyoouurr CCaalllleerr IIDD ooppttiioonnss::
1 Pr ess . The fol lowing scr een appears.
2 Use , , or a number k ey (1-3) to move the pointer to the selection
that you w ould like to change.
Press to toggle between “
On“ and “Off“ for “Auto
Talk“. For “CIDCW“, choose “On“, “Off“, or “Opt“, depending
upon the type of service t o which you subscribe.
3 When y ou wish t o enter Are a Code, press or the number key to move
the pointer t o select “
Area Code“. Then press and enter
the 3 digits area code by using t he number keypad - . After ent ering
the area code, press .
4 Af ter y ou have made yo ur sel ections, press and retur n the handset
to the base.
CALLER ID FEATURES
TRU346 8/9/00 12:37 Page 27
Page 30

CALLER ID FEATURES[ 28 ]
When the Telephone Rings
1 When t he Caller ID message is received, t he display shows the caller´s
phone number along with the dat e and time. The incoming call info rmation
is stored in the Caller ID record.
If t he Caller ID service includes the call er´s name, the caller´s name
appears on the display (up to 15 letters ).
Here are some typical displa ys;
2 When you pick up the phone, t he display chang es to “
Talk“. (See page 14.)
Data errors appear as “
22
“.
WWhheenn tthhee pphhoonnee nnuummbbeerr
aanndd nnaammee ddaattaa aarree rreecceeiivveedd
WWhheenn aa pprriivvaattee nnuummbbeerr iiss rreecceeiivveeddWWhheenn aa pprriivvaattee nnaammee iiss rreecceeiivveedd
WWhheenn aann uunnkknnoowwnn nnuummbbeerr iiss rreecceeiivveeddWWhheenn aann uunnkknnoowwnn nnaammee iiss rreecceeiivveedd
WWhheenn iinnvvaalliidd ddaattaa iiss rreecceeiivveedd
• If you answer a call
before the Caller ID
message is received
(Example: before the
second ring), the Caller
ID message will
not appear.
• When the call is
received via a
telephone company
that does not offer
Caller ID service, the
caller´s phone number
and name do not
appear. (This includes
international calls.)
• When the call is via a
private br anch
exchange (PBX),
the caller´s phone
number and name may
not appear.
TRU346 8/9/00 12:37 Page 28
Page 31

CALLER ID FEATURES [ 29 ]
V iewing the Caller ID Message List
The Caller ID list sto res info rmation f or up to 50 incoming calls - e ven
unanswered calls.
CALLER ID FEATURES
1 Press .
The summar y screen appears.
The screen shows the number of new
messages and total messages.
2 Press to display the latest Caller
ID message.
3 Press to see t he next messag e, or
press to see pre vious message.
4 Press to return to s tandb y.
• In Caller ID operation,
if no key is pressed for
more than 20 seconds,
an error tone sounds
and the telephone
returns to the
standby mode.
• If a call comes in via a
telephone system that
does not offer Caller ID
service, no information
is stored.
•“End“ appears when
you have reviewed all
messages in the Caller
ID list. Press
repeatedly to return to
the summary screen.
• Each message can be
up to 15 characters for
the phone number and
the name.
TRU346 8/9/00 12:37 Page 29
Page 32

CALLER ID FEATURES[ 30 ]
Deleting Information from the Caller ID List
The TRU 346 sto res up t o 50 messages. If t he phone receives t he 51st
message, the oldest one in t he l is t is autom atically delet ed.
Caller ID data can also be delet ed manually.
DDeelleettiinngg aa CCaalllleerr IIDD mmeessssaaggee
1 Press .
Display the message to be deleted from
the Caller ID list by pressing or .
2 Press .
3 Press or to select “
Yes“ or “No“.
4 Press or .
WWhheenn tthhee ppooiinntteerr iiss aatt
“ Yes“:
A t one sounds and the Caller ID message
is deleted. The next Caller ID message is
then displayed.
WWhheenn tthhee ppooiinntteerr iiss aa
t “
No“:
The display returns to the Caller
ID display.
If you get an incoming
call or page, the deleting
operation is canceled.
The telephone retur ns to
standby so you can
answer the call or page.
TRU346 8/9/00 12:37 Page 30
Page 33

CALLER ID FEATURES [ 31 ]
DDeelleettiinngg aallll CCaalllleerr IIDD nnaammeess//nnuummbbeerrss
CALLER ID FEATURES
1 Press .
2 Press .
3 Press or to select “
Yes“ or “No“.
4 Press or .
WWhheenn tthhee ppooiinntteerr iiss aatt
“ Yes“:
A t one sounds and all sto red Caller ID
messages are deleted.
WWhheenn tthhee ppooiinntteerr iiss aatt
“
No“:
The display returns to the
summary screen.
If you get an incoming
call or page, the deleting
operation is canceled and
the telephone returns to
standby so you can
answer the call or page.
TRU346 8/9/00 12:37 Page 31
Page 34

CALLER ID FEATURES[ 32 ]
Using the Caller ID List
CCaalllliinngg aa ppaarrttyy ffrroomm tthhee CCaalllleerr IIDD lliisstt
You can place a call fr om the Caller ID lis t. The TRU 346 s t or es up t o 50 messag es.
1 Press .
Select the phone number t hat you w ant
to dial by pressing or .
2 Press .
The displayed phone number will be
dialed automatically.
Page 35

CALLER ID FEATURES [ 33 ]
SSttoorriinngg CCaalllleerr IIDD mmeessssaaggeess iinn MMeemmoorryy ddiiaalliinngg
The phone number of the party on the Caller ID lis t can be stored in
memor y dialing.
CALLER ID FEATURES
1 Press .
Select the phone number t o be stored fr om
the Caller ID list by pressing or .
2 Press .
3 Press and or enter a two-digit
number (01 - 20) to select the
memor y location.
4 Press .
A confir mation tone will sound.
The number is stor ed in memor y, and
the display returns to the Caller ID list.
LLoonngg DDiissttaannccee ccaallll aanndd AArreeaa CCooddee sseettttiinngg
When you need to s tor e Long Dis tance call pref i x “1“ and area code, edit the
number at step 1. Press for Long Distance call and fo r area code setting.
If a message has already been s to r ed in the select ed
memor y number location, a confirmation screen is
displayed. Press to select “
Yes“. Press
to overwrite. The display returns to the Caller ID lis t.
• You can not store a
Caller ID message if no
phone number appears
in the message.
• If there is an incoming
call or page, memor y
storage is canceled and
the telephone is set to
receive the incoming
call or page.
TRU346 8/9/00 12:37 Page 33
Page 36

CALLER ID FEATURES[ 34 ]
Using Caller ID on Call Waiting Service
““CCaalllleerr IIDD““ aanndd ““CCaallll wwaaiittiinngg““ aarree sseeppaarraattee sseerrvviicceess.. CCIIDDCCWW ((CCaalllleerr IIDD oonn
CCaallll WWaaiittiinngg)) ppeerrffoorrmmss tthhee ssaammee aass rreegguullaarr CCaalllleerr IIDD oonn aa ccaallll wwaaiittiinngg nnuummbbeerr..
YYoouu mmuusstt ssuubbssccrriibbee ttoo tthhee ““CCaalllleerr IIDD oonn ccaallll wwaaiittiinngg ((CCIIDDCCWW)) sseerrvviicceess““ bbeeffoorree
yyoouu ccaann uussee tthhee ffoolllloowwiinngg ffeeaattuurreess.. TThhee ““CCaallll wwaaiittiinngg““ sseerrvviiccee ccaann aallssoo bbee
uusseedd iinnddeeppeennddeennttllyy.. PPlleeaassee ccoonnttaacctt yyoouurr llooccaall tteelleepphhoonnee ccoommppaannyy ffoorr ddeettaaiillss..
1 When a ne w incoming call is received
during your curr ent tel ephone call, the
phone number and the name of the caller
are displayed.
2 Press .
You will be able t o talk with the
second caller. The fir st caller will be put
on hold.
3 To return to t he fir st caller,
press again.
When CIDCW is set to Opt in the Caller ID setup menu (see page 27),
you can press the ke y after receiving a call w aiting call and
view a list of w ays to handle the new call. Choose an option using t he
and keys and press to activ ate.
Page 37

CALLER ID FEATURES [ 35 ]
Call Waiting Features
Your TRU 346 gives you ne w options for call w aiting. At the touc h of a
button, you can ask t he caller t o hold, send them to your vo ice mail service,
or confer ence them int o your current call. You may be r equ ired to subscribe
to a voice mail service, call waiting, and call waiting options t o use these
features. Not all features are available in all areas. Chec k wit h your local
telephone company for details.
SSeelleeccttiinngg aann OOppttiioonn
CALLER ID FEATURES
1 When y ou r eceive a call w aiting call,
press for a list of options.
2 Press and keys or a number key
(1-7) to select an option.
3 Press .
A confir mation screen will appear.
Your TRU 346 is pre-programmed wit h se ven call waiting options. You may
select to ask the calling par ty to
hhoolldd
, send them a
bbuussyy
message,
ffoorrwwaarrdd
them to your voice mail service or
ccoonnffeerreennccee
them into the cur rent call. You
may also select to
aannsswweerr aanndd ddrroopp
the fir st caller or, at any time, choose to
ddrroopp tthhee ffiirrsstt
or
ddrroopp tthhee llaasstt
caller.
Check with your local telephone company for a full list of options.
You can also answer a call
waiting call immediately
by pressing the key.
The first caller will be
placed on hold. To return
to the original caller,
press again.
Page 38

ADDITIONAL INFORMATION[ 36 ]
Changing the Digital Security Code
The digital security code is an identification code used to connect t he
handset and the base unit. No rmall y, setting the code is not necessary.
The f i rs t time y ou c ha rg e your handset, t he security code is automaticall y set.
(See page 4.)
In the ra re situation t hat you suspect anot her cordless t elephone is using the
same security code, you can change t he code.
1 Remove the handset from the
base unit. Press and hold .
2 While t he handset is emitting the
paging sound, replace the
handset on the base unit. The
paging tone s tops.
Leave the handset on the base f or
more than 3 seconds. A random,
new security code is set.
If the handset battery
pack is completely
discharged or the battery
pack is removed, the
digital security code will
be lost. If this happens,
a new security code is
set automatically next
time the battery pack
is charged.
TRU346 8/9/00 12:38 Page 36
Page 39

ADDITIONAL INFORMATION [ 37 ]
Beltclip Installation
TToo aattttaacchh tthhee bbeellttcclliipp
Inser t the belt clip int o
the holes on each side
of the handset.
Press down until
it click s.
ADDITIONAL INFORMATION
TToo rreemmoovvee tthhee bbeellttcclliipp
Pull both sides of t he
beltclip t o release t he
tabs from the holes.
Headset Installation
Your phone may be used with an optional headset,
the Uniden HS910. To use t his feature, simply plug
the headset plug into the headset jack. Your phone
is ready fo r hands-free conver sation. (Headsets
may be purchased by calling t he Uniden Pa r ts
Department or visiting t he website. See page 5)
TRU346 8/9/00 12:38 Page 37
Page 40

ADDITIONAL INFORMATION[ 38 ]
BBaatttteerryy rreeppllaacceemmeenntt aanndd hhaannddlliinngg
When the operating time becomes short, even af ter a batte r y
is recharged, please replace t he batter y.
With normal usag e, your battery should last about one y ear.
Please contact y our place of pur chase or the Uniden P ar ts
Department for a r eplacement batte r y. (See page 5)
Note on Power Sources
RREECCYYCCLLIINNGG NNIICCKKEELL--CCAADDMMIIUUMM BBAATTTTEERRIIEESS
Nickel-cadmium cells are used in the batt er y
pack. Please take your used nickel-cadmium
battery pack s to a s tore t hat recycles nic kelcadmium batteries.
Page 41

ADDITIONAL INFORMATION [ 39 ]
Troubleshooting
If your phone is not per fo rming t o your expectations, please tr y these simple steps f ir st.
ADDITIONAL INFORMATION
SSyymmppttoomm SSuuggggeessttiioonn
The
ssttaattuuss
LED won´t light •Make sure the AC adapter is plugged int o the base unit
when the handset is placed and w all outlet.
in the base unit. • Make sure the handset is properly seated in the base unit.
• Make sur e the charging cont acts on t he handset and
base unit are clean.
The audio sounds weak • Press during a call to help eliminat e
and/or scratchy. background noise.
• Make su re that t he base unit antenna is in a ve r tical position.
• Move the handset and or base unit to a diffe rent location
away from met al objects or appliances and tr y again.
• Make su re t hat yo u ar e not t oo f ar fr om t he base.
Can´t make or receive calls. • Chec k both ends of t he base unit telephone line cord.
• Make sure the AC adapter is plugged int o the base unit
and wall outlet.
• Disconnect the AC adapt er for a f ew minutes,
then reconnect it.
• Reset the digit al security code (See page 36).
• Make sure is pressed.
TRU346 8/9/00 12:38 Page 39
Page 42

ADDITIONAL INFORMATION[ 40 ]
SSyymmppttoomm SSuuggggeessttiioonn
The ha ndset does n´t ri ng • The batt er y pack may be weak.
or receiv e a page. Charge the batter y on the base unit for more than 15 hour s.
• The handset may be too f ar away from the base unit.
• Place the base unit away from appliances or met al objects.
• Reset the digit al security code (See page 36).
The Caller ID does not display. • The handset w as picked up befo re the second ring.
• The call was placed t hr ough a switch board.
• Call your local telephone com pany to v erify your Caller ID
service is current.
Sever e noise inter fe rence. • Keep t he handset away from microwave ovens, compute rs,
remote control to ys, wireless microphones, alar m sy stems,
intercoms, room monit or s, fluorescent lights, and
electrical appliances.
• Move t o another location or tur n off the source
of interfe rence.
TRU346 8/9/00 12:38 Page 40
Page 43

ADDITIONAL INFORMATION [ 41 ]
ADDITIONAL INFORMATION
General Information
The TRU 346 complies with FCC P a r ts 15 and 68.
Operating Temperature: -10 ºC to +50 ºC (+14ºF to + 1 22 º F)
AACC AAddaapptteerr IInnffoorrmmaattiioonn
AC Adapter part number: AD-311
Input Volt ag e: 120V AC 60 Hz
Output Voltag e: 9V DC 210 mA
BBaatttteerryy IInnffoorrmmaattiioonn
Batter y part number: BT-905
Capacity: 600 mAH, 3.6V
Batte r y Use T ime (per c har ge)
From fully charged:
Talk Mode dur ation 6 hours
Standby Mode dur ation 10 days
If t he handset is lef t of f of the base, the actual Talk mode duration will be reduced respectiv e to
the amount of time the handset is off the base.
Recharge your phone on a regular basis about once a w eek by placing the handset on t he base for 15
hours. When the operating time becomes short, e ven after t he batte r y is recharged, please replace t he
batter y. With nor mal usage, t he batte r y should las t about one yea r.
Replacement batteries may be purchased at your local Uniden dealer or b y contacting t he Uniden P a r ts
Depar tment (800) 554-3988. Hours are from 7:00 a.m. t o 5:00 p.m. Central Time, Monday through Fr iday.
We can also be reached on the web at www.uniden.com
Specif ications, features, and a vailability of optional accessories are all subject to change without prior notice.
TRU346 8/9/00 12:38 Page 41
Page 44

ADDITIONAL INFORMATION[ 42 ]
Index
A
Adjusting ringer and earpiece volume ............11
B
Battery pac k
Preparing and char ging ............................ 9
Replacement and handling ...................... 38
Beltclip ins tallation .................................. 37
C
Caller ID
Caller ID service ...................................... 26
Call Waiting.......................................... 34
Deleting .............................................. 30
Setting Caller ID options ........................ 26
Using.................................................. 32
Viewing .............................................. 29
Connection .............................................. 7
D
Dialing mode ............................................ 8
Digital security code .............................. 4,36
E, F, G
Earpiece volume ...................................... 11
H, I, J, K, L
Headset installation ................................ 37
M, N, O
Maintenance .......................................... 38
Making a call .......................................... 12
Memory dialing
Making calls with memor y dialing .............. 19
Erasing a s to red name
and phone number ................................ 24
Storing phone
numbers and names .............................. 17
P, Q
Package cont ents ...................................... 5
Paging .................................................. 25
R
Receiving a call ...................................... 14
Redialing a call ...................................... 15
Ringer tone and volume ............................ 11
S
Setting up the Base unit ............................ 6
Setting up the Handset .............................. 9
T, U, V, W, X, Y, Z
Troubleshooting ...................................... 39
TRU346 8/9/00 12:38 Page 42
Page 45

[ 43 ]
AAtt UUnniiddeenn,, wwee´´llll ttaakkee ccaarree ooff yyoouu!!
If y ou need any assis tance wit h this product, please call our Customer Hotline at
11--880000--229977--11002233
PPLLEEAASSEE DDOO NNOOTT RREETTUURRNN TTHHIISS PPRROODDUUCCTT TTOO TTHHEE PPLLAACCEE OOFF PPUURRCCHHAASSEE..
Our Uniden represent atives will be happ y to help you with any matte rs r egar ding
the operation of this unit, a vail able accessories, or any other related matter s.
Thank you for p urchasing a Uniden pr oduct.
Hours: M-F 7:00 AM to 7:00 PM CST.
TRU346 8/9/00 12:38 Page 43
Page 46

[ 44 ]
Memo
TRU346 8/9/00 12:38 Page 44
Page 47

[ 45 ]
Memo
TRU346 8/9/00 12:38 Page 45
Page 48

THANK YOU FOR PURCHASING A UNIDEN CORDLESS PHONE
Covered under one or more of the following U.S. patents:
4,511,761 4,523,058 4,595,795 4,797,916 5,381,460 5,426,690
5,434,905 5,491,745 5,533,010 5,574,727 5,650,790 5,660,269
5,661,780 5,663,981 5,671,248 5,717,312 5,754,407 5,768,345
5,787,356 5,838,721 5,864,619 5,893,034 5,912,968 5,915,227
5,929,598 5,930,720 5,960,358 5,987,330
© 2000 Uniden America Corporation, Fort Worth, TX
All rights reserved.
Printed in China
UCZZ01716BZ
2.4GHz Owners Manual TRU346 8/9/00 12:42 Page 1
 Loading...