


SSE P1
Emergency Alert Pendant
For more exciting new products please visit our website:
Australia: www.uniden.com.au
New Zealand: www.uniden.co.nz
1

IMPORTANT SAFETY INSTRUCTIONS
The SSE P1 Pendant is an accessory product that must be registered to a
compatible telephone model before use. Please read this Owner’s Manual in full
for details on the installation and operation of the SSE P1.
Basic safety precautions should always be followed to reduce the risk of fire,
electric shock and injury to persons.
Some other things to help you make the most of your SSE P1 Pendant.
• This unit is splashproof NOT waterproof. Do not immerse the unit in water.
• The charger is not designed to be splash resistant. Do not place the pendant
on the charger if the pendant is wet.
• If the pendant gets wet, wipe it with a soft dry cloth.
• Avoid using a telephone (other than a cordless type) during an electrical
storm. There may be a remote risk of electric shock from lightning.
• Use the AC adaptor indicated in this manual.
• Do not expose the pendant to excessive heat, smoke, dust, chemicals and
vibrations.
SAVE THESE INSTRUCTIONS!
Important Notice:
• Under power failure conditions this appliance may not operate. Please ensure
that a separate telephone, not dependent on local power, is available for
emergency use.
SSE P1 Pendant will not function properly in the following circumstances:
• If it is not registered properly with the compatible phone.
• If the battery is low.
• If the emergency (SOS) numbers have not been stored in the phone, then it
will make only intercom calls.
• If the registered phone is not connected to power and telephone line.
General Notices for New Zealand Model:
• The grant of a NZ Telepermit for any item of terminal equipment indicates
only that Telecom has accepted that the item complies with minimum
conditions for connection to its network. It indicates no endorsement of the
product by Telecom, nor does it provide any sort of warranty. Above all, it
provides no assurance that any item will work correctly in all respects with
another item of Telepermitted equipment of a different make or model, nor
does it imply that any product is compatible with all of Telecom’s network
services.
• This equipment may not provide for the effective hand-over of a call to
another device connected to the same line.
2

WHAT’S IN THE BOX?
Belt Clip
AC Adaptor
Plastic Pin
SSE P1 Pendant with Charging
Wrist Band
Owner’s Manual
Cradle
• If any items are missing or damaged, contact your place of purchase
immediately. Never use damaged products!
• Need help? Get answers at our website:
www.uniden.com.au for Australian model
www.uniden.co.nz for New Zealand model.
3

CONTENTS
GETTING TO KNOW YOUR PENDANT ............................................................... 5
GET T ING STARTED ............................................................................................. 6
Charging Your Pendant ........................................................................................................................... 6
Attach the Belt Clip ................................................................................................................................... 7
Use the Wrist band .................................................................................................................................... 7
REGISTERING TO A BASE .................................................................................. 8
Compatible Bases ..................................................................................................................................... 8
Registration Methods ...............................................................................................................................9
To SSE 37 Base ............................................................................................................................................ 9
To SSE 35 Base ............................................................................................................................................ 9
ADDING THE EMERGENCY NUMBERS ............................................................ 11
Editing the SOS Entries in the Phonebook ....................................................................................... 11
RECORDING THE OUTGOING MESSAGE ......................................................... 12
For SSE 37 ................................................................................................................................................... 12
For SSE 35 ................................................................................................................................................... 13
OPERATION .......................................................................................................14
Make an Emergency Call ....................................................................................................................... 14
IMP OR TANT I N FOR M ATION ............................................................................ 15
GENERAL INFORMATION ................................................................................17
AC Adaptor ................................................................................................................................................ 17
Battery Information ................................................................................................................................. 17
ONEYEAR LIMITED WARRANTY ..................................................................... 18
4
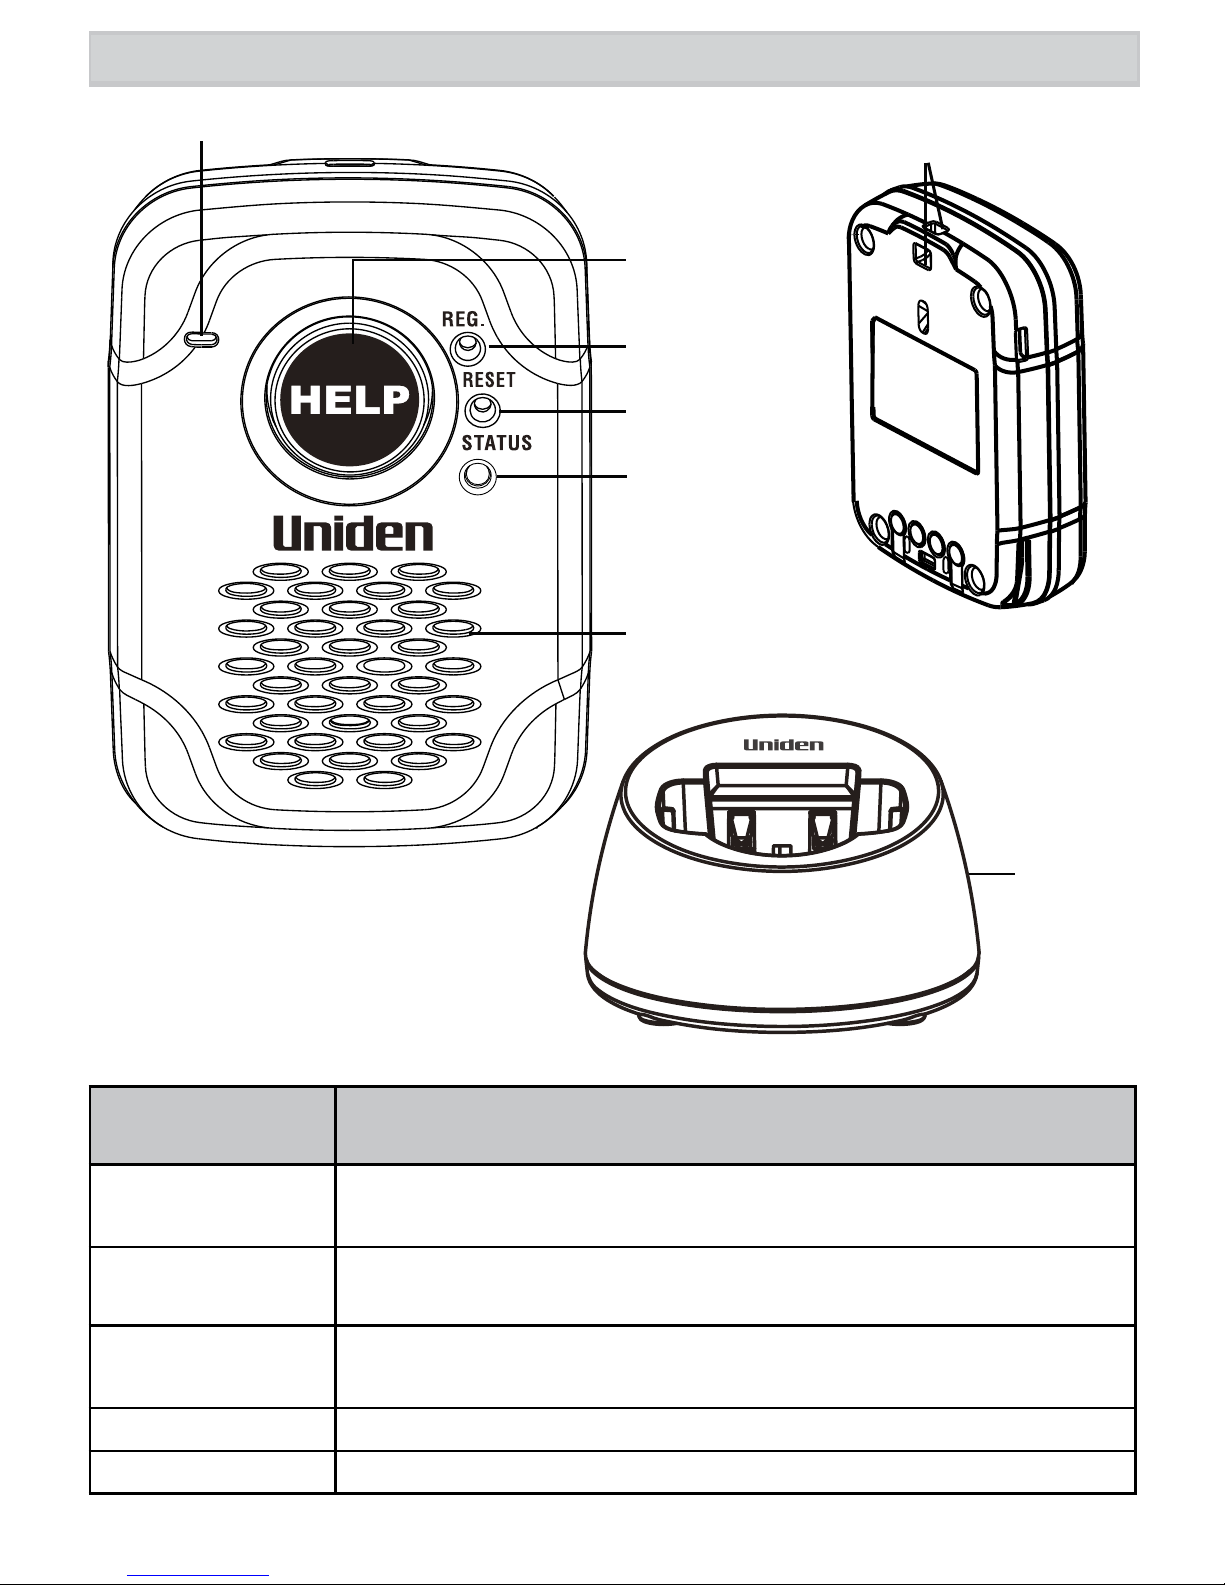
GETTING TO KNOW YOUR PENDANT
Microphone
Strap Holder
HELP
REG
RESET
LED
Speaker
Charging
cradle
Buttons and
What it does
Indicators
REG
Use to register the Pendant with a compatible phone.
(Registration)
RESET Use to reset the Pendant if registration fails. Pendant
powers off after reset.
STATUS (LED) Indicates the Pendant’s status when the Pendant is in use.
(See Status LED Indication table on page 6.)
SPEAKER Listen to the other person through the speaker
MICROPHONE Talk to the other person through the microphone.
5
GETTING STARTED
Before using the SSE P1 Pendant, it must first be charged, then registered to a
compatible base. Finally, to get the most out of the SSE P1 Pendant’s features,
it is strongly recommended that emergency contact numbers are stored in the
phonebook of the compatible base.
# Throughout the remainder of this manual the SSE P1 Pendant will be
referred to as the Pendant.
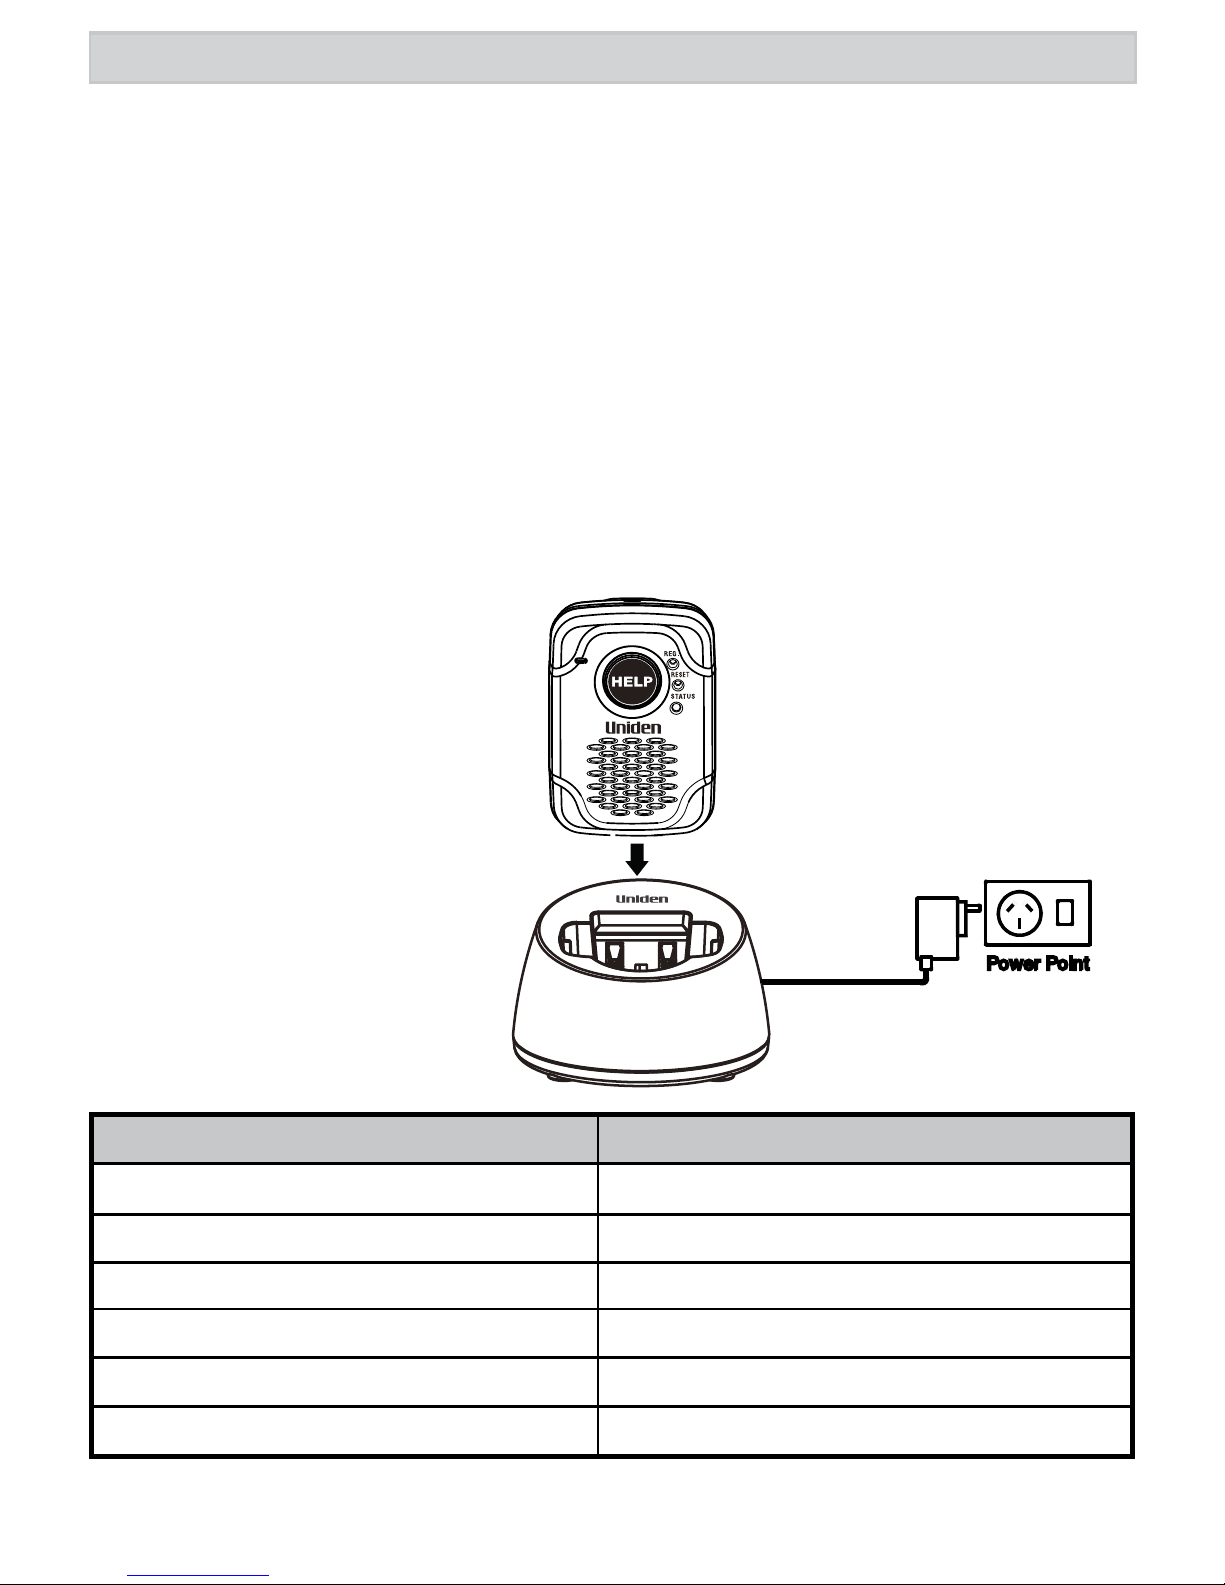
Charging Your Pendant
The battery for the Pendant is pre-installed.
1. Connect the AC adaptor to the charger’s DC IN 5.4V jack.
2. Plug the other end of the adaptor into a standard 240V AC power outlet.
3. Place the Pendant on the cradle with the HELP button facing forward while
charging.
# Charge the Pendant
completely (about 3 hours)
before using.
# Do not charge the
Pendant when the ambient
temperature is below 0°
C (32°F) or above 40°C
(104°F).
Status LED Indication What it means
Blue Charged
Red Charging
Blinking Red Battery is low
Blinking Blue Successfully registered
Blinking Blue rapidly During a call
Blink Blue and Red During the registration process
# The LED lights only when the Pendant is being used. The Pendant
automatically powers off after 2 minutes of inactivity.
6

Attach the Belt Clip
To attach a belt clip:
1. Line the belt clip with the grooves at
the side of the Pendant.
2. Then gently push until it snaps into
place.
To remove the belt clip:
Gently pull out the belt clip from one
groove and the other end will loosen on
its own.
Use the Wrist band
To attach a wrist band:
# The wrist band is attached to the Pendant with the help of the belt clip.
1. Insert one end of the wrist band into one of the slots on the belt clip and then
pull it out through the other end.
2. Next, attach the belt clip to the Pendant and then wrap the strap around your
wrist and keep it place with the help of the velcro fastener.
7

REGISTERING TO A BASE
# The Pendant will not work until you register it to a compatible base.
Compatible Bases
The Pendant is designed for use with Uniden’s;
• SSE 35 Base
• SSE 37 Base
SSE 37
SSE 35
8

Registration Methods
To SSE 37 Base
1. On the SSE 37 base,
press MENU to op en
the menu and select
the option, Register
Accy. Press OK.
To SSE 35 Base
1. On the SSE 35 base, press and hold the FIND HS button.
9

2. On the Pendant
# Make sure the Pendant is fully charged before registering to the base.
a) With the Pendant on the charger, use the plastic pin provided to press and
hold REG until the Status LED starts to blink blue and red.
OR
b) Take the Pendant off the charger and press HELP for 2-3 seconds
until you hear a beep sound. Then use the plastic pin provided to press and
hold REG until the Status LED starts to blink blue and red.
When the Pendant has been registered, a confirmation tone will sound.
Please Note:
# If the registration fails, press the
RESET switch with a pin and try
again.
PIN
# Use the plastic pin (provided with
the Pendant) or a blunt-tipped object
like an uncurled paper clip to press
the REG button. Do not press the
REG button too hard using the PIN
(or paperclip) as it may damage the
button.
Test your Pendant
# The Pendant
is usually powered off. To turn it on, press and hold HELP for
more than 2 seconds.
1. Pick up the Pendant and press and hold
HELP
until you hear a confirmation
tone.
2. The Pendant will make an intercom call to all handsets (SSE35) or handsets
& base (SSE37).
3. Answer the intercom call on a handset or base.
# Take this opportunity to test the range of the Pendant. Always use the
Pendant within range of the base!
To end the call, press
HELP
cradle.
10
for 2 seconds or place the Pendant back in the

ADDING THE EMERGENCY NUMBERS
The Pendant can dial 5 emergency contact numbers that are stored in the
phonebook of the compatible base.
The emergency contact entries in the phonebook must be saved as these
names; SOS1, SOS2, SOS3, SOS4, SOS5.
For your convenience the SSE35 and SSE37 come with these name entries
pre-loaded into the phonebook. These entries have no (emergency) numbers
stored. You need to edit these entries to add your emergency contact numbers.
Store the numbers with the area code and in the order in which you want.
# It is important to inform the people whose contact numbers are entered
in the SOS contact list. Do not forget to mention that if they receive an
emergency call from the Pendant they have to press # on their phone in
order to talk to the Pendant.
Editing the SOS Entries in the Phonebook
After registering the Pendant to either the SSE 35 or the SSE 37 base, store
the emergency (SOS) numbers in the phonebook, by following the steps given
below.
On the SSE35 Handset or SSE37 Base/Handset:
1. Press MENU. Select Phonebook and press OK. Phonebook Total: displays.
2. Press MENU. Select View and press OK. The phonebook entries display.
3. Select SOS1 entry and press OK. SOS1 entry displays.
4. Press MENU. Select Edit and press OK. Edit Name SOS1 displays.
5. Do not change the name. Press OK. Edit Number displays.
6. Enter the desired phone number and press OK.
7. The next settings are not required for emergency dial. Press OK to continue and
save. Saving and Done! displays.
Repeat for SOS2, SOS3, SOS4 and SOS5 entries.
Creating New SOS Entries in the Phonebook
If no SOS entries are pre-stored in the phonebook then follow the steps above but
select Create New at step 2 and name the entry SOS1 and continue the steps to edit
the number and save the entry.
# If you enter less than 5 SOS numbers, for example, you add just one SOS
number, the Pendant will call that one number 5 times. Or if you add 2
numbers, it will alternate between those two numbers till it completes 5
calls.
11

RECORDING THE OUTGOING MESSAGE
You can record a personal emergency message, in addition to the preset
recorded message, when the Pendant is registered to the SSE 35 and SSE 37
series. This will enable your family/friends to be able to identify your voice and
attend the call and it will also assure them that it is not a prank call.
# Your message can be up to 30 seconds long.
If you do not record a personal message, then the default message, “This is an
emergency call, to accept press the hash key on your telephone now” will play
when the Pendant dials out the emergency number.
For SSE 37
To record a message on the SSE 37 base, when the Pendant is registered to the
base, follow the steps given below.
1. Press and hold ON/OFF+DELETE keys on the base for 5 seconds.
2. The LCD displays, “To Start, press OK”. Press OK.
- You will hear a prompt asking you to record your message.
3. Speak your message loud and clearly towards the front of the base, and
then to stop recording, press PL AY/STOP. It’s recommended that you add the
instructions, “to answer this call, press the hash key on your telephone” to
your personal message.
- The Base will automatically playback the recorded message after recording.
The base then returns to the standby mode.
Playback the Recorded Message
1. Press and hold ON/OFF+REPEAT keys on the base for 5 seconds. The
LCD will display “playback” and the base starts to play the recorded
emergency message.
2. Press PLAY/STO P to stop playing the recorded emergency message.
If the emergency message has not been recorded, nothing will play.
If you want to delete the message, press DELETE when the message is
playing.
12

For SSE 35
To record a message on the SSE35 base, when the Pendant is registered to the
base, follow the steps given below.
1. Press and hold ON/OFF+DELETE keys on the base for 5 seconds.
2. The base plays the following instruction, “Record your Message”.
- After playing the confirmation tone, the Base starts recording the
emergency message.
3. Speak your message loud and clearly towards the front of the base, and
then to stop recording, press PL AY/STOP. It’s recommended that you add the
instructions, “to answer this call, press the hash key on your telephone” to
your personal message.
- The Base will automatically playback the recorded message after recording.
The base then returns to the standby mode.
Playback the Recorded Message
1. Press and hold ON/OFF+REPEAT keys on the base for 5 seconds. The base
starts to play the recorded emergency message.
2. Press PLAY/STO P to stop playing the recorded emergency message.
If the emergency message has not been recorded, nothing will play.
If you want to delete the message, press DELETE when the message is
playing.
13

OPERATION
Make an Emergency Call
1. Press and hold HELP for 2 seconds, until you hear a beep sound.
And after that?
2. The Pendant will first make an intercom call to all
handsets registered to the main base.
a) If the intercom call is answered then the Pendant’s
microphone is activated and you can talk through
the Pendant to the other handset.
b) If the other handsets are on an outside call or
intercom call, then the Pendant will interrupt and
join in with the outside or intercom call.
3. If there is no answer after 60 seconds, then it will
dial out the first emergency number (stored in the
SOS1 entry).
a) As soon as the first emergency number is dialled, the pre-set emergency
message will play, “This is an emergency call, to accept press the hash key
on your telephone now.”
This message will be heard on the Pendant’s speaker and the outside line,
and is repeated every 3 seconds. If a personal emergency message has been
recorded, it will play that message first and then the pre-set message.
b) If the first emergency number is not answered after 60 seconds, then the next
emergency number is dialled. This is repeated, if necessary, until 5 numbers
have been dialled.
4. When the outside line answers the call and presses the # key, then the
Pendant’s microphone is activated and you can talk through the Pendant.
To end a call:
• Press and hold HELP for 2 seconds, or until you hear a beep tone, to
disconnect an emergency call.
or
• Place the Pendant in the cradle to end the call.
# Ideally, place the Pendant back in the cradle so that the battery charges and
the Pendant is ready for the next emergency call.
14

IMPORTANT INFORMATION
• Test the Pendant’s HELP function regularly to ensure that it is working
properly.
• Always place the Pendant back in the cradle to ensure that the battery
is charged and the Pendant is ready for the next emergency call.
• The Pendant is meant to be used by your personal emergency contacts
- family, friends, neighbours. Do not use the Pendant to dial the police
or other emergency numbers. The emergency response systems might
not be technically equipped to respond to the Pendant .
• The Pendant will always call the intercom first before dialling out the
programmed emergency numbers.
• With the Pendant, you can reach out to 5 people. Ideally, try to add a
contact number for the 5 available SOS numbers.
15

• You have to ensure that the emergency numbers have been
programmed, otherwise the Pendant will not dial out anything.
• Store the phone numbers with the area code and in the order in which
you want.
• The emergency feature will stop automatically when all the 5 SOS
numbers have been dialled, or until the call has been answered and the
receiver has pressed the # key.
• It is important to inform the people whose names are enterted in the
SOS contact list. Do not forget to mention that they have to press the
# key when they answer the emergency call, in order to activate the
microphone on the Pendant .
• To cancel the emergency call either press and hold HELP for 2 seconds
or until you hear a beep sound, or place the Pendant back in the cradle.
16

GENERAL INFORMATION
AC Adaptor
Parts Number Input Voltage Output Voltage
PS-S0540NL2 100-240V~, 50-60Hz 150mA 5.4V 400mA
• Use only the supplied AC adaptor.
• Do not place the unit in direct sunlight or subject it to high temperatures.
Battery Information
Type Capacity Talk time Standby Time
Lithium-ion 230mAh, 3.7VDC about 5 hours about 30 days
• Please contact your place of purchase if the battery fails.
17

ONEYEAR LIMITED WARRANTY
SSE P1 Pendant
IMPORTANT Satisfactory evidence of the original purchase is required for
warranty service
Please refer to our Uniden website for any details or warranty durations offered in
addition to those contained below.
Warrantor
The warrantor is either Uniden Australia Pty Limited ABN 58 001 865 498 (“Uniden
Aust”) or Uniden New Zealand Limited (“Uniden NZ”) as the case may be.
Terms of Warranty
Uniden Aust/NZ warrants to the original retail purchaser only that the XDECT
SSE P1 (“the Product”), will be free from defects in materials and craftsmanship
for the duration of the warranty period, subject to the limitations and exclusions
set out below.
Warranty Period
This warranty to the original retail purchaser is only valid in the original country of
purchase for a Product first purchased either in Australia or New Zealand and will
expire one (1) year from the date of the original retail sale.
If a warranty claim is made, this warranty will not apply if the Product is found by
Uniden to be:
(A) Damaged or not maintained in a reasonable manner or as recommended in
the relevant Uniden Owner’s Manual;
(B) Modified, altered or used as part of any conversion kits, subassemblies or any
configurations not sold by Uniden Aust or Uniden NZ;
(C) Improperly installed contrary to instructions contained in the relevant Owner’s
Manual
(D) Repaired by someone other than an authorized Uniden Repair Agent in relation
to a defect or malfunction covered by this warranty; or
(E) Used in conjunction with any equipment, parts or a system not manufactured
by Uniden.
Parts Covered
This warranty covers the Product and included accessories.
18

User-generated Data
This warranty does not cover any claimed loss of or damage to user-generated
data (including but without limitation phone numbers, addresses and images) that
may be stored on your Product.
Statement of Remedy
If the Product is found not to conform to this warranty as stated above, the
Warrantor, at its discretion, will either repair the defect or replace the Product
without any charge for parts or service. This warranty does not include any
reimbursement or payment of any consequential damages claimed to arise from
a Product’s failure to comply with the warranty.
Our goods come with guarantees that cannot be excluded under the Australian
Consumer Law. You are entitled to a replacement or refund for a major failure
and for compensation for any other reasonably foreseeable loss or damage. You
are also entitled to have the goods repaired or replaced if the goods fail to be of
acceptable quality and the failure does not amount to a major failure.
This warranty is in addition to and sits alongside your rights under either the
COMPETITION AND CONSUMER ACT 2010 (Australia) or the CONSUMER
GUARANTEES ACT (New Zealand) as the case may be, none of which can be
excluded.
Procedure for Obtaining Warranty Service
Depending on the country in which the Product was first purchased, if you believe
that your Product does not conform with this warranty, you should deliver the
Product, together with satisfactory evidence of your original purchase (such as a
legible copy of the sales docket) to Uniden at the addresses shown below. You
should contact Uniden regarding any compensation that may be payable for your
expenses incurred in making a warranty claim. Prior to delivery, we recommend
that you make a backup copy of any phone numbers, images or other data stored
on your Product, in case it is lost or damaged during warranty service.
UNIDEN AUSTRALIA PTY LTD
Service Division
345 Princes Highway,
Rockdale, NSW 2216
Phone number: 1300 366 895
Email address: custservice@uniden.com.au
UNIDEN NEW ZEALAND LTD
Service Division
150 Harris Road, East Tamaki
Auckland 2013
Phone number: (09) 273 8377
Email address: service@uniden.co.nz
19

©2012 Uniden Australia Pty Ltd/Uniden New Zealand Limited
Printed in Vietnam U01UU283ZZZ(0)
20
 Loading...