


SSE34
Series
For more exciting new products please visit our website:
Australia: www.uniden.com.au

IMPORTANT SAFETY INSTRUCTIONS
When using your telephone equipment, basic safety precautions should
always be followed to reduce the risk of fire, electric shock and injury to
persons, including the following:
• This unit is NOT waterproof. DO NOT expose this unit to moisture.
• DO NOT expose this unit to rain.
• Do not use this product near water, for example, near a bath tub, wash
bowl, kitchen sink or laundry tub, in a wet basement or near a swimming
pool.
• Avoid using a telephone (other than a cordless type) during an electrical
storm. There may be a remote risk of electric shock from lightning.
• Do not use the telephone to report a gas leak in the vicinity of the leak.
• Avoid sources of noise and heat, such as motors, fluorescent lighting,
microwave oven, heating appliances, and direct sunlight.
• Avoid areas of excessive dust,moisture, and low temperatures.
• Never install telephone jacks in wet locations unless the jack is
specifically designed for wet locations.
• Never touch non-insulated telephone wires or terminals, unless the
telephone line has been disconnected at the network interface.
• Use caution when installing or modifying telephone lines.
SAVE THESE INSTRUCTIONS!
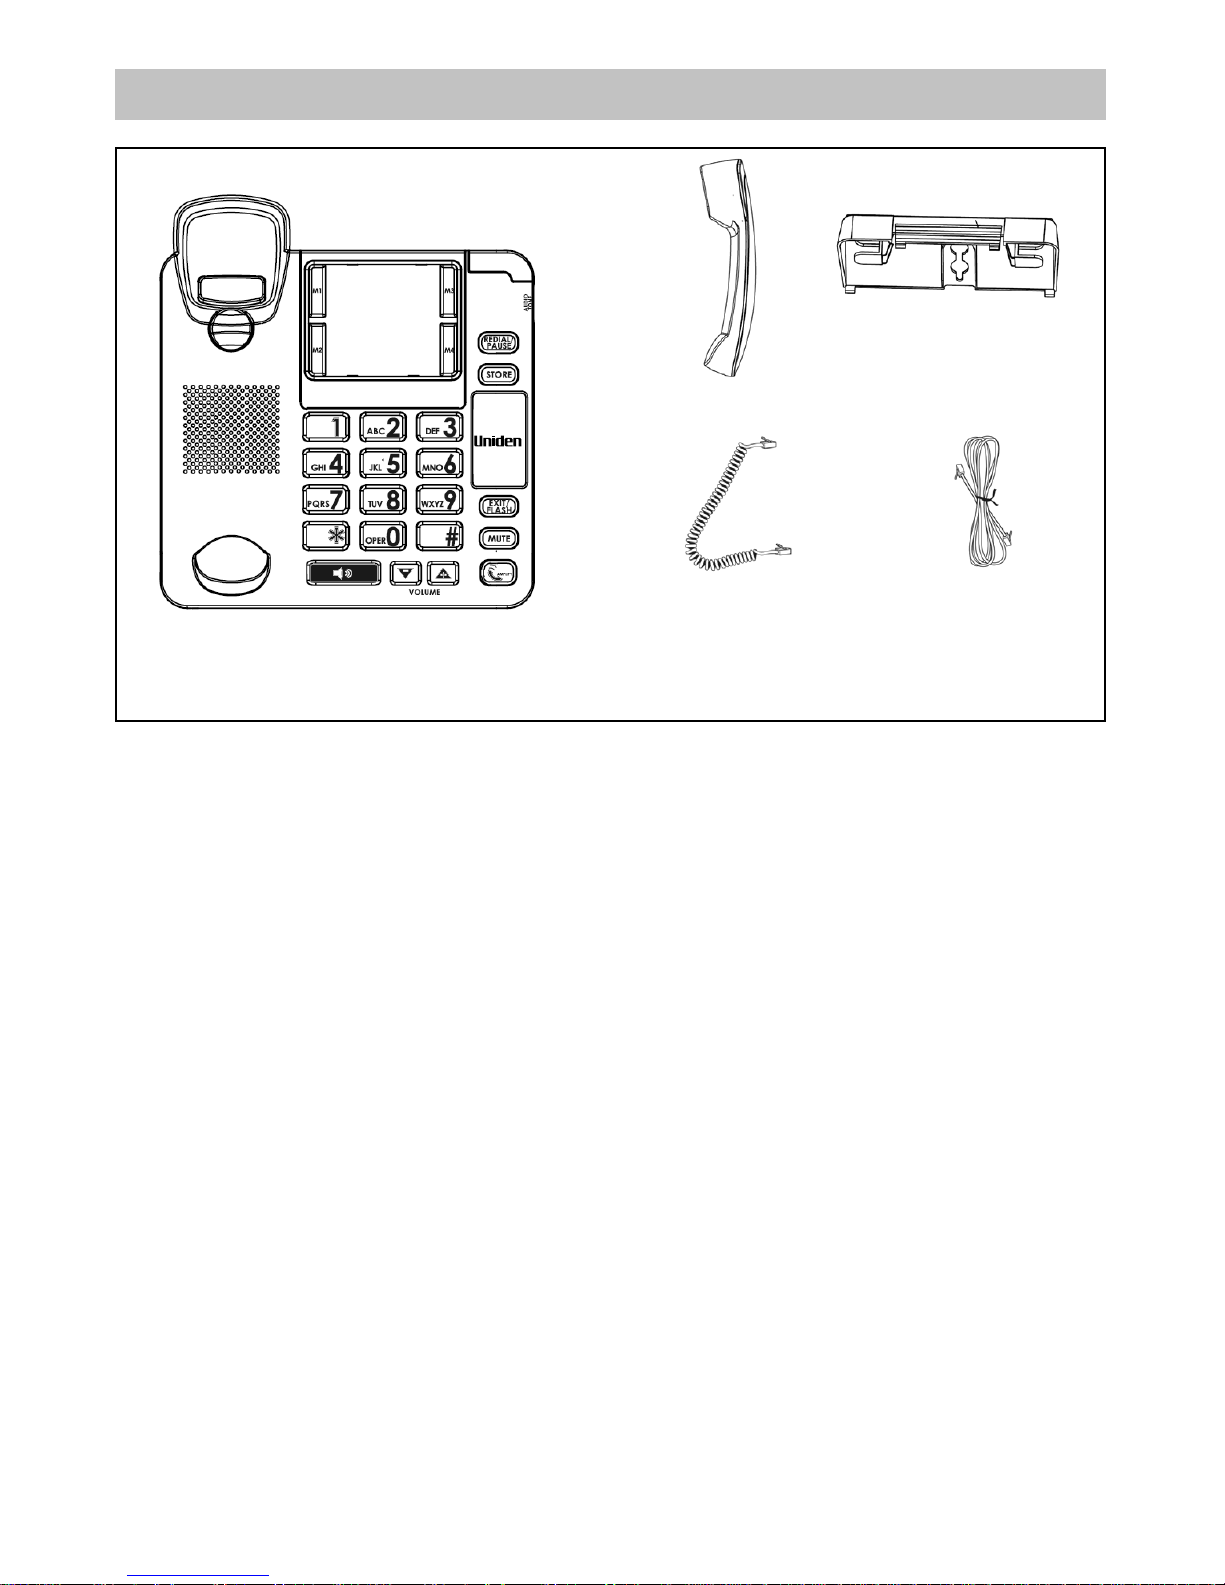
WHAT’S IN THE BOX?
Handset Cord
Telephone
Line Cord
SSE34 base
• If any item is missing or damaged, contact your place of purchase
immediately. Never use damaged products!
• Need help? Get answers at our website:
www.uniden.com.au for Australian model
Desk Stand
(might be
attached to base)
Handset

CONTENTS
INSTALLING YOUR PHONE ............................................................................. 5
Connect the Telephone ......................................................................................................... 5
Wall Mounting ............................................................................................................................ 6
BASE L AYOUT ................................................................................................... 7
Front View ..................................................................................................................................7
Back View ................................................................................................................................... 8
Side View .................................................................................................................................... 8
BASI C FUNC TI ON S ........................................................................................... 9
Speakerphone ..........................................................................................................................9
Placing a Call ...............................................................................................................................9
Answering A Call ...................................................................................................................... 10
Volume ...................................................................................................................................... 10
Amplified Audio ...................................................................................................................... 10
Audio Tone Control .................................................................................................................. 11
Mute ........................................................................................................................................... 11
Flash ........................................................................................................................................... 11
Redial ......................................................................................................................................... 11
Memory ..................................................................................................................................... 12
Adding a Pause to the Dialling Sequence ............................................................................. 12
Changing a Stored Number ................................................................................................... 12
Dialling a Number from Memory ........................................................................................... 12
TROUBLESHOOTING .....................................................................................13
ONE-YEAR LIMITED WARRANTY ..................................................................14
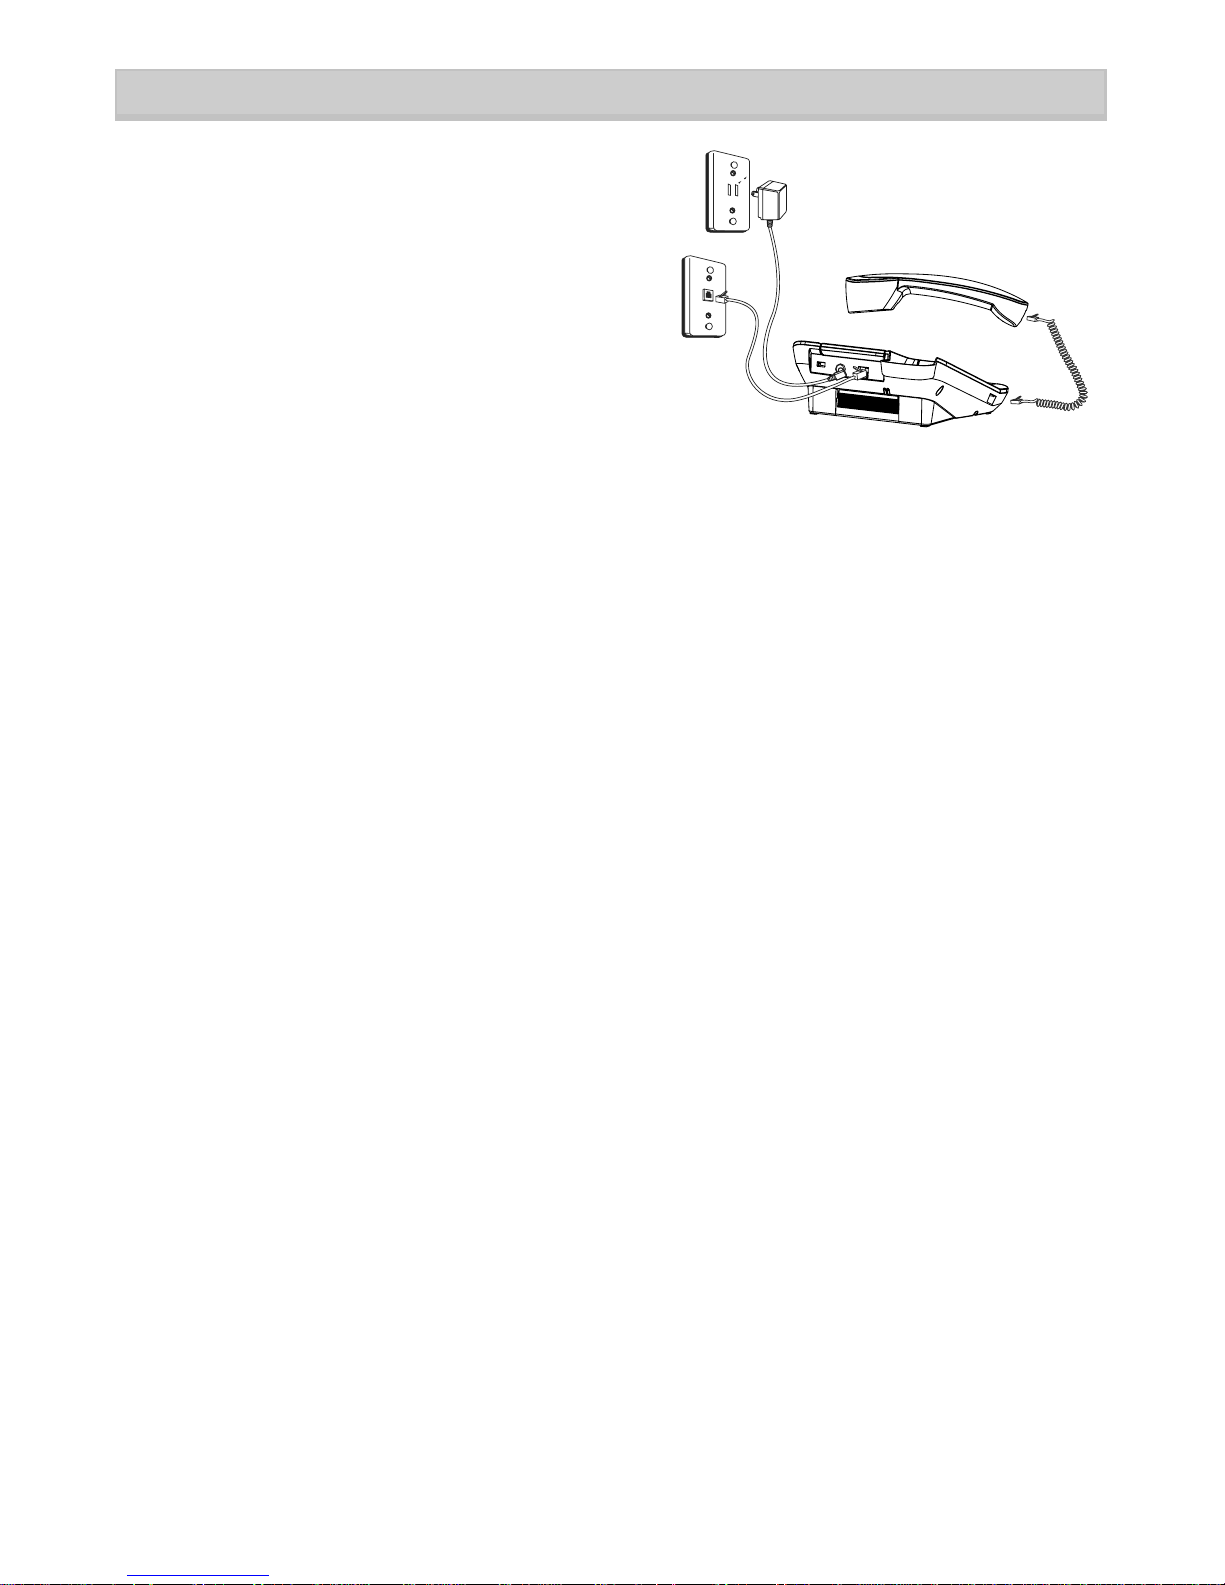
INSTALLING YOUR PHONE
Connecting the Telephone
1. Choose an area near a telephone wall
jack (RJ11C), and place your cordless
telephone on a level surface, such as a
desktop or tabletop, or you may mount it
on the wall.
2. Plug one end of the telephone line cord
into the Line jack at the back of the
base and the other end into a modular
jack.
3. If you have another device (example, an additional auxiliary phone or
data modem) need to be connected to the unit, please connect it to the
Data jack on the back of the unit.
4. Connect one end of the coiled handset cord to the jack on the handset.
5. Plug the other end of the coiled handset cord to the jack on the base.
6. Adjust the RINGER VOLUME switch to the desired setting: HIGH, LOW
or O FF.
The unit is properly installed if you pick up the handset and hear the dial
tone. If you don’t hear a dial tone, recheck all the installation steps.
# The unit is shipped from the factory for placement on a level surface.

Wall Mounting
1. Rotate the hook 180°.
2. Plug one end of the straight
telephone line cord into the jack
on the bottom of the base.
3. Feed the line cord through the
groove and plug the end into the
modular telephone jack. Excess
telephone line can be stuffed
into the recess area on the
bottom of the Base Unit.
4. Slip the mounting holes (on the
bottom of the base) over the
wall plate posts and firmly slide
the unit down into place.
To detach the desktop pedestal:

BASE LAYOUT
M1/M2
memory buttons
M3//M4
memory buttons
* button
SPEAKER button
VOLUME UP/DOWN
buttons
AUDIO TONE
CONTROL
REDIAL/PAUSE
button
STORE button
# button
EXIT/FLASH
button
MUTE button
AMPLIFY button
FRONT VIEW
Hook

BACK VIEW
SIDE VIEW
AMPLIFY Override
Switch
LINE Jack
RINGER VOL
(HIGH/LOW/OFF)
switch
RINGER PITCH
(HIGH/LOW)
switch

BASIC FUNCTIONS
Speakerphone
For hands-free operation and convenience, this unit is equipped with a
speakerphone.
For best speakerphone performance, avoid the following:
• Areas with high background noise. (The microphone might pick up these
sounds and prevent the speakerphone from going into the receiving mode
when you nish talking.)
• Surfaces affected by vibration.
• Recessed areas such as in a corner, under a cupboard, or next to a
cabinet,which can generate an echo effect.
Note the following guidelines when using the speakerphone:
• The speakerphone works similar to a two-way radio in that you can only
listen or talk at one time.
• Stay reasonably close to the phone so that you can be clearly heard by the
person to whom you are talking.
• You can adjust the speaker volume by adjusting the volume (or ) buttons
while speakerphone is in use.
• The speakerphone indicator comes on when the speakerphone is in use.
Placing a Call
Handset
1. Pick up the handset and listen for a dial tone.
2. Dial the number you want to call.
3. When nished, hang up the handset.
Speakerphone
1. Press the speaker button on the base and listen for a dial tone.
2. Dial the number you want to call.
3. When nished, press the speaker button to hang up.

Answering a Call
Handset
1. When the phone rings, pick up the handset.
2. When nished, hang up the handset.
Speakerphone
1. When the phone rings, press the speaker button to answer a call.
2. When nished, press the speaker button to hang up.
You may switch between the speakerphone and the handset during the dialing
process or anytime during a conversation.
Speakerphone to Handset -Pick up the handset to disable the speakerphone.
The speakerphone indicator turns off.
Handset to Speakerphone -Press the speaker button, and then hang up the
handset. The speakerphone indicator turns on and the handset is disabled.
# NOTE: Make sure the ringer switch is set to HI or LO, or the phone will not ring.
The visual ring indicator will flash at all settings
Volume
You can control the volume of both the handset receiver and the speakerphone.
While using the handset or speakerphone, you may adjust the volume to the
desired listening level by using the volume (or ) buttons. Handset volume has
4 levels for adjustment and Speaker volume has 8 levels.
Amplied Audio
You may press the amplify button to temporarily boost the volume of the handset
receiver during a call. To return to normal levels, press the button again. Volume
levels will also return to normal when handset is replaced on base after call.
The “AMPLIFY” button controls the increased volume level and audio tone of the
handset.
1. Press the volume (or ) button to minimum, pick up the handset and press
the amplify button to turn on the incoming voice amplier. The indicator around
the button illuminates.
2. Adjust the volume by pressing the volume (or ) button. When the amplify
button is pressed , an extra level of amplied volume is added providing up to
20dB of gain and level control. In standard use, the amplier turns off whenever
you hang up the telephone. If you want the amplier to turn on whenever you pick
up the handset , slide the Amplify Override switch located at the back of the unit
to ON.
# NOTE: AMPLIFY feature is working in Handset Mode only.
# WARNING: This Product is designed for users with hearing disabilities
and automatically amplifies the volume to the highest level when the
AMPLIFY Override switch is set to “ON”. If you wish to prevent the automatic
amplification, please turn the AMPLIFY Override switch located on the back of
the set to “OFF”.

Audio Tone Control
The phone’s Audio Tone Control boosts the sound of the frequency range from
600Hz to 3KHz to compensate for the ear’s limited sensitivity in the range.
1. To turn on the Audio Tone Control, press the “amplify” button after you pick up
the handset, or any time during the a call. The indicator around the button illuminates.
2. To adjust the setting, rotate the Audio Tone Control to select the specic fre-
quency range.
3. To turn off the Audio Tone Control press the “amplify” button and the indicator
light turns off.
Mute
Use the mute button to interrupt a phone conversation to talk privately with
someone else in the room. A conversation can be muted while using the speakerphone, handset or neck loop.
1. Press the mute button. The mute indicator illuminates.
2. Press mute again to turn it off.
# Note: Switching from speakerphone to handset cancels mute.
Flash
Press the flash button to activate customer calling services such as call waiting.
Redial
You may redial the last number you called by pressing the redial button after you
get a dial tone.
# NOTE: The Redial feature holds in memory the last phone number you dialed
(as many as 32 digits). If you pressed any numbers after dialing the phone
number, (for example, when accessing a voice-menu system) those numbers
also are redialed.

Memory
Store as many as 4 numbers in memory for easy dialing. They can be
stored the one-touch memory on the top of the Base unit. You can use the
space provided to either write the name of your contacts or stick pictures for
easy recognition.
Storing a Number in Memory
1. Pick up the handset or press SPEAKER.
2. Press the STORE button.
3. Dial the number to be stored (up to 16 digits).
4. Select and press any of the one-touch Memory Location buttons.
5. Hang up the phone or press the SPEAKER button.
Adding a Pause to the Dialing Sequence
Use the PAUSE button to insert a delay in the dialing sequence when
storing a number, for example, when you need to dial 9 to get an outside
line.
Pause function is enabled when the #pause button is pressed and held for
2 seconds.
Press and hold PAUSE button at the point in the dialing sequence in which
a pause is required.
The pause time is approximately four seconds, if additional time is needed,
press and hold the PAUSE button again.
Changing a Stored Number
Follow the same steps as “Storing a Number into Memory.” The new numbers will overwrite the existing numbers.
Dialing a Number from Memory
You can dial numbers from memory when using the handset or speakerphone. When you get a dial tone, press the one-touch memory button for the
number you want to dial.

TROUBLESHOOTING
Problems Possible Solutions
No Dial Tone • Check installation: Make sure the telephone line
cord is connected to the base unit and the wall
phone jack.
• Check the hook switch. Make sure it fully extends
when the handset is lifted from the cradle.
• You must have touch-tone service on your line to
use this phone. If you do not know what type of
service you have, check with the phone company.
• Make sure speakerphone indicator comes on (if
using speakerphone.)
• Unplug the phone, wait 30 seconds, and plug the
phone back in. Then lift the handset to check the
dial tone.
• Connect another phone to the same modular jack;
if the second phone doesn’t work, the problem
might be with your wiring or local service.
• Place the handset in the base for at least 20
seconds.
Phone doesn’t ring • Make sure ringer switch is set to LO or HI.
• You may have too many extension phones on your
line. Unplug some extension phones.
• Check for a dial tone. If there is no dial tone, see
solutions for“No dial tone.”
Low volume on
speaker/handset
Check the receiver or speaker volume settings.
Can’t be heard by
other party
• Make sure phone cord is securely plugged in.
• Make sure extension phones are on the hook at
the same time you’re using the phone. It is normal
for the volume to drop when additional extension
phones are used at the same time.
Memory Dialing • Make sure you entered numbers correctly. (See
“Memory” in page 12)
• Make sure the telephone is properly installed.
Pick up the handset and listen for the dial tone. If
you don’t hear the dial tone, recheck or repeat the
installation steps.

ONE-YEAR LIMITED WARRANTY
IMPORTANT Satisfactory evidence of the original purchase is
required for warranty service
Please refer to our Uniden website for any details or warranty durations
offered in addition to those contained below.
Warrantor
The warrantor is Uniden Australia Pty Limited ABN 58 001 865 498 (“Uniden
Aust”).
Terms of Warranty
Uniden Aust warrants to the original retail purchaser only that the SSE34
(“the Product”), will be free from defects in materials and craftsmanship for
the duration of the warranty period, subject to the limitations and exclusions
set out below.
Warranty Period
This warranty to the original retail purchaser is only valid in the original
country of purchase for a Product first purchased either in Australia or New
Zealand and will expire one (1) year from the date of the original retail sale.
If a warranty claim is made, this warranty will not apply if the Product is found
by Uniden to be:
(A)Damaged or not maintained in a reasonable manner or as recommended
in the relevant Uniden Owner’s Manual;
(B) Modified, altered or used as part of any conversion kits, subassemblies or
any configurations not sold by Uniden Aust;
(C)Improperly installed contrary to instructions contained in the relevant
Owner’s Manual
(D)Repaired by someone other than an authorized Uniden Repair Agent in
relation to a defect or malfunction covered by this warranty; or
(E)Used in conjunction with any equipment, parts or a system not
manufactured by Uniden.
Parts Covered
This warranty covers the Product and included accessories.
User-generated Data
This warranty does not cover any claimed loss of or damage to user-generated
data (including but without limitation phone numbers, addresses and images)
that may be stored on your Product.
SSE34

Statement of Remedy
If the Product is found not to conform to this warranty as stated above, the
Warrantor, at its discretion, will either repair the defect or replace the Product
without any charge for parts or service. This warranty does not include any
reimbursement or payment of any consequential damages claimed to arise
from a Product’s failure to comply with the warranty.
Our goods come with guarantees that cannot be excluded under the
Australian Consumer Law. You are entitled to a replacement or refund for a
major failure and for compensation for any other reasonably foreseeable loss
or damage. You are also entitled to have the goods repaired or replaced if
the goods fail to be of acceptable quality and the failure does not amount to
a major failure.
This warranty is in addition to and sits alongside your rights under either the
COMPETITION AND CONSUMER ACT 2010 (Australia) or the CONSUMER
GUARANTEES ACT (New Zealand) as the case may be, none of which can
be excluded.
Procedure for Obtaining Warranty Service
Depending on the country in which the Product was first purchased, if you
believe that your Product does not conform with this warranty, you should
deliver the Product, together with satisfactory evidence of your original
purchase (such as a legible copy of the sales docket) to Uniden. Please
refer to the Uniden website for address details. You should contact Uniden
regarding any compensation that may be payable for your expenses incurred
in making a warranty claim. Prior to delivery, we recommend that you make
a backup copy of any phone numbers, images or other data stored on your
Product, in case it is lost or damaged during warranty service.
UNIDEN AUSTRALIA PTY LTD
Phone number: 1300 366 895
Email address: custservice@uniden.com.au

©2016 Uniden Australia Pty Ltd
Printed in PRC
 Loading...