

1
SSE33
Series
For more exciting new products please visit our website:
Australia: www.uniden.com.au
New Zealand: www.uniden.co.nz

2
IMPORTANT SAFETY INSTRUCTIONS
When using your telephone equipment, basic safety precautions should always
be followed to reduce the risk of fire, electric shock and injury to persons,
including the following:
• This unit is NOT waterproof. DO NOT expose this unit to moisture.
• DO NOT expose this unit to rain.
• Do not use this product near water, for example, near a bath tub, wash bowl,
kitchen sink or laundry tub, in a wet basement or near a swimming pool.
• Avoid using a telephone (other than a cordless type) during an electrical
storm. There may be a remote risk of electric shock from lightning.
• Do not use the telephone to report a gas leak in the vicinity of the leak.
• Use only the power cord and batteries indicated in this manual. Do not
dispose of batteries in a fire. They may explode. Check with local codes for
possible special disposal instructions.
SAVE THESE INSTRUCTIONS!
General Notices for New Zealand Model:
• The grant of a NZ Telepermit for any item of terminal equipment indicates
only that Telecom has accepted that the item complies with minimum
conditions for connection to its network. It indicates no endorsement of the
product by Telecom, nor does it provide any sort of warranty. Above all, it
provides no assurance that any item will work correctly in all respects with
another item of Telepermitted equipment of a different make or model, nor
does it imply that any product is compatible with all of Telecom’s network
services.
• The maximum volume setting of this telephone exceeds the Telecom
specified volume requirement. Telecom takes no responsibility for the high
volume available on this telephone, who believe this telephone is too loud
should contact the manufacturer at the website indicated on owner’s manual
warranty page.
• For telephone networks other than Telecom there may be a charge incurred
for local calls if the Insert 0 feature is on. Turn Insert 0 off.
• This equipment may not provide for the effective hand-over of a call to
another device connected to the same line.
3
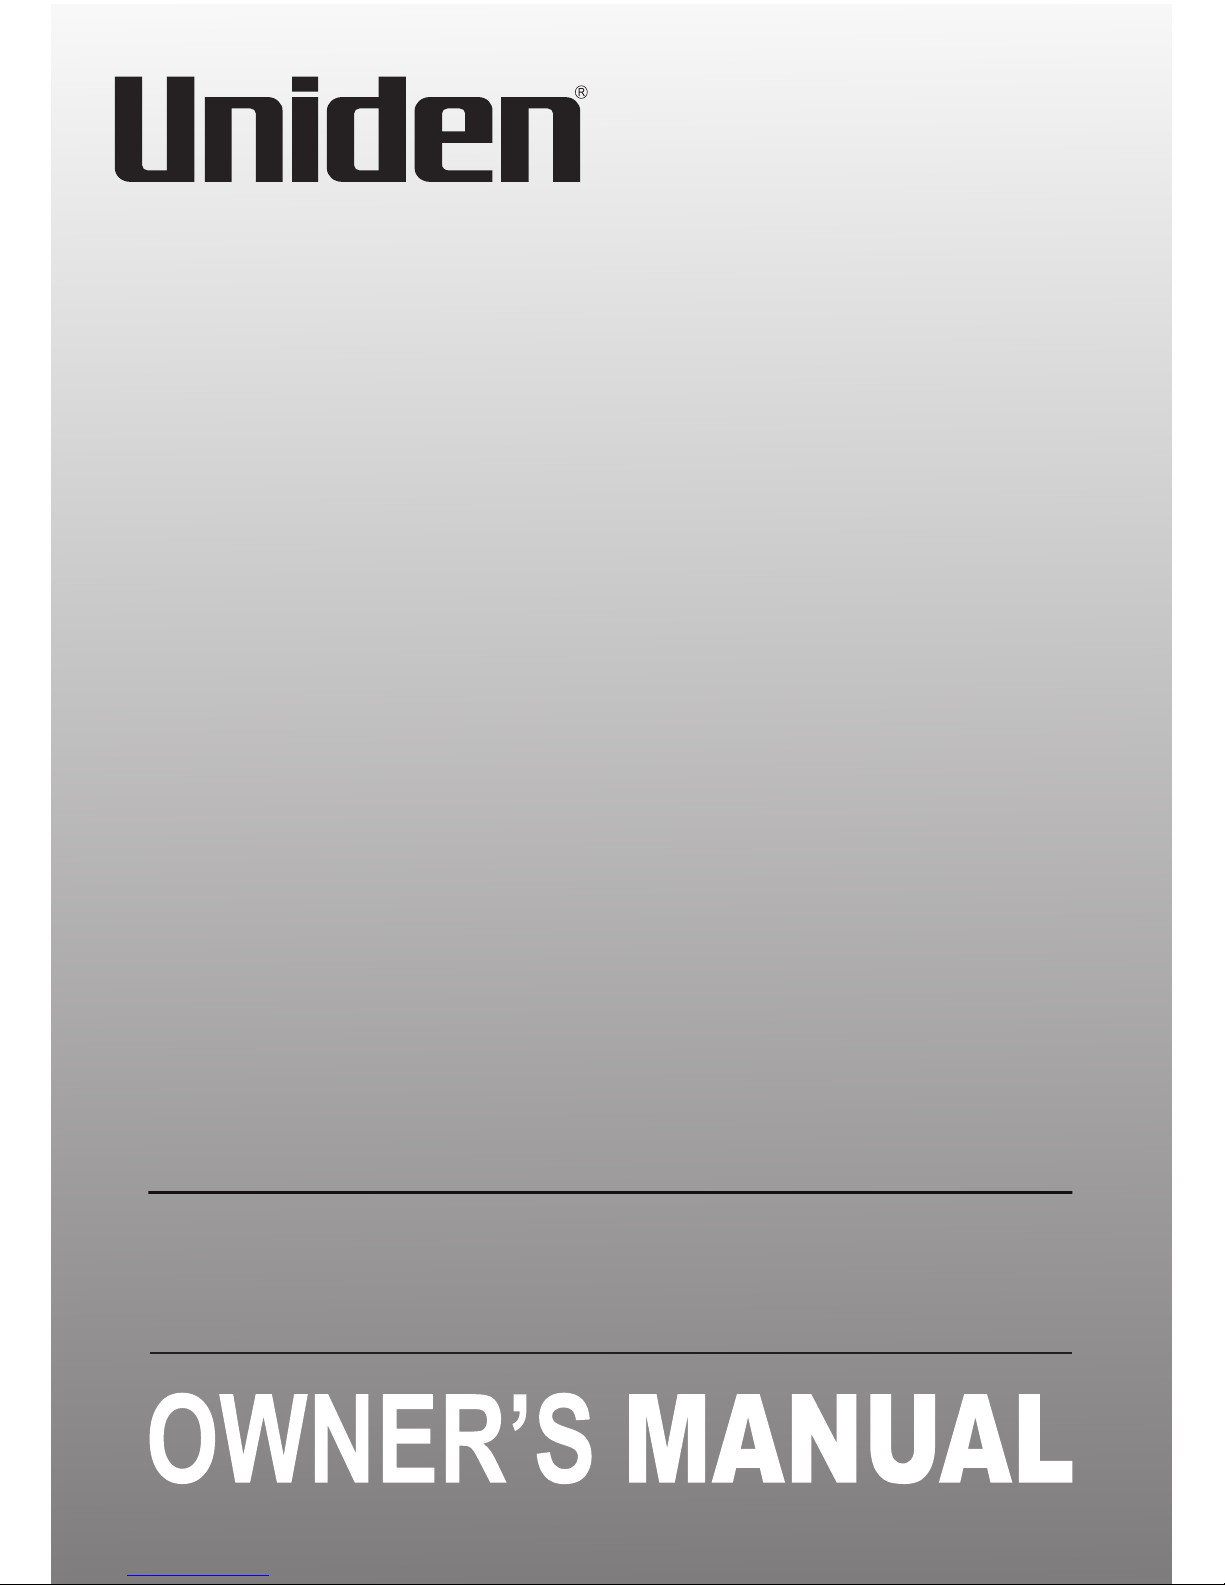
WHAT’S IN THE BOX?
Base AC Adaptor
Telephone Cord
SSE33 base with answering system
• If any item is missing or damaged, contact your place of purchase
immediately. Never use damaged products!
• Need help? Get answers at our website:
www.uniden.com.au for Australian model
www.uniden.co.nz for New Zealand model.
Emergency
Remote Dialler

4
CONTENTS
INSTALLING YOUR PHONE ................................................................................ 6
Connect the Corded Handset ................................................................................................................ 6
Connect the Power and Telephone Cords ......................................................................................... 6
GETTING TO KNOW YOUR PHONE ...................................................................8
BASIC FUNCTIONS ........................................................................................... 10
Make a Call ................................................................................................................................................. 10
Answer a Call ..............................................................................................................................................10
Pre-dial Function ...................................................................................................................................... 10
Last Number Redial ................................................................................................................................. 10
Pause ............................................................................................................................................................ 10
Flash Time ................................................................................................................................................... 10
SPECIAL FEATURES .......................................................................................... 12
CALLER ID MANAGEMENT ...............................................................................13
View the Caller ID List .............................................................................................................................13
Dial back from Caller ID list ....................................................................................................................13
Store a Caller ID number into Phonebook ........................................................................................13
Delete a Caller ID Number .....................................................................................................................13
PHONEBOOK MANAGEMENT ..........................................................................14
Dial back from Phonebook List .......................................................................................................... 14
Store a number into the Phonebook ................................................................................................. 14
Store a number on the HOT Dial Memory Buttons ...................................................................... 14
Store a number as SOS number .......................................................................................................... 15
Delete a Phonebook Entry ....................................................................................................................15
EMERGENCY REMOTE DIALLER ...................................................................... 16
Emergency Feature ................................................................................................................................. 16
MENU SETTINGS ..............................................................................................17
LCD Contrast Setting ............................................................................................................................. 17
Area Code Setting .................................................................................................................................... 17
Time and Date setting ........................................................................................................................... 17
Name Recording Setting ...................................................................................................................... 17
Record Message ........................................................................................................................................18
Check Message .........................................................................................................................................18
Set Flash Time .......................................................................................................................................... 18

5
Set Dial Mode ........................................................................................................................................... 18
Pair a New Pendant ..................................................................................................................................18
IMPORTANT INFORMATION ........................................................................... 20
ONEYEAR LIMITED WARRANTY ....................................................................21

6
INSTALLING YOUR PHONE
Connect the Corded Handset
Use the coiled cord to connect the corded handset to the connector on the left
side of the base.
1. Connect the base AC adaptor to the power jack and the telephone cord to the
TEL LINE jack.
2. Connect the AC Adaptor to the DC 9V/300 mA jack on the base. Plug the
other end to a standard 240 V AC outlet. For safety reasons, please only use
the adaptor which is supplied with the telephone.
# If there is a power failure, you can still make and receive phone calls using
the base corded handset. All other features of the base will not function.
Test the Connection
Pick up the corded handset from the base. You should hear a dial tone and the
display on the base should show 00-00. When you get a dial tone, make a quick
test call.
Test the Emergency Remote Dialler
Press and hold the red SOS button on the Emergency Remote Dialler for
3 seconds. The base will beep for 15 seconds. To cancel the call, press by
pressing and holding the button on the Remote Dialler for 3 seconds.
# When you install the SSE 33 corded phone, ensure that the base is within
the range of the Emergency Remote Dialler. The Emergency Remote Dialler
has a range of 40 meters, however, this is reduced by structural obstacles.
Connect the Power and Telephone Cords

7
Installing Batteries (OPTIONAL) in the base
1. Lift and remove the battery compartment cover.
2. Insert four AAA batteries (not supplied) into the compartment as indicated by
the polarity symbols.
3. Snap the battery compartment cover back into place.
# You can install 4 AAA Alkaline batteries in the base. The battery back up
system will then be able to power the unit for up to 12 hours if there is a
power failure. If the main power has been turned off for an extended period
or the power supply to the phone has been unplugged from main power
you should replace the batteries with 4 new high quality AAA Alkaline
batteries. Before opening the battery compartment, make sure the base is
disconnected from the telephone line and the mains power supply.
8
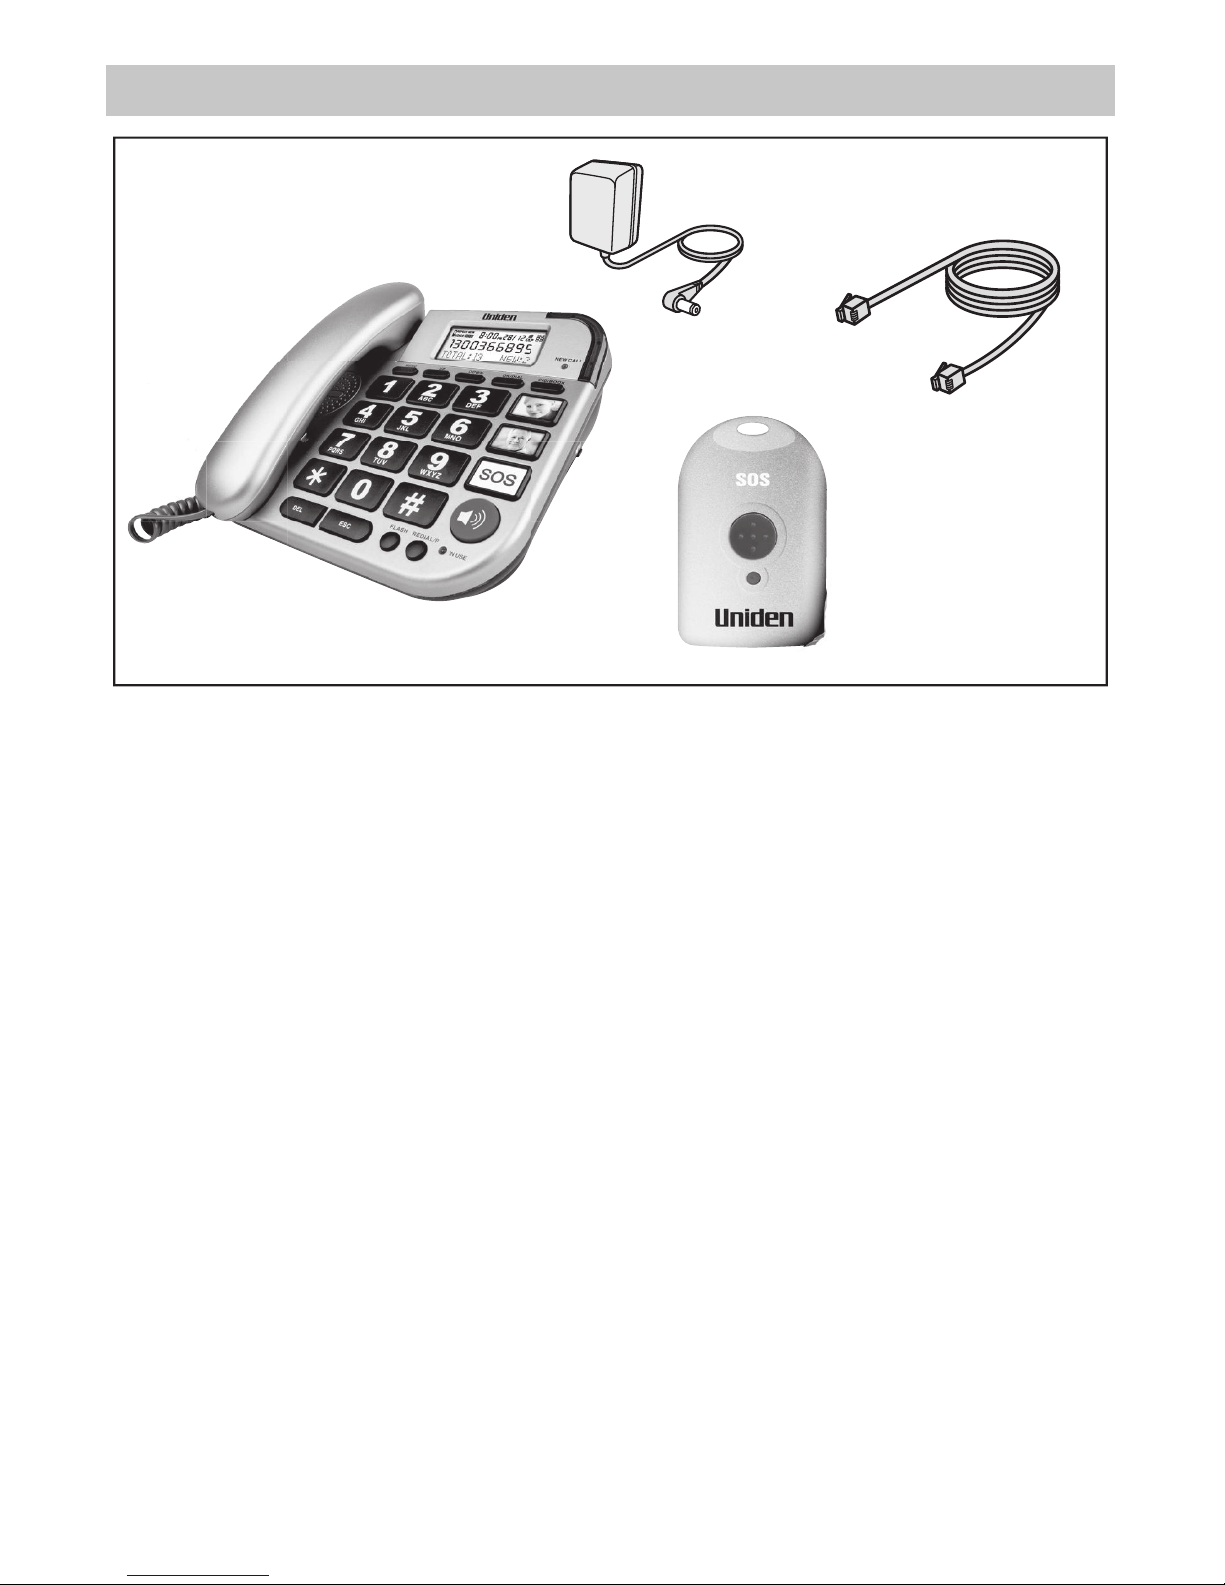
GETTING TO KNOW YOUR PHONE
Keys Description
1 Hook Switch
2 LCD Display
3 Ringer LED: Flashes when there is an incoming call
4 UP Button:
• In standby, scroll up the Caller ID list.
• In the Menu, scroll up the options
5 DOWN Button:
• In standby, scroll down the Caller ID list.
• In the Menu, scroll down the options
6 NEW CALL LED - flashes when there is a new call.
7 ESC - In menu mode, press this button to exit menu operation to
standby mode.
3

9
8 CID/BOOK - In standby mode, press this button to switch between
caller ID and phonebook list, then press UP or DOWN button to view
the list.
9 DEL
• In number and character input mode, press this button to delete
one digit or a letter.
• In menu operation mode, press this button to exit menu step by
step.
10 MENU
• In standby mode, press this button to enter menu mode.
• In menu mode press this button to scroll through menu options.
11 OK/DIAL
• In menu mode, press this button to confirm menu options.
• While reviewing caller ID or phonebook number, press this button
to dial out the number.
12 FLASH - Press this button to create a flash time (line breaking).
13 REDIAL/P - Last number redial.
14 IN-USE LED - LED glows while the handset is in the off-hook mode.
15 HANDSFREE - Press this button to turn on/off hands-free mode
(make or answer a call in hands-free mode).
16 Alpha-Numeric buttons - Input digits or letters
17 Speaker
18 Microphone
19 Earpiece
20 HOT Dial Memory Button 1 (with the option of adding a picture) - Use
this button to store an important contact number. Press the button to
display the stored number.
21 HOT Dial Memory Button 2 (with the option of adding a picture) - Use
this button to store another important contact number. Press the
button to display the stored number.
22 SOS - Press and hold to make an emergency call.

10
BASIC FUNCTIONS
Answer a Call
When there is an incoming call, the phone rings and the ringer LED flashes.
If Caller ID function is available for the line, the ‘NEW CALL’ LED flashes, the
Caller ID number is displayed on LCD and the base will announce the Caller
ID number. If the displayed number matches with one phonebook entry, the
stored name will also be displayed on the LCD. Pick up the handset or press
speaker button to answer the call. After talking, hang up the handset or press
the speaker button again to end the call.
Pre-dial Function
In the on-hook state, key in the numbers and the LCD will display the
corresponding numbers. A voice prompt accompanies the numbers, as they are
being keyed-in. Press the speaker button or press the OK/DIAL button to dial
out the number. While keying-in the number, if you want to delete a particular
digit, press the DEL button.
Last Number Redial
Pick up the handset or press the speaker button, then press REDIAL/P button,
the phone will automatically dial out the last dialed number.
Pause
When keying-in the numbers either in the off-hook or in the on-hook state,
press the REDIAL/P button, the display will insert the character ‘P’, and a 3.6
sec pause is inserted while dialing out the number.
# The pause can also be inserted into the phonebook number or the one
touch memory.
Flash Time
In the off-hook state, press FLASH button to insert flash time. You can opt to
change the flash time, using the menu. For details, refer to ‘Set Flash Time’,
page 19.
Make a Call
Pick up the handset or press the speaker button. The handset sounds a dial
tone. Make a quick test call.

11
Adjust Earpiece Volume
The switch to adjust the earpiece volume is found beneath the handset. Switch
between ‘+’ to increase the earpiece volume and ‘-’ to decrease the earpiece
volume.
Adjust Speaker Volume
The switch to adjust the speaker volume is found on the right side of the
telephone, slide the switch to increase or decrease the speaker volume.
Adjust Ringer Volume
The switch to adjust the ringer volume is found beside the DC IN port. There are
3 adjustable volume levels - low/middle/high.

12
SPECIAL FEATURES
• Large easy-to-read buttons.
• Adjustable Handsfree speaker, ringer and handset volume.
• Talking numbers - announce numbers as they are being keyed in.
• Voice Guide Programming - Voice prompt for the menu operations.
• Talking Caller ID - announce the name or the number of the person calling in
• Talking Phonebook - User can record voice to announce a contact name in
the phonebook. If an incoming call comes from the caller which is stored in
phonebook, the phone will announce the name. If there is no voice record,
then while viewing the phonebook, the phone will announce the phonebook
number.
• Recordable Emergency Message - There is a pre-recorded emergency
message for the SOS function. In addition to this, the user can record his
own personal message (up to 20 seconds) after the pre-recorded emergency
message.
• 10 Speed Dial - The 0-9 buttons can also double up as speed dial buttons.
In the standby mode, press and hold any of the buttons 0 to 9 for around
3 seconds, the LCD displays the corresponding phonebook number. Then
press the OK/DIAL button to dial out the number. Or pick up the handset and
press and hold the relevant button for 3 seconds to dial out.
• Emergency Remote Dialler - Use a high frequency (433MHz) wireless
pendant with a range of 40 meters within the line of sight. You can pair up to
5 pedants with the same telephone (optional).
• Answer from Remote Dialler - When there is an incoming call, the user can
activate the speakerphone by pressing and holding the red SOS key on
remote dialler for around 3 seconds. Press and hold the red SOS button on
the remote dialler for 3 seconds to hang up the call and return to standby
mode.
• Hot Dial Memory Buttons - the phone has two hot dial memory buttons to
help store two important numbers, for a quick dial out.

13
This feature is available if you have subscribed the Caller Line Identification
service with your network service provider. Your phone can store up to 64
answered and unanswered calls with date/time information in the call list.
Caller ID sequence code is shown on the top line of the LCD display together
with date and time. The number will be displayed on the LCD when the phone
is ringing. If the number matches with one of the entries in your phonebook, the
stored name will be displayed on bottom line of the LCD display.
Missed calls are marked with ‘NEW’ at the beginning of a missed call entry.
Once the missed call has been viewed, the icon NEW’ will be deleted. If several
calls come from same number, the icon ‘REPEAT’ is shown before the number,
and the latest call date and time is displayed.
In the standby mode, the LCD will show the total number of new Caller IDs
‘NEW :XX’. If the Caller ID number is withheld, the word ‘WITHHELD’ will be
displayed. If the Caller ID number is unavailable, ‘Out Of Area’ will be displayed.
View the Caller ID List
In the standby mode, press UP and DOWN buttons to view the Caller ID list. All
unanswered and answered calls are saved in the Caller ID list. Press the DOWN
button to view the latest Caller ID, and the UP button to view the older Caller ID.
When the call list is full, the oldest Caller ID will be replaced by a new Caller ID.
Dial back from Caller ID list
While viewing a Caller ID number in Caller ID list, press OK/DIAL button to
directly dial back the number on the speakerphone.
Store a Caller ID number into Phonebook
While viewing a Caller ID number in Caller ID list, press and hold MENU for 2
seconds, the LCD displays, ‘COPY TO MEMORY’. Press OK/DIAL button to
confirm, the LCD displays, ‘SAVED’.
While viewing a Caller ID number, press DEL button, the LCD diplays
‘DELETE?’. Press and hold DEL button for 2 seconds again and the LCD
displays ‘DELETED’.
While viewing a Caller ID number, press and hold DEL button for 2 seconds, the
LCD displays ‘DELETE ALL?’, press and hold DEL button for 2 seconds again,
the LCD displays ‘DELETED’.
Delete a Caller ID Number
CALLER ID MANAGEMENT

14
Dial back from Phonebook List
While viewing a phonebook number , press OK/DIAL button to directly dial the
number out on speakerphone mode.
You can store up to 30 phonebook entries in the telephone memory, with
maximum of 22 digits for number and 16 characters for name. When the
phonebook memory is full and if you want to add another entry, the LCD will
display, ‘MEMORY FULL’. You must delete one phonebook entry, then add new
phonebook entry.
In the standby mode, press CID/BOOK button to switch between Caller ID list
and phonebook list. While phonebook list
icon is displayed on the LCD, press
UP and DOWN button to view the phonebook list. Phonebook entry sequence
number is also displayed.
Press MENU and select STORE NUMBER. Then press OK/DIAL button to
enter the number. The cursor flashes on the LCD, key in the number (up to 22
digits), press OK/DIAL button again. The cursor flashes again on the LCD, input
characters (up to 16 characters). Then press OK/DIAL button to confirm and
save.
Store a number on the HOT Dial Memory Buttons
Store a number into the Phonebook
Press MENU and select the option STORE NUMBER, press OK/DIAL button
to key in the relevant number (up to 22 digits) and press OK/DIAL button to
confirm. Press HOT Dial Memory buttons 1 or 2, then press OK/DIAL button
again, the LCD will display ‘SAVED’ to indicate storing success.
When you want to make a call using the HOT Dial Memory buttons, pick up
handset or press the speaker button to get the line, and then press the relevant
HOT Dial Memory button.
PHONEBOOK MANAGEMENT
If you press OK/DIAL button, SAVED is displayed on the LCD and the unit
announces ‘Saved’ and ‘Name Recording’. To record voice, press and hold the
OK/DIAL button, speak clearly into the microphone after a beep and when the
VOICE icon flashes on the LCD. Release the button when you have finished or
the unit will stop recording after 3 seconds. The voice prompt will then be played
back automatically.
# Recording the voice is necessary for the personalized Caller ID with voice
prompt and a voice guide phonebook feature.

15
Delete a Phonebook Entry
To delete a phonebook entry, press DEL button while viewing an entry. The LCD
displays ‘DELETE?’. Press and hold the DEL button for 3 seconds, then the LCD
displays ‘DELETED’. While viewing a phonebook entry, press and hold DEL
button for 3 seconds, the LCD displays, ‘DELETE ALL?’. Press and hold the
DEL button for 3 seconds and the LCD displays ‘DELETED’.
Store a number as SOS number
Press CID/BOOK for 3 seconds, ‘SOS1’ is displayed on the LCD. Press
OK/DIAL to key in the number, press OK/DIAL to enter the name, and then
press OK/DIAL to confirm. The LCD displays ‘SAVED’.
There are totally 5 SOS numbers, from SOS1-5.

16
Once the SOS button on the phone or the Emergency Remote Dialler is pressed
held for 3 seconds, it will:
• first, activate an alarm on the phone’s base for 15 seconds to get immediate
help within the house;
• secondly, the Remote Emergency Dialler will automatically call up to 5
different pre-set phone numbers of your choice, whether they are mobile
or fixed line numbers from the emergency call list (You can store up to 5
emergency numbers, please read ‘Store SOS Number’, page 15);
• play a pre-recorded emergency message from the speaker “This is an
emergency call, to accept, press the hash key on your telephone now”
followed by a user recorded emergency message (optional);
When the other party accepts the emergency call by pressing the hash key,
on his/her phone, then speakerphone on the base will be activated for a
conversation.
If the other party does not press # key within 60 seconds, the next emergency
number will be dialled automatically, and so on till the last emergency number.
To stop the call, press and hold the SOS button on the base or the Emergency
Remote Dialler for 3 seconds.
# If the SOS numbers are not programmed, then only an alarm is activated on
the base for 15 seconds, when the SOS button is pressed and held.
EMERGENCY REMOTE DIALLER
Emergency Feature - How does it Work?

17
In on-hook state, press MENU to enter main menu. The LCD will display
the first option LCD CONTRAST, press UP and DOWN button to scroll
throughmenuoptions:ENTERTIME/DATE→STORENUMBER→NAME
RECORDING→RECORDMESSAGE→CHECKMESSAGE→SETFLASH
TIME→SETDIALMODE→PAIRNEWPENDANT→LOCALAREACODE.
When the LCD displays a menu option, press OK/DIAL button to navigate
further. During submenu settings, press DEL button to go back and upgrade.
Press ESC button to exit the menu setting and return to standby mode. After
entering the menu setting, if you don’t do anything for 30 seconds the LCD will
return to standby mode.
Press MENU to view the option LCD CONTRAST displayed on the LCD. Press
OK/DIAL button to view the current LCD contrast, the default setting is 3. Press
the UP and DOWN buttons to modify the contrast level (1-5) and then press OK/
DIAL to confirm.
LCD Contrast Setting
Select the menu option of LOCAL AREA CODE, and then press OK/DIAL to
enter the area code menu setting, the cursor “----- ” is on the AREA CODE.
Press the UP and DOWN buttons to adjust code digit, press OK/DIAL button to
confirm and the cursor will move to the next numeral setting. After completing 5
digits setting, press OK/DIAL button to return to standby mode.
If a call comes in from a local area (with the same area code at the beginning),
the area code number (at the beginning of the Caller ID number) will be hidden.
For example, if the local area code number is: 12345. While viewing a Caller
ID number of ‘1234567890’, the LCD will display only ‘67890’, ‘12345’ is
automatically hidden.
Area Code Setting
Select the menu option ‘ENTER TIME/DATE’, then press OK/DIAL button to set
the time and date separately. Press the UP and DOWN buttons to adjust the
time and date.
Time and Date setting
MENU SETTINGS
Name Recording Setting
The option ‘NAME RECORDING’ is used to record user’s own voice for
phonebook entry, the voice will be played back when there is an incoming call
from the phonebook entry.

18
Record Message
The Menu option RECORD MESSAGE is used to record user’s own message
for an SOS call. The personal message will be played from the speakerphone
after the pre-recorded message ‘This is an emergency call, to accept, press the
hash key on your telephone now’, when emergency call is being made. Select
the option RECORD MESSAGE and press and hold the OK/DIAL button, the
icon ‘VOICE’ is seen flashing on the LCD, indicating that the user can record a
message for 15 seconds. Then the recorded message will be played back.
Check Message
With the menu option CHECK MESSAGE, the user can check whether the
emergency call message is a personal recorded message or pre-recorded
message. Select the option, CHECK MESSAGE and then press the OK/DIAL
button, the emergency message will be played back from the speakerphone.
While playing back the personal recorded message, if you want to delete the
personal recorded message, press the DEL button.
Set Flash Time
Select Menu option of SET FLASH TIME, and then press the OK/DIAL button
to enter flash time selection. The following flash time type of 100MS, 80MS,
600MS, 300MS 270MS can be selected. Default time is 600MS for Australia
and 100MS for New Zealand.
Select NAME RECORDING and press the OK/DIAL button. The LCD will
display the phonebook list. Select one phonebook entry, then press and hold the
OK/DIAL button. You will notice the icon VOICE flashing on the LCD, indicating
that the user can record the name. The user can record for around 3 seconds.
Set Dial Mode
The telephone dial mode is set to TONE, by default. You need not change it if
not specially requested by PABX. Select Menu option of SET DIAL MODE, then
press OK/DIAL button to select between TONE or PULSE, then press OK/DIAL
to confirm.
Pair a New Pendant (Emergency Remote Dialler)
Use this Menu option to pair up to 5 Emergency Remote Diallers to the phone.
The Emergency Remote Dialler that comes with this phone has already been
paired to the phone. Select Menu option of PAIR NEW PENDANT, press OK/
DIAL, the LCD will display ‘PAIRING’, press OK/DIAL again, the word ‘PAIRING’
flashes on the LCD to indicate the pairing mode. At the same time, user should
press the red SOS button of the new Emergency Remote Dialler. If the pairing is
successful, the LCD will display ‘DONE’.

19
Select Menu option of PAIR NEW PENDANT, press OK/DIAL button, the LCD
will display, ‘PAIRING’, press the UP button to select ‘DELETE?’. Press OK/
DIAL button to confirm. The LCD will display, ‘DELETE DEVICE’, press OK/
DIAL to confirm, then the pairing for Emergency Remote Diallers becomes
invalid.

20
IMPORTANT INFORMATION
• You have to ensure that the SOS numbers have been programmed. If the
emergency numbers have not been programmed, the telephone won’t dial
anything, only the alarm on the base will be activated for 15 seconds.
• The SOS dial-out feature is meant to be used by your personal emergency
contacts - family, friends, neighbours. Do not program emergency messaging
to dial the police or other emergency numbers. The emergency response
systems might not be technically equipped to respond.
• It is important to inform the people whose names are entered in the SOS
contact list. Do not forget to mention that they have to press the # key when
they answer the emergency call, in order to activate the speakerphone
conversation.
• Always use the Pendant within range of the base. You should check
that there are no structural obstacles, heavy concrete walls between the
Emergency Remote Dialer and the base.
• It is recommended to activate the Emergency Remote Dialer once a month to
ensure normal operation and battery.
The Emergency Remote Dialler is pre-installed with 12V DC internal battery.
Every time the red SOS button is pressed and held, the LED will glow to show
correct transmission.
The battery should last for up to 12 months. If the LED does not glow, please
replace the battery with a new one.
1. Unscrew the rear case of the Emergency Remote Dialler and carefully open.
2. Replace the 12 Volt battery with 23A 12-Volt Alkaline Battery. Please pay
attention to the polarity.
3. Close the rear case and replace the screws.
4. To test, press and hold the red SOS button for 3 seconds. The base will
sound an alarm for 15 seconds.
Batteries

21
ONEYEAR LIMITED WARRANTY
IMPORTANT Satisfactory evidence of the original purchase is required for
warranty service
Please refer to ou r Uniden w ebsite f or an y details or w arranty durations offered in
addition to those contained below.
Warrantor
The warrantor is either Uniden Aus tralia Pty Limited ABN 58 001 865 498 (“Uniden
Aust”) or Uniden New Zealand Limited (“Uniden NZ”) as the case may be.
Terms of Warranty
Uniden Aust/NZ warrants to the original retail purchaser only that the SSE33 (“the
Product”), will be free from defects in materials and craftsmanship for the duration
of the warranty period, subject to the limitations and exclusions set out below.
Warranty Period
This warranty to the original retail purchaser is only v a lid in the original country of
purchase for a Product first purchased either in Australia or New Z ealand and wil l
expire one (1) year from the date of the original retail sale.
If a warranty claim is made, this warranty will not apply if the Product is found by
Uniden to be:
(A) Damaged or not maintained in a reasonable manner or as recommended in
the relevant Uniden Owner’s Manual;
(B ) Modified, altered or used as part of any conv ersion kits, suba ssemblies or an y
configurations not sold by Uniden Aust or Uniden NZ;
(C) Improper ly installed contrary to instructions contained in the relevant Owner’s
Manual
(D ) Repaired b y someone other than an authorized Uniden Repair A gent in relation
to a defect or malfunction covered by this warranty; or
(E) Used in conjunction with any equipment, parts or a system not manufactured
by Uniden.
Parts Covered
This warranty covers the Product and included accessories.
User-generated Data
This warranty does not cover any claimed loss of or damage to user- generated
data (including but without li mitation phone numbers, add resses and images) that
may be stored on your Product.
SSE33

22
Statement of Remedy
If the Product is found not to conform to this warranty as stated above, the
Warrantor, at its discretion, will either repair the defect or replace the Product
without any charge for parts or service. This warranty does not include any
reimbursement or payment of any consequential damages claimed to arise from
a Product’s failure to comply with the warranty.
Our goods come with guarantees that cannot be excluded under the Australian
Consumer Law. You are entitled to a replacement or refund for a major failure
and for compensation for any other reasonably foreseeable loss or damage. You
are also entitled to have the goods repaired or replaced if the goods fail to be of
acceptable quality and the failure does not amount to a major failure.
This warranty is in addition to and sits alongside your rights under either the
COMPETITION AND CONSUMER ACT 2010 (Australia) or the CONSUMER
GUARA NTEES ACT (New Zealand) as the case may be, none of which can be
excluded.
Procedure for Obtaining Warranty Service
Depending on the country in which the Product was first purchased, if you believe
that your Product does not conform with this warranty, you should deliver the
Product, together with satisfactory evidence of your original purchase (such as a
legible copy of the sales docket) to Uniden at the addresses shown below. You
should contact Uniden regarding any compensation tha t m ay be payable for your
expenses incurred in making a warranty claim. Prior to delivery, we recommend
that you mak e a backup cop y of an y phone nu mbers, images or other d ata stored
on your Product, in case it is lost or damaged during warranty service.
UNIDEN AUSTRALIA PTY LTD
Service Division
345 Princes Highway,
Rockdale, NSW 2216
Phone number: 1300 366 895
Email address: custservice@uniden.com.au
UNIDEN NEW ZEALAND LTD
Service Division
150 Harris Road, East Tamaki
Auckland 2013
Phone number: (09) 273 8377
Email address: service@uniden.co.nz

23

24
©2013 Uniden Australia Pty Ltd/Uniden New Zealand Limited
Printed in China
 Loading...