

Page 1

SSE17+1
SSE17+1 OM.indb ISSE17+1 OM.indb I 15/7/08 12:08:14 PM15/7/08 12:08:14 PM
Page 2

Contents
Welcome .............................................................3
Terminology ................................................... 4
Product Overview .............................................. 5
Main Phone Features .................................... 5
Answering Machine Features ......................... 5
Parts of the Base and Corded Handset .......... 6
Parts of the Cordless Handset ....................... 8
Parts of the Cordless Handset Charging
Cradle ......................................................... 9
Using the Interface ........................................... 10
Using the Base Menus ..................................10
Using the Handset Menus .............................10
Installing the Phone ......................................... 11
Choosing the Best Location ..........................11
Connecting the Base and Corded Handset ....12
Testing the Connection .................................13
Adjusting the Visual Ringer Brightness ..........14
Wall Mounting the Base ................................15
Connecting the Cordless Handset and
Charger .....................................................17
Installing the Beltclip .....................................18
Installing the Optional Headset .....................18
Setup ................................................................. 19
Setting the Day and Time (Base only) ...........19
Adjusting the Base Display (LCD Contrast) ...19
Name Tag ......................................................20
Insert 0 ..........................................................20
[1]
CONTENTS
Setting Caller ID on Call Waiting (CIDCW)
(Base only) .................................................21
Setting AutoTalk (Handset only) ....................21
Emergency Dialing From the Base & Cordless
Handset ........................................................... 22
One-touch Speed Dialing from the Base ........23
Speed Dialing from the Memory .....................24
Storing Names and Numbers for
Speed Dialing ............................................24
Storing Caller ID Information to
Speed Dial Locations .................................27
Using Your Phone ............................................28
During a Power Failure .................................28
Making and Receiving Calls ..........................29
Call Waiting ..................................................31
Redialing the Last Number Dialed .................32
Adjusting the Ringer, Earpiece and
Speaker Volume ........................................33
Audio Boost for the Cordless Handset ...........34
Selecting a Different Channel .......................35
Finding the Lost Handset ..............................35
Placing a Call on Hold from the Base ............35
Conferencing ................................................36
Intercom .......................................................37
Transferring a Call ........................................38
Using Caller ID and Call Waiting .....................39
Viewing Caller ID Information ........................40
SSE17+1 OM.indb 1SSE17+1 OM.indb 1 15/7/08 12:08:15 PM15/7/08 12:08:15 PM
Page 3

Deleting Information from the Caller ID List ...41
Setting Up the Answering Machine ................ 43
Features .......................................................43
Selecting a Language ...................................43
Setting the Record Time
(or Announce Only) ....................................44
Activating Call Screening ..............................44
Setting the Number of Rings .........................45
Activating the Message Alert .........................45
Setting Your Greeting ...................................46
Selecting Your Greeting ................................47
Setting a Security Code or
Personal Identifi cation Number (PIN) .........47
Using Your Answering Machine ...................... 48
Turning your Answering System On & Off ......48
Reviewing Messages ....................................49
Screening Calls ............................................50
Remotely Operating Your Answering
Machine .....................................................50
Maintenance ..................................................... 52
Specifi cations ...............................................52
Power Failure ...............................................52
Battery Life ...................................................53
Low battery alert ...........................................53
Battery Replacement and Handling ...............53
Installing the Rechargeable Battery for
Cordless Handset ......................................54
Cleaning the Battery Charging Contacts .......55
Troubleshooting ...............................................56
Travelling Out of Range ................................56
Common Issues ...........................................56
Liquid Damage .............................................59
Precautions ...................................................... 60
Important Safety Instructions ........................60
Index ................................................................. 61
Remote Operation Card .................................... 62
Warranty ............................................................66
CONTENTS
[2]
SSE17+1 OM.indb 2SSE17+1 OM.indb 2 15/7/08 12:08:16 PM15/7/08 12:08:16 PM
Page 4

Welcome
Congratulations on purchasing your new Uniden Corded/Cordless Telephone! Your new phone system
comes with a corded base unit and a cordless handset. The corded base allows you the convenience,
safety and security to make and receive calls during a power failure. In addition to the corded base, your
new phone has a full featured cordless handset and charger that can be placed anywhere in your home
where you have AC power and it does not require you to plug the handset in to a telephone line.
Note: Illustrations in this manual are used for explanation purposes.
Some illustrations in this manual may differ from the actual unit.
WELCOME/ACCESSIBILITY
[3]
SSE17+1 OM.indb 3SSE17+1 OM.indb 3 15/7/08 12:08:16 PM15/7/08 12:08:16 PM
Page 5

Terminology
TERMINOLOGY
Base
Charger
CID
CIDCW
Corded
Handset
on the Base
The main part of the phone that
connects to your phone line and lets
you make and receive calls.
A cradle that charges the handset
battery. It connects to power but
does not connect to a phone line.
Caller ID is available from your
telephone provider. With this service,
you can see the name and number of
incoming callers.
Caller ID on Call Waiting is available
from your telephone provider. With
this service, you can see incoming
caller information while on another
call.
A handset connected to the Base. It
can make and receive calls during a
power failure.
Emergency
Dial
Handset
Standby
Station
Talk
One touch speed dial key for your
most important or most frequently
called number.
A cordless handset that can be
placed anywhere in your home or
offi ce where AC power is available.
The handset is not in use. No line
has been activated. The corded base
handset is on the base and
[ ]
on
the base has not been pressed. No
dial tone is present.
The Cordless handset or base
phone.
When a dial tone has been enabled
allowing the user to dial and carry on
a conversation with an outside party.
[4]
SSE17+1 OM.indb 4SSE17+1 OM.indb 4 15/7/08 12:08:16 PM15/7/08 12:08:16 PM
Page 6

Product Overview
Main Phone Features
PRODUCT OVERVIEW
• 2.4 GHz Extended Range Technology
• Corded/Cordless Telephone System
• Visual Ringer
• Large Backlit Keys
• Dual Keypad and Backlit Screens
• Make and Receive Calls During a Power Failure
• Integrated Answering Machine
• Base Speakerphone
• Caller ID and Caller ID on Call Waiting
• 50 Number Caller ID List
Answering Machine Features
• Digital Tapeless Recording
• Up to 11 minutes of Recording Time
• Call Screening
• Personal or Pre-recorded Outgoing Messages
• Time and Day Announcement
• One-Touch Emergency Dial in the Base and
Cordless Handset
• 3 One-touch Speed Dial Numbers in the Base
• 10 Speed Dial Numbers in the Cordless Handset
• Ringer Volume Control
• Earpiece Volume Control
• Audio Boost for the Cordless Handset
• Hearing Aid Compatible
• Find Lost Handset
• Clock Display in the Base
• Intercom Between Cordless Handset and Base
• Hold Feature
• Remote Message Retrieval
• Toll Saver
• Message Alert
[5]
SSE17+1 OM.indb 5SSE17+1 OM.indb 5 15/7/08 12:08:17 PM15/7/08 12:08:17 PM
Page 7
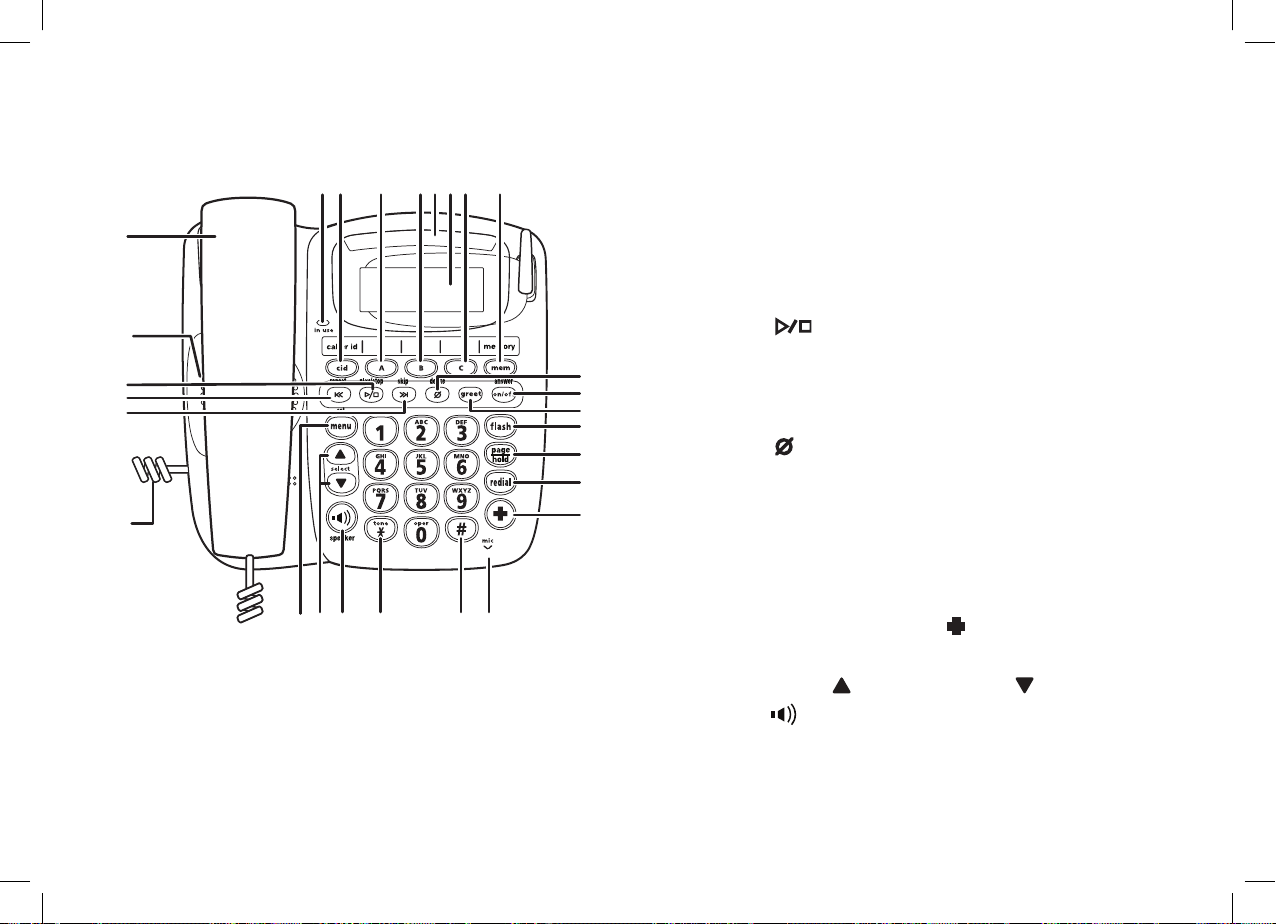
Parts of the Base and Corded Handset
Top view
1
2 3 4 5 6 7 8
9
10
11
12
13
14
24 25 26 27
22 23
1. in use light
2.
[cid]
key
3. One-touch speed dial
4. One-touch speed dial
5. Base visual ringer
[A]
[B]
key
key
15
16
17
18
19
20
21
6. Base display
7. One-touch speed dial
8.
[mem]
(memory) key
[C]
9. Corded base handset
10. Base speaker
11.
[ ]
12.
13.
[|<< ]
[ >>| ]
(play/stop) key
(repeat/rewind) key
(skip/forward) key
14. Coiled cord
15.
[ ]
(delete) key
16.
[on/off]
17.
[greet]
18.
[fl ash]
19.
[page/hold]
20.
[redial/pause]
21. Base Emergency
22.
[menu/set]
23.
[select/ ]
24.
[ ]
25.
[∗/tone]
26.
[#]
key / answer on/off light
key
key
key
key
[ ]
key
key
key and
[select/ ]
(speaker) key / speaker light
key
key
27. Microphone
PRODUCT OVERVIEW
key
key
[6]
SSE17+1 OM.indb 6SSE17+1 OM.indb 6 15/7/08 12:08:17 PM15/7/08 12:08:17 PM
Page 8

Side and Rear view
28
28
29
29
30
30
34
34
35
35
31 32 33
31 32 33
PRODUCT OVERVIEW
28. ringer tone button
28. ringer tone button
29. ringer on/off switch
29. ringer on/off switch
30. Coiled cord jack
30. Coiled cord jack
31.
31.
visual ringer hi/lo/off switch
visual ringer hi/lo/off switch
32. DC IN 9V jack
32. DC IN 9V jack
33.
33.
phone jack
phone jack
34.
Base antenna
34.
Base antenna
35.
Wall mount adapter
35.
Wall mount adapter
[7]
SSE17+1 OM.indb 7SSE17+1 OM.indb 7 15/7/08 12:08:18 PM15/7/08 12:08:18 PM
Page 9
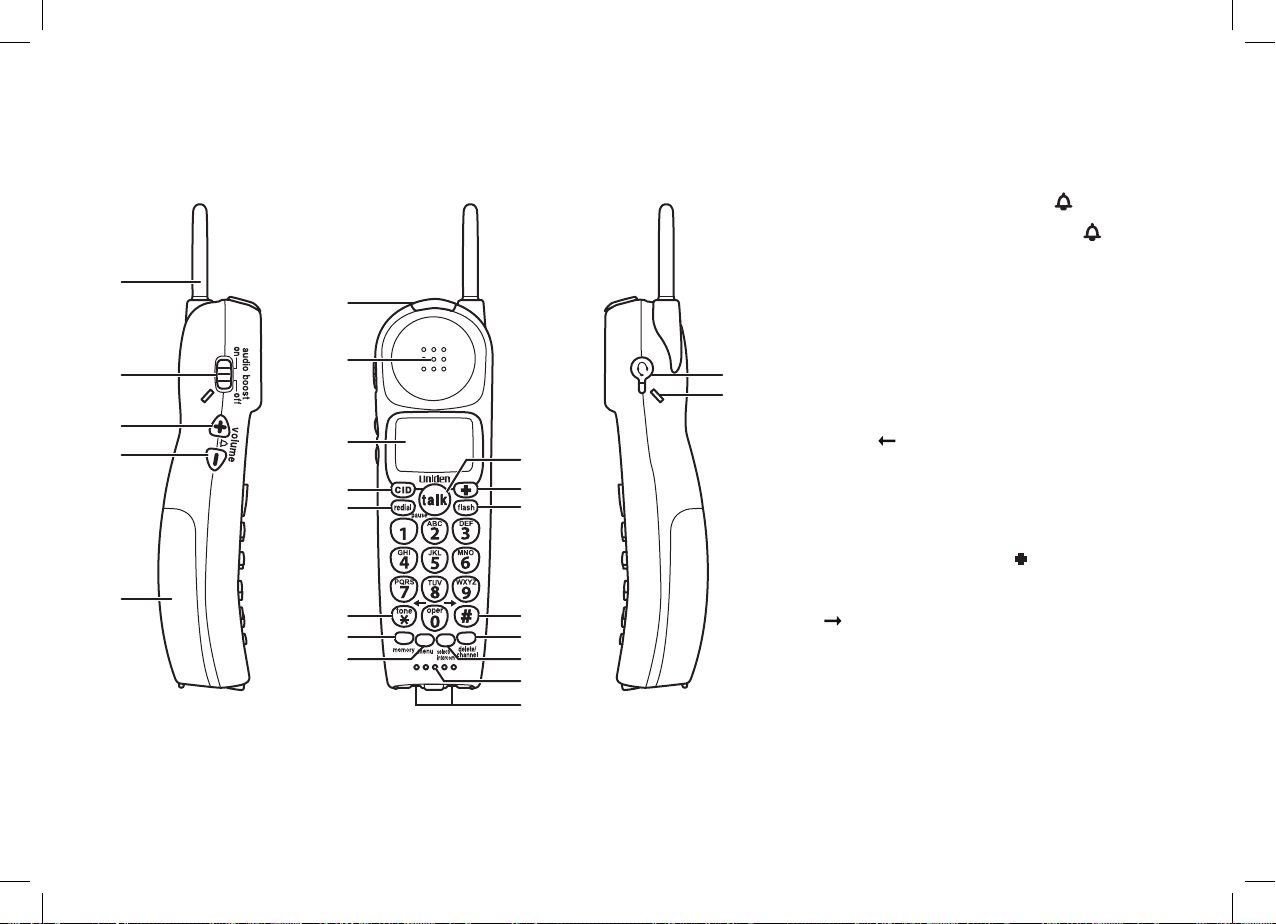
Parts of the Cordless Handset
1
2 22
3
4
5
10
11
12
13
6
7
8
9
14
15
16
17
18
19
20
21
1. Handset antenna
2. audio boost on/off switch
3. Volume/ringer up
4. Volume/ringer down
[volume/ /+]
[volume/ /-]
5. Handset battery compartment
6. Handset visual ringer
7. Handset earpiece
8. Handset display
9.
[CID]
23
10.
11.
12.
13.
14.
key
[redial/pause]
[∗/tone/ ]
[memory]
[menu]
[talk]
key
key
key
key
key
15. Handset Emergency
16.
[fl ash]
17.
[#/ ]
18.
[delete/channel]
19.
[select/intercom]
20.
Handset microphone and ringer speaker
key
(pound) key
key
key
21. Handset charging contacts
22. Headset jack
23. Beltclip hole
[ ]
PRODUCT OVERVIEW
key
key
key
[8]
SSE17+1 OM.indb 8SSE17+1 OM.indb 8 15/7/08 12:08:18 PM15/7/08 12:08:18 PM
Page 10
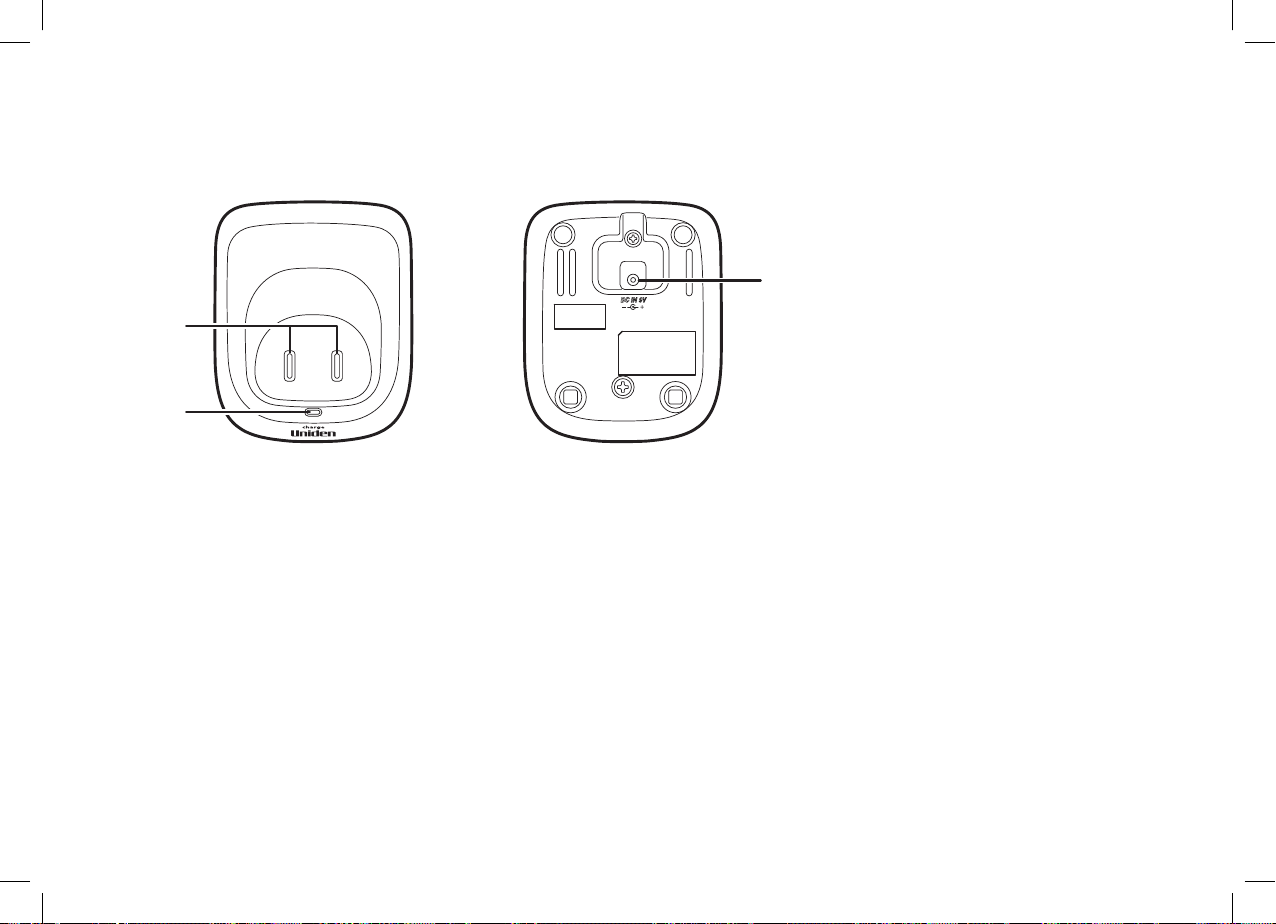
Parts of the Cordless Handset Charging Cradle
1
1
2
2
3
3
PRODUCT OVERVIEW
1. Charging contacts
2. Charge light
3. DC IN 9V jack
[9]
SSE17+1 OM.indb 9SSE17+1 OM.indb 9 15/7/08 12:08:19 PM15/7/08 12:08:19 PM
Page 11
Using the Interface
Using the Base Menus
USING THE INTERFACE
• Press
• Use
• Press
[menu/set]
on the base to access the base main menu.
[select/ ] or [select/ ]
[menu/set]
on the base to make a selection.
to scroll through options.
• For your convenience, voice prompts will guide you through the
base main menu (except LCD Contrast settings).
• To cancel your selection and return to standby, press
[ ]
(play/stop) on the base.
• If you do not press a key within 30 seconds, the phone will time
out and exit the menu. When setting Day and Time, the timeout period is extended to two minutes.
Using the Handset Menus
• Press
menu.
• Use
• Press
selection.
• To return to standby, press
return the cordless handset to the cradle.
[menu]
[volume/ /+]
on the cordless handset to access the main
or
[select/intercom]
[volume/ /-]
to scroll through the options.
on the cordless handset to make a
[menu]
on the cordless handset, or
select/
select/
intercom
intercom
[10]
SSE17+1 OM.indb 10SSE17+1 OM.indb 10 15/7/08 12:08:19 PM15/7/08 12:08:19 PM
Page 12
Installing the Phone
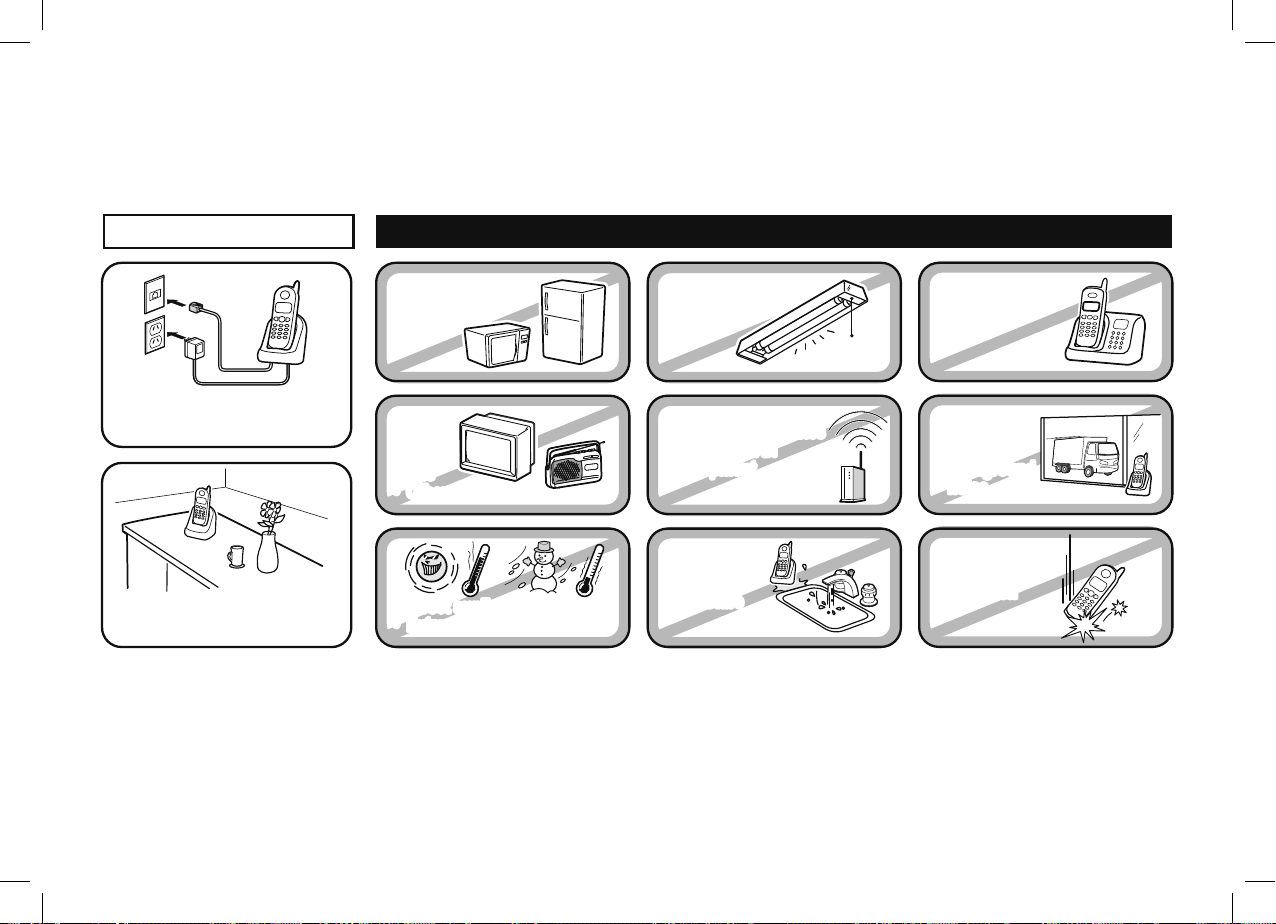
Choosing the Best Location
When choosing a location for your new phone, here are some important guidelines you should consider:
INSTALLING THE PHONE
PLACE YOUR BASE
• Microwave ovens
• Refrigerators
TRY TO AVOID
• Fluorescent
lighting
Near an AC outlet and
a telephone wall jack.
In a centrally-located
open area.
Notes: For maximum range:
• TVs
• TVs
• Other electronics
• Other electronics
• Direct sunlight
• Direct sunlight
• Extreme temperatures
• Extreme temperatures
• Personal computers
• Personal computers
• Wireless LAN
• Wireless LAN
equipment
equipment
• Dust
• Dust
• Excessive
• Excessive
moisture
moisture
Keep both the base and handset antennas free of obstruction.
When the handset is not in use, place the handset in an upright position.
Metal and reinforced concrete may affect cordless telephone performance.
• Other cordless
telephones
• Areas with
• Areas with
a lot of
a lot of
background
background
noise
noise
• Shock
• Shock
• Vibration
• Vibration
[11]
SSE17+1 OM.indb 11SSE17+1 OM.indb 11 15/7/08 12:08:20 PM15/7/08 12:08:20 PM
Page 13
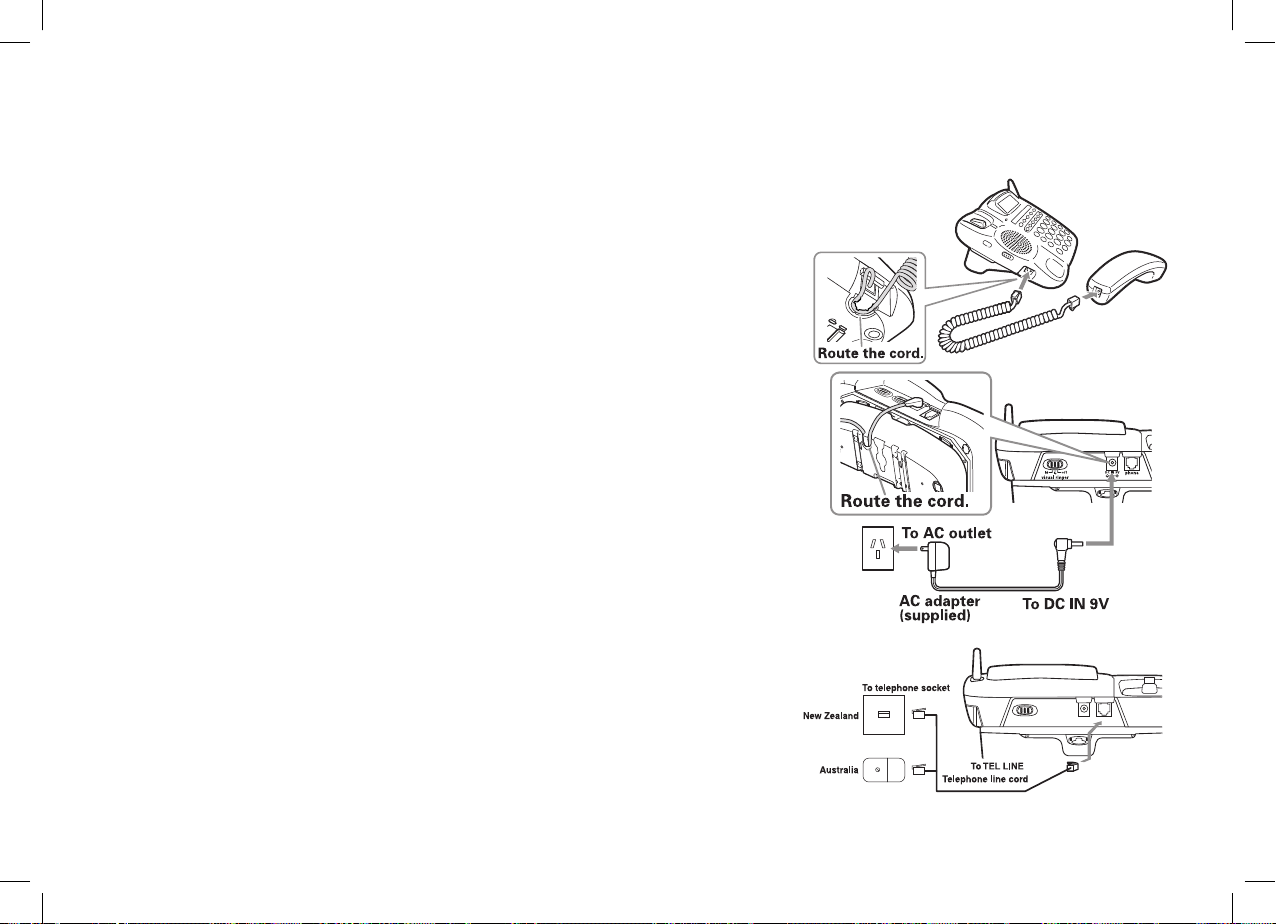
Connecting the Base and Corded Handset
1) Connect the corded handset Coiled cord to the left side of the
phone and to the corded handset.
2) Route the Coiled cord inside the molded wiring channel as
shown.
3) Connect the AC adapter to the DC IN 9V jack and to a standard
240V AC wall outlet.
CAUTION: To avoid risk of fi re and shock, only use the Uniden
AAD-065S(M) AC adapter.
4) Route the AC adapter cord inside the molded wiring channel as
shown.
5) Place the base unit close to the AC outlet to avoid long
extension cords.
6) Connect the telephone cord to the phone jack and to a
telephone outlet.
INSTALLING THE PHONE
7) Set the base on a desk or tabletop. Place the corded base
handset in the base cradle.
[12]
SSE17+1 OM.indb 12SSE17+1 OM.indb 12 15/7/08 12:08:27 PM15/7/08 12:08:27 PM
Page 14

Testing the Connection
There’s an easy way to test your connection: try making a call from your base. If your call connects, your
phone’s settings are fi ne. If your call does not connect:
Check the AC adapter cord. Make sure it is securely connected to the DC IN 9V connector and to a standard
AC power outlet.
INSTALLING THE PHONE
[13]
SSE17+1 OM.indb 13SSE17+1 OM.indb 13 15/7/08 12:08:28 PM15/7/08 12:08:28 PM
Page 15
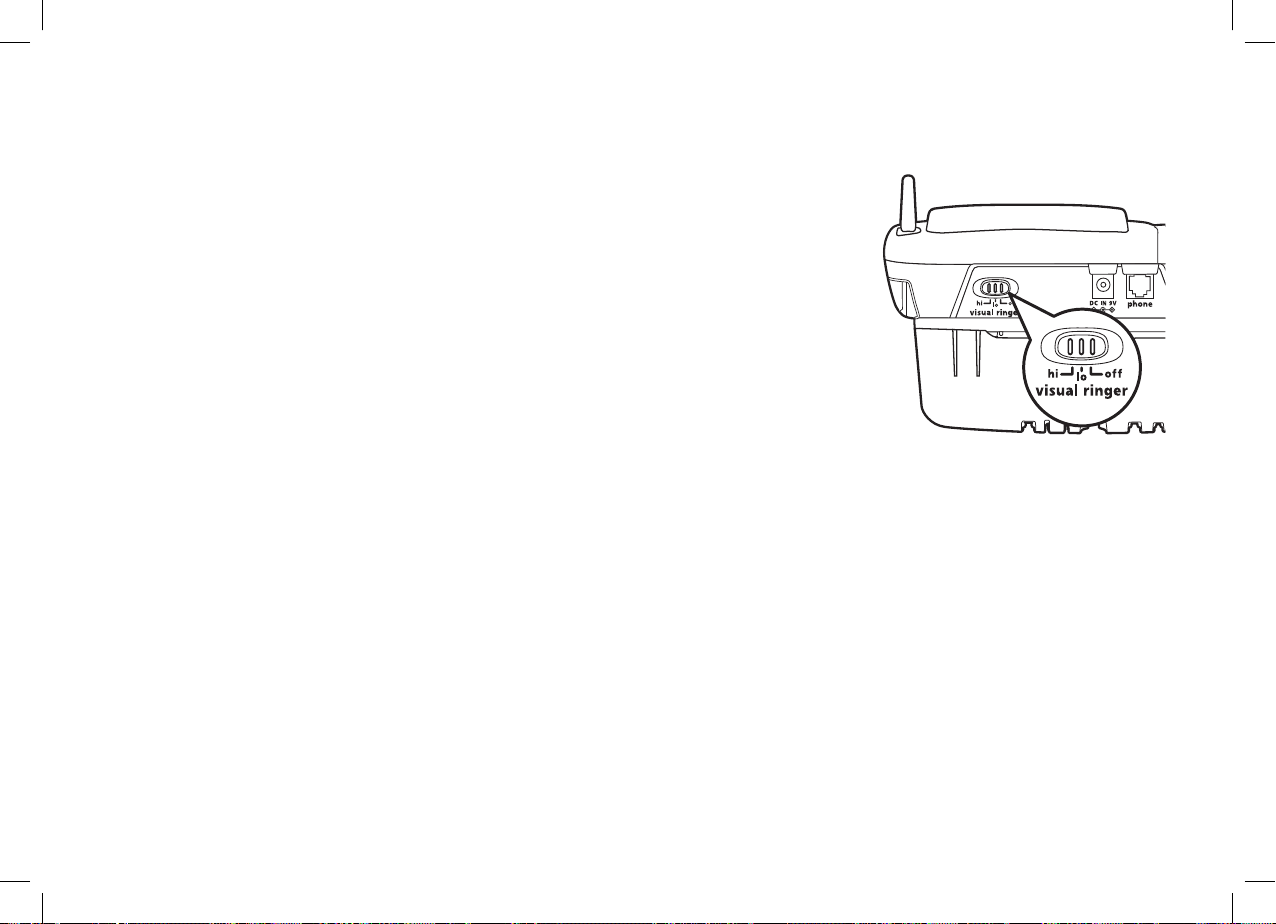
Adjusting the Visual Ringer Brightness
Your new phone has visual ringers located at the top of the base unit and at the top of the cordless handset.
These visual ringers will fl ash during incoming calls, so if you are in a noisy
work environment you will be able to see when the phone is ringing. The
phone comes with a switch for base visual ringer control, so you can turn the
visual ringers off when you do not want the base to fl ash brightly during
incoming calls.
The visual ringer hi/lo/off switch allows you to set the brightness and turn
off the visual ringer on the base. You can adjust the brightness by selecting
one of three options: high, low and off. If you set the switch to off, the visual
ringer on the base will not fl ash at all during incoming calls.
INSTALLING THE PHONE
[14]
SSE17+1 OM.indb 14SSE17+1 OM.indb 14 15/7/08 12:08:28 PM15/7/08 12:08:28 PM
Page 16

Wall Mounting the Base
This phone can be mounted on any standard wall plate.
1) Remove the wall mount adapter from the base and snap it
into the notches on the bottom of the base.
2) Plug the AC adapter to the DC IN 9V jack.
CAUTION: To avoid risk of fi re and shock, only use the
Uniden AAD-065S(M) AC adapter.
3) Route the AC adapter cord inside the molded wiring
channel as shown.
4) Plug the AC adapter into a standard 240V AC wall outlet.
5) Plug the telephone cord into the phone jack.
6) Route the telephone cord inside the molded wiring channel
as shown.
7) Plug the telephone cord into the telephone outlet.
8) Align the mounting slots on the base with the mounting posts
on the wall. Then push in and down until he phone is fi rmly
seated.
INSTALLING THE PHONE
9) On the base unit, pull the handset retainer out of the slot.
Rotate it clockwise 180 degrees.
[15]
SSE17+1 OM.indb 15SSE17+1 OM.indb 15 15/7/08 12:08:28 PM15/7/08 12:08:28 PM
Page 17

10) Flip the retainer from front to back. Slide it back into the slot so that the lip of the retainer is up and the
oval is down. The retainer holds the handset in place.
Direct Wall Mounting
If you don’t have a standard wall plate, you can mount your phone directly to the wall.
Before doing this, consider the following:
• Avoid electrical cables, pipes, or other items behind the mounting location that could cause a hazard
when inserting screws into the wall.
3mm
• Try to mount your phone within 1.5m of a working phone jack to avoid excessive
cord lengths.
• Make sure the wall material is capable of supporting the weight of the base and
handset.
• Use #10 screws (minimum length of 35mm) with anchoring devices suitable for
the wall material where the base unit will be placed.
1) Insert two mounting screws into the wall, (with their appropriate anchoring
device), 100mm apart. Allow about 3mm between the wall and screw heads for
mounting the phone.
35mm
35mm
3mm
100mm
100mm
INSTALLING THE PHONE
2) Refer to steps 1 through 10 on page 15 to mount the telephone.
[16]
SSE17+1 OM.indb 16SSE17+1 OM.indb 16 15/7/08 12:08:29 PM15/7/08 12:08:29 PM
Page 18
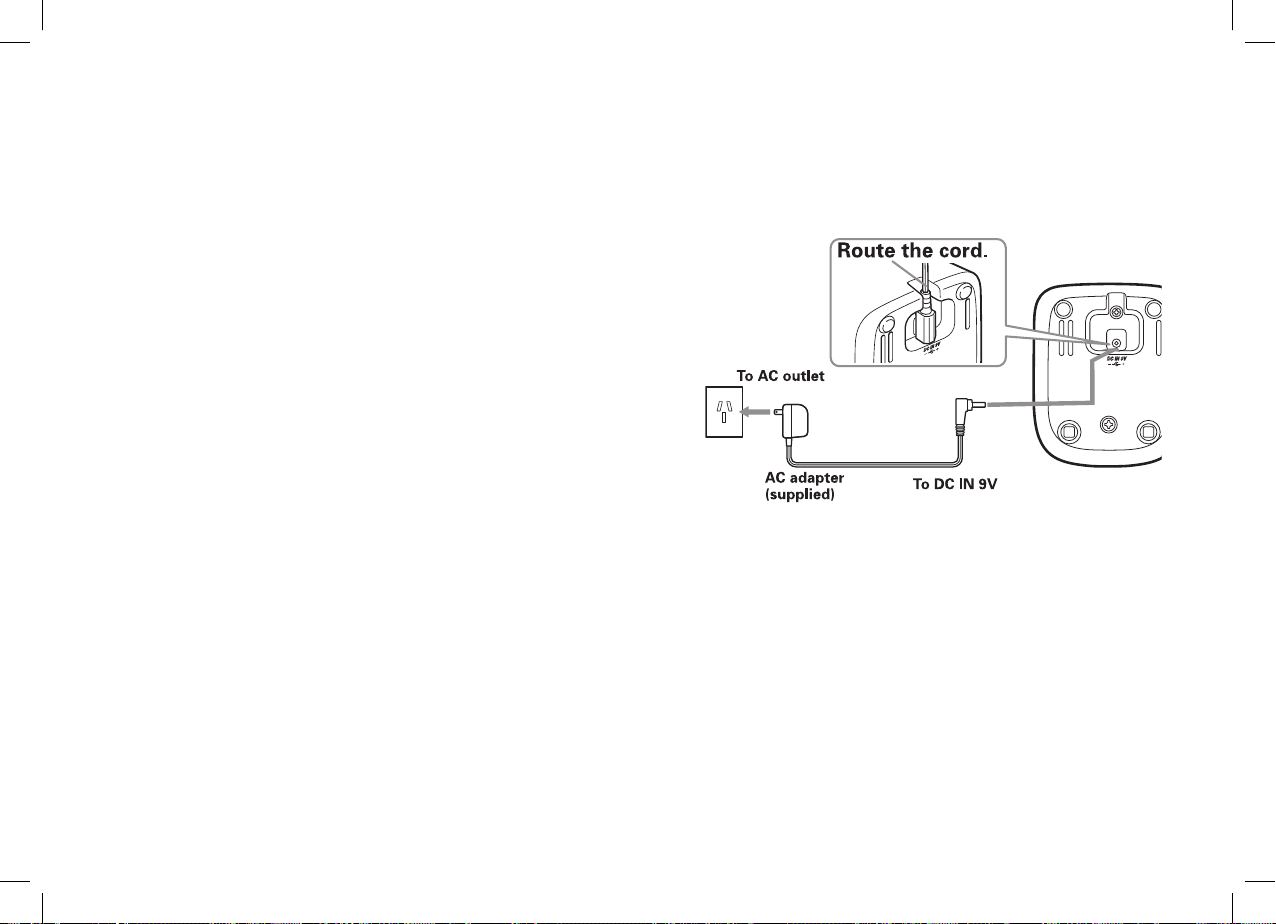
Connecting the Cordless Handset and Charger
The cordless handset is powered by a rechargeable battery pack. The battery recharges automatically
when the handset is placed in the charger.
1) Connect the AC adapter to the DC IN 9V jack and to a standard 240V AC wall outlet.
CAUTION: Use only the Uniden AAD-600S(M) AC
adapter.
2) Set the charger on a desk or tabletop, and place the
handset in the charger with the keypad facing forward.
3) Make sure that the charge light illuminates. If the
charge light does not illuminate, check to see that the
AC adapter is plugged in and the handset makes good
contact with the charging contacts.
4) Charge the handset battery pack for at least 15-20
hours before using your new cordless handset for the
fi rst time.
5) To test your connection, try making a call from the cordless handset. If your call does not connect,
check to make sure the battery is fully charged. If you see LOW BATTERY on the cordless handset
display, check to make sure the battery is properly connected. To check the battery, slide the battery
compartment door open and check the battery cables to ensure a tight and proper connection. If your
handset still does not work, please contact Uniden’s Customer Service department. Please see inside
the back cover for contact information.
INSTALLING THE PHONE
[17]
SSE17+1 OM.indb 17SSE17+1 OM.indb 17 15/7/08 12:08:29 PM15/7/08 12:08:29 PM
Page 19
Installing the Beltclip
Line up the holes on each side of the cordless handset.
To attach the beltclip, insert into the holes on each side of the
handset. Press down until it clicks.
To remove the beltclip, pull either side of the beltclip to release
the tabs from the holes.
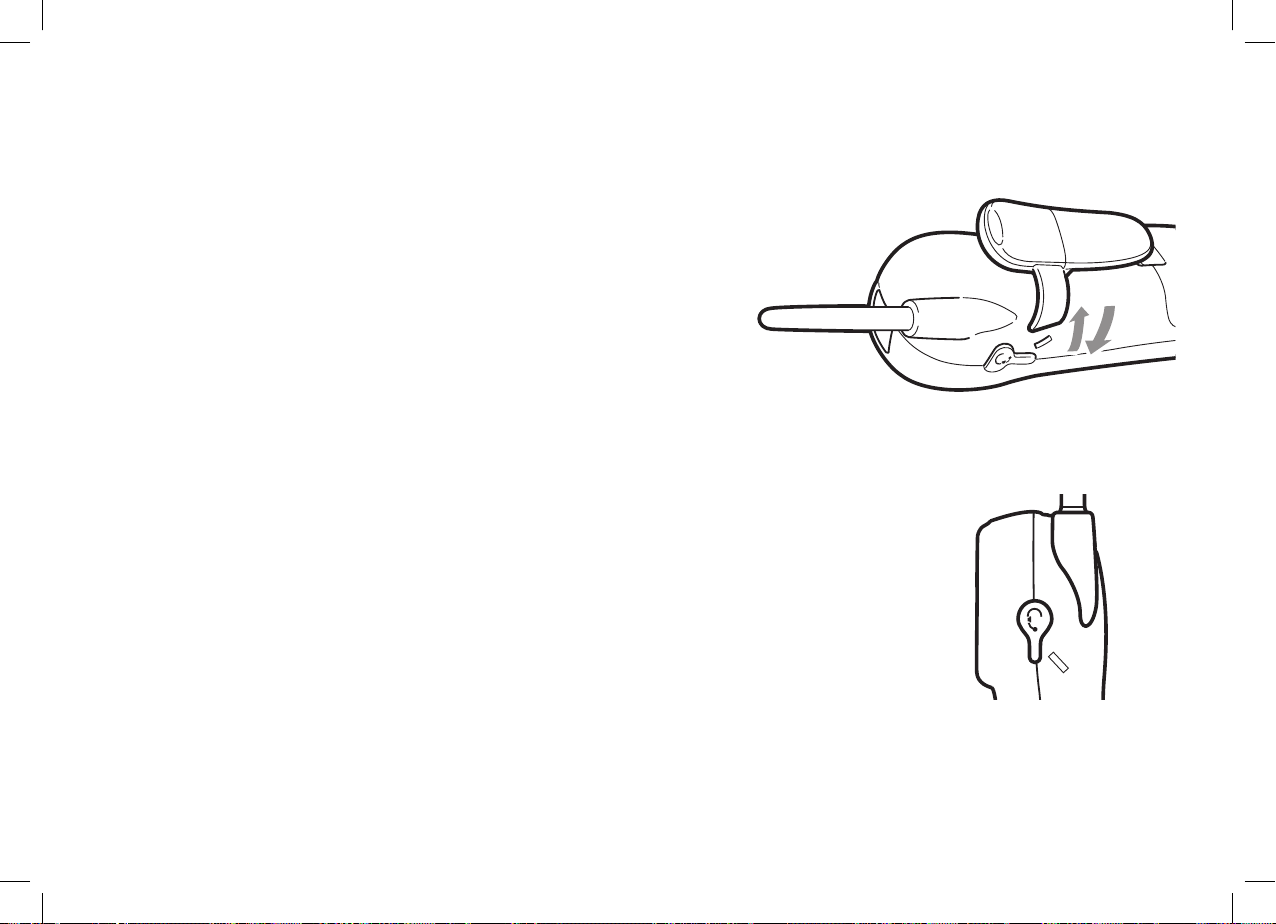
Installing the Optional Headset
Your cordless handset may be used with an optional headset. To use this feature,
insert the headset plug into the headset jack. Your phone is ready for hands-free
conversations. Headsets may be purchased by contacting Uniden. Please see inside
back cover or visit www.uniden.com.au for Australian model or www.uniden.co.nz for
New Zealand model for contact information.
INSTALLING THE PHONE
[18]
SSE17+1 OM.indb 18SSE17+1 OM.indb 18 15/7/08 12:08:30 PM15/7/08 12:08:30 PM
Page 20
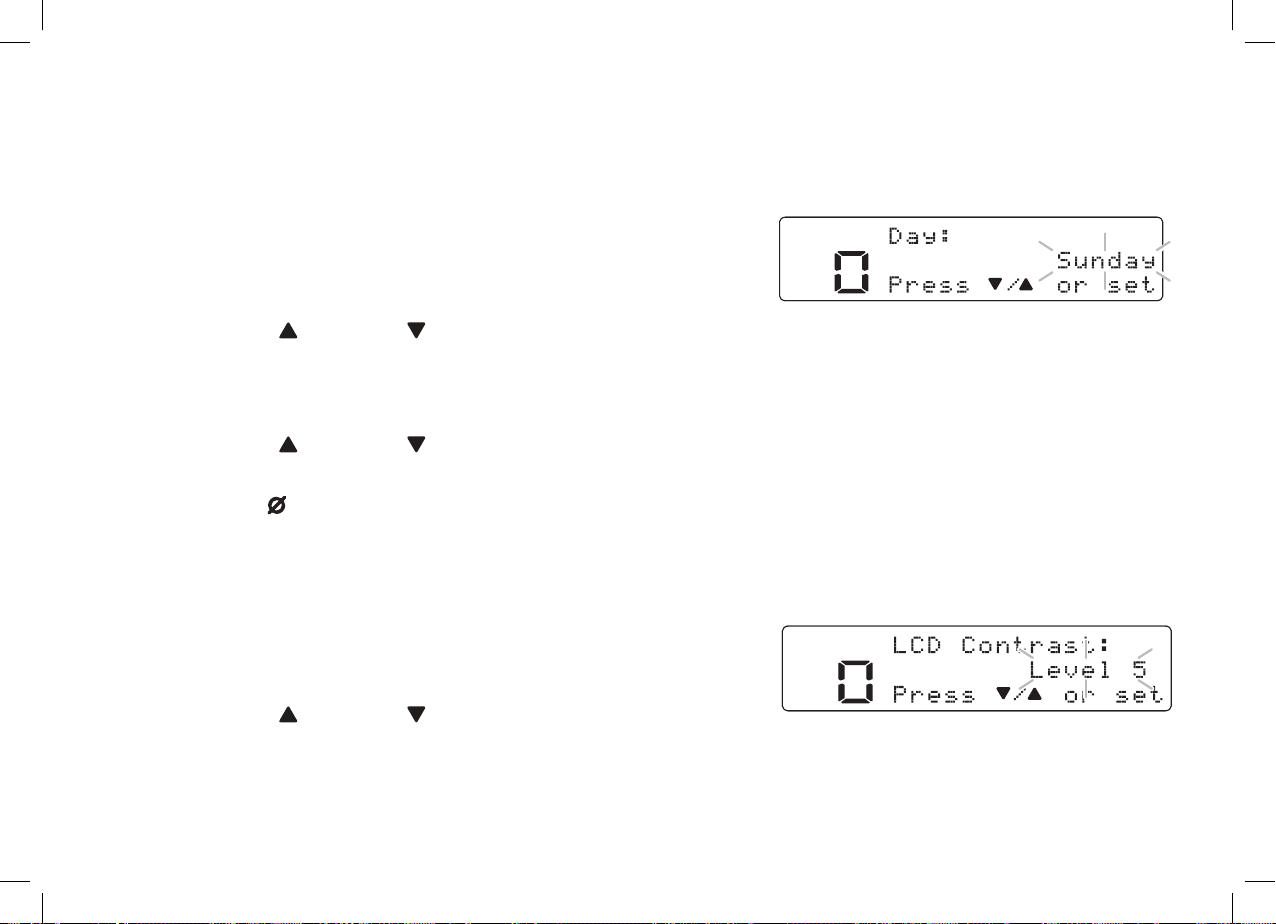
Setup
Setting the Day and Time (Base only)
To set the day and time on your phone, do the following:
1) Press
2) Press
“Time”, the current time and the voice guidance for setting the
time.
[menu/set]
[menu/set]
on the base.
to select TIME. The system announces
BASE SETUP
3) Press
then press
4) Enter a two-digit number (01-12) to set hour, and then press
5) Enter a two-digit number (00-59) to set minute, and then press
6) Press
confi rmation tone.
[select/ ]
[select/ ]
Note: Use
or
[select/] to select the day of the week, and
[menu/set]
[ ]
.
or
[select/] to choose AM or PM, and then press
(delete) to edit the hour and minute.
[menu/set]
[menu/set]
[menu/set]
.
.
. You will hear a
Adjusting the Base Display (LCD Contrast)
You can adjust the contrast or brightness of the text that appears on your base display. Choose one of ten
levels for optimum viewing.
1) Press
2) Press
and then press
3) Press
display.
4) Press
[19]
SSE17+1 OM.indb 19SSE17+1 OM.indb 19 15/7/08 12:08:30 PM15/7/08 12:08:30 PM
[menu/set]
[select/▲]
[menu/set]
[select/ ]
[menu/set]
or
on the base.
to move the pointer to select LCD CONTRAST
.
[select/] to adjust the contrast of the base
. You will hear a confi rmation tone.
Page 21

Name Tag
Name Tagging works with the Caller ID. You will need to subscribe to the Caller ID feature with your phone
company for Name Tagging to work.
When the phone rings, the received caller display number is compared to numbers stored in the phonebook.
If there is a match then any name stored with the phonebook number will be displayed. To change the Name
Tagging setting, follow the steps listed below.
1) Press
2) Press
3) Press
4) Press
[menu/set]
[select/▼]
on the base or
on the base or
If you set from the base, press
[select/▲]
[menu/set]
or
[select/▼]
on the base or
on the base. You will hear a confi rmation tone or press
[menu]
on the handset.
[volume/ /-]
[menu/set]
on the base.
on the handset to move the pointer to select NAME TAG.
[select/intercom]
on the handset to select ON or OFF.
[menu]
on the handset to
BASE SETUP
complete the setting.
Insert 0
This feature adds “0” or “00” at the beginning of the number received from Caller ID. The default setting for
New Zealand is ON. The default setting for Australia is OFF. To change the Insert 0 setting, follow the steps
listed below.
1) Press
2) Press
you set from the base, press
3) Press
4) Press
complete the setting.
SSE17+1 OM.indb 20SSE17+1 OM.indb 20 15/7/08 12:08:31 PM15/7/08 12:08:31 PM
[menu/set]
[select/▼]
[select/▲]
on the base or
or
[menu/set]
on the base or
[select/▼]
[menu]
on the handset.
[volume/ /-]
[menu/set]
on the base.
on the base or
on the handset to move the pointer to select INSERT 0. If
[select/intercom]
on the handset to select ON or OFF.
on the base. You will hear a confi rmation tone or press
[menu]
on the handset to
[20]
Page 22

Setting Caller ID on Call Waiting (CIDCW) (Base only)
Caller ID on Call Waiting (CIDCW) displays the name and number of an incoming call while you are on the
line.
HANDSET SETUP
1) Press
2) Press
press
3) Press
press
[menu/set]
[select/▼]
to move the pointer to select CIDCW, and then
[menu/set]
[select/▲]
[menu/set]
on the base.
.
or
[select/▼]
to select ON or OFF, and then
. You will hear a confi rmation tone.
Setting AutoTalk (Handset only)
AutoTalk allows you to answer the phone simply by removing the cordless handset from the cradle. You do
not have to press any keys to answer the call.
1) Press
2) Press
3) Press
[menu]
[select/intercom]
[menu]
on the cordless handset.
to select Auto Talk ON or OFF.
to complete the setting. The handset returns to standby.
[21]
SSE17+1 OM.indb 21SSE17+1 OM.indb 21 15/7/08 12:08:31 PM15/7/08 12:08:31 PM
Page 23

Emergency Dialing From the Base & Cordless Handset
Your corded base phone and cordless handset comes with a
special Emergency Speed Dial
pre-programmed to dial 000 for Australian model, 111 for
New Zealand model when pressed. This key can be
re-programmed with another special emergency dial number of
your choice by following these steps:
1) With the phone in standby, press and hold the Emergency Dial
on the base or the cordless handset. If the Emergency Dial
number is already programmed, the Edit screen appears. You can select
EDIT NUMBER to edit this entry, select DELETE NUMBER to erase this
entry or select GO BACK to return to the previous screen.
2) Store the number by following step 6 under Storing Names and Numbers
for Speed Dialing on page 26.
[ ]
key that is already
[ ]
key
EMERGENCY DIALING FROM
THE BASE & CORDLESS
3) Press
[menu/set]
on the base or
[select/intercom]
on the handset. You will
hear a confi rmation tone, and NUMBER STORED appears. Memory
storage is complete.
Note:
• When editing the Emergency Dial number, you must press a key within
30 seconds or the phone will return to standby.
• The Emergency Dial number can be up to 48 digits on the base and up to 20 digits on the handset.
• When
[ ]
on the base is pressed, base visual ringer tells you by fl ashing.
[22]
SSE17+1 OM.indb 22SSE17+1 OM.indb 22 15/7/08 12:08:32 PM15/7/08 12:08:32 PM
Page 24

ONE-TOUCH SPEED DIALING
• If you press
[ ]
accidentally, press
[ ] on the base or [talk] on the handset
to cancel the dialing.
One-touch Speed Dialing from the Base
The base has 3 one-touch speed dial locations (
frequently dialed numbers. Use the following steps to set up these speed dial numbers:
1) With the base in standby, press and hold
If the key already has a number programmed, the Edit screen
appears. You can select EDIT NUMBER to edit this entry,
select DELETE NUMBER to erase this entry or select GO
BACK to return to the previous screen.
2) Store the number by following step 6 under Storing Names
and Numbers for Speed Dialing on page 26.
3) Press
[menu/set]
on the base. You will hear a confi rmation tone,
and NUMBER STORED appears. Memory storage is complete.
Note:
• When editing these Speed Dial numbers, you must press a
key within 30 seconds or the phone will return to standby.
• The One-touch Speed Dial number can be up to 48 digits.
To make a call from a one-touch speed dial, simply press one of the one-touch speed dial keys
your phone will automatically dial the number.
[A], [B]
[A], [B]
,or
and
[C]
[C]
) that can be programmed for special or
.
[A-C]
FROM THE BASE
, and
[23]
SSE17+1 OM.indb 23SSE17+1 OM.indb 23 15/7/08 12:08:32 PM15/7/08 12:08:32 PM
Page 25

Speed Dialing from the Memory
Your corded base and cordless hanset allows you to store up to 10 names and numbers each for quick and
easy dialing of frequently called numbers. The numbers stored on the base and handset are independent of
each other.
These 10 speed dials are not limited to just phone numbers. You can store any number (up to 20 digits) that
you need to enter once your call connects. This is referred to as Chain Dialing. For example, you can save
your bank account number to a speed dial. When you call your bank’s telephone teller service and are
prompted to enter your account number, simply press
the speed dial number where you stored your account number. Then press
intercom]
on the handset. Or you can save and store prescription drug information for fast and easy
reordering with your pharmacy.
Note: When editing a Speed Dial, you must press a key within 30 seconds or the phone will return to
standby.
Storing Names and Numbers for Speed Dialing
[mem]
on the base or
[memory]
on the handset and
[menu/set]
on the base or
[select/
SPEED DIALING FROM THE
CORDLESS HANDSET
1) With the phone in standby, press
[memory]
on the handset or
[mem]
on
the base.
2) Enter
through the list with
the base ). Press
[0-9]
to select the speed dial number where you would like to store this entry. You can also scroll
[volume/ /+]
[select/intercom]
or
[volume/ /-]
on the handset or
on the handset
[mem]
on the base.
( [select/ ] or [select/ ]
on
[24]
SSE17+1 OM.indb 24SSE17+1 OM.indb 24 15/7/08 12:08:33 PM15/7/08 12:08:33 PM
Page 26

3) STORE NAME appears and a cursor fl ashes indicating that the display
is ready for the name to be entered.
If the selected speed dial number is already assigned, the Edit screen
appears. You can select MAKE A CALL to dial the number, select EDIT
MEMORY to edit this entry, select DELETE MEMORY to erase this
entry, or select GO BACK to choose another speed dial number.
4) Enter a name according to the instructions below.
• The name can be up to 14 characters.
• Use
• Use
[∗/tone/ ]
[delete/channel]
and
[#/ ]
to move the cursor to the desired location.
on the cordless handset (
[ ]
(delete) on the base) to delete characters as
needed.
• Press and hold
[delete/channel]
on the cordless handset (
[ ]
(delete) on the base) to delete all the
characters.
• If no name is required, go to step 5.
Refer to the letters on the number keys to select the desired characters.
Each time you press a numeric key, the displayed character appears in the following order: Upper case
letters fi rst, lower case letters next and fi nally the number corresponding to the key.
If you make a mistake while entering a name
Use
[∗/tone/ ]
Press
[delete/channel]
and
[#/ ]
to move the cursor to the incorrect character.
on the cordless handset (
[ ]
(delete) on the base) to erase the wrong character.
Then enter the correct character. To delete all characters, press and hold
cordless handset (
[ ]
(delete) on the base).
[delete/channel]
on the
[25]
SPEED DIALING FROM THE
CORDLESS HANDSET
SSE17+1 OM.indb 25SSE17+1 OM.indb 25 15/7/08 12:08:33 PM15/7/08 12:08:33 PM
Page 27

For example, to enter Movies:
2 ABC
3 DEF
4 GHI
5 JKL
6
MNO
7
PQRS
8
TUV
9
WXYZ
0
1
2 ABC
3 DEF
4 GHI
5 JKL
6
MNO
7
PQRS
8
TUV
9
WXYZ
0
1
[6]
1) Press
Then press
once to enter M.
[#/ ]
to move the cursor
to the right.
Number of times key is pressed
Number of times key is pressed
keys 1 2 3 4 5 6 7 8 9
keys 1 2 3 4 5 6 7 8 9
SPEED DIALING FROM THE
CORDLESS HANDSET
2) Press
3) Press
4) Press
5) Press
6) Press
5) Press
[6]
six times to enter o.
[8]
six times to enter v.
[4]
six times to enter i.
[3]
fi ve times to enter e.
[7]
eight times to enter s.
[select/intercom]
on the handset (
oper
oper
[menu/set]
on the base). STORE
NUMBER is displayed. The cursor fl ashes indicating that the display is
ready for the number to be entered
6) Use the keypad to enter the phone number; each number can be up to 20
digits. If you need the phone to pause during the dialing sequence, press
[redial/pause]
on the handset (
[redial/pause]
on the base). to insert a twosecond pause between the numbers. You can enter multiple pauses to
increase the delay. Each pause counts as a digit. The display shows a P
for every pause.
Note: If the next character uses the same number key, you must press
Otherwise the next time you press the number key, it changes the character that was previously set.
[#/ ]
to move the cursor over.
[26]
SSE17+1 OM.indb 26SSE17+1 OM.indb 26 15/7/08 12:08:34 PM15/7/08 12:08:34 PM
Page 28

7) Press
[select/intercom]
on the handset (
[menu/set]
on the base). You will
hear a confi rmation tone.
8) After about 2 seconds, the speed dial entries will appear.
9) Press
[memory]
on the handset (
[mem]
on the base) to exit memory
setup mode. The phone returns to standby.
Storing Caller ID Information to Speed Dial Locations
Caller ID names & numbers shown in the Caller ID list can be stored to a speed dial location.
For instructions on viewing the Caller ID information, see page 40. If the Caller ID information did not
include the phone number, then you will not be able to store it.
Follow these steps to store a Caller ID name and number to a speed dial location:
1) Press
to be stored from the Caller ID list by pressing
2) Press
[27]
[CID]
on the handset (
/-]
on the handset (
[memory]
[cid]
on the base). Select the phone number
[select/ ] or [select/ ]
on the handset (
[mem]
[volume/ /+]
on the base).
on the base).
or
[volume/
SPEED DIALING FROM THE
CORDLESS HANDSET
SSE17+1 OM.indb 27SSE17+1 OM.indb 27 15/7/08 12:08:35 PM15/7/08 12:08:35 PM
Page 29

3) Enter a number
handset (
[select/ ] or [select/ ]
location to be stored.
[0-9]
or press
[volume/ /+]
or
[volume/ /-]
on the
on the base) to select the memory
USING YOUR PHONE
4) Press
[select/intercom]
on handset (
[menu/set]
on base ). You will hear a
confi rmation tone, and the number is stored in memory. The display
returns to the Caller ID data.
Note: If a message has already been stored in the selected memory
number location, a confi rmation screen is displayed. Press
[volume/ /+]
Press
overwrite. The display returns to the Caller ID data.
[select/intercom]
on the handset (
on the handset ([menu/set] on the base) to
[select/ ]
on the base) to select YES.
Using Your Phone
During a Power Failure
Because the phone is a corded/cordless combination phone, it can still perform several of its functions
during a power failure. The following features will function with base corded handset even during a power
failure:
-- Making and receiving calls with the base corded handset
-- Using your Emergency Dial
-- Using your one-touch speed dial
-- Adjusting the volume (Base corded handset only)
-- Call Waiting (Base corded handset only)
-- Redialing the last number dialed (Base corded handset only)
[ ]
key after picking up the base corded handset
[A-C]
keys after picking up the base corded handset
[28]
SSE17+1 OM.indb 28SSE17+1 OM.indb 28 15/7/08 12:08:35 PM15/7/08 12:08:35 PM
Page 30

All other features are disabled during a power failure.
Making and Receiving Calls
Making a
call
Receiving a
call
Hanging Up
From the cordless handset
1) Pick up the handset from the cradle.
[talk]
2) Press
.
3) Listen for the dial tone.
4) Dial the number.
OR
1) Remove the handset from the cradle.
2) Dial the number.
3) Press
[talk]
.
From the base
speakerphone
1) Press
[ ]
.
2) Listen for the dial tone.
3) Dial the number.
OR
1) Dial the number.
2) Press
[ ]
.
From the base
corded handset
1) Pick up the corded
handset.
2) Listen for the dial tone.
3) Dial the number.
OR
1) Dial the number.
2) Pick up the corded
handset.
Note: To insert a two-second pause in the dialing sequence in standby, press
A P appears in the display.
1) Pick up the handset from the cradle.
(If AutoTalk is on, the phone answers
automatically when you pick up the
handset from the charging cradle.)
2) Press
[talk]
.
OR
Press
[ ]
.
Pick up the corded
handset.
If the handset is off the cradle, press
[talk]
. (If AutoTalk is on, you can press
any key in the twelve number keypad.)
Press
cradle.
[talk]
or return the handset to the
Press
[ ]
.
Return the corded
handset to the base.
[redial/pause]
.
USING YOUR PHONE
[29]
SSE17+1 OM.indb 29SSE17+1 OM.indb 29 15/7/08 12:08:36 PM15/7/08 12:08:36 PM
Page 31

Switching between the Base Speakerphone and Corded Handset During a Call
To switch a call from the corded handset on the base to the base speakerphone, press [ ]
To switch from a base speakerphone call to the base corded handset, pick up the corded handset.
on the base.
Making a Call from the Base One-Touch Speed Dial Locations
Simply press one of the three
automatically dial the number. To cancel, press
(3)
One-touch Speed Dial
[ ]
[A-C]
keys on the base, and your phone will
on the base.
Making a Call from the Emergency Dial or Speed Dial Locations
Simply press the Emergency Dial
dial the number.
To cancel, press
To dial one of the speed dial numbers, simply follow these steps:
1) Press
[memory]
on the handset (
displays your programmed speed dial numbers.
2) Enter the number
handset (
[select/ ] or [select/ ]
[0-9]
the speed dial number you would like to dial.
3) Press
[talk]
on the handset (
is dialed.
To cancel speed dialing
Press
[ ]
on the base or
[talk]
to standby. Also, if the phone is idle (e.g., no key is pressed) for 30 seconds,
the phone returns to standby.
Easy dialing
[ ]
key on the base or cordless handset and your phone will automatically
[ ]
, or press
on the base or [talk]
[mem]
on the base). The handset (or base if base key is pressed)
[volume/ /+]
or
on the cordless handset.
[volume/ /-]
on the
on the base) to select
[ ]
on the base) and the displayed number
on the handset again to cancel speed dialing. The phone returns
USING YOUR PHONE
[30]
SSE17+1 OM.indb 30SSE17+1 OM.indb 30 15/7/08 12:08:37 PM15/7/08 12:08:37 PM
Page 32

If you want to directly access the speed dial location, press and hold
standby, and when the stored number appears, press
[ ]
on the base or
Making a Call from a Caller ID Listing
You can place a call from the Caller ID list.
[0-9]
when the handset or base is in
[talk]
on the handset.
1) Press
2) Select the phone number that you want to dial by pressing
[select/
3) Press
[cid]
on the base or
on the base, or
[ ]
on the base or
[CID]
on the cordless handset.
[volume/ /+]
[talk]
on the handset or remove the corded
or
[volume/ /-]
[select/ ]
or
on the handset.
handset from the base. The displayed phone number dials automatically.
Note:
• You can also press
or remove the corded handset from the base before fi nding the phone number you want to dial. When
you come to the phone number you want to dial, press
the handset.
• You cannot make a call from the Caller ID list if your cordless phone is connected to a private branch
exchange (PBX).
[ ]
on the base or [talk] on the handset.
[menu/set]
on the base or
[select/intercom]
Call Waiting
If you subscribe to Call Waiting service, you can receive calls while on the line.
on
USING YOUR PHONE
[31]
SSE17+1 OM.indb 31SSE17+1 OM.indb 31 15/7/08 12:08:37 PM15/7/08 12:08:37 PM
Page 33

1) If a call comes in while you are on the phone, you will hear a call waiting tone. If you have CIDCW
activated, you will see the name and number of the incoming caller.
USING YOUR PHONE
For Australian model: Press
[fl ash]
and then
[2]
on the base or
cordless handset to switch between callers.
For New Zealand model: Press
[fl ash]
on the base or cordless
handset to switch between callers.
Tip: You must subscribe through your local telephone company
to receive Call Waiting service.
Redialing the Last Number Dialed
From the cordless handset
1) Pick up the handset from the
cradle.
2) Press
[talk]
.
3) Listen for the dial tone.
4) Press
[redial/pause]
.
OR
1) Pick up the handset from the
cradle.
2) Press
3) Press
[redial/pause]
[talk]
.
.
From the base speakerphone
[ ]
1) Press
.
2) Listen for the dial tone.
3) Press
[redial/pause]
.
OR
1) Press
2) Press
[redial/pause]
[ ]
.
.
From the base corded handset
1) Pick up the corded handset.
2) Listen for the dial tone.
3) Press
[redial/pause]
.
OR
1) Press
[redial/pause]
.
2) Pick up the corded handset.
[32]
SSE17+1 OM.indb 32SSE17+1 OM.indb 32 15/7/08 12:08:38 PM15/7/08 12:08:38 PM
Page 34

Adjusting the Ringer, Earpiece and Speaker Volume
Adjusting the Base Ringer
Ringer on/off: The ringer on/off switch allows you to set the base ringer
on or off. If you set the switch to off, the base ringer will be silent.
Ringer tone: Press the ringer tone button in standby to select one of 7
ring tones.
Ringer volume: The base has ten settings for ringer volume.
1) With the phone in standby, press
[select/ ]
or
[select/ ]
.
2) The base will sound the ringer volume at the selected setting and
display the new ringer volume.
Adjusting the Handset Ring Tone and Volume
Your cordless handset has two different ring tones (A and B) and two
different volumes for each (low and high).
1) With the phone in standby, press
[volume/ /+]
or
[volume/ /-]
to cycle
through Ringer A High, Ringer A Low, Ringer B High, Ringer B Low,
and Ringer off.
2) The phone will sound the different ring tones at different volumes. To
turn the ringer off, select Ringer Off.
[33]
SSE17+1 OM.indb 33SSE17+1 OM.indb 33 15/7/08 12:08:38 PM15/7/08 12:08:38 PM
USING YOUR PHONE
Page 35

Adjusting the Earpiece and Speaker Volume
Base Speakerphone: You can select eight different volume levels for the base speaker. To adjust the base
speaker volume while on a call, press
[select/ ]
(to make it louder) or
[select/ ]
(to make it softer). This
setting will remain in effect after the telephone call has ended.
Base Corded Handset: You can select the earpiece volume from among four volume levels. To adjust the
earpiece volume of corded handset while on a call, press
[select/ ]
(to make it louder) or
[select/ ]
(to
make it softer). This setting will remain in effect after the telephone call has ended.
Cordless Handset: You can select the earpiece volume from among four volume levels. To adjust the
earpiece volume of cordless handset while on a call, press
[volume/ /-]
(to make it softer). This setting will remain in effect after the telephone call has ended.
[volume/ /+]
(to make it louder) or
Temporarily Muting the Base Ringer
USING YOUR PHONE
To mute the ring tone temporarily for the base, when the phone is ringing, press
[ ]
(play/stop) on the
base. The mute will last for the current incoming call only. The ring tone will return to the previous setting
starting with the next incoming call.
Audio Boost for the Cordless Handset
This feature allows you to hear phone conversations more clearly by boosting the high
audio frequency tones.
To set audio boost on, slide the audio boost on/off switch upward. BOOST ON appears
on the handset display under the volume setting when you start a call. To set audio boost
off, slide the audio boost on/off switch downward.
[34]
SSE17+1 OM.indb 34SSE17+1 OM.indb 34 15/7/08 12:08:39 PM15/7/08 12:08:39 PM
Page 36

Selecting a Different Channel
If you encounter interference while using your cordless handset, you can manually change the handset’s
channel for clear operation. While using your handset, press
[delete/channel]
. SCANNING appears on the
display, indicating the handset is changing to another channel.
Finding the Lost Handset
If you misplace the cordless handset, press
handset fl ashes, and the cordless handset will beep for 60 seconds.
[page/hold]
on the base. The visual ringer on the cordless
To cancel a fi nd handset page, press
[page/hold]
on the base. Paging is also canceled
when the phone receives an incoming call.
Placing a Call on Hold from the Base
1) During a call from the base, press
2) To return to the call, press
[ ]
on the base. To talk to the caller from the cordless handset, press
Note:
• You can place a call on hold for ten minutes. When ten minutes has passed, the call is disconnected,
and the phone automatically returns to standby.
• You can return the corded handset to the base while a call is on hold, and the call will remain on hold.
[page/hold]
[35]
SSE17+1 OM.indb 35SSE17+1 OM.indb 35 15/7/08 12:08:39 PM15/7/08 12:08:39 PM
[page/hold]
. The call will be put on hold.
again, pick up the corded handset or press
[talk]
on the cordless handset.
USING YOUR PHONE
Page 37

Conferencing
With this phone system, up to three people can participate in a
conference call while using an outside line, the cordless handset,
and the base.
Joining a Conference Call
You can easily join a call already in progress.
USING YOUR PHONE
Joining the
conference
call
Exiting the
conference
call
From the cordless handset
During a call from the base,
press
[talk]
on the handset.
Press
[talk]
on the handset or
return the handset to the
cradle.
The base will still be connected
From the base
speakerphone
During a call from the cordless
handset, press
[ ]
on the
base.
Press
[ ]
on the base.
The cordless handset will still
be connected to the call.
During a call from the cordless
handset, pick up the corded
base handset.
Return the corded handset to
the base cradle.
The cordless handset will still
be connected to the call.
From the base
corded handset
to the call.
[36]
SSE17+1 OM.indb 36SSE17+1 OM.indb 36 15/7/08 12:08:40 PM15/7/08 12:08:40 PM
Page 38

Intercom
The intercom feature lets you communicate between the cordless handset and base without using the
phone line. You can make an intercom call while an outside caller is on hold; making an intercom call will not
terminate the call on hold. If the party does not answer within one minute, the operation is canceled.
Making an Intercom Page
Making an
Intercom
Page
(in standby)
Making an
Intercom
Page
(During a
call)
[37]
From the cordless handset
1) Press
[select/intercom]
.
2) The base will be paged.
An intercom tone sounds.
To cancel the Page:
Press
[select/intercom]
or
return the handset to the
cradle.
1) Press
[select/intercom]
.
2) The call will automatically
be placed on hold, and the
paging tone sounds.
To cancel the Page:
Press
[talk]
[select/intercom]
.
or
From the base
speakerphone
1) Press
[page/hold]
.
2) The handset will be paged.
An intercom tone sounds.
To cancel the Page:
[page/hold]
Press
1) Press and hold
or
[ ]
.
[page/hold]
2) The call will automatically
be placed on hold, and the
paging tone sounds.
To cancel the Page:
Press
[page/hold]
or
[ ]
.
From the base
corded handset
1) Press
[page/hold]
.
2) The handset will be paged.
An intercom tone sounds.
3) Pick up the corded handset.
To cancel the Page:
Press
[page/hold]
or return the
corded handset to the base.
.
1) Press and hold
[page/hold]
2) The call will automatically
be placed on hold, and the
paging tone sounds.
To cancel the Page:
Press
[page/hold]
.
.
USING YOUR PHONE
SSE17+1 OM.indb 37SSE17+1 OM.indb 37 15/7/08 12:08:40 PM15/7/08 12:08:40 PM
Page 39

Answering and Hanging up an Intercom Page
USING YOUR PHONE
On the cordless handset
With the base
speakerphone
With the base
corded handset
1) Pick up the handset from the cradle.
(If AutoTalk is on, the phone answers
automatically when you pick up the handset
Answering
an Intercom
Page
from the charging cradle.)
2) Press
[select/intercom]
or
OR
If the handset is off the cradle,
[select/intercom]
or
[talk]
.
[talk]
press
.
Press
[ ]
[page/hold]
.
Pick up the corded
or
handset.
(If AutoTalk is on, you can press any key in the
twelve number keypad.)
Hanging up
an Intercom
Page
Press
[select/intercom]
or
[talk]
.
Press
[ ]
.
Return the corded
handset to the base.
Transferring a Call
You can transfer a call from one station to another. You may also place a call on hold, intercom page the
other station and then transfer the call to that station.
During a call, press and hold
[page/hold]
on the base or press
[select/intercom]
on the cordless handset.
To transfer the call, the other station must answer. The station transferring the call may now hang up.
[38]
SSE17+1 OM.indb 38SSE17+1 OM.indb 38 15/7/08 12:08:41 PM15/7/08 12:08:41 PM
Page 40

USING CALLER ID AND CALL
Using Caller ID and Call Waiting
You must subscribe to Caller ID service through your local telephone provider to use this feature.
When the telephone rings, the Caller ID feature allows you to view the caller’s phone number,
date and time of call, and Name Tag (POP ID) feature allows you to view the caller’s name (see
page 20). The incoming call information is stored in the Caller ID record.
If you subscribe to Caller ID on Call Waiting (CIDCW) you can view a second caller’s information fi rst (see
Using Call Waiting on page 31 to answer call). The CIDCW service is currently unavailable in New Zealand.
Base
Caller's name
Caller's name
Caller's
Caller's
phone number
phone number
Cordless Handset
The date and
The date and
time received
time received
Caller's name
Caller's name
Caller's phone number
Caller's phone number
You may receive any one of the following messages:
When invalid data is received; INCOMPLETE DATA
When a private name is received; PRIVATE NAME
When a private number is received; PRIVATE NUMBER
When an unknown name is received; UNKNOWN NAME
When an unknown number is received; UNKNOWN NUMBER
When an overseas call(0000) is received
(New Zealand only): OVERSEAS CALL
When a call is coming from a payphone
(Australia only): PAYPHONE
Note: Data errors will appear on the display as “ .”
WAITING
[39]
SSE17+1 OM.indb 39SSE17+1 OM.indb 39 15/7/08 12:08:41 PM15/7/08 12:08:41 PM
Page 41

USING CALLER ID AND
Viewing Caller ID Information
With a Caller ID subscription from your local telephone company, you have two different ways to view Caller
ID information. The fi rst way is to look at your cordless handset or base unit when you receive an incoming
call. The second is to view your Caller ID history list. To view your CID list, follow these steps:
1) With the phone in standby, press
the base). The summary screen appears. The screen shows the number
of new messages and total messages.
2) To view the Caller ID information in historical order (from new to old or
from old to new), use
[volume/ /-]
on the base) to scroll through the data from the latest to the earliest, or
[volume/
/+]
on the cordless handset (
back through the messages.
3) To fi nish viewing the CID information, press
While viewing Caller ID information from your CID list, you may notice that a number will appear next to the
received time of some Caller ID information. This indicates the number of times that you have received a
call from that number. Once you view the information, the number will be cleared.
[CID]
on the cordless handset (
on the cordless handset (
[select/ ]
or on the base) to scroll
[CID]
on the cordless handset (
[cid]
on
[select/]
[cid]
on the base).
CALL WAITING
[40]
SSE17+1 OM.indb 40SSE17+1 OM.indb 40 15/7/08 12:08:42 PM15/7/08 12:08:42 PM
Page 42

USING CALLER ID AND
While viewing or deleting Caller ID information, if you do not press a key within 30 seconds, an error tone
will sound and your phone will return to standby. Also, if you receive an incoming call or intercom page while
viewing Caller ID information, your operation will be canceled allowing you to answer the call or intercom
page.
Deleting Information from the Caller ID List
The cordless phone stores up to 50 Caller ID names and numbers. If the phone receives the 51st Caller ID,
the oldest one in the list is automatically deleted. Individual Caller ID data can also be deleted manually by
following these steps:
1) Press
2) Find the message to be deleted from the Caller ID list by pressing
[volume/ /+]
[select/] on the base).
3) Press
base).
4) Press
select YES, and then press
(
[CID]
[delete/channel]
[volume/ /+]
[menu/set]
on the base).
on the cordless handset (
or
[volume/ /-]
on the cordless handset (
on the cordless handset (
on the cordless handset (
[select/intercom]
[cid]
on the base) while in standby.
[select/ ]
[ ]
(delete) on the
[select/ ]
on the base) to
on the cordless handset
or
CALL WAITING
You will hear a confi rmation tone.
[41]
SSE17+1 OM.indb 41SSE17+1 OM.indb 41 15/7/08 12:08:42 PM15/7/08 12:08:42 PM
Page 43

USING CALLER ID AND
To Delete the entire Caller ID List:
1) Press
2) Press
[CID]
on the cordless handset (
[delete/channel]
on the cordless handset (
[cid]
on the base) while in standby.
[ ]
(delete) on the
base).
3) Press
[volume/ /+]
select YES, and then press
(
[menu/set]
on the base).
on the cordless handset (
[select/intercom]
[select/ ]
on the base) to
on the cordless handset
You will hear a confi rmation tone and all Caller ID information is deleted.
CALL WAITING
[42]
SSE17+1 OM.indb 42SSE17+1 OM.indb 42 15/7/08 12:08:43 PM15/7/08 12:08:43 PM
Page 44

SETTING UP THE ANSWERING
Setting Up the Answering Machine
The phone has a built-in answering machine that answers and records incoming calls.
You can also use your system to announce a special outgoing message to callers when you are away from
your phone.
Features
• Digital Tapeless Recording
• Up to 11 minutes of Recording Time
• Call Screening
• Personal or Pre-recorded Outgoing Messages
• Time and Day Announcement
• Remote Message Retrieval
• Toll Saver
• Message Alert
MACHINE
[43]
SSE17+1 OM.indb 43SSE17+1 OM.indb 43 15/7/08 12:08:43 PM15/7/08 12:08:43 PM
Page 45

Setting the Record Time (or Announce Only)
You can select how long a caller has to record a message. You have three record time options. The options
1 MINUTE or 4 MINUTES set the duration for recording the incoming messages. ANNOUNCE ONLY
answers the call and plays either your personal greeting or the pre-recorded system greeting, but prevents
the caller from leaving a message.
1) Press
2) Press
TIME, and then press
3) Press
[menu/set]
[select/▼]
[select/▲]
on the base.
to move the pointer to select RECORD
or
[select/▼]
[menu/set]
.
to select Record Time 1
MINUTE, 4 MINUTES, or ANNOUNCE ONLY.
4) Press
[menu/set]
Note:
• For your convenience, voice prompts will guide you through the menus.
• Press
• If you do not press a key within 30 seconds, the phone will time out and exit the menu.
[ ]
. You will hear a confi rmation tone.
(play/stop) on the base to return to standby.
Activating Call Screening
Your phone allows you to listen to callers leaving you a message. This feature can be turned on or off with
the following steps:
1) Press
2) Press
SCREENING, and then press
[menu/set]
[select/▼]
to move the pointer to select CALL
on the base.
[menu/set]
.
[44]
SETTING UP THE ANSWERING
MACHINE
SSE17+1 OM.indb 44SSE17+1 OM.indb 44 15/7/08 12:08:44 PM15/7/08 12:08:44 PM
Page 46

SETTING UP THE ANSWERING
3) Press
4) Press
[select/▲]
or
[menu/set]
[select/▼]
to select ON or OFF.
. You will hear a confi rmation tone.
Setting the Number of Rings
The ring time setting allows you to set the number of rings the caller hears before your answering machine plays
the outgoing message. You can set the ring time to answer after six, nine or twelve rings. If you enable the Toll
Saver, the answering machine picks up after six rings if you have new messages and after nine rings if there are
none.
1) Press
2) Press
then press
3) Press
[menu/set]
[select/▼]
to move the pointer to select RING TIME, and
[menu/set]
[select/▲]
or
on the base.
.
[select/▼]
to select a Ring Time (TOLL SAVER,
6 TIMES, 9 TIMES or 12 TIMES).
4) Press
[menu/set]
. You will hear a confi rmation tone.
Activating the Message Alert
The Message Alert feature sounds a short alert tone every 15 seconds whenever you have a new message.
Once all new messages have been played, the alert tone automatically stops beeping until you receive another
new unplayed message.
MACHINE
1) Press
2) Press
and then press
[menu/set]
[select/▼]
to move the pointer to select MESSAGE ALERT,
[menu/set]
on the base.
.
[45]
SSE17+1 OM.indb 45SSE17+1 OM.indb 45 15/7/08 12:08:44 PM15/7/08 12:08:44 PM
Page 47

3) Press
[select/▲]
or
[select/▼]
to select ON or OFF.
4) Press
[menu/set]
. You will hear a confi rmation tone.
To quickly turn off the Message Alert tone, press any key on the base unit; the tone will automatically quiet
until you receive another new message.
Setting Your Greeting
When you receive a call, the answering machine automatically plays either the pre-recorded message or
your own greeting. Your answering machine comes with the following pre-recorded message:
“Hello, no one is available to take your call. Please leave a message after the tone.”
Or you can record your own personal outgoing greeting. Your recorded greeting must be between 2
seconds and 30 seconds long. Once you have recorded a personal greeting, you can switch back and forth
between the pre-recorded greeting and your own personal greeting.
To Record a Personal Greeting:
1) Press
press and hold
“Record greeting” and a confi rmation tone.
If you already have a greeting recorded, you can delete the current one and then record a new greeting.
While the current greeting is playing, press
[greet]
. While the pre-recorded message is playing,
[greet]
again. You will hear the announcement
[ ]
(delete). And then start over with the fi rst.
SETTING UP THE ANSWERING
MACHINE
[46]
SSE17+1 OM.indb 46SSE17+1 OM.indb 46 15/7/08 12:08:44 PM15/7/08 12:08:44 PM
Page 48

2) Start recording your message. You will have 30 seconds, and the message counter will count down.
When you are fi nished recording your greeting, press
[greet], [ ]
(play/stop) or
[menu/set]
. You will
hear a confi rmation tone, and then your greeting plays back for you.
Note:
• Position yourself as close to the base as possible and speak clearly when recording your greeting.
• If you make an outside call or a call is received during the new greeting recording, the operation is
canceled.
• The greeting must be more than two seconds long, or it will not be recorded.
• To delete the personal greeting, press
announces “Greeting has been deleted.”
[ ]
(delete) while the message is playing. The system
Selecting Your Greeting
You can switch back and forth between your personal greeting and the pre-recorded system greeting. With
the phone in standby, press
[greet]
. Then press
[greet]
again while the outgoing greeting is played. This
switches between the prerecorded greeting and the personal greeting. After your greeting selection plays
back, a confi rmation tone is heard.
Setting a Security Code or Personal Identifi cation Number (PIN)
SETTING UP THE ANSWERING
MACHINE
To play your messages from a remote location outside of your home, you will need to enter a two-digit
Security code or Personal Identifi cation Number (PIN).
1) Press
2) Press
SECURITY CODE, and then press
[menu/set]
[select/▼]
to move the pointer to select
on the base.
[menu/set]
.
[47]
SSE17+1 OM.indb 47SSE17+1 OM.indb 47 15/7/08 12:08:45 PM15/7/08 12:08:45 PM
Page 49

3) Enter a two-digit Security or PIN code (01-99) using the number keypad. To change the number, use
[ ]
(delete) to backspace.
4) Press
[menu/set]
. You will hear a confi rmation tone.
Using Your Answering Machine
The message counter on the base display will show the number of messages you have waiting. If NEW
appears in the base display and fl ashes, you have new messages waiting that you have not yet listened to.
The answering machine will play all of your new messages fi rst and then play any old messages that you
have not yet deleted from the system.
Turning your Answering System On & Off
Turning On Turning Off
1) With the phone in standby, press
[on/off]
on the base.
2) The system announces
“Answering System is on” and
plays the current greeting.
3) The answer on/off light will be
illuminated. If the answer on/off
light fl ashes, then you have new
messages waiting.
1) With the phone in standby, press
[on/off]
on the base.
2) The system announces
“Answering System is off”.
3) The answer on/off light will no
longer be illuminated.
USING YOUR ANSWERING
MACHINE
Note: When the answering machine is full, FL appears on the base display. You should delete some
messages so that the system can record new messages.
[48]
SSE17+1 OM.indb 48SSE17+1 OM.indb 48 15/7/08 12:08:45 PM15/7/08 12:08:45 PM
Page 50

Reviewing Messages
The base display indicates the number of messages you have waiting. When you have new messages, the
answer on/off light on the base will fl ash and NEW will appear in the base display and fl ash. The answering
machine plays your new messages fi rst. After you listen to all of your new messages, you can then play your
old messages.
To review your messages from the base:
USING YOUR ANSWERING
MACHINE
Playing
messages
Repeating a
message
Skipping a
message
Deleting a
message
Deleting all
messages
Ending the
message
review
Note: You can not delete unheard messages. If you try to delete messages before listening to them, the
answering machine will beep and say “Please playback all messages.”
With the phone in standby, press
and old messages. It announces the message number, plays the message, then announces the
time and date it was received.
Press
[ |<< ]
(repeat/rewind) once to go to the beginning of the current message. Press
(repeat/rewind) repeatedly to go back to a previous message. Press and hold
rewind) to rewind through the current message.
Press
[ >>| ]
(skip/forward) to go to the beginning of the next message. Press and hold
(skip/forward) to fast forward through the current message.
While a message is playing, press
While the phone is in standby, press
]
(delete) again. All messages are permanently deleted.
Press
[ ]
(play/stop) at any time to stop the message playback and return to standby. The
message counter shows the number of messages stored in memory.
[ ]
(play/stop). The system announces the number of new
[ ]
(delete). The message is permanently deleted.
[ ]
(delete). When the system asks you to confi rm, press
[ |<< ]
[49]
[ |<< ]
(repeat/
[ >>| ]
[
SSE17+1 OM.indb 49SSE17+1 OM.indb 49 15/7/08 12:08:46 PM15/7/08 12:08:46 PM
Page 51

Screening Calls
Your phone allows you to listen to callers leaving a message without answering the phone. You can always
hear callers from the base speaker. To screen an incoming call, make sure your phone has Call Screening
activated. To activate this feature, please see page 44.
• To adjust the volume, press
• To answer the call, pick up the corded handset or press
• To mute the Call Screen, press
• To cancel muting, press
[select/▲]
[ ]
[select/▲]
or
[select/▼]
(play/stop).
or
[select/▼]
on the base.
.
[talk]
on the base.
• If you turn the answering system off, you cannot screen a call.
Remotely Operating Your Answering Machine
You can access your answering machine while you are away from home to check, play, delete messages or
even record a new greeting or turn your answering machine on and off. Once you enter the remote access
menu, you must enter a command within 15 seconds, or the system automatically hangs up and returns to
standby. For your convenience remote operation cards, located on page 62, are provided for you to use
while away from home.
To remotely operate your answering machine from any touch-tone telephone:
1) Call your telephone number.
USING YOUR ANSWERING
2) During the greeting, press
Identifi cation Number (PIN) on page 47).
[#]
and enter your PIN code (see Setting a Security Code or Personal
MACHINE
3) The system announces the current time and the number of messages stored in memory. Then you hear
“To play incoming messages, press pound two. For help, press pound zero.”
[50]
SSE17+1 OM.indb 50SSE17+1 OM.indb 50 15/7/08 12:08:46 PM15/7/08 12:08:46 PM
Page 52

4) You may continue to listen to the voice prompts, or you may select a command from the following chart:
Command Function Command Function
[#]
then
[#]
[#]
[#]
[#]
then
then
then
then
[1]
[2]
[3]
[4]
[5]
Repeat a Message
Play incoming Messages
Skip a Message
Delete a Message
Stop Operation
[#]
[#]
[#]
[#]
[#]
then
then
then
then
then
[6]
[7]
[8]
[9]
[0]
Answering System On
Memo Record/Stop*
Greeting Message Record/Stop*
Answering System Off
Voice Prompts
* For Memo Record and Greeting Message Record, the fi rst time you enter the corresponding command,
it starts the recording automatically. If you want to stop the recording, enter the command again.
5) After all of the voice prompts have been played, you will hear intermittent beeps indicating that the
system is in the command waiting mode. You may enter another command at this time from the chart.
6) When you are fi nished, hang up to exit. The system automatically returns to standby.
Note:
• If you enter an incorrect security code three times, you will hear a beep and the system will return to
standby.
• The voice memo messages are recorded as incoming messages.
• When the answering system is full, you cannot record a voice memo message until you clear some
messages from the memory.
USING YOUR ANSWERING
MACHINE
[51]
SSE17+1 OM.indb 51SSE17+1 OM.indb 51 15/7/08 12:08:46 PM15/7/08 12:08:46 PM
Page 53

Maintenance
Specifi cations
Operation Temperature -10oC to +50oC (+14oF to +122oF)
For the Base For the Charger
AC Adapter
Part Number
Input Voltage
Output Voltage
Part Number
Handset Battery
Capacity
Note: To avoid damage to the phone use only Uniden AAD-065S(M), AAD-600S(M) and BT-905S with your
phone.
Power Failure
During a power failure, you can make and receive calls with the base corded handset; however, you will not
be able to use the base speakerphone or the cordless handset. The following features are available with the
base corded handset during a power failure:
• Corded Volume Control
• Emergency Key
• 3 One-touch dial Keys
• Redial
• Pause
AAD-065S(M) AAD-600S(M)
240V AC, 50Hz 240V AC, 50Hz
9V DC @500mA 9V DC @210mA
BT-905S
500mAh, 3.6V DC
• Flash
• A special ring tone will sound during a power
failure and you will not be able to control the
volume setting of this ring.
MAINTENANCE
[52]
SSE17+1 OM.indb 52SSE17+1 OM.indb 52 15/7/08 12:08:47 PM15/7/08 12:08:47 PM
Page 54

Battery Life
With average use, your battery talk time will be approximately 6 hours and standby time will be
approximately 6 days. For optimum performance, be sure to return the cordless handset to the charging
cradle after each call. If the cordless handset is left off of the charger, the actual talk time duration will be
reduced respective to the amount of time the handset is off the cradle.
Note: Do not place the power cord where it creates a trip hazard or where it could become chafed and
create a fi re or electrical hazard.
Low battery alert
When the battery pack is very low, the cordless handset is programmed to eliminate functions in order to
save power. The battery pack needs to be charged when the cordless handset
shows LOW BATTERY CHARGE HANDSET. None of the cordless handset
keys will operate until the cordless handset is fully charged. If you are on a call
and LOW BATTERY appears, complete your conversation as quickly as
possible, and return the handset to the charger.
Battery Replacement and Handling
With normal use, your cordless phone’s battery should last approximately one year. To order replacement
batteries or adapters, please see inside back cover or visit www.uniden.com.au for Australian model or
www.uniden.co.nz for New Zealand model for contact information.
MAINTENANCE
Note: When replacing batteries, the information stored in the phone’s memory will only be retained for
30 minutes after the battery pack is removed. This includes volume, ringer tone and last number dialed.
You will want to replace the battery as quickly as possible in order to avoid losing your cordless handset
settings.
[53]
SSE17+1 OM.indb 53SSE17+1 OM.indb 53 15/7/08 12:08:47 PM15/7/08 12:08:47 PM
Page 55

Warning: To avoid the risk of personal injury or property damage from fi re or electrical shock, only
use the Uniden battery model and Uniden adapter model specifi cally designated for this product.
Caution:
• Use only the specifi ed Uniden battery pack (BT-905S).
• Do not remove the batteries from the handset to charge it.
• Never throw the battery into a fi re, disassemble, or heat it.
• Do not remove or damage the battery casing.
Installing the Rechargeable Battery for Cordless Handset
1) Press down on the cordless handset battery case
cover (use the fi nger indention for a better grip) and
slide the cover downward to remove.
2) Plug the battery pack connector (red & black wires)
into the jack inside the battery compartment. (The
connector notches fi t into the grooves of the jack only
one way.) Match the wire colors to the polarity label in
the battery compartment, connect the battery and
listen for a click to insure connection.
3) Make sure you have a good connection by slightly
pulling on the battery wires. If the connection is secure,
the battery jack will remain in place.
MAINTENANCE
4) Place the battery case cover back on the handset and
slide it upwards until it clicks into place.
Note: Use only the Uniden BT-905S rechargeable battery pack supplied with your cordless telephone.
[54]
SSE17+1 OM.indb 54SSE17+1 OM.indb 54 15/7/08 12:08:47 PM15/7/08 12:08:47 PM
Page 56

Cleaning the Battery Charging Contacts
To maintain a good charge, clean the charging contacts on both the cordless handset and charger once a
month. Dampen a cloth with plain water. Gently rub the damp cloth over the charging contacts until all
visible dirt is removed. Dry the contacts thoroughly before returning the handset to the cradle.
Caution:
Do not use paint thinner, alcohol, or other chemical products.
Doing so may discolor the surface of the telephone and damage the fi nish.
MAINTENANCE
[55]
SSE17+1 OM.indb 55SSE17+1 OM.indb 55 15/7/08 12:08:48 PM15/7/08 12:08:48 PM
Page 57

Troubleshooting
Traveling Out of Range
During a call, if you move your cordless handset too far away from your base, noise may increase. If you
pass the range limits of the base, your call will terminate within one minute.
Common Issues
If your phone is not performing to your expectations, please try these simple steps fi rst. If these steps do not
solve your problem, please call our Customer Service Hotline. Please see inside the back cover for contact
information.
Symptom Suggestion
The charge light won’t
illuminate when the
cordless handset is placed
in the cradle.
The audio sounds weak
and/or scratchy.
Can’t make or receive calls.
• Make sure the AC adapter is plugged into the cradle and wall outlet.
• Make sure the cordless handset is properly seated in the cradle.
• Make sure the charging contacts on the cordless handset and charger are
clean.
•
Move the handset and/or base away from metal objects or appliances and try again.
•
Press
[delete/channel] during a call to help eliminate background noise.
•
Make sure that the cordless handset is not too far from the base.
• Check both ends of the telephone cord.
• Make sure the AC adapter is plugged into the base and wall outlet.
• Disconnect the AC adapter for a few minutes. Then reconnect it.
• Make sure that the cordless handset is not too far from the base.
• Check the dialing mode used by your telephone company.
TROUBLESHOOTING
[56]
SSE17+1 OM.indb 56SSE17+1 OM.indb 56 15/7/08 12:08:48 PM15/7/08 12:08:48 PM
Page 58

Symptom Suggestion
TROUBLESHOOTING
During power failure, can’t
make or receive a call.
The cordless handset
doesn’t ring or receive an
intercom page.
Severe noise interference.
The Caller ID does not
display.
The answering machine
does not work.
The answering machine
does not record any
messages.
• Make sure to use corded handset to make or receive a call.
• Make sure that telephone cord is fi rmly connected.
• The battery pack may be weak. Charge the battery for 15-20 hours.
• The cordless handset may be too far from the base unit.
• Place the base unit away from appliances or metal objects.
• Check the battery pack to ensure there is a secure connection.
• Make sure ringer volume is not set to off.
• Keep the handset away from microwave ovens, computers, remote control toys,
wireless microphones, alarm systems, intercoms, room monitors, fl uorescent
lights, and electrical appliances.
• Move the base to another location or turn off the source of interference.
• The call was answered before the second ring.
• The call was placed through a switchboard.
• Your Caller ID service may not be active; contact your local telephone service
provider.
• Make sure the AC adapter is plugged into a wall outlet.
• Make sure the answering machine is turned on.
• Set the record time to either the one minute or four minutes option.
• The memory may be full. Delete some or all of the saved messages.
[57]
SSE17+1 OM.indb 57SSE17+1 OM.indb 57 15/7/08 12:08:48 PM15/7/08 12:08:48 PM
Page 59

Symptom Suggestion
Messages are incomplete.
After a power failure, the
outgoing message is
deleted.
No sound on the base
speaker during call
monitoring or message
playback.
Cannot access remote callin features from another
touch tone phone.
CID Announce feature is not
announcing new incoming
calls.
• The incoming messages may be too long. Remind callers to leave a brief
message.
• The memory may be full. Delete some or all of the saved messages.
• Record your personal outgoing message again. The default message should
remain.
TROUBLESHOOTING
• Adjust the speaker volume on the base.
• Make sure the call screen feature is set to on.
• Make sure you are using the correct PIN code.
• Make sure that the touch-tone phone you’re using can transmit the tone for at
least two seconds. If it cannot, you may have to use another phone to access
your phone.
• Check to make sure the CID Announce switch on the back of the base is set to
ON.
• Check your base speaker volume to ensure it is loud enough to hear the CID
Announce feature.
[58]
SSE17+1 OM.indb 58SSE17+1 OM.indb 58 15/7/08 12:08:49 PM15/7/08 12:08:49 PM
Page 60

Liquid Damage
Moisture and liquid can damage your cordless phone.
• If the handset or base is exposed to moisture or liquid, but only the exterior plastic housing is affected,
wipe off the liquid, and use as normal.
• If moisture or liquid has entered the plastic housing (i.e. liquid can be heard in the phone or liquid has
entered the handset battery compartment or vent openings on the base), follow the steps below:
Cordless Handset Base
1) Remove the battery cover and leave it off for
ventilation.
2) Disconnect the battery pack. Leave the battery
cover off and the battery pack disconnected for at
least 3 days.
3) Once the handset is completely dry, reconnect the
battery pack and the battery cover.
4) Recharge the handset’s battery pack for 15 to 20
hours before using.
IMPORTANT:
You must unplug the telephone line while recharging the battery packs to avoid charge interruption.
1) Disconnect the AC adapter from the base, cutting
off electrical power.
2) Disconnect the telephone cord from the base.
3) Let dry for at least 3 days.
TROUBLESHOOTING
CAUTION:
DO NOT use a microwave oven to speed up the drying process. This will cause permanent damage to the
handset, base and the microwave oven. After following these steps, if your cordless telephone does not
work, please see inside back cover or visit www.uniden.com.au for Australian model or www.uniden.
co.nz for New Zealand model for contact information.
[59]
SSE17+1 OM.indb 59SSE17+1 OM.indb 59 15/7/08 12:08:49 PM15/7/08 12:08:49 PM
Page 61

Precautions!
Before you read anything else, please note the
following:
Warning!
Uniden Australia Pty Ltd and Uniden NZ Ltd DO
NOT represent this unit to be waterproof. To
reduce the risk of fi re, electrical shock, or damage
to the unit, DO NOT expose this unit to rain or
moisture.
Rechargeable Nickel-Cadmium Battery
Warning
• This equipment contains a rechargeable nickelcadmium battery.
• The rechargeable nickel-cadmium battery
contained in this equipment may explode if
disposed of in a fi re.
• Do not short-circuit the battery.
• Do not charge the rechargeable nickel-cadmium
battery used in this equipment in any charger
other than the one designed to charge this
battery as specifi ed in the owner’s manual.
Using another charger may damage the battery
or cause the battery to explode.
The exclamation point within an
equilateral triangle is intended to alert
the user to the presence of important
operating and maintenance (servicing)
instructions in the literature
accompanying the appliance.
Uniden works to reduce lead content in our PVC
coated cords in our products and accessories.
Important Safety Instructions
When using your telephone equipment, basic
safety precautions should always be followed to
reduce the risk of fi re, electric shock and injury to
persons, including the following:
1. Do not use this product near water, for
example, near a bath tub, wash bowl, kitchen
sink or laundry tub, in a wet basement or near
a swimming pool.
2. Avoid using a telephone (other than a cordless
type) during an electrical storm. There may be
a remote risk of electric shock from lightning.
PRECAUTIONS
[60]
SSE17+1 OM.indb 60SSE17+1 OM.indb 60 15/7/08 12:08:49 PM15/7/08 12:08:49 PM
Page 62

Index
A
AC adapter information ............. 52
Answering machine
Remote operation ................... 50
Reviewing messages ............. 49
Setup ...................................... 43
Turning on & off ...................... 48
Audio boost ............................... 34
B
Battery pack
Information ............................. 52
Installing ................................. 54
Replacement and handling ..... 53
Beltclip installation .................. 18
C
Caller ID service ........................ 39
Call waiting ............................. 31
Deleting .................................. 41
Making a call .......................... 31
Viewing .................................. 40
Channel .................................. 35
Charging a battery pack ......... 17
Cleaning contacts ..................... 55
Clock ......................................... 19
Connect the base unit ............... 12
Connect the cradle .................... 17
D, E, F, G, H
Earpiece volume ....................... 33
Emergency dial ................... 22, 30
Finding the lost handset ............ 35
Greeting .............................. 46, 47
Headset installation ................... 18
I, J, K, L
Insert 0 ...................................... 20
Installing the phone ................... 11
Intercom .................................... 37
Liquid damage .......................... 59
M, N, O, P, Q
Maintenance ............................. 52
Making a call ............................. 29
Message alert ........................... 45
Name Tag .................................. 20
One-touch speed dial (Base) ..... 23
Personal identifi cation number
(PIN) ....................................... 47
Power failure ....................... 28, 52
Precautions ............................... 60
Product overview ........................ 5
R
Receiving a call ......................... 29
Record time ............................... 44
Redial ........................................ 32
Remote operation ..................... 50
Reviewing messages ................ 49
Ring time ................................... 45
Ringer tone and volume ............ 33
S
Screening calls .................... 44, 50
Setting Caller ID on Call Waiting
(CIDCW) ................................ 21
Setup
Answering machine ................ 43
Base ....................................... 19
Handset .................................. 21
Speaker volume ........................ 33
Specifi cations ............................ 52
Speed dial memory
Making calls ........................... 30
One-touch speed dial
(Base) .................................. 23
Storing names and numbers .. 24
T, U
Transferring a call ..................... 38
Traveling out of range ............... 56
Troubleshooting ........................ 56
V, W, X, Y, Z
Visual ringer .............................. 14
Wall mounting ........................... 15
Warranty ................................... 66
INDEX
[61]
SSE17+1 OM.indb 61SSE17+1 OM.indb 61 15/7/08 12:08:49 PM15/7/08 12:08:49 PM
Page 63

Remote Operation Card
C U T
C U T
REMOTE OPERATION CARD
Remote access away from home
1. Call your phone number from
a touch-tone phone.
2. During the outgoing message,
press [#] and enter your PIN
code. The answering system
announces the number of
messages stored in memory
and the voice prompts. The
phone stands by for you to
enter a command.
3. To quit, hang up the phone.
C U T
C U T C U T
REMOTE OPERATION CARD
Remote access away from home
1. Call your phone number from
a touch-tone phone.
2. During the outgoing message,
press [#] and enter your PIN
code. The answering system
announces the number of
messages stored in memory
and the voice prompts. The
phone stands by for you to
enter a command.
3. To quit, hang up the phone.
Turn on the answering system remotely
1. Call your phone and let it ring
15 times until it answers.
2. Press [#] and enter your PIN
code.
3. Press [#] then [5] to stop
the announcement.
4. Press [#] then [6] to turn the
answering system on.
Turn on the answering system remotely
1. Call your phone and let it ring
15 times until it answers.
2. Press [#] and enter your PIN
code.
3. Press [#] then [5] to stop
the announcement.
4. Press [#] then [6] to turn the
answering system on.
Memory
Location
Memory
Location
1*
2
3
4
5
1*
2
3
4
5
C U T
C U T
MEMORY LOCATION MEMO
Phone NumberName
C U T
MEMORY LOCATION MEMO
Phone NumberName
SSE17+1 OM.indb 62SSE17+1 OM.indb 62 15/7/08 12:08:50 PM15/7/08 12:08:50 PM
Page 64

Remote Operation Card
C U T C U T
C U T
C U T
Memory
Location
6
7
8
9
10
Memory
Location
6
7
8
9
10
MEMORY LOCATION MEMO
Name
C U T C U T
C U T
Phone Number
MEMORY LOCATION MEMO
Phone NumberName
Task Key
Repeat a Message # 1
Play Incoming Messages # 2
Skip a Message # 3
Delete a Message # 4
Stop Operation # 5
Answering System On # 6
Memo Record/Stop # 7
Greeting Message Record/Stop # 8
Answering System Off # 9
Voice Prompts # 0
C U T
Task Key
Repeat a Message # 1
Play Incoming Messages # 2
Skip a Message # 3
Delete a Message # 4
Stop Operation # 5
Answering System On # 6
Memo Record/Stop # 7
Greeting Message Record/Stop # 8
Answering System Off # 9
Voice Prompts # 0
SSE17+1 OM.indb 63SSE17+1 OM.indb 63 15/7/08 12:08:50 PM15/7/08 12:08:50 PM
Page 65

Memo
[64]
SSE17+1 OM.indb 64SSE17+1 OM.indb 64 15/7/08 12:08:50 PM15/7/08 12:08:50 PM
Page 66

Memo
[65]
SSE17+1 OM.indb 65SSE17+1 OM.indb 65 15/7/08 12:08:50 PM15/7/08 12:08:50 PM
Page 67

ONE YEAR LIMITED WARRANTY
UNIDEN SSE17+1
IMPORTANT :
for warranty service.
WARRANTOR : Uniden Australia Pty Limited
A.B.N. 58 001 865 498
Uniden New Zealand Limited
Warranty only available in original country of
purchase.
ELEMENT OF WARRANTY :
Uniden warrants to the original retail owner for the duration of this warranty,
its SSE17+1 (herein after referred to as the Product), to be free from defects
in materials and craftsmanship with only the limitations or exclusions set out
below.
WARRANTY DURATION:
This warranty to the original retail owner only, shall terminate and be of no
further effect ONE (1) year after the date of original retail sale. This warranty
will be deemed invalid if the Product is;
(A) Damaged or not maintained as reasonable and necessary,
(B) Modified, altered or used as part of any conversion kits, subassemblies,
or any configurations not sold by Uniden,
(C) Improperly installed,
(D) Repaired by someone other than an authorized Uniden Repair Agent for
a defect or malfunction covered by this warranty,
(E) Used in conjunction with any equipment or parts or as part of a system
not manufactured by Uniden, or
(F) Where the Serial Number label of the product has been removed or
damaged beyond recognition.
Warranty only valid in the country of original retail/sale.
PARTS COVERED:
This warranty covers for one (1) year, the Product and included accessories.
STATEMENT OF REMEDY:
In the event that the Product does not conform to this warranty at any time
while this warranty is in effect, the warrantor at its discretion, will repair the
defect or replace the Product and return it to you without charge for parts
or service. This warranty does not provide for reimbursement or payment of
incidental or consequential damages.
This EXPRESS WARRANTY is in addition to and does not in any way affect
your rights under the TRADE PRACTICES ACT 1974 (Cth) (Australia) or the
CONSUMER GUARANTEES ACT (New Zealand).
PROCEDURE FOR OBTAINING PERFORMANCE OR WARRANTY:
In the event that the Product does not conform to this warranty, the Product
should be shipped or delivered, freight pre-paid, with evidence of original
Evidence of original purchase is required
purchase (e.g. a copy of the sales docket), to the warrantor at:
UNIDEN AUSTRALIA PTY LIMITED
SERVICE DIVISION
345 Princes Highway, Rockdale NSW 2216
Fax (02) 9599 3278
www.uniden.com.au
UNIDEN NEW ZEALAND LIMITED
SERVICE DIVISION
50 Harris Road, East Tamaki, Auckland
Fax (09) 274 4253
www.uniden.co.nz
Customers in other States should ship or deliver the Product freight pre-paid
to their nearest Uniden Authorized Repair Centre
(Contact Uniden for the nearest Warranty Agent to you)
1
ONE YEAR LIMITED
WARRANTY
[66]
SSE17+1 OM.indb 66SSE17+1 OM.indb 66 15/7/08 12:08:50 PM15/7/08 12:08:50 PM
Page 68

© 2008 Uniden Australia Pty Limited/Uniden New Zealand Limited
Printed in China UPZZ01138ZZ(0)
SSE17+1 OM.indb 67SSE17+1 OM.indb 67 15/7/08 12:08:51 PM15/7/08 12:08:51 PM
 Loading...