

Uniden SS E15 User Manual

SS E15
Series Owner's Manual
OWNER'S MANUAL


Contents
Welcome/Features 2
Controls and Functions 3
Terms Used in this Manual 4
Getting Started
Installing the Phone 5
A. Choose the Best Location 5
B. Connect the Base Unit and Charge
the Handset 6
C. Set the Visual Ringer Brightness 8
D. Mount the Base Unit on a Wall 9
Installing the Belt Clip 10
Headset Installation 10
Basic Setup 11
Auto Talk 11
Activating Caller ID on Call Waiting 11
Name Tag (POP ID) 12
Insert 0 13
Selecting the Ringer Tone and Volume 14
Basics
Using Your Phone 15
Making and Receiving Calls 15
Adjusting the Handset Earpiece Volume 16
Traveling Out-of-Range 17
Selecting a Different Channel 18
Find Handset 18
Using Call Waiting 19
Visual Message Waiting Indicator 19
Emergency Dial
Emergency Dial 20
Storing the Emergency Dial 20
Using the Speed Dial Memory
Using the Speed Dial Memory 21
Storing Names and Numbers in
Speed Dial Memory 21
Storing Caller ID Messages
in Speed Memory Locations 24
Making Calls from Speed Dial Memory 25
Easy Dial 25
Caller ID Features
Caller ID and CIDCW (Caller ID on Call Waiting) 26
When the Telephone Rings 26
Viewing the Caller ID Message List 27
Deleting Information from the Caller ID List 28
Making a Call from the Caller ID List 30
Additional Information
Changing the Digital Security Code 31
Note on Power Sources 32
Installing a Replacement Battery 33
Maintenance 34
Troubleshooting 35
Liquid Damage 37
General Information 38
Index 39
Warranty 40
[1]

Welcome
Congratulations on your purchase of the Uniden cordless telephone. This
cordless phone is designed and engineered to exacting standards for reliability,
long life, and outstanding performance.
Features
Note: Some illustrations in this manual may differ from the actual unit for
explanation purposes.
• 2.4GHz Extended Range
Technology
• Visual Ringer LED
• Large Backlit Keys
• Caller ID*
• Caller ID on Call Waiting*
(CIDCW)
• Name Tag* (POP ID)
• 10 Speed Dial Memory
• One-Touch Emergency Dial
* The Caller ID and Caller ID on Call Waiting features require subscription to the
services provided by your network supplier. There is usually a fee for these
services. The Caller ID on Call Waiting service is currently unavailable in New
Zealand.
Be sure to visit our Website: www.uniden.com.au or www.uniden.co.nz
• 3 Line Backlit Easy to Read Display
• Audio Boost
• Last Number Redial
• Find Handset Key
• Earpiece/Ringer Volume Controls
• Hearing Aid Compatible
• 20 Channel Auto Scan
• Desk or Wall Mountable
[2]
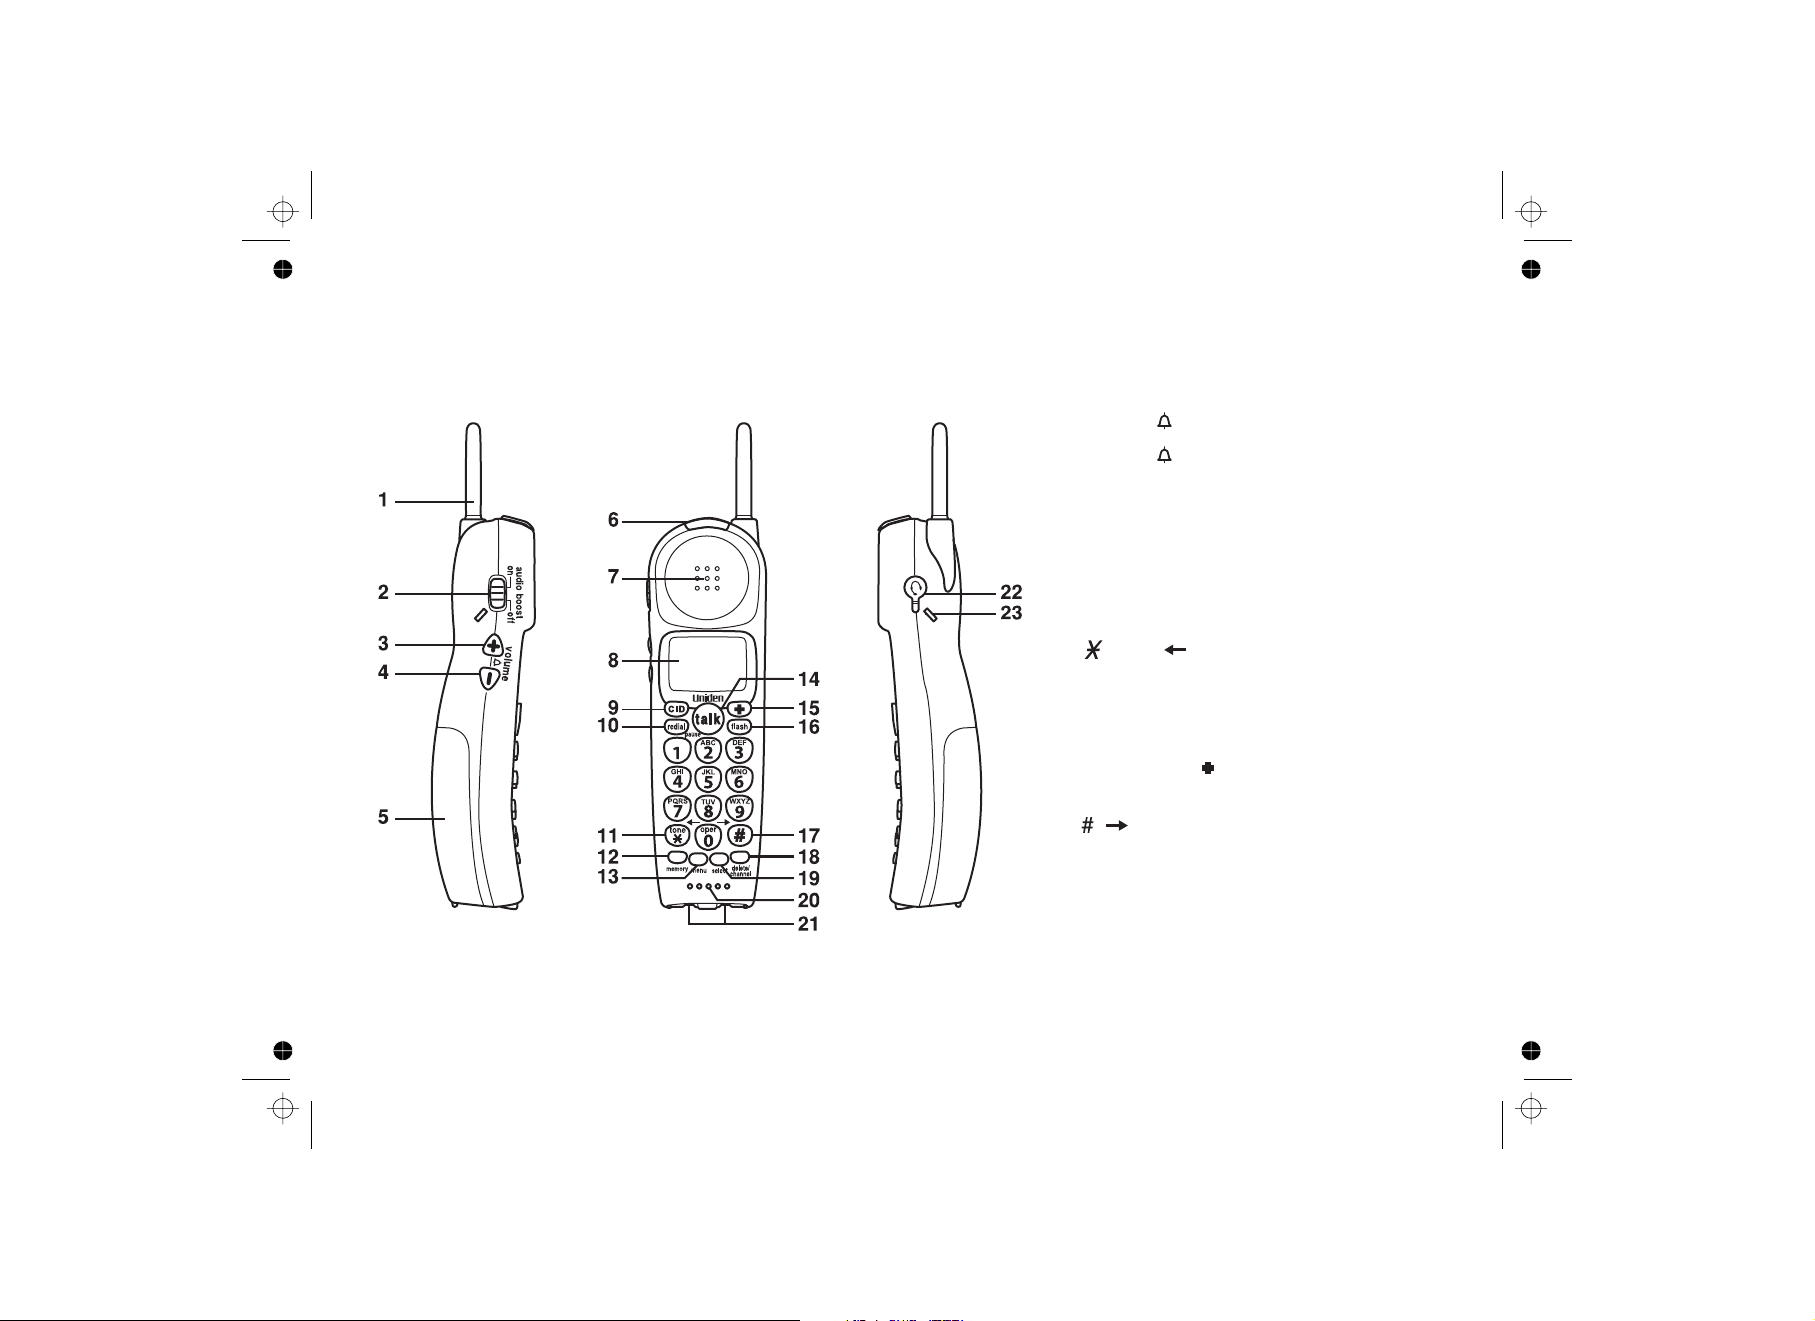
Controls and Functions
1. Handset antenna
2. Audio boost switch
3. key (p. 16/ 14)
Volume/ (ring)/+
4. - key (p. 16/ 14)
Volume/ (ring)/
5. Handset battery compartment
6. Handset visual ringer LED
7. Handset earpiece
8. LCD display
9. key (p. 27)
CID
10. key (p. 16/ 23)
Redial/pause
11. key (p. 22)
/tone/
12. key (p. 21)
Memory
13. key (p. 11)
Menu
14. key (p. 15)
Talk
15. ( ) key (p. 20)
Emergency
16. key (p. 19)
Flash
17. key (p. 22)
/
18. key (p. 22/ 18)
Delete/channel
19. key (p. 11)
Select
20. Handset microphone and ringer speaker
21. Handset charging contacts
22. Headset jack
23. Beltclip hole
[3]
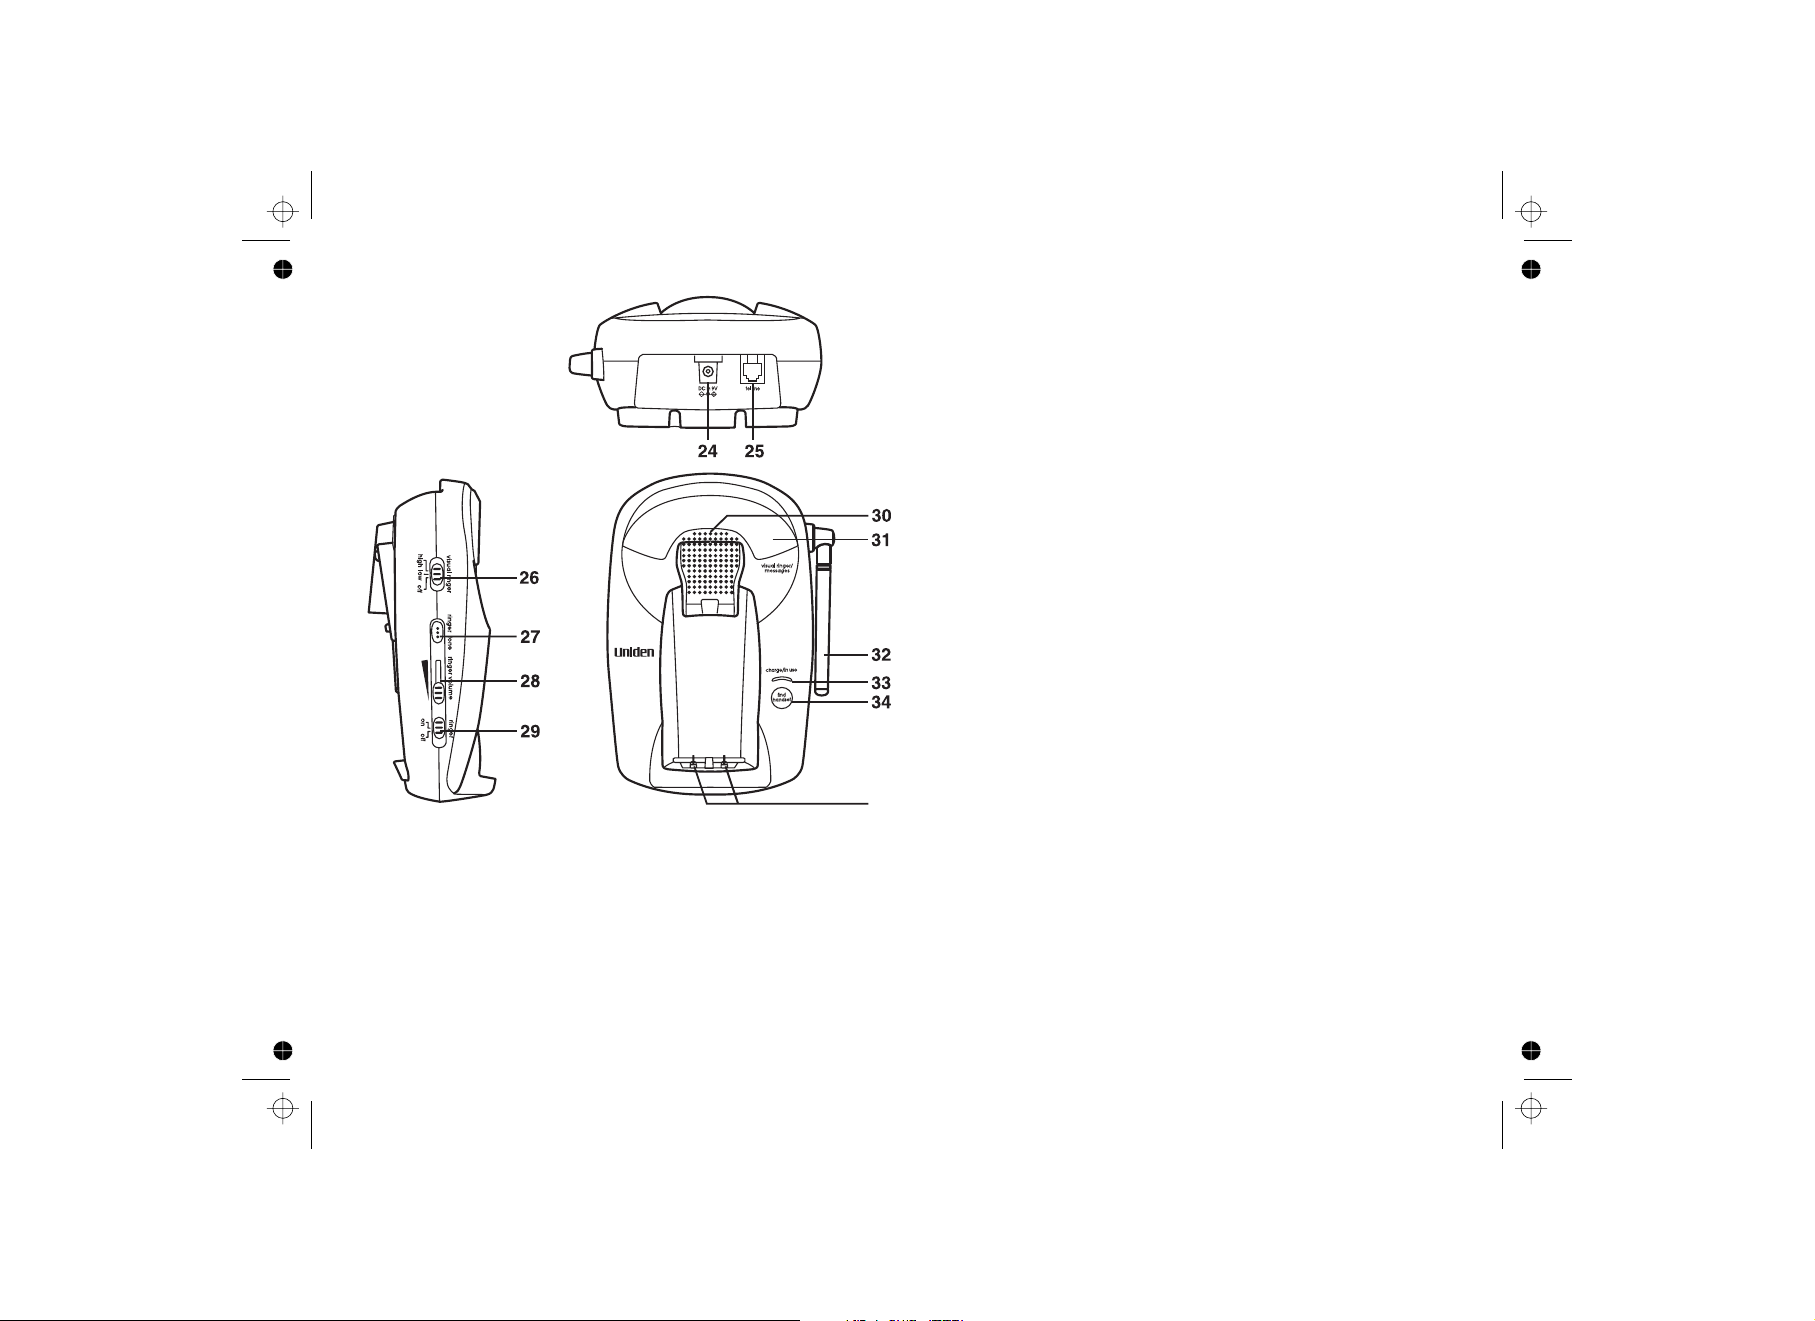
24. DC in 9V jack
25. Telephone line jack
26. Visual ringer switch (p. 8)
27. Ringer tone button (p. 14)
28. Ringer volume adjuster (p. 14)
29. Ringer on/off switch (p. 14)
30. Base speaker
31. Base visual ringer LED
32. Base antenna
33. Charge/in use LED (p. 6)
34. Find handset key (p. 18)
35. Base charging contacts
35
Terms Used in this Manual
• Standby Mode - The handset may be sitting in or off the base, but is NOT in use. The key has
not been pressed and there is no dial tone.
• Talk Mode - The handset is off the base and the key has been pressed, enabling a dial tone.
• CID - Caller ID
• CIDCW - Caller ID on Call Waiting
• Emergency Dial - One touch speed dial key
talk
talk
[4]
Installing the Phone
Do the following steps:
A. Choose the best location
B. Connect the base unit and charge the handset
C. Set the visual ringer brightness (optional)
D. Mount the base unit on a wall (optional)
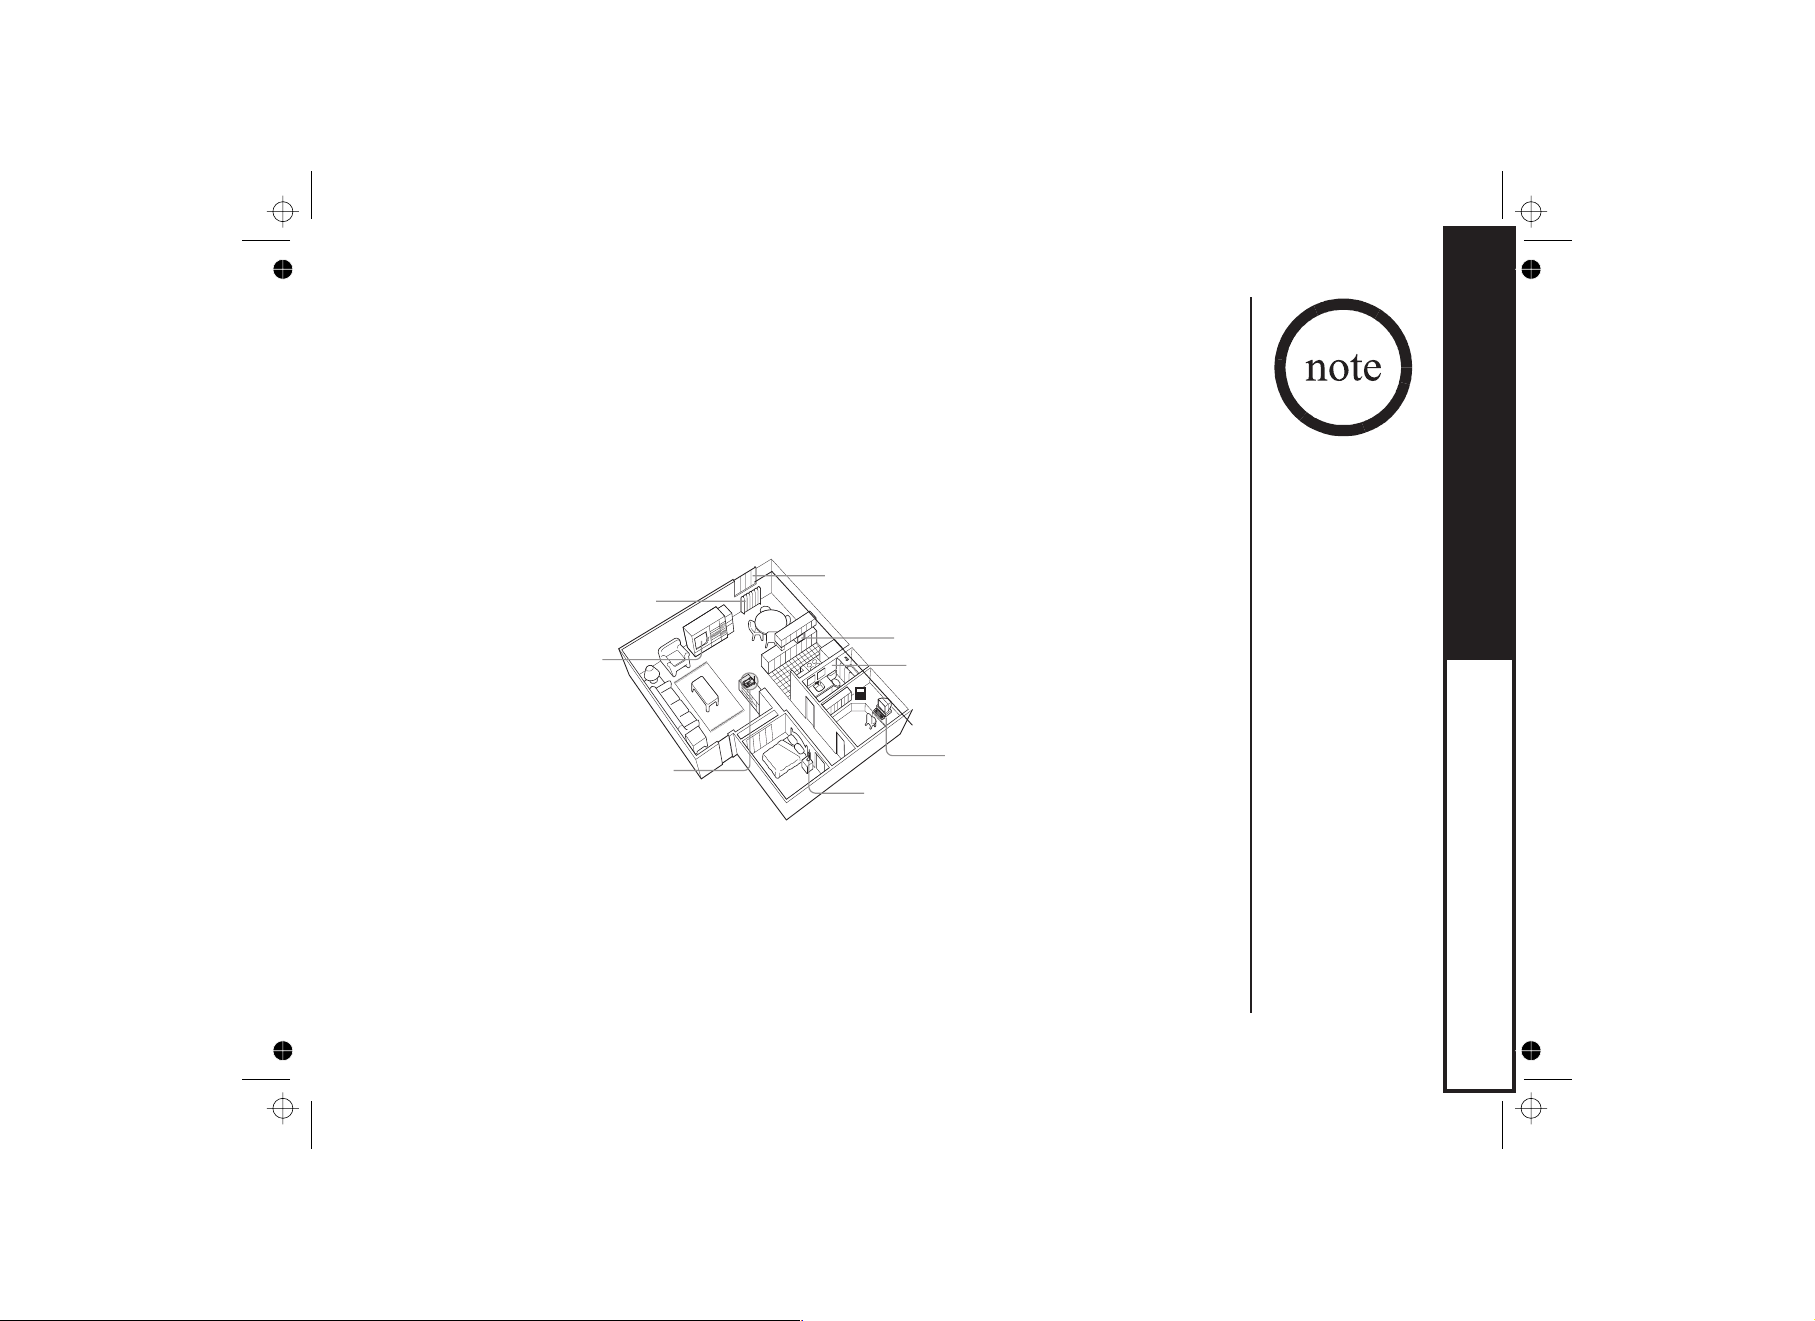
A. Choose the best location
When choosing a location for your new phone, here are some important guidelines you should
consider:
Avoid heat sources, such as radiators,
air ducts, and sunlight
Avoid television sets and
other electronic equipment
Choose a central location
• The location should be close to both a phone jack and a continuous power outlet (one which
is not connected to a switch).
• The base and handset should be kept away from sources of electrical noise such as motors
and fluorescent lighting.
• The base can be placed on a desk, tabletop, or mounted on a standard wall plate. For better
reception, place the base as high as possible.
• The base should be placed in an open area for optimum range and reception.
Avoid noise sources such as a window
by a street with heavy traffic
Avoid microwave ovens
Avoid excessive moisture, extremely
low temperatures, dust, mechanical
vibration, or shock
Avoid personal computers
Avoid other cordless telephones
!
If your home
has specially
wired alarm
equipment
connected to
the telephone
line, be sure
that installing
the system
does not
disable your
alarm
equipment.
!
If you have
questions
about what will
disable your
alarm
equipment,
contact your
telephone
company or a
qualified
installer.
GETTING STARTED
[5]
!
Use only the
supplied
AAD--041S
AC adapter.
Do not use
any other AC
adapter.
!
Do not place
the power cord
where it
creates a trip
hazard or
where it could
become
chafed and
create a fire or
electrical
hazard.
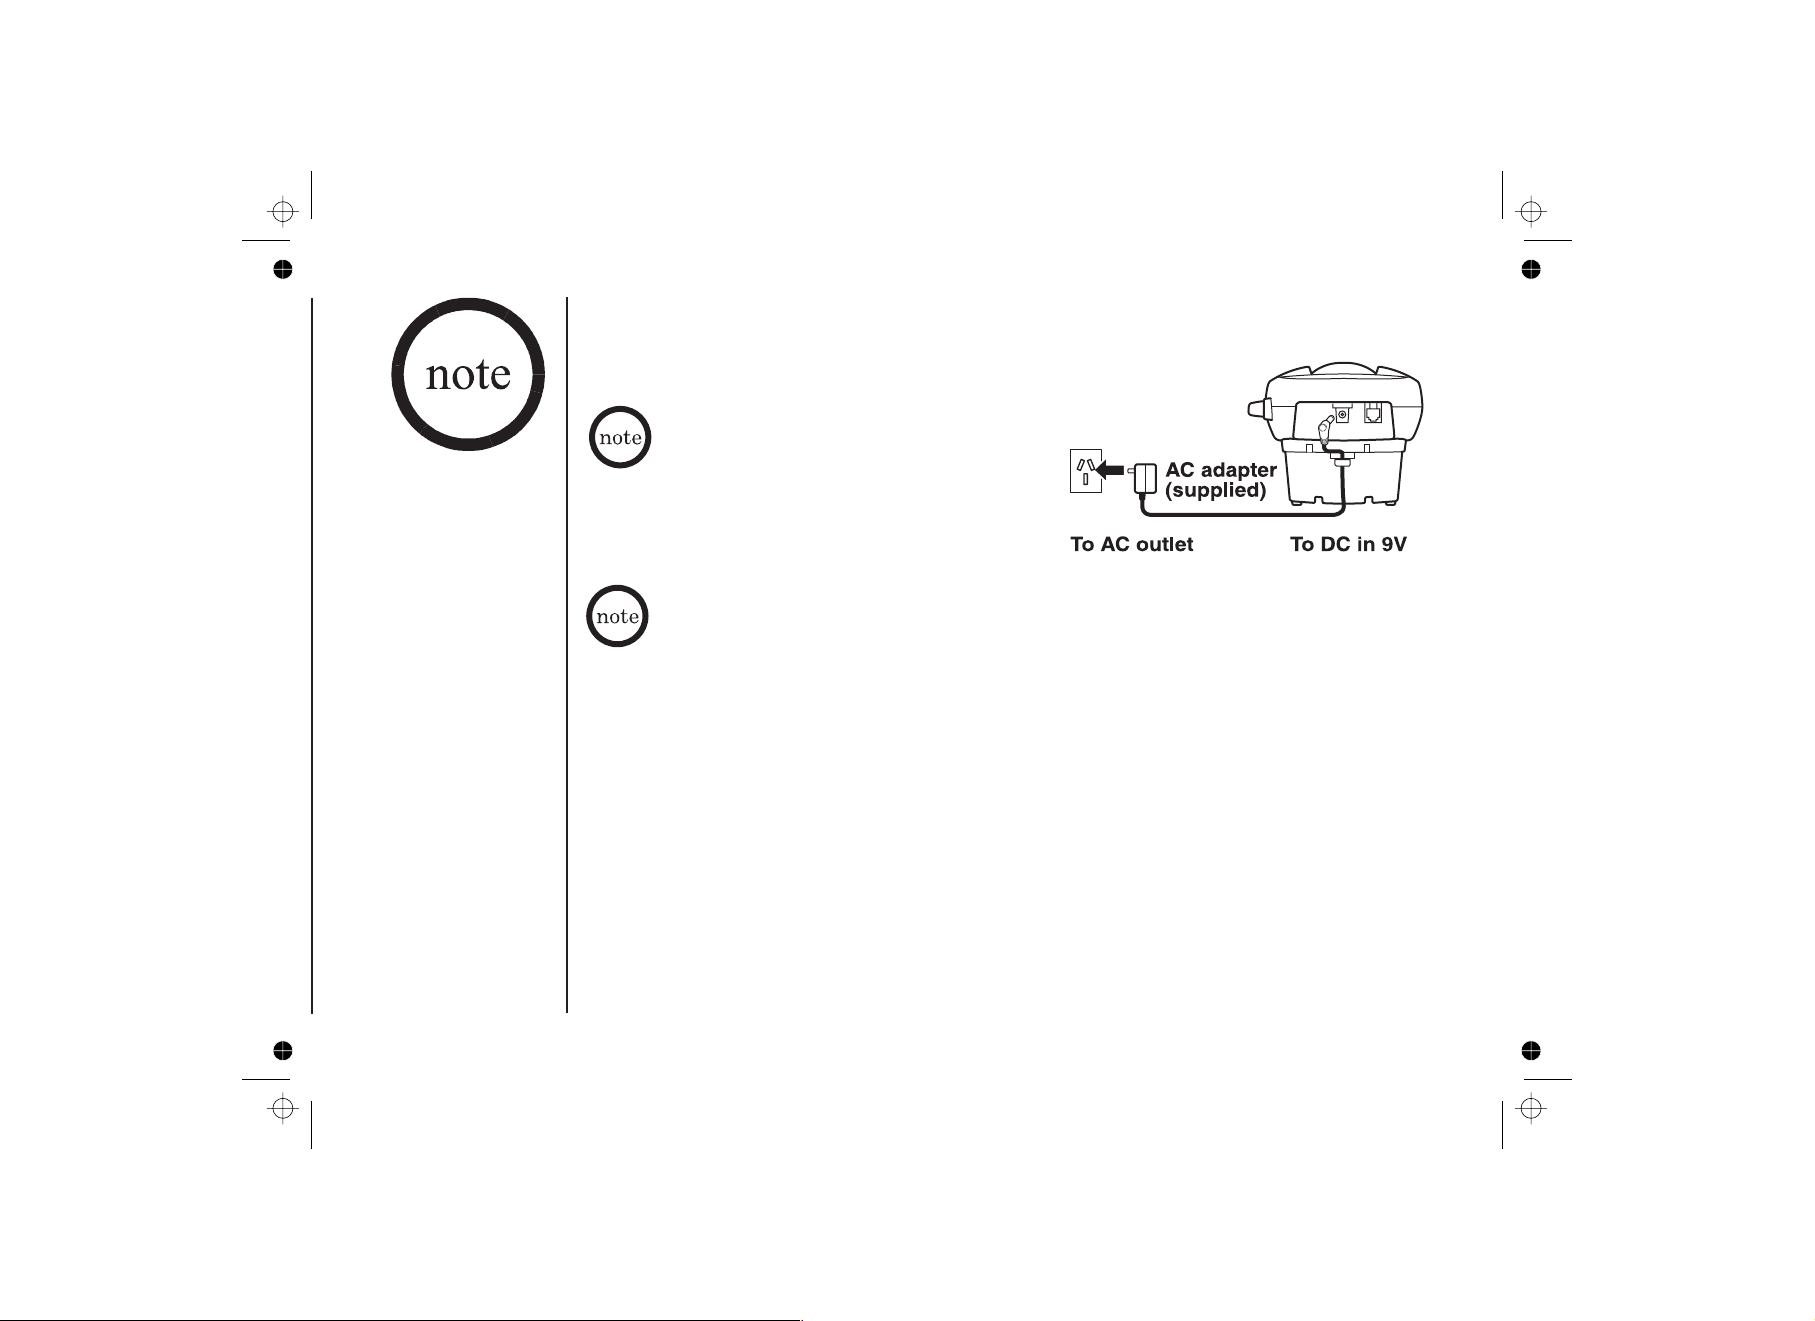
B. Connect the Base Unit and Charge the Handset
1) Connect the AC adapter to the
jack and to a standard 240V AC wall outlet.
• Connect the AC adapter to a continuous
power supply.
• Place the base unit close to the AC
outlet so that you can unplug the AC
adapter easily.
The rechargeable battery is already installed in your phone.
2) Place the handset in the base unit.
3) Make sure that the LED illuminates.
charge/in use
If the LED does not illuminate, check to see that the AC adapter is plugged in
and the handset makes good contact with the base charging contacts.
4)
Charge the handset battery pack for at least 15-20 hours before using
your new cordless telephone for the first time!
capacity of your battery pack, DO NOT plug the telephone cord into the base
unit and wall jack until the battery is fully charged.
DC in 9V
To maximize the charge
[6]
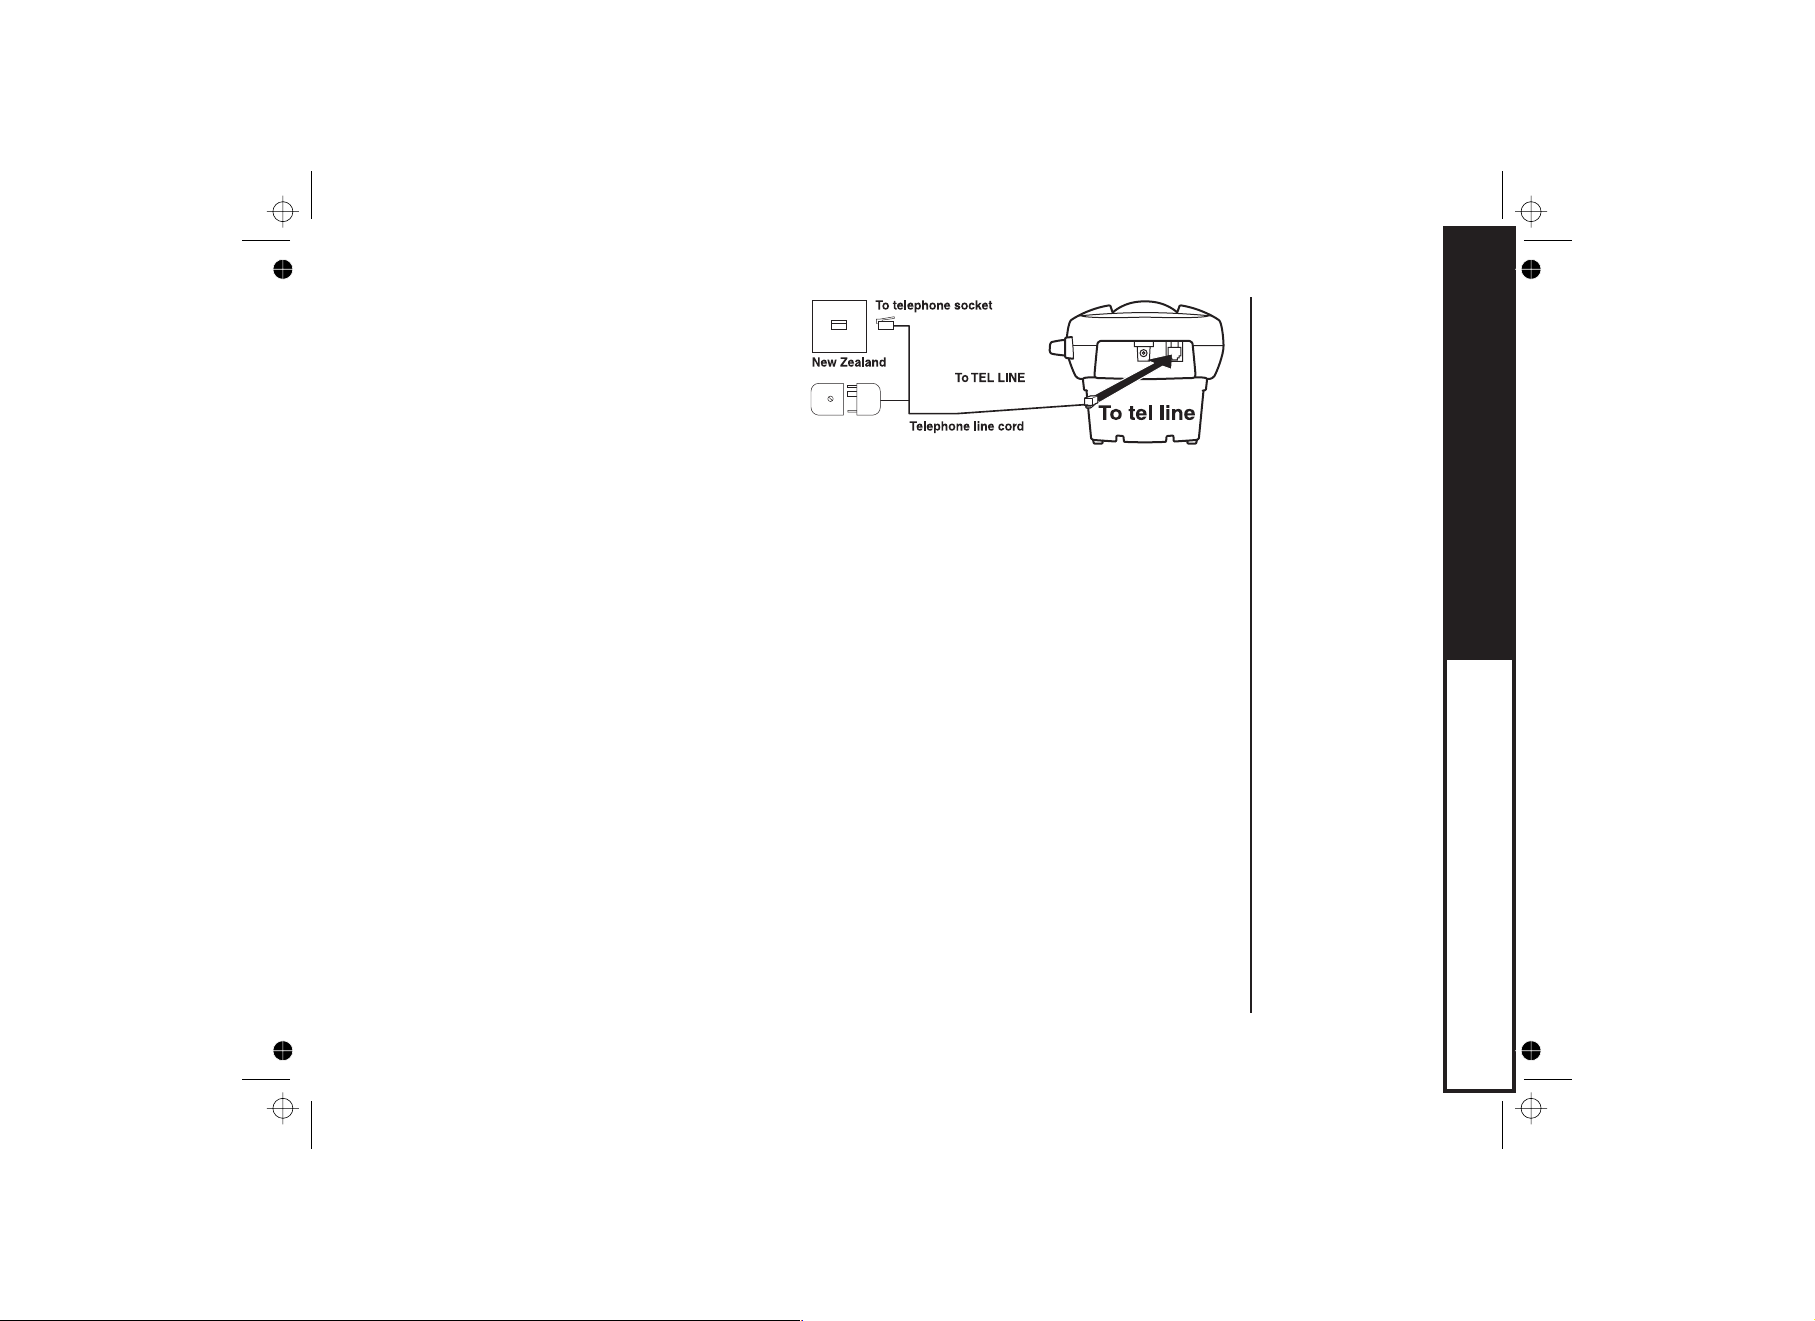
5) Once the handset battery pack is
fully charged, connect the
telephone line cord to the
tel line
jack and to a telephone outlet. If
your telephone outlet isn't
modular, contact your telephone
company for assistance.
Australia
Tel Line adaptor
(supplied)
6) After the phone is connected, pick up the handset from the base and press
talk.
If you do not get a dial tone, check the following:
• Be sure the telephone cord is securely connected to both the base and an
active telephone jack.
GETTING STARTED
• Be sure the LED is on. If not, check the AC adapter.
charge/in use
• Be sure the handset is fully charged.
• Be sure the battery is installed correctly.
[7]
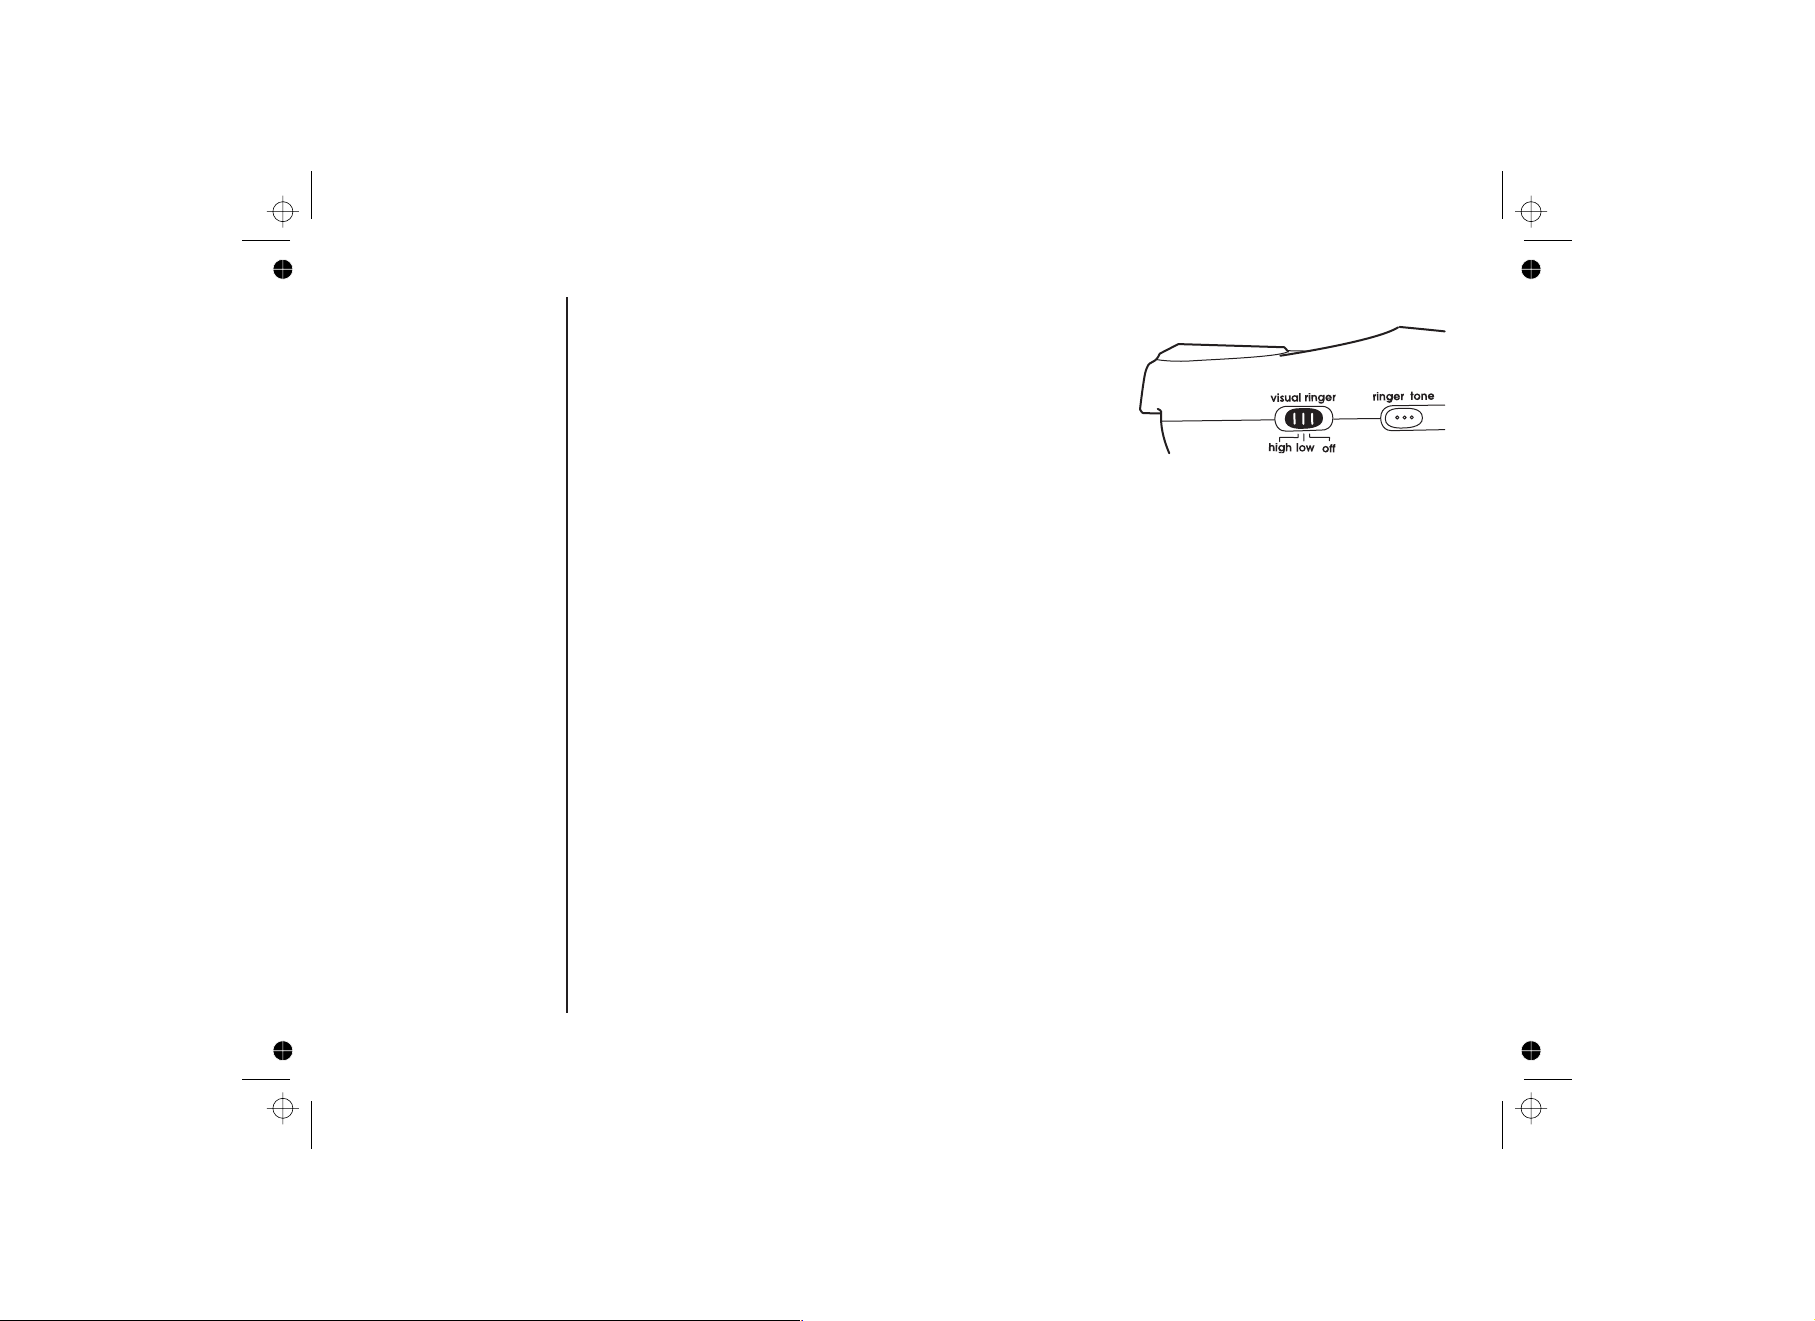
C. Set the Visual Ringer Brightness
The switch allows you to set the
visual ringer
brightness of the
LED on the base. There are three options to
choose from: high, low and off. If you set the
switch to off, LED
never flashes.
visual ringer/messages
visual ringer/messages
[8]
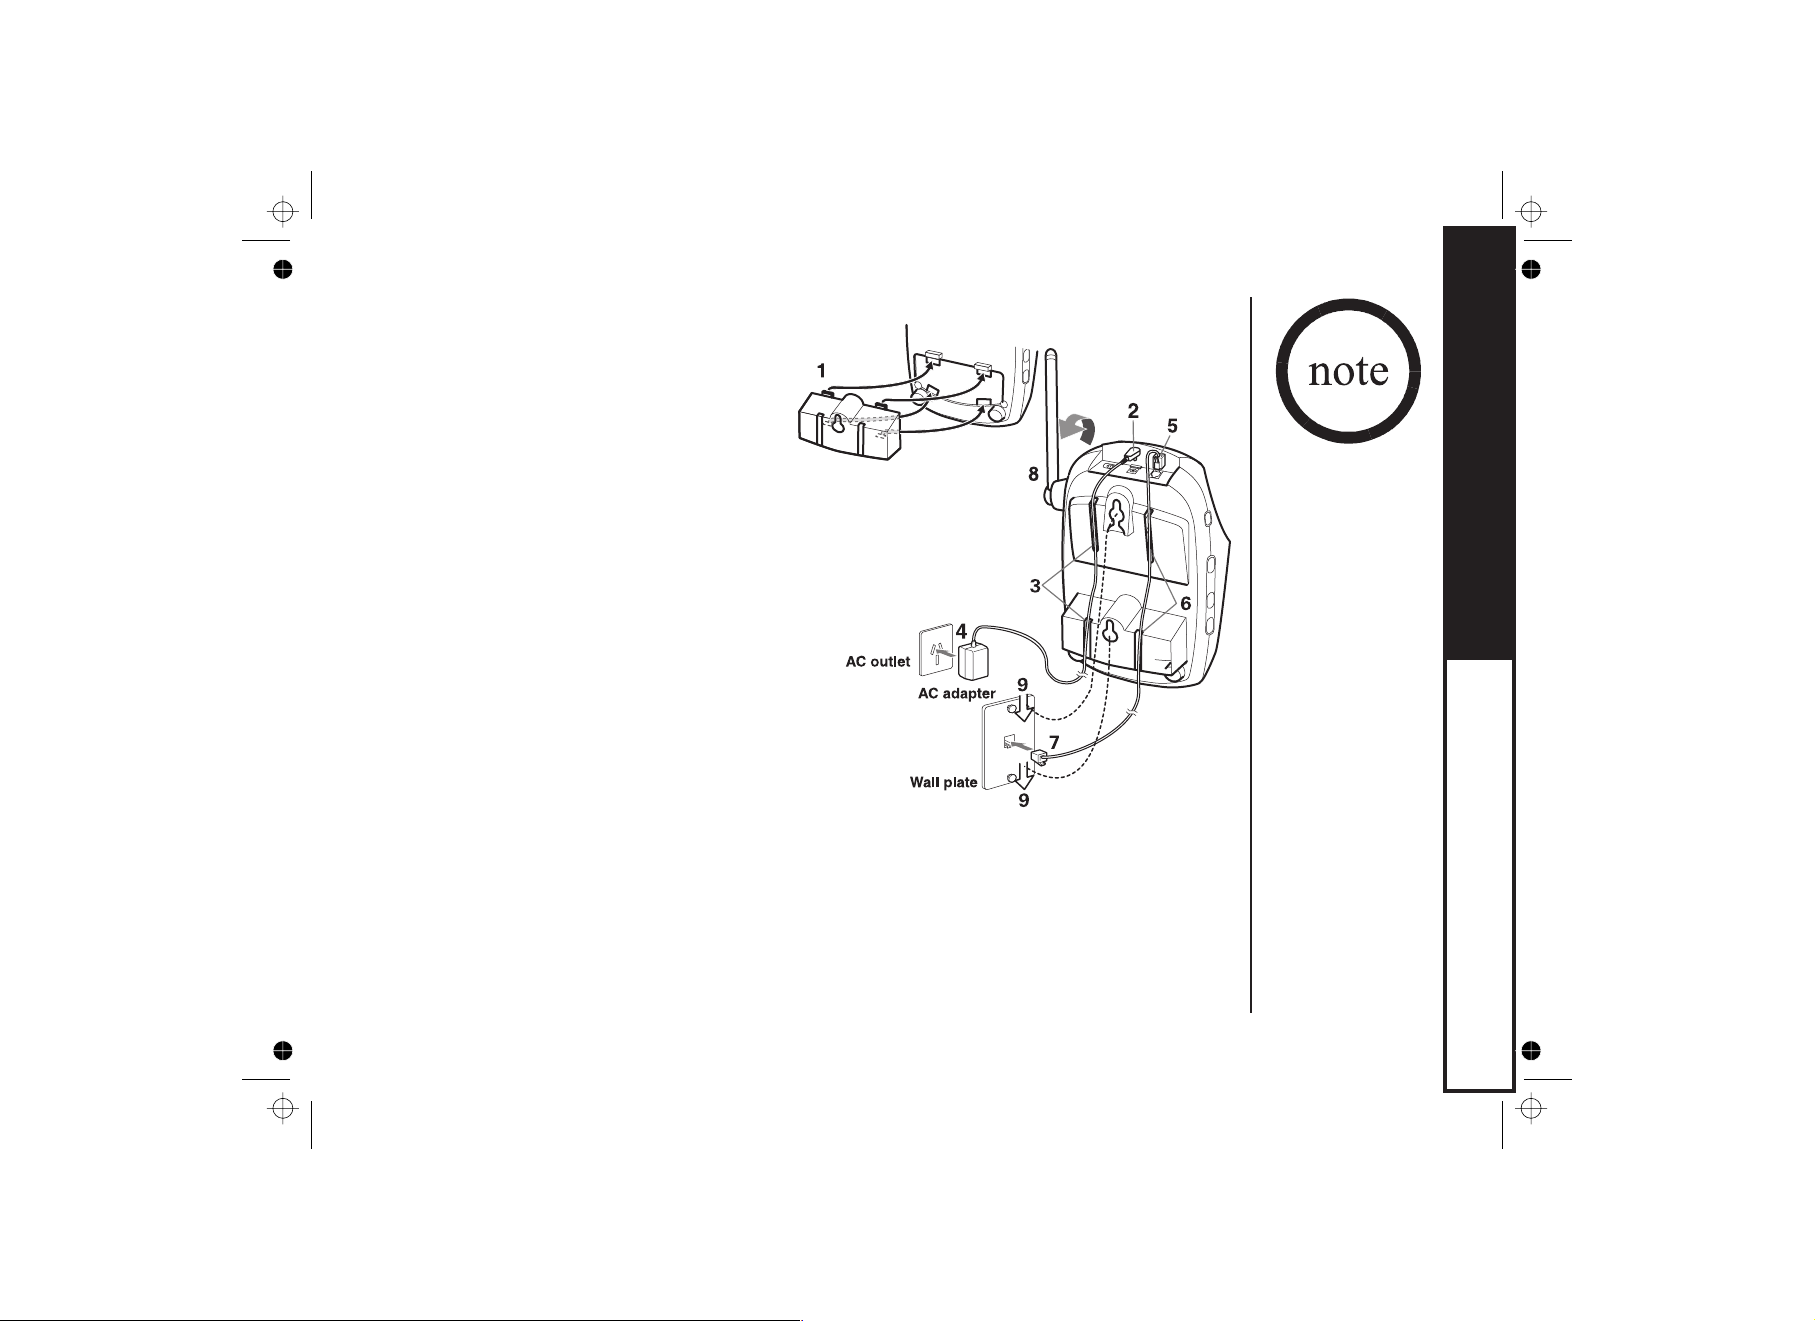
D. Mount the Base Unit on a Wall
Standard wall plate mounting
This phone can be mounted on any standard
wall plate.
1) Remove the wall mount adapter from the
base and snap it into the notches on the
bottom of the base.
2) Plug the AC adapter to the jack.
3) Wrap the AC adapter cord inside the
molded wiring channel as shown.
4) Plug the AC adapter into a standard
240V AC wall outlet.
5) Plug the telephone line cord into the
line
jack.
6) Wrap the cord inside the molded wiring
channel as shown.
7) Plug the telephone line cord into the
telephone outlet.
8) Raise the antenna to a vertical position.
9) Align the mounting slots on the base with the
mounting posts on the wall.
Then push in and down until the phone is firmly seated.
Direct wall mounting
If you don't have a standard wall plate, you can mount your phone directly to the wall.
Before doing this, consider the following:
DC in 9V
tel
GETTING STARTED
If the base unit is
mounted on the
wall, always put
the handset in
the base with the
CID display
facing forward to
make sure the
handset does not
fall out of the
base.
• Avoid electrical cables, pipes, or other items behind the mounting location that could
cause a hazard when inserting screws into the wall.
[9]
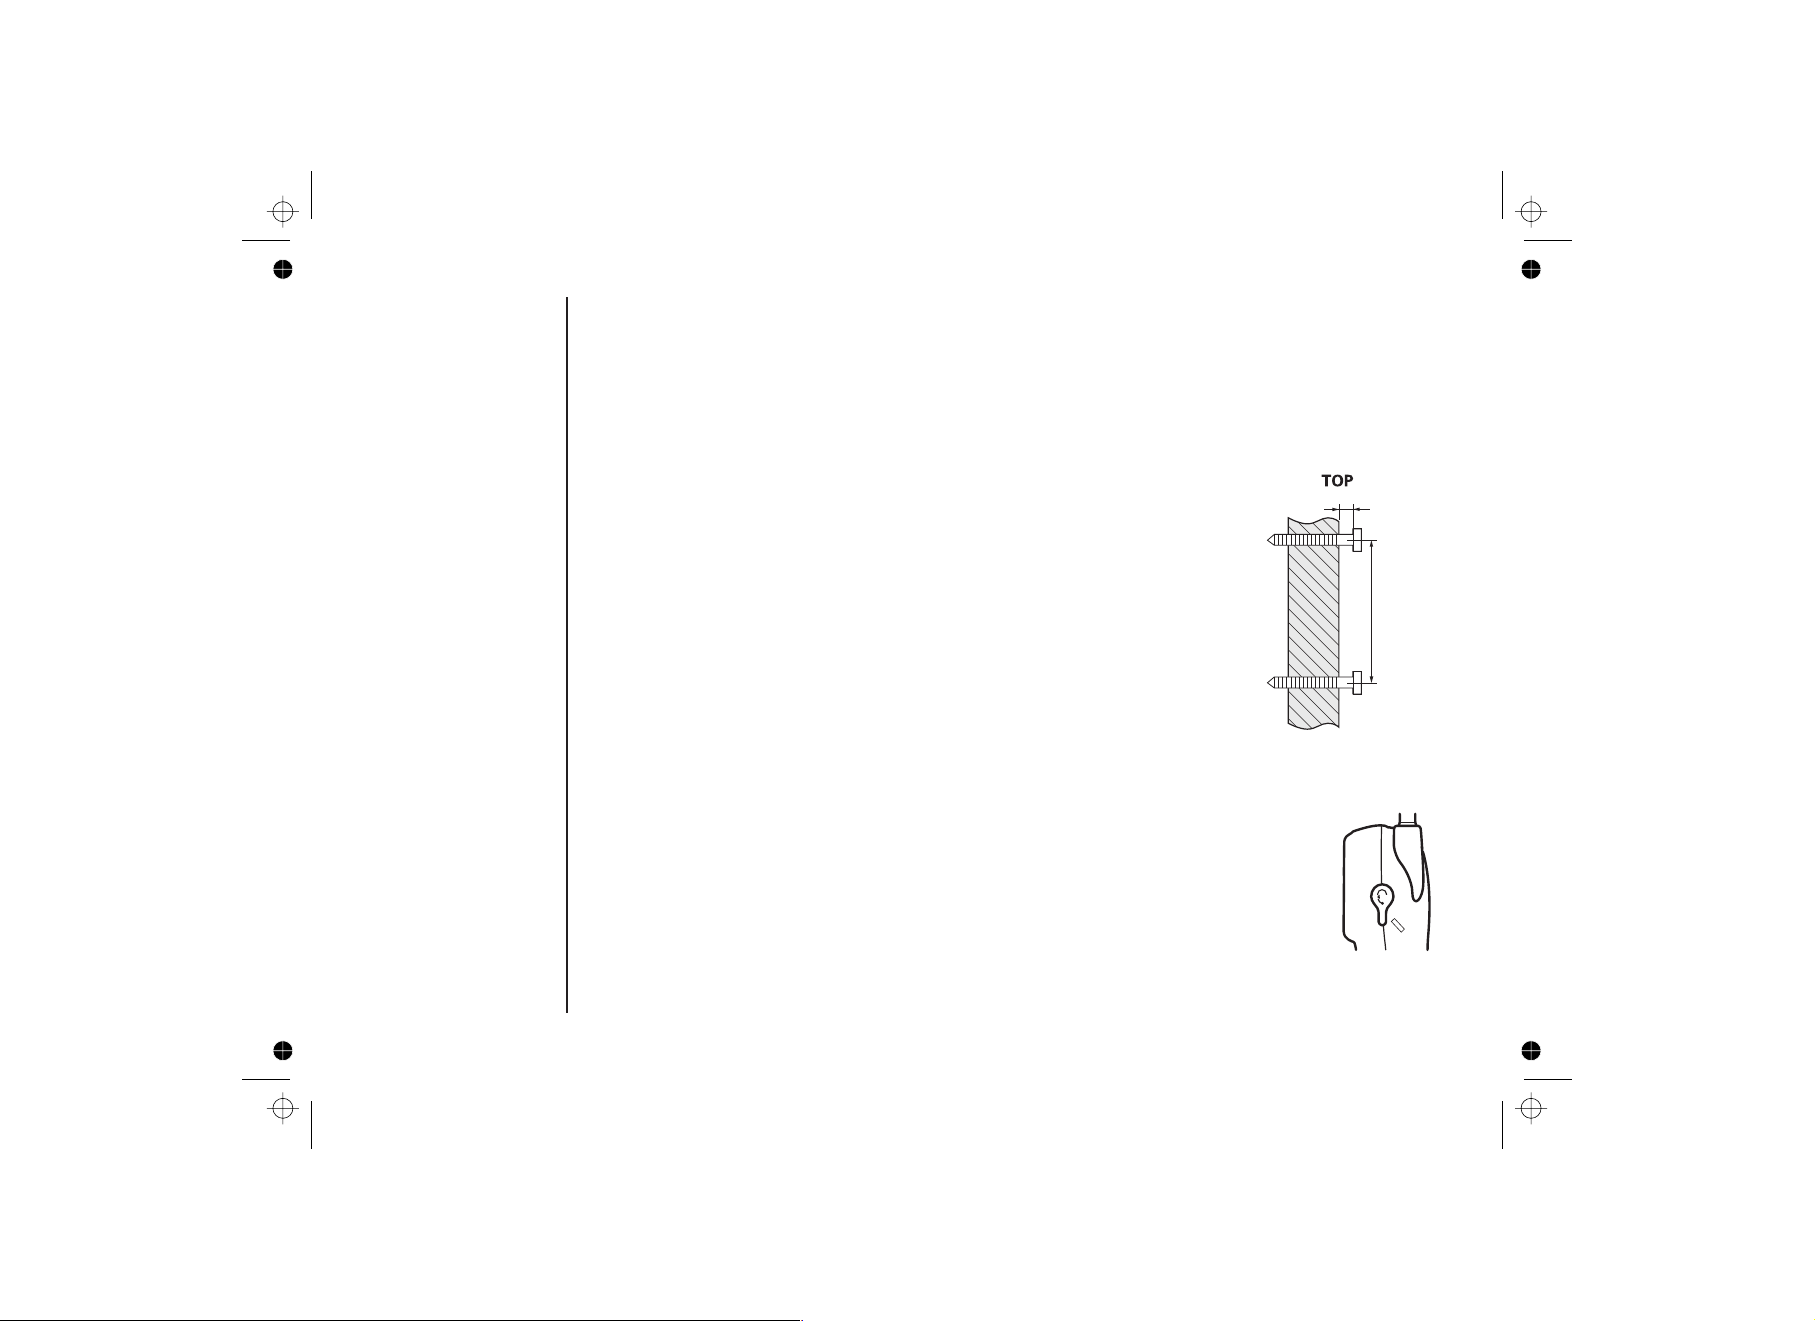
• Try to mount your phone within 1.5m of a working phone jack to avoid
excessive cord lengths.
• Make sure the wall material is capable of supporting the weight of the base
and handset.
• Use #10 screws (minimum length of 35mm) with anchoring devices suitable
for the wall material where the base unit will be placed.
1) Insert two mounting screws into the wall, (with their appropriate
anchoring device), 100mm apart. Allow about 3mm
between the wall and screw heads for mounting the phone.
2) Refer to steps 1 through 9 on page 9 to mount the telephone.
Installing the Beltclip
To attach the beltclip
Insert the beltclip into the holes on each side of the handset.
Press down until it clicks.
To remove the beltclip
Pull both sides of the beltclip to release the tabs from the holes.
Headset Installation
Your phone may be used with an optional headset.
To use this feature, insert the headset plug into the headset jack.
Your phone is ready for hands-free conversations.
(Headset may be purchased by visiting our website at;
www.uniden.com.au or www.uniden.co.nz )
[10]
3mm
100mm
Basic Setup
There are four basic options that you will need to set up: AutoTalk, CIDCW (Caller ID
on Call Waiting), Name Tag and Insert 0.
AutoTalk
Autotalk allows you to answer the phone simply by removing the handset from the
base. You do not have to press any keys.
GETTING STARTED
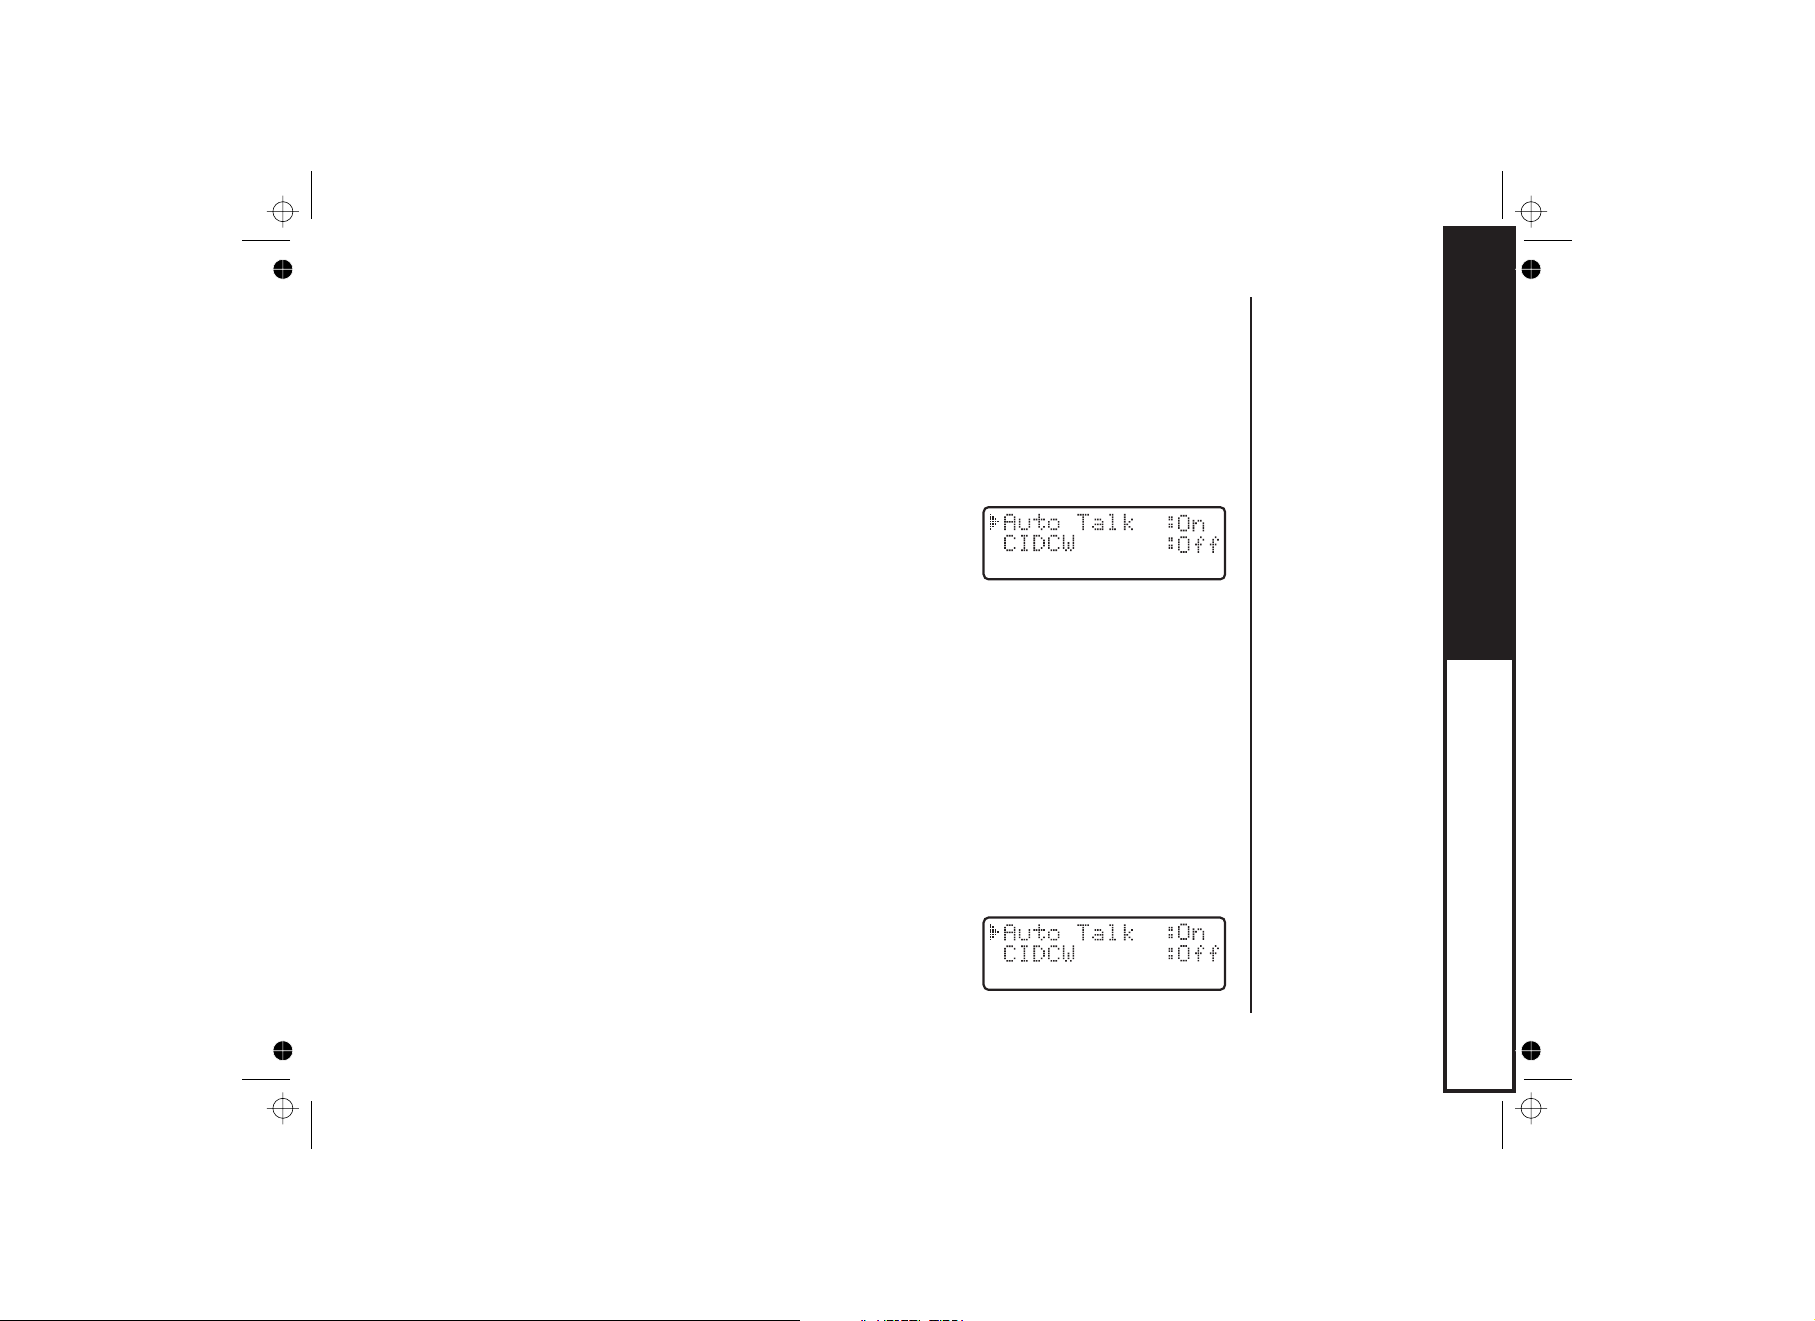
1) When the phone is in standby mode, press the
key. The following screen appears.
2) Press the key to turn AutoTalk on.
3) Press the key to complete the setting. The handset returns to
standby mode.
select
menu
menu
Name Tag :On
Activating Caller ID on Call Waiting
Caller ID allows you to see the number of the calling party before you answer the phone.
Caller ID on Call Waiting (CIDCW) lets you see the number of a call that comes in when
you are on the line.
You must subscribe to Caller ID service through your local telephone provider to use this
feature. You must also subscribe to Call Waiting Service to use Caller ID on Call
Waiting.
1) When the phone is in standby mode, press the
key. The following screen appears.
menu
Name Tag :On
[11]
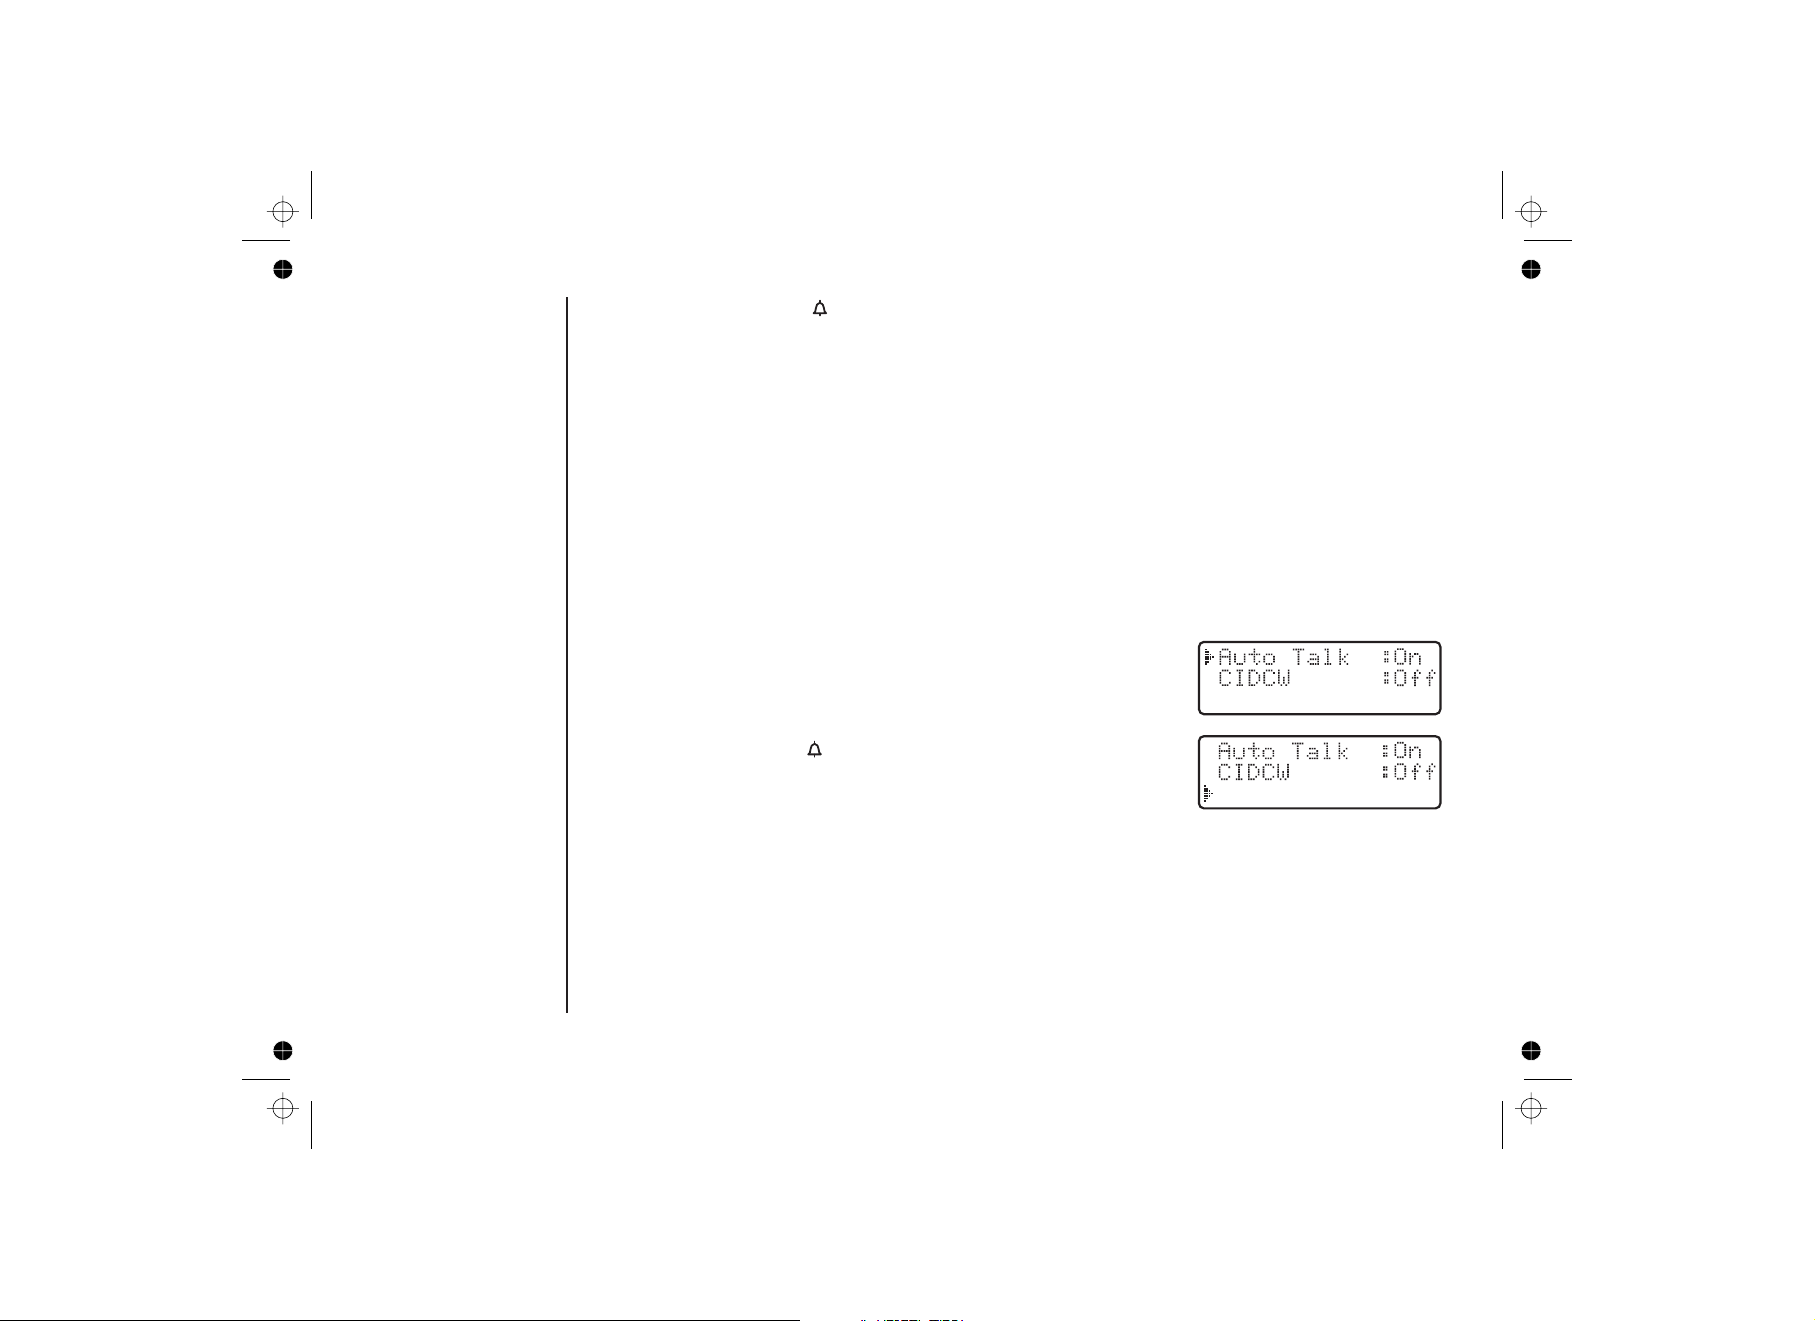
2) Press the key to select .
volume/
/-
CIDCW
3) Press the key to toggle and turn on Caller ID on Call Waiting.
4) Press the key and to complete the
setting. The handset returns to standby mode.
select
menu
return the handset to the base unit
Setting Name Tag (POP ID)
The Name Tag feature works with the Caller Display number from Caller ID. You must
subscribe to Caller ID service through your local telephone provider to use this feature.
There is usually a fee for this service. When the phone rings the caller display number,
when received will be compared to numbers stored in the dial memory. If there is a
match then any name stored with the dial memory number will be displayed (see page 21).
1) When the phone is in standby mode, press the
key. The following screen appears.
2) Press the key twice to select
Name Tag
3) Press the key to toggle Name Tag or .
4) Press the key to complete the setting.
The handset returns to standby mode.
volume/ /-
.
select
menu
menu
Name Tag :On
Name Tag :On
On Off
[12]
 Loading...