

Uniden iGO CAM 80 Owner's Manual

iGO CAM 80
Accident CAM
Vehicle Recorder
For more exciting new products please visit our website:
Australia: www.uniden.com.au
2
UNIDEN iGO CAM 80 Vehicle Recorder
Important Safety Instructions
NOTE
Uniden does not represent this product to be waterproof. Do not
expose this product to Rain or Moisture.
NOTE
This product is intended for use in a motor vehicle. Don’t install
the device where it will block the driver’s view of the road
(including the mirrors!) or the deployment of the airbag.
NOTE
Keep your attention on the road! Don’t try to operate or focus
on any device while driving. If you have to concentrate on a
device, pull off the road for a few minutes.
NOTE
Ensure that the camera lens is kept clean and there is nothing
blocking the lens.
NOTE
Don’t leave the device in direct sunlight for a long period of time
or where the temperature could go above 60°C.
NOTE
You should examine, check and/or verify the device at least
once a month including the associated SD card, to ensure the
recording are working properly.
NOTE
Never attempt to disassemble, repair or make any modications
to your device.

Important Safety Instructions ............................................. 2
What Do I Do First? ................................................................4
Make Sure These Items Arrived in the Box ................................................. 4
Controls & Indicators ............................................................ 5
How Do I Put It in My Car? .................................................... 7
Attaching the Windshield Mount .................................................................. 7
Operation .............................................................................. 8
Micro SD Card ....................................................................................................... 8
Plug it in, Power On/O .................................................................................... 9
Record Mode ......................................................................................................10
Photo Mode ....................................................................................................... 14
Playback Mode ................................................................................................. 14
Connecting to a PC .......................................................................................... 15
iGO CAM Player ................................................................................................. 15
Special Features .................................................................................................17
Important Information ................................................................................... 19
Warranty .............................................................................. 20
3
UNIDEN iGO CAM 80 Vehicle Recorder
Contents

4
UNIDEN iGO CAM 80 Vehicle Recorder
Make Sure These Items Arrived in the Box
• If any item is missing or damaged, contact your place of purchase
immediately. Never use damaged products!
• Need help? Get answers at our website:
www.uniden.com.au for Australian model.
• 3M Sticker Mount Bracket
• Owner’s Manual
iGO CAM 80
What’s In The Box
DC Car Adaptor
Mini USB data cable
3M stickers
Controls & Indicators
UNIDEN iGO CAM 80
5
Vehicle Recorder
1
2
3 4
5
6 7
10
11
12
13
14
15
16
17
8
9
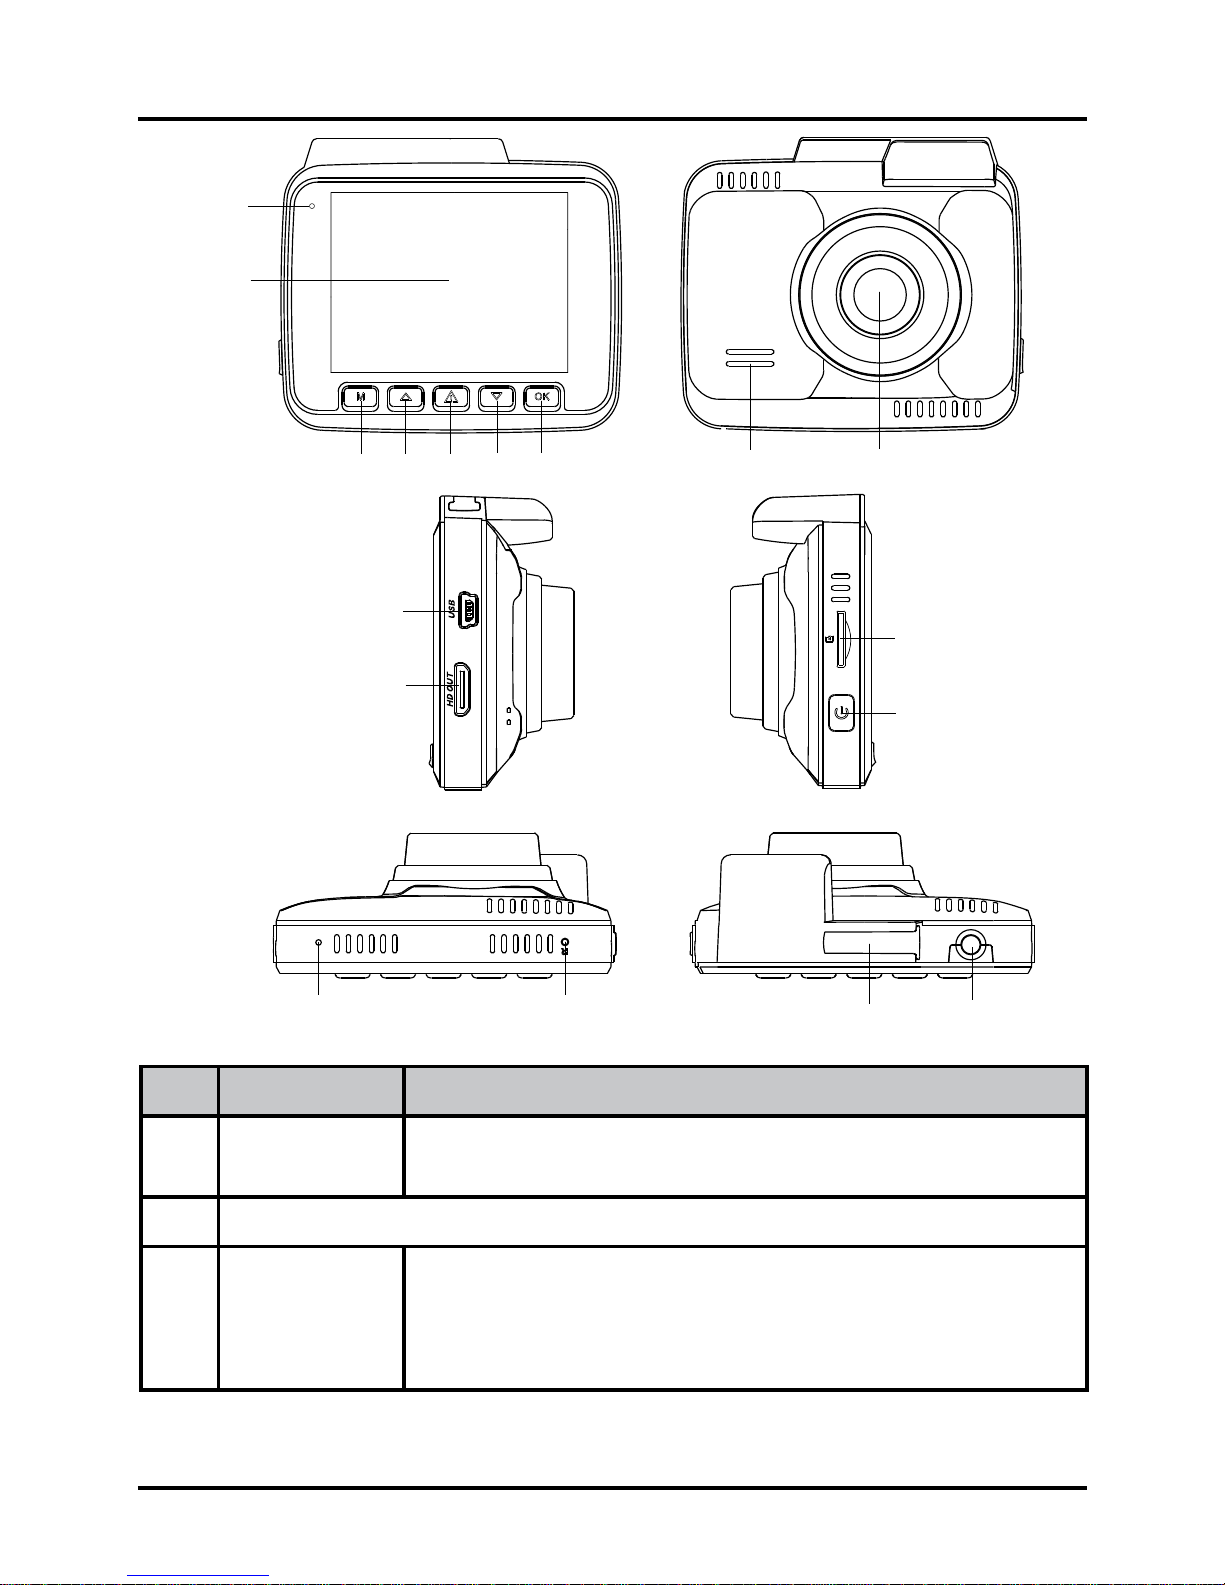
Ref Component Description
1 LED Glows red when the device is recording.
Glows green when charging.
2 LCD Screen
3 MENU/
MODE
Press to open the Record/Photo/Playback Menu,
General Settings Menu.
Press and hold to switch between various modes Record, Photo and Playback.

6
Vehicle RecorderUNIDEN iGO CAM 80
4 UP Press to zoom inwards in record and photo mode.
In Menu list, move the cursor, one line up.
Press and hold to turn on/off audio recording.
5 Emergency
Press to lock the current recording le.
Press and hold to turn on/off WiFi hotspot.
6 DOWN Press to zoom outwards in record and photo mode.
In Menu list, move the cursor, one line down.
Press and hold to turn on/off park mode in record
mode.
7 OK Record Mode: Press to start or stop video recording.
Playback Mode: Press to take a snapshot.
Playback Mode: Play/Pause/Resume.
Press to conrm a selection in the Menu.
Press to conrm a change in the settings.
8
Speaker
9
Camera Lens
10
Mini USB
Port
Connect to mini USB cable & charge battery.
Connect to PC for data (SD card) transfer.
11
HDMI Port
HDMI output. Connect using an HDMI cable to a TV
to view video/photo (not included).
12
Micro SD
Card Slot
Insert micro SD Card (up to 64GB min class 10).
13 Power
Press & hold for 2 seconds to turn power on.
Press & hold for 3 seconds to turn power off.
14 MIC
Records sound.
15 Reset
If the device fails to operate properly, try resetting the
device. Press the reset button by using a ne pen or
paperclip.
16 Bracket Slot
Slot in the sticker mount bracket.
17 AV In
Connect to the Reverse Camera (Optional).

7
UNIDEN iGO CAM 80 Vehicle Recorder
Installation
Location
To have a better view, try to install at the center of the windshield. Make
sure the lens is located in a place where the windshield wiper can clean the
window to ensure view is clear.
Make sure the device is not installed in a place where it will interfere with the
safety bag. Make sure the GPS will not be obstructed by the windshield’s sun
control lm (window tint).
Installing the Mount onto the Windshield
1. Slide the sticker mount bracket into the device bracket slot and make sure
it ts tightly.
2. Clean the area you desire to have the dash cam placed before sticking the
device.
3. Peel off the sticker protective lm from the 3M sticker
4. Press and apply force on the mount onto the windshield behind the rear-
view mirror.
5. Adjust the viewing angle of the camera by loosening the screw of the
bracket and fasten it back to secure the viewing angle. We recommend the
camera should point slightly downwards ~10° below eye level.
GPS Reception information
Surrounded with tall buildings, in a tunnel or poor weather conditions may
result in poor GPS reception or even lose GPS signal. Over-tinting or a rain
sensor on the windshield can affect GPS reception.
If the signal is unstable even when you are driving, please try changing the
installation spot of your dash camera. For the rst time use, it takes about
15~20 minutes to get GPS signal, and after that, it normally takes about 3
minutes.
NOTE
Sticker mount is difcult to remove after it is installed and will
not stick well on a curved/textured or wet surface.
NOTE
Do not install the product in a location where it can obstruct
the driver’s eld of vision.

Micro SD Card
NOTE
A compatible micro SD card (not supplied) has to be inserted
before you start using the unit. Ensure that the unit is turned off
before inserting or removing the micro SD card.
The device can support micro SDHC cards (High Capacity SD) up to 64GB in
capacity. A micro SDHC card of at least 8GB capacity and minimum speed of
Class 10 is recommended.
Insert a formatted micro SD card gently in the slot at the side of the unit. To
remove the card from the slot, press the edge of the micro SD card inwards
for it to pop out and then pull it out of the slot.
It is important to format the micro SD card before using it, so as to avoid any
damage to the les created on iGO CAM 80.
Uniden only recommends using good quality MLC/SLC micro SD cards.
Please ensure that the SD card used is rated for Dash Cam use.
Video Storage Capacity
Refer to the table below for the recording capacity for different card capacity
and some of the recording resolution.
Resolution 8GB 16GB 32GB 64GB
2880x2160P 24 45 mins 90 mins 180 mins 360 mins
1920x1080P 60 55 mins 110 mins 220 mins 440 mins
1280x720P 60 90 mins 180 mins 360 mins 720 mins
Operation
8
Vehicle RecorderUNIDEN iGO CAM 80
Battery Information
The iGOCAM 80 has an in-built battery of 250mAh capacity. The device is
designed mainly for in-vehicle use, drawing on vehicle power and the duration
of portable use is limited by the settings and the battery operating time.
The device will charge the battery whenever power is detected through the
USB port. The device will take about 120 minutes to charge completely.
NOTE
Please ensure that the battery is fully charged before using it for
the rst time. To extend the battery life, fully charge the device once
every 3 months. The battery life will degrade over a period of time
especially when the device is exposed to high temperature.
 Loading...