

Uniden Guardian App Cam 26 Owner's Manual
Guardian App Cam 26
IP Camera
For more exciting new products please visit our website:
Australia: www.uniden.com.au

2 3
INSTRUCTIONS
Damages caused by non-compliance with this Owner’s Manual will void the
warranty! We will not assume any liability for damages to items or persons
caused by improper handling or non-compliance with the safety notices!
Any warranty claim will be null and void in such cases.
• Do not drop, puncture or disassemble the camera. This camera is not
waterproof. DO NOT expose the camera to water or moisture.
• Never tug on the power cords. Use the plug to unplug it from the outlet.
• Do not expose the camera to high temperature or leave it in direct
sunlight. Doing so, may damage the camera or cause temporary camera
malfunction.
• Use the devices with care. Avoid pressing hard on the camera body.
• For your own safety, avoid using the camera or power off the camera
when there is a storm or lightning.
• Disconnect the power adaptor during long periods between usage.Use
only the accessories and power adaptors supplied by Uniden.
WIRELESS DEVICES OPERATING RANGE
Ensure the signal reception is acceptable between the camera(s) and the
WiFi router. If necessary, reduce the distance between them to improve
overall system performance. As local internet environments may vary,
your device may indicate that the camera is disconnected or may display a
black screen. If this occurs, refresh the app.
IMPORTANT SAFETY PRECAUTIONS

CONTENTS
INSTRUCTIONS .................................. ............................................................................... 2
CONTENTS ......................................... ............................................................................... 3
OVERVIEW. ........................................................................................................................ 4
Features .................................................. ........................................................................................ 4
System ................................................. ........................................................................................ 4
Guardian App Cam 26 Indoor Camera . ...................................................................................... 4
Uniden’s AppCam App ........................ ........................................................................................ 5
WHAT’S IN THE BOX? ....................... ............................................................................... 6
GETTING TO KNOW YOUR CAMERA ... .......................................................................... 7
NETWORK SETUP ............................. ............................................................................... 8
Overview ................................................. ........................................................................................ 8
Prerequisites ........................................... ........................................................................................ 8
Set Up Camera And Smartphone/Tablet ....................................................................................... 8
Connect Camera And Mobile Device ...... ........................................................................................ 9
Connect Camera And WiFi Router.......... ........................................................................................ 9
Mounting the Plate and Camera ............. ...................................................................................... 10
Set Time Zone/Daylight Savings Time .......................................................................................... 10
Setting up email alert ............................... ..................................................................................... 11
OPERATION OVERVIEW. ................................................................................................ 13
USING THE APP. .............................................................................................................. 14
Accessing your cameras ......................... ...................................................................................... 14
Snapshot Vs LIVE Video Screen ............ ...................................................................................... 15
Snapshot Screen Overview..................... ...................................................................................... 15
LIVE Video Screen Overview .................. ...................................................................................... 22
Turn Off the App...................................... ...................................................................................... 23
MAINTAINING YOUR SYSTEM ......... . ............................................................................ 24
TROUBLESHOOTING .... ................................................................................................. 25
SPECIFICATIONS .............................. ............................................................................. 28
WARRANTY ........................................ ............................................................................. 30

4 5
OVERVIEW
Uniden’s Guardian App Cam 26 system works with your smartphone
or wireless device to create a powerful home security network. No PC
interface is needed to view video on your smartphone or wireless devices.
The wireless Guardian App Cam 26 offers superior quality video with true
colour. It is suitable for day or night time use.
The Guardian App Cam 26 camera is an indoor camera. Also, as dust,
grime, and cobwebs accumulate on the camera glass, they can reflect light
from the infrared LED and might lower video quality. Periodically clean the
lens glass with a soft cloth.
FEATURES
System
• No PC required
• Wired connection to router
• WiFi connection to router
• P2P connection
• Records HD 720P up to 20fps
• Manual/Motion recording to microSD (not included)
• Supports up to 32GB microSD (not included)
• High quality H.264 video
• Two-way audio
Guardian App Cam 26 Indoor Camera
• IR cut filter switch
• Compact design
• Night vision range – up to 12 metres

• Built-in microphone and speaker
• microSD card slot (microSD card not included)
Uniden’s AppCam App
• Multiple camera viewing and management from single app
• Remote access to recorded video
• Remote snapshot & recording control
• Event notification/Email alert
6 7
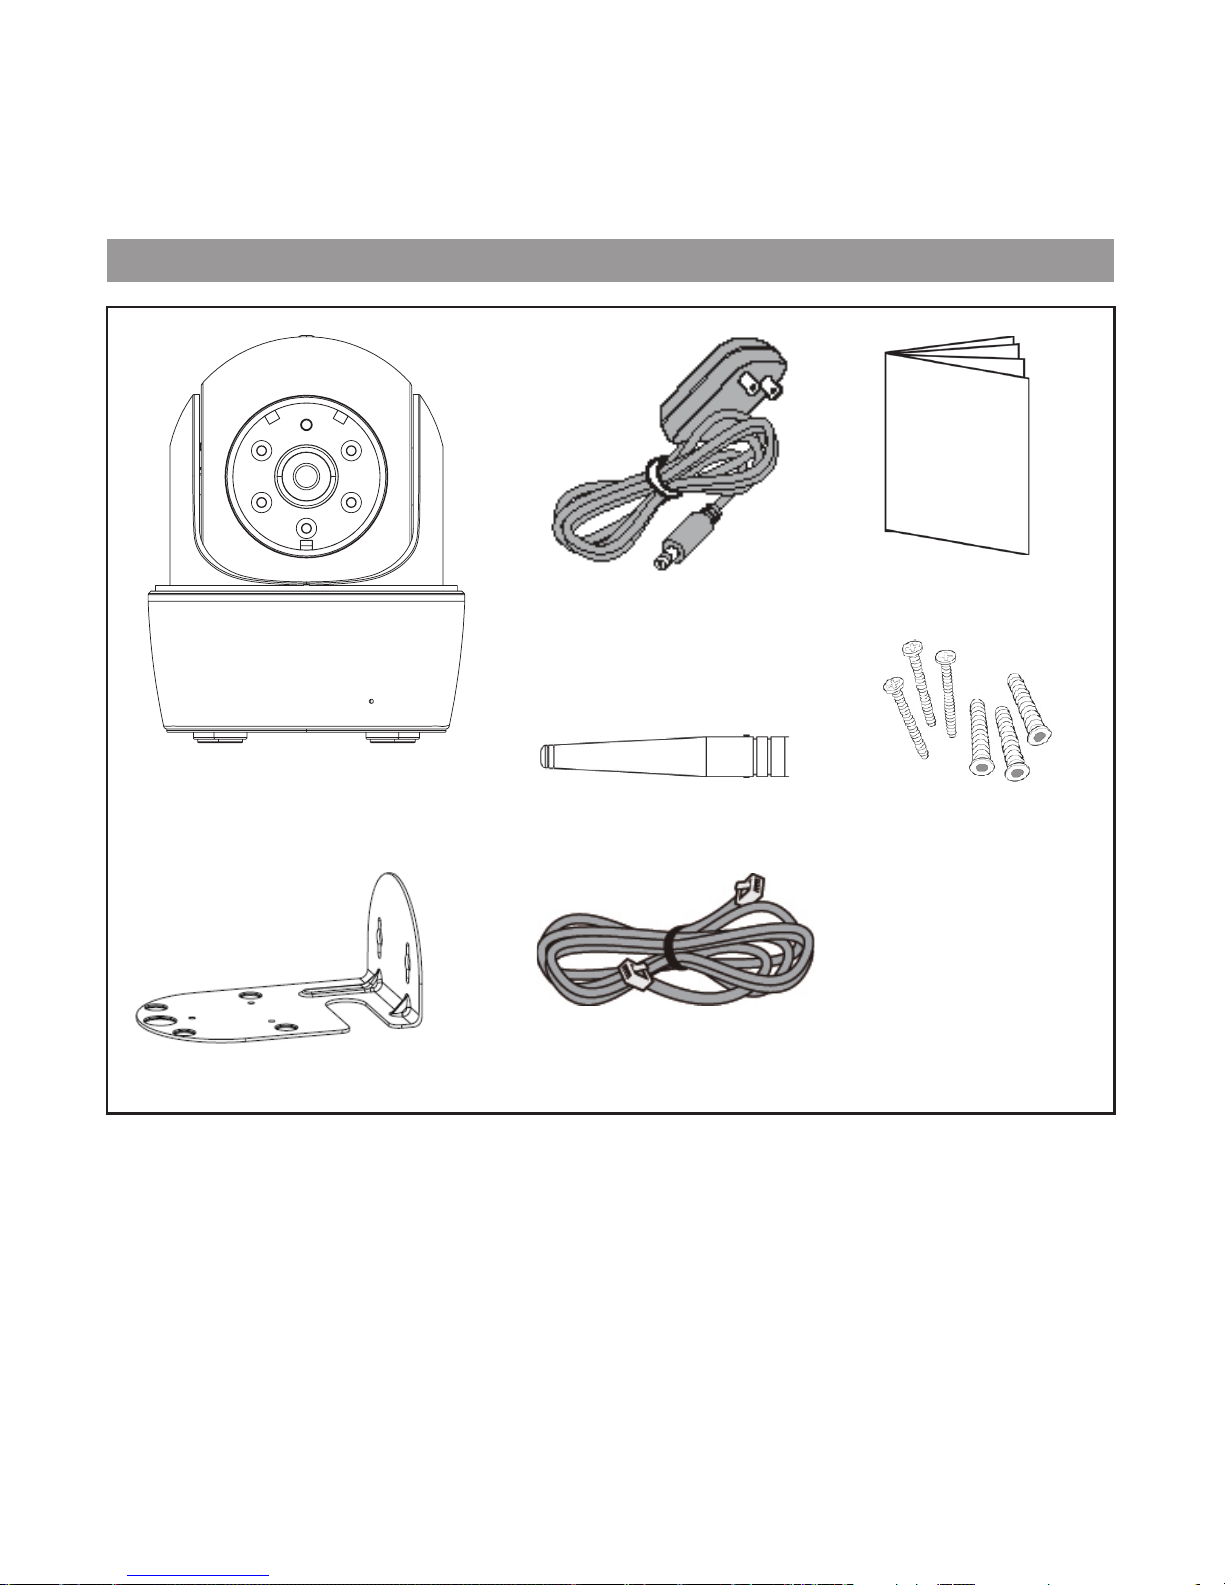
WHAT’S IN THE BOX?
QUICK START
GUIDE
Guardian App Cam 26
Camera
Antenna
5V/1.5A Power Adaptor
Quick Start Guide
Screws and Anchors
Ethernet Cable
If any item is missing or damaged, contact your place of purchase immediately.
Never use damaged products!
Need Help? Get answers at our website:
www.uniden.com.au for Australian model
Mounting Bracket
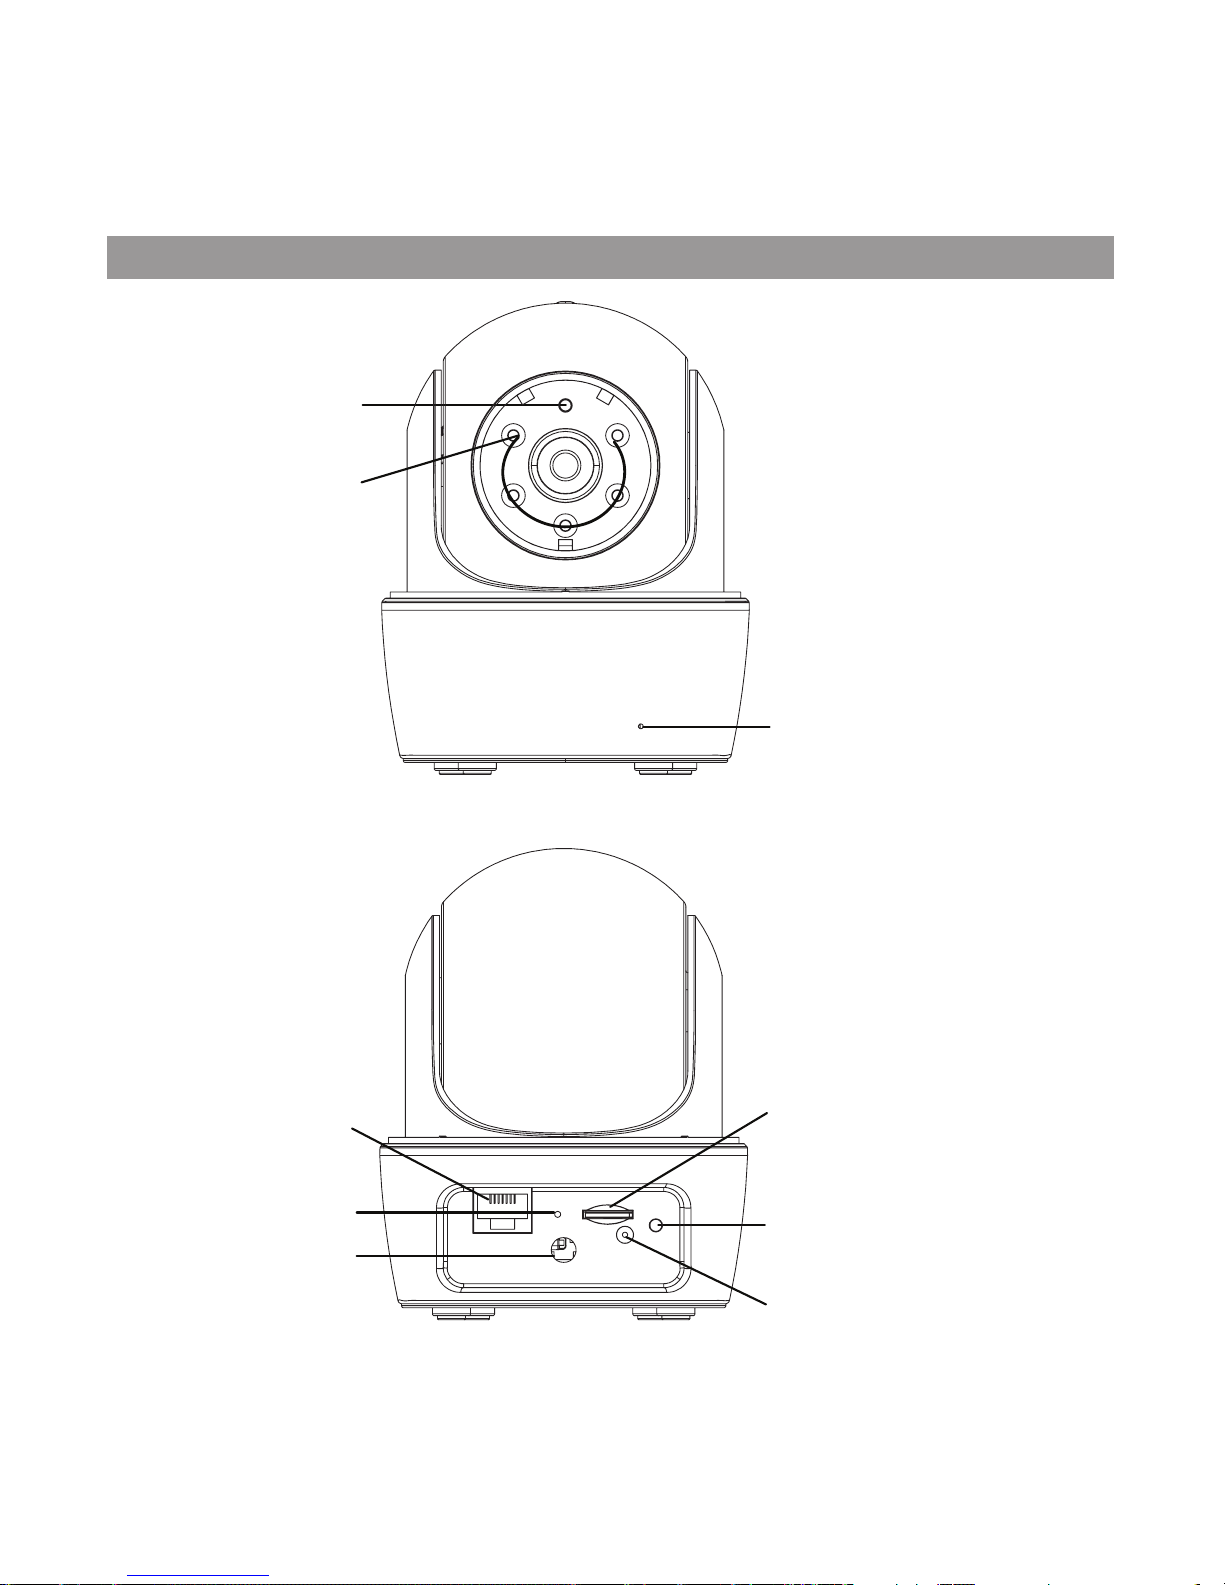
GETTING TO KNOW YOUR CAMERA
Light Sensor
LAN Port
Reset
Antenna
Jack
Microphone
Infrared LEDs
MicroSD Card Slot
Status LED
Power Jack

8 9
NETWORK SETUP
OVERVIEW
There are two methods of connecting the Guardian App Cam 26 camera to
your mobile device. One method is wireless and the other method has the
camera connected directly to the router using the provided Ethernet cable.
The add camera procedures themselves are identical. In the setup
procedures that follow, the wired connection instructions are noted where
applicable.
PREREqUISITES
• Your router must support WPA/WPA2 security and it must be turned on.
• You must have an available WiFi-enabled mobile device (Android or iOS
smartphone/tablet).
• The Guardian App Cam 26 and your mobile device must connect to the
same WiFi router for setup.
SET UP CAMERA AND SMARTPHONE/TABLET
1. Download the Guardian App (search for - Uniden® AppCam™) from the
Apple App store (iOS) or Play Store (Android) on to your device.
2. Connect the antenna to the camera.
3. Wireless Setup - Connect the camera to power. After about 45
seconds, the camera goes through a Pan/Tilt cycle and the green LED
begins to flash (3-flash/pause pattern), indicating that the camera is in
Pairing mode.
Wired Setup - Connect the camera to your router using the Ethernet
cable, provided. Connect to power. After about 45 seconds, the camera
goes through a Pan/Tilt cycle and the green LED begins to flash
(3-flash/pause pattern), indicating that the camera is in Pairing mode.
Go to Step 2 in the next section - Connect Camera and Mobile
Device.

Make a note of your DID code. It can be found on the base of the camera.
CONNECT CAMERA AND MOBILE DEVICE
1. If you are connecting wirelessly, from your mobile device’s settings, go
to
WiFi
. Select the Guardian App Cam 26 to connect your device to it.
The camera listing will be HD-XXXXXX where XXXXXX are the last 6
digits on the camera label. Enter the default password, 12345678. Your
mobile device is now connected to the camera.
2. Launch the app and tap the
Add New System
icon.
3. The
System Information
screen displays. Name the camera and
tap
Search
.
4. The
Search in LAN
result box displays. The camera’s DID should
display. Tap the DID number.
5. The
System Information
screen displays again. This time, enter the
security code (123456); tap
Save
. Tap
YES
, then
OK
at the next
prompts.
6. The
snapshot
screen displays. Tap it to access LIVE view.
7. The Modify Security Code prompt displays. Change security code and
tap OK.
8. The app now displays LIVE video.
CONNECT CAMERA AND WIFI ROUTER
1. From the LIVE view, tap Back icon ( ), the System icon ( ), and
then the System Setting icon (
). The
System Information
screen
displays.
2. Tap
Advanced
. Enter the Admin password (123456).
3. Scroll to
WiFi
on the Advanced Settings list. Tap
Manage WiFi Network.
Select your router from the drop-down list and enter your router’s
password. Tap
Connect
.
When connected to the LIVE view for the first time, the user is forced to
change the security code.
10 11
Your camera will reboot and reconnect to the router. If using the
wired set up process, unplug the Ethernet cable from the router
and camera during the reboot process. Wait 2 - 3 minutes until
the camera runs through the Pan/Tilt mode and the LED returns
to the steady on state to continue.
4. The camera screen indicates that it is disconnected. Tap the System
icon and then the Refresh icon. The camera refreshes and reconnects
to the router you chose. The app displays a snapshot of the video
image.
At this point, the green LED is steady on.
SET TIME ZONE/DAYLIGHT SAVINGS TIME
It is important to set the correct time zone and daylight savings time
indication on your camera to ensure correct date/time stamp on the video
files.
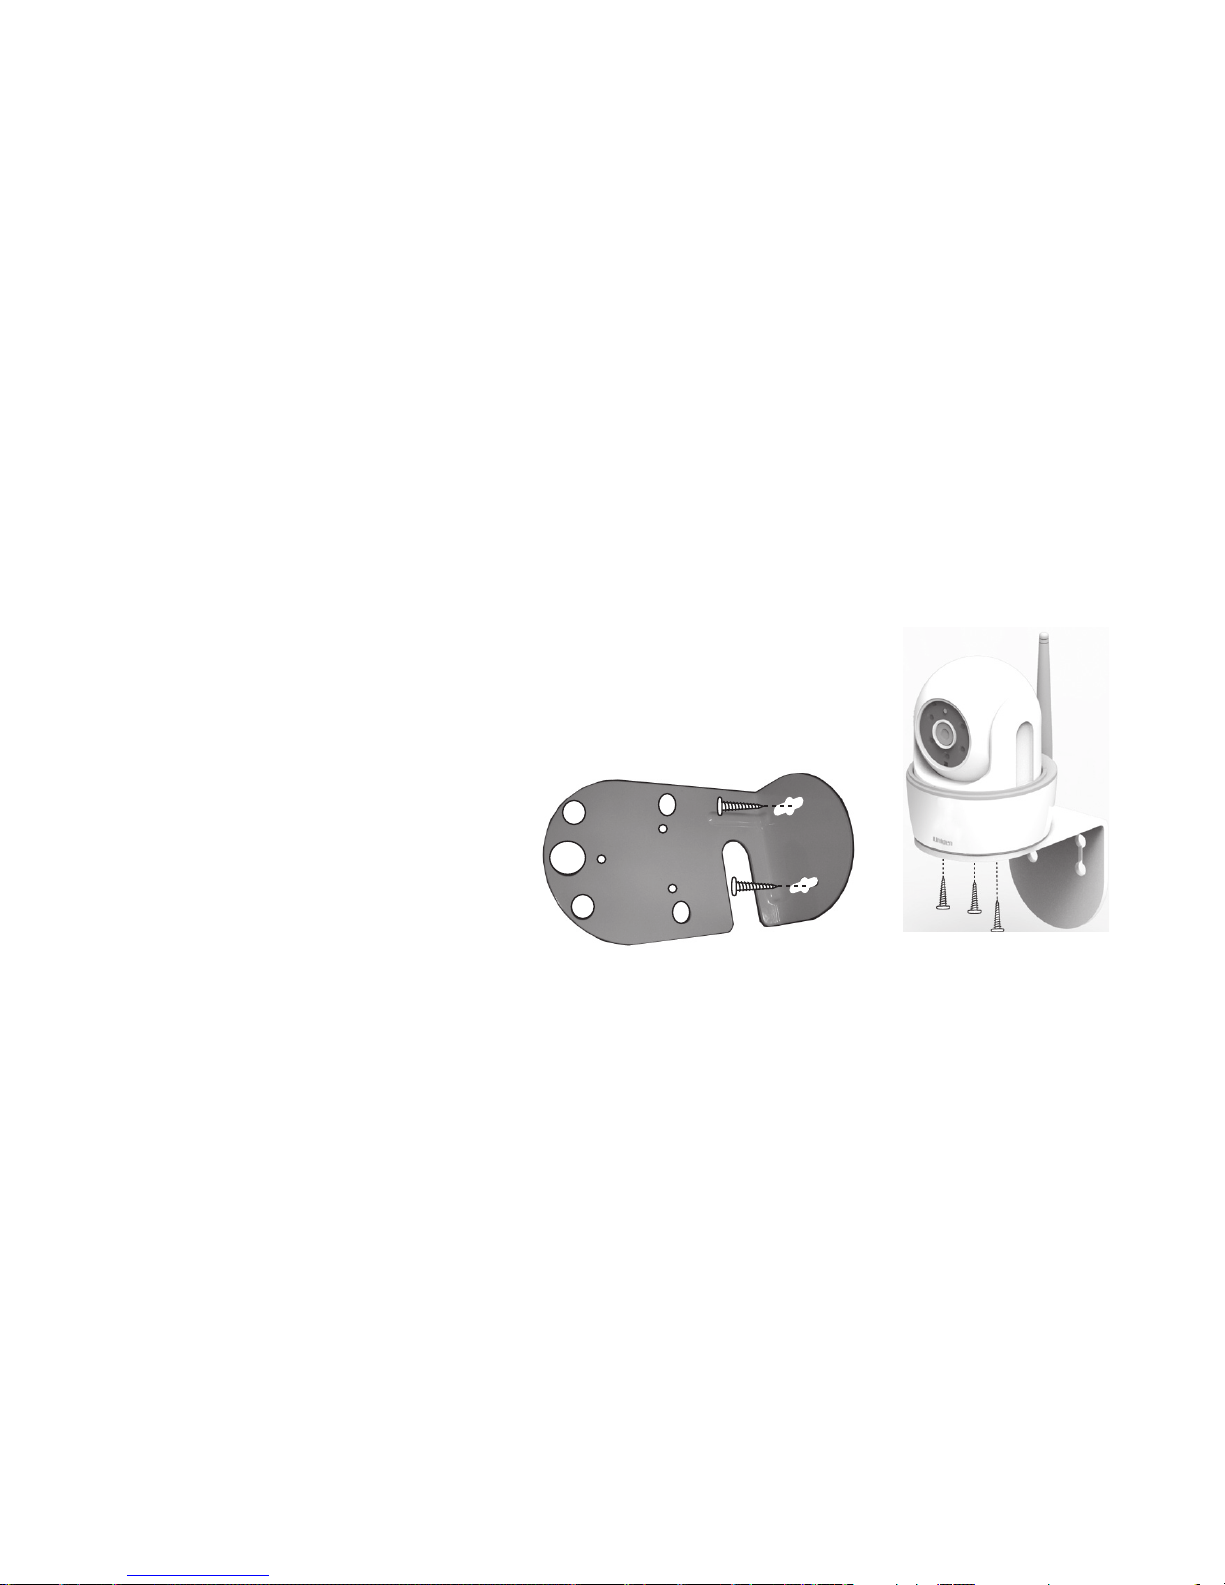
MOUNTING THE PLATE AND CAMERA
1. Hold the mounting plate where you want to mount
it and mark the location of the screw holes.
2. Use the included screws and anchors to attach
the mounting plate to the
wall.
3. Use the enclosed screws
to screw the camera to the
bracket.
1. Access the
Advanced Settings
list (see Connect Camera and WiFi
Router, described previously).
2. From the
Advanced Settings
list, scroll to
Time Zone
.
3. Select your time zone.
4. Set the Daylight Savings Time indicator.
5. Tap
Back
, and exit the
Advanced Settings
list.
 Loading...