

Uniden Guardian App Cam 25 Owner's Manual
Guardian App Cam 25
IP Camera
For more exciting new products please visit our website:
Australia: www.uniden.com.au

2 3
IMPORTANT SAFETY INSTRUCTIONS
Damages caused by non-compliance with this Owner’s Manual will void the
warranty! We will not assume any liability for damages to items or persons
caused by improper handling or non-compliance with the safety notices!
Any warranty claim will be null and void in such cases.
• Do not drop, puncture or disassemble the camera. DO NOT expose the
camera to excessive water or moisture.
• Never tug on the power cords. Use the plug to unplug it from the outlet.
• Do not expose the camera to high temperature or leave it in direct
sunlight. Doing so, may damage the camera or cause temporary camera
malfunction.
• Use the devices with care. Avoid pressing hard on the camera body.
• For your own safety, avoid using the camera or power off the camera
when there is a storm or lightning.
• Disconnect the power adaptor during long periods between usage.
• Use only the accessories and power adaptors supplied by Uniden.
Ensure the signal reception is acceptable between the camera(s) and the
WiFi router. If necessary, reduce the distance between them to improve
overall system performance. As local internet environments may vary,
your device may indicate that the camera is disconnected or may display a
black screen. If this occurs, refresh the app.
Item Requirement/Recommendation
Internet Bandwidth 1 Mbps upload/download speed
Network Requirement WiFi or 4G (optimize download speed)
Memory Card microSD, CLASS10, up to 32GB
Device Processor 1.5GHz dual core processor or equivalent
WIRELESS DEVICES OPERATING RANGE

CONTENTS
IMPORTANT SAFETY INSTRUCTIONS ... .........................................................................................2
CONTENTS ................................................ .......................................................................(this page)3
OVERVIEW .........................................................................................................................................4
FEATURES .........................................................................................................................................5
What’s in the box? ............................................................................................................................ 6
GETTING TO KNOW YOUR CAMERA ..... ........................................................................................ 7
INSTALLING THE CAMERA ..................... .........................................................................................8
NETWORK SETUP .................................... ...................................................................................... 10
Overview ....................................................................................................................................... 10
Prerequisites ................................................................................................................................. 10
Set Up Camera and Smartphone/Tablet ....................................................................................... 10
Connect Camera and Mobile Device ............................................................................................. 11
Connect Camera and WiFi Router .................................................................................................11
Set Time Zone ...............................................................................................................................12
Setting up Email Alert.....................................................................................................................13
USING THE APP ............................................................................................................................... 15
Accessing your cameras ......................... .......................................................................................15
Snapshot Vs Live Video Screen .................................................................................................... 16
Snapshot Screen Overview .......................................................................................................... 16
Live Video Screen Overview ................... .......................................................................................23
COMMON OPERATIONS .......................... .......................................................................................25
MAINTAINING YOUR SYSTEM .......................................................................................................26
TROUBLESHOOTING ..................................................................................................................... 27
SPECIFICATIONS ............................................................................................................................30
WARRANTY ......................................................................................................................................32

4 5
OVERVIEW
Uniden’s Guardian App Cam 25 system works with your smartphone
or wireless device to create a powerful home security network. No PC
interface is needed to view video on your smartphone or wireless devices.
The wireless Guardian App Cam 25 offers superior quality video with true
colour. It is suitable for day or night time use.
The Guardian App Cam 25 camera is an indoor/outdoor camera that
is splashproof and has an IP66 weather rating. Water can be sprayed
on it and it will still work; however, the camera cannot be submerged
underwater.
Although this camera can be exposed directly to the rain, it is
recommended that, if it is used outdoors, it be mounted under some type of
cover like a patio overhang or eave. As rainwater drops start to dry on the
camera glass, it can create spots that will reflect the light from the infrared
LEDs used for night vision, thus causing lower quality video.
Also, as dust, grime, and cobwebs accumulate on the camera glass,
they can reflect light from the infrared LED and might lower video quality.
Periodically clean the lens glass with a soft cloth.

FEATURES
System
• No PC required
• Wired connection to router
• WiFi connection to router
• P2P connection
• Records HD 720P up to 20fps
• Manual/Motion recording to microSD (not included)
• Supports up to 32GB microSD (not included)
• High quality H.264 video
• Audio reception
Guardian App Cam 25 Indoor/Outdoor Camera
• IP66 weather-rated
• IR cut filter switch
• Compact design
• Night vision range – up to 12 metrest
• Built-in microphone
• microSD card slot (microSD card not included)
Uniden’s AppCam App
• Multiple camera viewing and management from single app
• Remote access to recorded video
• Remote snapshot & recording control
• Event notification/Email alert
6 7
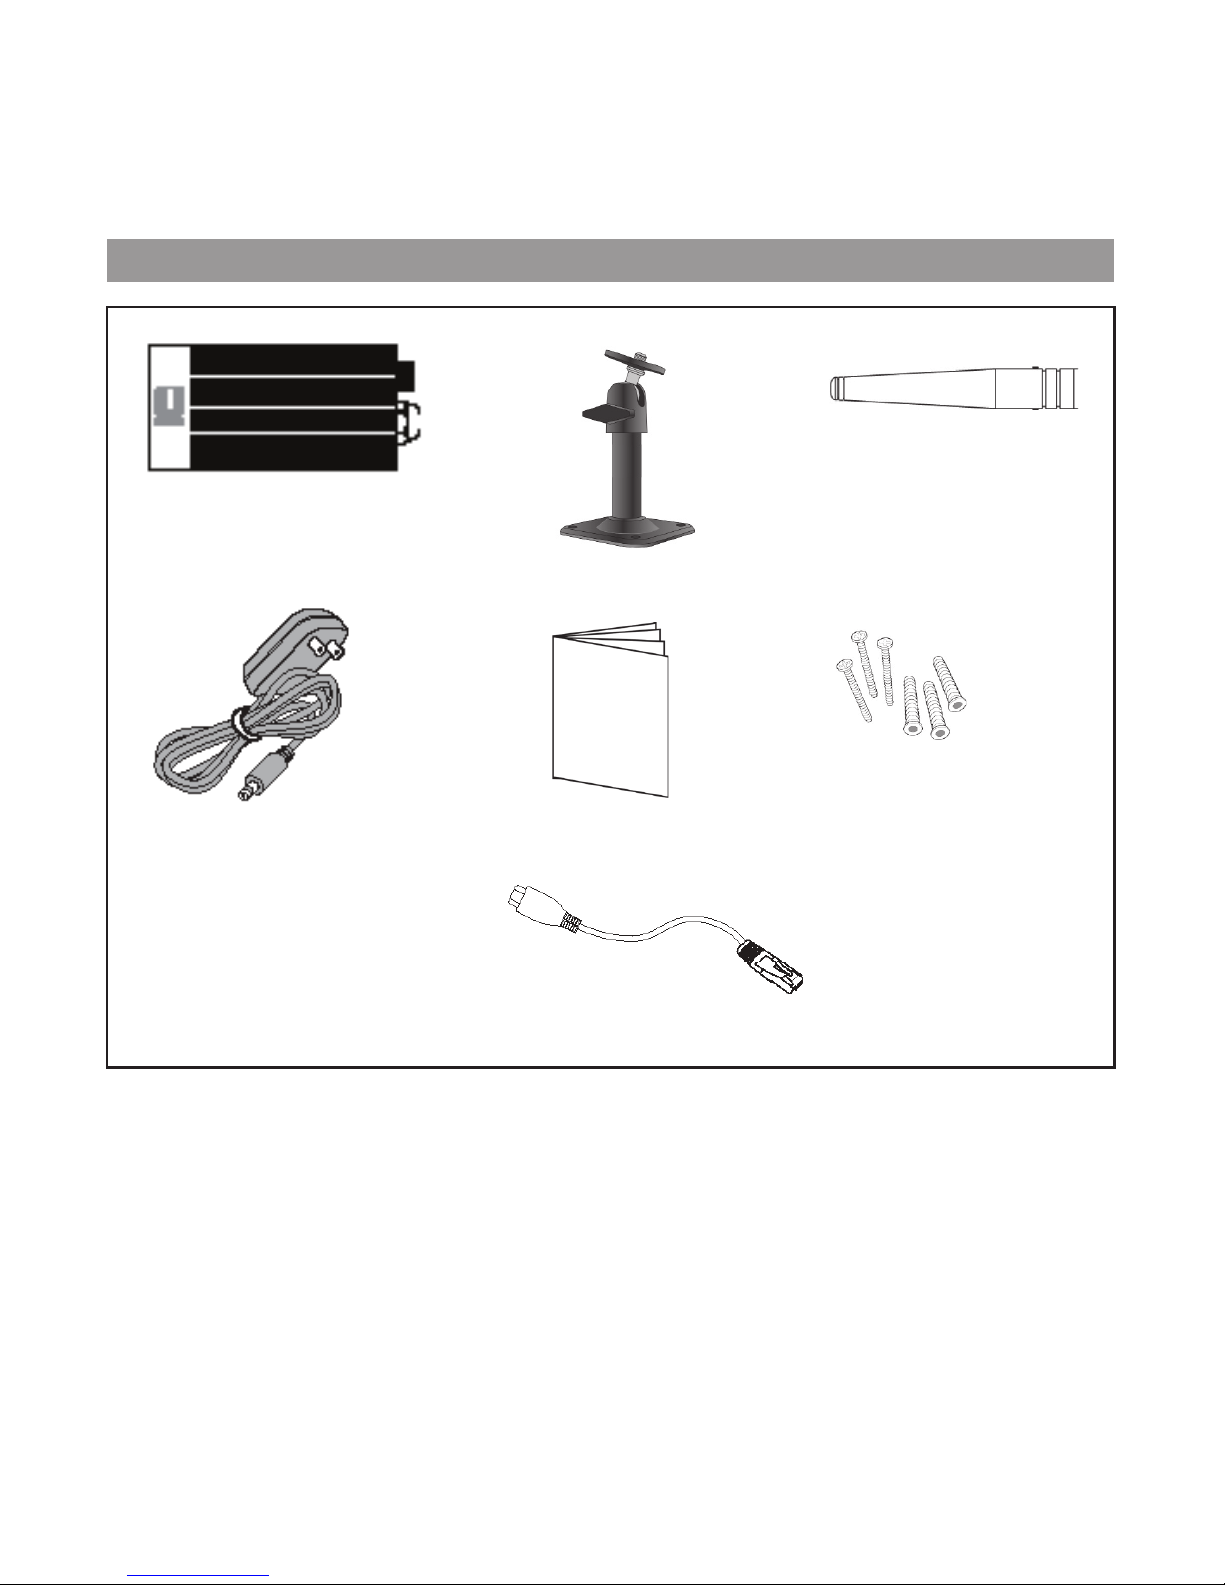
WHAT’S IN THE BOX?
QUICK START
GUIDE
Guardian App Cam 25
Camera
Camera Stand
Antenna
5V/1.5V Power Adaptor
Quick Start Guide
Screws and Anchors
Micro USB to Ethernet Cable
If any item is missing or damaged, contact your place of purchase immediately.
Never use damaged products!
Need Help? Get answers at our website:
www.uniden.com.au for Australian model

GETTING TO KNOW YOUR CAMERA
Antenna
Infrared LEDs
Power Indicator
PIR sensor
Signal indicator
SMA Connector
microSD
card slot
microUSB to
RJ45
Power cable/
Reset button
Camera
Stand

8 9
Consider the following when installing cameras:
• Clear line of sight video transmission distance is best.
- Walls, especially brick and concrete, shorten the transmission distance.
- Placement next to windows allows better transmission.
• Avoid having a direct light source in the view of the camera, including
street lights, ceiling or floor lamps, spotlights in the driveway, etc.
• The camera is equipped with built-in infrared LEDs so you can use night
vision for 24-hour surveillance. The LEDs will automatically activate
at night and the picture viewed will turn to black and white. The night
viewing range is up to 12ms. Avoid pointing the camera lens directly at
clear glass; the night vision LEDs will cause a blurred image.
• Optimized motion detection range is 1-6ms for the camera. The farther
away an object is, the less accurate the motion detection.
• Avoid pointing the camera directly at any bushes, tree branches, or
moving objects that might naturally move due to winds. This may cause,
the motion detection feature to record unnecessarily.
You can mount the Guardian App Cam 25 with the stand on the bottom (on
a flat surface such as a table-top), on the side (on a wall), or on the top (on
the ceiling or under an eave or overhang).
1. Use your mobile device to test the places where you are considering
mounting the camera. Hold the device in that location; if you still have a
WiFi signal on your device, the location should be okay.
Attach the camera stand if you have not already done so.
2. Unplug the camera from the power source and install it.
3. After the camera is installed, reconnect power.
INSTALLING THE CAMERA
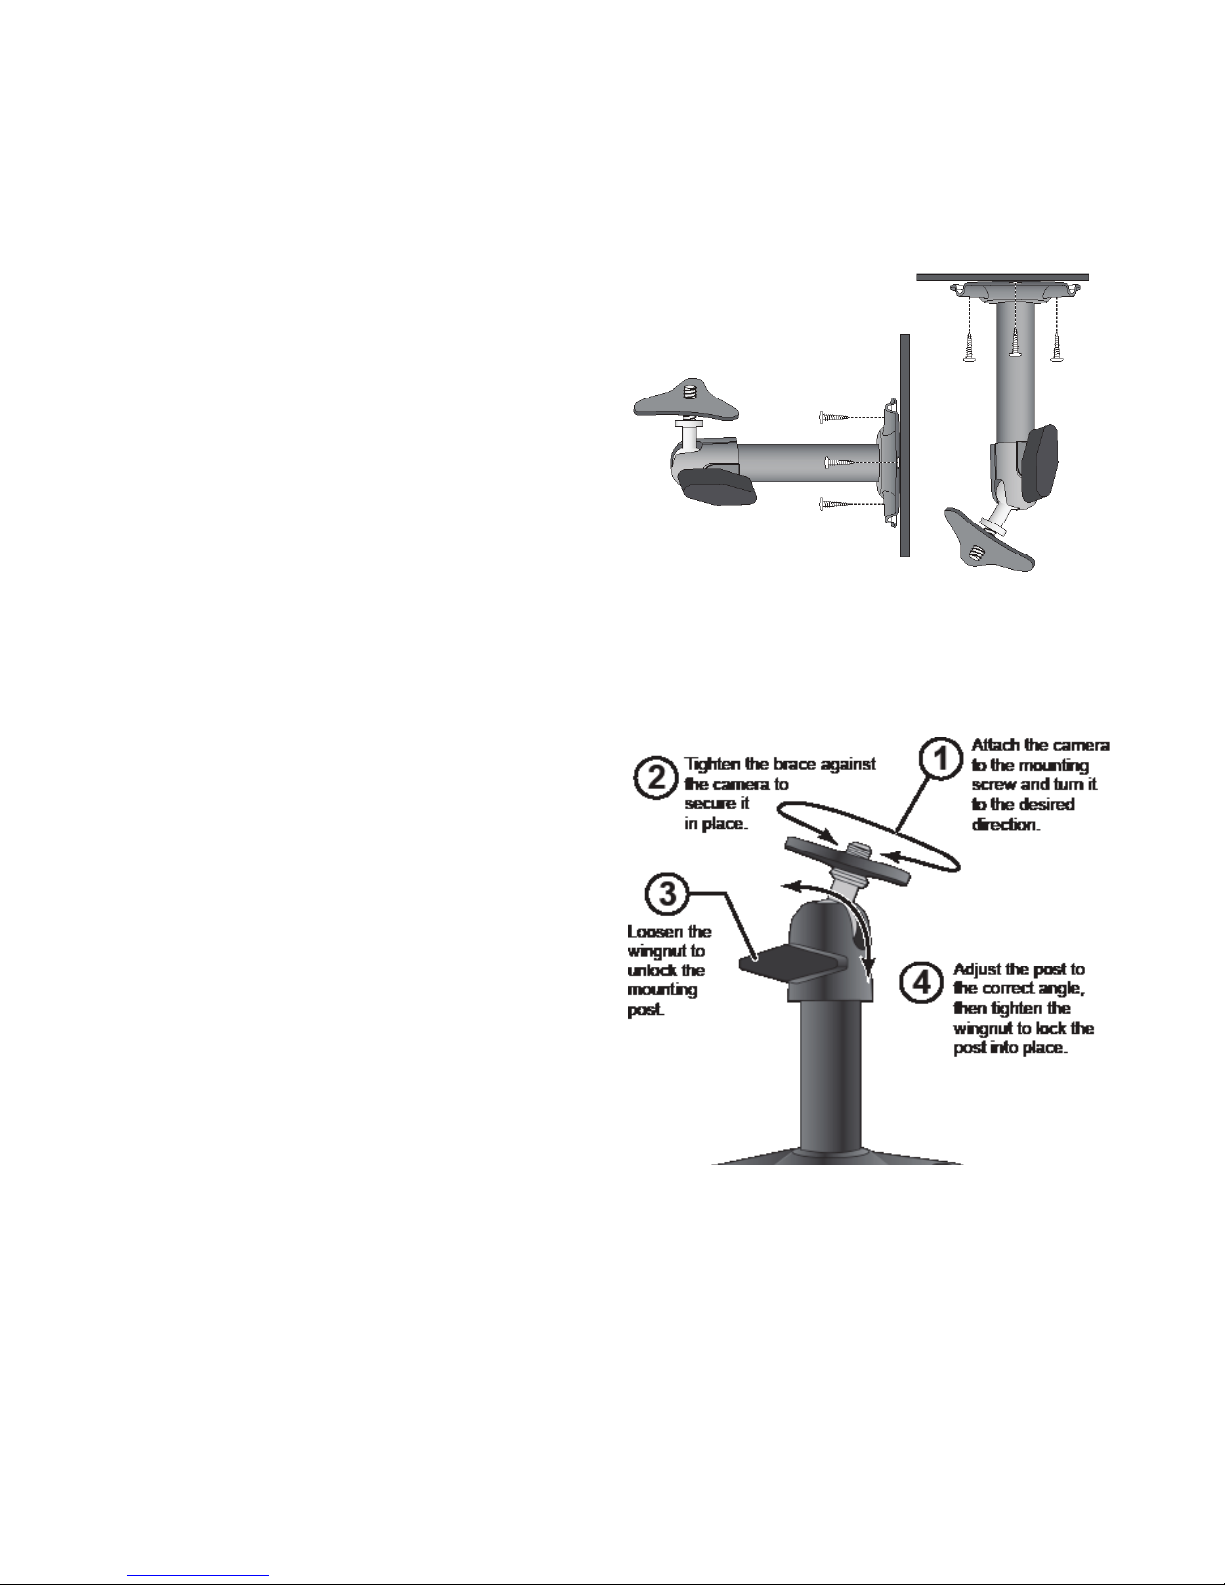
Mount the Guardian App Cam 25 Base
1. Hold the base of the camera
stand where you want to mount it
and mark the location of the
screw holes.
2. Use the included screws and
anchors to attach the base to
the wall or ceiling. You can also
screw the base into a flat surface
such as a tabletop if needed.
3. Before attaching the camera, tug gently on the stand to make sure it is
securely in place.
Attach the Guardian App Cam 25 Camera
1. For each Guardian App Cam 25,
attach the camera bracket to the
mounting screw. You can attach
the stand to the top or the bottom
of the camera as needed.
Tighten it a few turns, then turn
the camera to face the direction
you want.
2. Tighten the camera brace up
against the Guardian App Cam
25 to secure it into place.
3. Unlock the mounting post by
turning the wingnut to the left a few turns.
4. Set the mounting post to the correct angle, then tighten the wingnut until
the post is locked into place.
5. After the Guardian App Cam 25 camera is installed, reconnect power.

10 11
NETWORK SETUP
OVERVIEW
There are two methods of connecting the Guardian App Cam 25 camera to
your mobile device. One method is wireless and the other method has the
camera connected directly to the router using the provided microUSB to
Ethernet cable.
The add camera procedures themselves are identical. In the setup
procedures that follow, the wired connection instructions are noted where
applicable.
PREREqUISITES
• Your router must support WPA/WPA2 security and it must be turned on.
• You must have an available WiFi-enabled mobile device (Android or iOS
smartphone/tablet).
• The Guardian App Cam 25 and your mobile device must connect to the
same WiFi router for setup.
SET UP CAMERA AND SMARTPHONE/TABLET
1. Download the Guardian App (search for Uniden® AppCam™ app) from
the Apple App Store (iOS) or Play Store (Android) onto your device.
2. Connect the antenna to the camera. You can attach the camera stand
to the camera as well but it is not necessary.
3. Wireless Setup - Connect the camera to power. After about 45
seconds, the red LED is steady on and the green LED begins to flash
(3-flash/pause pattern), indicating that the camera is in Pairing mode.
Wired Setup - Connect the camera to your router using the microUSB
to Ethernet cable, provided. Connect to power. Go to Step 2 in the next
section - Connect Camera and Mobile Device.
As the Uniden App is constantly under development to enrich user experience, the icons/
screens shown in this manual may vary slightly from the actual app. This OM uses icons
from the Andriod device for most of the steps.

CONNECT CAMERA AND MOBILE DEVICE
1. If you are connecting wirelessly, from your device’s settings, go to
WiFi
. Select the Guardian App Cam 25 to connect your device to it.
The camera listing will be HD-XXXXXX where XXXXXX are the last 6
digits on the camera label. Enter the default password, 12345678. Your
mobile device is now connected to the camera.
2. If you are using the wired option, launch the app and tap the
Add New System
icon.
3. The
System Information
screen displays. Name the camera and
tap
Search
.
4. The
Search in LAN
result box displays. The camera’s DID should
display. Tap the DID number.
5. The
System Information
screen displays again. This time, enter the
security code (123456); tap
Save
. Tap
YES
, then
OK
at the next
prompts.
6. The
Globe
screen displays. Tap the Globe to access LIVE view.
7. Since this is the first time you connect to LIVE view, you must change
the security code. Once you change the security code, you will not be
asked again.
8. The app now displays LIVE video.
CONNECT CAMERA AND WIFI ROUTER
1. From the LIVE view, tap Back icon ( ), the System icon ( ), and
then the System Setting icon (
). The
System Information
screen
displays.
2. Tap
Advanced
. Enter the Admin password (123456).
3. Scroll to
WiFi
on the Advanced Settings list. Tap
Manage WiFi Network.
Select your router from the drop-down list and enter your router’s
password. Tap
Connect
.
 Loading...