

Page 1
GPS352 Owner’s Manual
Page 2
TM
Table of Contents
Introduction ...................................................................... 3
Features ........................................................................................3
Important Vehicle and Product Safety Information .........................3
Getting Started .................................................................. 4
What’s Included ............................................................................4
The Parts of the GPS Device ..........................................................5
Installing the GPS Device in Your Vehicle .....................................7
Using the Interface ............................................................ 9
Using the Main Menu Screen .........................................................9
Using the Map Screen .................................................................10
Changing the Map View ...............................................................11
Changing the Map Options ..........................................................12
Creating a Route .............................................................. 14
Entering an Address as Your Destination ....................................15
Reading the Route Screen ............................................................17
Route Information and Current Route Options ............................18
Running a Route Demo ...............................................................19
Using Other Destinations for Routing ..........................................20
Using the Quick Find Feature ...................................................... 22
Using the Mark Menu ..................................................................24
Working With Waypoints .............................................................25
Changing the Route Guidance Options ........................................26
Changing the Default Route Options ...........................................26
Customizing Your GPS Device .......................................... 27
Changing the Language ............................................................... 27
Changing the Voice Prompts ........................................................27
Entering Your Home Location ......................................................28
Entering the Date and Time ......................................................... 28
Customizing Your Display ...........................................................29
Setting Up Speed Alerts ............................................................... 30
Accessories ...................................................................... 31
Using an External Antenna..........................................................31
Using a Headset ..........................................................................31
Maintenance .................................................................... 32
Updating Maps and Software .......................................................32
Battery Information .....................................................................32
Troubleshooting ..........................................................................32
Using the GPS Status Screen .......................................................33
One Year Limited Warranty .............................................. 34
Copyright Information .................................................................35
Declarations of Conformity and Compliance ................................35
2
Page 3
TM
Introduction
Congratulations on your purchase of Uniden’s
GPS352 navigation device. This manual
contains important information on how to safely use
your GPS device in your vehicle. Please read this manual
carefully and follow all safety instructions.
Visit our web site at www.uniden.com to download
updated maps, order accessories, or get answers to any
questions about your GPS device.
Features
The navigation device receives signals
from Global Positioning Satellites (GPS) and uses these
signals and the advanced navigation software from Space
Machine to plot a route from your current location to your
chosen destination.
The GPS352 offers
Fast signal acquisition
●
Accurate, detailed maps covering all of the US and
●
Canada
Turn-by-turn guidance with true human voice
●
technology
Fast recalculation of routes
●
2 million pre-programmed points of interest
●
Three different navigation views (2 map and 1 full arrow)
●
Important Vehicle and Product Safety Information
Before using your GPS device, be sure you
review and understand the following information.
This device is not a substitute for common sense and
●
careful driving. Always comply with all trafc laws of the
state and city in which you are driving.
Do not allow the GPS device to be a distraction to safe
●
driving. What you see through your windshield is more
important than what you see on the LCD screen.
Do not attempt to input locations, change routing
●
options, or recongure your GPS device while driving.
Park your car or ask a passenger to operate the GPS
device for you.
Some states, such as California and Minnesota, prohibit
●
mounting any mobile electronics device on the windshield
of your vehicle. Before mounting your GPS device, check
to see if your state (and any state you plan to travel to)
have regulations governing how devices can be installed
in vehicles.
Never leave the in plain sight in an
●
unattended vehicle.
Remove the device from your vehicle to avoid prolonged
●
exposure to extremes of temperature and moisture.
Dense overhead trees, tunnels, and certain types of
●
metallic window tinting may temproarily disrupt the
connection to the satellites.
Memory for 25 custom routes, 10 waypoints per route,
●
50 recently-used locations, and 50 favorite locations
A breadcrumbs feature to track your current route
●
3
Page 4
TM
Getting Started
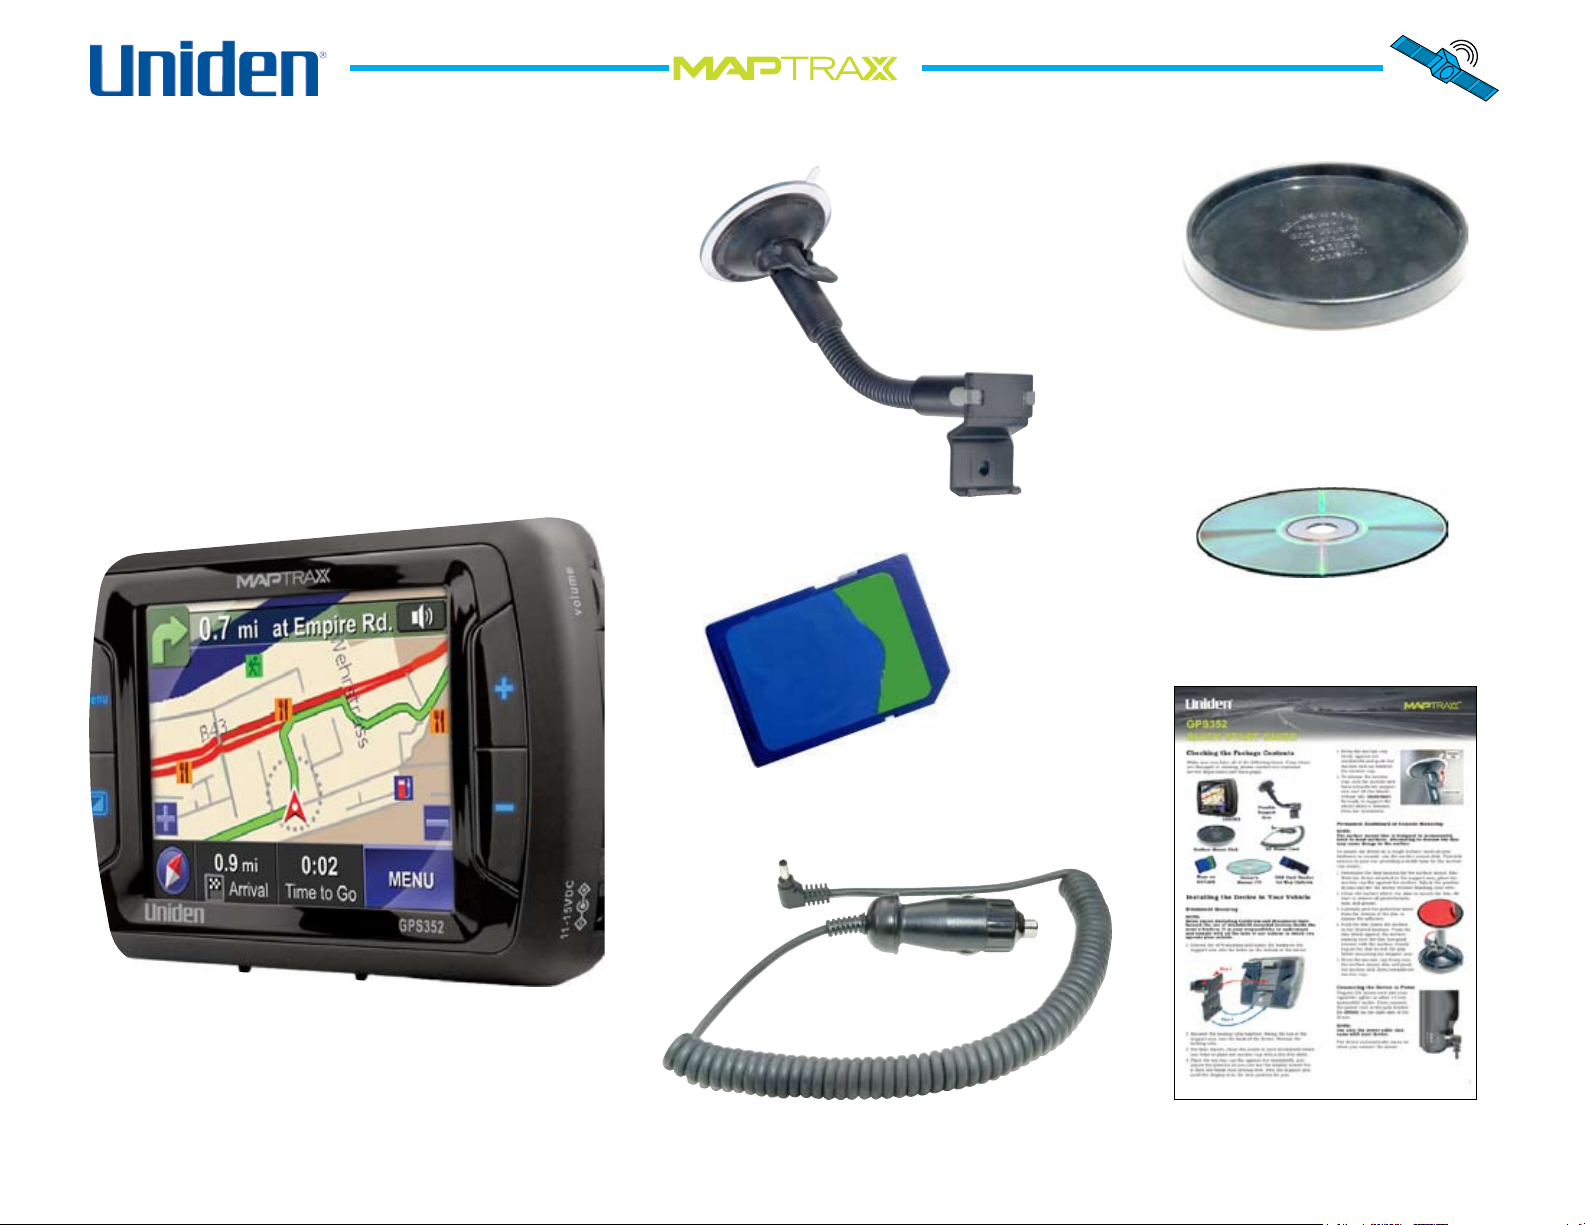
What’s Included
Check the contents of the box and make
sure you have all of the following items. If
any items are damaged or missing, please
contact our customer service department
(see back page).
GPS352
Surface Mount Disk
Flexible
Support Arm
Owner’s Manual CD
Maps on
SD Card
DC Power Cord
Quick Reference Guide
4
Page 5
TM
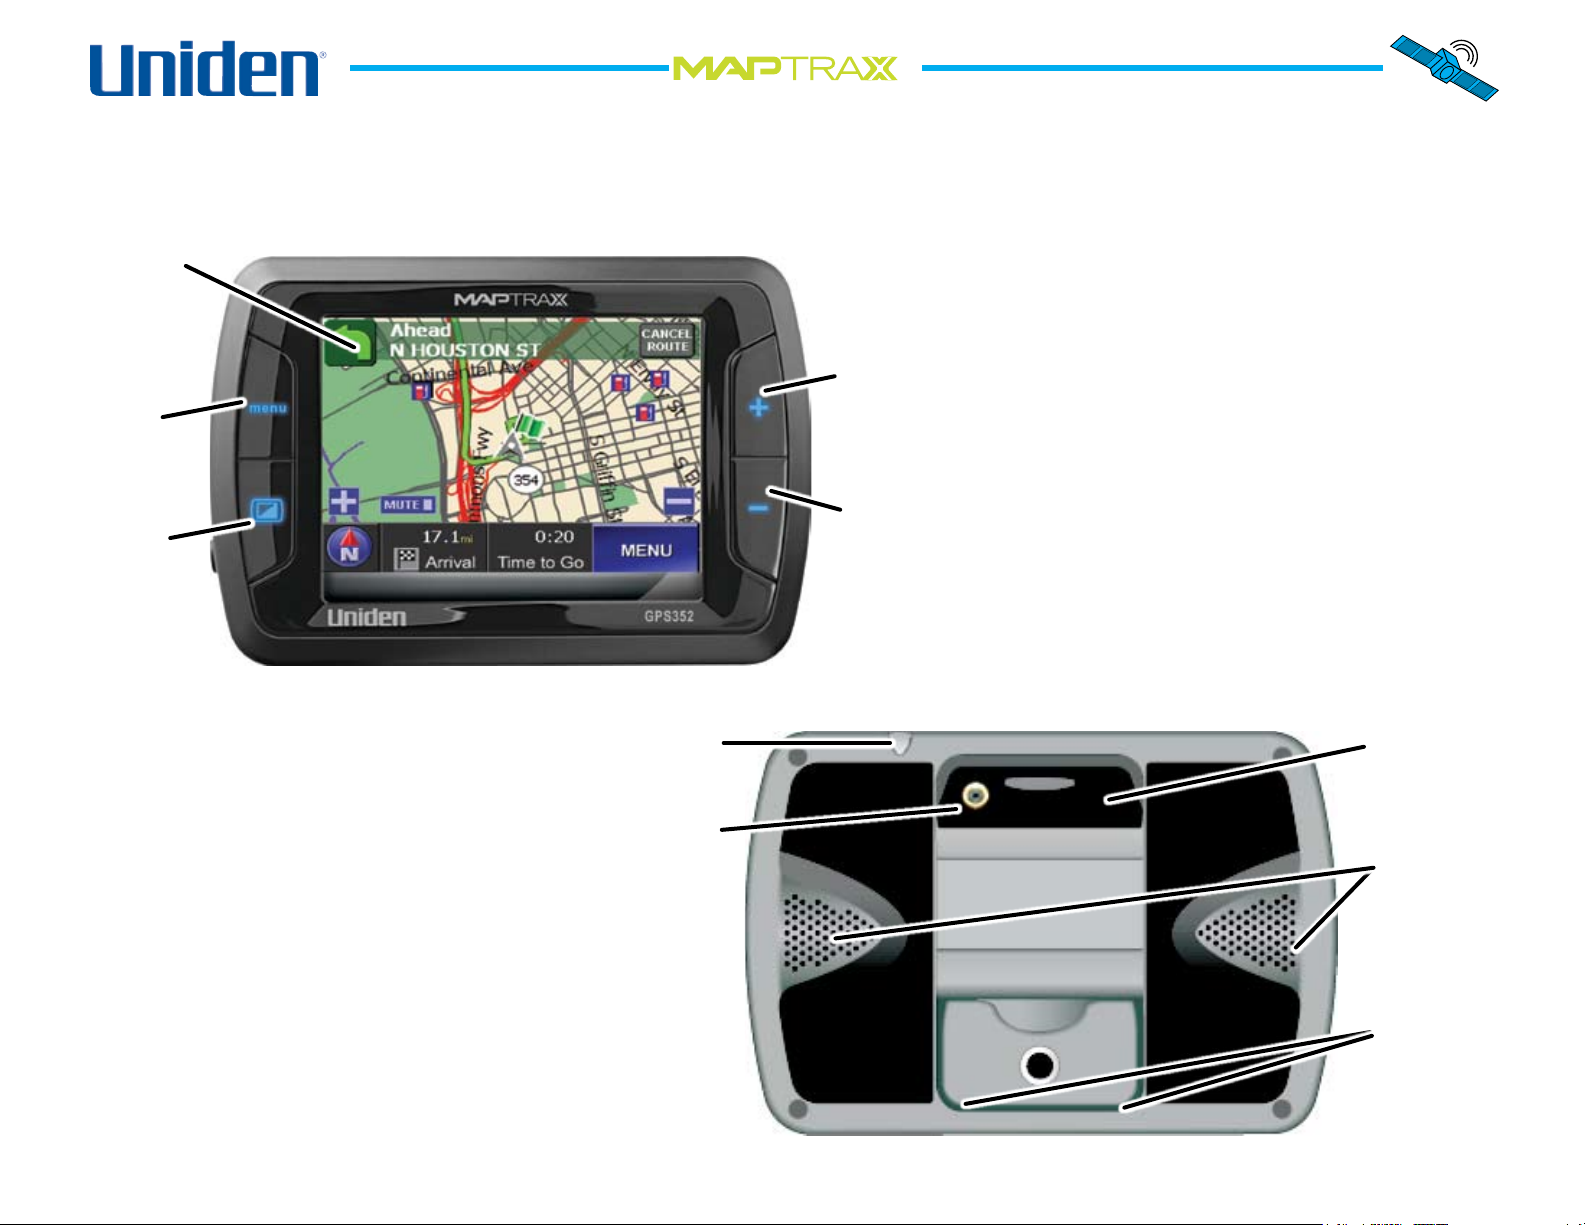
The Parts of the GPS Device
See the pictures below and on the following page for the parts of the GPS402 that you will use on a regular basis.
Front
LCD
Touch
Screen
Zoom IN or
Go to
Menu
LCD
Screen
ON/OFF
Scroll UP
Zoom OUT or
Scroll DOWN
Back
Removeable
Stylus
Connector
for Optional
External
Antenna
GPS
Antenna
(extended)
Speakers
Mounting
Holes for
Support
Arm
5
Page 6
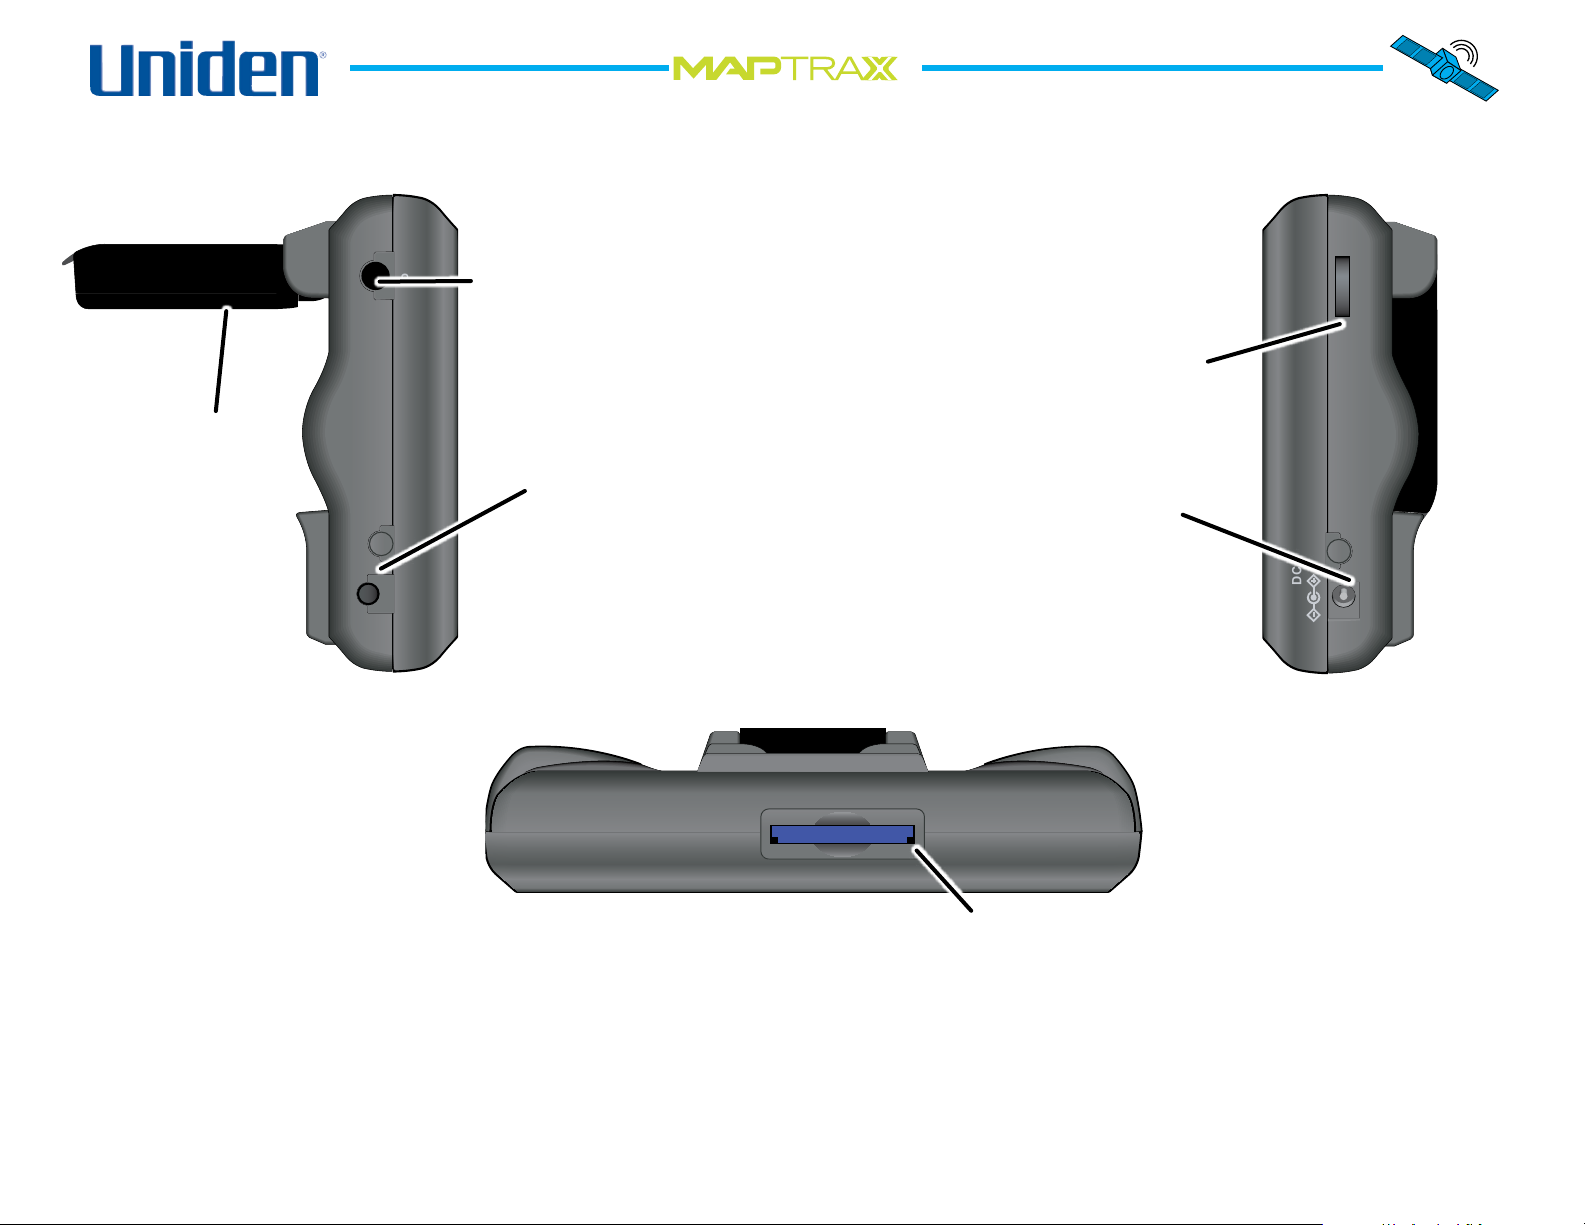
Left Right
po wer
au dio
volume
11- 1 5V D C
TM
Built-in GPS
Antenna
(extended)
Audio OUT
Supports standard
3.5 mm audio
headphones.
Power ON/OFF
Turns the entire
device on or off.
Volume
Control
DC Power
Input
Bottom
SD Card
The SD Card must be installed for the
mapping features to operate properly.
6
Page 7
Step 1
Step 2
TM
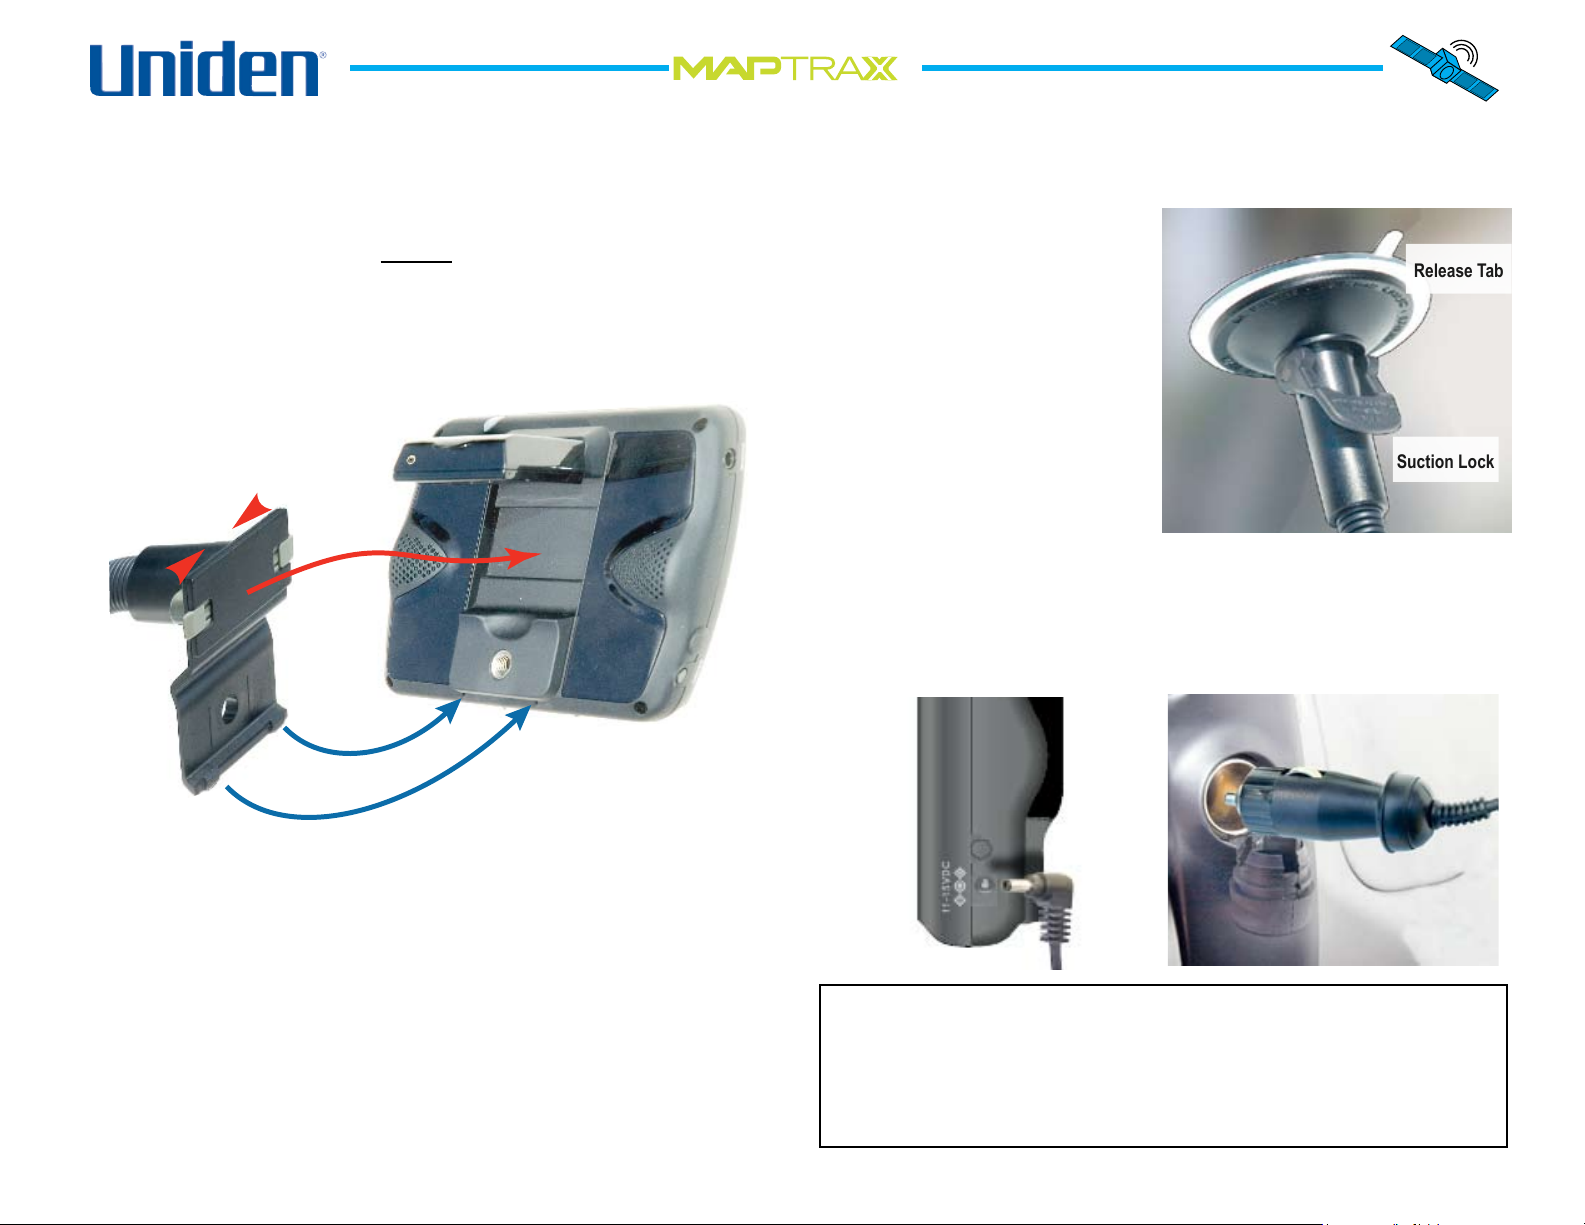
Installing the GPS Device in Your Vehicle
Suction Lock
Release Tab
Windshield Mounting
When you install the device for the rst time, attach the
device to the support arm before attaching the arm to your
vehicle windshield.
Note: Before attaching the suction cup, clean the inside
of your windshield with a standard window cleaner and a
lint-free cloth.
Press the suction cup
4.
rmly against the
windshield and push
the suction lock up
towards the suction
cup. To release the
suction cup, pull the
lock back towards the
support arm and lift the
plastic tab. Important:
be ready to support the
device when it releases
from the windshield.
Connect the DC power cord to the 11-15VDC jack.
5.
Then, insert the cigarrette-lighter plug into a standard
12-volt outlet. The device automatically turns on when
you connect the power.
1.
2.
3.
Extend the GPS antenna and insert the hooks on the
support arm into the holes on the bottom of the Device.
Squeeze the locking tabs together. Swing the top of the
support arm into the back of the device. Release the
locking tabs.
Place the suction cup at against the windshield, and
adjust the position so you can easily see the display screen
but your driving view is not obstructed. Flex the gooseneck support arm until the display is in the right position.
NOTE:
Some states (including California and Minnesota)
have banned the use of windshield-mounted devices
inside the state’s borders. It is your responsibility
to understand and comply with all the laws of any
state(s) in which you operate your vehicle.
7
Page 8
TM
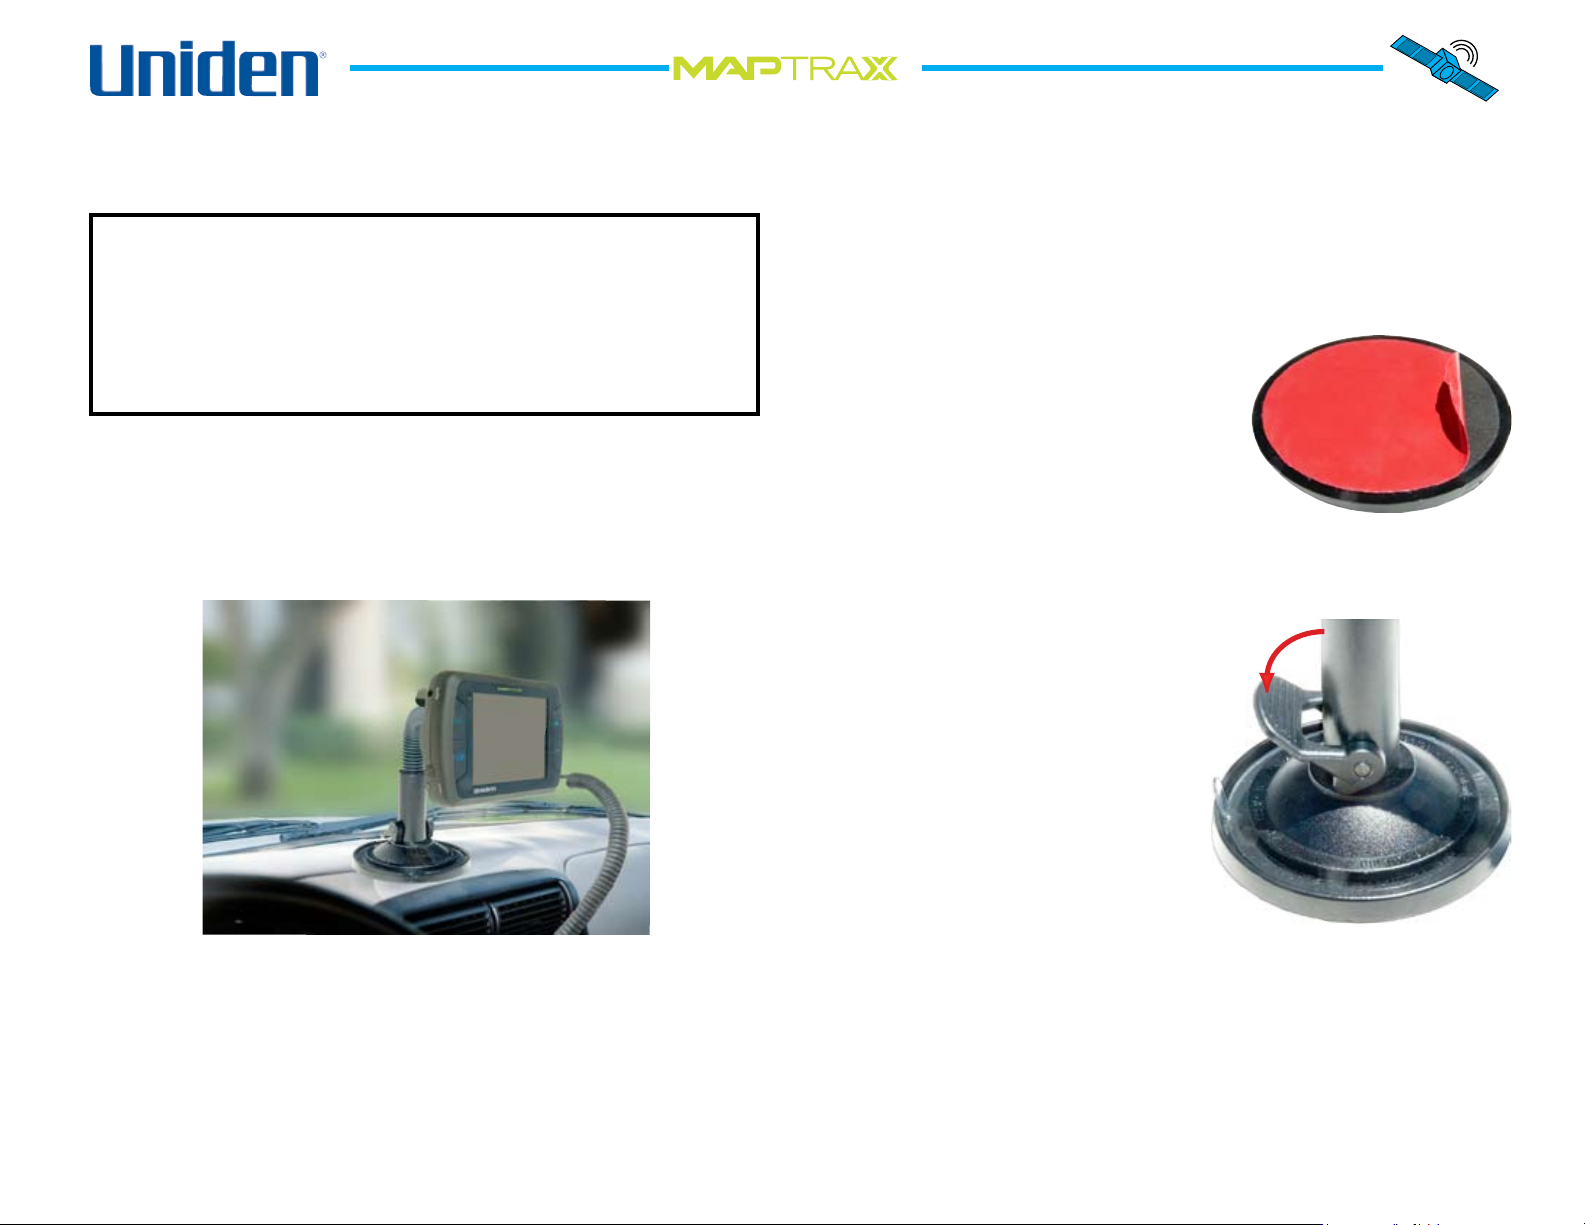
Permanent Dashboard or Console Mounting
NOTE:
The surface mount disc is designed to
permanently stick to most surfaces. Attempting
to remove the disc may cause damge to the
surface. Be certain you have the disc in the
desired location before exposing the adhesive.
To mount the device on a rough surface, such as your
dasboard or console, use the surface mount disk that
came with your device. This disk permanently mounts in
your car and provides a stable base for the suction cup
mount.
Clean the surface where you plan to mount the disc. Be
2.
sure to remove all protecterants, wax, and grease.
Carefully peel the protective sheet
3.
from the bottom of the surface
mount disc to expose the adhesive.
Position the disc above the surface
4.
in the desired location, Press the
disc rmly against the surface,
making sure that all parts of the
disc have good contact with the surface. Gently tug on the
disc to test the adhesive before mounting the support arm.
Press the suction cup rmly
5.
into the surface mount disc and
push the suction lock down
towards the suction cup.
To release the suction cup,
6.
pull the lock back towards the
support arm and lift the plastic
tab. Important: be ready to
support the device when it
releases from the windshield.
Determine the best location for the surface mount disc.
1.
Attach the device to the support arm. Place the suction
cup at against the surface, and adjust the position so
you can easily see the display screen but your driving
view is not obstructed.
Connect the DC power cord to
7.
the 11-15VDC jack. Then, insert the cigarrette-lighter plug
into a standard 12-volt outlet. The device automatically
turns on when you connect the power.
8
Page 9
TM
Using the Interface
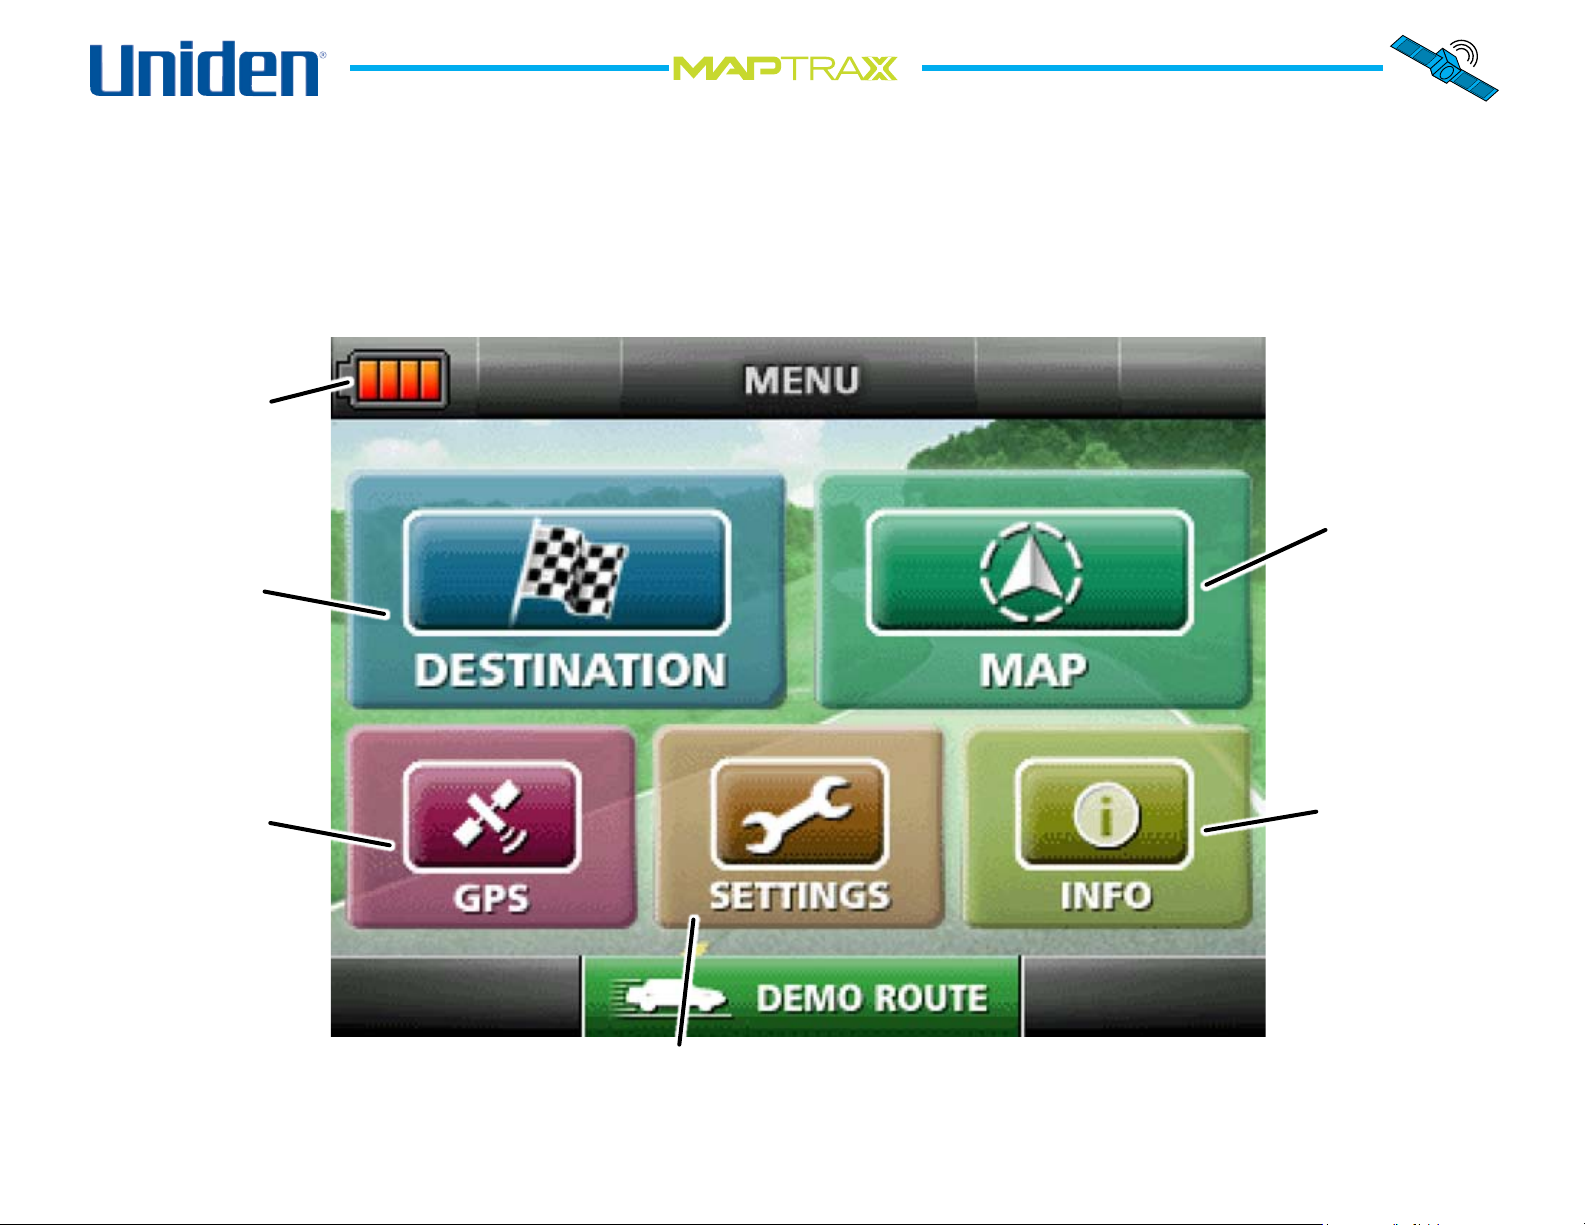
Using the Main Menu Screen
When the device rst powers on, it displays the menu screen. To select any item on any screen, simply tap the item
with your nger or the removeable stylus.
Battery
charge
indicator
Show the
current
Enter or
select a
destination
map and
location
Go to the
GPS status
screen
Show the
hardware
and software
versions
Change the device setup
and user information.
9
Page 10
TM
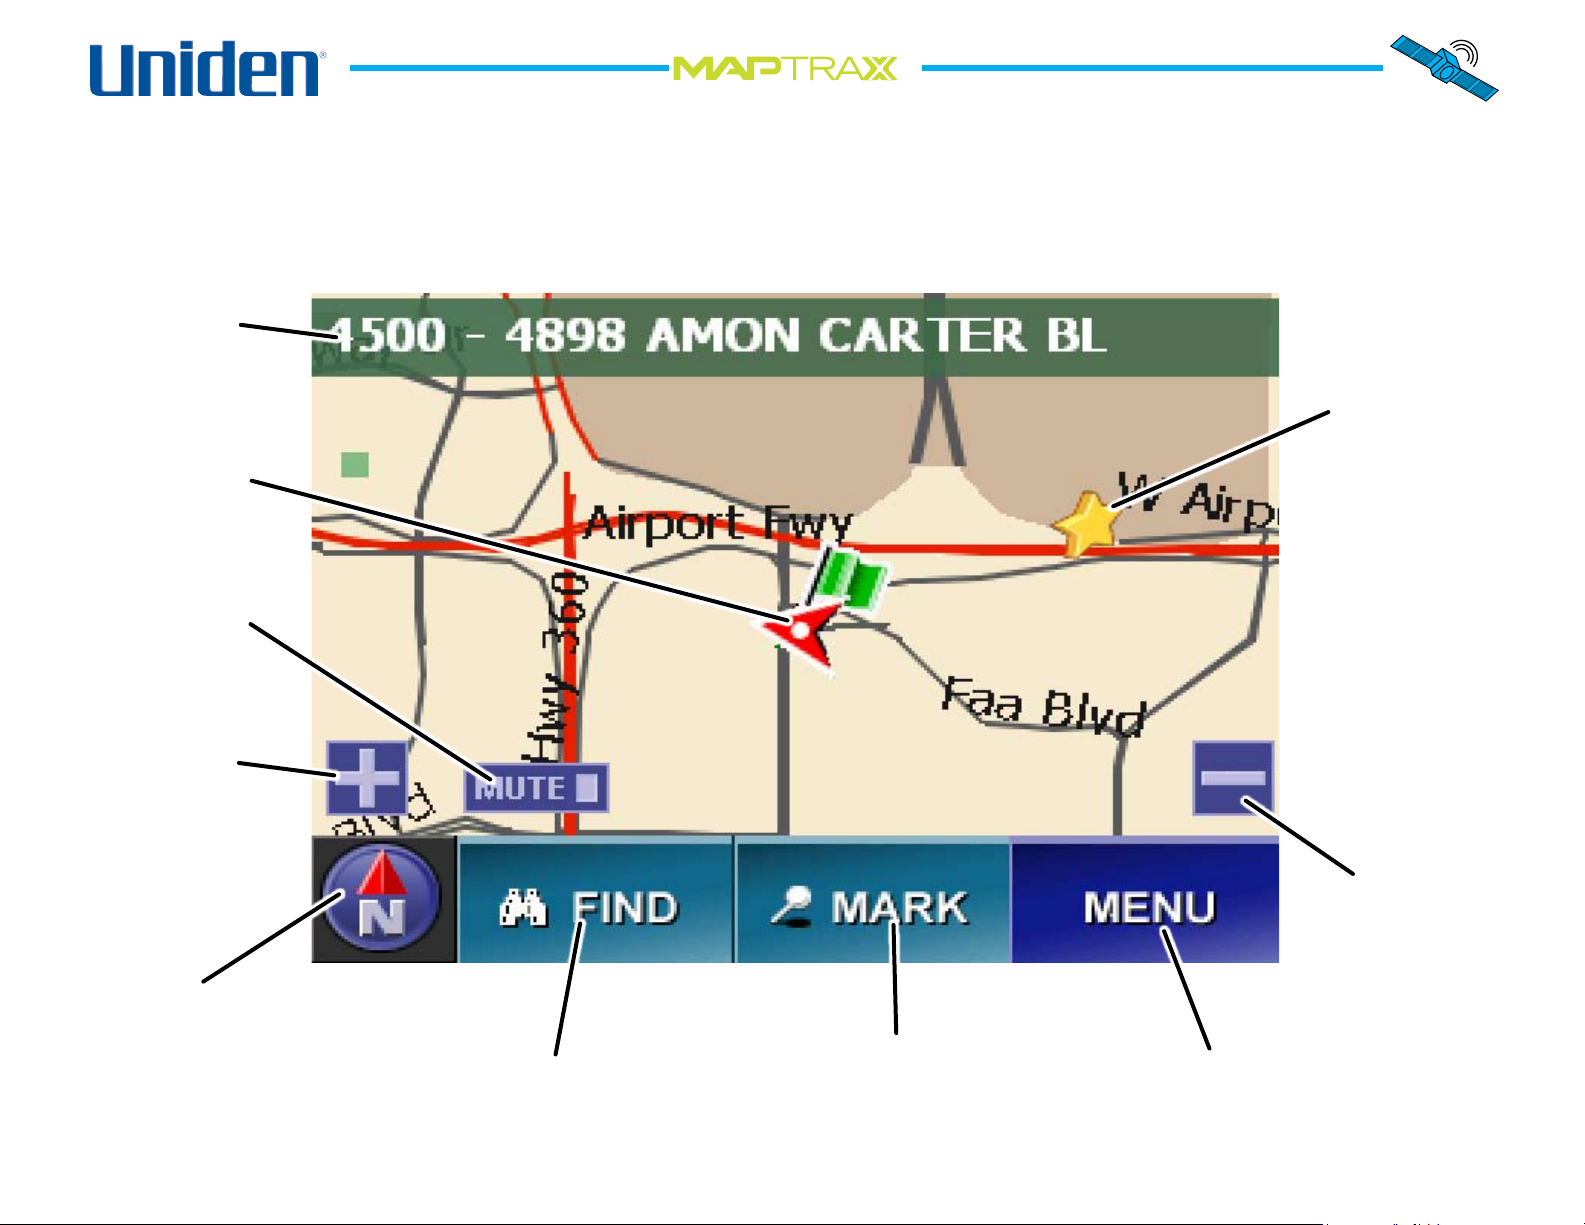
Using the Map Screen
As soon as the device acquires a valid satellite signal, it switches to the Map screen. You will probably use this screen the
most, so be sure you are familiar with its layout, icons, and options. The arrow in the center of the screen shows your
current position. If the arrow is red, it means the device has a valid GPS lock on your current position; if the arrow is
gray, the device does not have a lock on your position. (See Troubleshooting if you have difculty achieving a lock.)
Your current
location (the
map center)
A previously
bookmarked
Your current
location and
direction
Turn off
the voice
prompts
favorite
location (tap
the icon to
see the name,
full address,
and phone
number for
any marked
location)
Zoom in on
the map
center
The current map
view: by default,
north is always at
the top. Tap this
icon to change views.
Go to the Quick
Find screen
Go to the Mark menu.
Mark a location as a
point on a route or as a
favorite location.
10
Zoom out
from the
map center
Go back to
the menu
Page 11
TM
Changing the Map View
Zooming In and Out
The device has 8 zoom
levels. One-half inch on the
screen can equal 8 miles, 4
miles, 2 miles, 1 mile, 1/2
mile, 1000 feet, 500 feet,
or 250 feet. Tap the plus
button to zoom in to the
next level and the minus
button to zoom out. Each
time you zoom, the scale
appears in the lower right
corner of the map.
You can set the view so that the direction you are heading
is always at the top of the map, and the map itself turns.
Tap the compass
icon in the bottom
left corner of the
map to change the
heading direction.
When you set the
map to show your
heading at the top,
the compass icon
changes to show you
the actual direction
of your heading.
Changing Heading and Compass Direction
The map screen normally shows north always at the top
of the map and turns the arrow that shows what direction
you are traveling:
Using the Three-Dimensional View
Another map view is
the three-dimensional
view. In 3D view,
your heading is
always towards the
top of the screen.
Tap the compass icon
in the bottom left
corner of the map. In
3D view, the compass
icon points toward
north, wherever that
appears on the screen.
11
Page 12

TM
Changing the Map Options
Daytime color
scheme
Nighttime
color scheme
To change the defaut map view and display options, from
the Menu screen choose Setting and then Map Options.
This opens the Map Options screen:
Showing Map Labels for Streets and Roads
Select Yes to turn on the labels for streets or roads on the
map. Labels for smaller streets will only show when the
map is zoomed in.
Adjusting the Map Colors
The Map Display Color automatically adjusts as the
ambient light level changes from day to night. You can set
the map to remain one single color; choose the color sceme
designed for Day, Night, Dawn, or Dusk viewing.
Setting the Default Map View
Select the Map Orientation you want to use as the default
view: north at the top of the map, your heading direction at
the top of the map, or the 3D view.
12
Page 13

TM
Showing a Breadcrumb Trail
Tap any POI icon
to see the name,
address, and phone
number.
As you drive, the
device can leave a
trail of markers or
“breadcrumbs” so
you can retrace your
route. This is useful if
you are off-road or in
an area where roads
have changed since the latest map update.
Tap the back arrow to return to the previous screen or
3.
the map icon to go back to the map screen.
When you return
4.
to the map screen,
any selected points
of interest within
the boundaries
of the map are
marked with the
appropriate icon.
Showing Points of Interest on the Map
You can show icons for different points of interest on the
map, so you can always see when you are close to one.
From the Menu screen, choose Settings and then POI
1.
Selection. This opens the POI Selection screen:
Tap the check box beside a category to show those icons
2.
on the map screen. Selected categories are shown in
green with a white check mark.
To remove the
5.
points of interest
icons from the
map, go back to the POI Selection screen. Clear the
check box beside the icons you do not want to see.
Moving the Map Center
You can change the
center of the map by
tapping on the map
screen. The map
recenters and places
a crosshairs icon
on the location you
tapped. To create a
route to the location
marked by the
crosshairs, tap the
route button.
For more information on routing, see the section on
Creating A Route on the next page.
13
Page 14

TM
Creating a Route
You can plot a detailed route, including turn by turn directions, to any destination you choose. If you miss a turn or go
off the route, the device can automatically recalculate the route from your current location. You can create and save 25
custom routes. To create a route, from the Menu screen, select Destination; this opens the Set Destination screen:
Go back to the
Go back to
the previous
screen
Enter your
destination
as a complete
address
map screen
Select a
destination
from the preprogrammed
points of
interest list
Select your
previously-
saved home
location
as your
destination
Select a destination
from your list of saved
bookmarked locations
14
Enter your
destination as
an intersection
of two streets
Select a destination
from a list of recently-
used locations
Page 15

TM
Entering an Address as Your Destination
Use the keypad
to type a name.
Tap the number
key to switch to
the number pad.
Tap the space
key to insert a
space.
Tap anywhere on the
line to select a name.
Use the up & down
arrows to scroll
through the list.
Tap the backspace
key to delete the
last character.
You can plot a route to any address in the US or Canada.
Follow the steps below to enter address as your route
destination:
From the Menu screen, select Destination and then
1.
choose Address. This opens the address entry interface.
The rst time you enter an address, the device goes to
the Select a State screen:
Once you select a state or region, the Find Address
3.
screen opens with the last state you selected already
loaded. (To change the state, select Change to go back to
the Select a State screen):
Choose Select a City Name, or skip the city step and
4.
select a street from all the cities in the region (the street
search is faster if you select a city rst). Both of these
screens use the same interface:
Select the state your destination is in. Use the up and
2.
down arrows to scroll through the list or enter the name
of the state from the alphabet keypad. (As you enter
letters, the display jumps to the states that start with
those letters.) Tap anywhere on the line to select a listed
state. Tap the red backspace key in the bottom right
corner of the screen to delete letters.
Note: Larger states may be divided into regions, e.g.
Texas Central, Texas East, etc.
15
Page 16

TM
After you select a street, the Enter a House Number
Use the number
pad to enter the
house number.
Tap the ABC key
to switch to the
alphabet keypad.
Tap the OK button
to conrm the
address and
calculate the route.
Tap the right arrow
to see the rest of the
address.
The crosshairs
and the checkered
ag mark your
destination
The progress bar shows how much of
the route calculation is nished.
Use the minus
button to zoom
out and the plus
button to zoom in.
The screen title
is the destination
name.
5.
screen appears. This screen is almost the same as the
Select a Street and Select A City screens, but it starts
with the number pad instead of the alphabet keypad and
has an OK button in the top right hand corner:
After you enter the house number, the device calculates
7.
a route from your current location to this address. It
may take a few seconds to load the detailed map data
and calculate the route; during this time you’ll see the
following progress screen:
Enter the exact house number and tap OK, or select the
6.
range of addresses that includes the address you want.
If there is more than one possible match for the address
(for example, if a street has separate north and south
addresses), the Select Matching Address screen appears.
Use the up and down arrows to scroll through the
list, and tap the line that contains the address closest
matching your desired destination. If the address is
too long for the screen, tap the right arrow beside the
address to see the rest of the address.
16
Page 17

TM
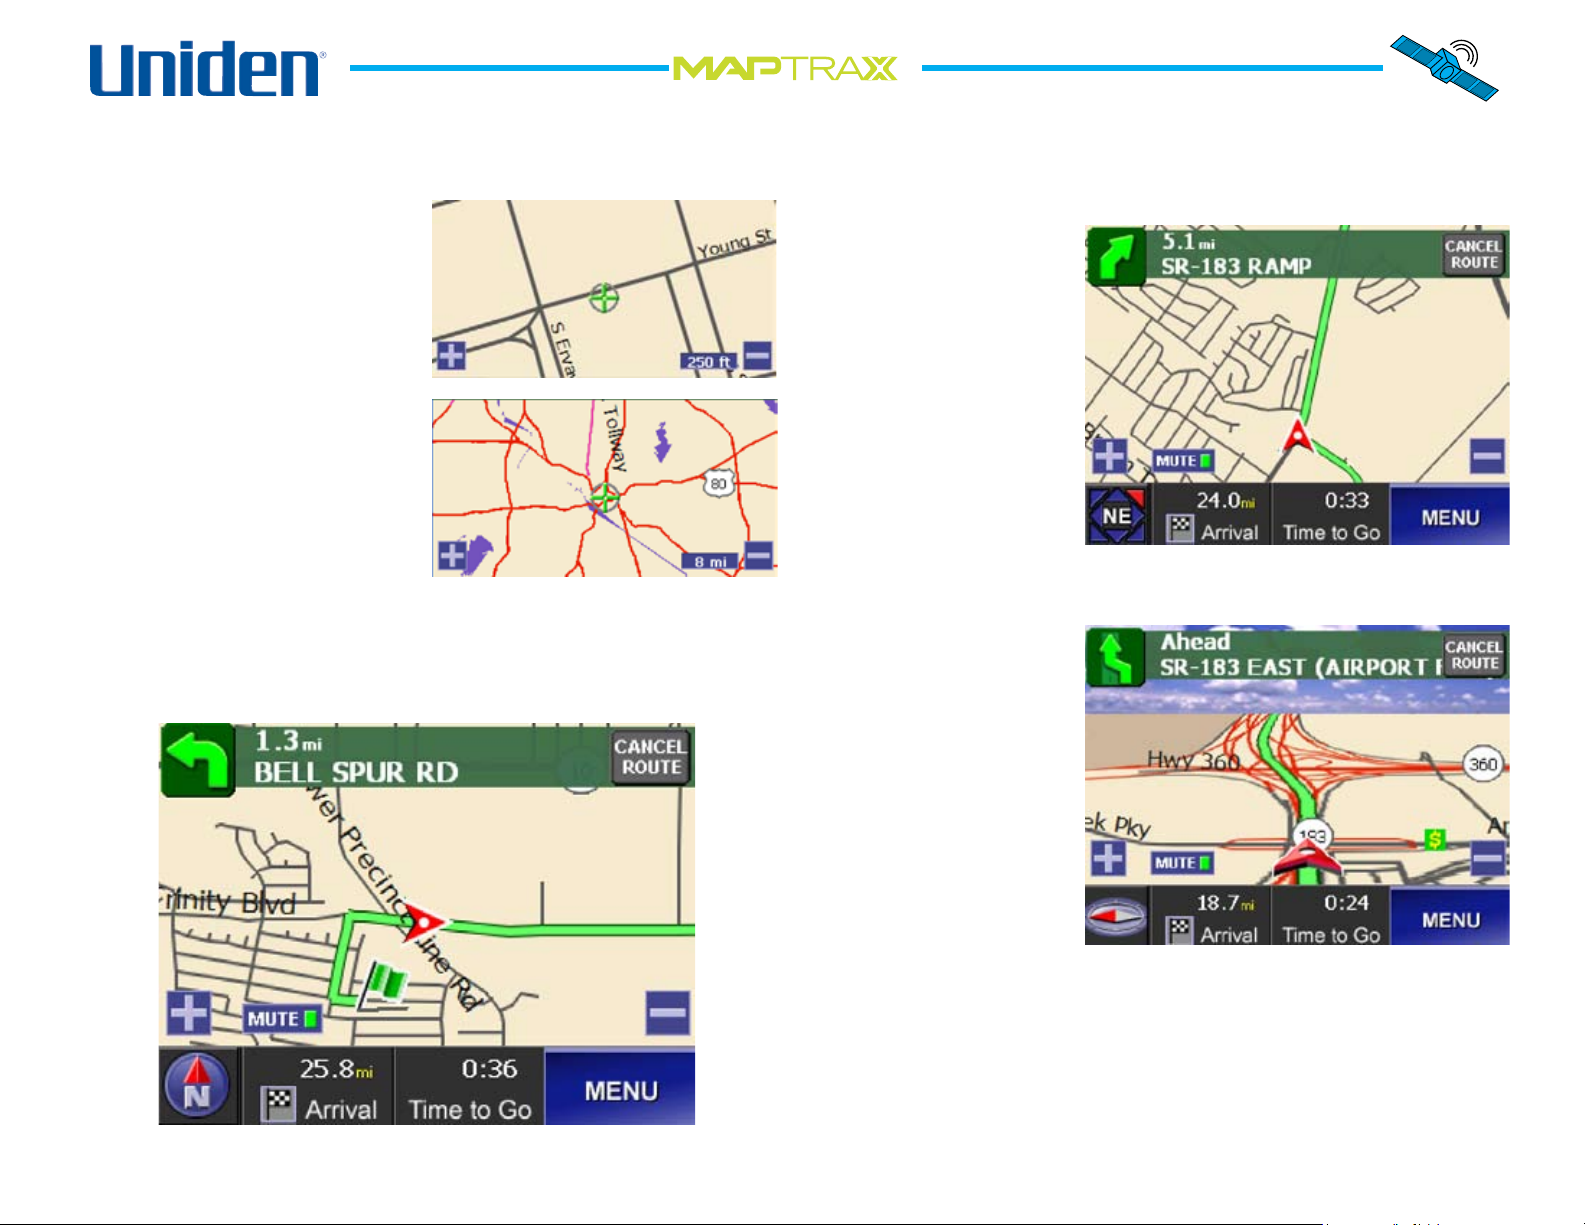
Reading the Route Screen
Once your route is calculated, the device displays the route screen. The route screen is based on the Map Screen, with
the following additonal information (all the controls on the Map Screen funtion the same way on the Route screen):
The distance to your next turn
The direction of
your next turn
Your starting
point for this
route
Turn Countdown Bar
When the next turn is
within 1000 feet, this
bar counts down the
distance to the turn.
Each colored block
represents about100 ft.
The name of your next turn
Cancel
this
route
Your route is
highlighted
in green
Tap anywhere
inside the
map area to
access route
information
(see next page)
Your car’s
current
location and
direction
(You can still
tap the plus
sign to zoom in
even when it’s
under the Turn
Countdown Bar.)
Turn the voice
instructions
on and off
The distance
to your
destination
Your estimated
travel time
17
Page 18

TM
Route Information and Current Route Options
Tap Route to see
information and
options for this route.
Tap the compass
to return to the
route screen/
Tap Cancel to
cancel this route.
Show route information screen
Show destination
Show origin
Recalculate route
Recalculate
this route
Select roads you
want to avoid when
calculating this route.
Show the list of step
by step directions.
Move & delete way-
points on this route
(See Adding Waypoints)
Return to the main
route screen.
Save this
route.
Cancel this
route.
From the route screen, tap anywhere inside the map area
to show the route information button:
Tap the Route button to open the pop-up options:
1.
Saving a Route
To save the current route,
tap the Save button. The
Save Route screen prompts
you to enter a route name.
The name can be up to 24
characters, including spaces.
Tap OK when you are
nished.
Select Info to open the Route Information screen:
2.
View the List of Directions
To see the list of turn-byturn directions, select Route
List. The Route List screen
shows you how many steps
are in the route and the
distance between each step.
Use the arrow buttons to
scroll up and down the list.
18
Page 19

TM
Avoiding Certain Roads
Tap anywhere on the
line to select a road.
The circle-slash
symbol marks roads
you selected to avoid.
Go to the
previous page
of steps.
Do not use
the selected
road.
Go to the next
page of steps.
If you prefer not to use specic roads for this particular
route, select Avoid Roads. The Avoid Roads screen lists the
all the roads and turn-by-turn steps used by the route:
Note: If you want to avoid certain types of roads
(freeways, tollways, etc.) for all future routes, use the
Route Options screen (see page 26).
Running a Route Demo
The device can show you an
animated “practice run” of the
route at a faster speed:
From the Route screen, tap the
1.
Menu button.
On the main menu
2.
screen, tap the Demo
Route button. The device
will run a quick animation of the
entire route. When it’s nished,
the animation will automatically
restart.
To stop the route demo, tap the
3.
Menu button on the Route screen.
Tap anywhere on a line to select a road, then tap the
1.
Avoid button to remove the selected road from the
calculations for this route only. (No other route will be
affected)
Any roads you’ve selected to avoid have the circle-slash
2.
symbol on the line. To clear the symbol and include the
selected road in the route, tap the Undo button.
Select OK to recalculate the route without using the
3.
blocked roads.
If you want to add the avoided roads back into the route,
4.
cancel the route and recreate it.
On the main menu
4.
screen, the Demo Route
button has changed to Stop Demo. Tap the Stop Demo
button to end the animated demo.
Note: Do not use the Cancel Route button to stop the
demo. Cancel Route will cancel the entire route, not
just the animated demo.
19
Page 20

TM
Using Other Destinations for Routing
Tap anywhere on the
line select a name.
Use the up & down
arrows to scroll
through the list.
Shows the number of
cross streets found.
Entering an Intersection as the Destination
Entering an intersection is very similar to address entry:
From the Menu screen, select Destination and then
1.
choose Intersection. This opens the Find Intersection
screen (The last state you entered is pre-loaded. To
change the state, select Change.):
After you select the cross street, the device calculates
4.
a route from your current location to this intersection.
It may take a few seconds to calculate the route and
display the Route screen (see Reading the Route screen
on page 16).
Selecting Your Home Location as the Destination
If you enter a home
location, you can
always nd your
way home with just
a few taps on the
screen. From the
Menu screen, select
Destination and
choose Home. The
device calculates the route and displays the route screen.
Choose Select City Name or Select Street name. Both
2.
screens are the same as entering an address (see page
15).
After you select a street, the Cross Street screen appears:
3.
If you have not entered a home location, the Home icon
on the destination screen is locked out. See page 28 for
information on entering a home location.
Selecting a Recent Destination
The device saves
the most recent 50
destinations; you can
quickly plot a route
to any of these recent
destinations. From
the Menu screen,
select Destination
and choose Recent.
When the Recent Locations screen displays, select the
destination from the list. The device calculates the route
and displays the route screen.
20
Page 21

TM
Selecting a Pre-Programmed Place as a Destination
List the places in
alphabetical order
by name.
List the
closest
places rst.
Use the current location
as the starting point.
Use the center of the map
as the starting point.
Use the center of a city
as the starting point.
The device has over 2 million pre-loaded locations-including airports, landmarks, hospitals, and hotels--that
you can use as destinations. To use a pre-programmed
place as a route destination, follow the steps below.
From the Menu screen, select Destination and choose
1.
Places. This opens the Select a Place Category screen:
Select one of
2.
the six popular
categories or
More to see all
available place
categories. Tap
anywhere on the
line to select a
category. This
opens the Select
Search Method
screen.
Choose whether you
3.
want to start from your
current location, the map
center, or a city center.
Then choose whether
to list the places by
name (alphabetical) or
by distance (closest to
furthest). If you choose
alphabetical, you can
enter letters from the
keypad to narrow down
the list.
Note: If you select City
Center, the device
prompts you to enter
a state and city before
displaying the Select a
Place Name screen.
21
Page 22

TM
Using the Quick Find Feature
The Quick Find feature lets you nd a location and gives you several options for that location. From the main map or
main route screen, choose Find. This opens the Quick Find screen. The Quick Find screen is almost the same as the Set
Destination screen, but the Quick Find screen add the City Center, Where Am I? and Coordinates options are added:
Go back to
the previous
screen
Find your
previously-
saved home
location
Find the
geographic
center of a city
Find a location
on the pre-
programmed
points of
interest list
Go back to the
map screen
Find a
complete
address
Find an
intersection of
two streets
Find a location
by entering
latitude and
longitude
Find your
current
location
Find a location on
your list of saved
bookmarked locations
Find a location on
a list of recently-
entered locations
22
Page 23

TM
Finding a City Center
To nd the geographical center of any city in the US and
Canada, tap the Find button and then select City Center.
The device prompts you to select a state and city, then it
centers the map on the center of the city you select.
Using Where Am I
To center the map on your current location, tap the Find
button and then select Where Am I?.
Finding Coordinates
To nd a location by the exact longitude and latitude
coordinates, tap the Find button and then select
Coordinates. This opens the Enter Coordinates screen.
Use the number keypad to enter the latitude. The digit
3.
you are entering appears in reversed out type. To move to
the next digit, use the right arrow key. Use the left arrow
key to move to the previous digit. (The device deactivates
any digits that would produce an invalid entry.)
When you enter the nal latitude digit, the cursor jumps
4.
to longitude. Select E for east longitude and W for west
longitude.
Select the format you wish to use. Choose from decimal
1.
degrees (the default), decimal minutes (ex. 32° 42.1593')
or decimal seconds (ex. 32° 42' 19.5214").
Select N for north latitude and S for south latitude.
2.
Use the number keypad to enter the longitude, and tap
5.
OK when you are nished. The map centers on these
coordinates.
23
Page 24

TM
Using the Mark Menu
Mark as
a favorite
location
Mark as the route
destination.
Mark as the
route origin.
Mark as a waypoint.
on this route
Mark as your
home location
Calculate a
route to this
location.
When the map displays a Quick Find location, it shows the
Mark menu on the right side of the screen. Choose whether
to mark the found location as the destination of a route, as
the origin of a route, or as a waypoint along a route. Tap
the Go button to calculate a route to the found location.
Adding Favorites
From the Mark
menu, choose the
Star icon to mark
this location as a
favorite place. Enter
a name and select an
icon for this favorite,
then tap the OK
button to save it.
Creating a Route to a Favorite Place
To use a favorite place as a route destination, from the
Menu screen, select Settings. Then choose User Data and
select Stored Favorites.
Marking Locations from the Map Screen
To mark your current position, tap the Mark button from
the map screen.
To mark another position on the map, tap on the map
screen to center the map on the desired location; the
location is marked with the crosshairs icon and the
location name appears at the top of the screen. Then, tap
the Mark button to mark the current map center.
Use this screen to change the name or delete a favorite
place. Select Locate to nd this favorite on the map, and
then use the mark menu to calculate a route.
24
Page 25

TM
Tap on the line to
select a waypoint.
Use the up & down
arrows to scroll
through the list.
Move the
selected
waypoint later
in the route.
Move the
selected
waypoint earlier
in the route.
Delete the
selected
waypoint.
Working With Waypoints
A waypoint is an intermediate stopping point or side trip
during a longer route. For instance, you can create a route
to another city and add waypoints along the way to stop for
gasoline, get something to eat, or spend the night. You can
have up to 10 waypoints for each route.
Use the Quick Find feature or the Mark menu to add a
waypoint to a route.
Adding a Waypoint
On the Mark menu, select the blue ag to add the location
currently at map center as the nal waypoint in this route,
just before the destination. The screen displays the number
of waypoints in the current route.
Editing and Deleting Waypoints
To change the order of the waypoints or to delete
waypoints, from the route screen, tap the Route button and
then select Edit. This opens the Edit Waypoints screen.
The Edit Waypoints screen shows the waypoints for the
route in the order you will stop at them. Move a waypoint
up the list to stop at it rst; move a waypoint down the list
to stop at it later. Tap the OK button to save your changes
and recalculate the route.
The revised route screen shows you all waypoints within
the border of the map. Each section of the route appears in
a different color. The bottom of the route screen shows the
distance and time to your next waypoint; tap this area to
show the distance and time to destination:
25
Page 26

TM
Changing the Route Guidance Options
Waypoint 1
Waypoint 2
Route
origin
Distance and time
to next waypoint
You can change how the route
screen shows the next turn and
whether the route recalculates
when you deviate from the route.
From the Menu screen, select
1.
Settings then Guidance
Options.
Guide View Display: choose
2.
the display you want to use:
mini arrow (the default route
screen), split screen (top) or
full guide (bottom).
Auto Reroute: choose whether
3.
you want the route to
recalculate if you go off route.
Changing the Default Route Options
You can change the options used for all routes.
From the Menu screen, select Settings and then Route
1.
Options. This opens the Route Options screen.
Route Priority: choose whether you prefer routes with the
2.
fastest travel time or the shortest travel distance.
Road Preference: choose whether you want routes to use
3.
more freeways or to avoid freeways in favor of local roads.
Use Toll Roads and Use Ferries: select whether you want
4.
routes to avoid toll roads and ferries when possible.
Reduce Turns and Avoid Sharp Turns: select whether you
5.
want routes with fewer turns and no sharp turns.
26
Page 27

TM
Customizing Your GPS Device
Changing the Language
The device supports English, Spanish, and French in both
the display and the voice prompts. Follow the steps below
to change the language:
From the Menu screen, select Settings.
1.
On the Settings screen, select Language Selection. This
2.
opens the Language Selection screen:
Changing the Voice Prompts
To change the voice prompts, from the Settings screen,
1.
select Voice Selection. This opens the Voice Selection
screen:
Use the right and left arrows to see the available voices in
2.
all languages. Tap Test to hear a sample of the voice.
Tap the left arrow to select Espanol (Spanish) or the right
3.
arrow to select Francais (French).
Tap the Back arrow to go back to the Settings screen.
4.
The display changes to the new language.
Tap the Back arrow to go back to the Settings screen.
3.
The voice prompts change to the new selection.
27
Page 28

TM
Entering Your Home Location
If you enter an address as your home location, the device
will automatically create a route from your current location
back home with just two taps on the screen. Follow the
steps below to enter your home location:
From the Menu screen, select Settings.
1.
On the Settings screen, select User Data and then Home
2.
Location. This opens the Home Location screen:
Entering the Date and Time
From the Menu screen, select Settings.
1.
On the Settings screen, select System Setup and then
2.
Time Setup. This opens the Time Setup Screen:
Select Change to enter a new Home Location, Delete to
3.
clear your home location, or Locate to see your home
location on the map scren.
Tap the Back arrow to go back to the User Data screen.
4.
Use the left and right arrows to select the Time Zone you
3.
will be operating the device in.
Choose whether to turn Daylight Savings Time on, turn
4.
it off, or let the device automatically adjust for daylight
savings time.
Choose a 12-Hour or 24-Hour time format.
5.
Tap the Back arrow to go back to the System Setup
6.
screen.
28
Page 29

TM
Customizing Your Display
Full opacity
No opacity
Half opacity
(default)
From the Menu screen, select Settings.
1.
On the Settings screen, select System Setup and then
2.
Display Setup. This opens the Display Setup Screen:
Choose the default settings for screen brightness and
3.
opacity. Opacity controls the transparancy of the
information band at the top of the map screen:
Choose the units you want to use for distance. Select
5.
kilometers (KM), a combination of miles for long
distances and feet for distances less than half a mile, or a
combination of miles and yards.
Choose the format you want to use for latitude and
6.
longitude coordinates. Select one of the following formats:
4.
Tap the Back arrow to return to the System Setup
screen. Then select Units Setup to open the Units Setup
screen:
Decimal Degrees 32.833694°
Decimal Minutes 32° 50.022'
Decimal Seconds 32° 50' 01.3''
Tap the Back arrow to go back to the System Setup
8.
screen.
29
Page 30

TM
Setting Up Speed Alerts
The device can sound an alert if you exceed a given speed
for a designated amount of time. You can activate alerts if
you exceed a particular road’s speed limit or if you exceed
an overall maximum speed. Follow the steps below to set
up alerts:
From the Menu screen, select Settings.
1.
On the Settings screen, select System Setup and then
2.
Speed Calibration. This opens the Speed Calibration
screen:
Use the left and right arrows to set the overall maximum
6.
speed limit in 5 MPH increments.
Use the left and right arrows to set the duration (the
7.
number of seconds you can exceed the maximum speed)
before the device sounds the alert; set the duration in 5second increments.
Select On to activate the Max Speed Alert, and then tap
8.
the Back arrow to return to Alerts Setup screen.
To activate an alert when you exceed the speed limits on
9.
the Speed Calibration screen, select Auto Speed Alert:
Use the left and right arrow keys to set the default speed
3.
for each type of road. The speeds are set in increments of
5 MPH.
Tap the Back arrow twice to go back to the Settings
4.
screen.
To activate an alert when you exceed an overal maximum
5.
speed, select Alerts Setup and then Max Speed Alert.
This opens the Max Speed Alert Screen:
Use the left and right arrows to set the speed threshold
(how many miles per hour you can drive above the speed
limit) and the duration. Select On to activate the Max
Speed Alert, and then tap the Back arrow to return to
Alerts Setup screen.
30
Page 31

Antenna
connector
po we r
au di o
TM
Accessories
Using an External Antenna
Like any radio signal, your GPS signal reception may
expeirence interference from tunnels, freeway “canyons”,
and competing radio signals; some reective metallic
window tinting can also interfere with signal reception. If
you have difculty getting or maintaining a GPS signal lock
in your area, consider using an external antenna.
A magnetic mount external antenna is available from
Uniden’s online store. This antenna has a magnetic base
to mount to the outside of your car without damaging your
car’s nish.
Clean a the area of your
1.
vehicle where you want
to mount the antenna.
Carefully lower the module
until the magnet holds it on
the car. Note: You should
remove the antenna before going through a car wash.
Route the cable from the antenna to the inside of your
2.
vehicle. Make sure the cable does not interfere with safe
driving.
Using a Headset
Your device supports a standard 3.5
mm audio headset. To use a headset,
turn the device volume all the way
down. Then, insert the headset
connector into the audio jack on
the left side of the device. Put your
headset on and adjust the volume to
the desired level.
Remove the device from its
3.
support cradle.
Insert the external antenna
4.
cable into the connector
on the back of the hinged
antenna.
Return the device to its
5.
support crade.
31
Page 32

TM
Maintenance
Updating Maps and Software
Updated maps are available for additional cost through
www.uniden.com. Instructions on how to update the
software are available at the website.
Battery Information
This equipment contains a rechargeable Lithium Ion
battery. With normal use, the battery charge should
last an average of 3 hours. For optimum battery life and
performance:
Do not store the device in temperatures below -4°F (-20°C)
●
or above +140°F (+60°C).
Do not expose the battery to temperatures above +140°F
●
(+60°C); this may cause the battery to rupture or fail.
Do not leave the device in direct sunlight for long periods
●
of time
Only use the DC adapter cord supplied with the product
●
to charge the battery. Using another charger or connector
may damage the device or create a re hazard.
The battery is not user-servicable. Do not attempt to
remove the battery from the device; this may void your
warranty.
In case of exposure to the cell contents, wash the affected
area thoroughly, and seek medical attention.
Lithium Ion batteries must be recycled or disposed
●
of properly. Lithium Ion batteries may explode if
disposed of in a re.
If you plan to dispose of the device, please return the
●
entire product to Uniden for proper battery recycling.
Troubleshooting
Below is is list of common problems with GPS devices and
how to solve them.
Can’t Get a GPS Signal Lock
●
Check to see if you are in an area with radio interference
or signal blockage. If your cell phone or an AM/FM radio
have difculty, your GPS device might have trouble
getting a clear signal also. If you regularly travel to “dead
spots” or to areas with heavy radio interference, consider
trying an external antenna to increase the receiver power.
●
Some cars use metallic tinting on the windows which can
interfere with radio signals. If your windows are tinted, try
stepping outside the car with your GPS device or holding
it out the window. Once it achieves a signal lock, the
GPS device will usually be able to maintain the lock back
inside the vehicle.
Out of Memory
●
Delete old routes or recently entered locations that you
don’t use anymore.
Screen is blurry and hard to read
Dirt and oils from your ngers can stay on the
●
touchscreen. Periodically clean the touch screen with a
lint free cloth dampened with water only. If the screen
remains dirty, try a mild soap solution or a cleaning spray
designed for electronics. Do not use ammonia on the
screen, and never immerse the device in water.
Can’t nd a location on the map
●
Newer addresses may not have existed when the map
software was created. Check www.uniden.com for the
latest maps.
32
Page 33

TM
Using the GPS Status Screen
Signal strength of tracked
satellites (green bars are
locked onto)
Satellites in view of
your location (green
squares are tracked)
The GPS status screen shows details about your device’s reception of the GPS satellite signals. You should only need to
check this screen if you are having trouble getting a signal lock.
Your current
heading (North
or 0° is the top
of the screen)
Your current
speed
The number of
satellites your
The accuracy of your
current coordinates.
In this example, the
tracked coordinates
might be up to 23
feet away from your
actual location
3D shows that the device
tracked enough satellites
to give an accurate altitude
reading as well as coordinates.
The number of satellites
your device has locked
onto (green bars in the
upper window)
Your current
latitude and
longitude
device can see
(total squares in
the lower window)
The number
of satellites
your device
can track
(green
squares in
the lower
window)
33
Page 34

TM
One Year Limited Warranty
Important: Evidence of original purchase is required
for warranty service. WARRANTOR: UNIDEN AMERICA
CORPORATION (“Uniden”) ELEMENTS OF WARRANTY:
Uniden warrants, for one year, to the original retail owner,
this Uniden Product to be free from defects in materials
and craftsmanship with only the limitations or exclusions
set out below.
WARRANTY DURATION: This warranty to the original
user shall terminate and be of no further effect 12 months
after the date of original retail sale. The warranty is
invalid if the Product is (A) damaged or not maintained
as reasonable or necessary, (B) modied, altered, or
used as part of any conversion kits, subassemblies, or
any congurations not sold by Uniden, (C) improperly
installed, (D) serviced or repaired by someone other
than an authorized Uniden service center for a defect or
malfunction covered by this warranty, (E) used in any
conjunction with equipment or parts or as part of any
system not manufactured by Uniden, or (F) installed or
programmed by anyone other than as detailed by the
owner’s manual for this product.
STATEMENT OF REMEDY: In the event that the product
does not conform to this warranty at any time while this
warranty is in effect, warrantor will either, at its option,
repair or replace the defective device and return it to
you without charge for parts, service, or any other cost
(except shipping and handling) incurred by warrantor or
its representatives in connection with the performance of
this warranty. Warrantor, at its option, may replace the
device with a new or refurbished device. THE LIMITED
WARRANTY SET FORTH ABOVE IS THE SOLE AND
ENTIRE WARRANTY PERTAINING TO THE PRODUCT AND
IS IN LIEU OF AND EXCLUDES ALL OTHER WARRANTIES
OF ANY NATURE WHATSOEVER, WHETHER EXPRESS,
IMPLIED OR ARISING BY OPERATION OF LAW, INCLUDING,
BUT NOT LIMITED TO ANY IMPLIED WARRANTIES OF
MERCHANTABILITY OR FITNESS FOR A PARTICULAR
PURPOSE. THIS WARRANTY DOES NOT COVER OR
PROVIDE FOR THE REIMBURSEMENT OR PAYMENT OF
INCIDENTAL OR CONSEQUENTIAL DAMAGES. Some states
do not allow this exclusion or limitation of incidental or
consequential damages so the above limitation or exclusion
may not apply to you.
NOTE: THERE ARE NO USER SERVICABLE PARTS IN
THIS PRODUCT. ANY ATTEMPT TO DISSASEMBLE THE
PRODUCT WILL VOID YOUR WARRANTY.
LEGAL REMEDIES: This warranty gives you specic legal
rights, and you may also have other rights which vary from
state to state. This warranty is void outside the United States
of America and Canada. PROCEDURE FOR OBTAINING
PERFORMANCE OF WARRANTY: If, after following the
instructions in the owner’s manual you are certain that the
Product is defective, pack the Product carefully (preferably
in its original packaging). The Product should include all
parts and accessories originally packaged with the Product.
Include evidence of original purchase and a note describing
the defect that has caused you to return it. The Product
should be shipped freight prepaid, by traceable means, to
warrantor at:
Uniden America Service
4700 Amon Carter Blvd.
Fort Worth, TX 76155
34
Page 35

TM
Copyright Information
Serial
number
This documentation is based on the most up-to-date
●
information available at the time of production. The
product, the documentation, the data base, and the
navigation software are subject to change without notice.
Any updates to this manual will be posted at www.uniden.
●
com and may be downloaded at no charge.
You may print copies of this manual for your personal use.
●
You may not print any part of the manual for distribution
or other commercial purpose without permission from
Uniden.
You may not transfer the contents of this CD onto any
●
other portable media for the purpose of distribution.
This manual is copyrighted by Uniden America
●
Corporation, Ft. Worth, TX.
Navigation software and screen design is copyrighted by
●
Space Machine, Inc., Sunnyvale, CA.
All logos and trademarks used in the media documentation
●
are copyrighted by their respective owners.
Declarations of Conformity and Compliance
Trade Name: Uniden
●
Model No.: GPS352
●
Responsible Party:
●
Uniden America Corporation
4700 Amon Carter Blvd.
Fort Worth, TX 76155, U.S.A.
Phone (817) 858-3300
www.uniden.com
This device complies with Part 15 of the FCC Rules.
●
Operation is subject to the following two conditions: (1)
This device may not cause harmful interference, and
(2) this device must accept any interference received,
including interference that may cause undesired
operation.
This Class B digital apparatus complies with Canadian
●
ICES-003.
●
™ is a trademark of Uniden America
Corporation.
Note: We recommend that you record
the serial number of your GPS device
in a safe, convenient place. The serial
number is helpful when contacting
customer service or if the device is
ever stolen, when contacting the
police or your insurance company.
The serial number is located on the
underside of the folding GPS antenna.
35
 Loading...