

Uniden GNS8400 User Manual

WARNINGS & NOTIFICATIONS
When used correctly, the GNS8400 enhances your
driving experience. The voice and map information
in the GNS8400 cannot be guaranteed accurate as
road layout may change. Always follow the posted
road signs and traffic laws.
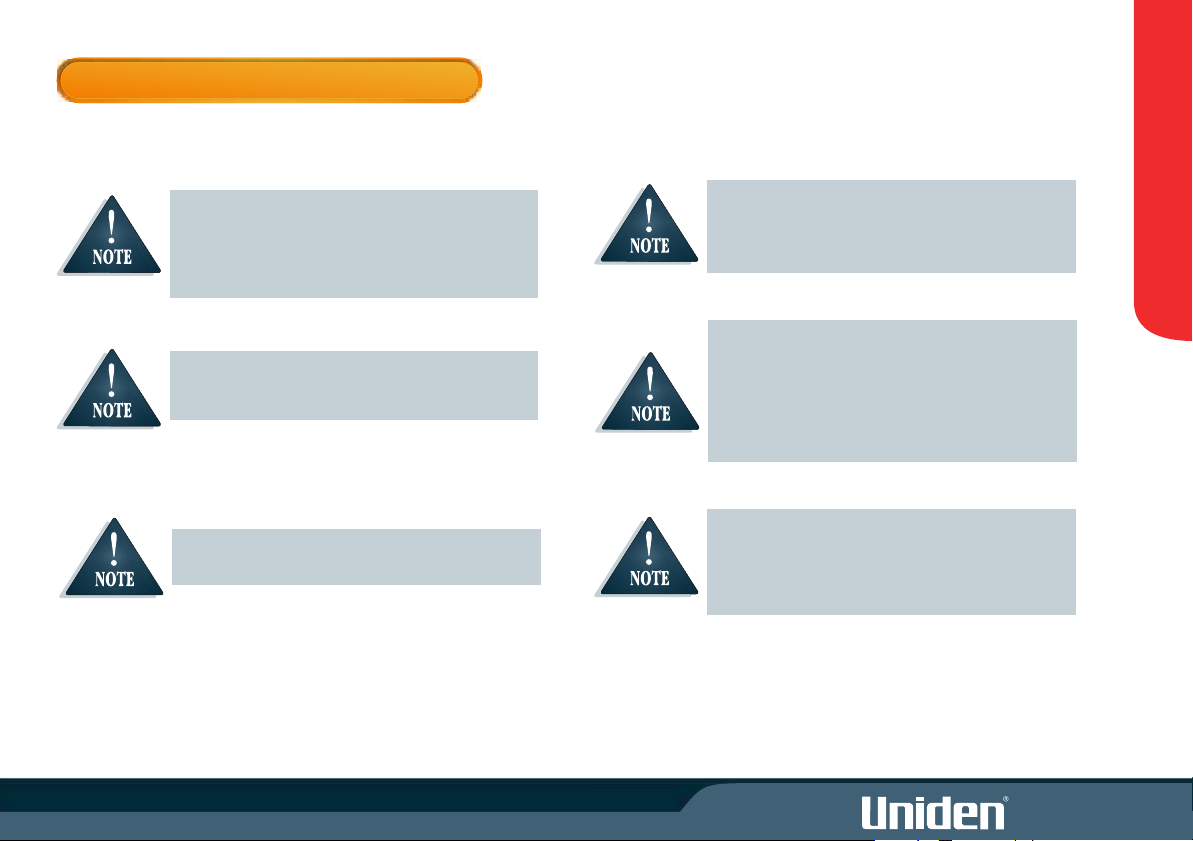
Do not mount the GNS8400 in a position which may
obstruct the driver's view or prevent the safe
operation of the vehicle.
Do not mount the GNS8400 in a position within an
air bag field of deployment.
The Global Positioning System is operated and
maintained by the US Government. The US
Government is completely responsible for the
accuracy of the Global Positioning System.
The US Government reserves the right to make
changes to the Global Positioning System in
accordance with the Department of Defence civil GPS
user policy and the Federal Radio navigation plan.
These changes along with poor satellite geometry
could cause inaccurate readings.
GPS signal reception can be affected by the location of
satellites, tall buildings, tunnels, bridges, etc. If the
GNS8400 is not receiving a signal, you will need to
change your location until a signal is received.
WARNINGS
i

Quick Start
Guide
1
3
Software CD
Stylus-Pen
+12V to +24V Cigarette
Lighter Power Cord
2
QUICKSTART GUIDE
Start
Here
BOX CONTENTS
1
Box Contents
Main Unit
Please contact your place of purchase if any of the
following items are missing.
This Owners Manual
Suction-Cup Mount
Carrying Case
Optional Accessories
AC Power Adaptor
SD Memory Card
(Australian model: 512MB)
(NZ model: 128MB)
SD Card Reader
External GPS Antenna
ii
2
INSTALLATION
Please consider the following when choosing a mount
location:
! Choose a location where the fixed antenna,
when extended horizontally will have a clear
view of the sky.
! Do not mount within any Airbag deployment
areas.
! Do not mount where the driver's view will be
obstructed or where safe operation of the vehicle
may be obstructed.
Ensure the mount location;
! Allows room to raise the GPS antenna
horizontally.
! Allows for the GNS8400 to be slotted in and out
of the mount stand.
! Allows for the tilt angle to avoid reflected
sunlight.
QUICKSTART GUIDE
iii i
3
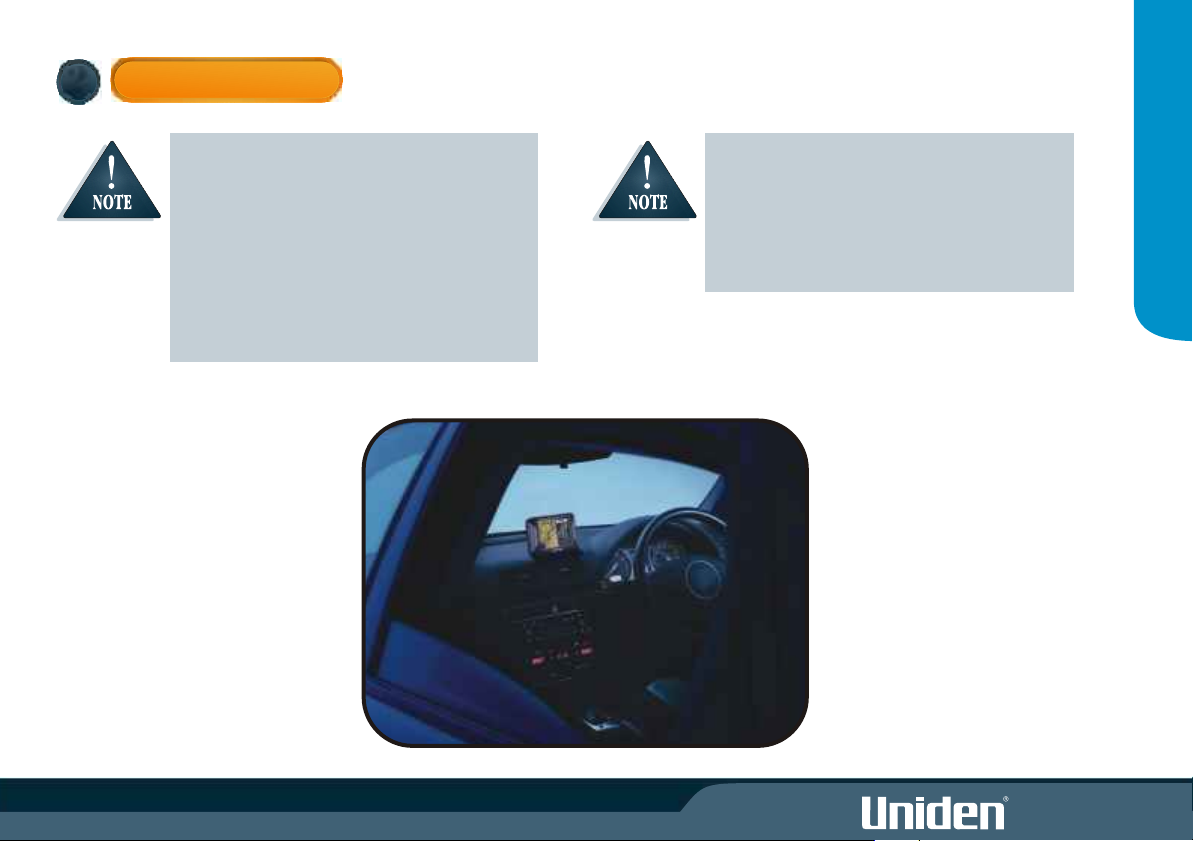
MOUNTING
Glass Mount Bracket
1. Make sure the glass area you wish to attach the Glass Mount Bracket to is
clean.
2. Double check that the final location does not impede the safe operation
QUICKSTART GUIDE
of the vehicle.
3. Hold the Glass Mount Bracket up to the intended position and bend
the bracket arm if needed. With the release lever loose firmly press
the suction cup against the windscreen, push the release lever to secure
suction. (fig 1).
Attach main unit
Secure unit to bracket. (fig 2).
1. Flip up the antenna located at the rear of the main unit.
2. Sit the main unit on the two locating pegs at the bottom of the
mounting bracket.
3. Squeeze together the two grey release buttons on the mounting
bracket and rock the main unit back onto the bracket.
4. Release the two grey buttons and check the unit is secure.
Secure
Press
Fig 1: Line up glass mount to
windscreen
Antenna
Secure
Release
buttons
Locating Pegs
Fig 2: Secure unit to bracket
Connect Power
1. Insert DC plug of Cigarette Lighter Lead into the DC Power
socket of your GNS8400 and connect the other end to the +12V 24V cigarette lighter socket.
iv
Ensure the cord does not interfere with safe
vehicle operation
4
Turn the ignition on and GNS8400 will power on.
The GNS8400 is On when the buttons left and right of the screen are lit
with a blue LED backlight.
Press the POWER button at the left side of the GNS8530 momentarily to
turn power On or Off.
The screen may be turned on or off by pressing .
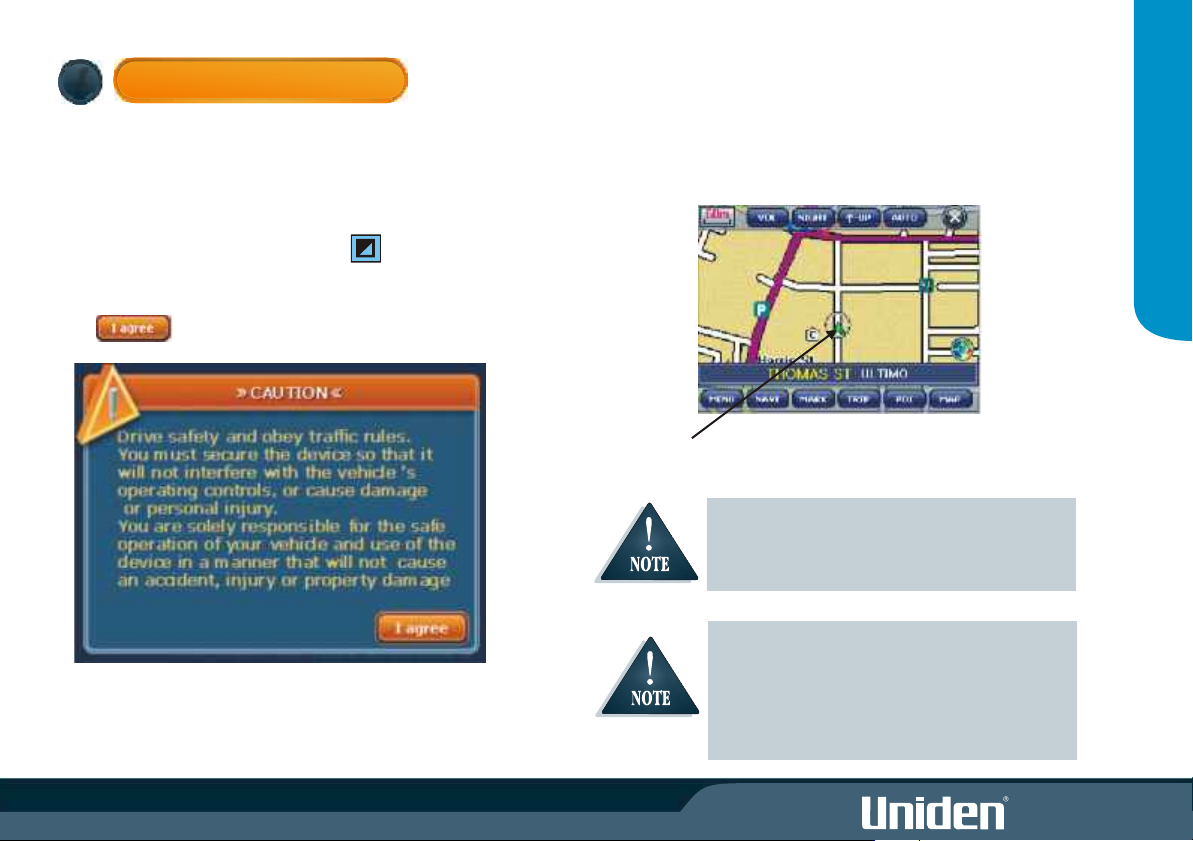
The CAUTION NOTICE will appear on the display.
Please read this message carefully.
Touch to proceed.
POWER ON SCREEN
The GNS8400 will then display the Map Screen.
'Searching for Satellites' will appear on the display.
Once the satellites have been found the map screen will show your
position.
QUICKSTART GUIDE
Your position will be indicated by the pointer in the centre of the
displayed map.
For the initial power up it may take up to 15 minutes
to secure satellite information. When satellite data
has been retrieved 'Searching for Satellites ' will
disappear.
If the unit continues to indicate searching for satellite
beyond 15 minutes try holding the GNS8400 outside
of the vehicle. If satellite data is then retrieved and
'Searching for Satellites' disappears then the vehicle
windscreen may have a tint which interferes with the
GPS signal.
vii

CONTENTS
Contents..................................................................................................................1
Features...................................................................................................................1
Controls & Views.......................................................................................................2
Using the Touchscreen.............................................................................................3
Care & Maintenance.................................................................................................3
Operation Flow Chart...............................................................................................4
CONTENTS
Main Menu Modes....................................................................................................5
Safety Warning System..............................................................................................5
Toolbar.....................................................................................................................6
Scale Bar: Zoom In/Out...............................................................................6
Volume.......................................................................................................6
Day/Night....................................................................................................6
Map Mode...................................................................................................7
Turn Guide Mode........................................................................................7
Navigation................................................................................................................8
Navigate to Address......................................................................................8
Navigate to an Intersection..........................................................................9
Navigate to a POI........................................................................................10
Navigate to a Recent Route or Reverse Route..............................................11
Navigate by Map.........................................................................................11
Mark Location........................................................................................................12
Mark Current Position.........................................................................12
Mark from Map Search..............................................................................12
Mark My POI.............................................................................................13
Trip Computer........................................................................................................14
Menu.....................................................................................................................15
Route Settings...........................................................................................16
MY POI Editor............................................................................................17
Safety Warnings.........................................................................................18
Map Settings..............................................................................................19
Information........................................................................................19
Simulations..............................................................................................20
GPS Status..............................................................................................................21
Turn Guide Descriptions........................................................................................22
Map Screen Icons...................................................................................................23
Main Menu............................................................................................................24
Playing Music Files....................................................................................25
Playing Movie Files....................................................................................26
Viewing Pictures........................................................................................27
Game........................................................................................................28
Calculator.................................................................................................28
World Clock...............................................................................................29
Settings.....................................................................................................29
Built-In Battery Specification....................................................................31
Software Updates...................................................................................................32
Points Of Interest Table...........................................................................................34
Troubleshooting.....................................................................................................35
Warranty................................................................................................................36
FEATURES
Car Navigation
! Navigate to pre-programmed State/City locations
! Navigate to street address
! Navigate to over 500,000 pre-installed points of interest (POI)
! Mark often used destinations as My POI
! Dynamic voice and visual guidance: Constant route verification and
re-calculation with turn by turn instructions
! Road Map
! TMC (Traffic Messaging Channel) Ready*
*The TMC feature is provided by a third party. A subscription is required
to use this feature. There is usually a fee for this service.
Speed and Safety Warning System
! Receive audio and visual warnings when you approach:
! Fixed Speed camera
! Red Light camera
! Black spots
! Moving speed alerts
Other Great Features
! 4 inch High Definition Non reflective LCD Screen
! Touchscreen
! Intuitive technology
! Built in GPS antenna
! 400MHz processor SIRF III GPS
Updateable Software** for;
! Operation
! Map data
! Safety Warning data
** For software updates please visit www.uniden.com.au (Australian
model) or www.uniden.co.nz (New Zealand model).
11
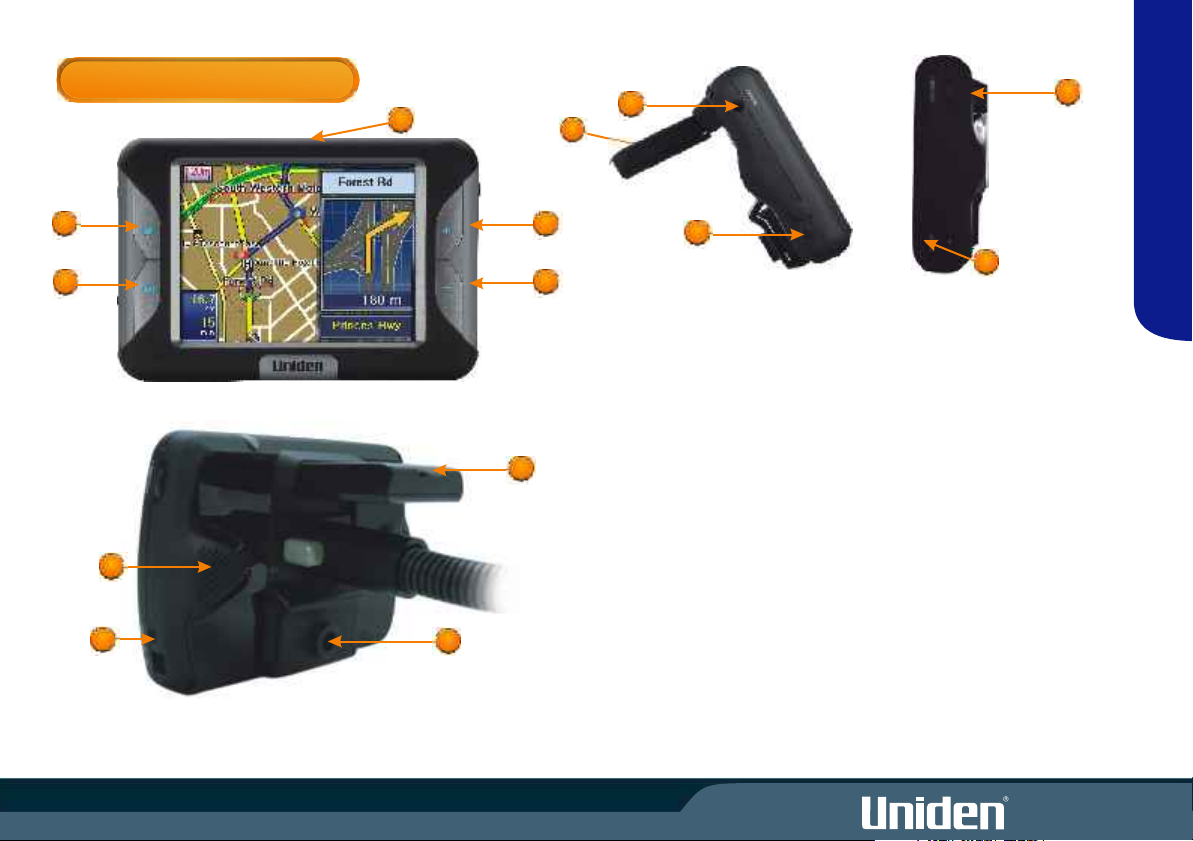
CONTROLS & VIEWS
8
10
9
12
POW
1
3
11
RE
OPERATION
13
2
4
LEFT SIDE RIGHT SIDE
1 Main Menu Button
2 Screen On/Off Button
3&4 Map Zoom In/Out
5 Stereo Speaker
6 Mount Holder Bracket
7 GPS Antenna
8 Secure Digital Card Slot
9 Audio-Out Jack
10 GPS Antenna
11 Power On/Off Button
12 Volume Control
13 Power-Supply Jack
14 Stylus Pen
14
FRONT
7
5
6
BACK
2
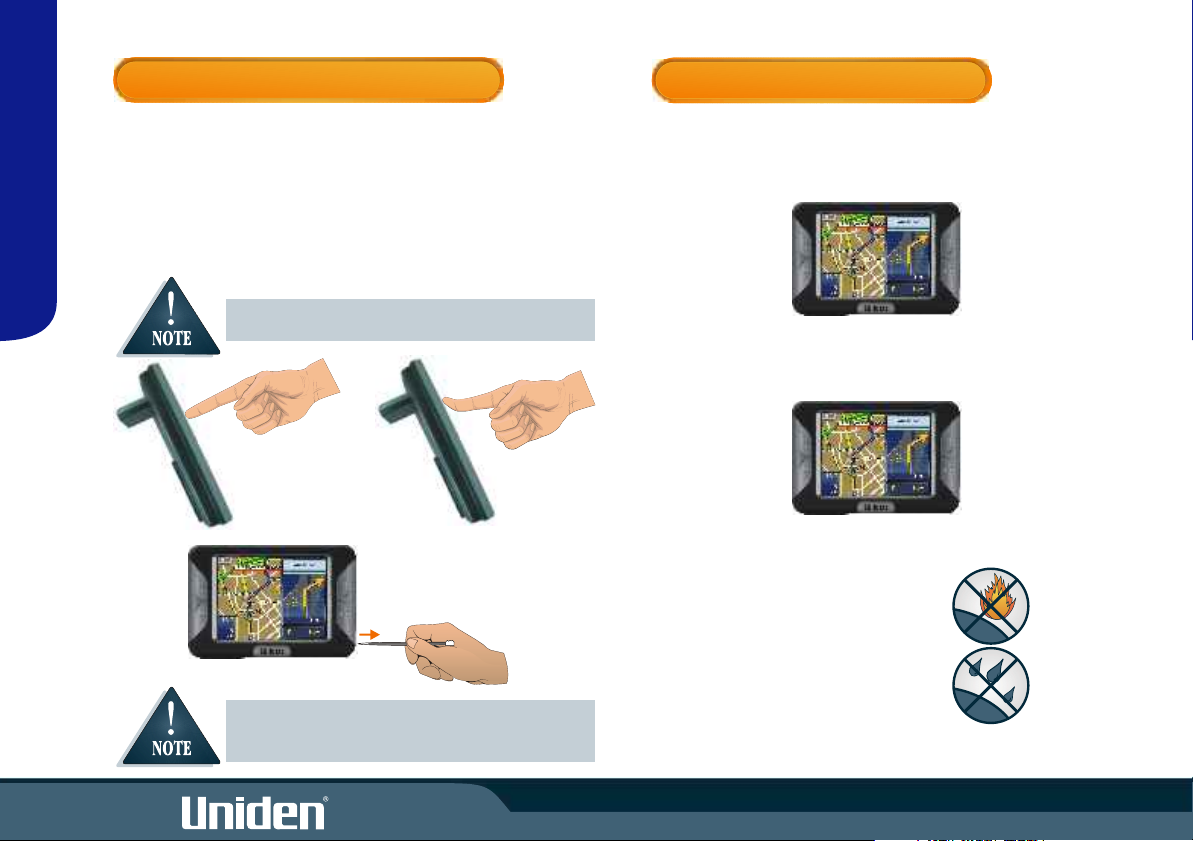
USING THE TOUCHSCREEN
CARE & MAINTENANCE
The GNS8400 is designed to respond to touchscreen input. Momentarily
touch the screen with the tip of your finger when making a selection (fig 3).
OPERATION
Avoid applying excessive pressure to the screen or holding a finger for more
than a moment (fig 4).
You may also use the stylus pen which is located at the bottom right side of
the unit to touch the screen (fig 5).
Do not use sharp objects which may scratch or damage
the screen.
Fig 3
Fig 4
Please take the following steps to ensure your GNS8400 is looked after.
! Always transport and store the GNS8400 using the carry case.
! Keep the GNS8400 free from dust by regularly cleaning the screen
with an LCD cleaner.
Take measures to reduce the risk of theft by covering the unit or remove
the unit from your dash when not in use.
! Do not leave unattended in direct
sunlight for extended periods.
Fig 5
Touchscreen activation is prevented while driving with
Safe Mode ON. See Safety Warnings on page 18 for Safe
Mode setting.
! Avoid any moisture contact.
3
OPERATION FLOW CHART
15m
30m
60m
120m
600m
1k
2k
8k
30k
100k
400k
ROUTE SETTINGS
MY POI EDITOR
SAFETY WARNING
MAP SETTINGS
INFORMATION
SIMULATION
DAY
NIGHT
TRANSIT
START
END
GO
MARK
3D
HEADING UP
NORTH
ADDRESS
INTERSECTION
MY POI
RECENT ROUTES
AUTO SPLIT ZOOM
SPLIT Mode
POI
TEXT Mode
EXIT
SPEED
TIME
RESET
EXIT
NAVIGATION
MODE
GPS Icon/Compass
SAVE
RENAME
EXIT
SCREEN
/CLOSE
POI list
see page 34
Touchscreen activation is
prevented while driving with
Safe Mode ON. See Safety
Warnings on page 18 for Safe
Mode setting.
OPERATION
4
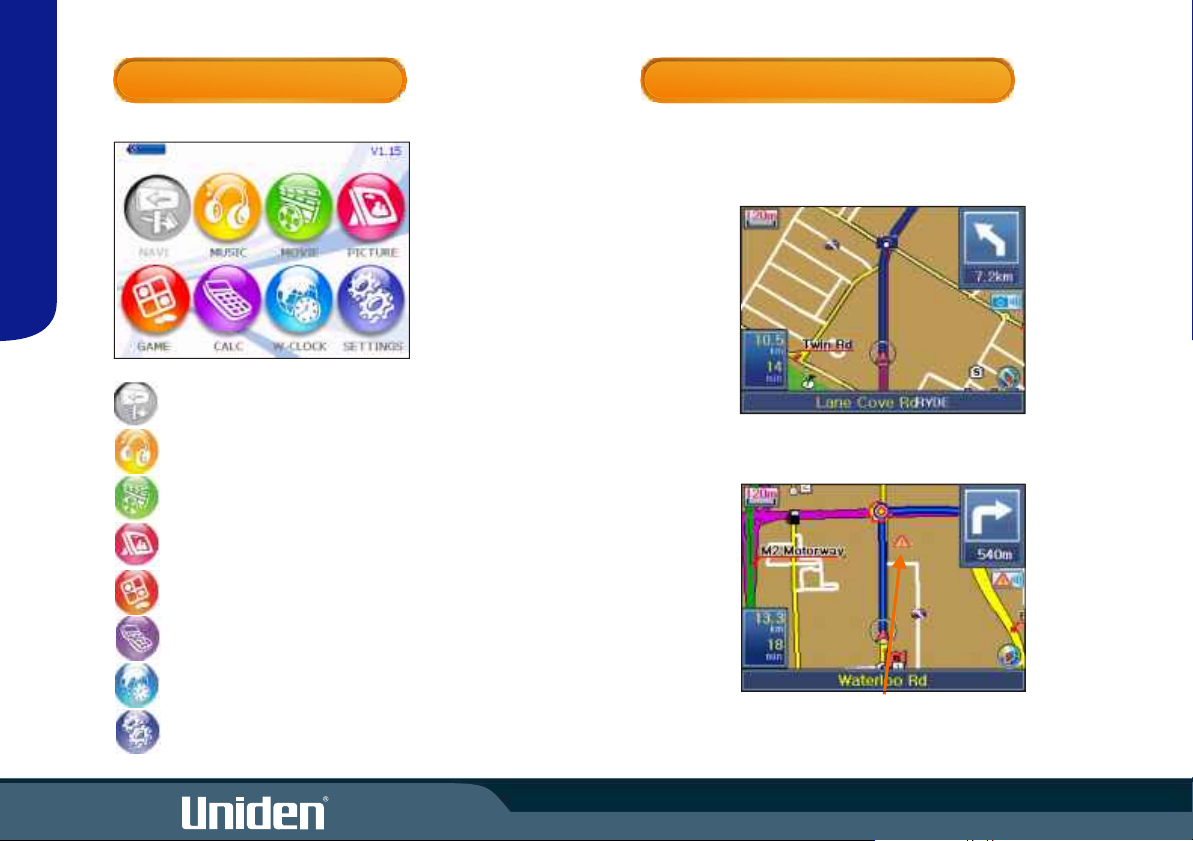
MAIN MENU MODES
SAFETY WARNING SYSTEM
The GNS8400 will give voice guide and display alert (see displays below)
of Fixed Speed Camera, Red Light Camera or Black Spots you are
approaching.
OPERATION
NAVI - Car Navigation
MUSIC - MP3/WAV Player
MOVIE - AVI Movie Player
PICTURE - Picture Viewer
GAME - Othello
CALCULATOR
Fixed Speed or Red Light Camera Location
WORLD CLOCK
Black Spot Location
SETTINGS - Personal Settings
5
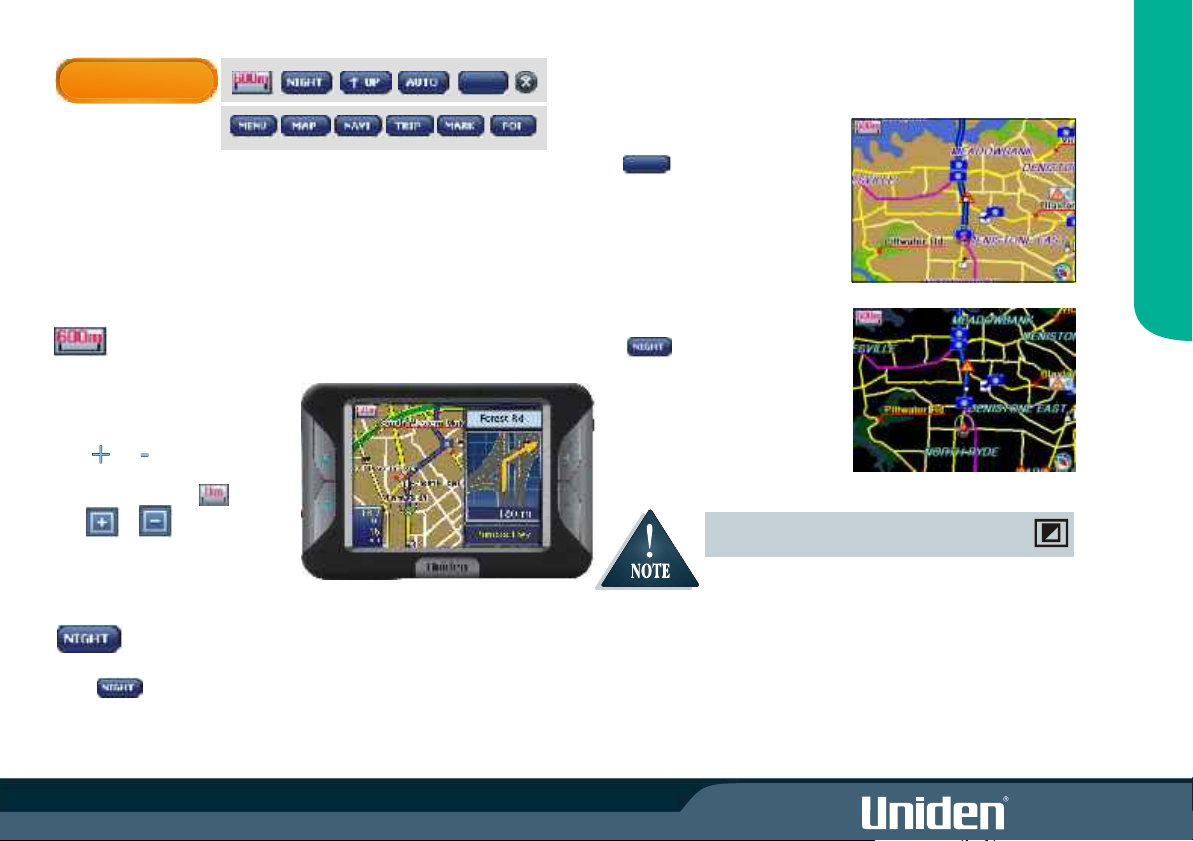
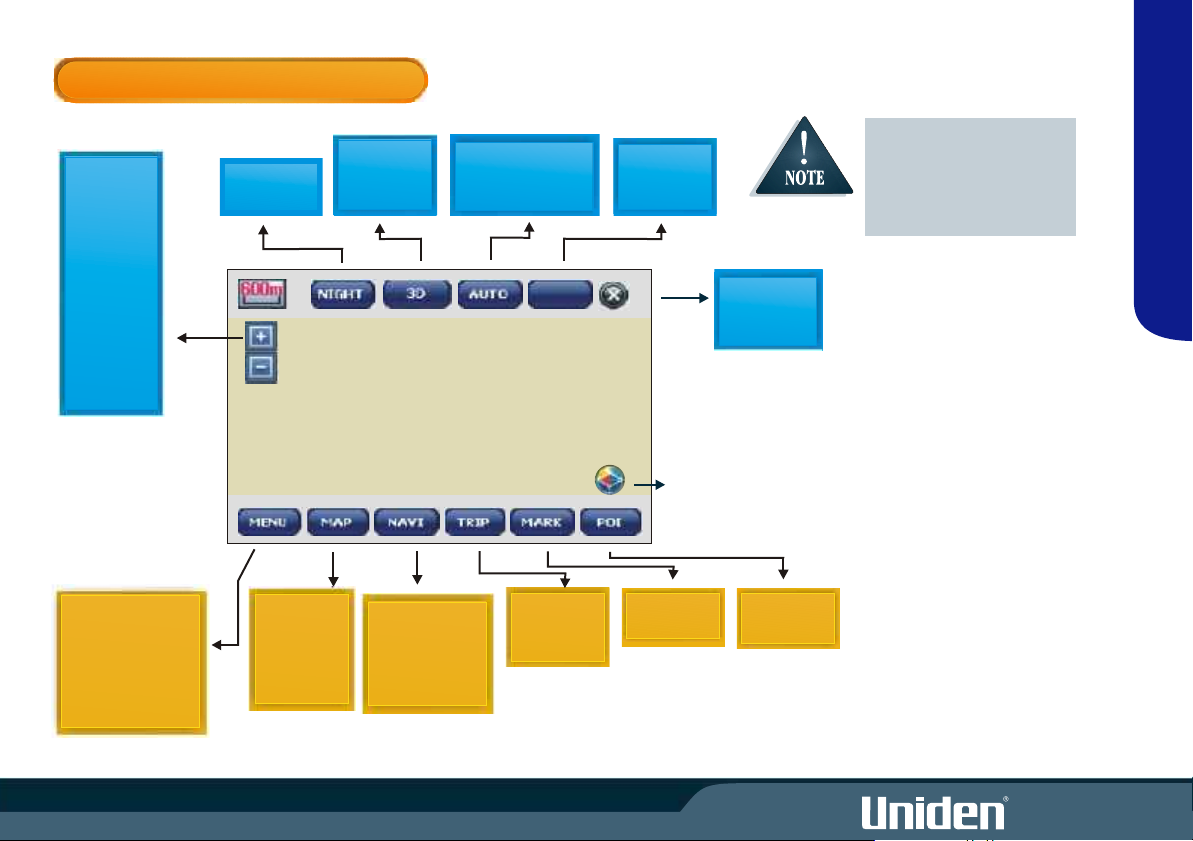
TOOLBAR
Touch the LCD and the TOOL BAR appears at the top and bottom of the
Map Screen.
The functions available in the Top Toolbar are to help you set your
preferred map viewing settings.
The name of the street you are currently on appears above the Bottom
Toolbar which has available your menu and navigation options.
EXIT
DAY
! Day Mode
SET UP
Scale: Zoom In/Out
There are 11 map levels 15m, 30m,
60m, 120m, 600m, 1k, 2k, 8k, 30k,
100k, 400k.
Press or to zoom in and out
or touch the scale icon
then or on screen.
Day/Night
Touch to switch the map
display colours from a day setting to
a night setting.
! Night Mode
! The screen may be turned off or on by pressing
6
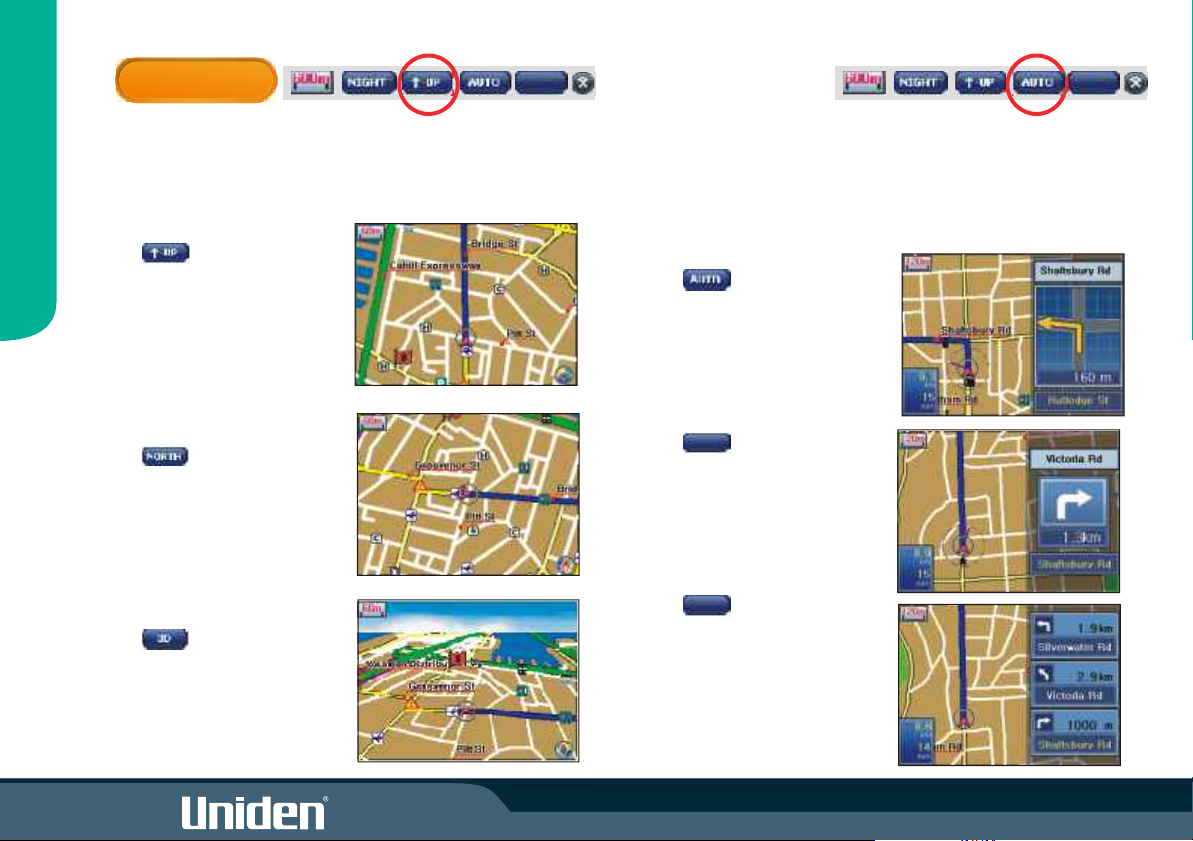
TOOLBAR
EXITEXIT
Map View
Map View changes the way the onscreen map is displayed. The 3 settings
SET UP
are below. The current Map View appears in the top toolbar. Touch the
current selection to change to your preferred view.
! - Heading Up
Shows your position as always
moving towards the top of the
screen.
! - North Up
Shows your moving direction
with reference to North always
pointing up.
! - 3D
Shows the 3D view of the map
with your position always
moving towards the top of the
display.
Turn Guide Mode
During navigation you may select the
way navigation is shown. The
current Turn Guide Mode appears in
the top toolbar.
! - Auto Split Zoom
When within 300m of an
intersection that is part of
your route, a pop up screen
with a zoomed in view of the
intersection will appear on the
right side of the display.
SPLIT
! - Split Mode
Always shows information for
the next turn on the right of the
display.
TEXT
! - Text Mode
Always shows information for
the next 3 turns on the right of
the display.
7
 Loading...