

Page 1
Page 2
Precautions!
Before you read anything else, please observe the following:
Warning!
Uniden America Corporation DOES NOT represent this unit to be waterproof.
To reduce the risk of fire, electrical shock, or damage to the unit, DO NOT
expose this unit to rain or moisture.
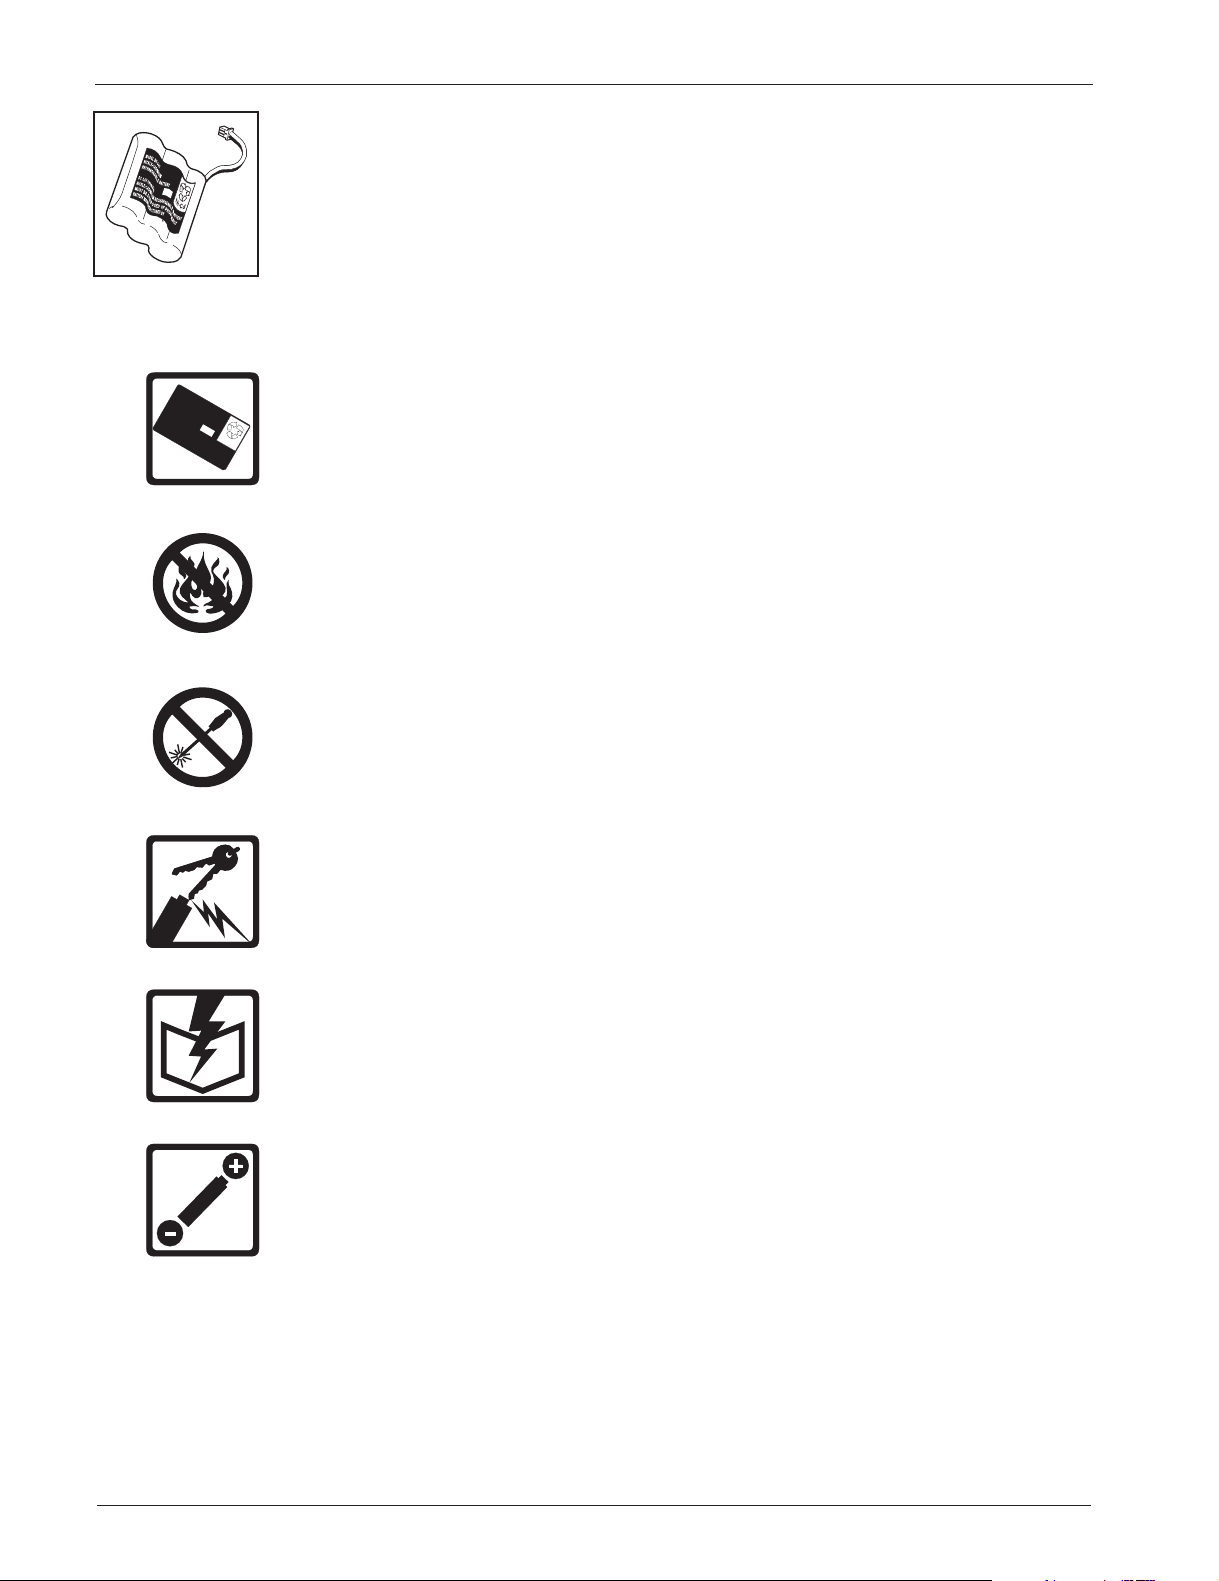
Rechargeable Nickel-Cadmium Battery Warning
q The EP200 handset contains a rechargeable nickel-cadmium battery.
q Cadmium is a chemical known to the State of California to cause cancer.
q The rechargeable nickel-cadmium battery contained in this equipment may
explode if disposed of in a fire.
q Do not short-circuit the battery.
q Do not charge the rechargeable nickel-cadmium battery used in this equipment in
any charger other than the one designed to charge this battery as specified in the
owner’s manual. Using another charger may damage the battery or cause the
battery to explode.
Rechargeable Nickel-Cadmium Batteries
Must Be Recycled or Disposed of Properly
q Uniden voluntarily participates in an RBRC
recycle nickel-cadmium batteries at the end of their useful life, when taken out of
service within the United States. The RBRC®program provides a convenient
alternative to placing used nickel-cadmium batteries into the trash or municipal
waste stream, which is illegal in some areas.
q Through the RBRC
battery at local retailers of replacement nickel-cadmium batteries. You may also
contact your local recycling center for information on where to return the used
battery. Please call 1-800-8-BATTERY for information on Ni-Cd battery recycling in
your area. Uniden’s involvement in this program is part of its commitment to
protecting our environment and conserving natural resources.
q RBRC
®
is aregistered trademark of the Rechargeable Battery Recycling Corporation.
®
program, Uniden makes it easy for you to drop off the used
The exclamation point within an equilateral triangle is
intended to alert the user to the presence of important
operating and maintenance (servicing) instructions in the
literatureaccompanyingtheappliance.
®
industry program to collect and
Page 3

Contents
Important Safety Instructions . . . . . . . . . . . . . . . . . . 3
EP200 Battery Safety Precautions . . . . . . . . . . . . . . . 5
Introduction . . . . . . . . . . . . . . . . . . . . . . . . . . . 6
Email phone Features . . . . . . . . . . . . . . . . . . 6
About the Internet . . . . . . . . . . . . . . . . . . . . 6
Getting Started . . . . . . . . . . . . . . . . . . . . . . . . . 7
Unpack Your Phone . . . . . . . . . . . . . . . . . . . 7
Check the Contents . . . . . . . . . . . . . . . . . . . 7
Preparing the Phone for Use . . . . . . . . . . . . . . . 8
EP200 Final Touches . . . . . . . . . . . . . . . . . . 9
EP100 Final Touches . . . . . . . . . . . . . . . . . . 11
Adjust the LCD Contrast . . . . . . . . . . . . . . . . 12
Initial Power Up . . . . . . . . . . . . . . . . . . . . . 12
Setup . . . . . . . . . . . . . . . . . . . . . . . . . . . . . 13
Email Phone Functional Areas . . . . . . . . . . . . . 14
Setup Screen . . . . . . . . . . . . . . . . . . . . . . 15
Setting Up the Phone . . . . . . . . . . . . . . . . . . 16
Establishing Email phone Service . . . . . . . . . . . 18
Automatic Sign-up. . . . . . . . . . . . . . . . . . . . 19
Using Your Existing Internet Service Provider (ISP) . . 22
More Setup Screens . . . . . . . . . . . . . . . . . . 25
Home . . . . . . . . . . . . . . . . . . . . . . . . . . . . . 28
The Home Screen. . . . . . . . . . . . . . . . . . . . 28
Entering Notes . . . . . . . . . . . . . . . . . . . . . 28
Temporary Notes . . . . . . . . . . . . . . . . . . . . 29
Viewing notes . . . . . . . . . . . . . . . . . . . . . . 30
Email phone . . . . . . . . . . . . . . . . . . . . . . . . . . 31
Email phone Screen. . . . . . . . . . . . . . . . . . . 31
Reading Messages . . . . . . . . . . . . . . . . . . . 31
Receiving Messages . . . . . . . . . . . . . . . . . . 32
Sending Messages . . . . . . . . . . . . . . . . . . . 32
Delete Messages . . . . . . . . . . . . . . . . . . . . 33
Reply to Messages . . . . . . . . . . . . . . . . . . . 33
Forwarding Messages. . . . . . . . . . . . . . . . . . 34
Address Book . . . . . . . . . . . . . . . . . . . . . . . . . 35
Address Book Screen. . . . . . . . . . . . . . . . . . 35
Entering New Addresses . . . . . . . . . . . . . . . . 35
Viewing Addresses . . . . . . . . . . . . . . . . . . . 36
Modifying Addresses . . . . . . . . . . . . . . . . . . 36
Deleting Addresses . . . . . . . . . . . . . . . . . . . 37
Speed Dialing From the Address Book . . . . . . . . . 37
1
Page 4

Caller ID . . . . . . . . . . . . . . . . . . . . . . . . . . . . 38
Caller ID Screen. . . . . . . . . . . . . . . . . . . . . 38
Viewing Caller Information . . . . . . . . . . . . . . . 39
Deleting Caller Information . . . . . . . . . . . . . . . 39
Adding Caller ID Information to the Address Book . . . 39
Dialing From the Caller ID Menu . . . . . . . . . . . . 39
Using Your Phone. . . . . . . . . . . . . . . . . . . . . . . 40
Receiving Calls . . . . . . . . . . . . . . . . . . . . . 40
Making Calls . . . . . . . . . . . . . . . . . . . . . . 40
Storing Memory Numbers. . . . . . . . . . . . . . . . 41
Erasing a Stored Number . . . . . . . . . . . . . . . . 41
Dialing Memory Numbers . . . . . . . . . . . . . . . . 41
Chain Dialing . . . . . . . . . . . . . . . . . . . . . . 41
Redialing the last Number Called. . . . . . . . . . . . 42
Using Your Phone With Call Waiting . . . . . . . . . . 42
Paging the Handset . . . . . . . . . . . . . . . . . . . 42
Changing Channels . . . . . . . . . . . . . . . . . . . 42
Changing the Handset Ring Type and Ring Volume . . 43
Specifications . . . . . . . . . . . . . . . . . . . . . . . . . 44
Controls and Indicators . . . . . . . . . . . . inside back cover
2
Page 5
Important Safety Instructions
This product has been designed to assure your personal safety. Improper use
can result in potential electrical shock or fire hazards. Carefully observe and
comply with all warnings, cautions, and instructions placed on the product, or
described in this operating guide.
WARNING! — When using your telephone equipment, these basic safety
precautions should always be followed to reduce the risk of fire, electrical shock,
and injury to persons:
Instructions — Read, understand, and retain all instructions.
Warnings — Follow all warnings and instructions marked on the product.
Cleaning — Unplug this product from the wall outlet before cleaning, and use a
dry cloth, without liquid or aerosol cleaners.
Water and Moisture — Do not use this product near water; for example, near a
bath tub, wash bowl, kitchen sink or laundry tub, in a wet basement, or near a
swimming pool.
Placement — Do not place this product on an unstable cart, stand, or table. The
telephone may fall, causing serious damage to the unit.
Ventilation — Slots and openings in the cabinet and the back or bottom are
provided for ventilation. To protect the product from overheating, these openings
must not be blocked or covered. This product should never be placed near or
over a radiator or heat register. This product should not be placed in a built-in
installation unless proper ventilation is provided.
3
Page 6
Important Safety Instructions
Power Sources — This product should be operated only from the type of power
source indicated on the marking label. If you are not sure of the type of power
supply to your home, consult your dealer or local power company.
Power-Cord Protection — Do not allow anything to rest on the power cord. Do
not locate this product where the cord will be damaged by persons walking on it.
Overloading — Do not overload wall outlets and extension cords, as this can
result in the risk of fire or electrical shock.
Obstructions — Never push objects of any kind into this product through cabinet
slots, as they may touch dangerous voltage points or short out parts that could
result in a risk of fire or electric shock. Never spill liquid of any kind on the product.
Servicing — To reduce the risk of electric shock, do not disassemble this
product. Take it to qualified service personnel when service or repair work is
required. Opening or removing covers may expose you to dangerous voltages or
other risks. Incorrect reassembly can cause electric shock when the appliance is
subsequently used.
Damage Requiring Service — Unplug this product from the wall outlet and refer
servicing to qualified service personnel under the following conditions:
A. When the power supply cord is damaged or frayed.
B. If liquid has been spilled into the product.
C. If the product has been exposed to rain or water.
D. If the product does not operate normally when following the operating
instructions. (Adjust only those controls that are covered by the operating
instructions. Improper adjustment of other controls may result in damage and
will often require extensive repair work by a qualified technician.)
E. If the product has been dropped or the cabinet has been damaged.
F. If the product exhibits a distinct change in performance.
Hazards — Do not use the telephone to report a gas leak in the vicinity of the leak.
Privacy — Cordless telephones are radio devices. Communications between the
handset and base of your cordless telephone are accomplished by means of
radio waves which are broadcast over the open airways. Because of the inherent
physical properties of radio waves, your communications can be received by
radio receiving devices other than your own telephone unit. Consequently, any
communications using your cordless telephone may not be private.
SAVE THESE INSTRUCTIONS
4
Page 7
MODEL BT-905
NICKLE-CADMIUM
RECHARGEABLE BATTERY
DC 3.6V 600mAh
NICKLE-CADMIUM RECHARGEABLE BATTERY
MUST BEDISPOSED OF PROPERLY
BATTERY MANUFACTURED BY
Ni-Cd
EP200 Battery Safety Precautions
EP200 Battery Safety Precautions
To reduce the risk of fire or injury to persons by the battery, read and follow
these instructions:
Recommended Battery — Use only the appropriate type and size Battery Pack
specified in this Owner’s Manual.
Battery Disposal — Do not dispose of the Battery Pack in a fire. The cell may
explode. Check the Nickel-Cadmium Battery Disposal package insert for disposal
instructions.
Damage to Battery Case — Do not open or mutilate the Battery Pack. Released
electrolyte is corrosive and may cause damage to the eyes or skin. It may be
toxic if swallowed.
Battery Handling — Exercise care in handling the battery in order not to short
the battery with conducting materials such as rings, bracelets, and keys. The
battery or conductor may overheat and cause burns.
Battery Charging — Charge the Battery Pack provided with or identified for use
with this product only in accordance with the instructions and limitations specified
in the instruction manual provided for this product.
Battery Polarity — Observe proper polarity orientation between the Battery
Pack and battery charger.
5
Page 8

Introduction
Congratulations on the purchase of your new Email Telephone Internet
Appliance. The Email phone is the industry’s first Internet integrated cordless
speaker phone with Email and Caller ID. You can use your Email phone to send
and receive Email messages, keep important notes, and store important names,
addresses, and phone numbers. Caller ID provides you with caller information
before you answer the phone. The Email phone also provides the hands-free
operation of a speaker phone.
Email phone Features
Email phone
q
Speaker Phone
q
Automatic Message Retrieval
q
q Calendar with Notepad
q Address Book
q Easy to Use Menu
QWERTY Keyboard
q
Flip-up LCD Monitor
q
Built-in Modem
q
q On-hook Dialing
q Dual Keypad
About the Internet
The Internet is basically a large group of computers tied together to share
information. It started as a military project back in the 1950’s, and has progressed
to a stand-alone network of universities and independent sites. The Internet is a
huge repository of information, provided by countless millions of people, and
covering every subject imaginable.
Your new Email phone allows you to tap into one of the most useful aspects of
the Internet. Electronic Mail, or Email for short, is a tool for sending letters and
messages to people all over the world via the Internet.
There are two ways you can get on the Internet with your new Email phone. One
is to use the automated sign-up feature to set up an account, see page 19. The
other is to use an account you already have, called an Internet service provider,
to access the Internet, see page 22. There are many different Internet service
providers on the market, from small to large. You can find information on how to
contact a service provider in most newspapers, computer magazines, and even
television commercials.
Again, if you would rather not hassle with setting up an account on your own, just
use the automated sign-up feature of your new phone. Whatever you choose to
do, it will be an experience well worth the effort. Welcome to the information
superhighway, and enjoy!
For assistance in setting up and answering questions about your new Email phone,
contact Uniden at 1-888-777-2947 or visit our Web site at http://www.uniden.com.
6
Page 9
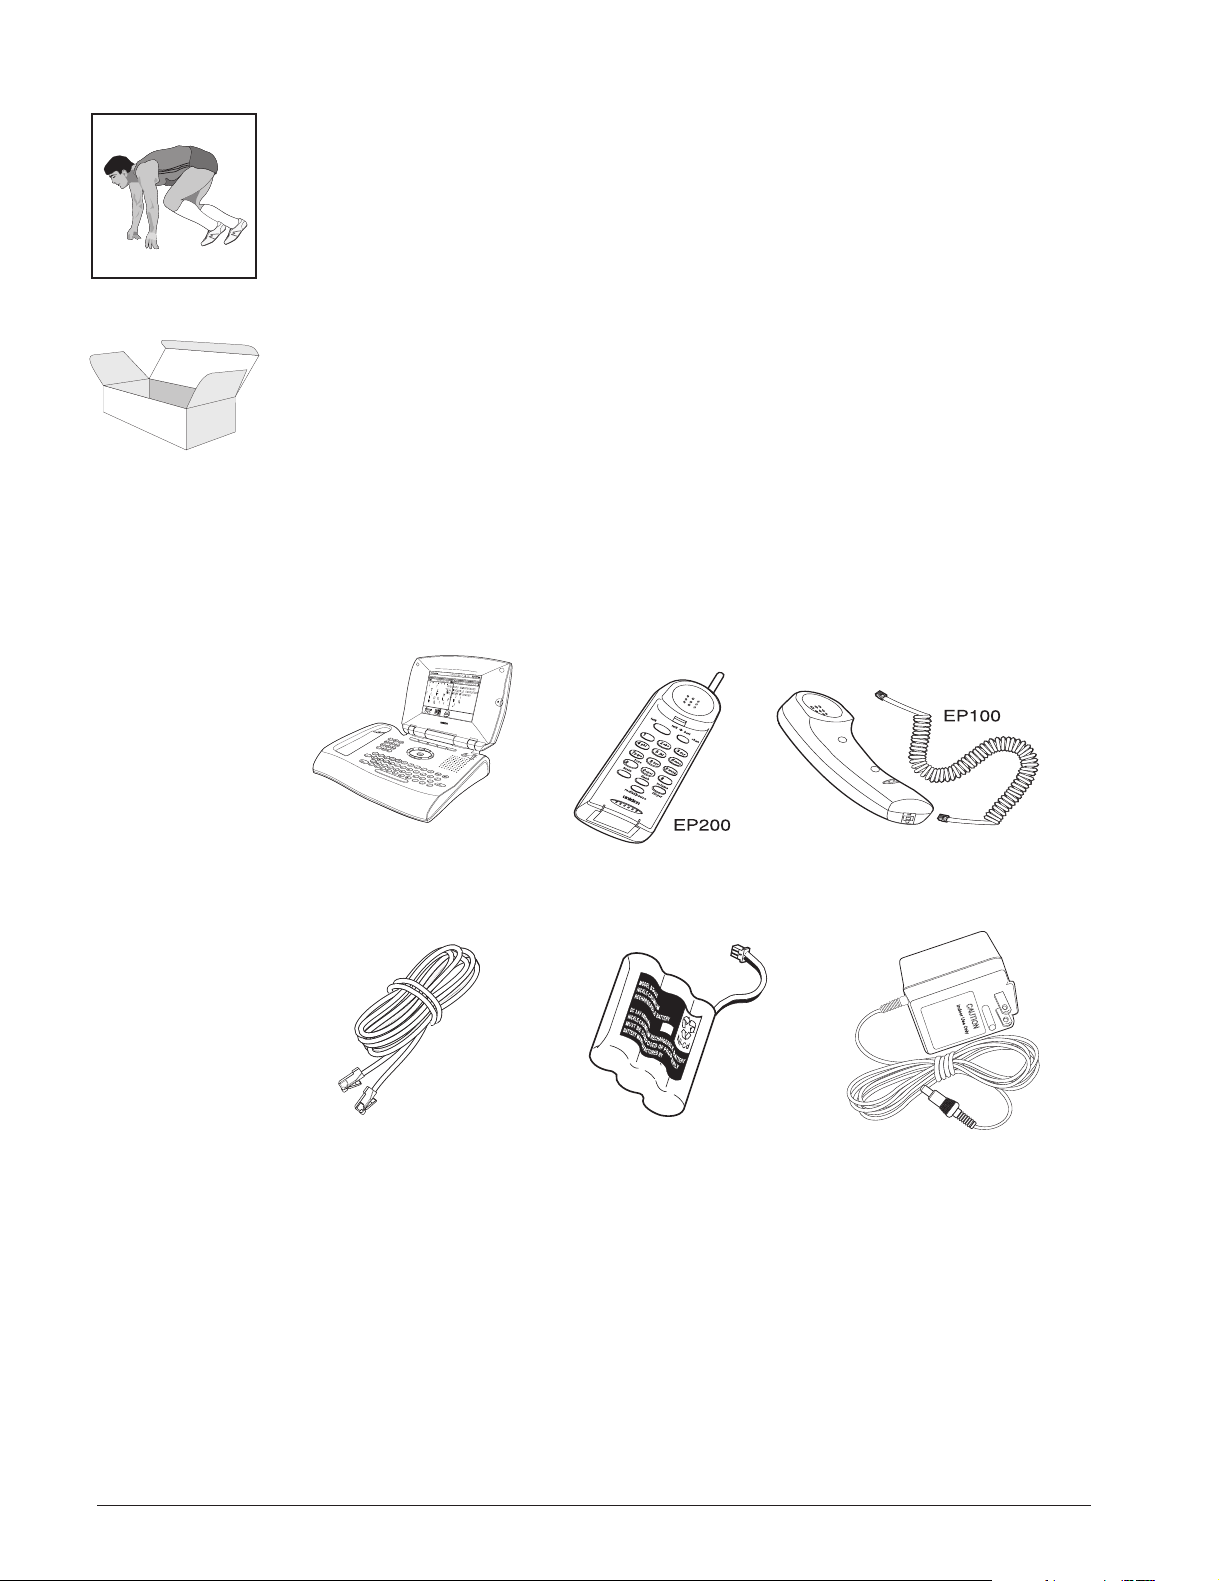
Getting Started
Unpack Your Phone
Remove all the components from the box.
Check the Contents
Your Email phone should contain the following items. If any of these items are
missing, please contact your place of purchase.
Base Unit
Telephone Cord EP200 Handset Battery AC Adapter
q
This Owner’s Manual
q
Other Printed Material
EP200 Cordless Handset
or
EP100 Handset and Coiled Cord
7
Page 10
Getting Started
Use only the
Uniden AC Adapter
supplied with this
phone.
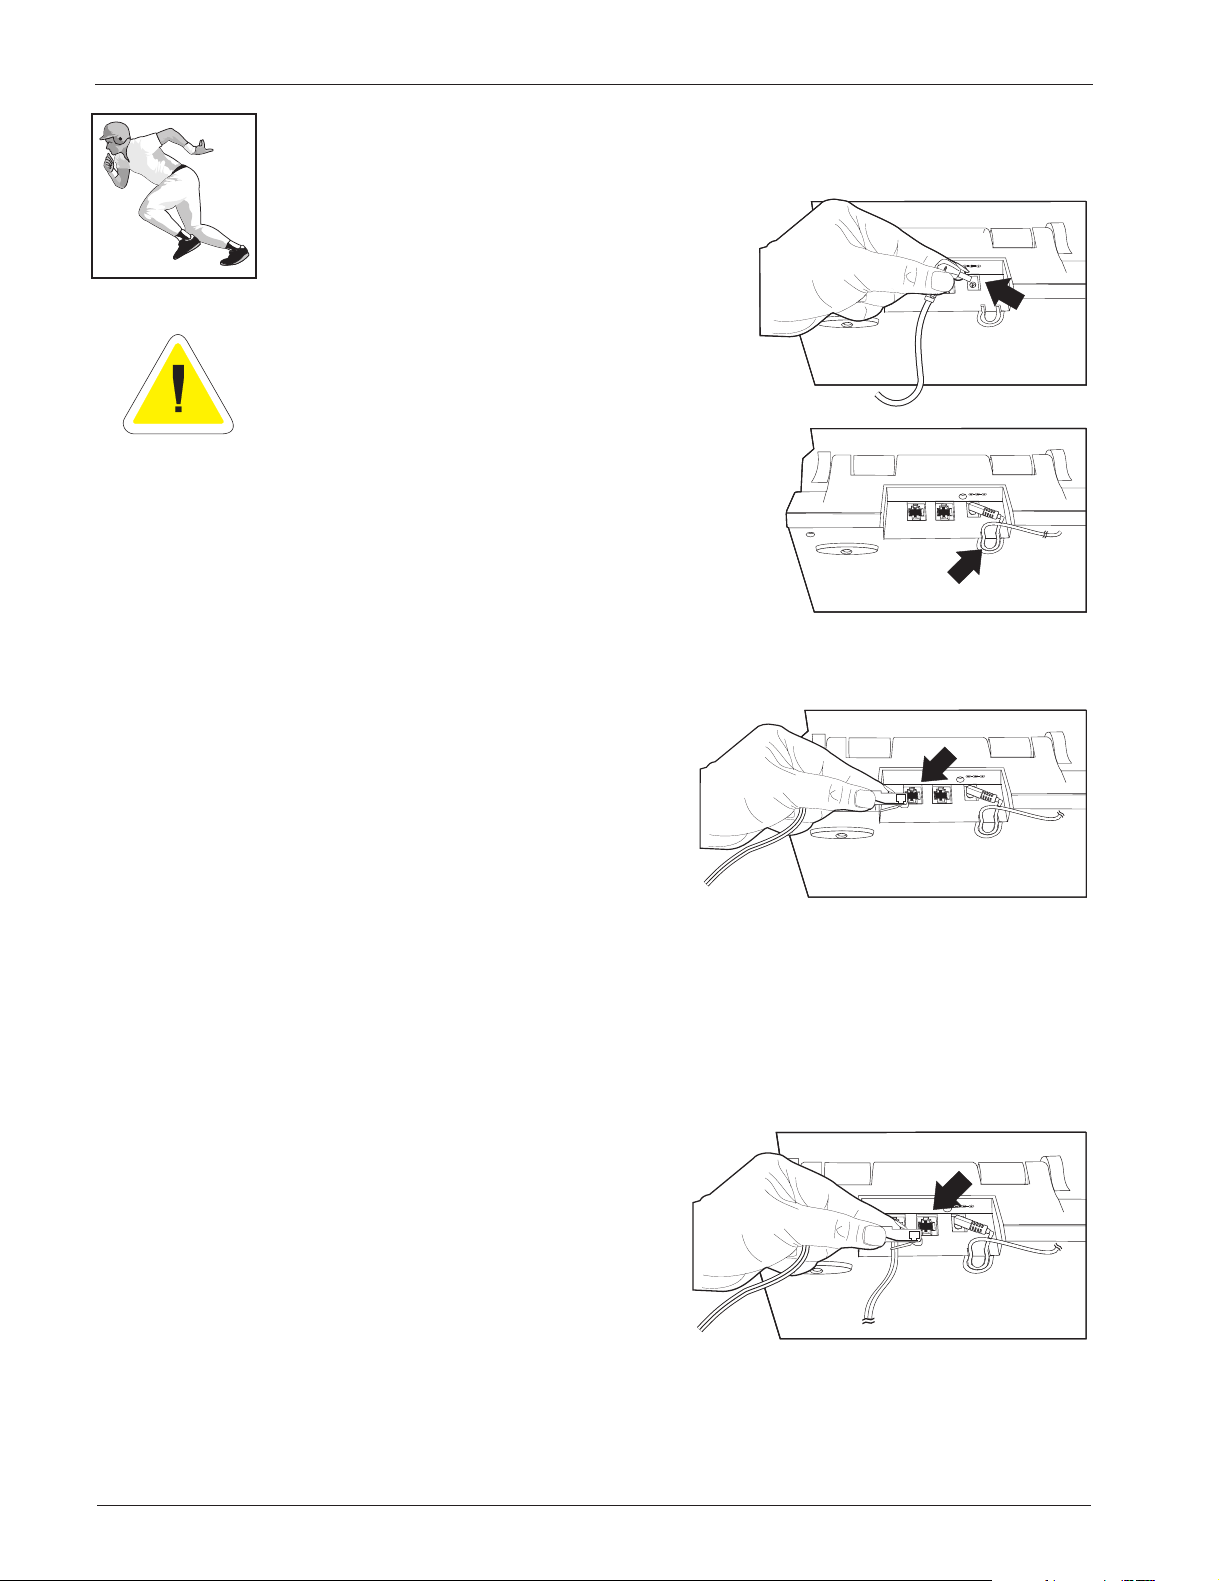
Preparing the Phone for Use
Connect the Power
1. Plug one end of the AC Adapter into
the DC 13V In jack on the back of
your Email phone.
2. Wrap the power cord around the strain relief
notch in the base.
3. Plug the other end of the AC Adapter into
your wall outlet.
LINE TEL
LINE TEL
DC13V IN
DC 13V IN
+
–
Connecting the Phone Line
1. Plug one end of the telephone
cord into the
Line
Jack on the
LINE TEL
back of your Email phone.
2. Plug the other end of the
telephone cord into your wall jack.
Installing Additional Equipment
You can install additional equipment, such as an answering machine or
messaging system, by connecting it to the
Email phone.
1. Plug one end of your telephone
cord into the
TEL
Jack on the back
of your Email phone.
TEL
Jack on the back of your
LINE TEL
DC 13V IN
+
DC13V IN
+
–
–
2. Plug the other end of the telephone cord into the additional device, such as an
answering machine.
8
Page 11
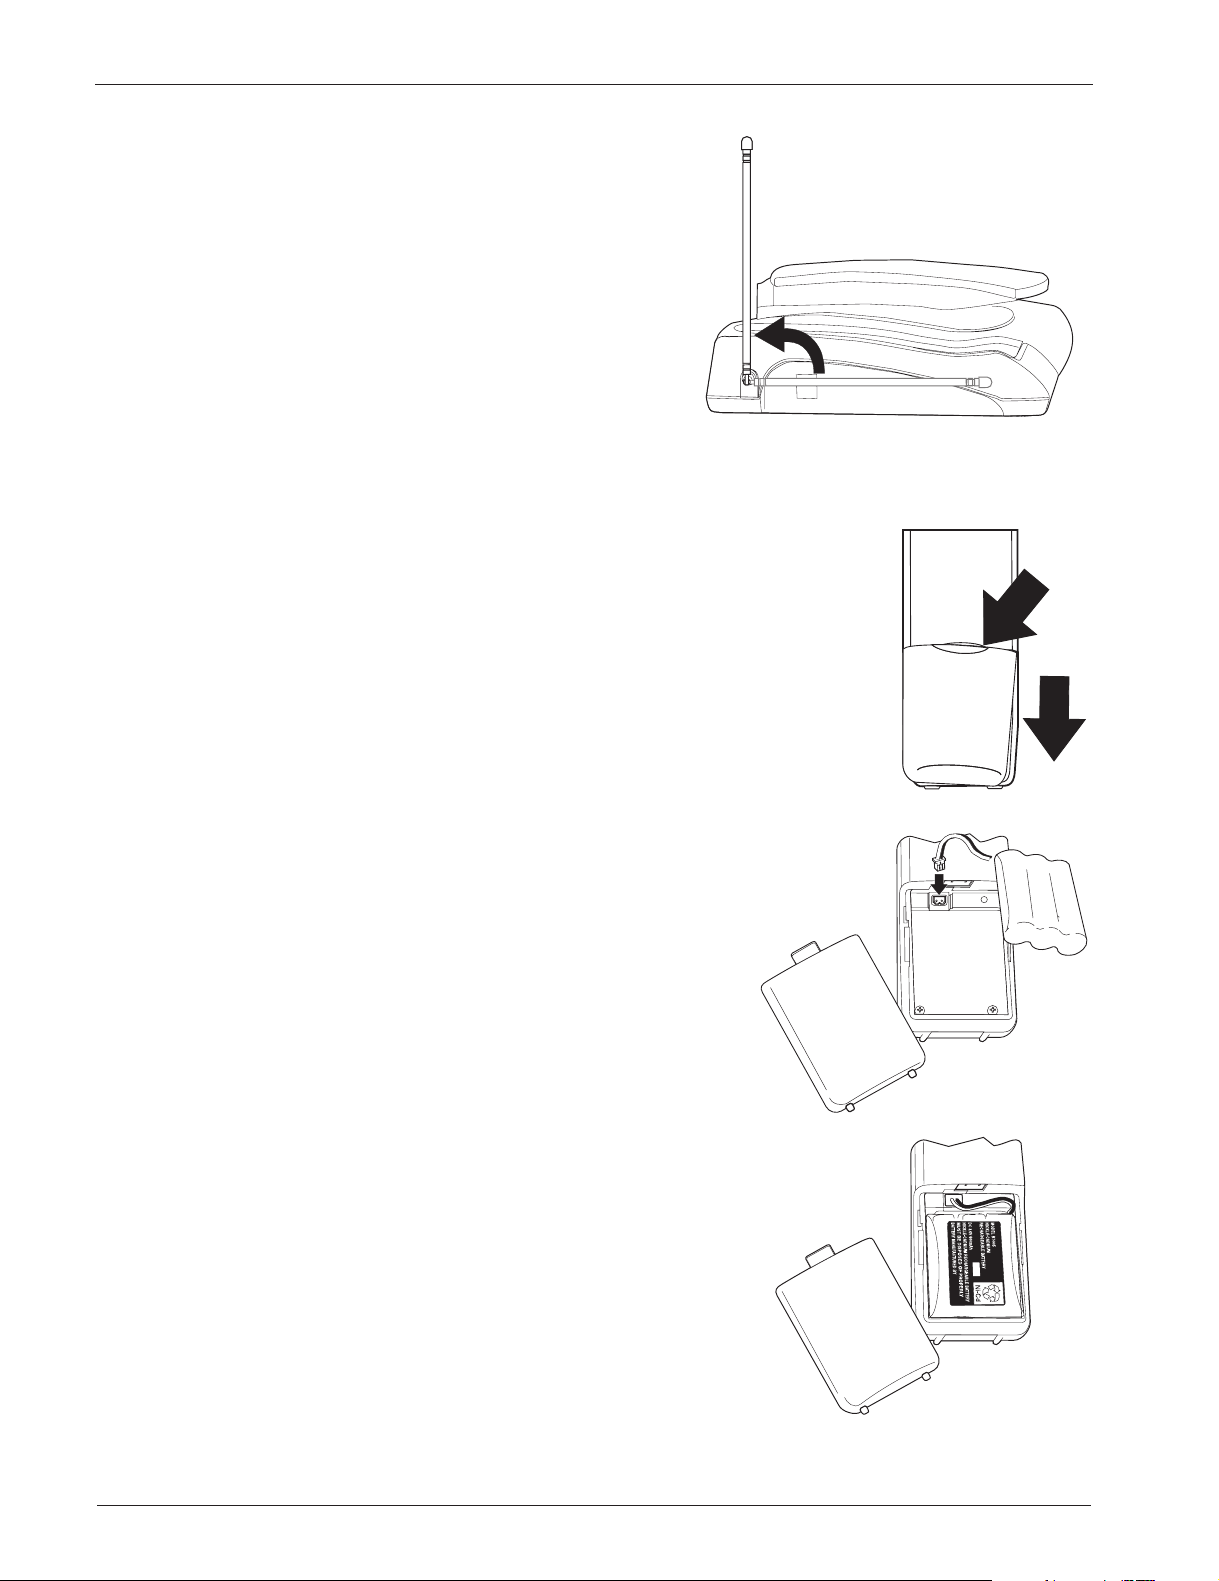
EP200 Final Touches
Raise the Antenna
Raise the antenna to the vertical position.
Installing the Handset Battery Pack
1. Press in on the Battery Cover Release and
slide the battery compartment cover down.
Getting Started
2. Align the plastic connector of the
Nickel-Cadmium battery pack with its socket
and plug it in.
Note: The black lead will be on the right when
the plug is properly aligned.
3. Place the battery pack inside the battery
compartment, and slide the battery cover
back on.
Note: The built-in Memory Backup feature
allows up to 3 minutes to disconnect the old
battery pack and install a new one without
losing any numbers stored in memory. For
optimum battery performance, please charge
the battery overnight before using the system.
9
Page 12
Getting Started
Charging the Cordless Handset
Place the handset on the base to charge. The Charge message appears on the
LCD. See page 13 for details.
Note: The handset must be fully charged before the phone will operate properly.
The battery included with your phone is not charged.
Allow 12 to 15 hours for the Handset to charge.
During this time you can use the speaker phone
to make calls.
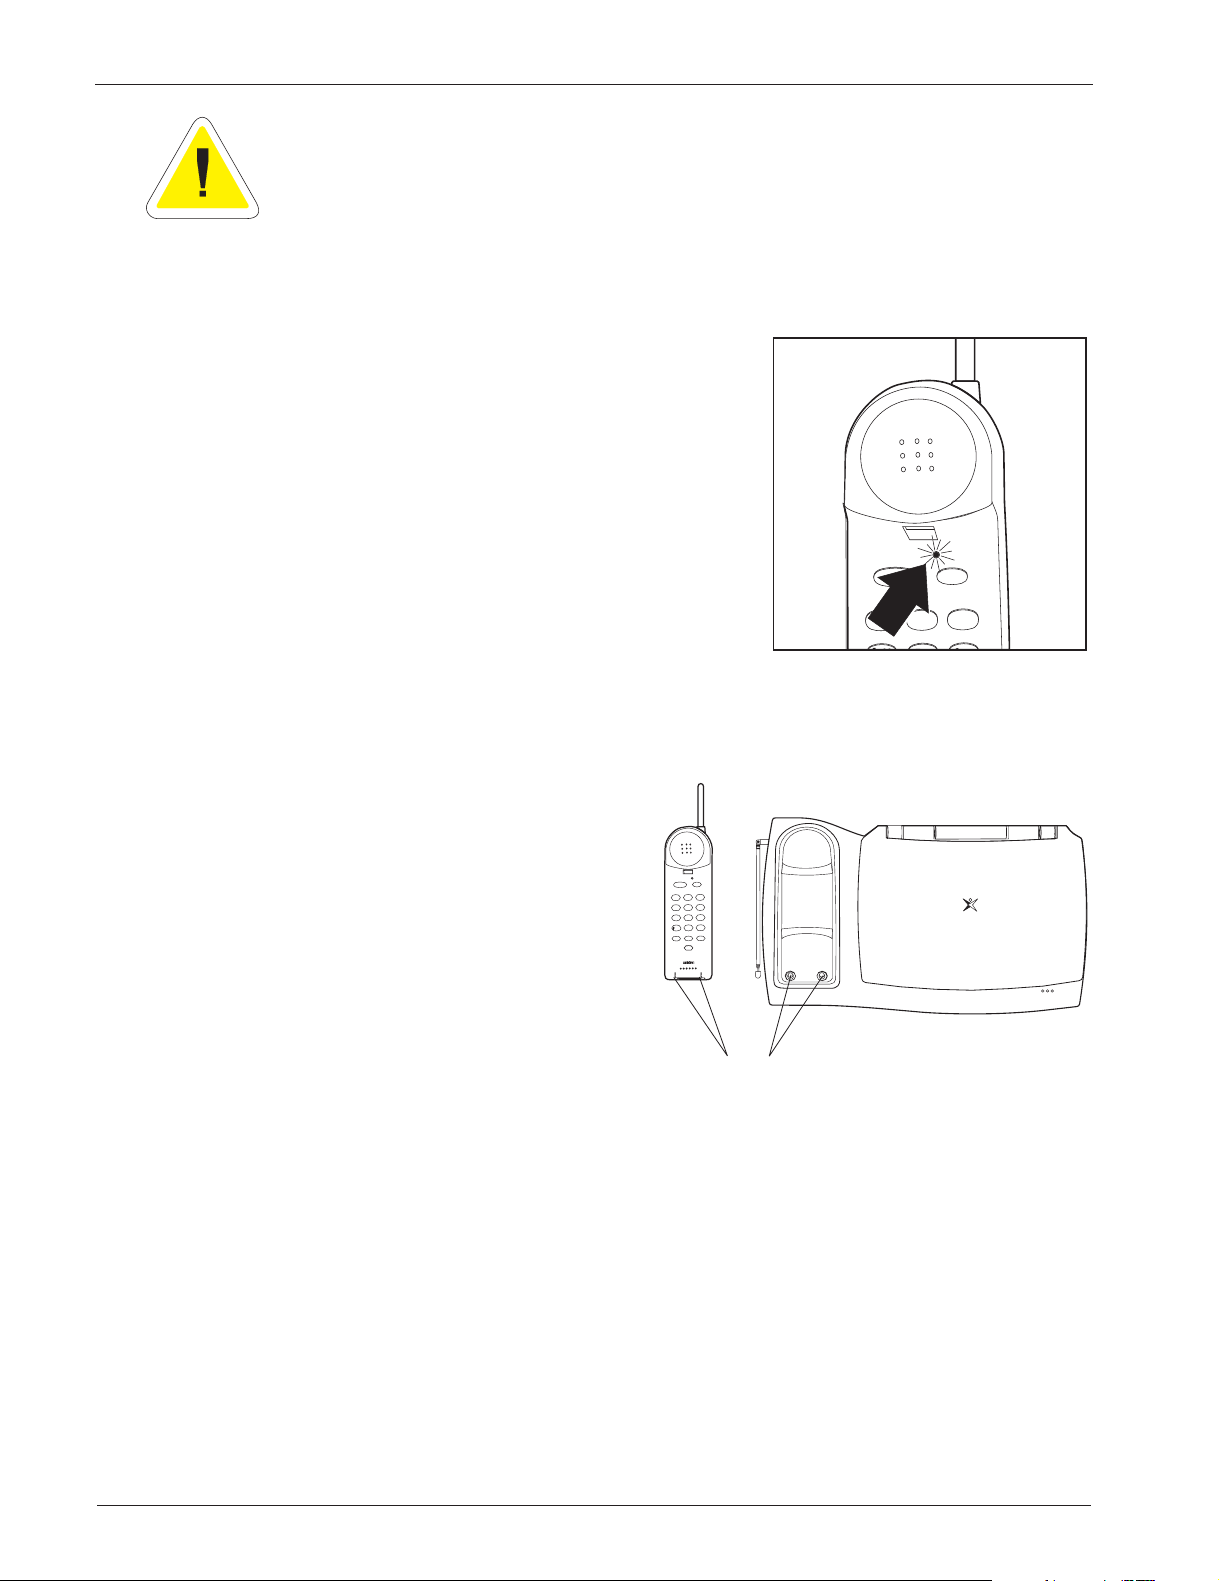
Low Battery Indicator
When the Battery Pack in the Handset
is low and needs to be charged, the
talk/batt low
LED flashes every 3 seconds.
talk
talk
1
batt
chan
def
abc
3
2
If this occurs while you are on the phone, you hear an alert tone. Complete your
call as quickly as possible, and return the Handset to the Base Unit for charging.
Allow 12 to 15 hours without any interruption for the Handset to fully recharge.
Cleaning the Battery Contacts
talk
batt
talk
To maintain a good charge, it is
important to clean all battery
contacts on the Handset and Base
Unit about once a month. Use a
pencil eraser or other contact
cleaner. Do not use any liquids
or solvents.
abc
2
1
ghi
jkl
4
5
pqrs
tuv
7
8
tone
oper
0
mem flash volume
redial/pause
chan
def
3
mno
6
wxyz
9
#
ringer
Contacts
10
Page 13
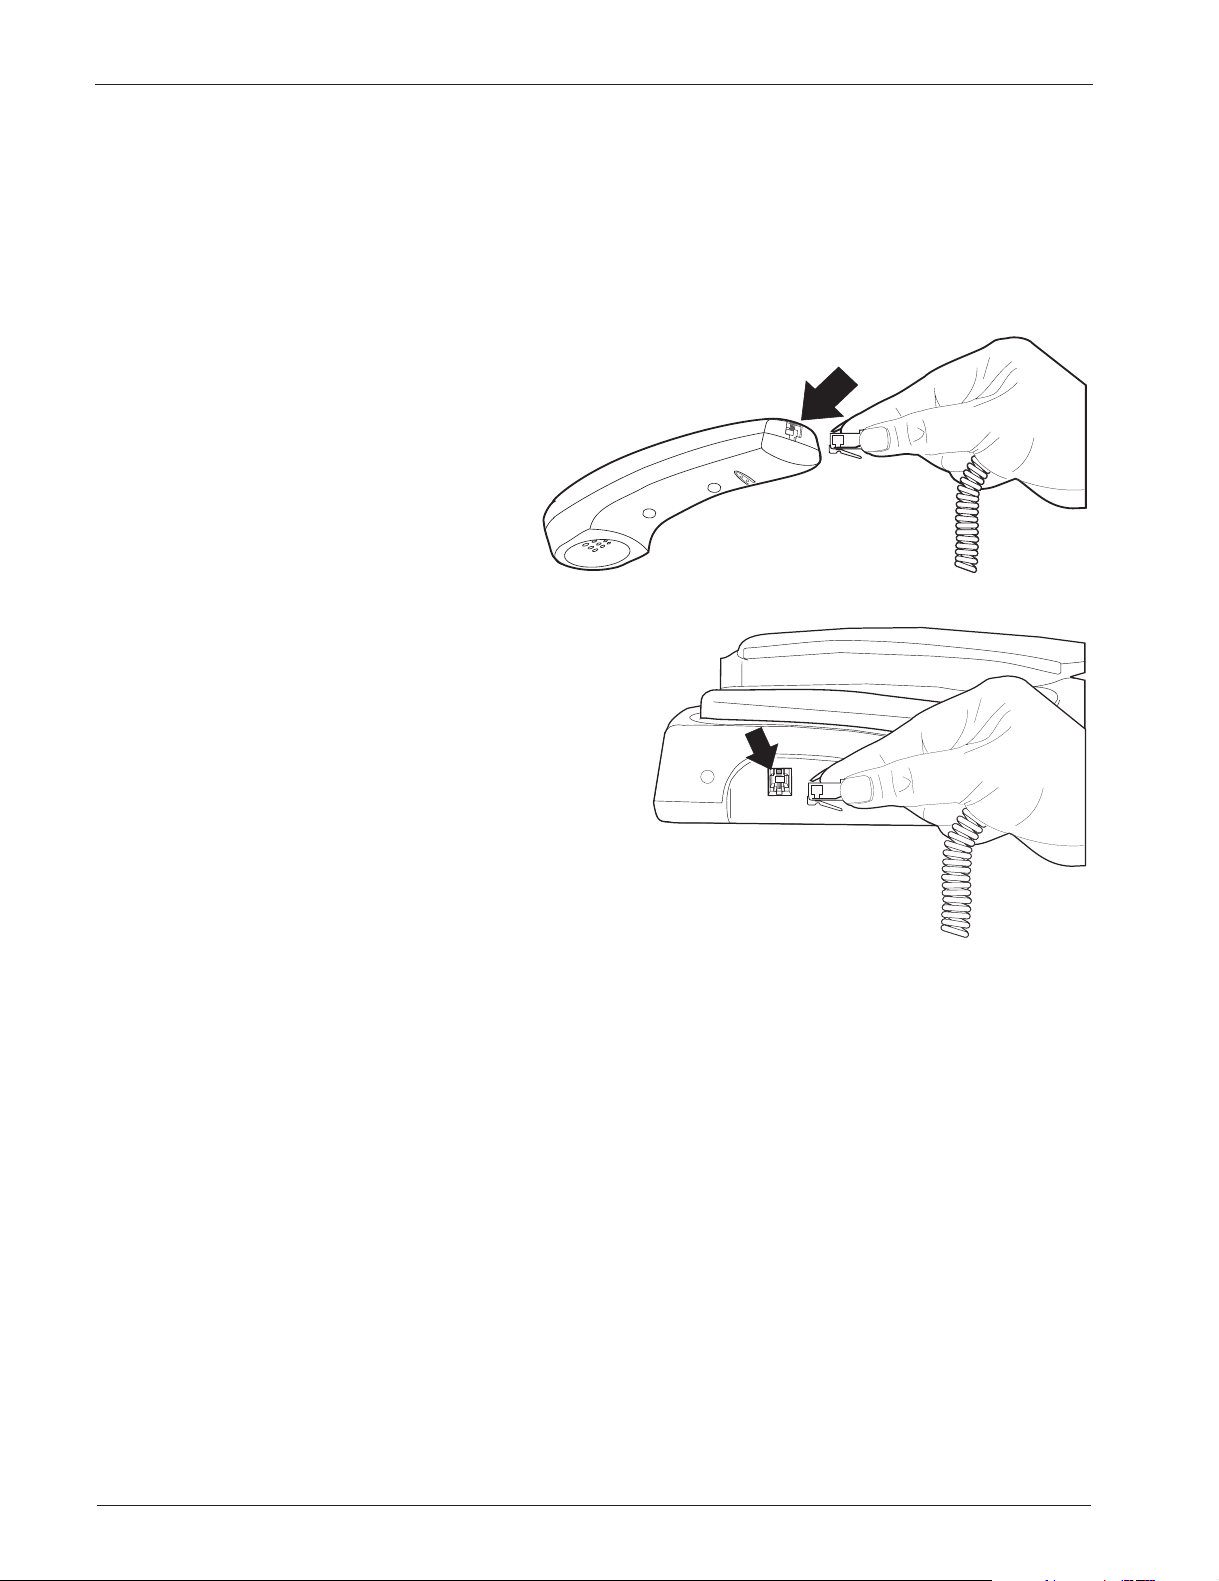
EP100 Final Touches
Attach the Handset
1. Plug one end of the coiled Handset
cord into the Handset.
2. Plug the other end of the coiled
Handset cord into the Base.
Getting Started
11
Page 14
Getting Started
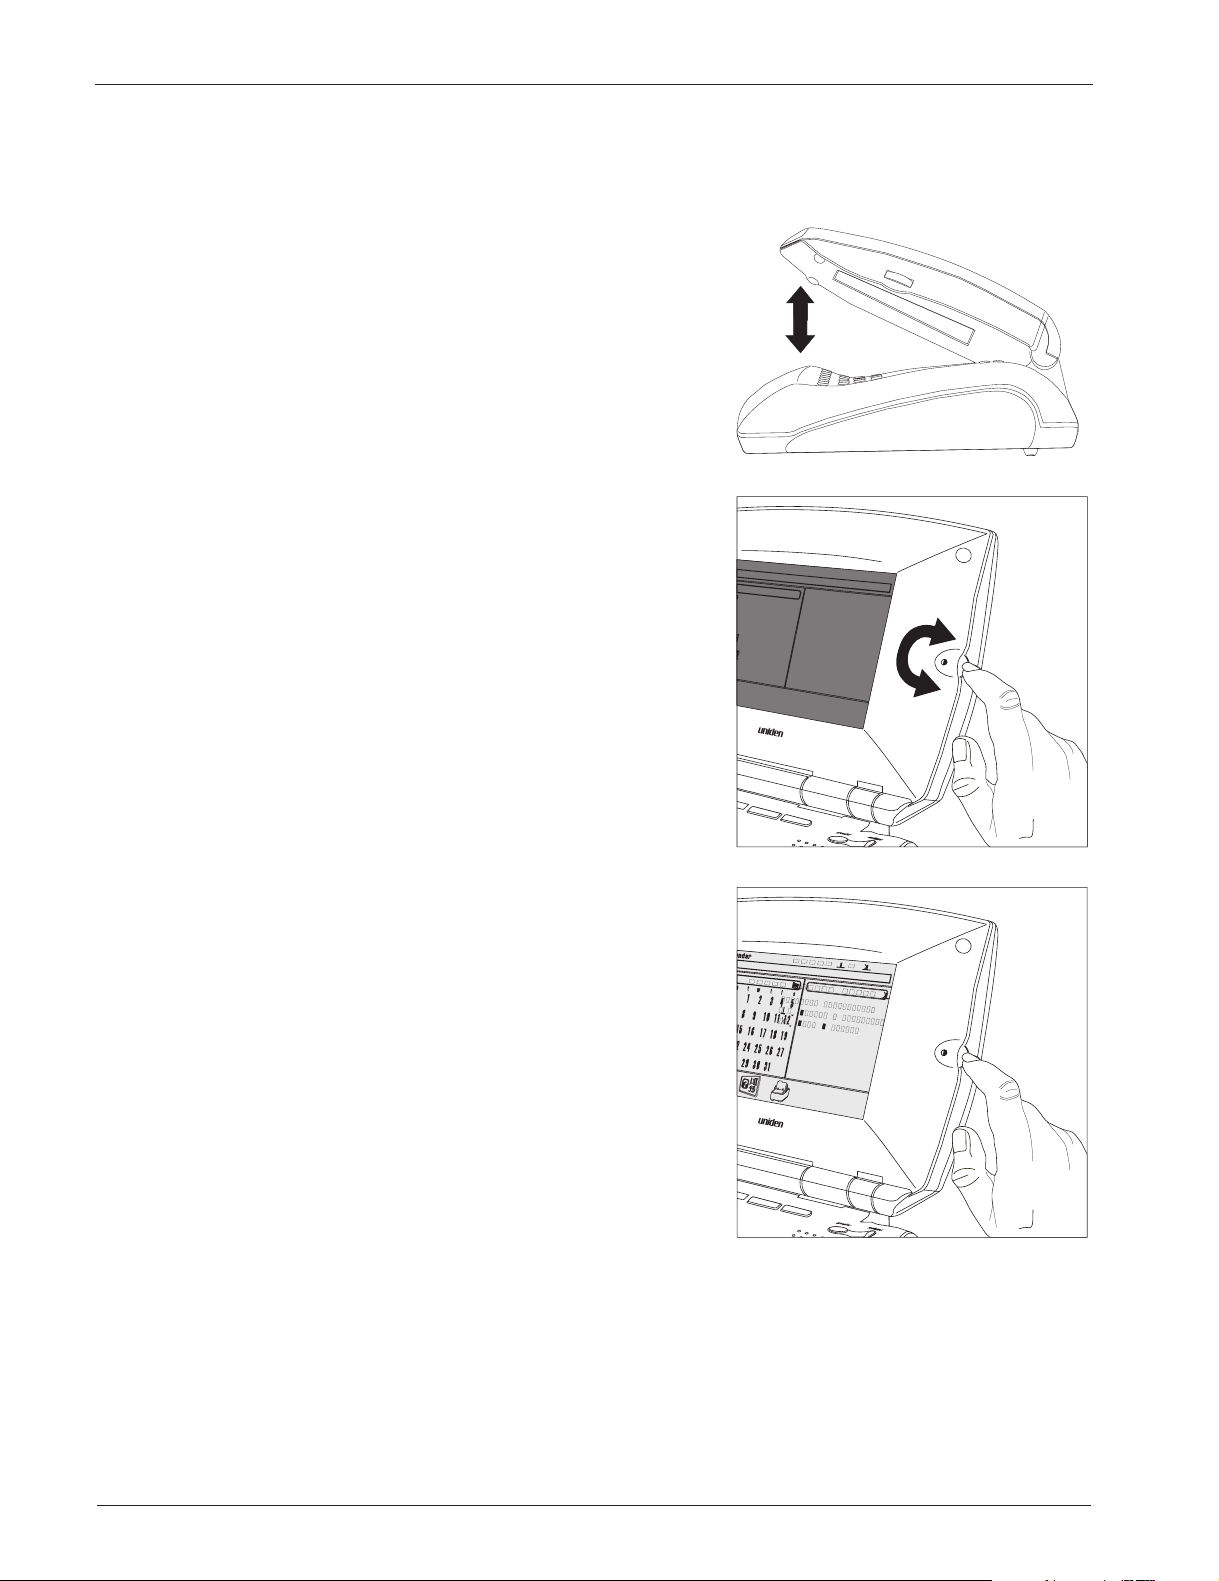
Adjust the LCD Contrast
1. Lift the LCD panel.
2. Move the contrast adjustment knob
to change the LCD contrast.
3. The LCD is properly adjusted when
you can comfortably read the screen.
Initial Power Up
When you first turn on the Email phone, a diagnostic is performed. During the
diagnostic which lasts around 15 seconds, the screen will be blank.
12
Page 15
Setup
Ù
Ù
ÚUse<>and "select" a day for notes.
Ú
April 1997
1
8
7
7
15
14
22
21
29
28
m
April 7, 1997
5
2
3
4
12
9
10
11
19
16
17
18
26
23
24
25
30
c
Calendar
Use<>and "select" a day for notes.
smt wt f s
6
13
20
26
Notes: April 7,1997
Dentist appointment
7:30 Dinner @ Grandma's
12:30 pick up Pete
a
10:50pm
charging
s
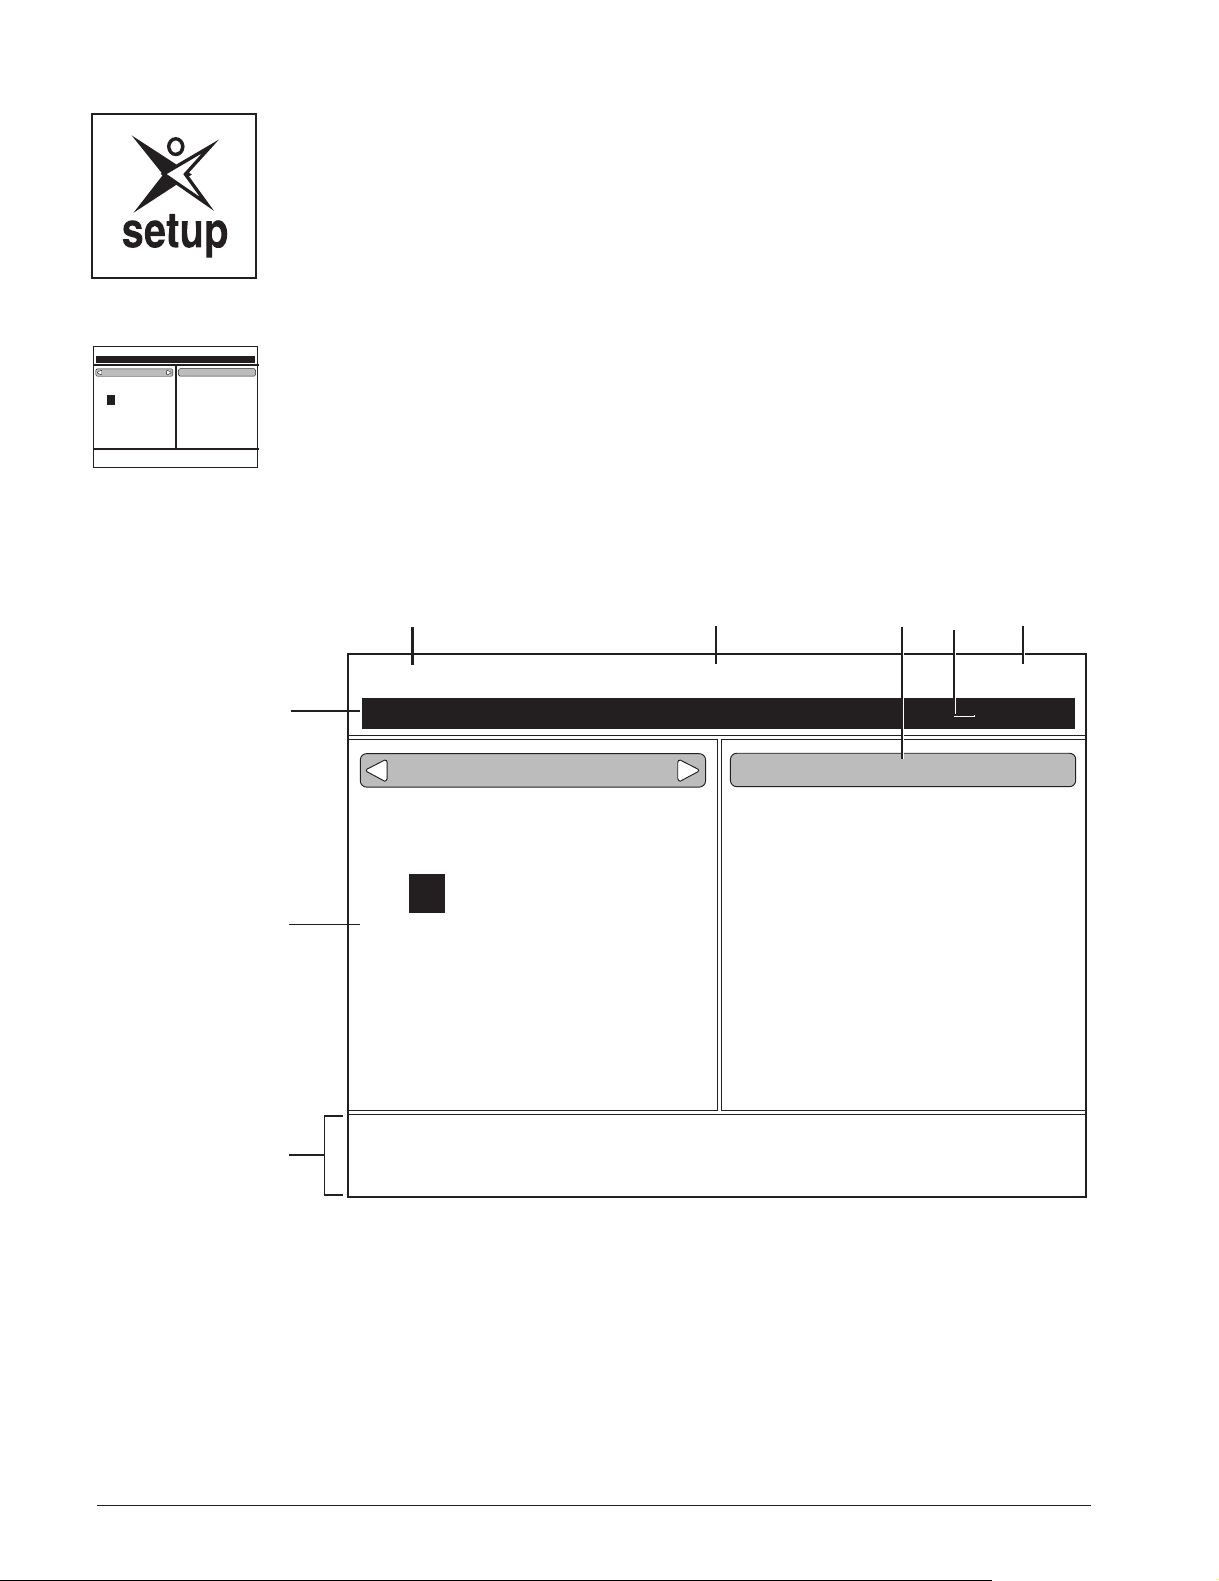
The LCD Screen
All of your information is displayed in the LCD screen. A typical Home screen is
shown below and is broken down into several different sections.
The Home screen can be reached at any time by pressing
10
17
icon.
April 7, 1997
Notes: April 7,1997
Dentist appointment
11
18
5
4
12
19
7:30 Dinner @ Grandma's
12:30 pick up Pete
3
the function key under the
h
Note: The LCD display could look different depending on the software in your
Email phone.
12345
Calendar
Ù
Ù
< >
6
7
< >
and "select" a day for notes.
ÚUse
and "select" a day for notes.
Ú
April 1997
sm t wt f s
1
2
8
9
16
13
6
7
7
15
14
10:50pm
chargingUse
8
1.
Screen Type
Date
2.
3.
4.
Current date.
Notepad
Charge Indicator
Notes for the current day.
21
28
22
29
20
26
m
Mode of operation.
Phone is Charging
23
30
24
c
25
26
a
5.
Time
Status Line
6.
Calendar
7.
Function Icons
8.
s
Current time.
Status and on-line instructions.
Current month.
Icons for Function Keys.
13
Page 16

Setup
Email Phone Functional Areas
Your Email phone is divided into several functional areas.
q The Arrow and Select Keys
q The Function Keys
q The Base Unit Keypad
q The Keyboard
q The LCD Screen
Arrow and Select Keys
These keys are used to move the
cursor on the screen, or to select
a message.
Function Keys
The function keys are associated with the icons on the LCD screen directly
above them. To select an operation represented by an icon on the LCD screen,
press the function key below the icon.
The Base Unit Keypad
The base unit keypad can be used
to dial phone numbers when using
the speaker option.
14
Page 17

The Keyboard
Use the keyboard to type Email
phone messages and notes.
Setup Screen
Setup
1. Press the function key under
2. A typical setup screen displays.
Note: The LCD display
could look different depending
on the software in your
Email phone.
s
.
15
Page 18

Setup
Setting Up the Phone
This section explains how to set up the phone features of your Email phone.
The features include setting the speaker volume, entering your local area code
and prefix, turning off the LCD screen, and paging the handset.
Setting the Speaker Volume
1. Press
2. Use the volume key
k
on the base.
to adjust the speaker volume to a comfortable level.
V
Entering the Local Area Code and Prefix
1. Press the function key under
2. Press the function key under
3. Enter a dial prefix, if necessary, and press
For example, enter the number 9 if you are required to dial 9 for an outside line.
4. Press on the keyboard.
5. Enter your local area code, for example, 817.
6. Press the function key under
Press the function key under
tab
.
s
.
H
return
to save the information.
d
h
to cancel.
on the keyboard.
16
Setting the Ringer Level
1. From the Setup Phone Screen, press
2. Use the left or right arrow keys to toggle between off, low, and high.
3. Press
4. Press the function key under
on the keyboard.
B
to save the information.
d
until the cursor is on Ringer Level.
B
Page 19

Setup
Modem Speaker
This option gives you the choice of turning the Modem Speaker on or off. When
the Modem Speaker is on, the user can hear the phone connecting to the Internet
when sending and receiving email messages.
1. From the Setup Phone Screen, press
2. Use the left or right arrow keys to toggle between on and off.
3. Press the function key under
to save the information.
d
until the cursor is on Modem Speaker.
B
Key Feedback
This option gives you the choice of turning the sound on or off when pressing the
keys on the base.
1. From the Setup Phone Screen, press
2. Use the left or right arrow keys to toggle between on and off.
3. Press the function key under
to save the information.
d
until the cursor is on Key Feedback.
B
Turn the LCD Display Off
Use this feature to turn the LCD backlight off.
Note: The LCD backlight automatically turns off after ten minutes if you are not
using the Email phone.
1. Press the function key under
2. Press the function key under
3. Press the function key under
s
H
Z
.
.
.
Paging the Handset
If the Handset is off the base and you cannot locate it, use this feature to find it.
1. Press the function key under
2. Press the function key under
s
H
.
.
Exiting Phone Setup
To exit the Phone Setup Screen, press the function key under
h
.
17
Page 20

Setup
Establishing Email phone Service
This section explains how to set up the Email phone features of your Email
phone. You may choose between Automatic Sign-Up or using your existing
Internet Service Provider.
Entering the Email phone Setup Screen
The Email phone setup screen is accessed from the Home screen.
If you are at a different screen, press the function key under
1. Press the function key under
2. A typical setup screen displays.
Note: The LCD display could
look different depending on
the software version in your
Email phone.
3. Press the function key under .
s
service
.
h
.
18
Page 21

Automatic Sign-up
Setup
(From the Home Screen press the Function Keys under
Note: You must complete the Personal Data section before you can use the
Automatic sign-up feature.
, then .)
s
service
Enter Your Personal Data
Note: You must fill in the personal data section in order for your Email phone to
operate properly when using the automatic sign-up feature.
1. Enter your First Name. For example, John.
2. Press
3. Enter your Last Name. For example, Smith.
4. Press
5. Enter your Street Address. For example, 333 Highland Way.
6. Press
7. Enter your City. For example, Chicago.
8. Press
9. Enter your two-letter State Code. For example, IL.
on the keyboard.
B
on the keyboard.
B
on the keyboard.
B
on the keyboard.
B
10.Press
11.Enter your Zip Code. For example, 76155.
12.Press
13.Enter your two-letter Country Code. For example, US.
14.Press
15.Enter your Area Code and Telephone Number. For example, 8178583000.
16.Press the function key under
An information screen displays listing the number to call for sign-up service.
To continue the sign-up process, press the function key under
on the keyboard.
B
on the keyboard.
B
on the keyboard.
B
q
.
.
s
19
Page 22

Setup
Setup Options
(From the Home Screen press the Function Keys under
Note: For more information on how to set up your Automatic Sign-Up, refer to the
Quick Start Instructions.
1. Enter your Email phone User name. For example, jsmith.
2. Press
3. Enter your Email phone Password. For example, password.
4. Press
5. Your SMTP (Simple Mail Transfer Protocol) Host Name should already be
entered for you.
6. Press
7. Your POP3 (Post Office Protocol) Host Name should already be entered for you.
8. Press
The last part of your email address has already been entered for you.
To enter the beginning of your address to personalize it, press the left arrow key
until the cursor is on the @ symbol; then enter the beginning of your address, for
example, jones08@abc.net. This is used as your return address.
on the keyboard.
B
on the keyboard.
B
on the keyboard.
B
on the keyboard.
B
, then and
s
service
i
.)
9. Press
10.The beginning of your server name is already displayed; enter the rest of
your username.
11.Press
12.Enter your Server Password. This is used to login to your service.
13.Press
14.Enter the Server phone number. This is your local access number.
For example, 877-7654.
15.Press the function key under
16.To cancel press the function key under
Note: After you complete the Automatic Sign-Up, you should write down all of the
address information. You may need it later if you have to contact your
service provider.
on the keyboard.
B
on the keyboard.
B
on the keyboard.
B
d
.
.
h
20
Page 23

Dial-up Script
(From the Home Screen,
Setup
press the Function Keys under
The Dial-up Script is a set of commands that tell the modem in your Email phone
what to do.
From the Setup ISP Screen, press the function key under
The dial-up script is provided as the default with your Email phone:
dial
wait 10 CONNECT
1. Press
2. To cancel, press the function key under
Note: See Scripts for more information.
d
.
, then ,
s
service
h
.
i
, and
Q
Q
.)
.
Entering Advanced Setup Information
(From the Home Screen, press the Function Keys under
service
then ,
Note: If you make any changes to this screen,
your system will restart automatically.
i
, and
A
.)
s
,
1. From the ISP Screen, press the function key under
Note: Authenticate data is already filled in for the first line.
2. The beginning of your authorized server username should already be provided.
3. Enter the rest of your username, then press
4. Press
entered for you; for example 999.999.99.9.
5. Press
entered for you; for example 999.999.99.9.
6. Press
7. Enter your server’s domain name. For example, netcom.com.
8. Press
on the keyboard. Your primary DNS Address should already be
B
on the keyboard. Your secondary DNS Address should already be
B
on the keyboard.
B
.
d
on the keyboard.
B
A
.
21
Page 24

Setup
Using Your Existing Internet Service Provider (ISP)
(From the Home Screen press the Function Keys under
Note: For more information on how to set up specific service providers, see the
Uniden Web Page at HTTP://WWW.UNIDEN.COM.
This information is normally provided by your Internet Service Provider. You will
also need to know the way your ISP has you login on a text screen. The text
screen login information will be used later when you enter your Dial-Up Script on
page 29. The Dial-Up Script is a set of commands that will tell the modem in the
Email phone how to dial and login to your service provider. Before you start this
procedure, be sure to have the following information ready:
Your Email phone user name
q
Your Email phone password
q
Your SMTP Host Name
q
Your POP3 Host Name
q
Your Email phone address
q
Your Server Name, if applicable
q
Your Server Password, if applicable
q
Local Access Number
q
q PAP Server Name and Password, if applicable
q CHAP Server Name and Password, if applicable
q
DNS Primary Address and Secondary Address
q
Server Domain Name
, then , and
s
service
i
.)
1. Enter your Email phone User name. For example, jsmith.
2. Press
3. Enter your Email phone Password. For example, password.
4. Press
5. Enter the SMTP (Simple Mail Transfer Protocol) Host Name. For example,
pop.airmail.net.
6. Press
7. Enter the POP3 (Post Office Protocol) Host Name. For example, mail.airmail.net.
8. Press
9. Enter your Email phone address. For example, jsmith@airmail.net. This is used
as your return address.
10.Press
11.The beginning of your server name is already displayed; enter the rest of your
username.
on the keyboard.
B
on the keyboard.
B
on the keyboard.
B
on the keyboard.
B
on the keyboard.
B
22
Page 25

Setup
12.Press
13.Enter your Server Password. This is used to login to your service.
14.Press
15.Enter the Server phone number. This is your local access number. For example,
877-7654.
16.Press the function key under
17.To cancel press the function key under
on the keyboard.
B
on the keyboard.
B
d
.
.
h
Entering a Dial-up Script
The Dial-up Script is a set of commands that tell the modem in your Email
phone what to do. Below are examples of Dial-up Scripts that should work for
most services.
Dial-up Script Commands
You will need to use the following commands when entering a dial-up script:
Dial — Dial the number provided in your server phone number setting in
Wait <time><response> — Wait for a designated period of <time> for the
<response> from your service.
i
.
For example, Wait 10 CONNECT would cause the Email phone to wait for ten
seconds for the service to send the word CONNECT back before proceeding to
the next command.
Send <response> — Sends the <response> to the service.
For example, Send 1234567 would send the number 1234567 to the
service provider.
1. Press the function key under
2. Press the function key under .
3. Press the function key under
4. Press the function key under
5. Enter the dial-up script. See examples on the following page.
s
service
i
Q
.
.
.
23
Page 26

Setup
Default Dial-up Script:
The dial-up script is provided as the default with your Email phone:
dial
wait 20 CONNECT
send +
wait 20 ogin:
send $ISPUSER
wait 20 word:
send $ISPPASS
6. Press
7. To cancel, press the function key under
d
.
.
h
Entering Advanced Setup Information
(From the Home Screen, press the Function Keys under
service
then ,
Note: If you make any changes to this screen, the system will restart
automatically.
1. Press the function key under
2. Press the function key under .
3. Press the function key under
4. Press the function key under
5. If your service provider requires PAP or CHAP authentication,
use
;or:
i,A
to select the proper type.
.)
.
s
service
.
i
.
A
s
,
24
6. Enter your Authorized Server Username. For example, jsmith.
7. Enter your Authorized Server Password. For example, rserve.
8. Enter your Primary DNS Address. For example, 206.244.43.1.
9. Enter your Secondary DNS Address. For example, 206.244.43.21.
10.Enter your server’s domain name. For example, netcom.com.
11.Press
d
.
Page 27

Setup
More Setup Screens
Note: If you have Caller ID service from your local phone company, the time and
date will be set automatically when you receive your first call.
Setting Up Email phone Retrieval Times
Use this feature to set up the times you want your Email phone to automatically
dial the Internet and retrieve your Email phone.
Note: If your Email phone cannot connect to the Internet at the set time, it will
redial every 10 minutes until it connects, or the next polling time is reached.
1. Press the function key under
2. Press the function key under .
3. Press the function key under
4. Use
5. Use
6. Use
7. Press
8. Use
9. Press
;or:
—OR—
Type the number directly.
>
;or:
>
;or:
B
Repeat for all times (up to four).
Note: If you set any polling time to 00:00:00, there will be no polling for that slot.
to select the hour.
to move to minutes.
to select minutes.
to move to am or p.m.
to select am or p.m.
on the keyboard to move to Time 2.
s
service
P
.
.
10.Press the function key under
Press the function key under
This sets all times to 00:00:00.
11.To cancel, press the function key under
when finished.
d
w
to start over.
h
.
25
Page 28

Setup
Setting the Time
Note: If you have Caller ID service from your local phone company, the time and
date will be set automatically when you receive your first call.
1. Press the function key under
2. Press the function key under
3. Press the function key under
4. Use
5. Press
6. Use
7. Press
8. Use
;or:
— OR —
Type the hour in with the number keys on the keyboard.
>
;or:
— OR —
Type the hour in with the number keys on the keyboard.
>
;or:
— OR —
Type a for am, or p for p.m. on the keyboard.
to select the hour.
to move to minutes.
to select minute.
to move to am/p.m.
to select am or p.m.
s
O
M
.
.
.
9. Press
10.Use
11.Press
12.Use
13.Press
14.Use
15.Press
16.Use
phone to automatically sense the change to Daylight Savings Time.
17.Press the function key under
18.To cancel, press the function key under
on the keyboard to advance to the date.
>
;or:<or>
to move to the day.
>
;or:
>
;or:
>
;or:
to select the day.
to move to the year.
to select the year.
on the keyboard to advance to daylight saving.
to select daylight savings time. Selecting yes will enable your Email
to select the month.
.
d
h
.
26
Page 29

Setup
Updating the Software
Use this option to automatically update the software inside your phone.
Warning! The update process may change the way certain screens and
functions operate. Use this option only on the recommendation of a Uniden
certified Service Technician.
1. Press the function key under
2. Press the function key under
3. Press the function key under
.
s
.
T
and follow the on-screen instructions.
U
Restarting the System
You can restart the Email phone anytime by pressing SHIFT + TAB + DEL at the
same time.
27
Page 30

Home
Calendar
April7, 1997
Ù
Ù
Use<>and "select" a day for notes.
ÚUse<>and "select" a day for notes.
Ú
April 1997
smt wt fs
1
2
3
4
12
8
9
10
11
6
7
7
19
15
16
17
18
13
14
26
22
23
24
25
20
21
29
30
26
28
m
c
Dentist appointment
5
7:30 Dinner @ Grandma's
12:30 pick up Pete
a
Notes: April 7,1997
10:50pm
charging
s
The Home Screen
A typical Calendar/Notepad screen is displayed below.
3
10
17
24
April 7, 1997
4
12
11
19
18
26
25
Note: The LCD display could
look different depending on
the software version in your
Email phone.
Entering Notes
Calendar
Ù
Ù
<>
<>
Use
sm t wt f s
6
13
20
26
m
and "select" a day for notes.
ÚUse
and "select" a day for notes.
Ú
April 1997
1
2
8
7
7
14
21
28
9
15
16
22
23
29
30
c
Notes: April 7,1997
Dentist appointment
5
7:30 Dinner @ Grandma's
12:30 pick up Pete
a
10:50pm
charging
s
You can store up to eight lines of notes for each date on the calendar. Each line
contains 23 characters. The calendar changes each day and the notes for that
day are automatically displayed.
Setting up Temporary Notes
Note: Temporary notes are only active for 60 days after they are entered.
1. Press;,:,<,or>to move to the desired date on the calendar.
2. Press
3. Type in the note.
4. If you need to modify your note, press
and modify text.
5. Press
6. Press
7. Repeat for multiple notes.
8. Press the function key under
.
l
;,:,<
del
on the Base to backspace and erase text.
return
on the Base.
when finished.
d
,or>to move through your note
28
Page 31

Temporary Notes
1. Press;,:,<,or>to move to the desired date on the calendar.
Home
2. Press
3. Press
4. Press the
5. Press the
6. Repeat for multiple notes
7. Press the function key under
.
l
;,:,<
del
key to backspace and erase text.
return
,or>to move through your note and modify text.
key.
Setting Up Permanent Notes
1. Press the function key under
2. Press the function key under
3. Use
4. Press
5. Enter the note.
;or:<or>
on the base.
l
to select the date.
when finished.
d
.
s
.
o
6. Press the function key under
Permanent notes will be highlighted on the calendar.
d
.
Clearing Permanent Notes
Note: This clears all permanent notes on the day selected.
1. Press the function key under
2. Press the function key under
3. Use
4. Press the function key under
5. Repeat for other dates.
6. Press the function key under
;or:<or>
to select the date.
s
o
w
d
.
.
.
.
29
Page 32

Home
Viewing notes
1. Press:to highlight the month.
2. Press
desired month.
3. Press
<
;,:,<
or
to move back and forth one month at a time and highlight the
>
,or>to move to the desired date on the calendar.
30
Page 33

Email phone
Email phone Screen
To enter this screen, press the function key under
If you have unread Email phone, the
A typical Email phone screen is displayed below.
Note: The LCD display could
look different depending on
the software in your phone.
m
E-Mail
Ù
Use and "select" an e-mail to read
N otk< otk@unidenTest 4/7/97 11: 31 pm
N otk< otk@ unidenRe: mail 4/7/97 11:31 pm
new
icon will flash.
Ú
delete
m
fetch
.
11:00pmApril7, 1997
Reading Messages
Note: The Email phone does not accept attachments to files. Only plain text will
be retrieved and displayed.
1. Press;or:to highlight a message to read.
2. Press the function key under
3. Press
;or:
to scroll through the message.
l
.
31
Page 34

Email phone
Receiving Messages
You can configure your phone to automatically receive messages at certain
times during the day. See Setting Up Email Phone Retrieval Times on page 25
for details.
To manually receive your Email phone messages:
1. Press the function key under
2. Press the function key under
E
f
.
.
Sending Messages
1. Press the function key under
2. Press the function key under
3. Enter the Email phone Address.
— OR —
Press the function key under
Note: If the recipient’s alias and Email phone address is longer than 51
characters, the address will not be imported into the field.
Press
The recipients will remain highlighted once you have selected them.
Repeat until all recipients have been chosen.
l
.
.
E
.
N
. Use;or:to select recipient.
a
32
Press the function key under
4. Press
5. Enter the Subject.
6. Press
7. Enter your message.
You can use the
before sending it.
8. Press the function key under
Note: Do not touch the keyboard until the Email phone is finished sending the
message. Wait until the screen displays “Messages Sent” before continuing
with operations.
— OR —
Press the function key under
The message will be deleted and no message will be sent.
on the keyboard.
B
on the keyboard.
B
<,>,:
, and;keys to move the cursor and edit your message
d
S
x
.
.
to exit.
Page 35

Delete Messages
Email phone
1. Press the function key under
2. Use
3. Press the function key under
4. Press the function key under
;or:
Repeat for all messages you want to delete.
Note: The messages will be deleted the next time your Email phone dials your
Email phone server.
to highlight the message you want to delete.
E
D
h
.
.
when finished.
Reply to Messages
1. Press the function key under
2. Use
3. Press the function key under
;or:
to highlight the message you want to reply to.
E
l
.
.
To exit Reply Mode, press the function key under
Email phone screen.
4. Press the function key under
5. Press
6. Type in the subject.
7. Press
8. Type in your reply.
9. Press the function key under
— OR —
Press the function key under
The message will be deleted and no message will be sent.
on the keyboard.
B
on the keyboard.
B
.
R
to send reply.
S
to quit without sending.
x
to return to the
b
33
Page 36

Email phone
Forwarding Messages
1. Press the function key under
2. Use
3. Press the function key under
4. Press the function key under forward. You will see a message on the status line
5. Enter the Email phone Address.
;or:
To exit, press the function key under
telling you to wait while the original message is loaded into memory.
Note: Do not attempt to forward extremely long Email phone messages. Long
messages can fill up the Email phone’s memory and cause improper operation.
— OR —
Press the function key under
Use
;or:
Press
The recipients will remain highlighted once you have selected them.
Repeat until all recipients have been chosen.
l
to highlight the message you want to reply to.
to select recipient.
.
E
l
a
.
.
to return to the Email phone screen.
b
.
Press the function key under
6. Press
subject line.
7. Type in your message.
8. Press the function key under
— OR —
Press the function key under
The message will be deleted and no message will be sent.
on the keyboard until you reach the message field right under the
B
.
d
to send reply.
S
to quit without sending.
x
34
Page 37

Address Book
Address Book Screen
To enter the Address Book, press the function key under
You can enter a maximum of 150 addresses in the Address Book. Any
addresses you try to save above that number will be lost.
A typical Address Book screen is displayed below.
Note: The LCD display could
look different depending on
the software version in your
Email phone.
AddressBook
Use
address:
h e-mail:
W e-mail:
∧
<>
∨
or letter to choose or "select" to dial
John Smith
name:
4700 Amon Carter Blvd.
Fort Worth, TX 76155
Johns321@abccompany.com
JSmith@uniden.com
delete
.
a
W phone:
H phone:
phone:
fax:
erasenew
817-555-3261
817-555-3462
817-555-3221
11:05pmApril7, 1997
Entering New Addresses
1. Press the function key under
2. Press the function key under
3. Press
to modify.
4. Type in the changes.
Press
5. Press the function key under
6. Press the function key under
on the keyboard or use<and>to move to the field you want
B
del
on the keyboard to backspace over a mistake.
.
a
.
N
when finished.
d
h
to exit.
35
Page 38

Address Book
Viewing Addresses
1. Press the function key under
Note: The address book will display the message “Please wait while loading
address book” while the information is loaded in memory.
2. Press;or:to highlight the desired name.
— OR —
Enter the first letter of the Name.
3. Press
4. Press the function key under
<,>
,or
to move to the next field.
B
.
a
h
when done.
Modifying Addresses
1. Press the function key under
2. Press
— OR —
Enter the first letter of the Name.
3. Press the function key under
;or:
to highlight the desired call.
a
e
.
.
4. Press
you want to modify.
Note: The field in front of the phone number can be used as a reminder of what
location the number belongs to. For example, you could use H for (H)ome or W
for (W)ork. You can use any letter in this field.
5. Type in the changes.
Press
6. Press the function key under
7. Press
— OR —
Press the function key under
on the keyboard, or use<and>to move to the field
B
del
on the keyboard to backspace over a mistake.
when finished.
d
;or:
to select another address.
h
to exit.
36
Page 39

Deleting Addresses
Address Book
1. Press the function key under
2. Press
— OR —
Enter the first letter of the Name.
3. Press the function key under
4. Press
— OR —
Press the function key under
;or:
;or:
to highlight the desired call.
to select another address.
.
a
r
h
.
to exit.
Speed Dialing From the Address Book
1. Press the function key under
2. Press
3. Press
4. Pick up handset and press the
— OR —
;or:
>
to highlight the desired entry.
to highlight the phone number.
a
talk
.
key.
Press
5. Press
6. The selected number is dialed.
k
l
on the base.
on the base.
37
Page 40

Caller ID
April7, 1997
Call I.D.
Ù
Ù
Use and "select" to return call
ÚUse and "select" to return call
Ú
UNIDEN CORP 8175556162 4/7/97 11:31 pm 1
JONES MARY 2145556321 4/7/97 11:31 pm 1
BROWN TIM 7135552331 4/7/97 11:31 pm 1
avD hp
11:10pm
Caller ID Screen
The Caller ID icon will blink when you have new calls.
Note: You must subscribe to Caller ID service from your local phone company to
use this feature.
A typical Caller ID screen is displayed below.
Note: The LCD display could look different depending on the software version in
your Email phone.
CallI.D.
Ù
Ù
Use and "select" to return call
ÚUse and "select" to return call
Ú
UNIDEN CORP 8175556162 4/7/97 11:31 pm 1
JONES MARY 2145556321 4/7/97 11:31 pm 1
BROWN TIM 7135552331 4/7/97 11:31 pm 1
April 7, 1997
11:10pm
38
avD hp
12345
1. Caller’s Name.
2. Caller’s Number.
3. Date of last call.
4. Time of last call.
5. Number of times called.
Page 41

Viewing Caller Information
Caller ID
1. Press the function key under
2. Press
3. Press the function key under
;or:
to highlight the desired call.
.
c
h
to exit.
Deleting Caller Information
1. Press the function key under
2. Press
3. Press the function key under
Repeat for all calls you want to delete
4. Press the function key under
;or:
to highlight the desired call.
.
c
D
h
.
.
to exit.
Adding Caller ID Information to the Address Book
1. Press the function key under
2. Press
;or:
to highlight the desired call.
c
.
3. Press the function key under
4. Press the function key under
Repeat for all calls you want to add to the Address Book.
5. Press the function key under
v
d
h
.
.
when done.
Dialing From the Caller ID Menu
Note: If the area code is the same as yours, the phone will not dial the area code,
only the last seven digits.
1. Press the function key under
2. Press
3. Pick up handset and press the
— OR —
Press
4. Press the function key under
5. The selected number is dialed.
;or:
k
to highlight the desired call.
on the base.
c
talk
l
.
key.
.
39
Page 42

Using Your Phone
Receiving Calls
1. After the second ring Caller ID information is displayed.
To remove the window immediately, press the
The window closes automatically after two minutes.
2. Pick up the Handset.
— OR —
return
key on the keyboard.
Press
Note: All screen functions are still available during your conversation. For
example, you can type a note while talking on the phone.
3. To hang up, return the Handset to the Base or press
k
.
.
k
Making Calls
1. Pick up the Handset.
2. Press the
— OR —
Press the speaker key on the base unit.
Note: If your Email phone was in the process of sending or receiving Email
phone, you may not get a dial tone for approximately five seconds while the line
is cleared. Any Email phone send or receive in progress will be continued after
you finish your conversation, either at the next scheduled polling time or manually
by using the fetch function.
3. Dial the Number.
talk
key.
40
Page 43

Using Your Phone
Storing Memory Numbers
Up to 10 numbers can be stored in the Handset for speed dialing when you are
away from the base.
Note: These numbers will not be stored in the Address Book automatically. You
need to enter Address Book numbers separately.
Numbers cannot be stored in the Base unit.
1. Pick up the Handset and press
LED flashes.
2. Enter the number you want to store on the Handset keypad.
Note: You may enter a delay between numbers (for accessing a switchboard, or
long distance service) by pressing the
point in the number sequence you wish to pause. The
as one digit. Pressing
pause between numbers.
3. Press
4. Enter a number (
Note: After pressing
number you wish to store. Otherwise, an error tone will sound and the unit returns
to Standby.
mem
. You will hear another confirmation beep.
redial/pause
0-9
) from the Handset keypad for the memory location.
mem
mem
. You will hear a beep and the
redial/pause
more than once will increase the length of the
the second time, you have 20 seconds to enter the
button on the Handset at the
redial/pause
talk/batt low
button counts
Erasing a Stored Number
1. On the Handset, press
2. Enter the memory location number (0-9) you want to clear. You will hear a long
beep confirming the number is erased.
mem
twice.
Dialing Memory Numbers
1. Press the
2. Press the
3. Enter the Memory Location Number (0-9).
talk
key on the Handset.
mem
key on the Handset.
Chain Dialing
1. Press the
2. Press the
3. Enter the Memory Location Number (0-9)
4. While on call, enter the number from the Handset
— OR —
Enter the memory location number where the second number is stored.
talk
key on the Handset.
mem
key on the Handset.
41
Page 44

Using Your Phone
Redialing the last Number Called
1. Press the
2. The last number you called is dialed.
redial/pause
key on the Handset.
Using Your Phone With Call Waiting
Note: You must subscribe to call waiting service from your local phone company
to use this feature.
1. While talking, you hear the call waiting signal.
2. Press
3. To switch back to your original call, press
flash
on the Handset to switch to that call.
flash
on the Handset again.
Paging the Handset
1. Press the function key under
2. Press the function key under
s
H
.
.
3. Press the function key under
g
.
Changing Channels
Note: If you have more than one cordless phone in your house, they must be set
to different channels. This function works only when the phone is in use.
The
channel
channels. During the course of a conversation if you hear static or noise causing
difficulty in hearing the other party, change channels by:
1. Pressing the
2. The talk/batt low LED on the Handset will flash, indicating the Email phone is
finding the best channel available.
key on the Handset allows you to choose among 40 factory set
channel
key on the Handset.
42
Page 45

Using Your Phone
Changing the Handset Ring Type and Ring Volume
There are two ring types and two ring volumes that can be selected while your
Email phone is in the Standby mode. Be sure the talk/batt low LED is not lit on
your phone Handset.
1. Press the
rings and volumes.
volume/ringer
key on the Handset to change between the two different
Changing the Handset Earpiece Volume
1. While on a phone call, press the
2. You will hear a tone indicating a decrease in the earpiece volume.
3. Press the
higher level.
volume/ringer
key again to increase the earpiece volume to the
volume/ringer
key on the Handset.
43
Page 46

Specifications
General
LCD Display: VGA-compatible with contrast adjustment.
Keyboard: Full QWERTY keyboard.
Operating Temperature: 10° to 40° C
Storage Temperature: -40° to 100° C
Humidity: Up to 90% relative, without condensation
Power Requirements
Voltage: 90-130 volts AC, 55-65 Hz
Cordless Telephone Specifications
General
Frequency Control Phase Locked Loop
Modulation FM
Operating Temperature -10° - 50° C
44
Base Unit
Transmit Frequency: 926.000 ~ 927.950 MHZ (40 Channels)
Power Requirements: 13VDC 900mA (from AC Adapter)
Handset
Transmit Frequency: 902.050 ~ 904.000 MHZ (40 Channels)
Battery
Capacity: 600 mAH 3.6VDC
Talk Mode: 5 hours
Standby Mode: 14 days
Specifications shown are typical and subject to change without notice.
Page 47

One-Year Limited Warranty
Important: Evidence of original purchase is required for warranty service.
WARRANTOR: UNIDEN AMERICA CORPORATION (“Uniden”)
ELEMENTS OF WARRANTY: Uniden warrants, for one year, to the original retail owner, this Uniden Product to be free
from defects in materials and craftsmanship with only the limitations or exclusions set out below.
WARRANTY DURATION: This warranty to the original user shall terminate and be of no further effect 12 months after the
date of original retail sale. The warranty is invalid if the Product is (A) damaged or not maintained as reasonable or
necessary, (B) modified, altered, or used as part of any conversion kits, subassemblies, or any configurations not sold by
Uniden, (C) improperly installed, (D) serviced or repaired by someone other than an authorized Uniden service center for
a defect or malfunction covered by this warranty, (E) used in any conjunction with equipment or parts or as part of any
system not manufactured by Uniden, or (F) installed or programmed by anyone other than as detailed by the owner’s
manual for this product.
STATEMENT OF REMEDY: In the event that the product does not conform to this warranty at any time while this
warranty is in effect, warrantor will either, at its option, repair or replace the defective unit and return it to you without
charge for parts, service, or any other cost (except shipping and handling) incurred by warrantor or its representatives in
connection with the performance of this warranty. Warrantor, at its option, may replace the unit with a new or refurbished
unit. THE LIMITED WARRANTY SET FORTH ABOVE IS THE SOLE AND ENTIRE WARRANTY PERTAINING TO THE
PRODUCT AND IS IN LIEU OF AND EXCLUDES ALL OTHER WARRANTIES OF ANY NATURE WHATSOEVER,
WHETHER EXPRESS, IMPLIED OR ARISING BY OPERATION OF LAW, INCLUDING, BUT NOT LIMITED TO ANY
IMPLIED WARRANTIES OF MERCHANTABILITY OR FITNESS FOR A PARTICULAR PURPOSE. THIS WARRANTY
DOES NOT COVER OR PROVIDE FOR THE REIMBURSEMENT OR PAYMENT OF INCIDENTAL OR
CONSEQUENTIAL DAMAGES. Some states do not allow this exclusion or limitation of incidental or consequential
damages so the above limitation or exclusion may not apply to you.
LEGAL REMEDIES: This warranty gives you specific legal rights, and you may also have other rights which vary from
state to state. This warranty is void outside the United States of America.
PROCEDURE FOR OBTAINING PERFORMANCE OF WARRANTY: If, after following the instructions in the owner’s
manual you are certain that the Product is defective, pack the Product carefully (preferably in its original packaging). The
Product should include all parts and accessories originally packaged with the Product. Include evidence of original
purchase and a note describing the defect that has caused you to return it. The Product should be shipped freight
prepaid, by traceable means, or delivered, to warrantor at:
Uniden America Corporation
4700 Amon Carter Blvd
Fort Worth, TX 76155
Uniden offers 30 days of toll free support and you can call (800)297-1023, 8 a.m. to 5 p.m. Central, Monday through
Friday. Beyond that period, you can obtain assistance by calling (900)224-4UAC.
Page 48

Covered under one or more of the following U.S. patents:
4,511,761 4,523,058 4,595,795 4,597,916 4,803,491
5,157,686 5,253,268 5,381,460 5,434,905
©1998 Uniden America Corporation
All Rights Reserved
Printed in the USA
®
Page 49

Controls and Indicators
11
16
17
12
talk
batt
talk
abc
3
2
ghi
6
jkl
5
pqrs
9
tuv
8
tone
oper
0
mem flash volume
redial/pause
chan
def
mno
wxyz
#
ringer
1
1
2
4
7
3
4
5
6
7
8
9
10
13
14
18
19
20
15
21
1. Talk Key
talk
2. Numeric Keypad
3. Tone/*
4. Memory Key
5. Flash Key
mem
flash
6. Talk/Battery Low LED
7. Channel Key
chan
8. Pound Key
9. Volume/Ringer Control
10.Redial/Pause Key
redial/pause
11.LCD Screen
volume/ringer
12.Function Keys
13.Numeric Keypad
14.QWERTY Keyboard
15.Charging Cradle
16.LCD Contrast
17.Speaker Button
18.Speaker Volume Control
19.Control Keys
20.Speaker
21.Microphone
 Loading...