

Page 1
ELITE 8805
ELITE SERIES
EXPANSION HANDSET
OWNER'S
MANUAL
OWNER'S MANUAL
Page 2

Welcome
Congratulations on your purchase of the Uniden ELITE8805 Series optional
handset and charger. This expansion handset is compatible with models
in the following series: ELITE8815/ELITE8815+1 and
ELITE8855/ELITE8855+1 (Model numbers may vary).
Each model within this series will support up to ten handsets. You can
place a fully featured cordless handset anywhere in your home as long as
AC power is available to connect to the handset's charging cradle.
IMPORTANT
The ELITE8805 Series expansion handset will not operate unless it has
been registered to your main base. Refer to the owner's manual supplied
with your main base model for detailed instructions on operating your
new expansion handset.
Backward /Forward Compatibility
Your phone is compatible with other Uniden 5.8GHz Digital Expandable
Systems. Models include the ELITE series (ELITE8815, ELITE8815+1,
ELITE8855 and ELITE8855+1) and the DSS7800 series (DSS7815,
DSS7815+1, DSS7855 and DSS7855+1).
Your new handset has many advanced features that may NOT be
supported by main base models such as the DSS7800 Series. Please visit
our website at www.uniden.com.au or www.uniden.co.nz for feature
comparisons.
Checking the Package Contents
Make sure you have received the following items in the package.
If any of these items are missing or damaged, contact your retailer.
• Cordless Handset
• Charging Cradle
• AC Adapter (AAD-600S)
(INPUT:240V AC 50Hz)
(OUTPUT:9V DC 210 mA)
• Audio Recording Cable
• Battery Pack (BT-0003)
• Belt Clip
• This Owner’s Manual
• Other Printed Material
(1)
Page 3
Installing Your Expansion Handset
Follow these three easy steps to get your new handset ready to use:
Install the battery pack.
1
2
Connect the charger and charge your new handset for 15 - 20 hours.
3
Register your new handset to the main base.
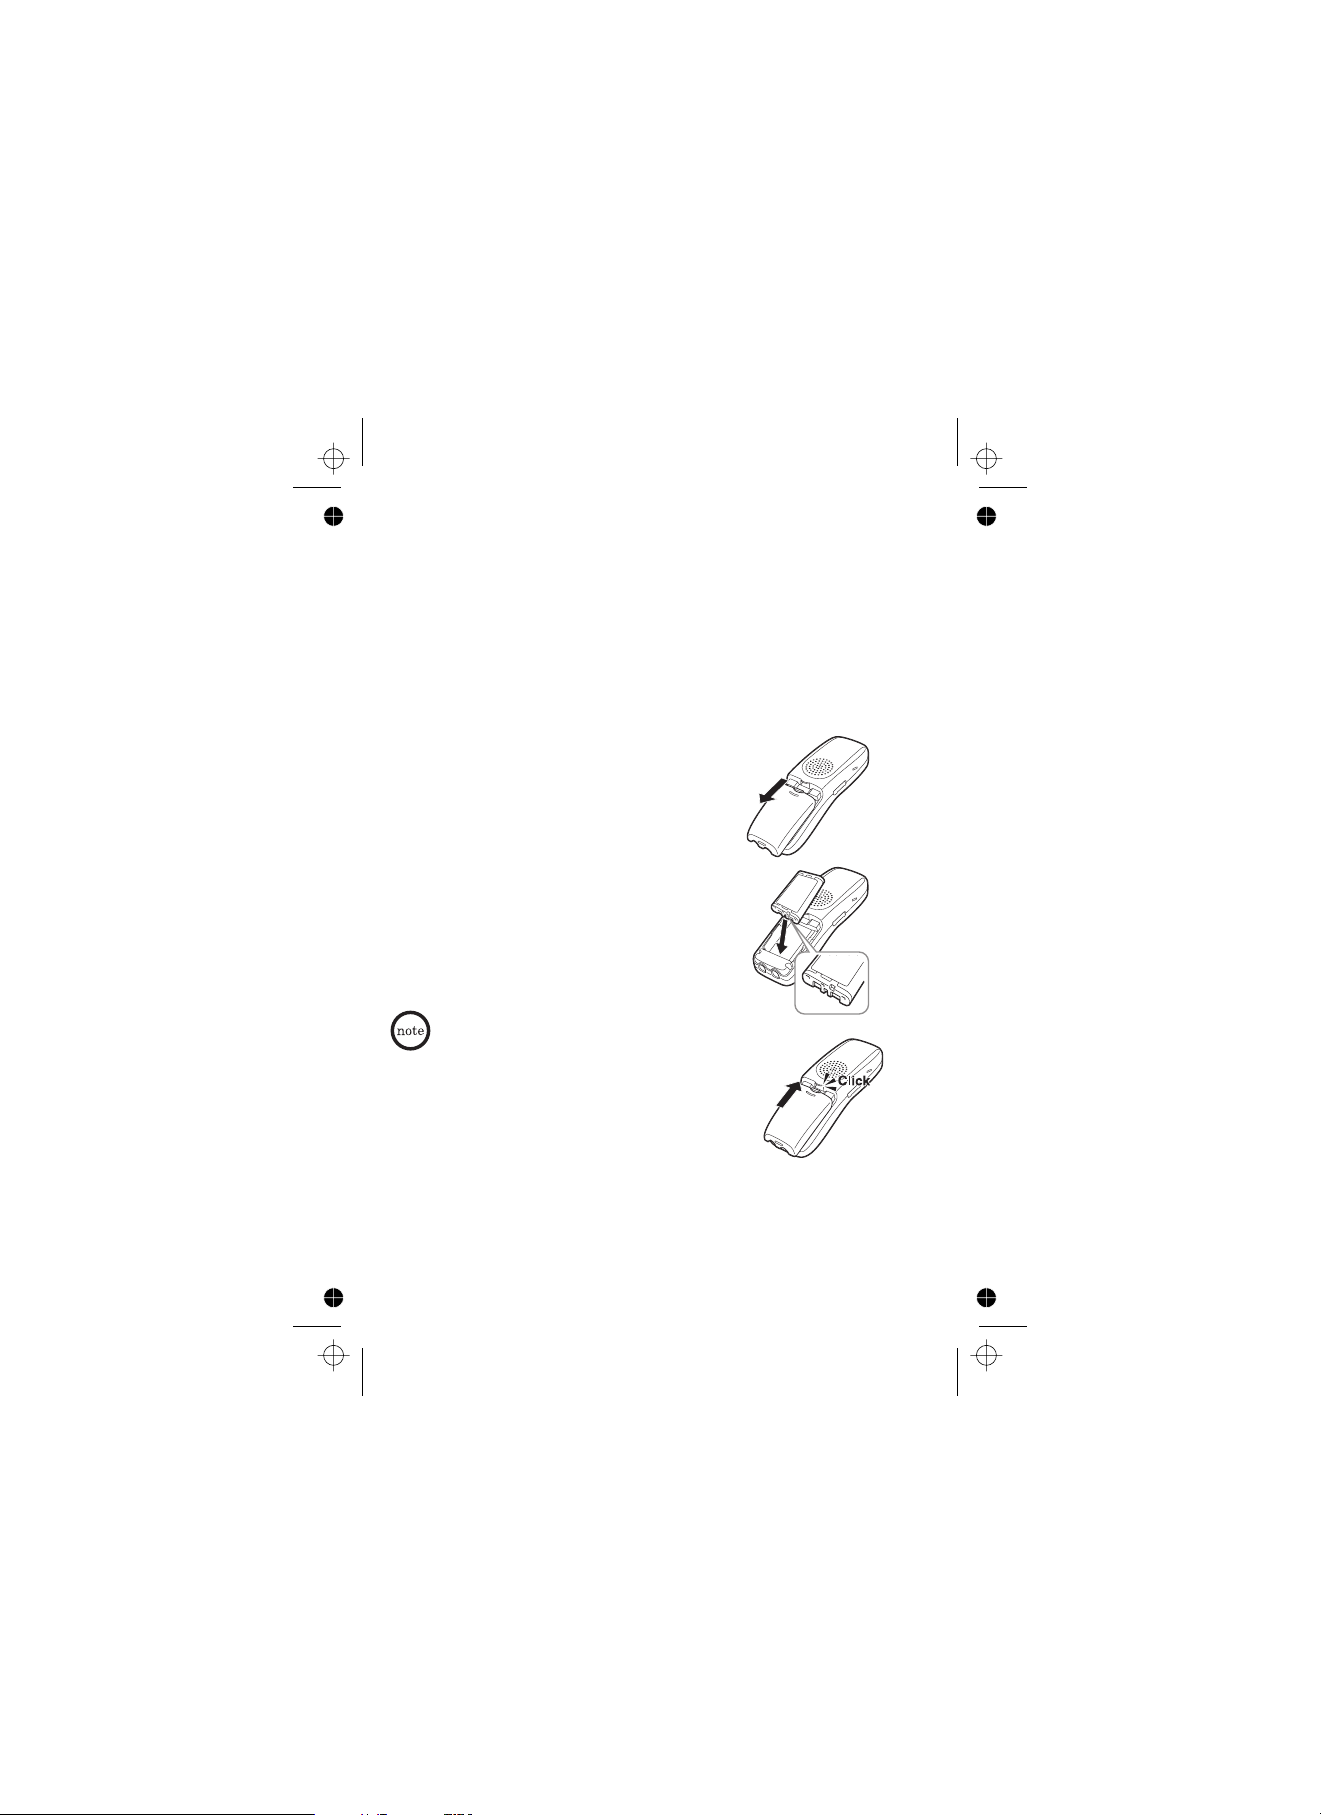
Step 1: Install the Battery Pack
1
Press down on the handset battery case
cover (use the finger indention for a better
grip) and slide the cover downward to
remove.
Place the battery pack in the battery
2
compartment with the connectors on the
battery and on the compartment aligned.
Place the battery case cover back on the
3
handset and slide it upwards until it clicks
into place.
•
Use only the Uniden battery (BT-
0003) supplied with your phone.
Replacement batteries are available.
Please see our website at
www.uniden.com.au or www.uniden.co.nz
• Recharge your handset on a regular
basis by returning the handset to
the charger after each phone call.
Rechargeable Ni-MH Batteries
Must Be Recycled or Disposed of Properly
(2)
Page 4
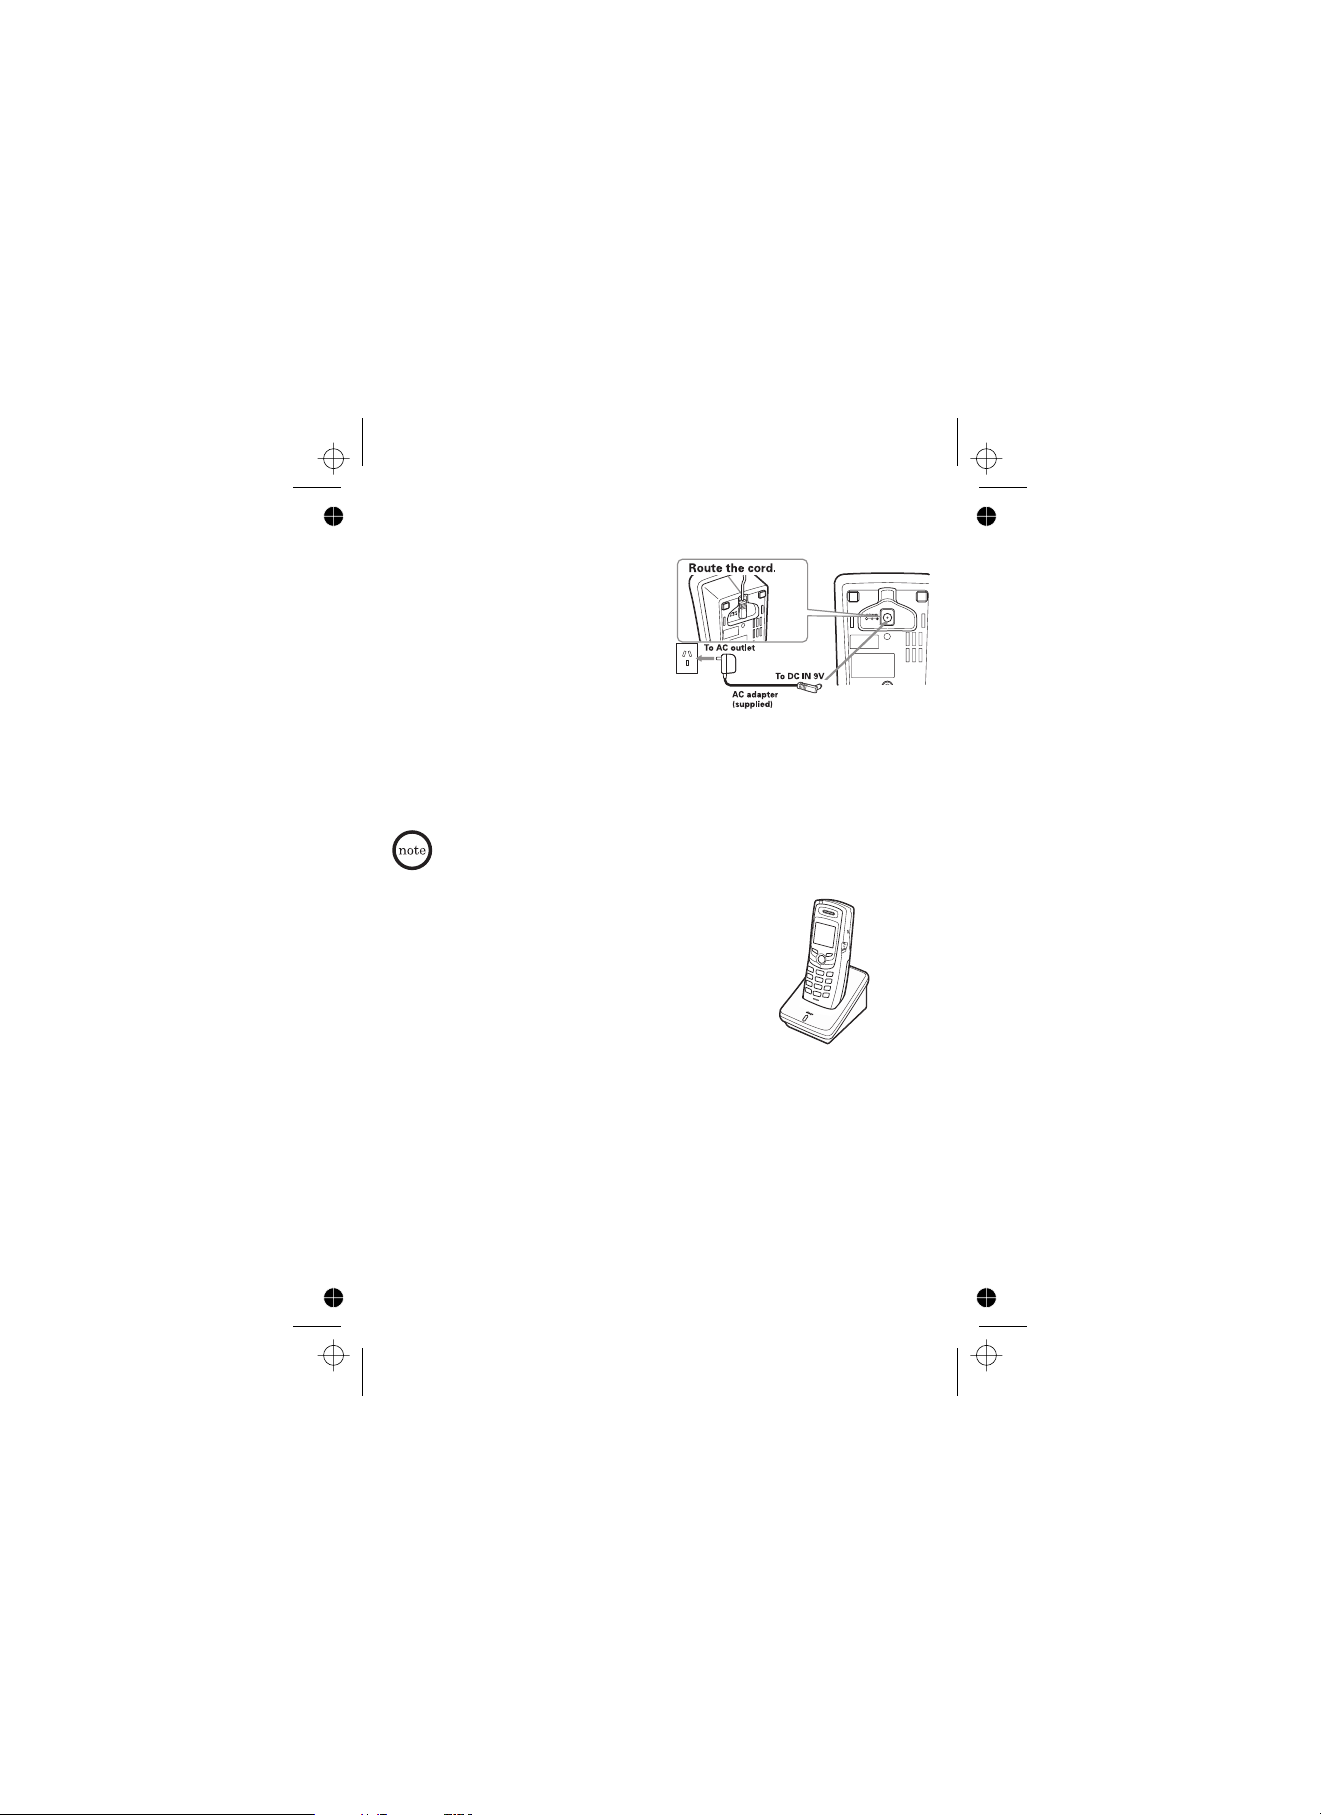
Step 2: Connect the Charger
1
Connect the AC adapter to
DC IN 9V
the jack and to a
standard 240V AC wall outlet.
Set the charger on a desk or
2
tabletop, and place the
handset in the charger with
the LCD screen facing
forward.
Make sure the LED
3
illuminates. If the LED does not
illuminate, check to see that the AC adapter is plugged in and that
the handset makes good contact with the charger charging contacts.
•
• Place the charger close to the AC outlet so that you can
Charge the handset for 15 - 20 hours before using.
4
charge
Use only the supplied AAD-600S AC adapter. Do not use
any other AC adapter.
unplug the AC adapter easily.
Step 3: Register the Handset
YOU NEED TO REGISTER THE ELITE8805 SERIES TO THE MAIN BASE
BEFORE USE!
For Backward Compatible Base Models - DSS7800 series [DSS7815,
DSS7815+1, DSS7855 and DSS7855+1]
1
Disconnect the AC adapter from the main base.
2
While pressing down on the following key, reconnect the AC adaptor.
DSS7815/DSS7815+1 models - key
DSS7855/DSS7855+1 models - key
Keep pressing the key until the CHARGE LED starts to blink.
On the handset, press and hold the key until you hear a beep.
3
find handset
flash/find hs
#
(3)
Page 5

For ELITE8815/ELITE8815+1
1
Press and hold the Registration
button at the underside of the base.
Keep pressing the Registration
2
button until the handset charge
LED on main base starts to blink.
On the handset, press and hold the
3
key until you hear a beep.
#
Registration button
For Main Base Models ELITE8855/ELITE8855+1
With the main base in standby mode (i.e. not being used), press
1
menu/select
on the base.
Use the up/down key to select .
2
Use the up/down key to select .
3
The base LCD screen will display the following prompt:
4
On handset, press and hold "#" key for 2 sec
On the handset, press and hold the key until you hear a beep.
5
System Setup
Register Handset
#
De-register the handset
1
Press and hold and for more than 5 seconds. Select
Deregister Hs
The phone will ask you to confirm the deregistration. Select .
2
Select at instruction 1 if handset has previously
been registered to another base and you want to register to a new
base.
end #
.
Replacing Base
(4)
Yes
Page 6

Using Your Expansion Handset
Now that your new handset is registered, it can perform all the same
functions as the handsets originally included with your phone. With
your new handset, you can;
• Transfer calls between handsets
• Use two handsets as 2-way radios in DirectLink mode
• Use two handsets or a handset and the base as a baby/room
monitor
• Hold 3 to 4 way conference calls (depends on the model)
• Access the integrated answering device or voice mail using the
handset
• Record Distinctive Ringer Tones
See the owner's manual that came with your main base for complete
instructions on operating your new expanded digital phone. You can
also download owner's manuals from our website at www.uniden.com.au or
www.uniden.co.nz.
(5)
Page 7

Using the joystick
The joystick makes it easy
to use your phone. The
four most commonly used
functions are accessible
just by moving the
joystick:
To enter the menu, press the centre of
the joystick inwards.
Highlight the option you want by moving the
joystick up, down, right, or left on the
handset. This will move the cursor; the
option currently highlighted appears in
reversed out text.
Select the highlighted option by pressing in
on the center of the joystick.
To exit the MENU and return to standby, press the key on the
handset.
To go back a level in the menu, press the
back/hold/int'com
.
end
(6)
Page 8

Setting Advanced Features
• When using your handset with the backward-compatible
DSS7800 Series (DSS7815, DSS7815+1, DSS7855 and
DSS7855+1), some advanced features (such as
Reminders) may not be compatible.
• Please refer to your respective (DSS7815, DSS7815+1,
DSS7855 and DSS7855+1) Owner's Manual.
Record Ringer Tones
1) Connect the audio recording cable to the handset and sound source
(e.g. stereo or CD player). Insert one end of the audio recording
cable into the handset's headset jack and the other end into the
sound source. You can also simply use the handset's microphone by
holding the handset close to the sound source.
2) Select menu option .
3) Go to .
4) Select a location from 1-5, and press the soft key.
5) Select . To start recording, press the soft key. The
6) When you are finished recording, press the soft key. The
7) Enter the title of this ringer (up to 12 Characters) using the number
8) Press the center of the joystick, you will hear a confirmation tone,
Set Animation Type
1) Select menu option .
2) Go to and highlight the animation you want.
3) Press the soft key to activate it.
Set Themes (wallpaper)
1) Select menu option .
2) Go to and highlight the wallpaper you want. Press the
Rec/Edit Rings
Record
message counter displays 20 and then begins to count down.
phone will play the recorded ringer. To re-record the ringer, press
ReRec
the soft key.
keypad, the soft key, right, or left key.
and appears.
VIEW
activate it.
DELETE
Done!
Animation Type
SELECT
Wall Paper
soft key to see the wallpaper or the center of the joystick to
OPTIONS
RECORD
STOP
(7)
Page 9

Set Color Scheme (Color handsets Only)
1) Select menu option .
2) Go to and select the color you want. As you scroll
Creating and Editing Phonebook Entries
Press the joystick to the left, and then press the soft key for the
1st entry. From the 2nd entry, press the soft key. Select
Entry Edit Selection
much information as you want. Press the center of the joystick to enter
each entry and confirm the selection. When you finish, press the
soft key to save this phonebook entry.
Operational Restrictions
Several of your handset's advanced settings such as Room Monitor,
Unique ID and Call Privacy, will operate differently with the DSS7800
Series Phones.
Setting Privacy Mode
Privacy mode prevents interruption from other registered handsets or
the base. This works only when the phone is in use:
While on a call, press the soft key. Use the joystick to select
Privacy, Privacy Mode On
Privacy Mode, use the same procedure.
OR
1) Select menu option .
2) Go to
3) Select .
4) Use the joystick to select .
Color Scheme
through the options, the phone displays the highlighted color for you.
STORE
OPTIONS
to store, or to edit the location. Enter as
OPTIONS
appears in the display. To exit
Handset.
Call Privacy
On
You will hear a confirmation tone.
New
DONE
Call
(8)
Page 10

Setting Unique ID
You can assign special ringer tones to anyone in your phonebook. When
your phone gets a call, it looks up the Caller ID information in your
phonebook; if you have assigned a distinctive ringer and pictures to
that number, the phone uses them to tell you who's calling.
1) Select .
2) Go to
3) Select .
4) Use the joystick to select .
Setting Room Monitor On/Off
To prevent the monitoring of a particular handset or the base, simply
turn off the Room Monitor Feature.
To turn off the Room Monitor:
1) Select .
2) Go to .
3) Select .
4) Use the joystick to select .
Handset.
Unique ID
On
A confirmation tone tells you that distinctive ringing is active.
When viewing a Caller ID entry, the picture that
corresponds to the Phonebook Unique ID setting appears.
If the Unique ID is set to Off, the phone uses the default
picture for viewing Caller ID entries.
Handset
Room Monitor
Off
You will hear a confirmation tone.
(9)
Page 11

Battery Information
Low battery alert
When the battery pack is very low, the phone is programmed to
eliminate functions in order to save power.
The battery pack needs to be charged when:
- The empty battery icon appears.
Low Battery
- appears in the display.
If the phone is in standby mode, none of the
keys will operate. If you are on a call,
complete your conversation as quickly as
possible, and return the handset to the
cradle.
30/05 SUN 10:10A
Low Battery
New CID: 10
Cleaning the battery charging contacts
To maintain a good charge, clean the charging contacts on the
handset once a month. Dampen a cloth with plain water. Gently rub
the damp cloth over the charging contacts until all visible dirt is
removed. Dry the contacts thoroughly before returning the handset
to the cradle.
Caution:
thinner, benzene, alcohol, or
other chemical products. Doing
so may discolor the surface of
the telephone and damage the
finish.
Do not use paint
(10)
Page 12

Warranty
UNIDEN ELITE 8805 Handset
Limited One Year Warranty
Note:
Please keep your sales docket as it provides evidence of warranty.
Warrantor:
Elements of Warranty:
this warranty, its ELITE (hereinafter referred to as the Product) to be free
from defects in materials and craftsmanship with only the limitations or exclusions set
out below.
Warranty Duration:
be of no further effect ONE (1) Year after the date of original retail sale. This warranty
will be deemed invalid if the product is; (A) Damaged or not maintained as reasonable
and necessary, (B) Modified, altered or used as part of any conversion kits,
subassemblies, or any configurations not sold by Uniden, (C) Improperly installed, (D)
Repaired by someone other than an authorized Uniden Repair Agent for a defect or
malfunction covered by this warranty, (E) Used in conjunction with any equipment or
parts or as part of a system not manufactured by Uniden, (F) Installed, programmed or
serviced by anyone other than an authorized Uniden Repair Agent, or (G) Where the
Serial Number label of the product has been removed or damaged beyond recognition.
Parts Covered:
Accessories:
Statement of Remedy:
at any time while this warranty is in effect, the warrantor at its discretion, will repair the
defect or replace the product and return it to you without charge for parts and service.
THIS WARRANTY DOES NOT COVER OR PROVIDE FOR THE REIMBURSEMENT
OR PAYMENT OF INCIDENTAL OR CONSEQUENTIAL DAMAGES. THIS
GUARANTEE IS IN ADDITION TO AND DOES NOT AFFECT YOUR RIGHTS UNDER
THE CONSUMER GUARANTEES ACT.
Procedure for obtaining performance or warranty:
does not conform to this warranty, the Product should be shipped or delivered, freight
prepaid, with evidence of original purchase, (e.g. a copy of the sales docket), to the
warrantor at:
Uniden Australia Pty Limited ABN 58 001 865 498
Uniden New Zealand Limited
Warranty only available in original country of purchase
Uniden warrants to the original retail owner for the duration of
8805 Handset
This warranty to the original retail owner only, shall terminate and
This warranty covers for 1 year, the Handset and Charge Unit only.
Batteries, AC adaptor etc are covered for 90 days.
In the event that the product does not conform to this warranty
In the event that the Product
UNIDEN AUSTRALIA PTY LTD
Service Division
345 Princes Highway,
Rockdale, NSW 2216 Auckland
Fax (02) 9599 3278
www.uniden.com.au www.uniden.co.nz
UNIDEN NEW ZEALAND LTD
Service Division
150 Harris Road, East Tamaki,
Fax (09) 274 4253
© 2005 Uniden Australia Pty Limited/Uniden New Zealand Limited
Printed in China UUZZ01435BZ(0)
 Loading...