

Page 1
Operating Guide
for Australia and New Zealand
7500AI
Digital Telephone Answering Machine
with Caller ID
Page 2

i
CONTENTS
CONTENTS
Safety Information . . . . . . . . . . . . . . . . . . . . . . . . . . . 1
Introduction . . . . . . . . . . . . . . . . . . . . . . . . . . . . . . . . 3
Parts Checklist . . . . . . . . . . . . . . . . . . . . . . . . . . . . . . 4
Features . . . . . . . . . . . . . . . . . . . . . . . . . . . . . . . . . . . 5
Installation
Selecting a Location . . . . . . . . . . . . . . . . . . . . . . . . . 6
Connecting the 7500AI to the Telephone Line . . . . . . . 6
Connecting Power . . . . . . . . . . . . . . . . . . . . . . . . . . . 7
Backup Battery . . . . . . . . . . . . . . . . . . . . . . . . . . . . . 8
Controls and Functions . . . . . . . . . . . . . . . . . . . . . . . 9
Setting up
LCD Contrast . . . . . . . . . . . . . . . . . . . . . . . . . . . . . . 11
Security Code . . . . . . . . . . . . . . . . . . . . . . . . . . . . . 11
Call Breakthrough Code . . . . . . . . . . . . . . . . . . . . . 11
Time and Date . . . . . . . . . . . . . . . . . . . . . . . . . . . . 12
VIP Alert . . . . . . . . . . . . . . . . . . . . . . . . . . . . . . . . . 12
Number of Rings . . . . . . . . . . . . . . . . . . . . . . . . . . . 13
Toll Saver . . . . . . . . . . . . . . . . . . . . . . . . . . . . . . . . 13
Outgoing Messages (OGM) . . . . . . . . . . . . . . . . . . . 13
Recording Outgoing Messages . . . . . . . . . . . . . . . . . 14
Basic Operation
Setting the 7500AI to Answer Calls . . . . . . . . . . . . . . 16
Setting the 7500AI to Announce only . . . . . . . . . . . . 16
Turning the 7500AI off . . . . . . . . . . . . . . . . . . . . . . 16
Page 3

CONTENTS
Continued over....
Recording Incoming Messages . . . . . . . . . . . . . . . . . 17
Display Information During Incoming Calls . . . . . . . 18
Screening Calls . . . . . . . . . . . . . . . . . . . . . . . . . . . . 20
Recording A Memo . . . . . . . . . . . . . . . . . . . . . . . . . 20
Two-Way Recording . . . . . . . . . . . . . . . . . . . . . . . . 21
Call Timer . . . . . . . . . . . . . . . . . . . . . . . . . . . . . . . . 21
Calls and Messages Display . . . . . . . . . . . . . . . . . . . 21
Reviewing Calls . . . . . . . . . . . . . . . . . . . . . . . . . . . . 22
Calls with Messages . . . . . . . . . . . . . . . . . . . . . . . . . 23
Playing Messages . . . . . . . . . . . . . . . . . . . . . . . . . . . 23
Pause Playback . . . . . . . . . . . . . . . . . . . . . . . . . . . . 23
Adjusting the Volume . . . . . . . . . . . . . . . . . . . . . . . . 24
VIP . . . . . . . . . . . . . . . . . . . . . . . . . . . . . . . . . . . . . 24
Callback . . . . . . . . . . . . . . . . . . . . . . . . . . . . . . . . . 26
Deleting Calls and Messages . . . . . . . . . . . . . . . . . . 27
Using Call Breakthrough . . . . . . . . . . . . . . . . . . . . . 28
Remote Operation
Automatic 7500AI Switch On
(for Australian version only) 29
Using Remote Commands . . . . . . . . . . . . . . . . . . . . 30
Care and Maintenance . . . . . . . . . . . . . . . . . . . . . . . 32
Troubleshooting . . . . . . . . . . . . . . . . . . . . . . . . . . . 33
Resetting the 7500AI . . . . . . . . . . . . . . . . . . . . . . . . 34
Warranty . . . . . . . . . . . . . . . . . . . . . . . . . . . . . . . . . . 35
CONTENTS
ii
WARRANTY WARRANTY
Page 4

SAFETY INFORMATION
1
FOR YOUR SAFETY, PLEASE OBSERVE THE FOLLOWING:-
• Never install telephone wiring during lightning storm.
• Do not use your 7500AI unit near water or when wet.
• Do not take apart or remove the screws (except battery
cover screw) - there are no serviceable parts inside.
• Make sure the line cord and AC Adaptor do not cause
a trip hazard.
READ THIS BEFORE INSTALLATION
Your 7500AI conforms to Australian or New Zealand
Telecommunications Authority Standards and you can connect it
to most telephone lines. However, each device you connect to
the phone line draws power from the phone line. We refer to
this power draw as the device’s Ringer Equivalence Number, or
REN. This number is on the label under the 7500AI.
If you are using more than one phone or other device on the
line, add up all the RENs. If the total is more than three(3),
your phone(s) may not ring and your 7500AI may not answer.
If ringer operation is impaired, remove a device from the line.
NOTE: You must not connect your 7500AI to any of the following:
• Coin operated systems
• Party-line systems
• Most electronic key phone systems
Page 5

WARRANTY
SAFETY INFORMATION
2
NOTE: NEW ZEALAND ONLY
The grant of a Telepermit for any item of terminal equipment indicates only
that Telecom has accepted that the item complies with minimum conditions
for connection to it’s network. It indicates no endorsement of the product
by Telecom, nor does it provide any sort of warranty. Above all, it provides
no assurance that any item will work correctly in all respects with another
item of Telepermitted equipment of a different make or model, nor does it
imply that any product is compatible with all of Telecom’s network services.
This equipment may not provide for the effective hand-over of a call to another
device connected to the same line.
Page 6
INTRODUCTION
3
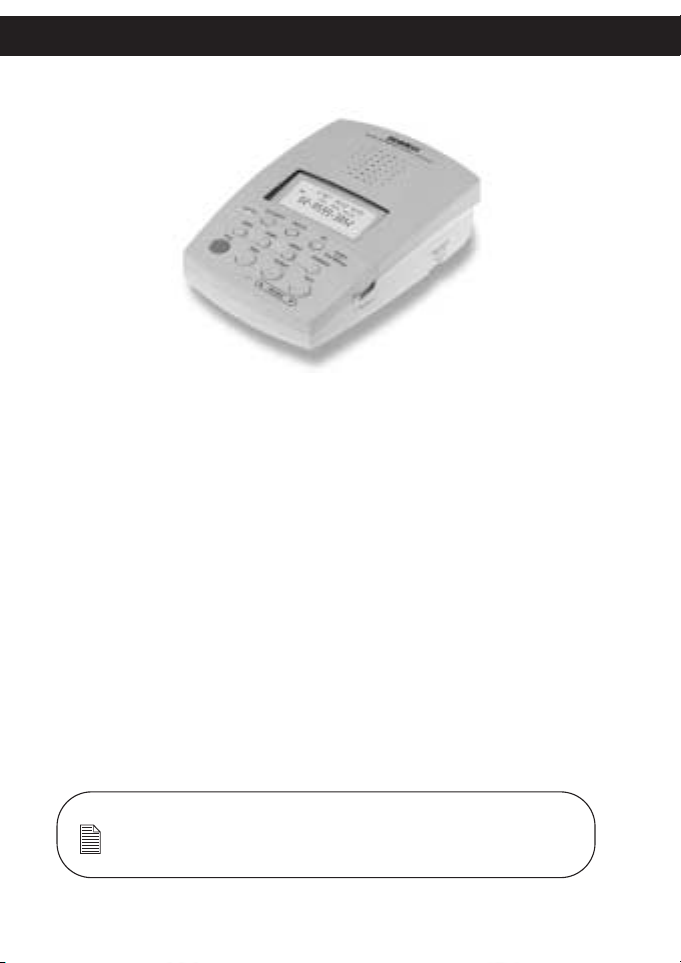
Congratulations on the purchase of your 7500AI Digital
Telephone Answering Machine (7500AI) with Caller ID Display.
This product has been designed especially for the Australian or
New Zealand market. It is guaranteed to provide you with
reliability, long life and outstanding performance.
The 7500AI is built with a wide screen for easy viewing of caller
identification. It displays the caller’s details (name* and
telephone number) the time and date the call came through,
and an indicator if the call came with a message.
Digital Answering Machine means all messages are stored on a
computer chip - there are no tape mechanisms to wear out and
no tapes to bother with. This gives you capabilities that tapebased answering machines don’t have. For example, you can
delete individual messages or play only new messages.
NOTE: To use the Caller ID feature you must first subscribe to this service from your
telephone service provider.
* Caller’s name will only appear if it is sent by Telstra or your telephone service
provider.
Page 7
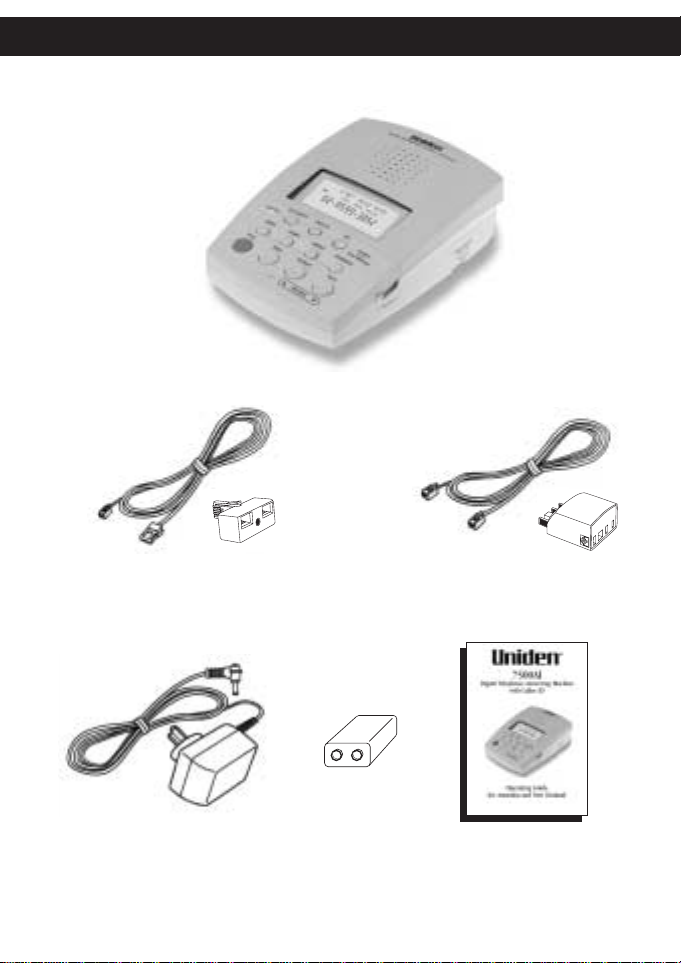
PARTS CHECKLIST
4
7500AI
Telephone cord and
Splitter for New Zealand
or
Telephone cord and
Splitter for Australia
AC Adaptor
9
v
o
lt
9 Volt Battery Operating
guide
If any of these items are missing or damaged, please contact the
place of purchase.
Page 8
YOUR 7500AI’S FEATURES INCLUDE:-
➤ Wide Screen
➤ 88 Caller ID Memories
➤ 12 VIP Call Alert
➤ Up to 18 minutes
Record Time
➤ 2 Outgoing Messages (OGM)
➤ Time & Date Display
➤ Two-Way Recording
➤ Memo Recording
➤ Call Screening
➤ Callback Feature
➤ New Calls &
Message LED Indicators
➤ Pause Message Playback
➤ New Message Review
➤ Voice Time & Day Stamp
➤ Call & Message Counter
➤ Call Timer
➤ Adjustable Ring Tone (2/4/7)
➤ Toll Saver
➤ Room Monitor
➤ Remote Access
➤ Call Breakthrough
➤ Memory Backup
(9V Battery)
FEATURES
5
Page 9
SELECTING A LOCATION
Select a location that is near both a telephone socket and an AC outlet.
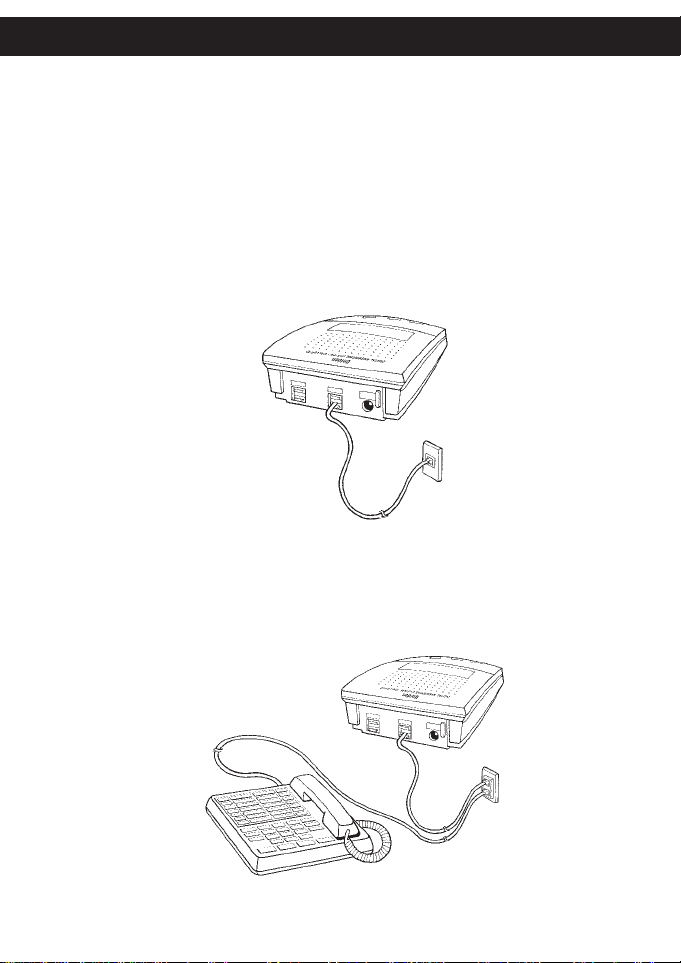
CONNECTING THE 7500AI TO THE TELEPHONE LINE
To connect the 7500AI to the phone line, plug one end of the supplied
modular cord into the jack on the back of the 7500AI labelled “line”.
Then plug the cord’s other end into a telephone socket.
If you wish to connect both the 7500AI and a telephone to the telephone line,
simply use the two way splitter supplied. Plug the splitter into the telephone
wall socket then plug the 7500AI into one side of the splitter and the phone
into the other side.
INSTALLATION
6
Page 10
INSTALLATION
INSTALLATION
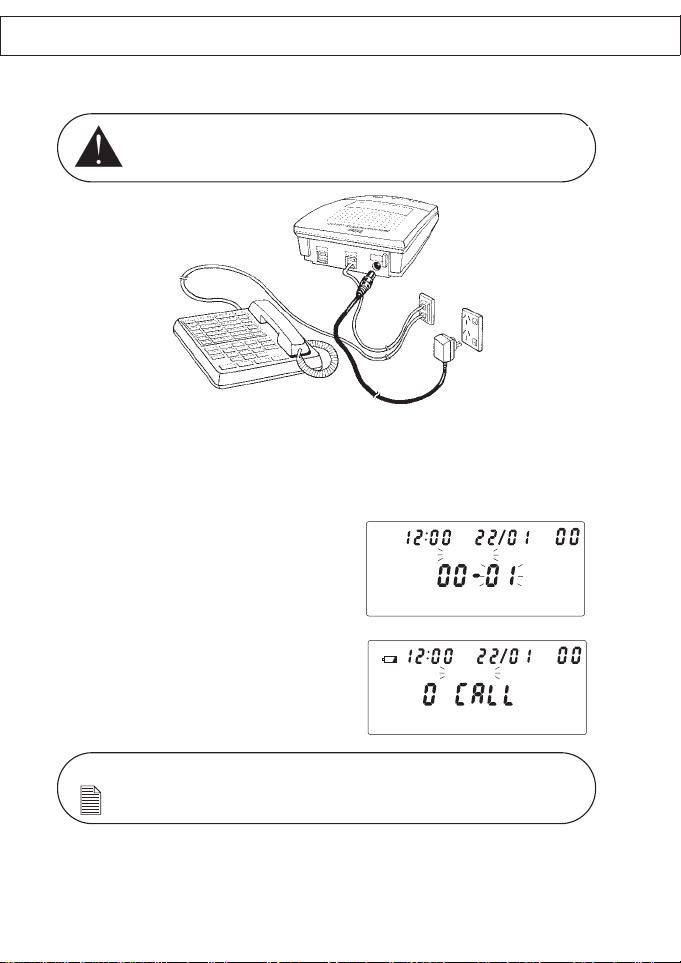
CONNECTING POWER
1. Plug the AC Adaptor into the power socket at the rear of the 7500AI
labelled “AC 9V 400mA”.
2. Then plug the other end into your mains socket.
When the power is first connected, the
7500AI beeps and the display shows a
memory test counting from 00 to 22.
After the counter reaches 22, the 7500AI
beeps and the display shows.
7
NOTE: The display will have OGM1 OGM2 flashing to call the user’s attention to record an OGM.
The battery icon will also be displayed if no battery is installed on your 7500AI.
Use only the Uniden AC Adaptor supplied with this
Uniden 7500AI Digital Telephone Answering Machine.
AM
OGM1 OGM2
CALL#
NEW
MEMORY TEST
AM
OGM1 OGM2
CALL#
NEW
0 MESSAGE
Page 11

BACKUP BATTERY
If the power fails or you unplug the 7500AI, a 9V backup battery would save
the messages and the settings for the day, time and security code. We
recommend you use an alkaline battery.
Follow these steps to install the backup battery.
1. Use a Phillips screwdriver to
remove the screw on the
compartment cover.
2. Push down the latch to release
the battery compartment cover.
3. Snap the battery’s contacts firmly to the
battery connector, then
place the battery into the compartment.
4. Replace the cover and secure it with the
screw.
INSTALLATION
8
INSTALLATION
Disconnect the telephone line and power line cords before replacing the battery.
Always use a new 9V battery for optimum performance.
Dispose of old battery promptly and properly.
Page 12
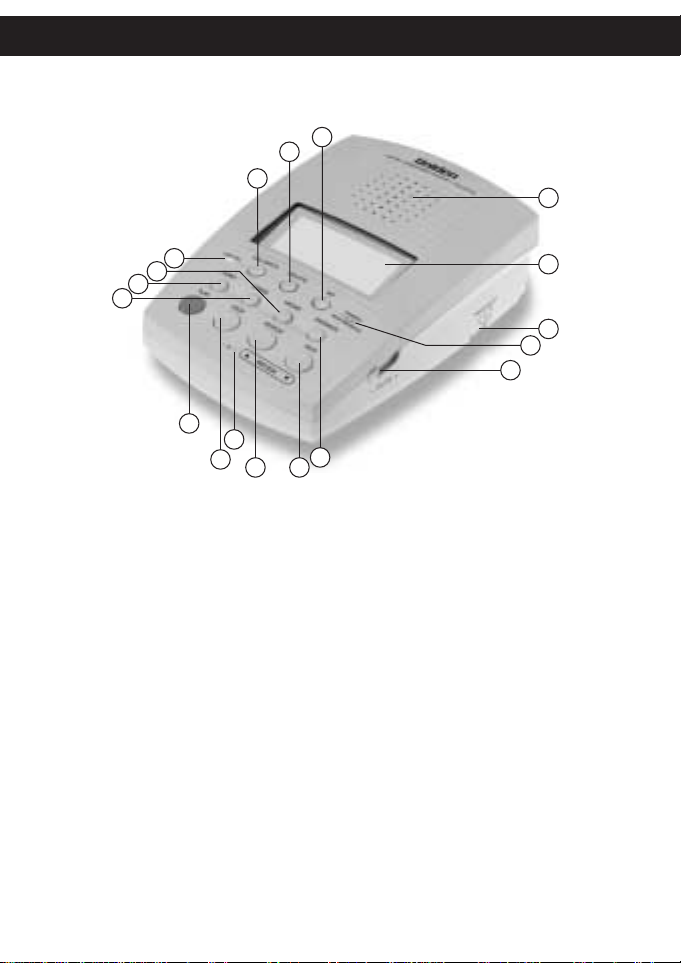
CONTROLS & FUNCTIONS
9
1. Speaker
2. LCD Screen
3. Ring Selector
4. Answer On/Off &
New Message LED Indicator
5. Volume Control Switch
6. Answer On/Off Button
7. Message Skip Button
8. Message Repeat Button
9. Microphone
10. Stop Button
11. Message Play Button
12. Outgoing Message 2 Button
13. Outgoing Message 1 Button
14. Memo Button
15. New Call LED Indicator
16. Callback Button
17. Message Delete Button
18. VIP Select Button
16
18
17
1
15
14
13
12
11
9
10
6
78
2
3
4
5
Page 13

CONTROLS & FUNCTIONS
10
1. VIP Alert ON Indicator
2. No/Low Battery Indicator
3. Time
4. OGM1 & OGM2 Indicator
5. Date
6. Answer ON/Announce Only
Indicator
7. Message Indicator
8. New Call/MSG/Call Counter
9. Caller’s Telephone Number
10. Caller’s Name*
*Caller’s name will appear only if it is sent by
Telstra or your telephone service provider.
2 3 5 6 74
1
AM
OGM1 OGM2 ANS ON
UNIDEN
CALL#
NEW
8
9
10
Page 14

SETTING UP
11
NOTE: If you do not complete each step within 8 secs., the 7500AI will exit set-up mode and
return to standby. In this case you have to start again by pressing STOP
for 2 secs.
LCD CONTRAST
The 7500AI provides 0 to 9 (lightest to darkest) levels LCD luminescence.
1. Press STOP for 2 secs. The 7500AI beeps to confirm entry to set-up
mode.
2. Press REPEAT to adjust contrast
to desired level.
3. Press CALLBACK to save setting
and continue setting up.
SECURITY CODE
This code is needed for remote operation (refer to page 29 for details).
1. Press STOP for 2 secs.
2. Press CALLBACK.
3. Press REPEAT to select desired
number and SKIP to move up to the
next digit.
4. Press CALLBACK to save setting and continue to next step.
CALL BREAKTHROUGH (CBT) CODE
This code is needed to alert the user to urgent calls (refer to page 28 for details).
1. Press STOP for 2 secs.
2. Press CALLBACK 2 times.
NOTE: You can press STOP anytime to exit set-up mode.
AM
OGM1 OGM2
LCD CONTRAST
AM
OGM1 OGM2
SECURITY CODE
CALL#
NEW
CALL#
NEW
Page 15

3. Press REPEAT to select desired
number and SKIP to move up to the
next digit.
4. Press CALLBACK to save set-up
and continue to next set-up.
TIME AND DATE
1. Press STOP for 2 secs.
2. Press CALLBACK 3 times.
3. Press REPEAT to set AM or PM (the
hour, minutes, day and month).
4. Press SKIP to move to time and date and day setting.
5. Press CALLBACK to save setting and continue to next set-up.
VIP (PRIORITY CALL) ALERT
The 7500AI sends out a VIP alert (fast beep tone) to the user for incoming
calls which are selected as VIP (refer to page 25 for details).
1. Press STOP for 2 secs.
2. Press CALLBACK 4 times.
3. Press REPEAT to set alert ON or
OFF. The indicator on the display
means VIP alert is ON. If this icon is not
displayed then the VIP alert is OFF.
4. Press CALLBACK to save setting.
SETTING UP
12
NOTE: If you have subscribed to a caller ID service, time and date will be updated
automatically during the first call.
AM
OGM1 OGM2
CALL#
NEW
SET CBT CODE
CALL
AM
OGM1 OGM2
#
NEW
SUNDAY
AM
OGM1 OGM2
VIP ALERT ON
CALL#
NEW
Page 16

SETTING UP
SETTING UP
13
NUMBER OF RINGS
The 7500AI can be set to 2, 4 or 7 rings
before it plays the OGM and receives the
call. To set the ringer, move the ringer
select switch to the desired position.
TS (TOLL SAVER)
The 7500AI has New Message Detection to avoid unnecessary toll charges
when calling long distance to check your messages. To use this feature set the
ringer select to TS. If there are new messages, the 7500AI will answer after 2
rings, otherwise it will answer after 4 rings. Thus, when checking messages
you can hang up after 2 rings because the 7500AI has no new messages.
OUTGOING MESSAGES (OGM)
The 7500AI will not receive calls until at least one of the outgoing messages
has been recorded.
• OGM 1 plays the message you recorded, and lets the caller leave a
message of up to 60 seconds.
• OGM 2 (announcement only) plays the message you recorded, and
hangs up without letting the caller leave a message. This is useful for
announcing information about an upcoming event.
NOTE: Be sure the announcement clearly states that the caller cannot leave a message.
If the 7500AI memory becomes full, it will automatically switch from OGM 1 to
OGM 2 and play that message for any new calls.
Page 17

RECORDING OUTGOING MESSAGES
1. Press and hold OGM1 or OGM2
for 2 secs or until a beep is heard.
2. Speak in a normal voice about 8 inches
away from the microphone.
While recording messages, display show:
3. When you finish recording,
press STOP.
A confirmation beep is heard.
Then the 7500AI automatically
plays back the outgoing
message.
WARRANTY
SETTING UP
SETTING UP
14
NOTE: The maximum length for OGM 1 and OGM 2 is 60 seconds each.
The display counts the recording time.
TIP: Do not tell the callers that you are not home.
Instead, say that you cannot come to the phone right now.
D
I
G
I
T
A
L
A
N
S
W
E
R
I
N
G
S
Y
S
T
E
M
C
A
L
L
E
R
I
D
N
E
W
C
C
A
A
L
L
L
L
B
A
C
K
O
D
G
E
M
L
E
1
T
E
O
G
M
PL
V
2
A
I
P
Y
M
E
S
M
T
O
O
P
A
N
S
N
W
E
E
W
A
R
N
M
R
E
S
S
E
W
S
P
A
E
E
G
R
A
E
T
S
K
I
P
▼
REVIEW
▼
- V
T
C
E
L
E
S
S
R
T
E
G
4 7
IN
2
R
+
E
M
U
L
O
AM
CALL#
NEW
OGM1 OGM2
OGM1 RECORDING
FOR OGM1 FOR OGM2
AM
CALL#
NEW
OGM1 OGM2
OGM2 RECORDING
BEEP
N
E
W
C
C
A
A
L
L
O
G
M
1
O
G
P
L
A
Y
S
T
O
P
▼
REVIEW
D
IG
IT
A
L
A
N
S
W
E
R
I
N
G
S
Y
S
T
E
M
C
A
L
L
E
R
ID
L
L
B
A
C
K
D
E
L
E
T
E
M
V
2
IP
M
E
M
O
A
NSW
N
E
E
W
A
R
N
M
R
E
S
S
E
W
S
P
A
E
E
G
R
A
E
T
S
K
IP
▼
GER SELECT
IN
2 4 7 TS
R
+
E
M
U
L
O
V
-
Page 18

SETTING UP
SETTING UP
15
To play your outgoing OGM 1 message
at any time, press OGM1, the 7500AI
beeps and the outgoing message plays.
To play your outgoing OGM 2 message at
any time, press OGM2, the 7500AI beeps
and the outgoing message plays.
NOTE: • If no outgoing OGM1 is recorded when you press OGM 1, the 7500AI
announces "You have no announcement one" and sounds four beeps.
• If no outgoing OGM2 is recorded when you press
OGM 2,
the 7500AI announces "You have no announcement two" and sounds four beeps.
• OGM1 and/or OGM2 continuously flash on the display until a message has been
recorded.
AM
OGM1 PLAYING
OGM1
NEW CALL
C
A
L
OGM1
O
G
P
L
A
Y
STO
P
▼
R
E
L
B
M
R
V
D
IG
IT
A
L
ANSWERING
SYSTEM
C
A
L
L
E
R
I
D
A
C
K
D
E
L
E
T
E
VIP
2
M
E
M
O
A
N
S
NEW MESSAGE
W
E
ANSWER
R
E
P
E
A
T
SKIP
I
E
W
▼
- V
T
C
E
L
E
S
S
R
T
E
7
G
4
N
I
2
R
+
E
M
U
L
O
CALL
NEW
#
OGM2
NEW CALL
C
A
OGM1
O
G
P
L
A
Y
STO
P
▼
R
D
IG
IT
A
L
ANSWERING
SYSTEM
C
A
L
L
E
R
I
D
L
L
B
A
C
K
D
E
L
E
T
E
M
VIP
2
M
E
M
O
A
N
S
NEW MESSAGE
W
E
ANSWER
R
R
E
P
E
A
T
SKIP
E
V
I
E
W
▼
- V
T
C
E
L
E
S
S
R
T
E
7
G
4
N
I
2
R
+
E
M
U
L
O
AM
CALL#
NEW
OGM2 PLAYING
Page 19

SETTING THE 7500AI TO ANSWER CALLS
To Turn the 7500AI On
To set the 7500AI to answer calls and record messages, press ANSWER
once. The 7500AI announces "Answer-on", beeps once and plays the
outgoing message. The Answer LED indicator lights up. ANS ON
appears on the display. The 7500AI is now set to answer calls using the OGM
1 message and record callers’ messages.
To Announce Only
To set the 7500AI to answer calls but not record messages, press OGM 2
when the 7500AI is set to “Answer-on" mode. The 7500AI announces "Announce
only", beeps and plays your announcement, then displays (Announce only). The
7500AI is now set to answer calls using the OGM 2 message without recording
callers’ messages. To swap between recording messages (OGM 1) or announce
only (OGM 2 ) simply press OGM 1 or OGM 2 as required.
To Turn the 7500AI Off
To turn off the 7500AI so it does not answer calls, press ANSWER again.
The 7500AI announces “Answer off”, beeps and the red Answer LED
indicator turns off. ANS ON or ANS ONLY disappears from the display.
BASIC OPERATION
16
NOTE: After 15 rings, the 7500AI will turn ON automatically (for Australian version ONLY)
Answer on
D
I
G
I
T
A
L
A
N
S
W
E
R
I
N
G
SYSTEM
- C
A
LL
ER
ID
NEW CALL
CALLB
ACK
O
D
G
E
M
L
1
E
T
E
O
G
M
P
L
A
Y
V
2
IP
MEMO
S
T
O
P
A
N
S
N
W
E
E
W
A
R
N
M
REPEAT
E
S
S
W
S
A
E
G
R
E
S
K
IP
▼
R
E
V
I
E
W
▼
- VOLUME +
T
C
E
L
E
S
S
R
T
E
7
G
4
IN
2
R
Page 20

BASIC OPERATION
BASIC OPERATION
RECORDING INCOMING MESSAGES
The maximum incoming message recording length is 60 seconds. When a
recording reaches 55 seconds, the 7500AI beeps once to notify the caller that
time will soon be up. When the recording reaches 60 seconds, the 7500AI
sounds one long and four short beeps, and plays "Thank you for your call",
then hangs up. While the incoming call is being recorded the display shows:
The 7500AI hangs up and resets to
answer the next call when:
• The caller hangs up.
• The maximum message length
(60 seconds) is reached.
• There are more than 8 seconds of silence.
If the 7500AI’s memory is full, it will answer
the call after the set number of rings then
play the announcement only message
(OGM2). The display shows:
If no OGM2 is recorded, the 7500AI announces "Message is full, thank you
for your call". Please delete some messages to restore normal operation.
17
NOTE: OGM 2 indicator on the display continuously flashes if OGM 2 has
not been recorded
PM
OGM1 OGM2 ANS ON
ICM RECORDING
PM
OGM1 OGM2 ANS ON
88 MSG FULL
CALL#
NEW
CALL
NEW
#
Page 21

DISPLAY INFORMATION DURING INCOMING CALLS
All the caller’s details are only displayed if
released by Telstra or your telephone
service provider. The display shows:
PRIVATE
showing on the display
means:
• the caller has chosen to block their
telephone number
• the call is from an old type of telephone network exchange
• the call is from a silent number subscriber
• the call is from an analogue cellular mobile telephone
ERROR
showing on the display means:
• there has been an error during the
transmission of Caller ID information.
This does not mean your phone is
faulty.
UNAVAILABLE
showing on the
display means:
• the call is coming from overseas
• the call is from an old type of
telephone network exchange
(applies to New Zealand ONLY)
• the call is from an payphone (applies to New Zealand ONLY)
• the call is coming from a non-Telecom network (applies to New Zealand ONLY)
BASIC OPERATION
18
BASIC OPERATION
NOTE: You must subscribe to a CALLER ID service from your local telephone service provider
to make use of the Caller ID display on your 7500AI.
PM
OGM1 OGM2 ANS ON
UNIDEN
PM
OGM1 OGM2 ANS ON
PRIVATE
PM
OGM1 OGM2 ANS ON
ERROR
CALL
CALL
NEW
NEW
CALL
NEW
#
#
#
CALL
PM
OGM1 OGM2 ANS ON
#
NEW
UNAVAILABLE
Page 22

BASIC OPERATION
BASIC OPERATION
19
0000
showing on the display means:
(applies to New Zealand ONLY)
• the call is coming from overseas
PAYPHONE
showing on the display
means:
• the call is coming from a payphone
END OF CALLS
or
TOP OF CALLS
showing on the
display means:
• you have reached the end or start of
the Caller ID history.
When a telephone connected to the 7500AI
is in use the display shows:
CALL
#
PM
OGM1 OGM2 ANS ON
NEW
0000
CALL
#
PM
OGM1 OGM2 ANS ON
NEW
PAYPHONE
CALL
#
PM
OGM1 OGM2 ANS ON
NEW
END OF CALLS
CALL
#
PM
OGM1 OGM2 ANS ON
NEW
CONVERSATION
Page 23

BASIC OPERATION
20
BASIC OPERATION
SCREENING CALLS
To screen calls, let the 7500AI answer, then listen to the caller’s message
through the 7500AI’s speaker. If you decide to answer the call, pick up the
phone.
If you do not want to take the call, do not pick up the phone, and let the
7500AI finish recording the caller’s message.
RECORDING A MEMO
A memo is a message you can record (up to 60secs long) by speaking
directly into the 7500AI, without having to call on the phone.
1. Press MEMO until the 7500AI
sounds a long beep and the
LCD shows
MEMO
RECORDING
. Speak
into the microphone in a
normal voice. The display
counts up the recording time.
2. The 7500AI automatically stops
recording after 60 seconds or
you can press STOP to finish
the memo. The 7500AI beeps once, and the message number counter
increases by one.
The memo is stored along with the incoming messages. To hear the memo,
simply play back your messages.
BEEP
NE
W
C
C
A
A
LL
L
L
B
A
C
K
O
D
G
ELE
M
1
TE
OGM2
PLAY
M
E
STOP
M
O
ANSWER
R
E
P
E
A
T
SKIP
▼
R
E
V
I
E
W
▼
D
IG
IT
A
L
ANSWERING
S
Y
S
T
E
M
- CALLER ID
VIP
A
N
S
N
W
E
E
W
R
M
E
S
S
A
G
E
- VOLUME +
T
C
LE
E
S
S
R
E
7 T
G
4
IN
2
R
Page 24

BASIC OPERATION
BASIC OPERATION
21
TWO-WAY RECORDING
During a telephone call the user can record both sides of the conversation on
any phone connected to your 7500AI.
To record the conversation
Press memo until the display shows
2 WAY RECORDING
.
The timer starts counting.
The 7500AI records the
conversation until:
• you press stop
• the 7500AI heard 8 secs of a
busy signal or 25 secs of silence
• memory is full
CALL TIMER
The 7500AI is equipped with a timer that starts counting as soon as the
telephone (connected to the 7500AI) handset is lifted. See display on page 23.
CALLS AND MESSAGES DISPLAY
The display shows the total number of calls
and messages received by your 7500AI.
NOTE:
While recording a low tone beep will be heard during the conversation to make both
parties aware that the call is being recorded. (This is a government requirement)
NEW
C
C
ALL
A
L
L
B
A
C
K
O
G
M
1
OGM2
PLAY
STOP
R
E
P
E
▼
R
E
V
I
E
W
D
I
G
IT
A
L
ANSWERING
S
Y
S
T
E
M
- CALLER ID
D
ELE
TE
VIP
M
E
M
O
A
N
S
N
W
E
E
W
ANSWER
R
M
E
S
S
A
G
A
E
T
SKIP
▼
- VOLUME +
T
C
E
L
E
S
S
R
T
E
G
4 7
IN
2
R
CALL
PM
OGM1 OGM2 ANS ON
#
NEW
2 WAY RECORDING
CALL
#
PM
OGM1 OGM2 ANS ON
NEW
XX MESSAGES
Page 25

BASIC OPERATION
22
BASIC OPERATION
REVIEWING CALLS
Your 7500AI stores information for up to
88 Caller ID’s (CID).
The display shows the total number of calls
received by your 7500AI.
To review calls:
Press REPEAT (review starts from “Top
of the List”) or SKIP (review starts from
“End of the List”)
The call display shows:
• caller’s telephone number
• calling party’s name
(if released by
Telstra or your telephone service provider)
• time and date of call
If while reviewing the calls you encounter
a CID which has been reviewed (repeat
call) the display shows “RPT”
REVIEWING NEW CALLS
If you don’t want to review all the calls and
would just like to view the new calls.
Press REPEAT or SKIP for 2 secs.
The display starts reviewing from the first
unviewed call. The indicator “NEW”
appears together with a new call. Once
the call has been viewed the “NEW”
disappears from the display. The new call
(yellow) LED indicator also flashes when a new call is received.
W
M
R
NOTE: The new call overrides the memory
space of the old one.
PM
OGM1 OGM2 ANS ON
2 MESSAGES
PLAY STOP REPEAT
REVIEW▲▼
PM
OGM1 OGM2 ANS ON
UNIDEN
PM
OGM1 OGM2 ANS ON
RPT
UNIDEN
CALL
#
NEW
SKIP
CALL
#
NEW
CALL
#
NEW
PM
OGM1 OGM2 ANS ON
UNIDEN
NEW CALL
OGM1
P
L
A
Y
S
T
O
P
CALL
#
NEW
C
A
L
L
B
A
C
K
DELETE
O
G
M
2
R
E
▼
VIP
M
E
M
O
N
E
ANSW
P
E
A
T
ER
SKIP
Page 26

BASIC OPERATION
BASIC OPERATION
23
CALLS WITH MESSAGES
As you scroll through your received calls,
your 7500AI, you will notice that some calls
come with a icon. This means that
the call received came with a message.
PLAYING MESSAGES
The display shows the total number of
messages received.
To play all the messages (old and new,
beginning from the very first message), press
PLAY. The 7500AI announces the
number of messages recorded, each message
number and the day and time the message was
recorded and then plays the message.
Your 7500AI also displays the caller’s details
(if transmitted or released by your
telephone service provider) together with
the particular message you are playing.
After all the messages have been played, the 7500AI says, “End of Message(s)”.
PAUSE DURING MESSAGE PLAYBACK
To pause listening to the messages, press
PLAY. Display shows pause and timer
starts counting. To resume playback, press
PLAY within 60 secs. Otherwise, the
7500AI beeps once, then stops playback,
announces “End of message(s)” and returns to standby.
NOTE:
While reviewing messages, flashes while playing new messages and stops
flashing if the message has been played previously.
PM
OGM1 OGM2 ANS ON
UNIDEN
PM
OGM1 OGM2 ANS ON
CALL
CALL
NEW
#
#
5 MESSAGES
PLAY STOP REPEAT SKIP
CALL
PM
OGM1 OGM2 ANS ON
NEW
MSG#
#
UNIDEN
CALL
PM
OGM1 OGM2 ANS ON
PAUSE
NEW
MSG#
#
Page 27

BASIC OPERATION
24
BASIC OPERATION
PLAYING NEW MESSAGES ONLY
To play only new messages, hold down
PLAY for 2 seconds. (If there are no
new messages stored, the 7500AI says
"You have no new messages").
ADJUSTING THE VOLUME
To adjust the volume to your desired listening level, adjust the volume slider
on the right side of the 7500AI.
REPLAYING OR SKIPPING MESSAGE(S)
WHILE ON REVIEW
To replay a message while you are listening to it, press REPEAT.
The current message starts again from the beginning.
To return to the previous message, press
and hold down REPEAT. The previous
recorded message(s) play.
To skip to the next message, press SKIP once. The next recorded message
plays.
For fast message playback, press and hold SKIP, the message playback
speed increases. This lets you quickly scan a message or move to any place
within a message. To resume to normal playback, release SKIP.
To stop playback at any time, press STOP.
The 7500AI beeps and resets to answer calls.
▼
S
T
P
L
A
Y
PLAY STOP REPEAT
“You have
no new
messages”
N
E
W
C
C
A
A
L
L
L
L
B
A
C
K
O
D
G
E
M
L
E
1
T
E
O
G
M
2
MEMO
S
T
O
P
A
N
REPEAT
S
K
I
P
▼
REVIEW
▼
REVIEW▲
D
IG
IT
A
L
ANSWERING
S
Y
V
I
P
A
N
S
N
W
E
E
W
R
M
E
S
S
W
S
A
E
G
R
E
+
E
M
U
L
O
V
-
SKIP
PLAY STOP REPEAT SKIP
Page 28

BASIC OPERATION
BASIC OPERATION
25
VIP
The 7500 allows 12 sets of Caller ID to be stored as a VIP caller. Each time a
VIP caller calls, the 7500AI will sound a special tone or alert which is
different from the ringer tone.
When a VIP call is received by your 7500AI,
the display shows the VIP icon.
Storing a CID as a VIP Caller
1. Select the CID to be set as a VIP by pressing SKIP and REPEAT.
2. Press and hold VIP until you hear the
confirmation beep. The VIP icon then
appears on the display.
To view the VIP CID List
1. Press VIP. The display immediately shows the first VIP CID.
2. Press REPEAT to scroll though the rest of the CID on the list.
NOTE: The VIP alert will not sound if the VIP alert setting is not activated.
See page 16 to see how to turn the VIP alert on or off.
NOTE: • A four tone beep sounds when VIP is pressed and there is no CID stored
in the VIP list.
• If there are already 12 CIDs stored as VIP callers the display will show
VIP IS FULL
.
PM
OGM1 OGM2 ANS ON
VIP
UNIDEN
CALLBACK DELETE VIP
OGM1OGM2 MEMO ANSWER
CALL
#
Page 29

BASIC OPERATION
26
BASIC OPERATION
To delete a CID from the VIP List
1. Press VIP to enter the VIP list.
2. Select CID to be deleted by pressing REPEAT or SKIP.
3. Press DELETE. A confirmation beep will sound then the CID
disappears from the display.
CALLBACK
The 7500AI allows user to dial back to a
certain caller with a touch of a button.
1. Select the desired CID.
2. Press CALLBACK.
3. Display shows
WAITING
when
picking a line or dial tone.
4. Display shows
DIALING
when
dialing.
5. Display shows pick up the phone and
starts counting down from
8
to 0.
The user must pick up the phone
before the count reaches 0.
Otherwise, the call will hang up.
NOTE: • Pressing DELETE, while
END OF CALLS
is displayed
will delete ALL the CID in the VIP list.
• Deleted VIP CID will remain in the total calls memory until it is also deleted in
the total calls list. See “Deleting CID” on page 27.
NOTE: Callback feature can be used either while reviewing calls, calls with a message or
the VIP caller list.
WAITING
DIALING
PICK UP PHONE 8
CALLBACK DELETE VIP
OGM1OGM2 MEMO ANSWER
PM
OGM1 OGM2 ANS ON
PM
OGM1 OGM2 ANS ON
PM
OGM1 OGM2 ANS ON
CALL
CALL
CALL
#
#
#
Page 30

BASIC OPERATION
BASIC OPERATION
27
DELETING CALLS AND MESSAGES
The 7500AI gives the user an option to delete calls and messages one at a
time or all at the same time.
Deleting Calls
To delete a particular Caller ID (CID):
1. Set the display showing the CID to be deleted using REPEAT or SKIP.
2. Press DELETE once. The 7500AI deletes the displayed CID, then
shows the next.
To delete ALL the CID:
1. Press STOP to return to stand-by mode.
2. Press and hold DELETE until display
shows.
3. Press REPEAT (▲). A confirmation beep sounds.
4. Press STOP to return to stand-by mode. Otherwise, the 7500AI
automatically goes to stand-by after 8 secs.
Deleting Messages
To delete a specific message, press DELETE once while the message is playing.
The 7500AI beeps once and deletes the current message, then plays the next.
To delete ALL the Messages:
1. Press STOP to return to stand-by mode.
2. Press and hold DELETE until display
shows.
3. Press SKIP (▼). A confirmation beep
sounds.
4. Press STOP to return to stand-by mode. Otherwise, the 7500AI
automatically goes to stand-by after 8 secs.
NOTE: The 7500AI does not delete calls and messages that have not been played to the end.
If you have calls and messages that have not been played, the 7500AI sounds four
beeps. Deleted messages and calls are permanently deleted. It is recommended to
delete your messages regularly to avoid filling up your message memory.
PM
OGM1 OGM2 ANS ON
▲
CID ▼MSG
PM
OGM1 OGM2 ANS ON
▲
CID ▼MSG
CALL
CALL
#
#
Page 31

BASIC OPERATION
28
BASIC OPERATION
USING CALL BREAKTHROUGH (CBT)
If you screen call, but want to make sure that you don’t miss calls from
important people (like members of the family), you can provide these people
with your CBT code. See code encoded while Setting CBT Code on
page 15-16.
CBT Alert
When a caller enters the CBT code, the 7500AI alerts you with loud beeps for
35 seconds. Then the 7500AI sounds two beeps every two seconds for 30
seconds, and one short beep every second for the last 5 seconds. To answer
the call, pick up the handset. If you do not answer, the caller can leave a
message after the outgoing message plays and a long beep sounds.
To use the CBT code in a call:
1. Call your telephone number
2. Once the OGM starts playing, enter the CBT code using the caller’s
telephone keypad then the VIP alert will be heard on your 7500AI.
Changing the CBT Code
The CBT code is preset to 168, but you can change it by following the steps in
Setting CBT the Code on page 15-16 of this owner’s manual.
NOTE: Be sure to set each digit within 8 seconds. Otherwise, you must start over from
Step 1.
Page 32

REMOTE OPERATION
29
NOTE: • An outgoing message must be recorded before you can
remotely set the 7500AI to answer calls.
• For New Zealand model, the 7500AI remains off even after 15 rings.
REMOTE OPERATION
You can operate the 7500AI from any remote location using a touch-tone
phone, or from a rotary phone using a pocket tone-dialler.
Call your telephone
When you hear the OGM, enter your security code. After a long beep, enter
your remote command code(s).
If you do not hear an OGM, the unit is either in Answer-off mode or is not
setup properly.
Automatic 7500AI Switch On (for Australian version only)
• Call your telephone (After 15 rings you will hear the 7500AI play your
OGM1 or OGM2)
• Your 7500AI is now ready to answer calls
Page 33

USING REMOTE COMMANDS
To use the remote commands, you must enter the remote operation security
code within 8 seconds after the 7500AI answers the call. After the 7500AI
beeps once to verify you entered the code correctly, enter the number(s) for
the function(s) you want the 7500AI to perform.
REMOTE OPERATION
30
REMOTE OPERATION
Press To
00 Turn the 7500AI off. The 7500AI beeps and announces "Answer Off".
01 Turn the 7500AI on. The 7500AI beeps and announces "Answer on"
then plays OGM1. If no OGM1 is recorded, the 7500AI beeps and
announces "You have no announcement one".
02 Set the 7500AI to answer with OGM2 announcement. The 7500AI
beeps and announces "Announce only", then plays OGM2. If no
OGM2 is recorded, the 7500AI beeps and announces "You have no
announcement two".
21 Play all messages. If no message is recorded, the 7500AI says
"You have no messages".
31 Play new messages. When new messages are recorded, the 7500AI
announces the number of new messages before playback. If no new
message is recorded, the 7500AI says, "You have no new messages".
32 Announce new Caller ID information. If there are no new Caller ID
calls, 7500AI says “You have no new calls.” If you get a private call,
the 7500AI says “unknown number” after announcing Caller ID
number and time
22 Announce all Caller ID records. The 7500AI announces the total calls
and each caller’s information. If there are no Caller ID records, the
7500AI says “You have no calls”.
5, the 7500AI Delete all messages (except new messages).
says “erase”,
then press 1
5, the 7500AI Delete all Caller ID (except new Caller ID calls).
says “erase”,
then press 2
6 Stop playback and message recording.
7 Record a memo.
Page 34

REMOTE OPERATION
REMOTE OPERATION
31
After you press 21, 22, 31 or 32 to play messages or Caller ID record:
Changing the Remote Operation Security Code
The remote operation security code is preset to 704, but you can change it by
following the steps in Setting the Security Code on page 15.
Press To
81 Change OGM1. After the 7500AI beeps, begin your new OGM1.
When you finish, press 6. The 7500AI beeps and replays.
82 Play OGM1. If no OGM1 is recorded, the 7500AI announces "You
have no announcement one".
91 Change OGM2. After the 7500AI beeps, begin your new OGM2.
When you finish, press 6. The 7500AI beeps and replays.
92 Play OGM2. If no OGM2 is recorded, the 7500AI announces
"You have no announcement two".
Press To
1 Replay the previous Caller ID or message
3 Skip to the next Caller ID or message
4 Replay the current Caller ID or message
5 Delete the current Caller ID or message
6 Stop message playback
Page 35

CARE AND MAINTENANCE
32
1. Unplug the unit before cleaning it.
2. Clean your unit with a damp(never wet) cloth.
Solvent or detergent should never be used as they may damage the finish
of the plastic casing.
3. Make sure there is space above and to the rear of your unit to allow for
proper ventilation.
4. Make sure you check your 9V DC battery at regular intervals for leakage.
Replace when necessary.
Page 36

33
TROUBLESHOOTING
If your 7500AI 7500AI unit is not performing to your expectations, please try
these simple steps.
PROBLEM SUGGESTION
Answering system does not work • Make sure the telephone line cord
is plugged in.
• Make sure that the AC Adaptor
is plugged in.
• Make sure the 7500AI is turned on.
• There has been a power failure.
Disconnect the telephone line cord,
reset the 7500AI (refer to page 38) and
re-connect the telephone line cord.
Answering System does not answer • The memory may be full. Delete some
after the set number of rings. or all of the saved messages.
• You might have exceeded the total
number of REN. See page 5.
Messages are incomplete. • The incoming messages may be too
long.
• The memory may be full. Delete some
or all of the saved messages.
No sound on the speaker during call • Adjust the volume control on the side
monitoring or message playback. the 7500AI.
Cannot record outgoing message
(OGM)
• The memory may be full. Delete some
or all of the saved messages.
Cannot access remote call-in features • Make sure you’re using the correct
from another touch-tone phone. security number.
• Make sure that the touch-tone phone
you’re using can transmit the tone for
at least two seconds. If it cannot, you
may have to change to another phone.
Page 37

PROBLEM SUGGESTION
Clock loses time. • The power to the base unit has been
interrupted. Reset the clock as detailed
on page 16 of this owners manual.
CID not being displayed • Make sure that you are subscribing to
Caller ID subscription from your local
telephone company.
Display information is incomplete • This can be caused by power
or frozen interruption. Reset your 7500AI.
TROUBLESHOOTING
34
WARRANTY
TROUBLESHOOTING
WARRANTY
RESETTING THE 7500AI
If all of the above suggestions do not resolve
your problem, use a straightened paper
clip to press RESET on the back of
the 7500AI to reset the answering
machine.
NOTE: Resetting the 7500AI erases your outgoing messages and all stored information.
Disconnect the telephone line cord before operating the RESET switch.
Page 38

WARRANTY
35
Uniden 7500AI 1 YEAR WARRANTY
(Batteries and Accessories are covered for 90 Days ONLY)
Note: Please keep your sales docket as it provides evidence of warranty. Warranty is only valid in the
country where the product has been purchased.
WARRANTOR: Uniden Australian Pty Ltd. ACN 001 865 498
Uniden New Zealand Limited
ELEMENTS OF WARRANTY: Uniden warrants to the original retail owner for the duration of this
warranty, its product to be free from defects in materials and craftsmanship with only the limitations
or exclusions set out below.
WARRANTY DURATION: This warranty to the original retail owner only, shall terminate and of no
further effect ONE (1) Year after the date of original retail sale. This warranty will be deemed invalid
if the product is: (A) Damaged or not maintained as reasonable and necessary, (B) Modified, altered
or used as part of any conversion kits, subassemblies, or any configurations not sold by Uniden, (C)
Improperly installed, (D) Repaired by someone other than an authorised Uniden Repair Agent for a
defect or malfunction covered by this warranty, (E) Used in conjunction with any equipment or parts
or as a part of a system not manufactured by Uniden, (F) Installed, or serviced by anyone other than
an authorised Uniden Repair Agent, (G) Where the Serial Number label of the product has been
removed or damaged beyond recognition.
STATEMENT OF REMEDY: In the event that the product does not conform to this warranty at any
time while this warranty is in effect, the warrantor at its discretion, will repair the defect or replace the
product and return it to you without charge for parts and service. THIS WARRANTY DOES NOT COVER
OR PROVIDE FOR THE REIMBURSEMENT OR PAYMENT OF INCIDENTAL OR CONSEQUENTIAL
DAMAGES. THIS GUARANTEE IS IN ADDITION TO AND DOES NOT IN ANY WAY AFFECT YOUR RIGHTS
UNDER THE CONSUMER GUARANTEE ACT.
WARRANTY CARD: If a warranty card has been included with this product then please fill it in and
return to us within 14 days of purchase. Your name and the Serial number of the product will then be
registered in our database and this will help us process your claim with greater speed and efficiency
should you require warranty service.
PROCEDURE FOR OBTAINING PERFORMANCE OF WARRANTY:
In the event that the product does not conform to this warranty, the Product should be shipped or
delivered, freight pre-paid, with evidence of original purchase (e.g. a copy of the sales docket), with a
full description of the problem, to the warrantor at:-
UNIDEN AUSTRALIA PTY. LIMITED UNIDEN NEW ZEALAND LIMITED
SERVICE DIVISION 150 Harris Road, East Tamaki, Auckland.
345 Princes Highway, Rockdale, NSW 2216 Ph: (09) 273 8383
Ph: (02) 9599 3577 Fax: (02) 9599 3278 Fax: (09) 274 0009
Toll Free: 1300 366 895 Toll Free: 0800 4 UNIDEN
0800 4 864336
Customers in other States should ship or deliver the Product freight pre-paid to their nearest Uniden
Authorised Repair Centre. (Contact Uniden for the nearest Warranty Agent to you).
NOTE: Keep your receipt of purchase in a safe place in case you ever need warranty service.
You should also save the carton and packaging material for storage or shipping
purposes.
Page 39

A Clear Signal of What’s Ahead.
© 2000 UNIDEN CORPORATION. ALL RIGHTS RESERVED.
 Loading...