

Page 1
User Manual
Page 2
Safety Notes
The following are to protect safety of user and to prevent damages to property.
Use product properly after carefully reading the following contents.
ENGLISH
Warning Caution
Instructions
Act prohibited Contact by wet hand prohibited
Modification prohibited
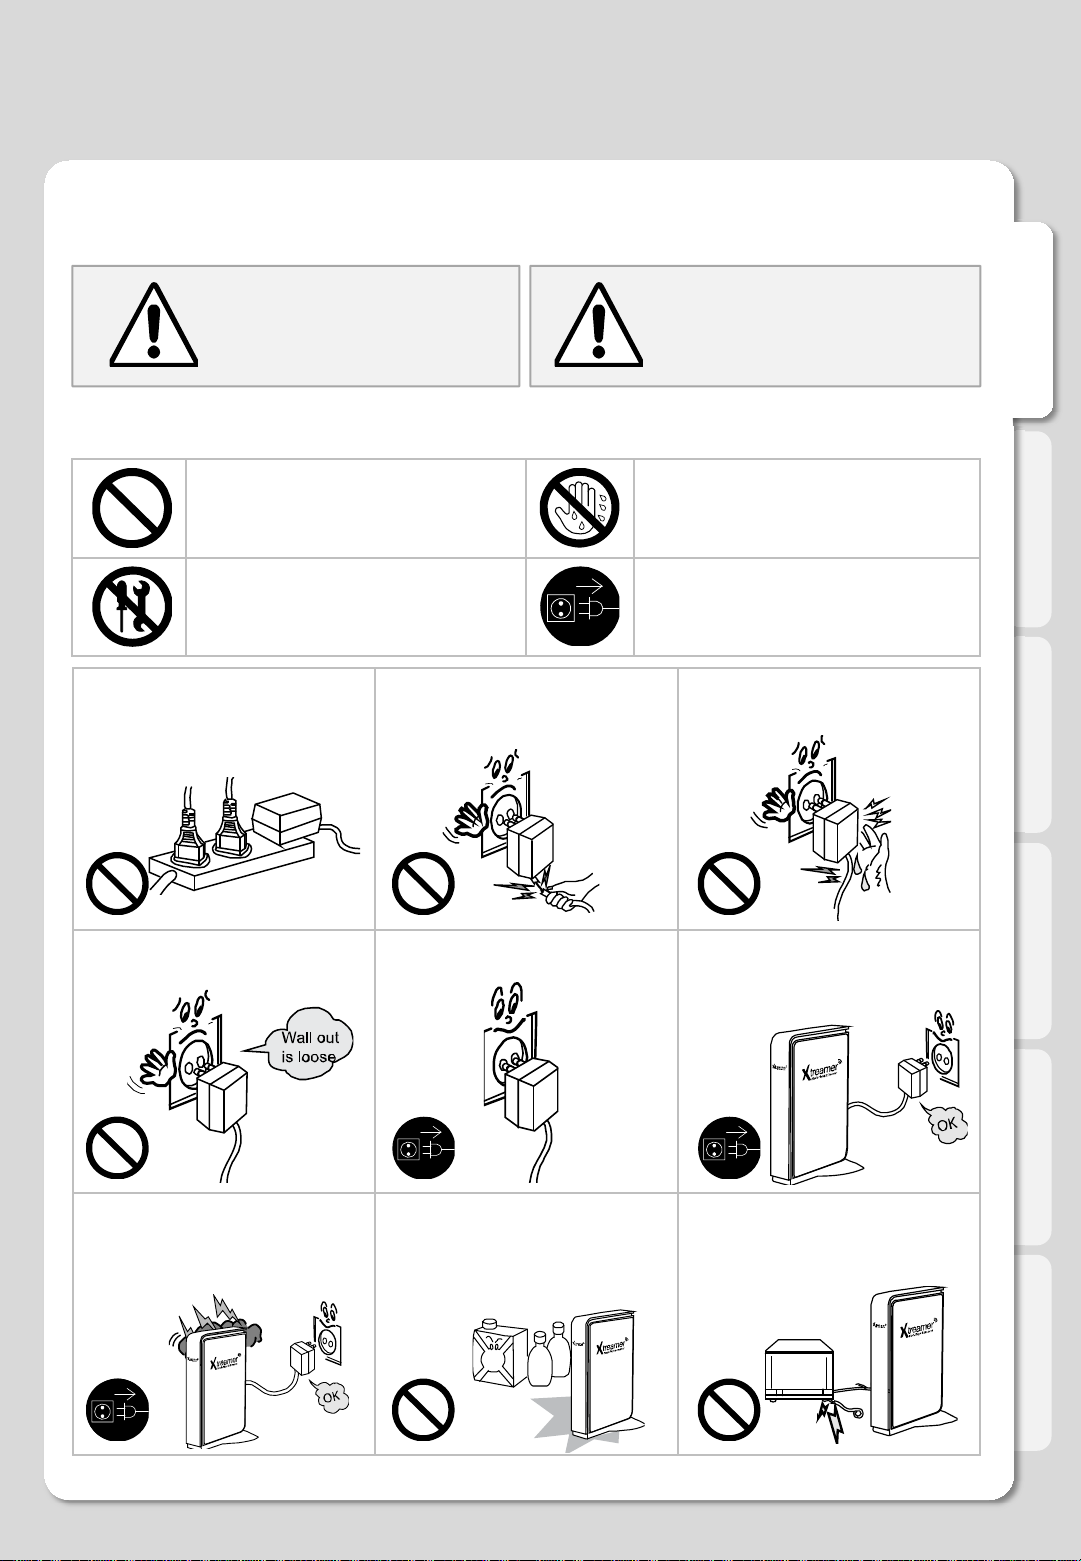
Do not connect a number of power
plugs at the same time. (This may
generate heat or cause fire.)
Violating instructions
may lead to serious
injury or death.
Do not forcefully pull out power cord.
(Breakage of power cord may cause
fire and electric shock.)
Violating instructions may
lead to slight injury or
damage to product.
Power plug to be separated
from power outlet
Do not insert of pull out power plug
with wet hand. (This may cause
electric shock.)
Do not insert power plug if it fits loose
to power outlet. (This may cause fire
or electric shock.)
Clean the outside of product by
wiping it with lightly wet or dry towel.
(Using detergent for grease removal,
thinner or heavily wet towel, etc. may
cause breakdown of product.)
Make sure to turn off power switch
and pull out power plug when moving
product.
Product must not be disassembled,
repaired or modified. Take caution not
to have foreign substances inserted
into products. (This may cause
breakdown of product or electric
shock.)
2
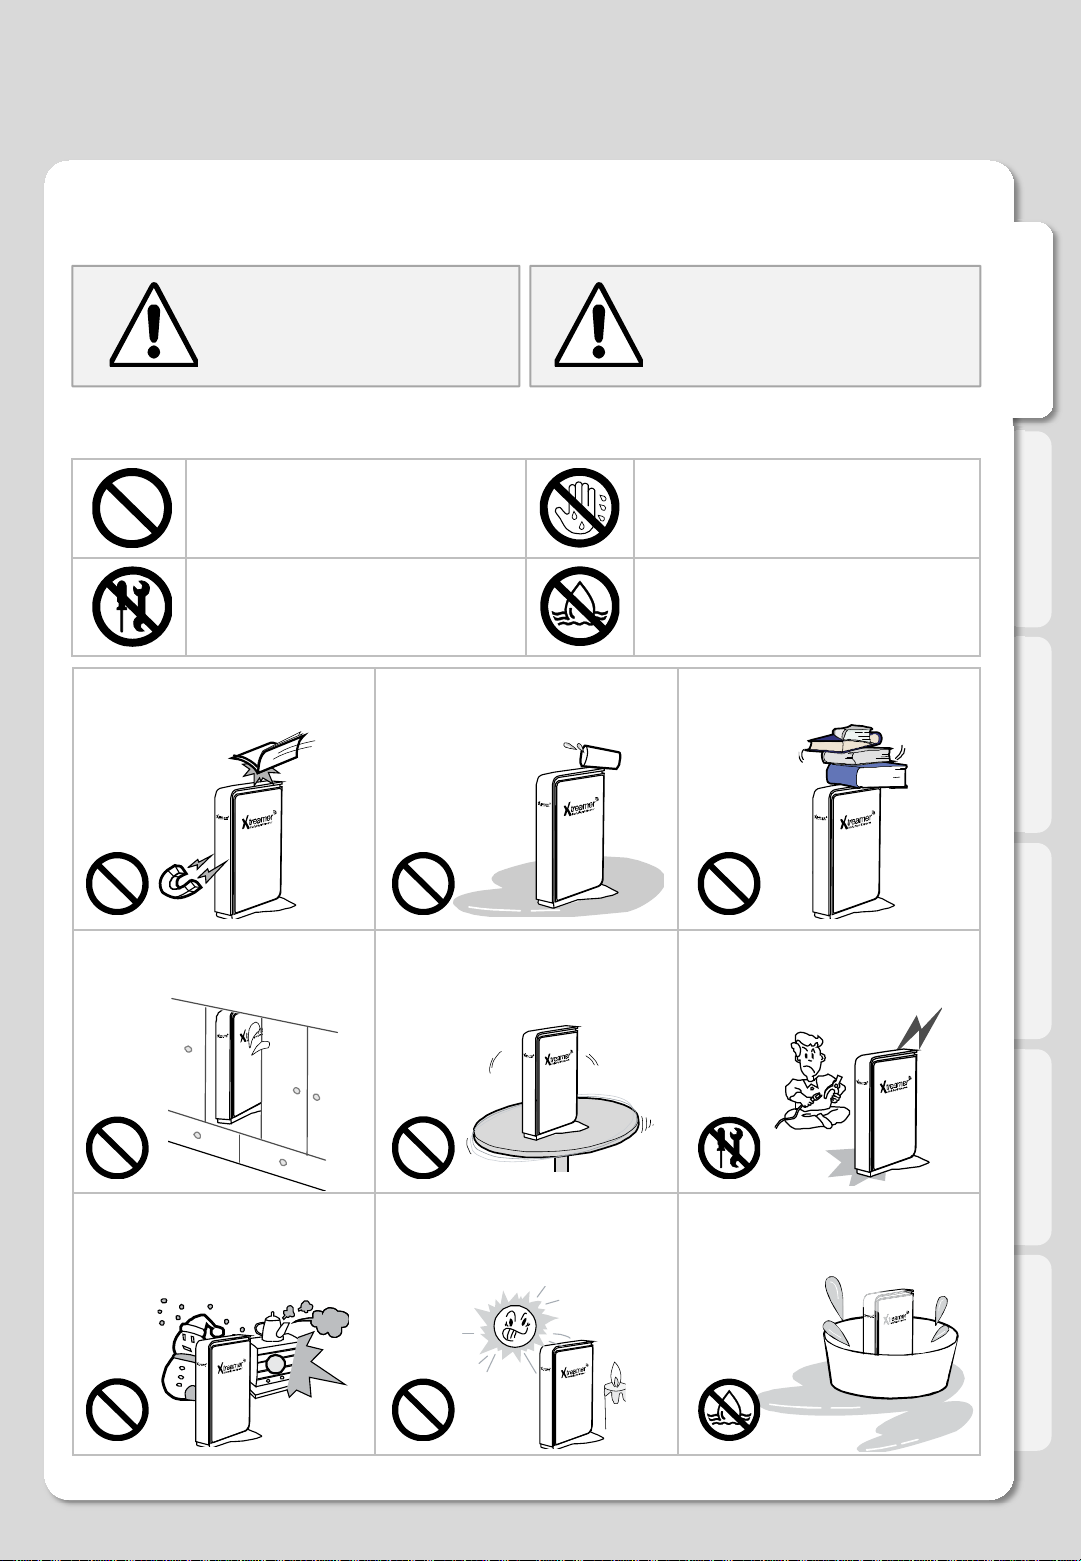
Do not place plant pots, cups or
objects filled with chemical or water,
etc. on top of product. (This may
cause breakdown of product.)
Do not forcefully bend the connected
power cord or have it pressed down
by heavy objects. (This may cause
fire or electric shock.)
Page 3
Safety Notes
The following are to protect safety of user and to prevent damages to property.
Use product properly after carefully reading the following contents.
ENGLISH
Warning Caution
Instructions
Act prohibited Contact by wet hand prohibited
Modification prohibited Soaking prohibited
Do not connect a number of power
plugs at the same time. (This may
generate heat or cause fire.)
Violating instructions
may lead to serious
injury or death.
Do not forcefully pull out power cord.
(Breakage of power cord may cause
fire and electric shock.)
Violating instructions may
lead to slight injury or
damage to product.
Do not insert of pull out power plug
with wet hand. (This may cause
electric shock.)
Do not insert power plug if it fits loose
to power outlet. (This may cause fire
or electric shock.)
Clean the outside of product by
wiping it with lightly wet or dry towel.
(Using detergent for grease removal,
thinner or heavily wet towel, etc. may
cause breakdown of product.)
Make sure to turn off power switch
and pull out power plug when moving
product.
Product must not be disassembled,
repaired or modified. Take caution not
to have foreign substances inserted
into products. (This may cause
breakdown of product or electric
shock.)
3
Do not place plant pots, cups or
objects filled with chemical or water,
etc. on top of product. (This may
cause breakdown of product.)
Do not forcefully bend the connected
power cord or have it pressed down
by heavy objects. (This may cause
fire or electric shock.)
Page 4

Table of Contents
Safety Notes
About Product
Titles of parts
Specification
Hard-Disk Installation
Connection
1. Connect to your PC
2. Connect to the Network
3. Video & Audio output Connect
Remote Control Functions
Media Environment Setting
1. System setting
2. Playback setting
3. A/V setting
4. Network setting
4-1 Wired Network
4-2 Wireless Network (Optional)
5. Misc setting
2
5
7
8
9
10
10
11
12
14
17
17
18
19
20
20
21
22
ENGLISH
Major Functions
1. Media Library Menu
1-1. Movie Playback in Media Library
1-2. Photo Playback in Media Library
1-3. Music Playback in Media Library
2. Internet menu
2.1. What is Xtreamer Live
2-2. How to Use You Tube
2-3. Using Picasa Function
3. File Manager Menu
For Advanced Users
1. UPnP Media Server
1-1. UPnP to connect
1-2. UPnP to setup
1-3. UPnP Media Server
1-4. File upload and download
2. NAS (Network Attached Storage)
3. Windows Vista Share Folder Setting
4.Change/Give Power for Windows Vista Share Folder (Copy Function)
5. Firmware Upgrade
Limited Warranty
23
23
25
27
28
29
29
29
30
31
32
32
32
33
34
35
36
37
40
41
42
Copyright and Legal Attributions
43
4
Page 5
About Product
Multimedia library
High Resolution HD-level File Play: Xtreamer supports the max. of 1920X1080
progressive scan to provide clear and high resolution picture quality.
Supporting Diverse Movie Format Types
Xtreamer supports a variety of HD files, such as TP, TS ,TRP and M2T,M2TS.MTS files,
but also MPEG1/2/4 , Divx (3/4/5/6), Xvid, DAT, ISO, DVD (VOB, IFO) and MKV(X.264),
AVC HD, WMV9, ASF, H.264,MOV,MP4, RMVB, FLV, etc. You can convenient ly enjoy
watching movies anywhere as long as you have access to a display device, such as TV,
etc.
Convenient Copy
Xtreamer allows you to copy a media file to a network-connected PC.
Also, you can copy files by high-sp e e d from PC to Xtreamer HDD or to
USB storage device connected to Xtreamer.
ENGLISH
Supporting Diverse Music Files
Xtreamer supports a variety of music source s, such as AAC,MPEG audio MP1/2/3/A,
WMV,WMA,FLAC,OGG, AC3 and DTS, etc. As the player supports fast rewind/
forward functions, you can quickly find the desired part you require for listening.
Digital Photo Album
Xtreamer supports the upgraded JPEG and BMP image files. The entire
family can enjoying watching the files through TV, etc. Also, vertically
photographed filed can be rotated in screen for viewing without requiring
modification.
Network-shared File Play
Files shared on a network can be played through wired/ wireless means
without having to move them to the Xtreamer hard disk.
NAS (Network Attached Storage)
Xtreamer uses the network drive in Window at support SAMBA function
5
Page 6
About Product
Supporting USB Host
Xtreamer supports 2 USB2.0 hosts. By connecting USB external storage devices,
you can easily add additional storage to the Xtreamer and play the files on the
external USB devices. A USB type memory card reader, etc. can also be used .
Supporting UPnP client
Xtreamer supports UPnP server functions. Xtreamer supports free DDNS so
that you can connect to the internal HDD of the Xtreamer not only from your local
PC, but also from any PC with a Internet connection. This function can be used
from an external device that supports UPnP client.
Supporting High Resolution HDMI
Built in with HDMI terminal for digital signal output, Xtreamer enables you to
enjoy video content with better picture quality.
ENGLISH
5.1CH Audio Output and Down Mix Function
Xtreamer provides 5.1CH Dolby Digital audio and DTS, etc. Also, down mix function lets
you play 2CH audio through TV, etc. without requiring an additional decoding device,
such as amplifier, etc (optical).
Manufactured under license from Dolby Laboratories. Dolby and the double-D symbol are trademarks of Dolby Laboratories
DTS is a registered trademark & the DTS logos and Symbol are trademarks of DTS, Inc.
6
Page 7
②
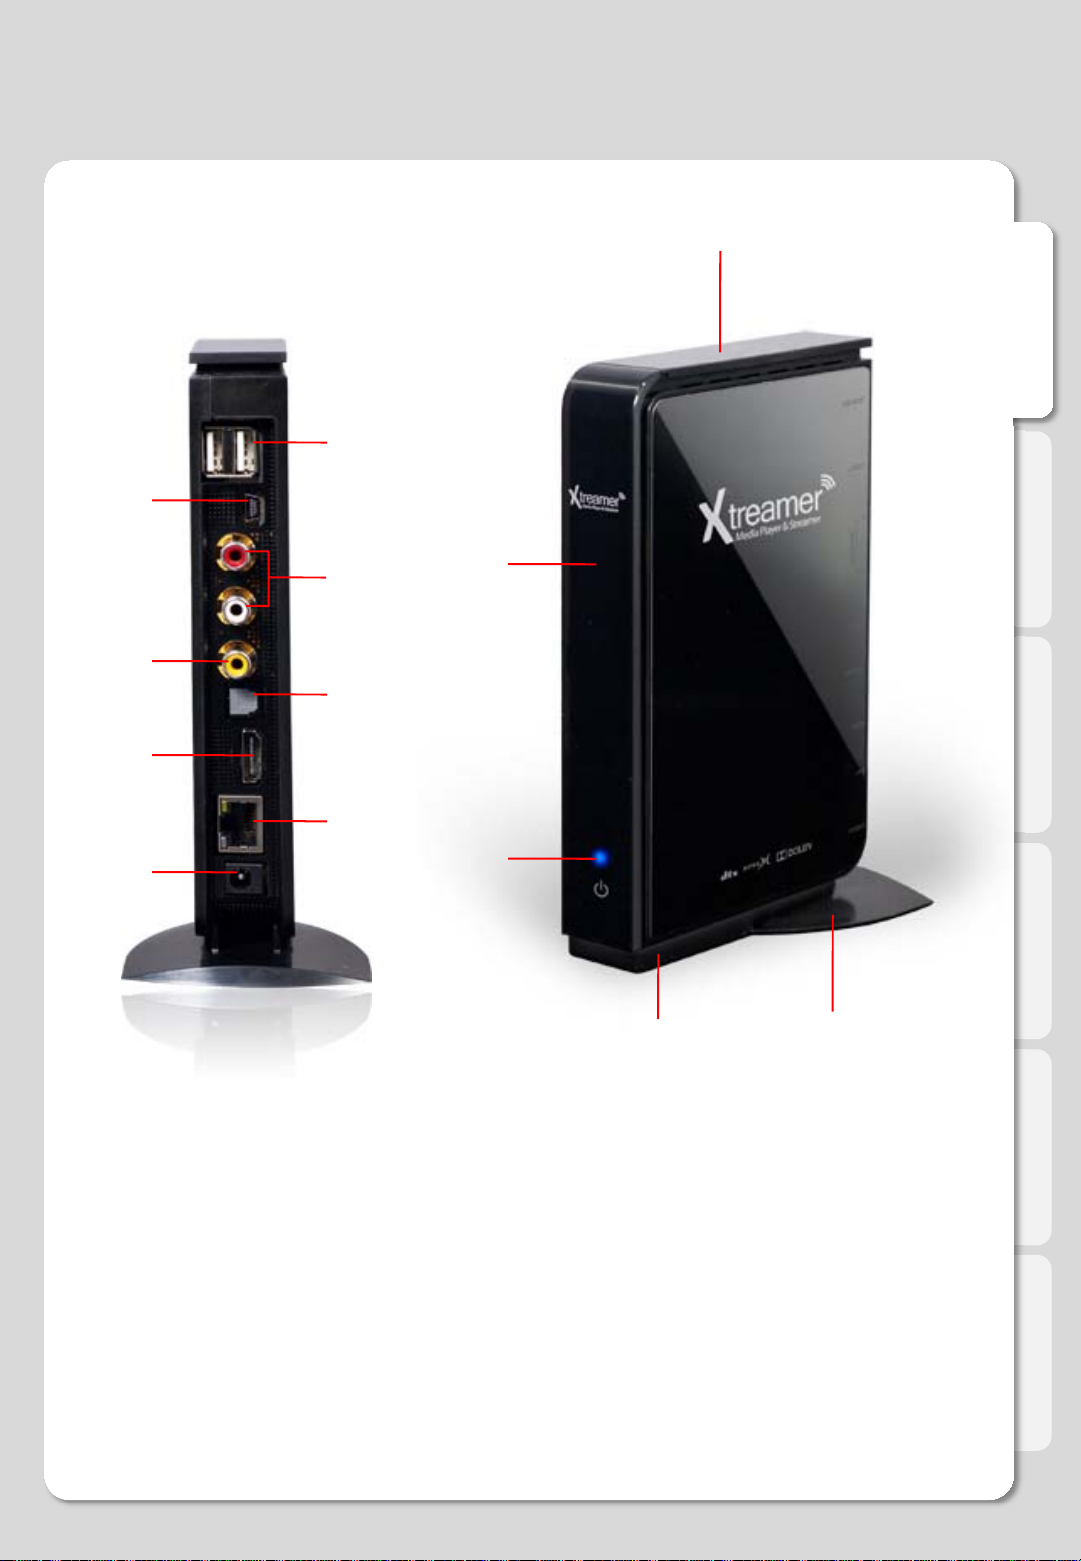
Titles of parts
①
ENGLISH
①
④
⑥
⑧
③
⑤
⑦
③
②
⑤
④
Front PanelBack Panel
① USB host X 2port
② USB slave port
③ Stereo RCA terminal
④ Composite terminal
⑤ Optical terminal
⑥ HDMI terminal
⑦ 10/100Mbps LAN port
⑧ Power
① Top cover for install HDD
② LED status
③ IR reception part
④ Cradle
⑤ Cooling Fan
7
Page 8
Specification
Product Name Xtreamer
Processor RTD1283DD 400Mhz
Operating System Linux
File System FAT16/FAT32/NTFS/UDF/EXT3
ASF / AVI / DIVX / FLV / IFO / ISO / M2P / M2TS / M2V / M4V / MKV /
MOV / MP4 / MPEG / MPG / MTS / RMVB / TP / TRP / TS / VOB /
WMV
XVID SD/HD / MPEG1, VCD 1.0/2.0, SVCD / HD MPEG2 (up to
MP@HL1080i), ISO/IFO/VOB/TS / HD MPEG4
SP/ASP(720p/1080i/1080p), Xvid / H.264 BP@L3, HP@4.1 /
WMV9/VC-1 AP@L3 / RealVideo 8/9/10, up to 720@30P /
DviX3/4/5/6 (Licensee Only)
AAC / AC3 / DTS / FLAC / FLC / M3U / M3U8 / M4A / MP1 / MP2 /
MP3 / MPA / MPC / OGG / PCM / RA / RM / WAV / WMA
Dolby® Digital Plus, TrueHD / DTS HD Master Audio, High
Resolution, LBR / 7.1 down-mix / WMAWMA Pro, Dolby® Digital
AC3 and DTS® (Licensee Only) / MPEG I Layer 1, 2, 3 (2-CH) and
MPEG II Layer 1, 2 (Multi-Channel) / LPCM,ADPCM, FLAC, AAC,
WAV, and OGG Vorbis / RA1/RA-cook/RA-lossless
HD JPEG/BMP/GIF/MGIF(not act)/PNG/TIFF/TIF /
HD JPEG with unlimited resolution(40M-pixel tested) / Full-pixel
JPEG decode with high resolution zoom-in
Supported File
& Formats
Video
Formats
Video
Codecs
Audio
Formats
Audio
Codecs
Image
ENGLISH
Video Output Composite and HDMI1.3
Analog Stereo RCA
Audio Output
Digital Optical
TV System NTSC, PAL or HDMI auto
Hi-Def Decoding HD HDMI(480P, 576P, 720P 50HZ/60HZ , 1080i 50HZ/60HZ, 1080P 50HZ/60HZ)
Wired Ethernet (10/100) LAN via RJ-45 Port
Networking
Wireless USB host port
Network Security Wireless : WEP, WPA
Wireless : IEEE802.11N, 3dBi USB antenna(Optional)
Network Protocol
Hard-Disk Type 2.5” Internal SATA I/II
USB Interface USB2.0 host and USB slave
Power DC 12V, 2A
Dimension 110mm(W) X 162mm(H) X 27mm(D)
Wired : 10/100Mbps Fast Ethernet (RJ45)
TCP/IP (DHCP client mode, Manual IP mode)
Specifications subject to change without prior notice
8
Page 9
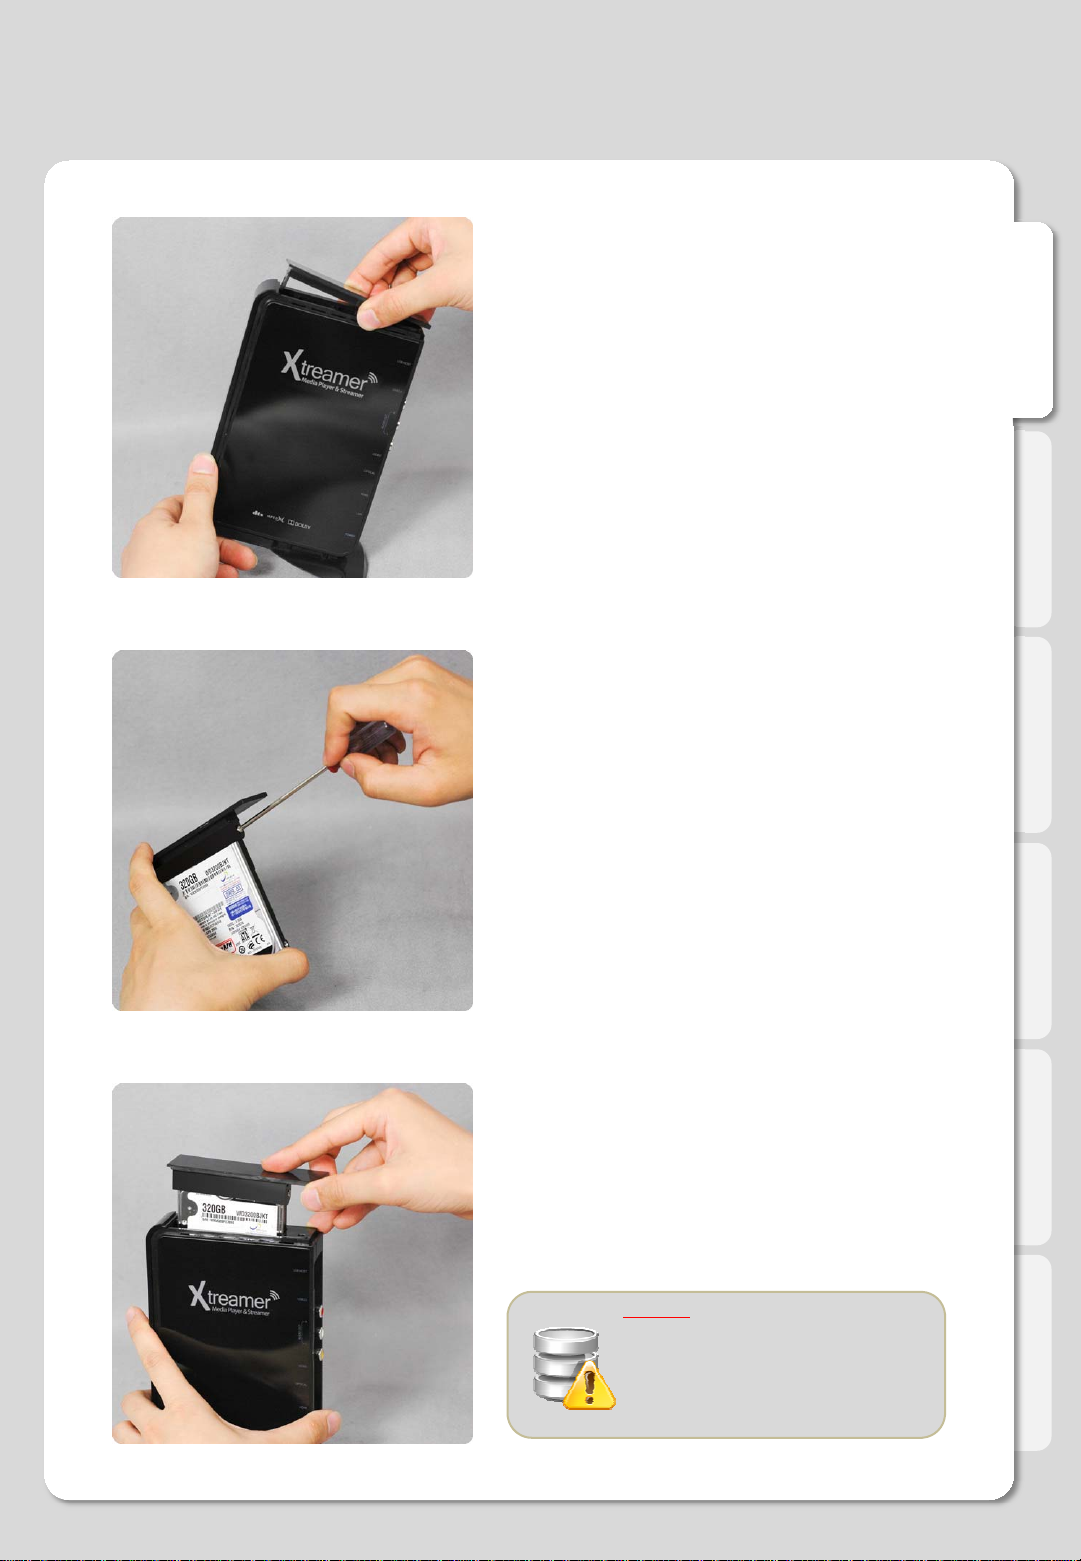
Hard-Disk Installation
ENGLISH
01.
02.
Remove the HDD cover on the top of
product by pulling and separating the HDD
guard from the main body of Xtreamer
Connect the HDD guard and SATA HDD
as shown in the picture. Fasten screws.
03.
9
As shown above, slowly push the HDD
guard together with the SATA HDD into
the main body of Xtreamer.
Caution
Do not force HDD into unit under any
circumstances. If installation doesn’t
go easily, it could break the SATA
port in Xtreamer. Must reinstall from
beginning.
Page 10
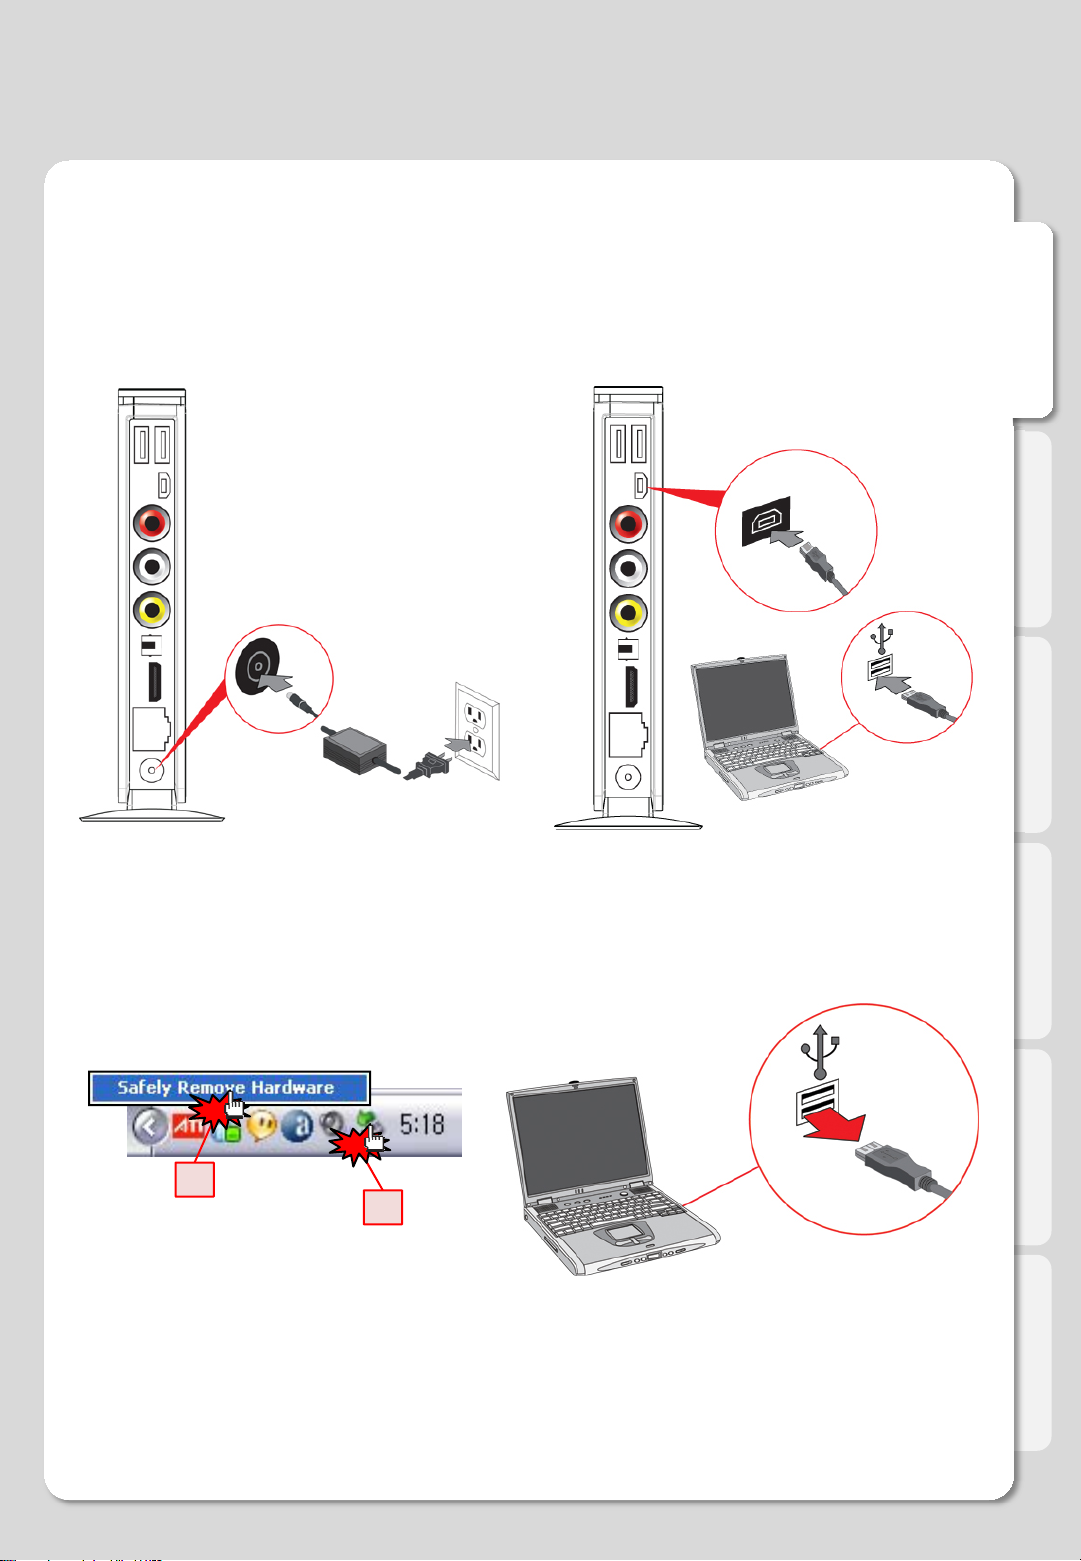
Connection
1. Connect to your PC
ㆍConnect the Adapter ㆍConnect the USB cable
ENGLISH
PC
ㆍDisconnect the Xtreamer
(1) Click on
Click
Click
2
1
(2) Disconnect
10
Page 11

Connection
2. Connect to the Network
ㆍWired Network
Wired IP Sharing Router
ENGLISH
ㆍWireless Network
Optional : Wireless USB antenna
Wireless IP Sharing Router
11
Page 12
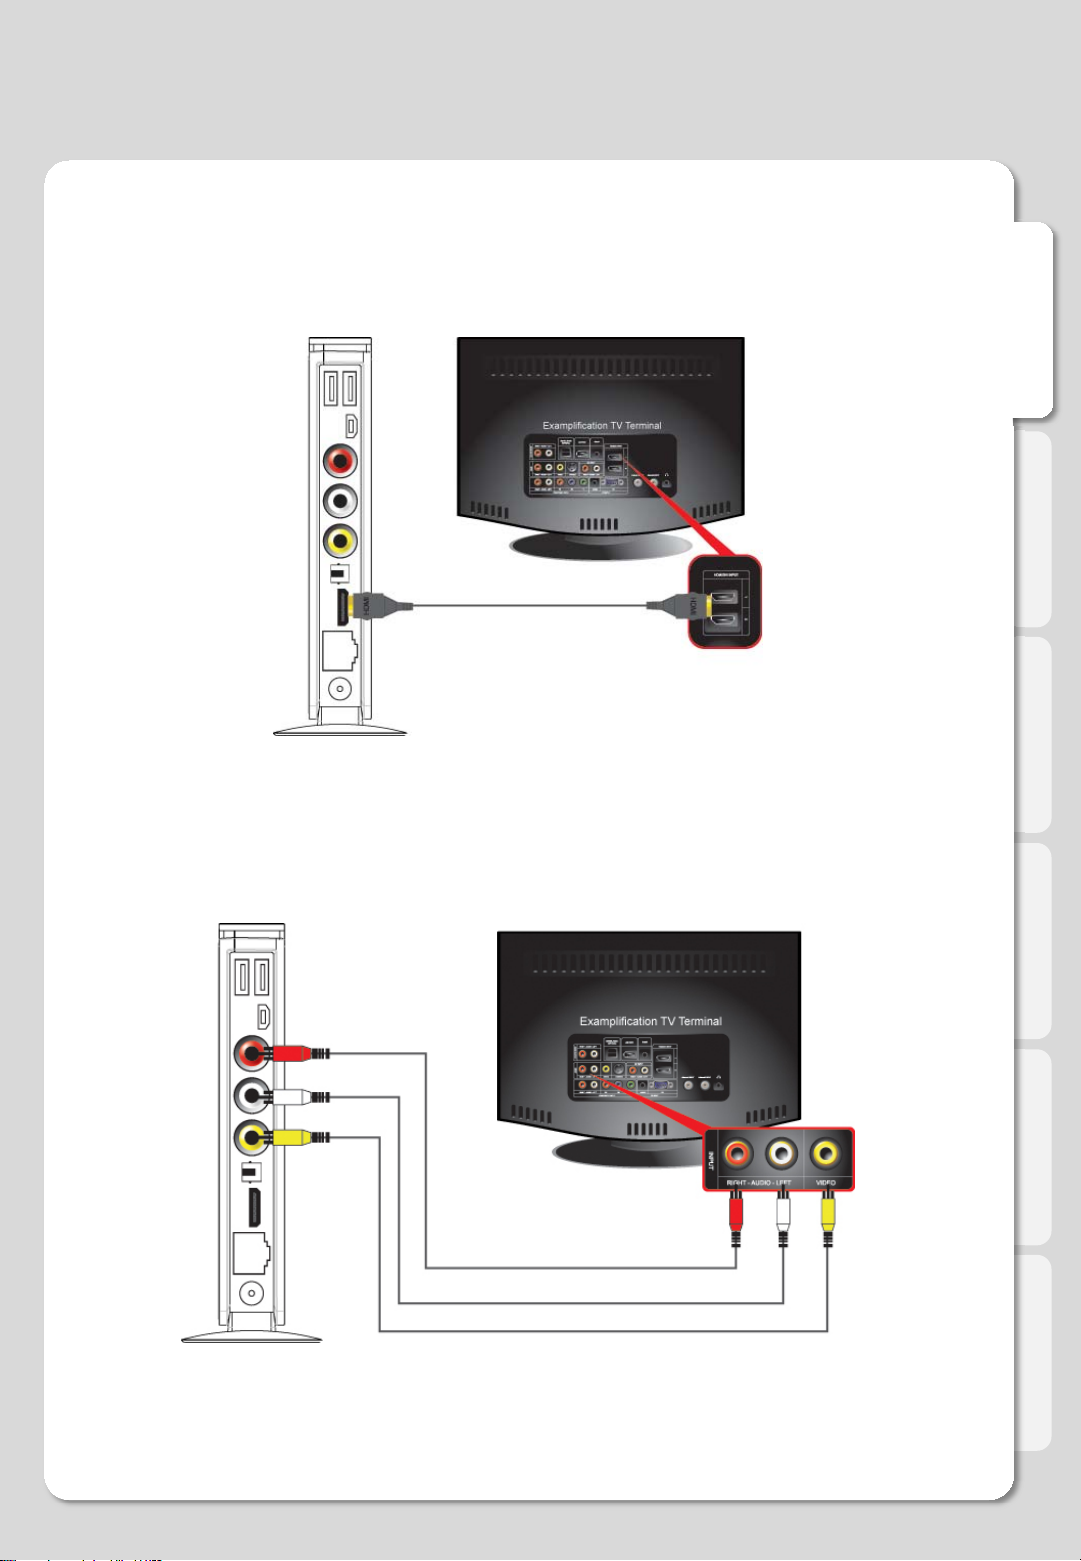
Connection
3. Video & Audio output Connect
ㆍHDMI cable connection
ENGLISH
Connect HDMI cable to HDMI terminal at the back of product. Connect the remaining cable
terminal to HDMI terminal at the back of digital TV. Make sure to carefully distinguish
between input and output terminals.
ㆍComposite cable connection
Connect yellow cable for video signal to the terminal located at the back of side of TV. Then,
select external input of TV. Connect the remaining red and white terminal cables to the left/ right
and audio output terminal at the back of the device. Then, connect red and white cables to the
left/ right terminal of DTV input or component audio input located at the back of digital TV.
12
Page 13
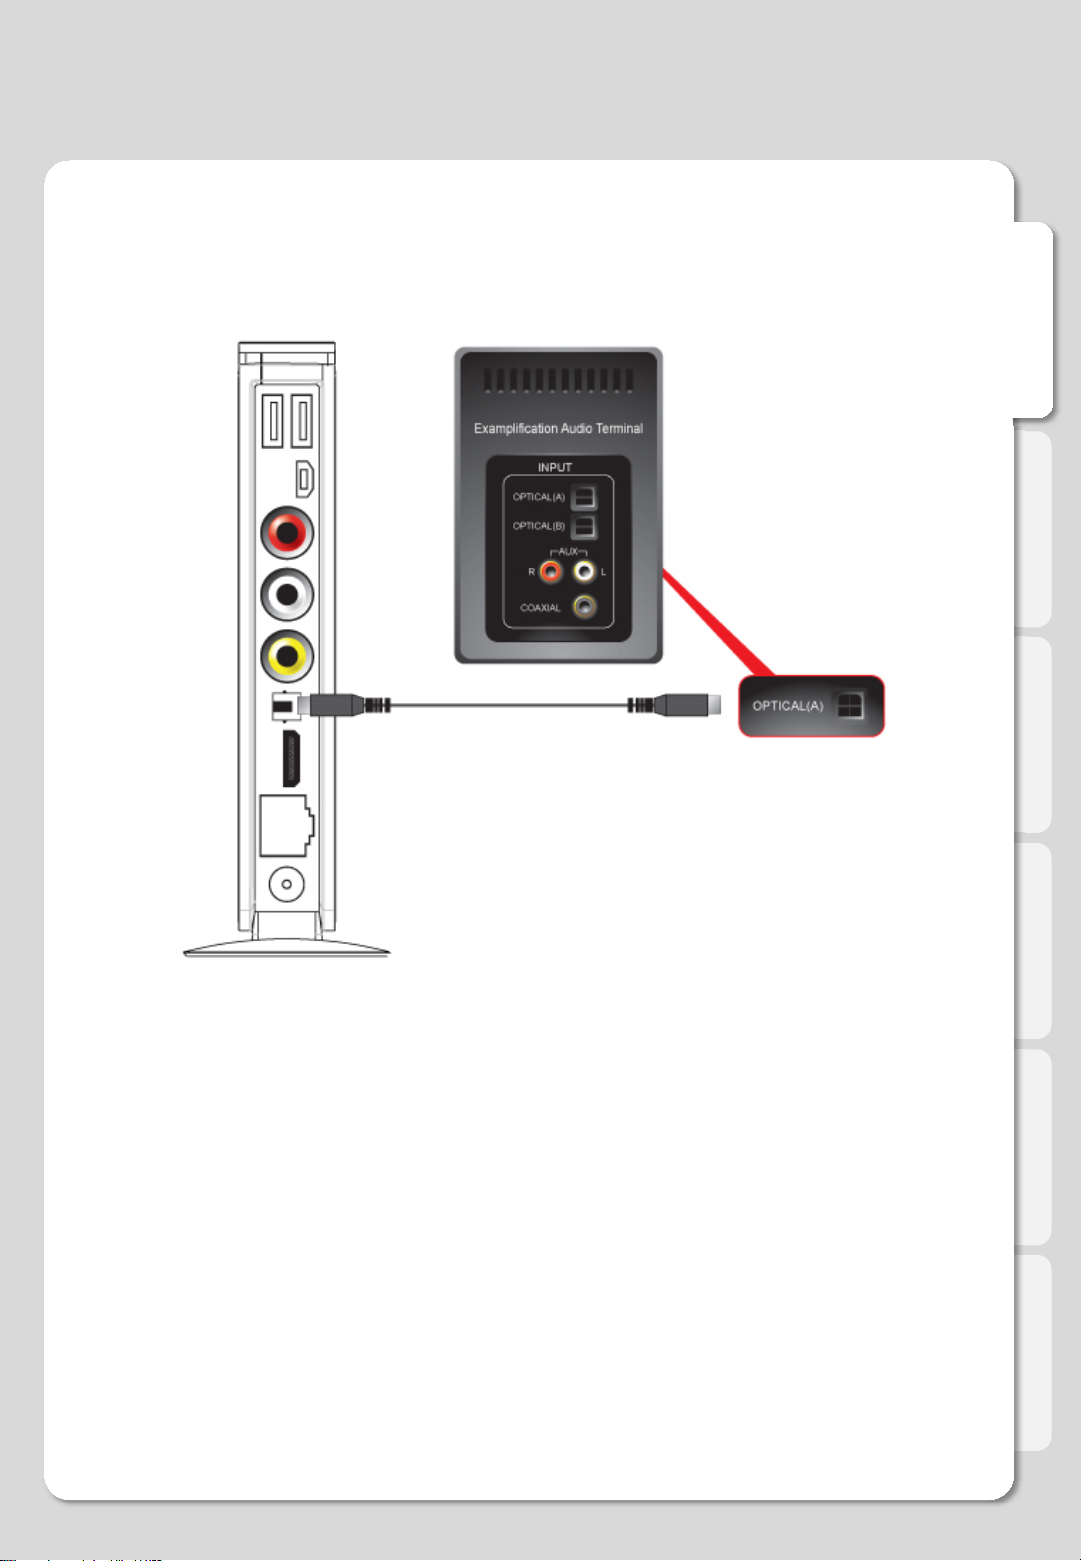
Connection
ㆍOptical cable connection
ENGLISH
You can enjoy high-quality sound 5.1CH if the audio device is an amplifier or a receiver with
optical output cable input terminal. Connect optical cable to Optical, the optical output terminal
of Xtreamer as shown above. Then, connect amplifier or receiver to enjoy 5.1CH.
13
Page 14

Remote Control Functions
ENGLISH
12
3
4
7
9
10
13
5
6
8
11
12
14
15
17
19
21
23
26
27
28
16
18
20
22
24
25
29
14
Page 15

Remote Control Functions
1POWER
2HOME
3EJECT
4ADD
5 DELETE
6 GOTO
7 ZOOM
8MENU
9 FUNC
10 SETUP
To turn on/ off power mode
To go to top menu
To add the selected media file to list / Eject for DVD
ADD
Delete
To select file in the same title or to execute shortcut to
the already designated chapter position/shortcut to the
desired time position
To enlarge and reduce screen/ repetitive pressing for
adjusting zooming percentage/moving to position of
enlarged output by using direction keys.
To change or set DVD file menus by moving to MENU
screen during DVD(VOB) file play
To implement the function of ~
Function available when playing media file or using
menu’s in VIDEO IN screen to display various setup
screens
ENGLISH
11 TVOUT
12 PREVIEW
13 INFO
14 RETURN
15 DIRECTION KEY
16 ENTER
17 PGUP
18 PGDN
19 PLAY/PAUSE
20 STOP
21 FR/FF
Toggle Video Output Modes and resolution (HDMI, AV)
To turn on/ off preview screen automatically displayed
in media play file search mode
To display the current status function available while
recording is in play/ repetitive pressing for displaying
network status/ to hide or display OSD of TIME SHIFT
function
For returning
To move and select cursor
To confirm selection/ play
To move to previous chapter or file (list)
To move to next chapter or file (list)
To play and pause the selected file
To stop file in play
1.5x/2x/4x/8x/16x/32x speed, function available in mp3
as well sound output available in 2x speed
22 VOLUME
To adjust volume
15
Page 16

Remote Control Functions
23 AUDIO
24 A-B
25 MUTE
26 SHUFFLE
27 REPEAT
28 SUBTITLE
29 SYNC SUBTITLE
To change or select audio tracks of file in play
To set zone repetition
For mute function
To change play sequence to shuffle
To repeat file in play or to repeat all media files in the
corresponding folder
To select multi-language in a subtitle file
To adjust sync of subtitle files played with film
(100ms/ 0.1sec)
ENGLISH
16
Page 17

Media Environment Setting
1. System setting
Menu Language
Language for menu can be changed. Available languages are English, Spanish, French, German,
Italian, Greek, Hebrew, Korean and Dutch. The changed language is immediately applied
ENGLISH
Text Encoding
Method of display to fetch subtitle file from computer can be changed.
Unicode(UTF8)/Korean/Western/Turkish/Central European/Greek/Cyrillic/Hebrew/Source Eastern
are available
UPNP Media Server
Using Xtreamer UPnP media server
Samba Server
Using NAS network driver to PC
System Update
Currently, firmware version is displayed and firmware update through USB storage device and
hard disk in Xtreamer is possible.
Time
Set time of Xtreamer that serves as the basis of using Timer function. Using up/down/left/right keys
in remote control, set year/month/day/hour/minute/second. Press OK to save the set values.
HDD Format
Xtreamer includes the automatic format menu and can format to NTFS file system.
Restore default
All set values can be restored to default (UPnP)
17
Page 18

Media Environment Setting
2. Playback setting
ENGLISH
Resume Play
For replaying the movie file which was previously played, select the starting place either from
the beginning or from the paused point.
Slide Show Time
This is to set the time of which display is produced and maintained when viewing photos
Time can be designated as off/2sec/5sec/10sec/30sec/1min/2min.
Transition Effect
When viewing photos, transition effect to move to the next photo is set. Total of 7 effects are
available. All other randomly applied effects are also supported.
Background Music
Folder : The audio file automatically replays in the same folder of picture files.
Play list : The audio file automatically replays in the playlist in Xtreamer
Media Play Movie Preview
In media play function, you can disable or enable preview function. This is not applied in Playback
menu. On/Off setting can be made by using Preview key in remote control.
18
Page 19

Media Environment Setting
3. A/V setting
Aspect Ratio
Screen ratio can be set to suit TV type. Setting is changed to Pan Scan 4:3/Letter Box 4:3/16:9.
ENGLISH
Pan Scan 4:3
Letter Box 4:3
16:9
Brightness
Brightness of the displayed screen is adjusted. While video is in play, press SETUP in remote
control. Brightness can be adjusted while video is in play.
Contrast
Contrast of the displayed screen can be adjusted. While video is in play, press SETUP button in
remote control. Contrast can be adjusted while video is in play.
TV Out
Video output resolution can be changed. PAL and NTSC modes are not compatible with each
other, therefore, it must be adjusted to the TV in use. There is a function that automatica lly adjusts
output to TV system, therefore, it is not necessary to change PAL/ NTSC modes.
Night Mode
Output the sound comfortably during the night. Support the night mode to Off/On
This ratio is used when aspect ratio of TV is 4:3. This setting is to show the film of 16:9 ratio
by cutting it to 4:3 size.
This ratio is used when aspect ratio of TV is 4:3. This setting is to show the 16:9 film full of
screen in its original ratio.
This ratio is used when aspect ratio of TV is 16:9 to show film with the ratio of 16:9. As of
4:3 ratio, this ratio shows the film full of screen.
Digital Output
Select the HDMI LPCM/SPDIF LPCM, output the Dolby D(AC3) or DTS of down mixing. Support
the 7.1ch down mixing. And select the HDMI RAW/SPDIF RAW, output the 5.1ch Dolby D(AC3) or
DTS through the optical cable.
19
Page 20

Media Environment Setting
4. Network setting
4-1 Wired Network
<Wired Network Not Connected> <Wired Network Connected>
Automatic Allocation Mode (DHCP)
When making connection by using wired LAN, connection is automatically made to network if
selecting automatic IP allocation.
ENGLISH
Static IP (Manual)
This function is for using static IP or for manua l conn ec tio n.
20
When setting is completed, press
OK to attempt connection. Then,
network is connected.
If IP address is displayed as of the example on
the right, network connection is completed with
IP successfully received.
Page 21

Media Environment Setting
4. Network setting
4-2 Wireless Network (Optional)
The following are descriptions on the method of wireless network connection by searching signals.
To use wireless network, you need wired/ wireless sharer.
<Wireless Network Not Connected> <Wireless Network Connected>
The following are descriptions on the method of wireless network connection by searching signals.
To use wireless network, you need wired/ wireless sharer.
ENGLISH
Select Connection1 and move to the
next step.
Caution
Must use the Xtreamer USB antenna.
Select signal search mode. Move to
the next step.
21
When SSID for connection is displayed,
select it and move to the next step.
When encryption input screen is
displayed, enter the accurate password and
press OK to attempt connection.
Page 22

Media Environment Setting
5. Misc setting
ENGLISH
Screen Saver
Display the screen saver when Xtreamer is not active. Time can be designated as
1min/5min/30min/45min.
Fan Speed
Adjust the fan speed for cooling the heat. If the surrounding heats up, don’t lower the fan speed.
TV System
Intro screen output to the PAL/NTSC. Apply the booting after selecting the TV system.
22
Page 23
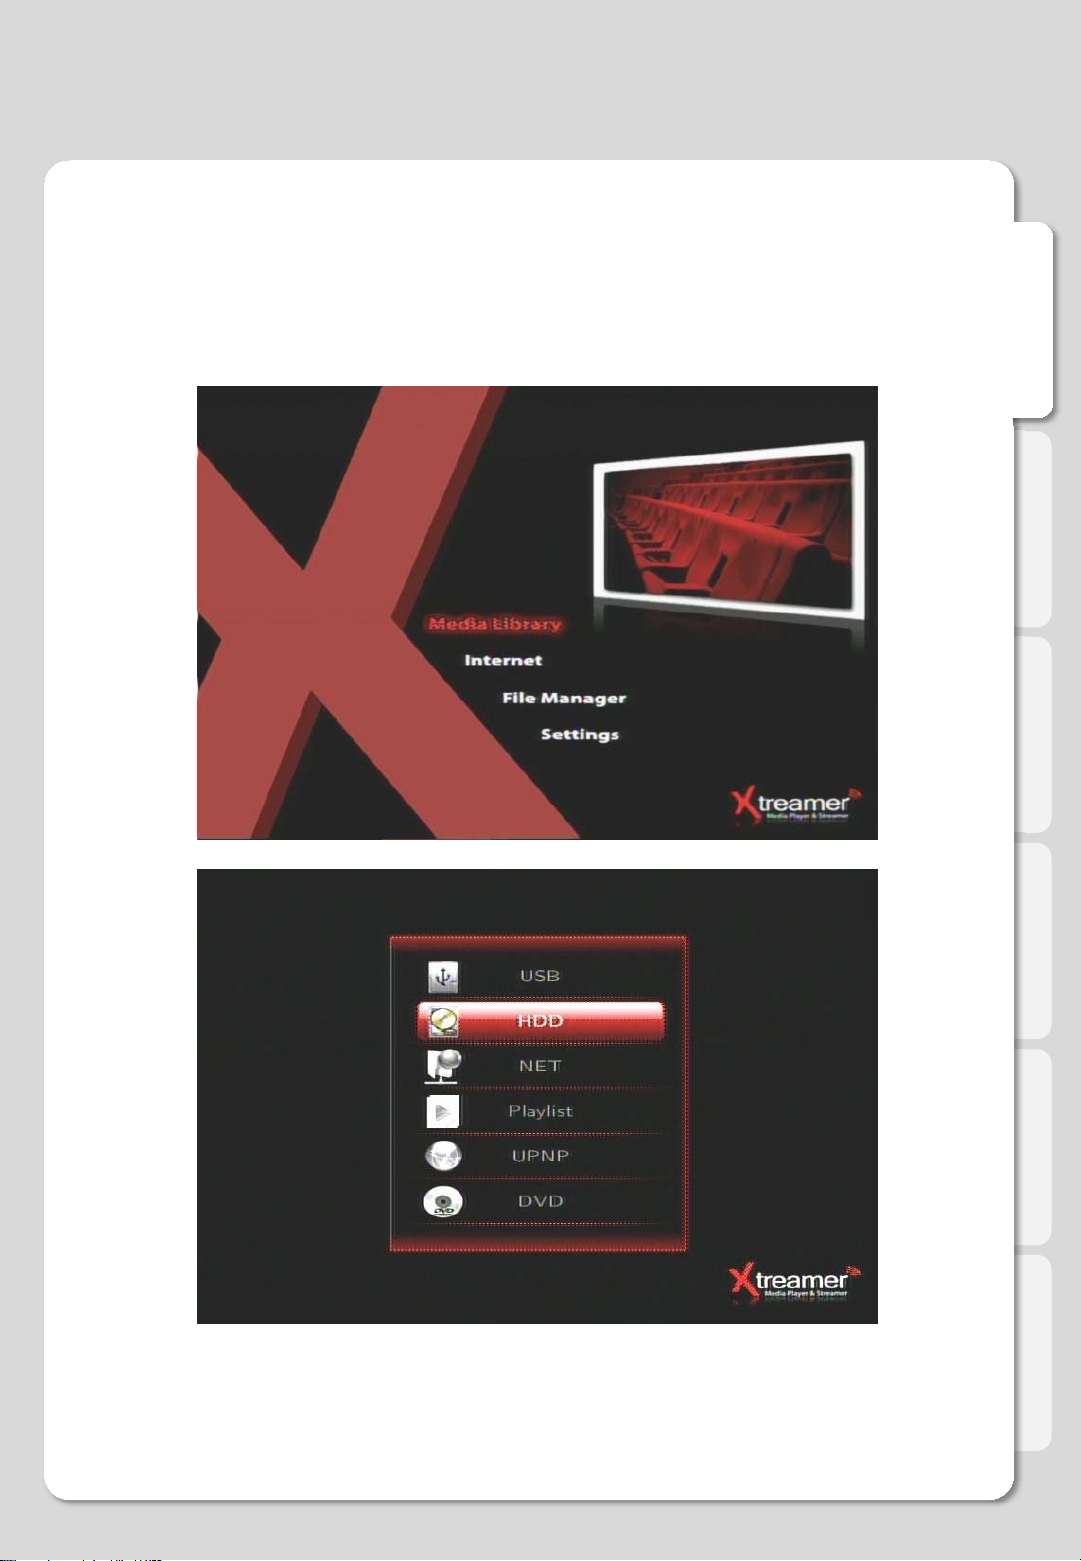
Major Functions
1. Media Library Menu
You can play media of various files, such as film, music and photograph, etc. connected to USB, HDD and NET
or enjoy high-resolution movies. Also, you can connect to and play shared files in a computer that is conn ecte d
to network. Xtreamer also supports the functions of preview or to control storage devices connected to USB
host. In addition, you can play media file while recording is in progress. By connecting USB card reader to USB
host, various memory chips can be expanded for use. Digital camera and mobile phone, etc., which can be used
as mobile storage device, can be directly connected to play and copy media files.
(Function not available if HDD is not mounted)
ENGLISH
USB : External hard disk or flash memory to connected USB host
HDD : 2.5” hard disk in Xtreamer..
NET : Share folder for NAS, Share folder for PC
Playlist : Playlist of the HDD in Xtreamer
UPnP : A/V steaming via UPnP server.
DVD : DVD ROM to connected USB
23
Page 24

Major Functions
ENGLISH
Button Function
UP/DOWN in navigation Move cursor up/down
Enter Enter or confirm the selected item
Left/Right in Navigation Select the media menu
ADD Check the selected file.
EJECT Save the checked file in play list
PREVIEW Change to the Preview mode and File list mode in GUI
FUNC Deleted file or change the file name
RETURN Cancel or return to the previous menu
PLAY/PAUSE Begin playback and pause
PGUP/PGDN View the previous or next movie
24
Page 25

Major Functions
1-1. Movie Playback in Media Library
Play the movie by using the remote control as follows:
1
2
3
ENGLISH
Button Function
ZOOM Move cursor up/down
1 Title : move the index file in same folder
GOTO
MENU Use to the DVD title
TVOUT Change the resolution of TV
2 Chapter : use to the DVD or MKV (PGUP/PGDN)
3 Time : move to the
2
1
Button Function
Hide or display the information bar during playback
1 Video, audio and resolution information
INFO
2 Status playing time
3 Index
4 Repeat/Shuffle/Sequence/A-B
5 Wireless strength
3
4
5
ENTER Enter or confirm the selected item
25
Page 26

Major Functions
Button Function
Navigation Change the subtitle size and position
ENGLISH
PGUP/PGDN
PLAY/PAUSE Begin playback or pause
STOP To stop file in play
FR/FF
VOLUME To adjust volume
MUTE For mute function
View the previous or next movie
DVD mode : move the chapter
1.5x/2x/4x/8x/16x/32x speed, function available in mp3 as well sound
output available in 2x speed
Button Function
AUDIO Select the audio output of multi-audio in movie file
A-B To set zone repetition
SHUFFLE T o change play sequence to shuffle
REPEAT To repeat file in play or to repeat all media files in the corresponding folder
SUBTITLE
SYNC SUBTITLE To adjust sync of subtitle files played with film (100ms/ 0.1sec)
SETUP Change the Bright, Contrast and Sound setting
To select multi-language in a subtitle file and adjust subtitle size and
location
26
Page 27

Major Functions
1-2. Photo Playback in Media Library
Supports JPEG/BMP/TIFF/GIF/PNG/MGIF.
See photos by using the remote control as follows:
ENGLISH
Button Function
ENTER Play the photo file
PLAY Play the photo file
INFO Show the information of EXIF data in JPEG
STOP Stop the photo file
Left/Right in navigation Rotate the photo file
PGUP/PGDN To move to previous or next file
VOLUME To adjust volume (use the background music)
MUTE For mute function (use the background music)
SHUFFLE T o change play sequence to shuffle
Use the Preview mode, show the EXIF data in JPEG.
Does not support action in MGIF.
27
Page 28

Major Functions
1-3. Music Playback in Media Library
Play music by using the remote control as follows:
ENGLISH
Button Function
ENTER Play the music file
PLAY Play the music file
PGUP/PGDN To play to previous or next file
STOP Stop the music file
FB/FF
SHUFFLE T o change play sequence to shuffle
REPEAT To repeat file in play or to repeat all media files
VOLUME To adjust volume
MUTE For mute function (use the background music)
1.5x/2x/4x/8x/16x/32x speed, function available in mp3 as well sound
output available in 2x speed
28
Page 29

Major Functions
2. Internet menu
2.1. What is Xtreamer Live?
Live supports real-time broadcasting streaming. Using online RSS, you can use popular film,
digital photo and weather functions. For user convenience, Xtreamer Live also supports search
function to satisfy diverse tastes of users.
ENGLISH
2-2. How to Use YouTube
Select YouTube in Xtreamer Live. Search/ Recent contains 9 YouTube files, such as Added UCC/
Recommended UCC/ Favorite UCC/ Frequently Viewed UCC, etc.
TIP
Connection may be disabled if link is not normal or blocked. LIVE menu is subject to
change according to manufacturer’s conditions.
29
Page 30

2-3. Using Picasa Function
Major Functions
What is Picasa Function?
This is the free album function provided in Google. You can register to the site and use the service free of
charge. All images registered in Picasa can be searched with keywords. Also, you can view your own albums
by registering them in Xtreamer LIVE. The folder structure of Picasa is supported so that you can conveniently
use this service.
<Screen to Select Picasa> <Selecting Search Keyword or ID Search>
Select search keyword or Picasa ID search in the menu displayed after selecting Picasa menu.
ENGLISH
Xtreamer can confirm the weather of the world
(connection online network)
30
Page 31

Major Functions
3. File Manager Menu
ENGLISH
Button Function
Navigation Move the cursor
ENTER To confirm selection
Red Button To select the folder or file for copy
Green Button To cancel the checked folder or file
Yellow Button To start the copy
31
Page 32

For Advanced Users
1. UPnP Media Server
1-1. UPnP to connect
Using Xtreamer UPnP Media Server
Setting >System > UPNP MEDIA SERVER → ON
Activate Xtreamer UPnP function through the above sequence.
1. In Setting → NETWORK, confirm the allocated IP address for connection to UPnP Server.
2. Enter the confirmed IP address to internet browser.
ENGLISH
Preferentially, connect to wired network for use the UPnP Media Server.
We don’t recommend the wireless network because it can disconnect from
interference.
32
Page 33

1-2. UPnP to setup
For Advanced Users
ENGLISH
Menu Function
Login Setting the user ID and password
DDNS
HTTP T o change the 80 HTTP port
FTP To change the 21 FTP port
Live Keyword
Backup To recover the setting
Language To select the language.
UPnP Server Boost
By using the free DDNS of www.xtreamer.net, you can connect to the
Xtreamer anywhere, anytime.
Languages and search keywords not supported in input of Xtreamer LIVE
are designated in advance for convenient use.
Start button : To improve the upload/download speed but no TV out
Stop button : restore to previous status
33
Page 34

For Advanced Users
1-3. UPnP Media Server
ENGLISH
Menu Function
Video To show the video file
Audio To show the audio file
Photo To show the photo file
All To show the all media file
Upload To upload in network
File Manager Support the new folder, rename, copy/move, delete.
34
Page 35

For Advanced Users
1-4. File upload and download
ENGLISH
UPnP Upload
1.Connect to UPnP and click Copy_Recordings_Here disc.
2. Click Upload button displayed on screen.
3. Sequential uploading of up to 10 files is supported when
uploading a number of files at once.
File Download
1. Connect to UPnP and move to the position of disc to download.
2. Click file name and downloading of the file is administered immediately. Also, you can use the
WMP/GOM/VLC applications in UPnP itself.
35
Page 36

For Advanced Users
2. NAS (Network Attached Storage)
Setting >System > UPNP MEDIA SERVER → ON
Activate Xtreamer UPnP function through the above sequence.
1. In Setting → NETWORK, confirm the allocated IP address
or connection to UPnP Server.
ENGLISH
2. Enter the confirmed IP address to run window.
3. Right key Click to Xtreamer folder.
4. Select the “Map Network Drive” menu.
Then you can directly connect to Xtreamer in
Windows.
Caution
You can use the “Network Drive” in
Windows but you must be have a
HDD installed in Xtreamer.
36
Page 37

For Advanced Users
3. Windows Vista Share Folder Setting
Set and Apply Share Folder
& Copy To Folder in Windows Vista
1. Select a folder in Windows Explorer to activate
the functions for playing share folder using network
and for copying files to Windows Vis ta. Rightclick the folder. When popup is displayed, click
‘Properties’.
ENGLISH
Click
2. Click ‘advanced share’.
Click
3. Click and check the selected share folder. Then
click power.
37
Page 38

For Advanced Users
4. When a menu to set the power of use is displayed,
you will see that ‘everyone’ has been added as
default. You need to register ‘Guest’ user here.
Click ‘Add’.
Click
ENGLISH
Click
5. When another window is displayed to add a user or
group, click ‘Advance’.
Click
6. Click ‘Find Now’ as marked in the picture.
38
Page 39

For Advanced Users
7. The list of search results shows ‘Guest’. Select it as in
the picture and either double-click it or click OK.
Click
ENGLISH
Click
8. Check that ‘computer\Guest’ has been added as in
the picture. Click OK.
39
Page 40

For Advanced Users
4.Change/Give Power for Windows Vista Share Folder (Copy Function)
9. Check ‘Allow Change’ when guest account is added.
When the following screen is displayed, press OK.
Checking ‘Allow Change’ enables you to copy files
to the corresponding folder when using COPY
function. Do not check it if you only intend to play
media files through network share.
Click
Caution is required as all users of the same network
status can access the folder and administer read/
modify/ write/ delete.
Click
ENGLISH
10. Press OK or Apply if the procedure up to No. 9 has
been successfully completed. Check if share folder has
been added as in the picture. Complete the process of
giving power for share folder in Windows Vista.
※ If file is not visible in Windows Vista, check setups as of the following.
In Control Panel -> Network and Share Center, check setups for ‘Use File Sharing’ and ‘Not
Password protected sharing’ as in the above.
40
Page 41

For Advanced Users
5. Firmware Upgrade
ENGLISH
1. Download the firmware file from www.xtreamer.net homepage.
2. Put the firmware file in USB Flash memory or HDD in Xtreamer.
3. Search the firmware to Setting -> System -> System Update.
4. After reboot, firmware upgrade will start.
5. Don’t turn off the power.
41
Page 42

Limited Warranty
Your
w
r
f
r
w
r
r
w
Your
Xtreamer Wireless Hi-Definition Multimedia
Playercomes with a full 1-yr manufacturer’s
arrantyon parts and labor.
The Warranty coverage on this player begins the
dayyou buy your product. This warranty covers
defects in manufacturing only, and expressly
excludes coverage for excessive wear and tear,
physical or accidental abuse, loss and theft. Kindly
contact your local distributor for the warranty and
service procedures. Warranty service is available in
all countries where the product is officially
distributed. The warranty covers any service o
exchange required for a defective unit during the
coverage period. The service / exchange
opportunityends one year after the date o
purchase. The replacement product is covered only
fo
the warranty period of the original product. When
the warranty on the original product expires, the
arranty on all replaced products also expires.
When it is necessary for you to ship the product to
distributor/ service center for service / exchange,
you will pay the shipping costs for shipment to the
distributor. The distributor will pay the shipping
costs when returning the product to you.
To receive warranty service, please be sure to have
yourproof of purchase and a barcode from the
product's packaging. Warranty requests cannot be
processed without proof of purchase.
In no event shall Unicorn’s (or its distributors’)
liabilityexceed the price paid for the product from
direct, indirect, special, incidental, or consequential
damages resulting from the use of the product, its
software, or its documentation. Unicorn does not
refunds for any product. As a part of ou
offe
arranty service, we offer to repair or replace the
product. We offer cross shipments, a faster process
forprocessing and receiving your replacement.
Unicorn and its distributor pay for ground shipping
only. Please contact Unicorn’s Distributor in your
countryfor more
details.
◈ Damage occurring to product during shipping
when improperly packaged or cost associated with
packaging.
◈ Incidental or consequential damages resulting
from the product. (Some states do not allow the
exclusion of incidental or consequential damages,
so the above exclusion may not apply to you. This
includes, but is not limited to, prerecorded material,
whether copyrighted or not.) Unicorn Information
Systems Co. Ltd., Xtreamer, Inc. and its other
partners and distributors DO NOT assume any
responsibility in any way for how you choose to use
this product, associated firmware and this manual.
By purchasing or receiving this product, you
automatically agree to this disclaimer, and eliminate
this company and any affiliates of any responsibility
in this matter.
LIMITATION OF LIABILITY AND
REMEDY...UNICORN or ITS DISTRIBUTORS ARE
NOT LIABLE UNDER ANY CIRCUMSTANCES
FOR ANY DIRECT, INDIRECT, SPECIAL,
INCIDENTAL, OR CONSEQUENTIAL DAMAGES,
HOWSOEVER INCURRED, EVEN IF NOTIFIED
OF THE POSSIBILITY OF SUCH DAMAGES. TO
THE EXTENT PERMITTED BY LOCAL LAW, THE
REMEDIES PROVIDED IN THIS WARRANTY
STATEMENT ARE YOUR SOLE AND EXCLUSIVE
REMEDY. THIS LIMITED WARRANTY GIVES
YOU SPECIFIC LEGAL RIGHTS,AND YOU MAY
ALSO HAVE OTHER RIGHTS WHICH VARY
FROM STATE/PROVINCE TO STATE/PROVINCE.
REMEMBER...Please record below the model and
serial numbers found on the product.
MODEL #_______________________
SERIAL #_______________________
ENGLISH
warranty does not cover the following:
◈ Shipping charges to return defective product.
◈ Labor charges for installation or setup of the
product, adjustment of customer controls on the
product, and installation or repair of systems
outside of the product.
◈ Product repair and/or part replacement because
of improper installation, connections to improper
voltage supply, abuse, neglect, misuse, accident,
unauthorized repair or other cause not within our
control.
42
Page 43

Copyright and Legal Attributions
All textual references, brands, logos or product names are the copyrights, trademarks or registered
trademarks of their respective owners/holders. Use of these trademarks on our website, products,
literature, communications, manuals, advertising material, press releases, etc. do not represent
endorsements by the respective companies for Xtreamer Inc.'s products, services or brand, but
merely reflect their possible compatibility with our products.
◈ DivX® is a registered trademark of DivX Networks Inc. DivX is a digital video compression form
at based on the MPEG-4 technology.
◈ DivX files can be downloaded over high-sp e e d lines in a relatively short time without sacrificing
the quality of the digital video
◈ Dolby, AC3 are registered trademarks of Dolby Laboratories Licen sing Corp.
◈ DTS is a registered trademark of Digital Theater Systems, Inc.
◈ Google is a trademark of Google Technology, Inc.
◈ HDMI is a trademark of HDMI Licensing LLC.
◈ iPod® is a registered trademark of Apple Computer, Inc.
◈ PSP™ (PlayStation Portable) is a trademark of Sony Computer Entertainment Inc.
◈ Java and all Java-based trademarks are trademarks of Sun Microsystems, Inc. in the United
States, other countries, or both.
◈ UNIX is a registered trademark of The Open Group in the United States and other countries.
◈ XVID is a trademark of XVID Project
REFERENCES TO CORPORATIONS, THEIR SERVICES, PRODUCTS and BRANDS WITHOUT
WARRANTY OF ANY KIND, EITHER EXPRESSED OR IMPLIED. IN NO EVENT SHALL
XTREAMER INC. BE LIABLE FOR ANY SPECIAL, INCIDENTAL, INDIRECT OR
CONSEQUENTIAL DAMAGES OF ANY KIND, OR ANY DAMAGES WHATSOEVER, INCLUDING,
WITHOUT LIMITATION, THOSE RESULTING FROM LOSS OF USE, DATA OR PROFITS,
WHETHER OR NOT ADMISSED OF THE POSSIBILITY OF DAMAGE, AND ON ANY THEORY
OF LIABILITY, ARISING OUT OF OR IN CONNECTION WITH THE USE OR PERFORMANCE
OF THIS INFORMATION.
Xtreamer Multimedia Players are not officially licensed or certified by D ivX® Networks.
Any Xtreamer, Inc. publication may include technical inaccuracies or typographical errors. The
information presented here is intended for general information only and is subject to change
without notice. ALL INFORMATION IS PROVIDED "AS IS" WITHOUT WARRANTY OF ANY KIND,
EITHER EXPRESSED OR IMPLIED, INCLUDING BUT NOT LIMITED TO THE IMPLIED
WARRANTIES OR CONDITIONS OF MERCHANTABILITY OR FITNESS FOR A PARTICULAR
PURPOSE, OR NON-INFRINGEMENT. SOME JURISDICTIONS DO NOT ALLOW THE
EXCLUSION OF IMPLIED WARRANTIES, SO THE ABOVE EXCLUSION MAY NOT APPLY TO
YOU.
ENGLISH
Federal law provides severe civil and criminal penalties for the unauthorized reproduction, distribution,
rental or digital transmission of copyrighted video and audio files. (Title 17, United States Code, Sections
501 and 506). Xtreamer players are designed to assist you in backing up, storing and reproducing
material which you own the copyright for or for which you have obtained permission from the copyright
owner. UNLESS YOU OWN THE COPYRIGHT OR HOLD PERMISSION TO COPY FROM THE
COPYRIGHT OWNER, YOU MAY BE VIOLATING COPYRIGHT LAW AND BE SUBJECT TO PAYMENT
OF DAMAGES AND OTHER REMEDIES. IF YOU ARE UNCERTAIN ABOUT YOUR RIGHTS, YOU
SHOULD CONTACT YOUR LEGAL AHDMISOR. YOU ASSUME FULL RESPONSIBILITY FOR THE
LEGAL AND RESPONSIBLE USE OF THE MVIX MULTIMEDIA PLAYER. Use of Xtreamer Players, its
accessories and software/firmware for illegal purposes is strictly prohibited.
43
 Loading...