

Page 1

Product Specification
All-in-one Touchscreen Barebone PC
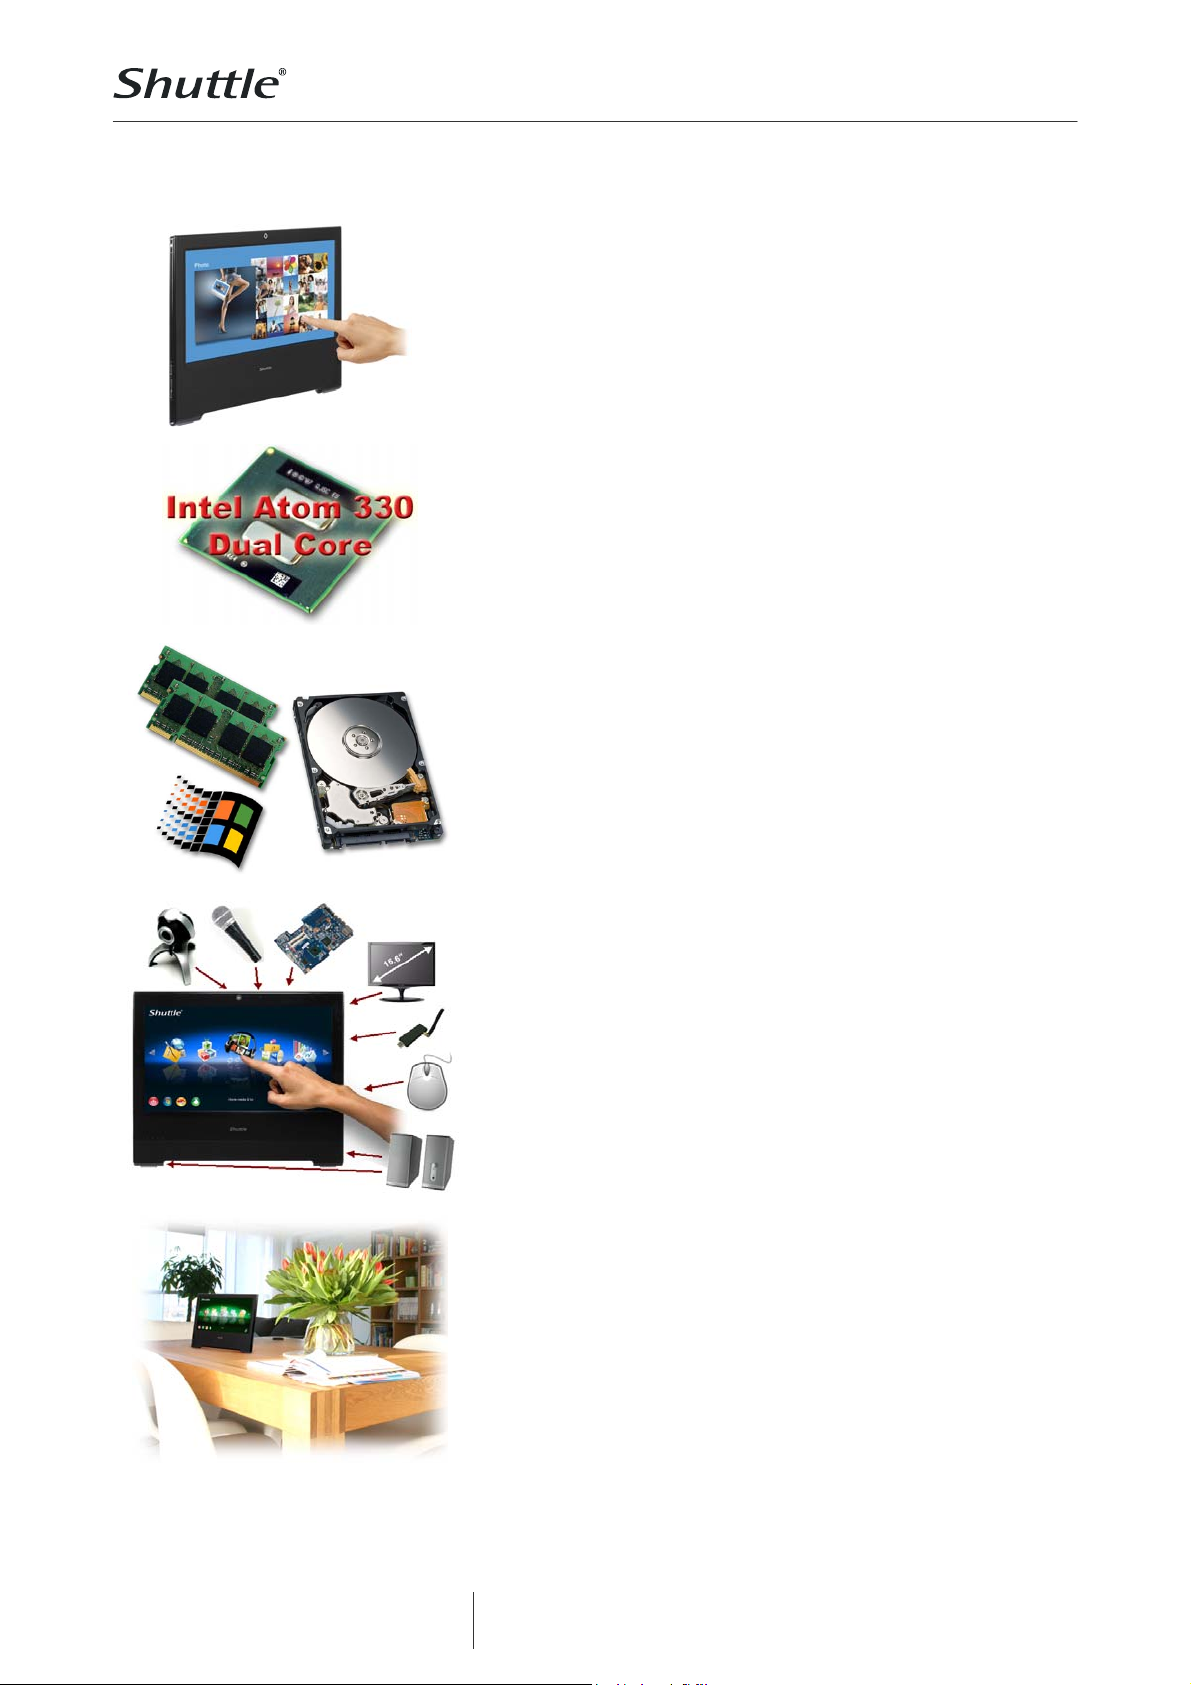
The Shuttle X50 Barebone Black is an all-in-one PC boasting a 39.6cm
(15.6-inch) touchscreen LCD powered by Intel's Atom 330 dual-core
processor. Intended for use in the home environment, the Shuttle X50
Barebone is targeted at hardware experts seeking to build a complete
system according to their individual requirements. The bulk of
components is yet built in, just three components need to be installed:
memory, hard disk and operating system. Equipped with Intel's
GMA950 onboard graphics, it provides generous performance for
daily computing with internet and office applications. A webcam,
built-in speakers, card reader, WLAN and other features leave nothing
you could ask for. Have any applications start up quickly by just
touching the screen for working most swiftly and conveniently
.
Feature Highlight
• Full featured stylish PC platform
All-in-one
design
CPU & Chipset
• Small: 391 x 327 x 36 mm (WHL)
• Stand can also be used as a handle
• External, fanless power supply (65W)
• CPU: Intel ATOM 330 Dual Core
• Chipset: Intel 945GC + ICH7
Shuttle All-in-One PC
X 50 Barebone
Touchscreen Dual Core
Black
Storage
(not included)
Operating
system
Display &
Graphics
Connectivity
Built-in
Application
Warranty
• Supports 1 or 2 GB (max. 2x 1GB)
2x 200 pin SO-DIMM slots (max. 2x 1GB)
• Supports one 6,35cm/2,5" SATA hard disk
• Without operating system
• Compatible with Windows XP/Vista/7+Linux
• 39.6cm (15.6”) touchscreen (1366x768)
• Integrated GMA950 graphics, 224MB UMA
• VGA Video output (clone mode)
• 5x USB
• Audio: Mic, Line-in/out or 5.1 Line-out
• Gigabit LAN, Wireless LAN (draft-n)
• 4-in-1 card reader
• 1.3 Megapixel webcam
• 2x 2W speakers, Microphone
• 100mm VESA mount capable
• Basic, Home Media
• 24 months Bring-in Service
© 2009 by Shuttle Computer Handels GmbH (Germany). All Information subject to change without prior notice. Pictures for illustration purposes only.
Product name: Shuttle AIO X50 Barebone Black
Shuttle order code: PAB-X50002
Images for illustration purposes only.
Page 1 | 16 November 2009
www.shuttle.com
Shuttle Computer Handels GmbH
Fritz-Strassmann-Str. 5
25337 Elmshorn | Germany
Tel. +49 (0) 4121-47 68 60
Fax +49 (0) 4121-47 69 00
sales@shuttle.eu
Page 2
Product Specification
Shuttle X50 Barebone Black - Special Product Features
All applications at your fingertips
The innovative touchscreen technology delivers the simplest operation
possible and makes the screen the centre of action. Its high-quality
design lets you control the whole range of multimedia - music, movies,
video playback and web browsers start by just touching the screen.
Dual Core. Do more.
The vast majority of the existing netbooks and all-in-one PCs with an
Intel Atom CPU use the original Single Core version. In contrast to this,
Shuttle's all-in-one PC stands out from the crowd with its embedded
Intel Atom 330 Dual Core processor, which is boosting the productivity
of the PC system, particularly with regards to multithreaded
applications.
What does "Barebone" mean?
The Shuttle X50 Barebone is targeted at hardware experts seeking to
build a complete system according to their individual requirements.
The bulk of components is yet built in, just the following hardware is
required to be installed by the purchaser in this case:
- One 6.35cm/2.5" Serial ATA hard disk
- One or two DDR2-667/800 SO-DIMM memory modules (200 pins)
- Optional: USB keyboard and USB mouse
- Operating system (Windows XP/Vista/7 or Linux)
All-in-one PC
Your complete PC system with many components already built in
comes in just one single device! This includes the webcam,
microphone, mainboard, display, touchscreen input interface, Wireless
LAN module and speakers. Saves you more space, looks simply stylish,
less wiring.
Page 2 | 16 November 2009
www.shuttle.com
Slim and chic
Designed as space-savers, this 15.6 inch all-in-one desktop PC only
measures 3.6cm in depth.
Shuttle Computer Handels GmbH
Fritz-Strassmann-Str. 5
25337 Elmshorn | Germany
Tel. +49 (0) 4121-47 68 60
Fax +49 (0) 4121-47 69 00
sales@shuttle.eu
© 2009 by Shuttle Computer Handels GmbH (Germany). All Information subject to change without prior notice. Pictures for illustration purposes only.
Page 3
Product Specification
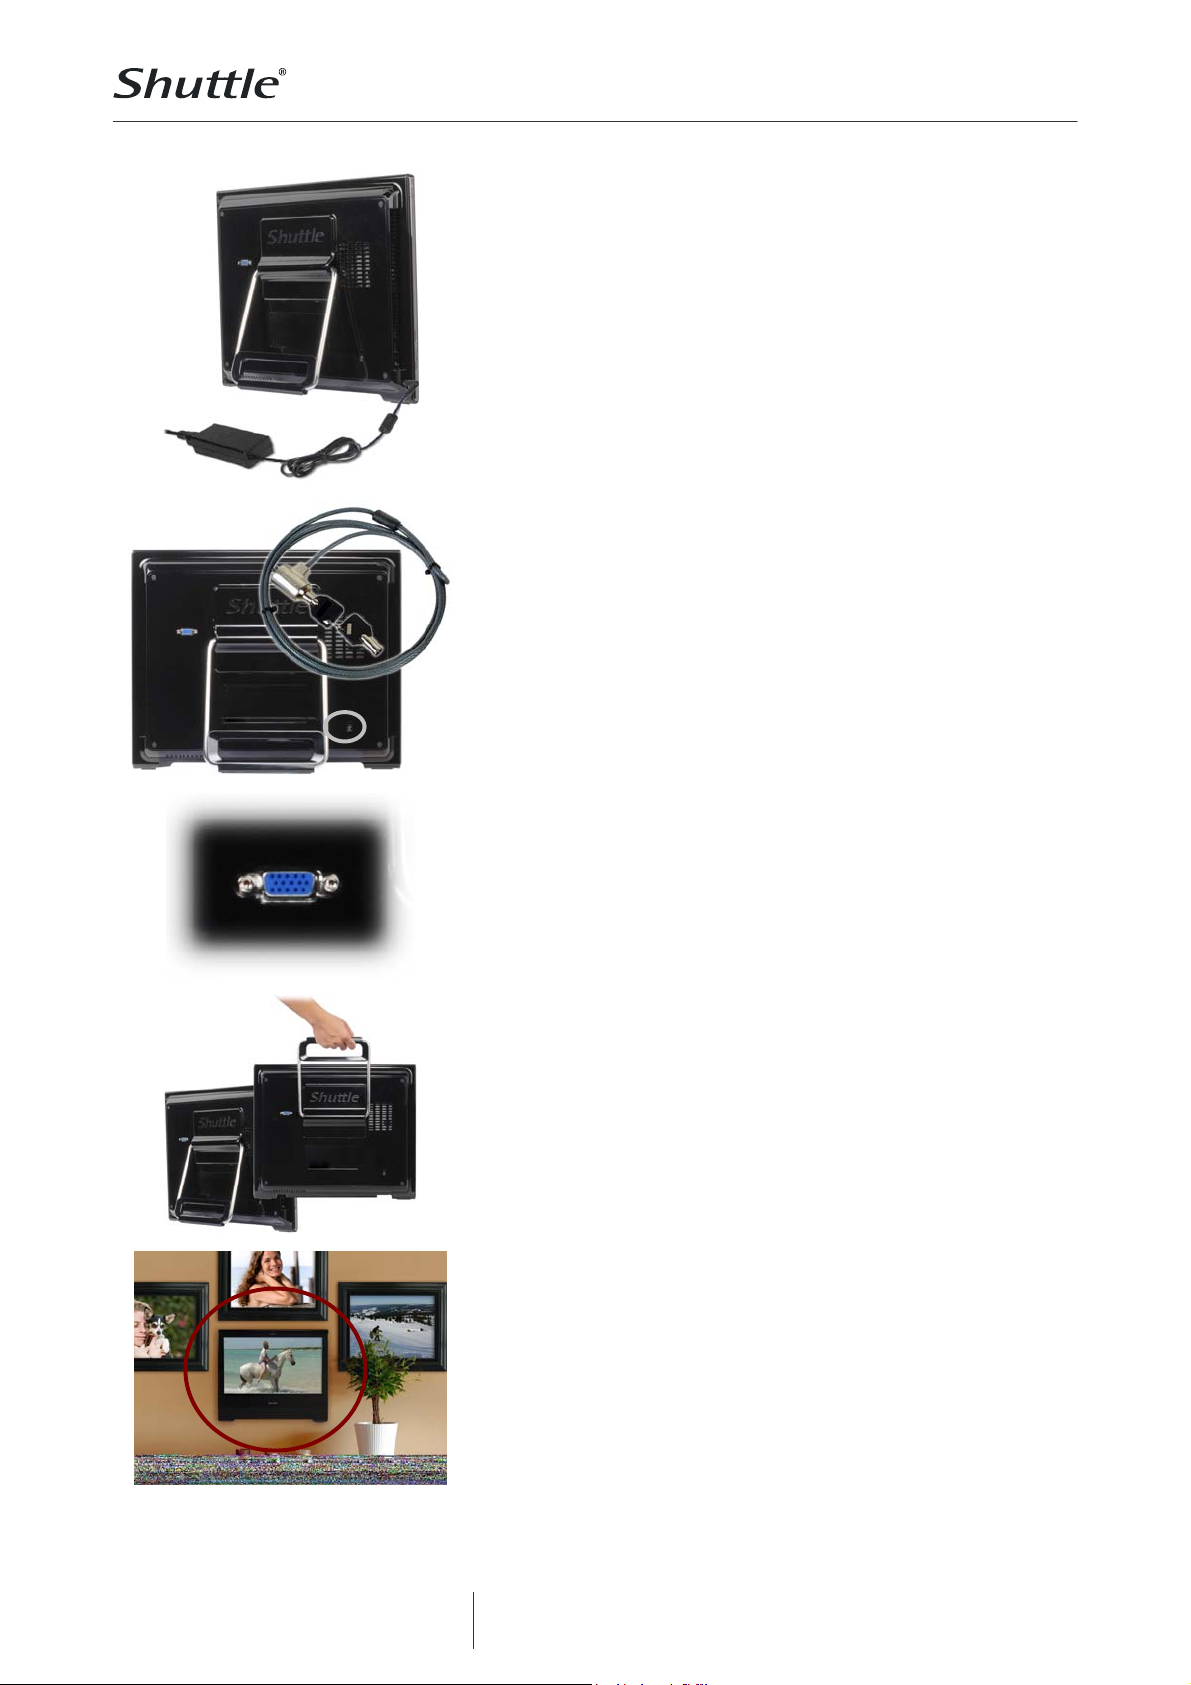
Fannless power supply
External, fanless 65W power supply for whisper quiet operation
Kensington Lock
This is a small, metal-reinforced hole as part of an anti-theft system.
(The lock-and-cable apparatus is not included.)
VGA Port
This VGA port can be used to connect a secondary external LCD
display or beamer to the PC. It supports the clone mode operation.
Page 3 | 16 November 2009
www.shuttle.com
Carrying handle
Cleverly, the stand can be pulled up to serve as a handle - easy to
move and light to carry with one hand.
VESA mounting
The stand on the rear can easily be removed unveiling four VESA
mounting screw holes that can be used for mounting arms and other
mounting devices from a variety of manufacturers.
© 2009 by Shuttle Computer Handels GmbH (Germany). All Information subject to change without prior notice. Pictures for illustration purposes only.
Shuttle Computer Handels GmbH
Fritz-Strassmann-Str. 5
25337 Elmshorn | Germany
Tel. +49 (0) 4121-47 68 60
Fax +49 (0) 4121-47 69 00
sales@shuttle.eu
Page 4
Product Specification
Shuttle X50 Barebone Overview (Connectors, buttons, etc.)
3
2
6
7
8
4
5
4
9 10
11
12
12
16
13
10
17
18
19
13
20
14
14
15
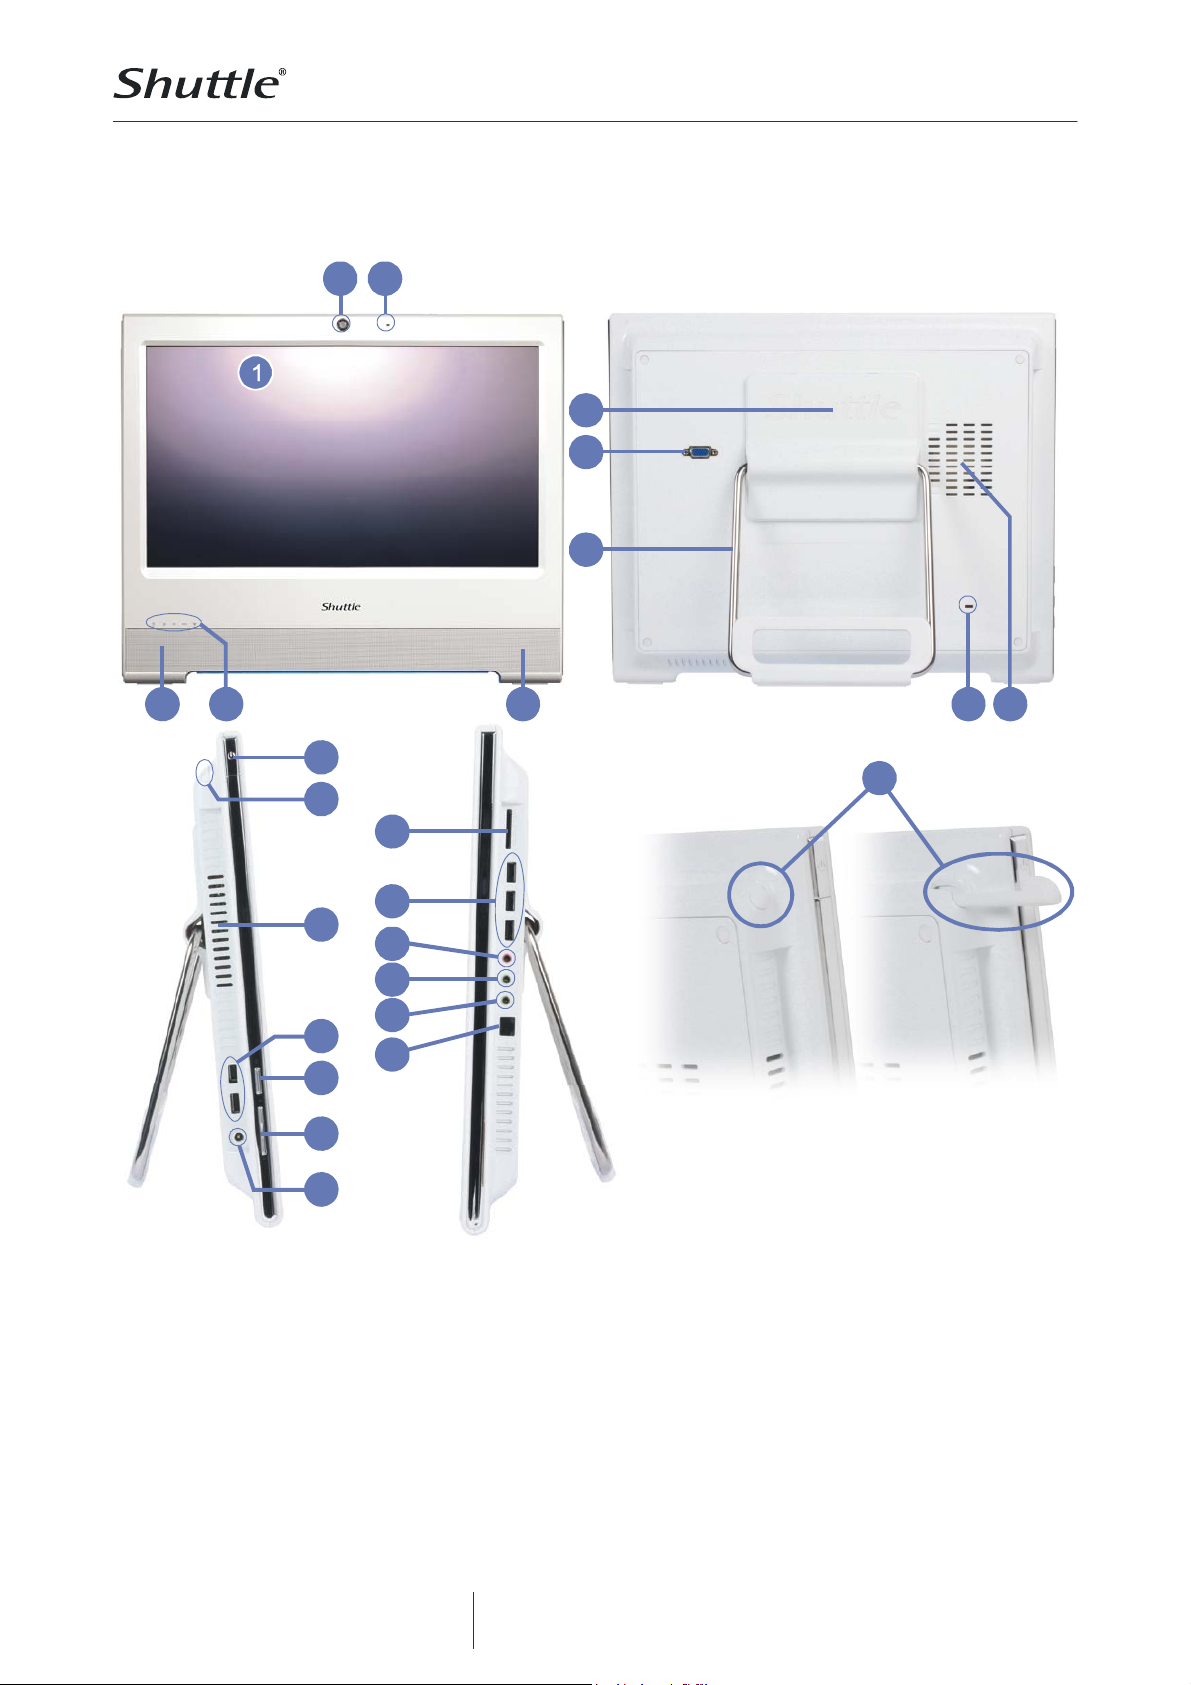
1 Touchscreen LCD display 8 Stand (or handle) 15 DC-input for power supply
2 Webcam 9 Kensington lock 16 Card-reader
3 Microphone 10 Vent holes 17 Audio Line-in
4 Speakers 11 Power on button 18 Audio Line-out
5 LEDs 12 Stylus pen with holder 19 Microphone input
6 VESA mount 13 USB connectors (5x) 20 Gigabit LAN port (RJ45)
7 VGA port 14 LCD buttons
© 2009 by Shuttle Computer Handels GmbH (Germany). All Information subject to change without prior notice. Pictures for illustration purposes only.
Page 4 | 16 November 2009
www.shuttle.com
Shuttle Computer Handels GmbH
Fritz-Strassmann-Str. 5
25337 Elmshorn | Germany
Tel. +49 (0) 4121-47 68 60
Fax +49 (0) 4121-47 69 00
sales@shuttle.eu
Page 5

W
V
Product Specification
Shuttle X50 Barebone – Range of Applications
Entertainment
Music, Movies,
Photo gallery, TV*
*) TV tuner USB stick
required
P.O.S.
Point of sales
ork
Banking, Shopping,
Office, Stock trading
Education
In schools, at home,
for children and adults
Control
Surveillance,
Home Automation,
Control device
Communication
Email, VoIP, Messenger,
Blog, Video Conferencing
Page 5 | 16 November 2009
www.shuttle.com
Digital Signage
© 2009 by Shuttle Computer Handels GmbH (Germany). All Information subject to change without prior notice. Pictures for illustration purposes only.
isual advertising,
Shuttle Computer Handels GmbH
Fritz-Strassmann-Str. 5
25337 Elmshorn | Germany
entertainment, displaying
information in public areas
Tel. +49 (0) 4121-47 68 60
Fax +49 (0) 4121-47 69 00
sales@shuttle.eu
Page 6

Chassis
Product Specification
Shuttle X50 Barebone Black – Specifications
Color: Black
Dimensions: 391.3 x 327 x 36 mm (WxHxL)
100mm VESA mount capable
Mounting hole for Kensington lock
Operating
system
Touchscreen
39.6cm
(15.6-inch)
display
Processor
Memory
Chipset
This system comes without operating system.
It is compatible with Window XP, Windows Vista, Windows 7 und Linux
Touchscreen function support fingertip input
Resistance and single touch technology
Including stylus pen for the touchscreen
39.6cm / 15.6" display, ratio: 16:9
Resolution: 1366x768 = 1.05 Megapixels
Adjustable backlight unit: High power LED
OSD (On Screen Display)
Intel Atom 330 Dual Core processor (Codename: Diamondville)
2x 1.6 GHz core clock, 533 MHz FSB
2x 512kB L2 cache
Supports Hyper-Threading (4 threads total)
TDP = 8 watts
Supports up to 2 modules DDR2-667/800 SO-DIMMs with 200 pins
(max. 1GB per module)
Intel® 945GC+ICH7 Express Chipset
Hard disk
drives
Card
reader
Supports one Serial ATA II hard disk in 6.35cm / 2.5" format
Integrated multi-format 4-in-1 card reader (USB 2.0)
Supports the memory card types: SD, MMC, MS and MS-pro
Webcam Integrated Webcam module with 1.3 Megapixel resolution
Intel Graphics Media Accelerator 950 (GMA950)
with PCI-E x1 improved bandwidth, features 333MHz graphics core
Integrated
graphics
Page 6 | 16 November 2009
www.shuttle.com
DX8/DX9 support and enhanced 3D performance
Dynamic Video Memory Technology (DVMT) 3.0
Shared Memory max. 224MB
Video out: Analog 15pin D-Sub VGA
Supports Dual Display operation in clone mode
Shuttle Computer Handels GmbH
Fritz-Strassmann-Str. 5
25337 Elmshorn | Germany
© 2009 by Shuttle Computer Handels GmbH (Germany). All Information subject to change without prior notice. Pictures for illustration purposes only.
Tel. +49 (0) 4121-47 68 60
Fax +49 (0) 4121-47 69 00
sales@shuttle.eu
Page 7

5.1 audio
Microphone
Speakers
Gigabit LAN
Audio Realtek® ALC 662 5.1-channel High-Definition Audio
Three analog audio connectors (3.5mm):
1) Front Line out (head phone)
2) Rear Surround line-out (shared with microphone input)
3) Center line-out (shared with Line in)
Front panel with integrated microphone and 2x 2W speakers
Realtek 8111C Ethernet network controller (Gigabit)
Supports 100 / 1.000 MBit/s operation
Supports Wake-on-LAN (WOL)
Product Specification
Wireless
LAN (Wifi)
Connectors
LED’s and
buttons
Power
supply
Accessories
Supports 802.11 b/g and draft-n
VGA connector (D-Sub 15 pol., analog)
5x USB 2.0
GigaBit LAN (RJ45)
Audio 5.1 channel (shared with microphone, line-in, line-out)
Hard disk LED
Voice volume LED
Power button
On Screen Display button
1x panel backlight brightness setting
External 65 power adapter (fanless)
Input: 100~240V AC, 50~60Hz, Output: 19V DC
Outline Dimension: 108x46x30mm, Color: Black
User guide
System manual
Driver CDROM
Recovery CDROM
Stylus pen for the touchscreen
Power adapter
Certifi-
cations
Environment
Weight
Safety certifications: UL TÜV, CB, BSMI
EMI certifications: CE, FCC, BSMI, C-tick
Other certifications: Energy Star 4.0
Operating temperature: 0~35°C
Humidity: 0~60%
Net weight: 3.6 kg
Warranty 24 months Bring-in Service
Page 7 | 16 November 2009
www.shuttle.com
© 2009 by Shuttle Computer Handels GmbH (Germany). All Information subject to change without prior notice. Pictures for illustration purposes only.
Shuttle Computer Handels GmbH
Fritz-Strassmann-Str. 5
25337 Elmshorn | Germany
Tel. +49 (0) 4121-47 68 60
Fax +49 (0) 4121-47 69 00
sales@shuttle.eu
Page 8

Product Specification
Shuttle X50 Barebone Installation Instructions
As a barebone, the device is delivered
without memory and hard drive. Please
note the following when installing or
removing certain components. The device
features two SO-DIMM slots for a maximum
capacity of 2x 1GB DDR2-667/800 memory
and one 2.5 inch drive bay for one S-ATA
hard disk.
Please note and proceed as follows:
a) Only authorized and skilled personnel
must intervent
b) Improper handling might damage the
device which is not covered by warranty
c) To avoid damage of electronical
components by electrostatic discharge
(ESD), ensure that the static electricity of
your body is diverted permanently before
you touch electronical components. Use
an earthing wrist strap and an anti-static
ground mat, if possible.
(1) Disconnect the device from the mains
and put it on a soft base with the display
facing downward and fold the stand
vertically upward. Next, carefully remove
the cap with the Shuttle logo that is clicked
into place by six hooks. Carefully press the
side of the cap with your fingertips to
loosen it. Otherwise the cap can be
loosened using a plastic card.
© 2009 by Shuttle Computer Handels GmbH (Germany). All Information subject to change without prior notice. Pictures for illustration purposes only.
Page 8 | 16 November 2009
www.shuttle.com
Shuttle Computer Handels GmbH
Fritz-Strassmann-Str. 5
25337 Elmshorn | Germany
Tel. +49 (0) 4121-47 68 60
Fax +49 (0) 4121-47 69 00
sales@shuttle.eu
Page 9

Product Specification
(2) Loosen the four cross-head screws (or
Phillips screws) to remove the stand
(3) Remove the four cross-head screws that
fix the case cover.
(4) The case cover is clicked into place by
several hooks. At the bottom of the case is
a notch that can be used to lever the case
cover out of place by carefully using a
screwdriver or plastic card. Be sure to
apply only little force in order not to break
the hooks.
Page 9 | 16 November 2009
www.shuttle.com
© 2009 by Shuttle Computer Handels GmbH (Germany). All Information subject to change without prior notice. Pictures for illustration purposes only.
Shuttle Computer Handels GmbH
Fritz-Strassmann-Str. 5
25337 Elmshorn | Germany
Tel. +49 (0) 4121-47 68 60
Fax +49 (0) 4121-47 69 00
sales@shuttle.eu
Page 10

Product Specification
(5) As the next step, remove the large
electromagnetic shielding (EMI cover). This
metal sheet is fixed by three cross-head
screws.
(6) Another shielding is fixed by four screws.
Only remove this part to install or
exchange memory modules. To remove
such memory modules, carefully bend
back the cramps on both sides of the
module. Please see the notch when
installing the module to make sure it faces
in the right direction.
(7) Loosen the four screws of the drive
cage.
In case of a hard disk fan is included:
(A) Remove the screws including the
affixed fan (B) with its small board (C) while
leaving the cables connected.
Page 10 | 16 November
www.shuttle.com
© 2009 by Shuttle Computer Handels GmbH (Germany). All Information subject to change without prior notice. Pictures for illustration purposes only.
Shuttle Computer Handels GmbH
Fritz-Strassmann-Str. 5
25337 Elmshorn | Germany
Tel. +49 (0) 4121-47 68 60
Fax +49 (0) 4121-47 69 00
sales@shuttle.eu
Page 11

Product Specification
(8) Please insert a 2.5 inch S-ATA hard disk
with the connectors facing towards the
metal sheet into the drive cage. Please
then fix the hard disk with four screws and
carefully push it in afterwards to connect it.
In case of a hard disk fan is included:
(9) Remove the protective foil on the
adhesive tape that is attached to the fan.
Then fix the drive cage with the fan and
board with four screws.
(10) Please re-mount the two
electromagnetic shieldings, the case cover
and the stand vice versa. Finally, click the
cap with the Shuttle logo back into place
and cover the four screw holes with the
self-adhesive rubber coverings included in
the delivery scope.
Overview of parts:
(A) X50-chassis
(B) case cover
(C) stand
(D) cap with Shuttle logo
(E) large shielding
(F) little shielding
(G) drive cage
(H) hard disk
(I) memory modules
(J) cooling fan (optional)
(K) small board (optional)
The screws removed:
(1) hard disk x4
(2) drive cage x4
(3) little shielding x4
(4) large shielding x3
(5) stand x4
(6) rubber coverings x4
(7) case cover x4
© 2009 by Shuttle Computer Handels GmbH (Germany). All Information subject to change without prior notice. Pictures for illustration purposes only.
Page 11 | 16 November
www.shuttle.com
Shuttle Computer Handels GmbH
Fritz-Strassmann-Str. 5
25337 Elmshorn | Germany
Tel. +49 (0) 4121-47 68 60
Fax +49 (0) 4121-47 69 00
sales@shuttle.eu
Page 12

Product Specification
Shuttle All-in-one-PC X50-Series – Product Overview
All versions are available in Black and White color.
Operating system Memory Hard disk Barcode
Windows XP Professional
Online
Configurator
(BTO)
Fixed
configuration
X 5000T
X500V
X50XA
X 5000TA
X 5000TB
X500VA
X50XB
Windows Vista Home Basic
Windows Vista Business
Windows 7
openSUSE Linux 1 or 2 GB 160~500GB –
– 1 or 2 GB 160~500GB –
Windows Vista Home Basic 2 GB 160 GB
Windows 7 2 GB 160 GB
openSUSE Linux 2 GB 160 GB
– 2 GB 160 GB
1 or 2 GB
160~500GB –
White: 4046047101894
Black: 4046047101931
White: 4046047101986
Black: 4046047101993
White: 4046047101948
Black: 4046047101955
White: 4046047101917
Black: 4046047101924
Barebone
X50
Barebone
– – –
White: 811686007593
Black: 811686002925
Last update: October 2009
© 2009 by Shuttle Computer Handels GmbH (Germany). All Information subject to change without prior notice. Pictures for illustration purposes only.
Page 12 | 16 November
www.shuttle.com
Shuttle Computer Handels GmbH
Fritz-Strassmann-Str. 5
25337 Elmshorn | Germany
Tel. +49 (0) 4121-47 68 60
Fax +49 (0) 4121-47 69 00
sales@shuttle.eu
 Loading...