

Page 1

UMAX AstraCam
OWNER'S GUIDE
P/N:83100158-0000
08/99
Page 2

TRADEMARKS
UMAX is a registered trademark of UMAX Technologies, Inc. AstraCam is a trademark of
UMAX Data Systems. PhotoDeluxe is a trademark of Adobe Systems, Inc. Windows is a
registered trademark of Microsoft Corporation. PhotoCabinet is a trademark of NewSoft
Technology Corporation. Other names and trademarks appearing herein are trademarks of their
respective holders.
COPYRIGHT
1999 UMAX Technologies, Inc. All rights reserved. No part of this publication may be
reproduced, transmitted, transcribed, stored in a retrieval system, or translated into any
language or computer language, in any form or by any means, electronic, mechanical,
magnetic, optical, chemical, manual, or otherwise, without the prior written permission of
UMAX Technologies, Inc.
IMPORTANT SAFEGUARDS
Read all of the instructions:
• Save these instructions for later use.
• Follow all warnings and instructions marked on the product.
• When replacement parts are required, be sure that service technicians have used
replacement parts that conform to at least the same safety standards with regard to fire,
electric shock, or other hazards.
• Do not use this product near water or in rainy/moist environment.
• The product should be operated using only the type of power source indicated on the
product label.
• Do not attempt to service this product yourself as opening or removing the enclosure may
expose you to dangerous voltage or other hazards.
• This unit has input circuitry suitable for a 5V DC supply.
• The sound pressure level at the operators position according to IEC 7041:1982 should be
less than or equal to 70dB(A).
CAUTION
Improperly inserting the rechargeable batteries (wrong polarity) may cause damage to your
camera and will void the warranty. See the guide symbols inside the battery case for proper
installation of the batteries and read the section titled, Preparing the AstraCam for Use.
Use only the AC adapter that came with your AstraCam system to power the cradle.
Danger of Explosion - Non-rechargeable AAA Batteries can be used temporarily to take
photos, however, the batteries must be removed prior to putting the camera on the cradle.
Failure to remove all of the non-rechargeable batteries before placing the camera in the cradle
may cause damage to the camera voiding the warranty and/or batteries to discharge or explode
which may cause bodily injury.
Replace only with the AAA size, 1.2V, nickel metal hydride rechargeable batteries. Check with
local codes for possible special disposal instructions.
Page 3

AstraCam Owner's Guide
CONTENTS
Getting Started...............................................................................2
Introduction .............................................................................2
UMAX AstraCam Package Contents .....................................2
Setting Up Your New Digital Camera System..............................3
Installing the Batteries ........................................................... 3
Replacing Worn-Out Batteries .............................................. 3
PC System Requirements .............................................................4
Installing the Software ..................................................................4
Installing Adobe PhotoDeluxe ................................................4
Installing the AstraCam Software ...........................................4
Connecting the AstraCam Cradle..................................................5
Powering Up the Cradle ..........................................................5
Connecting the Cradle to Your Computer ..............................5
The AstraCam Digital Camera .....................................................6
Taking Your First Photo..........................................................7
Recording a Message for Your Photo .....................................8
Erasing Photos ........................................................................8
Camera Memory Full ..............................................................9
Recharging the AstraCam Batteries ........................................9
Using the AstraCam Program......................................................10
Downloading Photos..............................................................11
The AstraCam Software..............................................................12
Viewing Your Photos ............................................................13
Transferring the Photos.........................................................14
Saving a Photo a File.............................................................14
Megapixel...............................................................................15
Deleting Photos......................................................................15
Operating the AstraCam from the Program.................................16
Taking a Photo ..................................................................... 16
Making a Recording ............................................................ 16
Adjusting AstraCam Settings .............................................. 16
Checking the USB Port ........................................................ 17
Quitting the AstraCam Program .......................................... 17
Organizing Your Photo Data with PhotoCabinet ...................... 17
Retrieving Your Photos ....................................................... 18
Creating a Calendar with PhotoDeluxe.......................................19
Creating a Photo & Sound E-Mail ............................................. 20
Preparing a Photo & Sound E-Mail Greeting ...................... 20
Sending Your Photo & Sound E-Mail Greeting .................. 21
Sending a Photo & Sound File as an Attachment ................ 21
Caring for Your AstraCam..........................................................22
AstraCam Specifications.............................................................23
Contacting Technical Support.....................................................24
Product Registration....................................................................24
FCC Declaration of Conformity..................................................25
Warranty......................................................................................26
1
Page 4
AstraCam Owner's Guide
GETTING STARTED
Introduction
Thank you for purchasing the UMAX AstraCam digital camera system. Now
you can take great digital photos, and capture up to 20 seconds of sound with
each shot. Easily transfer your new photos to a computer and be enjoying them
in just moments.
Your AstraCam comes with software to make your photo taking experience
really creative. Use Adobe PhotoDeluxe for artistic manipulation of your
photos or to just make them better. Organize your photos with PhotoCabinet
and make Internet photo greeting cards with VistaShuttle. AstraCam with its
lightweight point and shoot simplicity, and fast photo downloading is a great
way to welcome you to the world of digital photography.
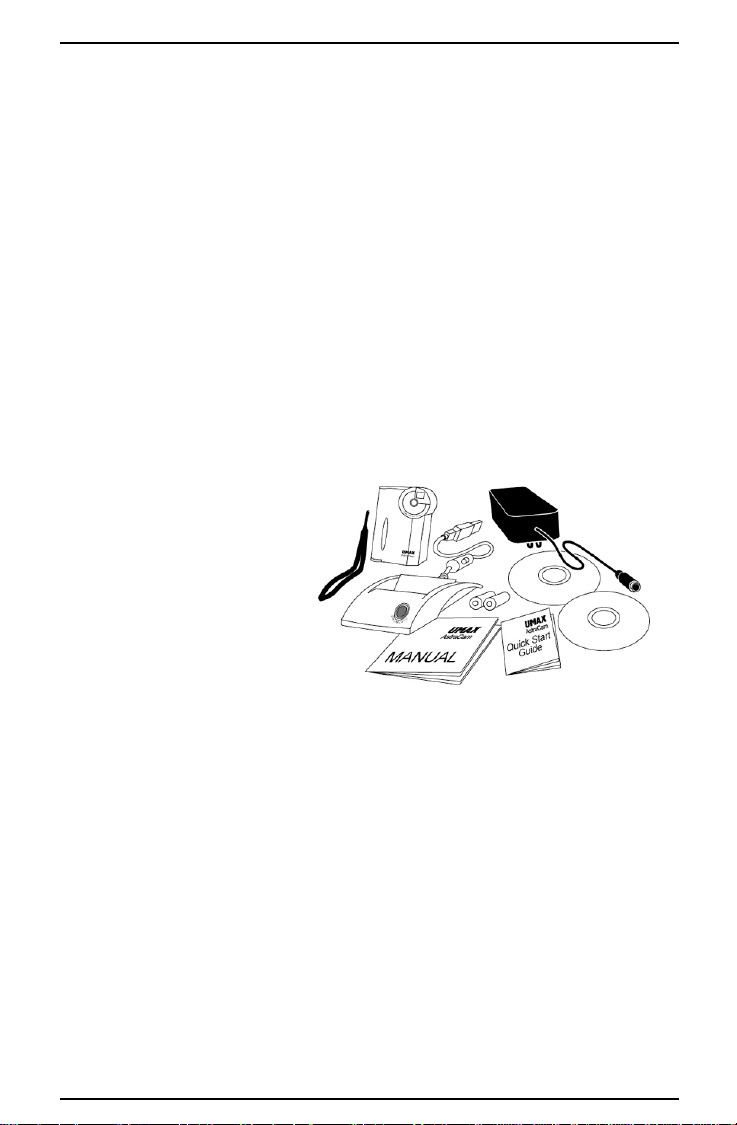
UMAX AstraCam PackagePackage Contents
Your AstraCam package
contains everything you
need to take digital photos,
download them to your
computer and make use of
your photos. When
unpacking your AstraCam,
make sure you've received
all the components:
• AstraCam Digital Camera
• Cradle with built in battery charger
• 2 AAA Nickel Metal Hydride rechargeable batteries
• Power adapter & power cable
• Camera Strap
• Quick Start Guide
• AstraCam software CD including:
- AstraCam Software (TWAIN Driver)
- PhotoCabinet
- VistaShuttle
• Adobe PhotoDeluxe software CD
2
Page 5
AstraCam Owner's Guide
AstraCam
SETTING UP
YOUR NEW DIGITAL CAMERA SYSTEM
Installing the Batteries
Important Battery Usage Guides: Read Before Using the AstraCam.
WARNING: Improperly inserting the rechargeable batteries (wrong polarity)
may cause damage to your camera and will void the warranty. See the guide
symbols inside the battery case for proper installation of the batteries.
WARNING: Non-rechargeable AAA batteries can be used temporarily to take
photos. However, these batteries must be removed prior to putting the camera in
the cradle. Failure to remove all non-rechargeable batteries before placing the
camera in the cradle may cause damage to the camera, voiding the warranty
and/or causing the batteries to discharge or explode, which may result in bodily
injury.
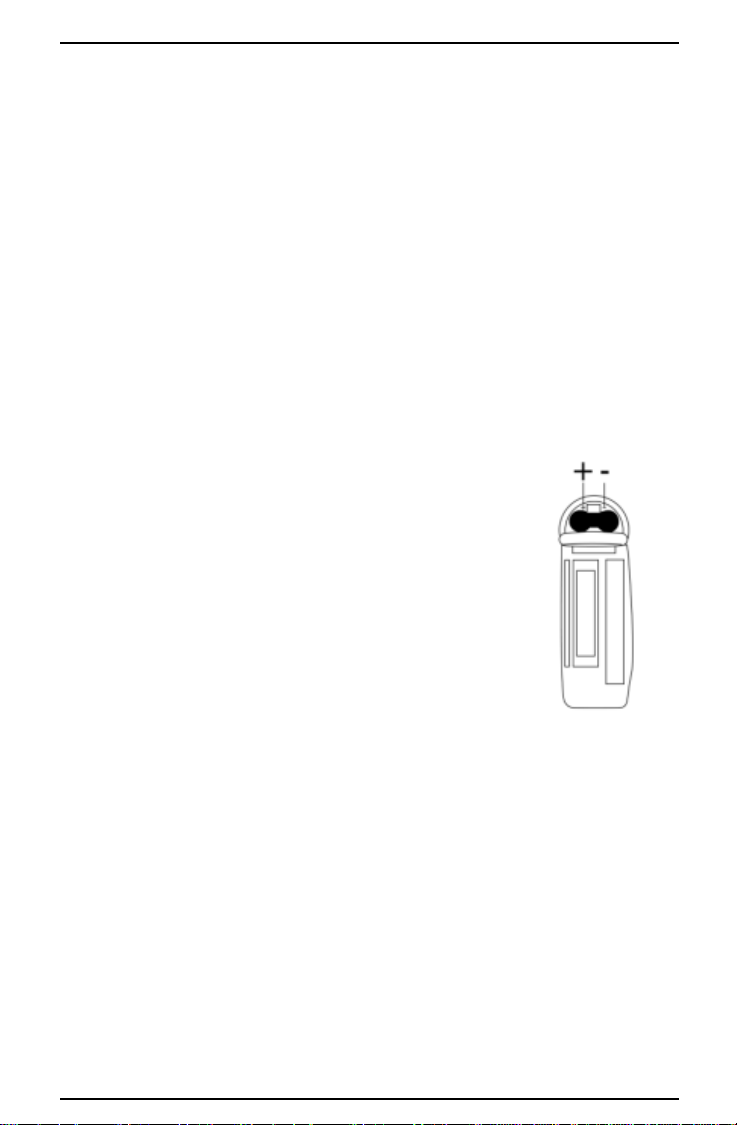
To put the rechargeable batteries in the AstraCam:
1. Unwrap the 2 AAA rechargeable batteries. Note the
polarity symbols near the ends of each battery.
2. Open the battery cover at the bottom of the camera by
pushing the cover out with your thumb.
3. Note the +/- polarity symbols on the contacts attached
to the inside of the cover. Insert each battery so that
the polarity symbol of the exposed end of each battery
matches the polarity symbols on the contacts inside the
battery compartment.
4. Close the cover.
Note: Before charging the batteries, you must install the
AstraCam cradle. See page 5, "Connecting the AstraCam
Cradle." When the cradle is connected, place the
AstraCam in the cradle to charge the batteries. The charge
time for the batteries is up to 2.6 hours.
Bottom View
Replacing Worn-Out Batteries
Replace the batteries only with AAA size, 1.2V, nickel metal hydride
rechargeable batteries.
3
Page 6

PC SYSTEM REQUIREMENTS
AstraCam Owner's Guide
• Pentium
• Microsoft Windows
• At least 32 MB RAM
• 90 MB available hard disk space
• CD-ROM drive
• VGA Color Monitor
• USB Port
• Sound Card (recommended)
®
processor or higher
®
98
INSTALLING THE SOFTWARE
Please quit all Windows programs before installing your new software.
IMPORTANT: Install the software prior to installing the AstraCam Cradle.
Please install Adobe® PhotoDeluxe® first and then install the AstraCam
software.
Installing Adobe PhotoDeluxe
1. Insert the Adobe PhotoDeluxe CD into your CD-ROM drive. (If the
installation program starts automatically, skip to step 5.)
2. Double-click on the MY COMPUTER icon on your Windows desktop.
3. Double-click on the PHOTODELUXE icon (your CD-ROM drive icon).
4. Double-click on the AUTOPLAY icon.
5. Follow the onscreen instructions to continue the installation. This CD will
install Adobe PhotoDeluxe, Adobe® Acrobat® Reader and Adobe® Type
Manager®.
6. Once everything has been installed, click on the FINISH button to finish
installation and begin the registration process.
7. After registration is complete, you will be prompted to restart the computer.
Click on the OK button to restart Windows.
Installing the AstraCam Software
1. Insert the AstraCam Digital Camera CD into your CD-ROM drive. (If the
installation program starts automatically, skip to step 5.)
2. Double-click on the MY COMPUTER icon on your Windows desktop.
3. Double-click on the UMAX AstraCam CD icon (your CD-ROM drive icon).
4
Page 7
AstraCam Owner's Guide
4. Double-click on the SETUP icon.
5. Follow the onscreen instructions to continue the installation. On the Select
Component screen, select the programs you want to install:
• PhotoCabinet
• VistaShuttle
• AstraCam Software (including the Twain driver)
The default setting is to install all three programs (highly recommended).
You must install the AstraCam and PhotoCabinet software in order to
download photos to your computer using the DOWNLOAD button.
CONNECTING THE ASTRACAM CRADLE
Powering Up the Cradle
The power adapter sends power to the cradle and recharges the AstraCam
batteries when the camera is resting in the cradle.
1. Insert the power adapter plug into the base at the rear of the AstraCam
Cradle.
2. Attach the AC power cord to the power adapter.
3. Plug the power cord into an electrical outlet.
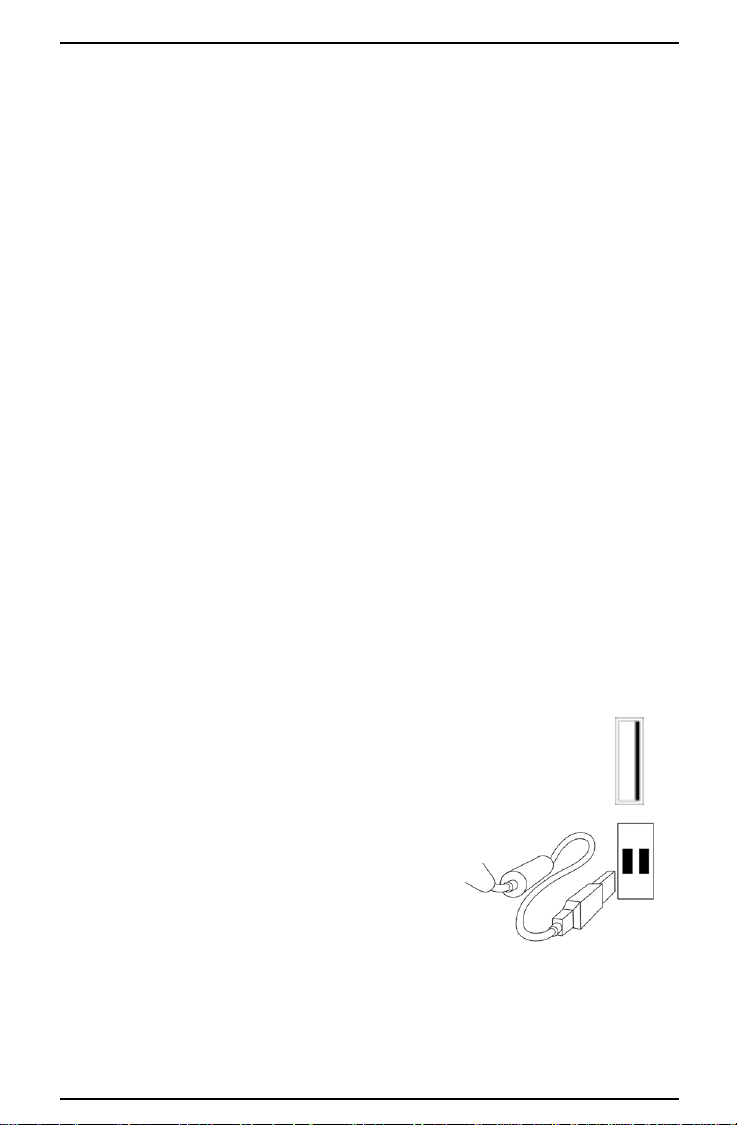
Connecting the Cradle to Your Computer
The AstraCam Cradle connects your camera to a computer using the
attached USB cable. The USB system is "hot-swappable." You do not have
to turn your system off before inserting the USB cable into the port.
1. Look on the back of your computer for the USB port. The USB
port is a small slot 1/2" long by 1/4" wide (see illustration on the
right).
2. Gently push the USB cable connector from
the cradle into the socket making sure that
it is firmly inserted in the port. With the
AstraCam power switch turned OFF, place
the AstraCam in the cradle. Windows will
display screens saying that it discovered
your new hardware, is updating the driver
database and is installing new software.
5
Page 8
AstraCam Owner's Guide
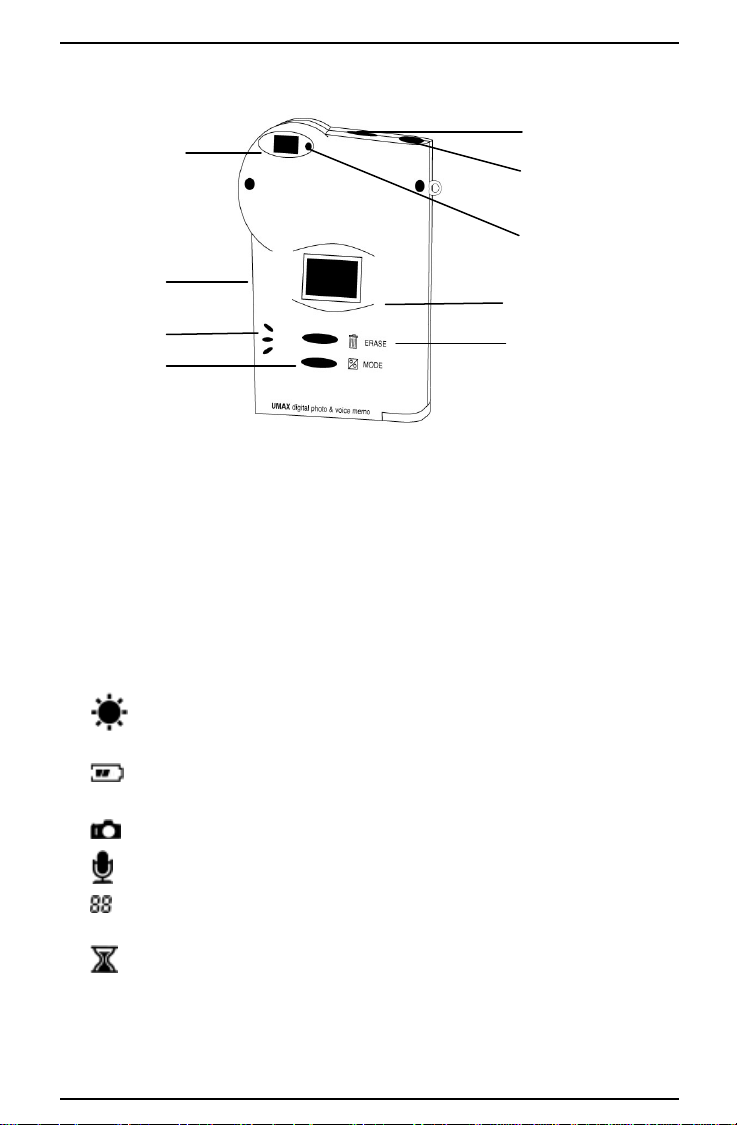
White Balance
THE ASTRACAM DIGITAL CAMERA
Power Switch
Viewfinder
Record Button
Microphone
Mode
• Viewfinder Look through this to compose the photo.
• Action Light Flashes whenever camera or recorder operates and is
accompanied by an audible beep.
• Record Button Press and hold this button to make a recording.
• White Balance Mode Press to change the White balance settings.
• Erase Button Press to erase photos from the camera.
• Microphone Speak toward the microphone when making a recording.
• Settings Display Shows the current settings of the AstraCam with the
following symbols:
Shutter Button
Action Light
Settings Display
Erase Button
(See page 7, "White Balance Settings for Better Photos.")
solid block when batteries have less than a 20 percent charge.
In Microphone mode, shows seconds remaining.
commands.
White Balance Icon Displays the selected White Balance Mode.
Battery Status Shows two solid blocks for full batteries and one
Camera Icon Indicates that the AstraCam is ready to take photos.
Microphone Icon Indicates that the AstraCam recorder is ready.
Shots/Seconds Remaining In Camera mode, shows shots remaining.
Process When this symbol flashes, the camera is processing
6
Page 9

AstraCam Owner's Guide
Taking Your First Photo
Taking photos with your AstraCam is easy:
1. Turn the power switch ON.
2. Compose your photo by looking through the viewfinder.
3. Slightly press and hold the SHUTTER button. You will hear a short beep as
the AstraCam automatically sets exposure.
4. Continue pressing fully down on the SHUTTER button. You will hear a
second short beep as the photo is taken. Release the shutter button.
Note: It is important to hold the camera very still when taking a picture.
Moving the camera when shooting will create blurry pictures.
White Balance Settings for Better Photos
AstraCam has four white balance settings that adjust the camera for specific
lighting situations. These settings help you get normal looking photos in
different kinds of light. One of the icons below will always appear in the
settings display when the camera is turned on.
You can set the camera to take pictures in:
Sunny light
Cloudy light or shade
Tungsten light (Keep photos from looking too yellow when taken in
tungsten light. This kind of light is common in homes.)
Fluorescent light (Keep your photos from looking too green when
taken in fluorescent light. This kind of light is common in stores.)
To change the white balance setting before taking a photo:
1. Press the MODE button. The camera will make an audible tone. You will
see the White Balance icon in the settings display change.
2. Press and release the button until the white balance setting you want appears
in the settings display.
Note: You can also change the camera's white balance on the computer
using the AstraCam program. See page 16, "Operating the AstraCam from
the Program."
7
Page 10

AstraCam Owner's Guide
Recording a Message for Your Photo
After taking your first photo, you can record sound to go with it (if the Record
feature is enabled).
To record a message:
1. Press and hold the RECORD button. The action light next to the viewfinder
starts blinking. In the settings display, the Microphone icon flashes and the
shot counter turns into a countdown timer beginning at 20 seconds.
2. Talk into the microphone or record any close sounds.
3. When you are finished recording, or the countdown time is finished, release
the RECORD button. Your AstraCam returns to photo mode and is ready for
the next photo.
Disabling the Record Feature
You can disable the Record feature on the AstraCam to allow the camera to
store more photos. With Record disabled, the capacity of the AstraCam
increases to 46 shots. (The default mode is Record ON with a 31-photo
capacity, and the Microphone icon appears in the settings display.)
To disable the Record feature:
1. The memory must be empty (no photos are being stored in the AstraCam;
see below, "Erasing Photos").
2. Press the RECORD button. The Record feature is now disabled and the
AstraCam is set to take 46 photos.
Note: To turn on the Record feature, press the RECORD button when the
memory is clear (no pictures in the camera). The Microphone icon will
reappear and the camera will have a 31-photo capacity.
Erasing Photos
You can erase the most recent photo taken or all the photos with the Erase
button. When you erase a photo, the sound recording you made for it is also
erased.
To erase the most recent photo:
1. Press the ERASE button. The film counter will begin blinking and the green
action light will turn on.
2. Press the ERASE button again to erase the photo from the camera's memory.
To erase all the photos:
1. Press and hold down the ERASE button for 3 seconds. The film counter will
begin blinking and the action light will turn on.
8
Page 11

AstraCam Owner's Guide
2. Press the ERASE button again to erase all the photos from the camera's
memory. The film counter returns to "31" or "46" depending whether the
Record feature is enabled/disabled.
Note: You can also delete photos from your camera using the AstraCam
program. See page 15, "Deleting Photos."
Camera Memory Full
When you run out of shots, a continuous beep sounds and the green light comes
on to signal that camera memory is full. The film counter reads "0." It's time to
download your photos to a computer.
Recharging the AstraCam Batteries
The battery status indicator will show two solid blocks within the battery
symbol to indicate that the battery is fully charged. When the batteries contain
less then 20 percent of their charge, only one solid block will appear in the
battery indicator. When the batteries become completely exhausted, your
AstraCam will emit a continuous tone and the display will go blank. The
AstraCam Cradle acts as the battery charger for your camera.
To recharge the camera batteries:
1. Turn the AstraCam power switch OFF (the batteries will not charge when
the AstraCam is turned on).
2. Place the camera in the cradle with the front of the camera facing the front
of the cradle. Lights on the front of the cradle indicate the battery status:
• Orange The camera batteries are charging.
• Green The batteries are fully charged.
• Red The charger is unable to charge the batteries for some reason. Make
sure the batteries are inserted properly. Turn the AstraCam OFF before
placing it in the cradle. The light might also indicate that the batteries are
damaged.
If the light on the cradle is not illuminated, please check that the power
adapter is plugged into the cradle and into an electrical outlet.
Note: The charging process can take up to 2.6 hours for totally exhausted
batteries.
9
Page 12

AstraCam Owner's Guide
USING THE ASTRACAM PROGRAM
To use the AstraCam program, you must first open a TWAIN compliant photo
manipulation program. TWAIN is an interface that allows cross platform
transfer of data from a digital camera or scanner to a program. The AstraCam
software includes a TWAIN driver to communicate with photo manipulation
programs and other TWAIN compliant applications.
Examples of TWAIN compliant application software:
• PhotoCabinet
• Adobe PhotoDeluxe
Use the AstraCam program to:
• Download photos for viewing on a computer.
• Make photo adjustments.
• Transfer photos to photo manipulation programs.
• Make camera adjustments.
• Operate your AstraCam from the computer.
10
Page 13

AstraCam Owner's Guide
Downloading Photos
You can download photos from the AstraCam to your computer in two ways:
• Press the DOWNLOAD button on the cradle to load your photos directly
into PhotoCabinet.
• Open a photo manipulation program and connect to the AstraCam.
Prepare to Download
To prepare for downloading photos from your
AstraCam:
1. Make sure the cradle is plugged into an
electrical source and that the USB cable is
connected to the computer.
2. Slide your camera into the cradle with its
front facing the front of the cradle.
If the AstraCam is turned OFF, it will use the external power from adapter.
If the AstraCam is turned ON, it will use battery power, even if the adapter
is connected. If the AstraCam is turned ON, you do not need to have the
adapter plugged in, but the batteries will run down.
Warning: If the AstraCam is turned ON, the battery charger is disabled.
Download Photos into PhotoCabinet
To download photos into PhotoCabinet, press the DOWNLOAD button on the
front of the cradle.
How to Acquire Photos Through PhotoCabinet and the AstraCam Driver
Acquiring photos may vary with each program used, but the basic procedure is
the same. You are activating the TWAIN interface between the program and the
AstraCam and its software.
To open PhotoCabinet and the AstraCam program:
1. Open PhotoCabinet by clicking on the PhotoCabinet icon on your desktop.
2. Click on the FILE MENU.
3. Click on SELECT SOURCE. Click on UMAX ASTRACAM DIGITAL
CAMERA. Click on the SELECT button (you only need to do this step 3
once).
4. Click on the FILE MENU and click AQUIRE. The AstraCam driver will
launch.
11
Page 14

AstraCam Owner's Guide
Download Photos Through a Photo Application Software
To open PhotoDeluxe and the
AstraCam software:
1. Open PhotoDeluxe.
2. Click on the GET & FIX
PHOTO button.
3. Click on the GET PHOTO
button.
4. Click on the CAMERAS
button. See that UMAX
AstraCam is the selected
camera.
5. Click on the OPEN
CAMERA button. The
AstraCam program will open.
6. Click on the LOADING THUMBNAIL(S) FROM CAMERA button at the
top of the AstraCam control panel.
To open VistaShuttle and the AstraCam program:
1. Open the VistaShuttle program.
2. Click on one of VistaShuttle's task buttons to open the AstraCam software.
3. Click on the LOADING THUMBNAIL(S) FROM CAMERA button at the
top of the AstraCam control panel.
THE ASTRACAM SOFTWARE
After opening the AstraCam program with a supporting photo manipulation
program, you can begin to work with your photos.
Note: See page 11, "Downloading Photos" for opening the AstraCam program.
The AstraCam program has two main parts:
• The Control Panel
- Download save or transfer photos.
- Make adjustments to both your photos and your camera.
- Operate the camera remotely.
• The Photo Display
- View and select downloaded photos.
- Listen to recordings or make new ones.
- Delete photos.
12
Page 15

AstraCam Owner's Guide
Viewing Your Photos
To bring your photos into the Photo Display panels, click
on the LOADING THUMBNAIL(S) FROM CAMERA
button in the Control Panel. (Make sure your AstraCam
camera is in the cradle.)
• Use the scroll photos arrows at the right of the Photo Display to see all your
photos.
• Click on a photo to select it for adjustment.
• Click on the yellow speaker icon below a photo to hear a recording.
Adjusting Thumbnail Photo
You can make adjustments to your thumbnail photos in
the AstraCam program.
• Brightness Make the photo lighter or darker.
• Contrast Reduce or increase the difference between
light and dark elements in the photo.
• Highlight Adjust the brightness of highlights.
• Shadow Adjust the brightness of shadows.
• Gamma Adjust the middle tones.
To adjust a thumbnail:
1. Click on the photo you want to adjust.
2. Click on the photo adjust palette to open the controls.
3. Click and hold an adjustment button and drag it back and
forth to make a change.
4. Release the mouse button to see the change in the photo.
5. Click on the green OK button at the bottom of the photo adjust panel to save
the changes. Click on the red CANCEL button to keep the photo unchanged.
AFTER SHOT RECOVERY (ASR)
Sometimes you might take a picture that has an incorrect color cast. The
AstraCam driver features a new technology developed by UMAX called After
Shot Recovery (patent pending). ASR allows you, with a click of a button, to
adjust the white balance of the image and correct the color cast.
1. Click on the photo you want to recover.
2. Click on the AFTER SHOT RECOVERY button on the
Photo Display until the color of your photo appears normal.
13
Page 16

AstraCam Owner's Guide
Rotate Photos
1. Click on the photo(s) you want to rotate. (Press and
hold the CTRL key to select multiple photos.)
2. Click on the ROTATING PICTURE(S) LEFT 90°
button to turn the photo(s) 90 degrees clockwise.
Transferring the Photos
Transferring is how you move the photo(s) into photo application software from
the AstraCam program.
Note: This section only discusses how to transfer photos to programs. Please
refer to the documentation with your application software on how to Acquire.
To transfer photos to the open photo manipulation program:
Single Photo
Double-click on the photo you want to transfer and it will appear in the photo
manipulation program.
Selected Photos
1. Click on the photo(s) you want to transfer. (Press and hold the CTRL key to
select multiple photos.)
Note: Some applications can only take one photo at a
time.
2. Click on the TRANSFERING PICTURE(S) button in
the Control Panel. Your transferred photo(s) appears in
the photo manipulation program.
Saving a Photo to a File
You might want to just save your photo to a file so you can delete it from your
camera and make room for more photos.
To save a photo:
1. Click on the photo you want to save, and
then click on the SAVING A NEW FILE
button in the Control Panel.
2. When the Save As box appears, make an entry in the file name box and
choose FOLDER to save the photo to the Save To box.
3. Click on the SAVE button. Your photo is saved in JPEG format and the
voice recording as a WAV file. You can open the file later in your photo
manipulation program and the voice file in your audio program.
14
Page 17

AstraCam Owner's Guide
Megapixel
Megapixel is a software feature that increases the resolution of your original
photo from 640 x480 to 1280 x 960 through the AstraCam software.
To use Megapixel:
1. Click on a thumbnail in the Photo Display.
2. Click on the CAMERA CONTROL icon on the
Control Panel.
3. Click on the MEGAPIXEL button.
4. Click the CAMERA CONTROL icon to close the panel.
Look at the bottom of the photo display. The resolution of the selected photo
has increased to 1280 x 960.
Deleting Photos
You can delete one or all the photos stored on your AstraCam.
• To delete one photo, click on the photo you want to
delete and then click on the DELETING PICTURE(S)
button at the top of the Photo Display.
• To delete selected photos, click on the photos you want
to delete (press and hold the CTRL key to select multiple
photos), and then click on the DELETING PICTURE(S)
button at the top of the Photo Display.
• To delete all the photos, click on the DELETING ALL
PICTURES button.
When the dialog box appears asking if you want to delete
the photo(s), click on the YES button.
Note: You can also delete photos using the ERASE button on the camera. See
page 8, "Erasing Photos."
15
Page 18

AstraCam Owner's Guide
OPERATING THE ASTRACAM
FROM THE PROGRAM
The AstraCam program has everything you need to operate the camera from the
computer when the camera is in its cradle.
You can:
• Take photos.
• Make recordings.
• Adjust your AstraCam settings.
Taking a Photo
To take a photo using the AstraCam program, click on the
TAKING PICTURE button.
Making a Recording
You can make a recording for the last photo taken or overwrite a previous
recording for any photo in the display:
1. Click on the photo you want to make the recording for.
2. Click on the RECORDING SOUND button. If you are
overwriting a previous recording, a dialog box prompts if
you want to record over the message. Click on the YES
button.
3. Speak toward the camera from a close distance.
Note: When recording with the AstraCam software, you must make a full
20-second recording. Clicking on the
microphone will not halt the recording process.
Adjusting AstraCam Settings
Make sure the camera is switched ON and in the
cradle.
To adjust the settings:
1. Click on the CAMERA CONTROL button on
the Control Panel to open the Camera Settings.
2. Click on the setting you want.
3. Click on the CAMERA CONTROL button to
close the Camera Settings.
16
Page 19

AstraCam Owner's Guide
White Balance
Select a white balance setting according to your lighting conditions. These
settings are the same as the ones on your AstraCam. See page 7, "White
Balance Settings for Better Photos."
Resolution
The resolution setting for the AstraCam is always 640 x 480. However, the
Megapixel feature can increase the resolution of downloaded photos to 1280 x
960 using the AstraCam software.
Camera Information
Click on CAMERA INFO to check camera information and picture capacity.
Checking the USB Port
Click on the CHECK USB PORT button if you are having
problems with your system. It may report a problem. If you
find that the cradle is not connected to the USB port, reconnect it, turn on the AstraCam and click on the RETRY
button.
Quitting the AstraCam Program
To quit the program, click on the EXIT icon at the bottom of the
AstraCam display, or click on the X at the top right of the
window.
ORGANIZING YOUR PHOTO DATA
WITH PHOTOCABINET
PhotoCabinet's Information feature helps you
keep track of you photos. You can enter
important data about your photo, give it a title
and even add a voice memo. Later you can
quickly retrieve your photo using the
information you entered.
To use the Information feature:
1. If you do not already have photos stored in
PhotoCabinet, refer to page xx,
"Downloading Photos."
2. You can use the Information Feature in
Page View (one photo is displayed) or
17
Page 20

AstraCam Owner's Guide
Thumbnail View (All photos downloaded from your AstraCam are
displayed). To switch between Page View and Thumbnail View, open the
VIEW menu and select SWITCH TO THUMBNAIL VIEW or SWITCH
TO PAGE VIEW.
3. If PhotoCabinet is in Thumbnail View, click on the photo you want to work
with (a red frame will appear around the selected photo). If you are in Page
View, proceed to step 4.
4. Open the View menu and select INFORMATION.
5. Enter the data.
• In the Title field, name your photo.
• On the Photo Info tab, fill in the Author, Keyword and Place fields.
• Click on the ADDRESS BOOK tab and fill in the fields with all the
important information you want.
• Fill in the MEMO field.
6. To add a voice memo, click on the ADD VOICE button (your AstraCam
must be in the cradle). Click on the RECORD button and speak into your
AstraCam. When you are done, click on the STOP button and the OK
button.
7. Click on the OK button to close the Information box and save your data.
Retrieving Your Photo
Once your photo information is recorded, you can open it later by using the
Find function:
1. Open the EDIT menu and select FIND.
2. Fill in one of the fields with the information from your photo. For example,
if the title of your photo is "Bob," type it into the Title field.
3. Click on the SEARCH NOW button. A thumbnail of the photo will appear
at the bottom of the Find box. Click on the GO TO button to open your
photo.
If you have trouble remembering an exact search term, try the Fuzzy Level
search. For more information on Fuzzy Level searching, click on the
FUZZY LEVEL tab and click on the HELP button.
18
Page 21

AstraCam Owner's Guide
CREATING A CALENDAR WITH PHOTODELUXE
You can create your own photo calendar using PhotoDeluxe and your
AstraCam.
1. Insert the PhotoDeluxe CD in your CD-ROM drive so that you can access
the calendar templates.
2. Open PhotoDeluxe by selecting START> PROGRAMS> ADOBE>
PHOTODELUXE HOME EDITION> ADOBE PHOTODELUXE HOME
EDITION. The PhotoDeluxe window appears.
3. Click on the CARDS & MORE button
4. Click on the CALENDARS icon, and CHOOSE MONTHLY
CALENDARS option from the drop-down menu.
5. Follow the onscreen instructions through step 5, then click on the ADD tab
and choose CAMERAS. The AstraCam software will open.
6. Click on the DOWNLOAD THUMBNAIL(S) FROM CAMERA button to
load photos from your AstraCam.
7. Double-click on the photo you want for your calendar to bring it into
PhotoDeluxe. The Open Photos menu displays the thumbnail you
downloaded from your camera.
8. Drag the thumbnail over the new calendars you created.
9. Click on the SAVE button from the File menu to store the calendar page, or
click on the PRINT button to print the calendar page.
19
Page 22
AstraCam Owner's Guide
CREATING A PHOTO & SOUND E-MAIL
PhotoCabinet and E-Card use the following E-mail programs:
• Eudora
• Microsoft Mail
• Netscape Mail
• Lotus CC: Mail
Note: If you do not have one of the e-mail programs listed above, see page 21,
"Sending a Photo & Sound File as an Attachment."
Preparing a Photo & Sound E-Mail Greeting
1. Take a photo and make a recording with your AstraCam.
2. Place the AstraCam in the cradle and press the DOWNLOAD button.
PhotoCabinet will open and display your photo. If other photos are being
displayed from previous downloads, look at the In Box at the left of the
PhotoCabinet display and click on the bottom film roll icon to see the latest
download.
3. Click on the program selector arrows at the bottom of the screen until you
see E-CARD.
4. Drag your photo & sound selection to the E-Card icon. The E-Card program
will open and display your photo.
20
Page 23

AstraCam Owner's Guide
5. Make your card, stamp, frame, and paper selections by clicking on a button
at the right of the screen to open the selection. Drag the slider at the right of
the panel to view all the options. Click on the selection you want and it will
appear with your photo. Click on the ARROW at the top of the panel to
close it so you can click on the other buttons.
6. Adjust and resize your photo.
• To reposition your photo, drag it to wherever you want.
• To re-size the photo, drag the frame corners. If you want to undo the re-
size, press the CTRL + Z keys to return the photo to its normal size.
7. Add text to your greeting. Click on the TEXT button and type in the text you
want. Click on the FINISH ARROW at the right of the text box to insert text
into your greeting. Click on the X at the upper right of the text box to close
it. To position your new text, drag it to the new position.
8. Review your recording by clicking on the CASSETTE icon at the lower
right corner of your greeting.
Sending Your Photo & Sound E-Mail Greeting
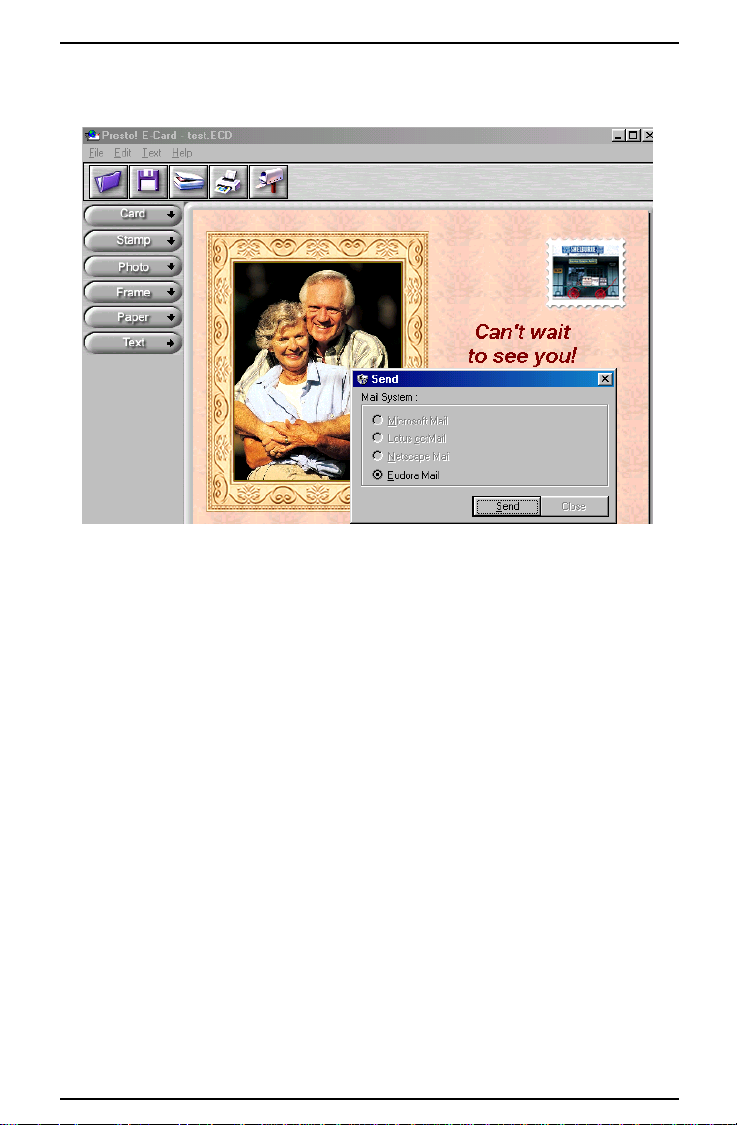
1. Click on the MAILBOX icon at the top of the screen.
2. A Send box will appear displaying the compatible e-mail programs
(programs not installed on your system are grayed out). Select the e-mail
program you want and click on the SEND button to open your e-mail
program.
3. Fill in the recipient field and press the SEND button.
Sending a Photo & Sound File as an Attachment
If you do not have one of PhotoCabinet's compatible e-mail programs, you can
save your greeting as a self-expanding file and send it as an attachment.
1. To make your greeting, follow steps 1 through 8 beginning on page 20.
2. When your greeting is finished, select SAVE from the File menu.
3. Choose the .EXE file type, name your file and click on the SAVE button.
Your picture & sound e-mail will turn into a self-expanding file.
4. Open your e-mail program, create a new message and attach your file to it.
The person who receives the attachment can simply click on the file to open
it.
Note: Refer to your Internet service provider (ISP) or your email program
for information on attachments.
21
Page 24

AstraCam Owner's Guide
CARING FOR YOUR ASTRACAM
• Do not store your AstraCam in hot locations such as in a closed car under
direct sunlight.
• Do not use solvents to clean your AstraCam Camera or AstraCam Cradle.
• Do not apply any liquids directly to the camera or cradle.
• Clean the camera and cradle with a soft, lint free cloth.
To clean the lens:
1. Carefully use an air blower or compressed gas duster to blow dust off the
lens.
2. Moisten lens cleaning tissue with a commercial lens cleaning fluid and wipe
the lens gently. Never pour lens cleaning fluid directly on the lens.
22
Page 25

ASTRACAM SPECIFICATIONS
AstraCam Owner's Guide
Optical Resolution
Maximum Resolution (interpolated)
Interface
Power Source
Memory
Photo Capacity
Voice Recorder
Voice Capacity
Download Speed
Lens Aperture
Lens Focal Length
Lens Focal Distance (focus free)
ISO Sensitivity
Exposure
Processing Time between Photos
Image Output File Type
Sound Output File Type
Weight
Item #
UPC Code
640 x 480
1280 x 960
USB AstraCam Cradle with Built-In
Battery Charger
Rechargeable - 2AAA Nickel Metal
Hydride Batteries (included)
4MB Internal Flash Memory
46 Photos (31 with Sound enabled)
Built-In
Up to 20 Seconds per Image
3 Seconds per Image (approximate)
Focus Free (F2.8)
50mm (as equivalent to a 35mm camera)
20" to Infinity
125 (equivalent)
TTL (through the lens) Automatic
Exposure
2.5 Seconds
JPEG
WAV
3.9 oz. (without batteries)
MTMD-84500
785461845000
23
Page 26

AstraCam Owner's Guide
CONTACTING TECHNICAL SUPPORT
The UMAX AstraCam is designed to be reliable, easy-to-install, and
easy-to-use. If you encounter any problems with your camera:
• Check out the UMAX Web site at: http://www.umax.com/support
• E-mail UMAX with your technical support question at: support@umax.com
• Call UMAX automated interactive support 24-hours a day at: 1-800-468-
8629
• Contact your dealer or call the UMAX support line between 6 a.m. – 8 p.m.
(PT) Monday-Friday and 8 a.m. – 5 p.m. (PT) Saturday at 208-552-7980.
Note: You are eligible to receive 90 days of free technical support from the
purchase date. If you call after the 90-day period, you will be charged a flat fee
of $19.95 per call. All charges will be billed to your (major) credit card.
Before calling, please be sure to have the following information ready:
• The camera model and serial number.
• The version number of the camera driver (located on the front of the CD).
• The computer model you are using.
• The printer and model that you are using (if applicable).
• The application software packages that you are using.
• Error codes or messages seen.
• A description of what you were doing at the time of the malfunction so
that the problem can be recreated.
• Other observations that may aid the technician in identifying the problem
and solution.
• When you call, please be in front of your computer. You will need to have
your camera and the computer turned on. Try to have as much information
about your problem as possible. This information allows the technician to
more effectively troubleshoot your problem.
PRODUCT REGISTRATION
To register your UMAX AstraCam digital camera, please go to the UMAX Web
site at: http://www.umax.com/support/registration and follow the online
instructions.
24
Page 27

AstraCam Owner's Guide
FCC DECLARATION OF CONFORMITY
Declares that the product:
Product Name: Digital Camera Model No.: DC-D1 (or) H9C0
FCC Rules: Tested to comply with FCC Part 15, Class B
Operating Environment: For home or office use:
FCC Compliance Statement:
This device complies with part 15 of the FCC Rules. Operation is subject to the following two
conditions: (1) This device may not cause harmful interference, and (2) This device must
accept any interference received, including interference that may cause undesirable operation.
Information to user:
This equipment has been tested and found to comply with the limits of a Class B digital device,
pursuant to Part 15 of the FCC Rules. These limits are designed to provide reasonable
protections against harmful interference in a residential installation. This equipment generates,
uses and can radiate radio frequency energy and, if not installed and used in accordance with
the instructions, may cause harmful interference to radio communications. However, there is
no guarantee that interference will not occur in a particular installation. If this equipment does
cause harmful interference to radio or television reception (which can be determined by turning
the equipment off and on) the user is encouraged to try to correct the interference by one or
more of the following measures:
• Reorient/relocate the receiving antenna.
• Increase the separation between the equipment and the receiver.
• Connect the equipment to an outlet different from the one to which the receiver is
connected.
• Consult the dealer or an experienced radio/TV technician for help.
Caution:
Changes or modifications not expressly approved by the manufacturer responsible for
compliance could void the user's authority to operate the equipment.
The party responsible for the product compliance:
Corporate Name: UMAX Technologies, Inc.
Address: 3561 Gateway Blvd., Fremont, CA 94538, USA
Person responsible for making this Declaration:
Position/Title: President Signature:
25
Page 28

AstraCam Owner's Guide
WARRANTY
One Year Limited Warranty
UMAX Technologies, Inc. UMAX warrants this hardware product against defects in material
and workmanship for a period of ONE (1) year from the original date of purchase.
Should defect(s) be discovered, the product may be returned either to the manufacturer or an
authorized UMAX service center. If your are returning product for repair, please be sure to do
the following:
1) Call UMAX Technical Support Mon-Fri during regular business hours at (208) 552-7980
and obtain an RMA (Return Merchandise Authorization) number.
2) Clearly write your RMA number on the OUTSIDE of the box or package next to the
shipping label.
3) Include a copy of the bill of sale with the returned product.
4) Unless otherwise instructed, do not return any manuals or software when returning items
for repair.
5) Ship to UMAX via a traceable shipping method and retain the tracking number.
This warranty is only valid within the boundaries and territories of the USA and Canada.
UMAX is not responsible for costs incurred due to shipping, insurance, customs, or duties.
UMAX is not responsible for non-traceable packages or packages shipped without a valid
RMA number on the outside of the package.
This warranty does not apply if the product has been damaged by accident, electrical fault,
through misuse or abuse. If the product has been altered without written authorization by
UMAX, the warranty will not be applicable.
This Warranty applies only to hardware products manufactured by or for UMAX. Warranted
products must bear the "UMAX" brand name, tradename, or logo. The aforementioned
warranty and remedies are exclusive, and in lieu of all others, whether oral, written, expressed
or implied. UMAX specifically disclaims any and all implied warranties of merchantability and
fitness for a particular purpose.
UMAX is not responsible for incidental or consequential damages resulting from any breach of
warranty. UMAX is not responsible under any other legal theory, including, but not limited to
lost profits, and any cost of recovering reprogramming or reproducing any program or data
stored in or used with UMAX products.
For more warranty information, please call UMAX at (208) 552-7980.
Warranty Service
If your UMAX product needs to be returned for repair, you must contact UMAX technical
support or your reseller in Canada prior to shipment for an RMA number before sending in the
product. The RMA number is a Return Merchandise Authorization number. UMAX and
UMAX Authorized Service centers will refuse all shipments without a proper RMA number.
The RMA number MUST be printed on the outside of the box or package next to the shipping
label.
UMAX Technologies
3561 Gateway Blvd., Fremont, CA 94538, USA
www.umax.com
26
 Loading...