

Page 1

Astra 610S
Owner’s Manual
This operation manual contains all the information to setup and use the hardware and software
that came with your scanner. More detailed information can be obtained through the online
manual in the VistaScan folder.
Make sure the power is OFF before installing.
!
Trademarks
IBM PC/AT is a trademark of International Business Machines Corporation. MS-Windows,
Windows, and MS-DOS are trademarks of Microsoft Corporation. Macintosh and MacSeries are
trademarks of Apple Computer, Inc. Photoshop is a trademark of Adobe Systems, Inc. Other
names and trademarks appearing herein are trademarks of their respective holders.
1
Page 2

Table of Contents
Quick Installation
1.
Connecting the Interface Card (For PC only) ………………………………………………………….. 3
2.
Connecting the SCSI Cable ……………………………………………………………………………. 4
3.
Important! Unlock Your Scanner First ………………………………………………………………... 5
4.
Connect the Power ……………………………………………………………………………………... 5
5.
Driver Installation ……………………………………………………………………………………… 6
6.
Testing Your Scanner (For PC only) …………………………………………………………………... 7
7.
A Glance at Your Scanner ……………………………………………………………………………... 7
Using The Bundled Software
8.
Using Adobe PhotoDeluxe …………………………………………………………………………….. 8
9.
Using Newsoft’s Presto! PageManager ………………………………………………………………. 11
Learning More About Your Scanner
10.
Start Your First Scan by Using the Scan Button on your Scanner …………………………………… 13
11.
Acquiring images into TWAIN compliant Scanner ………………………………………………….. 13
12.
VistaScan ……………………………………………………………………………………………... 14
13.
Changing the SCSI ID Number ………………………………………………………………………. 14
14.
Ten things you should know about scanning ………………………………………………………… 15
15.
Troubleshooting ………………………………………………………………………………………. 15
16.
If all else fails ………………………………………………………………………………………… 16
17.
Glossary ………………………………………………………………………………………………. 17
2
Page 3

1.
Connecting the Interface Card (For PC only)
1.
Turn your computer’s power off and remove the computer’s housing cover. (Usually this will require
you to remove some screws from the back of your computer with a Phillips head screwdriver.)
2.
Locate an available 16 bit ISA expansion slot. Remove the slot cover of that 16 bit slot so that you can
put in the included SCSI card.
3.
Insert the SCSI card by pressing it gently but firmly into the slot. Make sure it is firmly seated into the
slot. (Remember to secure the SCSI card by using the screw from the slot cover.)
4.
Replace the computer’s housing.
• The SCSI card that is supplied by UMAX is a proprietary card and will only support the
UMAX scanner. However, UMAX scanners are ADAPTEC compliant so they are
ADAPTEC compatible.
3
Page 4
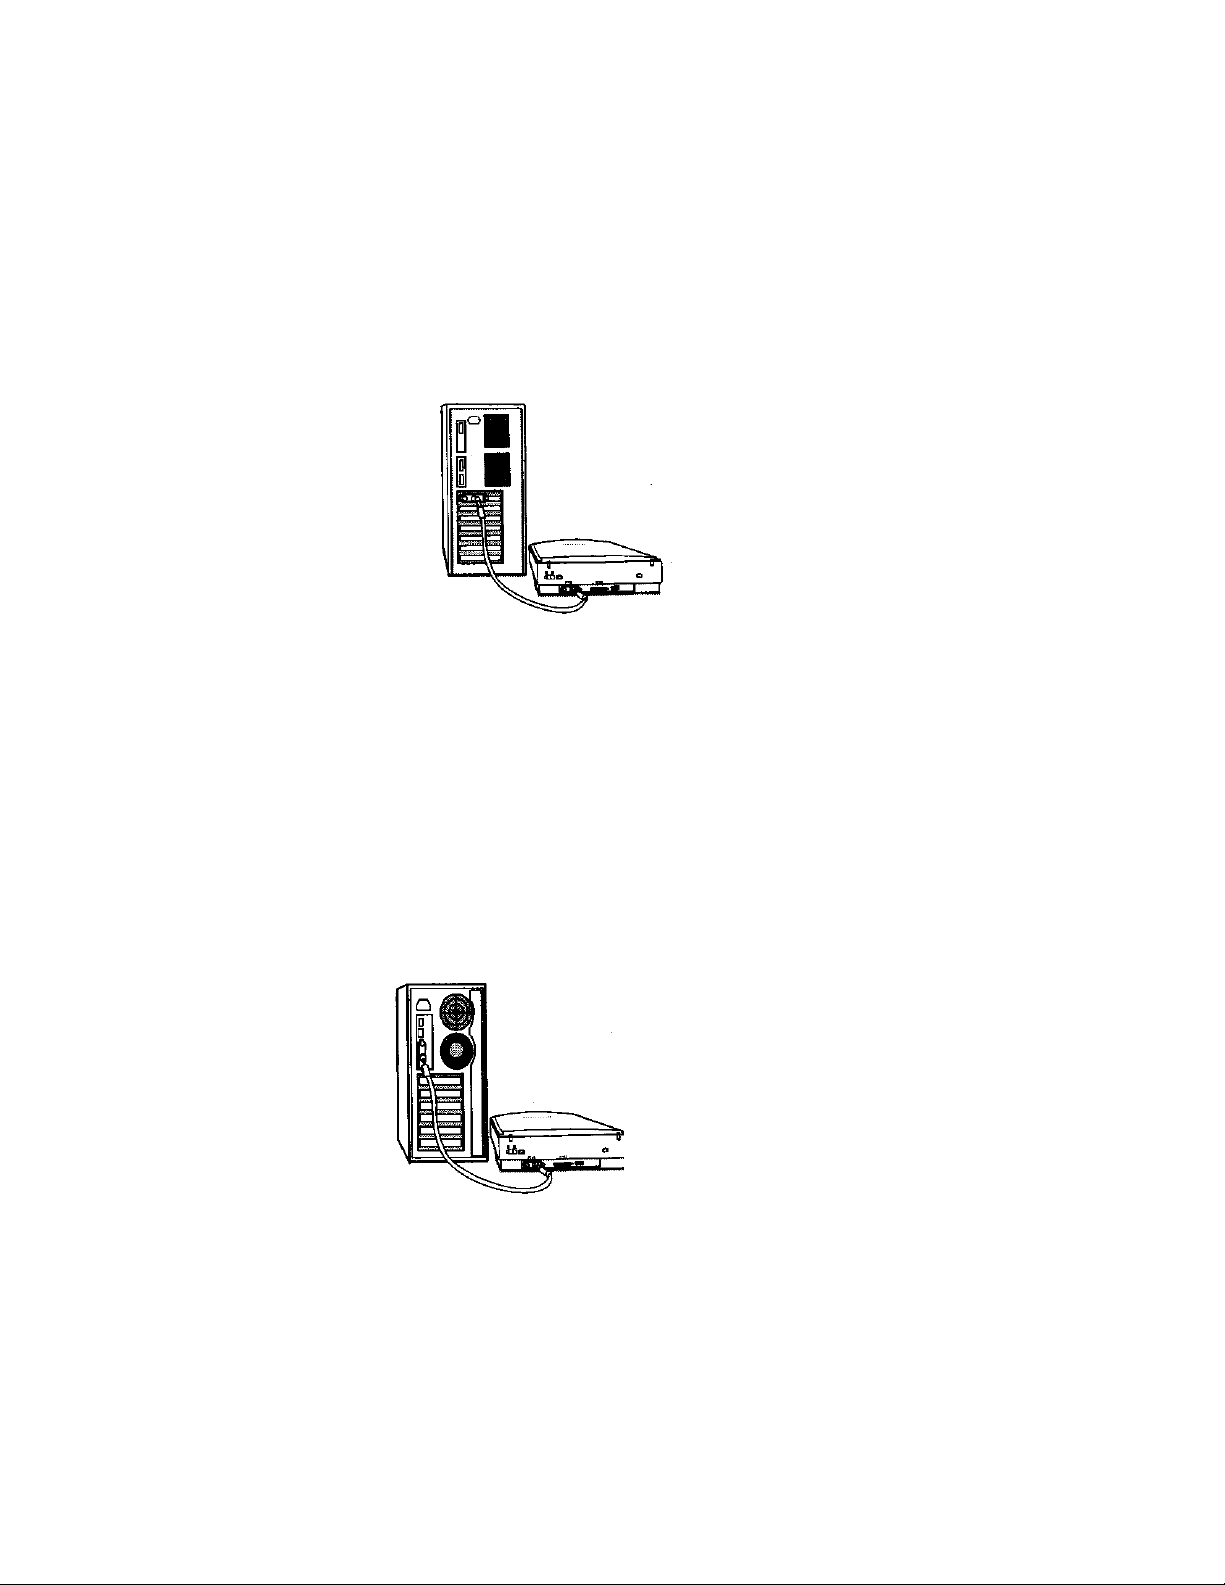
2.
Connecting the SCSI Cable
For PC
1.
2.
3.
Connect the SCSI cable to the SCSI interface card you installed.
Connect the other end of the SCSI cable to the scanner. It is OK to connect the cable to either SCSI
port on the scanner.
If your scanner is not chained to other SCSI devices, please connect the Terminator to the remaining
SCSI port of your scanner.
For Macintosh
You need to check to see which SCSI ID’s are already being used by other devices that are hooked up to
your computer. UMAX scanners are preset at SCSI ID 55. If no other device is using this address you can
proceed to install the scanner. If another device is already using this address you must change the SCSI ID
number on the scanner. To change the SCSI ID number (located at the back of the unit),
1.
Make sure the scanner is turned off.
2.
UMAX scanners are preset to SCSI ID #5. If you already have a SCSI device pre-set to SCSI ID #5,
see page 14 to change the ID number of your scanner. The section is titled, “Changing the SCSI ID
number”.
3.
Connect the SCSI cable to your scanner then connect the other end of the cable to your Mac’s SCSI
port.
4.
If your scanner is not chained to other devices, please connect the Terminator to the remaining SCSI
port of your scanner.
4
Page 5
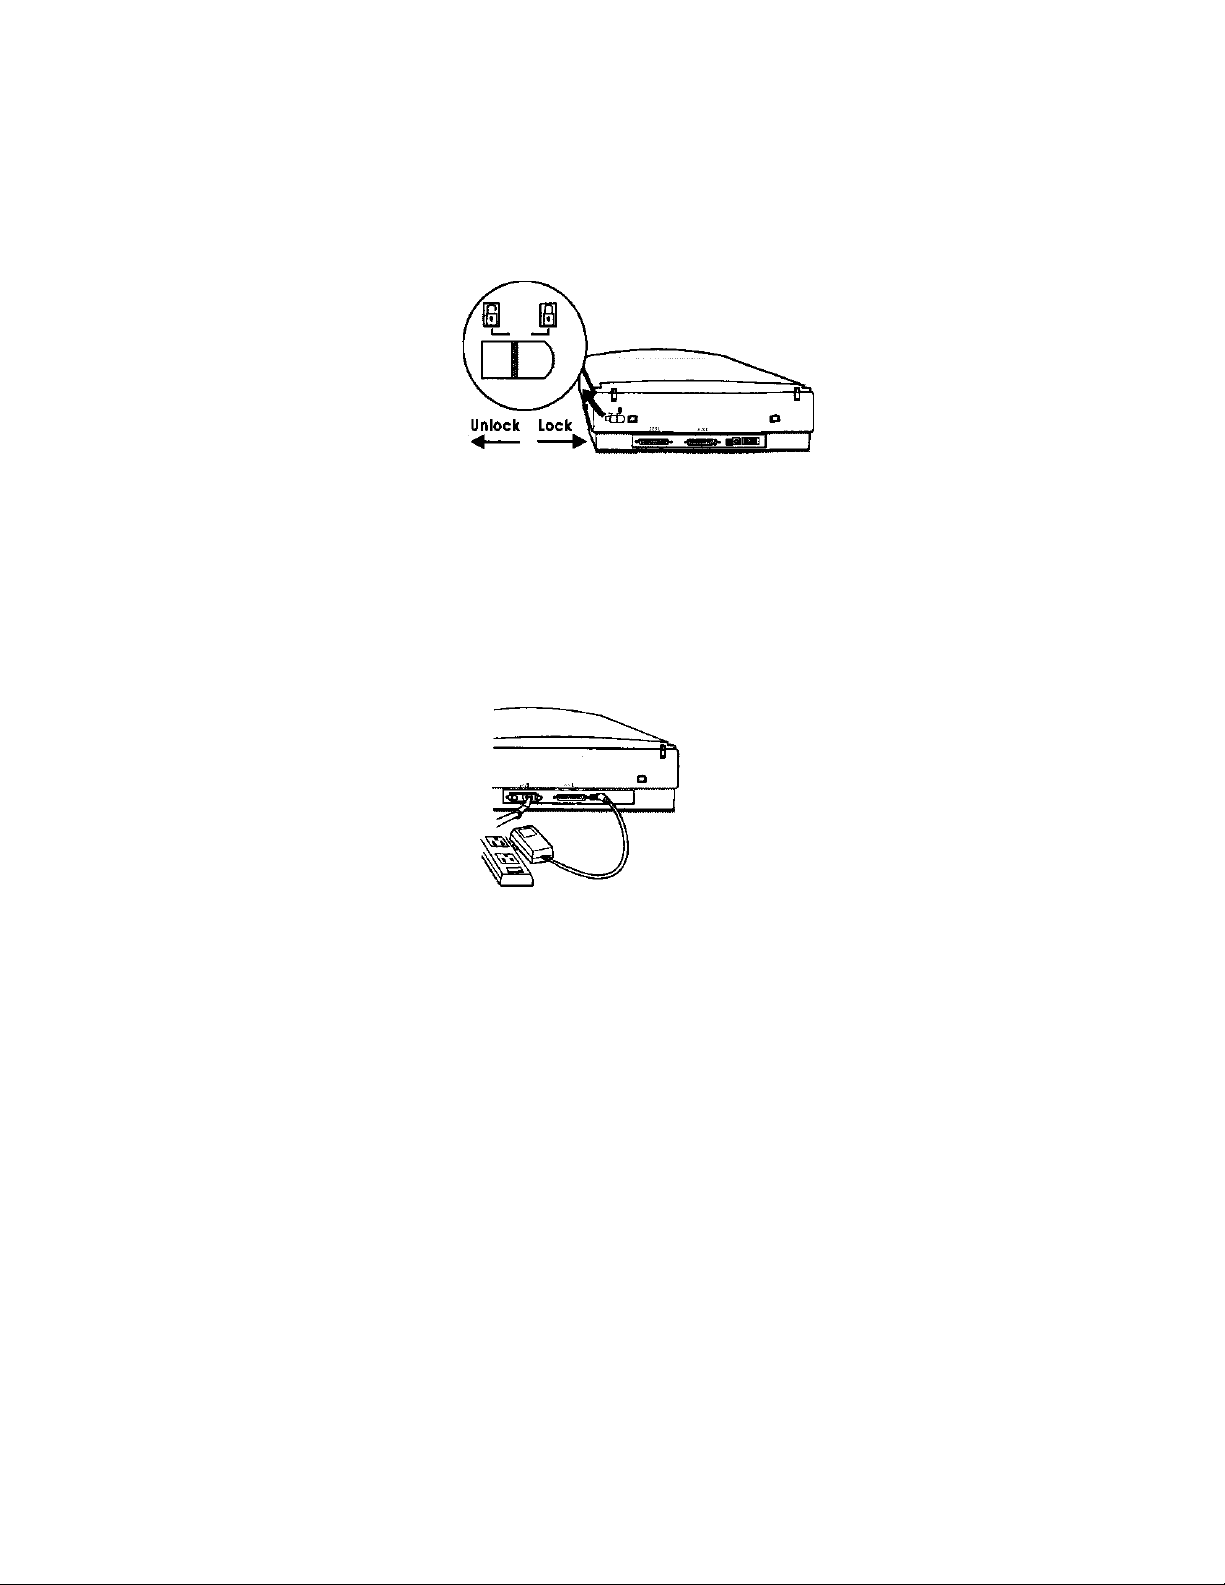
3.
Important! Unlock your scanner first
Look at the rear of the scanner. You should see a switch that has an unlock and lock symbol. Your scanner
is locked to prevent damage during shipment so the optics must be freed before scanning. Flip the switch
from the Locked position to the Unlocked position. See the illustration below.
4.
Connect the Power
Plug in the Power Adapter power cord and follow the installation instructions below:
Simply insert the round end of the power cable into the back of the scanner and plug the other end of the
cable into an available electrical outlet. See the illustration below.
5
Page 6
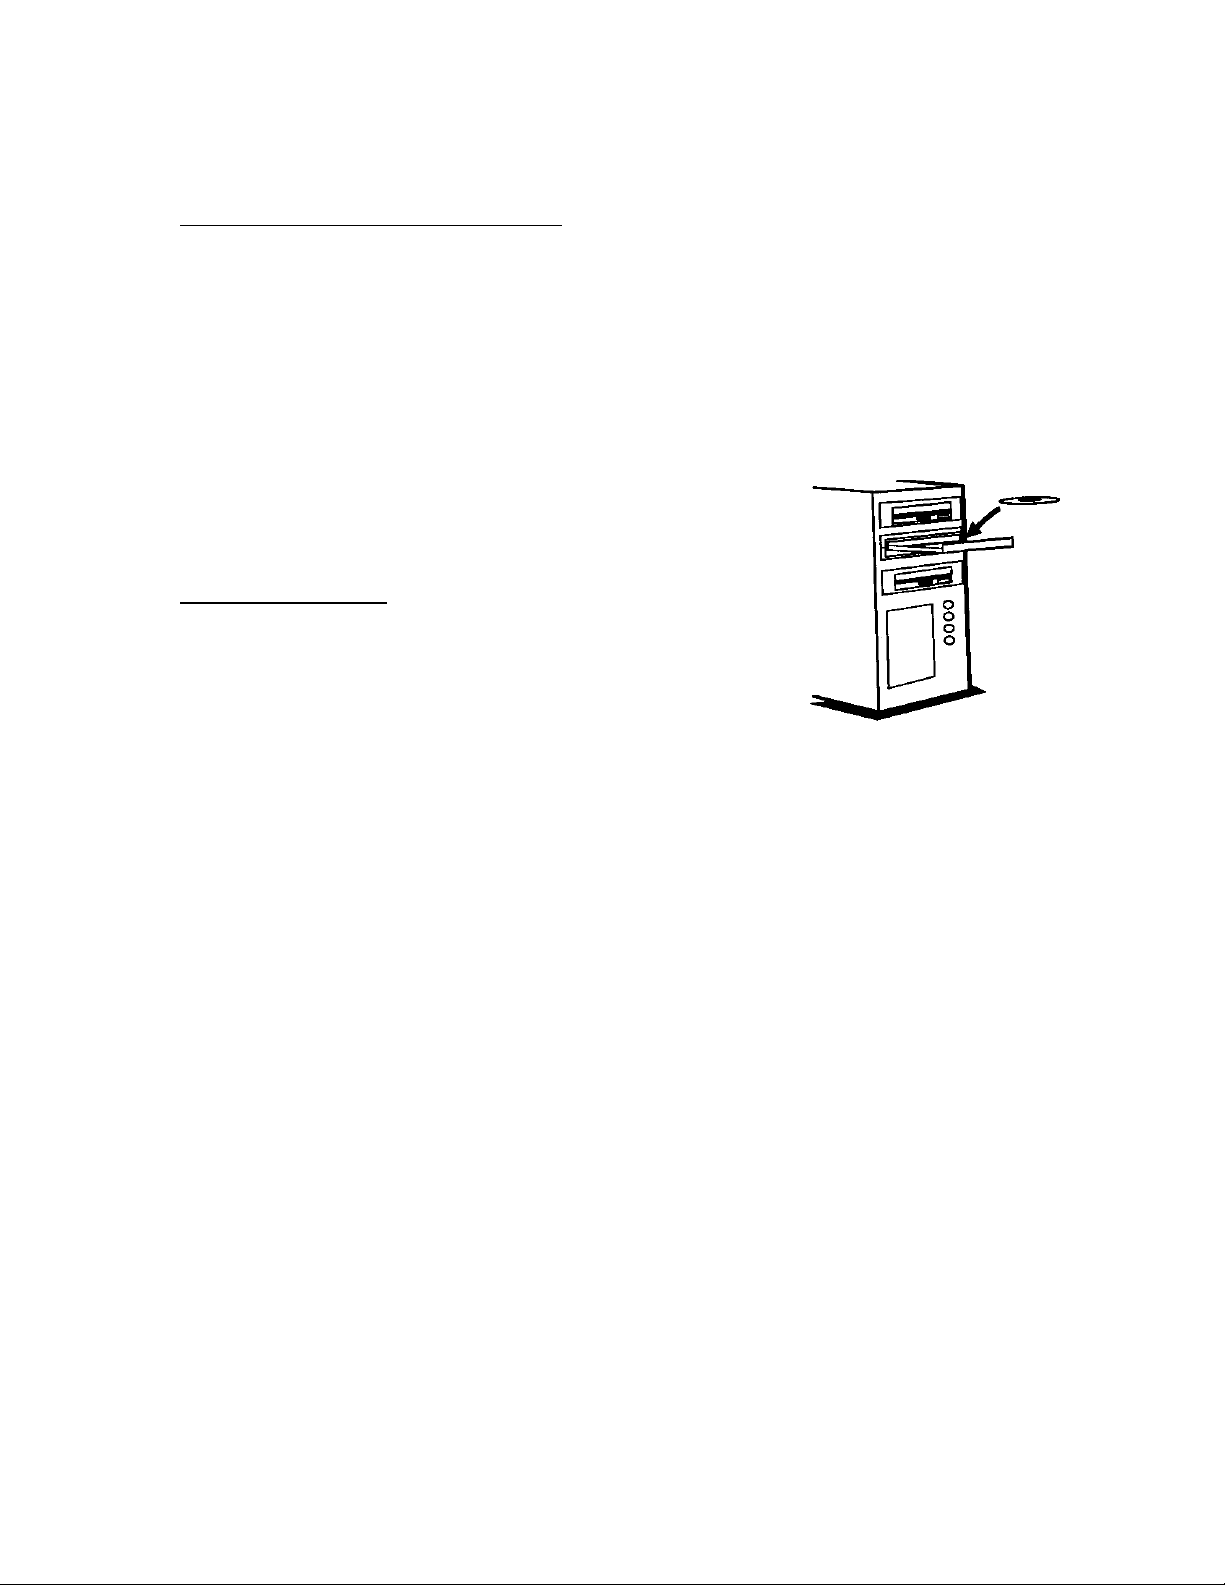
5. Driver Installation
For Windows 95 and Windows NT 4.0 users:
1.
Insert the Scanner CD into your CD-ROM drive.
2.
Click the Start button on the taskbar and select the Run… command.
3.
Install Adobe PhotoDeluxe first: PhotoDeluxe will automatically run its install program. Follow the
instructions to install PhotoDeluxe.
4.
Install Presto! PageManager and VistaScan next: On the command line of the Run dialog box, type
D:\SETUP (where D indicates the CD-ROM drive).
5.
Follow the on-screen instructions to complete the installation.
For Windows 3.X users:
1.
Insert the Scanner CD into your CD-ROM drive.
2.
Run Windows.
3.
Choose the File. Then Run command from the Windows Program Manager.
4.
Install Presto! PageManager and VistaScan next: On the command line of the Run dialog box, type
D:\SETUP (where D indicates the CD-ROM drive).
5.
Follow the on-screen instructions to complete the installation
For Macintosh users:
1.
Install PhotoDeluxe first. Insert the CD labeled PhotoDeluxe into your CD-ROM drive and double
click on the PhotoDeluxe Installer icon. Follow the on screen instructions to install the software.
2.
Insert the UMAX Scanner CD into your CD-ROM drive and double click on the icon that reads
UMAX Scanner CD Installer. Follow the on-screen instructions to install Presto! PageManager
(Scanning OS), VistaScan (UMAX scanner driver), and on-line manual.
6
Page 7

6.
Testing your scanner (for PC only)
Doing this step ensures that you have setup all of the software, SCSI card, and
hardware correctly.
1.
Turn on your computer.
2.
Run Windows, locate and open the VistaScan folder.
3.
Click on the icon that reads, “Scanner Test” to execute the test process. Follow all of the on-screen
instructions in order to test the scanner. This process will ensure that you have installed all of the
hardware and software correctly.
Note: If the scanner test fails, please refer to the Troubleshooting section of this manual for a solution.
Consult page 8 to complete your first scan using PhotoDeluxe. Page 11 for Presto! PageManager.
7.
A Glance at Your Scanner
7
Page 8

8. Using Adobe PhotoDeluxe
Adobe PhotoDeluxe is an image editing application that provides guided activities for easy image
manipulation. With PhotoDeluxe and your scanner, you can easily create cards, calendars, touch up
photos, change backgrounds, and much more. Your scanner will scan photographs into PhotoDeluxe and
PhotoDeluxe will walk you through the scanning/image editing process. PhotoDeluxe provides activities
that would take hours in other programs. Image editing is made easy.
For complete information see the following topics: “Scanning a photo” and “About scanners and
digital cameras” in on-line help.
Intro Tabs
The buttons shown to the left organize all of the activities in PhotoDeluxe into
categories. Clicking on this icon will bring up a series of tabs that have all of the
activities that PhotoDeluxe has templates for (shown below).
Guided Activities folders
Inside of each folder are numbered
tabs which will guide you through the
image editing process. Clue cards
will assist you by providing you with
information about each step.
Pictured above is the Select Input Source menu that shows you all the selectable drivers for PhotoDeluxe.
You will see this interface when you click on the down arrow – located below the scanner icon. Please
select VistaScan 32 then click OK. You will only need to select VistaScan once unless you choose to
change your scanner driver.
8
Page 9

Toolbar
The toolbar shown above allows you to zoom in and out of the picture with the magnifying glass or with
the magnification pull down bar. The garbage can allows you to delete the selected object. The “T” button
above allows you to place text onto your current project.
For complete information about the toolbar, click the Help button in the photo window and see the topic
“Looking at the photo window,” under “PhotoDeluxe Basics”.
Photo Organizer
When using a gallery, or photo
collections, the photo organizer
appears. The photo organizer floats
above other windows. For more
complete information about the photo
organizer, see the topic “Organizing
your photos” in on-line help.
The following is an example of a typical task in PhotoDeluxe.
Step 1 – Open PhotoDeluxe
Step 2 – The remaining instructions will show you how to make your first scan using PhotoDeluxe. As an
example, we will create a calendar. Click the Cards & More option from the menu at the side.
You will notice that all the functions are preceded by an introduction. Click on the Cards &
Calendars tab and then the Calendar icon. Follow the Clue cards and messages until you reach the
Add tab. You will see the two illustrations below during this process.
9
Page 10

Step 3 – Clicking on the Add tab will display the set of
icons shown to the right.
Step 4 – Next, click the arrow underneath the scanner icon.
Step 5 – Select the appropriate driver from the Select
Input Source dialog box. Choose
VistaScan32 V3.1 (for Windows 95 users).
Click OK to confirm your driver.
Step 6 – Then, click the Scanner icon to acquire the image. The My photos dialog box will display a
thumbnail of the image in the Acquire dialog box. This process will ask you to enter a filename.
Step 7 – Drag the thumbnail from the Acquire section of
the My photos dialog box to the area on the
calendar you wish to place the photograph.
To save a photo into a different format or to use in a different program
Step 1 – With a photo open, complete any activity you may be using, click the Send button and then click
the To Disk Tab.
Step 2 – Click the Export button, and click the 1 Export tab.
Step 3 – Click the button that matched how the photo will be used. If you are unsure which format to save
to consult the following list.
- for World Wide Web – try .gif - for any other file format, click Other Export
- for output to a desktop publishing program – try .eps, .tiff in the Other Export tab
10
Page 11

9. Using Newsoft’s Presto! PageManager
Presto! PageManager adds versatility to your Astra 610S color scanner. Photos and Documents can be
scanned into PageManager from where they can be e-mailed, printed, or faxed. The application bar (the
bar at the bottom of the interface) can be customized with as many different applications as you desire.
Image management is as easy as “dragging and dropping”. There are many functions included in
PageManager. This guide will lead you through some of the most common uses for PageManager.
Additional help can be accessed from the on-line manual.
Scanning Documents Into Presto! PageManager
Step 1 – Open Presto! PageManager.
Step 2 – Since this is your first time setting up the software,
from the Scan menu, choose Select Source.
Step 3 – A dialog box should appear with all of the selectable
scanner drivers. Choose VistaScan_32 (for Windows
95 users) and VistaScan (for Windows 3.1 users) as
your driver. Click on Select.
Note: steps 2 & 3 only need to be done the first time setting up the software unless you choose another
driver.
Step 4 – To begin the Scan process: Click the scanner icon
(pictured at the right) or access VistaScan from the
Scan menu by selecting Acquire…VistaScan should
appear.
Step 5 – Place photo or document to be scanned face down on the object glass. Align the photo or
document on the zero mark for optimal scanning.
Step 6 – Select appropriate settings (dpi, color/B&W, brightness, etc.).
Step 7 – Click Preview. The scanner’s optics will move and the image will appear as a low res image in
the preview box. Crop off our image by moving dotted lines to cover only the desired scanning
area. Click Scan.
Step 8 – The scanner optics will scan, and your image will show up as a thumbnail on the Presto!
PageManager desktop. To view the entire image, you can double click on the thumbnail
-orTo use this image in another program: You can “drag and drop” the thumbnail to the application bar to
print, fax, e-mail, or a program you customize to open it (an example is pictured above). (To set up a
program in this bar, consult the sections “Adding programs to your Application Bar”)
11
Page 12

Adding programs to your Application Bar
The following description will describe how to setup a program in your application bar.
Step 1 – From the File menu select Preferences.
Step 2 – Click Applications. The Applications tab appears.
Step 3 – Click Add. The Add Application dialog box appears.
Step 4 – Click Browse.
Step 5 – Locate the executable file (?.exe) of the program that you want to add.
An example is c:\winword\winword.exe:
a) Click on your hard drive (c:)
b) Find your Winword folder
c) Click on Winword.exe
d) Click OK
Step 6 – Approve the Description (how you want the icon to read), Filename (the ?.exe of the program that
you want to add), and the Format (the format that PageManager will save to before sending your image to
the desired program).
Step 7 – Click OK to save the new settings and Close the dialog box.
How to do Optical Character Recognition
Step 1 – Scan an image as described in Scanning Documents Into Presto! PageManager.
(Note: the settings in VistaScan, the scanner driver, should be Lineart and 300dpi)
Step 2 – Double click on thumbnail to bring the image full screen when it is in Presto! PageManager.
Step 3 – Click on the icon that reads, OCR (pictured above). This will automatically OCR your document,
-or- If you want to OCR your image to your word processing program “drag and drop” the
thumbnail to your application bar which has your word processing program set up.
(To set up a program in this bar, consult the section “Adding programs to your Application
Bar”)
Saving into Different Formats
(example: .tiff, .bmp, .jpg, etc.)
If you would like to save the image in a specific format to use in a different application such as image
editing and desktop publishing programs, e-mail, fax, or word processors.
Step 1 – Scan the image as described in Scanning Into Presto! PageManager.
Step 2 – Double click on thumbnail on the PageManager desktop to bring the image full screen.
Step 3 – From File menu select Save As.
Step 4 – Enter a filename, select which format and what drive you would like to save to.
Step 5 – Click OK.
12
Page 13

10.
Start Your First Scan by Using the Scan Button on Your
Scanner
Document and photo placement
1.
Raise the scanner’s document cover.
2.
Place the document, graphic, text, or photo to be scanned face down
on the scanner. Center the document to the triangle as shown to the
right.
3.
Lower the document cover.
Follow the below instructions to complete scanning
1.
Run Windows.
2.
Make sure that the “Scan Button On” is running under the VistaScan
program group. If it is not, the push button will not work. Locate the “Scan
Button On” icon located in the VistaScan folder to activate the Scan button
on your scanner. MAC users will find Scan Button On located in the
startup folder.
3.
Press the Scan button on the front panel of your scanner.
Presto! PageManager pops up automatically and the scanner’s driver
appears. Choose whatever formatting you would like (dpi, color/B&W, contrast, etc.).
4.
Click Preview; Crop off the desired scanning area; then click Scan.
11.
Acquiring images into TWAIN compliant software
(ex. PhotoShop, Picture Publisher, Kai’s Power Goo, etc.)
1.
Open up your image editing software (ex. PhotoDeluxe, PageManager, PhotoShop, etc.)
2.
For Windows users –
a) From the File menu, choose Select TWAIN 32 Source (Select TWAIN Source for
Windows 3.1 users).
b) Click VistaScan 32 (for Windows 95 users) or VistaScan (for Windows 3.1 users).
c) Again click the File menu, choose TWAIN 32…
For Macintosh users – From the File menu, choose Acquire or Import
3.
VistaScan, the UMAX scanner driver, should appear. At this point you should select whatever
formatting you would like to scan at (dpi, B&W, brightness, contrast, etc.).
4.
Click Preview; Crop off only the area that you would like to scan.
5.
Click Scan.
13
Page 14

12.
VistaScan is the user interface that controls the various functions of the scanner. In this interface you can
change the dpi, color/B&W, scaling, etc. VistaScan also allows you to do a Preview – allows you to get a
low res image which allows you to see where
you have placed your photo or documents.
Crop – You can crop off only the area that you
want to scan.
Scan – This button allows you to scan the image
with the settings that you have designated.
VistaScan
For more detailed information on
VistaScan, consult the on-line manual.
13.
If you have other devices connected to your SCSI port, you need to check and see what SCSI ID’s are
already used. The scanner is preset at the factory to SCSI ID 5.
If, after checking other devices in the SCSI chain, you find that SCSI ID 5 is unused, you do not need to
change the ID on the scanner and you can go ahead with the installation.
If, however, after checking other devices in the SCSI chain, you find that another device uses SCSI ID 5,
you must change the SCSI ID on your scanner.
To change the SCSI ID, do the following:
1.
2.
Changing the SCSI ID Number
Make sure the scanner is turned off.
Gently turn the switch until an unused number
appears in the switch’s notch.
Note: Do not use SCSI ID 8 or 9 on your scanner.
They are for factory use only.
14
Page 15

14.
1.
2.
Ten things you should know about scanning:
Generally, scan at half of the resolution of the printer that you are outputting to.
If you are unsure what DPI to scan at…try 300 dpi for color, photos, B&W documents, and OCR; 72
dpi for web publishing; and 200 dpi for faxing.
3.
TWAIN is a standardized interfacing system tat allows many software applications to access many
different image input devices. Umax scanners are fully TWAIN compliant.
4.
SCSI – is one of the interfaces that allow a scanner to connect to a computer.
5.
Descreen – descreen is a function built into VistaScan. When scanning magazine articles, art prints, or
newspapers, descreen must be turned on to eliminate the moiré pattern. (image looks checkered)
6.
halftone, RGB – these are some of the more common settings in VistaScan. B&W would be for
scanning Black and white documents and OCR scanning, halftone consists of numerous levels of gray,
and RGB is for color photos and documents.
7.
“How can I get more information on my scanner?” There is detailed information about your scanner,
VistaScan, PageManager, and PhotDeluxe located in electronic format. Help and additional
information can be accessed from the users guide located in the VistaScan and PageManager folders.
8.
OCR – “Optical Character Recognition”; translates an image with printed text into computer
recognizable symbols.
9.
DPI – “Dot Per Inch”; measurement that defines the density of display.
10.
“How can I get technical help?” UMAX offers technical support at 214-739-1915 Monday-Friday
9am-5pm CST and through our technical assistance page on our website (includes downloading
drivers).
15.
The scanners are designed to be reliable and easy to install. If, however, you have a problem with your
scanner, these troubleshooting steps should indicate the cause of the problem.
If the scanner lamp flickers, is dim, or fails to come on:
The scanning lamp is failing or has failed and needs to be changed. Please contact your dealer or Technical
Support.
Troubleshooting
If the indicator comes on, but software returns “scanner link failed”, or similar message:
1.
Make sure the cable is connected properly.
2.
Check the installation procedures to make sure you followed all of the instructions. Macintosh users
should pay special attention to the setting of the SCSI ID number.
3.
Disconnect all of the SCSI devices. Connect only the scanner WITH NO terminator. Doing this will
see if there is an address conflict with the scanner and your computer. Once your scanner is working,
connect the other SCSI devices one-by-one to see which one caused the problem.
4.
Check the terminators and the cables.
Note: If you are having intermittent problems either with the link between the scanner and your computer
or are having intermittent problems with the results of your scans, try installing an external SCSI
terminator if it is not already connected.
15
Page 16

If you get an error message that ready, “Invalid Port Address”
1.
Make sure that you are using the SCSI card that was supplied or an Adaptec compatible SCSI card.
2.
The SCSI card might not be firmly seated in the 16 bit expansion slot. Reseat the card, preferably in a
different slot, or swap it with a slot that you know is working.
3.
If you are using an Adaptec card, please reinstall Presto! PageManager and VistaScan through the
customer installation (the UMAX installation defaults to the proprietary card that comes with the
scanner). When you are prompted to select your card, select Adaptec compliant card.
If you get a message that reads, “Device not found”:
This means that the SCSI card is installed right but there could be a problem wit the connection from
there. Make sure that all of the cable connections are fully connected. If that does not work, try the
scan without the terminator on. If problems still persist, call technical support with details of your
problem. See Chapter 16, If all else fails.
16.
Please go through the installation setup and make sure everything is setup correctly, but if the above
solutions do not resolve the problem, contact your dealer or Technical Support. Be sure to have the
following information ready:
1.
2.
If all else fails…
The scanner model you are using.
The version number of the scanner driver. (Located on the front of the CD)
3.
The computer model you are using.
4.
All SCSI devices that you are using.
5.
The application software packages that you are using.
6.
Error codes or messages seen.
7.
A description of what you were doing at the time of the malfunction so that the problem can be
recreated.
8.
Other observations that may aid the technician in identifying the problem and solution.
9.
If at all possible, please be in front of your computer and scanner with both turned on. Try to have as
much description about your problem as possible. Having this information will allow the tech to
troubleshoot your problem more effectively.
16
Page 17

17. Glossary
Apple-Compatible Driver: A Macintosh system extension that addresses the scanner in Apple Scanner
emulation mode. This is used for programs that do not support the PhotoShop Plug-in protocol or do not
drive the scanner directly.
Application Software: Software that is used to perform a specific function, e.g., image processing, OCR
(Optical Character Recognition), or DTP (Desktop Publishing).
ASPI: Advanced SCSI Programming Interface; SCSI communication standard developed by Adaptec.
Black and White: A 1-bit image file capable of only displaying black and white image data with no
intermediate gray levels.
DIP Switches: Small switches mounted in or on computer equipment that set certain perimeters.
Document Cover: The plastic cover that is lowered over a document on the scanner’s object glass.
Expansion Slot: A connector and bracket system in a computer into which an expansion or interface card
can be inserted to add functions to a computer system.
Expansion Slot Cover: A metal or plastic dust cover that covers the exterior “hole” in an expansion slot.
Folder: An electronic storage area used to store and organize files and other folders and is often
represented on a computer by a folder-like icon.
Grayscale: An 8-bit image file capable of representing all tones and colors in the image using 256 shades
of gray.
I/O Base Address: An address that is used for communication between a host computer and an expansion
or interface card. All cards in a computer system must be set to different I/O addresses.
Icon: The graphical representation of a computer file or piece of computer software.
Indicator Panel: The area of the scanner that contains the LED indicators to show scanner status.
Interface Card: A card that is inserted into an expansion slot to allow the connection of a peripheral
device to a PC.
Non-TWAIN Driver: An interfacing system that does not follow the TWAIN standard and is designed for
a specific software package and a specific image input device.
Object Glass: The tempered glass of the scanner where documents or objects to be scanned are placed.
Optical Assembly: The component system of the scanner that contains all of the optical components.
Sometimes referred to as a carriage or carriage assembly.
Peripheral Device: A device attached to a computer that adds functionality to a computer system.
Ready Indicator: The indicator that glows when the scanner’s power cable is connected to the scanner
and a “live” outlet and the power switch is turned on.
SCSI Chain: One or more SCSI devices connected to the same SCSI controller.
SCSI Device: A device which connects to a computer using the SCSI interface.
17
Page 18

SCSI ID: A unique number between 0 and 7 that identifies each device on a SCSI chain. The SCSI ID is
set using a SCSI ID switch (present on most external SCSI devices).
SCSI ID Switch: The switch on most external SCSI devices which is used to set the SCSI ID.
Terminator: An electronic component that absorbs stray signals in a SCSI chain or computer equipment
to ensure reliable operation.
Transparency Adapter: A scanner option that consists of additional hardware allowing the scanning of
transparent originals, such as slides or X rays.
TWAIN Compliant: Any software or image input device that conforms to the TWAIN standard.
TWAIN: A standardized interfacing system that allows many different software applications to access
many different image input devices. TWAIN is currently more popular on the Windows platform than it is
on the Macintosh.
The following adapters are approved to be used with TUVGS:
ADP-12B Rev. B/Delta
ADP-12CB Rev. C
WP10XY/Dow Dec
HES10-311/Hitron
For UL CSA Listed products, the adapter shall be UL, CUL or
CSA Listed Class 2 Power Supply.
18
 Loading...