


SERVICE MANUAL
®
MODULAR 3000 SERIES 230V, 3045CLR MODELS
U-3045CLROL-00
U-3045CLROL-01
U-3045CLROL-40
U-3045CLROL-41
U-3045CLRS-00
U-3045CLRS-01
U-3045CLRS-40
U-3045CLRS-41
THE MODULAR 3000 SERIES ARE INTENDED FOR BUILT-IN INSTALLATIONS ONLY
The American Built-In Undercounter Leader Since 1962 |
U-LINE.COM |
|
|

INTERNATIONAL PRODUCT LIABILITY POLICY (as of 11/4/2011)
Field service engineers are authorized to make an initial assessment. If in the engineer’s judgment the damage is the result of a product defect, the product would be removed and returned to the importer in an unaltered condition. The importer would then be authorized to permanently replace the end-user’s product at no cost to the end-user. The importer will notify U-Line and initiate a discussion regarding disposition along with holding the product unaltered for evaluation.
If in the engineer’s judgment, the damage is the result of installation, the end-user would be so notified and the correction would be made by the engineer or installer without requiring removal of the product. Any claim for damages should be directed to the original installer of the product.
Any U-Line product involved in an alleged property damage claim must remain unaltered and unrepaired, for evaluation. No service or repairs should be performed on any product suspected to be involved in property damage. If a product has been altered or repaired in the field prior to the evaluation, any claim for damage may be declined. The product will be held (unaltered) at the importer for disposition until notified by U-Line.
To complete the damage claim process for the end-user, the importer must obtain the following and forward to U-Line at the email intl@u-line.com:
1.Pictures of the product, installation and any alleged property damage.
2.Inquire when the problem first appeared, any prior problems with the product and provide a brief description of the alleged damages.
3.To expedite the claim process, two damage repair estimates will be needed.
4.Reference the Return Authorization (RA) number and end-user name when providing this information.
If a product is returned to the importer, the importer will work with U-Line to facilitate the evaluation. U-Line reserves the right to evaluate the product and will provide written (via email) approval for any person performing this evaluation. No field service engineer is authorized to perform this evaluation without approval from U-Line. When a Return Authorization Number is issued, and the product has been boxed in a U-Line carton, importer should be contacted and then will make arrangements for shipping, or designate a truck line to have the product shipped freight collect to the importer.
If the evaluation finds the product to be defective, the damage claim will be reviewed by the U-Line Customer Assurance Department. If the evaluation finds the product not to be defective, all claims for damage will be declined.
When a product evaluation is needed, it is the end-user’s responsibility to assure that the product is released for evaluation. If the end-user fails to do so, or has the product repaired in the field prior to the evaluation, any claim for damage will be declined.
Website: u-line.com
Mailing Address:
P.O. Box 245040
Milwaukee, WI 53224-9540
U.S.A.
Physical Address:
8900 N. 55th St.
Milwaukee, WI 53223
U.S.A.
Phone 1-414-354-0300
Fax 1-414-354-7905
u-line.com

Table of Contents |
|
General Information |
|
Safety Alert Definitions......................................................................................................................................... |
1 |
General Precautions .............................................................................................................................................. |
1 |
Product Features |
|
Guide Coverage ..................................................................................................................................................... |
3 |
Model Features ....................................................................................................................................................... |
3 |
3000 Series Features ............................................................................................................................................. |
3 |
Warranty Claims Procedure ............................................................................................................................... |
4 |
Proof of Purchase................................................................................................................................................... |
4 |
Serial Number......................................................................................................................................................... |
4 |
Replacement Parts ................................................................................................................................................. |
4 |
Models Covered..................................................................................................................................................... |
4 |
System Default Values........................................................................................................................................... |
4 |
Product Operation |
|
Air Flow.................................................................................................................................................................... |
5 |
Initial Startup ........................................................................................................................................................... |
5 |
U-Select® Control................................................................................................................................................. |
5 |
Customer Menu ..................................................................................................................................................... |
5 |
Service Menu........................................................................................................................................................... |
9 |
USB Communication........................................................................................................................................... |
13 |
Thermistors........................................................................................................................................................... |
14 |
Viewing Temperature.......................................................................................................................................... |
14 |
Refresh Kit............................................................................................................................................................. |
15 |
Ice Cube Thickness Adjustment....................................................................................................................... |
15 |
Quick Guide .......................................................................................................................................................... |
17 |
Prepare Plumbing |
|
1/4" Copper Water Supply Connection......................................................................................................... |
18 |
U-Line Water Hookup Kit Connection.......................................................................................................... |
19 |
Drain Connection |
|
Gravity Drain ........................................................................................................................................................ |
20 |
Factory Installed Drain Pump............................................................................................................................ |
20 |
Drain Connection ................................................................................................................................................ |
21 |
Final Installation .................................................................................................................................................... |
21 |
3000 Series Maintenance |
|
Leveling................................................................................................................................................................... |
22 |
Removing and Installing Grille........................................................................................................................... |
22 |
Adjusting Grille..................................................................................................................................................... |
22 |
Cleaning |
|
Exterior Cleaning ................................................................................................................................................. |
23 |
Interior Cleaning .................................................................................................................................................. |
23 |
Clear Ice Maker Cleaning Cycle ....................................................................................................................... |
23 |
Condenser Cleaning ............................................................................................................................................ |
25 |
Storage, Vacation and Moving ........................................................................................................................... |
25 |
Product Disposal.................................................................................................................................................. |
25 |
3000 Series Doors |
|
Door Alignment and Adjustment..................................................................................................................... |
26 |
Service |
|
Replacement Parts ............................................................................................................................................... |
27 |
Normal Operating Sounds................................................................................................................................. |
27 |
Troubleshooting Guide....................................................................................................................................... |
27 |
Troubleshooting |
|
Main Control......................................................................................................................................................... |
28 |
Component Testing............................................................................................................................................. |
29 |
System Information.............................................................................................................................................. |
30 |
General Information
General Information
NOTICE
•PLEASE READ all instructions before installing, operating, or servicing the appliance.
•Proper installation procedures must be followed when completing an installation or relocation of a unit. An INSTALLATION GUIDE for the unit, providing complete installation information, is available from U-Line Corporation direct. Consult the installation guide before any installation begins. U-Line contact information appears on the rear cover of this guide.
•The unit requires a grounded and polarized 230 VAC,
50 Hz, 15A power supply (normal household current). An individual, properly grounded branch circuit or circuit breaker is recommended. GFCI (ground fault circuit interrupter) is usually not required for fixed location appliances and is not recommended for your unit because a GFCI could be prone to nuisance tripping, However, be sure to consult your local codes.
Safety Alert Definitions
Throughout this guide are safety items labeled with a Danger, Warning or Caution based on the risk type:
! DANGER
Danger means that failure to follow this safety statement will result in severe personal injury or death.
! WARNING
Warning means that failure to follow this safety statement could result in serious personal injury or death.
General Precautions
Use this appliance for its intended purpose only and follow these general precautions with those listed throughout this guide:
! DANGER
RISK OF CHILD ENTRAPMENT. Before you throw away your old refrigerator or freezer, take off the doors and leave shelves in place so children may not easily climb inside.
This appliance is not intended for use by persons (including children) with reduced physical, sensory or mental capabilities, or lack of experience or knowledge, unless they have been given supervision or instruction concerning use of the appliance by a person responsible for their safety. Children should be supervised to ensure that they do not play with this appliance.
Do not store explosive substances such as aerosol cans with a flammable propellant in this appliance.
! WARNING
SHOCK HAZARD - Electrical Grounding Required.
•Never attempt to repair or perform maintenance on the unit until the electricity has been disconnected.
•Never remove the round grounding prong from the plug and never use a two-prong grounding adapter.
•Altering, cutting of electric cord, removal of electric cord, removal of electric plug, or direct wiring can cause serious injury, fire and/or loss of property and/or life, and will void the warranty.
•Never use an extension cord to connect electric current to the unit.
•Always keep your working area dry.
If the detachable type electric supply cord is damaged, it must be replaced by an equivalent cord available from the manufacturer or its service agent.
! CAUTION
Caution means that failure to follow this safety statement may result in minor or moderate personal injury, property or equipment damage.
! WARNING
Install provided Anti-Tip kit on all 3000 series models.
! WARNING
Do not store explosive substances such as aerosol cans with flammable propellant in this appliance.
! WARNING
Requirement for an external switch in the fixed wiring is specified.
u-line.com |
1 |

General Information
!CAUTION
•Use care when moving and handling the unit. Use gloves to prevent personal injury from sharp edges.
•If your model requires defrosting, DO NOT use an ice pick or other sharp instrument to help speed up defrosting. These instruments can puncture the inner lining or damage the cooling unit. DO NOT use any type of heater to defrost. Using a heater to speed up defrosting can cause personal injury and damage to the inner lining.
NOTICE
Do not lift unit by door handle.
•Never install or operate the unit behind closed doors. Be sure front grille (plinth strip/base fascia) is free of obstruction. Obstructing free airflow can cause the unit to malfunction and will void the warranty.
•Failure to clean the condenser every six months can cause the unit to malfunction. This could void the warranty.
•Allow unit temperature to stabilize for 24 hours before use.
•Do not Block any internal Fans.
Use only genuine U-Line replacement parts. Imitation parts can damage the unit, affect its operation or performance and may void the warranty.
This appliance is intended to be used in household and similar applications such as:
•Staff kitchen areas in shops, office and other working environments.
•Farm houses and by clients in hotels, motels and other residential type environments.
•Bed and breakfast type environments.
•Catering and similar non-retail applications.
2 |
u-line.com |

General Information
Product Features
Guide Coverage
This guide covers the following list of models.
U-3045CLROL-00
U-3045CLROL-01
U-3045CLROL-40
U-3045CLROL-41
U-3045CLRS-00
U-3045CLRS-01
U-3045CLRS-40
U-3045CLRS-41
Model Features
High daily ice production and storage. The 3045CLR produces up to 27 kg of ice per day and stores up to 14 kg.
Electronic control module. Automatically adjusts for changes in room and water temperatures to maximize ice production.
Easy, self-cleaning process. Models have a simple to use self cleaning process. Within one hour all ice making internal components have been thoroughly cleaned and rinsed.
Flexible water drain options. Water maybe drained using either a gravity fed drain or a U-Line supplied P60 drain pump.
3000 Series Features
Advanced OLED control system: State of the art OLED control system display.
Fully integrated design: Units are designed to blend seamlessly with surrounding decor.
Stainless steel: Stainless steel models offer a commercial stainless steel handle and door wrap.
Integrated panel models: Integrated panel models accept a custom integrated panel or frame to achieve perfect symmetry with surrounding cabinetry.
Fully adjustable toe-kick / Grille: Grille is fully adjustable and can be lined up with surrounding cabinetry toe kick height and depth for a truly built-in look.
Adjustable leg levelers: Heavy Duty leg levelers help dial in the perfect fit. Rear leg levelers are adjusted from the front of the unit for ease of installation.
Advanced diagnostic system: Advanced diagnostic systems accessible through front grille mounted USB port, an industry first.
Advanced LED lighting system: Energy efficient and low heat LED lighting provides an elegant illumination system. Theater style lights built to fully on and dim to fully off over a 3 second window. Fully programmable/adjustable.
u-line.com |
3 |

General Information
Warranty Claims Procedure
NOTICE
Warranty claims must be filed within 60 days after the completion of the service call.
When submitting claims for warranty payment, please see u-line.com/intl.
Proof of Purchase
If a copy of the Proof of Purchase/Proof of Install is not available, the technician should record the following information on the Labor Invoice:
Name of the selling dealer Date of purchase/installation Sales order or Invoice number
Description of verification document (i.e., Store Receipt, Closing Papers, Sign-Off of Building Permit, Final Walk Through, etc.) Confirm model and Serial number
Serial Number
The serial number is divided into four segments. A typical serial number is 1214997-08-0005.
1214997-08-0005
|
|
|
Factory |
Year Factory Month |
|||
Use Only |
Use Only |
||
Replacement Parts
Please refer to your importer for replacement parts or see u-line.com/intl.
Models Covered
This guide covers the following models:
18" Clear Icemaker Models
Model |
Hinge Configuration |
Door Configuration |
P-60 Pump |
|
|
|
Factory Installed |
|
|
|
|
U-3045CLROL-00 |
Right Hand Hinge |
Solid Integrated Panel Door |
No |
U-3045CLROL-01 |
Left Hand Hinge |
Solid Integrated Panel Door |
No |
U-3045CLROL-40 |
Right Hand Hinge |
Solid Integrated Panel Door |
Yes |
U-3045CLROL-41 |
Left Hand Hinge |
Solid Integrated Panel Door |
Yes |
U-3045CLRS-00 |
Right Hand Hinge |
Stainless Steel Door |
No |
U-3045CLRS-01 |
Left Hand Hinge |
Stainless Steel Door |
No |
U-3045CLRS-40 |
Right Hand Hinge |
Stainless Steel Door |
Yes |
U-3045CLRS-41 |
Left Hand Hinge |
Stainless Steel Door |
Yes |
|
|
|
|
System Default Values
18" Clear Icemaker Models
|
Available |
Default |
|
Offset |
Differential |
Set Points |
|
Model |
Modes |
Modes |
Bin |
Condenser |
Zone |
Zone |
Evap |
|
|
|
|
|
|
|
|
U-3045CLROL-00 |
Ice |
Ice |
0 |
0 |
2 |
2.2 |
5.5 |
U-3045CLROL-01 |
Ice |
Ice |
0 |
0 |
2 |
2.2 |
5.5 |
U-3045CLROL-40 |
Ice |
Ice |
0 |
0 |
2 |
2.2 |
5.5 |
U-3045CLROL-41 |
Ice |
Ice |
0 |
0 |
2 |
2.2 |
5.5 |
U-3045CLRS-00 |
Ice |
Ice |
0 |
0 |
2 |
2.2 |
5.5 |
U-3045CLRS-01 |
Ice |
Ice |
0 |
0 |
2 |
2.2 |
5.5 |
U-3045CLRS-40 |
Ice |
Ice |
0 |
0 |
2 |
2.2 |
5.5 |
U-3045CLRS-41 |
Ice |
Ice |
0 |
0 |
2 |
2.2 |
5.5 |
|
|
|
|
|
|
|
|
4 |
u-line.com |

General Information
Product Operation
Air Flow
NOTICE
The unit requires proper air flow to perform at its highest efficiency. Do not block the front grille, internal fans or vents at any time, or the unit will not perform as expected. Do not install the unit behind a door.
3.Use U-Select Lighting  to cycle through each available timer setting. Selections include “On With Door”, “On 3 Hours”, “On 6 Hours”, or “On 24 Hours”.
4.To exit, press Select  or simply wait for the menu to time out.
Customer Menu
The 3000 Series of U-Line undercounter refrigeration appliances contain a feature rich customer menu. The Customer Menu allows access to a Series of advanced features including Energy Saver Mode, Sabbath mode, actual temperature readings as well as a method to restore factory defaults.
Initial Startup
All U-Line controls are preset at the factory. Initial start-up requires no adjustments.
To power your unit on simply press POWER  and the unit will immediately switch on. To turn the unit off, press and hold POWER
 for 5 seconds and release. The display will show a countdown to switching the unit off.
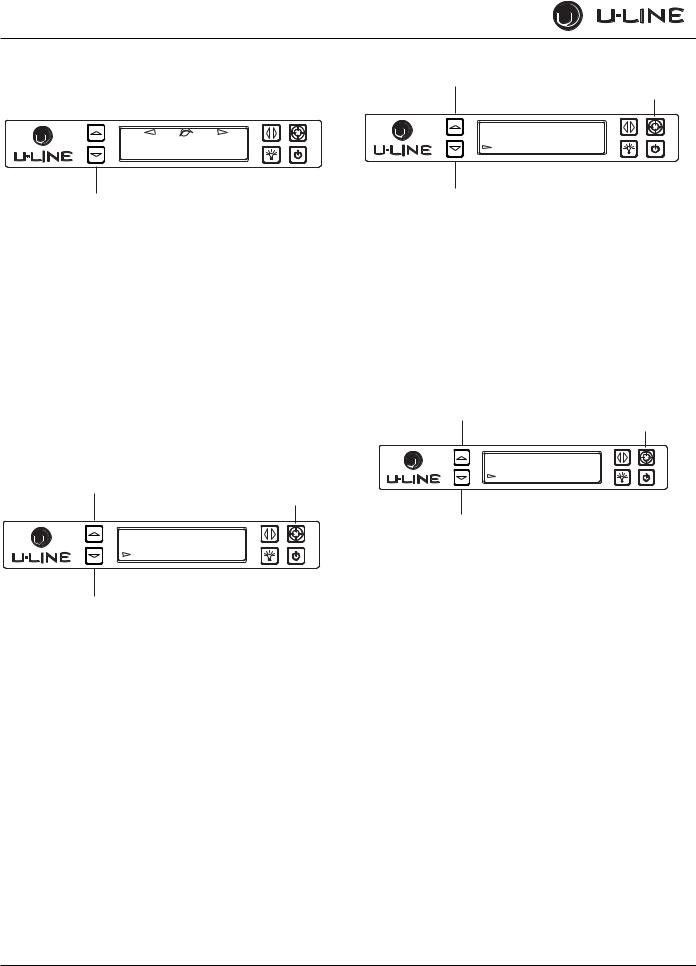
U-Select® Control
Digital Display
The 3000 Series units are controlled by a feature rich, advanced OLED display control unit. The control panel allows adjustment to temperature set-point, access to Energy Saver Mode, internal temperature readings, and many other features.
U-Select Lighting
Up
Select
|
|
|
|
|
|
|
|
|
|
|
|
|
|
|
|
|
|
|
|
|
|
|
|
|
|
|
|
|
|
|
|
|
|
|
|
|
|
|
|
|
|
|
|
|
|
|
|
|
|
|
|
|
|
|
|
|
|
|
|
|
|
|
|
|
|
|
|
|
|
|
|
|
|
|
|
|
|
|
|
|
|
|
|
|
|
|
|
|
|
|
|
|
|
|
|
|
|
|
|
|
|
|
|
|
|
|
|
|
|
|
|
|
|
|
|
|
|
|
|
|
|
|
|
|
|
|
|
|
|
|
|
|
|
|
|
|
|
|
|
|
|
|
|
|
|
|
|
|
|
|
|
|
|
|
|
|
|
|
|
|
|
|
|
|
|
|
|
|
|
|
|
|
|
|
|
|
|
|
|
|
|
|
|
|
|
|
|
|
|
|
|
|
|
|
|
|
|
|
|
|
|
|
|
|
|
|
|
|
|
|
|
|
|
|
|
|
|
|
|
|
|
|
|
|
|
|
|
|
|
|
|
|
|
|
|
|
|
|
|
|
|
|
|
|
|
|
|
|
|
|
|
|
|
|
|
|
|
|
|
|
|
|
|
|
|
|
|
|
|
|
|
|
|
|
|
|
|
|
|
|
|
|
|
|
|
|
|
|
|
|
|
|
|
|
|
|
|
|
Power |
|
Down |
|
|
|
|
|
|
|
|
|
|
|
|
|
|
|
|
|
|
|
|
|
|
|
|
|
|
|
U-Select Lighting |
||||||||||||||
1.To begin, press U-Select Lighting  to enter the lighting menu.
2.Use Up  or Down
  to cycle through each available brightness setting; Low, Medium, or High.
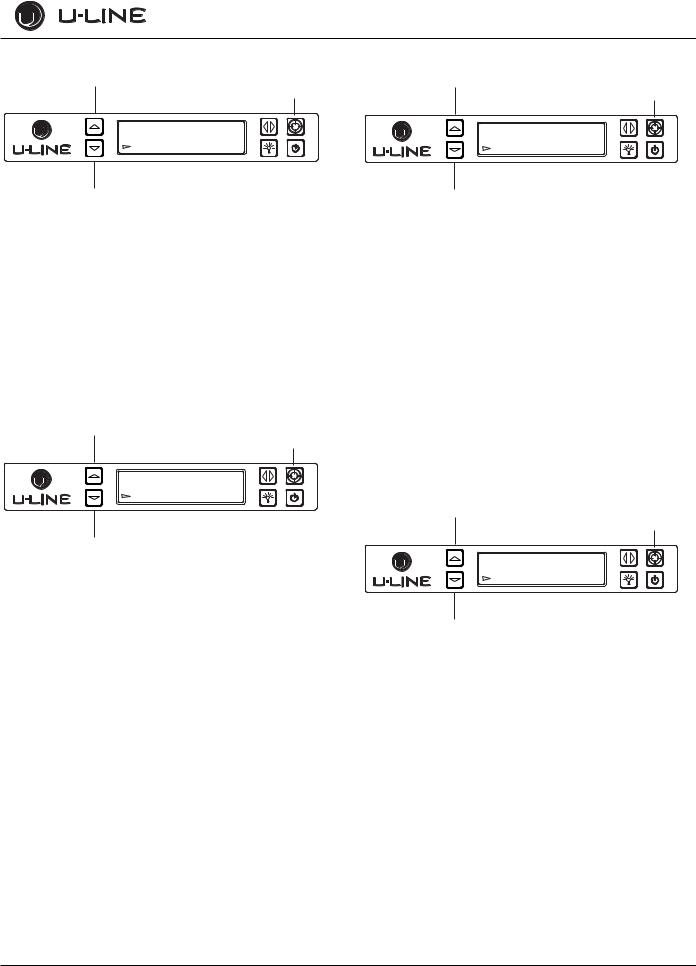
3000 Series - Customer Menu
Up
Select
WELCOME TO THE
CUSTOMER MENU. USE
UP/DOWN ARROWS TO
SCROLL SETTINGS.
Down
1.To access the Customer Menu hold Select  for 5 seconds.
2.Use Up  or Down
  to scroll through available selections.
3.Use Select  to enter selected sub-menu.
4.To exit Customer menu, Use Down  to scroll to the bottom of the display and use Select
  to Select “Exit.”
Actual Temps
Up
Select
RETURN TO MENU
ACTUAL TEMPS
BIN TEMP = 1.6
COND TEMP = 45.5
Down
The Actual Temps option displays the actual temperature of the ice bin, condenser, as well as ambient temperature.
1.To view actual temperature, Select  Actual Temps from the customer menu.
2.Use Up  or Down
  to scroll through available information.
3.To return to the customer menu, Select  Return to Menu.
u-line.com |
5 |
General Information
Energy Saver Mode
Up |
Energy Saver Mode |
Select |
|||
|
|
Indicator |
|||
|
|
|
|
|
|
|
|
|
|
|
|
ICE PRODUCTION (12m remaining)
Down
Energy Saver mode reduces overall energy consumption by reducing the amount of ice stored in the bin, along with decreasing the lighting.
1.To enter Energy Saver first select Energy Saver from the Customer Menu.
2.Use Down  to select “Off” in the menu.
3.Press Select  .
.
4.Use Up  or Down
  to change the selection from Off to On.
5.Press Select  to confirm your selection.
6.To return to the customer menu, Select  Return to Menu.
7.To cancel Energy Saver mode simply return to the Customer Menu, Select Energy Saver mode and change “On” to “Off”.
Sabbath Mode
Up
Select
RETURN TO MENU
SABBATH MODE
OFF
Down
The U-line 3000 Series of models offer a Sabbath mode for users who require this functionality during Sabbaths. Sabbath mode disables system responses to user initiated activities and all external functions; including lighting, display and audible alarms. The unit will still maintain internal temperatures and set points.
1.To enter Sabbath Mode, select Sabbath Mode from the Customer Menu.
2.Use Down  to select “Off”.
3.Press Select  , “Off” will begin to flash.
4.Use Up  or Down
  to change “Off” to “On”.
5.Press Select  to confirm your selection.
The Display will fade out as the unit enters Sabbath Mode. Sabbath Mode remains active until Power  is pressed.
Languages
Up
Select
RETURN TO MENU
LANGUAGES
ENGLISH
Down
The U-Line 3000 Series of models supports a number of display languages including English, Spanish, French and German.
1.To change display language select Languages from the Customer Menu.
2.Use Down  to select “English”.
3.Press Select  , “English” will begin to flash.
4.Use Up  or Down
  to cycle through the available Languages.
5.Press Select  to confirm your choice.
Tone Level
Up
Select
RETURN TO MENU
TONE LEVEL
HIGH
Down
Audible alarms and alert tones support four different Tone Level settings, High, Medium, Low, and Off.
To select a new tone level, enter the Tone Level menu from the Customer Menu.
1.Use Up  or Down
  to select the current tone level.
2.Press Select  , the current setting will begin to flash.
3.Use Up  or Down
  to select a different level.
4.Use Select  to confirm your choice.
6 |
u-line.com |
General Information
Fahrenheit / Celsius
Up
Select
RETURN TO MENU
FARENHEIT/CELSIUS
DEGREES = °F
Down
Temperature and Set point information can be displayed in either Fahrenheit or Celsius.
To change from Fahrenheit to Celsius enter the Fahrenheit / Celsius menu from within the Customer Menu.
1.Use Down  to select “Degrees”.
2.Press Select  . The selection will begin to flash.
3.Use Up  or Down
  to select between °F (Fahrenheit) or °C (Celsius).
4.Press Select  to confirm your choice.
Clean Cycle
Up
Select
RETURN TO MENU
CLEAN CYCLE
CLEAN?
Down
A clean cycle can be initiated through this menu. Once the cleaning cycle starts, the cycle cannot be stopped until complete.
To initiate a clean cycle, enter the Clean Cycle in the Customer Menu. Please refer to CLEANING section regarding proper cleaning procedure.
1.Use Down  to select “Clean Cycle”.
2.Press Select  . The clean cycle will now begin.
3.Refer to CLEANING section regarding proper cleaning procedure.
Silent Mode
Up
Select
RETURN TO MENU
SILENT MODE
SILENCE?
Down
Users can halt ice production for 3 hours with an option called “Silent Mode” in the Customer Menu. Silent Mode will begin once the current ice making cycle is complete. After 3 hours in Silent Mode, normal ice production will continue.
NOTE: Silent Mode will not silence any alerts.
To initiate Silent Mode, enter Silent Mode Menu from within the Customer Menu.
Activating Silent Mode
1.Use Down  to select “Silence?”.
2.Press Select  . Silent Mode will now begin.
Canceling Silent Mode
1.Use Down  to select “Cancel?”.
2.Press Select  . Silent Mode will end.
Ice Adjust
Up
Select
RETURN TO MENU
ICE ADJUST
ICE ADJUST = 0
Down
The Ice Adjust option adjusts ice thickness by adding or subtracting up to 5 minutes of ice production.
To change the ice thickness, enter the Ice Adjust menu from within the Customer Menu.
To adjust thickness
1.Use Down  to select “Ice Adjust”.
2.Press Select  . The selection will begin to flash.
3.Use Up  to make the ice thicker or Down
  to make the ice thinner.
4.Press Select  to confirm your choice.
u-line.com |
7 |
General Information
Factory Default
Up
Select
RETURN TO MENU
FACTORY DEFAULT
RESTORE?
Down
The Factory Default option restores all settings to the original settings the unit came with.
To restore Factory Default settings, enter the Factory Default menu from within the Customer Menu.
1.Use Down  to select “Restore?”.
2.Press Select  . All settings will now be at Factory Default.
Help
Up
Select
RETURN TO MENU
Help
Model 3018CLR 1-800-779-2547
Down
To access the Help menu select Help from the Customer Menu. Use Up  or Down
  to scroll through available information.
To return to the customer menu, use Up  to select “Return to Menu” and press Select
  to confirm.
8 |
u-line.com |
 Loading...