

Page 1
Para Español, vea páginas 8-14.
Pour le français, consulter les pages 15-21.
π
COMPACT AUTO
H-8041
1-800-295-5510
uline.com
FLOOR SCRUBBER
• Disconnect the scrubber from the main power socket
before performing maintenance.
• Only use the scrubber as instructed in these
instructions. Only use the accessories recommended
by the manufacturer.
SAFETY
• Do not disconnect the scrubber by pulling on
the power cable. Grip the plug, not the cable, to
disconnect the scrubber.
• Switch off all controls before unplugging the
scrubber.
• Do not move or transport the scrubber by pulling on
its power cable. Do not use the power cable as a
handle, close doors on it or pull it over sharp objects
or corners. Do not run over the power cable with the
scrubber. Keep the power cable completely clear of
hot surfaces.
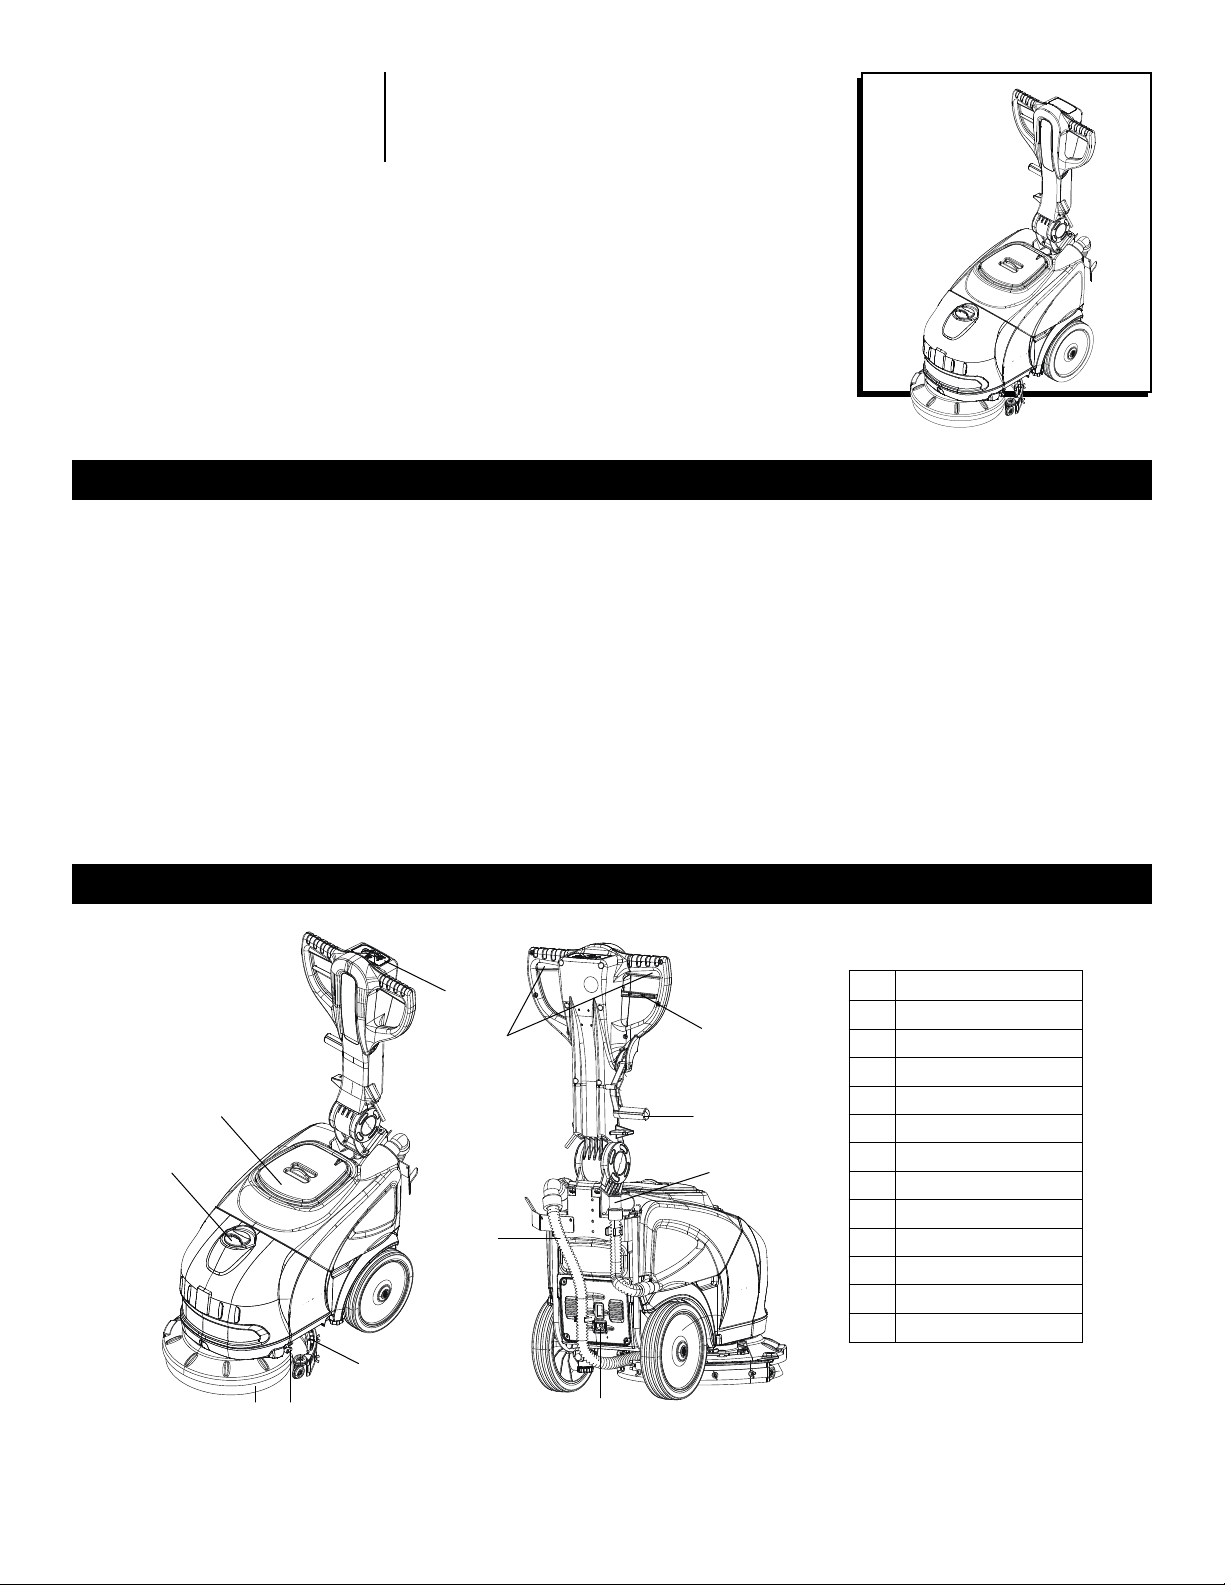
GENERAL INFORMATION
PARTS
1
2
6
7
8
• Do not use the scrubber to clean flammable or
combustible liquids like gasoline. Do not operate the
scrubber in areas where such liquids may be present.
# DESCRIPTION
12
11
10
1 Recovery Tank
2 Detergent Tank
3 Nylon Brush
4 Detergent Tap
5 Squeegee
6 Control Panel
7 Drive Lever
8 Recovery Tank Hose
9 Power Inlet
10 Drain Hose
11 Squeegee Release
12 Handle Release
5
3 4
PAGE 1 OF 21 0621 I H-8041
9
Page 2
GENERAL INFORMATION CONTINUED
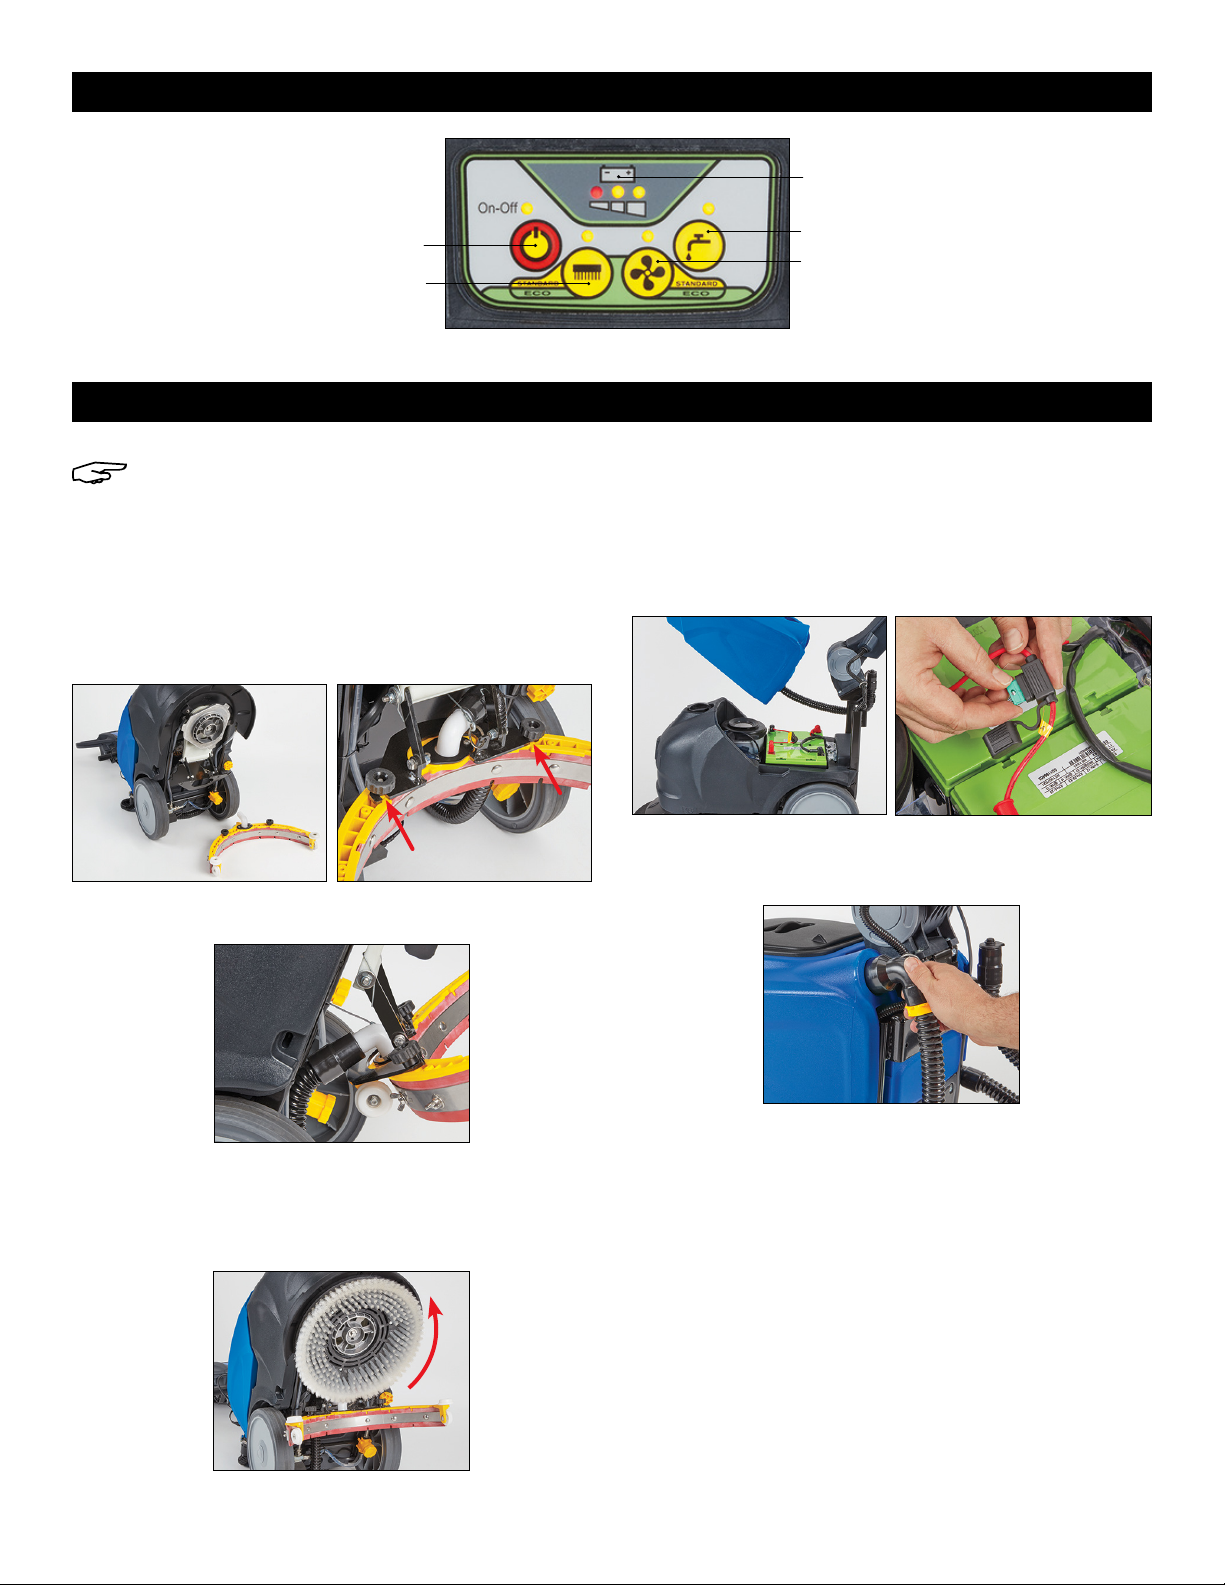
BUTTON FUNCTIONS:
Power
Brush
ASSEMBLY
NOTE: Battery must be fully charged before first
use.
ASSEMBLE SQUEEGEE
1. Tilt unit back and attach squeegee to scrubber by
inserting the black knobs into the notches on the
black bar. Turn knobs clockwise to tighten.
(See Figures 1 and 2)
Battery
Indicator
Water
Fan
INSTALL FUSE
1. Locate fuse in plastic parts bag. Lift recovery tank
off unit to expose fuse connector. Connect fuse and
close connector. Replace recovery tank on unit and
place lid on top. (See Figures 5 and 6)
Figure 1 Figure 2
2. Connect hose end to squeegee. (See Figure 3)
Figure 3
ASSEMBLE BRUSH
1. Install the brush by rotating it on counterclockwise.
Reposition the unit upright. (See Figure 4)
Figure 4
Figure 5
2. Connect hose to tank. (See Figure 7)
Figure 7
Figure 6
PAGE 2 OF 21 0621 I H-8041
Page 3
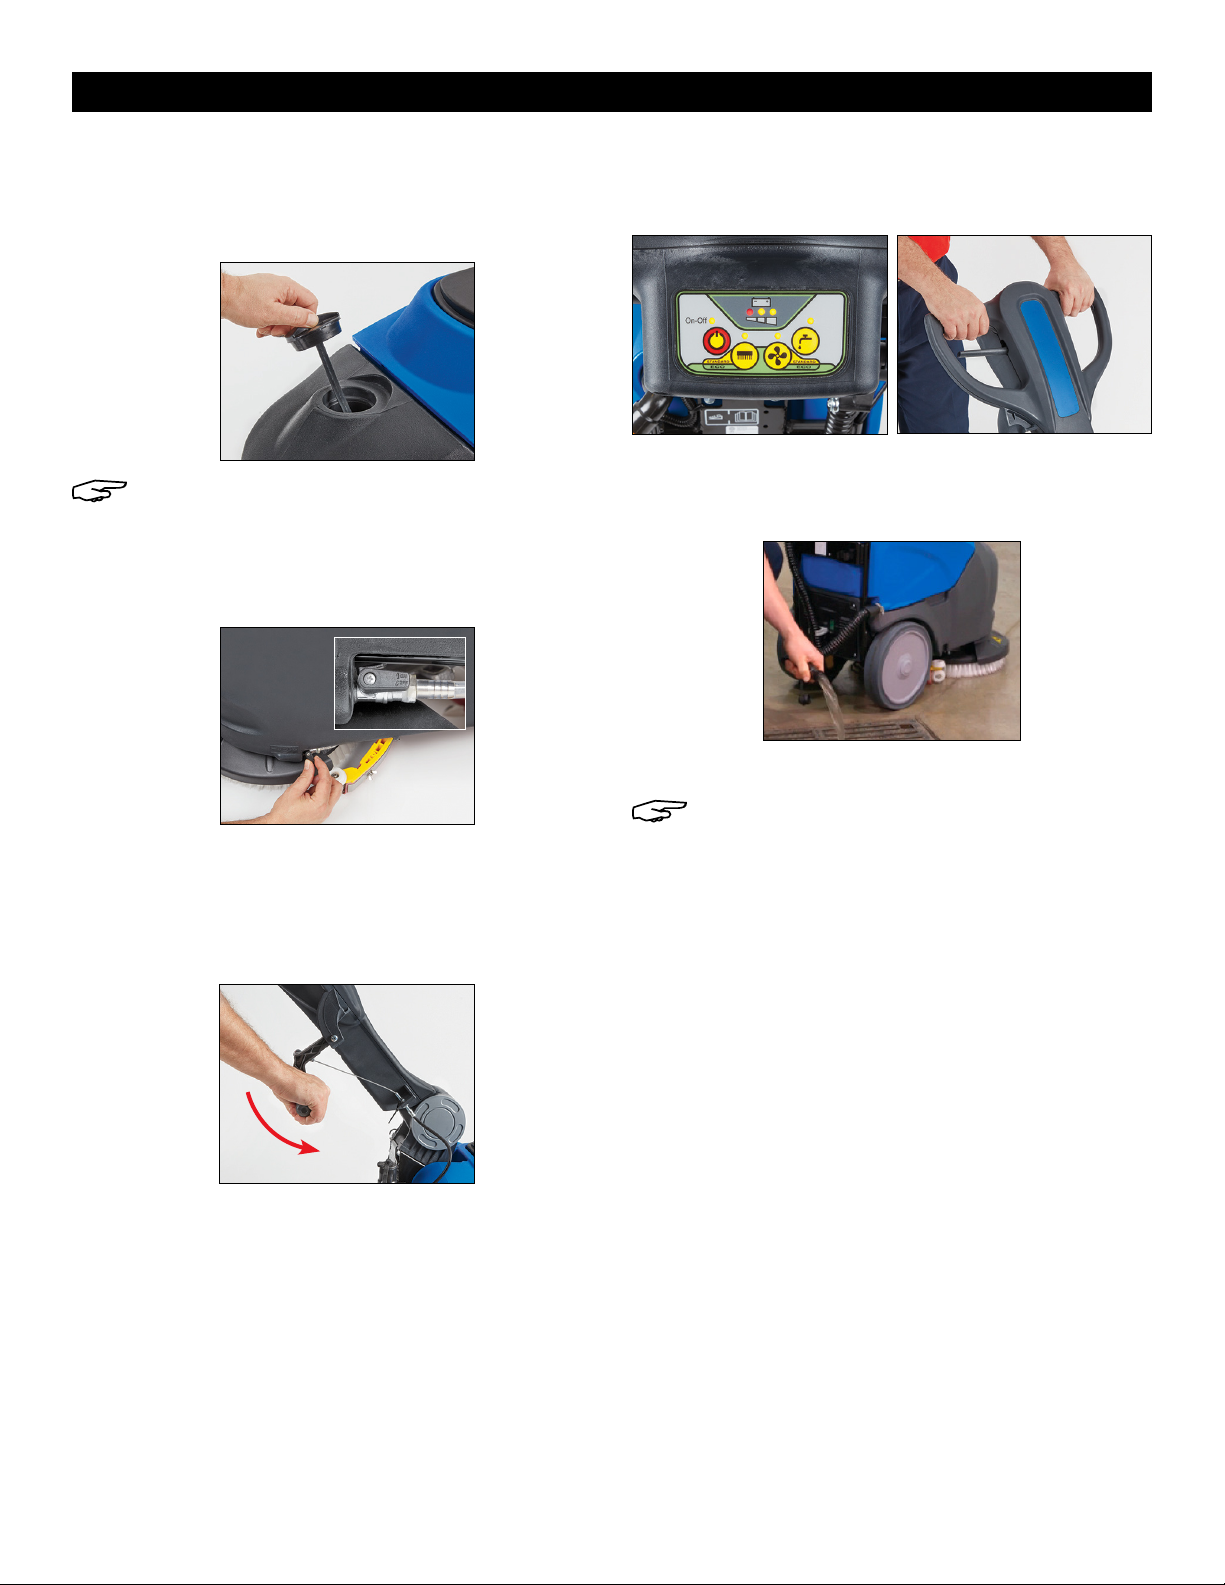
OPERATION
FILL TANK
1. Add water and detergent into the tank.
(See Figure 8)
Figure 8
NOTE: Use a non-foaming detergent with a
pH range between 7-11. Be sure to follow the
detergent instructions for proper dilution.
2. Open flow from detergent tank by pushing lever up
to horizontal position. Leave open. (See Figure 9)
Figure 9
2. Turn on unit and press brush button. All lights will light
up and unit is fully functional.
(See Figures 11 and 12)
Figure 11 Figure 12
3. After use, empty the recovery tank by using the
attached drain hose. (See Figure 13)
Figur e 13
BEGIN WORK
1. Lower squeegee by pushing handle down.
(See Figure 10)
Figure 10
4. Once finished, charge the battery.
NOTE: The battery should be charged after
every use. For optimal battery life, leave
plugged in when not in use.
WHEN FINISHED CLEANING
1. Turn machine off by pressing the On/Off button for at
least four seconds.
2. Raise squeegee.
3. Close the detergent tap.
4. Empty the recovery tank (see Maintenance).
5. Charge the battery (see Maintenance).
PAGE 3 OF 21 0621 I H-8041
Page 4
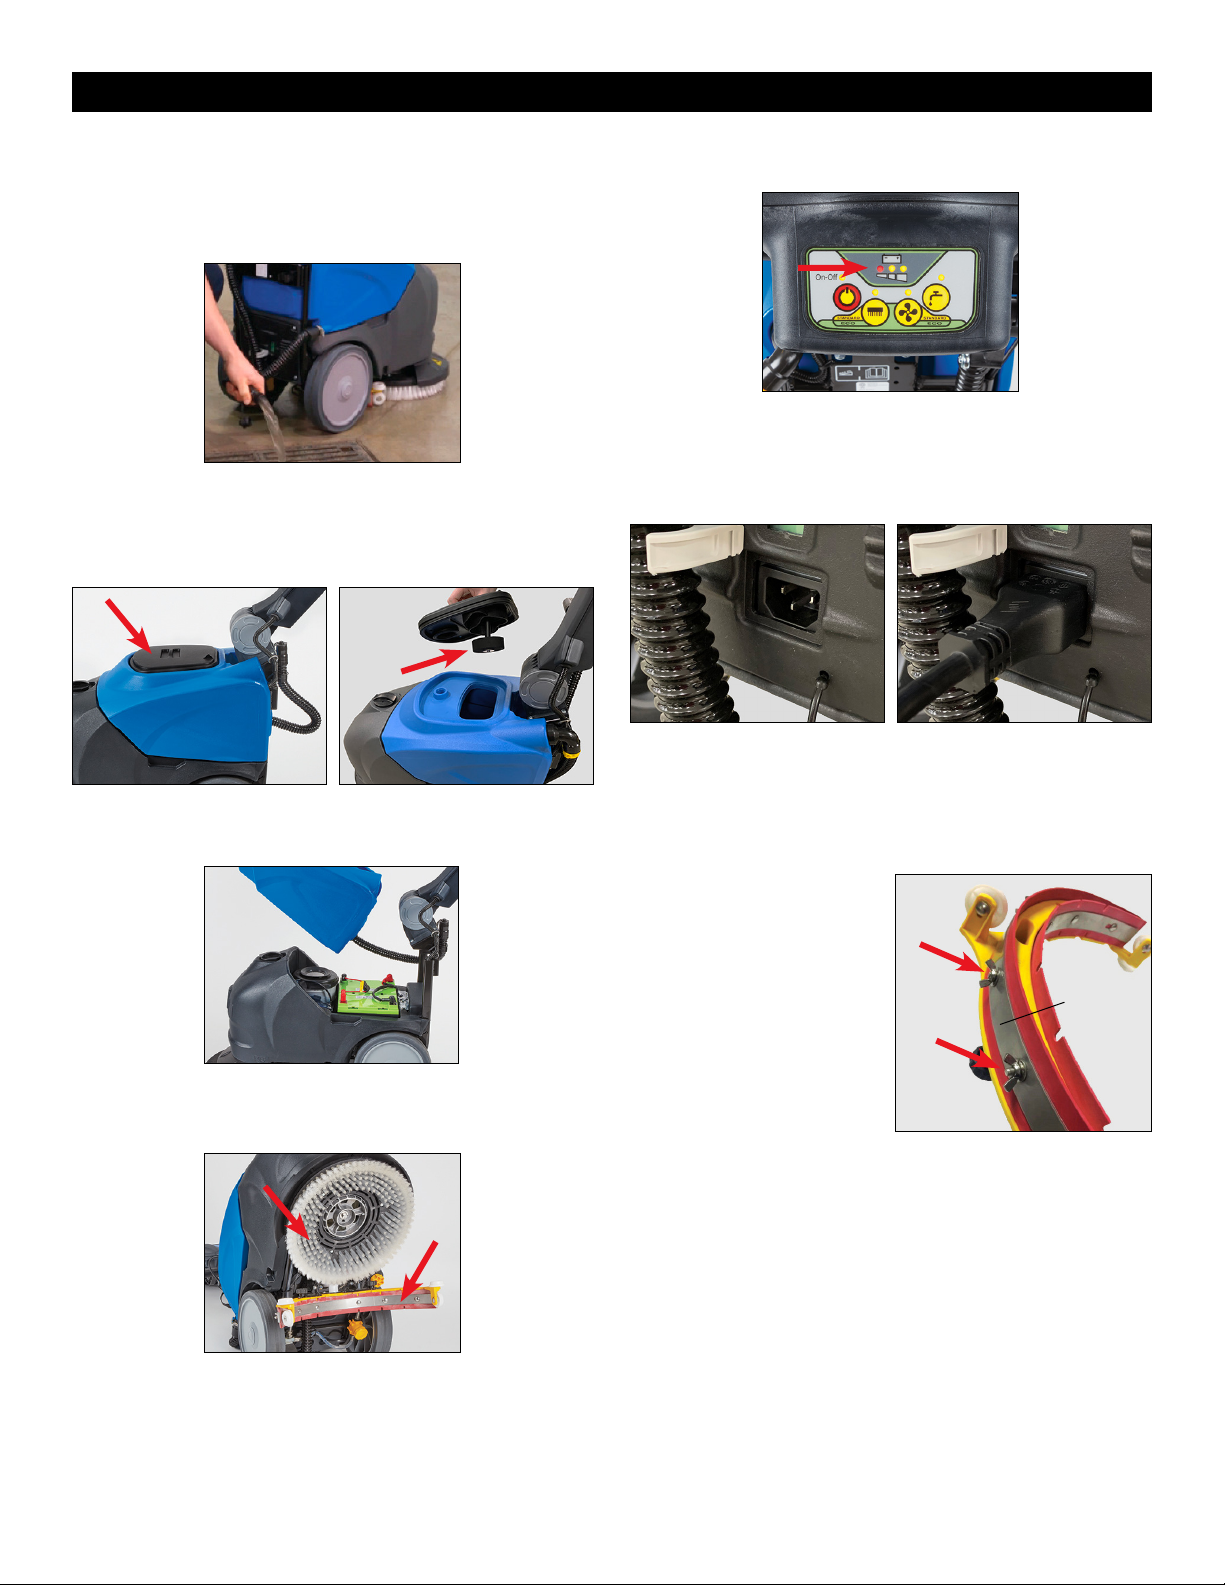
MAINTENANCE
DAILY MAINTENANCE
1. Use the attached drain hose to empty the dirty
water from the recovery tank. (See Figure 14)
Fi gure 14
2. Remove lid and check that dirty water tank float is
undamaged, clean and moves freely on pin.
(See Figures 15 and 16)
5. Check battery charge. (See Figure 19)
Figure 19
6. To recharge batteries, plug in battery charger using
electrical cord provided with machine. Charge is
complete when the green LED light is on.
(See Figures 20 and 21)
Figure 20 Figure 21
Figu re 15 Fig ure 16
3. Lift off recovery tank to clean. (See Figure 17)
Figure 17
4. Clean brush and check squeegee is clean and
blades are not damaged. (See Figure 18)
Figure 18
REPLACING THE SQUEEGEE BLADE
1. Remove the squeegee assembly using the two
black knobs.
2. Remove the squeegee
blade by removing the
screws, wing nuts and
blade retainers.
(See Figure 22)
Blade
Retainer
3. Reuse the same blade
by reversing the edge
in contact with the floor.
The blades should be
Figure 22
reused until all four
edges are worn out and can be replaced at once.
4. Align the new (or reversed) blades with the tabs and
screw holes on the squeegee body.
5. Reposition the two blade retainers, and insert the
screws. Attach and tighten the wing nuts.
BRUSH REPLACEMENT
1. With the underside exposed, remove brush by
rotating clockwise off the center hub.
2. Install new brush by rotating counterclockwise onto
the center hub.
PAGE 4 OF 21 0621 I H-8041
Page 5

MAINTENANCE CONTINUED
CHECK MOTOR FUSES
NOTE: Fuses need to be replaced with the
correct value. Value is listed on the fuse.
• Main fuse (A) between batteries – 30 amp
• Brush motor (B) – 25 amp
• Vacuum motor (C) – 20 amp
1. Lift off recovery tank. (See Figure 23)
Figure 23
2. Locate fuses. (See Figure 24)
Figure 24
C
A
3. Pull off black caps from the brush motor fuse (B) and
the vacuum motor fuse (C). (See Figures 25 and 26)
C
B
Figure 25 Figure 26
4. Check the fuse to see if it is blown by looking in
the fuse window. If the metal wire is present and
not broken, the fuse is good. If the metal wire is
missing or broken, the fuse is bad and needs to be
replaced with a new fuse. (See Figure 27)
Figure 27
B
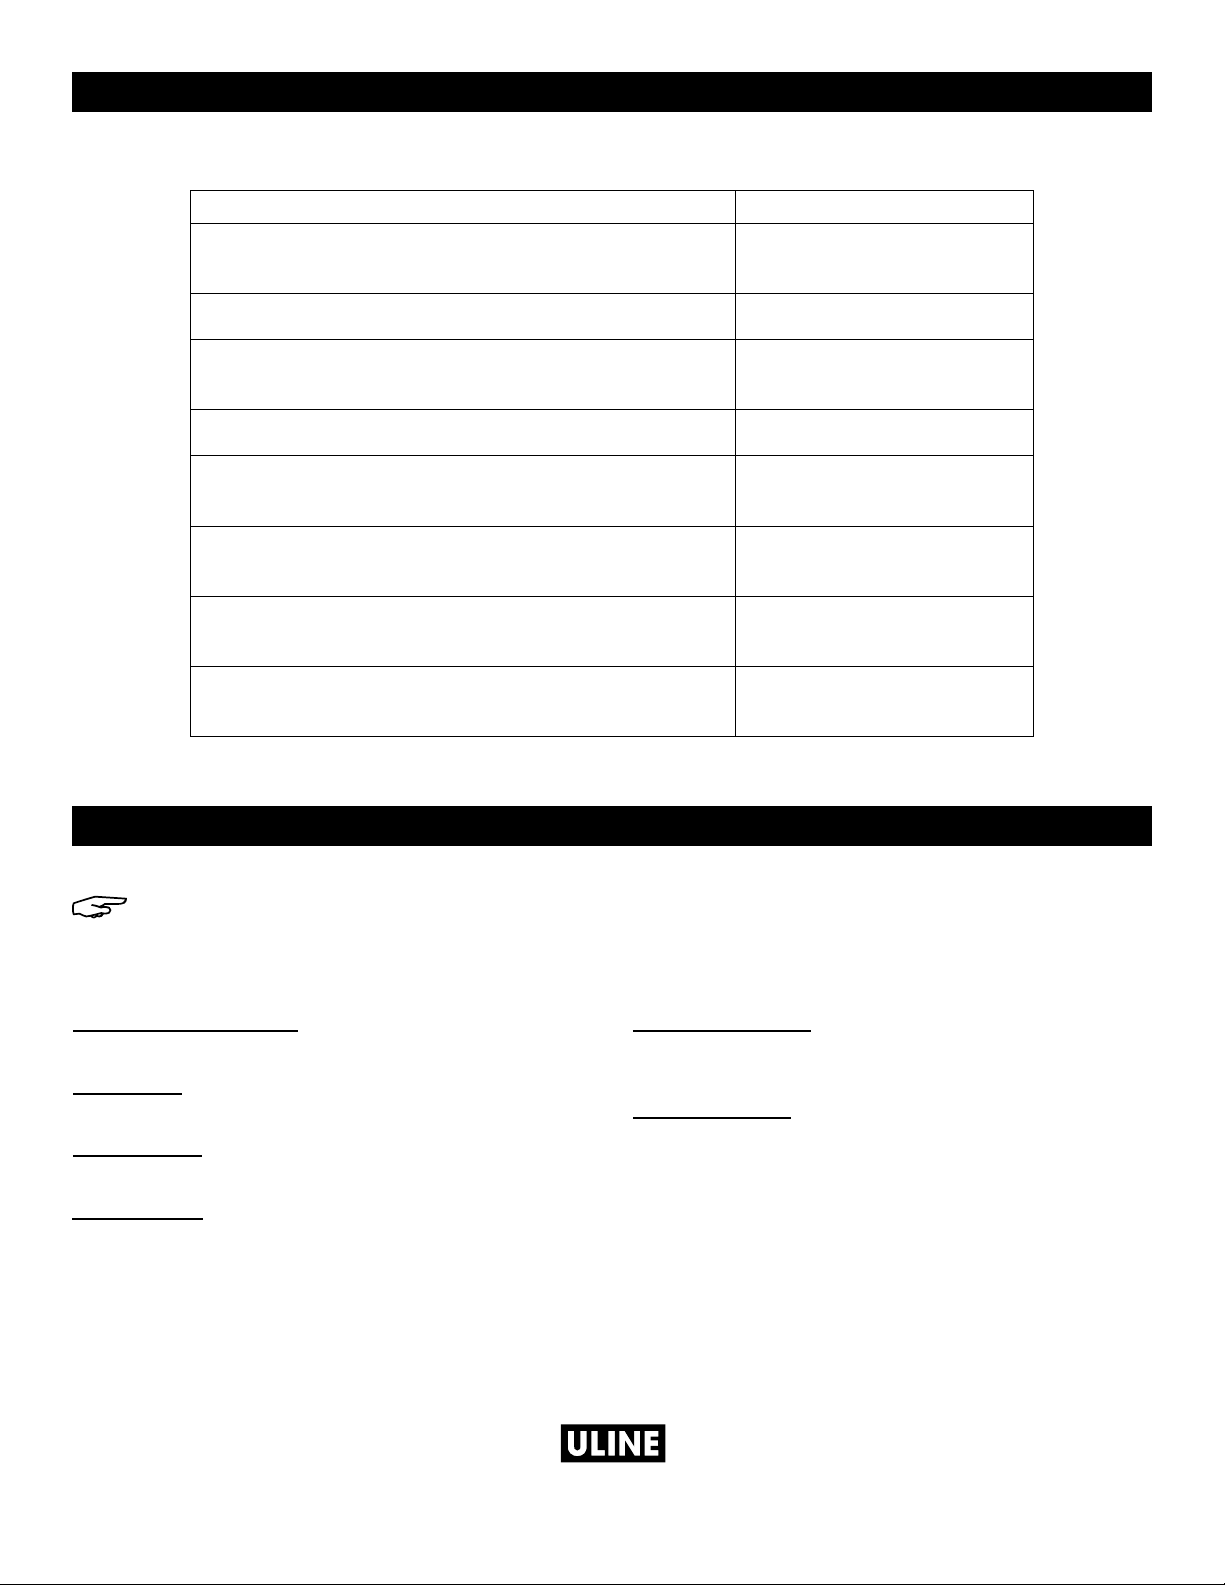
TROUBLESHOOTING
OPERATING ISSUE CAUSES RECOMMENDATIONS
The machine does not work. The batteries need to be charged. Charge the batteries.
The brush does not rotate. The brush button LED is off.
The brush motor thermal cutout has
tripped; the motor has overheated.
The batteries need to be charged.
The brush motor fuse has blown.
The machine does not
clean evenly.
The brush or floor cleaning pad is
worn.
Press the brush button.
Turn the unit off. Let the machine
cool down for at least 45 minutes.
Charge the batteries.
Replace the brush motor fuse.
Replace the worn brush or floor
cleaning pad.
PAGE 5 OF 21 0621 I H-8041
Page 6

TROUBLESHOOTING CONTINUED
OPERATING ISSUE CAUSES RECOMMENDATIONS
No detergent is delivered. The detergent button LED is off.
The detergent tank is empty.
The brush motor is off.
The hose delivering the detergent
to the brush is blocked.
The detergent tap is dirty or faulty.
The in-line filter is dirty (left side from
operator's position near the wheel).
The suction motor does not
start.
The squeegee does not
clean or has poor suction.
The fan button LED is off.
The vacuum motor fuse is blown.
The edge of the squeegee blades
in contact with the floor is worn.
The squeegee or hose is blocked or
damaged.
The float switch has tripped (dirty
water drum), is clogged by dirt or
broken.
Press the detergent button.
Fill the detergent tank.
Turn the motor on by pressing the
brush button.
Unblock and open the detergent
tank tap.
Have the detergent tap cleaned or
replaced.
Clean the filter. Make sure to close
the detergent tap prior to cleaning.
Press the fan button.
Replace the vacuum motor fuse.
Replace the squeegee blades.
Unblock and repair the damage.
Empty the recovery tank or reset
the float switch.
The machine leaves stripes of
wet floor.
The batteries do not provide
the nominal work time.
The battery discharges too
fast during use, even though it
has been charged correctly.
The suction hose is blocked.
The suction hose is not connected
to the squeegee or is damaged.
Debris is trapped between the
squeegee blades.
Dust or debris on the floor is
catching on the squeegee blades.
Debris is trapped between the
squeegee blades.
The squeegee blades are worn.
The battery charger is not working. See battery charging instructions.
The battery is new and does not
deliver 100% of its expected
capacity.
Unblock the hose.
Connect or repair the hose.
Clean out debris from the
squeegee blades.
Sweep the floor prior to using the
machine.
Clean out debris from the
squeegee blades.
Replace the squeegee blades.
This is normal. New batteries require
a break-in period of approximately
10 charging cycles. Unplug unit and
use as normal. Charge after use.
PAGE 6 OF 21 0621 I H-8041
Page 7
ERROR CODE DISPLAY
1
0
uline.com
TROUBLESHOOTING CONTINUED
ERROR CODE ERROR
Brush Button LED:
2 quick flashes / pause / 2 quick flashes.
Brush Button LED: 1 flash / pause/ 1 flash. Overcurrent error.
Fan Button LED:
2 quick flashes / pause / 2 quick flashes.
Fan Button LED: 1 flash / pause / 1 flash. Overcurrent error.
Brush Button LED: + Fan Button LED, synchronized flash /
pause / synchronized flash.
Brush Button LED:
4 quick flashes / pause / 4 quick flashes.
Battery indicator yellow LED:
7 quick flashes / pause / 7 quick flashes.
Battery indicator yellow LED:
5 quick flashes / pause / 5 quick flashes.
Brush short circuit error.
Suction short circuit error.
Electronic board
temperature error.
Brush thermal protector error.
Machine on with battery
charger powered error.
Excess battery voltage error.
BATTERY CHARGER VISUAL SIGNALS
NOTE: Refer to Battery Charger manual for full
instructions.
OPERATING SIGNALS
Red LED Flashing (twice)
Battery charger is set to charge.
Red LED On
First phase of charge in progress.
Yellow LED On
Second phase of charge in progress.
Green LED On
Charge complete.
TROUBLESHOOTING
Yellow LED Flashing
Unsuitable battery OR battery not connected
OR output short circuit.
Red LED Flashing
Battery has reached its maximum charging time limit.
NOTE: This is normal. New batteries require a break-in
period of approximately ten charging cycles. Unplug
unit and use as normal. Charge after use.
-800-295-551
PAGE 7 OF 21 0621 I H-8041
Page 8

π
H-8041
FREGADORA DE PISOS
COMPACTA AUTOMÁTICA
800-295- 5510
uline.mx
SEGURIDAD
• Desconecte la fregadora del enchufe principal antes
de darle mantenimiento.
• Solo use la fregadora según se indica en estas
instrucciones. Solo use los accesorios recomendados
por el fabricante.
• No mueva ni transporte la fregadora jalando el
cable eléctrico. No use el cable eléctrico como asa,
ni cierre la puerta sobre él o lo jale sobre objetos
filosos o esquinas. No pase la fregadora sobre
el cable eléctrico. Mantenga el cable eléctrico
completamente alejado de superficies calientes.
INFORMACIÓN GENERAL
PARTES
1
2
5
6
7
8
• No desconecte la fregadora jalando el cable
eléctrico. Para desconectar la fregadora agarre la
clavija, no el cable.
• Apague todos los controles antes de desconectar la
fregadora.
• No use la fregadora para limpiar líquidos inflamables
o combustibles como la gasolina. No opere la
fregadora en áreas donde tales líquidos podrían
estar presentes.
# DESCRIPCIÓN
12
11
10
1 Tanque de Recuperación
2 Tanque de Detergente
3 Cepillo de Nylon
4 Tapa de Detergente
5 Jalador
6 Panel de Control
7 Palanca de Transmisión
Manguera de Tanque de
8
Recuperación
9 Entrada de Corriente
10 Manguera de Desagüe
11 Pedal de Liberación del Jalador
12 Pedal de Liberación del Asa
3 4
PAGE 8 OF 21 0621 I H-8041
9
Page 9

CONTINUACIÓN DE INFORMACIÓN GENERAL
FUNCIÓN DEL BOTÓN
Encendido
Cepillo
ENSAMBLE
NOTA: La batería debe estar completamente
cargada antes del primer uso.
ENSAMBLAR EL JALADOR
1. Incline la unidad hacia atrás y fije el jalador a la
fregadora insertando las perillas negras en las
muescas de la barra negra. Gire las perillas en el
sentido de las manecillas del reloj para apretarlo.
(Vea Diagramas 1 y 2)
Indicador de
Batería
Agua
Ventilador
INSTALAR FUSIBLE
1. Localice el fusible en la bolsa de las partes
plásticas. Levante el tanque de recuperación de
la unidad para exponer el conector del fusible.
Conecte el fusible y cierre el conector. Coloque de
nuevo el tanque de recuperación en la unidad y la
tapa por encima. (Vea Diagramas 5 y 6)
Diagrama 1 Diagrama 2
2. Conecte el extremo de la manguera al jalador.
(Vea Diagrama 3)
Diagrama 3
ENSAMBLAR EL CEPILLO.
1. Instale el cepillo girándolo en el sentido contrario
a las manecillas del reloj. Reposicione la unidad
hacia arriba. (Vea Diagrama 4)
Diagrama 4
Diagrama 5
2. Conecte la manguera al tanque. (Vea Diagrama 7)
Diagrama 7
Diagrama 6
PAGE 9 OF 21 0621 I H-8041
Page 10

FUNCIONAMIENTO
LLENAR EL TANQUE
1. Añada agua y detergente al tanque.
(Vea Diagrama 8)
Diagrama 8
NOTA: Use un detergente no espumoso con
un rango entre 7-11 de pH. Asegúrese de
seguir las instrucciones del detergente para la
dilución adecuada.
2. Abra el flujo del tanque del detergente empujando
la palanca hacia arriba a la posición horizontal.
Déjela abierta. (Vea Diagrama 9)
Diagrama 9
2. Encienda la unidad y presione el botón del cepillo.
Todas las luces se encenderán y la unidad estará
completamente funcional. (Vea Diagramas 11 y 12)
Diagrama 11 Diagrama 12
3. Después de usarla, vacíe el tanque de
recuperación utilizando la manguera de desagüe.
(Vea Diagrama 13)
Diagrama 13
EMPIECE A TRABAJAR
1. Baje el jalador empujando el asa hacia abajo.
(Vea Diagrama 10)
Diagrama 10
4. Al terminar, cargue la batería.
NOTA: Debe cargar la batería después de
cada uso. Para una vida útil óptima, déjela
conectada cuando no la esté utilizando.
AL TERMINAR LA LIMPIEZA
1. Apague la máquina presionando el botón de
encendido/apagado (On/Off) al menos por cuatro
segundos.
2. Eleve el jalador.
3. Cierre la llave del detergente.
4. Vacíe el tanque de recuperación
(Vea Mantenimiento).
5. Cargue la batería (Vea Mantenimiento).
PAGE 10 OF 21 0621 I H-8041
Page 11

MANTENIMIENTO
MANTENIMIENTO DIARIO
1. Utilice la manguera de desagüe anexa para vaciar
el agua sucia del tanque de recuperación.
(Vea Diagrama 14)
Diagrama 14
2. Retire la tapa y verifique que el flotador del tanque
de agua sucia esté sin daños, limpio y se mueva
libremente en el soporte.
(Vea Diagramas 15 y 16)
5. Verifique la carga de la batería. (Vea Diagrama 19)
Diagrama 19
6. Para volver a cargar las baterías, conecte el
cargador de baterías con el cable eléctrico
incluido con la máquina. La carga está completa
cuando la luz LED está en verde.
(Vea Diagramas 20 y 21)
Diagrama 20 Diagrama 21
REPUESTO DE LA HOJA DEL JALADOR
Diagrama 15 Diagrama 16
3. Levante el tanque de recuperación para limpiarlo.
(Vea Diagrama 17)
Diagrama 17
4. Limpie el cepillo y revise que el jalador esté limpio y
las hojas no presenten daños. (Vea Diagrama 18)
Diagrama 18
1. Retire el ensamble del jalador utilizando las dos
perillas negras.
2. Retire la hoja del
jalador quitando los
tornillos, las tuercas de
mariposa y los soportes
de la hoja.
(Vea Diagrama 22)
Soporte
de la Hoja
3. Utilice la misma hoja
de nuevo invirtiendo
el borde de contacto
con el piso. Las hojas
se deben utilizar hasta
Diagrama 22
que los cuatro bordes
estén desgastados y puedan ser reemplazados.
4. Alinee las hojas nuevas (o invertidas) con las pestañas
y los orificios para tornillos en el cuerpo del jalador.
5. Coloque de nuevo los soportes de las dos hojas
e inserte los tornillos. Fije y apriete las tuercas de
mariposa.
REEMPLAZAR EL CEPILLO
1. Con la parte inferior expuesta, saque el cepillo
del núcleo central girando en el sentido de las
manecillas del reloj.
2. Coloque en el núcleo central el cepillo nuevo
girando en el sentido contrario de las manecillas
PAGE 11 OF 21 0621 I H-8041
del reloj.
Page 12

CONTINUACIÓN DE MANTENIMIENTO
VERIFIQUE LOS FUSIBLES DEL MOTOR
NOTA: Los fusibles se deben reemplazar con el
valor correcto. El valor se lista en el fusible.
• Fusible principal (A) entre baterías –
30 amperios
• Motor del cepillo (B) – 25 amperios
• Motor de la Aspiradora (C) – 20 amperios
1. Levante el tanque de recuperación. (Vea Diagrama 23)
Diagrama 23
2. Ubique los fusibles. (Vea Diagrama 24)
Diagrama 24
C
A
3. Retire las tapa negras del fusible del motor del
cepillo (B) y el fusible del motor de la aspiradora (C).
(Vea Diagramas 25 y 26)
C
B
Diagrama 25 Diagrama 26
4. Verifique el fusible para ver si está quemado a
través de la ventana de fusibles. Si el alambre de
metal está presente y completo, significa que el
fusible está bien. Si el alambre de metal no está
o se rompió, significa que el fusible no sirve y será
necesario reemplazarlo con uno nuevo.
(Vea Diagrama 27)
Diagrama 27
B
SOLUCIÓN DE PROBLEMAS
PROBLEMA DE FUNCIONAMIENTO CAUSAS RECOMENDACIONES
La máquina no funciona. Las baterías se necesitan cargar. Cargue las baterías.
El cepillo no gira. El LED del botón del cepillo está
apagada.
El interruptor térmico del motor
del cepillo se desconectó y se
sobrecalentó el cabezal del motor.
Las baterías se necesitan cargar.
El fusible del motor del cepillo se
quemó.
La máquina no limpia de manera
uniforme.
El cepillo o la almohadilla
de limpieza para pisos se
desgastaron.
Presione el botón del cepillo.
Apague la unidad. Deje enfriar la
máquina al menos por 45 minutos.
Cargue las baterías.
Reponga el fusible del motor del
cepillo.
Reemplace el cepillo o
almohadilla de limpieza
desgastado.
PAGE 12 OF 21 0621 I H-8041
Page 13

CONTINUACIÓN DE SOLUCIÓN DE PROBLEMAS
PROBLEMA DE FUNCIONAMIENTO CAUSAS RECOMENDACIONES
No sale detergente. El LED del botón del detergente
está apagada.
El tanque de detergente está
vacío.
El motor del cepillo está apagado.
La manguera que despacha el
detergente hacia el cepillo está
bloqueada.
La llave del detergente está sucia
o defectuosa.
El filtro en línea está sucio (ubicado
al lado izquierdo de la posición del
operador cerca de la llanta)
No enciende el motor de succión. El LED del botón del ventilador está
apagado.
Se quemó el fusible del motor de
la aspiradora.
El jalador no limpia o tiene poca
succión.
El borde de las hojas del jalador
que tienen contacto con el piso
está desgastado.
El jalador o la manguera están
bloqueados o dañados.
El interruptor del flotador se desconectó
(contenedor de agua sucia), se llenó
de suciedad o está roto.
La manguera de succión está rota.
La manguera de succión no
está conectada al jalador o está
dañada.
La basura está atrapada entre las
hojas del jalador.
Presione el botón del detergente.
Llene el tanque del detergente.
Encienda el motor activando el
botón del cepillo.
Desbloquee y abra la tapa del
tanque del detergente.
Reemplace o limpie la llave del
detergente.
Limpie el filtro. Asegúrese de cerrar
la llave del detergente antes de
limpiar.
Presione el botón del ventilador.
Reemplace el fusible del motor de
la aspiradora.
Reemplace las hojas del jalador.
Desbloquee y repare el daño.
Vacíe el contenedor de agua
sucia o reinicie el interruptor del
flotador.
Desbloquee la manguera.
Conecte o repare la manguera.
Limpie la basura de las hojas del
jalador.
La máquina deja rayas de piso
mojado.
Las baterías no proporcionan el
tiempo de trabajo nominal.
Durante el uso la batería se
descarga muy rápido, aunque se
haya cargado correctamente.
PAGE 13 OF 21 0621 I H-8041
Se atora el polvo o la basura del
piso en las hojas del jalador.
La basura está atrapada entre las
hojas del jalador.
Las hojas del jalador están
desgastadas.
El cargador de baterías no
funciona.
La batería está nueva y no
funciona al 100% de su
capacidad esperada.
Barra el piso antes de usar la
máquina.
Limpie la basura de las hojas del
jalador.
Repuesto de la hoja del jalador.
Vea las instrucciones del cargador
de batería.
Esto es normal. Las baterías nuevas
requieren un período de adaptación de
aproximadamente 10 ciclos de carga.
Desconecte la unidad y úsela como
siempre. Cargue después de usar.
Page 14

CONTINUACIÓN DE SOLUCIÓN DE PROBLEMAS
8
0
uline.mx
INDICADOR DE CÓDIGOS DE ERROR
CÓDIGO DE ERROR ERROR
LED del Botón del Cepillo:
2 parpadeos rápidos / pausa / 2 parpadeos rápidos.
LED del Botón del Cepillo: 1 parpadeo / pausa /
1 parpadeo.
LED del Botón del Ventilador:
2 parpadeos rápidos / pausa / 2 parpadeos rápidos.
LED del Botón del Ventilador: 1 parpadeo / pausa /
1 parpadeo.
LED del Botón del Cepillo: + LED del Botón del
ventilador, parpadeo sincronizado / pausa / parpadeo
sincronizado.
LED del Botón del Cepillo:
4 parpadeos rápidos / pausa / 4 parpadeos rápidos.
LED amarillo indicador de la batería:
7 parpadeos rápidos / pausa / 7 parpadeos rápidos.
LED amarillo indicador de la batería:
5 parpadeos rápidos / pausa / 5 parpadeos rápidos.
Error de corto circuito del cepillo.
Error de sobrecorriente.
Error de corto circuito de succión.
Error de sobrecorriente.
Error de temperatura de la tarjeta
electrónica.
Error de la protección térmica del
cepillo.
Máquina encendida con error de
cargador accionado.
Error de exceso de voltaje de la
batería.
SEÑALES VISUALES DEL CARGADOR DE BATERÍA
NOTA: Vaya al manual de Carga de la Batería
para instrucciones completas.
SEÑALES DE FUNCIONAMIENTO
LED Rojo Parpadeando (dos veces)
Cargador de batería configurado para cargar.
LED Rojo Encendido
La primera fase de carga está en proceso.
LED Amarillo Encendido
La primera fase de carga está en proceso.
LED Verde Encendido
Carga completa.
SOLUCIÓN DE PROBLEMAS
LED Amarillo Parpadeando
Batería inadecuada, batería desconectada
o cortocircuito de salida.
LED Rojo Parpadeando
La batería alcanzó el límite de tiempo máximo de
carga.
NOTA: Esto es normal. Las baterías nuevas requieren
un período de adaptación de aproximadamente diez
ciclos de carga. Desconecte la unidad y úsela como
siempre. Cargue después de usar.
00-295-551
PAGE 14 OF 21 0621 I H-8041
Page 15

π
H-8041
AUTOLAVEUSE À PLANCHER
COMPACTE
1-800-295-5510
uline.ca
SÉCURITÉ
• Débranchez l'autolaveuse de l'alimentation
principale avant les opérations d'entretien.
• Utilisez l'autolaveuse uniquement selon les instructions
de ce manuel. Utilisez uniquement les accessoires
recommandés par le fabricant.
• Ne déplacez pas et ne transportez pas l'autolaveuse
en la tirant par son câble d'alimentation. N'utilisez
pas le câble comme poignée, ne fermez pas de
portes sur le câble et ne contournez pas des coins ou
des rebords tranchants avec le câble. Ne passez pas
avec l'autolaveuse par-dessus le câble. Gardez le
câble loin des surfaces chaudes.
RENSEIGNEMENTS GÉNÉRAUX
PIÈCES
1
2
5
6
7
8
• Ne débranchez pas l'autolaveuse en tirant sur le
câble d'alimentation. Saisissez la fiche et non le
câble pour débrancher l'autolaveuse.
• Éteignez toutes les commandes avant de débrancher
l'autolaveuse.
• N'utilisez pas l'autolaveuse pour le nettoyage de
liquides inflammables ou combustibles tels que
l'essence. N'utilisez pas l'autolaveuse dans les
endroits où de tels liquides peuvent être présents.
# DESCRIPTION
Réservoir de récupération
1
12
11
10
2 Réservoir de détergent
3 Brosse en nylon
4 Robinet de détergent
5 Raclette
6 Panneau de commande
7 Levier de conduite
Tuyau de réservoir de
8
récupération
9 Prise d'alimentation
10 Tuyau de vidange
Levier de dégagement de la
11
raclette
Levier de dégagement de la
12
poignée
3 4
PAGE 15 OF 21 0621 I H-8041
9
Page 16

RENSEIGNEMENTS GÉNÉRAUX (SUITE)
FONCTIONS DES BOUTONS :
Marche/arrêt
Brosse
ASSEMBLAGE
REMARQUE : La batterie doit être
complètement chargée avant la première
utilisation.
ASSEMBLAGE DE LA RACLETTE
1. Inclinez l'appareil en arrière et fixez la raclette sur
l'autolaveuse en insérant les boutons noirs dans les
fentes de la barre noire. Tournez les boutons dans le
sens horaire pour serrer. (Voir Figures 1 et 2)
Indicateur de
batterie
Eau
Ventilateur
INSTALLATION DES FUSIBLES
1. Repérez le fusible dans le sac en plastique prévu
pour les pièces. Soulevez le réservoir de récupération
pour accéder au connecteur à fusible. Branchez le
fusible et fermez le connecteur. Replacez le réservoir
de récupération sur l'appareil et mettez le couvercle
par-dessus. (Voir Figures 5 et 6)
Figure 1 Figure 2
2. Raccordez le tuyau à la raclette. (Voir Figure 3)
Figure 3
ASSEMBLAGE DE LA BROSSE
1. Installez la brosse en la tournant dans le sens horaire.
Remettez l'appareil debout. (Voir Figure 4)
Figure 4
Figure 5
2. Raccordez le tuyau au réservoir. (Voir Figure 7)
Figure 7
Figure 6
PAGE 16 OF 21 0621 I H-8041
Page 17

FONCTIONNEMENT
REMPLISSAGE DU RÉSERVOIR
1. Ajoutez de l'eau et du détergent dans le réservoir.
(Voir Figure 8)
Figure 8
REMARQUE : Utilisez un détergent non moussant
dont le pH est compris entre 7 et 11. Veillez à
suivre les instructions du détergent pour une
dilution adéquate.
2. Ouvrez le débit du réservoir de détergent en
poussant le levier vers le haut en position horizontale.
Laissez-le ouvert. (Voir Figure 9)
Figure 9
2. Allumez l'appareil et appuyez sur le bouton de la
brosse. Tous les voyants s'allument et l'appareil est
pleinement opérationnel. (Voir Figures 11 et 12)
Figure 11 Figure 12
3. Après utilisation, videz le réservoir de récupération à
l'aide du tuyau de vidange attaché. (Voir Figure 13)
Figur e 13
POUR COMMENCER LE LAVAGE
1. Abaissez la raclette en poussant la poignée vers le
bas. (Voir Figure 10)
Figure 10
4. Une fois terminé, rechargez la batterie.
REMARQUE : La batterie doit être rechargée
après chaque utilisation. Pour une durée de
vie optimale de la batterie, laissez l'appareil
branché lorsqu'il n'est pas utilisé.
APRÈS LE LAVAGE
1. Éteignez la machine en appuyant sur le bouton
marche/arrêt pendant au moins quatre secondes.
2. Soulevez la raclette.
3. Fermez le robinet du détergent.
4. Videz le réservoir de récupération (voir Entretien).
5. Chargez la batterie (voir Entretien).
PAGE 17 OF 21 0621 IH-8041
Page 18

ENTRETIEN
ENTRETIEN QUOTIDIEN
1. Utilisez le tuyau de vidange attaché pour vider l'eau
sale du réservoir de récupération. (Voir Figure 14)
Fi gure 14
2. Retirez le couvercle et vérifiez que le flotteur du
réservoir d'eau sale est sans dommages, propre et
libre de se déplacer sur sa cheville.
(Voir Figures 15 et 16)
5. Vérifiez le niveau de chargement de la batterie.
(Voir Figure 19)
Figure 19
6. Branchez le chargeur de la batterie au moyen du
cordon électrique fourni avec la machine pour
le rechargement de la batterie. La charge est
terminée lorsque le voyant DEL vert est allumé.
(Voir Figures 20 et 21)
Figu re 15 Fi gure 16
3. Soulevez le réservoir de récupération pour nettoyer.
(Voir Figure 17)
Figure 17
4. Nettoyez la brosse et vérifiez que la raclette
est propre et que les lamelles ne sont pas
endommagées. (Voir Figure 18)
Figure 18
Figure 20 Figure 21
REMPLACEMENT DE LA LAMELLE SUR LA
RACLETTE
1. Retirez l'ensemble de la raclette à l'aide des deux
boutons noirs.
2. Retirez la lamelle de la
raclette en retirant les
vis, les écrous à oreilles
et les dispositifs de
retenue des lamelles.
(Voir Figure 22)
3. Réutilisez la même
lamelle en inversant
le bord en contact
avec le plancher. Les
Figure 22
lamelles doivent être
réutilisées jusqu'à ce
que les quatre bords soient usés et puissent être
remplacés en même temps.
4. Alignez les nouvelles lamelles (ou les lamelles
inversées) avec les languettes et les trous de vis sur
le corps de la raclette.
5. Repositionnez les deux dispositifs de retenue des
lamelles et insérez les vis. Fixez et serrez les écrous à
oreilles.
Dispositif
de retenue
de lamelle
PAGE 18 OF 21 0621 I H-8041
Page 19

ENTRETIEN (SUITE)
REMPLACEMENT DE LA BROSSE
1. Avec la face inférieure exposée, retirez la brosse en
tournant dans le sens horaire hors du moyeu central.
2. Installez une nouvelle brosse en tournant dans le
sens antihoraire sur le moyeu central.
VÉRIFICATION DES FUSIBLES DU MOTEUR
REMARQUE : Les fusibles doivent être
remplacés en respectant la bonne valeur. La
valeur est indiquée sur le fusible.
• Fusible principal (A) entre les batteries – 30 A
• Moteur de la brosse (B) – 25 A
• Moteur de l'aspirateur (C) – 20 A
1. Soulevez le réservoir de récupération. (Voir Figure 23)
Figure 23
3. Enlevez les capuchons noirs sur le fusible du moteur
de la brosse (B) et sur le fusible du moteur de
l'aspirateur (C). (Voir Figures 25 et 26)
C
B
Figure 25 Figure 26
4. Vérifiez si le fusible a sauté en regardant par la
fenêtre du fusible. Si le fil métallique est présent
et entier, le fusible est bon. Si le fil métallique est
manquant ou cassé, le fusible n'est plus bon et a
besoin d'être remplacé. (Voir Figure 27)
Figure 27
2. Repérez les fusibles. (Voir Figure 24)
Figure 24
C
B
PROBLÈME CAUSES RECOMMANDATIONS
La machine ne démarre pas.
La brosse ne tourne pas.
Les batteries doivent être chargées. Chargez les batteries.
Le voyant du bouton de la brosse est
éteint.
Le coupe-circuit thermique du moteur
de la brosse a été déclenché; le
moteur est en surchauffe.
Les batteries doivent être chargées.
Le fusible du moteur de la brosse a
sauté.
A
DÉPANNAGE
Appuyez sur le bouton de la brosse.
Éteignez l'appareil. Laissez la machine
refroidir pendant au moins 45 minutes.
Chargez les batteries.
Replacez le fusible du moteur de la brosse.
La machine ne nettoie pas
uniformément.
PAGE 19 OF 21 0621 I H-8041
La brosse ou le tampon de
nettoyage pour plancher sont usés.
Remplacez la brosse ou le tampon de
nettoyage usés.
Page 20

DÉPANNAGE (SUITE)
PROBLÈME CAUSES RECOMMANDATIONS
Aucune distribution de
détergent.
Le moteur de succion ne
démarre pas.
La raclette ne nettoie pas ou
la succion est faible.
Le voyant du bouton de détergent
est éteint.
Le réservoir de détergent est vide.
Le moteur de la brosse est éteint.
Le tuyau qui distribue le détergent
à la brosse est obstrué.
Le robinet de détergent est sale ou
défectueux.
Le filtre intégré est sale (situé sur le
côté gauche de la machine près
de la roue).
Le voyant du bouton du ventilateur
est éteint.
Le fusible du moteur de l'aspirateur
a sauté.
Le bord des lamelles de la raclette
en contact avec le sol est usé.
La raclette ou le tuyau sont
obstrués ou endommagés.
L'interrupteur du flotteur est obstrué
par de la saleté, est brisé ou a été
déclenché (baril d'eau sale).
Le tuyau de succion est obstrué.
Le tuyau de succion n'est pas
raccordé à la raclette ou est
endommagé.
De la saleté est coincée entre les
lamelles de la raclette.
Appuyez sur le bouton de détergent.
Remplissez le réservoir de détergent.
Allumez le moteur en appuyant sur le
bouton de la brosse.
Débouchez et ouvrez le robinet du réservoir
de détergent.
Faites nettoyer ou remplacer le robinet de
détergent.
Nettoyez le filtre. Assurez-vous de fermer le
robinet du détergent avant d'effectuer le
nettoyage.
Appuyez sur le bouton du ventilateur.
Remplacez le fusible du moteur de
l'aspirateur.
Remplacez les lamelles de la raclette.
Débouchez et réparez les dommages.
Videz le réservoir de récupération ou
réinitialisez l'interrupteur du flotteur.
Débouchez le tuyau.
Raccordez ou réparez le tuyau.
Retirez les débris se trouvant dans les
lamelles de la raclette.
La machine laisse de
longues traces mouillées sur
le sol.
Les batteries ne fournissent
pas un temps de
fonctionnement nominal.
La batterie se décharge
trop rapidement pendant
l'utilisation même en étant
chargée correctement.
PAGE 20 OF 21 0621 I H-8041
De la saleté ou des débris au sol
s'accumulent entre les lamelles de
la raclette.
De la saleté est coincée entre les
lamelles de la raclette.
Les lamelles de la raclettes sont
usées.
Le chargeur de la batterie ne
fonctionne pas.
La batterie est neuve, mais ne
fournit pas 100 % de sa capacité
prévue.
Balayez le sol avant l'utilisation de la
machine.
Retirez les débris se trouvant dans les
lamelles de la raclette.
Remplacez les lamelles de la raclette.
Voir les instructions de chargement de la
batterie.
Ceci est normal. Une période de rodage
de 10 cycles de chargement environ est
nécessaire pour les nouvelles batteries.
Débranchez l'appareil et utilisez-le
normalement. Chargez l'appareil après
utilisation.
Page 21

AFFICHAGE DE CODES D'ERREUR
1
0
uline.ca
CODES D'ERREUR ERREUR
DÉPANNAGE (SUITE)
Voyant du bouton de la brosse :
2 clignotements rapides / pause / 2 clignotements rapides.
Voyant du bouton de la brosse : 1 clignotement / pause /
1 clignotement.
Voyant du bouton du ventilateur :
2 clignotements rapides / pause / 2 clignotements rapides.
Voyant du bouton du ventilateur : 1 clignotement / pause /
1 clignotement.
Voyant du bouton de la brosse : + voyant du bouton du ventilateur,
clignotement synchronisé / pause / clignotement synchronisé.
Voyant du bouton de la brosse :
4 clignotements rapides / pause / 4 clignotements rapides.
Voyant jaune d'indicateur de batterie :
7 clignotements rapides / pause / 7 clignotements rapides.
Voyant jaune d'indicateur de batterie :
5 clignotements rapides / pause / 5 clignotements rapides.
Erreur de court-circuit de la
brosse.
Erreur de surintensité.
Erreur de court-circuit de la
succion.
Erreur de surintensité.
Erreur de température de la
carte électronique.
Erreur du protecteur
thermique de la brosse.
Erreur de machine alimentée
par chargeur de batterie.
Erreur de surtension de la
batterie.
SIGNAUX VISUELS DU CHARGEUR DE BATTERIE
REMARQUE : Consultez le manuel du chargeur
de batterie pour les instructions complètes.
SIGNAUX DE FONCTIONNEMENT
Voyant rouge clignotant (deux fois)
Le chargeur de batterie est réglé pour se charger.
Voyant rouge allumé
Première phase de charge en cours.
Voyant jaune allumé
Seconde phase de charge en cours.
Voyant vert allumé
Charge terminée.
DÉPANNAGE
Voyant jaune clignotant
Batterie inadaptée OU batterie non connectée
OU court-circuit de sortie.
Voyant rouge clignotant
La batterie a atteint sa limite de temps de charge
maximale. REMARQUE : Ceci est normal. Une période
de rodage de 10cycles de chargement environ est
nécessaire pour les nouvelles batteries. Débranchez
l'appareil et utilisez-le normalement. Chargez l'appareil
après utilisation.
-800-295-551
PAGE 21 OF 21 0621 I H-8041
 Loading...