

Page 1
Para Español, vea páginas 10-18.
Pour le français, consulter les pages 19-27.
H-7241
AIR CUSHION MACHINE
BOX CONTENTS
• Air Cushion Machine
• Film Roll Holder
• Spacing Gauge
• Maintenance Kit
• Power Cord
• User Manual
1-800-295- 5510
uline.com
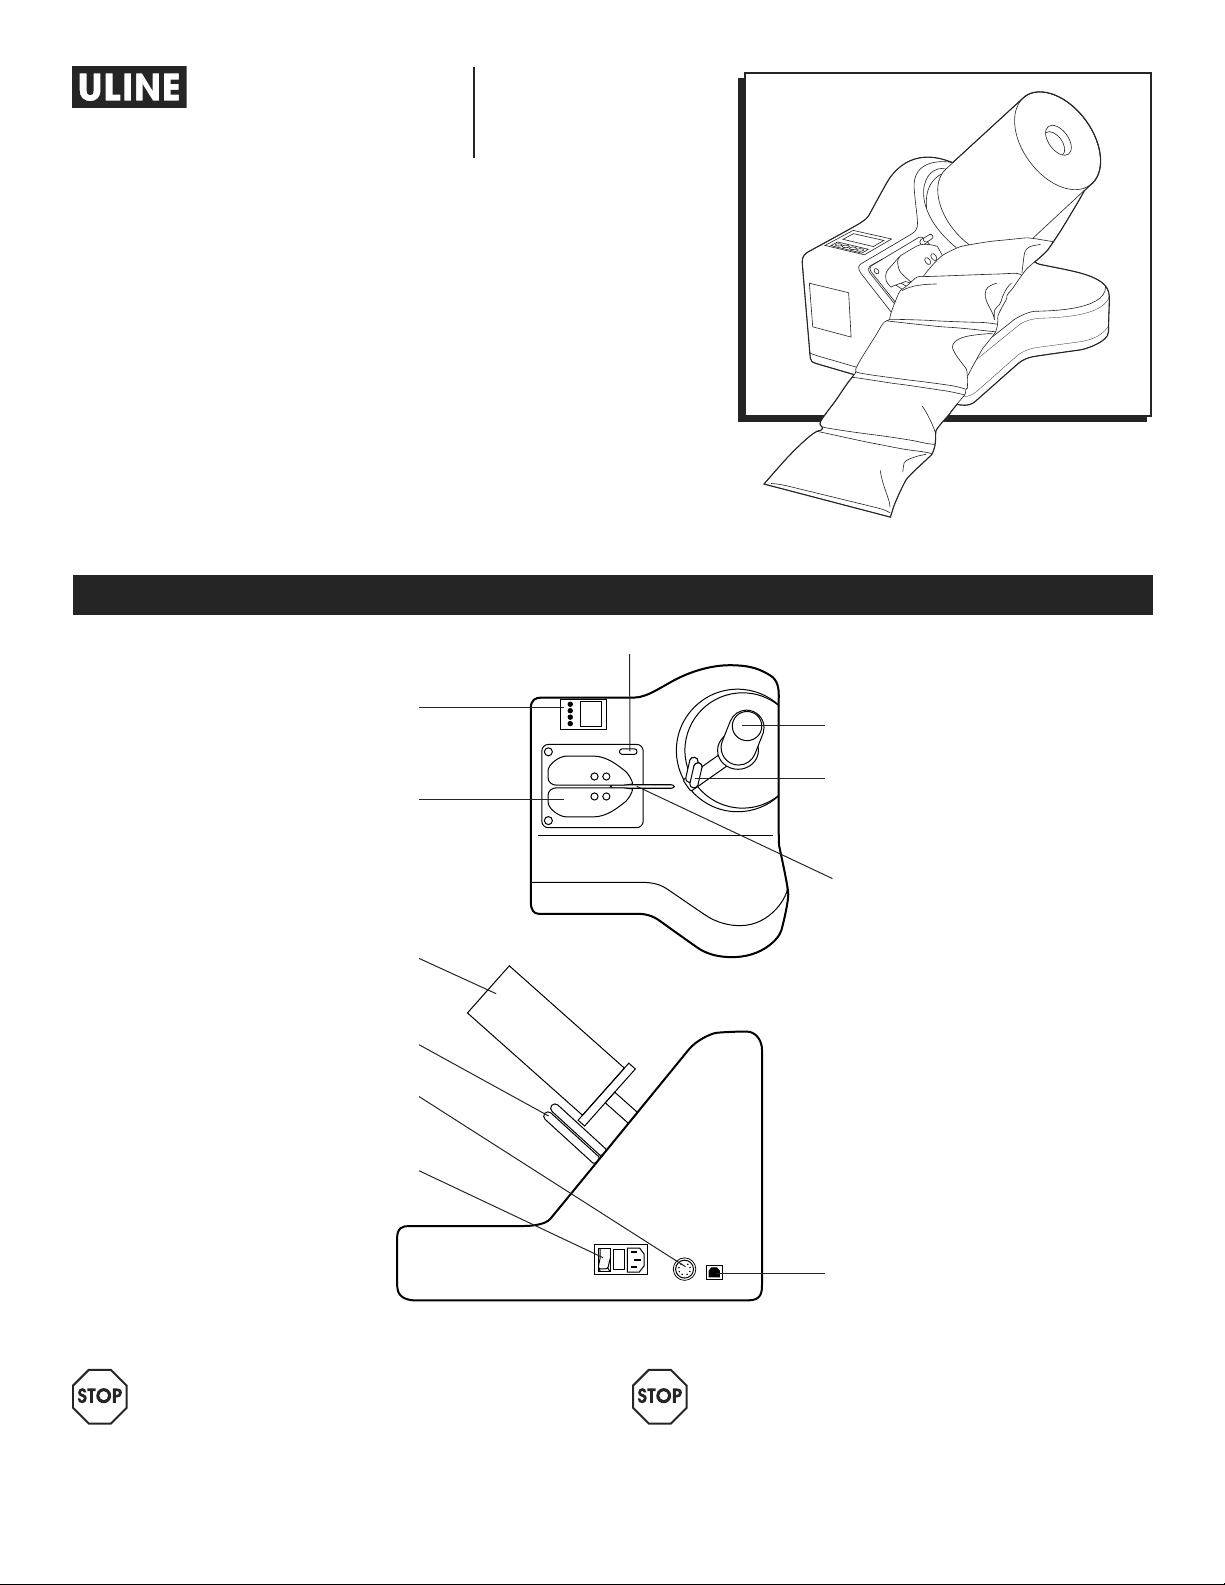
PARTS
Unlock Knob
Control Panel
Sealing Unit
(Includes Teflon® Belts)
Film Roll Holder
Guide Bar
External Input
Connection
Main Power Switch
and Power Socket
Film Roll Holder
Guide Bar
Air Injector
USB-B Connector
WARNING! Please read and understand
instructions fully before operating the
Uline Air Cushion machine.
PAGE 1 OF 27 0621 I H-7241
WARNING! To guarantee personal safety,
the following instructions must be carefully
observed.
Page 2

SAFETY
WORK AREA
• Keep the work area clean and well lit.
• Place the machine on a flat, dry surface.
• Do not operate machine in explosive atmospheres,
such as in the presence of flammable liquids, gases
or dust. Do not place flammable materials in, on or
around the machine.
ELECTRICAL SAFETY
• The power plug must match the outlet and the outlet
must be appropriately grounded. Do not modify
the plug in any way. Do not use adapter plugs or
extension cords.
• Do not expose the machine to wet conditions.
• For installation and maintenance work, the machine
must always be turned off by the main switch and be
disconnected from the main power connection.
• All safety, protective measures and facilities must be
applied and maintained in accordance with IEC
instructions.
PERSONAL SAFETY
• Prevent accidental starting. Ensure the switch is in the
off position before plugging in.
• There is an extremely sharp knife blade under the
air injector assembly. Strictly adhere to the blade
replacement instructions on page 8.
USE AND CARE
• Switch machine off and disconnect the plug from
the power source before performing any operation
to the machine. This includes replacing film,
cleaning or maintenance.
• The machine requires periodic cleaning. Check for
misalignment or binding of moving parts, broken
parts and any other condition that may affect the
operation. Do not operate a damaged machine.
• This system was designed for processing a specific
film type. In order to guarantee smooth function,
only replace with Uline Air Cushion Machine film.
• In emergency situations, turn the power switch
off. The machine will be switched off within a few
seconds (when indicator is turned off completely).
After eliminating the emergency situation or fault,
the machine can be switched on again according
to the user manual.
STORAGE
Store device only under the following conditions:
• Outdoor storage is prohibited.
• The device must only be stored in dry rooms.
• Keep dry and dust-free.
• Protect from massive heat, like radiators.
• The film is sealed by using a heated wire that is
located under a Teflon® belt. This wire gets very
hot and may cause burns if touched. Switch the
machine off and allow the wire 2-3 minutes to
cool before performing any operation exposing
the wire. Follow provided instructions, page 7, for
replacement of Teflon® belts.
PAGE 2 OF 27 0621 I H-7241
Page 3
TECHNICAL SPECIFICATIONS
Voltage 95 – 250 VAC; 50/60 Hz
Power Consumption (max.) 97 W
Power Consumption 76 W
Power Consumption (stand-by mode) 6.2 W
Recommended Main Fuse 3.15 AMP
Dimensions 14⁄ x 14⁄"
Height 13"
Transport Speed ~33 LFM
Weight 15.65 lbs.
Sound Pressure Level 52 db
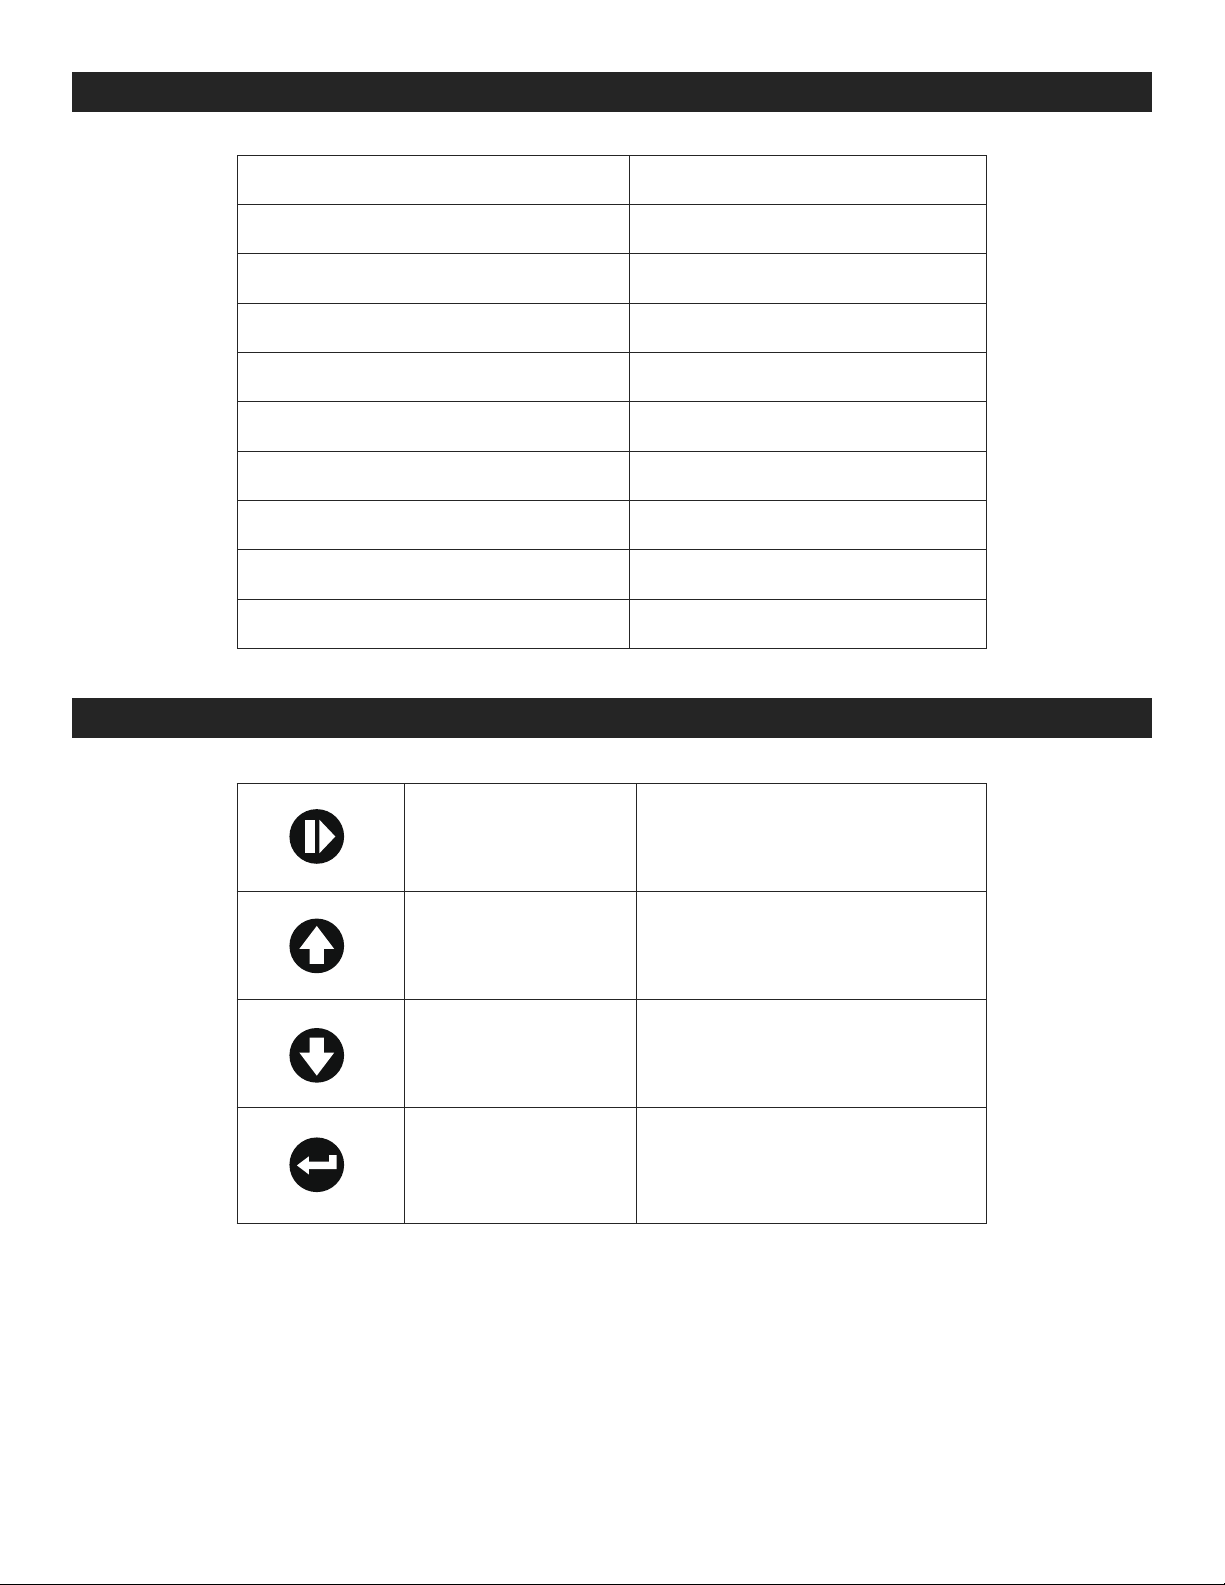
KEYPAD FUNCTIONS
Start/Stop Button • Starts or stops the machine
Arrow up
Arrow down
Enter Button
• Increases the value
• Scrolls up
• Decreases the value
• Scrolls down
• Confirms
• Enter menu
• Enter menu item
PAGE 3 OF 27 0621 I H-7241
Page 4
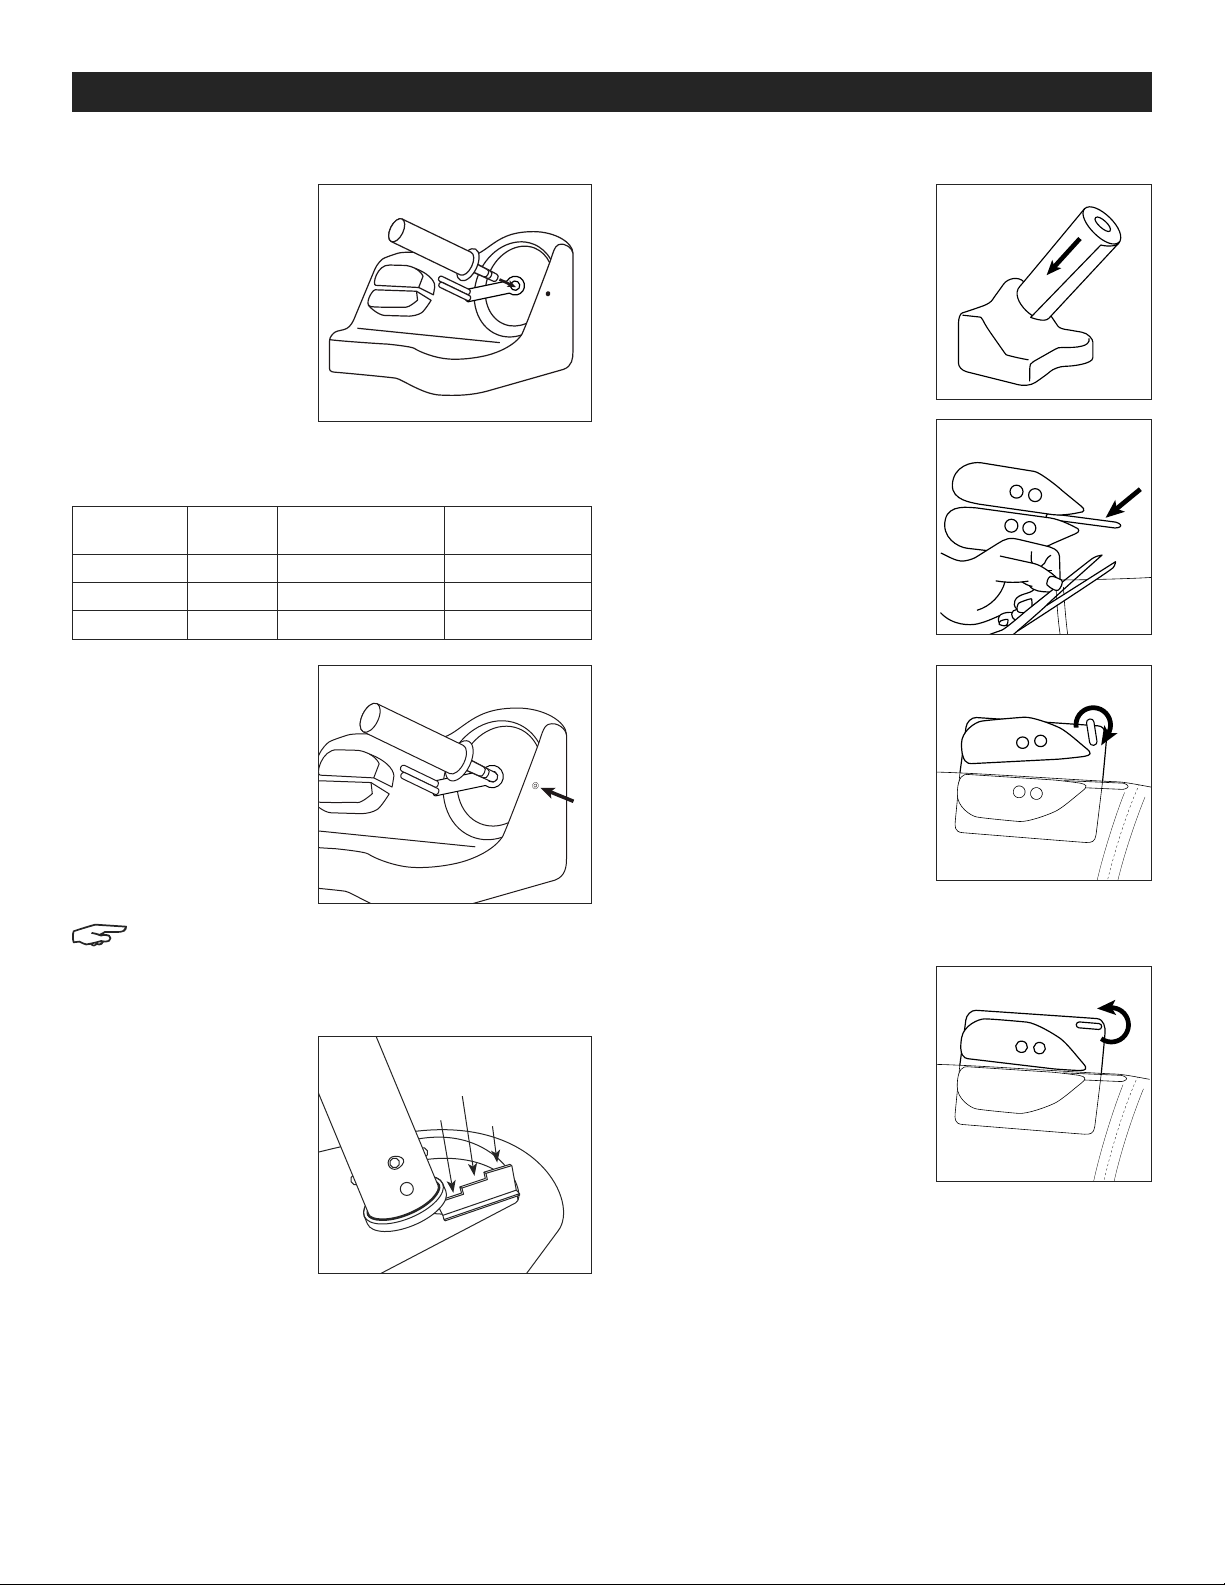
SETTING UP THE DEVICE
ASSEMBLY OF THE FILM ROLL HOLDER
1. Remove the machine
and the blue film roll
shaft from the box.
Insert the metal part
into hole on the front
side of the machine.
(See Figure 1)
Uline Air Cushion Machine films are available in three
different options:
DESCRIPTION
Air Pillows S-22467 8 x 4" 11/ 16"
Air Cushion S-22468 1⁄ x 9 x 13" 1/2"
Bubble Film S-22469 3/4 x 6 x 13" 1/2 "
ULINE
PART NO.
2. Adjust the film roll
holder to fit desired
film type by loosening
the screw on the right
side of the machine
with included Allen
wrench. Gently
tighten screw to
secure. (See Figure 2)
NOTE: Screw on right side of machine is set into
machine housing. It should be loosened and
tightened to adjust film roll holder and does
not need to be removed for this process.
3. Using the included
spacing gauge can
help find the right
setting for each film
type. (See Figure 3)
Figure 1 Figure 4
CUSHION SIZE SPACING GUIDE
Figure 2
Figure 3
11/ 16"
1/2"
15/16"
LOADING A FILM ROLL
1. Slide the film roll onto the
film roll holder. Ensure that
the film is oriented to unwind
from the underside of the
roll. (See Figure 4)
2. There is a gap between
the edge of the film and
the perforations. Cut a little
corner off the film gap.
(See Figure 5)
3. Turn the unlock knob
clockwise to unlock the top
sealing unit. Slide the film
between the guide bars
and thread the gap on
the film through the black
nozzle and between the
sealing units. Ensure the
film cuts on the blade, and
advance the film all the
way through the sealing units. (See Figure 6)
4. Turn unlock knob
counterclockwise to lock
the top sealing unit. Always
make sure that the knob is
locked before operating the
machine. (See Figure 7)
Figure 5
Figure 6
Figure 7
• Air Pillows = 11/16"
• Air Cushion = 1/2"
• Bubble Film = 1/2"
4. Tighten screw to
secure film roll holder.
PAGE 4 OF 27 0621 I H-7241
Page 5
SETTING UP THE DEVICE CONTINUED
POWER SWITCH AND CONNECTIONS
After checking the power supply, the system can be
switched on. The main switch is on position "I."
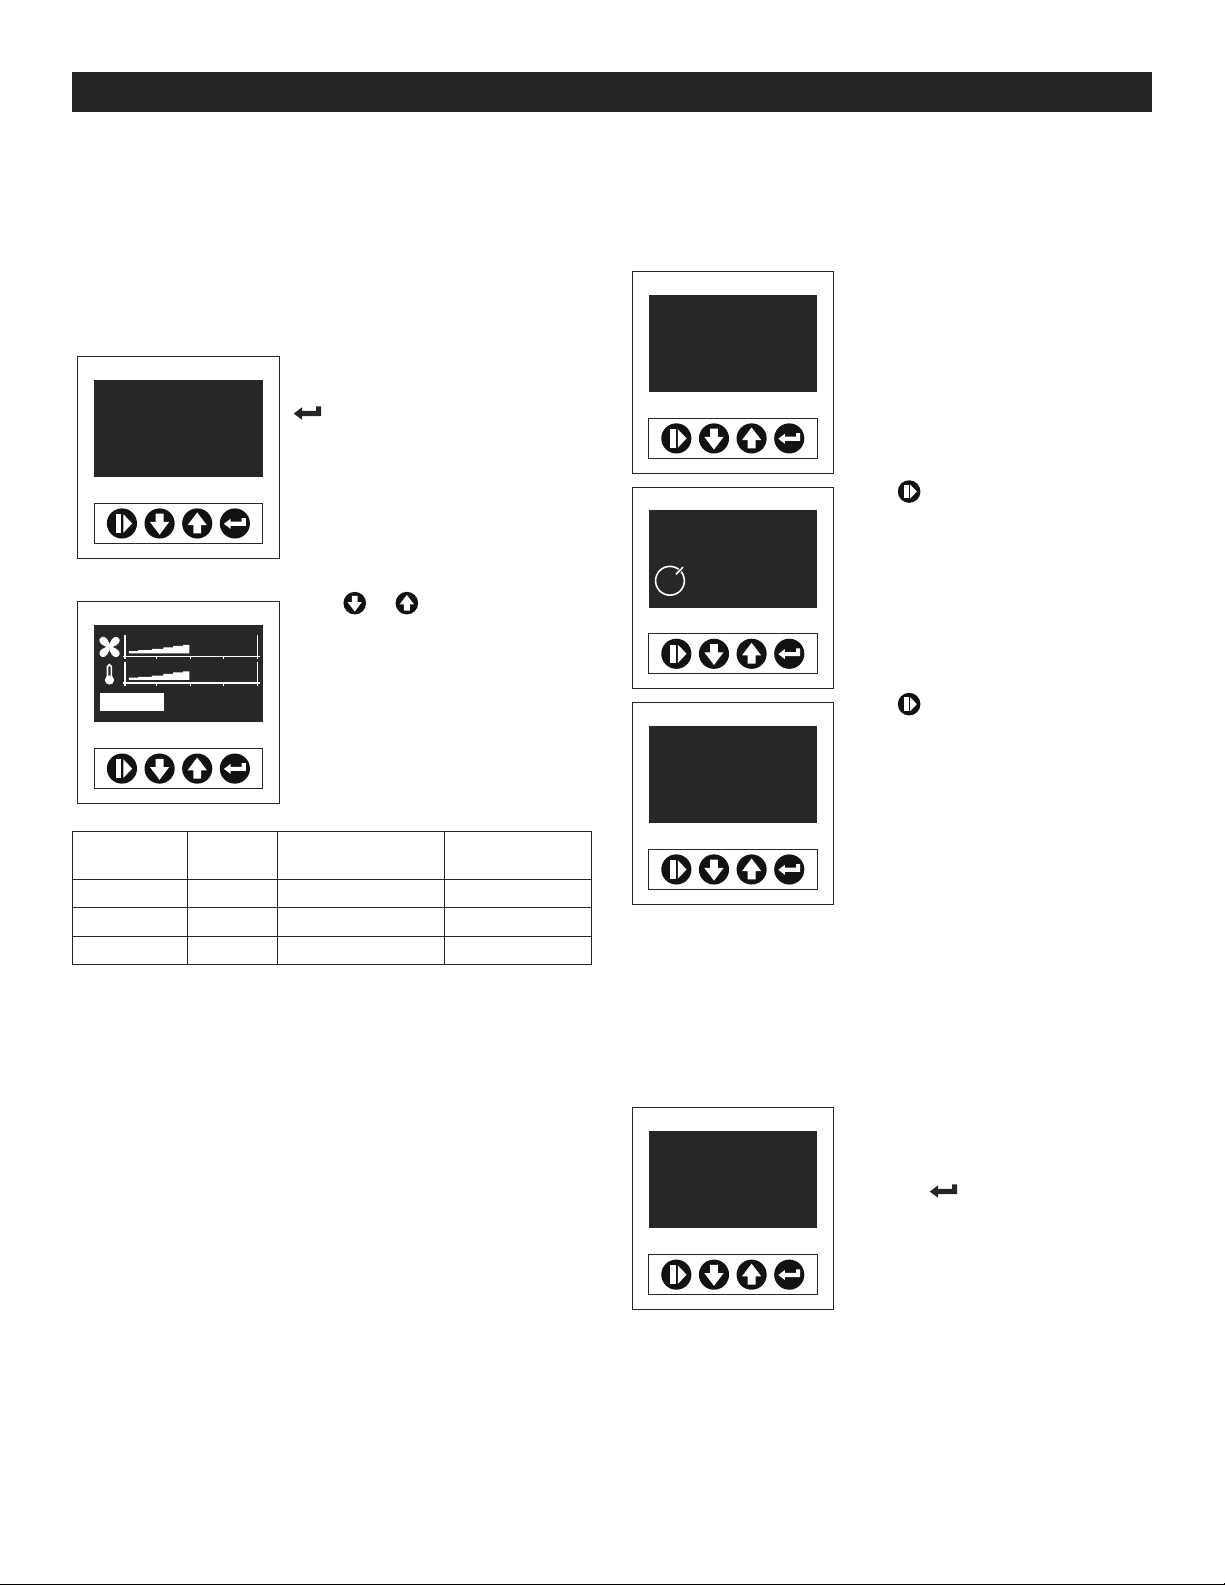
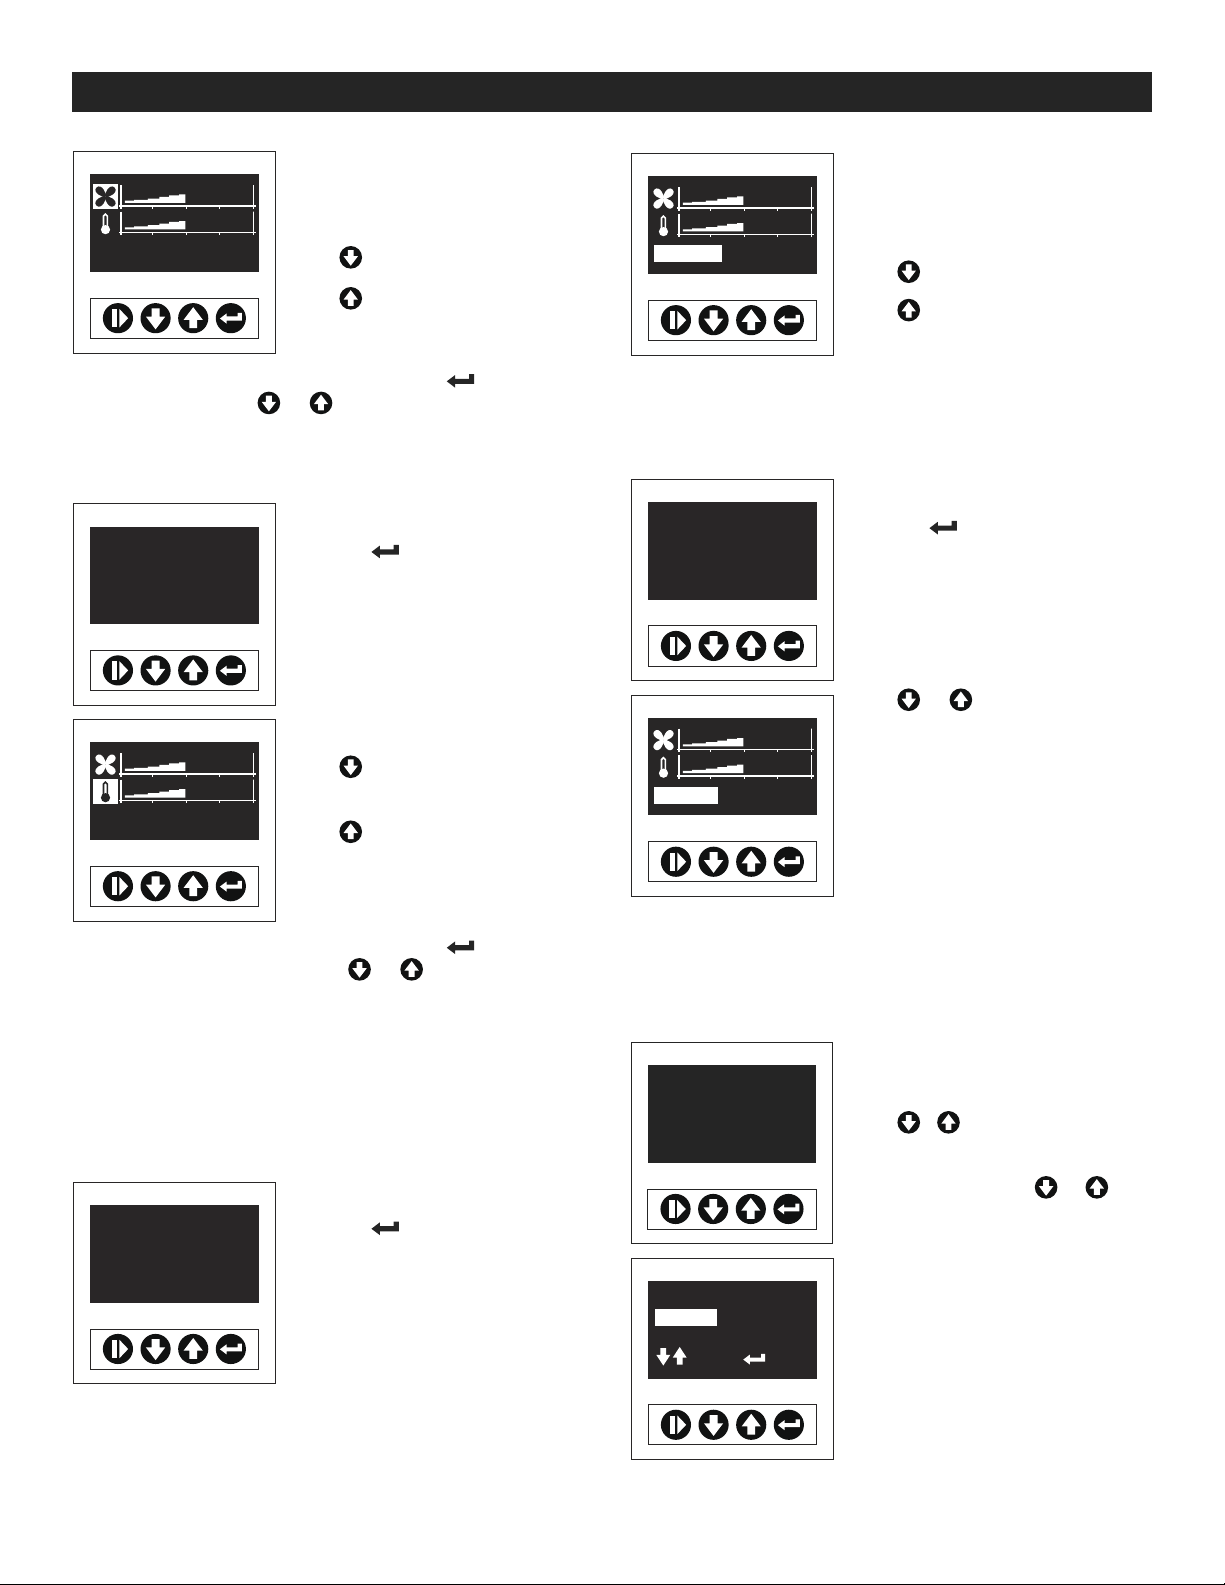
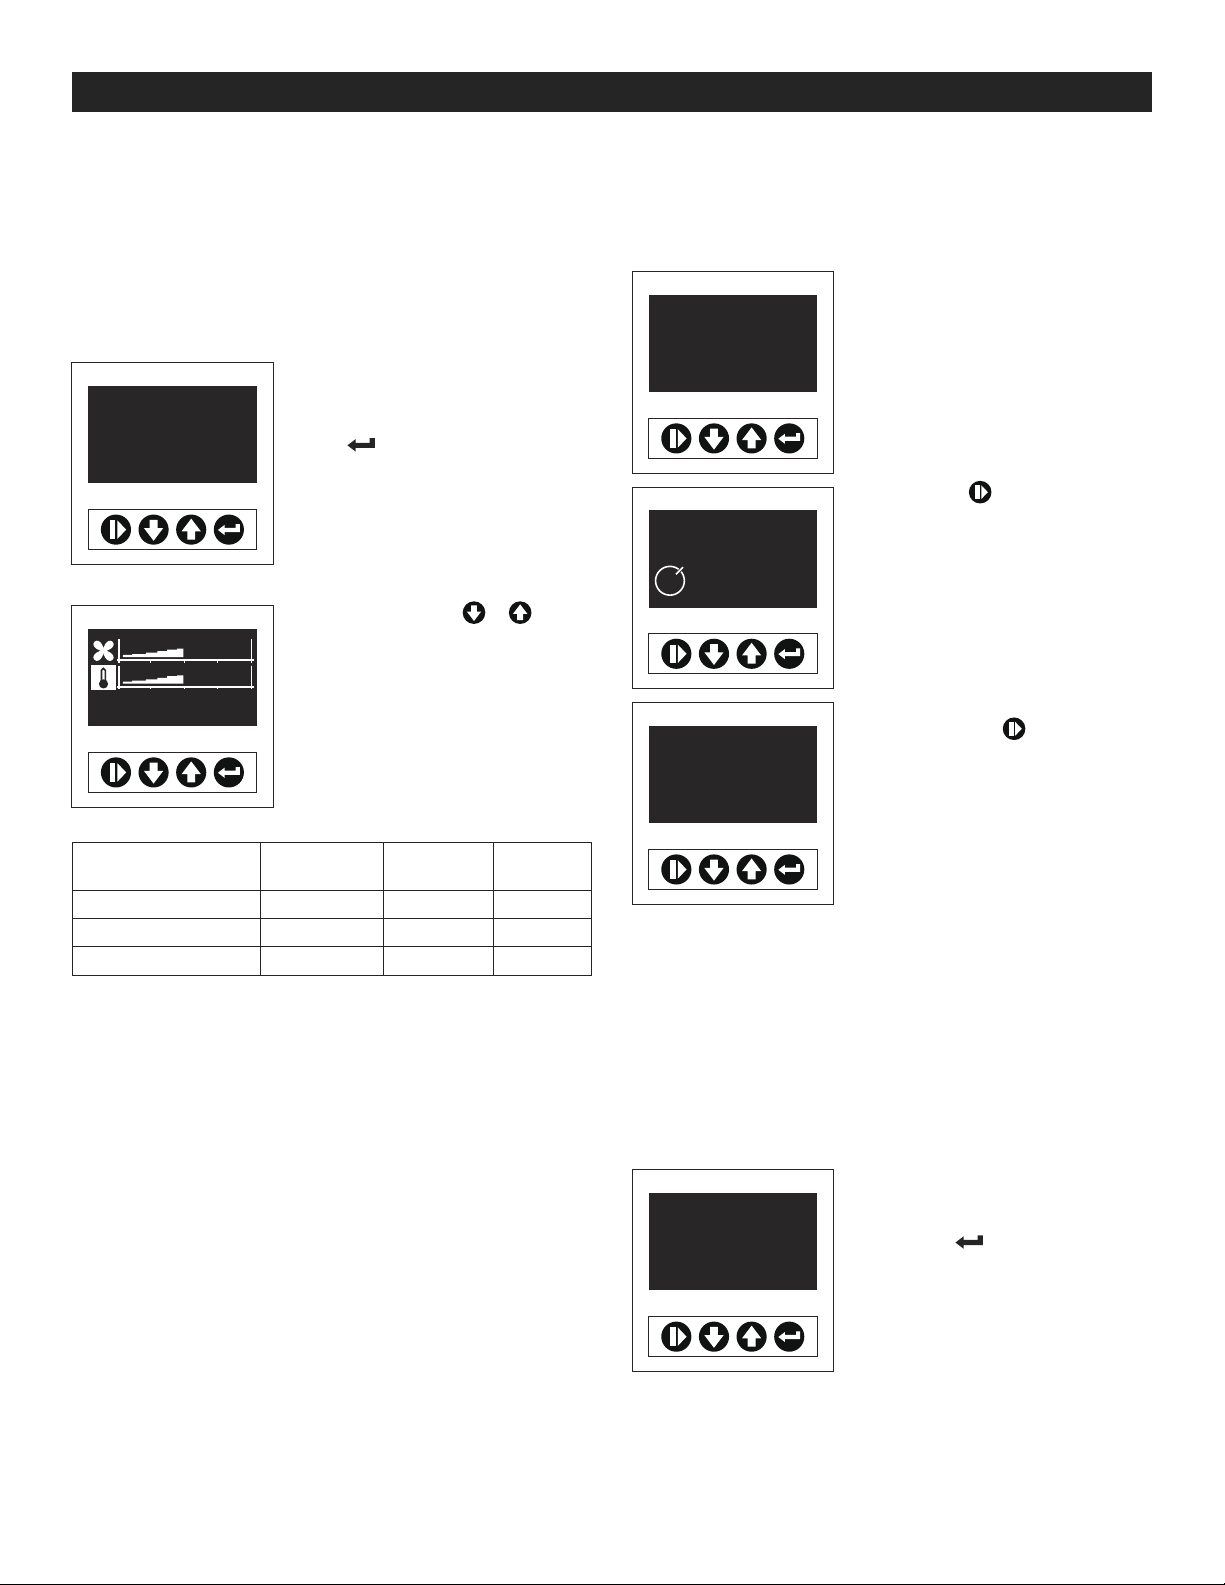
SELECTING INITIAL FILM TYPE
There are three different film types available for
selection when turning on the machine.
Select air pillows, bubble or
Air Pillows
ULINE S-22467
AIRmove
Air Pillows
cushion film options by pressing
six times until film type shows
up.
2
Press or to change the
film type.
START FILM PRODUCTION
Once a menu is selected with its pre-set parameters the
machine is ready to operate. Every menu follows the
same steps:
Machine is ready to start
Air Pillows
ULINE S-22467
Air Pillows
ULINE S-22467
180
Air Pillows
ULINE S-22467
AIRmove
AIRmove
Air Pillows film production.
2
Press to start
Air Pillows film production.
2
Press again to stop
Air Pillows production.
DESCRIPTION
Air Pillows S-22467 8 x 4" 11/ 16"
Air Cushion S-22468 1⁄ x 9 x 13" 1/2"
Bubble Film S-22469 3/4 x 6 x 13" 1/2"
ULINE
PART NO.
CUSHION SIZE SPACING GUIDE
2
AIRmove
HOW TO ADJUST AIR SETTINGS
The chosen film type menus automatically run on the
correct air and temperature settings. You do not need
to adjust machine setting manually, but if the automatic
settings are not optimal, the keypad allows you to
change the following settings:
Display Air Pillows
Air Pillows
ULINE S-22467
AIRmove
Ready to start
Press 1 x for air settings.
2
PAGE 5 OF 27 0621 I H-7241
Page 6
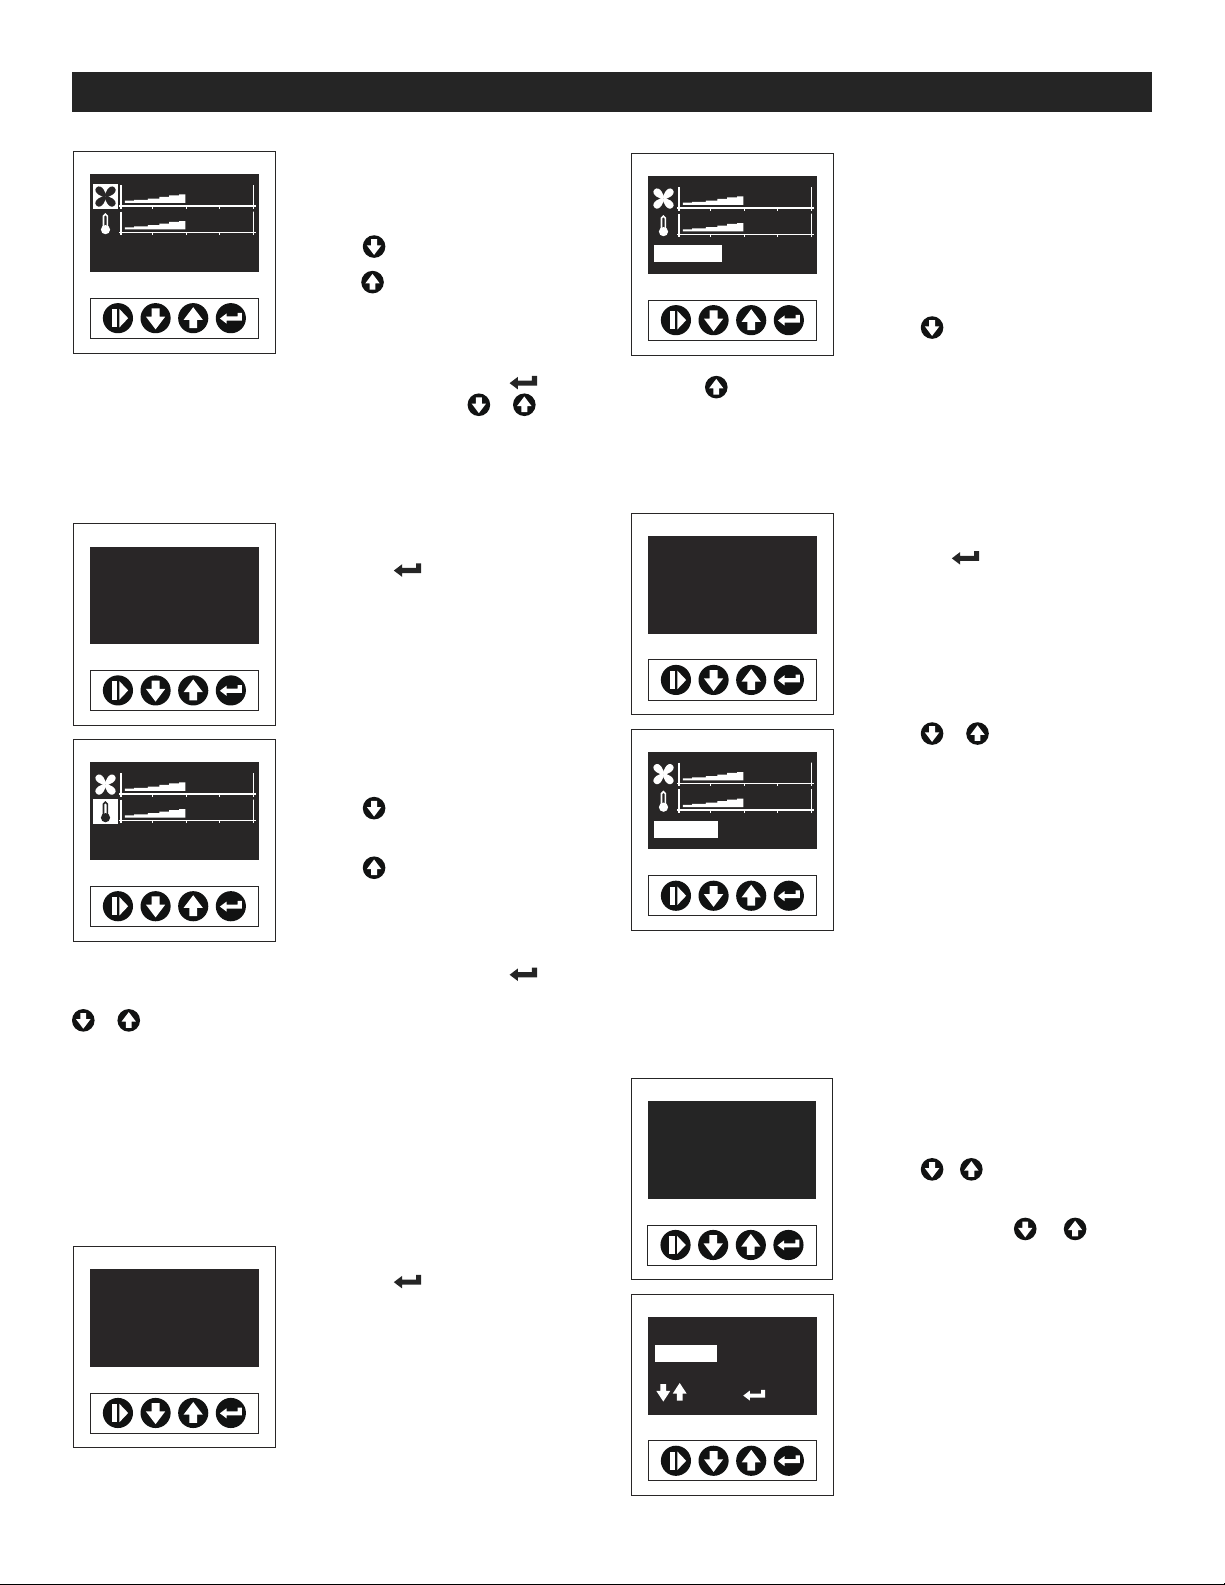
SETTING UP THE DEVICE CONTINUED
Connect_ _ Init_ _
HMI SW 22
Machine SW 1108977017
Reg nr 1
Display air settings
Amount of air is
now adjustable.
Runtime [s] 180
Press to decrease air.
Press to increase air.
Even while the machine is running, press to change
air settings by using or . While the machine is
running, the runtime sign will not show up.
HOW TO ADJUST SEALING TEMPERATURES
Display Air Pillows
Air Pillows
ULINE S-22467
AIRmove
Press 2 x for temperature
settings.
2
Display temperature settings
Change runtime settings
Minimum setting is 1 second.
Runtime [s] 180
Maximum setting is 2,400 seconds.
Press to decrease runtime.
Press to increase runtime.
HOW TO CHANGE FILM TYPE
Changing the menu to a new film type when loading a
different kind of film.
Display Air Pillows
Air Pillows
ULINE S-22467
AIRmove
Press 6 x until film
type shows up.
2
Press or to change the
film type.
Press to decrease
temperature.
Runtime [s] 180
Press to increase
temperature.
Even while the machine is running, press to change
temperature settings by using or . While the
machine is running, the runtime sign will not show up.
HOW TO ADJUST RUNTIME
To produce a desired amount of air pillows, a specific
runtime can be set. Runtime is indicated in seconds,
and its factory setting is 180 seconds. The set runtime will
run down to zero and production will stop.
Display Air Pillows
Air Pillows
ULINE S-22467
AIRmove
Press 3 x to get
the runtime menu.
2
Air Pillows
FACTORY SETTINGS
The machine setting enables resetting all choices,
parameters, adjustments and changes back to the
factory settings.
Machine off
Power switch [O] display off
Press and hold while
switching on the machine.
Release the buttons +
when the display runs.
Power switch on
Select Film type
Air Pillows
200mm/8inch
Select Set
Power switch on [I]
All settings have been reset,
proceed with "Selecting Initial
Film Type" again to choose a film
type.
PAGE 6 OF 27 0621 I H-7241
Page 7
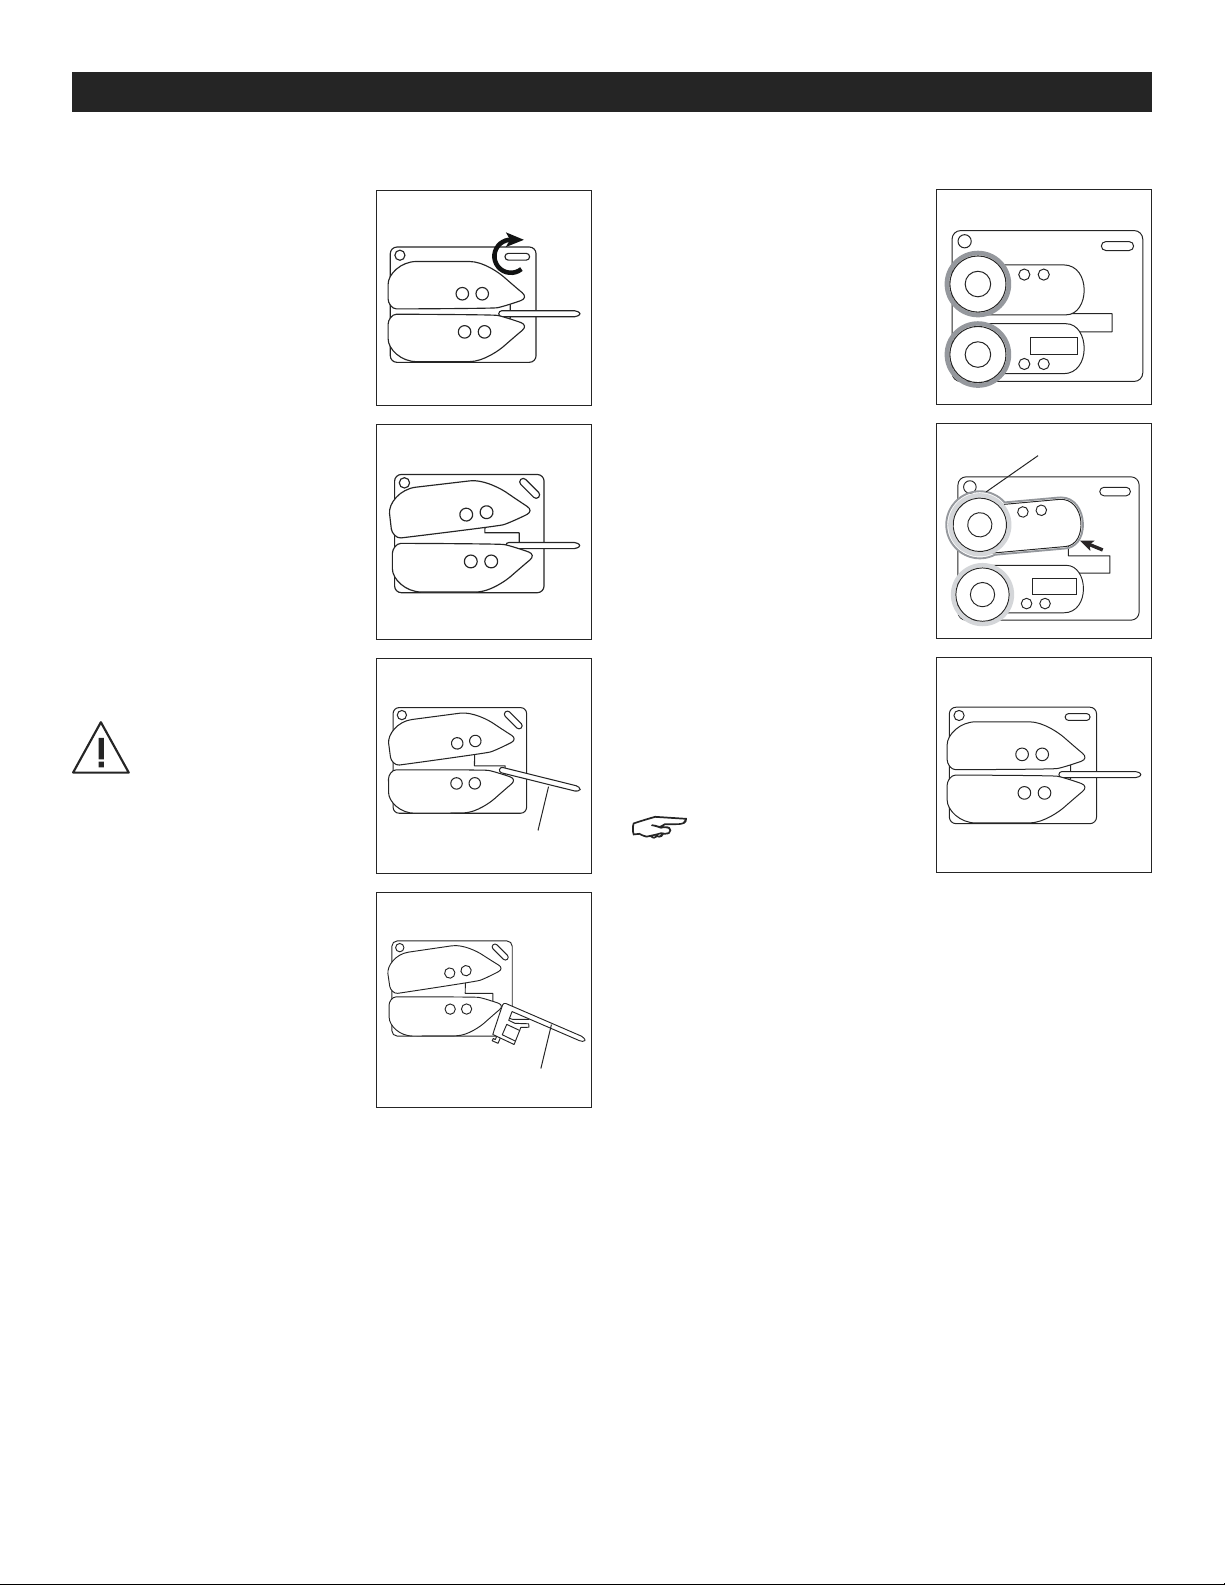
MAINTENANCE
REPLACING THE BLADE
Make sure to disconnect from
the power supply.
1. Turn the locking knob
clockwise to unlock the top
sealing unit. (See Figure 8)
2. Open the top sealing unit.
(See Figure 9)
3. Pull the blade to the right
side. (See Figure 10)
CAUTION! Sharp blade.
Figure 8
Figure 9
Figure 10
CHANGING THE BELTS
1. Remove the blue covers on
both the top and bottom
sealing units using included
Allen key. Ensure the top
sealing unit is unlocked.
(See Figure 12)
2. Push the top sealing unit to
the left.
3. Remove the Teflon® belt
while applying upward
pressure to the top sealing
unit and replace with a new
Teflon® belt. (See Figure 13)
4. Repeat steps 2 and 3 with
the bottom sealing unit.
5. Reattach the blue covers
using the included Allen key
and turn the locking knob
counterclockwise to lock
the top sealing unit.
(See Figure 14)
Figure 12
Figur e 13
Fi gure 14
Teflon Belt
4. Take the blade out of the
machine and insert a new
one. (See Figure 11)
5. Turn the locking knob
counterclockwise to re-lock
the top sealing unit.
Figure 11
Blade
Blade
NOTE: Visit uline.com
to order replacement
injector blades (H-7241INJCT) and teflon belts
(H-7241-TBELT).
PAGE 7 OF 27 0621 I H-7241
Page 8
ERROR CODES
ERROR 20
Calibration out of range
Calibrate seal wire
Turn off and on
ERROR 21
Seal wire
Check connection
Turn off and on
ERROR 22
Temperature not reached
Check seal system
Turn off and on
Calibration out of range.
Calibrate seal wire.
Turn off and on.
Call Uline Customer Service at
1-800-295-5510.
Seal wire.
Check connection.
Turn off and on.
Temperature not reached.
Check seal system.
Turn off and on.
ERROR 30
Seal jaw is not closed
Close jaw
Press start to release
ERROR 31
Transport failure
Check film transport
Press start to release
ERROR 32
Transport motor overload
Check film transport
Press start to release
Seal jaw is not closed.
Only possible if a micro switch is
mounted.
Close jaw.
Press start to release.
Transport failure.
Check film transport.
Press start to release.
Remove and reload film from
seal jaw/injector blade.
Transport motor overload.
Check film transport.
Press start to release.
Remove and reload film from
seal jaw/injector blade.
PAGE 8 OF 27 0621 I H-7241
Page 9
TROUBLESHOOTING
1
0
uline.ca
OPERATING ISSUE RECOMMENDATIONS
No power to machine
No display after power on
Display shown but machine will not start.
Bad film seal
Film seal is stretched.
Check power cord is connected to both machine and outlet.
Check main power switch is on.
Check power fuse.
Check power fuse.
Contact Uline Customer Service at 1-800-295-5510.
Check film type selection.
Turn off machine, check belt/blade position.
Check sealing units are closed and locked.
Check if film roll shaft is in the right position.
Replace belts and blades.
Adjust the temperature.
Check film type selection.
Check if film roll shaft is in the right position.
Adjust the temperature.
Adjust the air flow.
Check if film roll shaft is jammed.
Film does not run through.
Air cushions do not hold air.
Film jams occur frequently.
Film blockage
Film winding around rollers
Check if sealing units are closed and locked.
Check blade placement.
Replace belts and blades.
Film roll is loaded the wrong way.
Check belt/blade position.
Check if film roll shaft is in the right position.
Check if sealing units are closed and locked.
Check film causing blockage.
Check belts and blades. Replace as needed.
Check film and mandrel settings.
Remove and reload film into machine to ensure film is not
jamming up injector.
Check if film roll shaft is jammed.
Remove any film causing blockage.
Check film run on machine.
Remove any film causing blockage.
-800-295-551
PAGE 9 OF 27 0621 I H-7241
Page 10

H-7241
MÁQUINA PARA
ACOJINADO
CONTENIDO DE LA CAJA
• Máquina para Acojinado
• Soporte del Rollo de Película
• Medidor de Espacio
• Kit de Mantenimiento
• Cable Eléctrico
• Manual del Usuario
800-295- 5510
uline.mx
PARTES
Perilla de Desbloqueo
Panel de Control
Unidad de Sellado
(incluye Correas de Teflon®)
Soporte del Rollo de Película
Barra de Guía
Conexión de
Entrada Externa
Interruptor Principal
de Energía y Entrada
de Corriente
Soporte del Rollo de Película
Barra de Guía
Inyector de Aire
Conector USB-B
¡ADVERTENCIA! Lea y comprenda las
instrucciones por completo antes de utilizar la
Máquina para Acojinado Uline.
PAGE 10 OF 27 0621 I H-7241
¡ADVERTENCIA! Para garantizar la seguridad
personal, debe seguir con atención las
siguientes instrucciones.
Page 11

SEGURIDAD
ÁREA DE TRABAJO
• Mantenga el área de trabajo limpia y bien
iluminada.
• Coloque la máquina sobre una superficie plana y
seca.
• No utilice la máquina en ambientes explosivos,
como en presencia de líquidos inflamables, gases
o polvo. No coloque materiales inflamables dentro,
encima o alrededor de la máquina.
SEGURIDAD ELÉCTRICA
• La clavija debe corresponder al enchufe y el
enchufe debe hacer tierra de forma adecuada. No
modifique la clavija de ninguna manera. No utilice
un adaptador de clavijas o extensiones eléctricas.
• No exponga la máquina a condiciones de
humedad.
• Para trabajos de instalación y mantenimiento, la
máquina debe apagarse siempre mediante el
interruptor principal y estar desconectada de la
toma de corriente principal.
• Todas las medidas y facilidades de seguridad
y protección deben aplicarse y mantenerse
conforme a las instrucciones de la IEC (International
Electrotechnical Commission).
SEGURIDAD PERSONAL
• Evite el encendido accidental. Asegúrese de que
el interruptor esté colocado en apagado antes de
enchufar.
USO Y CUIDADO
• Apague la máquina y desconecte el enchufe de la
fuente de energía antes de llevar a cabo cualquier
operación a la máquina. Esto incluye reemplazo de
película, limpieza o mantenimiento.
• La máquina requiere limpieza periódica. Verifique si
hay partes móviles desalineadas o atoradas, partes
rotas, o cualquier otro problema que afecte el
funcionamiento. No utilice una máquina dañada.
• Este sistema fue diseñado para procesar un tipo
específico de película. Para garantizar el buen
funcionamiento, solo reemplace con película para
Máquina para Acojinado Uline.
• En situaciones de emergencia, apague el
interruptor de energía. La máquina se apagará en
unos pocos segundos (cuando el indicador esté
apagado por completo). Luego de eliminar la
situación de emergencia o el defecto, la máquina
se puede encender de nuevo de acuerdo al
manual del usuario.
ALMACENAMIENTO
Almacene el dispositivo solo bajo las siguientes
condiciones:
• El almacenamiento en exteriores está prohibido.
• El dispositivo solo se debe almacenar en
habitaciones secas.
• Mantenga seco y libre de polvo.
• Proteja del calor masivo, como los radiadores.
• Hay una navaja extremadamente filosa por
debajo del ensamble del inyector de aire. Siga
estrictamente las instrucciones de reemplazo de
navajas en la página 17.
• La película se sella utilizando un alambre térmico
localizado debajo de una correa de Teflon®. Este
alambre se pone muy caliente y podría quemar
si se toca. Apague la máquina y permita que el
alambre se enfríe de 2 a 3 minutos antes de llevar
a cabo cualquier operación que exponga el
alambre. Siga las instrucciones incluidas, página 16,
para reemplazar las correas de Teflon®.
PAGE 11 OF 27 0621 I H-7241
Page 12

ESPECIFICACIONES TÉCNICAS
Voltaje 95 – 250 VAC; 50/60 Hz
Consumo de Energía (máx.) 97 W
Consumo de Energía 76 W
Consumo de Energía (modo de espera) 6.2 W
Fusible Principal Recomendado 3.15 AMP
Dimensiones 37.3 x 36.4 cm (14⁄ x 14⁄")
Altura 33 cm (13")
Velocidad de Transporte ~33 LFM
Peso 7.1 kg (15.65 lbs.)
Nivel de Presión Acústica 52 db
FUNCIONES DEL TECLADO
Botón de Encendido/Apagado • Enciende o apaga la máquina
Flecha arriba
Flecha abajo
Botón de Entrada
• Aumenta el valor
• Desplaza hacia arriba
• Reduce el valor
• Desplaza hacia abajo
• Confirma
• Menú de entrada
• Elemento de menú de entrada
PAGE 12 OF 27 0621 I H-7241
Page 13

CONFIGURAR EL DISPOSITIVO
ENSAMBLE DEL SOPORTE DEL ROLLO DE PELÍCULA
1. Remueva la máquina
y el eje azul para
rollo de película
de la caja. Inserte
la pieza de metal
en el orificio en el
lado delantero de la
máquina.
(Vea Diagrama 1)
Las películas para la Máquina para Acojinado Uline
están disponibles en tres opciones diferentes:
DESCRIPCIÓN
Almohadillas de Aire S-22467 8 x 4" 11/ 16"
Acojinado S-22468 1¼ x 9 x 13" 1/2"
Burbuja S-22469 3/4 x 6 x 13" 1/2"
2. Ajuste el soporte
del rollo de película
para que quepa la
película deseada
aflojando el tornillo
en el lateral derecho
de la máquina con
la llave Allen que se
incluye. Apriete el
tornillo suavemente
para fijarlo.
(Vea Diagrama 2)
NOTA: El tornillo en el lado derecho de la
máquina está colocado en la cubierta de
la máquina. Debe aflojarse y apretarse para
ajustar el soporte del rollo de película y no es
necesario quitarlo para este proceso.
3. El uso del medidor de espacio incluido puede
ayudar a encontrar
la configuración
correcta para cada
tipo de película.
(Vea Diagrama 3)
Diagrama 1
NO. DE PARTE
DE ULINE
Diagrama 2
TAMAÑO DE
ACOJINADO
11/ 16"
1/2"
GUÍA DE
ESPACIO
Diagrama 3
15/16"
CARGAR UN ROLLO DE PELÍCULA
1. Deslice la película para
insertarla en el soporte
del rollo de película.
Asegúrese de que la
película esté orientada
para desenrollarse desde la
parte inferior del rollo.
(Vea Diagrama 4)
2. Hay un espacio entre el
borde de la película y
las perforaciones. Corte
un pequeña esquina del
espacio para la película.
(Vea Diagrama 5)
3. Gire la perilla de
desbloqueo en sentido
de las manecillas del
reloj para desbloquear la
unidad superior de sellado.
Deslice la película entre
las unidades de sellado lo
más lejos posible hasta que
sienta resistencia.
(Vea Diagrama 6)
4. Gire la perilla en sentido
contrario a las manecillas
del reloj para desbloquear la
unidad superior de sellado.
Asegúrese siempre de que la
perilla esté bloqueada antes
de operar la máquina.
(Vea Diagrama 7)
Diagrama 4
Diagrama 5
Diagrama 6
Diagrama 7
• Almohadillas
de Aire = 11/16"
• Acojinado = 1/2"
• Burbuja = 1/2"
4. Ajuste el tornillo para
asegurar el soporte del rollo de película.
PAGE 13 OF 27 0621 IH-7241
Page 14
CONTINUACIÓN DE CONFIGURAR EL DISPOSITIVO
INTERRUPTOR DE ENERGÍA Y CONEXIONES
Después de verificar la fuente de energía, el sistema
se puede encender. El interruptor principal está en la
posición "I."
SELECCIONAR EL TIPO DE PELÍCULA INICIAL
Hay tres tipos de películas diferentes para seleccionar
disponibles cuando enciende la máquina.
Seleccione las opciones de
Air Pillows
ULINE S-22467
AIRmove
Runtime [s] 180
almohadillas de aire, burbuja
o acojinado presionando seis
veces hasta que el tipo de
2
película aparezca.
Oprima el símbolo o
para confirmar la opción de
pelicula.
COMENZAR LA PRODUCCIÓN DE PELÍCULA
Una vez que se seleccione un menú con sus
parámeteros preconfigurados, la máquina está lista
para operar. Todo menú sigue los mismos pasos:
La máquina está lista para
Air Pillows
ULINE S-22467
Air Pillows
ULINE S-22467
180
Air Pillows
ULINE S-22467
AIRmove
AIRmove
AIRmove
comenzar la producción de
película Air Pillows.
2
Oprima para comenzar
la producción de película Air
Pillows.
2
Vuelva a oprimir para
detener la producción de
película Air Pillows.
2
DESCRIPCIÓN
Almohadillas de Aire S-22467 8 x 4" 11/ 16"
Acojinado S-22468 1¼ x 9 x 13" 1/2"
Burbuja S-22469 3/4 x 6 x 13" 1/2"
NO. DE PARTE
DE ULINE
TAMAÑO DE
ACOJINADO
GUÍA DE
ESPACIO
CÓMO AJUSTAR LAS CONFIGURACIONES DE AIRE
Los menús de tipo de película escogida funcionan
automáticamente bajo las configuraciones correctas
de aire y temperatura. No se necesita ajustar la
configuración de la máquina manualmente, pero si las
configuraciones automáticas no son óptimas, el teclado
le permite cambiar las siguientes configuraciones:
Visualizar Air Pillows
Air Pillows
ULINE S-22467
AIRmove
Listo para comenzar
Oprima 1 x para
configuración de aire.
2
PAGE 14 OF 27 0621 IH-7241
Page 15
CONTINUACIÓN DE CONFIGURAR EL DISPOSITIVO
Connect_ _ Init_ _
HMI SW 22
Machine SW 1108977017
Reg nr 1
Visualizar configuración de aire
La cantidad de aire
ya es ajustable.
Runtime [s] 180
Oprima para reducir el aire.
Oprima para aumentar el aire.
Aún cuando la máquina esté operando, oprima para
cambiar la configuración de aire utilizando o .
Mientras la máquina esté operando, el signo de tiempo
de ejecución no aparecerá.
CÓMO AJUSTAR TEMPERATURAS PARA SELLAR
Visualizar Air Pillows
Air Pillows
ULINE S-22467
AIRmove
Oprima 2 x para
configuración de temperatura.
2
Visualizar configuración de
temperatura
Cambiar configuración de
tiempo de Ejecución
Configuración mínima es de 1
Runtime [s] 180
segundo.
Configuración máxima es de
2,400 segundos.
Oprima para reducir el tiempo
de ejecución.
Oprima para aumentar el tiempo de ejecución.
CÓMO CAMBIAR EL TIPO DE PELÍCULA
Cambiar el menú a un tipo nuevo de película al cargar
un tipo diferente de película.
Visualizar Air Pillows
Air Pillows
ULINE S-22467
AIRmove
Oprima 6 x hasta que
aparezca el tipo de película.
2
Oprima o para cambiar el
tipo de película.
Oprima para reducir la
Runtime [s] 180
temperatura.
Oprima para aumentar la
temperatura.
Aún cuando la máquina esté operando, oprima
para cambiar la configuración de temperatura utilizando
o . Mientras la máquina esté operando, el signo de
tiempo de ejecución no aparecerá.
CÓMO AJUSTAR EL TIEMPO DE EJECUCIÓN
Para producir una cantidad deseada de acojinado, se
puede fijar un tiempo específico de ejecución. El tiempo
de ejecución se indica en segundos y su configuración
de fábrica es de 180 segundos. El tiempo de ejecución
fijado bajará a cero y cesará la producción.
Visualizar Air Pillows
Air Pillows
ULINE S-22467
AIRmove
Oprima 3 x para ver
el menú de tiempo de ejecución.
2
Air Pillows
CONFIGURACIONES DE FÁBRICA
La configuración de la máquina permite reiniciar todas
las opciones, parámetros, ajustes y cambios y volver a la
configuración de fábrica.
Máquina apagada
Visualización del interruptor de
energía [O] apagada
Oprima y déjelo oprimido
mientas encienda la máquina.
Suelte los botones +
cuando opere la visualización.
Interruptor de energía encendido
Select Film type
Air Pillows
200mm/8inch
Select Set
Interruptor de energía encendido [I]
Todos las configuraciones
fueron reiniciadas prosiga con
"Seleccionar el Tipo Inicial de
Película" de nuevo para escoger
un tipo de película.
PAGE 15 OF 27 0621 I H-7241
Page 16

MANTENIMIENTO
REEMPLAZAR LA NAVAJA
Asegúrese de desconectar de
la fuente de energía.
1. Gire la perilla de bloqueo
en sentido de las
manecillas del reloj para
desbloquear la unidad
superior de sellado.
(Vea Diagrama 8)
2. Abra la unidad superior de
sellado. (Vea Diagrama 9)
3. Jale la navaja hacia el
lado derecho.
(Vea Diagrama 10)
¡PRECAUCIÓN! Navaja
filosa.
4. Saque la navaja de la
máquina e inserte una
nueva. (Vea Diagrama 11)
5. Gire la perilla de bloqueo
en dirección contraria a las
manecillas del reloj para
volver a bloquear la unidad
superior de sellado.
Diagrama 8
Diagrama 9
Diagrama 10
Diagrama 11
Navaja
Navaja
CAMBIAR LAS CORREAS
1. Remueva las cubiertas
azules tanto en la unidad de
sellado superior como en
la inferior utilizando la llave
Allen incluida. Asegúrese de
que la unidad de sellado
superior esté desbloqueada.
(Vea Diagrama 12)
2. Empuje la unidad de
sellado superior hacia la
izquierda.
3. Retire la correa de Teflon®
mientras aplica presión
hacia arriba a la unidad
de sellado superior y
reemplácela con una nueva
correa de Teflon®.
(Vea Diagrama 13)
4. Repita los pasos 2 y 3 con la
unidad de sellado inferior.
5. Vuelva a fijar las cubiertas
azules utilizando la llave
Allen incluida y gire la
perilla en sentido contrario
a las agujas del reloj para
bloquear la unidad superior
de sellado.
(Vea Diagrama 14)
NOTE: Vea uline.mx para ordenar el repuesto
de las navajas del inyector (H-7241-INJCT) y las
correas de teflón (H-7241-TBELT).
Diagrama 12
Diagrama 13
Diagrama 14
Correa de
Teflon®
PAGE 16 OF 27 0621 I H-7241
Page 17

CÓDIGOS DE ERROR
ERROR 20
Calibration out of range
Calibrate seal wire
Turn off and on
ERROR 21
Seal wire
Check connection
Turn off and on
ERROR 22
Temperature not reached
Check seal system
Turn off and on
Calibración fuera de rango.
Calibre el alambre de sellado.
Encienda y apague.
Llame a Servicio a Clientes de
Uline al 800-295-5510.
Alambre de sellado.
Revisar conexión.
Encienda y apague.
No se alcanzó la temperatura.
Revise el sistema de sellado.
Encienda y apague.
ERROR 30
Seal jaw is not closed
Close jaw
Press start to release
ERROR 31
Transport failure
Check film transport
Press start to release
ERROR 32
Transport motor overload
Check film transport
Press start to release
La mordaza de sellado no está
cerrada.
Solo es posible si está instalado
un microinterruptor.
Cierre la mordaza.
Presione iniciar para liberarla.
Falla de transporte.
Revise el transporte de la película.
Presione iniciar para liberar.
Retire y cargue de nuevo la
película para sellar la navaja de
la mordaza/inyector.
Sobrecarga del transporte del
motor.
Verifique el transporte de la
película.
Presione iniciar para liberar.
Retire y cargue de nuevo
la película de mordaza de
sellado/inyector.
PAGE 17 OF 27 0621 I H-7241
Page 18
SOLUCIÓN DE PROBLEMAS
8
0
uline.mx
PROBLEMA DE FUNCIONAMIENTO RECOMENDACIONES
La máquina no recibe corriente
No hay visualización después de
encender
Aparece la visualización pero no
se enciende la máquina.
Sellado pobre de la película
El sellado de la película está
estirado.
Verifique que el cable eléctrico esté conectado tanto a la máquina como
al enchufe.
Verifique que el interruptor principal de energía esté encendido.
Verifique el fusible de energía.
Verifique el fusible de energía.
Comuníquese con Servicio a Clientes de Uline al 800-295-5510.
Verifique la selección de tipo de película.
Apague la máquina, verifique la posición de la correa/navaja.
Verifique que las unidades de sellado estén cerradas y bloqueadas.
Verifique que el eje del rollo de la película esté en la posición correcta.
Reemplace correas y navajas.
Ajuste la temperatura.
Verifique la selección de tipo de película.
Verifique que el eje del rollo de película esté en la posición correcta.
Ajuste la temperatura.
Ajuste el flujo de aire.
Verifica si el eje del rollo de película está atascado.
La película no sale.
El acojinado no almacena aire.
Ocurren atascos de película con
frecuencia.
Obstrucción de película
La película se enrolla alrededor
de los rodillos
Verifique que las unidades de sellado estén cerradas y bloqueadas.
Verifique la colocación de la navaja.
Reemplace correas y navajas.
El rollo de película está cargado en la dirección equivocada.
Verifique la posición de la correa/navaja.
Verifique que el eje del rollo de película esté en la posición correcta.
Verifique que las unidades de sellado estén cerradas y bloqueadas.
Verifique la película que causa la obstrucción.
Revise correas y navajas. Reemplace cuando sea necesario.
Revise la película y la configuración del eje del torno.
Retire y vuelva a cargar la película en la máquina para asegurarse de
que no esté atascada.
Verifique si el eje del rollo de película está atascado.
Remueva cualquier película que cause obstrucción.
Verifique el camino de la película en la máquina.
Remueva cualquier película que cause obstrucción.
00-295-551
PAGE 18 OF 27 0621 I H-7241
Page 19

H-7241
MACHINE À
COUSSIN D'AIR
CONTENU DE LA BOÎTE
• Machine à coussin d'air
• Support de rouleau de film
• Jauge d'espacement
• Ensemble d'entretien
• Cordon d'alimentation
• Manuel de l'utilisateur
1-800-295- 5510
uline.ca
PIÈCES
Bouton de déverrouillage
Panneau de commande
Unité de scellage
(comprend les courroies
en TeflonMD)
Support de rouleau de film
Barre de guidage
Port de connexion
externe
Commutateur
principal et prise de
courant
Support de rouleau de film
Barre de guidage
Injecteur d'air
Connecteur USB-B
ARRÊT ARRÊT
PAGE 19 OF 27 0621 I H-7241
AVERTISSEMENT! Veuillez lire et comprendre
toutes les instructions avant d'utiliser la
machine à coussin d'air Uline.
AVERTISSEMENT! Pour garantir la sécurité
personnelle, il est impératif de respecter les
instructions suivantes.
Page 20

SÉCURITÉ
ZONE DE TRAVAIL
• Maintenez la zone de travail propre et bien éclairée.
• Placez la machine sur une surface plate et sèche.
• N'utilisez pas cette machine dans un environnement
explosif, ou en présence de liquide inflammable,
de gaz ou de poussière. Ne placez aucune matière
inflammable à l'intérieur, sur ou à proximité de la
machine.
SÉCURITÉ ÉLECTRIQUE
• La fiche d'alimentation doit correspondre à la prise
électrique, qui doit être convenablement mise à la
terre. N'apportez aucune modification à la fiche.
N'utilisez pas de fiche d'adaptation ou de rallonge.
• N'exposez pas cette machine à l'humidité.
• Pendant les opérations d'installation et d'entretien, la
machine doit toujours être éteinte et débranchée de
la source d'alimentation principale.
• Toutes les consignes de sécurité et de protection
doivent être observées et maintenues conformément
aux réglementations ICE.
SÉCURITÉ PERSONNELLE
• Empêchez tout démarrage accidentel. Assurez-vous
que le commutateur est en position éteinte avant de
brancher la machine.
• Une lame extrêmement tranchante est située sous
l'injecteur d'air. Adhérez strictement aux instructions
de remplacement de lame à la page 26.
• Le film est scellé par un fil chauffant situé sous la
courroie en TeflonMD. Ce fil devient extrêmement
chaud et peut provoquer des brûlures en cas
de contact. Éteignez la machine et laissez le fil
refroidir pendant 2 ou 3 minutes avant d'effectuer
toute opération où il se trouvera exposé à nu.
Suivez les instructions fournies à la page 25 pour le
remplacement des courroies en TeflonMD.
UTILISATION ET SOIN
• Éteignez la machine et débranchez la fiche de
la source d'alimentation avant d'effectuer toute
opération. Ceci inclut le remplacement du film, le
nettoyage ou l'entretien.
• Cette machine nécessite un nettoyage régulier.
Assurez-vous qu'aucune pièce mobile n'est décalée,
bloquée ou endommagée et que rien ne puisse
affecter le fonctionnement. N'utilisez pas une
machine endommagée.
• Ce système a été conçu pour fonctionner avec
un certain type de film. Afin de garantir un bon
fonctionnement, remplacez uniquement avec le film
Uline pour machine à coussins d'air.
• En cas d'urgence, placez le commutateur en
position arrêt. La machine s'éteindra en quelques
secondes (lorsque l'indicateur est complètement
éteint). Après avoir réglé le problème ou l'urgence,
vous pouvez rallumer la machine selon les
instructions du manuel de l'utilisateur.
RANGEMENT
Ne rangez l'appareil que dans les conditions suivantes :
• Le rangement à l'extérieur est interdit.
• L'appareil ne doit être entreposé que dans une
pièce sèche.
• Conservez au sec et à l'abri de la poussière.
• Protégez des sources de chaleur intense, comme les
radiateurs.
PAGE 20 OF 27 0621 I H-7241
Page 21

SPÉCIFICATIONS TECHNIQUES
Tension 95 à 250 VCA; 50/60 Hz
Consommation électrique (max.) 97 W
Consommation électrique 76 W
Consommation électrique (mode de veille) 6,2 W
Fusible principal recommandé 3,15 A
Dimensions 37,3 x 36,4 cm (14 ⁄ x 14 ⁄ po)
Hauteur 33 cm (13 po)
Vitesse de route ~ 33 pi/m
Poids 7,1 kg (15,65 lb)
Niveau de pression acoustique 52 db
FONCTIONS DU CLAVIER
Touche marche/arrêt • Allume ou éteint la machine
Flèche vers le haut
Flèche vers le bas
Bouton d'entrée
• Augmente la valeur
• Fait défiler vers le haut
• Diminue la valeur
• Fait défiler vers le bas
• Confirme
• Accès au menu
• Accès aux options du menu
PAGE 21 OF 27 0621 I H-7241
Page 22

RÉGLAGE DE L'APPAREIL
MONTAGE DU SUPPORT DE ROULEAU DE FILM
1. Retirez la machine et
l'arbre porte-rouleau
de film bleu de la
boîte. Insérez la partie
métallique dans le
trou situé sur le côté
avant de la machine.
(Voir Figure 1)
Les films pour machines à coussin d'air Uline sont offerts
en trois options différentes :
DESCRIPTION
Coussins d'Air
Coussins d'Air
Film À Bulles
RÉF. ULINE
S-22467 8 x 4 po
S-22468 1 ⁄ x 9 x 13 po 1/2 po
S-22469 3/4 x 6 x 13 po 1/2 po
2. Ajustez le support de
rouleau de film au
type de film désiré
en desserrant la vis
située sur le côté
droit de la machine
à l'aide de la clé
Allen incluse. Serrez
légèrement la vis
pour sécuriser.
(Voir Figure 2)
REMARQUE : La vis située sur le côté droit de la
machine est placée dans son boîtier. Elle doit
être desserrée et serrée pour ajuster le support
de rouleau de film, sans nécessiter son retrait.
3. L'utilisation de la jauge
d'espacement incluse
peut aider à trouver
le bon réglage pour
chaque type de film.
(Voir Figure 3)
Figure 1
TAILLE DU COUSSIN
Figure 2
11/ 16 p o
1/2 po
GUIDE
D'ESPACEMENT
11/ 16 po
Figure 3
15/16 p o
CHARGEMENT DU ROULEAU DE FILM
1. Glissez le film sur le support
de rouleau de film. Assurezvous que le film est orienté
de manière à se dérouler
par le bas. (Voir Figure 4)
2. Il y a un écart entre le bord
supérieur du film et les
perforations. Coupez un
petit coin de film.
(Voir Figure 5)
3. Tournez le bouton de
déverrouillage dans le sens
horaire pour déverrouiller la
partie supérieure de unité
de scellage. Glissez le film
aussi loin que possible entre
les deux unités de scellage
jusqu'à ce que vous sentiez
une résistance. (Voir Figure 6)
4. Tournez le bouton de
déverrouillage dans le sens
antihoraire pour verrouiller
l'unité de scellage
supérieure. Assurez-vous de
toujours verrouiller le bouton
avant d'utiliser la machine.
(Voir Figure 7)
Figure 4
Figure 5
Figure 6
Figure 7
• Coussins
d'air = 11/16 po
• Coussins
d'air = 1/2 po
• Film à bulles = 1/2 po
4. Serrez la vis pour sécuriser le support de rouleau de
film.
PAGE 22 OF 27 0621 I H-7241
Page 23

RÉGLAGE DE L'APPAREIL SUITE
COMMUTATEUR ET CONNEXIONS
Après vérification de la source d'alimentation, vous
pouvez allumer l'appareil. Le commutateur principal est
en position « l ».
SÉLECTION DU TYPE DE FILM INITIAL
Il y a trois types de film offerts lorsque vous allumez la
machine.
Sélectionnez parmi les options
Air Pillows
ULINE S-22467
AIRmove
Select Film type
Air Pillows
200mm/8inch
Select Set
de coussins d'air ou de film à
bulles en appuyant six fois sur
jusqu'à ce que le type de
2
film s'affiche.
Appuyez sur ou pour
confirmer votre sélection de film.
DÉMARRAGE DE LA PRODUCTION
Lorsque vous avez sélectionné un menu et ses
paramètres, la machine est prête à l'emploi. Chaque
menu suit les mêmes étapes :
La machine est prête à démarrer
Air Pillows
ULINE S-22467
Air Pillows
ULINE S-22467
180
Air Pillows
ULINE S-22467
AIRmove
AIRmove
la production de film de
remplissage de vide S.
2
Appuyez sur pour
commencer la production de
film de remplissage de vide S.
2
Appuyez une nouvelle fois sur
pour arrêter la production de
film de remplissage de vide S.
DESCRIPTION
Coussins d'Air
Coussins d'Air
Film À Bulles
RÉF. ULINE
S-22467 8 x 4 po
S-22468 1 ⁄ x 9 x 13 po 1/2 po
S-22469 3/4 x 6 x 13 po 1/2 po
TAILLE DU
COUSSIN
GUIDE
D'ESPACEMENT
11/ 16 po
2
AIRmove
COMMENT AJUSTER LES RÉGLAGES DE L'AIR
Les menus de type de film choisi fonctionnement
automatiquement sur les paramètres d'air et de
température appropriés. Vous n'avez pas besoin
d'ajuster manuellement les paramètres de la
machine, mais si les paramètres automatiques ne
sont pas optimaux, le clavier vous permet de faire les
changements suivants :
Affichage de remplissage de
Air Pillows
ULINE S-22467
AIRmove
vide S
Prête à démarrer
2
Appuyer 1 x sur pour les
paramètres d'air.
PAGE 23 OF 27 0621 I H-7241
Page 24

RÉGLAGE DE L'APPAREIL SUITE
Connect_ _ Init_ _
HMI SW 22
Machine SW 1108977017
Reg nr 1
Affichage des paramètres d'air
La quantité d'air est maintenant
réglable.
Runtime [s] 180
Appuyez sur pour moins d'air.
Appuyez sur pour plus d'air.
Même lorsque la machine est en cours d'utilisation,
appuyez sur pour changer les réglages d'air
en utilisant ou . Lorsque la machine est en
cours d'utilisation, l'affichage de temps d'exécution
(«runtime») n'apparaît pas.
COMMENT AJUSTER LA TEMPÉRATURE DE SCELLAGE
Affichage des coussins d'air
Air Pillows
ULINE S-22467
AIRmove
Runtime [s] 180
Appuyer 2 x sur pour les
paramètres de température.
2
Affichage des paramètres de
température
Appuyez sur pour diminuer la
température.
Appuyez sur pour augmenter
la température.
Changer le réglage de temps
d'exécution
Le réglage minimal est de 1
Runtime [s] 180
seconde.
Le réglage minimal est de 2400
secondes.
Appuyez sur pour diminuer le
temps d'exécution.
Appuyez sur pour augmenter le temps d'exécution.
COMMENT CHANGER LE TYPE DE FILM
Changer le menu à un type de film différent lors du
chargement d'un type de film différent.
Affichage des coussins d'air
Air Pillows
ULINE S-22467
AIRmove
Air Pillows
Appuyez 6 x sur jusqu'à
l'affichage du type de film.
2
Appuyez sur ou pour
changer les type de film.
RÉGLAGES D'USINE
Même lorsque la machine est
en cours d'utilisation, appuyez sur pour changer les
réglages de température en appuyant sur ou .
Lorsque la machine est en cours d'utilisation, l'affichage
de temps d'exécution («runtime») n'apparaît pas.
COMMENT AJUSTER LE TEMPS D'EXÉCUTION
Pour produire une quantité désirée de coussins
d'air, il est possible de régler un temps d'exécution
spécifique. Le temps d'exécution est indiqué en
secondes; le réglage d'usine est de 180 secondes. Le
temps d'exécution préétabli descend vers zéro, et la
production s'arrête.
Affichage des coussins d'air
Air Pillows
ULINE S-22467
AIRmove
PAGE 24 OF 27 0621 I H-7241
Appuyez 3 x sur pour
parvenir au menu de temps
d'exécution.
2
Le réglage de la machine permet de réinitialiser vers le
réglage d'usine tous les choix, paramètres, ajustements
et changements effectués.
Machine éteinte
Affichage du commutateur
éteint [O]
Appuyez sur et maintenez
appuyé tout en allumant la
machine.
Relâchez les boutons + à
l'affichage de l'écran.
Commutateur allumé
Select Film type
Air Pillows
200mm/8inch
Select Set
Commutateur allumé [I]
Tous les paramètres sont
réinitialisés, suivez à nouveau
les instructions de la section
Sélection de type de film initial
pour sélectionner un type de
film.
Page 25

ENTRETIEN
REMPLACEMENT DE LA LAME
Assurez-vous que l'appareil est
débranché de toute source
d'alimentation.
1. Tournez le bouton de
verrouillage dans le sens
horaire pour déverrouiller
l'unité de scellage
supérieure. (Voir Figure 8)
2. Ouvrez l'unité de scellage
supérieure. (Voir Figure 9)
3. Tirez la lame vers le côté
droit. (Voir Figure 10)
MISE EN GARDE! Lame
tranchante
Figure 8
Figure 9
Figure 10
Lame
REMPLACEMENT DES COURROIES
1. Retirez les couvercles
bleus situés sur les unités
de scellage inférieure et
supérieure à l'aide d'une
clé Allen. Assurez-vous
que l'unité de scellage
supérieure est déverrouillée.
(Voir Figure 12)
2. Poussez l'unité de scellage
supérieure vers la gauche.
3. Tout en appuyant sur l'unité
de scellage supérieure,
retirez la courroie en
TeflonMD et remplacez-la
avec une courroie neuve.
(Voir Figure 13)
4. Répétez les étapes 2 et 3
avec l'unité de scellage
inférieure.
5. Replacez les couvercles
bleus à l'aide de la clé
Allen et tournez le bouton
de verrouillage dans le sens
antihoraire pour verrouiller
l'unité de scellage
supérieure. (Voir Figure 14)
Figure 12
Figur e 13
Fi gure 14
Courroie en
MD
Teflon
4. Retirez la lame de la
machine et insérez une
nouvelle lame.
(Voir Figure 11)
5. Tournez le bouton de
verrouillage dans le sens
antihoraire pour verrouiller à
nouveau l'unité de scellage
supérieure.
Figure 1
REMARQUE : veuillez
consulter fr.uline.ca pour commander des
lames d'injecteur (H-7241-INJCT) et des
courroies en téflon (H-7241-TBELT) de rechange.
Lame
PAGE 25 OF 27 0621 I H-7241
Page 26

CODES D'ERREUR
ERROR 20
Calibration out of range
Calibrate seal wire
Turn off and on
ERROR 21
Seal wire
Check connection
Turn off and on
ERROR 22
Temperature not reached
Check seal system
Turn off and on
Étalonnage hors échelle.
Calibrez le fil de scellage.
Éteignez et rallumez l'appareil.
Contactez le service à la
clientèle de Uline au 1 800
295-5510.
Scellez le fil.
Vérifiez la connexion.
Éteignez et rallumez l'appareil.
Température non atteinte.
Vérifiez le système de scellage.
Éteignez et rallumez l'appareil.
ERROR 30
Seal jaw is not closed
Close jaw
Press start to release
ERROR 31
Transport failure
Check film transport
Press start to release
ERROR 32
Transport motor overload
Check film transport
Press start to release
La mâchoire de scellage n'est
pas fermée.
Possible uniquement si un
microrupteur est installé.
Fermez la mâchoire.
Appuyez sur démarrer pour
relâcher.
Panne de transport.
Vérifiez le transport du film.
Appuyez sur démarrer pour
relâcher.
Retirez et rechargez le film de
la mâchoire de scellage/de la
lame de l'injecteur.
Surcharge du moteur de transport.
Vérifiez le transport du film.
Appuyez sur démarrer pour
relâcher.
Retirez et rechargez le film de la
mâchoire de scellage/de la lame
de l'injecteur.
PAGE 26 OF 27 0621 I H-7241
Page 27

DÉPANNAGE
1
0
uline.ca
PROBLÈME DE FONCTIONNEMENT RECOMMANDATIONS
La machine n'est pas alimentée
Aucun affichage après l'allumage
L'affichage apparaît, mais la
machine ne se met pas en marche.
Mauvais scellage du film
Le scellage du film est étiré.
Vérifiez que le cordon d'alimentation est branché dans la
machine et dans la prise de courant.
Vérifiez que le commutateur principal est allumé.
Vérifiez le fusible.
Vérifiez le fusible.
Contactez le service à la clientèle de Uline au 1 800 295-5510.
Vérifiez le type de film sélectionné.
Éteignez la machine, et vérifiez la position de la courroie/lame.
Vérifiez que les unités de scellage sont fermées et verrouillées.
Vérifiez que l'arbre porte-rouleau de film est bien positionné.
Remplacez les courroies et les lames.
Ajustez la température.
Vérifiez le type de film sélectionné.
Vérifiez que l'arbre porte rouleau de film est bien positionné.
Ajustez la température.
Ajustez le débit d'air.
Vérifiez si l'arbre porte rouleau est bloqué.
Le film n'avance pas.
Les coussins d'air ne se gonflent pas.
Le film se bloque fréquemment.
Blocage du film
Le film s'enroule autour des rouleaux
Vérifiez que les unités de scellage sont fermées et verrouillées.
Vérifiez le positionnement de la lame.
Remplacez les courroies et les lames.
Le rouleau de film est installé dans le mauvais sens.
Vérifiez la position de la courroie/lame.
Vérifiez que l'arbre porte rouleau de film est bien positionné.
Vérifiez que les unités de scellage sont fermées et verrouillées.
Inspectez le film provoquant les blocages.
Vérifiez les courroies et les lames. Remplacez-les au besoin.
Vérifiez le film et les réglages du mandrin.
Retirez et rechargez le film dans la machine pour vous assurer
que le film ne bloque pas l'injecteur.
Vérifiez si l'arbre porte rouleau est bloqué.
Retirez tout film provoquant un blocage.
Vérifiez l'avancée du film sur la machine.
Retirez tout film provoquant un blocage.
-800-295-551
PAGE 27 OF 27 0621 I H-7241
 Loading...