

Page 1
π
Check Weighing Weighing Unit
H-1653, H-1654
EASY-COUNT SCALES
H-1649, H-1650, H -1651
1-800-295-5510
uline.com
GENERAL INFORMATION
Para Español, vea páginas 10-18.
Pour le français, consulter les pages 19-27.
∏
1-800-295-5510
AVOID PLACING THE SCALE IN LOCATIONS
THAT MAY HURT ACCURACY:
• Temperature extremes – Do not place in direct
sunlight or near air heat/cooling vents.
• Mounting surface must be firm and level – Do
not place on uneven or wobbly surfaces or near
vibrating machinery.
• Unstable power sources – Keep away from big
electricity-using machines, like welding equipment
or large motors.
• Keep scale dry – Do not place in high humidity,
damp or wet locations.
• Keep away from air movers, like fans or open doors
and windows.
• Keep scale clean and dry.
• Do not stack items on the scale when not in use.
CAUTION! Scale is not waterproof. Avoid
direct contact with water, high humidity and
condensation. Do not spray or immerse scale
in water. Data may become unstable or scale
may malfunction. Turn power off and allow
scale to dry before reuse.
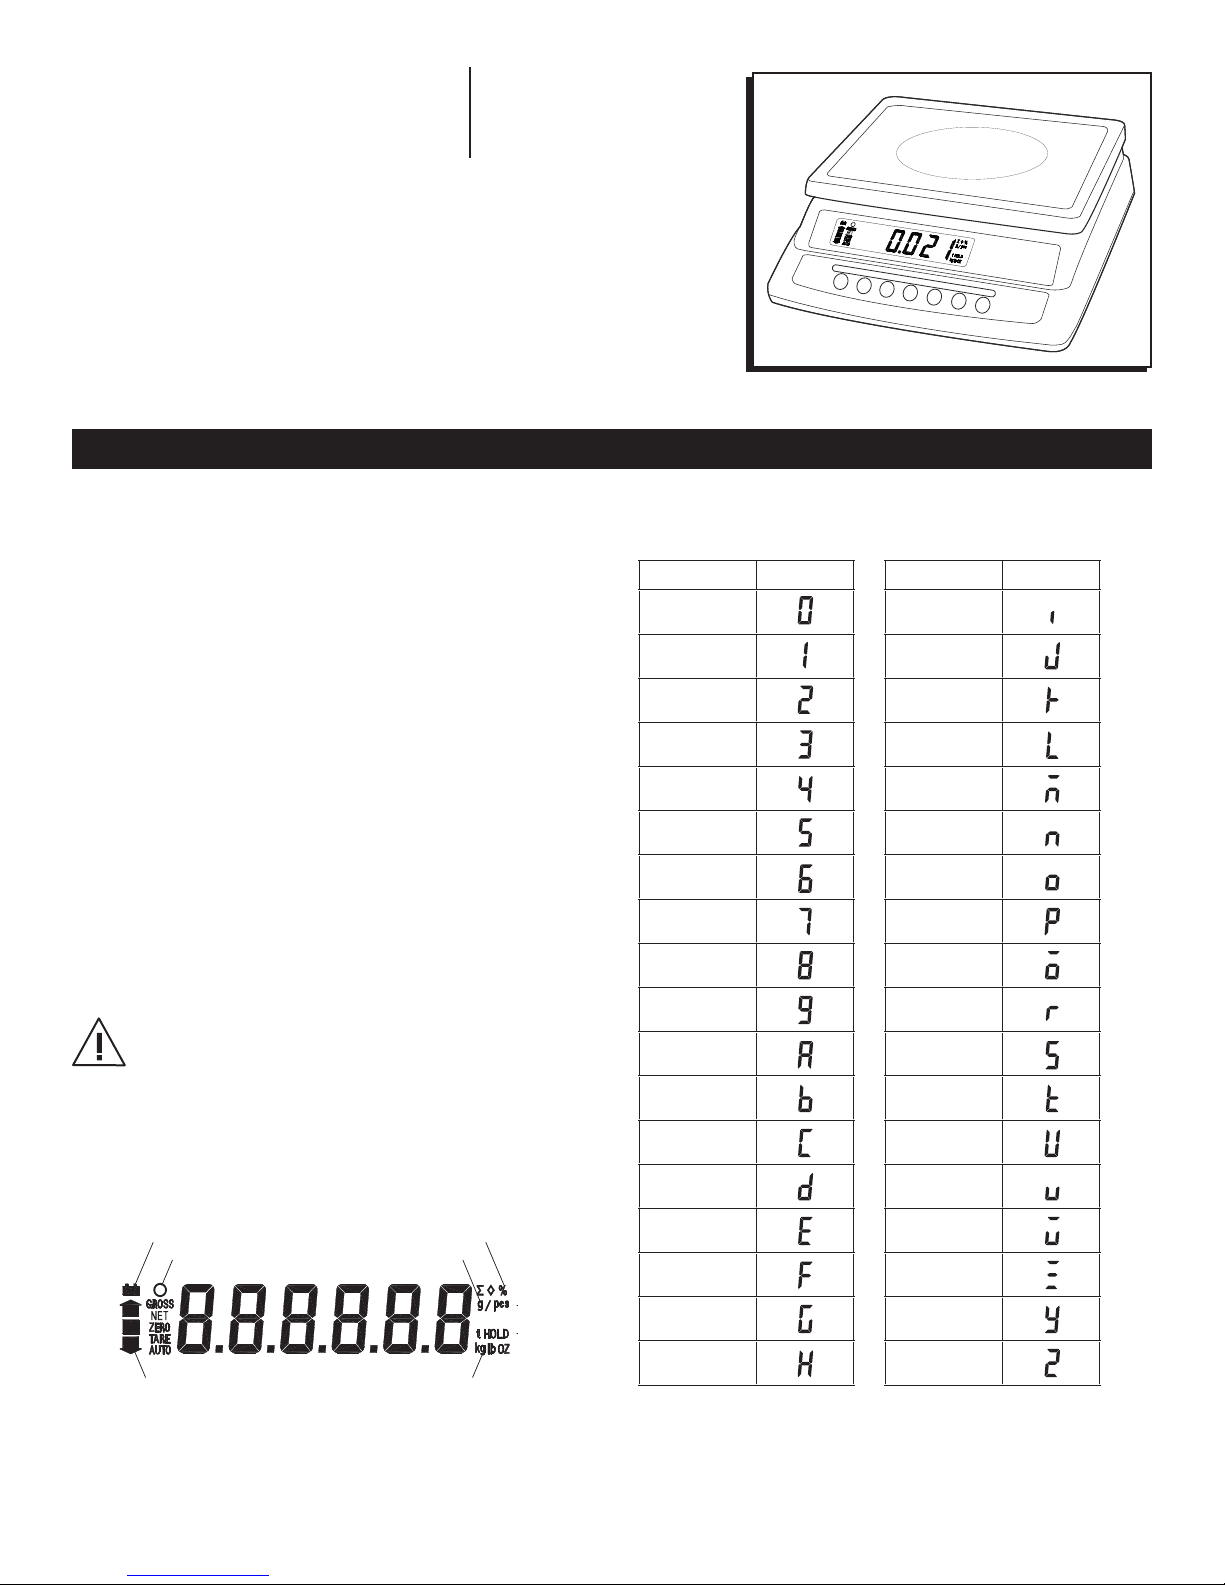
DISPLAY CHARACTERS
CHARACTER DISPLAY CHARACTER DISPLAY
0
1
2
3
4
5
6
7
8
9
A
B
C
I
J
K
L
M
N
O
P
Q
R
S
T
U
LCD DISPLAY
Low Battery
Stable
HI
OK
LO
PAGE 1 OF 27 0417 IH-1649
Parts Counting
Percentage Weighing
D
E
F
G
H
V
W
X
Y
Z
Page 2
SPECIFICATIONS
MODEL # H-1653/H -1654 H-1649 H-1650 H-1651
MAXIMUM CAPACITY
MINIMUM CAPACITY 2g 4g 10g 20g
ACCURACY (DIV) 0.1g /.0002 lbs. 0.2g /.0005 lbs. 0.5g /.001 lbs. 1g /.002 lbs.
RESOLUTION 1:30.000
TARE RANGE -3kg -6kg -10kg -30kg
REPEATABILITY (STD DEV) 0.1g 0.2g 0.5g 1g
LINEARITY ± 0.2g 0.4g 1g 2g
UNITS OF MEASURE kg, g, lbs., oz
STABILIZATION TIME 2 Seconds
OPERATING TEMPERATURE 0˚C - 40˚C / 32˚F - 104˚F
POWER SUPPLY (EXTERNAL) 115/230 Vac, 50/60Hz, 10 watts
CALIBRATION Automatic external
DISPLAY 6 digits LCD digital display
BALANCE HOUSING ABS plastic, stainless steel platform
PAN SIZE 225 x 300 mm / 9 x 11.5"
OVERALL DIMENSIONS (WxDxH) 320 x 340 x 125 mm / 12.6 x 13.4 x 4.9"
NET WEIGHT 3.8kg/8.4lb
APPLICATIONS General purpose scale
FUNCTIONS Weighing, parts counting, % weight, check weighing
OTHER FEATURES AND SPECS Internal rechargeable battery (~70 hours operation)
3kg / 6 lbs. 6kg / 12 lbs. 15kg / 30 lbs. 30kg / 60 lbs.
Primary Function Secondary Function
Unit Key (UNIT) – Selects weighing units: pounds,
Unit
ounces, kilograms, grams.
Accumulate Key (ACC) – Adds a value to the
Acc
accumulated total if the accumulation function
is not automatic.
Escape Key (ESC) – Used to return the scale to
ESC
normal operating mode.
Function Key (FUNC) – Allows switching from parts
Func
weighing to parts counting.
Clear Key (C) – Used to reset parameters or other
C
functions.
Percent Key (%) – Enters the percent weighing
%
function. Allows weight, unit weight and count to
show when counting parts.
Space Left (<) – Used to change different numbers
on the display. Also used to set parameters or other
functions.
CONTROLS
Limit
Tare
Zero
Limit Key (LIMIT) – Sets limits for check weighing.
Set high or low limit or both.
Space Right (>) – Used to change different
numbers on the display. Also used to set
parameters or other functions.
Tare Key (TARE) – Deducts the container weight
from pieces' weight.
Number Key (^) – Used to set parameters and
other functions.
Zero Key (ZERO) – Zeros display for next weight.
ENTER Key – Used to set parameters and other
functions.
PAGE 2 OF 27 0417 IH-1649
Page 3
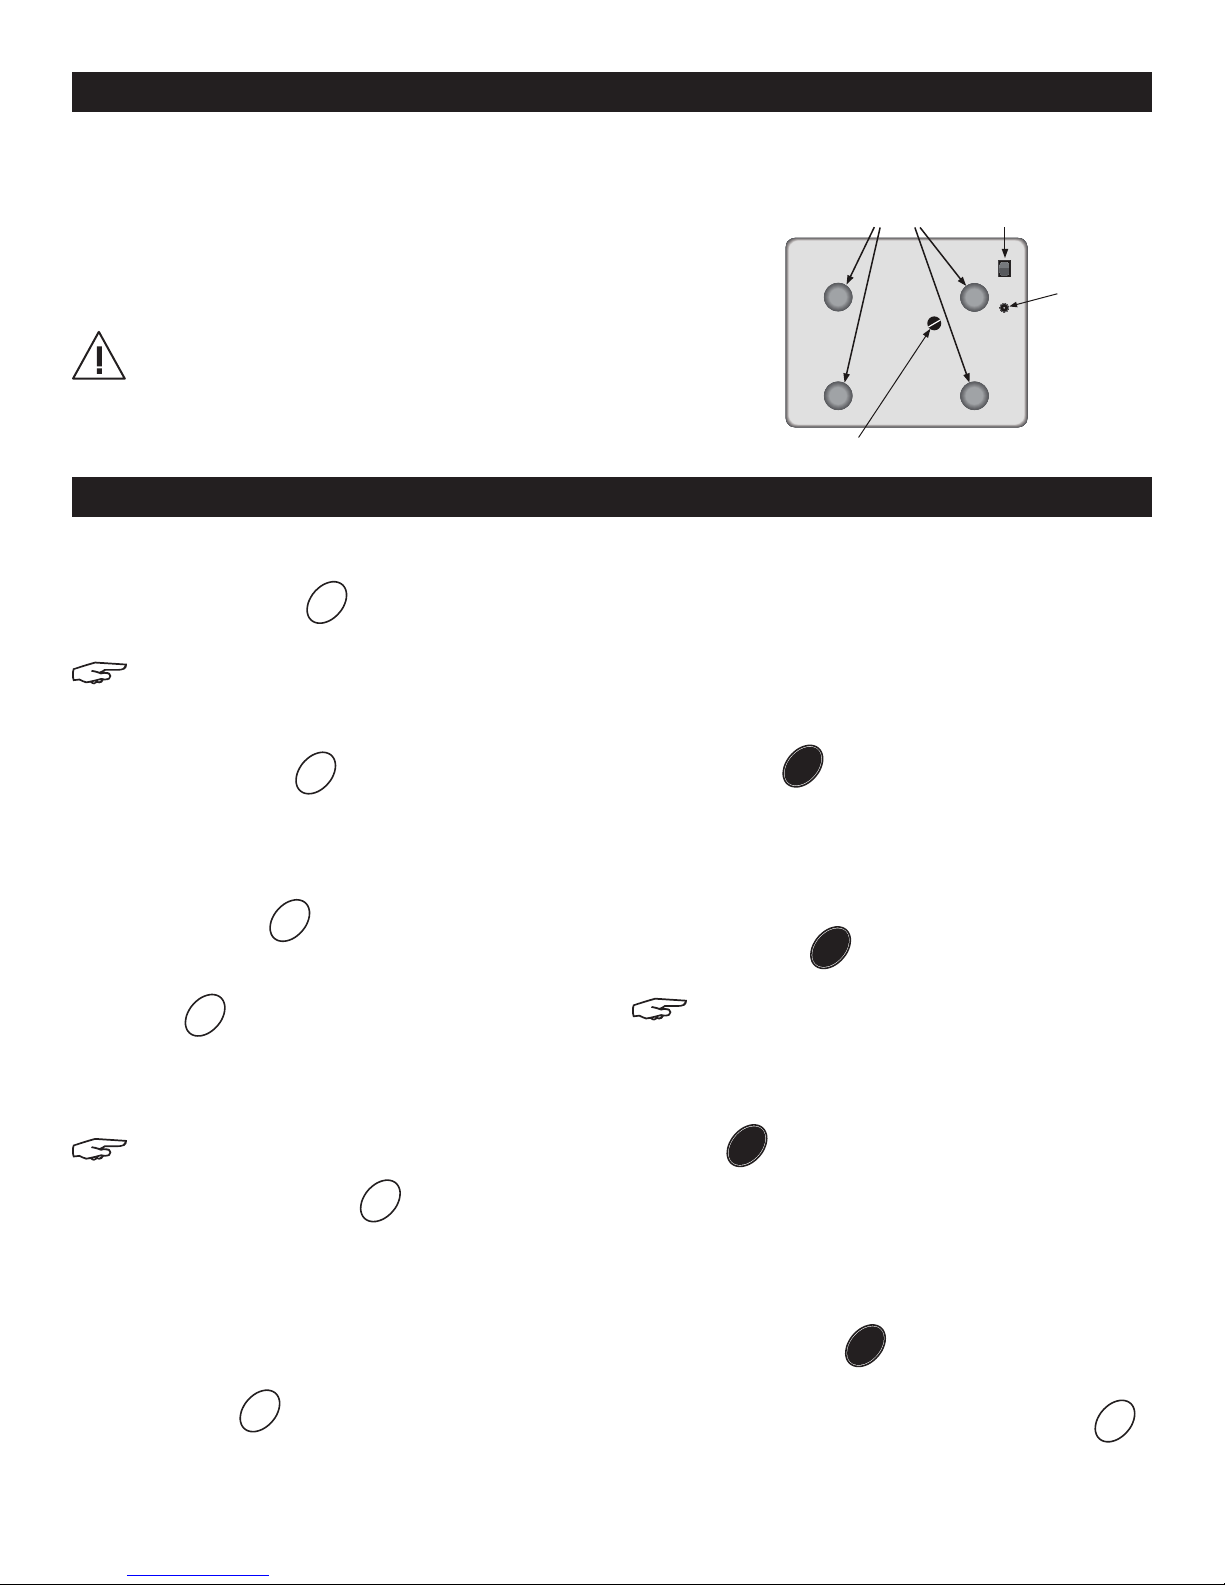
INSTALLATION
Stainless steel platform is packed separately.
1. Remove set screw on bottom of scale.
5. Power switch is located on the bottom right side of
the scale.
Level Feet
Power Switch
2. Level the scale. Adjust the four feet and reference
bubble on top of scale to level.
3. Set platform in the locating holes in the top cover.
CAUTION! Do not press down with excessive
BOTTOM VIEW
AC Adapter
Jack
force. This can damage the load cell.
4. Attach AC adapter to the power jack on the bottom
of the scale.
Set Screw
OPERATION
ZEROING THE DISPLAY
1. Press ZERO/ENTER key
before weighing or counting.
NOTE: Scale has an automatic re-zero to
handle minor drifting or material accumulation
on the weighing platform. If the display shows
a weight while the platform is empty, press the
ZERO/ENTER key
Zero
to reset the display to 0
to zero the scale.
Zero
TARE
Before weighing items, weigh the container so its weight
can be deducted from the accumulated item weight:
1. Press ZERO/ENTER
2. Place the container to be used on the weighing
Zero
to re-zero the display.
platform. The display will show its weight. Press the
TARE key
Tare
. Container weight will be stored as the tare
value and is subtracted from the display. Display shows 0.
3. Net indicator is on. When adding items to the
platform, only the item weight will be displayed.
NOTE: Scale can be tared a second time to
show only the weight of the items added after
you press the TARE key
Tare
again. Display will
show a negative (-) value if the container is
removed. ZERO indicator will also be on.
WEIGHING A SAMPLE
To determine the weight of a sample:
1. Place empty container on the platform.
2. Press TARE
3. Place sample in container. Display shows weight of
sample less the weight of the container.
PAGE 3 OF 27 0417 IH-1649
key
Tare
to subtract container weight.
PERCENT WEIGHING
Scale allows the sample weight to be shown as 100%.
Then, any other weight placed on the scale displays as
a percentage of the original sample.
For example:
1. 350g is placed on the scale.
2. Press % key
%
.
3. Display shows 100.00%.
4. Remove the 350g weight, then place a 300g weight
on the platform.
5. Display shows 85 .7 1% (300g is 85.71% of 350g).
6. Press FUNC key
Func
to return the scale to weighing
mode.
NOTE: Scale may jump by large amounts if
small weights are used to set the 100% level.
PARTS COUNTING
While the display is showing a weight, pressing the
FUNC key
1. Before starting, tare the weight of container used
and leave the empty container on the platform.
2. Place the number of samples on the scale. The
number should match the predetermined sample
sizes: 10, 20, 50, 100 or 200 pieces.
3. Press the FUNC key
for a sample size of 10 parts.)
4. To change the sample size, press the TARE key
Display will cycle through 10, 20, 50, 100, 200 and
back to 10.
Func
starts the parts counting function.
Func
. Display shows P 10 (looking
Tare
.
Page 4
OPERATION CONTINUED
PARTS COUNTING CONTINUED
5. Press the ZERO/ENTER key
number matches the number of items used in the
sample. As more weight is added, the display shows
the number of pieces (pcs).
6. Press the % key
%
total weight (k g) or the count (pcs).
7. Press the FUNC key
NOTE: See uline.com for a parts counting
instructional video.
Zero
when the displayed
to display the unit weight (g/pcs),
Func
to return to weighing mode.
CHECK WEIGHING
Check weighing sounds an alarm when the weight on the
scale exceeds limits stored in the memory. High and low
limits can be set and can be used individually or together.
Setting the High Limit:
1. Press the LIMIT key
high limit. left most number is flashing and the HI
icon is on.
2. To change the high limit, press the %/<
LIMIT/>
Limit
keys to select which number to change.
Limit
. Display shows the current
%
and the
Both Limits Set:
• The display shows OK when the weight is within
the limits.
Low Limit Set, High Limit Set to Zero:
• Display shows OK when weight is under the limit.
Shows HI when above the Low Limit.
High Limit Set, Low Limit Set to Zero:
• Display shows LO when weight is less than the high
limit. Above the high limit display shows OK.
Both Limits Set, Low is Set Greater than High:
• The beeper will never sound and display shows LO
if the weight is less than the LO limit. Display shows
HI if the weight is greater than the LO Limit.
NOTE: The weight must be greater than 20
scale divisions for check weighing to operate.
To Disable Check Weighing:
1. Press the LIMIT key
2. Press the FUNC/C key
limits when the current limits are shown, then press
the ZERO/ENTER key
Limit
to display current limits.
Func
to enter zero into both
Zero
to store the zero values.
3. Press the TA RE/^key
Tare
to change the flashing
ACCUMULATED TOTAL
number.
Scale can be set to accumulate automatically or
4. Press ZERO/ENTER key
5. If you need to reset the number to zero, press the
FUNC/C
Func
key.
Setting the Low Limit:
1. After pressing ZERO/ENTER key
shows the low limit, LO will be on (left side of display).
2. To change the low limit, press the %/<
LIMIT/>
Limit
to select which number to change.
3. Press the TA RE/^key
number.
4. Press ZERO/ENTER key
5. If you need to reset the number to zero, press the
FUNC/C key
Func
6. After pressing the ZERO/ENTER key
returns to weighing mode with the check-weighing
function turned on.
7. When a weight is placed on the scale, arrows
Zero
to set the number.
manually.
To set automatic or manual accumulation:
Zero
, display then
1. Press FUNC
Func
2. Press LIMIT/> key
and ACC
Limit
Acc
keys simultaneously.
to scroll through options until
AU ON or AU OFF is displayed.
%
and the
3. AU ON means automatic accumulation is on.
4. AU OFF means scale is set for manual
Tare
to change the flashing
Zero
to set the number.
.
Zero
, the scale
accumulation.
5. Press TA RE/^ key
Tare
and AU OFF.
6. Press ZERO/ENTER key
7. Press FUNC key
Func
NOTE: Even when the scale is set to display
grams or ounces, the accumulate function
still keeps weight in kilograms or pounds.
to toggle between AU ON
Zero
to set your selection.
to exit.
indicate if the weight is over or under the limits and
a beeper sounds.
PAGE 4 OF 27 0417 IH-1649
Page 5
OPERATION CONTINUED
MANUAL ACCUMULATION
When the scale is set for manual accumulation:
1. Press the ACC key
in the memory when the weight is stable.
2. Display shows ACC 1 and then the total stored in
memory for two seconds before returning to normal.
3. Remove the weight and allow the scale to return to
zero, then add a second weight.
4. Press ACC
Acc
5. Continue to remove and add weights and press
ACC
until all weights have been added.
Acc
6. To view the totals in memory, press ACC
the scale shows zero. The display shows the total
number of items ACC xx and the total weight and
then returns to zero.
To clear the memory:
1. Press ACC
Acc
2. Press the FUNC/C key
NOTE: ACC function is only available when the
stable indicator "O" is on.
Acc
to store the displayed weight
, the display shows
ACC 2
to display the totals.
Func
to clear the memory.
and the new total.
Acc
when
AUTOMATIC ACCUMULATION
When scale is set for automatic accumulation:
1. Add a weight to the scale. The beeper sounds when
the weight is stable to indicate the weight is added.
Remove the weight.
2. Display shows ACC 1 and totals the memory when
the scale returns to zero.
3. Add the next weight to continue the process.
NOTE: While a weight is on the scale, you can
also press ACC to store the value immediately.
In this instance, the scale will not store the
value when the weight is removed.
4. Press ACC
NOTE: The scale must return to zero or display
a negative number before another sample
can be added to the memory. More items can
be added and ACC pressed again, up to 99
entries or until you exceed the weight capacity
displayed.
5. To return to normal weighing mode, turn AU off.
Acc
to display the accumulated totals.
FUNCTIONS
To set functions, press the FUNC
at the same
%/<
time. Scroll through functions by pressing
%
or LIMIT/>
Limit
Func
and ACC
– the scale will go through the
functions in this order:
CHANGE SCALE WEIGHT INCREMENT
To minimize effects of vibration, wind or other conditions:
• Example: If scale normally weighs in increments of
0.5g, the value can be changed to 1.0g or 2.0g to
get a more stable reading.
1. Display shows Inc xx. The first value shown is the
default weight increment.
2. Press the TAR E/^ key
3. Press ZERO/ENTER
Tare
to change the default.
Zero
to set the new weight increment.
BACKLIGHT CONTROL
Backlight is set to operate automatically, turning off
when the scale is not being used. Turning the backlight
off helps maximize battery life.
PAGE 5 OF 27 0417 IH-1649
Acc
keys
1. Press TA RE/^
Tare
to select EL On (manual on),
EL Au (automatic on/off), or EL Off (turns off backlight)
2. Press ZERO/ENTER
ACCUMULATED TOTAL
Scale can be set to accumulate manually or automatically.
(Refer to ACCUMULATED TOTAL in OPERATION section.)
CHANGE THE BAUD RATE
Display shows b xxx this is the current baud rate.
1. Press TA RE/^
4800bps or 9600bps.
2. Press ZERO/ENTER
AUTO ZERO RANGE TRACKING
Set to 0.5d, 1d, 2d and 4d.
1. Press TA RE/^
2. Press ZERO/ENTER
Zero
to set your selection.
Tare
to select: 600bps, 1200bps,
Zero
to set your selection.
Tare
to select.
Zero
to set your selection.
Page 6
FUNCTIONS CONTINUED
CHANGE UNIT OF WEIGHT DISPLAYED
Select kilograms, grams, ounces or pounds.
1. Press TA RE/^
2. Press ZERO/ENTER
Tare
to select.
Zero
to set your selection.
CHANGE CHECK-WEIGHT BEEPER ALARM
Display shows beep x, select:
• Beep 1 – Beeper sounds when weight is between the
high and low limit range.
• Beep 2 – Beeper sounds when weight is out of high
and low limit range.
• Beep 0 – Beeper will not sound whether in or out of
high and low limit range.
1. Press TA RE/^
2. Press ZERO/ENTER
Tare
to select.
Zero
to set your selection.
CHANGE THE AUTOMATIC POWER OFF DELAY
Display shows power auto off time, select one of the following:
• Turns off auto off function.
• Powers off after 3 minutes with no weight changes or
key presses.
• Powers off after 5 minutes with no weight changes or
key presses.
• Powers off after 15 minutes with no weight changes
or key presses.
• Powers off after 30 minutes with no weight changes
or key presses.
1. Press TA RE/^
2. Press ZERO/ENTER
Tare
to select.
Zero
to set your selection.
RETURN TO NORMAL OPERATING MODE
Display shows return.
1. Press ZERO/ENTER
mode.
Zero
to return to normal operating
BATTERY OPERATION
BATTERY LIFE
The scale will operate on battery-only power for
approximately 70 hours.
LOW BATTERY INDICATOR
When the low battery icon turns on, recharge the
battery as soon as possible. To protect the battery, the
scale will shut off after 30 minutes. The indicator will
flash every 5 minutes.
CHARGING THE BATTERY
Plug into the AC adapter. Scale does not need to be
turned on. Battery should be charged for 12 hours for
full capacity.
BATTERY CHARGING STATUS
A light above the display (charging) indicates the state
of the battery charge. When the scale is plugged in, the
battery is charging.
The light color will change to indicate the battery status:
• Green – Battery is fully charged.
Over time, the battery may fail to hold a full charge and
eventually will need replacing.
WARNING! Never use any damaged charger
or battery. Do not short circuit the battery
across the + and - terminals. Do not dispose of
batteries in a fire or in household waste. Check
local regulations for proper disposal.
BATTERY PERFORMANCE
Always use original batteries and AC adapter. Counting
scale is not intended for use with non-original batteries
and/or battery chargers.
• AC adapter rating is 9V; normal output range is 11V
to 15V.
• New batteries or batteries stored for long periods of
time may require longer charging times.
• Keep battery at or near room temperature when
charging.
• Do not expose batteries to temperatures below 14˚F
(-10˚C) or above 113˚F (45˚C).
• Red – Battery needs recharging.
• Yellow – Battery is being charged.
PAGE 6 OF 27 0417 IH-1649
Page 7
CALIBRATION
The scale is calibrated before leaving the manufacturer’s
facility. Vibrations in shipping may cause the scale to
fall out of calibration. Uline recommends re-verifying
calibration in the field before first use. You must use a
precision calibration weight to properly calibrate the
scale. The calibration weight must be at least 1/3 of
the scale’s capacity and cannot exceed the scale’s
capacity.
NOTE: Calibration can be done in English
system weight (lb.) or Metric system weight (kg).
CALIBRATION WEIGHT (lb.)
Model # 1/3 WEIGHT (Minimum) FULL CAPACITY (Maximum)
H-165 4 2 lb. 6 lb.
H-165 3 2 lb. 6 lb.
H-1649 4 lb. 12 lb.
H-165 0 10 lb. 30 lb.
H-1651 20 lb. 60 lb.
CALIBRATION WEIGHT (kg.)
Model # 1/3 WEIGHT (Minimum) FULL CAPACITY (Maximum)
H-165 4 1 kg. 3 kg.
H-165 3 1 kg. 3 kg.
H-1649 2 kg. 6 kg.
H-165 0 5 kg. 15 kg.
H-1651 10 kg. 30 kg.
SINGLE POINT CALIBRATION (SPAN)
Single point calibration uses two calibration points: zero
and any weight between 1/3 of the scale’s capacity
and full weight of the scale capacity. Refer to the
calibration weights charts above.
1. Turn on the scale. In weighing mode, press the
UNIT key
Unit
until the desired weighing unit
appears – lb or kg.
2. Turn off the scale. Turn on the scale. During the
self-test, press the % key
%
and TARE key
Tare
simultaneously and release. UnloAd will be shown
on the display.
UnLoAd
5. Use the %
%
, LIMIT
Limit
and TARE
Tare
keys to
enter the calibration weight you are using.
6. Press the ZERO key
Zero
. LoAd will be shown on the
display.
LoAd
7. Place the calibration weight on the platform.
8. Once the stable indicator O is shown on the display,
press the ZERO key
Zero
.
9. Scale will enter a self-test mode. Remove weight
before self-test mode is complete. After completing
the self-test, the scale will enter the weighing mode.
MULTI-POINT CALIBRATION (LINEAR)
Multi-point calibration uses three calibration points: zero,
1/3 and full weight capacity of the scale. Refer to the
calibration weights charts above.
1. Turn on the scale. In weighing mode, press the
UNIT key
lb or kg.
2. Turn off the scale. Turn on the scale. During the
self-test, press the % key
simultaneously and release. UnloAd will be shown
on the display.
Unit
until the desired weighing unit appears –
%
and LIMIT key
Limit
UnLoAd
3. Remove all weight from the platform.
4. Once the stable indicator O is shown on the display,
press the ZERO key
will be shown on the display.
5. Place the 1/3 calibration weight on the platform.
6. Once the stable indicator O is shown on the
display, press the ZERO key
calibration weight will be shown on the display.
7. Place the full capacity calibration weight on the
platform.
Zero
. The 1/3 calibration weight
Zero
. The full capacity
3. Remove all weight from the platform.
4. Once the stable indicator O is shown on the display,
press the ZERO key
Zero
. The last calibration weight
used will be shown on the display.
PAGE 7 OF 27 0417 IH-1649
8. Once the stable indicator O is shown on the display,
press the ZERO key
Zero
.
9. Scale will enter a self-test mode. Remove weight
before self-test mode is complete. After completing
the self-test, the scale will enter the weighing mode.
Page 8
TROUBLESHOOTING
OPERATING ISSUE CAUSES RECOMMENDATIONS
Display is blank, scale
shuts off or will not turn on.
Main power is turned off.
Power supply not plugged in.
Power supply faulty.
Internal battery not charged.
Display turned off.
Check that power is going to the
scale. Verify that switch is turned on.
Verify the voltage going to the scale
matches the power supply labels on
the power module or scale.
Remove battery and plug the scale
in. If the scale works, you will need to
replace the battery.
Display blank after turn-on
test; error message display is
locked.
OL or FULL displayed.
UL or NULL displayed.
Display is unstable.
Pan not installed.
Unstable weight.
Load cell or mechanics damaged.
Mechanics damaged.
Maximum capacity exceeded.
Load cell or mechanics damaged.
Power supply faulty.
Weight on scale below permissible limit.
Pan has been removed.
Pan support not seated properly.
Power supply faulty.
Load cell or mechanics damaged.
Drafts or air currents.
Obstruction under pan.
Sample is moving (animal weighing).
Vibrations through table.
Temperature changed dramatically.
Power supply faulty.
Check if pan is installed correctly.
Turn the scale on again.
Check if pan is installed correctly.
Turn the scale on again.
Check if pan is installed correctly.
Press the ZERO key to reset.
Turn the scale on again.
Verify the scale is in an acceptable
location and on a stable surface.
Verify the power supply is correct for
the scale.
Scale not weighing correctly.
Cannot use full capacity.
PAGE 8 OF 27 0417 IH-1649
Calibration error.
Linearity error.
Unit calibrated with inaccurate weight.
Balance not level.
Obstruction between sample and cover.
Wrong unit of weight displayed.
Automatic accumulation is turned on
(AU on).
Overload stops hitting pan support or
hitting bottom of load cell.
Electronic problem on A/D.
Parameters set incorrectly.
Load cell or mechanics.
Double-check unit of weight.
Re-calibrate.
Set linearity.
Check if pan is installed correctly.
Verify installation is
acceptable.
Turn AU off
(see Operation section).
Double-check unit of weight.
Look for obstruction under pan and
verify pan installation.
Page 9
TROUBLESHOOTING CONTINUED
OPERATING ISSUE CAUSES RECOMMENDATIONS
Not linear.
Overload stops hitting too soon.
Load cell or mechanics damaged.
A/D damaged.
Look for obstruction under pan and
verify pan installation.
Set linearity.
Off center loading error.
Battery will not charge.
Adjust mechanics.
Overload stops not correct.
Load cell damaged.
Main not present or too low.
Charging circuit failure.
Battery failure.
Look for obstruction under pan and
verify pan installation.
Verify the batteries are
rechargeable types.
Check if power supply
voltage is correct.
ERROR CODES
During the initial power-on testing or during operation, it is possible the scale may
show an error message. Specific error message info is described below.
If an error message is shown, repeat the procedure that caused the message (turning
the balance on, calibrating or other functions). If error messages are displayed, turn
scale off, wait 3-5 minutes and then turn scale on again. If the error message is still
shown, contact Uline Customer Service at 1-800-295-5510 for further support.
ERROR CODE DESCRIPTION CAUSES
Err4
Initial zero is greater than allowed
(4% of maximum capacity) when
power is turned on or when the
ZERO/ENTER key is pressed.
Keyboard error. Improper operation of the scale.
Weight on the pan when turning the scale on.
Excessive weight on the pan when zeroing the scale.
Improper calibration of the scale.
Damaged load cell.
Damaged electronics.
Err5
Err6
Err7
A/D count is not correct when
turning the scale on.
Can’t set current weight as 100%. This message only shows when you press % key in
Platform not installed.
Load cell damaged.
Electronics damaged.
zero point.
Err8
Calibrate weight error. Use incorrect weight.
Err9
π
PAGE 9 OF 27 0417 IH-1649
CHICAGO • ATLANTA • DALLAS • LOS ANGELES • MINNEAPOLIS • NYC/PHILA • SEATTLE • MEXICO • CANADA
Unstable, can’t return to zero. (This
message only displays as scale is
powering on.)
Verify that scale is on a stable surface.
If scale was outside of operating temperature range, allow
ample time for unit temperature to return to acceptable
range. (See Specifications section.)
1-800-295-5510
uline.com
Page 10

π
Verificación de Peso Unidad de Peso
H-1653, H-1654
BÁSCULA CUENTA FÁCIL
H-1649, H-1650, H -1651
01-800 -295-5510
uline.mx
INFORMACIÓN GENERAL
∏
1-800-295-5510
EVITE COLOCAR LA BÁSCULA EN SITIOS QUE
PUDIERAN AFECTAR LA PRECISIÓN:
• Temperaturas extremas – No coloque en la
luz del sol directa o cerca de salidas de aire
acondicionado o calefacción.
• La superficie de instalación debe estar firme y
nivelada – No coloque sobre superficies irregulares
o tambaleantes o cerca de maquinaria que
produzca vibraciones.
• Fuentes de energía inestables – Mantenga alejada
de máquinas que usen gran cantidad de electricidad,
como equipo para soldar o motores grandes.
• Mantenga la báscula seca – No la coloque en sitios
de alta humedad o mojados.
• Manténgala alejada de aire en movimiento como
ventiladores o puertas y ventanas abiertas.
• Mantenga la báscula limpia y seca.
• No estibe artículos sobre la báscula cuando no esté
en uso.
¡PRECAUCIÓN! La báscula no es impermeable.
Evite contacto directo con agua, alta humedad
y condensación. No rocíe o sumerja la báscula
en agua. Los datos podrían desestabilizarse o la
báscula podría funcionar mal. Apague y permita
que la báscula se seque antes de usarla.
PANTALLA LCD
Batería Baja
Estable
Porcentaje de Peso
Conteo de Partes
CARACTERES EN PANTALLA
CARÁCTER PANTALLA CARÁCTER PANTALLA
0
1
2
3
4
5
6
7
8
9
A
B
C
D
E
F
G
I
J
K
L
M
N
O
P
Q
R
S
T
U
V
W
X
Y
HI
OK
LO
PAGE 10 OF 27 0417 I H -1649
H
Z
Page 11

ESPECIFICACIONES
MODELO # H-1653/H -1654 H-1649 H-1650 H-1651
CAPACIDAD MÁXIMA
CAPACIDAD MÍNIMA 2g 4g 10g 20g
PRECISIÓN (DIV) 0.1g /.0002 lbs. 0.2g /.0005 lbs. 0.5g /.001 lbs. 1g /.002 lbs.
RESOLUCIÓN 1:30.000
RANGO DE TARA -3kg -6kg -10kg -30kg
REPETIBILIDAD (STD DEV) 0.1g 0.2g 0.5g 1g
LINEALIDAD ± 0.2g 0.4g 1g 2g
UNIDADES DE MEDIDA kg, g, lbs., oz
TIEMPO DE ESTABILIZACIÓN 2 Segundos
TEMPERATURA DE FUNCIONAMIENTO 0˚C - 40˚C / 32˚F - 104˚F
FUENTE DE PODER (EXTERIOR) 115/230 Vac, 50/60Hz, 10 watts
CALIBRACIÓN Externa automática
PANTALLA Pantalla LCD digital de 6 dígitos
CUBIERTA DE LA BÁSCULA Plástico ABS, plataforma de acero inoxidable
TAMAÑO DE PLATAFORMA 225 x 300 mm / 9 x 11.5"
DIMENSIONES GENERALES (Ancho x Prof. x Alto) 320 x 340 x 125 mm / 12.6 x 13.4 x 4.9"
PESO NETO 3.8kg / 8.4lbs.
USOS Báscula para uso general
FUNCIONES Pesaje, conteo de partes, % de peso, verificación de peso
OTRAS CARACTERÍSTICAS Y ESPECIFICACIONES Batería interna recargable (~70 horas de funcionamiento)
3kg / 6 lbs. 6kg / 12 lbs. 15kg / 30 lbs. 30kg / 60 lbs.
Función Principal Función Secundaria
Tecla de Unidades (UNIT) – Selecciona unidades de
Unit
peso: libras, onzas, kilogramos, gramos.
Tecla de Acumular (ACC) – Agrega un valor al total
Acc
acumulado si la función de acumulación no es
automática.
Tecla de Salida (ESC) – Utilizada para regresar la
ESC
báscula al modo de operación normal.
Tecla de Función (FUNC) – Permite el cambio de
Func
pesar partes a conteo de partes.
Tecla de Borrar (C) – Utilizada para reiniciar
C
parámetros u otras funciones.
Tecla de Porcentaje (%) – Ingresa la función de
porcentaje de peso. Muestra el peso, peso unitario y
%
conteo cuando está contando partes.
Espacios a la Izquierda (<) – Utilizados para
cambiar diferentes números en la pantalla.
También se usa para establecer parámetros u otras
funciones.
CONTROLES
Limit
Tare
Zero
Tecla de Límite (LIMIT) – Configure límites para
revisión de peso. Configure límite alto o bajo, o
ambos.
Espacios a la Derecha (>) – Utilizados para
cambiar diferentes números en la pantalla.
También se usa para establecer parámetros u otras
funciones.
Tecla de Tara (TARE) – Resta el peso del
contenedor al peso de las piezas.
Tecla de Número (^) – Utilizada para establecer
parámetros y otras funciones.
Tecla Cero (ZERO) – Pantalla en ceros para el
siguiente peso.
Tecla "ENTER" – para establecer parámetros y otras
funciones.
PAGE 11 OF 27 0417 I H -1649
Page 12

INSTALACIÓN
La plataforma de acero inoxidable está empacada por
separado.
1. Retire tornillo de fijación de la parte inferior de báscula.
2. Nivele la báscula. Ajuste las cuatro patas y la burbuja de
referencia en la parte superior de la báscula para nivelar.
3. Coloque la plataforma en los orificios posicionadores
en la cubierta superior.
¡PRECAUCIÓN! No presione con fuerza excesiva,
podría dañar la celda de carga.
4. Conecte adaptador AC al enchufe abajo de la báscula.
FUNCIONAMIENTO
RESTABLECER PANTALLA EN CERO
1. Presione tecla ZERO/ENTER
pantalla en 0 antes del pesar o contar.
NOTA: La báscula automáticamente se pone
en cero para controlar movimientos menores o
acumulación de material en la plataforma de
pesaje. Si la plataforma muestra un peso mientras
está vacía, presione la tecla ZERO/ENTER
poner la báscula en cero.
TARA
Antes de pesar artículos, pese el contenedor para que ese
peso sea restado del peso acumulado del artículo:
1. Presione ZERO/ENTER
2. Coloque el contenedor que será utilizado en la
plataforma de pesaje. La pantalla mostrará su peso.
Presione la tecla TARE
será almacenado como el valor de la tara y es
restado de la pantalla. Pantalla muestra 0.
Zero
Zero
para restablecer la
para
Zero
para poner en cero la pantalla.
Tare
. El peso del contenedor
5. El interruptor para encender está localizado en la
parte inferior derecha de la báscula.
Patas para Nivelación
VISTA INFERIOR
Tornillo de Fijación
Interruptor
Salida del
Adaptador AC
PORCENTAJE DEL PESAJE
La báscula permite que el peso de la muestra sea indicado
como el 100%. Después cualquier otro peso colocado en
báscula aparece como un porcentaje de la muestra original.
Por ejemplo:
1. 350g son colocados en la báscula.
2. Presione tecla %
3. Pantalla muestra 100.00%.
4. Retire los 350g de peso, luego coloque 300g de peso
sobre la plataforma.
5. Pantalla muestra 85 .7 1% (300g es 85.71% de 350g).
6. Presione la tecla FUNC
a la función de pesaje.
NOTA: La báscula puede variar en grandes
cantidades si se utilizan pesos pequeños para
configurar el nivel al 100%.
%
.
Func
para regresar la báscula
3. El indicador Net está encendido. Cuando agregue
artículos a la plataforma solo el peso del artículo será
mostrado.
NOTA: La báscula se puede tarar por segunda
vez para mostrar solo el peso de los artículos
agregados después de que presione la tecla
Tare
TARE
de nuevo. La pantalla mostrará un
valor (-) negativo si se retira el contenedor. El
indicador ZERO también estará encendido.
PESAJE DE UNA MUESTRA
Para determinar el peso de una muestra:
1. Coloque el contenedor vacío en la plataforma.
2. Presione TARE
3. Coloque la muestra en el contenedor. La pantalla muestra
peso de la muestra menos el peso del contenedor.
PAGE 12 OF 27 0417 I H -16 49
Tare
para restar el peso del contenedor.
CONTEO DE PARTES
Mientras la pantalla está mostrando un peso, presionando la
tecla FUNC
1. Antes de comenzar, tare el peso del contenedor,
utilizado y deje el contenedor vacío sobre la
plataforma.
2. Coloque el número de muestras en la báscula. El
número deberá coincidir con los tamaños de las
muestras predeterminadas: 10, 20, 50, 100 ó 200 piezas.
3. Presione la tecla FUNC
(buscando un tamaño de muestra de 10 partes).
4. Para cambiar el tamaño de la muestra: Presione la
tecla TARE
200 y de regreso a 10.
Func
comienza la función del conteo de partes.
Func
. Pantalla muestra P 10
Tare
. Pantalla pasará por 10, 20, 50, 100,
Page 13

CONTINUACIÓN DE FUNCIONAMIENTO
CONTINUACIÓN DE CONTEO DE PARTES
5. Presione la tecla ZERO/ENTER
Zero
cuando coincida
Ambos Límites configurados:
• La pantalla muestra OK cuando el peso está dentro
de los límites.
el número en pantalla con el número de artículos
utilizados como muestra. Mientras más peso agregue,
la pantalla muestra número de piezas.
6. Presione la tecla %
%
para mostrar la unidad de
peso (g/pcs), peso total (kg) o conteo (pcs).
7. Presione la tecla FUNC
Func
para regresar al modo de
pesaje.
NOTA: Vea uline.mx para instructivo de conteo de
partes en video.
VERIFICACIÓN DE PESO
La Verificación de Peso emite una alarma cuando el peso en
la báscula excede límites almacenados en memoria. Límites
altos y bajos se pueden configurar y usar individualmene o juntos.
Configure el Límite Alto – High Limit:
1. Presione la tecla LIMIT
límite alto actual. A la izquierda el número parpadea y
el ícono HI está encendido.
2. Para cambiar el límite alto, presione las teclas %/<
y LIMIT/>
para seleccionar cuál número cambiar.
Limit
Limit
. La pantalla muestra el
%
Límite Bajo configurado, Límite Alto configurado a cero:
• La pantalla muestra OK cuando el peso está debajo
del límite. Muestra HI cuando está arriba del límite
bajo.
Límite Alto configurado, Límite Bajo configurado a cero:
• La pantalla muestra LO cuando el peso es menor
que el límite alto. Arriba de la pantalla de límite alto
muestra OK.
Ambos Límites configurados, Límite Bajo está configurado
mayor al Límite Alto:
• Nunca se emitirá sonido y la pantalla muestra LO si el
peso es menor que el límite bajo. La pantalla muestra
HI si el peso es mayor que el límite bajo.
NOTA: El peso debe ser mayor que 20 para que
Verificación de Peso funcione.
Para desactivar Verificación de Peso:
1. Presione la tecla LIMIT
actuales.
2. Presione la tecla FUNC/C
Limit
para mostrar los límites
Func
para poner en cero
ambos límites cuando se muestren los límites actuales,
3. Presione la telca TARE/^
parpadeando.
4. Presione la tecla ZERO/ENTER
número.
5. Si necesita reiniciar número a cero, presione tecla la
tecla FUNC/C
Func
Tare
para cambiar el número
luego presione la tecla ZERO/ENTER
Zero
para
almacenar los luego valores cero.
Zero
para configurar el
TOTAL ACUMULADO
La báscula puede configurarse para acumular
.
automáticamente o manualmente.
Para configurar la acumulación automática o manual:
Configure el Límite Bajo (Low Limit):
1. Después de presionar la tecla ZERO/ENTER
pantalla muestra límite bajo, LO estará encendido
(lado izquierdo de pantalla).
2. Para cambiar el límite bajo, presione %/<
LIMIT/<
para seleccionar cuál número cambiar.
Limit
Zero
%
, la
y
1. Presione las teclas FUNC
Func
y ACC
simultáneamente.
2. Presione la tecla LIMIT/>
Limit
para moverse a través
de las opciones hasta que se muestre AU ON o AU OFF.
3. AU ON significa que la acumulación automática está
Acc
encendida.
3. Presione la tecla TARE/^
número intermitente.
4. Presione la tecla ZERO/ENTER
número.
5. Si necesita reiniciar el número a cero, presione la
tecla FUNC/C
Func
6. Después de presionar la tecla ZERO/ENTER
báscula regresa al modo de pesaje con la función de
Verificación de Pesaje encendida.
7. Cuando el peso es colocado en la báscula, las
flechas indican si el peso está por arriba o debajo de
Tare
para configurar el
4. AU OFF significa que la báscula está configurada
para acumulación manual.
Zero
para configurar el
5. Presione la tecla TARE /^
Tare
para alternar entre
AU ON y AU OFF.
Func
para salir.
Zero
para configurar su
6. Presione la tecla ZERO/ENTER
.
Zero
, la
selección.
7. Presione la tecla FUNC
NOTA: Aún cuando la báscula esté configurada
para mostrar gramos u onzas, la función de
acumulación mantiene el peso en kilogramos
o libras.
los límites y emite un sonido.
PAGE 13 OF 27 0417 I H -16 49
Page 14

CONTINUACIÓN DE FUNCIONAMIENTO
ACUMULACIÓN MANUAL
Cuando la báscula es configurada para acumulación
manual:
1. Presione la tecla ACC
mostrado en la memoria cuando el peso se estabilice.
2. Pantalla muestra ACC 1 y luego el total almacenado en
memoria por dos segundos antes de regresar a normal.
3. Retire el peso y permita que la báscula regrese a cero,
luego agregue un segundo peso.
4. Presione ACC
Acc
nuevo total.
5. Continúe retirando y agregando peso y presione ACC
hasta que todo el peso haya sido agregado.
6. Para ver totales en memoria, presione ACC
la báscula muestre cero. Pantalla muestra el número
total de artículos ACC xx y el peso total y luego
regresa a cero.
Para borrar la memoria:
1. Presione ACC
Acc
2. Presione la tecla FUNC/C
NOTA: Función ACC solo está disponible cuando
el indicador de estabilidad "O" esté encendido.
Acc
para almacenar el peso
, la pantalla muestra ACC 2 y el
Acc
cuando
para mostrar los totales.
Func
para borrar la memoria.
Acc
ACUMULACIÓN AUTOMÁTICA
Cuando la báscula es configurada para Acumulación
Automática:
1. Agregue peso a báscula. Emitirá sonido cuando el
peso se estabilice para indicar que peso es agregado.
Retire peso.
2. La pantalla muestra ACC 1 y suma la memoria cuando
la báscula regresa a cero.
3. Agregue el siguiente peso para continuar con el proceso.
NOTA: Mientras el peso esté en la báscula, usted
también puede presionar ACC para almacenar
4. Presione ACC
5. Para regresar a la función de pesaje normal,
el valor inmediatamente. En este caso, la
báscula no almacenará valor cuando el peso
sea retirado.
Acc
para mostrar totales acumulados.
NOTA: La báscula debe regresar a cero o mostrar
número negativo antes de que otra muestra
pueda ser agregada a memoria. Más artículos
pueden ser agregados y presionarse ACC de
nuevo, hasta 99 entradas o hasta que usted
exceda la capacidad de peso mostrada.
apague AU.
FUNCIONES
Para configurar funciones, presione teclas FUNC
Acc
ACC
presionando %/<
al mismo tiempo. Desplácese por las funciones
%
o LIMIT/>
Limit
– la báscula irá a
través de las funciones en este orden:
CAMBIE INCREMENTO DE PESO EN BÁSCULA
Para minimizar efectos de vibración, viento u otras
condiciones:
• Ejemplo: Si báscula normalmente pesa en incrementos
de 0.5g, el valor puede ser cambiado a 1.0g ó 2.0g
para conseguir una lectura más estable.
Func
y
1. Presione TA R E/^
(encendido manual), EL Au (encendido/apagado
automático), o EL Off (apaga iluminación).
2. Presione ZERO/ENTER
TOTAL ACUMULADO
La báscula puede configurarse para acumular
manualmenteo automáticamente. (Referirse a TOTAL
ACUMULADO en sección FUNCIONAMIENTO).
CAMBIE RANGO DE BAUDIOS
La pantalla muestra b xxx, este es el rango de baudios actual.
1. Pantalla muestra Inc xx. El primer valor mostrado es
el incremento de peso predeterminado.
2. Presione tecla TAR E/^
Tare
para cambiar el
predeterminado.
3. Presione ZERO/ENTER
Zero
para configurar el nuevo
incremento de peso.
CONTROL DE ILUMINACIÓN
Normalmente la iluminación es configurada para operar
automáticamente, se apaga cuando la báscula no está
1. Presione TAR E/^
1200bps, 4800pbs o 9600bps.
2. Presione ZERO/ENTER
RASTREO AUTOMÁTICO DE RANGO CERO
Configure a 0.5d, 1d, 2d y 4d.
1. Presione TAR E/^
en uso. Apagando la iluminación ayuda a maximizar la
vida de la batería.
PAGE 14 OF 27 0417 I H -16 49
2. Presione ZERO/ENTER
Tare
para seleccionar EL On
Zero
para configurar su selección.
Tare
para seleccionar: 600bps,
Zero
para configurar su selección.
Tare
para seleccionar.
Zero
para configurar su selección.
Page 15

CONTINUACIÓN DE FUNCIONES
CAMBIE LA UNIDAD DE PESO MOSTRADA
Seleccione kilogramos, gramos, onzas o libras.
1. Presione TAR E/^
2. Presione ZERO/ENTER
Tare
para seleccionar.
Zero
para establecer su
selección.
CAMBIE SONIDO DE ALARMA DE VERIFICACIÓN
DE PESO
Pantalla muestra beep x, seleccione
• Beep 1 – Emite sonido cuando el peso está entre el
rango del límite alto y bajo.
• Beep 2 – Emite sonido cuando el peso está fuera de
rango del límite alto y bajo.
• Beep 0 – No emite sonido esté dentro o fuera de
rango del límite alto y bajo.
1. Presione TAR E/^
2. Presione ZERO/ENTER
selección.
Tare
para seleccionar.
Zero
para establecer su
CAMBIE EL TIEMPO DE DEMORA DEL APAGADO
AUTOMÁTICO
Pantalla muestra tiempo para apagado automático,
seleccione uno de los siguientes:
• Desactiva la función de apagado automático.
• Se apaga después de 3 minutos que no registra
cambios de peso o presión en las teclas.
• Se apaga después de 5 minutos que no registra
cambios de peso o presión en las teclas.
• Se apaga después de 15 minutos que no registra
cambios de peso o presión en las teclas.
• Se apaga después de 30 minutos que no registra
cambios de peso o presión en las teclas.
1. Presione TAR E/^
2. Presione ZERO/ENTER
Tare
para seleccionar.
Zero
para establecer su selección.
REGRESE AL FUNCIONAMIENTO NORMAL
Pantalla muestra return.
1. Presione
ZERO/ENTER
funcionamiento normal.
Zero
para regresar al
FUNCIONAMIENTO DE BATERÍA
DURACIÓN DE LA BATERÍA
La báscula operará por 70 horas aproximadamente solo
con la batería.
INDICADOR DE BATERÍA BAJA
Cuando el ícono Low Battery se encienda, recargue
la batería lo antes posible. Para proteger la batería, la
báscula se apagará después de 30 minutos. El indicador
parpadeará cada 5 minutos.
CARGUE LA BATERÍA
Conecte al adaptador AC. La báscula no necesita estar
encendida. La batería debe cargarse por 12 horas para
completar la capacidad.
ESTADO DE CARGA DE BATERÍA
Una luz arriba de la pantalla (charging) indica el
estado de carga de la batería. Cuando la báscula está
conectada, la batería se está cargando.
El color de la luz cambiará para indicar el estado de la
batería:
• Verde – La batería está completamente cargada.
• Rojo – La batería necesita recargarse.
Con el tiempo, la batería puede dejar de mantener
la carga completa y eventualmente necesitará ser
reemplazada.
¡ADVERTENCIA! Nunca utilice ningún cargador
o batería dañados. No cause cortocircuito
cruzando terminales + y -. No tire las baterías
al fuego o en desechos domésticos. Revise
regulaciones locales para una eliminación
adecuada.
DESEMPEÑO DE BATERÍA
Utilice siempre baterías y adaptador AC originales. La
Báscula Contadora no debe ser usada con baterías ni
cargadores no originales.
• Adaptador AC de 9V, rango de salida normal de
11V a 15V.
• Baterías nuevas o baterías almacenadas por largos
períodos de tiempo pueden requerir más tiempo de
carga.
• Mantenga la batería en o cerca de temperatura
ambiente cuando la esté cargando.
• No exponga las baterías a temperaturas debajo de
14˚F (-10˚C) o sobre 113˚F (45˚C).
• Amarillo – La batería está cargándose.
PAGE 15 OF 27 0417 I H -1649
Page 16

CALIBRACIÓN
La báscula se calibra antes de dejar las instalaciones
del fabricante. Las vibraciones durante el envío pueden
5. Utiliza las teclas de %
para ingresar la pesa de calibración que utilizarás.
%
, LIMIT
causar que la báscula deje de estar calibrada. Uline
recomienda volver a verificar la calibración al momento
antes del primer uso. Debe de utilizar una pesa de
6. Presiona la tecla ZERO
pantalla.
Zero
. LoAd aparecerá en la
calibración para calibrar la báscula correctamente. La
pesa de calibración debe de estar al menos a 1/3 de
la capacidad de la báscula y no deberá superar la
LoAd
capacidad de la báscula.
7. Coloca la pesa de calibración en la pantalla.
NOTA: La calibración puede realizarse en el
sistema Inglés (lbs.) o sistema Métrico (kgs.).
PESA DE CALIBRACIÓN (lb.)
Modelo # 1/3 DEL PESO (MÍN.) CAPACIDAD MÁXIMA (MÁX.)
H-165 4 2 lb. 6 lb.
H-165 3 2 lb. 6 lb.
H-1649 4 lb. 12 l b.
H-165 0 10 lb. 30 lb.
H-1651 20 lb. 60 lb.
PESA DE CALIBRACIÓN (kg.)
Modelo # 1/3 DEL PESO (MÍN.) CAPACIDAD MÁXIMA (MÁX.)
H-165 4 1 kg. 3 kg.
H-165 3 1 kg. 3 kg.
H-1649 2 kg. 6 kg.
H-165 0 5 kg. 15 kg.
H-1651 10 kg. 30 kg.
CALIBRACIÓN DE UN SOLO PUNTO (LAPSO)
8. Una vez que el indicador de estable O se muestre
en la pantalla, presiona la tecla ZERO
9. La báscula entrará en modo de auto prueba. Retira
el peso antes de que la modo de auto prueba esté
completa. Después de completar el modo de auto
prueba, la báscula entrará en modo de pesaje.
CALIBRACIÓN MULTIPUNTOS (LINEAL)
La calibración multipuntos utiliza tres puntos de
calibración: cero, 1/3 y capacidad completa del
peso de la báscula. Consulta las gráficas de pesas de
calibración en la parte superior.
1. Encienda la báscula. En el modo de pesaje,
presione la tecla UNIT
peso aparezca – lb o Kg.
2. Apague la báscula. Encienda la báscula. Durante el
modo de auto prueba, presione la teclas %
y LIMIT
Limit
simultáneamente y suelte. UnloAd
aparecerá en la pantalla.
Unit
hasta que la unidad de
La calibración de un solo punto utiliza dos puntos de
calibración: cero y cualquier peso entre 1/3 de la
UnLoAd
capacidad de la báscula y el peso completo de la
capacidad de la báscula. Consulta las gráficas de
pesas de calibración en la parte superior.
1. Enciende la báscula. En el modo de pesaje,
presiona la tecla UNIT
Unit
hasta que la unidad
3. Retire todo el peso de la plataforma.
4. Una vez que el indicador de estable O ise muestre
en la pantalla, presione la tecla ZERO
de calibración de 1/3 se mostrará en la pantalla.
deseada de medida aparezca - lb o Kg.
2. Apaga la báscula. Enciende la báscula. Durante
la auto prueba, presiona la tecla % key
tecla TARE
Tare
simultáneamente y suelta. UnloAd
%
y la
aparecerá en la pantalla.
3. Retira todo el peso de la plataforma.
5. Coloque la pesa de calibración de 1/3 en la plataforma.
6. Una vez que el indicador de estable O se muestre
en la pantalla, presione la tecla ZERO
de calibración de máxima capacidad se mostrará
en la pantalla.
7. Coloca la pesa de calibración de máxima
UnLoAd
capacidad en la plataforma.
8. Una vez que el indicador de estable O se muestre
4. Una vez que el indicador de estable O se muestre
en la pantalla, presiona la tecla de ZERO
Zero
. La
última pesa de calibración que se utilizó aparecerá
en la pantalla.
PAGE 16 OF 27 0417 I H -16 49
en la pantalla, presione la tecla ZERO
9. La báscula entrará en modo de auto prueba. Retire
el peso antes de que el modo de auto prueba esté
completo. Después de completar la auto prueba, la
báscula entrará en modo de pesaje.
Limit
y TARE
Zero
.
Zero
. La pesa
Zero
. La pesa
Zero
.
Tare
%
Page 17

SOLUCIÓN DE PROBLEMAS
PROBLEMA DE FUNCIONAMIENTO CAUSAS RECOMENDACIONES
Pantalla en blanco, la báscula se
apaga o no enciende.
Interruptor principal está apagado.
Fuente de poder no está conectada.
Fuente de poder defectuosa.
Batería interior descargada.
Pantalla apagada.
Revise que la energía vaya a la báscula. Verifique
que el interruptor esté encendido.
Verifique que el voltaje que va a la báscula
coincida con las etiquetas de la fuente de poder
en el módulo de poder o báscula.
Retire la batería y conecte la báscula. Si labáscula
funciona, necesitará reemplazar la batería
.
Pantalla en blanco después de la
prueba de encendido; muestra un
mensaje de error bloqueado.
Muestra OL o FULL.
Muestra UL o NULL.
Pantalla inestable.
Plataforma sin instalar.
Peso inestable.
Celda de carga dañada.
Mecanismo dañado.
Capacidad máxima excedida.
Celdas de carga o mecanismo dañado.
Falla en fuente de poder.
Peso en báscula debajo del límite
permisible.
Plataforma ha sido retirada.
Soporte de plataforma asentado
inapropiadamente.
Falla de la fuente de poder.
Celdas de carga o mecanismo dañado.
Corrientes de aire.
Obstrucción bajo la plataforma.
Muestra en movimiento (pesaje animal).
Vibraciones a través de la mesa.
Cambio drástico de temperatura.
Falla en fuente de poder.
Revise que plataforma esté correctamente instalada.
Encienda de nuevo la báscula.
Revise que la plataforma esté correctamente
instalada.
Encienda de nuevo la báscula.
Revise que la plataforma esté instalada
correctamente.
Presione tecla ZERO para reiniciar.
Encienda de nuevo la báscula.
Verifique que báscula esté en el sitio adecuado y
en superficie estable.
Verifique que fuente de poder sea la correcta
para báscula.
Báscula no pesa correctamente.
No puede utilizar capacidad
completa.
PAGE 17 OF 27 0417 I H -1649
Error de calibración.
Error de linealidad.
Unidad calibrada con peso inexacto.
Báscula desnivelada.
Obstrucción entre la muestra y la cubierta.
Muestra una unidad de peso
equivocada.
Acumulación automática encendida
(AU encendida).
Sobrecarga se detiene golpeando el
soporte de plataforma, o golpeando en
la parte inferior de la celda de carga.
Problema electrónico del A/D.
Parámetros configurados
incorrectamente.
Celdas de carga o mecanismo.
Revise nuevamente la unidad de peso.
Calibre nuevamente.
Configure linealidad.
Revise que la plataforma esté correctamente
instalada.
Verifique que la instalación es adecuada.
Apague AU
(vea sección de Funcionamiento).
Revise nuevamente la unidad de peso.
Busque por obstrucción debajo de la plataforma y
verifique la instalación de la plataforma.
Page 18

CONTINUACIÓN DE SOLUCIÓN DE PROBLEMAS
PROBLEMA DE FUNCIONAMIENTO CAUSAS RECOMENDACIONES
Sin linealidad.
Sobrecarga deja de golpear muy
pronto.
Celdas de carga o mecanismo
dañado.
A/D dañado.
Busque la obstrucción debajo de
plataforma y verifique instalación de
plataforma.
Configure linealidad.
Error por carga fuera del centro.
Batería no carga.
Ajuste mecánico.
Sobrecarga detiene incorrectamente.
Celda de carga dañada.
No existe voltaje principal o
demasiado bajo.
Falla de circuito de carga.
Falla de batería.
Busque por obstrucción debajo de
plataforma y verifique instalación de
plataforma.
Verifique que baterías sea tipo
recargable.
Revise que fuente de poder sea la
correcta.
CÓDIGO DE ERROR
Durante la prueba inicial de encendido o durante el funcionamiento es posible que la báscula pueda mostrar un mensaje
de error. Información sobre mensaje de error se describe abajo.
Si se muestra un mensaje de error, repita el proceso que causó el mensaje (encienda báscula, calibre u otras funciones).
Si los mensajes de error se muestran, apague la báscula, espere 3-5 minutos, después encienda de nuevo la báscula.
Si el mensaje de error aún aparece entonces llame a Uline Servicio a Clientes al 01-800-285-5510 para ayuda adicional.
CÓDIGO DE ERROR DESCRIPCIÓN CAUSAS
Err4
El cero inicial es mayor que
el permitido (4% del máximo
de capacidad) cuando es
encendida o cuando la tecla
ZERO/ENTER es presionada.
Error de teclado. Uso inadecuado de báscula.
Hay peso sobre la plataforma cuando enciende la báscula.
Peso excesivo en la plataforma cuando se pone en cero la
báscula.
Calibración inadecuada de la báscula.
Celda de carga dañada.
Daño electrónico.
Err5
Err6
Err7
Conteo A/D no es correcto
cuando enciende la báscula.
No puede configurar peso
actual al 100%.
Error de peso de calibración. Uso de peso incorrecto.
Err8
Err9
π
PAGE 18 OF 27 0417 I H -16 49
CHICAGO • ATLANTA • DALLAS • LOS ANGELES • MINNEAPOLIS • NYC/PHILA • SEATTLE • MEXICO • CANADA
Inestable, no puede regresar
a cero. (Este mensaje solo se
muestra mientras la báscula
está encendiendo).
Plataforma no instalada.
Celda de carga dañada.
Daño electrónico.
Este mensaje solo aparece cuando presiona tecla "%" en
punto cero.
Verifique que la báscula se encuentre sobre una superficie
estable.
Si la báscula estaba fuera del rango de temperatura de
funcionamiento, permita el tiempo suficiente para que la
temperatura de la unidad regrese al rango aceptable.
(Vea sección de Especificaciones).
01-80 0-295- 5510
uline.mx
Page 19

π
H-1653, H-1654
BALANCE EASY-COUNT
RENSEIGNEMENTS GÉNÉRAUX
H-1649, H-1650, H -1651
1-800-295-5510
uline.ca
∏
1-800-295-5510
ÉVITEZ DE PLACER LA BALANCE DANS DES
ENDROITS QUI PEUVENT AVOIR UN IMPACT
INDÉSIRABLE SUR LA PRÉCISION:
• Températures extrêmes: ne placez pas la balance
au soleil ou près des bouches de chauffage/
refroidissement d'air.
• La surface de montage doit être ferme et
horizontale: ne placez pas la balance sur une
surface inégale ou bancale, ou à proximité de
machines qui émettent des vibrations.
• Sources d'électricité instables: tenez la balance à
l'écart des grandes machines en utilisant l'électricité,
notamment les équipements de soudure ou les gros
moteurs.
• Maintenez la balance sèche: ne placez pas la
balance dans des endroits très humides ou mouillés.
• Maintenez la balance à distance des équipements
de déplacement d'air, notamment les ventilateurs,
ou les fenêtres et portes ouvertes.
• Maintenez la balance propre et sèche.
• N'empilez d'éléments sur la balance lorsqu'elle n'est
pas en service.
MISE EN GARDE! La balance n'est pas étanche.
Évitez tout contact direct avec l'eau, l'humidité
élevée et la condensation. Ne vaporisez pas la
balance et ne l'immergez pas dans l'eau. Les
données peuvent devenir instables ou la balance
peut présenter un dysfonctionnement. Éteignez la
balance et laissez-la sécher avant de la réutiliser.
AFFICHAGE ACL
CARACTÈRES D'AFFICHAGE
CARACTÈRE AFFICHAGE CARACTÈRE AFFICHAGE
0
1
2
3
4
5
6
7
8
9
A
B
C
D
E
F
I
J
K
L
M
N
O
P
Q
R
S
T
U
V
W
X
Batterie faible
Stable
HI
OK
LO
Pesage de vérification Unité de pesage
PAGE 19 OF 27 0417 I H -16 49
Comptage d’éléments
Pesage en pourcentage
G
H
Y
Z
Page 20

SPÉCIFICATIONS
N° DE MODÈLE H-1653/H-1654 H -1649 H-1650 H-1651
CAPACITÉ MAXIMALE
CAPACITÉ MINIMALE 2g 4g 10g 20g
PRÉCISION (DIV) 0.1g /.0002 lbs. 0.2g /.0005 lbs. 0.5g /.001 lbs. 1g /.002 lbs.
RÉSOLUTION 1:30.000
PLAGE DE TARE -3kg -6kg -10kg -30kg
REPRODUCTIBILITÉ (DÉV. TYPE) 0.1g 0.2g 0.5g 1g
LINÉARITÉ ± 0.2g 0.4g 1g 2g
UNITÉS DE MESURE kg, g, lbs., oz
DURÉE DE STABILISATION 2secondes
TEMPÉRATURE DE FONCTIONNEMENT 0˚C - 40˚C/32˚F - 104˚F
ALIMENTATION ÉLECTRIQUE (EXTERNE) 115/230VCA, 50/60Hz, 10W
ÉTALONNAGE Automatique, externe
AFFICHAGE Affichage numérique ACL à 6chiffres
BOÎTIER D'ÉQUILIBRAGE Plateforme en plastique ABS et acier inoxydable
TAILLE DU PLATEAU 225x300mm/9x11,5po
DIMENSIONS GÉNÉRALES (LxPxH) 320x340x125mm/12,6x13,4x4,9po
POIDS NET 3,8kg/8,4lb
APPLICATIONS Balance à usage général
FONCTIONS Pesage, comptage, % de poids, pesage de vérification
AUTRES CARACTÉRISTIQUES ET SPÉCIFICATIONS Batterie rechargeable interne (~70heures de fonctionnement)
3kg / 6 lbs. 6kg / 12 lbs. 15kg / 30 lbs. 30kg / 60 lbs.
Fonction principale Fonction auxiliaire
Touche d'unité (UNIT): sélectionne les unités de
Unit
pesage (livres, onces, grammes, kilogrammes).
Touche d'accumulation (ACC): ajoute une valeur
Acc
au total cumulé si la fonction d'accumulation n’est
pas automatique.
Fonctionne en tant que touche de sortie
ESC
(ESC) afin de replacer la balance en mode de
fonctionnement normal.
Func
Touche de fonction (FUNC): permet de passer du
pesage d'éléments au comptage d'éléments.
Fonctionne comme touche d'effacement (C) afin
C
de réinitialiser les paramètres ou autres fonctions.
Touche de pourcentage (%): permet de
sélectionner la fonction de pesage en pourcentage.
%
Permet d'afficher le poids, le poids unitaire et le
nombre lors du comptage des éléments.
Les espaces à gauche de «<» permettent de
modifier différents numéros sur l'affichage. Également
utilisés pour définir des paramètres ou autres
fonctions.
COMMANDES
Limit
Tare
Zero
Touche de limitation (LIMIT): définit les limites de
pesage de contrôle. Permet de définir une limite
haute ou basse, ou les deux.
Les espaces à droite de «>» permettent de
modifier différents numéros sur l'affichage.
Également utilisés pour définir des paramètres ou
autres fonctions.
Touche de tare (TARE): déduit le poids du
conteneur du poids des éléments.
La touche de modification de numéro «^»
permet de définir les paramètres et autres
fonctions.
Touche zéro (ZERO): réinitialise l'affichage pour le
pesage suivant.
La touche «ENTER» (Entrée) permet de définir
des paramètres et autres fonctions.
PAGE 20 OF 27 0417 I H -1649
Page 21

INSTALLATION
La plateforme en acier inoxydable est emballée
séparément.
1. Retirez la vis de réglage au bas de la balance.
2. Nivelez la balance. Ajuster les quatrepieds et bulle de
référence située en haut de la balance pour procéder
au nivellement au niveau de référence.
3. Placez la plateforme dans les orifices de
positionnement du couvercle supérieur.
MISE EN GARDE! N'appuyez pas avec une force
excessive; cela peut endommager la cellule de
pesage.
4. Branchez l'adaptateur CA à la prise d'alimentation au
bas de la balance.
FONCTIONNEMENT
RÉINITIALISATION DE L'AFFICHAGE
1. Appuyez sur la touche
ZERO/ENTER
l'affichage à0 avant le pesage
ou le comptage.
REMARQUE: la balance possède une fonction
de réinitialisation automatique qui accommode
les variations mineures ou accumulations
de matériau sur la plateforme de pesage.
Si l'affichage affiche un poids alors que la
plateforme est vide, appuyer sur la touche
ZERO/ENTER
pour réinitialiser la balance.
Zero
TARE
Avant le pesage des éléments, pesez le récipient afin que
son poids puisse être retiré du poids cumulé des éléments:
1. Appuyez sur la touche ZERO/ENTER
l'affichage.
2. Placez le conteneur à utiliser sur la plateforme
L'affichage affichera son poids. Appuyez sur la touche
Tare
TARE
. Le poids du conteneur sera enregistré en tant
que valeur de tare et soustrait de l'affichage. L'afficheur
indique0.
3. Le témoin Net est allumé. Lors de l'ajout d'éléments à
la plateforme, seul le poids de l'élément s'affiche.
REMARQUE: la balance peut être tarée une
seconde fois pour afficher uniquement le poids
des éléments ajoutés lorsque vous appuyez de
nouveau sur la touche TARE
affiche une valeur négative (-) si le conteneur est
retiré. L'indicateur ZERO sera également affiché.
PESAGE D'UN ÉCHANTILLON
Pour déterminer le poids d'un échantillon:
1. Placez un conteneur vide sur la plateforme.
2. Appuyez sur TARE
3. Placez un échantillon dans le conteneur. L'affichage indique
le poids de l'échantillon moins le poids du conteneur.
Tare
pour soustraire le poids du conteneur.
Zero
pour remettre
Zero
pour réinitialiser
de pesage.
Tare
. L'affichage
5. L'interrupteur d'alimentation se trouve du côté inférieur
droit de la balance.
Pieds de nivellement
VUE DU DESSOUS
Vis de réglage
Interrupteur d'alimentation
Prise d'adaptation CA
PESAGE EN POURCENTAGE
La balance permet d'afficher le poids de l'échantillon
comme 100%. Ensuite, tous les autres poids placés sur
la balance s'affichent sous forme de pourcentage de
l'échantillon original.
Par exemple:
1. Placez 350g sur la balance.
2. Appuyez sur la touche %
%
.
3. L'affichage indique100,00 %.
4. Retirez le poids de 350g, puis placez un poids de
300g sur la plateforme.
5. L'écran affiche 85,71% (300g correspondant à
85,71% de 350g)
6. Appuyez sur la touche FUNC
Func
pour replacer la
balance en mode de pesage.
REMARQUE: la balance affiche de grandes
différences si des poids légers sont utilisés pour
définir le niveau 100%.
COMPTAGE D'ÉLÉMENTS
Tandis que l'affichage indique un poids, une pression de
la touche FUNC
éléments.
1. Avant de commencer, tarez le poids du conteneur
utilisé et laissez le conteneur vide sur la plateforme.
2. Place le nombre d'échantillons sur la balance. Le
nombre doit correspondre aux tailles d'échantillon
prédéterminées: 10, 20, 50, 100 ou 200éléments.
3. Appuyez sur la touche FUNC
«P 10» (recherche d'une taille d'échantillon de
10éléments).
4. Pour modifier la taille d'échantillon: Appuyez sur la
touche TARE
50, 100 et 200, puis reviendra à10.
lance la fonction de comptage des
Func
Func
. L'affichage indique
Tare
: l'affichage alternera entre 10, 20,
PAGE 21 OF 27 0417 I H -1649
Page 22

FONCTIONNEMENT (SUITE)
COMPTAGE D'ÉLÉMENTS (SUITE)
5. Appuyer sur la touche ZERO/ENTER
nombre affiché correspond au nombre d'éléments
utilisé dans l'échantillon. À mesure que du poids
supplémentaire est ajouté, l'affichage indique le
nombre d'éléments
6. Appuyez sur la touche %
(pcs)
.
%
unitaire (g/pcs), le poids total (kg) ou le nombre (pcs).
7. Appuyez sur la touche FUNC
mode de pesage.
REMARQUE: reportez-vous à uline.com consulter
la vidéo d'instructions relative au comptage des
éléments.
Zero
lorsque le
pour afficher le poids
Func
pour revenir au
PESAGE DE VÉRIFICATION
Le pesage de vérification déclenche une alarme sonore
lorsque poids présent sur la balance dépasse les limites
enregistrées dans la mémoire. Des limites supérieure et
inférieure peuvent être définies et utilisées individuellement
ou ensemble.
Réglage de la limite supérieure:
1. Appuyez sur la touche LIMIT
la limite supérieure actuelle. Le nombre le plus à
gauche clignote et l'icône HI est allumée.
2. Pour modifier la limite supérieure, appuyez sur les touches
%
/<
%
et LIMIT/>
Limit
modifier.
3. Appuyez sur la touche TARE/^
nombre qui clignote.
4. Appuyez sur la touche ZERO/ENTER
nombre.
5. Si vous devez réinitialiser le nombre, appuyez sur la
touche FUNC/C
Func
.
Réglage de la limite inférieure:
1. Après avoir appuyé sur la touche ZERO/ENTER,
l'affichage indique ensuite la limite inférieure, et LO
sera affiché (à gauche de l'affichage).
2. Pour modifier la limite inférieure, appuyez sur les
touches %/<
%
et LIMIT/>
nombre à modifier.
3. Appuyez sur la touche TARE/^
nombre qui clignote.
4. Appuyez sur la touche ZERO/ENTER
nombre.
5. Si vous devez réinitialiser le nombre, appuyez sur la
touche FUNC/CFUNC
Func
Limit
. L'affichage indique
pour sélectionner le nombre à
Tare
pour modifier le
Zero
pour régler le
Zero
Limit
pour sélectionner le
pour modifier le
Tare
Zero
pour régler le
6. Après avoir appuyé sur la touche ZERO/ENTER
Zero
, la
balance revient au mode de pesage avec
la fonction Pesage de vérification activée.
7. Lorsqu'un poids est placé sur la balance, des flèches
indiquent si le poids est supérieur ou inférieur aux
limites et un signal sonore retentit.
Les deux limites réglées:
• L'affichage indique OK si le poids est conforme aux limites.
Limite inférieure réglée, limite supérieure réglée sur zéro:
• L'affichage indique OK lorsque le poids est inférieur
à la limite. L'affichage indique HI lorsque le poids est
supérieur à la limite inférieure.
Limite supérieure réglée, limite inférieure réglée sur zéro:
• L'affichage indique LO lorsque le poids est inférieur à
la limite supérieure. Lorsque le poids est supérieur à la
limite supérieure, l'affichage indique OK.
Les deux limites réglées, limite inférieure plus grande que
la limite supérieure:
• L'avertisseur sonore ne retentit jamais et l'affichage indique
LO si le poids est inférieur à la limite inférieure. L'affichage
indique HI si le poids est supérieur à la limite inférieure.
REMARQUE: le poids doit être supérieur à 20
échelons de balance pour que le pesage de
vérification fonctionne.
Pour désactiver le pesage de vérification:
1. Appuyez sur la touche LIMIT
Limit
pour afficher les
limites actuelles.
2. Appuyez sur la touche FUNC/C
Func
pour saisir zéro
pour les deux limites lorsque les limites actuelles sont
affichées, puis appuyer sur le ZERO/ENTER
Zero
pour
enregistrer les valeurs nulles.
TOTAL CUMULÉ
La balance peut être réglée pour accumuler
automatiquement ou manuellement.
Pour régler l'accumulation automatique ou manuelle:
1. Appuyez simultanément sur les touches FUNC
Acc
ACC
2. Appuyez sur la touche LIMIT/>
.
Limit
touche pour faire
défiler les options jusqu'à ce que AU ON ou AU OFF
s'affiche.
Func
et
3. AU ON signifie que l'accumulation automatique est
activée.
4. AU OFF
l’accumulation manuelle.
5. Appuyez sur la touche TARE/^
entre AU ON et AU OFF.
signifie que la balance est réglée pour
Tare
touche pour basculer
PAGE 22 OF 27 0417 I H -1649
Page 23

FONCTIONNEMENT (SUITE)
ACCUMULATION MANUELLE
Lorsque la balance est réglée pour l'accumulation manuelle:
1. Appuyez sur la touche ACC
poids affiché dans la mémoire une fois le poids stable.
2. L'affichage indique ACC 1, puis le total enregistré en mémoire
pendant deuxsecondes avant de revenir à la normale.
3. Retirez le poids et laissez la balance revenir à zéro,
puis ajoutez un second poids.
4. Appuyez sur ACC
; l'écran affiche ACC 2 et le
Acc
nouveau total.
5. Répétez la procédure jusqu'à ce que tous les poids
aient été ajoutés.
6. Pour afficher les totaux en mémoire, appuyez sur ACC
lorsque la balance affiche zéro. L'affichage indique le
nombre total d'éléments ACC xx ainsi que poids total,
puis revient à zéro.
Pour effacer la mémoire:
1. Appuyez sur ACC
Acc
pour afficher les totaux.
2. Appuyez sur la touche FUNC/C
mémoire.
REMARQUE: la s d'accumulation est disponible
uniquement lorsque le témoin fixe «O» est
allumé.
Acc
pour enregistrer le
Func
pour effacer la
Acc
ACCUMULATION AUTOMATIQUE
Lorsque la balance est réglée pour l'accumulation
automatique:
1. Ajoutez un poids sur la balance. L'avertisseur sonore
retentit lorsque le poids est stable afin d'indiquer que
le poids est ajouté. Retirez le poids.
2. L'affichage indique ACC 1 et totalise la mémoire
lorsque la balance est remise à zéro.
3. Ajoutez le poids suivant pour poursuivre la procédure.
REMARQUE: Lorsqu'un poids est sur la balance,
vous pouvez également appuyer sur ACC pour
enregistrer immédiatement la valeur. Dans ce
cas, la balance n'enregistrera pas la valeur
4. Appuyez sur ACC
5. Pour revenir en mode de pesage normal, désactivez la
lorsque le poids est retiré.
Acc
pour afficher les totaux cumulés.
REMARQUE: La balance doit revenir à zéro ou
afficher un nombre négatif avant qu'un autre
échantillon ne puisse être ajouté à la mémoire.
Vous pouvez répéter la procédure jusqu’à
99entrées ou jusqu’à dépasser la capacité
pondérale affichée.
fonction automatique.
FONCTIONS
P
our définir des fonctions, appuyez sur les touches FUNC
ACC
Acc
simultanément. Parcourez les fonctions en
%
ou LIMIT/>
Limit
; la balance fait
et
appuyant sur %/<
défiler les fonctions dans l'ordre suivant:
MODIFIER LE PALIER DE POIDS DE LA BALANCE
Pour minimiser les effets des vibrations, du vent ou autres
conditions:
• Exemple: si la balance pèse normalement par paliers
de 0,5g, la valeur peut être modifiée sur 1,0 ou 2,0g
pour obtenir un relevé plus stable.
1. L'affichage indique xx Inc. La première valeur affichée
est le palier de poids par défaut.
2. Appuyez sur la touche TARE/^
Tare
pour modifier la
valeur par défaut.
3. Appuyez sur ZERO/ENTER
Zero
pour régler le nouveau
palier de poids.
CONTRÔLE DU RÉTROÉCLAIRAGE
Généralement, le rétroéclairage est réglé pour fonctionner
automatiquement et s'éteindre lorsque la balance n'est
pas utilisée. La désactivation du rétro-éclairage permet de
maximiser l'autonomie.
Func
1. Appuyez sur TAR E /^
Tare
pour sélectionner EL On
(allumage manuel), EL Au (activation/désactivation
automatique) ou EL Off (désactive le rétroéclairage).
2. Appuyez sur ZERO/ENTER
Zero
pour définir votre
sélection.
TOTAL CUMULÉ
La balance peut être réglée pour accumuler
manuellement ou automatiquement. (Reportez-vous à la
partie TOTAL CUMULÉ de la section FONCTIONNEMENT).
MODIFIER LE DÉBIT EN BAUDS
L'affichage indique b xxx. Il s'agit du débit en bauds actuel.
1. Appuyez sur TA RE/^
Tare
pour sélectionner: 600bauds/s,
1200bauds/s, 4800bauds/s ou 9600bauds/s.
2. Appuyez sur ZERO/ENTER
Zero
pour définir votre
sélection.
SUIVI DE LA PLAGE ZÉRO AUTOMATIQUE
Réglez sur 0,5d, 1d, 2d ou 4d.
1. Appuyez sur TAR E /^
2. Appuyez sur ZERO/ENTER
sélection.
Tare
pour sélectionner.
Zero
pour définir votre
PAGE 23 OF 27 0417 I H -1649
Page 24

FONCTIONS (SUITE)
MODIFIER LES UNITÉS DE POIDS AFFICHÉES
Sélectionnez kilogrammes, grammes, onces ou livres.
1. Appuyez sur TAR E /^
2. Appuyez sur ZERO/ENTER
sélection.
Tare
pour sélectionner.
Zero
pour définir votre
MODIFIER L'ALARME DE L'AVERTISSEUR SONORE
DU PESAGE DE VÉRIFICATION.
L'affichage indique beep x. Sélectionnez:
• Beep1 (Bip1): L'avertisseur sonore retentit lorsque le
poids se trouve entre la plage définie par les limites
supérieure et inférieure.
• Beep2 (Bip2): L'avertisseur sonore retentit lorsque
le poids est hors de la plage définie par les limites
supérieure et inférieure.
• Beep0 (Bip0): L'avertisseur sonore ne retentit pas, que
le poids se trouve ou non dans la plage définie par les
limites supérieure et inférieure.
1. Appuyez sur TAR E /^
2. Appuyez sur ZERO/ENTER
Tare
pour sélectionner.
Zero
pour définir votre sélection.
MODIFIER LE DÉLAI D'ARRÊT AUTOMATIQUE
L'affichage indique la fonction de délai d'arrêt automatique.
Sélectionnez l'une des options suivantes:
• Fonction d'arrêt automatique désactivée.
• Arrêt au bout de 3minutes en cas d'absence de
charge ou d'actionnement de touche.
• Arrêt au bout de 5minutes en cas d'absence de
charge ou d'actionnement de touche.
• Arrêt au bout de 15minutes en cas d'absence de
charge ou d'actionnement de touche.
• Arrêt au bout de 30minutes en cas d'absence de
charge ou d'actionnement de touche.
1. Appuyez sur TAR E /^
2. Appuyez sur ZERO/ENTER
sélection.
Tare
pour sélectionner.
Zero
pour définir votre
RETOUR EN MODE DE FONCTIONNEMENT NORMAL
L'affichage indique return.
1. Appuyez sur
fonctionnement normal.
ZERO/ENTER
Zero
pour revenir en mode de
FONCTIONNEMENT DE LA BATTERIE
DURÉE UTILE DE LA BATTERIE
La balance fonctionnera sur batterie pendant environ
70heures seulement.
TÉMOIN DE BATTERIE FAIBLE
Lorsque l'icône batterie faible s'allume, rechargez
la batterie dès que possible. Pour protéger la batterie,
la balance s'éteint au bout de 30minutes. Le témoin
clignotera toutes les 5minutes.
CHARGE DE LA BATTERIE
Branchez l'adaptateur CA. Il n'est pas nécessaire d'allumer
la balance. La batterie doit être chargée pendant
12heures pour restaurer la pleine capacité.
ÉTAT DE CHARGE DE LA BATTERIE
Un témoin situé au-dessus de l'affichage (en charge)
indique l'état de charge de la batterie. Lorsque la batterie
est branchée, elle se charge.
La couleur du témoin change en fonction de l'état de la
batterie:
• Vert: la batterie est complètement chargée.
• Rouge: batterie doit être chargée.
• Jaune: la batterie est en cours de charge.
À long terme, la batterie peut ne plus tenir une pleine
charge et doit être remplacée.
AVERTISSEMENT! N'utilisez jamais le chargeur ou
la batterie en cas de dommages. Ne courtcircuitez pas la batterie sur les bornes+ et-.
N'éliminez pas les batteries par incinération
ou dans les ordures ménagères. Reportez-vous
aux réglementations locales pour connaître les
modalités d'élimination correctes.
PERFORMANCES DE LA BATTERIE
Utilisez toujours des batteries et un adaptateur CA
d'origine. Balance de comptage n'est pas prévue pour
une utilisation avec des batteries et/ou un chargeur non
originaux.
• La tension nominale de l'adaptateurCA est de 9V et
la plage de sortie normale est de 11V à 15V.
• Les batteries neuves ou stockées pendant de longues
périodes peuvent nécessiter des temps de charge plus
longs.
• Gardez la batterie à température ambiante ou à une
température proche lors de la charge.
• N'exposez pas les batteries à des températures
inférieures à 14˚F (-10˚C) ou supérieures à 113˚F
(45˚C).
PAGE 24 OF 27 0417 I H -1649
Page 25

ÉTALONNAGE
LoAd
La balance est étalonnée chez le fabricant avant d'être
expédiée. Les vibrations lors de l'expédition peuvent
entraîner la déprogrammation de l'étalonnage. Uline
recommande de vérifier l'étalonnage avant la première
utilisation. Vous devez utiliser un poids d'étalonnage
de précision pour étalonner correctement la balance.
Le poids d'étalonnage doit être d'au moins 1/3 de la
capacité de la balance et ne peut pas être supérieur à
la capacité maximale de celle-ci.
REMARQUE : L'étalonnage peut être effectué en
poids du système anglais (lb) ou en poids du
système métrique (kg).
POIDS D'ÉTALONNAGE (lb)
Nº de modèle
H-165 4 2 lb 6 lb
H-165 3 2 lb 6 lb
H-1649 4 lb 12 lb
H-165 0 10 lb 30 lb
H-1651 20 lb 60 lb
1/3 DU POIDS (Minimum)
PLEINE CAPACITÉ (Maximum)
POIDS D'ÉTALONNAGE (kg)
Nº de modèle
H-165 4 1 kg 3 kg
H-165 3 1 kg 3 kg
H-1649 2 kg 6 kg
H-165 0 5 kg 15 kg
H-1651 10 kg 30 kg
1/3 DU POIDS (Minimum)
PLEINE CAPACITÉ (Maximum)
ÉTALONNAGE À POINT UNIQUE (SPAN)
L'étalonnage à point unique utilise deux points
d'étalonnage : zéro et tout poids compris entre 1/3 de la
capacité de la balance et le poids total de la capacité
de la balance. Reportez-vous aux tableaux des poids
d'étalonnage ci-dessus.
1. Allumez la balance. En mode de pesage, appuyez
sur la touche UNIT
pesage souhaitée apparaisse – lb ou kg.
2. Éteignez la balance. Rallumez-la. Pendant l'autotest,
appuyez simultanément sur la touche % key
la touche TARE
sur l'écran.
Unit
jusqu'à ce que l'unité de
Tare
et relâchez. UnloAd s'affichera
et
%
5. Utilisez les touches %
%
, LIMIT
Limit
et TARE
Tare
pour saisir le poids d'étalonnage que vous utilisez.
6. Appuyez sur la touche ZERO
Zero
. LoAd s'affichera
sur l'écran.
7. Placez le poids d'étalonnage sur la plateforme.
8. Une fois que l'indicateur de stabilisation O est
affiché sur l'écran, appuyez sur la touche ZERO
Zero
9. La balance se mettra en mode d'autotest. Retirez le poids
avant que l'autotest ne soit terminé. Une fois l'autotest
terminé, la balance passera en mode de pesage.
ÉTALONNAGE À PLUSIEURS POINTS (LINÉAIRE)
L'étalonnage à plusieurs points utilise trois points d'étalonnage :
zéro et tout poids compris entre 1/3 de la capacité de la
balance et le poids total de la capacité de la balance.
Reportez-vous aux tableaux des poids d'étalonnage ci-dessus.
1. Allumez la balance. En mode de pesage, appuyez
sur la touche UNIT
Unit
jusqu'à ce que l'unité de
pesage désirée apparaisse - lb ou kg.
2. Éteignez la balance. Rallumez-la. Pendant l'autotest,
appuyez simultanément sur la touche %
la touche LIMIT
Limit
et relâchez ensuite. UnloAd
%
et
s'affichera sur l'écran.
UnLoAd
3. Retirez tout poids de la plateforme.
4. Une fois que l'indicateur de stabilisation O est
affiché sur l'écran, appuyez sur la touche ZERO
Le poids d'étalonnage utilisé, équivalent à 1/3 de la
capacité de la balance, s'affichera sur l'écran.
5. Placez le poids d'étalonnage, équivalent à 1/3 de la
capacité de la balance, sur la plateforme.
6. Une fois que l'indicateur de stabilisation O est affiché
sur l'écran, appuyez sur la touche ZERO
Zero
d'étalonnage de pleine capacité s'affichera sur l'écran.
Zero
. Le poids
.
.
UnLoAd
3. Retirez tout poids de la plateforme.
4. Une fois que l'indicateur de stabilisation O est affiché
sur l'écran, appuyez sur la touche ZERO
poids d'étalonnage utilisé s'affichera sur l'écran.
PAGE 25 OF 27 0417 I H -1649
Zero
. Le dernier
7. Placez le poids d'étalonnage de pleine capacité
sur la plateforme.
8. Une fois que l'indicateur de stabilisation O est
affiché sur l'écran, appuyez sur la touche ZERO
Zero
9. La balance se mettra en mode d'autotest. Retirez le poids
avant que l'autotest ne soit terminé. Une fois l'autotest
terminé, la balance passera en mode de pesage.
.
Page 26

DÉPANNAGE
PROBLÈME DE FONCTIONNEMENT CAUSES RECOMMANDATIONS
L'affichage est vide, la balance
s'éteint ou ne s'allume pas
L'alimentation électrique principale est coupée.
L'alimentation électrique n'est pas branchée.
L'alimentation électrique est défectueuse.
La batterie interne n'est pas chargée.
L'affichage est éteint.
Vérifiez que la balance est alimentée en
électricité. Vérifiez que l'interrupteur est
en position de marche.
Vérifiez que la tension en direction de
la balance correspond aux étiquettes
d'alimentation électrique apposées au
module d'alimentation ou à la balance.
Retirez la batterie et branchez la balance.
Si la balance fonctionne, vous devez
remplacer la batterie.
L'affichage est vide après le test
de démarrage; message d'erreur
affichage bloqué.
OL ou FULL s'affiche.
UL ou NULL s'affiche.
L'affichage est instable.
Le plateau n'est pas installé.
Le poids est instable.
La cellule de charge est endommagée.
Le système mécanique est endommagé.
La capacité maximale est dépassée.
Le système mécanique de la cellule de charge est
endommagé.
L'alimentation électrique est défectueuse.
Le poids sur la balance est inférieur à la limite
autorisée.
Le plateau a été retiré.
Le support du plateau n'est pas correctement installé.
L'alimentation électrique est défectueuse.
Le système mécanique ou la cellule de charge est
endommagé(e).
Présence de courants d'air.
Présence d'une obstruction sous le plateau.
L'échantillon est en mouvement (pesée animale).
Table est soumise à des vibrations.
La température a radicalement changé.
L'alimentation électrique est défectueuse.
Vérifiez que le plateau est correctement
installé.
Rallumez la balance.
Vérifiez que le plateau est correctement
installé.
Rallumez la balance.
Vérifiez que le plateau est correctement
installé.
Appuyez sur la touche ZERO pour
réinitialiser.
Rallumez la balance.
Vérifier que la balance se trouve dans un
emplacement correct, sur une surface
stable.
Vérifiez que l'alimentation électrique est
adaptée à la balance.
La balance ne pèse pas
correctement
Impossible d'utiliser la pleine
capacité
PAGE 26 OF 27 0417 I H -1649
Erreur d'étalonnage.
Erreur de linéarité.
L'appareil est étalonné avec un poids inexact.
La balance n'est pas d'aplomb.
Présence d'une obstruction entre l'échantillon et le couvercle.
L'unité de poids affichée est incorrecte.
L'accumulation automatique est activée. (AU on)
Les butées de surcharge touchent le support du
panneau ou le bas de la cellule de charge.
Présence d'un problème électronique sur A/D.
Les paramètres sont réglés de manière incorrecte.
Problème de cellule de charge ou de système mécanique.
Vérifiez l'unité de poids.
Réétalonnez.
Réglez la linéarité.
Vérifiez que le plateau est correctement
installé.
Vérifier que l'installation est correcte.
Désactivez la fonction automatique
(reportez-vous à la section Opérations).
Vérifiez l'unité de poids.
Recherchez la présence d'une
obstruction sous le plateau et vérifiez son
installation.
Page 27

DÉPANNAGE (SUITE)
PROBLÈME DE FONCTIONNEMENT CAUSES RECOMMANDATIONS
Fonctionnement non linéaire.
Les butées de surchargent entre en contact trop tôt.
Le système mécanique ou la cellule de charge est
endommagé(e).
Le système A/D est endommagé.
Recherchez la présence d'une
obstruction sous le plateau et vérifiez
son installation.
Réglez la linéarité.
Erreur charge décentrée.
La batterie ne se charge pas.
Réglez le système mécanique.
Les butées de surcharge sont incorrectes.
La cellule de charge est endommagée.
Tension électrique absente ou trop faible.
Dysfonctionnement du circuit de charge.
Dysfonctionnement de la batterie.
Recherchez la présence d'une
obstruction sous le plateau et vérifiez
son installation.
Vérifiez que les batteries sont
rechargeables.
Vérifiez que la tension de
l’alimentation électrique est correcte.
CODES D'ERREUR
Au cours du test d'allumage initial ou pendant le fonctionnement, la balance peut afficher un message
d'erreur. Les renseignements relatifs aux messages d'erreur spécifiques sont décrits ci-dessous.
Si un message d'erreur s'affiche, répétez la procédure qui a provoqué le message (allumage de la
balance, étalonnage ou autres fonctions). Si des messages d'erreur s'affichent, éteignez la balance,
patientez 3-5minutes, puis rallumez la balance. Si le message d'erreur s'affiche toujours, communiquez
avec le service clientèle d'Uline au 1-800-295-5510 pour obtenir une assistance supplémentaire.
CODE D'ERREUR DESCRIPTION CAUSES
Err4
Le point zéro initial est
supérieur à la valeur autorisée
(4% de la capacité maximale)
à la mise sous tension ou lors
de l'activation de la touche
ZERO/ENTER.
Erreur de clavier. Fonctionnement incorrect de la balance.
Présence d'un poids sur le plateau à l'allumage de la balance.
Poids excessif sur le plateau lors de la mise à zéro de la balance.
Étalonnage incorrect de la balance.
Cellule de charge endommagée.
Circuit électronique endommagé.
Err5
Err6
Err7
Nombre A/D incorrect à
l'allumage de la balance.
Impossible de définir le poids
actuel comme 100%.
Erreur de poids d'étalonnage. Poids utilisé incorrect.
Err8
Err9
π
PAGE 27 OF 27 0417 I H -1649
CHICAGO • ATLANTA • DALLAS • LOS ANGELES • MINNEAPOLIS • NYC/PHILA • SEATTLE • MEXICO • CANADA
Instable, impossible de revenir
à zéro (ce message s'affiche
uniquement à l'allumage de la
balance).
La plateforme n'est pas installée.
La cellule de charge est endommagée.
Le circuit électronique est endommagé.
Ce message s'affiche uniquement lorsque vous appuyez sur la
touche «%» au point zéro.
Vérifiez que la balance est posée sur une surface stable.
Si la balance se trouvait hors de la plage de température
de fonctionnement, patientez suffisamment, le temps que la
température de l'appareil revienne dans la plage acceptable.
(Reportez-vous à la section Spécifications)
1-800-295-5510
uline.ca
 Loading...