

Page 1

π
H -112 3
ECONOMY
COUNTING SCALE
DISPLAY KEYPAD
H -1121, H -1122
1-80 0-295 -5510
uline.com
OVERVIEW OF CONTROLS
1
WEIGHT
LOW
BATT.
TARE
0.131 0 10
ZERO
CHARGE
COUNTING SCALE
7 10 8 9 6 5 4
lb
UNIT WEIGHT
2 3
lb/pcs
TOTAL COUNT
SAMPLE
M+
INSUFFICIENT
DISPLAY DEFINITIONS
# NAME DESCRIPTION
1 Weight
2 Unit Weight Displays the unit weight.
3 Total Count Displays the number of counted items.
4 HI, LO, OK Indicators for check counting function.
Sample
5
Insufficient
6 M+ Indicates when accumulating.
7 TARE
8 ZERO
9 Low Batt
10 Charge
Displays the total weight.
Indicates when sample size is less than
10 pcs or unit weight is smaller than 4/5
of min. weighing capacity.
TARE shown on the display indicating
tare weight is set.
ZERO shown on the display after reset
of the weight to zero.
Symbol shown on the display
indicating battery low, recharging the
battery is required.
Light is red when charging, light is
green when charge is completed.
pcs
HI OK LO
KEYPAD DEFINITIONS
# NAME DESCRIPTION
1 0-9
2 CK
3 M+
4 MC
5 MR
6 ZERO
7 TARE
8 SMPL
9 CE
10 UWS
11 •
Numeric Keys
Check key. Used when keying in the amount
to check.
Add to the memory.
Memory clear. Clears out what has been
stored into the memory.
Memory recall. Displays what has been
entered into the memory.
If there is a minor weight displayed, without
anything on the platform, hit the zero key to
clear the display.
The tare key zeros out the weight of a
container being used to hold small parts.
Sample key. Used when keying in sample
amount.
Clear key. Clears out the unit weight
displayed.
Used when manually keying in the unit
weight.
Decimal Key.
1 2 3 4 5 6
CK
54321
09876
M+ MC MR
.
UWS
CE
SMPL TARE
11 10 9 8 7
ZERO
PAGE 1 OF 6 0515 IH-1121
Page 2
SET-UP
SELECTING THE LOCATION
The scale should always be used in an environment that
is free from excessive air currents, corrosives, vibration
and temperature or humidity extremes. These factors will
affect displayed weight readings.
Avoid placing the scale next to or near:
• Open windows or doors.
• Air conditioning or heat vents.
• Vibrating, rotating or reciprocating equipment.
• Magnetic fields.
• Equipment that generates magnetic fields.
• Direct sunlight.
• An unstable work surface.
• A dusty environment.
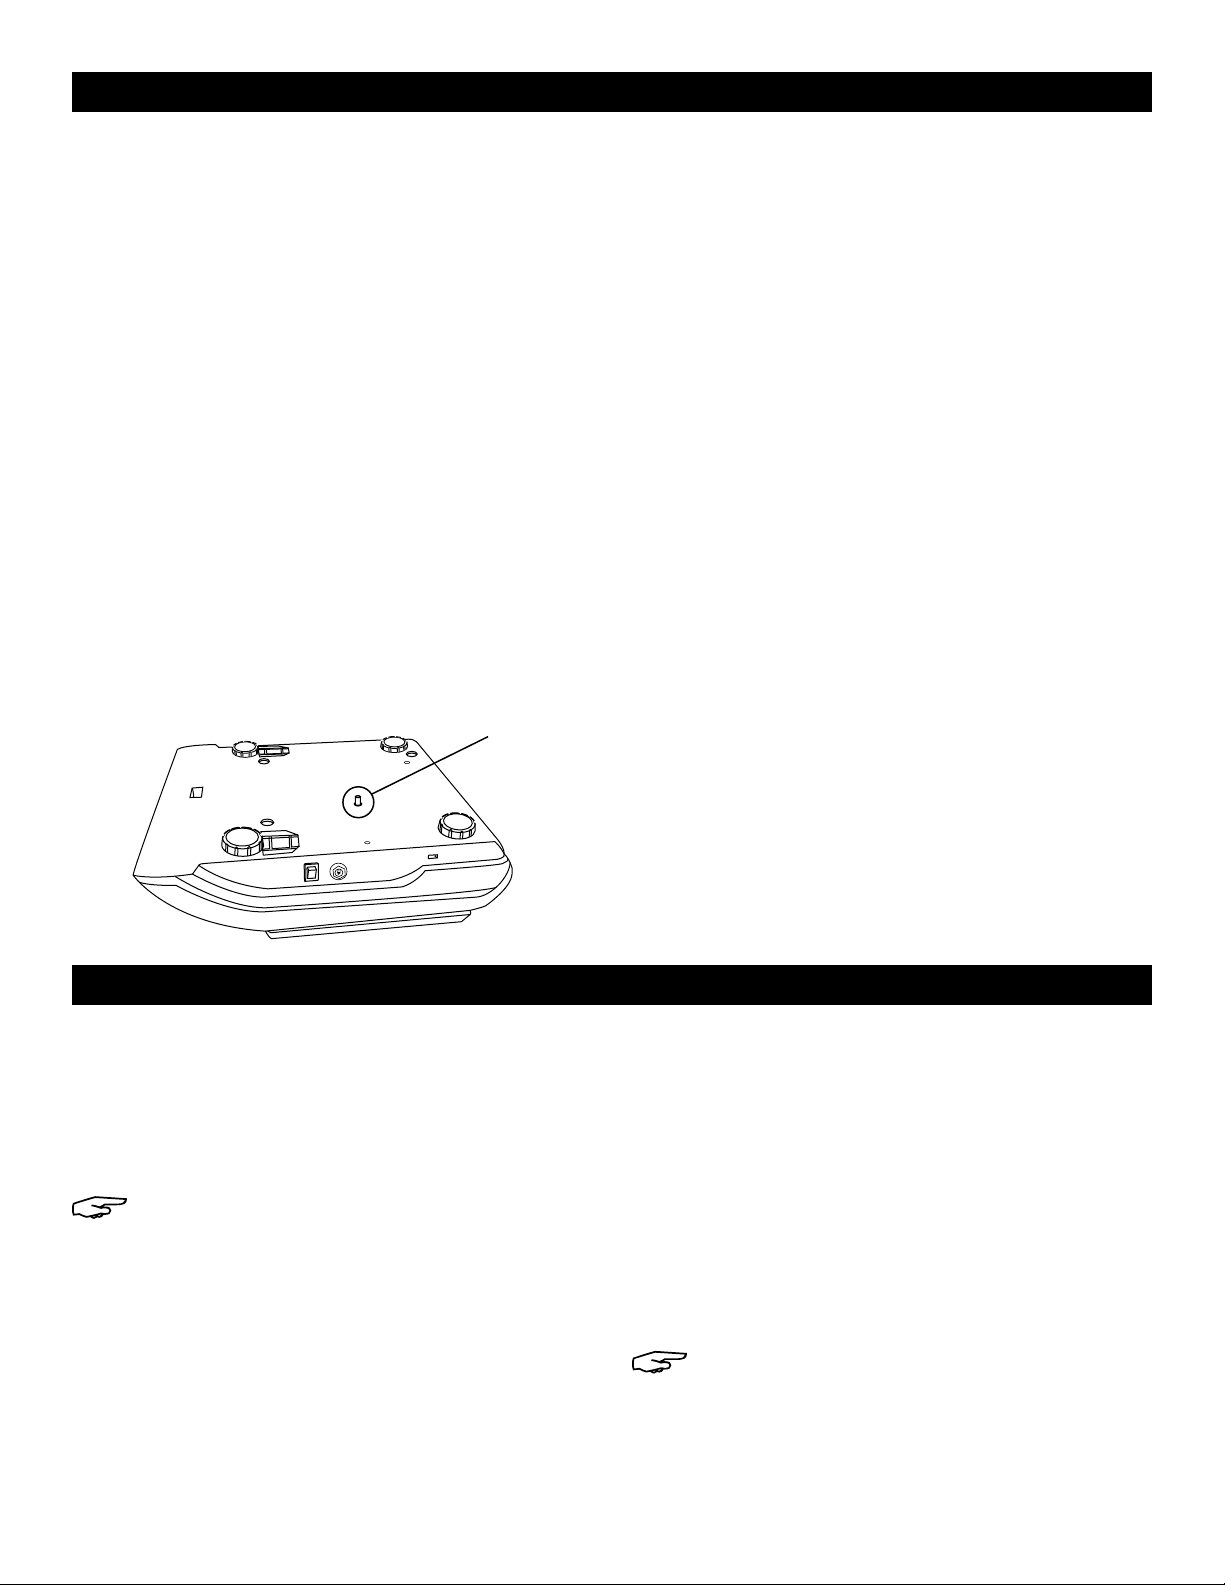
REMOVING THE SHIPPING SCREW
• Remove shipping screw from bottom of scale before
using. (See Figure 1)
Shipping
Figure 1
Screw
INSTALLING THE PLATFORM
Place the platform on top of the scale.
LEVELING
The scale is equipped with a level indicator located to
the left of the keypad. Use the adjustable leveling feet
located on the bottom of the scale until the bubble
appears in the center circle of the indicator.
CONNECTING POWER
The scale can operate continuously by connecting
directly to AC power or operate 120 hours on a fully
charged battery.
AC ADAPTER
Plug the AC adapter into the jack on the left side of the
scale.
BATTERY
The scale is equipped with a rechargeable battery.
When the battery voltage is low, a battery symbol
will start blinking in the left display. The scale will
automatically turn off 8 hours after the blinking has
started.
OPERATION
TURNING THE SCALE ON/OFF
Only power the scale on with an empty platform.
1. Power switch is located on the left side of the scale.
Press the power switch and the scale will start to count
down from nine to zero and will display the version in
the WEIGHT display. The scale is then ready for use.
NOTE: Allow scale to warm up for at least 20
minutes before use.
2. Press the power switch again, to turn the scale off.
CHANGE UNIT OF MEASURE
1. Turn off the scale.
2. Hold down the SMPL key and turn on the scale at the
same time.
3. Enter 1-1-3-2 and press the SMPL key. The words SEtu
will be shown in the weight display and -Lb- in the
total count display.
Plug the AC adapter in to recharge the battery. The
battery display window is located on the front panel on
the left side, next to the word CHARGE. When the display
is RED, the battery is being charged. It will take 8 hours
to fully charge the battery. When the display is GREEN,
the scale has been charged to its full capacity.
4. Press 1 to change the unit of measure. The words
SEtu will be shown in the weight display and -g- in
the total count display.
5. Press the SMPL key to accept.
6. Press the SMPL key again then press the ZERO key.
Scale will restart.
CALIBRATION
The scale is delivered pre-calibrated. There is no need
to calibrate the scale unless you feel it has become
inaccurate. You MUST use a precision test weight to
properly calibrate the scale. The test weight CANNOT
exceed the scale’s capacity.
NOTE: Calibration can only be done in metric
system weight (kg).
PAGE 2 OF 6 0515 IH-1121
Page 3

OPERATION CONTINUED
CALIBRATION WEIGHTS (METRIC ONLY)
Model # 1/3 weight 2/3 weight Full capacity
H -1121 2 kg 4 kg 6 kg
H -112 2 5 kg 10 kg 15 kg
H -1123 10 kg 20 kg 30 kg
SPAN CALIBRATION
1. Turn off the scale.
2. Hold down the SMPL key and turn on the scale.
• 0 will be displayed in the UNIT WEIGHT display.
• 0 will be displayed in the TOTAL COUNT display.
3. Press 1-1, then press SMPL.
• CAL. will be displayed in the WEIGHT display.
• Blinking 0 will be displayed in the UNIT WEIGHT
display.
• -H9- will be displayed in the TOTAL COUNT display.
• After 10-15 seconds Zero Calibration is completed
and the scale is now ready to be calibrated. CAL
will be in the weight display.
4. Press 1 to choose the weight of 1/3, 2/3 or full
capacity for calibration. Put the 1/3, 2/3 or full
capacity on the platform (kg unit). Press the
to confirm.
5. After 10-15 seconds the WEIGHT display will show PASS.
6. Remove the weights, press the SMPL key then the
ZERO key.
• Scale will restart.
•
key
THREE-POINT CALIBRATION
1. Start with the scale off.
2. While holding the TARE button, switch the scale on.
This will be displayed:
6. The WEIGHT display will then go to On2, place 2/3 of
the scale capacity on the platform (in KG):
On2
7. The WEIGHT display will then go to On3, place the
full scale capacity on the platform (in KG):
On3
8. If the calibration is successful, the scale will display
PASS in the WEIGHT display:
PASS
9. Remove weights from the platform, then press TARE
to return to weighing mode.
WEIGHING
1. Place item to be weight on the scale platform.
2. Weight will be shown in the WEIGHT display.
COUNTING
Use this mode to count parts of uniform weight.
SAMPLE OF UNIT WEIGHT
The scale cannot determine how many pieces are on a
platform without a sample.
1. Put the objects intended for sampling on the platform
2. Key in the sample quantity. This number will blink in
the UNIT WEIGHT display.
3. Press the SMPL key. The calculated unit weight will
then be shown in the UNIT WEIGHT display and the
number of objects is now shown in the TOTAL COUNT
display.
4. Put on the remaining objects. The total quantity will
then be displayed.
.
SEt
3. Remove all weights from the platform and press the
TARE button.
4. On0 will be displayed on the WEIGHT display:
On0
5. Once the WEIGHT display goes to On1, place 1/3 of
the scale capacity on the platform (in KG):
On1
PAGE 3 OF 6 0515 IH-1121
0 0
Enter a known unit weight by pressing the value first,
followed by the UWS key. You must key in the unit weight
using the metric system form. (Move the decimal point
over to the right 3 places).
EXAMPLE: You know your unit weight is .0014 lbs. If you
want to key in the weight manually, you would key in
0.014 and hit the UWS key.
UNIT WEIGHT RECALCULATING
The unit weight will be averaged again if you add the
remaining quantity gradually, by several lots. This will
help eliminate errors caused by the possible weight
variation among each object and lead to more
accurate results.
MANUAL ENTRY OF UNIT WEIGHT
Page 4

OPERATION CONTINUED
When adding objects to the pan, be sure that the
quantity is LESS THAN those already on the platform.
An alarm will sound a beep when the unit weight is
averaged again.
LACK OF UNIT WEIGHT
If the unit weight is no more than 4/5 of the set display
resolution (accuracy) or less than 10 piece sample,
the sample insufficient light will blink in the lower-right
corner of the UNIT WEIGHT display, reminding the user
that the unit weight is too small for accurate quantity
calculations.
MODEL
H -1121 .0005 lbs. .020 lbs.
H -1122 0.001 lbs. .040 lbs.
H -1123 0.002 lbs. .080 lbs.
If the unit weight is too light, another scale is needed.
Continuing to use this scale will result in less accurate
results.
MINIMUM PIECE
WEIGHT
MINIMUM
SAMPLE WEIGHT
TARE
When weighing an item that is in a container, taring
stores the container weight to memory.
To store the tare weight into memory and set the WEIGHT
display as zero:
1. Place an empty container on the platform.
2. Press TARE. The word TARE will be displayed in the
lower left of the WEIGHT display.
The container’s weight is then stored in the scale’s
memory.
3. Add pieces to the container. As the pieces are
added, their net weight will be displayed.
Removing the container from the platform will cause the
scale to display the container’s weight as a negative
number. Pressing the TARE or ZERO key will readjust the
scale to zero.
CHECK COUNTING
Users can set a number for counting check. When the
number of objects on the platform is equal to or larger
than the preset checking number the alarm sound
beeps repeatedly.
SET CHECK COUNT
1. Press CK key. CH will blink in the WEIGHT display
and the Hi setting will be shown in the UNIT WEIGHT
display.
2. Key in the desired checking number.
3. Press the
•
key to switch to Lo setting.
4. Key in the desired number.
5. Press CK again to accept.
CLEAR CHECK COUNT
1. Press the CK key.
2. Press the
•
key twice to reset.
ACCUMULATION
Use the M+, MR and MC keys to add, recall or clear
weight, accumulation times and total count.
ACCUMULATE DATA
Press the M+ key after the weight and total count has
been calculated and displayed. The M+ will light up.
The scale will show the accumulated weight in the
WEIGHT display, “ALL XX” (or ALL X) in the UNIT WEIGHT
display (XX represents the total accumulation times; at
the most 99 accumulations can be accepted), and the
total quantity in the TOTAL COUNT display.
ADDING ADDITIONAL LOTS
Remove the current lot of objects from the platform.
Put on the next lot of objects and press the M+ key
again. New data will then be added to the memory.
RECALL DATA
Stored data can be recalled by pressing the MR
key. When this is pressed the scale will show the
accumulated data. Total weight will be shown in the
WEIGHT display and the total quantity will be shown in
the TOTAL COUNT display.
The UNIT WEIGHT display will show ALL XX (or ALL X). XX
represents the total accumulated times.
Press MR repeatedly and the scale will show the stored
data from item 1 to the last item (at most 9 individual
items will be displayed). The UNIT WEIGHT display will
show ACC XX or ACC X to indicate the number of the
displayed item.
All the recalled data will be displayed in revolving order
if MR is pressed repeatedly.
CLEAR DATA
Press the MC key to clear the stored data.
pressed in the normal weighing mode, or in the memory
recall mode with accumulated data displayed (the UNIT
WEIGHT display shows ALL XX), the UNIT WEIGHT display
will show ALL 0, and both the accumulated data and the
individual item will be cleared.
If MC is pressed in the memory recall mode, when the
individual item is displayed (the UNIT WEIGHT display
shows ACC XX), only the displayed individual item will
be cleared.
When MC is
PAGE 4 OF 6 0515 IH-1121
Page 5

SET UP MENU
TO ENTER SET UP MENU
1. Turn off the scale.
2. Press and hold the ZERO key while turning on the
scale. The display will show SET SCALE FUNC.
BACKLIGHT
The backlight is provided for better visibility when the
scale is used in a dark environment.
1. Press 0 and display will show SEt0 Light OnOFF.
L i9htSEt0 OnOFF
2. Continue to press 0 to choose setup:
• ON: Backlight will always be ON.
• ONOFF: Backlight will be ON only when there is
something on the platform and it is greater than 9
times of the set display accuracy.
• OFF: Backlight will always be off.
MOTION FILTERING
This function is provided for weighing vibrating objects
or to prevent the scale from vibration, which will affect
the stability of the scale.
1. Press 2 and the display will show SEt2 FiLt -1-.
F iLtSEt2 - 1 -
2. Continue to press 2 to choose motion filtering level as 1 or 2.
• Level 1: Reaction is faster, effect to filter vibration is worse.
• Level 2: Reaction is slower, effect to filter vibration is better.
3. Press ZERO to return back to the weighing/counting mode.
TURNING
When in the check counting mode, alarm sounds can
be enabled.
1. Press 7 and the display will show SEt7 bEEP nbEEP.
CHECK COUNTING SOUNDS ON/OFF
• 2: Backlight stays on for 2 seconds after weight is
applied to scale.
• 5: Backlight stays on for 5 seconds after weight is
applied to scale.
• 10: Backlight stays on for 10 seconds after weight is
applied to scale.
3. Press ZERO to return back to the weighing/counting mode.
AUTO POWER-OFF
When the auto power-off time is enabled, the scale will
automatically turn off when there has been no load on
the platform and the scale is stable at zero position for a
specific period of time (in minutes).
1. Press 3 and the display will show SEt3 OFFt OFF.
OFFtSEt3 OFF
2. Five options exist: 5, 10, 30, 60 minutes and OFF are
available.
3. Continue to press 3 to choose the desired setup.
When OFF is chosen, the Auto Power-Off feature is
not enabled and the scale will remain on.
bEEP nbEEP
2. Continue to press 7 to choose the correct set up.
• Un: Beep sounds when quantities are over
the setting of Hi.
• In: Beep sounds when quantities are within
the setting of Hi and Lo, including the Hi
and Lo limits.
• no: Beep sounds when quantities are out of
Hi and Lo setting.
• Lo: Beep sounds when quantities are below
the setting of Lo.
• nbeep: No beep alert.
3. Press zero to return back to weighing/counting mode.
4. Press ZERO to return back to the weighing/counting mode.
PAGE 5 OF 6 0515 IH-1121
Page 6

TROUBLESHOOTING
OPERATING ISSUE RECOMMENDATIONS
Not displaying accurate weights Make sure all shipping material has been removed (foam protective screw, etc.).
If scale is indicating insufficient sample Make sure sample and piece weight meet the scales minimum requirements.
Scale shuts off or will not turn on
Error 2
If the problem persists, or if the troubleshooting section does not resolve or describe your problem, contact Uline Customer
Service at 1-800-295-5510.
Make sure there is nothing on the platform when the scale is turned on.
Remove battery and plug the scale in. If the scale works, you will need to replace the battery.
Make sure shipping screw is removed from bottom of scale. Perform three point calibration.
π
CHICAGO • ATLANTA • DALLAS • LOS ANGELES • MINNEAPOLIS • NYC/PHILA • SEATTLE • MEXICO • CANADA
1-800 -295-5510
PAGE 6 OF 6 0515 IH-1121
uline.com
 Loading...