

Page 1

Para Español, vea páginas 7-12.
Pour le français, consulter les pages 13-18.
π
H-1036
ELECTRONIC KRAFT
TAPE DISPENSER
1-800-295-5510
uline.com
IMPORTANT!
Read this manual thoroughly and
familiarize yourself with ALL controls
and operating features. Keep this
manual for future reference and
maintenance.
Unpacking: Check the machine
for damage. If damage is found,
return to Uline.
TECHNICAL DATA
Dimensions of machine: 17¾ x 11½ x 9¾"
Weight of machine: 26½ lbs.
Voltage and frequency: see machine label
Control circuit in DC 115 Volts
Electrical power: 100W
Dispensing velocity: 2.5 ft. or 30" / sec.
Length: min. 4" / max. 46"
Sound measured in a room:
less than 70 dB (A)
TAPE
Types of gummed tape: All
PAPER FEATURES
Width: min. 3/4" / max. 4"
Maximum roll diameter: 7¾"
PAGE 1 OF 18 1120 IH-1036
Page 2
Reservoir
Random Length
GENERAL INFORMATION
CAUTION! Only trained personnel should be
allowed to operate or service this machine.
WARNING! Burn Danger – Switch off power,
unplug the dispenser and allow the top heater
to cool down before performing any cleaning,
maintenance or repair.
Follow all safety and operating instructions contained in
this manual. Check state and local safety and
electrical codes.
SETUP INSTRUCTIONS
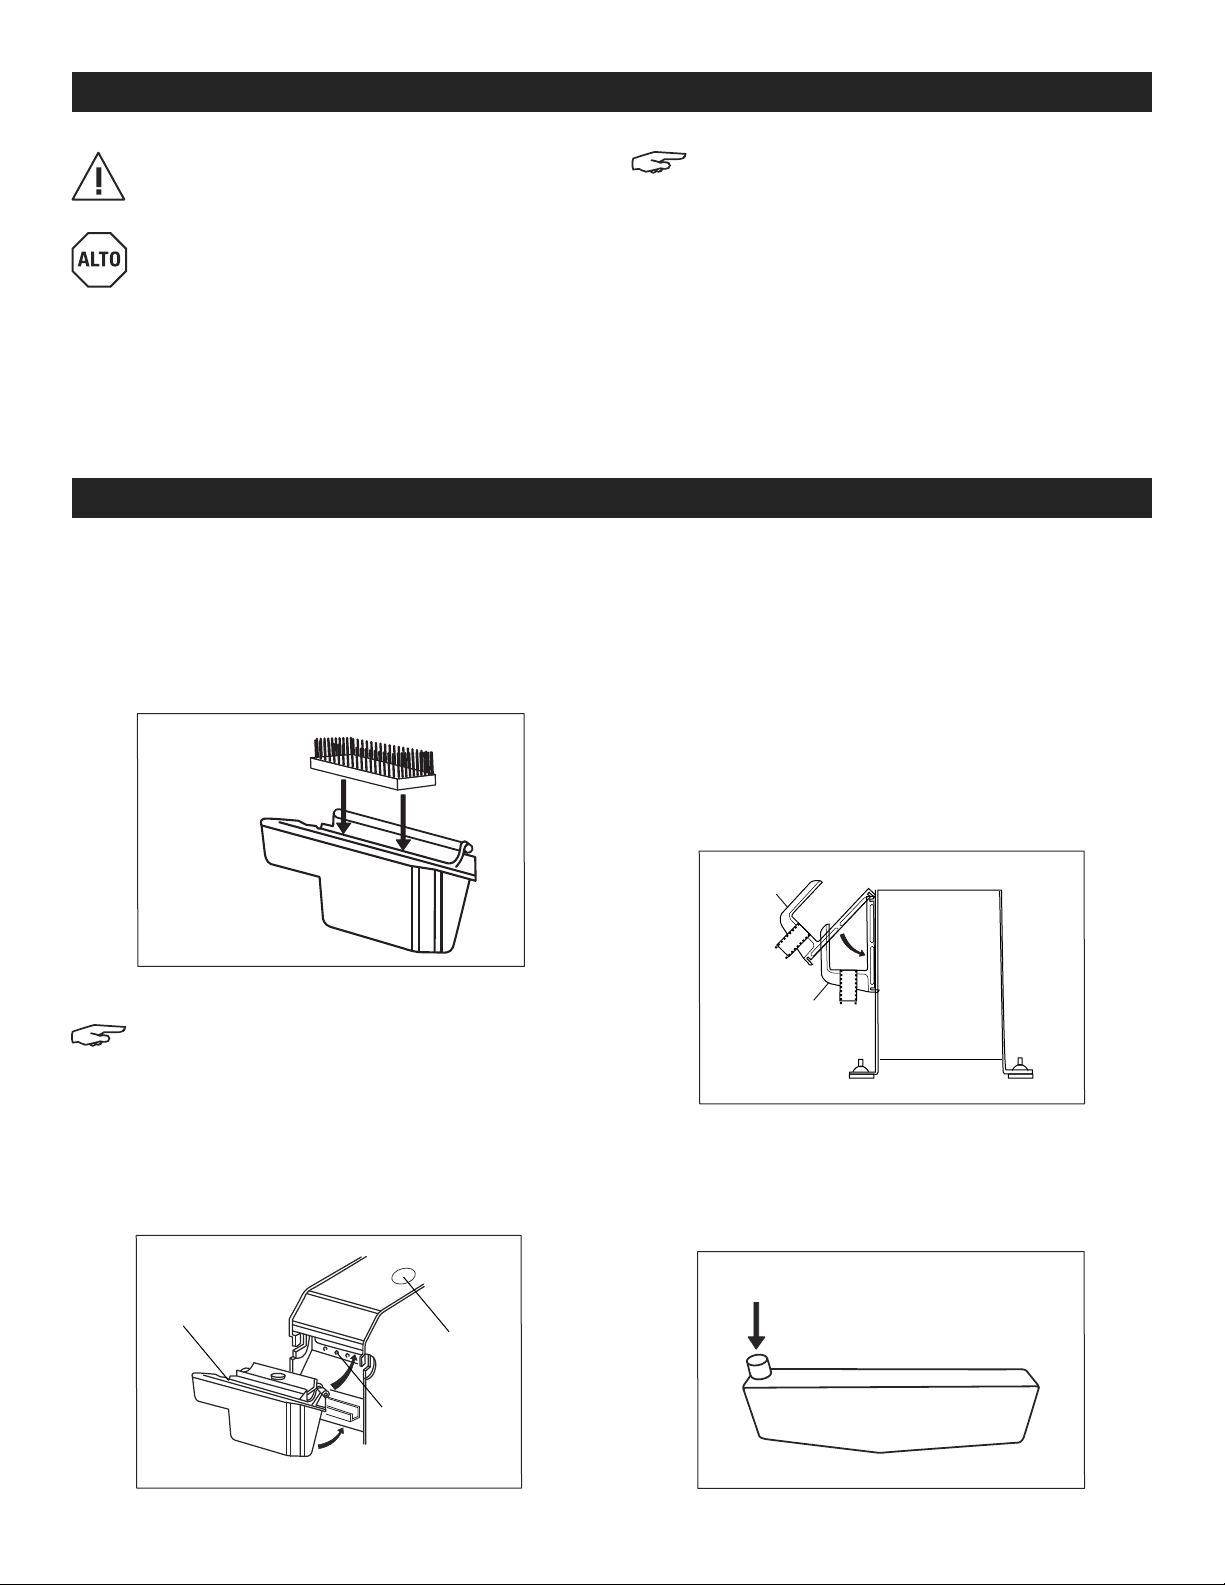
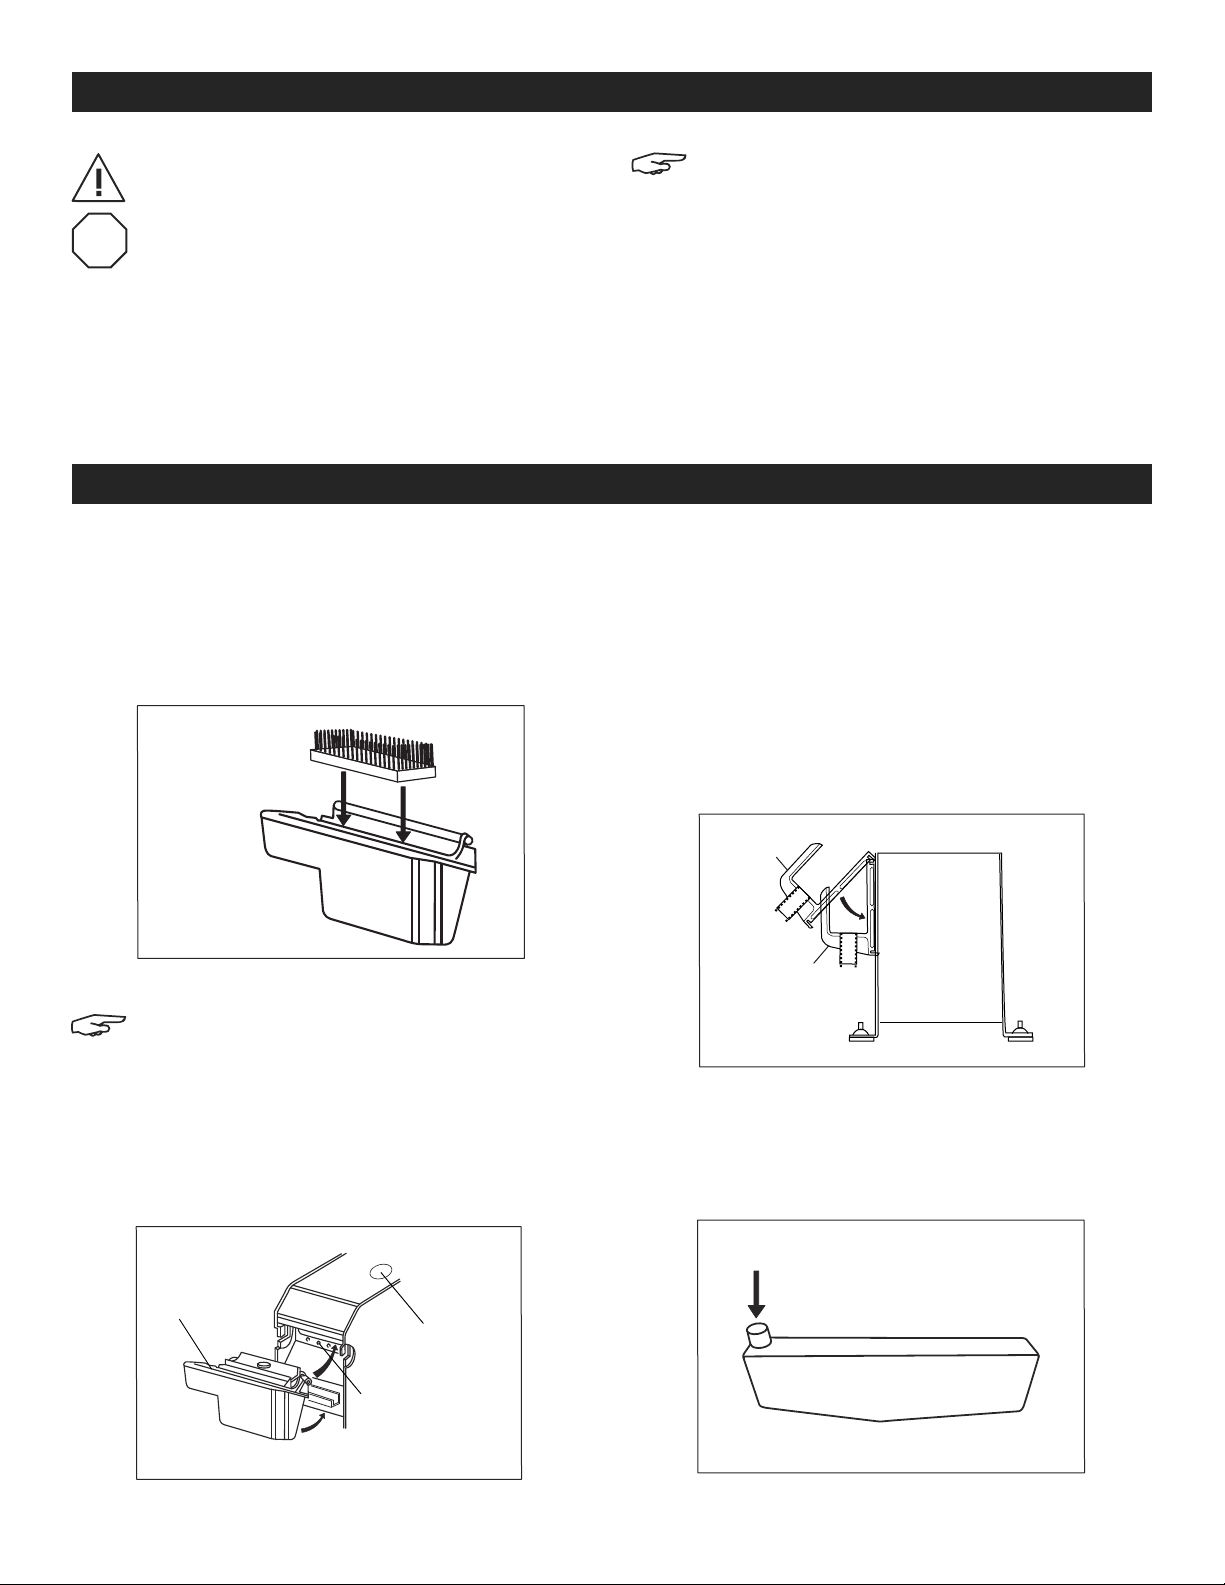
INSTALL WATER RESERVOIR
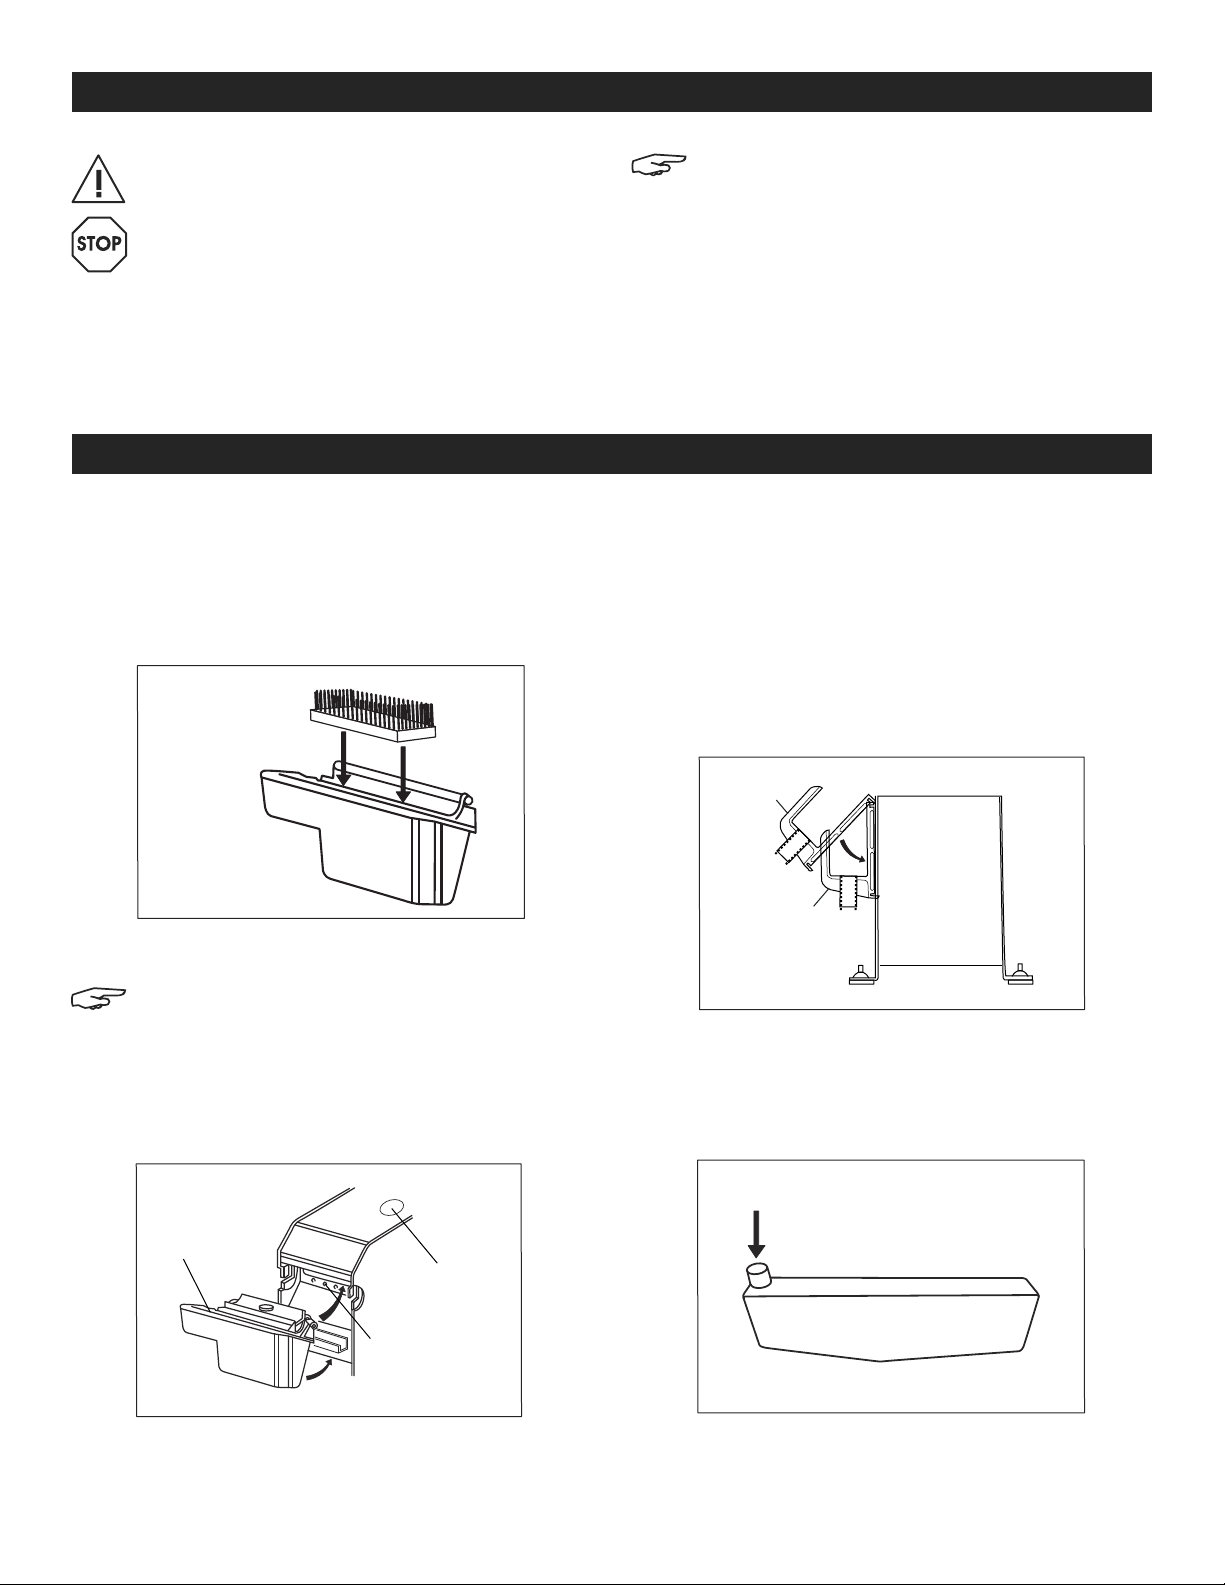
Before using the dispenser: Wash the moistening brush
with soap and water. Rinse thoroughly.
1. Insert the brush in the water reservoir. (See Figure 1)
Figure 1
NOTE: Tape dispenser is for use with gummed
tape ONLY. Uline accepts no responsibility for
damage due to improper use.
Check Voltage – Verify that machine voltage and power
supply voltage are the same before plugging in
the dispenser.
Keep the machine clean, dry and in good operating
condition. DO NOT place or operate machine in damp
or humid environments.
4. Slide reservoir down so bottom fits over tab
on dispenser.
5. Release the green button.
INSTALL BRACKETS FOR WATER BOTTLE
1. Mount the bottle brackets on left side of machine,
inserting first the upper tooth in top slot (C) then the
lower one until it locks (D). (See Figure 3)
2. Switch power on.
NOTE: Make sure top heater is switched OFF
and no tape is loaded.
3. While holding down the green Random Length
button, take the reservoir in your left hand and insert
the pivot shaft into the slots on sides of dispenser.
Move shaft up to the top of the slots. (See Figure 2)
Figure 2
Button
Pivot Shaft
Slots
C
D
Figure 3
FILL WATER BOTTLE
1. Remove bottle from brackets and turn over so filler
opening faces up. (See Figure 4)
WATER
Figure 4
PAGE 2 OF 18 1120 IH-1036
Page 3
Guide Plates
SETUP INSTRUCTIONS CONTINUED
FILL WATER BOTTLE CONTINUED
NOTE: If bottle is not empty, cover the filler
opening to prevent spills.
2. Fill bottle with clean water. Cover the filler opening
to prevent spilling, turn bottle over and place filler
opening over desired water level peg in the water
reservoir. (See Figure 5)
Figure 5
MIN.
MED.
MAX.
NOTE: Adjust reservoir level: To maintain the
optimum moisture level for the type of tape
you are using, place the water bottle filler
opening over one of the three water level pegs
in the water reservoir.
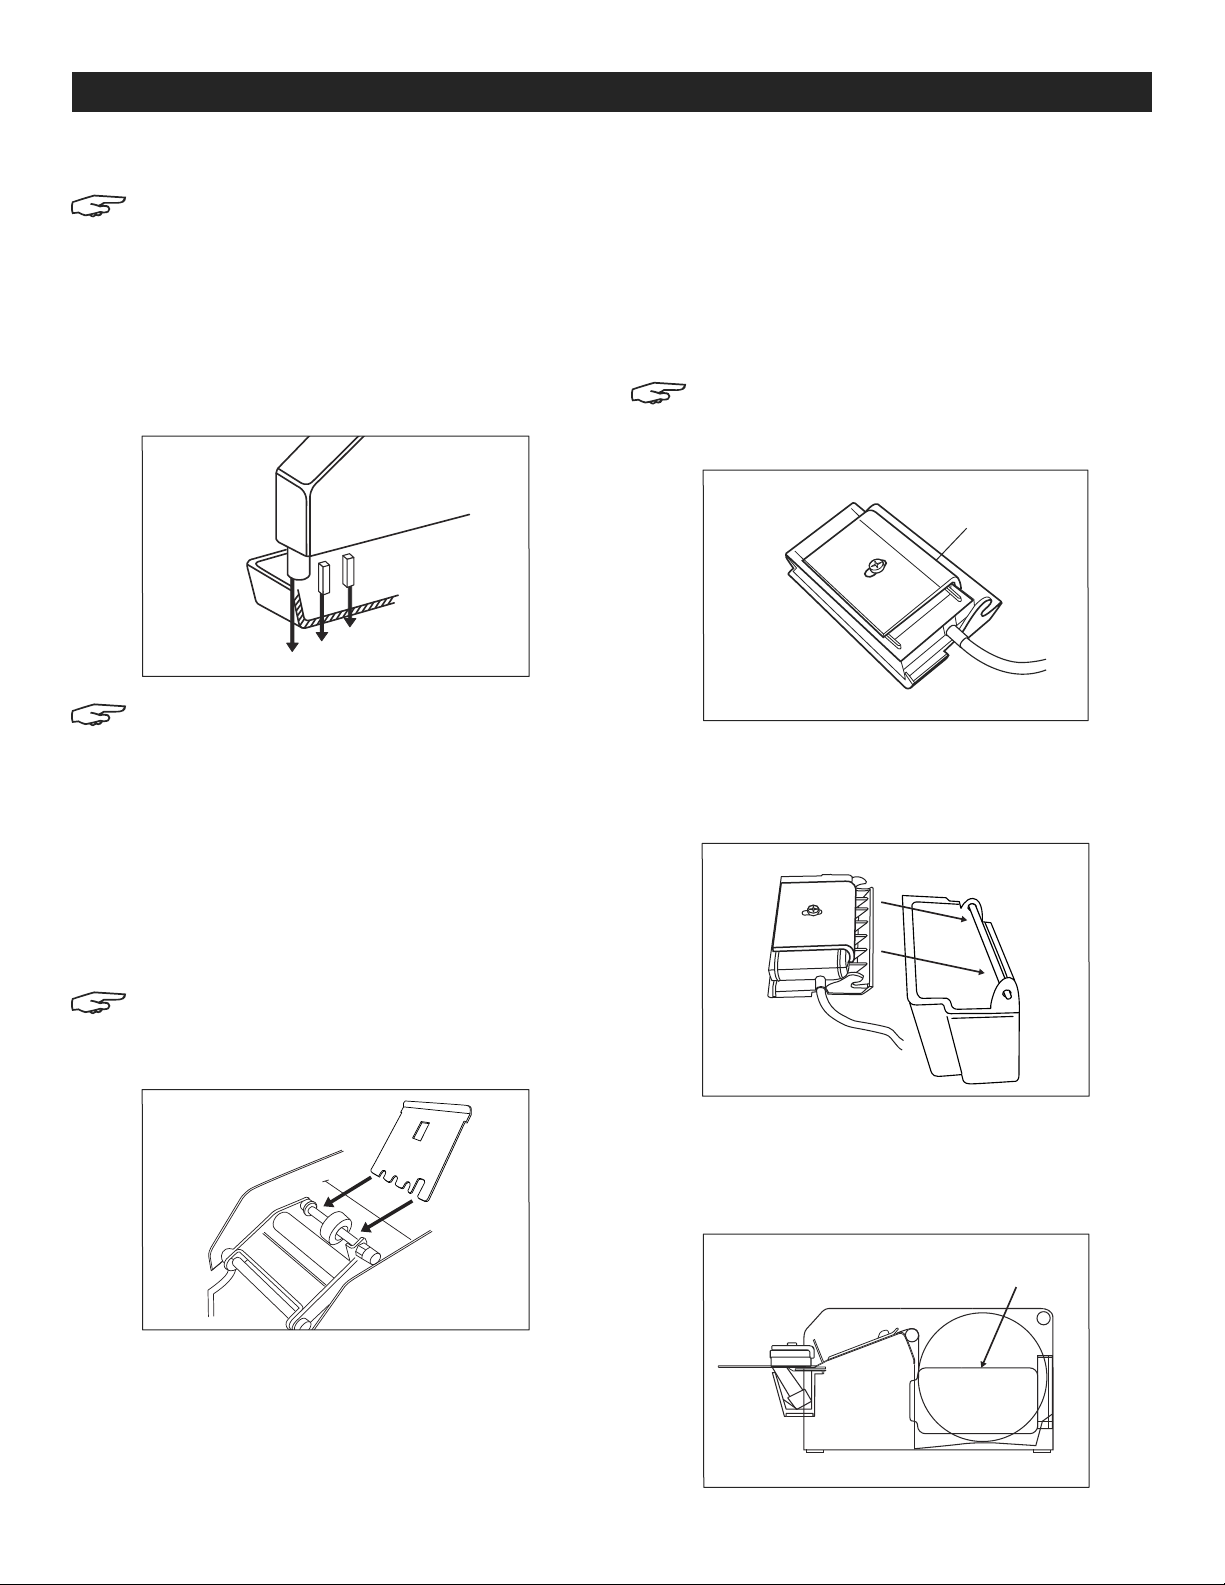
INSTALL UPPER PLATE GUIDE
INSTALL TOP HEATER
1. For lighter paper tapes (60/70 grade), remove the
weight on the top heater. For heavier paper tapes
(70+ grade), adjust screw and reposition the weight
so the bent part fits over the front of the top heater.
(See Figure 7)
NOTE: Paper jams often result from the weight
not being removed.
Figure 7
Weight
2. Take the top heater/weight assembly and slide the
notches over the pivot shaft on the water reservoir.
(See Figure 8)
With top cover open, slide the upper paper guide under
the white wheel.
NOTE: Flange should face up and toward tape
compartment. (See Figure 6)
Figure 6
Figure 8
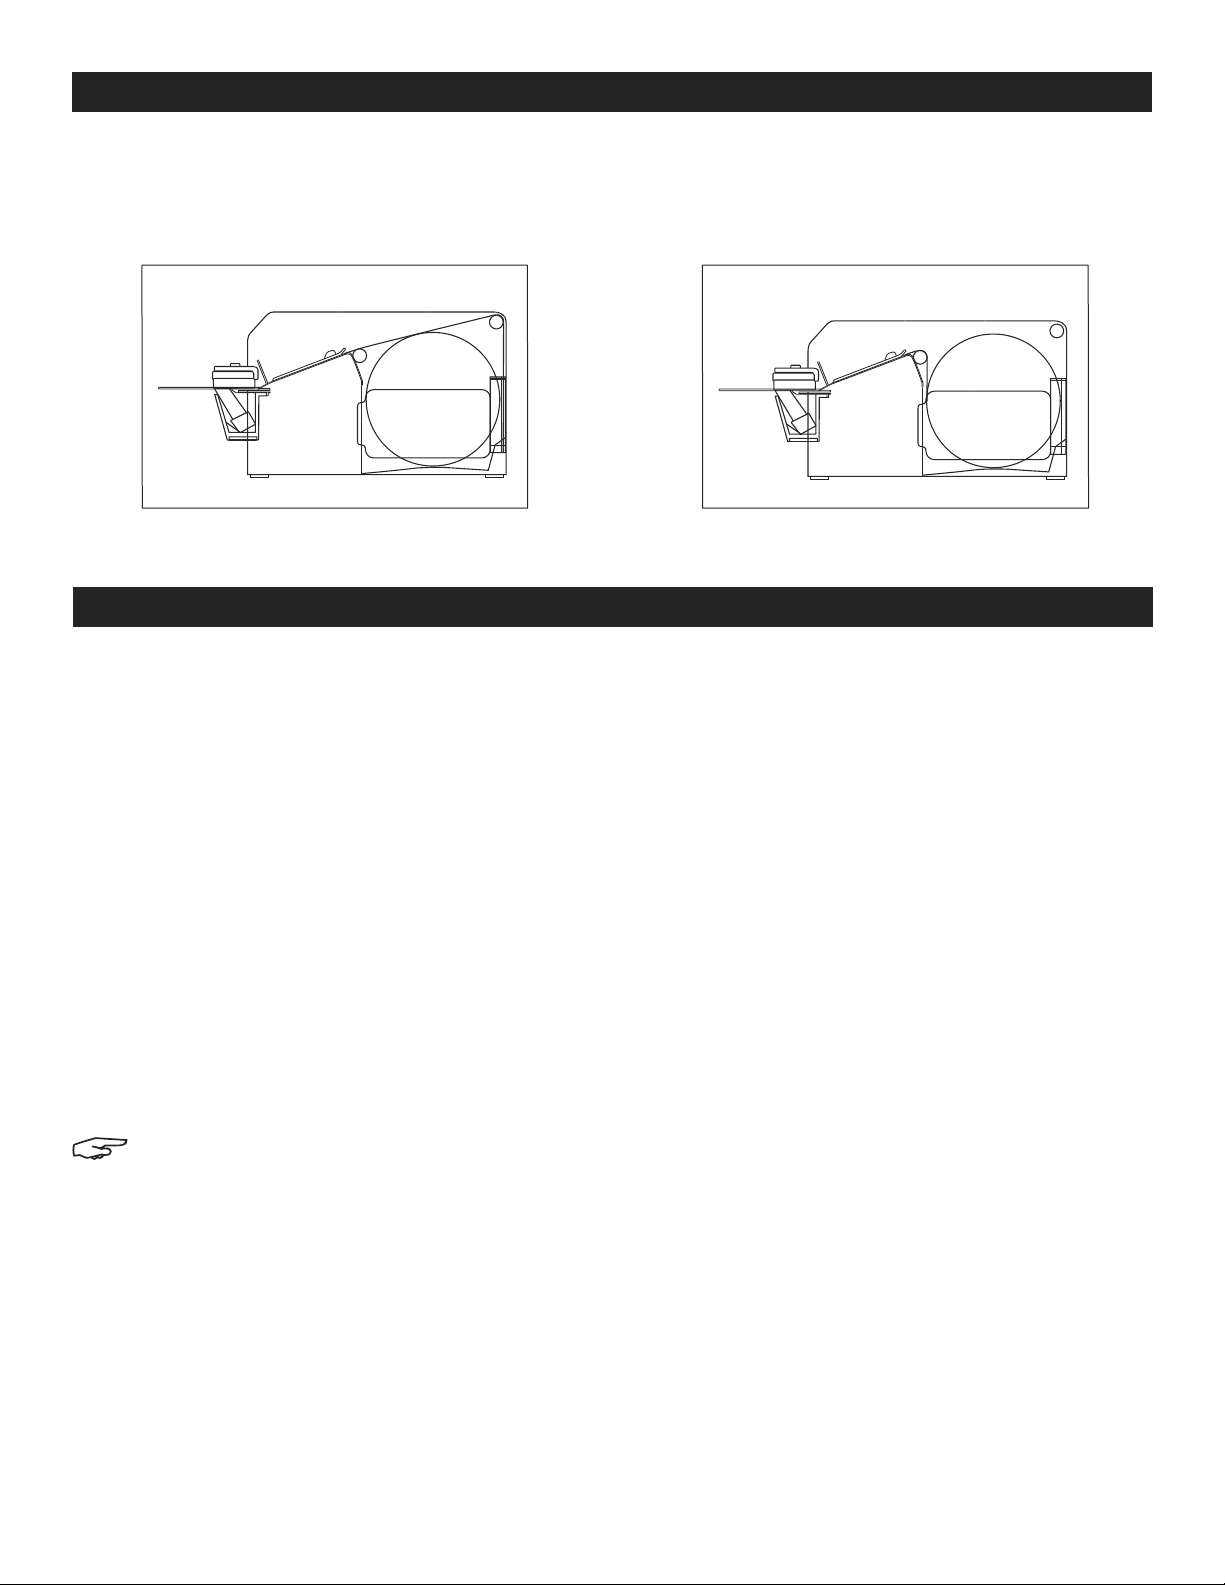
LOAD TAPE ROLL
1. Adjust roll guide plates to fit tape width.
(See Figure 9)
Figure 9
PAGE 3 OF 18 1120 IH-1036
Page 4
SETUP INSTRUCTIONS CONTINUED
LOAD TAPE ROLL CONTINUED
2. Reposition the roller for gummed in or gummed
out tapes.
Figure 10A
Gummed
In
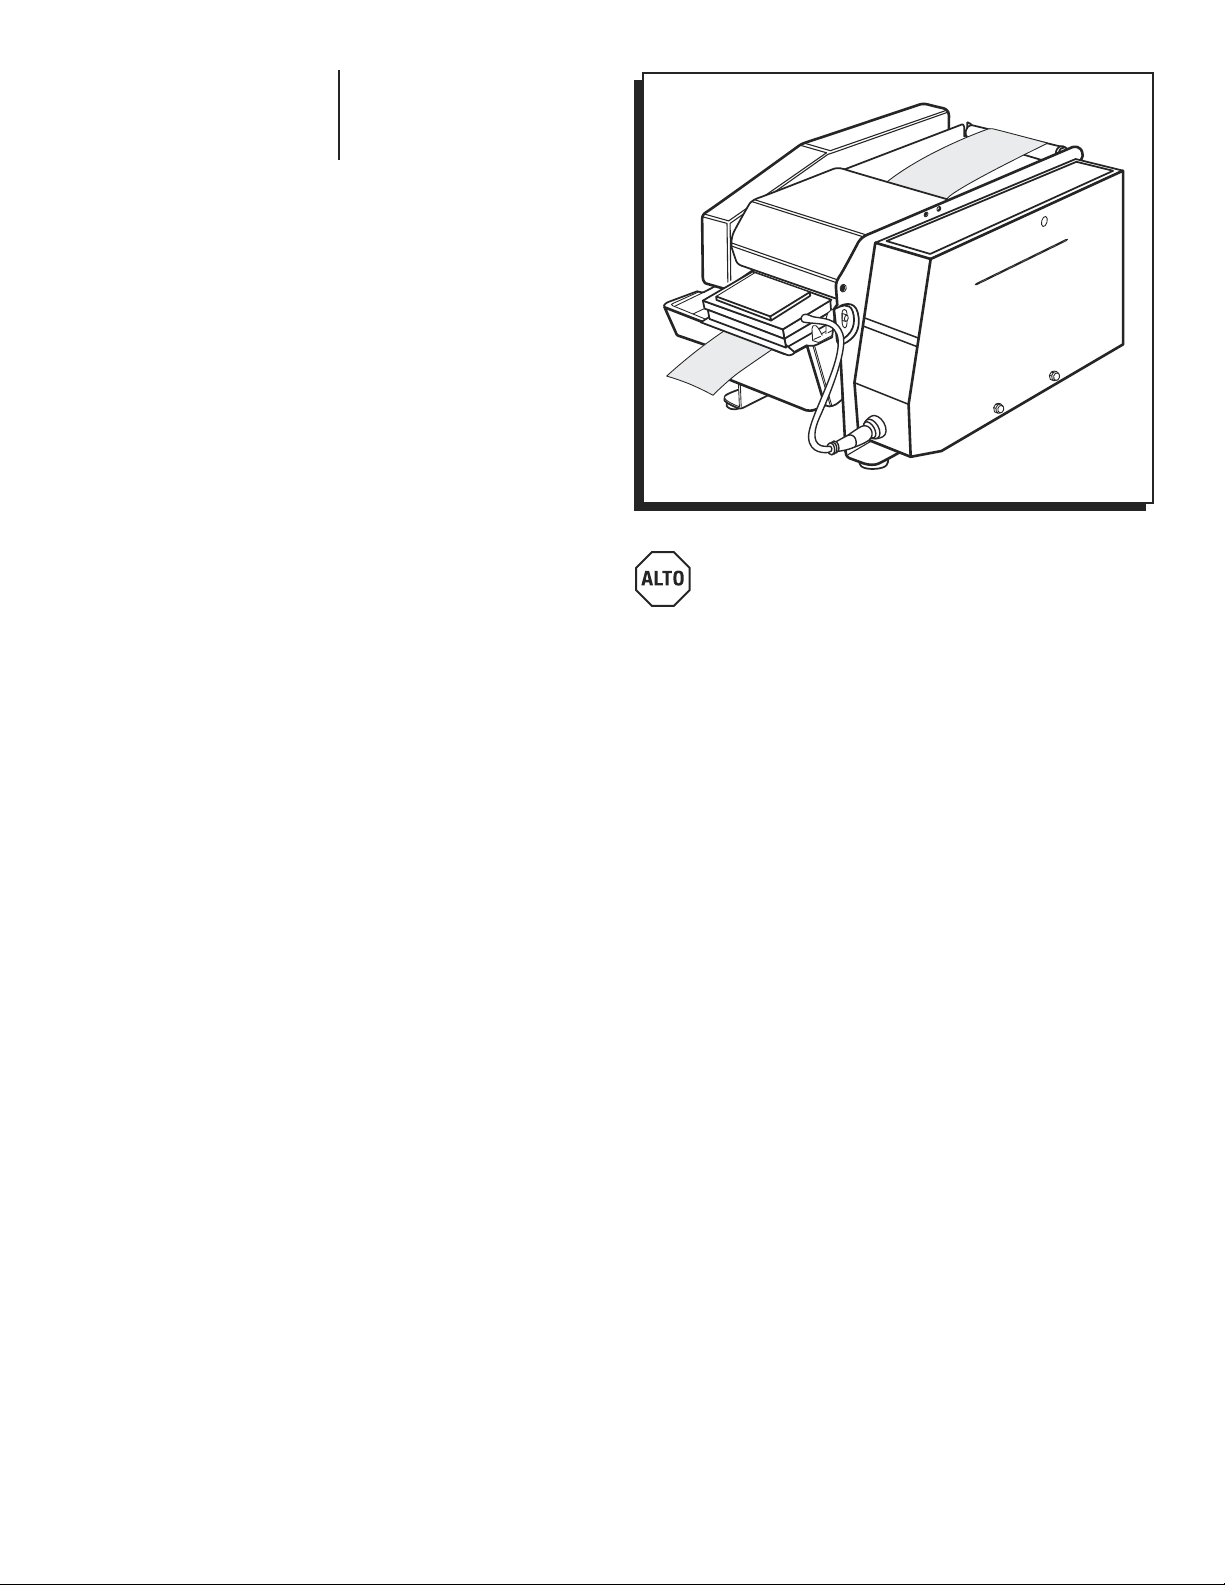
OPERATION
With machine switched on, tape loaded and water in
reservoir:
1. For preset lengths of tape: Press the numbered key
that corresponds to the desired length.
2. Add 2" to preset lengths. For example, to make a 10"
length of tape: First, push the +2 key (light comes
on), then push the '8' key. Dispenser makes a 10"
length of tape. Push the +2 key again to turn off
this feature.
3. For custom tape lengths: Press and hold the
green "Random Length" key until the desired length
is dispensed.
PROGRAMMING TWO LENGTHS OF TAPE
You can program the dispenser to memorize one or two
different tape lengths with the Short Length and Long
Length keys.
NOTE: Programmed keys must be reset each
time the dispenser is switched on.
1. Set Short Length: While holding down the Short
Length key, press the number key that corresponds
to the shorter length desired. Release both keys to
set the short length.
2. Set Long Length (second length): while holding
down the Long Length key, press the number key
that corresponds to the longer length desired.
Release both keys to set the long length.
3. Insert tape roll between guide plates and over roller
so tape is positioned gummed side down. Feed the
tape under the upper paper guide and white wheel.
(See Figures 10A & 10B)
Figure 10B
Gummed
Out
3. Use the Short Length key to dispense your shorter
length and the Long Length key to dispense the
longer length.
4. Slide the color-coded sliding indicators next to the
number keys to mark your two chosen lengths.
PROGRAMMING INTERMEDIATE LENGTHS OF TAPE
Use this procedure to dispense intermediate lengths of
tape (example, 18" or 22" lengths).
1. Press the +2 key (indicator light is on). This adds 2" to
any preset number key you choose.
2. Follow Steps 1-4 in "Programming Two Lengths of Tape."
USING THE TOP HEATER
Use the top heater in cold conditions or with particular
types of paper tape. Heats up within 3 minutes.
1. Switch heater ON. Press the thermometer icon key
(light comes on).
2. Switch heater OFF. Press the thermometer icon key
(light goes out).
WHEN DISPENSER IS NOT IN USE
Always switch power off and unplug dispenser.
PAGE 4 OF 18 1120 IH-1036
Page 5
MAINTENANCE AND CARE
CAUTION! Only trained personnel should be
allowed to operate or service this machine.
WARNING! Burn Danger – Switch off power,
unplug the dispenser and allow the top heater
to cool down before performing any cleaning,
maintenance or repair.
WEEKLY MAINTENANCE
1. Wash the moistening brush with soap and warm
water. Rinse thoroughly with water.
2. Clean the dispenser using compressed air (NEVER
WATER) to clean off dust and dirt.
MONTHLY MAINTENANCE
1. Lubricate the cutting blades with a drop of oil.
2. Clean the rubber tape advance wheel with water.
DO NOT grease or oil the wheel. Access the wheel
by removing the upper paper guide.
3. Clean the water reservoir with soap and water.
Rinse thoroughly.
4. Clean only the outside of the heater (close to the
brush) with a cloth dipped in decalcifying product.
HEATER CLEANING
WARNING! Burn Danger - Switch off power,
unplug the dispenser and allow the top heater
to cool down before attempting to clean
the heater.
CAUTION! NEVER use water or liquid to clean
the top heater.
5. To remove bigger deposits, use a very fine abrasive
cloth or thin blade– Do not scratch or damage the
surface.
6. Replace the heater if deposits cannot be removed
or after 3,500 hours of use.
PAGE 5 OF 18 1120 IH-1036
Page 6
10 11
15
19
D
C
G
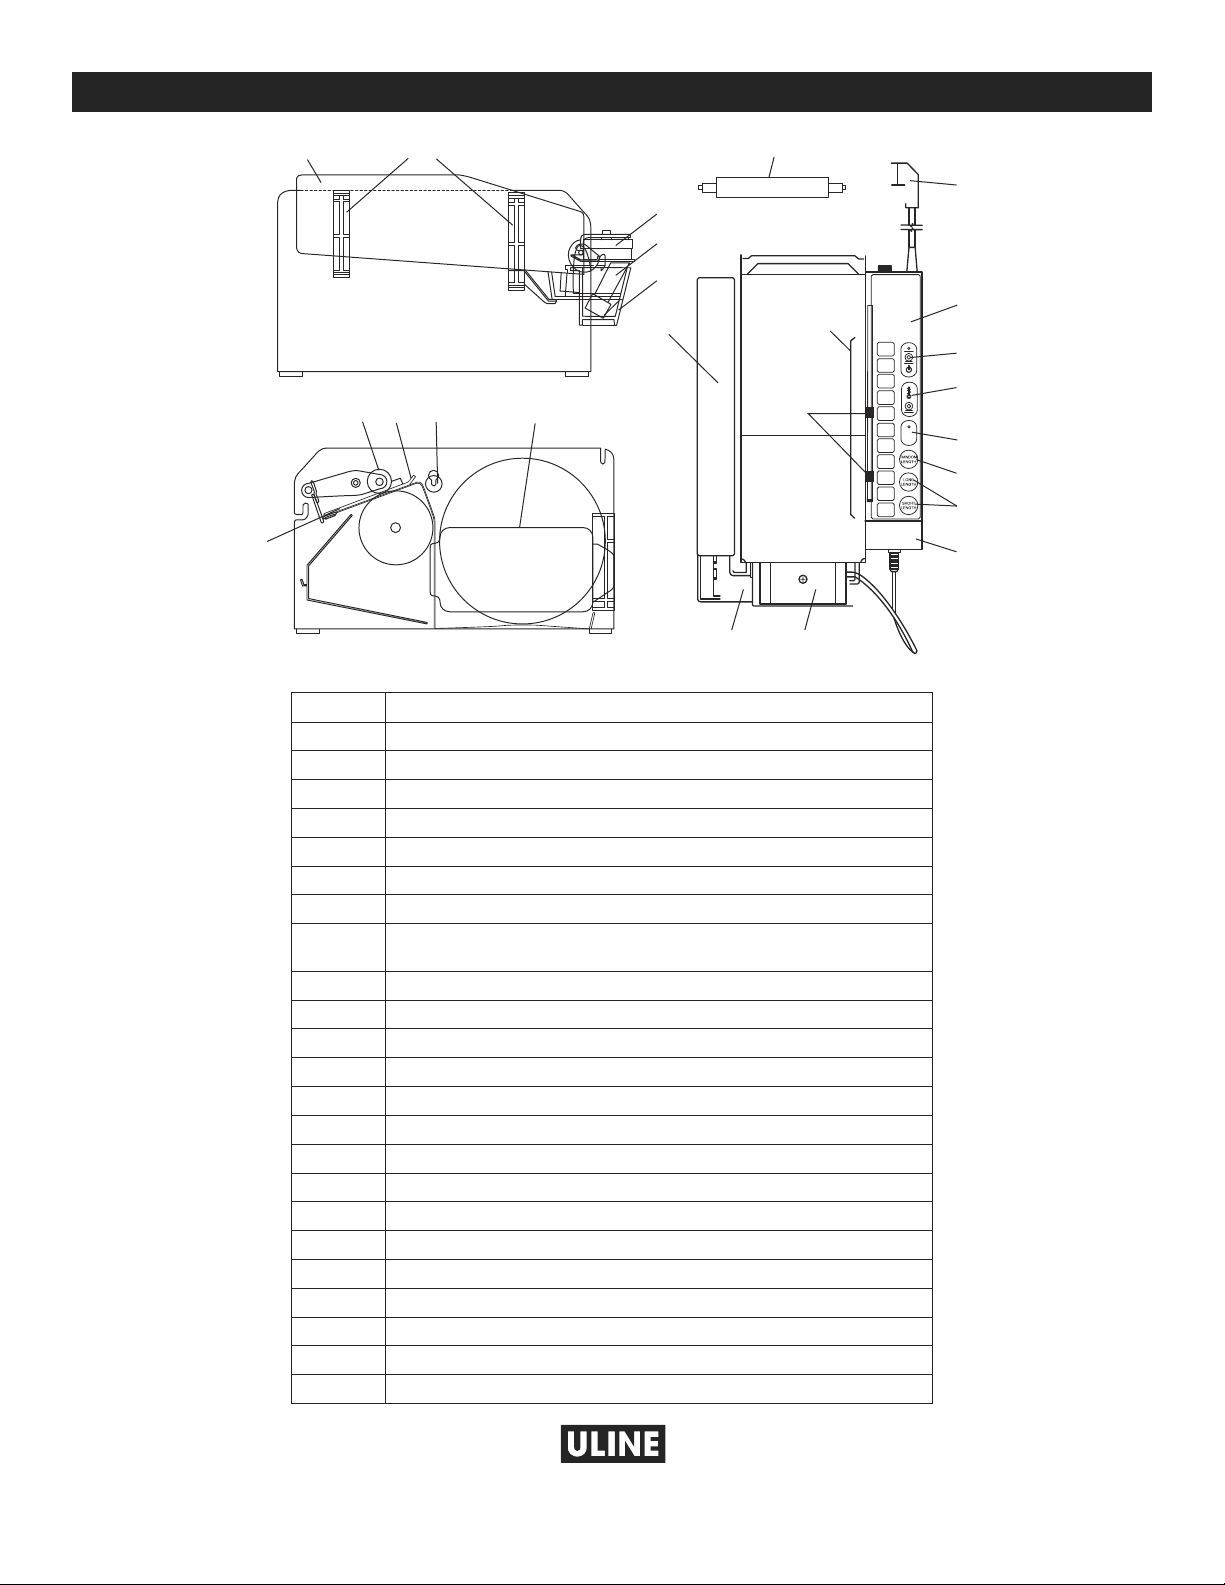
REFERENCE
1
0
uline.com
12
13
14
A
N
16 17 18 19
Q
M L
KEY DESCRIPTION
A Power Cord
B Side Cover
C Power
D Control Panel
E Green Key 'Random Length' – Dispenses tape
F Keys for 11 presets of tape length
G +2 (inches) key – presets length by 2"
'Short Length' – Sets one length of tape shorter
H
'Long Length' – Sets one length of tape longer than the first one
I Top Heater Switch
L Top Heater
M Water Reservoir
N Water Bottle
Q Colored Indicators
10 Water Reservoir
11 Bottle Holder
12 Top Heater 24V
13 Brush
14 Complete water tank without Top Heater and without brush
15 Knives (2)
16 Rolls (2)
17 Upper Paper Plate
18 20mm Diam. Roll
19 Roll Guide Plate
F
44
40
36
100°
8O°
I
°C
32
28
24
+2
20
16
12
8
4
E
H
B
-800-295-551
PAGE 6 OF 18 1120 IH-1036
Page 7
π
H-1036
DESPACHADOR
ELECTRÓNICO
DE CINTA KRAFT
800-295-5510
uline.mx
¡IMPORTANTE!
Lea detenidamente este manual
y familiarícese con TODOS los
controles y características de
funcionamiento. Conserve este
manual para referencias futuras y
mantenimiento.
Desempaque: Inspeccione la
máquina en busca de daños. Si se
encuentra algún daño, regrésela
a Uline.
INFORMACIÓN TÉCNICA
Dimensiones de la máquina:
(17¾ x 11½ x 9¾")
Peso de la máquina: 12 kg (26½ lbs.)
Voltaje y frecuencia: ver etiqueta de la máquina
Circuito de control en CD de 115 voltios
Potencia eléctrica: 100 W
Velocidad de despachado: 76.2 cm (2.5 pies o 30")
/ segundo
Longitud: mín. 10.2 cm (4") / máx. 116.9 cm (46")
Sonido medido en una habitación:
menos de 70 dB (A)
CINTA
Tipos de cinta engomada: Todos
CARACTERÍSTICAS DEL PAPEL
Ancho: mín. 1.9 cm (3/4") / máx. 10.2 cm (4")
Diámetro máximo del rollo: 19.7 cm (7¾")
45 x 29.2 x 24.8 cm
PAGE 7 OF 18 1120 IH-1036
Page 8
Depósito
Largo Aleatorio
INFORMACIÓN GENERAL
¡PRECAUCIÓN! Solo personal capacitado
deberá manejar o darle mantenimiento a esta
máquina.
¡ADVERTENCIA! Peligro de Quemaduras –
Apague el despachador, desenchúfelo
y permita que el calentador superior se
enfríe antes de limpiarlo, realizar tareas de
mantenimiento o reparaciones.
Siga todas las instrucciones de seguridad y
funcionamiento que se incluyen en este manual.
Verifique los códigos de seguridad y eléctricos estatales
y locales.
INSTRUCCIONES DE CONFIGURACIÓN
INSTALACIÓN DEL DEPÓSITO DE AGUA
Antes de usar el despachador: Lave el cepillo de
humectación con agua y jabón. Enjuáguelo bien.
1. Inserte el cepillo en el depósito de agua.
(Vea Diagrama 1)
Diagrama 1
NOTA: El despachador de cinta debe
utilizarse SOLO con cinta engomada. Uline
no acepta responsabilidad alguna por daños
ocasionados por un uso inapropiado.
Verifique el Voltaje - El voltaje de la máquina y el voltaje
de suministro de electricidad deben coincidir antes de
enchufar el despachador.
Mantenga la máquina limpia, seca y en buenas
condiciones de funcionamiento. NO coloque ni haga
funcionar la máquina en entornos húmedos o mojados.
4. Deslice el depósito hacia abajo de forma que la
parte inferior quede por encima de la pestaña del
despachador.
5. Libere el botón verde.
INSTALACIÓN DE LOS SOPORTES PARA LA BOTELLA
DE AGUA
1. Coloque los soportes de la botella en el lado
izquierdo de la máquina, insertando primero el
diente superior en la ranura superior (C) y luego el
inferior hasta que se trabe (D). (Vea Diagrama 3)
2. Encienda el despachador.
NOTA: Asegúrese de que el calentador de
la parte superior esté APAGADO y de que no
haya cinta cargada.
3. Mientras mantiene presionado el botón verde de
Largo Aleatorio, tome el depósito con la mano
izquierda e inserte el eje del pivote en las ranuras de
los laterales del despachador. Mueva el eje hacia
la parte superior de las ranuras. (Vea Diagrama 2)
Diagrama 2
Botón de
Ranuras del
Eje del Pivote
C
D
Diagrama 3
LLENADO DE LA BOTELLA DE AGUA
1. Quite la botella de los soportes y voltéela de forma
que la abertura de llenado apunte hacia arriba.
(Vea Diagrama 4)
AGUA
Diagrama 4
PAGE 8 OF 18 1120 IH-1036
Page 9

Placas Guía
CONTINUACIÓN DE INSTRUCCIONES DE CONFIGURACIÓN
CONTINUACIÓN DEL LLENADO DE LA BOTELLA DE
AGUA
NOTA: Si la botella no está vacía, cubra la
abertura de llenado para evitar derrames.
2. Llene la botella con agua limpia. Cubra la abertura
de llenado para evitar derrames, voltee la botella
y coloque la abertura de llenado sobre la marca
de nivel del agua deseada en el depósito de agua.
(Vea Diagrama 5)
Diagrama 5
MÍN
MED
MÁX.
NOTA: Ajuste el nivel del depósito: Para
mantener un nivel de humedad óptimo para
el tipo de cinta que vaya a usar, coloque la
abertura de llenado de la botella sobre una
de las tres marcas de nivel del agua en el
depósito de agua.
INSTALACIÓN DE LA GUÍA DE LA PLACA SUPERIOR
INSTALACIÓN DEL CALENTADOR SUPERIOR
1. Para cintas de papel más ligeras (grado 60/70),
quite la pesa del calentador superior. Para cintas
de papel más pesadas (grado 70+), ajuste el
tornillo, quite y vuelva a poner la pesa de forma
que la parte doblada pueda colocarse al frente de
la parte delantera del calentador superior.
(Vea Diagrama 7)
NOTA: Los atascos de papel a menudo
suceden por no quitar la pesa.
Diagrama 7
Pesa
2. Tome el ensamble del calentador superior/pesa y
deslice las muescas por encima del eje del pivote
del depósito de agua. (Vea Diagrama 8)
Con la cubierta superior abierta, deslice la guía de
papel superior por debajo de la rueda blanca.
NOTA: La brida deberá apuntar hacia arriba y
hacia el compartimento para la cinta.
(Vea Diagrama 6)
Diagrama 6
Diagrama 8
CARGA DEL ROLLO DE CINTA
1. Ajuste las placas de la guía del rollo para
adaptarlas al ancho de la cinta. (Vea Diagrama 9)
Diagrama 9
PAGE 9 OF 18 1120 IH-1036
Page 10

CONTINUACIÓN DE INSTRUCCIONES DE CONFIGURACIÓN
Engomado
Hacia Adentro
CARGA DEL ROLLO DE CINTA - CONTINUACIÓN
2. Vuelva a colocar el rodillo para cintas con la cara
engomada hacia adentro o afuera.
Diagrama 10A
3. Inserte el rollo de cinta entre las placas guía y por
encima del rodillo de forma que la cinta quede
colocada con la cara engomada hacia abajo.
Inserte la cinta por debajo de la guía de papel
superior y la rueda blanca.
Diagrama 10B
(Vea Diagramas 10A y 10B)
Engomado
Hacia Afuera
FUNCIONAMIENTO
Con la máquina encendida, la cinta cargada y agua
en el depósito:
1. Para longitudes de cinta preestablecidas: Presione
la tecla del número que corresponda a la longitud
deseada.
2. Agregue 5 cm (2") a las longitudes preestablecidas.
Por ejemplo, para obtener una cinta de 25 cm (10")
de largo: Primero, presione la tecla +2 (se encenderá
la luz) y luego presione la tecla '8'. El despachador
administrará
Presione de nuevo la tecla +2 para desactivar esta
característica.
3. Para largos de cinta personalizados: Presione y
mantenga presionada la tecla verde de "Largo
Aleatorio" hasta que se despache el largo deseado.
una cinta de 25 cm (10") de largo.
PROGRAMACIÓN DE DOS LARGOS DE CINTA
Puede programar el despachador para que memorice
uno o dos largos de cinta diferentes con las teclas Short
Length (Longitud Corta) y Long Length (Longitud Larga).
NOTA: Las teclas programadas deben reiniciarse
cada vez que se enciende el despachador.
1. Fijar la Longitud Corta: Mientras mantiene
presionada la tecla Short Length (Longitud Corta),
presione la tecla numérica que corresponda a la
longitud más corta deseada. Libere ambas teclas
para fijar la longitud corta.
2. Fijar la Longitud Larga: Mientras mantiene
presionada la tecla Long Length (Longitud Larga),
presione la tecla numérica que corresponda a la
longitud más larga deseada. Libere ambas teclas
para fijar la longitud larga.
PAGE 10 OF 18 112 0 I H-1036
3. Use la tecla Short Length (Longitud Corta) para
despachar la longitud más corta y la tecla Long
Length (Longitud Larga) para despachar la longitud
más larga.
4. Deslice los indicadores deslizantes codificados por
color ubicados junto a las teclas numéricas para
marcar las dos longitudes elegidas.
PROGRAMACIÓN DE LARGOS DE CINTA
INTERMEDIOS
Use este procedimiento para despachar largos de cinta
intermedios [ejemplo: largos de 46 o 56 cm (18 o 22")].
1. Presione la tecla +2 (la luz indicadora está
encendida). Esto agrega 5 cm (2") a cualquier tecla
numérica preestablecida que elija.
2. Siga los Pasos 1-4 en "Programar Dos Largos de Cinta".
USO DEL CALENTADOR SUPERIOR
Use el calentador superior en condiciones frías o con
tipos de cintas de papel específicos. Se calienta en 3
minutos.
1. Encender el calentador. Presione la tecla con el
icono del termómetro (la luz se encenderá).
2. Apagar el calentador. Presione la tecla con el
icono del termómetro (la luz se apagará).
CUANDO EL DESPACHADOR NO ESTÉ EN USO
Siempre apague y desenchufe el despachador.
Page 11

MANTENIMIENTO Y CUIDADO
¡PRECAUCIÓN! Solo el personal capacitado
deberá hacer funcionar o realizar tareas de
mantenimiento en esta máquina.
¡ADVERTENCIA! Peligro de Quemaduras –
Apague el despachador, desenchúfelo
y permita que el calentador superior se
enfríe antes de limparlo, realizar tareas de
mantenimiento o reparaciones.
MANTENIMIENTO SEMANAL
1. Lave el cepillo de humectación con agua tibia y
jabón. Enjuáguelo bien con agua.
2. Limpie el despachador con aire comprimido
(NUNCA CON AGUA) para eliminar el polvo y la
suciedad.
MANTENIMIENTO MENSUAL
1. Lubrique las navajas de corte con una gota de
aceite.
2. Limpie la rueda de avance de caucho con agua.
NO engrase o lubrique la rueda. Acceda a la rueda
quitando la guía de papel superior.
LIMPIEZA DEL CALENTADOR
¡ADVERTENCIA! Peligro de Quemaduras –
Apague el despachador, desenchúfelo y
permita que el calentador superior se enfríe
antes de limpiarlo.
¡PRECAUCIÓN! NUNCA use agua o ningún
líquido para limpiar el calentador superior.
3. Lave el depósito de agua con agua y jabón.
Enjuáguelo bien.
4. Limpie solo el exterior del calentador (cerca del
cepillo) con un paño humedecido con producto
descalcificador.
5. Para eliminar los residuos más grandes, use un
paño abrasivo muy fino o una hoja fina – No raye ni
dañe la superficie.
6. Reemplace el calentador si los residuos no se
pueden eliminar o después de 3,500 horas de uso.
PAGE 11 OF 18 112 0 I H-1036
Page 12

10 11
16 17 18 19
15
19
G
8
0
uline.mx
REFERENCIA
12
13
14
N
Q
M L
A
D
F
44
40
36
32
28
24
20
16
12
8
4
C
100°
8O°
I
°C
+2
E
H
B
CLAVE DESCRIPCIÓN
A Cable Eléctrico
B Cubierta Lateral
C Encendido
D Panel de Control
E Tecla Verde de 'Largo Aleatorio' - Despacha cinta
F Teclas para 11 Longitudes de Cinta Preestablecidas
G Tecla +2 (pulgadas) – Preestablece el largo en 5 cm (2")
'Short Length' (Longitud Corta) – Fija una longitud de cinta más corta
H
'Long Length' (Longitud Larga) – Fija una longitud de cinta más larga que la primera
I Interruptor del Calentador Superior
L Calentador Superior
M Depósito de Agua
N Botella para Agua
Q Indicadores de Colores
10 Depósito de Agua
11 Soporte para Botella
12 Calentador Superior de 24 V
13 Cepillo
14 Tanque de Agua Completo sin Calentador Superior y sin cepillo
15 2 Navajas
16 2 Rollos
17 Placa de Papel Superior
18 Rollo de 20 mm de diám.
19 Placa Guía del Rollo
00-295-551
PAGE 12 OF 18 112 0 I H-1036
Page 13

π
H-1036
DÉVIDOIR
ÉLECTRONIQUE DE
RUBAN ADHÉSIF
KRAFT
1-800-295-5510
uline.ca
IMPORTANT!
ARRÊT
Lisez attentivement ce manuel et
apprenez à connaître TOUTES les
commandes et caractéristiques
de fonctionnement. Conservez ce
manuel en vue de consultation et
d'entretien ultérieurs.
Déballage: Vérifiez si l'appareil
est endommagé. En cas de
dommage, retournez-le à Uline.
DONNÉES TECHNIQUES
Dimensions de l'appareil: 45 x 29,2 x 24,8 cm
(17¾ x 11½ x 9¾ po)
Poids de l'appareil: 12 kg (26 ½ lb)
Tension et fréquence: consultez l'étiquette sur
l'appareil
Circuit de commande en CC: 115 volts
Alimentation électrique: 100 W
Vitesse de distribution: 76,2 cm (2,5 pi)/sec
Longueur: 10,2cm (4po) min./116,9cm (46po)
max.
Volume sonore mesuré dans une pièce:
moins de 70dB (A)
RUBAN ADHÉSIF
Types de ruban gommé: Tous
CARACTÉRISTIQUES DU PAPIER
Largeur : 1,9cm (3/4po) min./10,2cm (4po) max.
Diamètre maximal de rouleau: 19,7cm (7¾po)
PAGE 13 OF 18 112 0 I H-1036
Page 14
Réservoir
longueur aléatoire
RENSEIGNEMENTS GÉNÉRAUX
MISE EN GARDE! Seules des personnes formées
peuvent utiliser ou réparer cet appareil.
AVERTISSEMENT! Risque de brûlure – Éteignez
ARRÊT
l'appareil, débranchez le dévidoir et laissez
refroidir l'élément chauffant supérieur avant
d'effectuer toute opération de nettoyage,
d'entretien ou de réparation.
Suivez toutes les instructions d'utilisation et les consignes
de sécurité contenues dans ce manuel. Vérifiez les
codes de sécurité et d'électricité locaux et provinciaux/
d'État.
INSTRUCTIONS D'INSTALLATION
INSTALLATION DU RÉSERVOIR D'EAU
Avant d'utiliser le dévidoir: Lavez la brosse humidifiante
avec de l'eau et du savon. Rincez soigneusement.
1. Insérez la brosse dans le réservoir d'eau.
(Voir Figure1)
Figure1
REMARQUE: Le dévidoir de ruban adhésif
est conçu pour être utilisé avec du ruban
gommé SEULEMENT. Uline n'assume aucune
responsabilité pour les dommages attribuables
à une mauvaise utilisation.
Vérification de la tension – Assurez-vous que la tension
et la tension de l'alimentation électrique de l'appareil
sont identiques avant de brancher le dévidoir.
Maintenez l'appareil propre, au sec et en bon état
de fonctionnement. NE placez PAS ou NE faites PAS
fonctionner l'appareil dans un environnement humide.
4. Glissez le réservoir vers le bas afin que le dessous
s'insère sur la languette du dévidoir.
5. Relâchez la touche verte.
INSTALLATION DES SUPPORTS DE BOUTEILLE D'EAU
1. Installez les supports de bouteille sur le côté gauche
de l'appareil, en insérant d'abord la dent supérieure
dans la fente supérieure (C), puis la dent inférieure
jusqu'à ce qu'elle s'enclenche en position (D).
(Voir Figure3)
2. Allumez l'appareil.
REMARQUE: Assurez-vous que l'élément
chauffant supérieur est éteint et qu'aucun
ruban n'est chargé.
3. Tout en maintenant la touche verte de longueur
aléatoire enfoncée, tenez le réservoir avec votre
main gauche et insérez l'arbre pivot dans les fentes
sur les côtés du dévidoir. Déplacez l'arbre jusqu'à la
partie supérieure des fentes. (Voir Figure2)
Figure2
Touche de
Fentes de l'arbre
de bascule
C
D
Figure3
REMPLISSAGE DE LA BOUTEILLE D'EAU
1. Retirez la bouteille des supports et retournez-la afin
que l'orifice de remplissage soit orienté vers le haut.
(Voir Figure4)
EAU
Figure4
PAGE 14 OF 18 112 0 I H-1036
Page 15
Plaques de guidage
INSTRUCTIONS D'INSTALLATION SUITE
REMPLISSAGE DE LA BOUTEILLE D'EAU SUITE
REMARQUE: Si la bouteille n'est pas vide,
couvrez l'orifice de remplissage pour éviter les
déversements.
2. Remplissez la bouteille avec de l'eau propre.
Couvrez l’orifice de remplissage pour empêcher tout
déversement, retournez la bouteille et placez l'orifice
de remplissage sur la cheville correspondant au
niveau d'eau souhaité dans le réservoir d'eau.
(Voir Figure5)
Figure5
MIN.
MED.
MAX.
REMARQUE: Réglage du niveau du réservoir:
Pour maintenir le niveau d'humidité optimal
pour le type de ruban que vous utilisez, placez
l'orifice de remplissage de la bouteille d'eau
sur l'une des trois chevilles correspondant au
niveau d’eau dans le réservoir d'eau.
INSTALLATION DE L'ÉLÉMENT CHAUFFANT
SUPÉRIEUR
1. Pour les rubans de papier plus légers (calibre 60/70),
retirez le poids de l'élément chauffant supérieur. Pour
les rubans de papier plus lourds (calibre 70 et plus),
ajustez la vis et repositionnez le poids de façon à
ce que la partie pliée s'adapte sur le devant de
l'élément chauffant supérieur. (Voir Figure7)
REMARQUE: Les bourrages de papier sont
souvent causés par un poids n’ayant pas été
retiré.
Figure7
Poids
2. Prenez l'ensemble de l'élément chauffant supérieur
et de poids et glissez les encoches sur l'arbre de
pivot du réservoir d'eau. (Voir Figure8)
INSTALLATION DU GUIDE DE PLAQUE SUPÉRIEURE
Avec le couvercle supérieur ouvert, glissez le guide de
papier supérieur sous la roue blanche.
REMARQUE: La bride doit être orientée vers le
haut et vers le compartiment à ruban.
(Voir Figure 6)
Figure6
Figure8
CHARGEMENT DU ROULEAU DE RUBAN
1. Ajustez les plaques de guidage du rouleau selon la
largeur du ruban. (Voir Figure9)
Figure9
PAGE 15 OF 18 112 0 I H-1036
Page 16

INSTRUCTIONS D'INSTALLATION SUITE
Gommés
vers l'extérieur
CHARGEMENT DU ROULEAU DE RUBAN SUITE
2. Repositionnez le rouleau pour les rubans gommés
vers l'intérieur ou l'extérieur.
Figure 10A
Gommés
vers l'intérieur
FONCTIONNEMENT
Lorsque l'appareil est allumé, avec le ruban chargé et
de l'eau dans le réservoir :
1. Pour obtenir des longueurs de ruban prédéfinies:
Appuyez sur la touche numérotée qui correspond à
la longueur désirée.
2. Ajoutez 5cm (2po) aux longueurs prédéfinies. Par
exemple, pour obtenir une longueur de ruban de
25cm (10po): Appuyez d'abord sur la touche +2
(le voyant s'allume), puis sur la touche «8». Le
dévidoir distribue une longueur de ruban de 25cm
(10po). Appuyez de nouveau sur la touche +2 pour
désactiver cette fonction.
3. Pour obtenir des longueurs de ruban sur mesure:
Maintenez la touche de «longueur aléatoire» verte
enfoncée jusqu’à ce que la longueur souhaitée soit
distribuée.
PROGRAMMATION DE DEUX LONGUEURS DE RUBAN
Vous pouvez programmer le dévidoir afin qu'il mémorise
une ou deux longueurs de ruban différentes à l'aide des
touches de courte longueur et de grande longueur.
3. Introduisez le rouleau de ruban entre les plaques
de guidage et par dessus le rouleau de façon à ce
que le côté gommé du ruban soit vers le bas. Faites
passer le ruban sous le guide de papier supérieur et
la roue blanche. (Voir Figures10A et 10B)
Figure 10B
3. Utilisez la touche de courte longueur pour distribuer
le ruban à la longueur plus courte et la touche de
grande longueur pour distribuer le ruban à la plus
grande longueur.
4. Faites glisser les indicateurs coulissants à code
de couleurs à côté des touches numériques pour
marquer vos deux longueurs choisies.
PROGRAMMATION DE LONGUEURS DE RUBAN
INTERMÉDIAIRES
Utilisez cette procédure pour distribuer des longueurs
de ruban intermédiaires [par exemple, longueurs de
46 ou de 56cm (18 ou de 22po)].
1. Appuyez sur la touche +2 (le voyant est allumé).
Cela ajoute 5cm (2po) à la touche numérique
prédéfinie que vous choisissez.
2. Suivez les étapes 1à 4de la section
«Programmation de deux longueurs de ruban.»
UTILISATION DE L'ÉLÉMENT CHAUFFANT SUPÉRIEUR
REMARQUE: Les touches programmées doivent
être réinitialisées chaque fois que le dévidoir
est allumé.
1. Définir la courte longueur: Tout en maintenant la
touche de courte longueur enfoncée, appuyez
sur la touche numérique qui correspond à la plus
courte longueur souhaitée. Relâchez les deux
touches pour définir la courte longueur.
2. Définir la grande longueur (deuxième longueur): Tout en
maintenant la touche de grande longueur enfoncée,
appuyez sur la touche numérique qui correspond
à la plus grande longueur souhaitée. Relâchez les
deux touches pour définir la grande longueur.
PAGE 16 OF 18 112 0 I H-1036
Utilisez l'élément chauffant supérieur dans des conditions
froides ou avec des types de ruban de papier
particuliers. Il chauffe en moins de trois minutes.
1. Pour allumer l'élément chauffant: Appuyez sur
la touche représentant l'icône d'un thermomètre
(la lumière s'allume).
2. Pour éteindre l'élément chauffant: Appuyez sur
la touche représentant l'icône d'un thermomètre
(la lumière s'éteint).
LORSQUE LE DÉVIDOIR N'EST PAS UTILISÉ
Éteignez et débranchez toujours le dévidoir.
Page 17

ENTRETIEN ET NETTOYAGE
MISE EN GARDE! Seules des personnes formées
peuvent utiliser ou réparer cet appareil.
AVERTISSEMENT! Risque de brûlure – Éteignez
ARRÊT
l'appareil, débranchez le dévidoir et laissez
refroidir l'élément chauffant supérieur avant
d'effectuer toute opération de nettoyage,
d'entretien ou de réparation.
ENTRETIEN HEBDOMADAIRE
1. Lavez la brosse humidifiante avec de l'eau chaude
et du savon. Rincez soigneusement avec de l'eau.
2. Nettoyez le dévidoir avec de l'air comprimé (JAMAIS
AVEC DE L'EAU) pour enlever la poussière et la saleté.
ENTRETIEN MENSUEL
1. Lubrifiez les lames de coupe avec une goutte
d'huile.
2. Nettoyez la molette d'avancement du ruban en
caoutchouc avec de l'eau. NE graissez PAS ou
NE huilez PAS la molette. Accédez à la molette en
retirant le guide de papier supérieur.
NETTOYAGE DE L'ÉLÉMENT CHAUFFANT
AVERTISSEMENT! Risque de brûlure – Éteignez
ARRÊT
et débranchez le dévidoir, puis laissez refroidir
l'élément chauffant supérieur avant d'effectuer
toute opération de nettoyage.
MISE EN GARDE! N'utilisez JAMAIS de l'eau ou
de liquide pour nettoyer l'élément chauffant
supérieur.
3. Nettoyez le réservoir d'eau avec de l'eau et du
savon. Rincez soigneusement.
4. Nettoyez l'extérieur de l'élément chauffant (à
proximité de la brosse) à l'aide d'un chiffon trempé
dans un produit de décalcification.
5. Pour retirer les dépôts plus importants, utilisez un
chiffon abrasif très fin ou une lame mince– Évitez
d'érafler ou d'endommager la surface.
6. Remplacez l'élément chauffant si les dépôts ne
peuvent pas être enlevés ou après 3500 heures
d'utilisation.
PAGE 17 OF 18 112 0 I H-1036
Page 18

10 11
15
19
D
C
G
RÉFÉRENCE
1
0
uline.ca
12
13
14
A
N
16 17 18 19
M L
TOUCHE DESCRIPTION
A Cordon d'alimentation
B Couvercle latéral
C Alimentation
D Panneau de commande
E Touche de «longueur aléatoire » verte – distribue le ruban
F Touches pour 11 longueurs de ruban prédéfinies
G Touche +2 (pouces) – longueur prédéfinie de 5cm (2po)
«Short Length» – définit une longueur de ruban plus courte et
H
« Long Length » – définit une longueur de ruban plus grande que la première
I Interrupteur de l'élément chauffant supérieur
L Élément chauffant supérieur
M Réservoir d'eau
N Bouteille d'eau
Q Indicateurs colorés
10 Réservoir d'eau
11 Support de bouteille
12 Élément chauffant supérieur 24 V
13 Brosse
14 Réservoir d'eau complet sans élément chauffant et sans brosse
15 Couteaux (2)
16 Rouleaux (2)
17 Guide de papier supérieur
18 Rouleau de 20mm de diamètre
19 Plaque de guidage du rouleau
F
44
40
36
100°
8O°
I
°C
Q
32
28
24
+2
20
16
12
8
4
E
H
B
-800-295-551
PAGE 18 OF 18 112 0 I H-1036
 Loading...